Prepared by: Westat, Inc Research Boulevard Rockville, MD September 1989
|
|
|
- Howard John Jefferson
- 8 years ago
- Views:
Transcription
1 NATIONAL HEALTH AND NUTRITION EXAMINATION SURVEY III CYCLE 2 PULSE AND BLOOD PRESSURE PROCEDURES FOR HOUSEHOLD INTERVIEWERS Prepared by: Westat, Inc Research Boulevard Rockville, MD September 1989 Revised July 1993

2 TABLE OF CONTENTS Chapter Page 1 PULSE AND BLOOD PRESSURE PROCEDURES Introduction to Pulse and Blood Pressure Background on Pulse and Blood Pressure The Circulatory System Definition of Pulse Definition of Blood Pressure Meaning of Blood Pressure Method of Measuring Arterial Blood Pressure DESCRIPTION AND MAINTENANCE OF BLOOD PRESSURE EQUIPMENT Blood Pressure Equipment Manometer Inflation System Stethoscope Equipment Care Checklist TECHNIQUES OF PULSE AND BLOOD PRESSURE MEASUREMENT Focus Preliminary Steps to Pulse and Blood Pressure Measurement for Adults Positioning the SP for Blood Pressure Measurement Locating the Pulse Points Cuff Size and Application Pulse Measurement Determine the Maximum Inflation Level (MIL) Blood Pressure Readings Procedural Guidelines Procedures to Enhance the Brachial Pulse Sounds Auscultatory Gap i

3 TABLE OF CONTENTS (Continued) Chapter Page 4 REPORTING AND RECORDING PROCEDURES Reporting Physical Measurement Findings to the SP Instructions for Recording Pulse and Blood Pressure on the Examination Form General Detailed Instructions for Completing the Blood Pressure Measurement Form List of Exhibits Exhibit 1 The Heart Mercury-Gravity Manometer Inflation System Five Cuff Sizes Pressure and Bulb Valve Position Air Leak Test Stethoscope Short Subject Position Adult Subject Position Pulse Pressure Points Feeling the Pulse Compression Cuff Proper Applications of Cuff Adult Report of Pulse and Blood Pressure Findings (DHHS Letter) Adult Blood Pressure Value Box Blood Pressure Measurement Chart Checklist for Pulse and Blood Pressure NHANES III Mercury Spill Report ii

4 /****/N:\9304\WP930411\PULSE-BP\BP-HH2.WP5 - August 9, dr 1. PULSE AND BLOOD PRESSURE PROCEDURES 1.1 Introduction to Pulse and Blood Pressure As part of this survey, you will measure pulse and blood pressure. Although these tests appear simple, accurate measurements depend on many factors. This section of the Manual has been devised to help you understand how to obtain these measurements accurately and the sources of error that can occur. Standardized procedures have been established for this survey. Because the measurements must be obtained in a uniform manner for each subject, it is critical that you always follow these procedures. The pulse and blood pressure will be taken during the Household Interview appointment. 1.2 Background on Pulse and Blood Pressure The Circulatory System The heart (Exhibit 1) is located in the center of the chest, protected by the rib cage. The heart is really a double pump. One pump, the "right heart," receives blood which has just come from the body. The "right heart," during contraction, pumps the blood to the lungs via the pulmonary artery. The blood then returns to the "left heart" via the pulmonary vein. This second pump, the "left heart," receives the blood from the lungs during contraction, pumps it out through the great artery called the aorta. The aorta branches out to supply the entire body with blood through a series of arteries. Veins are the series of vessels which carry blood from various parts of the body back to the heart. One-way valves in the veins aid the blood on its return trip to the heart. This valve system prevents backward circulation. 1

5 1-2

6 1.2.2 Definition of Pulse Pulse is the rhythmic expansion and contraction of an artery caused by the impact of blood pumped by the heart. The pulse can be felt with the fingers at different pulse pressure points throughout the body and heard through a listening device called a stethoscope. In this survey you will use the radial pulse (at the wrist) and the brachial pulse (inside of arm at the elbow), to obtain the pulse and blood pressure measurements. (See Exhibits 10 and 11) Definition of Blood Pressure Arterial blood pressure is the force exerted by the blood on the wall of a blood vessel as the heart pumps (contracts) and relaxes. Systolic blood pressure is the degree of force when the heart is pumping (contracting). The diastolic blood pressure is the degree of force when the hearts relaxed Meaning of Blood Pressure Risk of illness and death are related to changes in blood pressure. There is no particular dividing line which indicates a person is definitely ill. This can be interpreted only by a physician in light of the total health picture of the individual. Specific instructions will be followed in reporting the blood pressure measurements to the subject. This action is taken so that the subject is informed of any findings that are outside of normal limits. 1-3
 and relaxes.")
7 1.2.5 Method of Measuring Arterial Blood Pressure In the measurement procedure a cuff is wrapped around a person s arm with an inflatable rubber bag inside the cuff centered over the brachial artery. Enough air pressure is pumped into the cuff to close the artery. Air pressure is then released by opening the thumb valve. When the pressure in the cuff is equal to the pressure on the artery, the artery opens and the blood begins to return to the part of the artery that was closed. As the blood returns to the artery, pulse sounds begin. These sounds can be heard through a stethoscope placed over the brachial pulse point. The sounds continue for a time while the cuff is deflated slowly, eventually becoming too faint to hear. The cuff is connected by tubing to a manometer, which shows the amount of pressure on the artery. When the first pulse sounds are heard, the reading on the manometer measures the systolic blood pressure. The last sound heard is the diastolic blood pressure. In children, the muffling of sound or fourth sound is often used as the diastolic blood pressure rather than the disappearance of sound. 1-4

8 August 9, \PULSE-BP\BP-HH.DOC 2. DESCRIPTION AND MAINTENANCE OF BLOOD PRESSURE EQUIPMENT 2.1 Blood Pressure Equipment consist of: The set of equipment which will be used for measuring blood pressure in the arteries a. Baumanometer, mercury - gravity Rx model, with case from which the pressure is read. b. Blood pressure cuffs, Baum calibrated, V-Lok cuffs, child, adult, large arm and thigh sizes, each with a complete inflation system which has an unyielding compression cuff containing an inflatable rubber bladder, a pressure bulb, and a pressure control valve to control the rate of deflation. (The infant cuff will not be used because the pulse and blood pressure measurements will be done on adults age 17 years and older.) c. A Littman Classic Stethoscope with combination head, diaphragm and bell to hear pulse sounds Manometer The mercury-gravity manometer (Exhibit 2) consists of a calibrated glass tube connected to a reservoir containing mercury. The mercury reservoir communicates with a compression cuff through a rubber tube. When air pressure is exerted on the mercury in the reservoir, by pumping the pressure bulb, the mercury in the glass tube rises and indicates how much pressure the cuff is applying against the artery. The mercury manometer is calibrated when it is manufactured and, once calibrated, recalibration is unnecessary. However, regular inspection is necessary to eliminate conditions that could cause the blood pressure measurement to be read as erroneously high or low. The level of mercury in the calibrated glass tube should always be at the zero line when the manometer is on a level surface with the inflation system disconnected. If the level of mercury is above or below the zero line, the cause may be too much mercury in the reservoir, mercury leak, or dirt in the mercury or in the calibrated glass tube. Tip 2-1

9 2-2

10 the manometer gently to the right and then back to the erect position. If the top of the mercury column does not return to zero, replace the equipment. If the shape of the mercury meniscus (top of the column of mercury) is not a smooth, well-defined curve, replace the equipment. This is also caused by dirt in the mercury or the glass tube. NEVER ATTEMPT TO CLEAN OR REPAIR THE EQUIPMENT YOURSELF. If the mercury does not rise easily in the tube, or if the mercury column bounces noticeably as the valve is closed, replace the equipment. The atmospheric pressure within the tube has been altered. NEVER ATTEMPT TO CLEAN OR REPAIR THE EQUIPMENT YOURSELF. Mercury Spills and Leaks Mercury is a metallic substance which gives off a toxic vapor when exposed to the atmosphere. Temperature, ventilation, and sunlight affect the level of the vapor s concentration. MERCURY VAPORS WILL PERMEATE THE SKIN SURFACE AND ARE POISONOUS WHEN INHALED. Check the cap at the top of the calibrated glass tubing. If it is not securely closed, the mercury could leak out. Mercury leaks may also occur if the manometer case itself is not stored properly. Before closing the manometer case, always make sure that the: Manometer tubing is connected and the thumb valve is closed; and Manometer case is stored by placing the case on its right side. This will allow the mercury to flow back into the reservoir. Loss of air and mercury will occur if the glass tube is broken. Care should be taken in handling and storing the manometer to prevent this. If the tube appears cracked, check for any spilled mercury in and outside the manometer case and replace the equipment if necessary. 2-3

11 The following procedure is recommended for handling spilled or leaking mercury: (a) Leakage and/or spillage into manometer case or equipment case: * Do not touch the mercury with your bare hands. If the mercury spill is in the manometer case, close the case of the blood pressure manometer, put the case in a plastic trash bag and secure tightly with a twist tie. If the mercury spill is in the equipment case, remove the equipment that was not contaminated by the mercury, close the equipment case and return the case to the MEC (mobile exam center) manager. Advise your supervisor immediately and request replacement equipment. You and your supervisor will complete a Mercury Spill Report form (See Exhibit 18 at the end of this manual). (b) Leakage or spillage outside the case on a hard surface (e.g., hard floor, table, etc.): Do not touch the mercury with your bare hands. NEVER ATTEMPT TO VACUUM UP THE MERCURY. Use the mercury (Hg * Absorb) sponge. a - b - Remove the sponge from the plastic ziplock bag. Dampen the sponge with water. c - Wipe the area contaminated with mercury. Do this slowly to allow for complete absorption of all free mercury. The mercury droplets will be absorbed by the chemical layer (Hg Absorb Powder) on the sponge. d - e - After finishing with the Hg Absorb sponge, place it back into its plastic ziplock bag. Place the manometer case and mercury sponge into separate plastic bags and secure tightly with twist ties. Return to your supervisor. * When the spillage in the manometer case is just tiny droplets and the mercury level remains at zero, use the mercury sponge as indicated in (b) of this section to clean up the droplets and continue using the manometer. * Hg is the chemical symbol for mercury. 2-4
.")
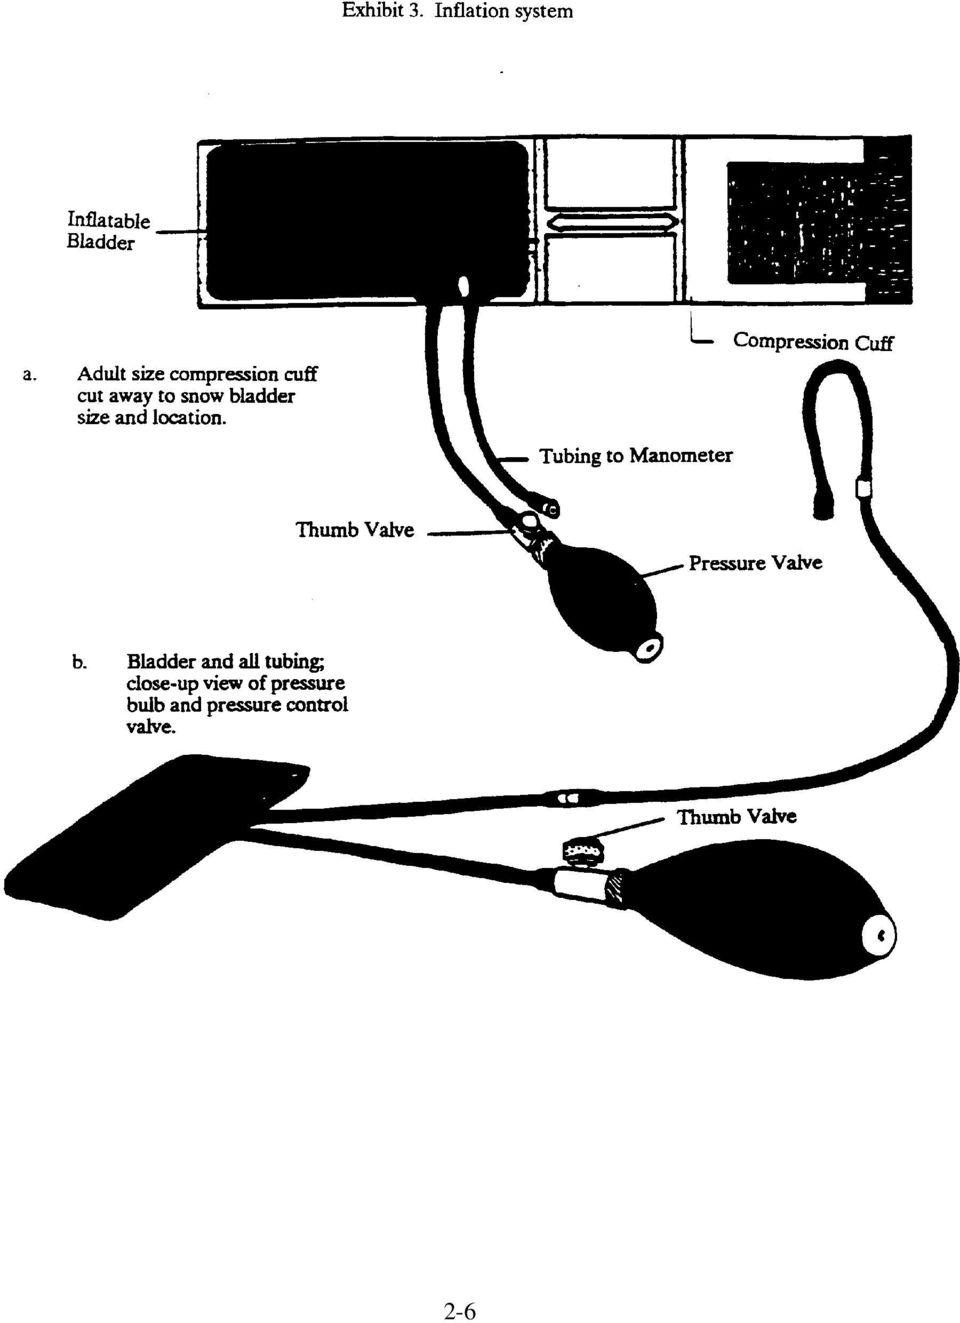
12 You and your supervisor will complete a Mercury Spill Report form (See Exhibit 18). Obtain replacement equipment. (c) Leakage and/or spillage outside of the case on a soft or absorbent surface (e.g., rug, etc.): Do not touch the mercury with your bare hands or attempt to vacuum or clean up the spill yourself. If possible, close off the room and the heat or air conditioning in that room. NEVER SWEEP OR VACUUM. Use the mercury (Hg Absorb) sponge, if possible. Contact your supervisor immediately to report the incident and receive instructions. He/she will notify the MEC manager to determine if the mercury spill powder should be used for the spill. If necessary, the MEC manager will call the local contact to report such spills. This agency may want to make a follow-up visit to the facility to check for levels of mercury in the exposed area. Request replacement equipment. If you have an appointment with an SP within the next few days, and will not be able to obtain replacement equipment in time, you should make arrangements through your supervisor for another Household Interviewer to take those appointments or you must reschedule these appointments. Discuss your plan of action with your supervisor before making any arrangements. You and your supervisor will complete the Mercury Spill Report form together (See Exhibit 18) Inflation System The inflation system consists of the compression cuff, inflatable rubber bladder, pressure bulb, pressure control valve (thumb valve) and all the rubber tubing of the manometer (Exhibit 3). The compression cuff is made of an unyielding material to exert an even pressure on the inflatable bladder inside the cuff. Modern compression cuffs have Velcro fasteners which adhere to themselves to keep the cuff in position when placed on the arm. 2-5

13 2-6
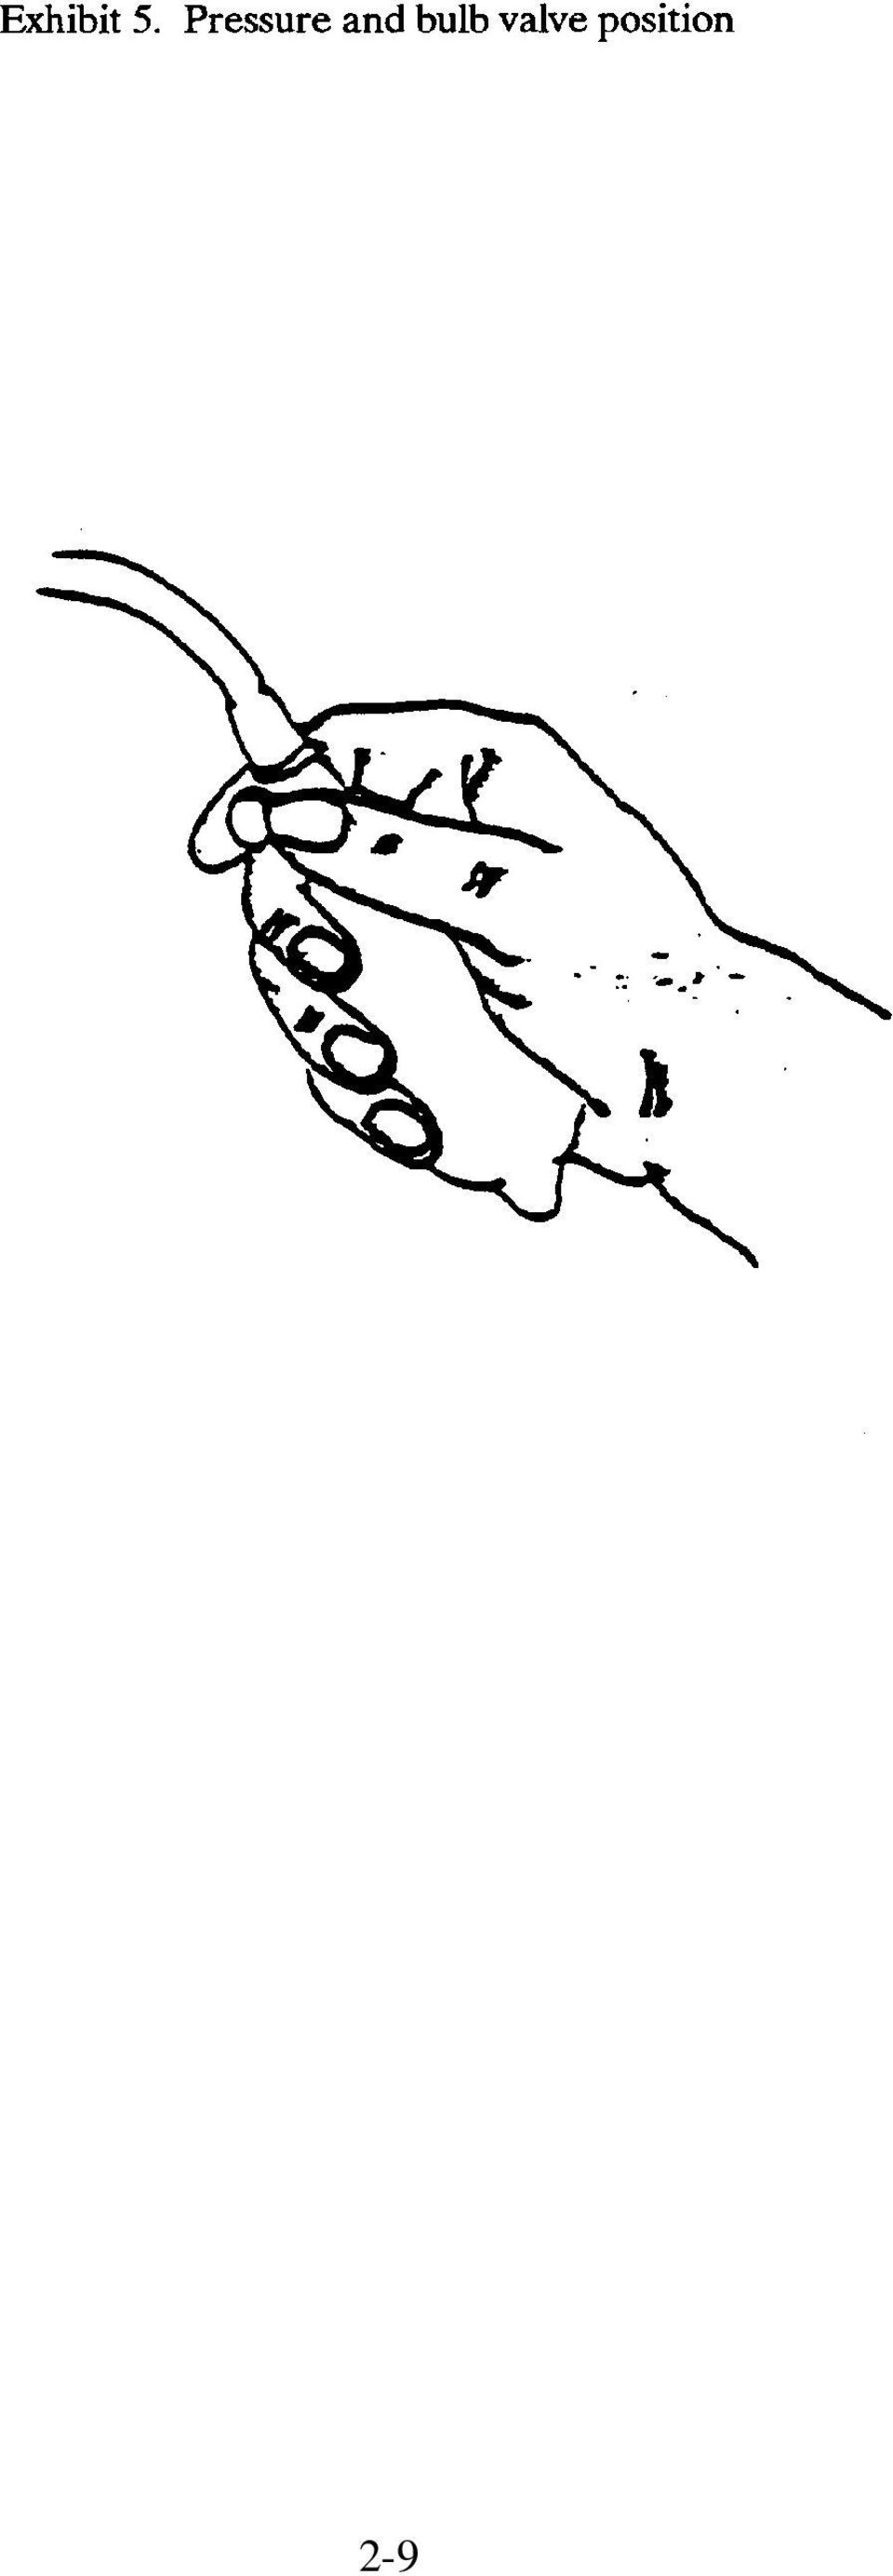
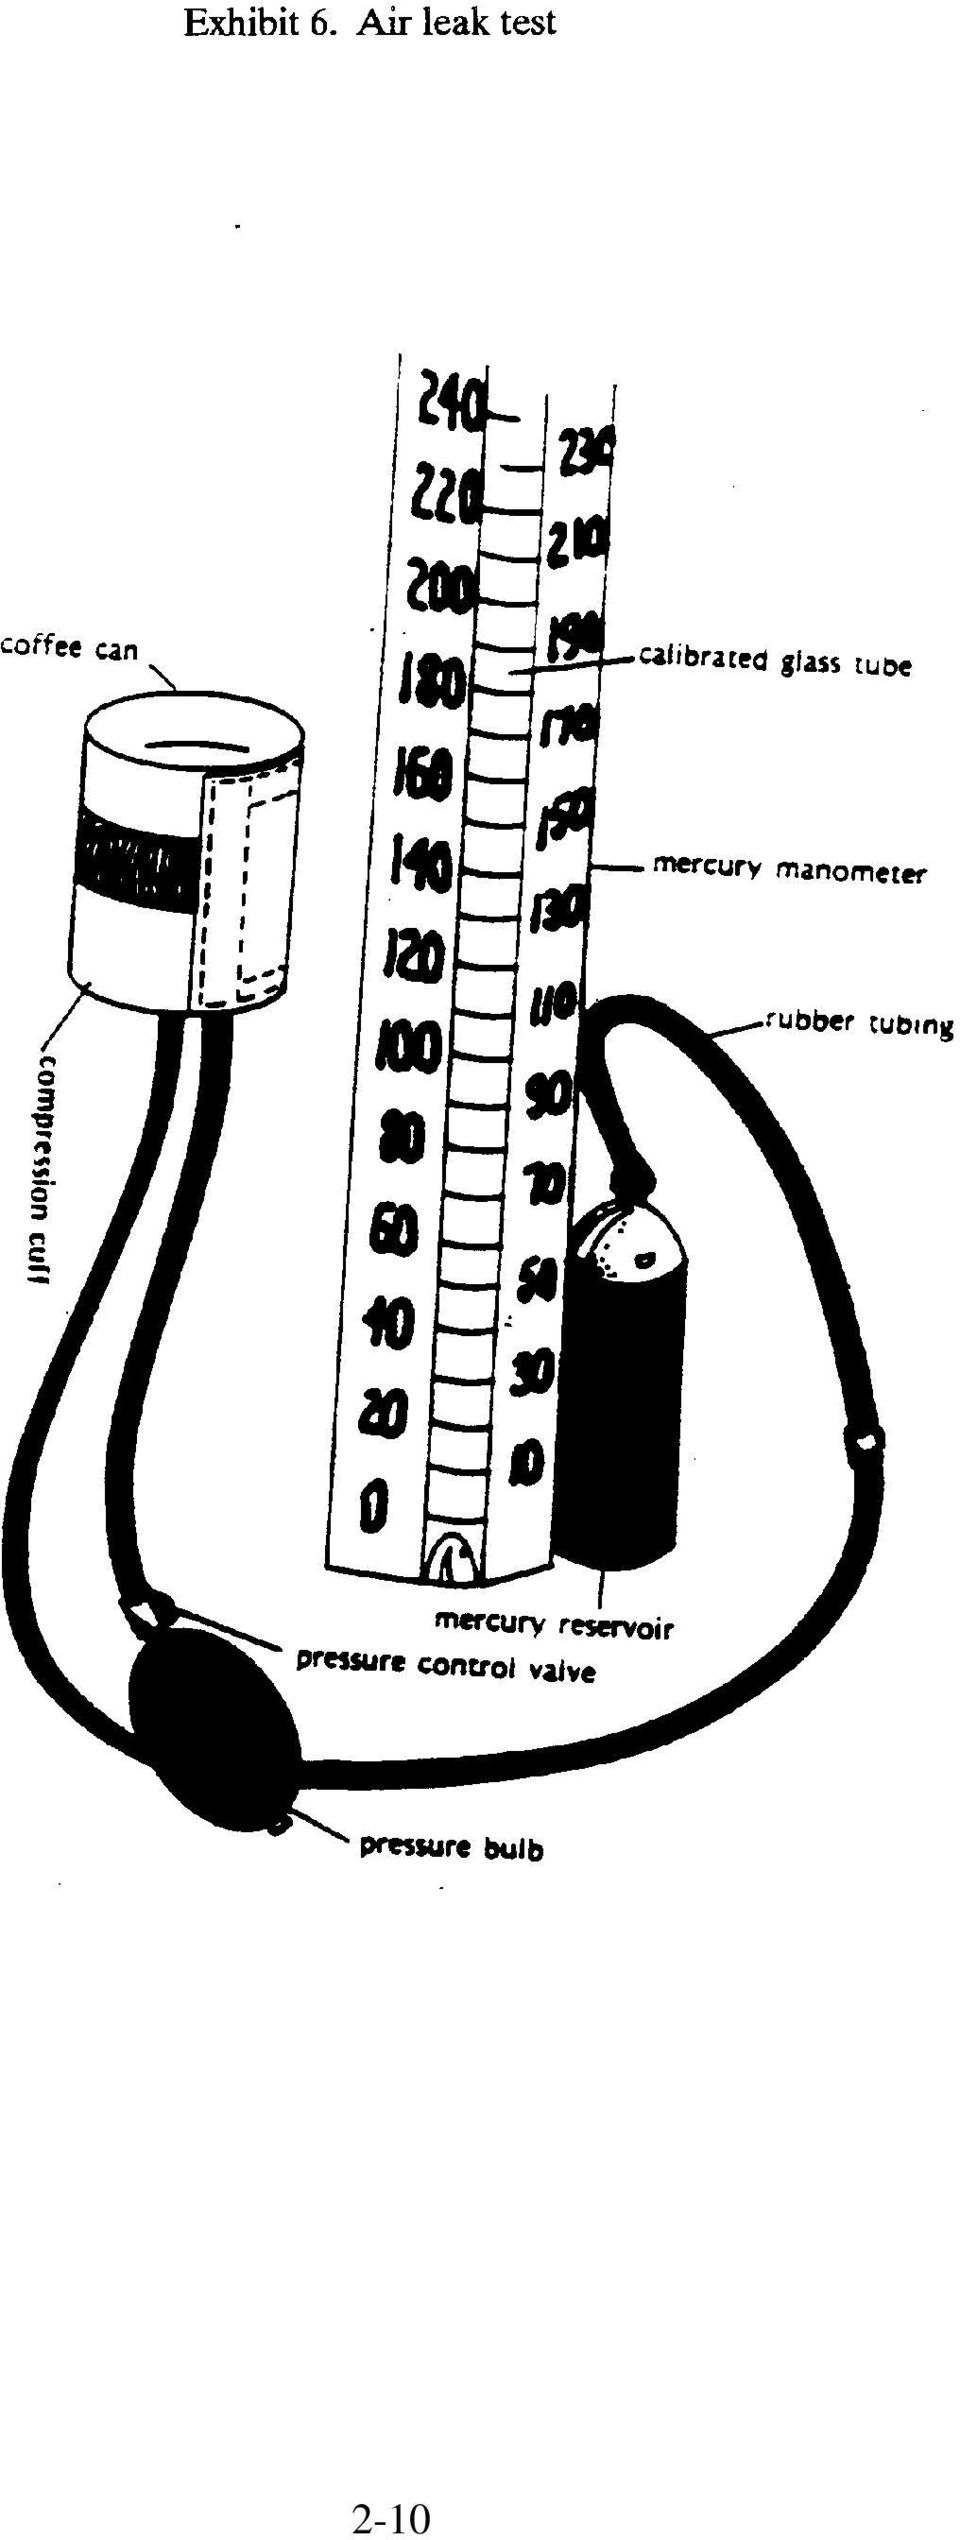
14 For this study, four cuffs of different sizes will be used: the child cuff, the adult cuff, the large arm cuff, and the thigh cuff (Exhibit 4). The size of the cuff and bladder used influences the accuracy of the blood pressure readings. If the cuff is too narrow, the observed blood pressure will be too high, and if it is too wide, the reading may be too low. The size of the arm, not the age, determines the cuff used. The inside of the cuff is marked with an index line and range lines. If the index line along the edge of the cuff fits completely within the range lines inside the cuff, the cuff is the correct size. If the cuff is barely large enough, the next larger cuff will be used. The function of the pressure bulb is to create pressure in the system -- specifically, to inflate the bladder. It should be held in the right hand, with the pressure control valve on the left (inside) side (Exhibit 5). The pressure control valve controls the rate at which the system is deflated. To close the valve, or inflate the cuff, the valve is turned with the thumb toward you. To open the valve, or deflate the cuff, the valve should be turned with the thumb away from you. Learning to use the thumb valve is an important part of learning blood pressure measurement. Each cuff size will have a complete inflation system. These are easily attached by a twist connection to the manometer. It will not be necessary to exchange inflation bulbs and valves with the various cuffs. The cuffs, pressure bulb, and manometer and manometer tubing will be checked each day, before use, for cracks, tears and/or air leaks. The pressure control valve will be checked each day, before use, for sticking. To test for air leaks in the inflation system, wrap the compression cuff around a one pound coffee can * or similar object (Exhibit 6). Close the pressure control valve and inflate the pressure to 250 mm Hg., then decrease the pressure to 200 mm Hg. Close the pressure control valve. Wait for 10 seconds. If the mercury column falls more than 10 mm Hg, there is a leak in the inflation system. * Use the coffee can for the adult, large arm, and thigh compression cuff. Use a soda can for the child s compression cuff. 2-7

15 2-8

16 2-9
17 2-10
18 Check for tears in the compression cuff and for cracks or punctures in the rubber tubing and rubber pressure bulb. Check that the pressure control valve does not stick. If an air leak is located, the compression cuff is torn, or the valve or connections do not operate properly, contact your supervisor. Do not measure additional blood pressures with this equipment. You will be supplied with replacement equipment Stethoscope The stethoscope (Exhibit 7) is an instrument for listening to sounds within the body. Body sounds can be heard at the skin s surface and transported via enclosed columns of air to the ear. In order to take the blood pressure, the stethoscope diaphragm is applied directly over the brachial pulse pressure point (inner arm). The diaphragm headpiece should be applied with light pressure (heavy pressure will distort the artery and produce sounds below the true diastolic) so that there is no air between the skin and the stethoscope. In using stethoscopes with bent ear tips, the ear tips should point forward toward the nose. Select the diaphragm as opposed to the open bell head of the stethoscope by holding the stem of the head in one hand and rotating the head with the other hand until a click is felt. The small hole located in the center of the bell head should be closed Equipment Care Checklist Daily: (Checks to be done every day that you work.) 1. Check to see that the level of mercury in glass tube is at zero. 2. Check the shape of the meniscus - it should be a smooth, well-defined curve. 2-11

19 2-12

20 3. Check that the mercury rises easily in the tubing and that the mercury column does not bounce noticeably when the valve is closed. 4. Check for cracks in the glass tube. 5. Check the cap at the top of the calibrated glass tube to make sure it is securely in place. 6. Check for spilled mercury in the manometer case. 7. Check the cuffs, pressure bulb, and manometer and stethoscope tubing for cracks or tears. 8. Check the pressure control valve for sticks or leaks. 9. Check stethoscope diaphragm for cracks. 10. Make sure when you close the manometer case that: The manometer tubing is connected and the thumb valve is closed. The manometer case is stored on its right side, so that the mercury will flow back into the reservoir. 11. Never attempt to repair the equipment yourself. Weekly: 1. Do the daily checks, and then 2. Use the "coffee can" procedure to check for air leaks. Connect the inflation system and wrap it around a one pound coffee can (or soda can, if child s cuff). Inflate to 250 mm Hg. Open valve and deflate to 200 mm Hg and close valve. Wait for 10 seconds. If mercury column falls more than 10 mm Hg, there is an air leak in the system. Contact your supervisor as soon as possible. 2-13

21 August 9, \PULSE-BP\BP-HH.DOC 3. TECHNIQUES OF PULSE AND BLOOD PRESSURE MEASUREMENT 3.1 Focus In this discussion of pulse and blood pressure measurement technique, the focus is on measurement for research purposes, not as a diagnostic test. These measurements in a survey situation do not constitute a medical diagnosis of disease, but will be used only as a statistical description of the survey population. The person having his pulse and blood pressure measured will be referred to as the SP (sampled person) and the person taking the measurements will be referred to as the interviewer. The Blood Pressure Measurement form will be used for recording information about the pulse and blood pressure. Detailed instructions for this form are found in Section 4. In measuring the SP s pulse and blood pressure, the maximum inflation level will be determined, the pulse counted, and the three blood pressure readings obtained. For simplicity, all blood pressure measurements will be made on the SP s right arm. Where this is not feasible the left arm will be utilized and the exception noted on the Blood Pressure Measurement form. 3.2 Preliminary Steps to Pulse and Blood Pressure Measurement for Adults Before starting the pulse and blood pressure measurements the subject should have been quietly seated for a five minute period. Be sure that the SP does not smoke or drink coffee during the examination since these could affect the blood pressure. If the SP has had any alcohol, coffee, or cigarettes thirty minutes before the examination, record this on the form but still take the measurements. 3-1
22 If the adult for whom the blood pressure is being taken indicates any reason why the blood pressure procedure should not be done on the right arm, use the left. If there is a problem with both arms, do not take the blood pressure and note this on the Blood Pressure Measurement form. Observe the adult s arm while talking to him/her. If you observe any rashes, small gauze/adhesive dressings, casts, withered arms, puffiness, tubes, open sores, hematomas or wounds on both arms, do not take the blood pressure. If these conditions prevent measuring pulse, provide an explanation on the Blood Pressure Measurement form. 3.3 Positioning the SP for Blood Pressure Measurement The SP will be seated at a table in a relaxed but not slouched position, with feet flat on the floor (Exhibits 8 and 9). Outer jacket or sweater will be removed and sleeve rolled loosely up to the shoulder, taking care that two fingers may be placed under the sleeve without difficulty. The SP s right arm will be placed on the table, slightly flexed with palm upward. The SP s arm should be positioned so that it is resting on the table at heart level. Heart level is halfway between the shoulders and the waist. The person s elbow must be no lower than the lowest rib and must not be raised as high as the shoulder. For tall people it may be necessary to support the arm higher than a standard desk or table top. Place the tall person s forearm on a pillow, large book or directory to raise the arm to heart level. For smaller or short adults, place a cushion or large book on the chair so their arm is at heart level when it is resting on the desk or table top. Place a box or large book under their feet if they do not rest flat on the floor. The interviewer will be seated facing and slightly to the SP s right, permitting easy access to the SP s arm. Equipment will be positioned so that the tube to the manometer is away from the SP s body while the tube to the inflation bulb is closer to the body. Should the SP be bedridden, measure the blood pressure with the SP in bed. Place a table or night stand next to the bed to support the manometer (this will help avoid the manometer possibly tipping over on the 3-2
23 3-3
24 3-4
25 bed.) Then proceed with the usual blood pressure measurement. Indicate that the SP was bedridden in the Comments Section and note if the SP was flat, head elevated, etc. 3.4 Locating the Pulse Points After explaining the procedure to the SP, the interviewer will locate the brachial and radial pulse points in the right arm. (See Exhibits 10 and 11). Locating the radial pulse: With the right palm of the hand of the SP turned upward, place the first two fingers of your hand on the outer part of the crease of the wrist. Press firmly. You will feel a pulsating motion under your fingers. This is the radial pulse. Locating the brachial pulse: Again, with the right palm of the SP turned up, and the arm straightened (slightly bent at the elbow), place the first two fingers of your hand on the inner third (side toward the body) of the crease of the elbow. Press firmly and hold for five seconds. If the brachial pulse is still not felt, begin again from the center of the arm and work your way toward the innermost (toward the body) part of the elbow fold crease. You should be able to feel the brachial pulse by using this method. Both pulse and blood pressure will be measured in the same arm. The right arm will always be used unless specific conditions prohibit its use. Use the following guidelines: If the radial pulse is apparent, whether or not the brachial pulse can be felt, proceed with the measurement of the first blood pressure. If the radial pulse cannot be felt in the right arm, use the left arm. If the radial pulse cannot be felt in either arm, the blood pressure procedure should be terminated and this noted on the Blood Pressure Measurement form. 3-5
26 3-6
27 3.5 Cuff Size and Application B. Select and Apply the Cuff After locating the pulse points, apply the cuff to the SP s arm. Always begin with the adult cuff. Check the size before applying the cuff by making sure that the index line falls completely within the range lines. (See Exhibit 12). If the cuff is barely large enough, use the next larger size. The procedure for applying the cuff is as follows: 1. Check the index line to determine if it lies completely within the size range lines marked on the cuff. 2. Position the rubber bladder over the brachial artery at least 1" above the crease of the elbow. (Exhibit 13). Place the marker on the inner part of the cuff directly over the brachial artery. 3. Wrap the cuff smoothly and snugly around the arm. Cuff should be wrapped in a circular manner. No spiral direction of the cuff should be used. 4. Check the fit by placing both thumbs under the cuff and tugging gently. Should the cuff slip or come off, reposition and rewrap the cuff securely. 5. For very large arms, use the thigh cuff. Wrap the thigh cuff around the upper arm, not the thigh. It is possible that when using the thigh cuff or the large arm cuff, the length of the cuff from shoulder to elbow may be too long. If so, place the stethoscope diaphragm directly over the brachial pulse point under the cuff. Never use an inappropriate size cuff. 6. Cuff placement should not be altered once the Maximum Inflation Level (MIL) has been obtained. (If the cuff needs to be refitted for any reason, the MIL must be measured again.) 7. If the thigh cuff is used because a proper fit could not be obtained with any of the smaller size cuffs, measure the blood pressure readings (provide an explanation on the Blood Pressure Measurement form) and check the box "NO PROPER FIT - THIGH CUFF USED" on the Report of Findings form. 3-7
28 3-8
29 3.6 Pulse Measurement With the elbow and forearm resting comfortably on a table and the palm of the hand turned upward (See Exhibit 10) the radial pulse is felt and counted for 30 seconds exactly. The number of beats in 30 seconds is recorded on the Blood Pressure Measurement form. If you are unable to measure the pulse using the radial pulse, attempt to count the pulse using the brachial pulse. If the pulse cannot be counted because of an irregular or erratic beat, ask the SP if he or she is aware of the problem. If the SP replies in the negative, try to take the pulse again counting for 30 seconds. If the difficulty is still present, say: "I find it difficult to measure your pulse. You may wish to have your physician check it." Describe the difficulty on the Blood Pressure Measurement form. 3.7 Determine the Maximum Inflation Level (MIL) To measure the maximum inflation level (MIL), connect the inflation tubing to the manometer by twisting the two ends of the tubing together. The MIL is obtained to determine the highest level to which the cuff should be inflated. If the cuff is underinflated and the SP has an auscultatory gap, a falsely low reading will result. If the cuff is overinflated a falsely high reading could result. The MIL will then be determined as follows: Locate the radial pulse pressure point in the arm to be used. Close the thumb valve. Palpate the radial pulse and watch the center of the mercury column of the manometer. Inflate the cuff quickly to 80 mm Hg, then inflate in increments of 10 mm Hg until the radial pulse disappears, noting the reading of the mercury column at that point. Continue inflating the cuff at increments of 10 mm Hg, pausing briefly to make sure the pulse is absent. Continue 30 mm Hg higher to make sure the radial pulse has disappeared. 3-9
30 Rapidly deflate the cuff by opening the thumb valve completely and disconnecting the tubing. The MIL is the reading at the point the radial pulse disappeared plus 30 mm Hg. Wait 1 minute before making a second attempt if the first is unsatisfactory. If the second attempt is unsatisfactory, terminate the procedure and note the problem on the form. This value is the maximum level to which the cuff should be inflated for measuring this SP s blood pressure. If the SP reports significant discomfort from the cuff during determination of the MIL, recheck the fit of the cuff and remeasure the MIL. If the discomfort persists, terminate the procedure and note the problem on the form. If the radial pulse is still felt at a level of 270 mm Hg or higher (which means that the MIL is 300 mm Hg or higher), repeat the MIL. If the MIL is still 300 mm Hg, terminate the blood pressure measurements and write in "300/MIL" on the Blood Pressure Measurement form. On the Report of Findings indicate the blood pressure as 270 palpated, then circle and read statement #6. Repeat the MIL if the first attempt was unsatisfactory or you have had to readjust the cuff after measuring the MIL. Wait at least 1 minute after measuring the MIL and before starting the blood pressure measurement. When the MIL has been satisfactorily determined, do not remove or reapply the cuff. Wait at least 1 minute before measuring the blood pressure. 3.8 Blood Pressure Readings When the MIL has been satisfactorily determined, do not remove or reapply the cuff. Three consecutive blood pressure readings will be obtained, using the same arm. Wait at least 1 minute between readings. Open the thumb valve completely and disconnect the manometer tubing between each reading to reduce the pressure level to zero. 3-10
31 The following procedure will be used for the measurement of blood pressure: Position the stethoscope ear pieces comfortably in your ears, turning them forward toward the nose. Be sure the SP s arm is positioned at the heart level. For small or short SPs, have the SP sit on a book or pillow to raise their body to the correct position. If necessary, place their feet on a box or other item to stabilize their feet. For very tall SPs, place the SP s arm on a book or pillow to bring their upper arm to the correct position. Feel the brachial pulse and place the stethoscope diaphragm directly over the pulse beat just below the cuff. The diaphragm/bell should be applied with light pressure so there is no air between it and the skin. If the brachial pulse is too faint to be felt, place the stethoscope diaphragm/bell over the innermost part of the crease of the elbow and proceed. If possible, avoid allowing the cuff, the tubing or diaphragm/ bell to touch. Close the thumb valve. Rapidly and steadily inflate the cuff to the MIL. (If you inflate the cuff more than 10 mm Hg above the MIL, open the thumb valve, rapidly deflate the cuff and disconnect the tubing. Discontinue this reading and wait 1 minute before inflating again.) When the MIL is reached, open the thumb valve and smoothly deflate the cuff at a constant rate near 2 mm Hg per second (one mark per second). Be sure your eyes are level with the center of the manometer. Watching the top of the mercury column, note the reading at the point when pulse sounds first appear, using the mark at or just above the top (meniscus) of the mercury column. Listen for at least two beats to eliminate recording a single erroneous sound. Note the reading at the point the first pulse sound appears, not at the second beat. This is the systolic reading and will be reported on all SPs. Continue steady deflation at 2 mm Hg per second. Note the reading at which the last sound is heard, using the mark at or just above the top of the mercury column. This is the diastolic reading and will be reported on all SPs. Continue steady deflation at 2 mm Hg per second for at least 20 mm Hg below the final reading; then open the thumb valve completely and disconnect the tubing. Let the cuff fully deflate and disconnect the tubing. If you need to repeat the measurement, wait 1 minute between measurements. Use the first reading (appearance of sounds, first Korotkoff sound) as the systolic pressure. Record the last sound heard as the diastolic pressure only. Use the nearest even digit. If the column fell between two digits, use the mark at or just above the top of the mercury column. 3-11
32 If pulse sounds continue to be heard down to zero pressure, record the diastolic reading as "000". Tell the SP that "there may or may not be a problem with your diastolic blood pressure. Your diastolic pressure was not measurable. You may wish your physician to check it." 3.9 Procedural Guidelines If a measurement was interrupted, use the following guidelines; 1. Repeat the MIL only if the cuff was removed or more than 5 minutes has elapsed between the MIL and the first blood pressure reading or between any two blood pressure readings. 2. Repeat the MIL whenever a systolic blood pressure reading is less than 10 mm Mercury from the MIL. 3. Maximum of five inflations still applies. 4. Note on Blood Pressure Measurement form, whichever is applicable. If a measurement is unsatisfactory because of improper technique or instruction, that particular measurement will not be repeated. You may inflate the cuff on the subject s arm only five times in total (two MIL attempts plus three blood pressure readings or one MIL and four blood pressure attempts). Enter the reason for the unsatisfactory reading on the Blood Pressure Measurement form. If the blood pressure sounds are not heard during the first measurement, review your technique, check stethoscope position for loose connections or tubing kinks, and maintain a quiet environment. Relocate the brachial pulse and apply the diaphragm headpiece directly over the pulse point. See item 2 of the procedure for instructions if brachial pulse cannot be palpated. Take care to wait at least 1 minute between measurements. Use the procedure to enhance the sounds (Section 3.10) and take the second reading, placing the stethoscope in the same position. Note the use of the enhancement procedures in the comments section of the Blood Pressure Measurement form. 3-12
33 If you still do not hear the blood pressure sounds during the third measurement, note this on the Blood Pressure Measurement form. Each of these attempts must be documented on the form. When reporting the blood pressure readings to the subject, first ask the subject, "Are you feeling well at this time?" If no, explain to the subject that you did not hear the blood pressure and refer these subjects to their doctor or health facility today. If yes, they do feel well, explain that you did not hear the blood pressure, and that this happens with some persons but that they need not be worried about it. You can suggest that the subjects telephone their doctors to report the incident and ask if they need an appointment for followup, as they may feel anxious about these inaudible blood pressures Procedures to Enhance the Brachial Pulse Sounds If you are having difficulty hearing the blood pressure sounds, there are three methods which can be used to increase the intensity and loudness of the sounds: 1. Reduce room noise. 2. Have the SP raise his/her arm and forearm for at least 60 seconds. Lower, inflate the cuff, and take the BP immediately. If raising the arm is difficult for the subject, use Method Instruct the SP to open and close his/her fist 8 to 10 times. Inflate the cuff and take the BP immediately. If it was necessary to use one of these enhancement methods, make sure you record the method you used Auscultatory Gap An auscultatory gap is the fading or disappearance of sound after the first sounds are heard. The sound then reappears at a level well above the diastolic pressure. The radial pulse can still 3-13
34 be felt during the silent phase and the gap usually occurs between Phases I and II. This phenomenon is seen more frequently in older subjects and only rarely in children. This means that in an adult with an auscultatory gap, the real systolic pressure may be missed and read as a much lower BP. For example: Real systolic is 172 but sounds fade at 168 and reappear at 152 and disappear at 98. If the correct procedure (inflating to MIL) for BP measurement is not used, this subject s BP may be read as 152/98 instead of 172/98. The only way to avoid this error is to obtain the MIL before BP measurement. There is an exception here, though. The rule is to deflate the cuff 20 mm Hg below the last sound. Even if you deflate 20 mm Hg below last sound you would only deflate to 148 and think BP is 172/168. Therefore, whenever the blood pressure fades very shortly after hearing the systolic, deflate the cuff to zero. 3-14
35 August 9, \PULSE-BP\BP-HH.DOC 4. REPORTING AND RECORDING PROCEDURES 4.1 Reporting Physical Measurement Findings to the SP In surveys of this nature it has been considered appropriate to report the pulse and blood pressure findings to the SP. While these survey measurements should not be represented as a medical diagnosis, it is important that the SP be made aware of an elevated blood pressure in order that he or she may seek a proper medical examination for themselves. After completing the pulse and blood pressure measurements, and the entries on the Blood Pressure Measurement form, follow the procedure outlined below in reporting to the SP. 1. Adult Report of Physical Measurements Findings Enter name of SP, date, and the pulse on the "Adult Report of Pulse and Blood Pressure Findings" (Exhibit 14). Any irregularities in the pulse should be noted on the comments line, next to the pulse reading. If the average of the second and third systolic and diastolic readings is computed, enter this on the report form and check "Average of the second and third measurements;" If the blood pressure was not an averaged finding, enter the single finding and check "Single measurement." If the MIL was not measurable (MIL 300) check "MIL not measurable." If there was no proper fit with any arm cuff and the thigh cuff was used, check "No proper fit - thigh cuff used" and enter whether this is an average or single blood pressure, by checking the appropriate box. If the blood pressure was obtained, look at the Adult Blood Pressure Value Box (Exhibit 15). Then ascertain where the systolic and diastolic readings intersect. Circle the correct number in the Value Box and on the Adult Report of Pulse and Blood Pressure Findings Form and read 4-1
36 4-2
37 the statement to the SP. An example may make this clearer. If the average of the second and third blood pressure reading was 124/76, you would circle the number (1) since the systolic is under 129 and the diastolic is under 84. You would then circle and read statement (1) on the Adult Report of Pulse and Blood Pressure Findings Form to the subject. For this survey a Spanish version of the form is also available. Exhibit 15 (ZA12 in Adult Questionnaire) Adult Blood Pressure Value Box SYSTOLIC DIASTOLIC < >120 < < < < < > Ask the SP to read and then sign the report form explaining that this is needed as an assurance that he/she has been made aware of his/her blood pressure. If a SP refuses to sign, record the subject s name and sign your name and date at the bottom of the form. Then give the SP the second copy (yellow) of the report form to keep and retain the white copy to return with the questionnaire. 4-3
38 4.2 Instructions for Recording Pulse and Blood Pressure on the Examination Form General The Blood Pressure Measurement form, Section ZA of the Adult Questionnaire (Exhibit 16) will be used to record the pulse and blood pressure readings and any conditions that might have prevented the measurement or affected the accuracy of the reading. Both purposes are important and adequate notes on any qualifying conditions are necessary for proper interpretation of the readings. The Blood Pressure Measurement form is designed to follow the sequence prescribed for the pulse and blood pressure measurements. Exhibit 17 is a checklist of the steps to be followed in these measurement processes Detailed Instructions for Completing the Blood Pressure Measurement Form If it is obvious to you that there is no appropriate setting for the blood pressure measurement to be taken, go to ZA9 and explain the situation. Examples of this include: a household with no furniture, or if the interview is taking place in a car, etc. These are rare situations. If you observe an SP s right and left arm and see conditions preventing the blood pressure from being taken on both arms, go to ZA9 and explain. Examples of this include: withered arms, injuries, dressings or casts, shunts or rash. These conditions must exist on both arms. This is a rare situation. Remember, Question ZA9 is for an interviewer s response. Read the introduction to the SP. It is important that the introduction be read to the SP as it is written. Follow the written instructions on the checklist for positioning the SP. Item ZA1 - If you have not observed conditions preventing blood pressure measurement (physical surroundings or the condition of the SP s arms), ask the SP the question in ZA1 as it is written. If the SP indicates a medical reason why the procedure should not be done on both arms, check the "1" box for "Yes" 4-4
39 4-5
40 4-6
41 4-7
42 Exhibit 17. Checklist for Pulse and Blood Pressure 1. Position the subject: reduce room noise, if possible has been resting for 5 min. not slumped loose sleeve rolled up no smoking, coffee, or alcohol for 30 minutes 2. Locate radial and brachial pulse. 3. Select and place the cuff: Check that the index line is within range lines, 1" above elbow crease, over brachial artery, and wrap the cuff, two thumbs under cuff, pull gently. 4. Obtain resting pulse and record for 30 seconds. 5. Obtain MIL by inflating cuff to 80 mm, then continue in increments of 10 mm until the point at which the radial pulse disappears, then continue for 30 mm above that point. Then deflate rapidly, disconnect the manometer tubing and record on the Adult Questionnaire, Section ZA. 6. Wait 1 minute. 7. Place stethoscope in ears, ear pieces turned forward, and diaphragm piece over brachial pulse point. 8. Inflate rapidly to MIL. 9. Deflate 2 mm per second, eyes level with midpoint of the manometer column. Read the point on the manometer when the first sound is heard (systolic), and at which the last sound is heard (diastolic). 10. Continue deflation to 20 mm below diastolic reading. 11. Deflate rapidly to zero. 12. Remove stethoscope from ears. 13. Disconnect manometer tubing. 14. Record systolic and diastolic blood pressure readings on the Adult Questionnaire Section ZA. 15. Wait 1 minute. 16 Repeat Steps 7-14 for two more readings. Wait 1 minute between measurements. This checklist includes all steps you will be tested on during the third day of training. 4-8
43 and specify the reason. Check the "01" box for recent surgery, the "02" box for upper body circulatory problem, the "03" box for "pains/injury" or the "04" box for "Other." If you check "Other," specify what the problem is. This does not occur frequently. If the SP indicates that there is no medical reason why the procedure should not be done, check the "2" box for "No." Remember, Question ZA1 is reserved for the SP s response only. Interviewer observations are to be recorded in ZA9. Item ZA2 - Ask the SP the question as it is written. If the SP responded "Yes," check the "1" box for "Yes" and check all boxes that apply regarding what product(s) was/were consumed, then continue with the procedure. If the SP responds "No," check the "2" box for "No" and continue with the procedure. Indicate to the SP that the actual procedure will now begin. Item ZA3 - After selecting and applying the arm cuff to be used, check the appropriate box for the cuff size used. Check the "1" box for the child cuff, the "2" box for the adult cuff, the "3" box for the large arm cuff or the "4" box for the thigh cuff. Remember, that if a proper fit cannot be made with any of the cuff sizes, because of a large arm, use the thigh cuff for measurement and provide an explanation in the comments section (ZA13). Item ZA4 - Check which arm was selected for the pulse and blood pressure measurement. Check the "1" box for the right arm or the "2" box for the left arm. If the left arm was used, check the appropriate reason. Check the "01" box for "Injury, Rash," the "02" box for "Cast, Dressing," the "03" box for "Placement of Equipment" or the "04" box for "Other." If you check the "Other" box, specify the reason in the space provided. If neither arm can be used, explain the specific physical condition observed in the comments section (ZA9). Take the SP s pulse, if possible, and then discontinue the procedure. 4-9
44 Item ZA5 - Count the pulse for 30 seconds, record the count in the boxes provided and go to ZA6. If any condition(s) might have affected the reading, explain in the Comments Section (ZA13). If you are unable to locate the pulse in either arm, check the "00" box and go to ZA9. Item ZA6 - Indicate if the pulse was regular. By regular, we mean steady and rhythmic. Check the "1" box for "Yes," the pulse was regular or the "2" box for "No," the pulse was not regular. Any additional comments about the pulse should be recorded in the comments section (ZA13). Item ZA7 - A grid is provided for recording the MIL. Determine the reading at which the radial pulse disappears. Add 30 to the reading and record the MIL in the "Reading" column for ZA7a. If the first attempt at the MIL is unsuccessful, a second attempt may be made. The grid contains areas for a first and second attempt at the MIL. If only one attempt is made, record the MIL in the first attempt ("Reading" column of ZA7a). If a second attempt is necessary, enter the reason the first MIL was unsuccessful in the "MIL Not Done" column of ZA7a and go to ZA7b. Again, enter the MIL for the second attempt in the boxes provided in the second attempt "Reading" column or the reason the second attempt was unsuccessful in the "MIL Not Done" column. If the first MIL is not attempted, check the "1" box for "Not Attempted" in the "MIL Not Done" column and go to ZA7b. If the first attempt is unsatisfactory, check the "2" box for failed attempt in the "MIL Not Done" column in ZA7a. Explain why in the comments section (ZA13) and make a second attempt. If the second attempt is also unsatisfactory, check the "2" box for failed attempt in the "MIL Not Done" column in ZA7b, and go to ZA9 and explain. Then terminate the blood pressure measurement. If there is equipment failure for either the first or second attempt, check the "3" box in the "MIL Not Done" column and go to ZA9 and explain. If the radial pulse is still felt at a level of 270 mm Hg or higher (which means that the MIL is 300 mm Hg or higher), enter 300 in the boxes provided in the "Reading" 4-10
45 column of ZA7a, first attempt. Repeat the MIL. If the pulse is still felt at a level of 270 mm Hg or greater, enter "300" in the boxes provided for in the "Reading" column of ZA7b, second attempt, and terminate the blood pressure measurements. Go to ZA9. Item ZA8 - At this point, remember that you have a maximum of five inflations. Think of the fifth inflation as a "freebie" that can be used either for a second MIL or an additional blood pressure reading. A grid is also provided for ZA8 to allow for three or four attempts if necessary, for the blood pressure measurement, depending on the number of MILs attempted. The grid is arranged so that for each attempt, a column or space is provided for the "Reading" or the reason why the "BP Not Done" or the reason the "BP Refused." Make an entry for each attempt in only one of the three columns. Item ZA8a - First attempt - If the first attempt for the blood pressure reading is successful, enter the systolic blood pressure (SBP) reading and the diastolic blood pressure (DBP) reading in the boxes provided in the "Reading" column for the first attempt and go on to ZA8b. If the blood pressure was not done on the first attempt, check either the "666" box for "Missed Reading" or the "667" box for "Equipment Failure" in the "BP Not Done" column for the first attempt and go to ZA8b. If the SP refuses the first attempt to obtain the blood pressure measurement, check the "997" box, "Time Constraints," or the "998" box for "Discomfort" or the "999" box for "Other" in the "BP Refused" column for the first attempt and go to ZA9. If you check the "Other" box, specify the reason the SP refused. Item ZA8b - Second attempt - If the second attempt for the blood pressure reading is successful, enter the systolic blood pressure (SBP) reading and the diastolic blood pressure (DBP) reading in the boxes provided in the "Reading" column for the second attempt and go on to ZA8c. If the blood pressure was not done on the second attempt, check either the "666" box for "Missed Reading" or the "667" box for "Equipment Failure" in the "BP Not Done" column on the second attempt and go to ZA8c. If the SP refuses the second attempt to obtain the blood pressure 4-11
46 measurement, check the "997" box, for "Time Constraints," or the "998" box for "Discomfort" or the "999" box for "Other" in the "BP Refused" column. If you check the "Other" box, specify the reason the SP refused. Go to ZA10 if at least one blood pressure reading was obtained, otherwise go to ZA9. Item ZA8c - Third attempt - If the third attempt for the blood pressure reading is successful, enter the systolic blood pressure (SBP) reading and the diastolic blood pressure (DBP) reading in the boxes provided in the "Reading" column for the third attempt and go on to ZA10. If three blood pressure readings have been obtained or you have used all five inflations and have at least one BP reading, go to ZA10; otherwise go to ZA8d. If the blood pressure was not done on the third attempt, check either the "666" box for "Missed Reading" or the "667" box for "Equipment Failure" in the "BP Not Done" column for the third attempt and continue to ZA8d if you have used less than five inflations. If you have used all five inflations and have obtained at least one blood pressure reading, go to ZA10; otherwise go to ZA9. If the SP refuses the third attempt to obtain the blood pressure measurement, check the "997" box for "Time Constraints," or the "998" box for "Discomfort" or the "999" box for "Other" in the "BP Refusal" column for the third attempt If you check the "Other" box, specify the reason the SP refused. Go to ZA10 if you have obtained at least one blood pressure reading; otherwise go to ZA9. Item ZA8d - Fourth attempt - You will only use ZA8d if you have not obtained three blood pressure readings and have at least one inflation left to use. If the fourth attempt for the blood pressure reading is successful, enter the systolic blood pressure (SBP) reading and the diastolic blood pressure (DBP) reading in the boxes provided in the "Reading" column for the fourth attempt and go on to ZA10. If the blood pressure was not done on the fourth attempt, check either the "666" box for "Missed Reading" or the "667" box for "Equipment Failure" and go to ZA10 if at least one blood pressure measurement has been obtained; otherwise go to ZA9. If the SP refuses the fourth attempt to obtain the blood pressure measurement, check the "997" box for "Time Constraints," or the "998" box for "Discomfort" or the "999" box for "Other" in the "BP Refused" column for the fourth attempt. If you check the "Other" box, specify the reason the SP refused. Go to ZA10 if at least one blood pressure reading has been obtained; otherwise go to ZA
MEASURING VITAL SIGNS TRAINING CHECKLIST
 Measuring Vital Signs A guide to help Direct Support Professionals learn how to measure, and report vital sign measurements. Outcomes: Know how to take each individual s vital signs. Demonstrate the correct
How to measure blood pressure using digital monitors
 How to measure blood pressure using digital monitors What is high blood pressure? Blood pressure is the pressure exerted by circulating blood upon the walls of blood vessels. Systolic pressure is the blood
MEASURING AND RECORDING BLOOD PRESSURE
 MEASURING AND RECORDING BLOOD PRESSURE INTRODUCTION The blood pressure, along with the body temperature, pulse, and respirations, is one of the vital signs. These measurements are used to quickly, easily,
Plank 1 Tool: Hypertension Medical Assistant Training (Providence Medical Group)
") Plank 1 Tool: Hypertension Medical Assistant Training (Providence Medical Group) Task Qualification Training Packet Volume 1 Date Performing Blood Pressure Checks SUBJECT AREA Vital Signs EQUIPMENT REQUIRED
Plank 1 Tool: Hypertension Medical Assistant Training (Providence Medical Group) Task Qualification Training Packet Volume 1 Date Performing Blood Pressure Checks SUBJECT AREA Vital Signs EQUIPMENT REQUIRED
Blood Pressure Assessment Program Screening Guidelines
 Blood Pressure Assessment Program Screening Guidelines Assessment Pre-Assessment Prior to/during assessment, explain to client the following: What is meant by high blood pressure; What are the effects
All About Your Peripherally Inserted Central Catheter (PICC)
") All About Your Peripherally Inserted Central Catheter (PICC) General Information Intravenous (IV) therapy is the delivery of fluid directly into a vein. An intravenous catheter is a hollow tube that is
All About Your Peripherally Inserted Central Catheter (PICC) General Information Intravenous (IV) therapy is the delivery of fluid directly into a vein. An intravenous catheter is a hollow tube that is
Manual Blood Pressure Measurement
 Manual Blood Pressure Measurement 1 Peter Mahoney, CETL Clinical Skills Facilitator Measuring Blood Pressure manually can be difficult if not practised regularly. However it is important to be able to
P R E S S U R E P O I N T S S E R I E S : Measuring your blood pressure at home
 P R E S S U R E P O I N T S S E R I E S : NO.5 Measuring your blood pressure at home B L O O D P R E S S U R E A S S O C I AT I O N Pressure Points series Pressure Points is a series of booklets produced
Automatic Wrist Blood Pressure Monitor with
 Instruction Manual Automatic Wrist Blood Pressure Monitor with Model HEM-609 ENGLISH ESPAÑOL CONTENTS Before Using the Monitor Introduction...................................... 3 Important Safety Notes.............................
MEASURING AND RECORDING BLOOD PRESSURE
 MEASURING AND RECORDING BLOOD PRESSURE INTRODUCTION The blood pressure, along with the body temperature, pulse, and respirations, is one of the vital signs. These measurements are used to quickly, easily,
Whole Hand Activities
 Activities Walk & Flip 5 Baton Twirl Rotate the pencil in, around and between all your fingers like it was a baton. 10 Walk your fingers up the pencil (your index will look like an inchworm climbing the
Blood Pressure Guidelines and Screening Techniques
 Blood Pressure Guidelines and Screening Techniques Connie M. Kracher, PhD, MSD Continuing Education Units: 1 hour Taking patients blood pressure during dental examinations is critical to their overall
Functional rehab after breast reconstruction surgery
 Functional rehab after breast reconstruction surgery UHN A guide for women who had DIEP, latissimus dorsi with a tissue expander or implant, or two-stage implant based breast reconstruction surgery Read
A Stretch-Break Program for Your Workplace! www.healthyworkplaceweek.ca
 www.healthyworkplaceweek.ca A Stretch-Break Program for Your Workplace! Why is stretching at work important? Sitting at a desk or computer; or standing at your work station for extended periods of time
General Guidelines. Neck Stretch: Side. Neck Stretch: Forward. Shoulder Rolls. Side Stretch
 Stretching Exercises General Guidelines Perform stretching exercises at least 2 3 days per week and preferably more Hold each stretch for 15 20 seconds Relax and breathe normally Stretching is most effective
Range of Motion Exercises
 Range of Motion Exercises Range of motion (ROM) exercises are done to preserve flexibility and mobility of the joints on which they are performed. These exercises reduce stiffness and will prevent or at
How To Stretch Your Body
 Exercise Module A New Leaf Choices for Healthy Living University of North Carolina at Chapel Hill 2007 Center for Health Promotion and Disease Prevention Physical Activity Exercises for Keeping Active
Self- Lymphatic Massage for Arm, Breast or Trunk Lymphedema
 Self- Lymphatic Massage for Arm, Breast or Trunk Lymphedema Patient Education Improving health through education The lymphatic system is part of our circulatory system. It helps balance the fluids of our
Reduce Stress with This 15-Minute Restorative Yoga Sequence
 Reduce Stress with This 15-Minute Restorative Yoga Sequence Try this short, stress-busting restorative yoga sequence to ease tension around the holidays, at work, and more Stress it s something everyone
PATIENT GUIDE. Care and Maintenance Drainage Frequency: Max. Drainage Volume: Dressing Option: Clinician s Signature: Every drainage Weekly
 PATIENT GUIDE Care and Maintenance Drainage Frequency: Max. Drainage Volume: Dressing Option: Every drainage Weekly Clinician s Signature: ACCESS SYSTEMS Pleural Space Insertion Site Cuff Exit Site Catheter
Measurement of Blood Pressure
 Measurement of Blood Pressure Ambulatory and Home Blood Pressure Monitoring BHS Non Medical Prescribing Update MSc. Management of Hypertension in Primary Care University of Birmingham February 2013 Louise
Take a few minutes for yourself and incorporate some Office Yoga into your daily routine.
 OFFICE YOGA Working in an office or at a computer for prolonged periods of time can put strain on the neck, shoulder and back muscles which in turn can lead to tension and stiffness. This tension can cause
Going home with your Tunneled Catheter
 Going home with your Tunneled Catheter Your Tunneled Catheter was put in by on Interventional Radiologist Date Your Tunneled Catheter was put in at: McMaster University Medical Centre Hamilton General
Adult Forearm Fractures
 Adult Forearm Fractures Your forearm is made up of two bones, the radius and ulna. In most cases of adult forearm fractures, both bones are broken. Fractures of the forearm can occur near the wrist at
Passive Range of Motion Exercises
 Exercise and ALS The physical or occupational therapist will make recommendations for exercise based upon each patient s specific needs and abilities. Strengthening exercises are not generally recommended
CHEM 1406 BSA/BMI Measurement Laboratory (revised 01/03//06) BSA, Body Surface Area
 BSA, Body Surface Area") CHEM 1406 BSA/BMI (revised 01/03//06) BSA, Body Surface Area See pages 105-110 of dosage text for equations, calculations and adult nomogram See pages 270-273 of dosage calculation text for pediatric nomogram
CHEM 1406 BSA/BMI (revised 01/03//06) BSA, Body Surface Area See pages 105-110 of dosage text for equations, calculations and adult nomogram See pages 270-273 of dosage calculation text for pediatric nomogram
Provided by the American Venous Forum: veinforum.org
 CHAPTER 1 NORMAL VENOUS CIRCULATION Original author: Frank Padberg Abstracted by Teresa L.Carman Introduction The circulatory system is responsible for circulating (moving) blood throughout the body. The
Range of Motion. A guide for you after spinal cord injury. Spinal Cord Injury Rehabilitation Program
 Range of Motion A guide for you after spinal cord injury Spinal Cord Injury Rehabilitation Program This booklet has been written by the health care providers who provide care to people who have a spinal
1. The Determination of Boiling Point
 1. The Determination of Boiling Point Objective In this experiment, you will first check your thermometer for errors by determining the temperature of two stable equilibrium systems. You will then use
Vtial sign #1: PULSE. Vital Signs: Assessment and Interpretation. Factors that influence pulse rate: Importance of Vital Signs
 Vital Signs: Assessment and Interpretation Elma I. LeDoux, MD, FACP, FACC Associate Professor of Medicine Vtial sign #1: PULSE Reflects heart rate (resting 60-90/min) Should be strong and regular Use 2
PART I THE INCREDIBLE SHRINKING ARM
 PART I THE INCREDIBLE SHRINKING ARM Want to know how to make one of your arms shorter than the other? Unlike expensive plastic surgery, this method s armless and the effect is, thankfully, temporary! Hold
Please Do Not Call 911
 The Last Hours of Life - What to Expect Names and Phone Numbers You May Need Name Phone Family Dr. Palliative Dr. After Hours Access Centre Visiting Nurse Hospice Clergy Funeral Contact Please Do Not Call
AMBULATORY BLOOD PRESSURE MONITORING QUICK START GUIDE
 C A R D I O P E R F E C T AMBULATORY BLOOD PRESSURE MONITORING QUICK START GUIDE UNDERSTANDING ERROR CODES ERROR CODE DESCRIPTION 1 Unknown error 2 This can indicate one of the following problems: After
Evaluation copy. Blood Pressure. Project PROJECT DESIGN REQUIREMENTS
 Blood Pressure Project 9 Blood pressure is a measure of the fluid pressure within the circulatory system. This pressure is required to ensure the delivery of oxygen and nutrients to, and the removal of
Qigong. Ba Duan Jin. The Eight Pieces of Brocade
 Qigong Ba Duan Jin The Eight Pieces of Brocade by Col and g Hamilton Yiheyuan Martial Arts Contents Page Introduction 2 Preparation 2 1. Hold up the Sky 3 2. The Archer 4 3. Join Heaven and Earth 5 4a.
2. (U4C2L3:F2) If your friend received a deep cut on her wrist, what would you do?
 If your friend received a deep cut on her wrist, what would you do?") Cadet Name: Date: 1. (U4C2L3:F1) Your friend receives a deep cut on her wrist while washing dishes. She asks for your help. How confident are you that you could provide appropriate aid? A) My friend is
Cadet Name: Date: 1. (U4C2L3:F1) Your friend receives a deep cut on her wrist while washing dishes. She asks for your help. How confident are you that you could provide appropriate aid? A) My friend is
Health Technician skills checklist Health Services Department Lincoln Public Schools TEMPERATURE
 Rev. 2/07 Health Technician skills checklist TEMPERATURE 1. Explain to student what you are going to do. 2. Wait for Welch-Allyn thermometer to beep, then apply probe cover. Make sure probe cover is secure.
SELF-MASSAGE HANDOUTS
 SELF-MASSAGE HANDOUTS Self-Massage for the Head and Face Self-Massage for the Low Back and Buttocks Self-Massage for Runners Self-Massage for the Neck Self-Massage for the Feet Self-Massage for the Arms
NIH Clinical Center Patient Education Materials Giving a subcutaneous injection
 NIH Clinical Center Patient Education Materials What is a subcutaenous injection? A subcutaneous injection is given in the fatty layer of tissue just under the skin. A subcutaneous injection into the fatty
SENIOR/LTC ASSESSMENT TRAINING MODULE
 Welcome to the Superior Mobile Medics Senior/LTC Assessment Training i Module Learning Objectives Gain familiarity with the Senior/LTC Assessment process, including company-specific requirements. Know
Blood Pressure. Blood Pressure (mm Hg) pressure exerted by blood against arterial walls. Blood Pressure. Blood Pressure
 pressure exerted by blood against arterial walls. Blood Pressure. Blood Pressure") Blood Pressure Blood Pressure (mm Hg) pressure exerted by blood against arterial walls Systolic pressure exerted on arteries during systole Diastolic pressure in arteries during diastole 120/80 Borderline
Blood Pressure Blood Pressure (mm Hg) pressure exerted by blood against arterial walls Systolic pressure exerted on arteries during systole Diastolic pressure in arteries during diastole 120/80 Borderline
Your Recovery After a Cesarean Delivery
 Your Recovery After a Cesarean Delivery It is normal to have many questions about your care after delivery. Cesarean delivery is surgery and your body needs time to heal and recover for the next 6 weeks,
Axillary Lymph Node Dissection: Instructions/Exercises
 Axillary Lymph Node Dissection: Instructions/Exercises The following activities have been approved by your physician to help you increase the motion and strength of your shoulder and improve your posture
Dressing and bandage
 Dressing and bandage Mihajlo Lojpur, M.D., Ph.D. INTRODUCTION The terms dressing and bandage are often used synonymously. In fact, the term dressing refers more correctly to the primary layer in contact
IMPORTANT INFORMATION - PLEASE READ. Table of Contents. Introduction. General Information
 IMPORTANT INFORMATION - PLEASE READ Introduction Congratulations! Welcome to the world of the ELLIPTICAL CROSS TRAINER. The ELLIPTICAL CROSS TRAINER is one of the finest and most comprehensive pieces of
Keeping your lungs healthy
 Keeping your lungs healthy A guide for you after spinal cord injury and other neurological conditions Regional Rehabilitation Program This booklet has been written by the health care providers who provide
Bankart Repair For Shoulder Instability Rehabilitation Guidelines
 Bankart Repair For Shoulder Instability Rehabilitation Guidelines Phase I: The first week after surgery. Goals:!! 1. Control pain and swelling! 2. Protect the repair! 3. Begin early shoulder motion Activities:
How to Do Self Lymphatic Massage on your Upper Body
 How to Do Self Lymphatic Massage on your Upper Body UHN For patients who were treated for breast cancer on one side of their body. For example: Lumpectomy Mastectomy Lymph node removal from an underarm
WSN ERGONOMIC SAFETY TALK #3
 What is a safety talk? This safety talk is one of a series of brief meetings held on regular basis with workers and their supervisors to discuss problems and concerns about health and safety. All safety
Do s and Don ts with Low Back Pain
 Do s and Don ts with Low Back Pain Sitting Sit as little as possible and then only for short periods. Place a supportive towel roll at the belt line of the back especially when sitting in a car. When getting
Blood Pressure and Your Health
 Blood Pressure and Your Health YOUR GUIDE TO: Blood pressure basics The danger of high blood pressure Steps to avoid or lower high blood pressure I started measuring my blood pressure at home after I learned
INSTRUCTIONS FOR USE HUMIRA 40 MG/0.8 ML SINGLE-USE PEN
 INSTRUCTIONS FOR USE HUMIRA (Hu-MARE-ah) (adalimumab) 40 MG/0.8 ML SINGLE-USE PEN Do not try to inject HUMIRA yourself until you have been shown the right way to give the injections and have read and understand
A proper warm-up is important before any athletic performance with the goal of preparing the athlete both mentally and physically for exercise and
 A proper warm-up is important before any athletic performance with the goal of preparing the athlete both mentally and physically for exercise and competition. A warm-up is designed to prepare an athlete
Head Start Bus Monitor Training
 Head Start Bus Monitor Training The bus monitor works with the driver to ensure all Head Start children are safe and comfortable on the bus. Bus monitors encourage and direct the Head Start child to be
PATIENT GUIDE. Care and Maintenance Drainage Frequency: Max. Drainage Volume: Dressing Option: Clinician s Signature: Every drainage Weekly
 PATIENT GUIDE Care and Maintenance Drainage Frequency: Max. Drainage Volume: Dressing Option: Every drainage Weekly Clinician s Signature: ACCESS SYSTEMS Pleural Space Insertion Site Cuff Exit Site Catheter
Care and Handling of Your VAIO Computer
 Care and Handling of Your VAIO Computer Proper Handling Use your computer on a clean dry, stable surface. Use only specified peripheral equipment and interface cables or you may experience problems. When
Do you sit at a desk all day? Does your 9 to 5 leave no time for structured exercise..?
 Do you sit at a desk all day? Does your 9 to 5 leave no time for structured exercise..? Staying healthy at work is easier than you might think: Try building the following desk based exercises into your
ROTATOR CUFF HOME EXERCISE PROGRAM
 ROTATOR CUFF HOME EXERCISE PROGRAM Contact us! Vanderbilt Sports Medicine Medical Center East, South Tower, Suite 3200 1215 21st Avenue South Nashville, TN 37232-8828 For more information on this and other
stretches and exercises
 stretches and exercises The enclosed sheets contain stretches and exercises which can be used to delay and minimise the development of contractures and deformities occurring in children with Duchenne muscular
Cast removal what to expect #3 Patient Information Leaflet
 Cast removal what to expect #3 Patient Information Leaflet SM466 Now your cast is off, self help is the key! Follow the advice given to you by your doctor and the staff in the clinic. Your skin will be
PATIENT HANDBOOK AND JOURNAL POST SURGERY
 PATIENT HANDBOOK AND JOURNAL POST SURGERY POST ANESTHESIA CARE UNIT (PACU) After surgery you will be moved from the Operating Room directly to a special recovery room, called the Post Anesthesia Care Unit
Sheet 1A. Treating short/tight muscles using MET. Pectorals. Upper trapezius. Levator scapula
 Sheet 1A Treating short/tight muscles using MET Pectorals Once daily lie at edge of bed holding a half-kilo can, arm out sideways. Raise arm and hold for 10 seconds, then allow arm to hang down, stretching
Understand nurse aide skills needed to promote skin integrity.
 Unit B Resident Care Skills Essential Standard NA5.00 Understand nurse aide s role in providing residents hygiene, grooming, and skin care. Indicator Understand nurse aide skills needed to promote skin
Project 4.2.1: Heart Rate
 Project 4.2.1: Heart Rate Introduction Even before you were born, one of the first things your doctor did when you went for an office visit was listen to your heart. Your heart rate, the number of times
TECHNICAL BULLETIN. Meritor WABCO Cab Leveling Valves and Chassis Leveling Valves. How the Cab Leveling and Chassis Leveling Valves Work
 Revised 02-00 TECHNICAL BULLETIN Meritor WABCO Cab Leveling Valves and Chassis Leveling Valves This technical bulletin covers both cab and chassis leveling valves manufactured by Meritor WABCO. While the
Stretch the fingers by either interlocking them or holding your fingers as one unit and pull them downwards gently with the other hand.
 Although often thought of as a technique that requires two people, massage on yourself is also beneficial and can be done at any time during the day. In fact, whenever you rub a tense spot or ease a tight
The Super 7 For Tennis Elbow
 Exercises for Tennis elbow Tennis elbow recovery time varies with each person and may take several weeks. Recovery may be faster and more successful when a combination of local injections (e.g. steroids
Going home after an AV Fistula or AV Graft
 Going home after an AV Fistula or AV Graft TGH Information for patients and families During your hospital stay, your surgeon created an: AV Fistula AV Graft Read this booklet to learn: how to care for
PTA 210 PTA Technique. Vital Signs
 PTA 210 PTA Technique Vital Signs Review Last Lecture Why learn aseptic technique? 3 modes of infection transmission 3 levels of cleanliness Standard precautions (hand hygiene, PPE, respiratory hygiene,
X-Plain Foley Catheter Male Reference Summary
 X-Plain Foley Catheter Male Reference Summary Introduction A Foley catheter is a tube that is put through the urinary opening and into your bladder to drain urine. Your doctor may have placed or may ask
GRASP. Graded Repetitive Arm Supplementary Program. Exercise manual. Level. This research project is funded by UBC and the Heart and Stroke Foundation
 GRASP Graded Repetitive Arm Supplementary Program Exercise manual Level 1 This research project is funded by UBC and the Heart and Stroke Foundation 1 Welcome to the Grasp study! Thank you for volunteering
NAIAD INFLATABLES (NZ) LTD
 LTD") Inner Tube Removal and Fitting Original System The buoyancy tubes add significantly to the stability of the craft. It is the owners responsibility to ensure that the various components that make up the
Inner Tube Removal and Fitting Original System The buoyancy tubes add significantly to the stability of the craft. It is the owners responsibility to ensure that the various components that make up the
Our Human Body On-site student activities Years 5 6
 Our Human Body On-site student activities Years 5 6 Our Human Body On-site student activities: Years 5-6 Student activity (and record) sheets have been developed with alternative themes for students to
OEM MAXNIBP Frequently Asked Questions
 Frequently Asked Questions Why does the monitor sometimes inflate the BP cuff, then shortly thereafter reinflate the cuff? How will I know if the monitor is experiencing motion artifact during a measurement?
How to safely collect blood samples from persons suspected to be infected with highly infectious blood-borne pathogens (e.g.
 How to safely collect blood samples from persons suspected to be infected with highly infectious blood-borne pathogens (e.g. Ebola) Step 1: Before entering patient room, assemble all equipment (1 st part)
PICCs and Midline Catheters
 Patient Education PICCs and Midline Catheters Patient s guide to PICC (peripherally inserted central catheter) and midline catheters What are PICCs and midline catheters used for? Any medicine given over
Ensure that the chair you use is sturdy and stable. Wear comfortable clothes and supportive footwear.
 Page 1 Safety Ensure that the chair you use is sturdy and stable. Wear comfortable clothes and supportive footwear. Prepare a space and have your exercise band and a glass of water (for afterwards) ready
Achieving Independence
 Bard: Intermittent Self-Catheterization A Guide to Self-Catheterization Achieving Independence Introduction This brochure is provided by Bard, a leading provider of urology products since 1907. The best
Lab Activity on Air Pressure, Wind and Air Circulation Caused by Heating of the Atmosphere
 Lab Activity on Air Pressure, Wind and Air Circulation Caused by Heating of the Atmosphere 2002 Ann Bykerk-Kauffman, Dept. of Geological and Environmental Sciences, California State University, Chico *
Brachial Plexus Palsy
 Patient and Family Education Brachial Plexus Palsy A Therapy Guide for Your Baby Brachial Plexus Palsy is caused by trauma to the nerves of the arm. This trauma may have caused muscle weakness, lack of
DURAS INFLATABLE BOAT OWNER'S MANUAL
 DURAS INFLATABLE BOAT OWNER'S MANUAL Table of Contents About your new Duras Inflatable Boat Page 1 Assembly Instruction Page 3 Motor Installation Page 5 Capacities Page 5 Troubleshooting Page 6 Using
Peripherally Inserted Central Catheter (PICC) Patient Instructions
 Patient Instructions") Patient Care Services 300 Pasteur Drive Stanford, CA 94305 Peripherally Inserted Central Catheter (PICC) Patient Instructions A Peripherally Inserted Central Catheter (PICC) is a soft flexible tube inserted
Patient Care Services 300 Pasteur Drive Stanford, CA 94305 Peripherally Inserted Central Catheter (PICC) Patient Instructions A Peripherally Inserted Central Catheter (PICC) is a soft flexible tube inserted
24 Hour Blood Pressure Monitoring A guide to the test
 Page 1 of 5 24 Hour Blood Pressure Monitoring A guide to the test Introduction Your doctor has advised you to have this test to monitor your blood pressure over 24 hours. This involves taking multiple
Preventing Falls. Strength and balance exercises for healthy ageing
 Preventing Falls Strength and balance exercises for healthy ageing Exercise should be comfortable and fun. To get the most out of your home exercise book, join a class for older people to check your exercises
MOON SHOULDER GROUP. Rotator Cuff Home Exercise Program. MOON Shoulder Group
 MOON Shoulder Group For information regarding the MOON Shoulder Group, talk to your doctor or contact: Rosemary Sanders 1215 21 st Avenue South 6100 Medical Center East Vanderbilt University Medical Center
Percutaneous Transluminal Angioplasty (PTA) and Stenting For PVS Patients
 and Stenting For PVS Patients") Percutaneous Transluminal Angioplasty (PTA) and Stenting For PVS Patients There are two types of blood vessels in the body arteries and veins. Arteries carry blood rich in oxygen from the heart to all
Percutaneous Transluminal Angioplasty (PTA) and Stenting For PVS Patients There are two types of blood vessels in the body arteries and veins. Arteries carry blood rich in oxygen from the heart to all
Rehabilitation after shoulder dislocation
 Physiotherapy Department Rehabilitation after shoulder dislocation Information for patients This information leaflet gives you advice on rehabilitation after your shoulder dislocation. It is not a substitute
Rotator Cuff Home Exercise Program MOON SHOULDER GROUP
 Rotator Cuff Home Exercise Program MOON SHOULDER GROUP Introduction The MOON Shoulder group is a Multi-center Orthopaedic Outcomes Network. In other words, it is a group of doctors from around the country
INSTRUCTION MANUAL. 7 series Blood Pressure Monitor with ComFit TM Cuff. Model BP760 ESPAÑOL ENGLISH
 INSTRUCTION MANUAL 7 series Blood Pressure Monitor with ComFit TM Cuff Model BP760 ENGLISH ESPAÑOL TABLE OF CONTENTS Before Using the Monitor Introduction................................................4
Fact sheet Exercises for older adults undergoing rehabilitation
 Fact sheet Exercises for older adults undergoing rehabilitation Flexibility refers to the amount of movement possible around a joint and is necessary for normal activities of daily living such as stretching,
SHOULDER REHABILITATION EXERCISE PROGRAM. Phase I
 Franklin Orthopedics 7400 W Rawson Ave, Suite 225 Franklin, WI 53132 414-425-8232 SHOULDER REHABILITATION EXERCISE PROGRAM Phase I PENDULUM EXERCISES: Bending over at the waist and balancing with the good
Monitoring Blood Pressure
 Introduction Why monitor your blood pressure? Low blood pressure symptoms Hot to choose a monitor How to record your blood pressure General tips Twenty-four hour monitoring Helpful contacts Monitoring
Meniscus Tear: Exercises
 Meniscus Tear: Exercises Your Kaiser Permanente Care Instructions Here are some examples of typical rehabilitation exercises for your condition. Start each exercise slowly. Ease off the exercise if you
LABORATORY PROCEDURE MANUAL
 Exercise 2 Donor Physical Exam Textbook: Skills: 20 points Objectives 1. For each of the following state the acceptable values for blood donation using appropriate units: a. Pulse b. Temperature (Celsius
Wrist Fracture. Please stick addressograph here
 ORTHOPAEDIC UNIT: 01-293 8687 /01-293 6602 UPMC BEACON CENTRE FOR ORTHOPAEDICS: 01-2937575 PHYSIOTHERAPY DEPARTMENT: 01-2936692 GUIDELINES FOR PATIENTS FOLLOWING WRIST FRACTURE Please stick addressograph
Strength Training HEALTHY BONES, HEALTHY HEART
 Strength Training HEALTHY BONES, HEALTHY HEART No matter what your age, strength training can improve your bone health and your balance. As we age, our bones lose both tissue and strength. This condition
INVESTIGATING HEART RATE AND BLOOD PRESSURE
 Hughes Undergraduate Biological Science Education Initiative HHMI INVESTIGATING HEART RATE AND BLOOD PRESSURE Learn how to measure heart rate and blood pressure. Learn the normal values for heart rate
We ve got your back. Physical Therapy After Lumbar Fusion Surgery
 We ve got your back Physical Therapy After Lumbar Fusion Surgery Physical therapy is an extremely important part of you recovery after spinal surgery. This booklet, prepared by the therapists who specialize
Getting Your Hand Moving After a Wrist Fracture
 Information for patients Getting Your Hand Moving After a Wrist Fracture Physiotherapy Department Tel: 01473 703318 DPS ref: 06175-14(RP) Issue 1: April 2015 Review date: March 2018 The Ipswich Hospital
Caring for Your PleurX Pleural Catheter
 Caring for Your PleurX Pleural Catheter A PleurX Pleural Catheter has been placed in your chest through a small incision in your skin into the pleural space (see picture below). This allows you to drain