Helpdesk for ArchiCAD User Manual
|
|
|
- Aubrey Tucker
- 10 years ago
- Views:
Transcription
1 Helpdesk for ArchiCAD User Manual Contents Brief User Manual Review...2 Registration...2 Sending the application for registration...2 Confirming the application for registration...4 Signing-in...6 Operator Interface...7 Creating Clients Download and Install Helpdesk for ArchiCAD Add-on Creating Users Editing Users Manage Licenses Create a new request Handling Requests Repairman Interface Maintenance History Property Sheet Assign to Language Setting ArchiFM Maintenance for Mobile... 48

2 Review By means of the Helpdesk for ArchiCAD program, you can manage your clients reports of breakdowns and distribute your maintenance crew s work from ArchiCAD. The program differentiates between three different types of users: operator, who is fully authorized to handle the requests. He or she admits each client as well as other users with right of operation and right of maintenance, repairman, who carry out the work in relation to the individual requests, and requester, who is a dedicated person of the client company, he or she can create maintenance requests. Registration The user can create his or her own operating portal during registration. This includes a complete dedicated database and, initially, one user with complete right of operation. Sending the application for registration 1. First, go to 2. Then click on the Register Now Helpdesk for ArchiCAD icon.


3 3. Fill in the required information, added address hasn t been editable anymore. Click Send to register. 4. The window that appears within a few minutes shows that the application for registration has been recorded by the system and that the letter necessary for the confirmation of the application has been sent to the address given. 5. Next, by clicking on the link given in the letter, confirm the application for registration.

4 Confirming the application for registration 1. By clicking on the link given on the sign-in page, you again enter the web site.

5 2. Here you can see that the second step was completed; i.e., you confirmed the application for registration. 3. On this site you have an opportunity, if necessary, to change the name, user name, telephone number. 4. You need only to read and accept the Service Contract and the Data Protection Statement. 5. By clicking I Accept, you enable the system to create your own database and to provide you with full-scale access thereto with the user name specified at registration. The password that belongs to the user name is generated automatically by the system and sent to you in an .


6 Signing-in 1. The data required for signing-in (user name, password) is sent to you by the system in an The includes a link to the sign-in page in case you signed out from the program. If you stayed on the registration page, you can get to the sign-in page by clicking Sign In. 3. Keep the sent by the system at hand and copy the data into the fields on the sign-in page. If you check out Keep me signed in, you have no need to fill user name and password every time. 4. Click Sign In.

7 Operator Interface After signing in, you get to the operator interface since the automatically-generated user is given full-scale authority, i.e., he or she has a right of operation. The operator interface helps your everyday work by providing information about the status of each request. At the time of the first entry, there are no data yet in the system and only a pre-defined user is shown in the users list. You can change the generated password if you click on the pencil icon before user s name at Persons. The first task of the system operator is to admit the clients whose requests he or she wants to handle in the system. Project settings:

8 Here you can add your name and your company name, address, phone number and the project language. Your project will be identified by these added information. Search: You can list requests by different filters (Client, Equipment, Request number, Status, Date and Time, Requester). Date and Time filter lists requests by declaration time. By using Request number filter, the selected request is opening.
. Date and Time filter lists requests by declaration time.")
9 Equipment list: By using this function, we can list all equipments assigned to request.

10 If you click on the pencil icon before the equipment, the equipment s detail page will open. You can read more about equipment s detail in chapter Property Sheet.

11 Creating Clients 1. To create a client, click New Client. 2. Of the client s data, only the code and the name are mandatory. 3. In addition, you can specify: a. the company logo (badge) that appears on the client s portal b. a contact person, who is assigned the tasks of operation by the given client, c. useful information can, by means of the message board, be provided to the reporters of breakdowns, which is shown when a new event is created or edited (see Reporting of Breakdowns) d. at the notification, you can set in what cases the system should send an to the user with the given right if the given user later requires those notifications. e. the client s language. You can set it as default to be the language of the project. f. Operators subject. At new request, in the subject of Operator s appears the text chosen by the Operator. Copy the appropriate subject to the Operators subject row. In default, you can choose between five choice: Client name, Status, Requester, Location, Text. If you would choose more than one subject, you should copy the appropriate texts to the Operators subject row. The text between the % signs are coming from Database, the other texts written by the Operator will be appear without changes. Important: subject is not depend on languages. This subject will be sent by every language settings. g. the language of the Client. As default, the language of the project is selected. h. You can set the type of the License here. Currently, you can choose between two possibilities: Free license or choose license later. With free license, you can use Helpdesk for ArchiCAD 30 days and it will be extended for more 30 days.

12
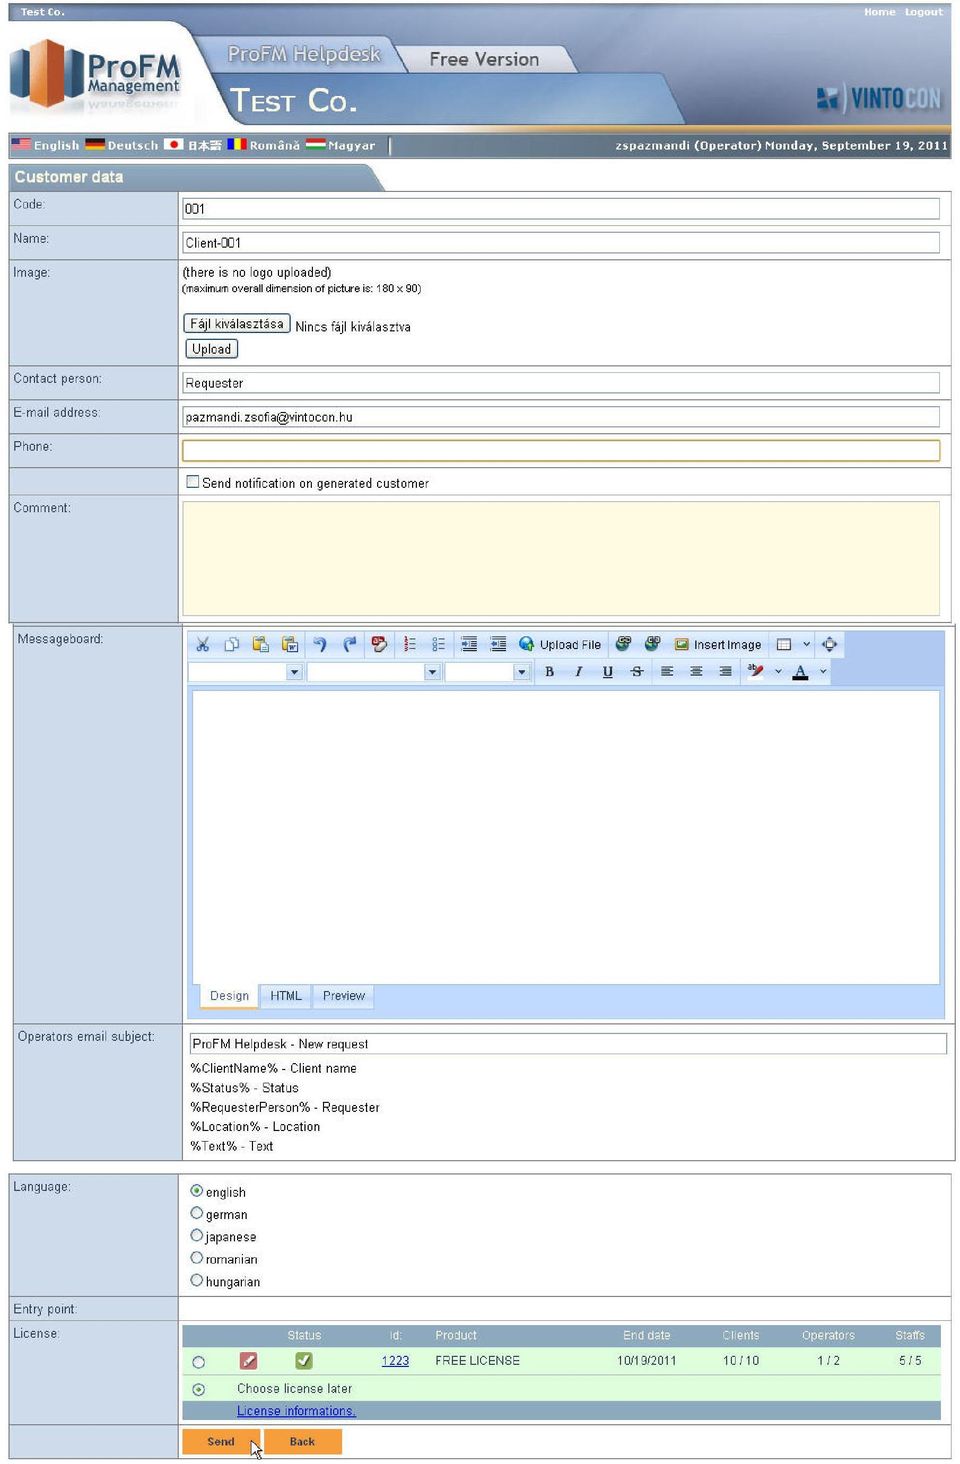
13 4. If the required data are completed, click Save. 5. The operator will receive an about the creation of the client in any case. 6. The will include a link where the reporters that belong to the client can send their request. 7. If you select Send Notification about the Creation of the Client, the contact person will also get a notification about the creation of the client, which will also include the above-mentioned link. 8. If the system allows for requests by people other than the contact person, the link can be forwarded to the reporters that belong to the client. 9. After the creation of the client, you will return to the operator s page, where you can immediately see your newly admitted client.

14 10. The numbers next to the clients pertain to the various status of the request belonging to the given client. For a detailed description please see the chapter entitled Handling of Requests. 11. The clients data can be edited by clicking on the small pencil icon shown next to the client. 12. The link through which the client s reporters can send their reports of breakdowns can also be reached on the editing page. IMPORTANT: Users can change their password by themselves, if they click on their user s name on the top-right section of the window.

15 Download and Install Helpdesk for ArchiCAD Add-on 1. To download Helpdesk for ArchiCAD Add-on, click on the link given in the first letter or type download.helpdesk.vintocon.com to a web browser. IMPORTANT! You have to install Helpdesk for ArchiCAD Add-on for all ArchiCAD user s PC. 2. Click on Download button.

16 3. To start download ArchiCAD Add-on, you have to click with right mouse button on the security warning scale and choose Download File. 4. Run this file or save and run it later. 5. You have to click Run for the second Security Warning to install Helpdesk for ArchiCAD.

17 6. Follow the current steps of the installation wizard.

18
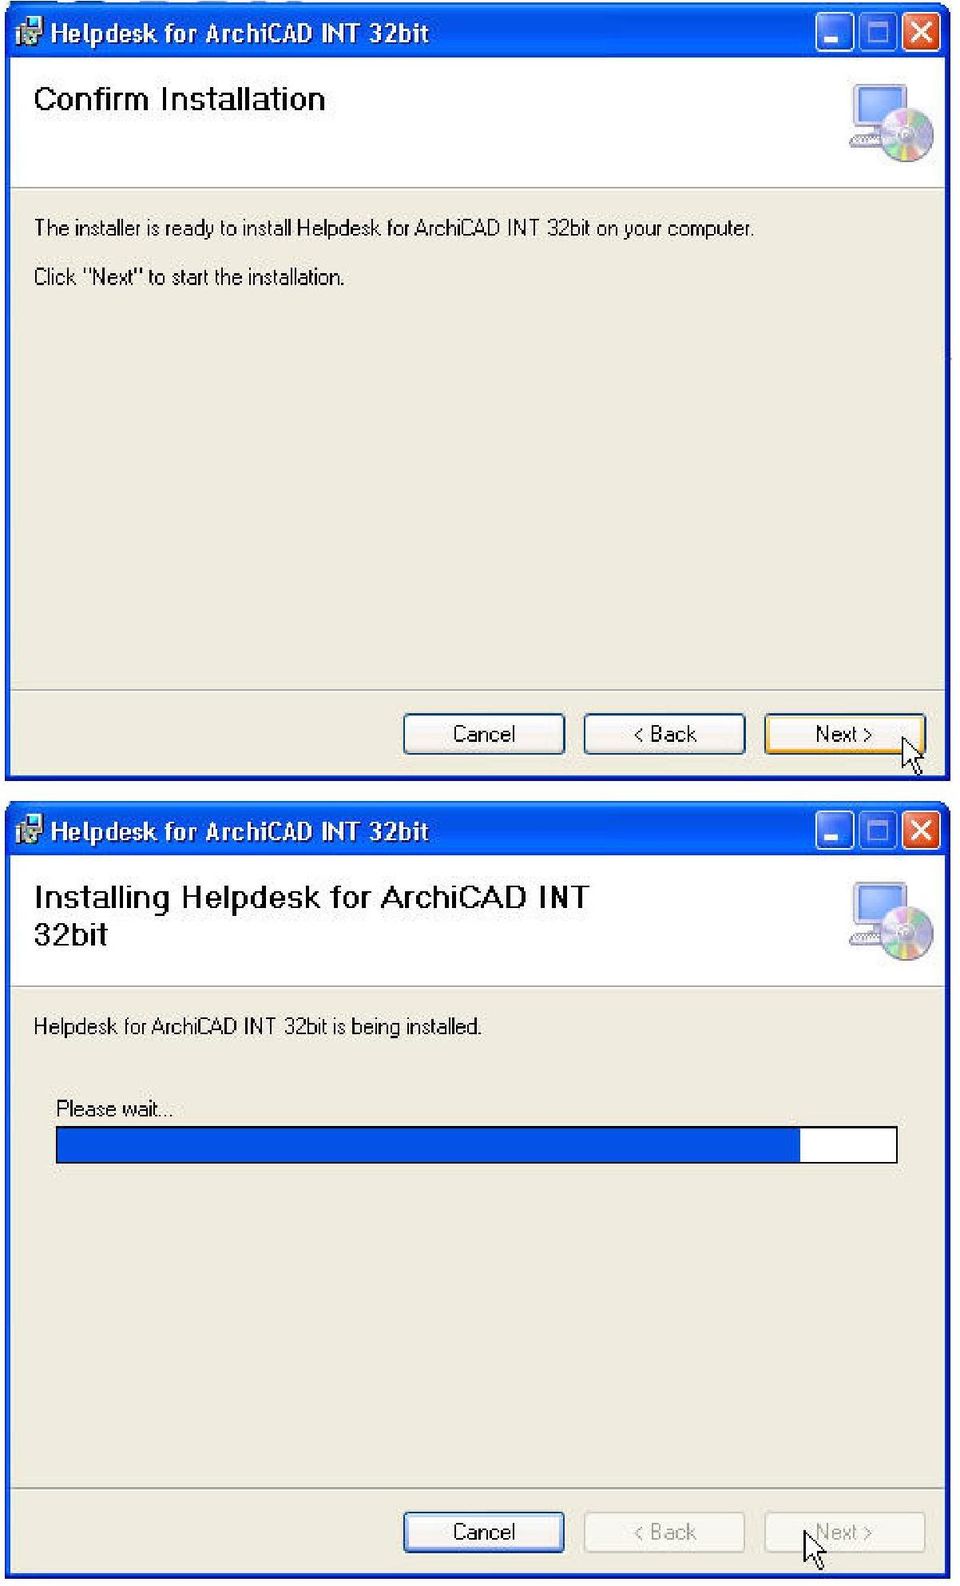
19 7. Click Close to complete installation. 8. If you open ArchiCAD you can see Helpdesk for ArchiCAD Add-on on the menubar. 9. Open the plan which you would like to assign Helpdesk requests. Select Settings from Helpdesk menu.

20 10. Type Project Page Code which you can find in the first letter and click on Load Project Settings.

21 11. Login to the project. 12. You have to save the plan after settings. Creating Users The system supports several kinds of work processes. If the operator does not have a maintenance co-worker, he or she can operate the system on his or her own without the need to add other users to the system. If, however, you would like the system to track which task is assigned to which maintenance person and also the status of the tasks, it is recommended that the maintenance crew be entered as users. 1. To add new users, click New Person on the right hand side.
22 2. Among the users information, provide the first and last names, user name, contact addresses and what rights you wish to assign to the given user. If you have fee-paying license, you can provide several addresses, in which case you have to separate them by semi-colons or commas (supported only in Premium Edition). This option is most advantageous if, for example, the cell phone service provider offers mobile service. In this case, the system will send any notification about new requests and required modifications to both the cell phone and the address. 3. You can select Operator, Repairman and Requester role. In this case, select Requester role. 4. Select a client to the new user from Clients list by check out the box. 5. Select Send Notification and click Send. 7. The newly established user receives a notification that the system operator created a user with his or her name and the user also receives the data that are required for signing in. 8. By clicking on the sign-in point specified in the , you get to the sign-in page, where you have to provide your user name and password that you received in the .
23 Editing Users Click on the pencil icon to edit user: If you open an operator to edit (if the system has more operator) you can check out Notifications about Requests (Operator only ) to get notification about changes of the requests. This function is not available in single-operator system and it is appeared in grey. You can set 10 licensed Clients, 2 Operators and 5 Repairman to the free license. The number of the users assigned to the license are viewed in Manage license menu. Number before / sign means that how many users can be assigned to the selected license.
24 If you assign more user to the license than allowed by the free license, users over the limited number are inactive.
25 In this case, the inactive user s license is not editable and it is appeared in grey. To edit the inactive user, you have to remove an active user (with the same role) from the license or set another role for him. Manage Licenses If a client hasn t been assigned to license, click on the pencil icon to manage license. Select 30 days free license and save settings of the license.
26 The program warns you that license will expire in 10 days and you get warning 10,5 and 3 days before expiring. You also have to assign persons to a license as you did at Clients. If your 30 days free license expired, you can extend you license for more 30 days.to extend your license, click on the red arrow. Your new license is valid from the first 30 days license s expiration date. Data limit of these licenses are 50 MB which means that you can upload 50 MB files to the server totally. If your second 30 days free license expired, you should require a new license with using Request License button in Manage license menu.
27 ProFM Helpdesk generates a request key for you. To send license request to your distributor, click on Send request by button. In some cases, it is impossible to send license request by filling the form, in this case system warns you that you should send license request key by manually. You can find your new license key in the received from vintocon. Click on Activate License and copy license key to the text box.
28 To validate new license, click on Validate, check all data of the new license and validate by using Create new license button. The new license is appeared in Manage licenses list.
29 If you would like to assign users with expired license to the new license, click on the pencil icon to edit new license. Choose a license from the list of Loadable expired license to assign users to the new license, click on Load to save changes. Create a new request There are two ways to create a breakdown request: o When a new client is established, the system operator receives a letter that contains the client s data, as well as a link through which the client s reporters can send their reports of breakdowns. o Another way to create requests, to select object or building elements in ArchiCAD and assign to the requests in Helpdesk: 1. To make a new breakdown report, first you have to log in to the database: Click on Load project settings button and type user name and password. You can create a new request after choosing Client from the dropdown list. Role is assigned to user name automatically. In this case we create request as an operator but you can also create requests in Requester and Repairman role.
30 2. Choose the failed object or building elements which you would like to be assigned to the request.
31 3. Select New Request from Helpdesk menu. 4. To create your request, you have to login to the project. 5. After log in, you can see the data of the equipment coming from ArchiCAD.
32 6. You can add some more data to your request: o You can select the type of the event: Emergency case, Contracted o Add recognition time o Select request type from a dropdown list o Type the description of the breakdown o Choose notification of the status changing 7. If you filled all necessary information about the request, click on Register to send your request. 8. The new request is appeared in the list:
33 Handling Requests The workflow of the users is different by every role: o Requester workflow: Requesters can create New requests and close event in some cases. A new request created by the requester and a Reported event can by closed by the Requester as the following picture shows:
34 o Repairman workflow: Repairman start to work on a Scheduled event and Report event after finishing work. Repairman can also create new requests and close event. o Operator workflow: The operator can follow on the summary screen which requests need action. There are two summary charts: one that shows the requests according to clients, and one that shows the requests according to users.
35 Both charts comprise five columns with certain numbers in their rows. Icons mean the status of the request, as the following: New requests: New requests which haven t been handled yet Due jobs: Scheduled requests with expired start date or their planned start date is the actual date Drawn jobs: In progress status requests with expired end date Overdue jobs: Scheduled requests with expired start date Complete requests: Cancelled, reported and closed requests with expired start date The first column shows the new requests. In the chart that shows the requests according to clients, the row of each client contains the number of new requests received from the given client. In the following example, the row of Client-001 shows two new requests. By clicking on the number or the client s name, you can view the two reque By opening the requests one by one, the operator may choose between 3 options as you see on the Operator workflow: Operator simply modify something in the request, the request status isn t changed. If the request has to be deleted, he or she can cancel the request and new status will be Cancelled. He or she can specify planned start date and select repairman for the breakdown event. The operator can save the planned event by click on Approve button. In this case the event status will be changed for Scheduled. The requester of the breakdown may receive a notification about the change of the request status if that option was selected during the editing of the client;
36 after reading the notification, the requester may respond thereto. The dialogue box contains a summary of the users and operators responses along with their times. He or she then selects which maintenance person has to carry out the work and when the work is planned to be commenced and completed; also he or she has to provide a brief description of the work to be done. To start work, first Repairman has to open the scheduled event. Here he or she can add supplement to the event. To start the event, you have to click on the Start button. The status of the event is changed for In progress. When the Repairman finishes the work, he or she simply has to change the report status to Reported and it appears in the Complete request column in Operator s view.
37 Operator can add more supplement and clarify all details of the event. If Operator selected Notification of Reporter, the system will send a message to the reporter s address about the closing of the report. If there are no more task about the event, Operator can close the Event and the status is changed for Closed.
38
39 To print requests, you have to open requests list and click on print icon at the end of the request s line. Repairman Interface Repairman Interface has 3 part: o Requests: This is a list of all requests assigned to the user. You can filter requests for Status, Date and Time, Requester, Equipment and Clients by using filters. Date and Time filter is filtering for declaration time. New request and My requests commands are not available in default, to use these functions you have to select a client from the Clients filter. o Due jobs for today:due jobs mean Scheduled and In progress requests which start or deadline date is today. o Old drawn requests: Requests with expired deadline.
40 Maintenance History In some case, it is necessary to know about the maintenance history of the equipment. Maintenance History command from Helpdesk menu lists all maintenance event of the selected equipment. This function is available in all roles. 1. Select the equipment. 2. Click on Maintenance History in the Helpdesk menu. 3. Sign in to the system.
41 4. You can see the list of the equipment s event and here you can filter data by different parameters: Client, Equipment, Request number, Status, Date and Time, Requester. Default equipment in the Equipment filter is the object chosen in ArchiCAD. In default the selected request is listed. Date and Time filter is filtering for declaration time of the requests. Operators can choose between clients, Repairmen and Requesters can achieve requests of the Client which was chosen in ArchiCAD. 5. Here you can also filter for other equipment s maintenance history.
42 Property Sheet With using Property Sheet command from Helpdesk menu, you can list all details of the selected equipment. This function is available by all roles. 6. Select an equipment 7. Click on Property Sheet in Helpdesk menu 8. Sign in to the project. 9. Here you can see the main details of the equipment. All details are editable except GUID (inner ID of the object). You can also add description for the equipment. To save your work, click on Save. 10. If you sign in as an Operator you can assign equipment to a request, users with Requester and Repairman role can t use this function.
43 11. You can assign documents, links and pictures to the selected element by using Description editor. These functions are available from the Design tab. In the following example a document will be uploaded but you can also upload link and pictures as the same way. o Click on Upload File button to upload document.
44 o You have to click on the 3 dots on the URL line and select file by using Browse and Upload buttons. o Select the file to upload and click on Select button. o In next window, you have to add a text to Text field which would like to appear in the Description window and a text to the ToolTip field.
45 o Save the modification by using Save button and click on Preview tab to open the uploaded file. 12. If you sign in as an Operator you can assign equipment to a requests, users with Requester and Repairman role can t use this function.
46 Assign to If you have Operator role, you can assign equipments to requests. This function is available from Helpdesk menu of ArchiCAD (after select an equipment) and also available from the Property Sheet window. 1. First, you have to select an equipment and click Assign to in Helpdesk or click on Assign to from Property Sheet. 2. Here you can see the main details of the equipment and a table to filter data. 3. In default, Unknown is the default equipment. To find a request, you should delete Unknown from Equipment column and add parameter to filter column. If you delete only Unknown, all requests which are not Closed, are listed.
47 4. You can filter requests for Status, Id, Registration Time, Location, Message, Client and Equipment. To filter, you should type the filtered text to the appropriate box. 5. If you find the request or requests what you looked for, check the boxes of the requests and click on Assign to.
48 6. To clear filter parameter, click on Clear at he filter row. Language Setting The textual components of the user interface can be displayed in any one of five languages: English, Hungarian, Romanian, Japanese and German. The sites contain five buttons for the selection of the language. If a site requires user identification, it is displayed in the language set for the given user. If there is no such setting, the project setting will be used. If there is no project setting either, the language set as favorite in the browser will be used. If that language does not belong to the supported languages (English, Hungarian, German), the page is displayed in English. If you are on the client s page, you will use the language set for him or her; on the sign-in page, the project s language is prevailing. ArchiFM Maintenance for Mobile ArchiFM Maintenance for Mobile is a mobile solution to cooperate with ProFM Helpdesk and Helpdesk for ArchiCAD web based services. As a user you can report and send new breakdown requests with photos and geo location coordinates to the helpdesk server directly from you mobile. You can also follow your requests status until the completion of the repair works. As a repairman, you can see your assigned work orders and report back the accomplished works. First start - Connection Information At the first start of the application you have to specify your connection information. These information are used to send and receive data between you mobile device and the ProFM Helpdesk web server. The connection information are sent to you via when you register to the Helpdesk server for the first time. Namespace: Web address of the online web services.(default: Site address: Web address of the Helpdesk site.(default:
49 Project code: Unique ID number of your maintenance project. It was sent to you by . User name: The user name that was registered on the Helpdesk server. It was sent to you by . Password: The password that was assigned to you by the Helpdesk server. It was sent to you by . My Work Orders If you are registered to the Helpdesk server as an Operator or Repairman, you can find your assigned and scheduled works under this command. On the first page you find your work orders on a map close to your current position. To achieve a better positioning don't forget to enable the GPS receiver of your mobile device. Here you can move the position, zoom in, zoom out and tap on an icon that representing a work on the map. The "List Works" button displays a scrollable list of your assigned work orders. If you tap on a work on the map or in the list you will see the work details page listing all the necessary information about the work. If you click on the buttons on this page, you can see the attached picture or photo - if exists -, call the reporter person if you have questions and see the exact location of the work on the map. Tap and hold on a list item to open a popup menu. In the popup menu you can open the details page of the selected list item or change the status. New Request With using this button you create a new breakdown repair request and send it up to the server. IMPORTANT: To send up your request to the server you need an online Wi-Fi or GSM connection. If the connection is offline your mobile device stores the requests internally. In this case the request will be sent up to the server after you activate one of your wireless connections and issue the Refresh menu command. To create a new request, you should fill the following fields: Client: Don't forget to specify the name of the client in the name of which you are working. If there is only one client assigned to your user name it will be selected automatically. If you are working with more clients you can specify a default client on the Settings page. Reporting person: The default person name assigned to your user name. You can overwrite the default name here. Phone: The default phone number assigned to your user name. You can overwrite the default phone number here. The default address assigned to your user name. You can overwrite the default address here.
50 Location: Location of the breakdown event. You can type in the location with your own words here. The geo tag location is assigned to the breakdown event automatically in an other place. Text: The description of the breakdown event. Make a photo to attach!: By tapping this button you can take a snapshot about the breakdown and assign it to the event. My Requests Displays a scrollable list of your reported breakdown requests. Each list item contains an icon representing the status of the event followed by the place and description and the request time. If you tap on a list item you will see the work details page listing all the necessary information about the work. If you click on the buttons on this page, you can see the attached picture or photo - if exists -, call the reporter person if you have questions and see the exact location of the work on the map. Tap and hold on a list item to open a popup menu. In the popup menu you can open the details page of the selected list item. Settings Namespace: Web address of the online web services. (Default: Site address: Web address of the Helpdesk site. (Default: Project code: Unique ID number of your maintenance project. It was sent to you by . User name: The user name that was registered on the Helpdesk server. It was sent to you by . Password: The password that was assigned to you by the Helpdesk server. It was sent to you by . Factory settings: Sets back the original settings of the communication, such as the namespace: " and the Site address: " The "Project code", "User name" and "Password" should be filled out by you according to the parameters sent to you by after the registration to the server. Default client: The name of the client used as a default setting on the "New Request" page. Personal information: The name, phone number and assigned to your user name on the server. These parameters are only for information purposes. You can change them only on the Helpdesk web server. Resolution: The default resolution of the photo.
51 Image quality: The quality of the photo image. This can be "Superfine", "Fine" or "Normal". (Basically, this defines the quality of the jpeg compression.) Storage: The default location for temporary storage of photos. This can be the "Phone" or the external "Memory card". About ArchiFM Maintenance: Copyright and version information of ArchiFM Maintenance for Mobile. Send feedback: You can send your feedback and comments to us.
ProFM Helpdesk Manual
 ProFM Helpdesk Manual Contents Brief User s Manual Review... 2 Registration... 2 Sending the application for registration... 2 Confirming the application for registration... 3 Signing-in... 5 Operator
TriCore Secure Web Email Gateway User Guide 1
 TriCore Secure Web Email Gateway User Guide This document provides information about TriCore Secure Web Email Gateway. This document is for users who are authorized to send and receive encrypted email
Managed File Transfer Utility
 The Managed File Transfer Utility (MFT) is a file transfer solution that enables DOT users and external parties to transfer files securely through an intuitive interface without some of the email pitfalls.
WSDOT ProjectWise V8i Training 101
 WSDOT PROJECTWISE V8I TRAINING 101 ABOUT THIS TRAINING This training is intended to give a user the ability to open ProjectWise and access working files. Once you become comfortable working within the
Store, Edit and Share your files in OneDrive for Business on Web. A. Activate OneDrive for Business (Only for First-time Users)
") Store, Edit and Share your files in OneDrive for Business on Web A. Activate OneDrive for Business (Only for First-time Users) B. Create a New Document at OneDrive for Business C. Rename a Document at
Store, Edit and Share your files in OneDrive for Business on Web A. Activate OneDrive for Business (Only for First-time Users) B. Create a New Document at OneDrive for Business C. Rename a Document at
AT&T Online Fax User Guide Version 1.0
 AT&T Online Fax User Guide Version 1.0 Welcome to AT&T Website Solutions SM We are focused on providing you the very best web hosting service including all the tools necessary to establish and maintain
ACR Triad Web Client. User s Guide. Version 2.5. 20 October 2008. American College of Radiology 2007 All rights reserved.
 ACR Triad Web Client Version 2.5 20 October 2008 User s Guide American College of Radiology 2007 All rights reserved. CONTENTS ABOUT TRIAD...3 USER INTERFACE...4 LOGIN...4 REGISTER REQUEST...5 PASSWORD
AdventNet ManageEngine SupportCenter Plus :: User Guide. Table Of Contents INTRODUCTION... 3 REQUEST... 4. Creating a New Request...
 Table Of Contents INTRODUCTION... 3 REQUEST... 4 Creating a New Request... 5 Quick Create...5 Contact Details...5 Classifying Request Category...5 Prioritizing Request...6 Describe Request...6 Add Attachments
EBOX Digital Content Management System (CMS) User Guide For Site Owners & Administrators
 User Guide For Site Owners & Administrators") EBOX Digital Content Management System (CMS) User Guide For Site Owners & Administrators Version 1.0 Last Updated on 15 th October 2011 Table of Contents Introduction... 3 File Manager... 5 Site Log...
EBOX Digital Content Management System (CMS) User Guide For Site Owners & Administrators Version 1.0 Last Updated on 15 th October 2011 Table of Contents Introduction... 3 File Manager... 5 Site Log...
Salesforce Customer Portal Implementation Guide
 Salesforce Customer Portal Implementation Guide Salesforce, Winter 16 @salesforcedocs Last updated: December 10, 2015 Copyright 2000 2015 salesforce.com, inc. All rights reserved. Salesforce is a registered
Desktop Fax. Administration and Fax Management User Guide
 Desktop Fax Administration and Fax Management User Guide Table of Contents Welcome to Desktop Fax... 0 Desktop Fax Management... 0 Login to Desktop Fax... 1 Navigation... 1 Getting Started with Desktop
Introduction... 2. Download and Install Mobile Application... 2. About Logging In... 4. Springboard... 4. Navigation... 6. List Pages...
 Contents Introduction... 2 Download and Install Mobile Application... 2 About Logging In... 4 Springboard... 4 Navigation... 6 List Pages... 6 Example: Edit Contact... 7 View Pages... 12 Example: Companies...
Concur Expense Guide: Version 2
 Concur Expense Guide: Version 2 Welcome to Concur Expense...3 Log on to Concur...3 Explore the My Concur Page...4 Update Your Expense Profile...5 Step 1: Change Your Password...5 Step 2: Review Your Expense
HELPDESK SYSTEM (HDS) USER MANUAL
 USER MANUAL") HELPDESK SYSTEM (HDS) USER MANUAL Release No.: 2.0 prepared by OMESTI Berhad. TABLE OF CONTENTS 1.0 HOW TO ACCESS THE HELPDESK SYSTEM (HDS)... 1 2.0 HOW TO REGISTER NEW USER... 2 3.0 HOW TO RECOVER PASSWORD...
HELPDESK SYSTEM (HDS) USER MANUAL Release No.: 2.0 prepared by OMESTI Berhad. TABLE OF CONTENTS 1.0 HOW TO ACCESS THE HELPDESK SYSTEM (HDS)... 1 2.0 HOW TO REGISTER NEW USER... 2 3.0 HOW TO RECOVER PASSWORD...
2) Log in using the Email Address and Password provided in your confirmation email
 Log in using the Email Address and Password provided in your confirmation email") Welcome to HR Classroom! The following will show you how to use your HR Classroom admin account, including setting up Training Groups, inserting Policies, and generating Trainee Reports. 1) Logging into
Welcome to HR Classroom! The following will show you how to use your HR Classroom admin account, including setting up Training Groups, inserting Policies, and generating Trainee Reports. 1) Logging into
Table of Contents INTRODUCTION...2 HOME PAGE...3. Announcements... 6 Personalize... 7 Reminders... 9 Recent Items... 11 SERVICE CATALOG...
 Table of Contents INTRODUCTION...2 HOME PAGE...3 Announcements... 6 Personalize... 7 Reminders... 9 Recent Items... 11 SERVICE CATALOG...12 REQUEST...14 Request List View... 15 Creating a New Incident...
Cox Business Premium Online Backup USER'S GUIDE. Cox Business VERSION 1.0
 Cox Business Premium Online Backup USER'S GUIDE Cox Business VERSION 1.0 Table of Contents ABOUT THIS GUIDE... 4 DOWNLOADING COX BUSINESS PREMIUM ONLINE BACKUP... 5 INSTALLING COX BUSINESS PREMIUM ONLINE
DaRIS portal visual user guide
 DaRIS portal visual user guide In this guide, we show some basic operations that you can do with DaRIS portal. Login / logout To access to the portal, click on this link https://mf-erc.its.monash.edu.au:8443/daris
Editing Adobe Connect User and Meeting Room Settings
 Editing Adobe Connect User and Meeting Room Settings Editing an Adobe Connect Meeting Room is a very simple process. The following presentation will walk through the process step by step. Log Into the
File Management Utility User Guide
 File Management Utility User Guide Legal Notes Unauthorized reproduction of all or part of this guide is prohibited. The information in this guide is subject to change without notice. We cannot be held
HDAccess Administrators User Manual. Help Desk Authority 9.0
 HDAccess Administrators User Manual Help Desk Authority 9.0 2011ScriptLogic Corporation ALL RIGHTS RESERVED. ScriptLogic, the ScriptLogic logo and Point,Click,Done! are trademarks and registered trademarks
Integrating ConnectWise Service Desk Ticketing with the Cisco OnPlus Portal
 Integrating ConnectWise Service Desk Ticketing with the Cisco OnPlus Portal This Application Note explains how to configure ConnectWise PSA (Professional Service Automation) application settings and Cisco
System requirements 2. Overview 3. My profile 5. System settings 6. Student access 10. Setting up 11. Creating classes 11
 Table of contents Login page System requirements 2 Landing page Overview 3 Adjusting My profile and System settings My profile 5 System settings 6 Student access 10 Management Setting up 11 Creating classes
Easy Manage Helpdesk Guide version 5.4
 Easy Manage Helpdesk Guide version 5.4 Restricted Rights Legend COPYRIGHT Copyright 2011 by EZManage B.V. All rights reserved. No part of this publication or software may be reproduced, transmitted, stored
Secure Collaboration User Guide for Workspace Creation and Use
 Secure Collaboration User Guide for Workspace Creation and Use Workspaces allow you to create a space to securely share files in a collaborative environment. They support the use of nested workspaces,
Secure Website and Reader Application User Guide
 Secure Website and Reader Application User Guide February 2005 IMPORTANT NOTICE Copyright Medibank Private Limited All rights reserved. No part of this document (including its appendices and Schedules)
Using Internet or Windows Explorer to Upload Your Site
 Using Internet or Windows Explorer to Upload Your Site This article briefly describes what an FTP client is and how to use Internet Explorer or Windows Explorer to upload your Web site to your hosting
Strategic Asset Tracking System User Guide
 Strategic Asset Tracking System User Guide Contents 1 Overview 2 Web Application 2.1 Logging In 2.2 Navigation 2.3 Assets 2.3.1 Favorites 2.3.3 Purchasing 2.3.4 User Fields 2.3.5 History 2.3.6 Import Data
SNAMP Data Server Tutorial
 SNAMP Data Server Tutorial The server hosted by UC Merced is a data server that is used to share data among the science teams and with the public. To ensure the proper data disclosure, a sharing level
Richmond Systems. SupportDesk Web Interface User Guide
 Richmond Systems SupportDesk Web Interface User Guide 1 Contents SUPPORTDESK WEB INTERFACE...3 INTRODUCTION TO THE WEB INTERFACE...3 FEATURES OF THE WEB INTERFACE...3 HELPDESK SPECIALIST LOGIN...4 SEARCHING
Mikogo User Guide Linux Version
 Mikogo User Guide Linux Version Table of Contents Registration 3 Downloading & Running the Application 4 Start a Session 5 Join a Session 6 Features 7 Participant List 7 Switch Presenter 8 Remote Control
How To Log On To The Help Desk On Manageengine Service Desk Plus On Pc Or Mac Or Macbook Or Ipad (For Pc Or Ipa) On Pc/ Mac Or Ipo (For Mac) On A Pc Or Pc Or Mp
 On Pc/ Mac Or Ipo (For Mac) On A Pc Or Pc Or Mp") Service Desk Plus: User Guide Introduction ManageEngine ServiceDesk Plus is comprehensive help desk and asset management software that provides help desk agents and IT managers, an integrated console to
Service Desk Plus: User Guide Introduction ManageEngine ServiceDesk Plus is comprehensive help desk and asset management software that provides help desk agents and IT managers, an integrated console to
User Guide. DocAve Lotus Notes Migrator for Microsoft Exchange 1.1. Using the DocAve Notes Migrator for Exchange to Perform a Basic Migration
 User Guide DocAve Lotus Notes Migrator for Microsoft Exchange 1.1 Using the DocAve Notes Migrator for Exchange to Perform a Basic Migration This document is intended for anyone wishing to familiarize themselves
Monnit Wi-Fi Sensors. Quick Start Guide
 Monnit Wi-Fi Sensors Quick Start Guide Inside the Box You should find the following items in the box: Monnit Wi-Fi (MoWi ) Sensors 2 x AA Batteries for Each MoWi Sensor Quick Start Guide Note: A MoWi USB
Fax User Guide 07/31/2014 USER GUIDE
 Fax User Guide 07/31/2014 USER GUIDE Contents: Access Fusion Fax Service 3 Search Tab 3 View Tab 5 To E-mail From View Page 5 Send Tab 7 Recipient Info Section 7 Attachments Section 7 Preview Fax Section
91.527 - Human Computer Interaction Final Project Tutorial. Hardware Inventory Management System (HIMS) By M. Michael Nourai
 By M. Michael Nourai") 91.527 - Human Computer Interaction Final Project Tutorial Hardware Inventory Management System (HIMS) By Table of Contents Introduction... 3 Running HIMS... 3 Successful Login to HIMS... 4 HIMS Main Screen...
91.527 - Human Computer Interaction Final Project Tutorial Hardware Inventory Management System (HIMS) By Table of Contents Introduction... 3 Running HIMS... 3 Successful Login to HIMS... 4 HIMS Main Screen...
Intellect Platform - Tables and Templates Basic Document Management System - A101
 Intellect Platform - Tables and Templates Basic Document Management System - A101 Interneer, Inc. 4/12/2010 Created by Erika Keresztyen 2 Tables and Templates - A101 - Basic Document Management System
Texas Woman s University RedDot Webspinner s Manual Revised 7/23/2015. [email protected]
 Texas Woman s University RedDot Webspinner s Manual Revised 7/23/2015 [email protected] 1 Contents CONNECTING TO YOUR SITE... 3 MAIN MENU... 4 REPEATED CONTENT AREAS... 4 OPENING PAGE LAYOUTS AND EXISTING
Central Commissioning Facility Research Management Systems (RMS): User Guidance
: User Guidance") Central Commissioning Facility Research Management Systems (RMS): User Guidance Contents 1. How to login and register a new account... 2 2. How to accept an invitation to review... 8 3. How to submit a
Central Commissioning Facility Research Management Systems (RMS): User Guidance Contents 1. How to login and register a new account... 2 2. How to accept an invitation to review... 8 3. How to submit a
Help Desk Web User Guide
 Help Desk Web User Guide 1 P age Contents Create an Incident... 3 Classifying Category... 3 Describe Incident Request... 3 Add Attachments to the Request... 4 Requests... 4 Request List View... 5 Modes
Infocare Parent Portal
 Introduction Infocare Parent Portal The Parent Portal is a fantastic tool which allows the parents and contacts to use the internet to securely see the learning experiences of their children, newsletters,
Electronic Payments & Statements User Guide
 Electronic Payments & Statements User Guide Contents Welcome to Electronic Payments & Statements (EPS) This guide will show you how to: 4 Get More Information about EPS on the Welcome Page The EPS Welcome
eopf Release E Administrator Training Manual
 eopf Release E Administrator Training Manual i The United States Office Of Personnel Management eopf Administrator Training Manual for eopf v5 eopf Version 4.1, July 2007, March 2008, March 2009; eopf
Wireless Web Portal ISO User Guide
 Wireless Web Portal ISO User Guide 2 87 1 Pu llman S tree t, Sa nta An a, C A 927 05 P ho ne. 94 9.4 86.03 20 F a x. 949.4 86.03 33 www. e xa d igm.com Copyright ExaDigm, Inc. All Rights Reserved. Printed
FORM SIMPLICITY QUICK REFERENCE GUIDE PROFESSIONAL/ULTIMATE EDITION
 FORM SIMPLICITY QUICK REFERENCE GUIDE PROFESSIONAL/ULTIMATE EDITION Library Getting a Form 1. Click on Start a Form. (Alternatively, you can click on Library in the menu bar at the top) 2. This will open
WebSphere Business Monitor V6.2 Business space dashboards
 Copyright IBM Corporation 2009 All rights reserved IBM WEBSPHERE BUSINESS MONITOR 6.2 LAB EXERCISE WebSphere Business Monitor V6.2 What this exercise is about... 2 Lab requirements... 2 What you should
ACCELLOS HELPDESK CUSTOMER GUIDE
 ACCELLOS HELPDESK CUSTOMER GUIDE Version: 2.0 Date: December 2011 Copyright Accellos, Inc. All rights reserved The information contained in this document is confidential and is intended only for the persons
Resolve Disputes User Guide
 Resolve Disputes User Guide Online Merchant Services Copyright Statement Copyright 2012 by American Express Travel Related Services Company, Inc. All rights reserved. No part of this document may be reproduced
Helpdesk Ticketing User Guide
 Helpdesk Ticketing User Guide University College of the North 1/5/2012 Table of Contents UCN Helpdesk Ticketing System Requirements... 1 Logging into Helpdesk Ticketing System... 1 Support Center Options...
PCRecruiter Resume Inhaler
 PCRecruiter Resume Inhaler The PCRecruiter Resume Inhaler is a stand-alone application that can be pointed to a folder and/or to an email inbox containing resumes, and will automatically extract contact
BeamYourScreen User Guide Mac Version
 BeamYourScreen User Guide Mac Version Table of Contents Registration 3 Download & Installation 4 Start a Session 5 Join a Session 6 Features 7 Participant List 7 Switch Presenter 8 Remote Control 8 Whiteboard
Onboarding for Administrators
 This resource will walk you through the quick and easy steps for configuring your Paylocity Onboarding module and managing events. Login Launch Events Complete Tasks Create Records Configure Events Module
SPC Connect Configuration Manual V1.0
 SPC Connect Configuration Manual V1.0 I-200090-1 28.11.2014 Copyright Copyright Technical specifications and availability subject to change without notice. Copyright Siemens AB We reserve all rights in
Virtual Communities Operations Manual
 Virtual Communities Operations Manual The Chapter Virtual Communities (VC) have been developed to improve communication among chapter leaders and members, to facilitate networking and communication among
User Guidelines for QFES e-lodgement
 Guidelines to assist with electronically registering, submitting, receiving and viewing applications for QFES Referral Agency Advice under the Sustainable Planning Act 2009. State of Queensland (Queensland
Patrol Master Software
 Handheld Guard Tracking System PATROL Patrol Master Software Software version : 3.1.16 Document version: Rev. C Contents 1. Introduction... 3 1.1 Purpose and main features... 3 1.2. Requirements... 3 1.3.
GETTING STARTED WITH COVALENT BROWSER
 GETTING STARTED WITH COVALENT BROWSER Contents Getting Started with Covalent Browser... 1 What is the Browser Version?... 4 Logging in... 5 The URL address... 5 Home page... 5 Menu bar... 5 Go To button...
Avaya Network Configuration Manager User Guide
 Avaya Network Configuration Manager User Guide May 2004 Avaya Network Configuration Manager User Guide Copyright Avaya Inc. 2004 ALL RIGHTS RESERVED The products, specifications, and other technical information
Mikogo User Guide Mac Version
 Mikogo User Guide Mac Version Table of Contents Registration... 3 Download & Installation... 4 Start a Session... 5 Join a Session... 5 Features... 6 Participant List... 6 Switch Presenter... 7 Remote
State of Indiana Content Management System. Training Manual Version 2.0. Developed by
 State of Indiana Content Management System Training Manual Version 2.0 Developed by Table of Contents Getting Started... 4 Logging In... 5 RedDot Menu... 6 Selecting a Project... 7 Start Page... 8 Creating
General Product Questions... 3. Q. What is the Bell Personal Vault Vault?...4. Q. What is Bell Personal Vault Backup Manager?...4
 Frequently Asked Questions to be posted at: /faqs/ Table of Contents General Product Questions... 3 Q. What is the Bell Personal Vault Vault?...4 Q. What is Bell Personal Vault Backup Manager?...4 Q. What
 1. 2. 3. 2.1.1.1 Change your Password o 2.1.1.2 Match Request to your Company 2.1.2.1 License Status 2.1.2.2 Choose a License 2.1.2.3 Payment 2.1.3.1 Changing company data 2.1.3.2 Organization 2.1.3.3
Welcome to Collage (Draft v0.1)
") Welcome to Collage (Draft v0.1) Table of Contents Welcome to Collage (Draft v0.1)... 1 Table of Contents... 1 Overview... 2 What is Collage?... 3 Getting started... 4 Searching for Images in Collage...
Welcome to Collage (Draft v0.1) Table of Contents Welcome to Collage (Draft v0.1)... 1 Table of Contents... 1 Overview... 2 What is Collage?... 3 Getting started... 4 Searching for Images in Collage...
Welcome to MaxMobile. Introduction. System Requirements. MaxMobile 10.5 for Windows Mobile Pocket PC
 MaxMobile 10.5 for Windows Mobile Pocket PC Welcome to MaxMobile Introduction MaxMobile 10.5 for Windows Mobile Pocket PC provides you with a way to take your customer information on the road. You can
Single Sign On and Launch Pad User Guide
 Single Sign On and Launch Pad User Guide 7001 Weston Parkway, Suite 200 Cary, North Carolina 27513 2014 Railinc Corp. All Rights Reserved. Last Updated: March 2014 SSO/Launch Pad User Guide SSO/Launch
JOOMLA 2.5 MANUAL WEBSITEDESIGN.CO.ZA
 JOOMLA 2.5 MANUAL WEBSITEDESIGN.CO.ZA All information presented in the document has been acquired from http://docs.joomla.org to assist you with your website 1 JOOMLA 2.5 MANUAL WEBSITEDESIGN.CO.ZA BACK
Quick Start : i-fax User Guide
 Quick Start : i-fax User Guide Introduction Welcome to the i-fax System User Guide! This manual will help new users navigate i-fax System and perform common tasks. This manual is task-oriented. You will
End User Training Guide
 End User Training Guide October 2013 2005-2013 ExpenseWire LLC. All rights reserved. 1 expensewire.com Use of this user documentation is subject to the terms and conditions of the applicable End- User
WEBTrader. User Guide
 WEBTrader User Guide Table of Contents Creating a Demo account How to log in Main Areas of the WebTrader Market Watch Favorites Adding Favorites Spot Panes Charts Adding New Chart Using Charts Chart Options
Online Trading (E-Trade) USER GUIDE English. Version 1.0. Web Link: www.nbadsecurities.com/etrade
 USER GUIDE English. Version 1.0. Web Link: www.nbadsecurities.com/etrade") Online Trading (E-Trade) USER GUIDE English Version 1.0 Web Link: www.nbadsecurities.com/etrade 1 Table of Contents Introduction... 3 Purpose of This Document... 3 Target Audience... 3 Logging on to Your
Online Trading (E-Trade) USER GUIDE English Version 1.0 Web Link: www.nbadsecurities.com/etrade 1 Table of Contents Introduction... 3 Purpose of This Document... 3 Target Audience... 3 Logging on to Your
VMware vcenter Operations Manager Administration Guide
 VMware vcenter Operations Manager Administration Guide Custom User Interface vcenter Operations Manager 5.6 This document supports the version of each product listed and supports all subsequent versions
HowTo. Planning table online
 HowTo Project: Description: Planning table online Installation Version: 1.0 Date: 04.09.2008 Short description: With this document you will get information how to install the online planning table on your
WebSphere Business Monitor V7.0 Business space dashboards
 Copyright IBM Corporation 2010 All rights reserved IBM WEBSPHERE BUSINESS MONITOR 7.0 LAB EXERCISE WebSphere Business Monitor V7.0 What this exercise is about... 2 Lab requirements... 2 What you should
The United States Office Of Personnel Management eopf System Administrator Training Manual for eopf Version 4.0.
 The United States Office Of Personnel Management eopf System Administrator Training Manual for eopf Version 4.0. Copyright 1994-2007 by Northrop Grumman. All rights reserved. Northrop Grumman, the Northrop
AT&T ONLINE FAX USER GUIDE
 AT&T ONLINE FAX USER GUIDE Welcome to AT&T Website Solutions SM We are focused on providing you the very best service including all the tools necessary to establish and maintain your Online Fax service.
Payco, Inc. Evolution and Employee Portal. Payco Services, Inc.., 2013. 1 Home
 Payco, Inc. Evolution and Employee Portal Payco Services, Inc.., 2013 1 Table of Contents Payco Services, Inc.., 2013 Table of Contents Installing Evolution... 4 Commonly Used Buttons... 5 Employee Information...
TM SysAid Chat Guide Document Updated: 10 November 2009
 SysAidTM Chat Guide Document Updated: 10 November 2009 Introduction 2 Quick Access to SysAid Chat 3 Enable / Disable the SysAid Chat from the End User Portal. 4 Edit the Chat Settings 5 Chat Automatic
Quick Start Guide to. ArcGISSM. Online
 Quick Start Guide to ArcGISSM Online ArcGIS Online Quick Start Guide ArcGIS SM Online is a cloud-based mapping platform for organizations. Users get access to dynamic, authoritative content to create,
User s Guide For Department of Facility Services
 Doc s File Server User s Guide For Department of Facility Services For Ver : 7.2.88.1020 Rev : 1_05-27-2011 Created by : Elliott Jeyaseelan 2 Table of Contents SERVER LOGIN & AUTHENTICATION REQUIREMENTS
USC Aiken CMS Manual. A manual on using the basic functions of the dotcms system. Office of Marketing and Community Relations-USC Aiken
 USC Aiken CMS Manual A manual on using the basic functions of the dotcms system Office of Marketing and Community Relations-USC Aiken Table Of Contents Introduction/How to Use Manual... 2 Logging In...
MultiSite Manager. User Guide
 MultiSite Manager User Guide Contents 1. Getting Started... 2 Opening the MultiSite Manager... 2 Navigating MultiSite Manager... 2 2. The All Sites tabs... 3 All Sites... 3 Reports... 4 Licenses... 5 3.
Learning Management System (LMS) Guide for Administrators
 Guide for Administrators") Learning Management System (LMS) Guide for Administrators www.corelearningonline.com Contents Core Learning Online LMS Guide for Administrators Overview...2 Section 1: Administrator Permissions...3 Assigning
Learning Management System (LMS) Guide for Administrators www.corelearningonline.com Contents Core Learning Online LMS Guide for Administrators Overview...2 Section 1: Administrator Permissions...3 Assigning
PowerSchool Parent Portal Administrator Guide. PowerSchool 7.x Student Information System
 PowerSchool 7.x Student Information System Released March 2012 Document Owner: Documentation Services This edition applies to Release 7.1.3 of the PowerSchool software and to all subsequent releases and
NYS OCFS CMS Contractor Manual
 NYS OCFS CMS Contractor Manual C O N T E N T S CHAPTER 1... 1-1 Chapter 1: Introduction to the Contract Management System... 1-2 CHAPTER 2... 2-1 Accessing the Contract Management System... 2-2 Shortcuts
OneSourceFax Customer Guide
 OneSourceFax Customer Guide General Information Billing: OneSourceFax Plan Features Monthly Charge OneSourceFax 150 Unlimited Faxes to Numbers in your Local Calling Area $12.95 150 Nationwide Long Distance
Mikogo User Guide Windows Version
 Mikogo User Guide Windows Version Table of Contents Registration 3 Download & Installation 4 Start a Session 4 Join a Session 5 Features 6 Participant List 6 Switch Presenter 7 Remote Control 7 Whiteboard
Table of Contents INTRODUCTION... 2 HOME PAGE... 3. Announcements... 7. Personalize & Change Password... 8. Reminders... 10 SERVICE CATALOG...
 Table of Contents INTRODUCTION... 2 HOME PAGE... 3 Announcements... 7 Personalize & Change Password... 8 Reminders... 10 SERVICE CATALOG... 12 Raising a Service Request... 12 Edit the Service Request...
PassKey Manager. Schoolwires Centricity
 Schoolwires Centricity Table of Contents Introduction... 1 What Provides... 1 What Does Not Provide... 1 Definitions for... 1 Manage PassKeys in Site Manager... 2 Access... 2 Create PassKeys... 2 Create
EPO Online Filing. Advanced tutorials. Version 5.00 (Release 5.00) Copyright European Patent Office All rights reserved
 Copyright European Patent Office All rights reserved") EPO Online Filing Advanced tutorials Version 5.00 (Release 5.00) Copyright European Patent Office All rights reserved Last Update: 16/11/2009 Document Version: OLF5_TutorialAdv_EN_091116.doc Table of contents
EPO Online Filing Advanced tutorials Version 5.00 (Release 5.00) Copyright European Patent Office All rights reserved Last Update: 16/11/2009 Document Version: OLF5_TutorialAdv_EN_091116.doc Table of contents
www.shopmainstreet.com 855-733-SHOP (7467) [email protected]
 help@shopmainstreet.com") www.shopmainstreet.com 855-733-SHOP (7467) [email protected] TABLE OF CONTENTS Getting Started...3 Business Address & Categories.......... 4 Payment Method...6 Merchant Profile...7 Everyday Offers...9
www.shopmainstreet.com 855-733-SHOP (7467) [email protected] TABLE OF CONTENTS Getting Started...3 Business Address & Categories.......... 4 Payment Method...6 Merchant Profile...7 Everyday Offers...9
WatchDox for Windows User Guide. Version 3.9.0
 Version 3.9.0 Notice Confidentiality This document contains confidential material that is proprietary WatchDox. The information and ideas herein may not be disclosed to any unauthorized individuals or
USER GUIDE. Unit 2: Synergy. Chapter 2: Using Schoolwires Synergy
 USER GUIDE Unit 2: Synergy Chapter 2: Using Schoolwires Synergy Schoolwires Synergy & Assist Version 2.0 TABLE OF CONTENTS Introductions... 1 Audience... 1 Objectives... 1 Before You Begin... 1 Getting
Set up Delegate & Travelers
 Set up Delegate & Travelers Setting Up a Delegate and Assigning New Travelers Learn how to Login to Banner Travel and Expense Management Application and to set up yourself as a Delegate and assign Travelers
EMC Smarts Network Configuration Manager
 EMC Smarts Network Configuration Manager Version 9.4.1 Advisors User Guide P/N 302-002-279 REV 01 Copyright 2013-2015 EMC Corporation. All rights reserved. Published in the USA. Published October, 2015
MyCaseInfo Attorney Administration Users Guide. A Best Case Bankruptcy Add-on Tool
 MyCaseInfo Attorney Administration Users Guide A Best Case Bankruptcy Add-on Tool 2 Table of Contents I. ATTORNEY ADMINISTRATION OVERVIEW... 4 II. HELP CENTER... 5 Documents Web Tutorials Online Seminar
Verizon Wireless Family Locator 4.9 User Guide Contents
 Verizon Wireless Family Locator.9 User Guide Contents Let s get started... Sign up, then activate phones!... Use the Activation Wizard... Set Up an Android... Set Up a BlackBerry... 6 Set Up a Feature...
Tips & Tricks SSL VPN - Windows
 Tips & Tricks SSL VPN - Windows What is SSL VPN 2 Signing into Meredith s SSL VPN 2 Using Webapp 4 Using File Servers 5 Downloading Files from the Server 5 Uploading Files to the Server 6 Network Connect
Teacher References archived classes and resources
 Archived Classes At the end of each school year, the past year s academic classes are archived, meaning they re still kept in finalsite, but are put in an inactive state and are not accessible by students.