Document Software Version 2.0 1
|
|
|
- Russell Burke
- 10 years ago
- Views:
Transcription
1

2 Warnings and General Guidelines... 2 Product Handling and Transportation... 3 Product Description... 4 Power Switch Function... 5 Startup Instructions... 5 Installation... 5 General Use... 5 Operations and programming... 6 Equipment Operation... 6 Interface... 6 Home screen... 7 Main settings screen:... 8 Profile Selection Screen:... 9 Steps to creating a new pour-over profile: Preferences screen: Advanced preferences screen: File operations screen: System info screen: Dispensing Operations Dispensing Flow Control Maintenance General service/maintenance safety guidelines Regular cleaning procedures Cleaning the spray head Cleaning the exterior of the equipment Water Filtration/Softener Preventative maintenance Basic diagnostics Module not heating Tap not dispensing Button only dispenses in manual

3 This machine is for professional use only, and should be installed in locations where its use and maintenance is restricted to trained personnel. Children are forbidden to operate or play with the machine. The equipment must be installed to comply with the applicable federal, state, or local electrical and plumbing code. The installation also must comply with the manufacturer s instructions, and must be performed by qualified and authorized personnel. Ensure that the specifications on the equipment name plate correspond to the main electrical supply to which you will connect the Modbar. Safe electrical operation of this device will be achieved only when the connection to the power outlet has been completed correctly and in observance of all local, national, and international electrical codes and safety regulations, and particularly by grounding the unit. Make sure grounding has been done properly as it represents a fundamental safety requirement. Ensure qualified personnel check such connection. Improper use or installation of Modbar equipment can cause product damage and or serious injury to end user. Modbar will not be held responsible for any damages or injuries occurring if equipment has been misused, installed improperly, or tampered with. When you receive your equipment, thoroughly inspect the packaging and equipment for any signs of damage. If damage is suspected, please contact Modbar support before attempting to install or operate the equipment. Modbar equipment is not intended for use outdoors or in an unconditioned environment where freezing temperatures may occur. Do not leave machine unattended during brewing processes. Do not use wet cloth to clean screens or switches on unit(s) as they are not waterproof. Repairs to Modbar equipment should be made only by trained technicians and use only Modbar approved parts. Incorrect installation may cause injury and/or damages to people, animals, or objects, for which the manufacturer shall not be held responsible. We do not recommend using adapters, multiple plugs and/or extension cords. If you cannot avoid using them, make sure that they are exclusively of the kind which conforms to local, national, and international electrical codes and safety regulations, being careful not to exceed the power and current ratings indicated on such adapters and extension cords. This device must be used exclusively for the functions which it has been designed and built for. Any other application is inappropriate and dangerous. The manufacturer shall not be responsible for any damages caused by improper and/or irrational use. 2

4 Using any electrical device requires that certain fundamental rules be observed. Do not touch the device with wet or humid hands and feet. Do not use the device while having no shoes on your feet. Do not use extension cords in bath or shower rooms. Do not unplug the device from the power outlet by pulling on the power supply cable. Do not expose the device to atmospheric agents (rain, sun, etc.). Do not allow children or untrained people to use this device. Do not clean the control panel with a wet cloth since it is not watertight. Before performing any maintenance and/or cleaning operations, turn the main power switch to the OFF position and disconnect the machine from the power source by unplugging the cord or by switching off the relative circuit breaker. For any cleaning operations, follow exclusively the instructions contained in the manual. If the equipment is operating in a faulty manner or breaks down, turn the main power switch to the off position, disconnect the machine from the power source (as described in the previous paragraph), and close the water supply valve. Do not attempt to repair it. Contact a qualified and authorized professional to perform any repair. Any repairs must be performed exclusively by the manufacturer or by an authorized technician using only original parts. Noncompliance with the above could compromise the safe operation of the equipment. Do not obstruct air intake and exhaust grilles. The machine s power supply cable must not be replaced by users. In the event that the power supply cable is damaged, shut off the equipment, disconnect the machine from the power supply by switching off the relative circuit breaker, and close the water supply valve. To replace the power supply cord, contact a qualified professional. CAUTION Risk of fire and electric shock. Replace only with manufacturer s cord set, part No. E ATTENTION - Risque d'incendie et de choc électrique. Remplacez-la uniquement avec le cordon de série du fabricant, partie n E Modbar equipment is shipped in factory approved packaging. Upon receipt of equipment, thoroughly inspect the packaging for damage. If damage is suspected, contact Modbar immediately. In the event that equipment needs to be returned to Modbar, or shipped for any reason, it should be shipped in the factory approved packaging. If you have discarded the packaging, please contact Modbar for replacements. The equipment must be properly drained prior to shipment, to avoid damage from freezing. If you have questions about how to properly drain equipment for shipping, please contact Modbar support. Do not store the equipment in places where temperature may cause water in the boilers to freeze. 3

5 4
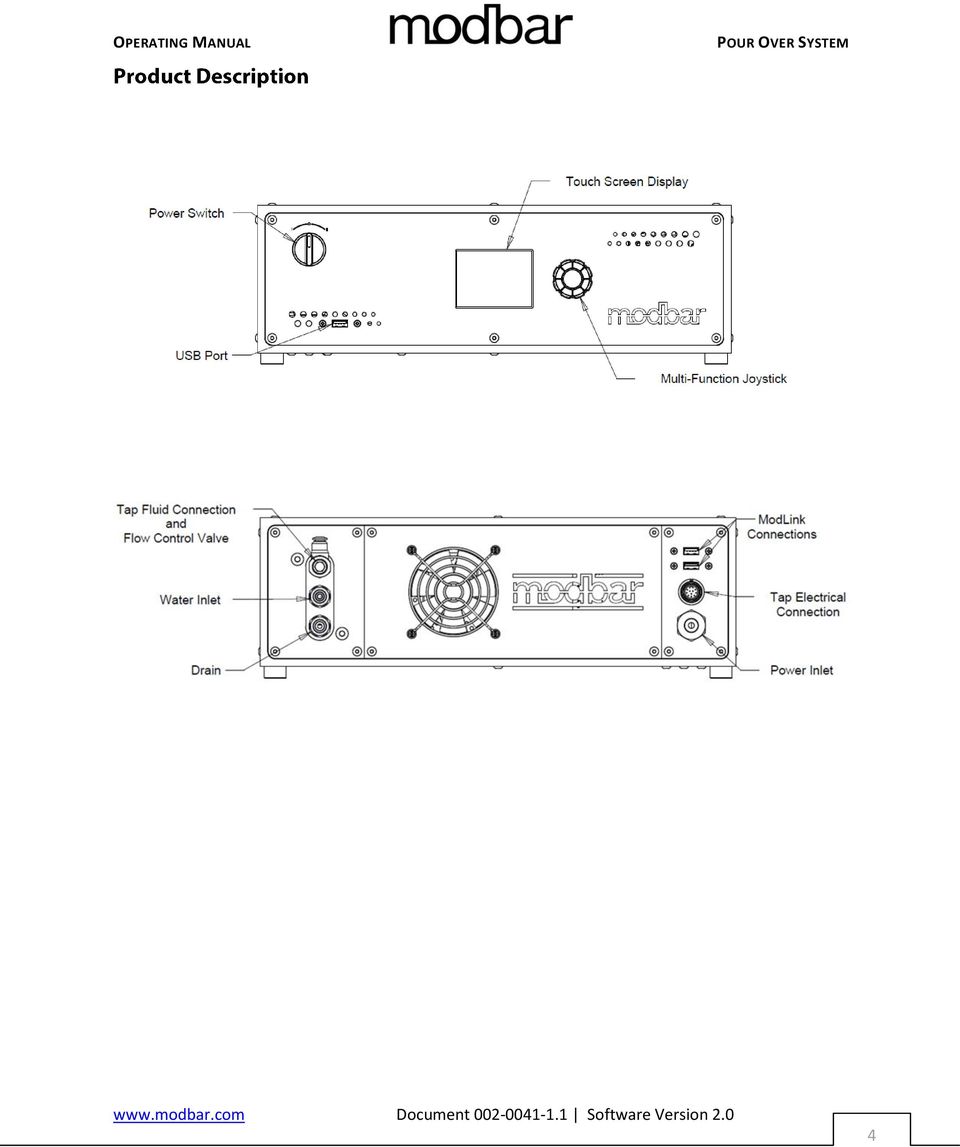

6 The three-position power switch on the Modbar module has three separate functions, as illustrated in the following image. 0 - Off I - Standby Mode II - Operating Mode In this position, the module is in the off position. In this position, the module is in standby mode. When in standby mode, all operations functions as normal, but no power is applied to the heating elements. This mode is used for priming the system upon installation, and can also be useful for some diagnostic applications. In this position, the module is in operating mode. Power is applied to the heating elements, and all functions operate as normal. Upon installation, the Modbar module must be primed before use. This is accomplished by the following steps. Ensure that filtered water is supplied to the module. Ensure that the power switch is in the off position. Ensure that the module power cable is plugged into its appropriate power source. Turn the power switch counter-clockwise to place it in standby mode. Actuate the tap handle in manual mode, as described in the Dispensing Operations section of this guide. After water begins to pour from the tap (This may take some time on a new system) allow water to flow for at least 30 seconds to ensure that the system is primed. At this point, it is safe to turn the switch clockwise into operating mode. During general use, the module is already primed, and it is not necessary to prime the system. To start the module, follow these steps: Ensure that filtered water is supplied to the module. From the off position, turn the power switch clockwise to place it into operating mode. At this point, the elements will begin to heat. When each heat zone reaches set temperature, the module is ready for use. 5

7 The touch screen is used for selecting and displaying data. The multi-function encoder is used for editing data. The functions of the encoder are shown below: 6

8 Ready indicator: This square icon indicates whether the machine is at temperature to dispense. When first starting the machine, the indicator will remain red in color until all temperature zones are heated to set temperature. Once all zones are at temperature, the icon will turn green, indicating that we are now ready to dispense. Temperature set value: This is the current set-point value in degrees for the active heat zone. The temperature shown here is only for reference. To change the temperature set value, refer to the section of this manual labelled Steps to creating a new pour-over profile. Heat zone: In automatic temperature mode, this button has no function. In manual temperature mode, pressing this button cycles through the 2 heat zones on the pour-over system: Inlet Boiler and Outlet Boiler. (Refer to Advanced preferences screen page 2) Settings button: This button navigates to the main settings screen. Machine name & status: Displays the current name and status of the module & tap. Pour-over profile button assignments: Displays which pour-over program (profile) is selected for each of the dispensing switches (L = Left switch, R = Right switch). Time read-out: Displays the current time from the start of the dispensing readout. Volume read-out: Displays real-time fluid volume information during a dispensing cycle. 7

9 home -> main settings Home screen: This button navigates back to the home screen / dashboard. Profile menu: This button navigates to the profile selection menu. Preferences: This button navigates to the system preferences page. File operations: This button navigates to the file operations page. System info: This button displays the system version and software information. 8

10 home -> main settings -> profile selection Back button: Wherever you see the back button it will take you to the previous screen. Manual profile: This is a factory set profile. When assigned to either of the dispensing switches (or both) the switch(s) will operate in a simple on/off (manual) dispensing mode. For this profile only temperature edit is allowed. In this example the Manual Profile is assigned to both the Left and Right switches, indicated by a teal blue L and R next to the profile name Inactive profile: This is a profile that has profile information but is not active, indicated by a purple/grey filled circle. Empty profile: These are empty profile slots and may not be used until profiling data is entered. Empty profiles are indicated by a non-filled circle. Assign Left: Pressing this button will assign the current cursor selected profile to the Left dispensing switch. (You cannot assign an empty profile) Assign Right: Pressing this button will assign the current cursor selected profile to the Right dispensing switch. Profile edit: Press the profile edit button to edit the profile data for the current cursor selected profile. Cursor select: The dotted outline cursor select indicates which profile is selected on screen. You may use the rotary encoder or up/down function of the joystick to navigate the profiles list. Pressing the pushbutton will activate a selected profile. 9

11 1. Select an empty profile (indicated by a non-filled circle) and choose edit. 2. Touch next to the Profile Name field and enter a name for the profile. Use the joystick and encoder wheel to navigate the alpha-numeric character set. 3. Set the heat zone temperatures if desired. To change the set temperature, simply touch the temperature value on the screen and the value will be highlighted. Rotate the encoder left or right to change the value in 1-degree increments. Press the joystick up or down to change the temperature in 1/10 degree increments. Press the center button on the joystick to save the change. In manual temperature mode, both boiler heat zones will be displayed. Set the Inlet Boiler Temperature (Inlet-T) and Outlet Boiler Temperatures (Outlet-T) if so desired. In automatic temperature mode, only one temperature will be displayed. Set the brew temperature (Temp) if so desired. (Refer to Advanced preferences screen page 2 for temperature mode information) 4. Choose Save & Exit 5. The newly created profile will now appear in the Profile Select menu 10

12 6. Assign the profile to one of the dispensing switches by selecting the new profile with the cursor and choosing Assign Left or Assign Right. In this example the profile is assigned to the Left dispensing switch, indicated by the teal colored L. 7. Now that new profile has been created in the menu and assigned to the switch you may perform the profile that will be stored. 8. Prepare the coffee and device you wish to use for this profile. 9. Rinse the paper or filter basket to warm the device and pour-over tap plumbing. 10. Press and hold the dispensing switch that you assigned to the profile (left or right) for approximately 3 seconds until the button begins to flash. (Flashing indicates you are in recording mode) 11. Momentarily pressing the dispensing switch will stop the flow of water, pressing again will resume the flow, all the while volumetric and time based data are being stored in the profile memory. Also note that the total volume of water dispensed is displayed on the module display in real time. This value may be used to assist in performing your brew cycle. 12. When you are finished with the brewing cycle momentarily press the dispensing switch to stop the flow of water (the switch will still flash). Then hold the dispensing switch down until both the left and right dispensing switches flash. This indicates the program has been stored to the selected profile. 13. To repeat this brew cycle simply momentarily press the dispensing switch. The switch s light will now pulse to indicate that it is playing back the profile (contrary to recording). If you wish to overwrite the existing profile you may do so by repeating steps 10 through 12. Optionally, you can now lock the profile to prevent accidental reprogramming by entering the profile edit menu and then selecting the prevent programming checkbox. For a demonstration of this procedure and other video tutorials, please visit: 11

13 home -> main settings -> preferences Temperature units: This button sets the system s temperature units, in: Celsius (C), Fahrenheit (F) or Kelvin (K) Volume units: This button sets the system s volume units to: Milliliters (ml) or Fluid Ounces (oz.) Advanced: This button navigates to the advanced preference settings page. 12

14 home -> main settings -> preferences -> advanced Machine name: This is a descriptive name for the module, touch the name to highlight the field, use the encoder wheel and push-button to rename the machine if desired. Factory reset: This will return all of the system settings to their original factory values. ATTENTION! You will lose all stored pressure profiles and other settings. A confirmation screen is presented to confirm the operation of Factory Reset. Line volume: This value is used to accommodate for water in the line between the pour-over module and the pour-over tap. The line volume setting may also be used to correct discrepancies between volume of water yielded during a pour-over pour and volume displayed on the module. Lighting: This button navigates to the lighting settings screen. Advance preferences page 2: This button will navigate to page 2 of the advanced preferences screen. Save & Exit: You guessed it! This button saves the settings changes and exits the current screen. 13

15 home -> main settings -> preferences -> advanced Temperature mode button: This button will toggle between Automatic and Manual temperature modes. Automatic temperature mode is calibrated at the factory to deliver the best temperature performance using a single temperature setting. Manual temperature mode gives you independent control over the set points of each temperature zone from the home screen: Inlet boiler and outlet boiler. At the home screen, pressing the Heat Zone button will allow you to cycle through each zone and set its temperature independently. 14

16 Lighting screen: home -> main settings -> preferences -> advanced -> lighting LCD backlight: Use this slider to control the brightness of the touch screen display. RGB: Using the RGB color sliders you can create any color of the rainbow for the module s internal LED lighting. 15

17 home -> main settings -> file operations Load settings: This button will navigate to the load settings screen. Save settings: This button will navigate to the save settings screen. Update software: This button will navigate to the update software screen. 16


18 home -> main settings -> file operations -> load settings File list: This area displays all of the settings files that are currently saved to the USB drive. Cursor select: The dotted outline cursor select indicates which file is selected on screen. You may use the rotary encoder or up/down function of the joystick to navigate the file list. File select button: Pressing select will load the currently selected settings file. This includes profiles and all other user accessible settings and preferences. Note: existing profiles will be overwritten. 17

19 home -> main settings -> file operations -> save settings File list: This area displays all of the settings files that are currently saved to the USB drive. New file: This option allows the creation of a new settings file. To create a new settings file, highlight the < new file > option, and select it by either pressing the center encoder button or the file select button on the touch screen. Cursor select: The dotted outline cursor select indicates which file is selected on screen. You may use the rotary encoder or up/down function of the joystick to navigate the file list. File select button: Pressing select will save the current settings to the selected file. This includes profiles and all other user accessible settings and preferences. 18

20 home -> main settings -> file operations -> save settings -> new file File name: This is a descriptive name for the settings file. Touch the name to highlight the field, use the encoder wheel and push-button to rename the file if desired. 19

21 home -> main settings -> file operations -> update software File list: This area displays all of the software update files that are currently saved to the USB drive. Cursor select: The dotted outline cursor select indicates which file is selected on screen. You may use the rotary encoder or up/down function of the joystick to navigate the file list. File select button: Pressing select will install the selected software update on the system. The software update process is complete when the machine reboots, displaying the Modbar logo on the module touch screen display. 20
22 home -> main settings -> system info Software Version: This field displays the current software version loaded on the machine. Display board info: This field displays the hardware version and serial number of the display board. Main board info: This field displays the hardware version and serial number of the main board. Build info: This field displays the software build of each of the circuit boards in the system. 21
 To begin dispensing, press the desired button. Dispensing can be cancelled at any time by pressing the button again. 22")
23 Dispensing can be actuated by pressing either Button 1 or Button 2. The buttons can be set to dispense a pre-recorded program, or to dispense manually. (See Profile Selection Screen) To begin dispensing, press the desired button. Dispensing can be cancelled at any time by pressing the button again. 22
24 Flow rate can be adjusted via the flow control valve located on the tap port on the back of the module. To restrict flow, turn the flow control nut on the end of the valve clockwise. To increase flow, turn the flow control nut counter-clockwise. Note: If machine has been in use, this valve may be hot! 23
25 Before performing any maintenance and/or cleaning operations, turn the main power switch to the OFF position and disconnect the machine from the power source by unplugging the cord or by switching off the relative circuit breaker. For any cleaning operations, follow exclusively the instructions contained in the manual. Always use care when performing maintenance, as the equipment may be hot. We recommend allowing the equipment to fully cool before performing any maintenance procedures. Regular cleaning procedures are important to both the longevity of the equipment and to the quality of the beverages which it produces. Following these procedures will help ensure long life and great tasting beverages. Put 2 or 3 teaspoons of detergent powder for coffee machines in about 1/2 a liter of water inside a heat-resistant container and boil. Dip spray head(s) in the boiled solution and leave them fully submerged for about 30 minutes. Rinse thoroughly with clean water and run hot water through the dispenser several times with the tips in place. The exterior of the taps and modules should be periodically cleaned. We recommend wiping the equipment with a damp microfiber cloth. Do not use cleaning solutions containing strong acids or caustic solutions. Take care not to use excessive liquid when cleaning around electronics, so as not to damage them. It is very important that the media for your water filtration is replaced on a regular basis, in accordance with the manufacturer s recommendations. Please refer to the documentation for your filtration system for proper operating and cleaning instructions. 24
26 It is important that periodic maintenance be performed to keep your equipment in peak operating condition. Maintenance should be carried out by a qualified technician. Depending on usage, schedules may vary, but we recommend the following: Every 3-4 Months - Check brew temperature - Check water quality - Check all switches for proper operation - Inspect water dispensing solenoid valve - Inspect plumbing for leaks or clogs Every Year - Inspect electrical wiring - Inspect boiler safety switches - Remove and clean/inspect boiler temperature probes Every 3 Years - Check the interior of the boilers, and if necessary rinse out with a proper cleaning product allowed for food and beverage appliances Water quality is very important to the proper function of your Modbar equipment. Improper water filtration can lead to serious problems with both your equipment and the quality of the coffee produced. At a minimum, the following water standards need to be met. Total Dissolved Solids (All Equipment) Total Hardness (Steam Only) Total Hardness (Espresso and Pour-Over) ppm Less than 3 gpg Less than 5 gpg ph (All Equipment) For more detailed information about water quality, please visit 25
27 Verify that the power switch is turned clockwise to the operating mode position and not counterclockwise to the standby mode position. The pour-over module features two safety reset thermostat controlled switches, one on each boiler. If a boiler does not heat it may be due to the activation of one of these switches, which is triggered by excess temperature and signifies abnormal operation and possibly failed components. The safety switches mentioned are all internal to the pour-over module and are not user re-settable. If you believe a safety switch has been activated, the module or tap may require service by an authorized technician. Please contact Modbar for additional support and information. Verify that the water supply to the module is turned on. If you are still having trouble dispensing, verify that the flow control valve on the tap connection is not all of the way closed. Verify that you have a program assigned to the button in question. Check this in the profile screen, and verify that the profile is assigned left or right. 26
MAP COFFEE MIA CAPSULE COFFEE MACHINE INSTRUCTION MANUAL MODEL: CM4725. Read this manual thoroughly before using and save it for future reference
 MAP COFFEE MIA CAPSULE COFFEE MACHINE INSTRUCTION MANUAL MODEL: CM4725 Read this manual thoroughly before using and save it for future reference Purchase MAP capsules at Harvey Norman stores nationwide
B150 Series Commercial Brewer. Direct Plumb Kit
 B150 Series Commercial Brewer Welcome Keurig Authorized Dealer! Direct Plumb Kit This manual provides: Installation of the Direct Plumb Kit (DPK) that allows you to connect your customer s B150 brewer
CARING FOR YOUR WATER HEATER
 http://waterheatertimer.org/troubleshoot-rheem-tankless-water-heater.html Water Heater Inspections CARING FOR YOUR WATER HEATER Venting System (Direct Vent Only) The venting system should be inspected
Important Safeguards
 Table of Contents Important Safeguards...2 Product Layout...3 Preparing for Use...4 Air-conditioning without installation...4 Air-conditioning with installation...5 Control Panel...6 Operating from the
Name of Equipment Silver King Model SKMCD1P/C1. This equipment chapter is to be inserted in the appropriate section of the Equipment Manual.
 Name of Equipment Silver King Model SKMCD1P/C1 This equipment chapter is to be inserted in the appropriate section of the Equipment Manual. Manufactured exclusively for McDonald s By Silver King Refrigeration,
PLEASE READ ALL INSTRUCTIONS BEFORE USE AND SAVE A COPY FOR FUTURE REFERENCE!
 PLEASE READ ALL INSTRUCTIONS BEFORE USE AND SAVE A COPY FOR FUTURE REFERENCE! 1. Read all instructions carefully before using the machine. 2. Do not touch hot surfaces. Use handles or knobs. The lid and
USER S MANUAL HSC-24A
 AIRREX AIR CONDITIONER USER S MANUAL HSC-24A Thank you for purchasing an AIRREX AIR CONDITIONER. BEFORE operation please read this user s manual carefully. Keep this manual readily available. It is ESSENTIAL
Electric Kettle. Model: SK-1717 INSTRUCTIONS MANUAL
 Electric Kettle Model: SK-1717 INSTRUCTIONS MANUAL Thank you for your purchase. Please read this Instruction Manual thoroughly before use and keep in a safe place for future reference. READ ALL INSTRUCTIONS
Instruction Manual. Image of SP-3015 & SP-3815. Important Safeguards. Automatic Dispensing Hot Water Pot with Reboil Function
 Important Safeguards READ ALL INSTRUCTIONS BEFORE USE. Instruction Manual Automatic Dispensing Hot Water Pot with Reboil Function Image of SP-3015 & SP-3815 SP-3015: 3.0L SP-3815: 3.8L SP-3017: 3.0L (Stainless
OASIS-PLUS 120V READ ALL INSTRUCTIONS BEFORE OPERATING READ ALL INSTRUCTIONS BEFORE OPERATING OZONE IS A POWERFUL OXIDIZER AND MUST BE USED WITH CARE
 OASIS-PLUS 120V INFORMATION & OPERATING INSTRUCTIONS READ ALL INSTRUCTIONS BEFORE OPERATING READ ALL INSTRUCTIONS BEFORE OPERATING OZONE IS A POWERFUL OXIDIZER AND MUST BE USED WITH CARE 56041852 WARNING:
Please read this owner s Manual carefully before operating the unit. - Cooling - Heating - Dehumidifying - Fan
 Please read this owner s Manual carefully before operating the unit. - Cooling - Heating - Dehumidifying - Fan TABLE OF CONTENTS INTRODUCTION 2 IMPORTANT SAFEGUARDS...2 PACKAGE CONTAINS..2 NAMES OF PARTS.3
Do not store or use gasoline or other flammable vapors and liquids in the vicinity of this or any other appliance.
 Condensing Water Heater Operation Manual Model NPE-180A/ 210A/ 240A NPE-180S/ 210S/ 240S * Lead Free Keep this manual near this water heater for future reference whenever maintenance or service is required.
Please read and keep these instructions. Run water through your machine before first use
 47070 Rev 1 24/3/05 2:23 PM Page 1 12 cup filter coffee maker Please read and keep these instructions getting the best from your new coffee maker Safety first Caution must be used when handling hot water,
Ceiling Mount Air Handler Manual
 www.surna.com 303.993.5271 Ceiling Mount Air Handler Manual Models: CMAH12, CMAH18, CMAH24, CMAH30, CMAH36, CMAH48, CMAH60 Revised: September 2014 Table of Contents Warranty Information 4 Limited Warranty
Use and Care Manual. Model CPA12KH AIR CONDITIONER
 Use and Care Manual Model CPA12KH AIR CONDITIONER Introduction Thank you for choosing this air conditioner to provide you and your family with all of the "Home Comfort" requirements for your home, cottage
Ambiente Quick Reference Manual
 Ambiente Quick Reference Manual Schaerer USA Corporation 2900 Orange Avenue, Suite 102 Signal Hill, CA 90755 Phone (888) 989-3004 Fax (562) 989-3075 TABLE OF CONTENTS Machine Overview Page 1 Button Panel
Air Conditioner Water Heater - A Product of HotSpot Energy LLC
 Air Conditioner Water Heater - A Product of HotSpot Energy LLC PLEASE READ THIS BEFORE YOU INSTALL THE UNIT 1. This air conditioner must be installed and/or repaired by a qualified technician. If you perform
Nexus FS Point of Use Installation Guide
 Nexus FS Point of Use Installation Guide Nexus FS POU Install Guide:12152011:rev-12152011 Technical Specifications Dimensions: Height: 43.5 Width: 11.65 Depth: 15 Weight: 34.39 LBS Electrical Specs: Voltage:
Tassimo The Art of the Perfect Cup
 USER INSTRUCTIONS Tassimo The Art of the Perfect Cup Thank you for purchasing the Tassimo hot beverage machine. With Tassimo, you can now enjoy your favourite hot beverage any time. Rich filter coffee,
2 YEAR WARRANTY S7200PAU USE & CARE MANUAL ADVANCED CERAMIC TECHNOLOGY. To register your product go to www.remington-products.com.
 USE & CARE MANUAL PLEASE READ PRIOR TO USE To register your product go to www.remington-products.com.au ADVANCED CERAMIC TECHNOLOGY 2 YEAR WARRANTY S7200PAU 1 IMPORTANT SAFEGUARDS Warning: When the straightener
Programmable Thermostat MODEL 3312026.XXX With Dehumidify 3312024.XXX With Out Dehumidify
 Comfort Control Center 2 Thermostat Operating Instructions Programmable Thermostat MODEL 3312026.XXX With Dehumidify 3312024.XXX With Out Dehumidify TABLE OF CONTENTS About your new thermostat Features...2
IMPORTANT SAFETY INSTRUCTIONS WARNING READ AND SAVE THESE OPERATING AND SAFETY INSTRUCTIONS BEFORE USING THIS HEATER.
 THERMAWAVE CERAMIC HEATER Model HZ-850 Series Model HZ-860 Series IMPORTANT SAFETY INSTRUCTIONS WARNING READ AND SAVE THESE OPERATING AND SAFETY INSTRUCTIONS BEFORE USING THIS HEATER. Warning Failure to
Water Tec of Tucson Water Systems
 Water Tec of Tucson Water Systems Water Filter Owner s Manual Water Tec of Tucson www.water-tec.com 4601 S. 3 RD Avenue Tucson, AZ 85714 (520) 790-1512 Fax (520) 745-0549 1 MAIN COMPONENTS Your water treatment
ExStik TM ph Waterproof Meters
 User Guide ExStik TM ph Waterproof Meters Models PH100 & PH110 Patent Pending ExStik TM Description Front Panel Controls 1. Battery compartment cap 2. LCD Display 3. MODE / HOLD button 4. CAL / RECALL
English. Symbols used to mark instructions...3. Congratulations...5 Getting the best results...5. Warnings...6 Operating Procedure...
 2 Contents Components Attachments Guidance Installation Operation Maintenance Service Technical Troubleshooting Symbols used to mark instructions...3 Included Attachments...4 Congratulations...5 Getting
MICA HEATER INSTRUCTION MANUAL Model No: UHM-786 230V 50Hz 2200W
 MICA HEATER INSTRUCTION MANUAL Model No: UHM-786 230V 50Hz 2200W Safety Precautions To reduce the risk of personal injury or damage to property, basic safety precautions must be observed including the
the Soft Top Breville Customer Service Center www.breville.com Instruction Book - Livret d instructions
 Breville Customer Service Center the Soft Top Instruction Book - Livret d instructions US Customers Mail: Breville USA 19400 S. Western Ave Torrance CA CA 90501-1119 Phone: Customer Service 1 (866) BREVILLE
Geocontrol PRO INSTALLATION AND OPERATION MANUAL. Rev. 1 03/18/04 Part # 11150263
 Geocontrol PRO INSTALLATION AND OPERATION MANUAL Rev. 1 03/18/04 Part # 11150263 TABLE OF CONTENTS Chapter 1: System Description... p. 05 Function and Theory...p. 05 Chapter 2: System Installation... p.
Instruction Manual. Window Wiper AFW900. (Read carefully before use)
") Instruction Manual Window Wiper AFW900 (Read carefully before use) When using electrical appliances, basic precautions should always be followed, including the fact READ ALL INSTRUCTIONS IN THIS MANUAL
Instruction Manual Window Wiper AFW900 (Read carefully before use) When using electrical appliances, basic precautions should always be followed, including the fact READ ALL INSTRUCTIONS IN THIS MANUAL
www.morphyrichards.co.uk
 43922 rev2:x 06/01/2010 15:06 Page 1 Upon registration with Morphy Richards (UK & ROI only) Register online for your 2 year guarantee. See back of this instruction book for details. (UK and Ireland customers
Use & Care. of your Iron. All about the TA B L E O F C O N T E N T S. USA and Canada 1-888-845-7330
 All about the Use & Care of your Iron Important Safeguards... 2 Iron Safety Instructions... 3 Parts and Features...4 TA B L E O F C O N T E N T S Using Your Iron...6 Cleaning and Maintenance... 8 Warranty...9
Portable Air Conditioner
 Portable Air Conditioner Owner's Manual Model:3 in 1 12,000 Btu/h Series 3 Please read this owner s manual carefully before operation and retain it for future reference. CONTENTS 1. SUMMARY...1 2. PORTABLE
Heat Pump. Quick Start Guide Models: 035, 055, 075, 090, 115, 110, 120, 121, 135, 155, 156, & 175
 Heat Pump Quick Start Guide Models: 035, 055, 075, 090, 115, 110, 120, 121, 135, 155, 156, & 175 For product manuals and further installation / operation procedures visit www.aquacal.com Important Read
PC1131 Electric Air Compressor
 Senco Products Inc. 8485 Broadwell Road Cincinnati, Ohio 45244 PC1131 Electric Air Compressor Operating Instructions 2006 by Senco Products, Inc. Warnings for the safe use of this tool are included in
Quick Start Turning on the Tablet PC for the First Time
 User s Manual DL46 Getting Started Congratulations on your purchase of a Tablet PC. The Tablet PC is a fully functional PC with built-in LAN, and wireless connectivity. With your Tablet PC you will be
Deluxe Bottle Warmer
 Deluxe Bottle Warmer IMPORTANT SAFEGUARDS This product is for household use only. When using electrical appliances, basic safety precautions should always be followed including the following: Read all
 2 (. 3 4 5 . -,.. -,. 3. : 1 2 3 > 4, :!! 1,, 17 Lt MAX 2 3 4,, > 5.,,, 6 :, :1)! 2)! 7,, 1, :,. 2,, Bottom of steam generator 7 8 9 10 11 12 automatically and this phenomenon will continue for
TABLE OF CONTENTS QUICK START... 1 DIAGRAM OF THE DIGITAL PHOTO FRAME... 2 KEYPAD BUTTON FUNCTIONS... 3 REMOTE CONTROL FUNCTIONS..
 TABLE OF CONTENTS QUICK START........ 1 DIAGRAM OF THE DIGITAL PHOTO FRAME... 2 KEYPAD BUTTON FUNCTIONS..... 3 REMOTE CONTROL FUNCTIONS..4 DIGITAL PHOTO FRAME NAVIGATION........5 OSD MENU FUNCTIONS..6
ENGLISH INSTRUCTION & INSTALLATION MANUAL DUCTLESS MINI SPLIT AIR CONDITIONING SYSTEMS
 ENGLISH INSTRUCTION & INSTALLATION MANUAL DUCTLESS MINI SPLIT AIR CONDITIONING SYSTEMS Céliera Corporation. All rights reserved. Unauthorized duplication, reproduction prohibited. CONTENTS SAFETY PRECAUTIONS...
Owner s manual Keurig K-Cup K10 MINI Plus Brewer
 Owner s manual Keurig K-Cup K10 MINI Plus Brewer Important Safeguards Safe Operation & Use When using electrical appliances, basic safety precautions should be followed, including the following: 1. Read
FASCINATION 700 HVLP TANNING PRO SYSTEM USER MANUAL
 FASCINATION 700 HVLP TANNING PRO SYSTEM USER MANUAL Congratulations on choosing the Fascination 700 HVLP Tanning Pro System! Your system includes the following items: 1 Fascination 700 HVLP Tanning Pro
Operating Instructions Split System Air Conditioner
 Operating Instructions Split System Air Conditioner Model No. Indoor Unit Type Indoor Unit Type Nominal Capacity 26 36 F2 Low Silhouette Ducted S-26PF2U6 S-36PF2U6 Connectable outdoor unit lineup This
IMPORTANT SAFETY RULES TO FOLLOW
 WARNING FLOOR & CARPET CLEANER Any piece of equipment can be dangerous if not operated properly. YOU are responsible for the safe operation of this equipment. The operator must carefully read and follow
Dehumidifier Users manual. For Models: DH45S DH65S
 Dehumidifier Users manual For Models: DH45S DH65S 950-0062-revD Jan. 9 2007 FORWARD The appearance of the units that you purchase might be slightly different from the ones described in the Manual, but
Conical Burr Coffee Grinder. Operations Manual
 Conical Burr Coffee Grinder Operations Manual Skilled in the art of grinding Operations manuals are available in the following languages at www.baratza.com English.pdf French.pdf Spanish.pdf German.pdf
USER INSTRUCTIONS FOR GET PORTABLE 12k BTU AIR CONDITIONER MODEL No. GPACU12HR
 USER INSTRUCTIONS FOR GET PORTABLE 12k BTU AIR CONDITIONER MODEL No. GPACU12HR CONTENTS Introduction Safety Notes Identification of parts Installation instructions Operation instructions Maintenance Troubleshooting
36G22, 36G23, 36G24 & 36G52 36J22, 36J23, 36J24 & 36J52 DSI and HSI Single Stage Combination Gas Valve
 Operator: Save these instructions for future use! FAILURE TO READ AND FOLLOW ALL INSTRUCTIONS CAREFULLY BEFORE INSTALLING OR OPERATING THIS CONTROL COULD CAUSE PERSONAL INJURY AND/OR PROPERTY DAMAGE. DESCRIPTION
Ultrasonic support removal tank
 Ultrasonic support removal tank User guide and safety manual See inside for use and safety information. The Ultrasonic support removal tank automatically removes PLA support material from a printed ABS
Contents. Introduction
 TION Contents Introduction...1 Basics...2 Main Menu Structure...3 Time Schedule Menu...4 Settings Menu...5 Reports Menu...6 Date / Time Adjustment Menu...7 Introduction TION is an advanced control device
AN500T, AN1000, AN1000T, AN1500, AN1500T AN2000, AN2000T
 Product Instruction Manual Accona AN500T, AN1000, AN1000T, AN1500, AN1500T AN2000, AN2000T Panel heater v16.5/5 Version 3.2 Jan 2015 Contents 1. Important safety points 2. Installation 2.1. Wall mounting
PC1130 Electric Air Compressor
 Senco Products Inc. 8485 Broadwell Road Cincinnati, Ohio 45244 PC1130 Electric Air Compressor Operating Instructions 2006 by Senco Products, Inc. Warnings for the safe use of this tool are included in
OPTIONAL SLENDER REMOTE CONTROL
 DAIKIN ROOM AIR CONDITIONER Operation Manual OPTIONAL SLENDER REMOTE CONTROL BRC944A2B READ BEFORE OPERATION Safety Precautions...2 Names of Functions of Parts...4 Preparation before Operation...5 OPERATION
OPERATION GUIDE. IMPORTANT NOTE: For more information see our instructional video online at www.brewexpress.com. model no.
 OPERATION GUIDE model no. BE-104 & BE-110 IMPORTANT NOTE: For more information see our instructional video online at www.brewexpress.com. Do not return this product to place of purchase without authorization.
Single Zone LCD Thermostat Operating Instructions
 Fan Cool Furnace *Heat Pump or Heat Strip On/Off F Single Zone LCD Thermostat Operating Instructions MODEL 3313192.XXX Cool/Furnace 3313193.XXX Cool/Furnace/Heat Pump 3313194.XXX Cool/Furnace/Heat Strip
INDEX GENERAL OPERATING RULES TECHNICAL DATA
 14 GENERAL OPERATING RULES Carefully read the instruction manual and warranty limitations. The machine must be connected to a grounded power outlet. The machine must be kept clean by frequently washing
Hot Water Central. Electric Hot Water Dispenser. Instruction Manual AAP-325W. www.aromaco.com
 Hot Water Central Electric Hot Water Dispenser Instruction Manual www.aromaco.com AAP-325W With the Aroma Hot Water Central, hot water is just a button away. Boil up to 3 liters of water in just 30 minutes,
Tankless Water Heater
 Tankless Water Heater USER S INFORMATION MANUAL Models WGRTNG199 / WGRTLP199 WGRTCNG199 / WGRTCLP199 NOTICE: Westinghouse reserves the right to make product changes or updates without notice and will not
INSTALLER S & OWNER S MANUAL
 INSTALLER S & OWNER S MANUAL HVAC INSTALLER: PLEASE LEAVE MANUAL FOR HOMEOWNER DEH 3000 DEH 3000 Part No. 4028539 Dehumidifier & Ventilation System Controller P.O. Box 8680 Madison, WI 53708 TOLL-FREE
Portable Air Conditioner. OWNER S MANUAL Read these instructions before use. Model: MM14CHCSCS
 Portable Air Conditioner OWNER S MANUAL Read these instructions before use Model: MM14CHCSCS Voltage rating: 120V~60Hz Power rating : 1400W(Cooling) Power rating : 1350W(Heating) Customer Support : 1-800-474-21477
Due to continual improvement in design or otherwise, the product you purchase may differ slightly from the illustrations in this book.
 Kambrook 461 Plummer Street, Port Melbourne 3207, Australia Customer Service Line (free call) 1800 800 634 Customer Service Fax 1800 621 337 Kambrook New Zealand, Private Bag 94411, Greenmount, Auckland,
User manual DMX CONTROL 512. Table of contents
 User manual DMX CONTROL 512 Table of contents 1. SAFETY INSTRUCTIONS... 4 2. OPERATING DETERMINATIONS... 4 3.OVERVIEW... 6 3.1.REAR PANEL CONNECTIONS... 6 3.2.FRONT PANEL... 6 4.MENU... 6 4.1.CHOOSE FIXTURES...
OPL BASIC. Dosing System for Professional Laundry machines. Contents
 OPL BASIC Dosing System for Professional Laundry machines Contents 1 Getting Started. Page 2 2 Installation. Page 4 3 Set Up & Operation. Page 8 4 Maintenance & Accessories. Page 10 5 Troubleshooting Page
GSM Door Phone System
 GSM Door Phone System System Installation, Setting and Operation Manual User Manual (263-S V1) Please read this user manual completely before operating this system and keep it in a safe place for future
Instruction manual for Firstline FCS12000CH
 Instruction manual for Firstline FCS12000CH Contents Introduction... 2 Safety Awareness... 3 Safety Awareness... 4 Name of Parts... 5 Name of Parts... 6 Remote Controller Preparation... 7 Operation of
HEAT PUMP PROGRAMMABLE THERMOSTAT
 HEAT PUMP PROGRAMMABLE THERMOSTAT SA PM 3 COOL TEMP Form 44014-01 r010408 Model 43168 Owners Manual 1 Congratulations! Heat Pump Programmable Thermostat Model 43168 THERMOSTAT CONTROLS Switches & Buttons...15
Portable Air Conditioner. OWNER S MANUAL Read these instructions before use. Model: MN12CES / MN10CESWW
 Portable Air Conditioner OWNER S MANUAL Read these instructions before use 8 Model: MN12CES / MN10CESWW Voltage rating: 120V~60Hz Power rating : 1100W (MN12CES) Power rating : 900W (MN10CESWW) Customer
Operating Instructions Air Conditioner
 P07-T10130 Operating Instructions Air Conditioner Indoor Unit CS-F24DD1E5 CS-F28DD1E5 CS-F34DD1E5 CS-F43DD1E5 CS-F50DD1E5 Outdoor Unit Inverter Model (HBE5 Series) CU-YL24HBE5 CU-YL28HBE5 CU-YL34HBE5 CU-YL43HBE5
WARMER or COOKER/WARMER
 WARMER or COOKER/WARMER Use & Care Manual FW-S500 WARMER 3138365 Conforms to: UL STD: 197 3138365 Conforms to: NSF STD.4 FW-S600 COOKER / WARMER Model Description Size Voltage Hz Wattage FW-S500 Electric
12 cup programmable coffee maker
 12 cup programmable coffee maker USER GUIDE Now that you have purchased a Kitchen Living product you can rest assured in the knowledge that as well as your 2 year parts and labor warranty you have the
ACW200C / ACW200CH. Innovative AutoDrain Technology. Owner s Manual Portable Air Conditioner with Heat
 Owner s Manual Portable Air Conditioner with Heat ACW200C / ACW200CH It is important that you read these instructions before using your new purchase and we strongly recommend that you keep them in a safe
Portable Air Conditioner. OWNER S MANUAL Read these instructions before use. Model: MM14CCS. Voltage rating: 115V~60Hz Power rating : 1400W
 Portable Air Conditioner OWNER S MANUAL Read these instructions before use Model: MM14CCS Customer Support : 1-800-474-2147 Voltage rating: 115V~60Hz Power rating : 1400W For product inquiries or support
SERVICE MANUAL. Room Air Conditioner Multi Split Wall-Mounted Type Indoor. FSAI-Pro-91AE2 FSAI-Pro-121AE2 FSAIF-Pro-181AE2
 SERVICE MANUAL Room Air Conditioner Multi Split Wall-Mounted Type Indoor FSAI-Pro-91AE2 FSAI-Pro-121AE2 FSAIF-Pro-181AE2 NOTE: Before servicing the unit, please read this at first. Always contact with
USER INSTRUCTIONS FOR 10 LITRE PORTABLE DEHUMIDIFIER MODEL NO. DHMD102
 USER INSTRUCTIONS FOR 10 LITRE PORTABLE DEHUMIDIFIER MODEL NO. DHMD102 THANK YOU FOR CHOOSING YOUR NEW DEHUMIDIFIER. BEFORE USING THE UNIT READ THESE INSTRUCTIONS FULLY AND RETAIN THEM FOR FUTURE REFERENCE
Digital Photo Picture Frame. Operation Manual
 Digital Photo Picture Frame Operation Manual 20070309 CONGRATULATIONS on your purchase of a Polaroid 7 LCD Digital Photo Picture Frame. Please read carefully and follow all warnings and instructions in
Recommended with NESCAFÉ GOLD Barista Style. Experience the full range today.* NESCAFÉ GOLD BLEND
 Recommended with NESCAFÉ GOLD Barista Style. Experience the full range today.* TABLE OF CONTENTS SAFETY PRECAUTIONS...2-3 MACHINE OVERVIEW... 4 FIRST TIME USE & INITIAL RINSING...5 REFILLING WITH COFFEE...
OWNER'S MANUAL R-410A Duct Free Split System Air Conditioner and Heat Pump
 R-410A Duct Free Split System Air Conditioner and Heat Pump Product Family: DFS4(A/H)-System, DFC4(A/H)3-Outdoor, DFF4(A/H)H-Indoor Please read the operating instructions and safety precautions carefully
Service manual. Website: www.andico.com.au CAUTION - BEFORE SERVICING THE UNIT, READ THE SAFETY - PRECAUTIONS IN THIS MANUAL.
 Website: www.andico.com.au Service manual CAUTION - BEFORE SERVICING THE UNIT, READ THE SAFETY - PRECAUTIONS IN THIS MANUAL. - ONLY FOR AUTHORISED SERVICE PERSONNEL. MODELS: MPK1-09CR-QB8 MPK1-12ER-QB6
SERVICE MANUAL FOR 6535 SERIES TWO TON HIGH EFFICIENCY PACKAGED HEAT PUMPS
 SERVICE MANUAL FOR 6535 SERIES TWO TON HIGH EFFICIENCY PACKAGED HEAT PUMPS TABLE OF CONTENTS 1. Warnings...2 2. Accessibility Of Appliance...3 3. Unit Dimensions And Specifications...3 4. Unit Specifications
FUTURE CALL PICTURE CARE PHONE MODEL: FC-1007 USER MANUAL
 FUTURE CALL PICTURE CARE PHONE MODEL: FC-1007 USER MANUAL Please follow instructions for repairing if any otherwise do not alter or repair any parts of device except specified. IMPORTANT SAFETY INSTRUCTIONS
SPLIT WALL MOUNTED TYPE AIR CONDITIONERS OWNER'S MANUAL
 SPLIT WALL MOUNTED TYPE AIR CONDITIONERS OWNER'S MANUAL Thank you for choosing our Air Conditioner. Please read this OWNER'S MANUAL carefully prior to use and keep it for further reference. CONTENTS Contents
DUCT TYPE AIR CONDITIONER
 OPERATING MANUAL OPERATING MANUAL BEDIENUNGSANLEITUNG MODE D EMPLOI MANUAL DE FUNCIONAMIENTO MANUALE DI ISTRUZIONI ΕΓΧΕΙΡΙ ΙΟ ΛΕΙΤΟΥΡΓΙΑΣ MANUAL DE INSTRUÇÕES AIR CONDITIONER DUCT TYPE English Deutsch
PROFESSIONAL SILK CERAMIC HAIR DRYER USE & CARE MANUAL PLEASE READ PRIOR TO USE 2400 WATTS SILK CERAMIC GRILLE 5 YEAR WARRANTY AC9096AU
 PROFESSIONAL USE & CARE MANUAL PLEASE READ PRIOR TO USE SILK CERAMIC HAIR DRYER 2400 WATTS SILK CERAMIC GRILLE 5 YEAR WARRANTY AC9096AU IMPORTANT SAFEGUARDS Warning: When the hair dryer is used in a bathroom,
~RITA NP-2388F NP-3888F. www.naritausa.com
 ~RITA HIGH ALTITUDES CAUTION(5,OOO ft and higher) This appliance may not shut-off property or from boiled to keep warm position when used at high altitudes; Use EXTREME caution! If unit does not shut off
Troubleshooting Salt Generators
 Troubleshooting Salt Generators NOTE Turn off power to unit prior to attempting service or repair. Problems and Corrective Action Problem Possible Cause Corrective Action Low or no chlorine. Low stabilizer
BELLMAN CXE-25/27 INSTRUCTIONS
 IMPORTANT SAFEGUARDS BELLMAN CXE-25/27 INSTRUCTIONS 1. READ ALL INSTRUCTIONS. 2. WARNING: SCALDING MAY OCCUR IF TOP IS NOT TIGHTENED DOWN COMPLETELY OR IF TOP IS TAKEN OFF BEFORE MACHINE IS COOL AND ALL
StorTrends 3400 Hardware Guide for Onsite Support
 StorTrends 3400 Hardware Guide for Onsite Support MAN-3400-SS 11/21/2012 Copyright 1985-2012 American Megatrends, Inc. All rights reserved. American Megatrends, Inc. 5555 Oakbrook Parkway, Building 200
Business Audio System: Music & Messaging MP3 Player. by Grace Digital Audio. User Guide. Model No. GDI-USBM10
 Business Audio System: Music & Messaging MP3 Player by Grace Digital Audio User Guide Model No. GDI-USBM10 User Guide Contents Introduction 2 Safety & General Use Information 2 Features 3 Set Up & Operation
Cambridge Electric Infared Fireplace User Manual
 EL1239 WW12993 Cambridge Electric Infared Fireplace User Manual SAVE THESE INSTRUCTIONS FOR FUTURE REFERENCE. If you are assembling this unit for someone else, give this manual to him or her to read and
RIGOL. Quick Guide. DS1000CA Series Oscilloscope. Aug. 2011. RIGOL Technologies, Inc.
 Quick Guide DS1000CA Series Oscilloscope Aug. 2011 Technologies, Inc. Guaranty and Declaration Copyright 2011 Technologies, Inc. All Rights Reserved. Trademark Information is a registered trademark of
Call us toll free at: 1-800-GEVALIA (1-800-438-2542)
") LIMITED WARRANTY: This appliance shall be free from defects in materials and workmanship under normal home use for a period of one year from the date of receipt. During that period, defects will be repaired
LIMITED WARRANTY: This appliance shall be free from defects in materials and workmanship under normal home use for a period of one year from the date of receipt. During that period, defects will be repaired
HYUNDAI Fingercam. User Manual
 HYUNDAI Fingercam User Manual 7 1. Structure Detail I Characters of Product 8 It has small contour design, which does UV spray finishing for the whole body. Itisvery fashionable and wearable and matches
Troubleshooting Guide for Dispenser Model #900172
 Troubleshooting Guide for Dispenser Model #900172 Q. The cold water is room temperature. A. There is a cold water thermostat control mounted to the back of the majority of our appliances. Simply unplug
User s Operation Manual - contents
 User s Operation Manual - contents Safety Instructions Personal Safety Warranty Operating Instructions Maintenance Troubleshooting & Error Code Guide Safety Related Sysmbols 3 Warning Safety Precautions
OWNER S MANUAL VMH 09/12/18/27/36 InverterFlex
 OWNER S MANUAL VMH 09/12/18/27/36 InverterFlex Version C Single, Dual, Tri or Quad Zone Ductless Mini-Split System Heat Controller, Inc. 1900 Wellworth Ave. Jackson, MI 49203 (517)787-2100 www.heatcontroller.com
NewAir AC-10100E / AC-10100H Portable Air Conditioner Owner s Manual PLEASE READ AND SAVE THESE INSTRUCTIONS
 NewAir AC-10100E / AC-10100H Portable Air Conditioner Owner s Manual PLEASE READ AND SAVE THESE INSTRUCTIONS ELECTRICAL SAFETY This appliance is for indoor use only. Always turn off the unit and unplug
How To Use An Easypad On A Pc Or Macbook Or Ipad (For Pc)
") User Guide Congratulations on your new EasyPad 1000. Please follow the instructions in this manual carefully. Statement: If the final version of this product has any differences from the description of
User Guide Congratulations on your new EasyPad 1000. Please follow the instructions in this manual carefully. Statement: If the final version of this product has any differences from the description of
Quick Start Guide See Inside for Use and Safety Information
 3 rd Generation Personal 3D Printer Quick Start Guide See Inside for Use and Safety Information The USB Mass Storage Device Contains the User Guide and Quick Start Guide in other Languages Congratulations
Espresso/Cappuccino Maker MODELS MEXKITB, MEX1B
 READ AND SAVE THESE INSTRUCTIONS WARNING: A risk of fire and electrical shock exists in all electrical appliances and may cause personal injury or death. Please follow all safety instructions. Espresso/Cappuccino
Portable Air Conditioner. OWNER S MANUAL Read these instructions before use. Model: MF08CESWW. Voltage rating: 115V~60Hz Power rating : 800W
 MODE ALARM Portable Air Conditioner OWNER S MANUAL Read these instructions before use 8 Model: MF08CESWW Voltage rating: 115V~60Hz Power rating : 800W Customer Support : 1-800-474-2147 For product inquiries
Hot Water Urns. all models. Helpline. v3.0
 Hot Water Urns all models Helpline 01384 573999 instructions.indd 1 v3.0 02/06/2014 14:50 IMPORTANT INFORMATION - RETAIN FOR FUTURE USE When using any electrical appliance, basic safety precautions should