Technical Data. wedi Fundo Shower System Primo
|
|
|
- Marcus Carpenter
- 10 years ago
- Views:
Transcription
1 Technical Data wedi Fundo Shower System Primo

2 Technical Data wedi Fundo Shower System-Primo Overview There are several ways to build and make a shower tileable. There is only one fully equipped and performance tested product that allows you to build a waterproof shower system from floor to framework to ceiling and ready to tile - the wedi Fundo Primo Shower System. Competitive products offer partial, untested or uncertified system parts. However, the wedi Fundo Shower System is a one-step approach, modular waterproofing shower system that has no risk and is designed for safe and easy installation. It combines the values of traditional shower floor installation methods such as cement/sand mix-based methods (flexible/robust), while adding the technology benefits of a next generation system such as internal waterproofness, light weight and light processing. The wedi Fundo Primo Shower Floor unit includes base and drain. The components of the full wedi Fundo Shower system can also include wedi waterproof building panels, waterproof wedi curbs and all the other elements needed to build a 100% waterproof and directly tileable shower using one manufacturer, all under one warranty. The Fundo Primo is a single, solid piece, shower floor base that is pre-sloped and 100% internally waterproof. It can be cut to size before its standard drain is connected to a Schedule 40 PVC or ABS pipe on site. When connecting to comparable 2 cast iron or copper pipes, order the appropriate drain sealing gaskets wedi offers for such cases. The Fundo Primo offers a heavy duty traffic shower, allowing for small or large format tiles, yet heavy live and dead loads. It is robust enough to allow contractors to work and walk over the surface prior to tiling without compromising waterproofing as is the case with shower products featuring only thin and topical waterproofing products. It is customizable and represents the evolution in shower systems. It includes 100% internal waterproofness, insulation value, exact ¼ /ft slope factory-made into the surface, no drying times, no inconsistencies, lightweight handling, and easy and clean cutting. Unlike traditional cement mix/pan liner shower floors, Fundo Primo will not absorb any water which is, in wedi s case, fully guided to the surface drain outlet. Thus eliminating all risk for mold, mildew or staining of attached materials due to the damages typically caused by unmanaged water flow and control including clogged weepholes, cracks in pvc or copper liners or breaches in liquid applied membranes in cases where movement or physical stress overpower the thin application of these topical waterproofing approaches. General Product Description wedi Fundo shower bases are a reliable, cost-efficient solution for constructing waterproof flush (recessed) or over-subfloor shower floors. These ready-to-tile floor units are simple to install. Even when incorporating small mosaic tiles, wedi

3 Technical Data: Fundo Shower System-Primo Fundo Primo has a heavy duty point load capability, a coating that allows for it and a ready-made slope for perfect setting. Used in conjunction with wedi Building Panels on walls, Fundo shower bases offer an alternative to traditional installation methods no more pre-sloping base liners, mud beds, waterproofing membranes and the weep hole drain. Fundo also eliminates the risks related to conventional installations such as base liner cracks, clogged weep holes and mold growth in mud beds. These prefabricated shower bases reduce installation time from 2-3 days to 30 minutes. All wedi shower substrate installations are ready-to-tile the same day. All wedi shower bases can be easily cut to size or extended with pre-sloped extension panels to fit custom showers and accommodate offset drain locations. Fundo Primo bases can be cut to size with hand saws or skill saws. Round, curvy cuts can be made with a hand saw or jig saw. wedi shower accessories are also available to complete the entire shower system wedi building panels to create a waterproof transition into the walls, pre-sloped solid foam curbs, ADA compliant sloped shower ramps, recessed niches and corner seats and, of course, wedi joint sealant to seal and fuse all components together. wedi has also conveniently packaged a ready-to-install complete shower kit. The wedi Fundo Shower Kit includes your choice of floor bases, wedi Building Panels that will cover up to (3) 80 walls, a drain assembly, a full foam curb and wedi Joint Sealant and Fasteners to make a complete installation ready for tile. Fundo Shower System Components Featuring the Fundo Primo Shower Base Shower Floor Base-Fundo Primo Square and rectangular floor bases with center and/or off-center drains. Custom made sizes available. Drains Standard kits in pressure fit ABS, glue-in or Brass are available. These Oatey No Calk drains (pressure fit ) are included with every Fundo Primo unit. Drain Covers Standard 4 x 4 square, brushed stainless steel drain covers and frames plus a PVC made height extension collar are included with every Fundo Primo unit. Colored or round drain covers are available separately. Fundo Primo Shower Floor System Product Features Composed of a closed cell extruded polystyrene foam core with a glass mesh wrap and cement based, water resistant coating Lightweight, easy to handle, cut & install 100% waterproof as tested using ASTM D4068 according to compliance requirements with ANSI % waterproof system assembly performance as tested acc. to PS ( ICC PMG 1189) Mold and mildew proof; inorganic in material and composition Thermally insulating Helps reduce stresses from substrates and cracks in tile and grout Great for tile bonding using any cement-based thinset mortar including standard thinset or modified thinset mortars building panel transition against separation movement. Light on existing building structure/floor Easily recessed into subfloors due to low height of bases Any tile size, type or format can be installed over wedi Fundo Primo 3

4 Technical Data: Fundo Shower System-Primo Fundo Shower Kit The wedi Fundo Shower Kit is a conveniently packaged ready-to-install complete shower. It includes your choice of floor base, wedi Building Panels that will cover up to (3) 80 walls, a drain assembly, a full foam curb and wedi Joint Sealant and Fasteners to make a complete installation ready for tile. Safe transportation in one box, easy estimating of product quantities needed. Screws and Washers Niche (Optional) Fundo Shower Base standard shapes and dimensions* Square, center drain 36 x 36 incl. drain 48 x 48 incl. drain Rectangular, center drain 36 x 48 incl. drain 36 x 60 incl. drain 48 x 60 incl. drain 48 x 72 incl. drain 36 x 72 incl. drain Rectangular, offset drain 36 x 72 incl. drain * Customized Fundo Shower Base shapes and sizes are also available. Contact a certified wedi installer for more information. Curb Extension Collar Strainer Collar Strainer Building Panel Triangle Seat (optional) Fundo Shower Base 4
 Fundo Shower Base standard shapes and dimensions* Square, center drain 36 x 36 incl. drain 48 x 48 incl. drain Rectangular, center drain 36 x 48 incl.")
5 Technical Data: Fundo Shower System-Primo Legend A Caulking nut B Rubber caulking gasket C Drain body D wedi sealant E Rubber gasket F Fiber gasket G Locking nut Optionally a glue drain can be obtained from wedi. For a cement glue connection, the floor pipe must be cut 2 1/4 inches below the surface of the subfloor. Optionally a brass drain can be obtained from wedi. The installation proceeds as shown for the standard PVC drain provided with each Fundo base. A B C D E F G 2 Tool & Material Bucket Notch Trowel Drill with Thinset Mixer Utility Knife Straight Edge / T Square 5 ft or longer Speed Square Caulk Gun Handsaw Flat Head Screwdriver Screw gun Solid Putty Knife Paper Towels Level Circular Saw Saw Horse Tape Measure Permanent Marker Extension Cord for Powertools Shop vacuum cleaner 5

6 Technical Data: Fundo Shower System-Primo Installation instructions wedi Fundo onto wooden or concrete floors Before Installation Have 2 x 2 x 4 s installed between the studs (horizontally / on floor) to back the bottom of wedi wall assembly Subfloor is sound, level and meets deflection criteria. Wooden or concrete structural substrates are dry and loadbearing. Steel framing is loadbearing. Floor joists not to exceed 16 o.c. Subfloor panels 3 /4 T&G EGP or equivalent. 2 PVC or ABS pipe is cut flush/ even with subfloor top surface and is in the correct position 2 drain assembly below floor is stabilized and will not sink under water load. Only wedi products (Building Panels, Curb, Joint Sealant and Fasteners) are used for wedi Fundo Shower System assembly. Installer has received instructions from wedi technical sales staff or is informed about proper installation methods as described wedi shower bases can be cut to size using a skilsaw. The Z notch channel must be remade and cleaned from sawdust or contaminants. 1 Cut the 2 pipe flush to the surface of the floor construction. Make sure that the cut out fits to the Fundo panel drain. Cut out a 5 diameter hole around the 2 pipe to allow the wedi drain to be inserted into the subfloor. The drain and trap have to be sturdily fastened to the sub floor. 2 Assemble the drain unit following the instruction drawing. 3 Set up a continuous 1 /4 bead of wedi sealant along the top side of the wedi Fundos valve groove profile. 4 Drop the drain body firmly into the sealant. 5 Turn the Fundo pan upside down and apply the rubber and the fiber gasket. 6 Tighten the gaskets firmly to the pans steel ring using the locking nut. Make sure the drain body is still safely received in the valve-bead of sealant. 6

7 Technical Data: Fundo Shower System-Primo 7 Skim coat the thinset ANSI and comb through with a 1 /4 x 1 /4 notched trowel. Channels pointing to the entrance. 8 Trowel the thinset on the rear side of the Fundo again using a 1 /4 x 1 /4 notched trowel. 9 Press the Fundo firmly into the thinset bed, ensuring that the installation is level and void free. Apply some weight equally and for at least 30 minutes (thinset bags). 10 Set up the rubber caulking gasket (with the bevelled side up) around the 2 pipe in the subfloor. The rubber gasket must be flush with the upper end of the 2 ABS or PVC pipe. Do Not use any Lubricants. 11 Tighten (squeeze) the rubber caulking gasket firmly with the caulking nut (use a flat headed screwdriver) and finally insert the plastic frame and strainer on top (without adhesive). The frame and strainer will be held in a flexible grout joint. 12 Set up a continuous 1 /2 bead of wedi sealant along the pans channel on the outer perimeter and only in areas where you can immediately install a building panel into the fresh sealant. 13 You are ready to install the wedi panels around the Fundo, fixed and sealed in the Fundo channels bead of sealant. Fasten the panels directly to the studs using one wedi fastener per foot. One extra fastener is set in between seams of panels to create a flush transition. 14 Set up continuous 1 /2 beads of sealant between and in all seams to adjacent panels. Excessive sealeant is smoothed out using a putty knife. An addition al 1 /2 bead of sealant is set along the inside bottom joints connecting the wall panels and pan and spread flat over the joint. All fasteners are covered with sealant. 7

8 Technical Data: Fundo Shower System-Primo 15 wedi Niches are installed in a cut out in the wedi wall and attach with it s flange right into the center of 16 o.c. studs. wedi joint sealant is set along the connection of wall to niche Fasteners each side of the niche are set to create a flush transition to the wall panels. Another 1 /2 bead of wedi sealant is spread over fasteners and seams. 17 A continuous 1 /2 bead of sealant is set into the channel and along the vertical curb notch part. A 1 /2 bead of sealant is set against both wedi walls. A 1 /2 bed of thin set mortar is set on the floor. The tightly cut to fit curb is pressed into the connnection. 18 Weight is applied for 30 minutes and another 1 /2 bead of wedi sealant is spread along all curb joints. After Installation Using a 2 drain plug, the wedi pressure fit drain / sealing gasket is water tested prior to ceramic tile installation and prior to other full surface flood tests. All bottom perimeter joints, curb joints and vertical joints are covered with wedi Joint Sealant. Coverage should be continuously visible for at least 3 /4 to 1 on each side of the joint. No mastic adhesives are used to install ceramic tile in the wedi system. A high quality modified thinset mortar is recommended. Tiles smaller than 2 x 2 inches require epoxy grout. Exception are pebble stones or river rock stones where a modified cement bade grout can be used. Large format tile can be used on wedi Fundo bases. The tiles must be cut where the slope fields meet. When complete wedi shower system is installed with wedi joint sealant, a water flood test may be performed only 2 hours after final application of wedi joint sealant (application temperature must be ambient/ interior with normal relative humidity and temperatures above 40 F). Where wedi building panel or curb overs / caps are installed over horizontal surfaces (seats, curbs, tubdeck transitions) do not set any fasteners and do not allow the glass door installation to penetrate the wedi panel as it is your waterproofing. Make sure that doors are installed tight to contain water inside the shower. Make sure doors are installed to only load bearing reinforced framing. Where wedi buildig panel is installed over corners of a structure showing an angle other than 90 please miter the board edges to gain adhesion surface. Utilize a wedi sealing tape in addition to regular sealing for safety. 8

9 Technical Data: Fundo Shower System-Primo Legend A wedi Strainer B Strainer Collar C Optional Extension Collar A B C Insert Strainer Collar into pan hole (no glue / no screws). Caulk between part and tile to create a flexible grout joint. Extension Collar can be cut to height if part is needed. The caulk joint must not create a water barrier damming up the water draining through the thinset bed into the drain. Therefore the thinset layer must be continuous toward the drain. 9

10 Technical Data: Fundo Shower System-Primo Straight and Corner Extension Panels to Enlarge Fundo Primo Shower Bases To make complicated designs for shower floor extensions as quick, easy and safe as possible, wedi offers prefabricated and pre-sloped panels that connect to wedi Fundo bases. These extension panels come as a corner element that would extend around a corner of a shower base, and as a straight element to extend a side of a shower. The extension panels feature a slope of 1/4 /ft. and are pre-grooved to connect with the Fundo s channel groove and the adjoining extension panels to enlarge shower areas. Due to varying thickness of Fundo Primo Bases, a wedi Building Panel 1/4 or thicker may be required to bring the extension panel to a flush installation height, with a proper 2-notch connection wedi Fundo Corner Extension Panel Shower Base Extension wedi Fundo Corner Extension - Step by Step Installation Includes: 1 Pc. Fundo Corner Extension Corner or 1 Pc. Fundo Corner Extension Straight wedi Fundo Shower Base is installed around the center of the shower area A 1/2 bead of wedi Joint Sealant is continuously applied on the horizontal and vertical surface area of the Fundo Base channel As when installing the Fundo Base, apply a 1/2 bed of modified thinset mortar in the area where the wedi extension element will be installed. Make sure the mortar does not contaminate the wedi Joint Sealant. Here, a wedi corner extension is laid into the the thinset bed and the shiplap connection between extension and base is made with the beads of joint sealant acting as a waterproofing and adhesion promoter. The straight extension elements can be used to further continue creating your ready to tile, sloped shower floor in both directions of the corner. The installation procedure is identical with steps

11 Technical Data: Fundo Shower System-Primo The side connections between the corner extension and straight extension panel also offer a shiplap notch in wich wedi Joint Sealant is applied as described in step 2. The straight extension is now properly embedded in modified thinset mortar and tightly sealed and connected to the Fundo Base and the corner extension panel. Finally, a continuous 1/2 bead of wedi Joint Sealant is applied over all surface connection joints and spread over the joints using a putty knife. Weights are applied equally over the shower floor to promote a firmer bond with the thinset mortar on the floor and to enable you to continue working on the shower immediately. 11

12 Technical Data: Fundo Shower System-Primo General Limitations System must not be installed over uneven or non-load bearing substrates. System must not be exposed to temperatures over 165 F. Tiles smaller than 2 x 2 should be grouted with epoxy grout (with one exception being pebblestones). Do not install system over substrates subject to settlement and extreme movement. Two horizontal backing layers of 2 x 4 are recommended to guard the perimeter of wedi Fundo Primo and wedi building panel transition against separation movement. Interior use only. Storage Store dry and on flat surface. Do not expose to the elements. Disposal Upon removal with attached building materials, the product should be disposed of as construction waste in appropriate containers. Warranty Log on to www. wedicorp.com to learn more about wedi s limitedwarranty. MasterFormat 2004 Sections Section Tile Setting Materials and Accessories Section 10185: Shower Compartments Section 09300: Tile 12

13 Technical Data: Fundo Shower System-Primo National Building Code Compliances Compliance with current ICC Evaluation Service standards 13

14 Technical Data: Fundo Shower System-Primo General Technical Properties wedi Fundo Shower System Kit 14

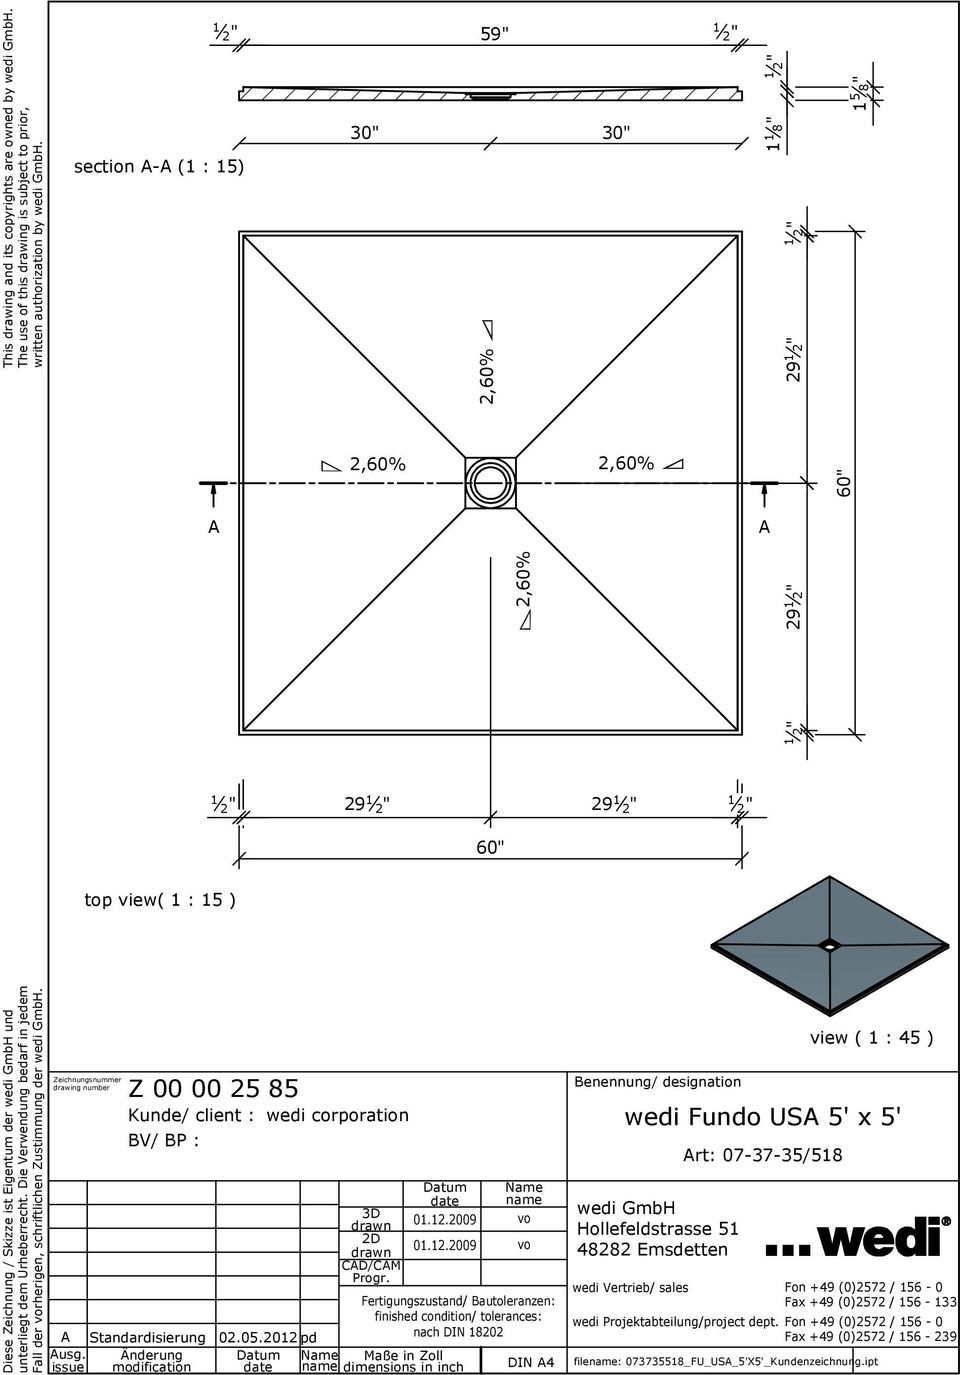
15 Technical Data: Fundo Shower System-Primo Product Order Information wedi Fundo Shower Kit Description Dimension Unit Item # wedi Fundo Shower Kit 36 x 36 center drain 1 pc /509 wedi Fundo Shower Kit 36 x 48 center drain 1 pc /516 wedi Fundo Shower Kit 48 x 48 center drain 1 pc /511 wedi Fundo Shower Kit 36 x 60 center drain 1 pc /510 wedi Fundo Shower Kit 36 x 72 center drain 1 pc /125 wedi Fundo Shower Kit 36 x 72 offset drain 1 pc /524 wedi Fundo Shower Kit 48 x 60 center drain 1 pc /512 wedi Fundo Shower Kit 48 x 72 center drain 1 pc /513 Wall height 80 1 wedi Fundo Pan wedi building Panels to cover up to (3) 80 walls 1 drain assembly 1 full foam curb wedi Joint Sealant fasteners Fundo Primo Square and Rectangular Floor Bases, Center Drain Description Dimensions Unit Item # Fundo Primo, square 36 x 36 incl. drain; 3 x 3 1 pc /507 Fundo Primo, square 48 x 48 incl. drain; 4 x 4 1 pc /505 Fundo Primo, square 60 x 60 incl. drain; 5 x 5 1 pc /518 Fundo Primo, square 72 x 72 incl. drain; 6 x 6 1 pc /524 Fundo Primo, rectangular 36 x 48 incl. drain; 3 x 4 1 pc /516 Fundo Primo, rectangular 36 x 60 incl. drain; 3 x 5 1 pc /506 Fundo Primo, rectangular 48 x 60 incl. drain; 4 x 5 1 pc /509 Fundo Primo, rectangular 48 x 72 incl. drain; 4 x 6 1 pc /508 Fundo Primo, rectangular 60 x 72 incl. drain; 5 x 6 1 pc /519 Fundo Primo, rectangular 48 x 84 incl. drain; 4 x 7 1 pc /522 Fundo Primo, rectangular 60 x 84 incl. drain; 5 x 7 1 pc /523 Fundo Primo, rectangular 36 x 72 incl. drain; 3 x 6 1 pc /525 Fundo Primo Rectangular Floor Base, Offset Drain Description Dimensions Unit Item # Fundo Primo, rectangular, offset drain 36 x 72 incl. drain; 3 x 6 1 pc /521 For tub replacement installations Technical Drawing Drain position for 36 x 72 15
 80 walls 1 drain assembly 1 full foam curb wedi Joint Sealant fasteners Fundo Primo Square and Rectangular")
16 Technical Data: Fundo Shower System-Primo Fundo Floor Bases Customized Products The customized products are between thick. Other thicknesses available upon request. You can freely select the position of the drain in your customized product. Your customized products can be square, rectangular or polygonal. Curves are available upon request. Delivery of Fundo customized products takes approx. 7 weeks. Slope will reflect 1/4 per one ft. (minimum) Fundo Floor Bases Extension Systems Description Dimensions Unit Item # wedi Fundo, corner extension 42 x 42 x 2 to 1 1/2 sheet /529 Shower base extension 24 x 48, sloped 1/4 /ft. sheet /528 For Fundo Shower Systems, extends 2 both sides. Pre-grooved Fundo Drain Kit Standard Drain, PVC, ABS and Brass with Cover Description Dimensions Unit Item # Fundo Drain Kit Standard, drain, PVC or ABS Fundo Glue In Drain Kit, PVC or ABS for schedule 40 2 floor pipes 1 pc /015 for schedule 40 2 floor pipes 1 pc /025 Fundo Drain Kit, drain, brass for schedule 40 2 floor pipes 1 pc /018 Fundo Primo Drains Compression & Glue-In PVC, ABS and Brass Description Dimensions Unit Item # Fundo Drain Standard, compression fit, PVC or ABS Fundo Glue In Drain, PVC or ABS Fundo Drain, compression fit, brass for schedule 40 2 floor pipes 1 pc /077 for schedule 40 2 floor pipes 1 pc /048 for schedule 40 2 floor pipes 1 pc /150 Fundo Drain Accessories 2 Sealing Gasket Description Unit Item # Special Rubber Caulking Gasket for Cast Iron Pipe Connection 1 pc /157 Special Rubber Caulking Gasket for Cast Iron Pipe Connection 1 pc /158 Important information Scope of delivery 16
 Fundo Floor Bases Extension Systems Description Dimensions Unit Item # wedi Fundo, corner extension 42 x 42 x 2 to 1 1/2 sheet 07-37-83/529 Shower base extension 24 x 48, sloped 1/4 /ft.")
17 Technical Data: Fundo Shower System-Primo Fundo Standard Drain Cover, Stainless Steel Description Width x Length Unit Item # Fundo Standard, stainless steel drain cover, incl. frames 4 x 4 1 pc /305 For this drain cover, the height of your tiling must be at least 1/4 Included with wedi Fundo bases 1 drain cover, stainless steel 1 frame, stainless steel 1 extension collar, PVC, black Color Color Number Color Color Number Brass *019 Oil Rubbed Bronze *026 Copper *020 * Colors shown are available as an upgrade option. Fundo Fino Round Drain Covers, Stainless Steel Description Width x Length Unit Item # Fundo Fino Classic, drain cover Round 1 pc /000 Fundo Fino Perfect, drain cover Round 1 pc /020 Fundo Fino Harmony, frame Round 1 pc /000 1 drain cover, stainless steel Be sure to ask for a Certified wedi Installer. Contact us: [email protected] Find wedi products & specs: wedi corporation 1100 Landmeier Rd. Ste. 200 Elk Grove Village, IL Tel.: WEDI (9334) Fax: /13

18

19

20
21
22
23
24
25
26
27
28
29
30
31
32
33 2"
34
Technical Data. wedi Fundo Shower System Riolito and Riofino
 Technical Data wedi Fundo Shower System Riolito and Riofino Technical Data wedi Fundo Shower System-Riolito and Riofino Overview wedi Waterproof Shower Systems offer reliable, cost-efficient solutions
Technical Data. wedi Shower Accessories
 Technical Data Shower Accessories Technical Data Shower Accessories Overview A secret among bath design professionals is to use L- and U-shaped Building Panels to create more tileable surfaces in bathroom.
Technical Data wedi Subliner Dry Waterproofing Shower and Wet Area System
 Technical Data wedi Subliner Dry Waterproofing Shower and Wet Area System Technical Data wedi Subliner Dry Waterproofing Shower and Wet Area System General Product Description Waterproof, thin-layer, crack
Schlüter -KERDI-BOARD Substrate, structural panel, bonded waterproofing
 Substrate, structural panel, bonded waterproofing The universal substrate for tiles Perfect covering No matter whether you work with mosaics or large format tiles, an absolutely level substrate with straight
8.7 Schluter -KERDI-LINE
 8.7 Schluter -KERDI-LINE INNOVATIVE SOLUTIONS FOR CERAMIC AND STONE TILE LINEAR DRAINS FOR BONDED WATERPROOFING ASSEMBLIES Application and Function 8.7 Schluter -KERDI-LINE is a low profile linear floor
Schluter -KERDI-BOARD Substrate, building panel, bonded waterproofing
 Schluter -KERDI-BOARD Substrate, building panel, bonded waterproofing Schluter -KERDI-BOARD The universal substrate for tiles Flat. Level. Plumb. Square. No matter the quality, cost, or extravagance of
How to Install GoBoard:
 How to Install GoBoard: A Step-by-Step Guide Durable, Ultra-Lightweight, Waterproof Tile Backer Board Introducing GoBoard Every tiling project requires a durable, waterproof surface under the tile, called
12.1 Schlüter -KERDI-BOARD
 I n n o v a t i v e p r o f i l e s 12.1 Schlüter -KERDI-BOARD S u b s t r a t e U N I V E R S A L S T R U C T U R A L P A N E L, B O N D E D W A T E R P R O O F I N G Application and Function Schlüter
Shower Walls and Tub Surrounds
 Reverso en español TEC Skill Set How-To Project Guide Shower Walls and Tub Surrounds 3 Steps to a Beautiful Tile Surface! 1. Prepare the surface 2. Set the tile 3. Grout and caulk H.B. Fuller Construction
Schluter -Shower System Installation Handbook 2014. Bonded Waterproofing System for Tiled Showers, Steam Showers, Steam Rooms, and Bathtub Surrounds
 Schluter -Shower System Installation Handbook 0 Bonded Waterproofing System for Tiled Showers, Steam Showers, Steam Rooms, and Bathtub Surrounds Schluter -Shower System Bonded Waterproofing System for
PANELIZED HOME INSTALLATION GUIDELINE
 PANELIZED HOME INSTALLATION GUIDELINE A typical home package will be constructed of Snap-N-Lock Insulated Panels clad with steel skins. 4" panels will be used for the walls, and 6" panels for the roof.
Replacement Window Installation Guide Non-Impact & Impact Resistant Windows without Nailing Fin
 Replacement Window Installation Guide Non-Impact & Impact Resistant Windows without Nailing Fin americancraftsmanwindows.com Project Requirements: Failure to follow these instructions may void product
8.2 Schluter -KERDI-DRAIN
 INNOVATIVE SOLUTIONS FOR CERAMIC AND STONE TILE FLOOR DRAINS FOR BONDED WATERPROOF MEMBRANES Schluter -KERDI-DRAIN and Schluter -KERDI-LINE floor drains provide a simple and secure connection to bonded
Window Installation Instructions
 Caution The correct installation methods of windows in full frame or insert applications is critical towards achieving the tested performance of the window and longterm enjoyment and energy savings for
USG DUROCK BRAND SHOWER SYSTEM A SUPERIOR SHOWER SYSTEM FROM A NAME YOU TRUST
 USG Tile & Flooring Solutions USG DUROCK BRAND SHOWER SYSTEM A SUPERIOR SHOWER SYSTEM FROM A NAME YOU TRUST SMARTER DESIGN MEETS PEACE OF MIND USG DUROCK BRAND SHOWER SYSTEM The USG Durock Brand Shower
DRAINAGE MATS For Vertical: Flow 15-P For Horizontal: Flow 18-H
 DRAINAGE MATS For Vertical: Flow 15-P For Horizontal: Flow 18-H Soil Drainage Mat with Built-In Protection Layer POLYGUARD DRAINAGE MATS are three-part prefabricated geocomposite drain consisting of a
Knauf Aquapanel Interior. Tile Backing. Cement board for wet areas. Will not deteriorate in water. Easy to score and snap
 Tile Backing Will not deteriorate in water Easy to score and snap Resistant to mould and mildew Knauf Aquapanel Interior Cement board for wet areas Knauf Aquapanel Interior Cement Board Drywall for Wet
SCHLUTER -KERDI-BOARD
 SCHLUTER -KERDI-BOARD S U B S T R AT E S U B S T R AT E, B U I L D I N G PA N E L, B O N D E D W AT E R P R O O F I N G Application and Function 12.1 Schluter -KERDI-BOARD Schluter -KERDI-BOARD is a multifunctional
Shower and Floor Gullies Channel Drain and Tile Drain SECTION
 Shower and Floor Gullies Channel Drain and Tile Drain SECTION 2 Shower and Floor Gullies, Channel Drain and Tile Drain 29 General Information Shower and Floor Gullies McAlpine has responded to market conditions
ALKALI-RESISTANT WATERPROOFING AND DECOUPLING MEMBRANE UNDER CERAMIC TILES AND NATURAL STONE
 Mapeguard WP System ALKALI-RESISTANT WATERPROOFING AND DECOUPLING MEMBRANE UNDER CERAMIC TILES AND NATURAL STONE Products used: Mapeguard WP 200, Mapeguard ST, Mapeguard IC, Mapeguard EC, Mapeguard WP
WINDOW INSTALLATION GUIDE FOR NEW CONSTRUCTION - WOOD FRAMING
 WINDOW INSTALLATION GUIDE FOR NEW CONSTRUCTION - WOOD FRAMING IMPORTANT NOTICES AND INFORMATION Read these instructions in their entirety prior to installing windows. Any local building code requirements
Sun Windows General Information Sun New Construction Window Installation Instructions
 Sun Windows General Information Section 1 G F H H H A. Apply Weather Resistive Barrier B. Apply Sill Flashing Tape C. Place Waterproof Sill Shims D. Caulk Back of Nail Fin Sides & Top, Set Window, Fasten
PUBLIC RESTROOMS, DESIGN INTENT
 PUBLIC RESTROOMS, DESIGN INTENT 1.01 STRUCTURAL A. Where feasible, metal stud partitions will be constructed on a 6 high concrete curb. 1.02 MECHANICAL A. Restrooms will have a minimum of 15 air changes
Ecoflex Wall Penetration Systems: An efficient, sustainable solution for penetrating concrete or block walls
 Pre- insulated pipe systems ecoflex Wall Penetration installation guide Ecoflex Wall Penetration Systems: An efficient, sustainable solution for penetrating concrete or block walls Pre-insulated Pipe Systems
Technical Data. wedi Building Panel
 Technical Data wedi Building Panel Technical Data wedi Building Panel Overview The original wedi Building Panel is engineered as a general purpose underlayment for tile with special added benefits that
Clad Direct Glaze Window Installation Instructions
 Clad Direct Glaze Window Installation Instructions Sill flashing and sealing: 2. An overview of the proper flashing sequence is shown in figure 1. Please read entire installation instructions carefully
Installation Instructions Double-Hung, Single-Hung, Casement, Awning, Sliding, Picture & Shapes Non-Impact & Impact Resistant Nailing Fin Windows
 Installation Instructions Double-Hung, Single-Hung, Casement, Awning, Sliding, Picture & Shapes Non-Impact & Impact Resistant Nailing Fin Windows americancraftsmanwindows.com Project Requirements: Read
NCMA TEK CONCRETE MASONRY FOUNDATION WALL DETAILS. TEK 5-3A Details (2003)
") NCMA TEK National Concrete Masonry Association an information series from the national authority on concrete masonry technology CONCRETE MASONRY FOUNDATION WALL DETAILS TEK 5-3A Details (2003) Keywords:
NCMA TEK National Concrete Masonry Association an information series from the national authority on concrete masonry technology CONCRETE MASONRY FOUNDATION WALL DETAILS TEK 5-3A Details (2003) Keywords:
SECTION 02630 STORM DRAINAGE SYSTEM
 SECTION 02630 PART 1 - GENERAL 1.01 DESCRIPTION A. Section includes specifications for storm drainage systems including modifications and connections to existing storm drainage systems. 1.02 REFERENCE
SECTION 15076 CEMENT-MORTAR LINED AND COATED STEEL PIPE
 SECTION 15076 CEMENT-MORTAR LINED AND COATED (CML&C) STEEL PIPE PART 1 GENERAL 1.01 DESCRIPTION This section designates the requirements for steel pipe fabrication, test in shop, installation of steel
INSTALLATION RECOMMENDATIONS. Outdoor Rubber Tiles
 INSTALLATION RECOMMENDATIONS Outdoor Rubber Tiles Prior to Installation: The Outdoor Rubber Tiles and accessory transition pieces intended for this installation have been shipped to you via a freight carrier
Technical Data. wedi Building Panel
 Technical Data wedi Building Panel Technical Data wedi Building Panel Overview The original wedi Building Panel is engineered as a general purpose underlayment for tile with special added benefits that
Schluter -KERDI-LINE Elegant, low-profile linear floor drain
 Schluter -KERDI-LINE Elegant, low-profile linear floor drain Create an Oasis in the comfort of home Install at walls or intermediate locations Ensure a simple, waterproof drain connection Slope floor on
Mark Cramer Inspection Services, Inc.
 Mark Cramer Inspection Services, Inc. 492 Twentieth Avenue, Indian Rocks Beach, FL 34635-2970 (727) 595-4211 Fax (727) 596-7583 Certified Member #12085 American Society of Home Inspectors Construction
How to Install Hardwood Flooring Over a Sub Floor
 How to Install Hardwood Flooring Over a Sub Floor Installation Preparation Instructions Read the entire instructions before starting your project. 1) INSPECT EACH PLANK (see fig. a) Wood is a natural product
INSTALLATION GUIDE. americanwick.com 800.242.WICK (9425)
") INSTALLATION GUIDE americanwick.com 800.242.WICK (9425) American Wick Drain SITEDRAIN prefabricated drainage products may be installed in a variety of civil construction applications including: retaining
INSTALLATION GUIDE americanwick.com 800.242.WICK (9425) American Wick Drain SITEDRAIN prefabricated drainage products may be installed in a variety of civil construction applications including: retaining
Important Information for Installer & Homeowner
 Important Information for Installer & Homeowner Homeowner: Please keep this information for your records, do not discard! Installation Instructions for Wood Frame Construction Replacement (See other side
Installation Guide. Bath and Wall Surrounds SERIES 7104 1021861-2-B
 Installation Guide and Wall Surrounds SERIES 7104 1021861-2-B Thank You For Choosing Sterling We appreciate your commitment to Sterling value. Please take a few minutes to review this manual before you
The better way to build TM. Installation Manual. FOUNDATION SIPs & FROST WALLS SIPs
 The better way to build TM Installation Manual FOUNDATION SIPs & FROST WALLS SIPs February 2016 PWF FOUNDATION & FROST WALL SIPs Installation Manual Table of Contents Topics General Requirements...................................
INSTALLATION OF A BAY WINDOW
 INSTALLATION OF A BAY WINDOW Installation of a Bay Window These instructions relate to the replacement of an existing bay window or replacement of a straight window with a new bay window, in an opening
Waterproofing System for Wastewater Tanks in Petrochemical Industries and Refineries
 Waterproofing System for Wastewater Tanks in Petrochemical Industries and Refineries Introduction Wastewater of petrochemical industries and refineries contains high amounts of emulsified aliphatic or
Installing Window and Door Mouldings
 Installing Window and Door Mouldings About Window and Door Mouldings The trim around windows and doors greatly influences the look and style of your interior. They also bridge the gaps and cover spaces
DUROCK Brand Cement Board. installation guide. Substrate and ceramic tile installation for walls, floors, countertops and wall shields.
 DUROCK Brand Cement Board installation guide Substrate and ceramic tile installation for walls, floors, countertops and wall shields. DUROCK Brand Cement Board... Strength beneath the surface A ceramic
We urge you to read and follow the attached installation instructions. Failure to do so may void the warranty of this garden window unit.
 Important Information for New Construction Installations Attention Installer! We urge you to read and follow the attached installation instructions. Failure to do so may void the warranty of this garden
Mold Preventing I nterior System
 interior insulation and renovation boards A system of components that have been designed to work perfectly together to repair damage caused by mold. The system consists of boards, insulation wedges, reveal
Porcelain Vessel Sink Installation
 Porcelain Vessel Sink Installation Required Supplies & Tools A. One of these two type of Faucets Threaded Faucet Nut & Bolt Faucet B. Under Counter Supply/Drain Lines & Shutoff Valves Water Supply Lines
Premier & Deluxe 3-Season Room Sliding Glass Door
 DTSSGD-11 Premier & Deluxe 3-Season Room Sliding Glass Door Installation Instructions Screen Door Seal Left Side Track Top Track Assembly Right Side Track Right Side Trim Sliding Glass Door Sliding Screen
THIRD PARTY INSPECTION GUIDELINES FOR OWNERS AND GENERAL CONTRACTORS/CONSTRUCTION MANAGERS DS150
 THIRD PARTY INSPECTION GUIDELINES FOR OWNERS AND GENERAL CONTRACTORS/CONSTRUCTION MANAGERS DS150 SECTION ONE A. Objective The objective of this guide is to provide Owners and General Contractors/Construction
Brick Veneer Construction
 Brick Veneer Construction Check list of suggested tools & support items Claw hammer Tape measure 3/4" [19 or 20] Wood chisel Wood or plastic shims Pry bar Utility knife Caulking and caulking gun Power
Renovating Your Basement
 building science.com 2006 Building Science Press All rights of reproduction in any form reserved. Renovating Your Building America Report - 0309 2003 (revised 2007) Building Science Corporation Abstract:
Roofing Systems. There are many different systems, each with it's own special requirements and benefits. Browse through all the options below.
 Roofing Systems There are many different systems, each with it's own special requirements and benefits. Browse through all the options below. BUR (Built-Up Roofing) Built-Up-Roofing, BUR is a roof that
LAYING BLOCK AND BRICK
 LAYING BLOCK AND BRICK Products highlighted in this section: SAKRETE Type N Mortar Mix SAKRETE Type S Mortar Mix Brick And Block Laying Basics The first step in building a brick or block wall is to construct
Basement Window Installation Guide Hopper and Sliding
 Basement Window Installation Guide Hopper and Sliding americancraftsmanwindows.com Project Requirements: Installation must comply with all applicable building codes. Existing window frame, wall and weatherresistant
Electrical Wiring Technical Bulletin
 Electrical Wiring Technical Bulletin Overview In general, SIP construction is easier and more cost effective when things are planned and thought out before the panels are manufactured. This process will
Finding and Fixing Leaks
 Finding and Fixing Leaks Where did all that water go? Could we have splashed all that water out of the tub? These are all common thoughts that can run through your mind when you open up the hot tub cover
NEW ELECTRICAL SUBSTATION Building 300 SECTION 07 53 23 ETHYLENE-PROPYLENE-DIENE-MONOMER ROOFING WORK
 ETHYLENE-PROPYLENE-DIENE-MONOMER ROOFING WORK PART 1 GENERAL 1.1 REFERENCES The publications listed below form a part of this specification to the extent referenced. The publications are referred to within
Barrier-free Bathrooms
 Designing Barrier-free Bathrooms Combining utility and modern design by Sean Gerolimatos All images courtesy Schluter-Systems The way we build bathrooms is changing. Owners of homes, condominiums, hotels,
FRAMED & MOUNTED TILE MURAL
 Page 1 of 5 There is no denying that tile murals have taken the sublimation industry by storm. The unique ability to take a customer s artwork or high resolution photograph, tile it using your software
How To Install Your Frameless Shower Enclosure
 How To Install Your Frameless Shower Enclosure a) Installing Single Frameless Door Side Mounted Wall Hinges b) Installing Frameless Door with In-Line Panel c) Installing Frameless Door Between In-Line
Measure Guideline: Water Management at Tub and Shower Assemblies
 Measure Guideline: Water Management at Tub and Shower Assemblies Bruce Dickson IBACOS, Inc. December 2011 NOTICE This report was prepared as an account of work sponsored by an agency of the United States
SECTION 08000 STORM DRAINAGE TABLE OF CONTENTS
 SECTION 08000 STORM DRAINAGE 08010 DESIGN A. Location B. Sizing TABLE OF CONTENTS 08020 MATERIALS A. Pipe Materials B. Structure Materials C. Installation D. Inlets and Outlets 08030 INSPECTIONS AND TESTING
Ver. 2. Guide to. Inspecting Residential Brick Veneer
 Ver. 2 Guide to Inspecting Residential Brick Veneer 1. A guide created by industry professionals. The knowledgeable staff at MASONPRO together with technical support from the Masonry Institute of Michigan
Always. Reliable. Tight. Wall sleeves Versatile solutions for building entries. cablepipebuildingentry+
 Always. Reliable. Tight. Wall sleeves Versatile solutions for building entries. cablepipebuildingentry+ The wall sleeve The wall sleeve a largely unnoticed but very important sealing part. Wall sleeves
Retail Price List 2015
 Retail Price List 2015 SETTING MORTARS SERVOFLEX TRIO SUPER TEC Flexible Full Transfer Thin Set and Medium Bed Mortar 20 KG Flexible, cement-based thin set and medium bed mortar with polymer additive for
Profiles. Exclusively Manufactured By
 Profiles and TRANSITIONS Exclusively Manufactured By PrORound Introducing a new choice in high quality Profiles and Transitions. Enhance the beauty of tile and natural stone surfaces in your projects with
Borges Construction Company A limited liability Corporation Page1 of 1
 Page1 of 1 The following is a quote to remodel the master bathroom at your home: Materials Labor Demolition 1 Dumpster $ 225.00 $ - 2 Remove existing carpet $ - $ 50.00 3 Remove existing tile $ - $ 80.00
08003-1 WATER SERVICE 2
 08003_Mar08_2011.pdf Page 1 of 7 INDEX Page 08003-1 WATER SERVICE 2 1.1 Pipe 2 1.1.1 Copper 2 1.1.2 Polyethylene 2 1.2 Valves and Fittings 2 1.2.1 Main Stops 3 1.2.2 Curb Stops 3 1.2.3 Curb Box 3 1.2.4
All-Season Sunroom Sliding Glass Door Installation Instructions
 ASRESGD-08 All-Season Sunroom Sliding Glass Door Installation Instructions Panel Frame Door Frame Left Side Foam Insulator IE241 H Bar Assembly Door Frame Top Track Panel Frame Door Frame Right Side Stationary
Installation Instructions For Slider Casement Air Conditioners
 Installation Instructions For Slider Casement Air Conditioners NOTE: These instructions describe installation in a typical wood framed window with a wood SLIDE-BY sash, or installation in a metal CASEMENT
Waterproofing and interior insulation for basements takes new twist in technology.
 Waterproofing and interior insulation for basements takes new twist in technology. Free report reveals how to stop all call backs for basements for the life of the structure by installing these 3 low cost
Schluter -Shower System Installation Handbook 2008. Bonded Waterproofing System for Tiled Showers, Steam Showers, and Bathtub Surrounds
 Schluter -Shower System Installation Handbook 008 Bonded Waterproofing System for Tiled Showers, Steam Showers, and Bathtub Surrounds Schluter -Shower System Bonded Waterproofing System for Tiled Showers,
Built to Last. Built for Beauty. Good. Solid. Logix. TM
 Built to Last. Built for Beauty. Good. Solid. Logix. TM Quality, Value and Service Introducing LOGIX Insulated Concrete Forms. Based on the simple concept of interlocking blocks, LOGIX ICF gives you a
March 14, 2007. Installation of Bay, Bow and Garden Windows
 March 14, 2007 Re: Installation of Bay, Bow and Garden Windows Attached are the Atrium Companies, Inc recommendation for the installation of bay, bow and garden windows. These instructions were developed
2.18 INTERIOR & EXTERIOR FINISHES 2.18.1 VAPOR & AIR BARRIERS
 2.18 INTERIOR & EXTERIOR FINISHES 2.18.1 VAPOR & AIR BARRIERS The LOGIX wall assembly has no need for an additional vapor barrier, the solid concrete core covered with the low permeance EPS (Type II) foam
Installation Instructions
 Installation Instructions One-Piece Deep Wall Sleeve For Use with Packaged Terminal Units Please read these instructions completely before attempting installation. NOTE: Ensure that the unit is only installed
K2 STONE NATURAL VENEER
 INTRODUCTION WHAT IS K2 NATURAL THINSTONE VENEER? Natural K2 Stone veneer is real stone, cut 1 inch thick, making it light enough to be installed as a veneer. Sometimes referred to as thin veneer, thin
foot skylight) is enough to knock a worker off their feet. A 10 mph wind gust on a 5 x 6 skylight develops a wind force of 270 lbs.
 is enough to knock a worker off their feet. A 10 mph wind gust on a 5 x 6 skylight develops a wind force of 270 lbs.") Skylight Installation Instructions This document provides instruction and guidelines for installation of both curb mount (CM) and self flashing (SF) unit skylights on flat, pitched (> or equal to 3/12
Skylight Installation Instructions This document provides instruction and guidelines for installation of both curb mount (CM) and self flashing (SF) unit skylights on flat, pitched (> or equal to 3/12
SECTION 02612 NONREINFORCED CONCRETE SEWER PIPE
 SECTION 02612 PART 1 GENERAL 1.1 SUMMARY A. Section Includes: Furnishing and installing nonreinforced concrete sewer pipe. Provide concrete sewer pipe less than 12 inches in diameter, and in other sizes
INSTALLATION INSTRUCTIONS for Vinyl Windows without Nailing Fin (JII011) ImPOrTANT INFOrmATION & GlOssAry. rough OPeNINGs
 ImPOrTANT INFOrmATION & GlOssAry. rough OPeNINGs") Thank you for selecting JELD-WEN products. Attached are JELD-WEN s recommended installation instructions for vinyl windows without a nailing fin (including finless, flush fin and flange). Read these instructions
Thank you for selecting JELD-WEN products. Attached are JELD-WEN s recommended installation instructions for vinyl windows without a nailing fin (including finless, flush fin and flange). Read these instructions
7. Installation. installation 7.1.1. CAST-IN WINDOW SYSTEM 7.1. INSTALLATION OF WINDOW MAIN FRAME
 7. Installation Window involves the fixing of window frame at an earlier construction stage and subsequent of the window sashes. This is a highly workmanship dependent process. Only trained and approved
Eucaboard / Eucaplac/ Eucatile paneling is intended for dry interior use only and requires care in handling.
 i This instruction sheet describes the proper methods for installing Eucatex decorative wall paneling. Eucaboard / Eucaplac/ Eucatile paneling is intended for dry interior use only and requires care in
Important Information
 Single Door Quadrant Instruction Manual ESQ Important Information Toughened glass is completely safe for use in our shower enclosures and bath screens; providing our products are installed according to
Installing Window Trim and Door Trim
 Installing Window Trim and Door Trim Tools and Supplies You'll Need Screws or Finish Nails use screws or nails that are long enough to go through the Ledger and firmly attach to the wall behind it. If
WASHROOM UPGRADE SIR CHARLES TUPPER BUILDING 2250 RIVERSIDE DRIVE, OTTAWA, ON SIR CHARLES TUPPER BUILDING A0.0 COVER SHEET / DRAWING LIST
 0 RIVERSIDE DRIVE, OTTAWA, ON A0.0 COVER SHEET / DRAWING LIST A0. LEGEND AND GENERAL NOTES A0. GENERAL NOTES A0. GENERAL NOTES A0. TYPICAL WASHROOM WALL/SINK SECTION A0. DETAIL - CONTROL JOINT A0. DETAIL
Repairing Drywall Techniques for fixing everything from popped screws to big holes
 Repairing Drywall Techniques for fixing everything from popped screws to big holes BY MYRON R. FERGUSON C racks or holes in drywall, wet or stained drywall, peeling joint tape, popped nails or screws.
VINYL SHOWER PAN LINER
 VINYL SHOWER PAN LINER In 1965 PASCO was the first company to introduce a plastic shower pan liner for ceramic tile showers. Since that time, over 40,000,000 square feet of our shower pan liner has protected
1.02 DESCRIPTION A. This Section specifies furnishing and installing Cast in Place Detectable/Tactile Warning Surface tiles where indicated.
 CAST IN PLACE DETECTABLE/TACTILE WARNING SURFACE TILE PART 1 GENERAL 1.01 RELATED DOCUMENTS A. Drawings and general provisions of Contract, including General and Special Conditions and Division 1 Specifications
H-Stud Area Separation Wall System
 12 TH EDITION 09 21 16.33/NGC H-Stud Area Separation Wall System 09 21 16.33 139 H-STUD AREA SEPARATION WALL SYSTEM The fire-protection of gypsum-based Area Separation Walls is demonstrated in dramatic
IMPORTANT INFORMATION
 Curved Quadrant Instruction Manual CQ IMPORTANT INFORMATION Toughened glass is completely safe for use in our shower enclosures and bath screens; providing our products are installed according to our guidelines.
Hanson Building Products. precast basement solutions
 Hanson Building Products precast basement solutions Hanson Building Products Basement Systems Add an extra dimension and combine the inherent flexible, structural and waterproof properties of concrete
INSTITUTIONAL BARRIER FREE SHOWER INSTALLATION
 INSTITUTIONAL BARRIER FREE SHOWER INSTALLATION Rev. #: 1/3/13 Key Points to remember during installation 1. The subfloor must be 100% flat, level and free from obstructions of any kind. 2. When installed,
Aspect Metal Peel & Stick Tile Installation Guide
 Aspect Metal Peel & Stick Tile Installation Guide Proper surface preparation is essential for a successful project Failure to follow recommended surface preparation instructions may void the warranty Read
first look at GigaCrete s revolutionary new New Construction GigaHouse GigaHouse Utilizing GigaPanel
 first look at GigaCrete s revolutionary new New Construction GigaHouse GigaHouse Utilizing GigaPanel What is GigaCrete GigaCrete is a family of products based on low carbon footprint Green ceramic binders
SECTION 08 41 1 ALUMINUM FRAMED ENTRANCES and STOREFRONTS. System 402 Flush-Glazed Screw Spline Storefront
 PART 1 GENERAL 1.01 Work Included SECTION 08 41 1 ALUMINUM FRAMED ENTRANCES and STOREFRONTS System 402 Flush-Glazed Screw Spline Storefront A. Furnish and install aluminum architectural storefront system
After reading this lesson you will be able to: 12.3 IMPORTANCE OF ROOF 12.4 TYPES OF ROOF IN A HOUSE
 86 :: Certificate in Construction Supervision (CIVIL) 12 ROOF 12.1 INTRODUCTION The structure provided to cover the house surface (floor) is known as roof. For different situation and requirement, it is
Saferand easierinstallation
 EN 85-07 Saferand easierinstallation IföSigninstallationsystem andifösignbuilt-incistern www.ifosanitar.com/sign Aneffectivesolution withmanyadvantages. Ifö Sign installation system makes life a little
necessary for years of satisfactory service. SmartBlock insulating form concrete walls share the
 Chapter 7 PLUMBING AND ELECTRICAL 7.1 Introduction to Plumbing and Electrical Consideration of support services such as plumbing and electrical systems from the preliminary schematics phase through final
GreenGuard Housewrap Installation Guide
 000768PACBPHW_Flashing Bro 5/23/03 2:52 PM Page 1 For the most current product information, go to www.green-guard.com. Pactiv Building Products believes the information and recommendations herein to be
Tundra Series Windows January 2016
 Tundra Series Windows January 2016 New Construction Installation Instructions Nail Fin, J-Fin and Brickmold Aplications product. ATTENTION! Read and understand all installation instructions before installing
The existing roof angle change terminations and flashings when sound and intact can be reused.
 January 2, 2015 Summary Specification Re-Skinning an Existing Roof Maintenance and Repair Warranty Upgrade for Up to 30 Years Re-Skinning Over an Existing Roof with a New C-EPDM Membrane Using The Existing