WR-22 中文 GB Version 1
|
|
|
- Abigayle Dixon
- 9 years ago
- Views:
Transcription
1 WR-22 中 GB文 Version 1

2 1. 2. Important safety instructions Read these instructions. Keep these instructions. GB Heed all warnings. Follow all instructions. Do not use this apparatus near water. Clean only with dry cloth. Do not block any ventilation openings. Install in accordance with the manufacturer s instructions. Do not install near any heat sources such as radiators, heat registers, stoves, or other apparatus (including amplifiers) that produce heat. Do not defeat the safety purpose of the polarized or groundingtype plug. A polarized plug has two blades with one wider than the other. A grounding type plug has two blades and a third grounding prong. The wide blade or the third prong are provided for your safety. If the provided plug does not fit into your outlet. consult an electrician for replacement of the obsolete outlet. 10. Protect the power cord from being walked on or pinched particularly at plugs, convenience receptacles, and the point where they exit from the apparatus.

3 Only use attachments/accessories specified by the manufacturer. Use only with the cart, stand, tripod, bracket, or table specified by the manufacturer, or sold with the apparatus. When a cart is used, use caution when moving the cart/apparatus combination to avoid injury from tip-over Unplug this apparatus during lightning storms or when unused for long periods of time. Refer all servicing to qualified service personnel. Servicing is required when the apparatus has been damaged in any way, such as power-supply cord or plug is damaged. liquid has been spilled or objects have fallen into the apparatus, the apparatus has been exposed to rain or moisture, does not operate normally, or has been dropped. 15. To Reduce the Risk of Fire or Electric Shock, Do not Expose This Appliance To Rain or Moisture. 2

4 The Shock Hazard Marking and Associated Graphical Symbol is provided on the rear of unit. Apparatus shall not be exposed to dripping or splashing and no objects filled with liquids, shall be placed on the apparatus. GB Excessive sound pressure on ear- and headphones could impair the hearing ability. Higher setting that idle on the equalizer leads to higher signal voltages on the output for ear and headphones. The power plug should be close to the radio, and easy to be approached that during the emergency, to disconnect the power from the radio, just unplug the power plug from the AC power slot. Where the MAINS plug or an appliance coupler is used as the disconnect device, the disconnected device shall remain readily operable. IMPORTANT NOTE: To comply with the FCC RF exposure compliance requirements, no change to the antenna or the device is permitted. Any change to the antenna or the device could result in the device exceeding the RF exposure requirements and void user s authority to operate the device. 3

5

6 Controls Speaker Bluetooth indicator Display Source button Play mode button Alarm 1 button Alarm 2 button Nap button Menu / Info button On / Off button / Sleep button Rotary tuning control Volume control / Tone control Dimmer sensor Remote control sensor Preset 5 / Fast-forward button Preset 4 / Play / Pause button Preset 3 / Backward button Preset 2 / Fold up button Preset 1 / Fold down button USB port Reset button GB 5

7 6
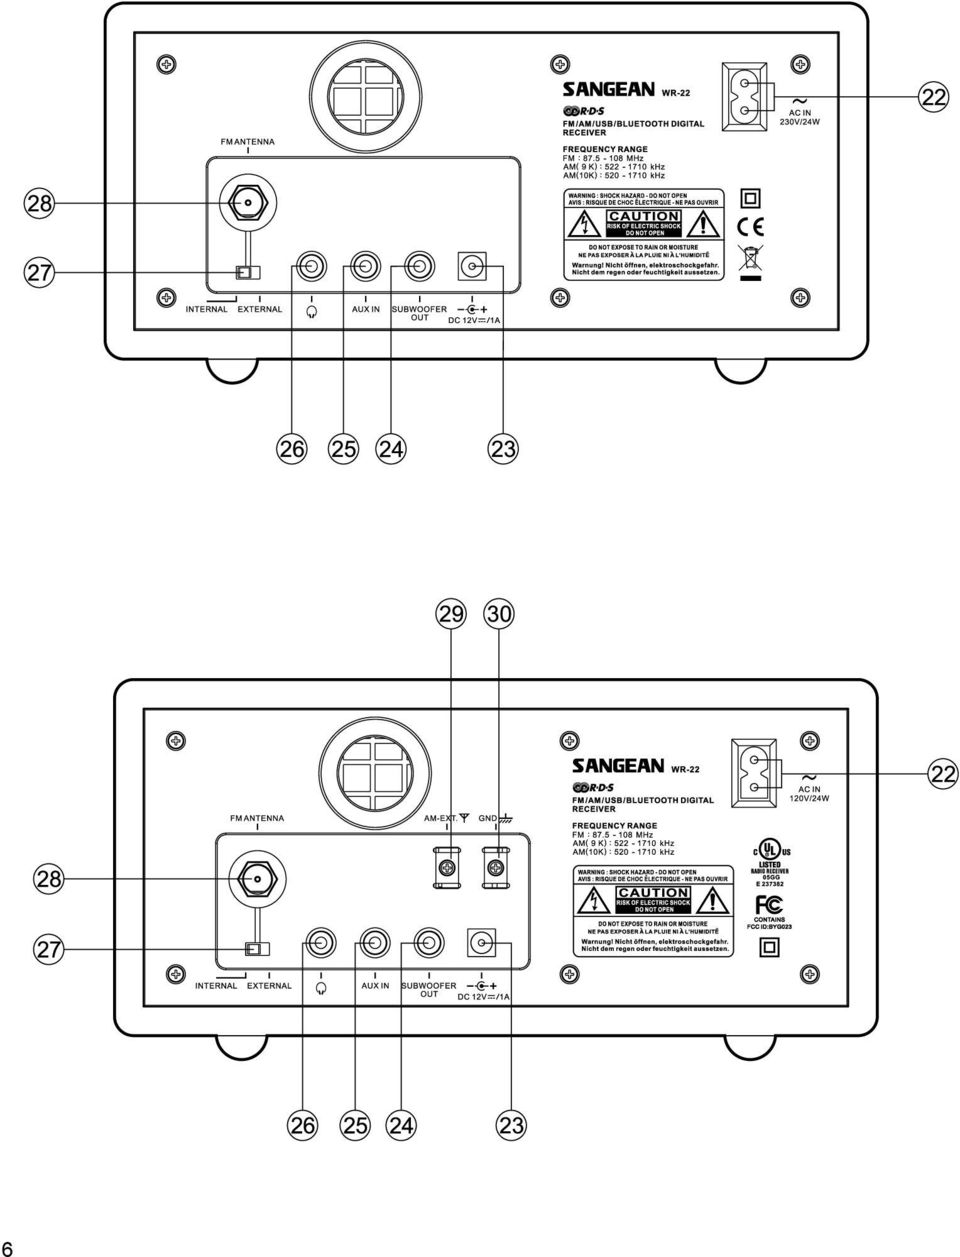
8 Controls AC power cord socket 12V DC input socket Subwoofer output socket AUX IN socket Headphone socket External / Internal antenna switch External F-type FM antenna terminal & 30 External AM antenna terminal (USA version only) GB A B C D E F G H I J K L M N O P Q Display Frequency / Station display RDS / RBDS indicator Nap indicator PM indicator Time indicator Sleep indicator Alarm 1 indicator Alarm 2 indicator Fast-forward indicator Play / pause indicator Backward indicator Shuffle Repeat all Repeat folder Repeat one Repeat section A-B Stereo indicator 7

9 a b c d e f g h i j k L m n o p Remote control On / Off button / Sleep button Alarm1 button Volume control button Alarm 2 button Nap button Preset 1 / Folder down button Preset 3 / Backward button Preset 2 / Folder up button Preset 4 / Play / Pause button Preset 5 / Fast-forward button Play mode button Tone control button Repeat A-B / Select button / Bluetooth pairing button Tuning up / down button Info / menu button Source button 8

10 Power your radio AC operation Before plugging the AC cord into the radio, make sure the AC voltage is correct. Insert the plug on the end of the supplied power cord into the AC power socket on the back of the radio. GB DC operation For outdoor use, you can power the radio by using 12v DC input socket from a DC power supply (example, from the power supply of vehicles or boats). An AC power adaptor with 1 Ampere and center positive in polarity can also power the radio in house. Antenna setup for FM reception The radio comes with built-in AM/FM antenna and external antenna. To use FM internal antenna, make sure to switch FM external/ internal antenna switch in the back of your radio to internal antenna position (i.e. INT. FM ANTENNA). As for external antenna, there are two types of antenna can be used to improve FM reception. You can connect the supplied FM antenna to the F-type antenna terminal and adjust the wire for best reception. You can also connect a 75 ohm coaxial cable of outdoor antenna to the terminal. Make sure to switch external/internal antenna switch to external position while connecting the outdoor / rooftop antenna. Note: In some of the European countries, you may have to use adaptor plug to connect with the outdoor/rooftop antenna in case your antenna has an incorrect type of plug. 9

11 Antenna setup for AM reception The radio comes with built-in AM Ferrite antenna which should be enough for normal listening. To improve the AM reception, you may connect the outdoor AM antenna (not supplied) with AM external antenna terminal. 10

12 Operating your radio Your radio is equipped with three tuning methods- Scan tuning, manual tuning and memory preset tuning. GB Scan tuning FM / AM 1. Make sure you have set up the FM antenna in advance. 2. Press the On/Off button to switch on your radio. 3. Press the Source button repeatedly to select the desired wave band. 4. Press the Tuning control rotary. Your radio will scan in an upwards direction (low frequency to high frequency) and stop automatically when it finds a station of sufficient strength. 5. After a few seconds the display will update. The display will show the frequency of the signal found. If the signal is strong enough and there is RDS / RBDS data present then the radio will display the station name. 6. To find other stations, press the Tuning control rotary as before. 7. When the waveband end is reached your radio will recommence tuning from the opposite waveband end. 8. Adjust the Volume buttons to the required setting. 9. To switch off your radio press the On/Off button. 11

13 Manual tuning FM / AM 1. Press the On/Off button to switch on your clock radio. 2. Press the Source button repeatedly to select the desired wave band. 3. Rotate the Tuning control rotary to tune to a station. The frequency will change in steps of 50kHz/100 khz in FM or 9 khz/10 khz in AM. 4. When the waveband end is reached the radio will recommence tuning from the opposite waveband end. 5. Adjust the Volume buttons to the desired settings. 6. To switch off your clock radio press the On/Off button. Setting up the tuning step increment 1. Press and hold the Info/menu button to enter the menu setting when the radio source is in AM/FM mode. 2. Rotate the Tuning control rotary button until FM xxk or AM xxkhz shown on the display, and press the Tuning control rotary to enter the step increment setting. 3. Rotate the Tuning control rotary button to select 50kHz/100kHz for FM radio, and 9kHz/10kHz for AM radio. Then press the Tuning control rotary to confirm the setting. 12

14 Display modes - FM Your radio has four display modes for FM radio. These use data provided by broadcasters which is commonly known as RDS/ RBDS. GB The Radio Data System (RDS / RBDS) is a system in which inaudible digital information is transmitted in addition to the normal FM radio programme. RDS / RBDS offers several useful features. The following are available on your radio:- 1. Press the Menu / Info button to cycle through the various modes. a. Station name Displays the name of the station being listened to. b. Programme Type Displays the type of station being listened to e.g. Pop, Classic, News, etc. c. Radio text Displays radio text message such as, new item etc. d. Year / Day Displays the current year and day of the week according to the date setting of your radio. e. Date / Day Displays the current date and day of the week according to the date setting of your radio. f. Frequency Displays the frequency of the station being listened to. If there is no RDS / RBDS data available (or if the signal is too weak) then the radio will display only the FM frequency and the optional Stereo indicator. 13

15 FM range setting FM range is different from countries to countries. It is necessary to adjust FM range to allow the radio to work properly. 1. Press and hold the Menu/ Info button to enter the menu setting. 2. Rotate the Tuning control rotary till the range of FM shows on the display. Press the Tuning control rotary to confirm the desired FM range. FM range setting is then completed. The available FM range is as following: for the common area (default) for Japan for Eastern European countries and Russia for some of China area 14

16 FM stereo / mono setting If the FM radio station being listened to has a weak signal some hiss may be audible by headphone. It is preferable to reduce this hiss by forcing the radio to play the station in mono rather than stereo. GB 1. Press the Standby button to switch on your radio. 2. Tune to the required FM radio station as previously described. 3. Press and hold the Menu/Info button to enter the menu setting. 4. Press the Tuning control rotary until FM AUTO or FM MONO shown on the display. Press the Tuning control rotary to enter the setting. If the setting is Auto rotate the Tuning control rotary to switch to Mono mode to reduce the hiss. 5. To return to Auto (stereo) mode, rotate the Tuning control rotary to alter the setting, so that the radio will switch back to Auto mode. 15

17 Presetting stations There are 5 memory presets for each FM/ AM wavebands. 1. Press the On/ Off button to turn on the radio. 2. Tune to desired station using one of methods previously described. 3. Press and hold the desired Preset button until the radio beeps. The preset number will appear in the display and the station will be stored under the chosen preset button. 4. Repeat this procedure for the remaining presets. 5. Station stored in preset memories may be overwritten by following the above procedure. Recalling a preset station 1. Press the On/ Off button to turn on the radio. 2. Select the desired waveband by repeatedly pressing the Source button. 3. Momentarily press the desired Preset button. The preset number and station frequency will appear in the display. 16

18 Clock and Alarms Setting the time format The clock display used in stand-by mode and on the playing mode screens can be set to 12 or 24 hour format. The selected format is then also used when setting the alarms. GB 1. Press and hold the Info/menu button to enter the menu setting. 2. Rotate the Tuning control rotary until CLOCK XXH appears on the display, then press the Tuning control rotary to enter the setting and the setting of time format begins to flash. 3. Rotate the Tuning control rotary to select either 12 or 24 hour format. Press the Tuning control rotary to confirm your choice of clock format. The display will then revert to the previous menu. If the 12 hour clock format is chosen, the radio will then use the 12 hour clock for the setting of alarms with a PM indicator. Setting the date format 1. Press and hold the Info/menu button to access the menu setting. 2. Rotate the Tuning control rotary until a series digit for month/date/day shown on the display. Press the Tuning control rotary to enter the date format setting and the digit for month and date will flash. 3. Rotate the Tuning control rotary to select the required date format. Press the Tuning control rotary to confirm your choice of date format. The display will then revert to the previous menu. 17

19 Setting the clock time Manual setting 1. When radio power is off, press and hold Menu/ info button to enter the menu setting. 2. Rotate the Tuning control rotary until CLOCK SET shown on the display. Press the Tuning control rotary to enter the setting. 3. The hour setting on the display will begin flashing. Rotate the Tuning control rotary to select the desired hour, and press the Tuning control rotary to confirm the setting. Then rotate the Tuning control rotary to select the desired minute, and press the Tuning control rotary to confirm the setting. Radio Data System (RDS/ RBDS) When you set the clock time using the RDS/ RBDS function, your radio will synchronize its clock time whenever it tunes to a radio station using RDS / RBDS with CT signals. 1. When tuning to a station transmitting RDS / RBDS data, press and hold the Info/menu button. 2. Rotate the Tuning control rotary until a clock symbol shown on the display. Press the Tuning control rotary to enter the setting. 18

20 3. Rotate the Tuning control rotary until RDS CT shown on the display. Press the Tuning control rotary to confirm the setting. The clock time of the radio will set up automatically according to the RDS/ RBDS data received. GB 4. When the action is completed, the RDS/ RBDS icon will appear on the LCD display indicating the radio time is RDS/RBDS clock time. The radio cock time will be valid for 2 days each time the radio time is synchronized with RDS CT. 19

21 Setting the alarm clock There are two alarms which can each be set to wake you to AM, FM radio, USB buzzer alarm. The alarms may be set while the unit is in standby mode or while playing. 1. Before setting an alarm ensure the clock time is set. Press and hold the Alarm 1 button to enter the alarm 1 setting. 2. The hour setting of alarm 1 will begin to flash. Rotate the Tuning control rotary to select the required alarm hour, and press the Tuning control rotary to confirm the setting. Rotate the Tuning control rotary to select the required alarm minute, and press the Tuning control rotary to confirm the setting. 3. Then the display will show the frequency options for the alarm. Rotate the Tuning control rotary to select the desired option and press the Tuning control rotary to confirm the setting. The alarm options are as follows: ONCE the alarm will sound once DAILY the alarm will sound everyday WEEKDAY the alarm will sound only on weekdays WEEKEND the alarm will sound only at weekends 20
22 4. Rotate the Tuning control rotary to choose the required alarm type, and then press the Tuning control rotary to confirm the setting. The alarm can be set to buzzer, FM, AM or USB. When radio mode is selected, the radio frequency and the preset number on the display will begin to flash. Rotate the Tuning control rotary to adjust the required radio frequency or the required preset number for the radio alarm, then press the Tuning control rotary to confirm the setting. GB 5. Rotate the Tuning control rotary to choose the required sound level for the alarm. Press the Tuning control rotary to confirm the setting. The alarm has now been set. Symbol for active alarm is shown on the display. Note: If USB is selected as your alarm type, but USB is not inserted when the alarm is sounding, the buzzer alarm will be used instead. 21
23 When the alarm sounds To cancel a sounding alarm, press the Standby button to cancel a sounding alarm. When the buzzer alarm activates, the alarm will start softly and gradually increase in level. It will sound for 1 minute and silence for 1 minute in repetition for 60 minutes unless cancelled. When the other alarm types are set, the radio will sound non-stop at the selected time for up to 60 minutes. When the radio alarm is activated, the alarm will go off in Humane Waking System. It will increase its volume in 0.5increments from 0 to your set volume. Disabling / cancelling alarm setting To cancel the alarm setting, press and hold the corresponding alarm button before the alarms sound off. 22
24 Snooze 1. When the alarm sounds, press any button other than the Standby button will silence the alarm for 5 minutes. SNOOZE will appear on the display. GB 2. To adjust the silence time for the snooze timer, press and hold the Info/menu button to enter the menu setting. 3. Rotate the Tuning control rotary until SNOOZE X shown on the display, then press the Tuning control rotary to enter the setting. Rotate the Tuning control rotary to adjust the silence time. There are 5, 10, 15 and 20 minutes for the snooze timer. 4. To cancel the snooze timer while the alarm is suspended, press the Standby button. Sleep timer Sleep timer will automatically switch off the radio after a preset time has elapsed. 1. Press and continue to hold the Power On/ Off button, the display will cycle through the available sleep time in the order of Release the button when the required sleep time shown in the display and the radio will play the last station selected. 2. Cancel the sleep function, press the Power On/Off button, The radio power will be off and the symbol will disappear from the display. 23
25 Playback MP3 or WMA Files from USB This section describes how to use your radio to access and playback your audio files via USB memory devices. USB slots are located on the front panel of the unit. Important: Your radio is only designed to work with USB memory flash memory devices. It is not intended to be connected to hard disk drives or any other type of USB device. It is possible to use SD or SDHC cards for media playback when held in a suitable USB adaptor. However, due to the wide variation of such adaptors, it is not possible to guarantee that all adaptor / card combinations will work with the radio. The unit has been tested with a range of USB memory devices of up to 32GB capacity. It supports USB 2.0 full-speed and USB 3.0. (Note: when using USB 3.0, at the beginning it will show No device on the display, please allow the unit to detect the device for a longer period of time.) USB memory must use the FAT or FAT 32 filing system in order to operate with the sound system, it does not support NTFS. Audio formats supported for playback are MP3 and WMA. Playback does not support files encoded using WMA lossless, WMA Voice, WMA 10 professional, nor files of any format which have DRM protection. 24
26 Cautions: In order to minimize the risk of damage to your radio, your USB Memory, please place the unit such that the device cannot easily be knocked while it is inserted in the socket. GB Remove the USB before carrying the unit or if not using the USB feature for a prolonged period. Place the unit in Standby mode removing your USB memory device. The USB connection is intended only for flash memory devices. The use of hard disk storage media is not supported. Play back via USB files stored on MP3 players is not guarantee. 25
27 Playing MP3 and WMA files in USB 1. When USB is inserted, press the On/Off button to turn the radio on and then press Source button to select USB. The LCD display will show reading and the number of files and folders stored in the USB will appear momentarily. However, under some circumstances, some error messages may appear. If the display shows Unkown indicating your radio does not support the filing system of the inserted USB; whereas it shows No music indicating there are no suitable MP3/ WMA files for playback. 2. Press the Play / Pause button to start playing from the USB. The display will show track number momentarily, e.g. TRACK To pause playing, press the Play / Pause button. To resume playing, press the Play / Pause button again. 4. Press the Info button repeatedly to view the information related to the specific media files. (Note: This function only supports English letters, if the media files contain symbols other than English letters, the symbols will be blank.) 26
28 Note: a) If you put the unit into standby mode without pressing the pause button, the next time the unit is turned on, it will resume to the last play track. GB b) It is highly recommended to store only music files (MP3 / WMA) in your USB device, because if there is one folder contains files other than music files, then your radio will skip this folder and the folder number shown on the display will not be serial. c) Your WR-22 allows a maximum of 200 folder (including root folder) and 9999files and 6 layers maximum within a folder. If the USB stores more than 200 folders, the extra folders will not show on the display. Selecting a file 1. While the USB device is playing, press either the fast-forward or rewind buttons to change to the desired file. The track number is updated on the display. If there s more than one folder, all files in the current folder should have been played and the next folder will be played. 2. You can skip to the desired file by pressing the fast-forward or rewind buttons and release the button when the desired track number is displayed. Your WR-22 allows a maximum of 200 folder and 9999files and 6 layers maximum within a folder. 27
29 Search function While the USB memory device is playing, press and hold the Fastforward or Rewind button. Release the button when the desired part of the current file is reached. To skip to another folder With the USB memory is in stop or play mode, press and release either the Folder Up / Down button. The first file of the next or previous folder will be played. Note: If your USB contains a folder without files, the device will skip the folder and play the files in the next folder. Play mode When playing the files in USB, press and release Play mode button to select. Repeat 1: repeatedly play the file you are listening to. Repeat Folder: repeatedly play the files within the folder you are listening to. Repeat All: repeatedly play the folders in the USB. Random: it will play files in the USB by in random. 28
30 Repeat File within Section A B If you d like to repeat the file only within the selected section (e.g. learning languages), during the playback, press and release the Tuning Down button for the selection you d like to start the repeat, press the button once again for the selection you d like to end the repeat. GB The radio will repeat the playback only within the selected section and it will show on the display. The cancel the repeat, simply press the button again. The display icon will disappear. Charging with USB socket The USB jack can only provide power for the USB memory stick only with 1A 5V maximum and most of iphone models. However, it does not support external Hard disk drive and all of mobile phones and electronic device. The USB jack charging function can only be charged in AUX-IN, USB or Bluetooth mode. The maximum volume of the output power speaker will decrease when your USB is charging. Important: Do not connect this USB socket with your PC USB port, as it highly possible may cause breakdown of the units. 29
31 Listening to Bluetooth music You need to pair your Bluetooth device with your radio before you can auto-link to play/stream Bluetooth music through your WR-22. Paring creates a permanent bond so two devices can always recognize each other. Paring your Bluetooth device for the first time 1. Press the Source button to select Bluetooth function. The Bluetooth icon on the panel will flash. 2. Press and release the Tuning control rotary to activate the paring function. 3. Activate Bluetooth on your device according to the device s user manual to link to your WR Once connected, there will be a beep sound and the Bluetooth icon will remain illuminated. The display will also show the model name of you Bluetooth-enabled device. 5. WR-22 will auto link with the last linked device when that device is in range. 30
32 Note: a) For version BT 2.0 Bluetooth device, you may be asked to input PIN code, the pass code is GB b) If SANGEAN WR-22 shows in your Bluetooth device list but your device cannot connect to WR-22, please delete the Sangean WR-22 item from your list and pair the device with WR-22 again following the steps described previously. c) The effective operation range between the docking system and the paired device is approximately 10 meters (30 feet). d) Any obstacle between the system and the device can reduce the operational range. 31
33 Pair with your Bluetooth device before If your Bluetooth device already paired with WR-22 previously, the unit will memorize your Bluetooth device, so when the device is in range, it will be asked the permission to link with the radio. WR-22 can memorize up to 8 sets of Bluetooth device, when the memory exceed this amount, the earliest paired device will be cancelled from the radio. Delete pairing device memory in your radio Press and hold the Tuning control rotary to cancel all the paring device memory stored in WR-22. Playing Bluetooth music 1. Once your device and the WR-22 are linked you can start to play Bluetooth music via the WR Press the Play / Pause button on the panel or the remote control to start playing from your Bluetooth-enabled device. 3. To pause playing, press the Play / Pause button. To resume playing, press the Play / Pause button again. Selecting a file 1. While the Bluetooth-enabled device is playing, press either the fast-forward or rewind buttons to change to the desired file. 32
34 Nap timer 1. Press and hold the Nap timer button to enter the menu setting. Keep holding the Nap timer button and the options will start switching on the display from 1 to 120 minutes. Stop until the required Nap Timer setting appears on the display. The setting will be saved and the LCD will return to normal display with the NAP icon shown on the display. GB 2. To view the remaining time of an active timer setting, press the Nap timer button. To cancel a sounding Nap timer, press Standby button. If any button other than the Standby button is pressed when the alarm sounds, snooze function will be activated. To cancel the function when countdown is progressing, go to nap timer setting menu and select OFF. 33
35 Time zone setting Your radio can set up the time zone for its radio clock time. 1. Press and hold the Info/menu button to enter the menu setting. 2. Rotate the Tuning control rotary until TIME ZONE shown on the display. Press the Tuning control rotary to enter the setting. 3. Rotate the Tuning control rotary to choose the Time zone setting for your area, then press the Tuning control rotary to confirm the setting. Note: When switching on the radio after a power disconnection, you will need to complete the time zone setting before the normal operation of the radio. Daylight Saving Time 1. Press and hold the Info/menu button to enter the menu setting. 2. Rotate the Tuning control rotary until DST XX shown on the display. Press the Tuning control rotary to enter the setting. 3. Rotate the Tuning control rotary to choose, for example, +1H to set the clock 1 hour faster, and press the Tuning control rotary to confirm the setting. 4. To set the clock back from D.S.T., choose OFF and then press the Tuning control rotary to confirm the setting. 34
36 Tone control- treble and bass If you find the preset equalizer functions not to your liking, you may set up a custom treble and bass setting as follows: GB 1. Press the Volume control rotary once to get into Treble control setting. Rotate the control until desired treble level is reached. 2. Press the Volume control rotary again to enter Bass control setting. Rotate the control until the desired bass level is reached. Press the Volume control to confirm the setting. Loudness You can get compensation on lower and higher frequency for your radio by adjusting the Loudness function. 1. Press and hold the Info/menu button to enter the menu setting. 2. Rotate the Tuning control rotary until LOUD ON or OFF shown on the display. Press the Tuning control rotary to enter the setting. 3. Rotate the Tuning control rotary to choose ON to turn on the loudness function, then press the Tuning control rotary to confirm the setting. 4. To turn off the loudness function, select OFF and press the Tuning control rotary to confirm the setting. 35
37 Auto Dimmer The dimmer sensor is located on the front of the radio which will adjust the intensity of the display to suit room brightness. Dimmer control The brightness of the LCD display may be adjusted. 1. Press and hold the Info/ menu button to enter the menu setting. 2. Rotate the Tuning control rotary until DIMMER shown on the display. Press the Tuning control rotary to enter the setting. 3. Rotate the Tuning control rotary to adjust the LCD backlight to be darker or brighter. Press the Tuning control rotary to confirm the setting. Note: The default setting of the dimmer level is at the lowest. Please adjust your dimmer level as appropriate. 36
38 Auxiliary input socket A 3.5mm stereo Auxiliary Input socket is provided on the rear of your radio to permit an audio signal to be fed into the unit from an external audio device such as ipod, MP3 or CD player. GB 1. Repeatedly press and release the Band button until AUX IN is shown. 2. Connect an external audio source (for example, ipod, MP3 or CD player) to the Auxiliary Input socket. 3. Adjust the volume setting on your ipod, MP3 or CD player to ensure an adequate signal level from the player, and then rotate the Volume control on the radio as needed for comfortable listening. Headphone socket A 3.5mm Headphone socket located on the rear of your radio is provided for use with either headphones or an earpiece. Inserting a plug automatically mutes the internal loudspeaker. IMPORTANT: Excessive sound pressure from earphones and headphones can cause hearing loss. 37
39 Software version The software display cannot be altered and is just for your reference. 1. Press and hold the Info/menu button to enter the menu setting. 2. Rotate the Tuning control rotary until P XX appears on the display to view the software version of your radio. RESET the radio If your radio fails to operate correctly or some digits on the display are missing or incomplete, please carry out the following procedure. 1. Switch off the radio. 2. With the aid of a suitable implement (e.g. paper clip), press the RESET button located in the bottom of your radio for at least 2 seconds. This will reset the microprocessor clock time and clear all stations stored in the preset memory. Subwoofer out socket Connect the subwoofer input with built-in amplifier. Subwoofer output level will change in accordance to the volume adjustment of the radio. 38
40 Specifications Powered: AC 120V/60Hz/24W (US version) AC 230V/50Hz 24W (European version) GB Frequency Coverage: FM MHz AM khz (10 khz version) or MW khz (9 khz version) Bluetooth GHz class-ii Internal Antenna system: AM built-in ferrite antenna FM built-in wire antenna External antenna terminal: AM antenna terminal FM F-type antenna terminal Output power 7 W 10% T.H.D.@100 Hz Subwoofer out socket 3.5 mm diameter mono jack output level: 1.5 Vrms(max.) Frequency Response: 40~220Hz (+20/-10Hz) Headphones socket 3.5 mm diameter stereo jack output power 1mW+1mW (load 32 ohm) 39
41 Aux In socket 3.5 mm diameter stereo jack. Input sensitivity: In 350 mvrms, Output 100 Hz Input impedance: 47 Kohm DC IN 12V/1A center pin positive (operational voltage 9-14V) Accessories FM F-terminal wire antenna AC power cord F-PAL terminal adaptor (European version only) Dimension: WxHxD in mm: 240x115x183. Weight: 2.6 kgs Notice: The changes or modifications not expressly approved by the party responsible for compliance could void the user s authority to operate the equipment. The Company reserves the right to amend the specification without notice. 40 If at any time in the future you should need to dispose of this product please note that: Waste electrical products should not be disposed of with household waste. Please recycle where facilities exist. Check with your Local Authority or retailer for recycling advice. (Waste Electrical and Electronic Equipment Directive)
Important Safety Instructions
 PR-D7 GB Revision 1 Important Safety Instructions 1. Read these instructions. 2. Keep these instructions. 3. Heed all warnings. 4. Follow all instructions. 5. Do not use this apparatus near water. 6. Clean
Digital Radio/DAB+/FM RDS digital clock radio with dual alarm Operating instruction
 381SE1D-A Digital Radio/DAB+/FM RDS digital clock radio with dual alarm Operating instruction GB Contents Controls... 2-3 Using the clock radio for the first time... 4 Operating your clock radio... 5 Selecting
PR-D9W. GB Version 1
 PR-D9W Version 1 Table of contents Important safety instructions... 2-3 Introduction... 4 Controls... 5-8 Using your weather alert radio for the first time... 9 Operating your radio Search tuning AM/FM...
Controls. LCD Display. Tuning Up Time Set and Station Scan
 PR-D8 GB Revision 3 1 1 2 4 5 7 9 10 12 14 16 18 20 22 24 25 26 27 29 31 33 35 36 37 38 Controls Stereo Built-in Microphone (Left Channel) LCD Display Stereo Built-in Microphone (Right channel) Power/Auto
RCR-22 AM/MW 2 bands Digital Clock Radio instruction manual
 RCR-22 AM/MW 2 bands Digital Clock Radio instruction manual Important safety instructions 1. Read and understand all safety and operating instructions before the radio is operated. 2. Retain instruction:
Controls (front) 1. Loudspeaker 2. Light button 3. Band button 4. Auto tune button 5. Alarm button 6. LCD display
 1. Loudspeaker 2. Light button 3. Band button 4. Auto tune button 5. Alarm button 6. LCD display") GB Contents Controls... 2-4 Mains operation... 5 Operating your radio... 6 Selecting a station DAB... 7 Display modes DAB... 8 Finding new stations - DAB... 9 Secondary services DAB... 9 Manual tuning
GB Contents Controls... 2-4 Mains operation... 5 Operating your radio... 6 Selecting a station DAB... 7 Display modes DAB... 8 Finding new stations - DAB... 9 Secondary services DAB... 9 Manual tuning
Radio BMR100 INSTRUCTION MANUAL. ENGLISH (Original instructions)
") ENGLISH (Original instructions) INSTRUCTION MANUAL Radio BMR00 WARNING: For your personal safety, READ and UNDERSTAND before using. SAVE THESE INSTRUCTIONS FOR FUTURE REFERENCE. Symbols The following show
ENGLISH (Original instructions) INSTRUCTION MANUAL Radio BMR00 WARNING: For your personal safety, READ and UNDERSTAND before using. SAVE THESE INSTRUCTIONS FOR FUTURE REFERENCE. Symbols The following show
DAR-101. GB Version 1
 DAR-101 Version 1 Table of contents Important security notice... 2-3 Introduction... 4 Controls and connections... 5-9 Battery operation... 10 Using the AC adaptor / Charging the batteries... 11 Setting
ATS-505. GB Version 1
 ATS-505 GB Version 1 Control Locations Power/Sleep Power On/off/Alarm off/sleep function Display Switch between radio frequency and time while radio is power on Mode Mode set up (please see below mode
User Guide. CR-111IP Clock radio with dock for ipod
 User Guide CR-111IP Clock radio with dock for ipod IMPORTANT SAFETY INFORMATION CAUTION! RISK OF ELECTRIC SHOCK DO NOT OPEN TO REDUCE THE RISK OF ELECTRIC SHOCK DO NOT REMOVE COVER (OR BACK) This symbol
CR9971 2 Band Auto Set Dual Alarm Clock Radio ROBERTS. Sound for Generations. Please read this manual before use
 ROBERTS Sound for Generations CR9971 2 Band Auto Set Dual Alarm Clock Radio Please read this manual before use Contents Contents... 1 Controls...2-5 Switching on... 6 Setting the time manually... 6 Setting
Register your product and get support at. www.philips.com/welcome AS111. User manual
 Register your product and get support at www.philips.com/welcome AS111 User manual Contents 1 Important 4 Safety 4 English 2 Your docking speaker for AndroidTM 5 Introduction 5 What's in the box 5 Overview
H203D 中文 GB Version 1
 H203D 中 GB文 Version 1 Contents Installing batteries... 4 Using the AC adapter (not supplied)... 5 Setting the clock... 6-7 Updating your radio - DAB... 8 Selecting a station - DAB... 9 Secondary services
Spider IV 15. Pilot s Handbook Manuel de pilotage Pilotenhandbuch Pilotenhandboek Manual del Piloto 取 扱 説 明 書
 Spider IV 15 Pilot s Handbook Manuel de pilotage Pilotenhandbuch Pilotenhandboek Manual del Piloto 取 扱 説 明 書 40-00-0187 Pilot s Handbook available @ www.line6.com/manuals Rev D Important Safety Instructions
CR9986 ROBERTS. Dual Alarm CD Clock Radio. Sound for Generations. Please read this manual before use
 ROBERTS Sound for Generations CR9986 Dual Alarm CD Clock Radio Please read this manual before use Contents Contents... Controls... - Switching on and setting the time... 4 Listening to the radio... 5 Compact
AM / FM Tuner + RDS. Model: TU-101. www.pulse-audio.co.uk
 AM / FM Tuner + RDS Model: TU-101 www.pulse-audio.co.uk 1 Safety Information The lightning bolt within a triangle is intended to alert the user to the presence of dangerous voltage levels within the product
AM/FM ALARM CLOCK RADIO
 AM/FM ALARM CLOCK RADIO Instruction Manual JL-206 Please read this manual carefully before operating and save it for future reference. Have a question? Please visit http:// INTRODUCTION Thank you for purchasing
PORTABLE ALARM CLOCK. Dual Alarm. FM Radio. Wake-up Sounds. USB Phone Charger G-1CR
 G-BUZZ PORTABLE ALARM CLOCK Dual Alarm FM Radio Wake-up Sounds USB Phone Charger G-1CR Welcome Alarm clocks can be boring. Get ready to shake things up with your new G-BUZZ. Slap the snooze for more ZZZ
CMP30. User Manual. www.audac.eu
 CMP30 User Manual www.audac.eu 2 Index Introduction 4 Precautions 5 Safety requirements 5 Caution servicing 5 EC Declaration of Conformity 5 Waste of Electrical and Electronic Equipment (WEEE) 6 Caution
Prescott. CD Alarm Clock Radio INSTRUCTION MANUAL
 1215205 Prescott CD Alarm Clock Radio INSTRUCTION MANUAL Important Safety Instructions CAUTION RISK OF ELECTRIC SHOCK DO NOT OPEN The lightning flash with arrowhead symbol, within an equilateral triangle
MODEL NPB-252 PORTABLE CD MP3 RADIO PLAYER
 MODEL NPB-252 PORTABLE CD MP3 RADIO PLAYER PLEASE READ THIS USER MANUAL COMPLETELY BEFORE OPERATING THIS UNIT AND RETAIN THIS BOOKLET FOR FUTURE REFERENCE. WARNING TO PREVENT FIRE OR SHOCK HAZARD, DO NOT
BIG GAMES HOME VIDEO ARCADE ASSEMBLY INSTRUCTIONS
 TM BIG GAMES HOME VIDEO ARCADE ASSEMBLY INSTRUCTIONS IN-HOME ASSEMBLY OF YOUR BIGGAMES HOME VIDEO ARCADE MAY BE AVAILABLE IN YOUR AREA FOR AN ADDITIONAL CHARGE. FOR INFORMATION, PLEASE CALL (800) 749-4345.
Albrecht DR314. DAB/DAB+/FM Radio 1.) User Manual
 User Manual") Albrecht DR314 DAB/DAB+/FM Radio 1.) User Manual -1- Important Safety Notes TO PREVENT FIRE OR SHOCK HAZARD, DO NOT USE THIS PLUG WITH AN EXTENSION CORD, RECEPTACLE OR OTHER OUTLET UNLESS THE BLADES CAN
Albrecht DR314 DAB/DAB+/FM Radio 1.) User Manual -1- Important Safety Notes TO PREVENT FIRE OR SHOCK HAZARD, DO NOT USE THIS PLUG WITH AN EXTENSION CORD, RECEPTACLE OR OTHER OUTLET UNLESS THE BLADES CAN
ROBERTS. Enjoy Listening. DAB / FM RDS Digital Clock Radio with large display. Please read this manual before use
 ROBERTS Enjoy Listening DAB / FM RDS Digital Clock Radio with large display Please read this manual before use Contents Controls... -3 Using the clock radio for the fi rst time...4 Operating your clock
DAB / FM RDS / SD Digital Radio Recorder with PausePlus
 ROBERTS Enjoy Listening DAB / FM RDS / SD Digital Radio Recorder with PausePlus Please read this manual before use Contents Controls... 2-3 Battery operation...4 Using the AC adaptor...5 Operating your
DAB2+ Dear Customer, Congratulations with your new Argon DAB2+
 Dear Customer, Quality has always been our driving force and founding Argon Audio is a natural extension of this philosophy. We have 20 years' experience in creating and specifying high quality products,
Evolution Digital HD Set-Top Box Important Safety Instructions
 Evolution Digital HD Set-Top Box Important Safety Instructions 1. Read these instructions. 2. Keep these instructions. 3. Heed all warnings. 4. Follow all instructions. 5. Do not use this apparatus near
CAUTION RISK OF ELECTRIC SHOCK NO NOT OPEN
 Evolution Digital HD Set-Top Box Important Safety Instructions 1. Read these instructions. 2. Keep these instructions. 3. Heed all warnings. 4. Follow all instructions. 5. Do not use this apparatus near
IMPORTANT SAFETY INSTRUCTIONS
 IMPORTANT SAFETY INSTRUCTIONS Before you install or use the apparatus, you must read and understand these Important Safety Instructions. At all times when using the apparatus you must follow these Important
User Guide. MT-91 / MT-90 / MT-92 Interlinking Transmitter Module MT-90/MT-92 MT-91
 User Guide MT-9 / MT-90 / MT-9 MT-90/MT-9 All rights reserved. MN 04/08 Do not copy or forward without prior approvals MIPRO. Specifications and design subject to change without notice. CE5 0 4 A MT-9
Owner s Manual AWM910 JENSEN AWM910 COMPACT DISC PLAYER RADIO CD COMPACT MUSIC SYSTEM MUTE AUX BAND AUX IN PUSH PUSH PWR VOL ALARM T/F AUD SPK A SPK B
 AWM910 Owner s Manual COMPACT DISC PLAYER PUSH 1 2 3 4 5 6 RPT SCAN RDM H M PUSH PWR VOL ALARM SET ON/OFF EQ T/F AUD RADIO CD COMPACT MUSIC SYSTEM MUTE AUX BAND CD AUX IN A B A+B JENSEN AWM910 Thank You!
CD / DAB / FM Digital Sound System with dock for ipod and iphone
 Enjoy Listening ROBERTS CD / DAB / FM Digital Sound System with dock for ipod and iphone Please read this manual before use Contents Introduction...2-9 Sound 00 Sound System features...3 Controls and connections...4-5
The Bouncer Bluetooth Stereo Speaker
 The Bouncer Bluetooth Stereo Speaker 1 Welcome to JLab! Thank you for purchasing The Bouncer Bluetooth Speaker! Enjoy your music wirelessly from any smartphone, tablet, laptop, or other Bluetooth enabled
Single Day Alarm Clock with. Bluetooth and USB Play-through
 Single Day Alarm Clock with Bluetooth and USB Play-through MODEL : BSC 200 READ THIS INSTRUCTION MANUAL BEFORE OPERATING THE APPLIANCE. SAVE THIS MANUAL FOR FUTURE REFERENCE. TABLE OF CONTENTS IMPORTANT
THE NEW GENERATION IN TECHNOLOGY. NI-3103A Alarm Clock w/fm Radio ipod & iphone Docking. Operating Instructions
 THE NEW GENERATION IN TECHNOLOGY NI-3103A Alarm Clock w/fm Radio ipod & iphone Docking Operating Instructions Table of Contents Important Safeguards... 3 Parts... 6 Controls... 6 To Set Up... 7 ipod/iphone
NS-HDRAD_14-1417_MAN_V4_ENG.fm Page 1 Friday, December 12, 2014 12:13 PM
 V4 FINAL FOR PRINT NS-HDRAD_14-1417_MAN_V4_ENG.fm Page 1 Friday, December 12, 2014 12:13 PM USER GUIDE HD Radio Tabletop NS-HDRAD Before using your new product, please read these instructions to prevent
User Guide. DCR1401B/G Crescendo DAB alarm clock radio
 User Guide DCR1401B/G Crescendo DAB alarm clock radio IMPORTANT SAFETY INFORMATION CAUTION! RISK OF ELECTRIC SHOCK DO NOT OPEN TO REDUCE THE RISK OF ELECTRIC SHOCK DO NOT REMOVE COVER (OR BACK) This symbol
40 Watt Mixer Amplifier Owners Manual with Media Player
 40 Watt Mixer Amplifier with Media Player Model #USB-80 2009 MCM Electronics MCM Custom Audio MCM Electronics Centerville, Ohio www.mcmelectronics.com SAFETY INSTRUCTIONS Please be sure to read all the
RD-11 ROBERTS. FM RDS/DAB digital radio with. Sound for Generations. Please read this manual before use
 ROBERTS Sound for Generations RD- FM RDS/DAB digital radio with Please read this manual before use Contents Controls... Battery operation... 3 Mains operation... 3 Operating your radio - DAB... 4 Selecting
ALTEC LANSING ONE YEAR LIMITED WARRANTY (TWO-YEAR LIMITED WARRANTY IN THE EUROPEAN UNION AND ASIA)
") User s guide The lightning flash with arrowhead, within an equilateral triangle, is intended to alert the user to the presence of uninsulated dangerous voltage within the product s enclosure that may be
User s guide The lightning flash with arrowhead, within an equilateral triangle, is intended to alert the user to the presence of uninsulated dangerous voltage within the product s enclosure that may be
XPanel V2. Remote Control Panel. User Manual. XILICA Audio Design
 XPanel V2 Remote Control Panel User Manual XILICA Audio Design Important Safety Instructions 1. READ THESE INSTRUCTIONS All the safety and operating instructions should be read before the product is operated.
Controls. Opening the cover
 BTS-102 GB 2013 CSR plc and its group companies. The aptx mark and the aptx logo are trademarks of CSR plc or one of its group companies and may be registered in one or more jurisdictions. The Bluetooth
Digital Satellite Receiver
 USER GUIDE Digital Satellite Receiver Models DSR207, DSR317, DSR505, and DSR530 CONTENTS IMPORTANT SAFETY INSTRUCTIONS...1 DSR BASICS SYMBOLS/ICONS...6 Front Panel...6 Back Panel...7 CONNECTING YOUR DSR...10
Hi, let s get started. Sound Rise Wireless Speaker & Alarm Clock
 Hi, let s get started. Sound Rise Wireless Speaker & Alarm Clock Welcome to your new Sound Rise! We created Sound Rise for music lovers like you. Start the day with your favorite tunes, rock out while
INSTRUCTION MANUAL RM-5750. AM/FM Digital Alarm Clock Radio
 INSTRUCTION MANUAL RM-5750 AM/FM Digital Alarm Clock Radio Fig. 1 CAUTION: THE APPARATUS SHALL NOT BE EX- POSED TO DRIPPING OR SPLASHING. NO OBJECTS FILLED WITH LIQUIDS, SUCH AS VASES, SHALL BE PLACED
DAB & FM RADIO Installation Manual
 Size: 105x145mm 105g copper paper DAB & FM RADIO Installation Manual Model: 10798 10799 10800 10801 Thank you for purchasing this AGK DAB/FM radio. Please read the instructions and warnings carefully before
INSTRUCTION MANUAL CD/MP3 PLAYER WITH FM RADIO AND USB READER
 English INSTRUCTION MANUAL CD/MP3 PLAYER WITH FM RADIO AND USB READER Please read and follow these instructions before using your unit. OVERVIEW OF THE PLAYER 1 2 3 10 8 4 5 6 9 7 11 12 13 14 15 16 17
DAB+ Digital Alarm Clock Radio with Dock for iphone
 DAB+ Digital Alarm Clock Radio with Dock for iphone BCR33DABIP The Gold Technical Support Line: 1902 215 259 (Charges will apply at $2.95 per minute) www.bushaustralia.com.au Safety Instructions Ensure
User Guide. DAB-109CR DAB Digital Radio alarm clock
 User Guide DAB-109CR DAB Digital Radio alarm clock IMPORTANT SAFETY INFORMATION CAUTION! RISK OF ELECTRIC SHOCK DO NOT OPEN TO REDUCE THE RISK OF ELECTRIC SHOCK DO NOT REMOVE COVER (OR BACK) This symbol
RD-27 ROBERTS. FM RDS/DAB digital radio with. Sound for Generations. Please read this manual before use
 ROBERTS RD-7 Sound for Generations FM RDS/DAB digital radio with Please read this manual before use Contents Controls... Battery operation... 3 Mains operation... 3 Operating your radio - DAB... 4 Selecting
Model PS-4001 Power Supply User Instructions
 Model PS-4001 Power Supply User Instructions 9350-7710-000 Rev E 9/2009 PROPRIETARY NOTICE The product information and design disclosed herein were originated by and are the property of Bosch Security
STANDBY SCAN PRESET ALARM ENTER SNOOZE MODE INFO/MENU. User Guide. DR1402 DAB Radio
 STANDBY SCAN PRESET MODE INFO/MENU ALARM ENTER SNOOZE User Guide DR1402 DAB Radio IMPORTANT SAFETY INFORMATION CAUTION! RISK OF ELECTRIC SHOCK DO NOT OPEN TO REDUCE THE RISK OF ELECTRIC SHOCK DO NOT REMOVE
DAB+ / FM Tuner Model: TU-201
 DAB+ / FM Tuner Model: TU-201 Instruction Manual www.pulse-audio.co.uk 1 Safety Information The lightning bolt within a triangle is intended to alert the user to the presence of dangerous voltage levels
Instruction Manual. 5.1 Power Amplified Home Theatre Speaker System w/ Remote Control DSS-200
 R Instruction Manual DSS-200 R 5.1 Power Amplified Home Theatre Speaker System w/ Remote Control Read this manual carefully to get the excellent acoustics from this unit. SPECIFICATIONS SAFETY INFORMATION
Tiny Audio C3. English TINY AUDIO C3. Please read carefully before using this product
 English TINY AUDIO C3 Please read carefully before using this product 1 Safety Instructions: 1. Do not use this radio near water. 2. Clean with dry cloth. 3. Do not block any ventilation openings. 4. Do
DIGITAL ALARM CLOCK RADIO
 DIGITAL ALARM CLOCK RADIO INSTRUCTION MANUAL For information and support, www.lenco.eu CR3302 LENCO ENG FM ONLY IM 98 x1 1 11/5/2009 9:14:35 CAUTION RISK OF ELECTRIC SHOCK DO NOT OPEN WARNINGS ATTENTION
HD udta Quick-Start Guide
 HD udta Quick-Start Guide Vyve Broadband HD Set-Top Box Important Safety Instructions 1. Read these instructions. 2. Keep these instructions. 3. Heed all warnings. 4. Follow all instructions. 5. Do not
DUAL ALARM CLOCK RADIO WITH AUTO TIME SET
 DUAL ALARM CLOCK RADIO WITH AUTO TIME SET USER MANUAL JCR-230 PLEASE READ THIS USER MANUAL COMPLETELY BEFORE OPERATING THIS UNIT AND RETAIN THIS BOOKLET FOR FUTURE REFERENCE. WARNING TO PREVENT FIRE OR
DR 70 Portable Digital DAB+ and FM Radio Receiver User Manual English Please read carefully before using this product
 DR 70 Portable Digital DAB+ and FM Radio Receiver User Manual Please read carefully before using this product 15 1 Table of Contents 1 Table of Contents... 16 2 Safety Instructions:... 17 3 Specification:...
DBT-003 FM/DAB+ Radio with Bluetooth Receiver
 DBT-003 FM/DAB+ Radio with Bluetooth Receiver User Manual : English Contents Important Safety Precautions... 3 Features and Controls... 4 Listening to your radio...5-6 Storing and Recalling Stored Stations...
AZATOM. Home-Hub. Radio Alarm Docking Station with Bluetooth Lightning Version USER MANUAL. www.azatom.com
 AZATOM Home-Hub Radio Alarm Docking Station with Bluetooth Lightning Version USER MANUAL www.azatom.com Contents Important Safety Instructions... 2 Safety... 2 Warning... 2 Identifying the Parts... 3 Main
ENGLISH (Original instructions) Job Site DAB Radio BMR101. INSTRUCTION MANUAL IMPORTANT: Read Before Using.
 Job Site DAB Radio BMR101. INSTRUCTION MANUAL IMPORTANT: Read Before Using.") ENGLISH (Original instructions) Job Site DAB Radio BMR0 INSTRUCTION MANUAL IMPORTANT: Read Before Using. ENGLISH (Original instructions) Symbols The following show the symbols used for the equipment. Be
ENGLISH (Original instructions) Job Site DAB Radio BMR0 INSTRUCTION MANUAL IMPORTANT: Read Before Using. ENGLISH (Original instructions) Symbols The following show the symbols used for the equipment. Be
User Manual DIGITAL MONITOR SPEAKERS MS /MS. 24-Bit/192 khz Digital 40/20-Watt Stereo Near Field Monitors
 User Manual DIGITAL MONITOR SPEAKERS MS /MS 24-Bit/192 khz Digital 40/20-Watt Stereo Near Field Monitors 2 DIGITAL MONITOR SPEAKERS /MS20 User Manual User Manual Table of Contents Thank you... 2 Important
igroove SXT Owner's Manual
 TM igroove SXT Owner's Manual Important Safety Safety Information Information 1. READ these instructions. 2. KEEP these instructions. 3. HEED all warnings. 4. FOLLOW all instructions. 5. DO NOT use this
ROBERTS CRD-37. Sound for Generations. DAB / FM RDS / CD Clock radio with MP3 / WMA playback facility. Please read this manual before use
 ROBERTS Sound for Generations CRD-37 DAB / FM RDS / CD Clock radio with MP3 / WMA playback facility Please read this manual before use Contents CRD-37 Clock Radio features... Controls... 3-4 Using your
ROBERTS. Enjoy Listening. DAB / FM / CD Stereo Clock Radio with CD Bookmark. Please read this manual before use
 ROBERTS Enjoy Listening DAB / FM / CD Stereo Clock Radio with CD Bookmark Please read this manual before use Contents Sound 38 clock radio features...2 Controls... 3-4 Using your clock radio for the fi
Portable MP3 Player User's Guide
 MP3-128 LCD MP3-256 LCD MP3-512 LCD Portable MP3 Player User's Guide Safety Introduction Installing the MP3 Player Transfer data to and from the MP3 Player Listening to your WMA/MP3 music MP3 Player Controls
DAB Radio. Instruction Manual L55DAB10
 DAB Radio Instruction Manual L55DAB10 L55DAB10_IB_110810_Zell.indd 1 L55DAB10_IB_110810_Zell.indd 2 Contents Unpacking...5 Product Overview...6 Top View... 6 Rear View... 6 Power Source...7 Battery Power...
ROBERTS. Enjoy Listening. DAB/FM RDS digital portable radio. Please read this manual before use
 ROBERTS Enjoy Listening DAB/FM RDS digital portable radio Please read this manual before use Contents Controls... 2-3 Battery operation...4 Using the AC adaptor...5 Operating your radio - DAB...6 Selecting
ATS-909X. GB Version 1
 ATS-909X GB Version 1 Important safety instructions 1. Read and understand all safety and operating instructions before the radio is operated. 2. Retain instruction: The safety and operating instructions
USER GUIDE LOUDBOX MINI
 USER GUIDE LOUDBOX MINI Whenever this symbol appears, it alerts you to the presence of important operating and maintenance (servicing) instructions in the user s manual for this amplifier. Wherever this
Introduction and Contents
 Introduction and Contents Thank you for buying this Bush product, which is designed to give you many years of trouble-free service. You may already be familiar with using a similar unit, but please take
ATTENTION RISQUE D ÉLECTROCUTION! NE PAS OUVRIR!
 Quick Start Guide ATTENTION RISQUE D ÉLECTROCUTION! NE PAS OUVRIR! CAUTION: TO REDUCE THE RISK OF ELECTRIC SHOCK, DO NOT REMOVE COVER (OR BACK). NO USER-SERVICEABLE PARTS INSIDE. REFER SER- VICING TO QUALIFIED
ROBERTS. Enjoy Listening. DAB/FM RDS digital portable radio. Please read this manual before use
 ROBERTS Enjoy Listening DAB/FM RDS digital portable radio Please read this manual before use Contents Controls... -3 Battery operation...4 Using the AC adaptor...5 Operating your radio - DAB...6 Selecting
DAB1001. Wireless Digital Radio Interface. Installation & User Guide
 DAB1001 Wireless Digital Radio Interface Installation & User Guide Contents Contents... 2 Introduction... 3 Contents of Package... 4 Installation... 5 Product Overview... 5 Installation Procedure... 5
Altec Lansing Moondance Home Digital Speaker System and Alarm Clock for ipod M302 User Guide
 Altec Lansing Moondance Home Digital Speaker System and Alarm Clock for ipod M302 User Guide Welcome Thank you for purchasing the Altec Lansing Moondance Home speaker system. Designed specifically to work
SUB 10 ACTIVE STUDIO SUBWOOFER
 USER S MANUAL SUB 10 ACTIVE STUDIO SUBWOOFER CONTENTS page INTRODUCTION GENERAL INFORMATION 3 REAR PANEL REAR PANEL 4 INPUTS/OUTPUTS 4 SWITCHES 5 INDICATORS 6 TECHNICAL SPECIFICATIONS TECHNICAL SPECIFICATIONS
User Guide Digital AM/FM Clock Radio
 User Guide Digital AM/FM Clock Radio NS-CLOPP2 Before using your new product, please read these instructions to prevent any damage. NS-CLOPP2 Insignia NS-CLOPP2 Digital AM/FM Clock Radio Contents Introduction..............................................
HOME THEATER SYSTEM. Instruction Manual. Model ASR150. Please read the instruction manual carefully before using your unit.
 SURROUND SOUND HOME THEATER SYSTEM Instruction Manual Model ASR150 Please read the instruction manual carefully before using your unit. For support visit : www.1800customersupport.com GENERAL TABLE OF
DAB Adapter 2+ Dear Customer,
 Dear Customer, Quality has always been our driving force and founding Argon Audio is a natural extension of this philosophy. We have 20 years' experience in creating and specifying high quality products,
24 Wide Screen LED Monitor with HDMI
 24 Wide Screen LED Monitor with HDMI USER MANUAL L24LE11B_MANUAL_EN_R1 Please read this manual carefully before using, and keep it for future reference. TABLE OF CONTENTS GETTING STARTED Monitor Stand
Instruction Manual CMP332DB CMP332DP
 Instruction Manual CMP332DB CMP332DP Table of contents Care & maintenance... 2 Disposal information... 2 Rechargeable battery disposal... 2 Accessories included...3 Overview of controls...3 Getting started...
Sound Spot SFQ-07. User Manual
 Sound Spot SFQ-07 User Manual Safety Information The lightning flash with arrowhead symbol, within an equilateral triangle is intended to alert the user to the presence of uninsulated "dangerous voltage"
SDM-190M. User Guide
 SDM-190M User Guide High Resolution Stereoscopic 3D Monitor TRUE3Di CONTENTS Parts Included... 3 Button Function description... 5 Installation guide... 7 Stereoscopic driver installation guide... 17 Quadro
Bluetooth Stereo Headphone. User Guide. Hive
 Bluetooth Stereo Headphone User Guide Hive 1. Product Description Avantree Hive is a Bluetooth stereo headphone with MIC from the Avantree family. It delivers clear voice transmission and high quality
Retro Radio. Operation Guide. Operation Guide. Guía de funcionamiento Guia de Operação. Guide d utilisation Betriebsanleitung.
 Retro Radio Operation Guide Guida Operativa Operation Guide Guide d utilisation Betriebsanleitung Guía de funcionamiento Guia de Operação GB View Quest Retro DAB+ Operation Guide 2 View Quest Retro DAB+
IMPORTANT SAFETY INSTRUCTIONS
 IMPORTANT SAFETY INSTRUCTIONS When using this electronic device, basic precautions should always be taken, including the following: 1. Read all instructions before using the product. 2. Do not use this
i399 2.1 Channel HiFi Audio System w/ BluePin Technology
 i399 2.1 Channel HiFi Audio System w/ BluePin Technology It is 2.1 channel ipod docking audio system with built-in woofer. It comes with a detachable BluePin. BluePin is a combination of Bluetooth TX and
Digital Photo Frame Instruction Manual
 Digital Photo Frame Instruction Manual Model 3FMPF210BK8-R Table of Contents SAFETY INFORMATION... 4 PACKAGE CONTENTS... 4 SPECIFICATIONS SUMMARY... 5 DPF INTRODUCTION... 6 QUICK START... 8 OPERATION
COMPANION 2 Series II MULTIMEDIA SPEAKERS
 COMPANION 2 Series II MULTIMEDIA SPEAKERS Owner s Guide Guia del usuario Notice d utilisation Français English SAFETY INFORMATION Please read this owner s guide Please take the time to follow the instructions
Dual Alarm Clock with SmartSet Auto Time Setting System
 Dual Alarm Clock with SmartSet Auto Time Setting System (U.S. Patent No. 6,567,344) OWNER S MANUAL AC100 Visit our web site at www.emersonradio.com AC100_072806.p65 16 TO PREVENT FIRE OR SHOCK HAZARD,
DIGITAL CABLE TV RECEIVER OPERATION MANUAL DVB-C8080AL DIGITAL CABLE RECEIVER DEAR CONSUMER
 DIGITAL CABLE TV RECEIVER OPERATION MANUAL DVB-C8080AL DIGITAL CABLE RECEIVER DEAR CONSUMER GREAT APPRECIATION FOR PURCHASING OUR PRODUCT TO ENSURE THE BEST PERFORMANCE AND THE HIGHEST SAFETY, PLEASE READ
Retro Style Turntable With CD/Radio/USB/SD/MP3/WMA and Vinyl-to-MP3 Encoding
 Retro Style Turntable With CD/Radio/USB/SD/MP3/WMA and Vinyl-to-MP3 Encoding PTCD8U INSTRUCTION MANUAL LOCATION OF CONTROLS 1) DUST COVER 2) DIAL POINTER 3) LEFT SPEAKER 4) LCD DISPLAY 5) FM STEREO LED
TABLETOP CONTROLLER USER'S MANUAL
 TABLETOP CONTROLLER USER'S MANUAL Preface TABLETOP CONTROLLER USER S MANUAL CLEARONE PART NO. 800-151-891 OCTOBER 2009 (REV. 2.1) 2009 ClearOne Communications, Inc. All rights reserved. No part of this
ROBERTS RC9907. Sound for Generations. 3 Band Radio Cassette Recorder. Please read this manual before use
 ROBERTS Sound for Generations Mains ROBERTS RC 9907 3 Band Ra dio Cassette Re corder with Programmable Clock Alarm FM 88 94 96 100 104 106 108 MHz MW LW 540 600 800 100 0 12 00 160 0 khz 150 160 180 200
MODEL: MEMPHIS FM STEREO RADIO OPERATING INSTRUCTIONS
 MODEL: MEMPHIS CD/USB/SD PLAYER WITH TURNTABLE. ENCODING TO USB AND SD CARD. FM STEREO RADIO OPERATING INSTRUCTIONS PLEASE READ THIS USER MANUAL COMPLETELY BEFORE OPERATING THIS UNIT AND RETAIN THIS BOOKLET
Rock-Ola Music Center Set-Up and Installation Guide For all Q-Series models 230V, Export
 Part No. 61745-01 Rock-Ola Music Center Set-Up and Installation Guide For all Q-Series models 230V, Export IMPORTANT SAFETY INSTRUCTIONS a. Read these instructions. b. Keep these instructions. c. Follow
IMPORTANT SAFETY INSTRUCTIONS. When using this electronic device, basic precautions should always be taken, including the following:
 IMPORTANT SAFETY INSTRUCTIONS When using this electronic device, basic precautions should always be taken, including the following: 1. Read all instructions before using the product. 2. Do not use this