NovaBACKUP. User Manual. NovaStor / May 2014
|
|
|
- Ashlee Gray
- 8 years ago
- Views:
Transcription
1 NovaBACKUP User Manual NovaStor / May NovaStor, all rights reserved. All trademarks are the property of their respective owners. Features and specifications are subject to change without notice. The information provided herein is provided for informational and planning purposes only.

2 Table of Contents Installation... 1 Getting To Know the User Interface... 2 The Express Wizard...24 Virtual Dashboard...25 Disaster Recovery...31 Backup Retention...54 Program Settings...59 Using the Logs Using Filters Using Online Storage Using the Network Storage Device Using the xsp Storage Device System State Backup and Restore Using Plug-Ins Importing Backups Advanced Features

3 Installation Installing the Software Installing from downloaded file: Run the SETUP.EXE program to install NovaBACKUP. To install from CD: Insert the CD into your CD-ROM drive. In most cases, SETUP.EXE will automatically begin. (If this fails to work, double click the SETUP.EXE file on the CD). 1

4 Getting To Know The User Interface Getting To Know the User Interface The User Interface The user interface consists of a single main screen. At the top of this screen you ll find the "Launch Button", "Quick Access Toolbar" and a set of seven tabs. Launch Button The Launch Button is in the top-left corner of NovaBACKUP. It provides fast access to files and frequently used commands. From here, you can quickly create a new job, open, run and save an existing job, or import previous backup jobs. Quick Access Toolbar From here, simply click on the appropriate icon to create a new job, open an existing job or save the current job. Tabs The Home tab contains convenient information about your previous and next scheduled backup as well as useful shortcuts and the "Quick Select" feature. The Backup tab allows you to select files and folders to backup. Similarly, the Copy tab allows you to select files and folders to be copied to another destination. The Restore tab enables you to make selections in order to restore files and folders. The Schedule tab provides a means to schedule backup jobs to run at a future time/date. The Logs tab provides access to logs for previously run jobs. The Device tab provides a means to configure and view backup devices. The Status tab give you a method to view the progress of the currently running job. 2

5 The file lists in the Backup, Copy and Restore tabs look very similar to the Windows Explorer, which makes it familiar and easy to use. Selected files can be browsed by expanding the drives or network resources in the tree view display on the left-hand side. Next to each folder and file is a check box. These are used for adding and removing files from the selection list. Note: The name of the currently selected job is listed at the top of the NovaBACKUP program window. Launch Button The Launch Button is in the top-left corner of NovaBACKUP. It provides fast access to files and frequently used commands. From there, you can quickly create a new job, open, run and save an existing job, or import previous backup sets. Item Detail New Job Open Job Save Job Save Job As Default Settings Run Job Import Media Recent Files List Exit This will allow you tocreatea new jobbased on the tab selected. This will allow you to open a previously savedjob. This will allow you to save the current job. This will allow you to save the current job using a different name. Default Settings. This will allow you to run a previously saved job This will allow you to import backup jobs that do not appear in the Restore View. These backup jobs are usually created with previous installations of or from other computers running NovaBACKUP. From this list, you can select a recently used job. This exits the application. 3

6 Tab Functionality HomeTab On this tab, you will find the task window on the left containing summary information on the most recent and next scheduled operations, the link to configure global settings and display the help file. 4

7 Left panel items: Click on any of the "Recent Tasks" items to open the corresponding log file for review. Click on any of the "Next Scheduled Task" items to open the corresponding schedule to view or edit. Click on the "Settings" item to open screen where default settings may be set which affect most areas of the application. Main selections: The Express Wizard The Express Wizard provides a step by step method to perform many common tasks available in the application. Topics will be added soon which outline the features and steps available in the Express Wizard. Virtual Dashboard The Virtual Dashboard is where all VMware and Hyper-V backups that are capable of restoring individual files take place. It is also the center of VMware and Hyper-V replication operations. These backups are not the same as backups that are done through the Backup tab. Disaster Recovery The Disaster Recovery selection opens the screen where either the Disaster Recovery scheduler application wizard may be launched. Cloud Backup Click Cloud Backup to setup a cloud backup device through our network of selected partners. Utilities: Run Job- Clicking this link allows you quickly select a specific Backup, Copy or Restore task to run. After making your selection, click "Run" and the specific task will be performed immediately. Open Job -Select this link to open a previously save Backup, Copy or Restore job permitting the job to be updated, saved or run. Import Media- This link launches the Import Media function allowing you to add details for media not already saved to the current NovaBACKUP database. For example, media from another system or installation of NovaBACKUP. Add Network Device Click this link to create a new network storage device. Once the device is created you can manage the device as well as all other deices by clicking the device tab. Copy Tab From here, you can create a job that will copy the files/folders you specify from one location to another. The different options available allow you to adjust the copy job to your specific needs. 5

8 What are copy jobs?copy jobs are combinations of directories and files that are selected as well as any of the options (including filters) that go along with that specific copy job. Copyjobs differ from backup jobs in that they result in the exact same set of files being "copied" or transferred to the destination device including: Hard Disk, Network Drive, CD or DVD, and online storage. Note: Copy jobs DO NOT permit the use of tape. 6

9 Button Functions "Copy Type" Button Select the copy type you with to perform: 7

10 "Copy" Copy files and directories from the source(s) on the left to the destination or the right. Does not remove files on the destination that DO NOT exist on the source "Mirror" Mirror files and directories from the source(s) on the left to the destination or the right. REMOVES files on the destination that DO NOT exist on the source "Bidirectional Copy" Copy files and directories between the left and the right paths. Results in an identical set of files and folders on both sides: Files on one side, but not the other are copied "Copy To" Button Note:Files that have been deleted from one path will NOT be deleted from the other Click this button to display a dialog showing all available devices. From here, select the destination device and/or path you want to use for this job "Make Folder" Button By highlighting an existing path and clicking this button, you are able to create a new, empty folder "Estimate" Button This will allow you to find out the estimated number of files and size of the current copy job. Once selected a "Estimate" box will appear with the following information: Files This indicates the Count (number of files) and Size (In Gigabytes) that you have selected for the job. This is especially helpful if the size of a copy is an issue when attempt to copy files to external devices with limited space such as CD/DVD s or USB Devices. Folders This indicates the number of folders that you have selected for the job. "Schedule" button This button is used for the schedule options. Within this window, you will be able to schedule the job as well as name it. You have various scheduling options including; one time, minute, hourly, daily, weekly, or monthly. You may also set the time and date of when the job will run. "Settings" button This will take you to the Advanced options for this specific copy job. Refer to the Copy Job Settings Topic for further information "Copy" button: This button starts the selected copy job immediately. 8

11 Backup Tab Using this tab, you can create a backup set that will include the files that you specify. The different options available allow you to adjust the backup job to your needs. You may select items from the "Select Backup Source" pane. Folders and volumes will be on the left and files on the right. You may select a descriptive name for the backup job by enter it in the "Backup Name" field at the top. This will allow you to clearly identify each job on a specific media. 9

12 Backup Job Name In this text box, you can input an optional name for the current backup job you are creating. Be sure not to confuse this with the filename of the backup job. The backup job name is essentially a descriptive name that you have assigned to the actual backup job file. A default job name will be assigned to each new backup indicating the date and time within the name. This name structure is just one way to help organize your backup jobs. What are backup jobs?backup jobs are combinations of directories and files that are selected for backup as well as any of the options (including filters) that go along with that specific backup. Backup jobs are used to allow one or more collections of files to be backed up at different times. For example, one backup job could be created for accounting data, and another backup job could be created for important data that changes daily. The important data might be backed up daily or even hourly, while the accounting data could be backed up at the end of the week. Remember that setting a backup job name is optional and is meant to aid in managing backup jobs. For instance, under the Logs Tab, which will be discussed later, a listing of previous backup activity can be seen. Each of these logs is indicated by a Backup Job Name and a date. If you do not specify a Backup Job Name for any of your backup jobs, it will be a daunting task to differentiate the several backups solely by the dates and times of each of the backups. Thus, it is highly recommended that you assign a name to each of your backup jobs in order to ease your ability to distinguish the different backups. Button Functions "Estimate" Button This will allow you to find out the estimated number of files and size of the current backup job. Once selected a "Estimate" box will appear with the following information: Files This indicates the Count (number of files) and Size (In Gigabytes) that you have selected for the job. This is especially helpful if the size of a backup job is an issue when attempting to backup files to external devices with limited space such as CD/DVD s or USB Devices. Folders This indicates the number of folders that you have selected for the job. "Schedule" button This button is used for the schedule options. Within this window, you will be able to schedule the job as well as name it. You have various scheduling options including; one time, minute, hourly, daily, weekly, or monthly. You may also set the time and date of when the job will run. "Settings" button This will take you to the Advanced options for this specific backup job. Refer to the Backup Job Settings Topic for further information. 10
 that go along with that specific backup.")
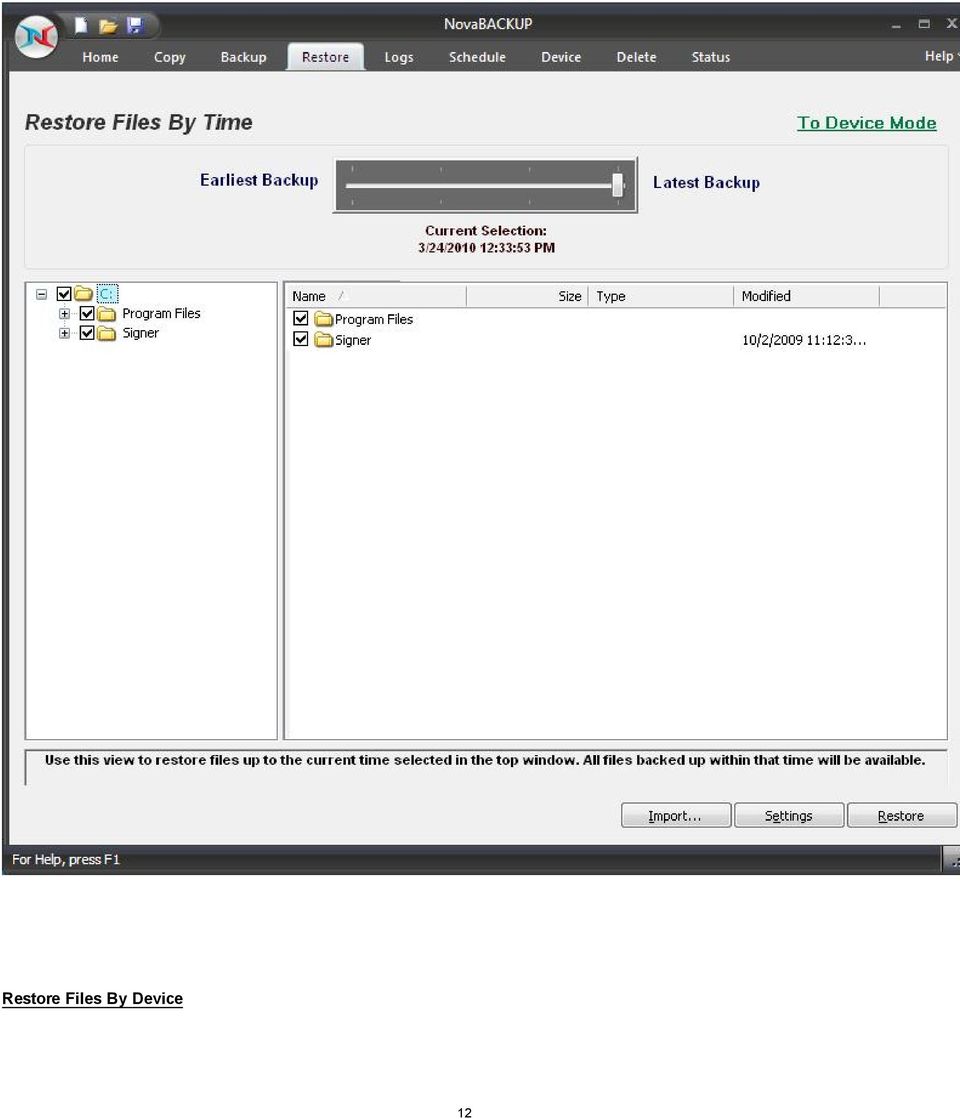
13 "Backup To.. " button Click this button to display a dialog showing all available devices. From here, select the backup destination device and/or path you want to save the backup to "Backup" button This button starts the selected backup job immediately. Restore Tab Under the Restore tab you will find all the folders/files from previous backups that you can restore either to the original or alternate location. Restore Files By Time This 'TimeSlider' view uses a patent pending technology to provide a single restorable fileset without the need to select the backup source device. Using the slider, files are listed based on the range of time the backup has run. 11

14 Restore Files By Device 12
15 This view displays a restorable fileset contained in a specific backup. Use the device view in the upper window to select the location of the backup and the backup session containing the files available to restore. 13

16 Why don't I see any media listed? If you are unable to see anything populated in the media view, you might need to perform an import on the media which is explained below in the import section. Select Backup Job From the Media View in the top window, you will see a list of available backups that you can restore from. Simply select the backup you would like to restore by double-clicking the entry and a listing of the folder/files included in that backup will appear in the windows below. The Media View - Restore Mode This window allows you to view all available backups to restore from, based on the database of backup jobs and folder/file selections cataloged within the database. All backups are categorized by destination type (Disk, Removable Disk, CD/DVD, Internet, and Tape) and further categorized by backup job name. This view is similar to the Media View as seen in the Backup mode. However, only destinations with backups available for restoration will be listed. Select Restore Item(s) These selection windows are similar to the ones seen on the Backup Tab. Here, a listing of files and folders will be displayed once a backup job has been selected for restoration. The only files and directories that will be listed are the ones that were included in the backup job that you are restoring. In the selection windows, you can select files and/or folders just as you did in the Backup Tab when you selected the files for backup. By default, if you are restoring files to their original location, files that already exist in that location will not be overwritten by the files that are to be restored. Check your Restore Setting to alter this. Button Functions "Import" Button This button will allow you to import backup jobs that are not in the currentnovabackupdatabase. Simply click on the button and browse to the backup job that you desire to import. Once imported into database, the backup job will then be listed in the media view, and available for restoration. "Settings" Button This button will allow you to access some options that you have in the restore process. These options are discussed in Restore Job Settings Topic. "Restore" Button 14

17 Once you have selected the files, folders, or drives that you want to restore, you may press this button to start the restore immediately. If you are restoring from a complete set of spanned media, you should always select the first piece of media as your first restoration media. NovaBACKUP will prompt you to insert each subsequent piece of media if necessary. You must have all media available to do the restore. If your backup consists of 5 pieces of media and media #3 is corrupt/missing/damaged, you will only be able to restore data from the first two pieces of media. Logs Tab From here, you can quickly determine the status of a Copy, Backup or Restore job that was performed. 15

18 The columns in the summery view include: Operation: Includes - Copy, Backup, Restore & Import. You can quickly determine the status of the backup by the color-coded icon next to each operation: Operation completed successfully Operation completed, but had warnings Operation had errors Job Name: The name of the job for this log file Date/Time: The Date & Time the specific job was run 16

19 Errors: The number of errors encountered after running the job Warnings: The number of warnings encountered after running the job Objects Selected: The number of objects selected before running the job Objects Completed: The number of objects successfully completed after running the job Size Completed: The total size of all objects successfully completed after running the job You can quickly sort the logs view by clicking on the appropriate column heading at the top of the window Button Functions Delete Button To delete a log file, simply select the log file and press thedeletebutton. To delete multiple log files, you may select more than one by using the Shift and/or Ctrl buttons on your keyboard to select the logs and pressing the Delete button. View Button To view the log file, select the log you would like to open and press the View button. Alternatively, you may also simply double-click the log file you want to view. For further details, see theusing the Logssection. Schedule Tab From this tab you are able to view, modify, add, run, and delete scheduled tasks. 17

20 Remember: You can quickly disable all schedules from running by unchecking the option - "Allow scheduled jobs to execute" The initial view contains an overview of all scheduled jobs including the following columns: Job Name: Job or Script Name Type:The "Type" of schedule set - includes (One Time, Minute, Hourly, Daily, Weekly, Monthly) Run As: Account used to run the job, Last Run:When the job last ran 18
 Run As: Account used to run the job, Last Run:When the job")
21 Last Run Status: The status the last time the job ran - includes: Completed - The scheduled job completed with no information (log) Completed with info - The scheduled job completed successfully and a log was generated Completed with warnings - The scheduled job completed but had warnings Completed with errors - The scheduled job completed but had errors Failed - The scheduled job failed to run Next Run: When the job is scheduled to run again Current Status: Waiting - Schedule is waiting to run Running - Schedule is running Held - Schedule has been placed on hold Error - Schedule will not run again until the error is corrected (Invalid Credentials, no media, no device available) Right-Click Functions Right-clicking on any of the listed schedules displays a menu with the following functions: New - Create a new schedule Hold/Resume Schedule - Permits the selected schedule to be placed on hold or resumed if already held Modify Schedule - Displays the schedule details so they can be viewed/modified Modify Job - Displays the specific job details so they can be viewed/modified Run Now.. - Runs the job associated with the selected schedule immediately View Log - Displays the log details of the scheduled job the last time it was run Delete - Deletes the selected schedule item from the list Button Functions Delete Button This button will allow you to delete the selected schedule item from the list, regardless of its status. Edit Button This button will allow you to edit the selected schedule item. Add Button This button will allow you to create new scheduled tasks. Backup Retention Button Click this button to display the screen which is used to define a backup retention job. Device Tab The Device Tab shows a list of all available storage devices jobs can be configured to utilize. In from this tab, you're able to add, modify and delete devices 19
22 The initial view contains an overview of all scheduled jobs including the following columns: Device - The name of the device Volume (Media) - The name of the volume (Disk, Removable Disk) or media name (CD/DVD, Tape) Size - Total size of the device or media Free - Total available size of the device or media File System - Type of file system (NTFS, UDF, FAT32, FAT, etc) 20
23 Right-Click Functions Right-clicking on any of the listed devices displays a menu with functions appropriate to the device: Hard Drive, Removable Hard Drives, Networked Drives, CD/DVD & Tape: Import - Allows you to import backup jobs that are not in the current NovaBACKUP database CD/DVD & Tape Devices Eject Media - Eject the currently inserted media Quick Erase Media - Performs a quick erase (header information is erased, but data remains) Full Erase Media - All data is erased from media Internet and Network storage devices Delete Device - Deletes the currently selected Internet device Properties - List the properties associated with the selected device Button Functions "Add" Button (Only applies to Internet and Network Devices) Launches the Internet and Network Device dialog. "Delete" Button (Only applies to Internet and Network devices) Deletes the currently highlighted Internet device from the list. "Refresh" Button Refreshes the device view to include newly added or connected devices. "Properties" Button (Only applies to Internet and Network devices) Displays the properties of the highlighted Internet and Network devices. You can also display the device properties by doubleclicking on the device in the list. Status Tab From here, you can quickly determine the status of a currently running job 21
24 The status view includes the following sections and items: Totals Time Device Completed Files/Bytes - The number of files and bytes successfully completed Selected Files/Bytes - The total number of files and bytes selected by the job Skipped Files/Bytes - The number of files and bytes that were skipped while running the job Elapsed Time: Hours:Minutes:Seconds representing the total amount of time the current job has been running Estimated Remaining Time: Hours:Minutes:Seconds representing the estimated time remaining for the current job to complete (This figure is an estimate only - actual time may vary) Estimated Time Completed: Date/Time representing the estimated completion time of the current job (This figure is an estimate only - actual time my vary) 22
25 Device Name: The name of the device/media used for the currently running job Current Speed: The speed (thruput) of the data being transferred for the currently running job Current Status Button Functions Status: Status of the currently running or completed job File: The file currently being transferred Size: The size of the file currently being transferred Progress: The progress bar representing the percentage completed of the currently running job (This is an approximate indication of job completion. Actual percentage may vary). "Stop" Button - Stops the currently running job "Pause" Button - Pauses the currently running job - Job remains active "Resume" Button -Resumes the previously paused job 23
26 The Express Wizard The Express Wizard The Express Wizard provides a step by step method to perform many common tasks available in the application. Topics will be added soon which outline the features and steps available in the Express Wizard. 24
27 Virtual Dashboard Virtual Dashboard The Virtual Dashboard is where all VMware and Hyper-V backups that are capable of restoring individual files take place. It is also the center of VMware and Hyper-V replication operations. These backups are not the same as backups that are done through the Backup tab. In order to access the Virtual Dashboard users will need to start NovaBACKUP and then click "Virtual Dashboard" from the "Home" tab. Adding a hypervisor Adding a hypervisor Upon opening the Virtual Dashboard users will be prompted with the option to add a hypervisor. Click the Add button at the top of the Hypervisor s menu. Once clicking "Add" users will be prompted to enter information relating to their Hypervisor. Note: If there are already VMware hosts added through the legacy backup functionality in NovaBACKUP, those servers will already be added to the Virtual Dashboard. Adding a VMware hypervisor Once users are in the "Add" menu of the Virtual Dashboard, select VMware. Users will then have four options: Display Name: This is the friendly name for the hypervisor. This can be anything and is designed for ease of use. Hostname / IP Address: The Hostname or IP address of the VMware ESXi or vcenter application Username: The username with access to the ESXi or vcenter application. Password: The password for the user Test / Save: Test the provided configuration or Save the provided configuration. Clicking Save will also test the credentials. Adding a Hyper-V hypervisor Once a user is in the "Add" menu of the Virtual Dashboard, select Hyper-V. Users will then be presented with two options: Editing a local Hyper-V hypervisor If NovaBACKUP is being installed onto a local Hyper-V host, users will not need to enter user credentials to access the Hyper-V service. Users will need to add two fields of information. Display Name: This is the friendly name for the hypervisor. This can be anything and is designed for ease of use. Hostname: This is the Fully Qualified Domain Name (FQDN) or hostname of the Hyper-V host. Test / Save: Test the provided configuration or Save the provided configuration. Clicking Save will also test the credentials. Editing a remote Hyper-V hypervisor If NovaBACKUP is being installed on a machine to manage a remote Hyper-V host, users will need to enter user credentials to access the Hyper-V service. Users will need to add four fields of information. If the Hyper-V host is remote, check "Connect using different credentials". Display Name: This is the friendly name for the hypervisor. This can be anything and is designed for ease of use. Hostname: This is the Fully Qualified Domain Name (FQDN) or hostname of the Hyper-V host. Username: The local or domain username with access to the Hyper-V host Password: The password for the user Test / Save: Test the provided configuration or Save the provided configuration. Clicking Save will also test the credentials. 25
28 Editing a hypervisor Editing a hypervisor To edit a hypervisor, click "Add" after selecting the hypervisor to be edited. Removing a hypervisor To remove a hypervisor, click "Remove" after selecting the hypervisor to be edited. Note: Removing a Hypervisor will remove all protected virtual machines and their backups from the Virtual Dashboard. Removing a virtual machine removes the ability to restore that virtual machine through the Virtual Dashboard Adding a virtual machine After adding a hypervisor, users will be shown a selection of virtual machines available for protection. Check the box next to the virtual machine needing protection in order to add it to the list of available virtual machines. Editing a VMware hypervisor Once a user is in the "Add" menu of the Virtual Dashboard, select VMware. Users will then have four options: Display Name: This is the friendly name for the hypervisor. This can be anything and is designed for ease of use. Hostname / IP Address: The Hostname or IP address of the VMware ESXi or vcenter application Username: The username with access to the ESXi or vcenter application. Password: The password for the user Test / Save: Test the provided configuration or Save the provided configuration. Clicking Save will also test the credentials. Editing a Hyper-V hypervisor Once a user is in the "Add" menu of the Virtual Dashboard, select Hyper-V. Users will then be presented with two options: Editing a local Hyper-V hypervisor If NovaBACKUP is being installed onto a local Hyper-V host, users will not need to enter user credentials to access the Hyper-V service. Users will need to add two fields of information. Display Name: This is the friendly name for the hypervisor. This can be anything and is designed for ease of use. Hostname: This is the Fully Qualified Domain Name (FQDN) or hostname of the Hyper-V host. Test / Save: Test the provided configuration or Save the provided configuration. Clicking Save will also test the credentials. Editing a remote Hyper-V hypervisor If NovaBACKUP is being installed on a machine to manage a remote Hyper-V host, users will need to enter user credentials to access the Hyper-V service. Users will need to add four fields of information. If the Hyper-V host is remote, check "Connect using different credentials". Display Name: This is the friendly name for the hypervisor. This can be anything and is designed for ease of use. Hostname: This is the Fully Qualified Domain Name (FQDN) or hostname of the Hyper-V host. Username: The local or domain username with access to the Hyper-V host Password: The password for the user Test / Save: Test the provided configuration or Save the provided configuration. Clicking Save will also test the credentials. 26
29 Backing up virtual machines Backing up virtual machines After adding a virtual machine to the list of protected virtual machines, users are able to create backup jobs that are able to restore individual files as well as directly back into the hypervisor. When creating a backup job, files will be stored in a hierarchal folder structure rather than a single file. After selecting a target folder on the user s machine, the Virtual Dashboard will automatically create another folder labeled NovaBACKUP underneath that folder. Users may continue to select the original destination for all future backup jobs. Example: A user selecting C:\Backups\ may continue to select this folder for all future backup jobs. After the first backup job runs, users will see a separate folder: C:\Backups\NovaBACKUP\ Backing up VMware VMware backups can be performed from any Windows 7 or Server 2008 R2 machine or greater. Changed Block Tracking Changed Block Tracking (CBT) is a VMware feature that helps perform incremental backups. After clicking on a protected virtual machine, users will see an option for CBT in the bottom right of the virtual machine s individual dashboard. Checking this box will enable CBT or show the current status of CBT on that virtual machine. Without CBT enabled, users will be unable to create an Incremental or Differential backup. Note: Enabling or disabling CBT may take time, as this is a VMware function change. Setting up VMware backups Name: The name of the backup job as it appears in the Virtual Dashboard Type: The type of backup job to configure &endash; Full, Incremental, or Differential Retention: In either Generations (number of versions to keep or count) or Days old (number of days to keep available) Run as: Users may choose to run the job as either the current user or as a specified user Schedule: Users may choose to schedule the job in a variety of methods. If no schedule is desired, users may toggle the "Schedule" switch in the top right to turn off the scheduler. VMware Retention VMware backups are able to maintain a retention value in either generations (count) or days for Full or Differential backups. In order to apply retention to an Incremental backup, users will need to target the same folder as their incremental backup with a scheduled or manually run full backup job that includes a retention value. Full A full backup is a backup of the entire virtual machine all at once. These backups can be very large in nature and users should be aware of how much storage space is available on the destination. Incremental and Differential initial backups If a user has not previously run a Full backup of a virtual machine, the initial Incremental or Differential backup job will execute as a full backup. This is intended behavior due to the required dependencies of Incremental or Differential jobs to their respective last full backup. Incremental Incremental backup jobs are backup jobs that base themselves on the last incremental backup job run. This means each incremental job is dependent upon the previous incremental backup in order to restore any particular file. Differential Differential backup jobs are backup jobs that base themselves on the last full backup job run. This means that each differential backup job is independent from each other and only the last full backup and the desired differential backup are required to restore a particular file. Backing up Hyper-V 27
NovaBACKUP. User Manual. NovaStor / November 2011
 NovaBACKUP User Manual NovaStor / November 2011 2011 NovaStor, all rights reserved. All trademarks are the property of their respective owners. Features and specifications are subject to change without
NovaBACKUP Virtual Dashboard
 NovaBACKUP Virtual Dashboard User Manual NovaStor / April 2015 2015 NovaStor, all rights reserved. All trademarks are the property of their respective owners. Features and specifications are subject to
Virtual Dashboard for VMware and Hyper-V
 Virtual Dashboard for VMware and Hyper-V USER MANUAL Steelgate Technologies, February 2015, all rights reserved. All trademarks are the property of their respective owners. Features and specifications
BackupAssist v6 quickstart guide
 New features in BackupAssist v6... 2 VSS application backup (Exchange, SQL, SharePoint)... 3 System State backup... 3 Restore files, applications, System State and mailboxes... 4 Fully cloud ready Internet
BackupAssist v6 quickstart guide
 Using the new features in BackupAssist v6... 2 VSS application backup (Exchange, SQL, SharePoint)... 2 Backing up VSS applications... 2 Restoring VSS applications... 3 System State backup and restore...
System Protection for Hyper-V Whitepaper
 Whitepaper Contents 1. Introduction... 2 Documentation... 2 Licensing... 2 Hyper-V requirements... 2 Definitions... 3 Considerations... 3 2. About the BackupAssist Hyper-V solution... 4 Advantages... 4
NovaBACKUP Network User s Guide
 NovaBACKUP Network User s Guide NovaStor / January 2011 2011 NovaStor, all rights reserved. All trademarks are the property of their respective owners. Features and specifications are subject to change
Hyper-V Protection. User guide
 Hyper-V Protection User guide Contents 1. Hyper-V overview... 2 Documentation... 2 Licensing... 2 Hyper-V requirements... 2 Windows Server 2012 Hyper-V support... 3 2. Hyper-V protection features... 3
NOVASTOR CORPORATION NovaBACKUP Disaster Recovery Walkthrough
 NOVASTOR CORPORATION NovaBACKUP Disaster Recovery Walkthrough 2009 NovaStor, all rights reserved. All trademarks are the property of their respective owners. Features and specifications are subject to
Backup Assistant. User Guide. NEC NEC Unified Solutions, Inc. March 2008 NDA-30282, Revision 6
 Backup Assistant User Guide NEC NEC Unified Solutions, Inc. March 2008 NDA-30282, Revision 6 Liability Disclaimer NEC Unified Solutions, Inc. reserves the right to change the specifications, functions,
User Guide. CTERA Agent. August 2011 Version 3.0
 User Guide CTERA Agent August 2011 Version 3.0 Copyright 2009-2011 CTERA Networks Ltd. All rights reserved. No part of this document may be reproduced in any form or by any means without written permission
CTERA Agent for Windows
 User Guide CTERA Agent for Windows May 2012 Version 3.1 Copyright 2009-2012 CTERA Networks Ltd. All rights reserved. No part of this document may be reproduced in any form or by any means without written
Acronis Backup & Recovery 10 Advanced Server Virtual Edition. Quick Start Guide
 Acronis Backup & Recovery 10 Advanced Server Virtual Edition Quick Start Guide Table of contents 1 Main components...3 2 License server...3 3 Supported operating systems...3 3.1 Agents... 3 3.2 License
System Protection for Hyper-V User Guide
 User Guide BackupAssist User Guides explain how to create and modify backup jobs, create backups and perform restores. These steps are explained in more detail in a guide s respective whitepaper. Whitepapers
Exchange Server Backup and Restore
 WHITEPAPER BackupAssist Version 6 www.backupassist.com Cortex I.T. 2001-2007 2 Contents 1. Introduction... 3 1.1 Overview... 3 1.2 Requirements... 3 1.3 Requirements for remote backup of Exchange 2007...
Vess A2000 Series. NVR Storage Appliance. Windows Recovery Instructions. Version 1.0. 2014 PROMISE Technology, Inc. All Rights Reserved.
 Vess A2000 Series NVR Storage Appliance Windows Recovery Instructions Version 1.0 2014 PROMISE Technology, Inc. All Rights Reserved. Contents Introduction 1 Different ways to backup the system disk 2 Before
Veeam Backup Enterprise Manager. Version 7.0
 Veeam Backup Enterprise Manager Version 7.0 User Guide August, 2013 2013 Veeam Software. All rights reserved. All trademarks are the property of their respective owners. No part of this publication may
UltraBac Documentation. UBDR Gold. Administrator Guide UBDR Gold v8.0
 UltraBac Documentation UBDR Gold Bare Metal Disaster Recovery Administrator Guide UBDR Gold v8.0 UBDR Administrator Guide UBDR Gold v8.0 The software described in this guide is furnished under a license
VMware/Hyper-V Backup Plug-in User Guide
 VMware/Hyper-V Backup Plug-in User Guide COPYRIGHT No part of this publication may be reproduced, stored in a retrieval system, or transmitted in any form or by any means, electronic, mechanical, photocopying,
Updates Click to check for a newer version of the CD Press next and confirm the disc burner selection before pressing finish.
 Backup. If your computer refuses to boot or load Windows or if you are trying to restore an image to a partition the Reflect cannot lock (See here), and then you will have to start your PC using a rescue
Moving the TRITON Reporting Databases
 Moving the TRITON Reporting Databases Topic 50530 Web, Data, and Email Security Versions 7.7.x, 7.8.x Updated 06-Nov-2013 If you need to move your Microsoft SQL Server database to a new location (directory,
Quick Start - Virtual Server idataagent (VMware)
") Page 1 of 24 Quick Start - Virtual Server idataagent (VMware) TABLE OF CONTENTS OVERVIEW Introduction Key Features Complete Virtual Machine Protection Granular Recovery of Virtual Machine Data Minimal
Page 1 of 24 Quick Start - Virtual Server idataagent (VMware) TABLE OF CONTENTS OVERVIEW Introduction Key Features Complete Virtual Machine Protection Granular Recovery of Virtual Machine Data Minimal
How To Backup A Virtual Machine With Thinware Vbackup
 vbackup Administrator s Guide Thinware vbackup 4.0.1 Thinware vbackup Administrator s Guide Thinware vbackup Administrator s Guide Revision: 4.0.1-1 The latest product updates and most up-to-date documentation
1. Overview... 2 Documentation... 2 Licensing... 2 Operating system considerations... 2
 User Guide BackupAssist User Guides explain how to create and modify backup jobs, create backups and perform restores. These steps are explained in more detail in a guide s respective whitepaper. Whitepapers
Parallels Desktop for Mac
 Parallels Software International, Inc. Parallels Desktop for Mac Quick Start Guide 3.0 (c) 2005-2007 Copyright 2006-2007 by Parallels Software International, Inc. All rights reserved. Parallels and Parallels
Image Backup and Recovery Procedures
 Image Backup and Recovery Procedures Thank you for purchasing a Fujitsu computer. Fujitsu is committed to bringing you the best computing experience with your new system. It is very important that you
Installation and User Guide for Partners and Businesses
 Installation and User Guide for Partners and Businesses Copyright 2013 SOS Online Backup Table of Contents Page Getting Ready 3 Choosing Components 4 Installing and Configuring ShadowProtect 5 Setting
Colligo Email Manager 6.0. Offline Mode - User Guide
 6.0 Offline Mode - User Guide Contents Colligo Email Manager 1 Key Features 1 Benefits 1 Installing and Activating Colligo Email Manager 2 Checking for Updates 3 Updating Your License Key 3 Managing SharePoint
User Guide Online Backup
 User Guide Online Backup Table of contents Table of contents... 1 Introduction... 2 Adding the Online Backup Service to your Account... 2 Getting Started with the Online Backup Software... 4 Downloading
VERITAS Backup Exec TM 10.0 for Windows Servers
 VERITAS Backup Exec TM 10.0 for Windows Servers Quick Installation Guide N134418 July 2004 Disclaimer The information contained in this publication is subject to change without notice. VERITAS Software
Acronis Backup & Recovery 11
 Acronis Backup & Recovery 11 Quick Start Guide Applies to the following editions: Advanced Server Virtual Edition Advanced Server SBS Edition Advanced Workstation Server for Linux Server for Windows Workstation
PGP Portable Quick Start Guide Version 10.2
 PGP Portable Quick Start Guide Version 10.2 Introduction to PGP Portable Use PGP Portable to distribute encrypted files to users who do not have PGP Desktop software. Use PGP Portable to transport files
Seagate Manager. User Guide. For Use With Your FreeAgent TM Drive. Seagate Manager User Guide for Use With Your FreeAgent Drive 1
 Seagate Manager User Guide For Use With Your FreeAgent TM Drive Seagate Manager User Guide for Use With Your FreeAgent Drive 1 Seagate Manager User Guide for Use With Your FreeAgent Drive Revision 1 2008
InventoryControl for use with QuoteWerks Quick Start Guide
 InventoryControl for use with QuoteWerks Quick Start Guide Copyright 2013 Wasp Barcode Technologies 1400 10 th St. Plano, TX 75074 All Rights Reserved STATEMENTS IN THIS DOCUMENT REGARDING THIRD PARTY
Xopero Centrally managed backup solution. User Manual
 Centrally managed backup solution User Manual Contents Desktop application...2 Requirements...2 The installation process...3 Logging in to the application...6 First logging in to the application...7 First
NetVanta Unified Communications Server Backup and Restore Procedures
 NetVanta Unified Communications Technical Note NetVanta Unified Communications Server Backup and Restore Procedures 1 Introduction 1.1 Overview This document provides backup and restore procedures to protect
Virtual Machine Backup User's Guide Version 5.3
 Virtual Machine Backup User's Guide Version 5.3 Last Revised: January 04, 2016 STORServer, Incorporated 485-B Elkton Drive Colorado Springs, CO 80907 1-800-550-5121 January 2016 2016 STORServer, Incorporated
2.6.1 Creating an Acronis account... 11 2.6.2 Subscription to Acronis Cloud... 11. 3 Creating bootable rescue media... 12
 USER'S GUIDE Table of contents 1 Introduction...3 1.1 What is Acronis True Image 2015?... 3 1.2 New in this version... 3 1.3 System requirements... 4 1.4 Install, update or remove Acronis True Image 2015...
ArCycle vmbackup. for VMware/Hyper-V. User Guide
 ArCycle vmbackup for VMware/Hyper-V User Guide 2 Copyright Copyright ArCycle Software, Ltd., 2011-2014. All rights reserved. No part of this publication may be reproduced, stored in a retrieval system,
Hyper-V Protection. User guide
 Hyper-V Protection User guide Contents 1. Hyper-V overview... 2 Documentation... 2 Licensing... 2 Hyper-V requirements... 2 2. Hyper-V protection features... 3 Windows 2012 R1/R2 Hyper-V support... 3 Custom
NovaBACKUP. Storage Server. NovaStor / May 2011
 NovaBACKUP Storage Server NovaStor / May 2011 2011 NovaStor, all rights reserved. All trademarks are the property of their respective owners. Features and specifications are subject to change without notice.
Colligo Email Manager 6.0. Connected Mode - User Guide
 6.0 Connected Mode - User Guide Contents Colligo Email Manager 1 Benefits 1 Key Features 1 Platforms Supported 1 Installing and Activating Colligo Email Manager 2 Checking for Updates 3 Updating Your License
SonicWALL CDP Local Archiving
 This document describes how to configure, implement, and manage a local archive for your SonicWALL CDP appliance. It contains the following sections: Feature Overview section on page 1 Using Local Archiving
CTERA Agent for Windows
 User Guide CTERA Agent for Windows September 2013 Version 4.0 Copyright 2009-2013 CTERA Networks Ltd. All rights reserved. No part of this document may be reproduced in any form or by any means without
User Guide. Version 3.0
 Kaseya Backup and Disaster Recovery User Guide Version 3.0 October 12, 2009 About Kaseya Kaseya is a global provider of IT automation software for IT Solution Providers and Public and Private Sector IT
Portions of this product were created using LEADTOOLS 1991-2009 LEAD Technologies, Inc. ALL RIGHTS RESERVED.
 Installation Guide Lenel OnGuard 2009 Installation Guide, product version 6.3. This guide is item number DOC-110, revision 1.038, May 2009 Copyright 1992-2009 Lenel Systems International, Inc. Information
Image Backup and Recovery Procedures
 Image Backup and Recovery Procedures Thank you for purchasing a Fujitsu computer. Fujitsu is committed to bringing you the best computing experience with your new system. It is very important that you
NTI Backup Now EZ v2 User s Guide
 NTI Backup Now EZ v2 User s Guide GMAA00423010 11/12 2 Copyright statement This guide is copyrighted by Toshiba Corporation with all rights reserved. Under the copyright laws, this guide cannot be reproduced
User Guide. Laplink Software, Inc. Laplink DiskImage 7 Professional. User Guide. UG-DiskImagePro-EN-7 (REV. 5/2013)
") 1 Laplink DiskImage 7 Professional Laplink Software, Inc. Customer Service/Technical Support: Web: http://www.laplink.com/contact E-mail: CustomerService@laplink.com Laplink Software, Inc. 600 108th Ave.
1 Laplink DiskImage 7 Professional Laplink Software, Inc. Customer Service/Technical Support: Web: http://www.laplink.com/contact E-mail: CustomerService@laplink.com Laplink Software, Inc. 600 108th Ave.
User Manual. Onsight Management Suite Version 5.1. Another Innovation by Librestream
 User Manual Onsight Management Suite Version 5.1 Another Innovation by Librestream Doc #: 400075-06 May 2012 Information in this document is subject to change without notice. Reproduction in any manner
16.4.3 Lab: Data Backup and Recovery in Windows XP
 16.4.3 Lab: Data Backup and Recovery in Windows XP Introduction Print and complete this lab. In this lab, you will back up data. You will also perform a recovery of the data. Recommended Equipment The
Kaseya 2. User Guide. Version 7.0. English
 Kaseya 2 Backup User Guide Version 7.0 English September 3, 2014 Agreement The purchase and use of all Software and Services is subject to the Agreement as defined in Kaseya s Click-Accept EULATOS as updated
WS_FTP Professional 12
 WS_FTP Professional 12 Tools Guide Contents CHAPTER 1 Introduction Ways to Automate Regular File Transfers...5 Check Transfer Status and Logs...6 Building a List of Files for Transfer...6 Transfer Files
Colligo Email Manager 6.2. Offline Mode - User Guide
 6.2 Offline Mode - User Guide Contents Colligo Email Manager 1 Benefits 1 Key Features 1 Platforms Supported 1 Installing and Activating Colligo Email Manager 3 Checking for Updates 4 Updating Your License
Advanced Event Viewer Manual
 Advanced Event Viewer Manual Document version: 2.2944.01 Download Advanced Event Viewer at: http://www.advancedeventviewer.com Page 1 Introduction Advanced Event Viewer is an award winning application
Contents. Getting Started...1. Managing Your Drives...14. Backing Up & Restoring Folders...28. Synchronizing Folders...48. Managing Security...
 Contents Getting Started.....................................................1 Using the Formatting Tool........................................1 Preparing the Software Manually..................................4
VMware@SoftLayer Cookbook Backup, Recovery, Archival (BURA)
") VMware@SoftLayer Cookbook Backup, Recovery, Archival (BURA) IBM Global Technology Services: Khoa Huynh (khoa@us.ibm.com) Daniel De Araujo (ddearaujo@us.ibm.com) Bob Kellenberger (kellenbe@us.ibm.com) 1
VMware@SoftLayer Cookbook Backup, Recovery, Archival (BURA) IBM Global Technology Services: Khoa Huynh (khoa@us.ibm.com) Daniel De Araujo (ddearaujo@us.ibm.com) Bob Kellenberger (kellenbe@us.ibm.com) 1
Team Foundation Server 2012 Installation Guide
 Team Foundation Server 2012 Installation Guide Page 1 of 143 Team Foundation Server 2012 Installation Guide Benjamin Day benday@benday.com v1.0.0 November 15, 2012 Team Foundation Server 2012 Installation
Understanding Backup and Recovery Methods
 Lesson 8 Understanding Backup and Recovery Methods Learning Objectives Students will learn to: Understand Local, Online, and Automated Backup Methods Understand Backup Options Understand System Restore
A+ Guide to Software: Managing, Maintaining, and Troubleshooting, 5e. Chapter 3 Installing Windows
 : Managing, Maintaining, and Troubleshooting, 5e Chapter 3 Installing Windows Objectives How to plan a Windows installation How to install Windows Vista How to install Windows XP How to install Windows
Team Foundation Server 2010, Visual Studio Ultimate 2010, Team Build 2010, & Lab Management Beta 2 Installation Guide
 Page 1 of 243 Team Foundation Server 2010, Visual Studio Ultimate 2010, Team Build 2010, & Lab Management Beta 2 Installation Guide (This is an alpha version of Benjamin Day Consulting, Inc. s installation
FalconStor Recovery Agents User Guide
 FalconStor Recovery Agents User Guide FalconStor Software, Inc. 2 Huntington Quadrangle Melville, NY 11747 Phone: 631-777-5188 Fax: 631-501-7633 Web site: www.falconstor.com Copyright 2007-2009 FalconStor
SonicWALL CDP 5.0 Microsoft Exchange InfoStore Backup and Restore
 SonicWALL CDP 5.0 Microsoft Exchange InfoStore Backup and Restore Document Scope This solutions document describes how to configure and use the Microsoft Exchange InfoStore Backup and Restore feature in
Hosting Users Guide 2011
 Hosting Users Guide 2011 eofficemgr technology support for small business Celebrating a decade of providing innovative cloud computing services to small business. Table of Contents Overview... 3 Configure
Lenovo Online Data Backup User Guide Version 1.8.14
 Lenovo Online Data Backup User Guide Version 1.8.14 Contents Chapter 1: Installing Lenovo Online Data Backup...5 Downloading the Lenovo Online Data Backup Client...5 Installing the Lenovo Online Data
Acronis Backup & Recovery 11.5 Quick Start Guide
 Acronis Backup & Recovery 11.5 Quick Start Guide Applies to the following editions: Advanced Server for Windows Virtual Edition Advanced Server SBS Edition Advanced Workstation Server for Linux Server
Retrospect 7.7 User s Guide Addendum
 Retrospect 7.7 User s Guide Addendum 2011 Retrospect, Inc. All rights reserved. Retrospect 7.7 Users Guide Addendum, first edition. Use of this product (the Software ) is subject to acceptance of the license
NAS 253 Introduction to Backup Plan
 NAS 253 Introduction to Backup Plan Create backup jobs using Backup Plan in Windows A S U S T O R C O L L E G E COURSE OBJECTIVES Upon completion of this course you should be able to: 1. Create backup
Allworx OfficeSafe Operations Guide Release 6.0
 Allworx OfficeSafe Operations Guide Release 6.0 No part of this publication may be reproduced, stored in a retrieval system, or transmitted, in any form or by any means, electronic, mechanical, photocopy,
Using iscsi with BackupAssist. User Guide
 User Guide Contents 1. Introduction... 2 Documentation... 2 Terminology... 2 Advantages of iscsi... 2 Supported environments... 2 2. Overview... 3 About iscsi... 3 iscsi best practices with BackupAssist...
EMC ViPR Controller Add-in for Microsoft System Center Virtual Machine Manager
 EMC ViPR Controller Add-in for Microsoft System Center Virtual Machine Manager Version 2.3 Installation and Configuration Guide 302-002-080 01 Copyright 2013-2015 EMC Corporation. All rights reserved.
IT Quick Reference Guides Using Windows 7
 IT Quick Reference Guides Using Windows 7 Windows Guides This sheet covers many of the basic commands for using the Windows 7 operating system. WELCOME TO WINDOWS 7 After you log into your machine, the
Yosemite Server Backup User s Guide
 Yosemite Server Backup User s Guide Part number: First edition: October 2010 Legal and notice information Copyright 2004, 2012 Barracuda Networks, Inc. Under copyright laws, the contents of this document
Symantec Backup Exec TM 11d for Windows Servers. Quick Installation Guide
 Symantec Backup Exec TM 11d for Windows Servers Quick Installation Guide September 2006 Symantec Legal Notice Copyright 2006 Symantec Corporation. All rights reserved. Symantec, Backup Exec, and the Symantec
13.1 Backup virtual machines running on VMware ESXi / ESX Server
 13 Backup / Restore VMware Virtual Machines Tomahawk Pro This chapter describes how to backup and restore virtual machines running on VMware ESX, ESXi Server or VMware Server 2.0. 13.1 Backup virtual machines
RingStor User Manual. Version 2.1 Last Update on September 17th, 2015. RingStor, Inc. 197 Route 18 South, Ste 3000 East Brunswick, NJ 08816.
 RingStor User Manual Version 2.1 Last Update on September 17th, 2015 RingStor, Inc. 197 Route 18 South, Ste 3000 East Brunswick, NJ 08816 Page 1 Table of Contents 1 Overview... 5 1.1 RingStor Data Protection...
Yosemite Server Backup User s Guide
 Yosemite Server Backup User s Guide Part number: First edition: October 2010 Legal and notice information Copyright 2004, 2012 Barracuda Networks, Inc. Under copyright laws, the contents of this document
Attix5 Pro Server Edition
 Attix5 Pro Server Edition V7.0.2 User Manual for Mac OS X Your guide to protecting data with Attix5 Pro Server Edition. Copyright notice and proprietary information All rights reserved. Attix5, 2013 Trademarks
GUARD1 PLUS SE Administrator's Manual
 GUARD1 PLUS SE Administrator's Manual Version 4.4 30700 Bainbridge Road Solon, Ohio 44139 Phone 216-595-0890 Fax 216-595-0991 info@guard1.com www.guard1.com i 2010 TimeKeeping Systems, Inc. GUARD1 PLUS
GFI Backup 2010 Business Edition. Administration and User Guide
 GFI Backup 2010 Business Edition Administration and User Guide http://www.gfi.com E-mail: info@gfi.com Information in this document is subject to change without notice. Companies, names, and data used
Quick Start - Virtual Server idataagent (Microsoft/Hyper-V)
") Page 1 of 19 Quick Start - Virtual Server idataagent (Microsoft/Hyper-V) TABLE OF CONTENTS OVERVIEW Introduction Key Features Complete Virtual Machine Protection Granular Recovery of Virtual Machine Data
Page 1 of 19 Quick Start - Virtual Server idataagent (Microsoft/Hyper-V) TABLE OF CONTENTS OVERVIEW Introduction Key Features Complete Virtual Machine Protection Granular Recovery of Virtual Machine Data
NovaBACKUP: VMware Plug-In
 NovaBACKUP: VMware Plug-In Nathan Fouarge / NovaStor / April 2012 2012 NovaStor, all rights reserved. All trademarks are the property of their respective owners. Features and specifications are subject
4 Backing Up and Restoring System Software
 4 Backing Up and Restoring System Software In this Chapter... Planning a Backup Strategy, 4-3 Preparing for Disaster Recovery, 4-4 Creating Boot Recovery Diskettes, 4-5 Making a Full Backup Tape, 4-8 Restoring
10.3.1.6 Lab - Data Backup and Recovery in Windows XP
 5.0 10.3.1.6 Lab - Data Backup and Recovery in Windows XP Introduction Print and complete this lab. In this lab, you will back up data. You will also perform a recovery of the data. Recommended Equipment
SOS SO S O n O lin n e lin e Bac Ba kup cku ck p u USER MANUAL
 SOS Online Backup USER MANUAL HOW TO INSTALL THE SOFTWARE 1. Download the software from the website: http://www.sosonlinebackup.com/download_the_software.htm 2. Click Run to install when promoted, or alternatively,
HP RDX Continuous Data Protection Software Quickstart Guide
 HP RDX Continuous Data Protection Software Quickstart Guide *5697-3351* HP Part Number: 5697-3351 Published: May 2014 Edition: Fourth Copyright 2008 2014 Hewlett-Packard Development Company, L.P. Microsoft,
Migrating a Windows PC to Run in VMware Fusion VMware Fusion 2.0
 Technical Note Migrating a Windows PC to Run in VMware Fusion VMware Fusion 2.0 This technical note describes the process for migrating an existing Windows PC to run as a virtual machine with VMware Fusion
Drobo How-To Guide. Topics. Back Up to Drobo File Sharing Storage Using StorageCraft ShadowProtect
 Drobo storage is an excellent backup-to-disk destination when used with StorageCraft ShadowProtect, allowing you to protect critical assets on your Windows servers, workstations, and notebooks. ShadowProtect
How to Backup and Restore a VM using Veeam
 How to Backup and Restore a VM using Veeam Table of Contents Introduction... 3 Assumptions... 3 Add ESXi Server... 4 Backup a VM... 6 Restore Full VM... 12 Appendix A: Install Veeam Backup & Replication
Dell AppAssure Universal Recovery
 Technology spotlight Dell AppAssure Universal Recovery The key to unlimited cross-platform restoration flexibility Universal Recovery is a built-in Dell AppAssure tool for recovering whole physical machines,
Backup Manager Configuration and Deployment Guide. Version 9.1
 Backup Manager Configuration and Deployment Guide Version 9.1 Contents Backup Manager 3 Backup Manager Support 9 Backup Manager Configuration and Deployment 14 Defining a Backup Manager Profile 14 Configuring
How to Install Microsoft Windows Server 2008 R2 in VMware ESXi
 How to Install Microsoft Windows Server 2008 R2 in VMware ESXi I am not responsible for your actions or their outcomes, in any way, while reading and/or implementing this tutorial. I will not provide support
Table of Contents. CHAPTER 1 About This Guide... 9. CHAPTER 2 Introduction... 11. CHAPTER 3 Database Backup and Restoration... 15
 Table of Contents CHAPTER 1 About This Guide......................... 9 The Installation Guides....................................... 10 CHAPTER 2 Introduction............................ 11 Required
Backup Tab. User Guide
 Backup Tab User Guide Contents 1. Introduction... 2 Documentation... 2 Licensing... 2 Overview... 2 2. Create a New Backup... 3 3. Manage backup jobs... 4 Using the Edit menu... 5 Overview... 5 Destination...
Operating System Installation Guide
 Operating System Installation Guide This guide provides instructions on the following: Installing the Windows Server 2008 operating systems on page 1 Installing the Windows Small Business Server 2011 operating
Bare Metal Recovery Quick Start Guide
 Bare Metal Recovery Quick Start Guide Revisions Document Control Version 5.4.3 Status Changes Date Final Created. August 2014 Copyright 2003-2014 Intronis, Inc. All rights reserved. 1 Table of Contents
Attix5 Pro. Your guide to protecting data with Attix5 Pro Desktop & Laptop Edition. V6.0 User Manual for Mac OS X
 Attix5 Pro Your guide to protecting data with Attix5 Pro Desktop & Laptop Edition V6.0 User Manual for Mac OS X Copyright Notice and Proprietary Information All rights reserved. Attix5, 2011 Trademarks
WINDOWS SERVER 2008 OFFLINE SYSTEM RECOVERY USING WINDOWS SERVER BACKUP WITH NETWORKER
 TECHNICAL NOTES WINDOWS SERVER 2008 OFFLINE SYSTEM RECOVERY USING WINDOWS SERVER BACKUP WITH NETWORKER NETWORKER RELEASE 7.4 SERVICE PACK 2 AND LATER TECHNICAL NOTE P/N 300-010-339 REV A02 Table of Contents
NovaBACKUP Central Management Console
 NovaBACKUP Central Management Console User Manual NovaStor / November 2013 2013 NovaStor, all rights reserved. All trademarks are the property of their respective owners. Features and specifications are
12 NETWORK MANAGEMENT
 12 NETWORK MANAGEMENT PROJECTS Project 12.1 Project 12.2 Project 12.3 Project 12.4 Understanding Key Concepts Backing Up and Restoring Data Monitoring Computer Activity Configuring SNMP Support 276 Networking