WEB2CS INSTALLATION GUIDE
|
|
|
- Jennifer Fitzgerald
- 10 years ago
- Views:
Transcription
1 WEB2CS INSTALLATION GUIDE FOR CPANEL / WHM XandMail 32, rue de Cambrai PARIS - FRANCE Tel : +33 (0)
1 40 388 700 - http://www.")
2 TABLE OF CONTENTS 1. INSTALLING WEB2CS ADDING XANDMAIL AS A VENDOR CONNECT TO YOUR SERVER S ADMINISTRATION INTERFACE OPEN THE CPANEL MENU AND DISPLAY THE INSTALL CPADDONS PAGE INPUT XANDMAIL S VENDOR URL AND CLICK UPDATE VENDORS INSTALLING THE WEB2CS PACKAGE ON THE SERVER CHECK THE INSTALLED CHECKBOX CORRESPONDING TO THE WEB2CS APPLICATION AND CLICK ON THE UPDATE ADDON CONFIG BUTTON YOUR SERVER CONNECTS TO THE XANDMAIL SYNC SERVER AND RETRIEVES THE WEB2CS PACKAGE CLICK ON BACK TO DISPLAY THE CPADDONS LIST INSTALLING THE WEB2CS APPLICATION IN A DOMAIN CONNECT TO YOUR DOMAIN S ADMINISTRATION INTERFACE CLICK ON SUBDOMAINS IN THE DOMAINS SECTION CREATE AN XMAIL SUBDOMAIN OF YOUR DOMAIN CLICK ON HOME THEN ON SITE SOFTWARE IN THE SOFTWARE/SERVICES SECTION XANDMAIL S APPLICATIONS ARE LISTED IN THE CPADDON SCRIPTS CLICK ON WEB2CS SELECT THE SUBDOMAIN IN WHICH TO INSTALL WEB2CS CLICK INSTALL CREATING THE POSTMASTER@DOMAIN ACCOUNT IF IT DOES NOT YET EXIST ADDING SECURITY TO THE INSTALLATION AND SETTING UP MULTIPLE DOMAIN MANAGEMENT GET THE INSTRUCTIONS FROM THE INSTALLATION.LOG FILE RESTART APACHE CHECKING THE POSTMASTER WEBMAIL ACCOUNT DISPLAY THE LOGIN PAGE DISPLAY THE ADMINISTRATION INTERFACE HIDE THE INSTRUCTIONS ON THE LOGIN PAGE MANAGING MULTIPLE DOMAINS ON THE SAME INSTALLATION PRESENTATION ONE INSTALLATION FOR SEVERAL DOMAINS, EACH WITH ITS OWN LEVEL OF FEATURES ONE INSTALLATION FOR SEVERAL DOMAINS, ALL WITH THE SAME LEVEL OF FEATURES ADD A NEW DOMAIN FOR ANOTHER CUSTOMER LINK AN XMAIL SUBDOMAIN OF THIS NEW DOMAIN TO THE WEB2CS INSTALLATION 28 2

3 2.4. RESTART THE APACHE SERVER CREATE THE ACCOUNT ACCESS THE WEB2CS LOGIN PAGE FOR DOMAIN1.NET LOGIN TO XMAIL.DOMAIN1.NET AS POSTMASTER REMOVING A DOMAIN ALIAS FROM THE INSTALLATION MAKING A BACKUP OF THE DOMAIN SPECIFIC DATA USING THE WEB2CS APPLICATION ACCESS THE MAIN INTERFACE DISPLAY THE LOGIN PAGE CHANGE THE APPLICATION COLORS AND LOGO Upload a logo Change the background color Is the customization valid for all domains? APPLICATION CAPABILITIES: LIMITED OR NOT? INSTALL AN UPGRADE LICENSE Is the license valid for all domains? CHANGE THE RSS FEED Is the RSS feed valid for all domains? TROUBLESHOOTING UPGRADING XANDMAILWEB2CS LOGIN DOES NOT WORK ON A 64 BITS SERVER UNINSTALLING WEB2CS UNINSTALLING WEB2CS FROM A DOMAIN REMOVING WEB2CS FROM THE SERVER 50 3

4 1. INSTALLING WEB2CS The Web2cs application has been packaged for installation on servers managed with cpanel s Web Host Manager ADDING XANDMAIL AS A VENDOR The first step to execute is to add XandMail as a vendor on your server CONNECT TO YOUR SERVER S ADMINISTRATION INTERFACE The connection is normally done in HTTPS, using the port

5 OPEN THE CPANEL MENU AND DISPLAY THE INSTALL CPADDONS PAGE 5

6 INPUT XANDMAIL S VENDOR URL AND CLICK UPDATE VENDORS XandMail s Vendor information URL is: 6

7 XandMail is now listed as a Vendor in the same page, with in the Webmail category the Web2cs product: 7

8 1.2. INSTALLING THE WEB2CS PACKAGE ON THE SERVER CHECK THE INSTALLED CHECKBOX CORRESPONDING TO THE WEB2CS APPLICATION AND CLICK ON THE UPDATE ADDON CONFIG BUTTON 8

9 YOUR SERVER CONNECTS TO THE XANDMAIL SYNC SERVER AND RETRIEVES THE WEB2CS PACKAGE 9

10 CLICK ON BACK TO DISPLAY THE CPADDONS LIST Now XandMail s Web2cs application is checked, indicating that it is available for installation on a domain. 10

11 1.3. INSTALLING THE WEB2CS APPLICATION IN A DOMAIN CONNECT TO YOUR DOMAIN S ADMINISTRATION INTERFACE The connection is normally done in HTTPS, using the port

12 CLICK ON SUBDOMAINS IN THE DOMAINS SECTION 12

13 CREATE AN XMAIL SUBDOMAIN OF YOUR DOMAIN Web2cs should be installed in a separate location. In order to avoid blocking a whole domain name, and also to keep a consistent way of calling the Webmail in all domains, it should be installed in a subdomain and not in a subdirectory of a domain. So each domain will call Web2cs using the following URL: name] 13

14 The subdomain is now created. 14

15 CLICK ON HOME THEN ON SITE SOFTWARE IN THE SOFTWARE/SERVICES SECTION 15

16 XANDMAIL S APPLICATIONS ARE LISTED IN THE CPADDON SCRIPTS Please take note of the information available in the product description: It runs only on Linux platforms. An installation log file called installation.log (or upgrade.log in case of upgrade) is created during installation at the root of the installed site. Please consult it after installation, as it contains instructions on how to make your installation secure. 16
 is created during installation at the root of the installed site.")
17 CLICK ON WEB2CS 17
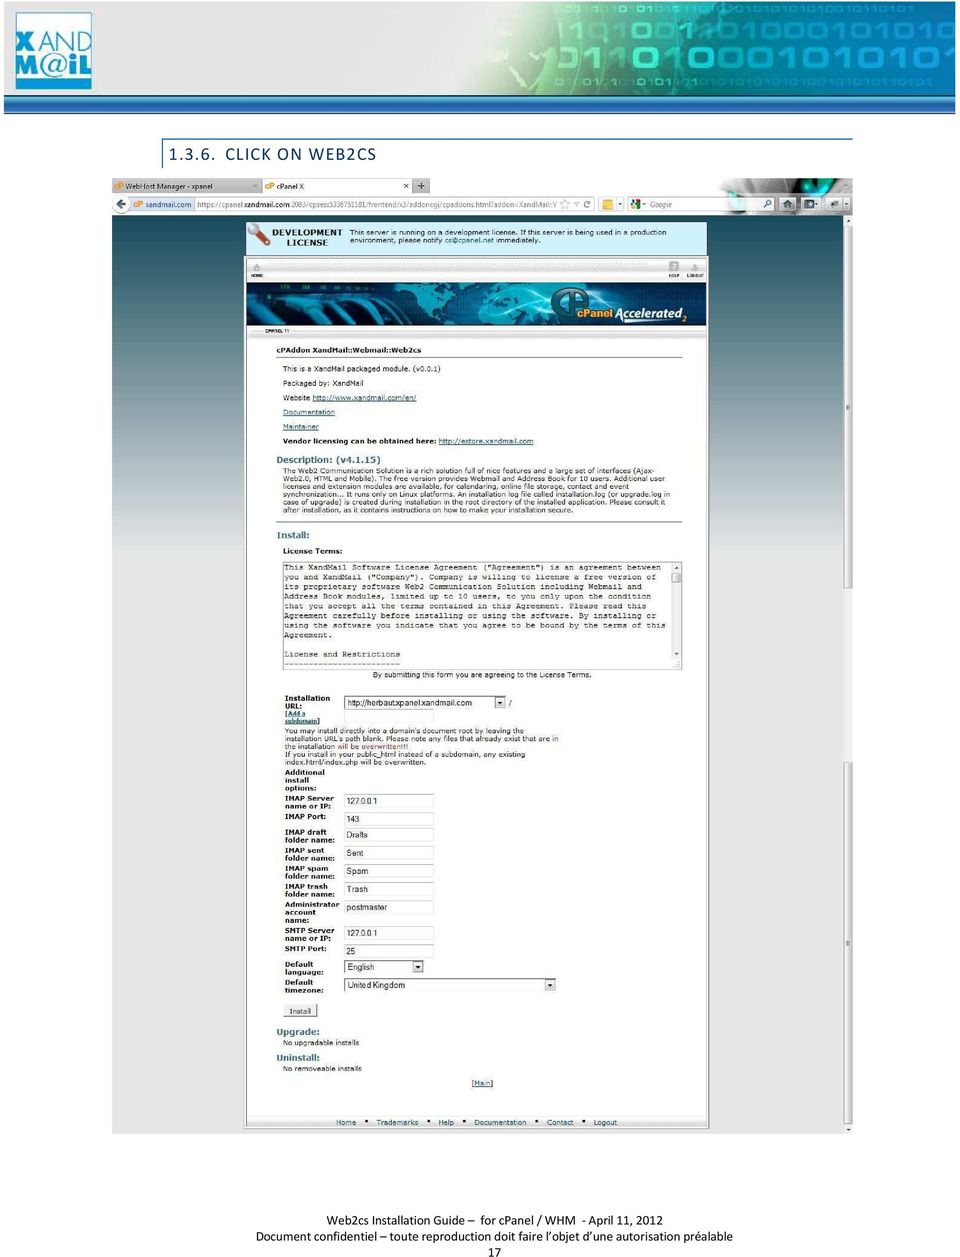
18 SELECT THE SUBDOMAIN IN WHICH TO INSTALL WEB2CS Make sure to select the name] subdomain that was previously created. Leave the Installation URL input field empty. Check the other installation parameters for correctness: Input the IMAP server name and port. If your mailboxes already have specific system folder names for Draft, Sent, Trash and Spam folders, input them so that Web2cs will use them instead of creating different ones. Keep postmaster as the administrator account name, unless you wish to use another mailbox name (in this case, you will need to create the mailbox accordingly in the next step). Note: If you will be hosting and managing in a single installation several domains (see the domain management section below), remember that you will have to create a mailbox with this administrator address for each managed domain. Input the SMTP server name and port. Choose the default language and timezone. 18
.")
19 CLICK INSTALL After installation, the access URL is indicated and you can use the application, BUT the installation is not complete yet You need to add some configuration rules to the Apache server in order to prevent users from accessing and breaking your server, as well as to enable the use of multiple domains in this installation. 19

20 1.4. CREATING THE ACCOUNT IF IT DOES NOT YET EXIST Click on Home, then on Accounts in the Mail section. Create the account. 20

21 1.5. ADDING SECURITY TO THE INSTALLATION AND SETTING UP MULTIPLE DOMAIN MANAGEMENT GET THE INSTRUCTIONS FROM THE INSTALLATION.LOG FILE Connect to your server using SSH. Go to the xmail subdirectory which hosts the installed Web2cs application. Read the installation.log file. The instructions indicated in the file are: In order to make your installation work and be secure, you must manually add the following line: Include /home/[% username %]/public_html/xmail/vhost.conf in a /usr/local/apache/conf/userdata/std/2/[% username %]/vhost.conf file which will be included in your Apache configuration. After that, call the command: /scripts/ensure_vhost_includes --all-users Follow these instructions RESTART APACHE The previous call to the ensure_vhost_includes command should normally restart the Apache server. If, however, it did not do so and did not display any error which would explain why Apache was not restarted, then restart Apache now. 21
22 1.6. CHECKING THE POSTMASTER WEBMAIL ACCOUNT DISPLAY THE LOGIN PAGE Type the installation URL in your favorite browser. Type the postmaster address and password that was previously created and click on Login to use the application. The application should start. 22
23 The domain] (unless you changed postmaster for another value in the installation parameters) address is configured to be the Web2cs administrator and has access to the administration menu. Logout 23
24 DISPLAY THE ADMINISTRATION INTERFACE The application administrator defined during the installation process ( postmaster by default) has access to the administration interface, using his login and password. The URL of that administration interface is indicated in the installation instructions page, but will no longer be available in the user interface once the installation instructions page is hidden (which is the next step). If you forget it, however, it will still be indicated in the installation.log file located in the root directory of the installed application. The URL is [application installation URL]/admin/index.html. In this administration interface, you will be able to: Replace the XandMail logo with your own logo Change the background color of the application Change the newsfeed URL to provide your own information to your users Manage the application s license The pages available in the administration interface are also accessible to the administrator in the Web2cs main interface. When you are through with your administrator configuration, clicking on the Web2.0 Communication Solution link on the login page will get you directly to the Web2cs login page. 24
25 HIDE THE INSTRUCTIONS ON THE LOGIN PAGE Click on the Web2.0 communication Solution link to get back to the login page. Now that the login works and you have added the security configuration parameters to the vhost.conf file, you can hide the installation instructions page by clicking on the When the login works correctly, click here to hide these instructions. link. Hiding the installations instructions page will display in its place the normal login page. 25
26 2. MANAGING MULTIPLE DOMAINS ON THE SAME INSTALLATION 2.1. PRESENTATION ONE INSTALLATION FOR SEVERAL DOMAINS, EACH WITH ITS OWN LEVEL OF FEATURES It is possible to use a single installation to manage several domains. In this type of installation, you install the application only once, for the first domain. Each subsequent domain can be added / removed through the configure-domain.sh script available in the root directory of the installed Web2cs application (/home/[account name]/public_html/xmail). Each domain needs its own license to enable the features required for that domain, but disk space is used sparingly as only the domain specific files are separated for each domain: 26

27 ONE INSTALLATION FOR SEVERAL DOMAINS, ALL WITH THE SAME LEVEL OF FEATURES It is possible to use a single installation to manage several domains. In this type of installation, you install the application only once, for the first domain. Each subsequent domain can be added / removed through the configure-domain.sh script available in the root directory of the installed Web2cs application (/home/[account name]/public_html/xmail). A global license is installed to enable a set of features which will be available to all the domains managed by that installation. Only the domain specific files are separated for each domain: 27
28 2.2. ADD A NEW DOMAIN FOR ANOTHER CUSTOMER The installation of the Web2CS application is made on the primary domain. This can be a valid domain managed by one of your customers, or it can be restricted to your own use as the server administrator. We recommend this second solution, as it will prevent your customer from putting in peril (voluntarily or by mistake) the Web2CS application used by other domains than his own. In order for each domain to have his private access to Web2CS, you will have to create a domain alias pointing to the primary Web2CS domain for each of the customer domains. For example, you have installed on xmail.domain.com. Your first customer purchases domain1.net from you. You will create the domain called domain1.net to host his website and a subdomain called xmail.domain1.net (or any other name that you fancy) to be the web2cs entry point. You will provide this xmail.domain1.net subdomain to the Web2CS service as a domain alias LINK AN XMAIL SUBDOMAIN OF THIS NEW DOMAIN TO THE WEB2CS INSTALLATION Connect to your server using SSH, using the account which owns the Web2cs installation. Go to the xmail subdirectory which hosts the installed Web2cs application. The configure-domain.sh script manages the installation and removal of the domain aliases: Usage:./configure-domain.sh (install remove) domain_alias Execute the script to link the xmail.domain1.net alias:./configure-domain.sh install xmail.domain1.net 28
29 2.4. RESTART THE APACHE SERVER You need to restart the Apache server for the new domain alias to be known through HTTP requests. In the WebHost Manager, expand the Restart Services menu and Click on HTTP Server (Apache). Confirm the restart request. 29
30 2.1. CREATE THE ACCOUNT Connect to your server using SSH, using the account which owns the new domain domain1.net. Click on Accounts in the Mail section. Create the account. Create in the same way mailboxes for all the users of that domain. 30
31 2.2. ACCESS THE WEB2CS LOGIN PAGE FOR DOMAIN1.NET Try the URL of the new domain alias : The Web2cs login page should be displayed. 31
32 2.3. LOGIN TO XMAIL.DOMAIN1.NET AS POSTMASTER Input as the login name. Input the password. Choose your preferred language. Click Login. If the login works fine, send a message to yourself to check that the messaging operations are also working. The message should appear in your Inbox. 32
33 2.4. REMOVING A DOMAIN ALIAS FROM THE INSTALLATION Removing a domain alias from the installation will delete the entire user data associated to that domain alias. Connect to your server using SSH, using the account which owns the Web2cs installation. Go to the xmail subdirectory which hosts the installed Web2cs application. The configure-domain.sh script manages the installation and removal of the domain aliases: Usage:./configure-domain.sh (install remove) domain_alias Execute the script to link the xmail.domain1.net alias:./configure-domain.sh remove xmail.domain1.net 2.5. MAKING A BACKUP OF THE DOMAIN SPECIFIC DATA To backup all the domain specific data of your web2cs installation, simply backup the domains directory. 33
34 3. USING THE WEB2CS APPLICATION 3.1. ACCESS THE MAIN INTERFACE DISPLAY THE LOGIN PAGE Type the installation URL in your favorite browser. Type an address and password that exist on your domain and click on Login to use the application. 34
35 CHANGE THE APPLICATION COLORS AND LOGO In order to change the application colors and logo, you must login either to the Web2cs or its administrator interface using the administrator account ( domain name] by default). In the application menu (located on the left), click on Administration. You will see the access points to the three administration pages: License Management Customization Manage RSS feed 35
36 Click on Customization You can in this page: Upload a logo Change the background color of the interface 36
37 UPLOAD A LOGO The format of the image for the logo must be in png format (.png extension) and not exceed the size of 100 KB. You can replace the logo for: the Web login page the Web interface (Web2cs and HTML) Mobile interface You have to respect the following rules: The name for the Web login page logo must be "logo_big.png" The name for the Web interface logo must be "logo_small.png" and the dimension should be less than 80x250 pixels The name for the mobile interface logo must be "logo_mobile.png" and the dimension should be less than 46x150 pixels Start by uploading the logo for the Web interface (logo_small.png) as it will immediately appear at the top of the page. 37
38 If the new logo does not immediately appear, finish uploading the other logo files, then logout, empty the cache of your browser and re-login. In the same way, upload then the Web login page logo and the Mobile interface logo. To see the Web login page s new logo, you will need to logout, empty your browser cache and reload the login page. To see the Mobile interface logo, you will need to connect with a Mobile phone. 38
39 CHANGE THE BACKGROUND COLOR In the customization administration page, you can also change the background color of the application to better match your company colors. You can either clear on the pre-defined colored squares (pink, yellow, green, blue, grey) or you can specify your own color using the standard hexadecimal color format: #RRGGBB (RR = red, GG = green, BB = blue each of the 3 colors can take hexadecimal values between 00 and FF). If you specify your own color, click on the Preview link to see the result: Once you are happy with the chosen color, do not forget to click on the Save button 39
40 IS THE CUSTOMIZATION VALID FOR ALL DOMAINS? Each account has access to the customization menu and can change the logos and background colors of his own domain. Here is an example: 40
41 APPLICATION CAPABILITIES: LIMITED OR NOT? The free basic version of the application is limited to using the messaging functions together with the address book. But the Web2cs application is capable of much more which, as service administrator, you might think about providing to your users. Thus the administrator account can see the full set of modules and options in the menus. Each of these modules or options can be enabled with a specific license, without having to reinstall the application. When you browse through a disabled module in the menu, a popup will indicate it and provide at the same time links to more information and pricing on that module. 41
42 Of course, a regular (non-administrator) user will not see those modules in the menu as long as they are disabled. So the application capabilities are limited in the free basic pack, but can easily be augmented by purchasing an upgrade license. 42
43 INSTALL AN UPGRADE LICENSE In order to install an upgrade license, you must login either to the Web2cs or its administrator interface using the administrator account ( postmaster by default). In the application menu (located on the left), click on Administration. You will see the access points to the three administration pages: License Management Customization Manage RSS feed Click on License Management. In this page, you can see which type of license you have purchased (Free basic license by default), the numbers of users available, which products are being used and when the license will expire. 43
44 When you receive an upgrade license, simply come to this page, click on the Upload a license file button and choose the part00.dat file you received after your purchase. A popup will list the content of the new license, waiting for your confirmation to apply the new license file. Once you click on the Apply license file button, the new license is installed. Logout and login again to have the application use the new license. 44
45 IS THE LICENSE VALID FOR ALL DOMAINS? The license is by default only valid for one domain. That domain is indicated in the popup showing the content of the new license and, after it is installed, in the license management page. To purchase a single license valid for all the domains of a single installation, you will have to provide an installation ID which can be found in the license management page: 45
46 CHANGE THE RSS FEED In order to change the RSS feed, you must login either to the Web2cs or its administrator interface using the administrator account ( postmaster by default). In the application menu (located on the left), click on Administration. You will see the access points to the three administration pages: License Management Customization Manage RSS feed Click on Manage RSS feed. Provide a new RSS feed URL. Click Save. The RSS feed is updated. Go to the Desktop page to see the new RSS feed. 46
47 IS THE RSS FEED VALID FOR ALL DOMAINS? No. The RSS feed is valid for one domain only. 47
48 3.2. TROUBLESHOOTING UPGRADING XANDMAILWEB2CS If you have a previously installed XandMailWeb2cs version, your users already have address book data and will want to keep their contacts in the new XandMailWeb2cs V4 for POA version. Follow these steps to upgrade your installation: 1. Backup the user data from the existing installation The user data is located in subfolders of the domains directory. Make a copy or a compressed file of the content of the domains directory. Make sure to announce to your users that their address book data will be copied at that time, so that they will not add or modify them afterwards 2. Install the new version of XandMailWeb2cs V4 for POA You should install in a new directory if you do not want to interrupt the service. This way, your users can keep working with the previous version while you prepare the new version. If you wish to install in the same directory, the service will be interrupted during the time it will take to make the installation. You must first uninstall the previous version (after making a backup of the domains directory) before installing the new version in the same location. 3. Copy the user data on the new installation Copy the content of the domains directory, taken from the previous installation, into the domains directory of the new installation. Make sure to keep the directory and file permissions as they were in the previous installation. 4. Update the Apache configuration includes on the new installation Include all the vhost_domain.conf filesfound under the domains subdirectories in the vhost.conf of the new installation 48
49 LOGIN DOES NOT WORK ON A 64 BITS SERVER 32 bits application binaries cannot execute on 64 bits servers if they are not recognized as executable files. So on 64 bits servers, it is necessary to install some system libraries used by 32 bits applications, so that they will execute correctly. You can check whether the application will work or not by going to the cgi-bin directory and asking for the binaries version. Type:./webmail -id It should display the version and copyright notices. If that succeeds, there is nothing to do. If you get an error /lib/ld-linux.so.2: bad ELF interpreter, you need to install the libgcc, glibc, and maybe also the libstdc++ and libncurses libraries. The command to see which library is missing is: ldd webmail The command to find out in which package to find the missing library is: yum whatprovides [the library name] The command to install the missing package is: yum install [the package name] After you have installed all missing packages and ldd finds all the dynamically linked libraries, ask once again for the binaries version. If that succeeds, try to login again from the login page in your browser. 49
50 4. UNINSTALLING WEB2CS We really do hope that you will not need to uninstall our application, except maybe to replace it with a more recent version of our products 4.1. UNINSTALLING WEB2CS FROM A DOMAIN 1) Connect to your server using SSH 2) Remove the /usr/local/apache/conf/userdata/std/2/[% username %]/vhost.conf file 3) Call the command: /scripts/ensure_vhost_includes --all-users to synchronize the Apache configuration 4) Connect to your domain s administration interface 5) Click on site software in the Software/Services section 6) Click on Web2cs 7) At the bottom of the page, choose the installation to remove and click on Uninstall 8) Confirm the request to uninstall the application 4.2. REMOVING WEB2CS FROM THE SERVER 1) Connect to your server s administration interface 2) Open the cpanel menu and display the Install cpaddons page 3) Uncheck the XandMail Webmail Web2cs application 4) Click on the Update Addon Config button 5) Click Back The Web2cs application is now no longer available for installation. If you have uninstalled all instances of the Web2cs application, you can also: 6) Click on the Completely Remove link presented beside the Web2cs application name The Web2cs application is now no longer present on the server. 50
FOR PARALLELS / PLESK PANEL
 WEB2CS INSTALLATION GUIDE FOR PARALLELS / PLESK PANEL HTTP://WWW.XANDMAIL.COM XandMail 32, rue de Cambrai 75019 PARIS - FRANCE Tel : +33 (0)1 40 388 700 - http://www.xandmail.com TABLE OF CONTENTS 1. INSTALLING
WEB2CS INSTALLATION GUIDE
 WEB2CS INSTALLATION GUIDE FOR PARALLELS / POA HTTP://WWW.XANDMAIL.COM XandMail 32, rue de Cambrai 75019 PARIS - FRANCE Tel : +33 (0)1 40 388 700 - http://www.xandmail.com TABLE OF CONTENTS 1. INSTALLING
WEB2CS INSTALLATION GUIDE
 WEB2CS INSTALLATION GUIDE FOR XANDMAIL XandMail 32, rue de Cambrai 75019 PARIS - FRANCE Tel : +33 (0)1 40 388 700 - http://www.xandmail.com TABLE OF CONTENTS 1. INSTALLING WEB2CS 3 1.1. RETRIEVING THE
WHM Administrator s Guide
 Fasthosts Customer Support WHM Administrator s Guide This manual covers everything you need to know in order to get started with WHM and perform day to day administrative tasks. Contents Introduction...
Vtiger CRM Outlook Plugin Documentation
 Vtiger CRM Outlook Plugin Documentation Outlook Plugin Version 1.0.04 Different Solutions GmbH [email protected] http://www.different-solutions.com Support Forum: http://forum.vtiger.de Date:
Introduction to cpanel
 Introduction to cpanel Thank you for hosting your domain with Sierra Tel Internet. In order to provide modern and efficient service, we are housing your website s files on a server running the Linux operating
Web Hosting Getting Started Guide
 Web Hosting Getting Started Guide This guide describes: - Hosting Terms and Definitions - How to sync a domain with your hosting account - How to change your domain s nameservers - How to use FTP to upload
Expresso Quick Install
 Expresso Quick Install 1. Considerations 2. Basic requirements to install 3. Install 4. Expresso set up 5. Registering users 6. Expresso first access 7. Uninstall 8. Reinstall 1. Considerations Before
WHY USE ILLUMIN8 MARKETING FOR HOSTING YOUR WEB SITE?
 QUESTIONS OR COMMENTS? email [email protected] or call 608-796-1990 WHY USE ILLUMIN8 MARKETING FOR HOSTING YOUR WEB SITE? Yes, there are cheaper (even free) alternatives out there. What we will
shweclassifieds v 3.3 Php Classifieds Script (Joomla Extension) User Manual (Revision 2.0)
 User Manual (Revision 2.0)") shweclassifieds v 3.3 Php Classifieds Script (Joomla Extension) User Manual (Revision 2.0) Contents Installation Procedure... 4 What is in the zip file?... 4 Installing from Extension Manager... 6 Updating
shweclassifieds v 3.3 Php Classifieds Script (Joomla Extension) User Manual (Revision 2.0) Contents Installation Procedure... 4 What is in the zip file?... 4 Installing from Extension Manager... 6 Updating
Personal Cloud. Support Guide for Mac Computers. Storing and sharing your content 2
 Personal Cloud Support Guide for Mac Computers Storing and sharing your content 2 Getting started 2 How to use the application 2 Managing your content 2 Adding content manually 3 Renaming files 3 Moving
Vodafone Hosted Services. Getting your email. User guide
 Vodafone Hosted Services Getting your email User guide Welcome. This guide will show you how to get your email, now that it is hosted by Vodafone Hosted Services. Once you ve set it up, you will be able
Linux VPS with cpanel. Getting Started Guide
 Linux VPS with cpanel Getting Started Guide First Edition October 2010 Table of Contents Introduction...1 cpanel Documentation...1 Accessing your Server...2 cpanel Users...2 WHM Interface...3 cpanel Interface...3
42goISP Documentation
 42goISP Documentation 42goISP Documentation I Table of Contents General...1 1 What is 42goISP?...1 2 Terms and structure of the manual...1 3 Installation/Upgrade/Deinstallation...1 3.1 Installation...1
ISPConfig Documentation
 ISPConfig Documentation ISPConfig Documentation I Table of Contents General...1 1 What is ISPConfig?...1 2 Terms and structure of the manual...1 3 Installation/Upgrade/Deinstallation...1 3.1 Installation...1
Domain Name. Domain Registrar. Web Site cpanel. www..com. www..net. www..biz URL: Username: Password: www.mydomain.com/cpanel. Username: Password:
 314 Main Street Onalaska, WI 54650 608-787-8887 Why Use The Idea Center for Hosting Your Web Site? Yes, there are cheaper (even free) alternatives out there. What we will offer you is a reliable service,
Configuring your email client to connect to your Exchange mailbox
 Configuring your email client to connect to your Exchange mailbox Contents Use Outlook Web Access (OWA) to access your Exchange mailbox... 2 Use Outlook 2003 to connect to your Exchange mailbox... 3 Add
Talk Internet User Guides Controlgate Administrative User Guide
 Talk Internet User Guides Controlgate Administrative User Guide Contents Contents (This Page) 2 Accessing the Controlgate Interface 3 Adding a new domain 4 Setup Website Hosting 5 Setup FTP Users 6 Setup
Parallels Plesk Automation. Customer s Guide. Parallels Plesk Automation 11.5
 Parallels Plesk Automation Customer s Guide Parallels Plesk Automation 11.5 Last updated: 17 March 2015 Contents Quick Start with Hosting Panel 4 Set Up Your First Website... 4 1. Create Your Site... 5
Using Internet or Windows Explorer to Upload Your Site
 Using Internet or Windows Explorer to Upload Your Site This article briefly describes what an FTP client is and how to use Internet Explorer or Windows Explorer to upload your Web site to your hosting
Grapevine Mail User Guide
 Grapevine Mail User Guide Table of Contents Accessing Grapevine Mail...2 How to access the Mail portal... 2 How to login... 2 Grapevine Mail user guide... 5 Copying your contacts to the new Grapevine Mail
DESKTOP CLIENT CONFIGURATION GUIDE BUSINESS EMAIL
 DESKTOP CLIENT CONFIGURATION GUIDE BUSINESS EMAIL Version 2.0 Updated: March 2011 Contents 1. Mac Email Clients... 3 1.1 Configuring Microsoft Outlook 2011... 3 1.2 Configuring Entourage 2008... 4 1.3.
WEBMAIL User s Manual
 WEBMAIL User s Manual Overview What it is: What it is not: A convenient method of retrieving and sending mails while you re away from your home computer. A sophisticated mail client meant to be your primary
Manage. Help Documentation. This document was auto-created from web content and is subject to change at any time. Copyright (c) 2016 SmarterTools Inc.
 2016 SmarterTools Inc.") Help Documentation This document was auto-created from web content and is subject to change at any time. Copyright (c) 2016 SmarterTools Inc. Manage Email Users An email user account represents a person's
Help Documentation This document was auto-created from web content and is subject to change at any time. Copyright (c) 2016 SmarterTools Inc. Manage Email Users An email user account represents a person's
Exchange Web Services [EWS] support in The Bat! v7
![Exchange Web Services [EWS] support in The Bat! v7](/thumbs/27/10409180.jpg "Exchange Web Services [EWS] support in The Bat! v7") Exchange Web Services [EWS] support in The Bat! v7 User Guide for TBBETA 7/17/2015 Page 1 of 17 Contents EWS support in The Bat! version 7... 2 New Wizard: Creating a new account... 2 Step 1... 2 Step
Exchange Web Services [EWS] support in The Bat! v7 User Guide for TBBETA 7/17/2015 Page 1 of 17 Contents EWS support in The Bat! version 7... 2 New Wizard: Creating a new account... 2 Step 1... 2 Step
Webmail Instruction Guide
 Webmail Instruction Guide This document is setup to guide your through the use of the many features of our Webmail system. You may either visit www.safeaccess.com or webmail.safeaccess.com to login with
FileMaker Server 13. FileMaker Server Help
 FileMaker Server 13 FileMaker Server Help 2010-2013 FileMaker, Inc. All Rights Reserved. FileMaker, Inc. 5201 Patrick Henry Drive Santa Clara, California 95054 FileMaker and Bento are trademarks of FileMaker,
Customer Control Panel Manual
 Customer Control Panel Manual Contents Introduction... 2 Before you begin... 2 Logging in to the Control Panel... 2 Resetting your Control Panel password.... 3 Managing FTP... 4 FTP details for your website...
Pentagon Message Exchange Setup Guide: All Devices
 Pentagon Message Exchange Setup Guide: All Devices This guide has been sent to you to help you set up Pentagon Message Exchange on your equipment. In this guide, you will find the details required for
Outlook Express POP Instructions - Bloomsburg University Students
 1. Open Outlook Express by clicking Start, All Programs, and Outlook Express. 2. Click on the Tools menu and click Accounts. 1 3. Click on Add Mail 4. Enter your name and click Next. 2 5. Enter your full
MailEnable Connector for Microsoft Outlook
 MailEnable Connector for Microsoft Outlook Version 2.23 This guide describes the installation and functionality of the MailEnable Connector for Microsoft Outlook. Features The MailEnable Connector for
Important Information
 June 2015 Important Information The following information applies to Proofpoint Essentials US1 data center only. User Interface Access https://usproofpointessentials.com MX Records mx1-usppe-hosted.com
VPOP3 Your email post office Getting Started Guide
 VPOP3 Your email post office Getting Started Guide VPOP3 Getting Started Guide, version 2.1 1 Copyright Statement This manual is proprietary information of Paul Smith Computer Services and is not to be
Online Backup Client User Manual
 For Mac OS X Software version 4.1.7 Version 2.2 Disclaimer This document is compiled with the greatest possible care. However, errors might have been introduced caused by human mistakes or by other means.
RoboMail Mass Mail Software
 RoboMail Mass Mail Software RoboMail is a comprehensive mass mail software, which has a built-in e-mail server to send out e-mail without using ISP's server. You can prepare personalized e-mail easily.
Welcome to Collage (Draft v0.1)
") Welcome to Collage (Draft v0.1) Table of Contents Welcome to Collage (Draft v0.1)... 1 Table of Contents... 1 Overview... 2 What is Collage?... 3 Getting started... 4 Searching for Images in Collage...
Welcome to Collage (Draft v0.1) Table of Contents Welcome to Collage (Draft v0.1)... 1 Table of Contents... 1 Overview... 2 What is Collage?... 3 Getting started... 4 Searching for Images in Collage...
G-Lock EasyMail7. Admin Guide. Client-Server Email Marketing Solution for Windows. Copyright G-Lock Software. All Rights Reserved.
 G-Lock EasyMail7 Client-Server Email Marketing Solution for Windows Admin Guide Copyright G-Lock Software. All Rights Reserved. 1 Table of Contents This document is your admin guide for G-Lock EasyMail7
FileMaker Server 14. FileMaker Server Help
 FileMaker Server 14 FileMaker Server Help 2007 2015 FileMaker, Inc. All Rights Reserved. FileMaker, Inc. 5201 Patrick Henry Drive Santa Clara, California 95054 FileMaker and FileMaker Go are trademarks
Parallels Panel. Parallels Small Business Panel 10.2: User's Guide. Revision 1.0
 Parallels Panel Parallels Small Business Panel 10.2: User's Guide Revision 1.0 Copyright Notice ISBN: N/A Parallels 660 SW 39 th Street Suite 205 Renton, Washington 98057 USA Phone: +1 (425) 282 6400 Fax:
WebSpy Vantage Ultimate 2.2 Web Module Administrators Guide
 WebSpy Vantage Ultimate 2.2 Web Module Administrators Guide This document is intended to help you get started using WebSpy Vantage Ultimate and the Web Module. For more detailed information, please see
Server Management Tool (SMT) 6.0 For Linux Web Hosting Customers User Manual
 6.0 For Linux Web Hosting Customers User Manual") Server Management Tool (SMT) 6.0 For Linux Web Hosting Customers User Manual Advanced Internet Technologies, Inc. AUGUST 2012 Page 1 TABLE OF CONTENTS INTRO TO SERVER MANAGEMENT & WEBSITE MANAGEMENT TOOLS...
Server Management Tool (SMT) 6.0 For Linux Web Hosting Customers User Manual Advanced Internet Technologies, Inc. AUGUST 2012 Page 1 TABLE OF CONTENTS INTRO TO SERVER MANAGEMENT & WEBSITE MANAGEMENT TOOLS...
the barricademx end user interface documentation for barricademx users
 the barricademx end user interface documentation for barricademx users BarricadeMX Plus The End User Interface This short document will show you how to use the end user web interface for the BarricadeMX
RoomWizard Synchronization Software Manual Installation Instructions
 2 RoomWizard Synchronization Software Manual Installation Instructions Table of Contents Exchange Server Configuration... 4 RoomWizard Synchronization Software Installation and Configuration... 5 System
Ciphermail for BlackBerry Quick Start Guide
 CIPHERMAIL EMAIL ENCRYPTION Ciphermail for BlackBerry Quick Start Guide June 19, 2014, Rev: 8975 Copyright 2010-2014, ciphermail.com. Introduction This guide will explain how to setup and configure a Ciphermail
Ahsay Replication Server v5.5. Administrator s Guide. Ahsay TM Online Backup - Development Department
 Ahsay Replication Server v5.5 Administrator s Guide Ahsay TM Online Backup - Development Department October 9, 2009 Copyright Notice Ahsay Systems Corporation Limited 2008. All rights reserved. Author:
IceWarp to IceWarp Server Migration
 IceWarp to IceWarp Server Migration Registered Trademarks iphone, ipad, Mac, OS X are trademarks of Apple Inc., registered in the U.S. and other countries. Microsoft, Windows, Outlook and Windows Phone
BOTTOM UP THINKING EMAIL SETUP INSTRUCTIONS. Unique businesses require unique solutions CLIENT GUIDE
 BOTTOM UP THINKING Unique businesses require unique solutions EMAIL SETUP INSTRUCTIONS CLIENT GUIDE INDEX How to connect a. Deciding on best method (POP or IMAP) Setting up email on devices Webmail a.
30 Steps to Successfully Installing DotNetNuke on a Network Solutions Shared Hosting Package
 30 Steps to Successfully Installing DotNetNuke on a Network Solutions Shared Hosting Package 1. Let s start using the DotNetNuke automated install within your shared hosting package. Login to your Network
Distributor Control Center Private Label/Channel Administrators
 March 13, 2014 Distributor Control Center Private Label/Channel Administrators Version 2.6.3 Everyone.net Table of Contents Distributor Control Center... 1 1 The Distributor Control Center... 4 1.1 Introduction...
Using Webmail. Technical Manual: User Guide. Document Updated: 1/07. The Webmail Window. Displaying and Hiding the Full Header.
 Using Webmail Technical Manual: User Guide The Webmail Window To save an attachment: 1. Click once on the attachment name. Or, if there are multiple attachments, click the Save icon to save all attachments
Installation Guide For ChoiceMail Enterprise Edition
 Installation Guide For ChoiceMail Enterprise Edition How to Install ChoiceMail Enterprise On A Server In Front Of Your Company Mail Server August, 2004 Version 2.6x Copyright DigiPortal Software, 2002-2004
About This Document 3. Integration Overview 4. Prerequisites and Requirements 6
 Contents About This Document 3 Integration Overview 4 Prerequisites and Requirements 6 Meeting the Requirements of the cpanel Plugin... 6 Meeting the Requirements of Presence Builder Standalone... 6 Installation
1. Open Thunderbird. If the Import Wizard window opens, select Don t import anything and click Next and go to step 3.
 Thunderbird The changes that need to be made in the email programs will be the following: Incoming mail server: newmail.one-eleven.net Outgoing mail server (SMTP): newmail.one-eleven.net You will also
OxyClassifieds Installation Handbook
 OxyClassifieds Installation Handbook OxyClassifieds Team Email: [email protected] Web: http://www.oxyclassifieds.com OxyClassifieds Installation Handbook by OxyClassifieds Team Copyright 2006-2011
Using Webmail. Document Updated: 11/10. Technical Manual: User Guide. The Webmail Window. Logging In to Webmail. Displaying and Hiding the Full Header
 Using Webmail Technical Manual: User Guide Webmail is supported in the following browsers: Windows Internet Explorer 6, Internet Explorer 7, Firefox 2, and Firefox 3 Mac OSX Safari 2, Safari 3, Firefox
ADMINISTRATOR GUIDE VERSION
 ADMINISTRATOR GUIDE VERSION 4.0 2014 Copyright 2008 2014. All rights reserved. No part of this document may be reproduced or transmitted in any form or by any means electronic or mechanical, for any purpose
Velocity Web Services Client 1.0 Installation Guide and Release Notes
 Velocity Web Services Client 1.0 Installation Guide and Release Notes Copyright 2014-2015, Identiv. Last updated June 24, 2015. Overview This document provides the only information about version 1.0 of
Content Management System User Guide
 Content Management System User Guide support@ 07 3102 3155 Logging in: Navigate to your website. Find Login or Admin on your site and enter your details. If there is no Login or Admin area visible select
Configuring, Customizing, and Troubleshooting Outlook Express
 3 Configuring, Customizing, and Troubleshooting Outlook Express............................................... Terms you ll need to understand: Outlook Express Newsgroups Address book Email Preview pane
Standard Mailbox Email Software Setup Guide
 Standard Mailbox Email Software Setup Guide Standard Mailbox Setup Guide Setting up a Standard mailbox only takes a few minutes. You can set up any email software to receive email from your mailbox. This
WineWeb Email Account Services
 As part of WineWeb s website services, we can provide email accounts under your domain name. Although this is optional, almost all of our clients use our mail server for their email accounts. We run the
How to configure your Windows PC post migrating to Microsoft Office 365
 How to configure your Windows PC post migrating to Microsoft Office 365 1 Contents Purpose... 3 Document Support Boundaries... 3 Examples used in this document... 4 Several different Microsoft Office 365
Admin Guide Virtual Private Server (VPS) MailStreet Hosting Control Panel (CP)
 MailStreet Hosting Control Panel (CP)") Admin Guide Virtual Private Server (VPS) MailStreet Hosting Control Panel (CP) DOCUMENT REVISION DATE: September 1, 2009 Virtual Private Server (VPS) Admin Guide / Table of Contents Page 2 of 87 Table
Admin Guide Virtual Private Server (VPS) MailStreet Hosting Control Panel (CP) DOCUMENT REVISION DATE: September 1, 2009 Virtual Private Server (VPS) Admin Guide / Table of Contents Page 2 of 87 Table
Bitrix Site Manager ASP.NET. Installation Guide
 Bitrix Site Manager ASP.NET Installation Guide Contents Introduction... 4 Chapter 1. Checking for IIS Installation... 5 Chapter 2. Using An Archive File to Install Bitrix Site Manager ASP.NET... 7 Preliminary
owncloud Configuration and Usage Guide
 owncloud Configuration and Usage Guide This guide will assist you with configuring and using YSUʼs Cloud Data storage solution (owncloud). The setup instructions will include how to navigate the web interface,
Avatier Identity Management Suite
 Avatier Identity Management Suite Migrating AIMS Configuration and Audit Log Data To Microsoft SQL Server Version 9 2603 Camino Ramon Suite 110 San Ramon, CA 94583 Phone: 800-609-8610 925-217-5170 FAX:
Livezilla How to Install on Shared Hosting http://www.jonathanmanning.com By: Jon Manning
 Livezilla How to Install on Shared Hosting By: Jon Manning This is an easy to follow tutorial on how to install Livezilla 3.2.0.2 live chat program on a linux shared hosting server using cpanel, linux
White Paper. Installation and Configuration of Fabasoft Folio IMAP Service. Fabasoft Folio 2015 Update Rollup 3
 White Paper Fabasoft Folio 2015 Update Rollup 3 Copyright Fabasoft R&D GmbH, Linz, Austria, 2016. All rights reserved. All hardware and software names used are registered trade names and/or registered
Microsoft Outlook Setup With Exchange Server. Outlook 2007 2010 2013
 Microsoft Outlook Setup With Exchange Server Outlook 2007 2010 2013 Revised 12/1/2014 CONTENTS SUMMARY... 3 I. OUTLOOK SETUP... 4 II. PERSONAL FOLDERS SETUP... 7 III. RULES SETUP... 9 Rule #1: Move Inbox
CPanel User Guide DOCUMENTATION VERSION: 1.2
 CPanel User Guide DOCUMENTATION VERSION: 1.2 Table of contents 1 What is CPanel? 8 2 How do I get help? 9 3 CPanel themes 10 4 How do I use CPanel? 11 4.1 Logging on..............................................
Using the Web email service
 Using the Web email service This booklet describes the web based email service used by Sandwell schools. The web based email service was introduced in January 2005 to replace an earlier webmail system.
Manual. CollabNet Subversion Connector to HP Quality Center. Version 1.2
 Manual CollabNet Subversion Connector to HP Quality Center Version 1.2 A BOUT THE CONNECTOR About the Connector The CollabNet Subversion Connector to HP Quality Center enables Quality Center users to
A User s Guide to Helm
 A User s Guide to Helm WebHost Automation Ltd http://www.webhostautomation.com/ January 2006 Doc: HELM300.02.09 Complying with all applicable copyright laws is the responsibility of the user. Without limiting
JOOMLA 2.5 MANUAL WEBSITEDESIGN.CO.ZA
 JOOMLA 2.5 MANUAL WEBSITEDESIGN.CO.ZA All information presented in the document has been acquired from http://docs.joomla.org to assist you with your website 1 JOOMLA 2.5 MANUAL WEBSITEDESIGN.CO.ZA BACK
Hosting Control Panel (CP) Admin Guide
 Admin Guide") Hosting Control Panel (CP) Admin Guide Document Revision Date: May 16, 2013 Hosting CP Admin Guide / TOC Page i Contents HOW TO USE THIS HOSTING CP ADMIN GUIDE... 1 GET STARTED WITH EXCHANGE... 1 Other
Hosting Control Panel (CP) Admin Guide Document Revision Date: May 16, 2013 Hosting CP Admin Guide / TOC Page i Contents HOW TO USE THIS HOSTING CP ADMIN GUIDE... 1 GET STARTED WITH EXCHANGE... 1 Other
EZblue BusinessServer The All - In - One Server For Your Home And Business
 EZblue BusinessServer The All - In - One Server For Your Home And Business Quick Start Guide Version 3.11 1 2 3 EZblue Server Overview EZblue Server Installation EZblue Server Configuration 4 EZblue Magellan
Apple Mail... 36 Outlook Web Access (OWA)... 38 Logging In... 38 Changing Passwords... 39 Mobile Devices... 40 Blackberry...
... 38 Logging In... 38 Changing Passwords... 39 Mobile Devices... 40 Blackberry...") Contents Email Accounts... 3 Adding accounts... 3 Account Modifications... 6 Adding Aliases... 7 Primary E-mail Addresses... 10 Mailbox Quotas... 12 Removing accounts... 13 Mail Forwarding and Distribution
Contents Email Accounts... 3 Adding accounts... 3 Account Modifications... 6 Adding Aliases... 7 Primary E-mail Addresses... 10 Mailbox Quotas... 12 Removing accounts... 13 Mail Forwarding and Distribution
Getting Started - The Control Panel
 Table of Contents 1. Getting Started - the Control Panel Login Navigation Bar Domain Limits Domain User Account Properties Session Management 2. FTP Management Creating and Editing Users Accessing FTP
PLESK 7 NEW FEATURES HOW-TO RESOURCES
 PLESK 7 NEW FEATURES HOW-TO RESOURCES Copyright (C) 1999-2004 SWsoft, Inc. All rights reserved. Distribution of this work or derivative of this work in any form is prohibited unless prior written permission
Version 1.7. Inbound Email Integration (POP3 and IMAP) Installation, Configuration and User Guide. Last updated October 2011
 Installation, Configuration and User Guide. Last updated October 2011") Version 1.7 Inbound Email Integration (POP3 and IMAP) Installation, Configuration and User Guide Last updated October 2011 1 Introduction and Overview... 1 2 The Case for Email monitoring... 2 3 Installation
Version 1.7 Inbound Email Integration (POP3 and IMAP) Installation, Configuration and User Guide Last updated October 2011 1 Introduction and Overview... 1 2 The Case for Email monitoring... 2 3 Installation
How to Use Your New Online Client Vault
 How to Use Your New Online Client Vault Table of Contents I. Getting Into Your Vault 3 How to Sign In 3 First Time Setup 4 II. Finding Your Way Around the Vault 5 Managing Your Vault s Contents 6 Creating
How to install and use the File Sharing Outlook Plugin
 How to install and use the File Sharing Outlook Plugin Thank you for purchasing Green House Data File Sharing. This guide will show you how to install and configure the Outlook Plugin on your desktop.
Program Update IPedge Feature Description IPedge Feature Desc. 8/2/13
 Program Update IPedge Feature Description IPedge Feature Desc. 8/2/13 OVERVIEW The IPedge program update process is controlled through Enterprise Manager. The software update can be performed using three
Microsoft Entourage 2008 / Microsoft Exchange Server 2010. Installation and Configuration Instructions
 Microsoft Entourage 2008 / Microsoft Exchange Server 2010 Installation and Configuration Instructions Table of Contents How to connect Microsoft Entourage 2008 EWS to the Exchange Server... 3 Important
3 Setting up Databases on a Microsoft SQL 7.0 Server
 3 Setting up Databases on a Microsoft SQL 7.0 Server Overview of the Installation Process To set up GoldMine properly, you must follow a sequence of steps to install GoldMine s program files, and the other
FTP Accounts Contents
 FTP Accounts Contents Goal... 2 1. Add an FTP Account... 2 2. The FTP Account Management Table... 3 3. Remove an FTP Account... 4 4. Edit an FTP Account's Quota... 4 5. Change an FTP Account's Password...
Installation and Deployment
 Installation and Deployment Help Documentation This document was auto-created from web content and is subject to change at any time. Copyright (c) 2016 SmarterTools Inc. Installation and Deployment SmarterStats
FileMaker Server 11. FileMaker Server Help
 FileMaker Server 11 FileMaker Server Help 2010 FileMaker, Inc. All Rights Reserved. FileMaker, Inc. 5201 Patrick Henry Drive Santa Clara, California 95054 FileMaker is a trademark of FileMaker, Inc. registered
Configuring Outlook 2013
 Configuring Outlook 2013 Contents 1. Configuring Outlook 2013... 1 2. Add the new IMAP email account to Outlook... 2 3. Change Start-up default Inbox... 7 4. IMAP Folders:... 8 5. Add/Change your signature....
FileMaker Server 10 Help
 FileMaker Server 10 Help 2007-2009 FileMaker, Inc. All Rights Reserved. FileMaker, Inc. 5201 Patrick Henry Drive Santa Clara, California 95054 FileMaker, the file folder logo, Bento and the Bento logo
Qbox User Manual. Version 7.0
 Qbox User Manual Version 7.0 Index Page 3 Page 6 Page 8 Page 9 Page 10 Page 12 Page 14 Page 16 Introduction Setup instructions: users creating their own account Setup instructions: invited users and team
Getting Started With Your Virtual Dedicated Server. Getting Started Guide
 Getting Started Guide Getting Started With Your Virtual Dedicated Server Setting up and hosting a domain on your Linux Virtual Dedicated Server using cpanel. Getting Started with Your Virtual Dedicated
Exchange 2003 Mailboxes
 Exchange 2003 Mailboxes Microsoft will stop supporting Exchange 2003 mailboxes in 2014 as it comes to the end of it s life. To maintain our levels of support and performance of all our customers, we will
Email Getting Started Guide Unix Platform
 Edition/Issue Email Getting Started Guide Unix Platform One of the most important features of your new Web Hosting account is access to a personalized Email solution that includes individual Email addresses
User s Manual. Management Software for ATS
 ATS Monitor User s Manual Management Software for ATS Table of Contents 1. ATS Monitor Overview... 2 2. ATS Monitor Install and Uninstall... 2 2.1. System Requirement... 2 2.2. Software Install... 2 2.3.
Sophos Mobile Control Installation guide. Product version: 3.5
 Sophos Mobile Control Installation guide Product version: 3.5 Document date: July 2013 Contents 1 Introduction...3 2 The Sophos Mobile Control server...4 3 Set up Sophos Mobile Control...10 4 External
How To Use Senior Systems Cloud Services
 Senior Systems Cloud Services In this guide... Senior Systems Cloud Services 1 Cloud Services User Guide 2 Working In Your Cloud Environment 3 Cloud Profile Management Tool 6 How To Save Files 8 How To