Compilation of Tutorials and Tips on Making DAP Templates (AOP) by Mary Warner
|
|
|
- Agatha Fisher
- 9 years ago
- Views:
Transcription
1 Title: Created 04/14 12:09 PM Modified 04/14 12:17 PM Compilation of Tutorials and Tips on Making DAP Templates (AOP) by Mary Warner Before getting started on your own template adventure, I would advise downloading a copy of JPEX ( or any other jpeg extractor utility which you might find). The aforementioned one can be found here: I believe it is shareware but it doesn't seem to be crippled in any way. First, be sure to look at the DAP Help File accessed from the DAP Help Menu under "Tutorials". Oscar has provided a fairly detailed description on creating templates starting on page 23 of the current version ("Section 3.12 Templates"). The section is copied here for your convenience.
2

3
4

5
6
7 In addition, there is a post in the DAP forum from Oscar with some additional details (extracted below for your convenience ) found here: The current way of jpg templates is a bit temporary solution as I am planning to create more straighforward way with access to the brushes one by one. A good template is harder task to do - I spent few days on each template and created many of them then selected the best ones. I will quickly describe what I do: I always use the template 50/50, that is first 50 are underpaint large brushes, next are small tiny for outlines and dark areas. (there is setting in AOP for that) From a painting(s): I took a picture I liked (some are paintings i have at home) then looked at the colors, selected significiant patches of colors and place them in the first 50 spaces of the grid. Then i created new layer, took wacom tablet and created masks (brush strokes) by painting white over the patches. New layer below it - fill with black. if the color patches already have some visible brush patterns then I duplicate layer. then selected first patch with rectangle - then Black and white and make the brush strokes stand out by moving the color sliders (for example darkening blue and lightening red), then levels and make it contrasty - move the black towards middle and white towards the middle. i did this for every patch so I got another layer of brush strokes. So now i have color layer, black fill, my white brushes and another layer with extracted brush strokes from the original. I will set this last layer to darken my brush strokes and change the transparency so it affect my brush strokes - but not too much. Now look at the colors - if they are all too regular - this will create too cartoony look, so i would create layer above, rectangle select the area, then gradient - BW gradient from one side to another. Then set that gradient layer as overlay, screen or even difference for crazy color changes. transparency to adjust. Such patches with gradients will then result in a smooth blend. you can choose only some of them as a painter would - for example only blue so a sky will be smooth but the rest will be more defined. Gradients:
 Painted by you: the preset like chalk or pastels are actually all painted - I took paper, got black crayon from my kids and draw like 20 different")
.")
8 Normal: Reduced 47% 1504 x 300 (58.46K) Add gradient layer Reduced 47% 1504 x 300 (37.18K) Set it as overlay Reduced 47% 1504 x 300 (58.82K) Painted by you: the preset like chalk or pastels are actually all painted - I took paper, got black crayon from my kids and draw like 20 different patterns and crosshatches. (With the kids looking worried if I finally got mental and play with crayons again) Scanned. this will then become my mask layer - bit work with levels and inverse to make it good black and white (white brush on black background). I repeated the same patterns few times etc, so no need for 50 different ones.

9 Then colors are simply colors squares, then I applied gradient to some of them as described above. Simple color patches on Chalk

10 A different one, yet could be used with the same mask
11 In both ways the fifty patterns are from big ones to medium sized. the big ones will be used first. if I like particular color like blue, i will for example create big blue pattern then lighter blue smaller pattern - this will go to sky and will blend nicely. Each color should be a bit different - so not the smae blue but perhaps darker or lighter shade. The way you go from for ex. light large patterns to darker smaller patterns determine the style of painting - if it starts with lighter underpaint and then progress to darker details or vice versa. The detail brushes: next 50 brushes are for details - I spent most of the time on them as it is easy to create mess at this stage - this is crucial for well balanced image. usually very fine tiny black strokes with various shapes. Sometimes I added a little larger semi-transparent white or light patch there which will then "remove" color at this stage. But most brushes are different shades of dark color, some tiny strokes are also white in some styles and sometimes primary color - flourishes like bright red specs, bright yellow brushes etc (ex. monet). But at his moment all are small. The transparency - the system disregards any brush stroke that has no pixels with 200 or more of brightness (0-255) so if a brush has no pixels in mask above it doesn't exist and will not be used. So you should design the mask where at least part of it has white. God thing is that if you produce a pattern that has good detail brushes you can use them elsewhere with little modifications (perhaps colors etc.) Now you do that and run it - watch what it does - some patterns will be not looking good - then you have to work on its mask and color more. Now look at the color balance, see if there is some color group missing - does it create blue sky etc? think what style and what type of image is this for (landscape? still life?) each ghas different color needs. You may then replace some big brushes colors with others to balance the result. For example my inititial benson was yellow - brown as I actually folowed the colors of a benson painting. looked ok but nothing really extra. I started replacing colors, put some blue, red increased saturation - untill the result looked as I wanted - bright bold colors. Granted it is far from where I started and the beson name just stuck even that it has now different qualities - and it is one I like maybe most. I worked on the benson on and off for maybe 3 days. Refining it etc. So don't expect to be ready in 30 min. Each templates can be refined to better look, just need time. Eacfh style is different so look what the painter does, does he use large underpaint then starts using darker small strokes to bring out details? Or (like monet) he doesn't use dark small brushes at all - he uses bright small brushes so any shading has to be done on the underpaint level? ===========

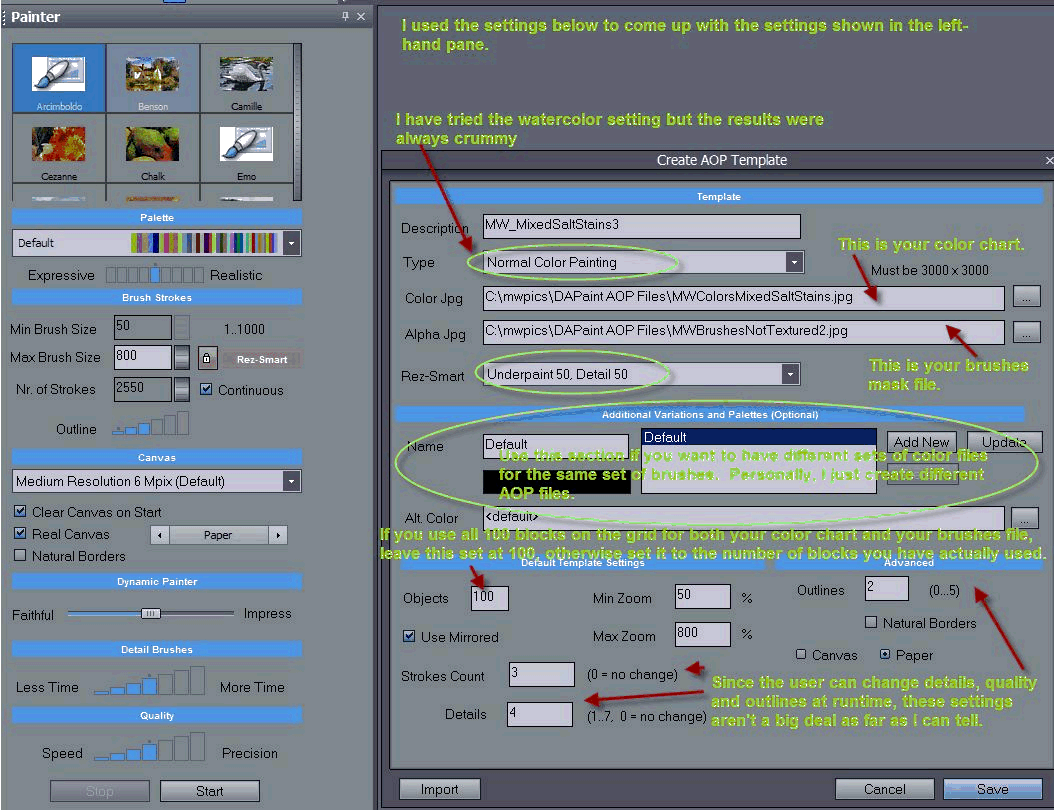
12 If you use the Rez Smart 50/50 setting then first 50 brushes are larger, last 50 brushes are smaller. It doesn't matter within the 50 the size of them, it just happened that I put larger on top row then smaller on next etc.. but they could mix within the 50. This is my modification, arcimbolder used all 100 brushes at same time, you can also do that when you specify rez-smart none. It does take time to fine tune preset so don't be discouraged. All the presets look weird at first. This was my posting in the forum when I first began making templates the brush and color grids :, primarily about the details of creating NOTE: This tutorial is located here in the MMB forum: here: and here: I have been experimenting and have made several. First off, if you haven't looked at this page, it will be helpful. AOP File Details and Grid Template Be sure to download the grid template. I used Photoshop to create my templates. Open a new 3000 x 3000 file. Paste the grid you download in as a second layer. For my "color" file, I actually found a Greytag Macbeth color chart knockoff and cut and pasted 300 x 300 squares from it onto the color template. I duplicated these squares several times in several different rows. Then I used adjustment layers to lighten, darken, change hue, saturation, etc. to get a good cross-section of colors. I have since made several of these color templates with different color arrangements. Then I made a composite layer (Ctrl, Alt, Shift E on the PC). Then I used various plugins -- especially the free Paint Engine plugin -- to further modify these color squares. I'm sure you could do the same with built-in filters in Photoshop as well. This provides color variations in your squares. I then experimented with adding layer styles incorporating patterns (I obtained some interesting results with canvas brushstroke patterns). Play with the opacity of the pattern for different effects. Save your.psd for further experimentation and do a "save as" to create a.jpg file which will be used for your.aop file. For the brushes, I created another 3000 x 3000 file and copied the grid png in as a second layer. Then I created a third layer and set my colors to the default black foreground, white background. I experimented with some free high res watercolor brushes I downloaded from various places on the 'net. Put one brush stroke per grid block. From my experimentation, it appears that the largest brushstrokes get used first and most often. Use much smaller strokes near the bottom of the grid (preferably over blacks, whites and a few accent colors), as these will be used to provide the detail. Once you get the
13 strokes looking like you want them, invert that layer (the brushstrokes become white and disappear until you do the next step). Add a new layer in between the grid and the brushstroke layer and fill that layer with black. Your brushstrokes will now be visible again. Save your.psd for further experimentation and do a "save as" to create a.jpg file which will be used for your.aop file. I would also suggest that you keep track of your naming conventions for the files and make notes of those that you use to create particular templates. I actually tried to incorporate the file names into the.aop file name. The reason for this is that once you have created an.aop, unless you go back to it immediately in the same session, there is no way to get a listing for the files you used to create a particular template. I learned that the hard way in the beginning. Here are samples of both a color chart and a brushes chart. I did not apply any layer styles or texture effects to either file in case anybody wants to embellish them in creating their own templates. Have fun experimenting and please share any additional tips you come up with.

14 3000 x 3000 (116.98K)

15 3000 x 3000 (377.48K)
16

17 And finally, this was from a tutorial that I never quite got finished on additional details from making AOP Templates:
18 Let me preface this by saying that I don't know enough about artists and "real" painting to be trying to emulate any particular artist. I am simply trying to create AOPs that are useful to me for making relatively believeable paintings from photographs I have taken. That means fairly similar colors and enough detail to actually be able to tell what the picture is supposed to be. These tips by saying that my tips are observations based on my experience. Without definitive confirmation from the programmer, my observations may not be 100% correct in every respect. But since I have spent some time making notes so that I would remember this information the next time I sit down to create some AOPs, I thought I would share it so that others may not have to spend so much time. Thus, I use a pretty colorful palette. If I use multiple palettes, it usually has to do with texturization rather than color. If I want really different colors than I find in a photo, I just find another photo that has colors I would prefer to emulate and pick the Impression or Impression + palette and select that photo as the palette. To me, it saves a lot of time in creating color palettes. One thing that I have found is the largest brushes get used the most. They use not only the color that matches their location in the color palette, but shades of that color and sometimes even other colors as well. I do think that the colors are used "top down" and as far as I can tell, the choice made in the "Rez Smart" box makes a difference on the middle rows. The top 4 (or 5 rows) of brushes are used first, no matter the colors. The bottom 4 or 5 are used second. A brush needs to have at least one spot of pure white in it to be used, so if there are more "gray" brushes that don't have at least one pixel of 255, that brush gets skipped altogether. My experience (somewhat patterned on examining the palettes in the original AOPs supplied by Oscar and by a lot of trial and error), is that only the top 4 or 5 rows of brushes will be used during underpainting. If you use dry reveal, brush size doesn't seem to matter a great deal, but if you don't want the dry reveal step, then smaller brushes at the bottom are better, particularly if you want the painting to have a lot of detail. You can mitigate the actual size or mix of brushes top to bottom somewhat by the settings used in the AOP for minimum and maximum brush sizes. Regarding colors, my experience is that an all-over mix works best. I believe that you need a good mix of colors in the last 4 rows, including a couple of blacks, for the best detail. I also try to have at least a row of very pale colors (yellow, red, green and blue particularly) for detail accents. Anyway, that's what I have experienced. And the bottom line really is that creating AOPs is a very subjective process and pretty much of a crap shoot that can suck away large amounts of your time. While it would be nice for Oscar to chime in, I seem to remember that he has said before that a lot of it is trial and error. If you haven't already done so, the best way to educate yourself is to take existing AOPs that have looks that you like and pick them apart. Go into the AOP template maker and import them and study the settings. Likewise, use the program "jpegex" previously recommend here (or any program that provides the same functionality) and pull out the jpgs for both the brushes and color templates from existing AOPs to see what Oscar and others have done. Most of all, have fun!! From the manual: (MW note: not sure if this applies if Dry Reveal is set to always run Preserve reveal Layer during Detail Paint/Min-Max If set the Dry reveal part will be preserved under the mask during detail paint - that means the detail paint will paint less over the masked portrait area and more over the unmasked area (background). The Max specify how strong will be the detail brush outside Portrait mask area and the Min will specify how strong will be painted inside the mask. This one drove me crazy for a while but the number of "Strokes Count" number in the "Default Template Settings" section of the Create AOP Template box equates to the "Nr. of Strokes" number WHEN THE CANVAS IS SET TO "STANDARD RESOLUTION 2.5 MPIX". If you change the canvas resolution to "Medium...", "High...", or

19 "UltraHigh...", that number will change correspondingly.

20 Modify the saturation level to make your colors "pop" (or to provide a more pastel feel).

21 The number in the box to the right of the saturation slider seems to equate to the number (+100) in the Saturation box under the "Default Template Settings" section of the Create AOP Template box. Changing levels appears to use more or less color from your underlying photo. Open a photo and from the main DAP menu choose "Adjust\Levels". Moving the RIGHTHAND left and/or right side of the slider to alter the histogram will give you some idea of the effect you might achieve by modifying the two levels parameters in the "Levels" section under the "Default Template Settings" section. You can experiment with the look you might achieve by first going into the "Adjust\Levels" menu item and moving the left and right sliders. The numbers you set will equate to the Levels boxes under the "Default Template Settings" section of the Create AOP Template box.

22 The following settings/information apply to using the Dry Reveal step itself or to allowing it to be used if the user creates a Mask: The opacity setting for Dry Reveal in the AOP equates to the slider available by right -clicking when Dry reveal is running in a painting
 will bring back less detail.")
23 Clicking on the slider shows what reveal opacity you have selected. The left side of the slider (and lower numbers for opacity in the AOP template maker) will bring back less detail. Conversely, higher numbers and clicking on the right side of the slider brings back maximum detail.
 -- picture below top is Smooth 10, Picture at bottom is Smooth 200.")
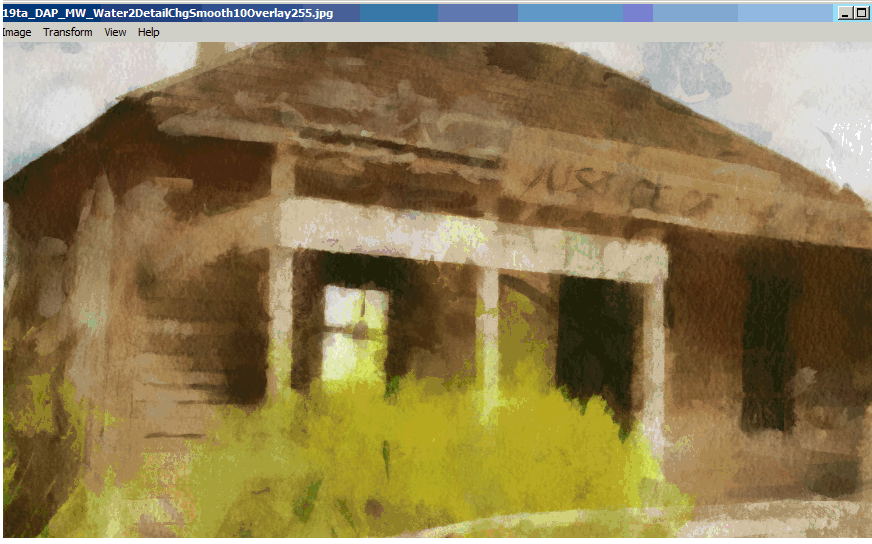
24 For the "Smooth" numbers, higher numbers appear to be more smooth (with less detail) -- picture below top is Smooth 10, Picture at bottom is Smooth 200. See more below

25
.")
26 Below top is set on smooth 255, bottom is set on smooth 10 (much more detail).

27

28 For the overlay setting, higher numbers will make the painting much darker. Top below is overlay 255, bottom is overlay 10
29

30 Happy Template Making!
MASKS & CHANNELS WORKING WITH MASKS AND CHANNELS
 MASKS & CHANNELS WORKING WITH MASKS AND CHANNELS Masks let you isolate and protect parts of an image. When you create a mask from a selection, the area not selected is masked or protected from editing.
Photoshop- Image Editing
 Photoshop- Image Editing Opening a file: File Menu > Open Photoshop Workspace A: Menus B: Application Bar- view options, etc. C: Options bar- controls specific to the tool you are using at the time. D:
Subjects: will be creating Twisters!
 The elements series is a guide to basic 2D Digital painting and can be followed in most software packages supporting paintbrushes and layers. Each month, professional artists will cover a specific theme
Multi-Zone Adjustment
 Written by Jonathan Sachs Copyright 2008 Digital Light & Color Introduction Picture Window s 2-Zone Adjustment and3-zone Adjustment transformations are powerful image enhancement tools designed for images
Seeing in black and white
 1 Adobe Photoshop CS One sees differently with color photography than black and white...in short, visualization must be modified by the specific nature of the equipment and materials being used Ansel Adams
Create A Collage Of Warped Photos
 Create A Collage Of Warped Photos In this Adobe Photoshop tutorial, we re going to learn how to create a collage of warped photos. Now, don t go letting your imagination run wild here. When I say warped,
The Lighting Effects Filter
 Appendix appendix E The Lighting Effects Filter The Lighting Effects filter is like a little program in itself. With this filter, you can create a wealth of different lighting effects, from making a particular
Drawing with Pencils, Charcoal and Pastels
 This tutorial is the first in a series of educational articles devoted to Corel Painter 8. ILLUSTRATION: CHER THREINEN-PENDARVIS 1 BY CHER THREINEN-PENDARVIS For Favorite Green Pitcher 2, a study created
ACADEMIC TECHNOLOGY SUPPORT
 ACADEMIC TECHNOLOGY SUPPORT Adobe Photoshop Introduction Part 1 (Basics- Image Manipulation) [email protected] 439-8611 www.etsu.edu/ats Table of Contents: Overview... 1 Objectives... 1 Basic Graphic Terminology...
Making natural looking Volumetric Clouds In Blender 2.48a
 I think that everyone using Blender has made some trials about making volumetric clouds. The truth is that a kind of volumetric clouds is already available in Blender for a long time, thanks to the 3D
Graphic Design. Background: The part of an artwork that appears to be farthest from the viewer, or in the distance of the scene.
 Graphic Design Active Layer- When you create multi layers for your images the active layer, or the only one that will be affected by your actions, is the one with a blue background in your layers palette.
Optimizing your image with Pixlr on-line photo editor
 Optimizing your image with Pixlr on-line photo editor Nick Dvoracek [email protected] In a web browser, go to http://pixlr.com/editor/ Click Open image from computer That will open a standard file dialogue
Flame Painter Manual version 1.2
 Flame Painter Manual version 1.2 Introduction Welcome to Flame Painter. Flame is a painting program I created as an experimental project in my 'I am an Artist' series. My initial vision was to create an
The Dennis Technique for SketchUp Models in Photoshop
 The Dennis Technique for SketchUp Models in Photoshop The big concept is to put a Black & White drawing over a coloured one and then artistically erase just enough of the top Black and White so that essential
Highlight Recovery in Camera Raw
 WHITEPAPER A little-known capability of the Adobe Camera Raw plug-in is highlight recovery in the nearly overexposed highlights of a raw digital capture. Normally, when one or two of the channels in an
Graphic Design Basics Tutorial
 Graphic Design Basics Tutorial This tutorial will guide you through the basic tasks of designing graphics with Macromedia Fireworks MX 2004. You ll get hands-on experience using the industry s leading
Get To Know Paint Shop Pro: Layers
 Get To Know Paint Shop Pro: Layers Layers are the building blocks of most images from photo collages to digital scrapbook layouts. Once you harness this powerful tool, you ll be able to easily create stunning
First Grade: April Lesson 6: Night Landscape Oil Pastel and Watercolor
 First Grade: April Lesson 6: Night Landscape Oil Pastel and Watercolor Objective: To create a resist painting showing a night landscape Technique: Drawing with oil pastels, adding a watercolor wash Set-up:
Color Balancing Techniques
 Written by Jonathan Sachs Copyright 1996-1999 Digital Light & Color Introduction Color balancing refers to the process of removing an overall color bias from an image. For example, if an image appears
Instructions for Creating a Poster for Arts and Humanities Research Day Using PowerPoint
 Instructions for Creating a Poster for Arts and Humanities Research Day Using PowerPoint While it is, of course, possible to create a Research Day poster using a graphics editing programme such as Adobe
Design Your Own Photo Card Add a personal touch to your holiday greetings
 IMAGE DIANA DAY Design Your Own Photo Card Add a personal touch to your holiday greetings By Diana Day Flat 4x8-inch photo cards, sometimes referred to as slimline cards, are popular for the holidays.
Dreamweaver and Fireworks MX Integration Brian Hogan
 Dreamweaver and Fireworks MX Integration Brian Hogan This tutorial will take you through the necessary steps to create a template-based web site using Macromedia Dreamweaver and Macromedia Fireworks. The
Solving the Rubik's Revenge (4x4x4) Home Pre-Solution Stuff Step 1 Step 2 Step 3 Solution Moves Lists
 Home Pre-Solution Stuff Step 1 Step 2 Step 3 Solution Moves Lists") Solving your Rubik's Revenge (4x4x4) 07/16/2007 12:59 AM Solving the Rubik's Revenge (4x4x4) Home Pre-Solution Stuff Step 1 Step 2 Step 3 Solution Moves Lists Turn this... Into THIS! To solve the Rubik's
Solving your Rubik's Revenge (4x4x4) 07/16/2007 12:59 AM Solving the Rubik's Revenge (4x4x4) Home Pre-Solution Stuff Step 1 Step 2 Step 3 Solution Moves Lists Turn this... Into THIS! To solve the Rubik's
Advanced Scanning Techniques
 Advanced Scanning Techniques High Tech Center Training Unit of the California Community Colleges at the Foothill-De Anza Community College District 21050 McClellan Road Cupertino, CA 95014 (408) 996-4636
TCS DIGITAL COLOR WHEEL VERSION 4.1 USER GUIDE
 TCS DIGITAL COLOR WHEEL VERSION 4.1 USER GUIDE We provide this TCS User Guide for our members as well as persons who would like to know more about the functionality before subscribing to TCS Color Match
SUPPLY LIST. Introduction to Oil Painting Instructor: Ron Hauser
 SUPPLY LIST Introduction to Oil Painting Instructor: Ron Hauser Beginning Oil Painting This class is for beginning and intermediate students who want to brush up on their oil painting skills! Emphasis
Colorize Three Ways with Paint Shop Pro s Professional Strength Tools
 Colorize Three Ways with Paint Shop Pro s Professional Strength Tools By JP Kabala In Paint Shop Pro, and most other graphics software, colorize means to convert an image or selection to a uniform hue
A Step-by-Step Colored Pencil Tutorial by Carol Moore
 A Step-by-Step Colored Pencil Tutorial by Carol Moore Materials and Tools: Reference photo Ruler X-Acto Knife Makeup Brush (to brush away debris) Small wooden stylus Fixatif Canson Mi Tientes paper (smooth
How to rotoscope in Adobe After Effects
 Adobe After Effects CS6 Project 6 guide How to rotoscope in Adobe After Effects Rotoscoping is an animation technique in which you draw, paint, or add other visual effects in a layer over live-action film
Carrie Schoenborn Molly Switalski. Big Idea: Journeys
 Carrie Schoenborn Molly Switalski Big Idea: Journeys What are types of journeys that people travel in life? Are all journeys physical journeys? What defines a journey? How do we know when a journey is
Piktochart 101 Create your first infographic in 15 minutes
 Piktochart 101 Create your first infographic in 15 minutes TABLE OF CONTENTS 01 Getting Started 5 Steps to Creating Your First Infographic in 15 Minutes 1.1 Pick a Template 1.2 Click Create and Start Adding
1 Choosing a photo for reference.
 This tutorial is the second in a series of educational articles devoted to Corel Painter 8. ILLUSTRATION: CHER THREINEN-PENDARVIS 1 BY CHER THREINEN-PENDARVIS For Fantasy Butterfly Sketch, a pen-and-ink
Microsoft PowerPoint 2010 Templates and Slide Masters (Level 3)
") IT Services Microsoft PowerPoint 2010 Templates and Slide Masters (Level 3) Contents Introduction... 1 Installed Templates and Themes... 2 University of Reading Templates... 3 Further Templates and Presentations...
IT Services Microsoft PowerPoint 2010 Templates and Slide Masters (Level 3) Contents Introduction... 1 Installed Templates and Themes... 2 University of Reading Templates... 3 Further Templates and Presentations...
Avatar: Appearance Changing Your Shape. 1-1.2 Introduction. 1-1.2.1 Instruction. 1-1.2.2 Practice LEVEL: 1 MODULE: AVATAR: APPEARANCE MISSION 2
 Avatar: Appearance Changing Your Shape LEVEL: 1 MODULE: AVATAR: APPEARANCE MISSION 2 1-1.2 Introduction Now that you have a default avatar, it s time to start customizing it to your liking! Fortunately,
July 21, 2010 Brushes ipad Edition User s Guide
 July 21, 2010 Brushes ipad Edition User s Guide Copyright 2010 Taptrix, Inc. All Rights Reserved. Contents Introduction 3 Contact Us 3 Gallery 4 Creating a New Painting 5 Deleting a Painting 5 Sharing
Filters for Black & White Photography
 Filters for Black & White Photography Panchromatic Film How it works. Panchromatic film records all colors of light in the same tones of grey. Light Intensity (the number of photons per square inch) is
MassArt Studio Foundation: Visual Language Digital Media Cookbook, Fall 2013
 INPUT OUTPUT 08 / IMAGE QUALITY & VIEWING In this section we will cover common image file formats you are likely to come across and examine image quality in terms of resolution and bit depth. We will cover
How to Create a Fun Circus Tent Icon. Final Image Preview. Tutorial Details. Step 1. By: Andrei Marius
 How to Create a Fun Circus Tent Icon By: Andrei Marius Roll up, roll up! In the following tutorial you will learn how to create a simple circus tent icon. You may discover some interesting things about
Students will complete these drawings/paintings throughout the length of this curriculum in this specific order.
 This training and curriculum is created from the best and most effective traditional methods and techniques used in 19th-century European academies and private ateliers, the apprentice system of the renaissance.
CREATING POSTERS WITH POWERPOINT
 CREATING POSTERS WITH POWERPOINT PowerPoint files will be required for Posters on CD-Rom with very few exceptions. WHY POWERPOINT? Although there are many software programs that will create posters, PowerPoint
Tutorial for Tracker and Supporting Software By David Chandler
 Tutorial for Tracker and Supporting Software By David Chandler I use a number of free, open source programs to do video analysis. 1. Avidemux, to exerpt the video clip, read the video properties, and save
EFX Keying/Alpha plugins for After Effects
 EFX Keying/Alpha plugins for After Effects Here you'll find description of the plugins developed to help select pixels based on many criteria. Also after selection, there are often things you want to do
Creating a Poster Presentation using PowerPoint
 Creating a Poster Presentation using PowerPoint Course Description: This course is designed to assist you in creating eye-catching effective posters for presentation of research findings at scientific
Quick Start Guide Simple steps for editing and manipulating your photo.
 PhotoPlus Quick Start Guide Simple steps for editing and manipulating your photo. In this guide, we will refer to specific tools, toolbars, tabs, or menus. Use this visual reference to help locate them
Learn How to Create and Profit From Your Own Information Products!
 How to Setup & Sell Your Digital Products Using JVZoo Learn How to Create and Profit From Your Own Information Products! Introduction to JVZoo What is JVZoo? JVZoo is a digital marketplace where product
Fireworks CS4 Tutorial Part 1: Intro
 Fireworks CS4 Tutorial Part 1: Intro This Adobe Fireworks CS4 Tutorial will help you familiarize yourself with this image editing software and help you create a layout for a website. Fireworks CS4 is the
A GUIDE TO USING PAINT.NET
 Presentation to the Melbourne PC Users Bayside SIG by Kathy Rouse 15 th June 2006. Paint.NET, the free program begun as an undergraduate senior design project at Washington State University, by Microsoft,
PREPARING PHOTOS for PRINTING
 PREPARING PHOTOS for PRINTING GENERAL WORKFLOW Open a PSD file SAVE AS a TIFF File Resize to Printer Resolution using IMAGE SIZE Sharpen with Layer Sharpen Add a Black Border using CANVAS SIZE Set the
How to create PDF maps, pdf layer maps and pdf maps with attributes using ArcGIS. Lynne W Fielding, GISP Town of Westwood
 How to create PDF maps, pdf layer maps and pdf maps with attributes using ArcGIS Lynne W Fielding, GISP Town of Westwood PDF maps are a very handy way to share your information with the public as well
UNDERSTANDING DIFFERENT COLOUR SCHEMES MONOCHROMATIC COLOUR
 UNDERSTANDING DIFFERENT COLOUR SCHEMES MONOCHROMATIC COLOUR Monochromatic Colours are all the Colours (tints, tones and shades) of a single hue. Monochromatic colour schemes are derived from a single base
NVCC Alexandria Campus
 1 NVCC Alexandria Campus Editing Photographs Using Microsoft Picture Manager Introduction Microsoft Picture Manager is an image editing program that allows you to browse/organize your photos, resize and
Greetings Card. Projects 1
 Projects 1 h b Whether it s to celebrate a birthday, an anniversary, or a graduation, or simply to tell a friend you are thinking of them, we all enjoy sending and receiving greetings cards. With PagePlus,
PART 1 Basic Setup. Section 1.1 Direct The Strokes 1.1.1
 Animated Impressionism with Adobe After Effects This tutorial covers a technique for animating paint strokes applied to a still image so that it appears to be a work of impressionistic art. Adobe After
Digital Image Concepts I
 Digital Image Concepts I The Pixel Handout 1.1 September 9, 2004 A Digital Image is composed of an array of picture elements or pixels. Each pixel represents a single color and value. The computer arranges
Hello Purr. What You ll Learn
 Chapter 1 Hello Purr This chapter gets you started building apps. It presents the key elements of App Inventor the Component Designer and the Blocks Editor and leads you through the basic steps of creating
NDSU Technology Learning & Media Center
 1 NDSU Technology Learning & Media Center QBB 150C 231-5130 www.ndsu.edu/its/tlmc Creating a Large Format Poster (Plot) Using PowerPoint 2013 Posters should be designed and created in a manner that best
ART 170: Web Design 1
 Banner Design Project Overview & Objectives Everyone will design a banner for a veterinary clinic. Objective Summary of the Project General objectives for the project in its entirety are: Design a banner
For this project, you will be using TORN PAPER to create a COLLAGE!
 Torn Paper Collage For this project, you will be using TORN PAPER to create a COLLAGE! You can use virtually any kind of paper you can find. Magazines, newspapers, junk mail Artwork, sheet music, pages
Create Your Own Picture Tubes
 Create Your Own Picture Tubes By JP Kabala What can do you do if you don t have a Picture Tube with the kind of images that you need or want? Well, you could try the Jasc.com Creative Downloads. These
A Guide to Microsoft Paint (Windows XP)
") A Guide to Microsoft Paint (Windows XP) Introduction Microsoft Paint allows you to produce your own pictures (or edit existing ones). In Windows XP, you can no longer access Paint directly from the Microsoft
A Guide to Microsoft Paint (Windows XP) Introduction Microsoft Paint allows you to produce your own pictures (or edit existing ones). In Windows XP, you can no longer access Paint directly from the Microsoft
We then book a follow up appointment for glamour. This allows you to spend some one-on-one time with your client to customize her look.
 Also check out the Start Something Beautiful DVD from the Starter Kit Select How To Hold A Party Then Select The Close Then Select The Table Close Using A Travel Roll-Up Bag, with Auri Hatheway Dash Out
3DVista Virtual Tour Suite
 3DVISTA ESPAÑA S.L. 3DVista Virtual Tour Suite Quick Guide 3dvista 01/08/2014 www.3dvista.com Table of Contents Introduction... 2 Requirements... 3 Before getting started... 3 How to create & publish a
Getting Started with WebSite Tonight
 Getting Started with WebSite Tonight WebSite Tonight Getting Started Guide Version 3.0 (12.2010) Copyright 2010. All rights reserved. Distribution of this work or derivative of this work is prohibited
Autodesk SketchBook Pro. Android 2.6
 Autodesk SketchBook Pro Android 2.6 Contents SketchBook Pro for Android What's New Introduction 7 Sketching... 7 Clutch... 7 Toolbar... 8 Information toolbar... 9 Gestures... 9 Zoom into and out of the
#3 GIMP Layers How to Use GIMP Layers & Create Amazing Photos
 GIMP 2.8 Plus #3 GIMP Layers How to Use GIMP Layers & Create Amazing Photos Edit Your Photos. Quick and Easy Tutorials GIMP for Photographers Series By Jeff Nott Quick and Easy Tutorials that enable you
Excel -- Creating Charts
 Excel -- Creating Charts The saying goes, A picture is worth a thousand words, and so true. Professional looking charts give visual enhancement to your statistics, fiscal reports or presentation. Excel
Excel Formatting: Best Practices in Financial Models
 Excel Formatting: Best Practices in Financial Models Properly formatting your Excel models is important because it makes it easier for others to read and understand your analysis and for you to read and
AngioSys 2.0 Image Analysis Software Manual
 AngioSys 2.0 Image Analysis Software Manual Table of contents Introduction and ordering Activate your software Analyse a new plate Open a previous plate Add well details Delete well details Fill a row/column
Digital Photography Composition. Kent Messamore 9/8/2013
 Digital Photography Composition Kent Messamore 9/8/2013 Photography Equipment versus Art Last week we focused on our Cameras Hopefully we have mastered the buttons and dials by now If not, it will come
Concept Art. Maurice Beumers (Mo) About the author
 About the author") Concept Art Maurice Beumers (Mo) About the author Born and based in Germany, Maurice Beumers (Mo) learned to draw as a young child. An autodidactic study of numerous scientific subjects, including anatomy
Concept Art Maurice Beumers (Mo) About the author Born and based in Germany, Maurice Beumers (Mo) learned to draw as a young child. An autodidactic study of numerous scientific subjects, including anatomy
1. Three-Color Light. Introduction to Three-Color Light. Chapter 1. Adding Color Pigments. Difference Between Pigments and Light. Adding Color Light
 1. Three-Color Light Chapter 1 Introduction to Three-Color Light Many of us were taught at a young age that the primary colors are red, yellow, and blue. Our early experiences with color mixing were blending
How to Use the Drawing Toolbar in Microsoft Word
 How to Use the Drawing Toolbar in Microsoft Word The drawing toolbar allows you to quickly and easily label pictures (e.g., maps) in a MS Word file. You can add arrows, circle spots, or label with words.
Painting A Face in Oils
 Painting A Face in Oils Ebook Guide to Painting a Face. HOW TO PAINT A FACE IN OILS Welcome to 2PaintMiniatures.com tutorial on Painting a Face in Oils. Please make sure you are connected to the Internet
EPSON SCANNING TIPS AND TROUBLESHOOTING GUIDE Epson Perfection 3170 Scanner
 EPSON SCANNING TIPS AND TROUBLESHOOTING GUIDE Epson Perfection 3170 Scanner SELECT A SUITABLE RESOLUTION The best scanning resolution depends on the purpose of the scan. When you specify a high resolution,
Masks. Using Quick Mask Mode. ARCH 593 Digital Image Media Handout 1.1 September 30, 2004
 Masks Masks let you isolate and protect areas of an image as you apply color changes, filters, or other effects to the rest of the image. When you select part of an image, the area that is not selected
Kenken For Teachers. Tom Davis [email protected] http://www.geometer.org/mathcircles June 27, 2010. Abstract
 Kenken For Teachers Tom Davis [email protected] http://www.geometer.org/mathcircles June 7, 00 Abstract Kenken is a puzzle whose solution requires a combination of logic and simple arithmetic skills.
Creating manga-style artwork in Corel Painter X
 Creating manga-style artwork in Corel Painter X Jared Hodges Manga is the Japanese word for comic. Manga-style comic books, graphic novels, and artwork are gaining international popularity. Bronco Boar,
Central England People First s friendly guide to downloading
 Central England People First s friendly guide to downloading What is Skype? Skype is a computer programme that turns your computer into a telephone. This means that you can speak to other people using
Excel Tutorial. Bio 150B Excel Tutorial 1
 Bio 15B Excel Tutorial 1 Excel Tutorial As part of your laboratory write-ups and reports during this semester you will be required to collect and present data in an appropriate format. To organize and
Posterizing Prints STUDIO. PROJECT 3 For use with Chapter 5. Objectives SUPPLIES
 STUDIO PROJECT 3 For use with Chapter 5 Name Posterizing Prints Date Class Period Objectives Alter an original photo using a posterization filter in a photo editing program. Continue experimenting with
Float a Beachball in Psuanmi
 Float a Beachball in Psuanmi How to composite objects into Psunamiʼs water surface [ from: Digital Anarchy ] f/x tools for revolutionaries Float a beachball in Psunamiʼs waves In this tutorial, we will
Billboard Tutorial. NOTE: The first Image is actually transparent any where you see white. The last picture actually IS white.
 Billboard Tutorial Many people have asked for a Tutorial on how to make Billboards, and since I have played around with them quite a bit I figured I would create one. Billboards are actually very easy
CORSAIR GAMING KEYBOARD SOFTWARE USER MANUAL
 CORSAIR GAMING KEYBOARD SOFTWARE USER MANUAL TABLE OF CONTENTS CORSAIR UTILITY ENGINE OVERVIEW PROFILES 1 9 Introduction 2 Starting the Corsair Utility Engine 2 Profiles: Settings for a Specific Program
Adobe Certified Expert Program
 Adobe Certified Expert Program Product Proficiency Exam Bulletin Adobe Photoshop CS4 Exam # 9A0-094 ACE Certification Checklist The checklist below will help guide you through the process of obtaining
How To Make A Poster In Microsoft Excel With Wordpress
 Make a Poster With Excel By Lorrie Jackson WHY A TECHTORIAL? What will I learn today? You will learn how to make a classroom poster using Microsoft Excel. What hardware and/or software does the techtorial