A Solar Wax Melter. In the Beekeeper s Work Shop Building a Solar Wax Melter by Stephen E. Tilmann
|
|
|
- Brooke Edwards
- 7 years ago
- Views:
Transcription
1 A Solar Wax Melter Most beginning beekeepers get into the hobby dreaming of producing a little honey; enough for their own use plus a little extra for gifts and perhaps for sale. We soon learn that there is another product of the hive - bees wax - which looks just too good to throw away. What to do with it? In fact, wax is way too valuable to simply toss. It is a handy product to have around the home and shop. Wax makes a great lubricant for door hinges, sliding glass door rollers and other annoying squeaks and scrapes. Wax will not leave an oily stain and because it does not evaporate like oil, it will last a long, long time. Of course in the arts and crafts department, bees wax has a history stretching back to ancient times. Who has not heard of bees wax candles? Did you know that bees wax tapers will not smoke like paraffin candles and will substantially outlast paraffin candles? There is also a very good market for bees wax. In fact, pound for pound bees wax will bring just as high - or higher - price than honey. You will find no problem selling any surplus bees wax. Most of your bees wax will come from the capping which you cut from the frames while harvesting honey. However, I always carry a bucket to the bee yard to save the burr and bridge comb that I gather when working with the hives. You will be surprised at the amount of wax you can collect while in the bee yard. Never throw away bees wax. Rendering Bees Wax Raw bees wax, either from the decapping tank or the bee yard, needs to be cleaned and rendered since it will be soaked with honey, bug parts and other hive debris. To clean, rinse raw wax two or three times with clean, cool water. I simply put the raw wax in a 5-gallon honey bucket, fill it full of water and let is stand overnight. I then drain the bucket out of the honey gate, fill it again with fresh water and repeat the process. After the final rinse, let the wax thoroughly dry. Spreading it out on several layers of newspaper will help. Now it is time to render the wax and this is where a solar wax melter will prove its worth. When raw wax is melted most of the debris will float to the top where it can be skimmed off. However, wax is highly flammable, and beekeepers who try to melt wax over an open flame (such as on your stove top) run the real risk of depilating themselves from the shoulders on up when the wax ignites in a big blue flash. (Note: I wrote when not if.) Even if melted in a double boiler, I get nervous with melted wax around an open flame or high heat source. The answer is a solar wax melter. With this gadget, you can load it up with your rinsed, raw wax, put it in the sun and then go attend to your other business. You don t have to worry about anything catching fire and the job will be done at the end of the day. As an added benefit, your wax will come out in near pristine condition since virtually all of the bug parts and other debris will be caught in the wax melter s wire basket.

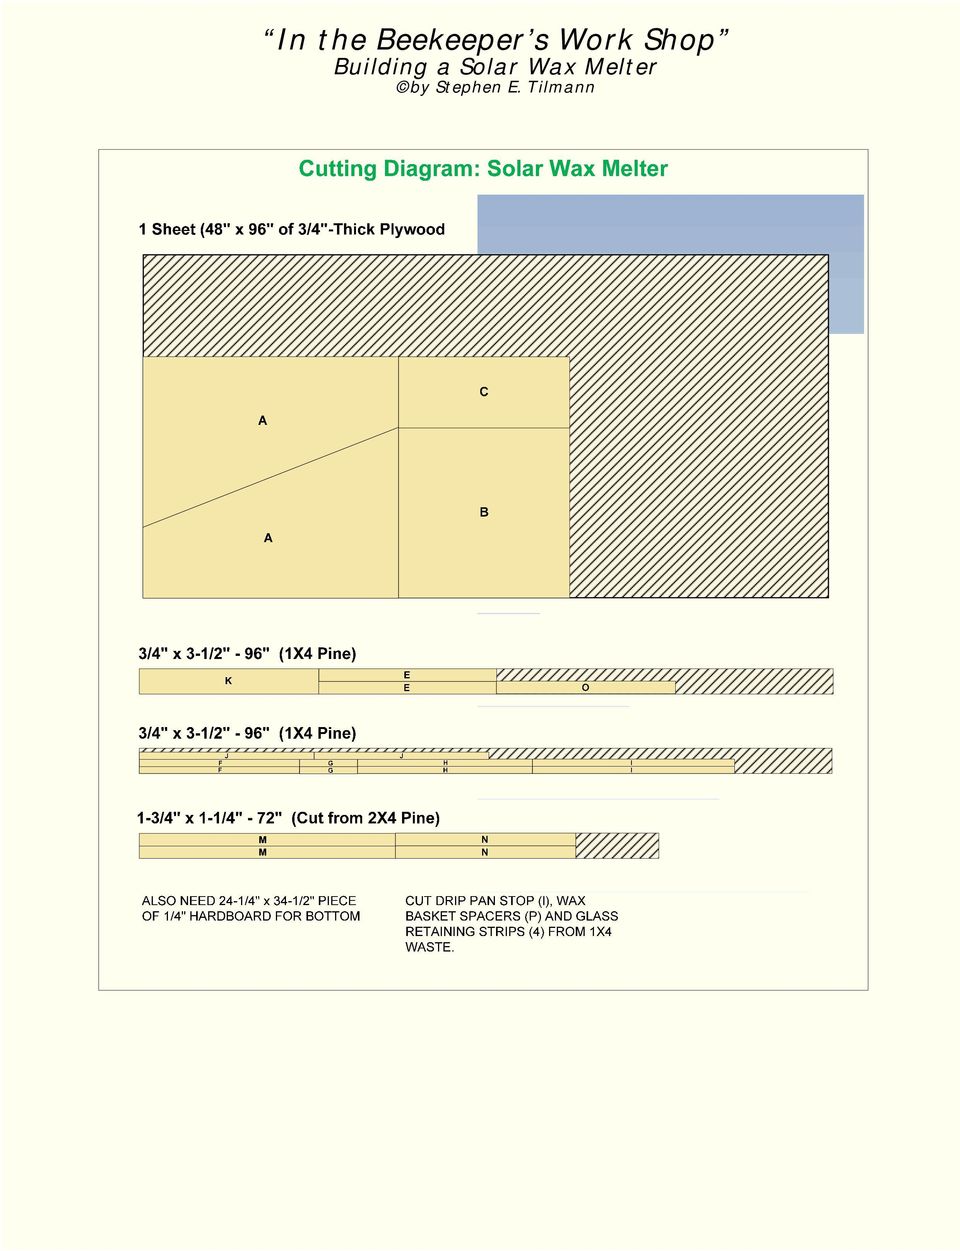
2 You will be left with pure bees wax in the collecting pan. It will have a nice light color, that intoxicating bee wax smell and bee market ready. Now you can t beat that! Hint: Although I usually collect the wax in old bread pans or cake pans, having wax in smaller blocks and other shapes can be useful. For molds, I keep vacuum sealed clear plastic coverings that are used for packaging many household products. These shapes are often just what is needed. Simply use the covering as a mold for the melted wax. See the Photo Gallery at the end of this article for examples. Basic Construction The solar wax melter is basically a box made out of 3/4" plywood (Figure 1 and photo). The top is slanted so that the hinged top lid has a more favorable presentation toward the sun. The lid has a double pane of glass with a 3/4" separation (dead air space) that greatly increases the efficiency of the device. The sides, back and bottom of the box are insulated with 3/4" foil faced foam board and painted black. Inside there is an large aluminum drip pan that rests on angled supports so that melted wax will run down and out through an opening cut at the lower end of the pan. Inside this pan, a #8 wire mesh basket holds the wax while melting. There are a couple of small wooden spacer bars stapled to the bottom of the wire basket to create a gap that permits the melted wax a flow space. The wire basket will catch and strain out almost all of the debris found in the wax. The melted wax you collect will be very clean. An old metal cake pan or bread pan is just right for collecting the melted wax as it runs out the very bottom of the drip pan. Because the front door is hinged, you can easily check on the collection pans and replace them if they get full. This project has a little of everything for the shop-bound beekeeper: woodworking (of course!), basic metal fabrication and even window glazing. Once completed and in use, you will wonder how you ever got by without your solar wax melter. Construction Details Step 1. Cut the Box Panels to Size From a sheet of 3/4" plywood, cut the sides (two required), front and back panels to the dimensions shown (Figure 2). From a sheet of 1/4" tempered Masonite, cut the bottom panel to the dimensions shown (Figure 2). Note: The circled letters refer to the materials list at the back of this article.

3 Step 2. Install Corner Braces on Side Panels For added strength, the inside corners of the box are reinforced with a 1-inch nailer cut from a scrap piece of 1/x4 pine (Figure 3). You can make these nailers by ripping a 1x4 into three pieces lengthwise. You will need two pieces 22-1/2" long and two pieces 8-1/2" long. On the inside of the two side panels, glue and nail the 22-1/2" nailer along the back side holding the nailer 3/4" from the edge. Position the nailer 1" from the bottom to allow for the bottom panel, which will be add later. Similarly, glue and nail the 8-1/2" piece along the front of the side panel. For this nailer, keep it flush with the edge of the side panel and 1 from the bottom. Step 3. Assemble the Side and Back Panels Glue and screw the back panel to the two side panels. The back panel will fit inside the sides. The bottom edges should be flush so that the back panel extends 7/8" above the top edge of the sides. Across the front, glue and screw two 1-3/4"horizontal braces 25-3/4" long made from scrap 1x4 pine (Figure 4). The space between the braces should be 6-1/2" to accommodate the front hinged panel. Step 4. Install the Bottom Panel Turn the partially assembled box upside down and prop up the front to make it easier to work on. Slide in the Masonite bottom panel. It will be supported by the four corner braces. Using similar material to the corner braces (1" x 3/4" pine), install support cleats on the inside of all four sides of the heater box (Figure 5). Glue, clamp and nail each of these support braces. Finally, install two support braces across the width of the bottom using 1" x 3/4" pine boards. Space the support braces about 10" from either end. Use two 3" drywall screws on the end of each cross brace.

4 Step 5. Install the Drip Pan Supports Inside the wax melter, the drip pan and wire basket are support by three 24-1/4" 1x4s spanning the width of the melter (Figure 6). The supports are 6" below the top of the side panels and spaced 2-3/4", 14" and 25" from the inside of the back panel. The flat side of the 1x4s should be slanted so that they are parallel to the top of the side panels. Use two 2" drywall screws screwed in from the outside of the side panels on each end of the supports. Before installing the lowest support, glue and nail two 1/2" x 1-3/4" x 8" stops on the front edge (Figure 7). Leave a 6" gap between the stops. 6" 14" 2-3/4" 25" Step 6. Make the Top Lid Frame The frame for the hinged glass top is made from 2x4s cut into strips 1-3/4" x 1-1/4". You will need two pieces 37-3/4" long and two pieces 25-3/4" long (Figure 8). On the same side of each piece, cut a 1/2" x 1/2" notch on the top and bottom edge (Figure 9). The glass panes will rest on the resulting ledge with a 3/4" space between the panes. Two assemble, miter each end (45 degrees), glue and use two 2" drywall screws (predrill) to secure. Double check to make sure the frame is square. The glass will be installed in a later step.

5 Step 7. Install Filler Strip For Hinged Lid A narrow filler strip needs to be installed across the top of the wax melter, adjacent to the back panel (Figure 10). The filler is made for 3/4" stock 25-3/4" wide. This filler will also be used for the lid hinges in a later step. The filler will be about 1-3/4" wide. We recommend that you test fit the lid to determine the exact size needed. Lay the lid on top of the wax melter with the lower edge flush with the front of the box. The measure the width of the filler at the top. Note that for a tight fit, the top edge of the filler is cut at an angle of 68 degrees. Again, determine your angle by striking a vertical line from the top corner of the filler when test fitting the lid. Step 8. Paint the Inside and Outside of the Wax Melter The assembly of all of the wood components for the wax melter is complete. Now is the time to completely paint the wax melter. The inside should be painted black. We suggest a primer coat and two top coats of good grade latex. Hint: The door panel will be installed between the two rails in the front of the wax melter. Make sure there is adequate space by test fitting the door panel. If necessary, you may need to trim a slight amount from the door panel. Remember, the door panel will be painted which will make a tight fit even tighter. Step 9. Line Inside of Wax Melter with Foam Board Using 3/4" foil faced foam board, line the two sides, bottom and back of the wax melter (Figure 11). Glue the foam board into place using an adhesive rated for foam. Put the foil faced side toward the inside of the wax melter and then paint black. Lumber yards also carry nails with plastic washers specifically designed to nail foam boards. These work quite well. However, the nail length may be too long for this application, so you might have to cut the nail to be no longer than 1-1/4".

6 Step 10. Attach Wheel Bracket and Wheel Assembly. The wheel bracket is made from a 1" x 12" piece of 1/8" steel. Position the bracket 6" from the front of the wax melter and screw the bracket to the side panel such that 2-1/2" extends beyond the bottom of the box (Figure 12). To make the bracket, drill a 1/2" hole 1" from the end for the wheel axle (Figure 13). Then drill five 3/16" holes for the mounting screws. Start these holes 1" from the top and space 2" apart. Screw the bracket to the side panel with five #10 x 3/4" pan head screws. Attach the wheel to the bracket using a 1/2" x 4" hex head bolt. Use washers as shown in Figure 13. End with a double nut separated by a lock washer. Repeat for the wheel on the other side. Note: the dimensions shown are for a 9" diameter wheel. When assembled, the bottom of the wax melter will be 6" above the ground. If your wheel has a different size, then the height of your melter will be radius of your wheel plus 1-1/2". This height is not critical. Step 11. Fabricate and Attach Rear Support Bracket The rear support bracket is made by bending a piece of 3/4" conduit into a U shape (Figure 14). The exact size is not critical. The bottom of the bracket should extend 6" below the bottom of the wax melter (when using a 9" diameter wheel) so that the bottom of the wax melter is level. Screw the bracket to the back panel using four #8 x 1-1/2" pan head screws per side. It is best to use a conduit bender to make the bends; not the type of tool that most hobbyists have. Check with your local hardware store, plumbing shop or electrical shop as they may be able to do the job for you. You can also make a support bracket out of wooden legs if the conduit is not used. In the prototype, we used the handle from an old garden cart. Finally, attach a 4" chest pull (a hinged handle) near to top center of the back panel. You will use the pull when moving the wax melter.

7 Step 12. Install the Front Door Panel Install the front door panel using two 1" hinges on the bottom (Figure 15). On the top, use two half turn buttons to keep the door closed. Finally, finish off the door with a 4" drawer pull. Step 13. Install Glass Panes You will need two 24" x 36" panes of tempered glass. Starting on one side of the frame, put a thin layer of glazing compound on the top of the ledge and the lay in the glass pane. Use push-in glazier points to secure the pane. Then nail the retaining strips on top of the glass using 7/8 x 18 brads (refer back to Figure 9). Turn the frame over and install the second pane of glass in a similar manner. After the glass is installed, place the cover on top of the wax melter and attach the lid to the filler strip using two 2-inch hinges. Then attach a drawer pull to the front of the lid frame. Step 14. Fabricate the Drip Pan The wax drip pan is made from aluminum (trim coil stock). It sits on the cross supports inside the wax melter. The drip pan is 19-1/2" x 26-1/2" in size and 4" deep (Figure 16). All four sides of the drip pan are bent up along the dotted lines as shown. The tabs along the sides are bent along the outside of the back and front (Figure 17). Fasten the tabs with several pop rivets. The bends are best made with a tool called a break. You can also use the sharp edge of your work bench to make the bends. Sheet metal shops will make this pan for you if you prefer to go that route. Note the front has a 6" wide spout. The two edges of the spout are bent upwards (as shown) to guide the melted wax into a wax pan. If there are any holes in the corners, particularly the bottom corners, these can be plugged with epoxy. Paint the inside and outside of the drip pan black,
. Turn the frame over and install the second pane of glass in a similar manner.")
8 Step 15. Fabricate the Wire Wax Basket The wire wax basket sits inside the drip pan. The basket is slightly smaller than the drip pan (17-1/2" x 25" x 3") and is made from #8 screen mesh (Figure 19), Along the bottom of the basket, there are three 3/4" spacers which hold the basket off the bottom of the drip pan and allows melted wax to flow. The basket is fabricated using the same basic steps as the drip pan. Use short pieces of wire to hold the basket together where the flaps fold over the back and front sides. Cut three 3/4" x 3/4" x 24" strips from scrap 1x4s. Staple these spacer strips to the bottom of the basket. Extra Credit. As an additional step, you may also want to add pivoting arm(s) (3/4 x 1 - to length) to hold up the lid. These can be attached to either the outside or the inside of the wax melter. Two arms (one on either side) may work best because there will be less twisting of the frame (and possible glass breakage) than with only one support arm.

9 List of Materials: Solar Wax Melter WOOD Reference Figure A Sides (2) 3/4 ply - 10 x 36 x 24 2 B Back (1) 3/4 ply 24-7/8 x 24-1/4 2 C Front (1) 3/4 ply 6-1/2 x 25-3/4 2 D Bottom (1) 1/4 hardboard 24-¼ x 34-1/2 2 E Front Brace (2) 1-3/4 x 3/4-25-3/4 4 F Back Corner Brace (2) 1 x 3/4-22-1/2 3 G Front Corner Brace (2) 1 x 3/4-8-1/2 3 H Bottom Support Brace (2) 1 x 3/4-24-1/4 5 I Bottom Cleat (2) 1 x 3/4-34-1/2 5 J Bottom Cleat (2) 1 x 3/4-24-1/4 5 K Drip Pan Support (3) 3-1/2 x 3/4-24-1/4 6 L Drip Pan Stop (2) 1-1/4 x 1/2-8 7 M Lid Frame Sides (2) 1-3/4 x 1-1/4 37-3/4 8 & 9 N Lid Frame Top/Bottom (2) 1-3/4 x 1-1/4 25-3/4 8 & 9 O Filler (1) 1-3/4 x 3/4 25-3/4 10 P Glass Pane Retaining Strips Top/Bottom (4) 3/8 x1/2-24-1/4 9 Q Glass Pane Retaining Strips Sides (4) 3/8 x1/2-37-1/4 9 R Wax Basket Spacers (3) 3/4 x 3/ S Glass Retaining Strips, Top/Bottom (4) 3/8 x 3/8 24-1/4 9 T Glass Retaining Strips, Sides (4) 3/8 x 3/8 36-1/4 9 HARDWARE AA 3/4" Foil Backed Foam Insulation, cut to fit (1) 11 BB 24 x 36 Tempered Glass (2) 9 CC 2" Hinge for top lid (2) 10 DD 4" Drawer Pull (3) 8, 14 & 15 EE 1 x 1/8 12 Steel for Wheel Assembly (2) 13 FF 9" Wheel for Wheel Assembly (2) 13 GG 1/2" x 4" Hex Head Bolt w/2 Nuts for Wheel Assembly (2) 13 HH 1/2" Flat Washer for Wheel Assembly (8) 13 II 1/2" Lock Washer for Wheel Assembly (2) 13 JJ #10 x 3/4" Pan Head Screw for Wheel Assembly (10) 13 KK 60" (approximately) 3/4" conduit bent into U shape for Rear Support Bracket (1) 14 LL #8 x 1-1/2" Pan Head Screw for Rear Support Bracket (8) 14 MM 1" Hinge for Front Door (1) 15 NN Half Turn Button for Front Door (1) 15 OO 27-1/2" x 34-1/2" Aluminum for Wax Drip Pan (1) 16 PP 23-1/2" x 31" #8 Hardware Cloth for Wire Wax Basket (1) 18 QQ 3/16" Pop Rivets for Aluminum Wax Drip Pan (as required) 18 RR 1/2" Staples for Wire Basket Spacers 18 SS 2-1/2" x 8 Decks Screws (as needed) Miscellaneous wire brads (7/8 x 18 ), staples (as needed) Wood Glue (eg, Franklin s Titebond
 1-3/4 x 1-1/4 25-3/4 8 & 9 O Filler (1) 1-3/4 x 3/4 25-3/4 10 P Glass Pane Retaining Strips Top/Bottom (4) 3/8 x1/2-24-1/4 9 Q Glass Pane Retaining Strips Sides (4) 3/8 x1/2-37-1/4 9 R")
10
11 Photo Gallery Photo Captions: 1. Completed solar wax melter ready for use. 2. Rendered wax in convenient shapes. 3. Detail of front corner showing insulating board. 4. Detail of wheel assembly. 5. Detail of bottom supports. 6. Detail of rear stand and pulling handle. 7. Interior shown was pan and hardware cloth basket.

A Screened Bottom Board
 A Screened Bottom Board As the name implies, a bottom board sits at the bottom of the hive; it is the floor of the hive (Figure 1). Basically, the bottom board is a platform connected to two side rails.
The Hive Bodies. In the Beekeeper s Work Shop. Building a Bee Hive: The Hive Bodies. by Stephen E. Tilmann
 The Hive Bodies In the Beekeeper s Work Shop The hive body is the heart of a managed bee hive colony (Figure 1). It is where the queen lays her eggs, the house bees raise the brood and the workers store
Hive Top Ventilation Shims
 Hive Top Ventilation Shims When preparing your bee hives for the winter, it is very important to provide for ventilation at the top of the hive. Through out the winter, the bees are expelling a lot of
How to Build a Poker Table
 How to Build a Poker Table www.pokertablematerials.com 10-Person Poker Table- 96 x 48 These are step by step instructions for building a poker table. The table will measure 48" x 96" and have a 4" wide
DIY CABINET REFACING INSTALLATION GUIDE
 DIY CABINET REFACING INSTALLATION GUIDE CABINET REFACING INSTALLATION Are you ready to reface your outdated cabinets? This guide will show you how to install your new Facelifters Cabinet Refacing Products
Modular Locomotive System Instruction Manual for HBK8 George Body Kit
 Modular Locomotive System Instruction Manual for HBK8 George Body Kit Roundhouse Engineering Co. Ltd. Units 6-10 Churchill Business Park. Churchill Road, Wheatley. Doncaster. DN1 2TF. England. Tel. 01302
A Telescoping Hive Cover
 A Telescoping Hive Cover The telescoping hive cover is what keeps the weather and elements out of your bee hive; it is like the roof of your house (Figure 1). Commercial hive covers typically feature a
How to Build Your Own CornHole Game
 How to Build Your Own CornHole Game DIMENSIONS Here is a diagram with the basic measurements for the Cornhole board game. SUPPLIES 1/2 thick sheet of plywood one 4 x4 or two 2 x4 s 8 long 2 4 s (4) 4 1/2
BUILD A TABLETOP LOOM
 BUILD A TABLETOP LOOM From 1" x 2" stock (actual 3/4" x 1"1/2) cut: 4 pieces 15" long 4 pieces 5"1/2 long Use the above to make 2 frames for the front and back of the loom. From 1" x 4" stock (actual 3/4"
Guidelines for Earthquake Bracing of Residential Water Heaters
 Guidelines for Earthquake Bracing of Residential Water Heaters Department of General Services Division of the State Architect 1102 Q Street, Suite 5100 Sacramento, CA 95814 Phone: (916) 324-7099 Fax: (916)
BUILDINGA 1/10 SCALE FLATBED TRAILER
 VOLUME 1, ISSUE 1 BUILDINGA 1/10 SCALE FLATBED TRAILER BUILT, DESIGNED & WRITTEN BY NATHAN MYERS MATERIALS: FEATURES: While the design was kept simple to allow anyone to be able to build their own trailer,
SUPER SHED. Indoor shelter for your outdoor tools.
 SUPER SHED Indoor shelter for your outdoor tools. Not everyone needs a garden shed. But, if you've no more space on your garage wall for that new leaf rake, if you can't find your potting trowel because
How to Install UnderDeck The Original.
 How to Install UnderDeck The Original. TOOLS: Chalk Line Caulk Gun Garden hose or water bucket Gloves Hammer or Screw Gun Power Mitre Saw with OSB Blade Pencil Pliers Safety Glasses Straight Edge / Carpenter
1. Lay out 2 pieces of 7/8" tubing and mark for bending as shown. Remember that the bend is in the shaded area as shown below in Figure 1.
 MINI BIKE PLANS Page 1 INTRODUCTION Before starting to build your Mini-Bike, be sure that you have all the parts shown on the material list. You will note that tubing has been used in the construction.
Pole Lathe and Shave Horse Design
 Pole Lathe and Shave Horse Design These pictures and accompanying words are Copyright Michael Hughes February 2002. They are not to be re-produced, in part or whole, without permission from the author.
1958-64 WINDOW CHANNEL, WEATHERSTRIP & WHISKER STRIP REPLACEMENT FOR 2-DOOR SEDANS
 By Denny Williams Photos by Denny Williams 1958-64 WINDOW CHANNEL, WEATHERSTRIP & WHISKER STRIP REPLACEMENT FOR 2-DOOR SEDANS Denny Williams - Technical Writer Denny is first and foremost a dyed-in-thewool
The tablesaw may be your shop s most valuable cutting. Crosscut Sleds. Foolproof. Innovative approach guarantees perfect results
 Foolproof Crosscut Sleds Innovative approach guarantees perfect results B Y A L A N T U R N E R The tablesaw may be your shop s most valuable cutting tool, but for precise, repeatable crosscuts it needs
Guidelines for Earthquake Bracing Residential Water Heaters
 Guidelines for Earthquake Bracing Residential Water Heaters Department of General Services Division of the State Architect In accordance with the Health and Safety Code Section 19215, the Division of the
Installing Window and Door Mouldings
 Installing Window and Door Mouldings About Window and Door Mouldings The trim around windows and doors greatly influences the look and style of your interior. They also bridge the gaps and cover spaces
Installation Instructions
 Installation Instructions READ BEFORE INSTALLING UNIT For Low Profile Window Air Conditioner INSTALLATION WARNINGS AND CAUTION Carefully read the installation manual before beginning. Follow each step
Installation Instructions For Slider Casement Air Conditioners
 Installation Instructions For Slider Casement Air Conditioners NOTE: These instructions describe installation in a typical wood framed window with a wood SLIDE-BY sash, or installation in a metal CASEMENT
Router Table Plans. www.bobsplans.com
 www.bobsplans.com Router Table Plans Increase the capabilities of your router with this weekend project. Features a sliding fence with EZ-Mount clamps. These clamps are simple to make and grip tightly
MGB Chrome Bumper Conversion
 MGB Chrome Bumper Conversion Installation Instructions For 1974 1/2-1980 MGB This kit requires cutting, welding, and painting. Professional installation recommended. Note: Every MGB body is slightly different
Heavy Glass Frameless Shower Door With Return Panel
 202 Anderson Ave., elvue, KS 66407 Phone: 800-669-9867 Fax: 800-393-6699 www.onyxcollection.com Heavy Glass Frameless Shower Door With Return Panel Full Showers with Return ench Seat with Return FRLSDRPL-0116
Gate Leg Drop Leaf Table Plans
 Preparing the table top blanks: Cut and glue enough 3/4 stock to make three panels 40 long by 24 wide (they will be cut to final size at a later time). While the glue dries we will work on the legs. Preparing
AMERICAN GOTHIC PLAYHOUSE
 AMERICAN GOTHIC PLAYHOUSE Project Plan #856 Sheet 1 of 5 Pick a spot and get started with the beautiful that your kids will love. The design of the playhouse includes 35 square feet of interior space plus
Black Wolf POCKET BILLIARD TABLE INSTALLATION MANUAL. SERVICE DEPARTMENT P.O. BOX 68 BRISTOL, WI 53104
 Black Wolf TM POCKET BILLIARD TABLE INSTALLATION MANUAL www.brunswickbilliards.com SERVICE DEPARTMENT P.O. BOX 68 BRISTOL, WI 53104 51-905710-000 SEPTEMBER 2010 NOTE: Please use the instructions in this
K. D. FRAME ASSEMBLY FOR CLOSED STEEL STUD WALLS...Ins 10. FRAME INSTALLATION DETAILS FOR CLOSED STEEL STUD WALLS...Ins 11
 K. D. FRAME ASSEMBLY FOR MASONRY WALLS...........................Ins 2 FRAME INSTALLATION DETAILS FOR MASONRY WALLS......................Ins 3 INSTALLING EXISTING MASONRY WALL ANCHORS IN FRAME..................Ins
INSTALLATION OF A BAY WINDOW
 INSTALLATION OF A BAY WINDOW Installation of a Bay Window These instructions relate to the replacement of an existing bay window or replacement of a straight window with a new bay window, in an opening
Cedar Cottage Doghouse Plans
 Overlapping cedar shingles add an element of charm to this medium size doghouse. The walls, floor, and trim are constructed of solid cedar, making it naturally weather resistant and provides excellent
HALE PET DOOR INSTALLATION INSTRUCTIONS HALE STANDARD PANEL MODEL
 HALE PET DOOR INSTALLATION INSTRUCTIONS HALE STANDARD PANEL MODEL Please read these instructions carefully and completely before attempting to install Hale Pet Doors; they will guide you through the steps
Installation Instructions
 READ BEFORE INSTALLING UNIT For Through-the-Wall Air Conditioners To avoid risk of personal injury, property damage, or product damage due to the weight of this device and sharp edges that may be exposed:
INSTALLATION INSTRUCTIONS for Bifold Doors (JII103)
") Thank you for selecting JELD-WEN products. Attached are JELD-WEN s recommended installation instructions for premium composite, hollow and solid core molded Bifold Doors. Bifolds are designed for fast
Thank you for selecting JELD-WEN products. Attached are JELD-WEN s recommended installation instructions for premium composite, hollow and solid core molded Bifold Doors. Bifolds are designed for fast
Total Quantity: IMPORTANT: Plans are to be used with 3 x6 Plexiglass (SKU #298-017).
.") # Materials: Quantity Each: 4x4x8 3 2x4x8 2 2x8x8 1 4x8x3/4 plywood 1 3 x6 corkboard (can be 18 of the 1 x1 pieces) 1 3 x6 plexiglass 1 8 door casing 3 Primer 1 qt. Total Quantity: TIPS FOR SUCCESSFUL
# Materials: Quantity Each: 4x4x8 3 2x4x8 2 2x8x8 1 4x8x3/4 plywood 1 3 x6 corkboard (can be 18 of the 1 x1 pieces) 1 3 x6 plexiglass 1 8 door casing 3 Primer 1 qt. Total Quantity: TIPS FOR SUCCESSFUL
Glass Jar Beekeeping Creating Edible Art By Morris Ostrofsky
 1 Glass Jar Beekeeping Creating Edible Art By Morris Ostrofsky Bees have always perfectly packaged honey in wax comb. Before the advent of modern bee hives, the bees built honey comb in straw skeps. Around
The JIG is UP Or A couple hours up front pays in the long run.
 Ed Simon Page 1 of 5 The JIG is UP Or A couple hours up front pays in the long run. A large part of the fun of beekeeping is the construction and assembly of the equipment. Since it is a hobby, I decided
Wine Rack & Glass Storage Bench Chris Gardner
 Wine Rack & Glass Storage Bench Chris Gardner Quantity Length Width Material Part 2 48 16 3/4 birch plywood top, bottom 2 14 16 3/4 birch plywood sides 2 14 13 3/4 birch plywood support dividers 2 3 15
Sun Windows General Information Sun New Construction Window Installation Instructions
 Sun Windows General Information Section 1 G F H H H A. Apply Weather Resistive Barrier B. Apply Sill Flashing Tape C. Place Waterproof Sill Shims D. Caulk Back of Nail Fin Sides & Top, Set Window, Fasten
KITCHENS. Tip PAGE 1 FITTING YOUR KITCHEN GUIDE. How to mark out a kitchen. Tools required for installing a kitchen STEP ONE STEP TWO STEP THREE
 FITTING YOUR KITCHEN GUIDE How to mark out a kitchen PAGE 1 Before starting on the installation, measure 870mm from the lowest point of the floor and mark a datum line around the room to indicate where
Tools Required: Sawzall, hack saw, or small body saw, drill, ¼ drill bit, ¾ hole saw, tape measure, silicone or epoxy, & 7/16 socket.
 When installing a one-piece window kit, it is best to do it as early as possible in the restoration process. This will allow for minimal repairs if need be. Kit Contents: Glass - 2 pcs Felt channels 2
Important Information for Installer & Homeowner
 Important Information for Installer & Homeowner Homeowner: Please keep this information for your records, do not discard! Installation Instructions for Wood Frame Construction Replacement (See other side
HOW TO INSTALL A BEAUTIFUL NEW KITCHEN
 HOW TO INSTALL A BEAUTIFUL NEW KITCHEN Easy to follow step-by-step kitchen cabinet installation TOOL AND MATERIAL LIST Hammer Pry bar Screwdriver Phillips Flathead Level Tape measure Pencil Straight edge
Installation Instructions
 READ BEFORE INSTALLING UNIT For Slider Casement Air Conditioners To avoid risk of personal injury, property damage, or product damage due to the weight of this device and sharp edges that may be exposed:
Ceiling Mounted Folding Attic Ladders Installation Instructions
 Ceiling Mounted Folding Attic Ladders Installation Instructions WARNING Before you start installing your new Louisville Ceiling Mounted Folding Attic Ladder, you must read and understand the following:
How to secure your property after a disaster
 How to secure your property after a disaster The Red Guide to Recovery HOuse secured properly Board-Up of Windows, Doors and Roof Hole. Lot secured with Perimeter Fencing. Fires, floods, tornadoes, hurricanes,
CHARISMA SHOWER/TUB DOOR INSTALLATION INSTRUCTIONS
 CHARISMA SHOWER/TUB DOOR INSTALLATION INSTRUCTIONS IMPORTANT DreamLine reserves the right to alter, modify or redesign products at any time without prior notice. For the latest up-to-date technical drawings,
WHI 90-Minute Rated Veneered Door Frame Installation Instructions
 No. 940-03-10 INSTALLATION INSTRUCTIONS 90 MINUTE RATED VENEERED DOOR FRAME DOOR REQUIREMENTS: Consult the door manufacturer to make sure that the doors are qualified for the hardware to be installed,
STEADYfast Stabilizer Installation Notes Fifth Wheel and Travel Trailers 11/23/13
 STEADYfast Stabilizer Installation Notes Fifth Wheel and Travel Trailers 11/23/13 (See Supplemental Instructions for trailers with heavy duty round footplates and/or Power Leveling Systems) PHONE SUPPORT
Easy Six Cube Bookshelf. Copyrighted Material. Page 1
 Compare to: Land of Nod Cube Collection, 6 Cube Bookshelf Skill Level: Beginner Easy Six Cube Bookshelf I love the storage cubes in kids rooms because they give you an opportunity to have your children
Air Conditioner Duct Construction & Repair
 PROPER ROOF AIR CONDITIONER MOUNTING At Newmar, there are two different models of air conditioners available on all towable and motorized units. The different models are the Dometic Brisk and Penguin models,
Best Barns USA Assembly Book
 Best Barns USA Assembly Book Revised November 27, 2013 the Easton - R 12'x 20' Manufactured by Reynolds Building Systems, Inc. 205 Arlington Drive Greenville, PA 16125 724-646-3775 This manual is copyrighted.
We urge you to read and follow the attached installation instructions. Failure to do so may void the warranty of this garden window unit.
 Important Information for New Construction Installations Attention Installer! We urge you to read and follow the attached installation instructions. Failure to do so may void the warranty of this garden
HfHMD uses LP SmartSide siding and trim.
 HfHMD uses LP SmartSide siding and trim. These products are: More durable than cement fiber board. Much more volunteer-friendly to install. When installed correctly, have a 5/50- year pro-rated warranty.
It's large enough to handle most welding job shop projects, yet small enough to make it a worth while home-workshop tool
 It's large enough to handle most welding job shop projects, yet small enough to make it a worth while home-workshop tool H Craft Print Project No. 272 ERE'S a metal bender that will enable you to bend
Go-kart for little race-drivers
 Go-kart for little race-drivers Drill and drive. Go-kart What it lacks in speed, it more than makes up for in fun: the go-kart will excite little race-drivers. 1 Introduction It s only a go-kart, but it
Brick Veneer Construction
 Brick Veneer Construction Check list of suggested tools & support items Claw hammer Tape measure 3/4" [19 or 20] Wood chisel Wood or plastic shims Pry bar Utility knife Caulking and caulking gun Power
Premier & Deluxe 3-Season Room Sliding Glass Door
 DTSSGD-11 Premier & Deluxe 3-Season Room Sliding Glass Door Installation Instructions Screen Door Seal Left Side Track Top Track Assembly Right Side Track Right Side Trim Sliding Glass Door Sliding Screen
FREEBIRD THE ORIGINAL D.I.Y. ORNITHOPTER! Tools and Glue. Required Materials
 Do not try to make your ornithopter using "household materials". If you want it to fly, you have to build it right. FREEBIRD THE ORIGINAL D.I.Y. ORNITHOPTER! Wingspan: 16 inches Weight: 1/4 ounce The Ornithopter
POD Visor Instructions
 POD Visor Instructions Please read fully before beginning assembly and mounting the Visor Parts List - Visor Left Part (LV), Visor Right Part (RV) Qty 2, Aluminum Crossbars Hardware - Qty 17, 1/4" X 3/4"
INSTRUCTION FOR ASSEMBLY. 150x180 v Traditional sauna cabin
 INSTRUCTION FOR ASSEMBLY 150x180 v Traditional sauna cabin 1. SAUNA PLAN 1800 LIGHT UNDER THE BENCH VENTILATION OUTLET UPPER BENCH 600 1500 LOWER BENCH 400 700 1656 956 HEATER 366 381 690 815 Light switch
How to Build an Elevated Square Foot Garden
 How to Build an Elevated Square Foot Garden Thralls, Edmund L., Extension Faculty, Urban Horticulture Fact Sheet Horticulture - 010 Tools: The Institute of Food and Agricultural Sciences (IFAS) is an Equal
SHELVES. www.tedswoodworking.com
 SHELVES It's rare that bookshelves look as interesting as the objects you display on them. After all, how much can you decorate the edges of your shelves and sides? This unit is unusual because the shelves
glass & Glazing Products
 glass & Glazing Products WallMaker Create an unlimited variety of bright, beautiful and secure interior environments with the easy-to-install Stylmark WallMaker glass wall system. This versatile system
Modular Locomotive System Instruction Manual for HBK5 Billy Body Kit
 Modular Locomotive System Instruction Manual for HBK5 Billy Body Kit Roundhouse Engineering Co. Ltd. Units 6-10 Churchill Business Park. Churchill Road, Wheatley. Doncaster. DN1 2TF. England. Tel. 01302
Trundle Bed Plans (For Use Under Twin or Full-Size Standard Length Beds)
") Bunk Beds Unlimited Trundle Bed Plans (For Use Under Twin or Full-Size Standard Length Beds) On the following pages we have included all of the necessary drawings and requirements for a Modified twin-size
Bunk Beds Unlimited Trundle Bed Plans (For Use Under Twin or Full-Size Standard Length Beds) On the following pages we have included all of the necessary drawings and requirements for a Modified twin-size
Chapter 3 Installing Over-the-Post Railing on an L-Shaped Stair
 49 Chapter 3 Installing Over-the-Post Railing on an L-Shaped Stair In this chapter: The Over-the-Post Balustrade System Determining the Rail Centerline Using Rail Bolts Making a Pitch Block Laying Out
Installation Manual. Solar Pool Heating System. Read the complete manual before beginning the installation
 Solar Pool Heating System Installation Manual Read the complete manual before beginning the installation 1. Sizing the System Visit www.techno-solis.com to size the system using the sizing calculator.
Ladder Shelf Plans Final dimensions: 25 L x 21 W x 72 H
 Ladder Shelf Plans Final dimensions: 25 L x 21 W x 72 H Copyright 2011. MLCS Woodworking. Page 1 Router bits and supplies needed: 3/8 Rabbeting bit (#10691) 1 Bottom Cleaning bit (#7941) Top and Bottom
March 14, 2007. Installation of Bay, Bow and Garden Windows
 March 14, 2007 Re: Installation of Bay, Bow and Garden Windows Attached are the Atrium Companies, Inc recommendation for the installation of bay, bow and garden windows. These instructions were developed
WINDOW REPAIR MANUAL & REFERENCE GUIDE
 WINDOW REPAIR MANUAL & REFERENCE GUIDE TABLE OF CONTENTS DOUBLE HUNG & SINGLE HUNG PARTS 4-5 CASEMENT PARTS 6 SCREEN PARTS 7-8 HOW TO REMOVE TILT-IN SASH 9 HOW TO REMOVE A BALANCE 10 HOW TO INSTALL BALANCE
www.cornholesupplies.com
 www.cornholesupplies.com How To Build Regulation Cornhole Boards Home of the Original Cornhole Bags and Boards Supply List: 1-4' X 8' Piece of Plywood (pre sanded) 4-2" X 4" X 8' Studs (2 by 4s make sure
2. This is a close up of a typical area where the rocker is rusted out leaving holes under where the rocker moulding would be..
 ROCKER PANELS 55,56,57 CHEVY REPLACEMENT Do not throw away any pieces when you first remove them. There are many supports that are not reproduced and will need to be used again. When disassembling try
Build a Trade-Show Booth for Under $200!
 Build a Trade-Show Booth for Under $200! This corner booth, with a seven foot front and sweeping 4x8 backdrop, assembles in less than 20 minutes and can be built in one weekend. Materials Tools 4 x8 x3/4
COMPLIMENTARY WOODWORKING PLAN
 COMPLIMENTARY WOODWORKING PLAN Adirondack Chair This downloadable plan is copyrighted. Please do not share or redistribute this plan in any way. It has been created for Wilton Tools, a division of WMH
Dave s Sheet Metal Bending Brake
 Dave s Sheet Metal Bending Brake I started building a Zenith CH601XL from plans in mid January 2006. After several failed attempts to bend the rudder spar I ended up going to a local sheet metal shop for
FRONT BUMPER INSTALLATION INSTRUCTIONS 2007-2011 DODGE / MERCEDES SPRINTER
 Aluminess Products Inc 9402 Wheatlands Ct. #A Santee, CA 92071 619-449-9930 FRONT BUMPER INSTALLATION INSTRUCTIONS 2007-2011 DODGE / MERCEDES SPRINTER Please read before beginning Stainless steel hardware
INSTRUCTIONS THOROUGHLY BEFORE BEGINNING***************
 Bill of Materials: RAC0012 Green Wing Aerodynamic Skirt Kit Item Part Number Description Quantity 1 RMC0218 Gen 2 Trailer Skirt Roadside 1 2 RMC0219 Gen 2 Trailer Skirt Curbside 1 3 RMC0041 Trailer Skirt
OHIO University Mechanical Engineering Summary Report: Human Power System for Small Appliances and Machinery
 OHIO University Mechanical Engineering Summary Report: Human Power System for Small Appliances and Machinery Appalachian Human Power Brad Bundy Ben Chovan Zach Fetchu Ed Passarrelli Ryan Tedford Will Zaylor
Children s Furniture Projects
 This is an excerpt from the book Children s Furniture Projects by Jeff Miller Copyright 2002 by The Taunton Press www.taunton.com CHILD S ROCKER KIDS ARE ALWAYS IN MOTION. It s not easy to get them even
Boiler Plan II Table of Contents
 Cover Page Table Of Contents Introduction Parts List Additional Materials Assembly instructions Drawings 1-15 Boiler Plan II Table of Contents Introduction This will be a very rewarding project, if you
Dock Hardware & Accessory Products Catalog
 Dock Hardware & Accessory Products Catalog Product Page # Product Page # Angle Brackets/Clips 8 Back Up Plate 5 Backing Plate/Hurricane Stop 10 Carriage Bolt Sets 4 Chain Retainer 10 Connector Pin Set
Base Cabinet with Self-storing Folding Doors and Floor
 Usable Kitchens When designing a kitchen for use by persons with mobility impairments, especially those who use wheelchairs, careful layout of the kitchen is crucial to maintaining accessibility. People
How to Make a Solar Cooker Kristi Jerger s 5th grade class
 How to Make a Solar Cooker Kristi Jerger s 5th grade class Dublin, Ohio Public Schools Credits: Marlin Languis, Emeritus Professor, Ohio State University Zep Wallace, Computer Specialist, Dublin Ohio Public
Installation Manual. SKU# 21000 series (Base Rails) SKU# 22000 series (Overhead Racks)
 SKU# 22000 series (Overhead Racks)") Installation Manual SKU# 21000 series (Base Rails) SKU# 22000 series (Overhead Racks) Welcome to the world of TracRac! We re delighted that you have chosen TracRac, the ultimate sliding truck rack system.
Installation Manual SKU# 21000 series (Base Rails) SKU# 22000 series (Overhead Racks) Welcome to the world of TracRac! We re delighted that you have chosen TracRac, the ultimate sliding truck rack system.
All-Season Sunroom Sliding Glass Door Installation Instructions
 ASRESGD-08 All-Season Sunroom Sliding Glass Door Installation Instructions Panel Frame Door Frame Left Side Foam Insulator IE241 H Bar Assembly Door Frame Top Track Panel Frame Door Frame Right Side Stationary
Making Wooden Hinges
 Making Wooden Hinges By Alex Reid - www.mokkou.jp Materials and tools used - 3.2mm straight router bit - 1/8 round-over router bit - Flush-cut straight bit (with bearing on bottom) - Finger-joint jig -
We urge you to read and follow the attached installation instructions. Failure to do so may void the warranty of this garden window unit.
 Important Information for New Construction Installations Attention Installer! We urge you to read and follow the attached installation instructions. Failure to do so may void the warranty of this garden
Owner's Manual & Assembly Instructions
 Owner's Manual & Assembly Instructions PM01 BASE KIT Model No. FDN1014 717090311 CAUTION: SOME PARTS HAVE SHARP EDGES. CARE MUST BE TAKEN WHEN HANDLING THE VARIOUS PIECES TO AVOID A MISHAP. FOR SAFETY
PANELIZED HOME INSTALLATION GUIDELINE
 PANELIZED HOME INSTALLATION GUIDELINE A typical home package will be constructed of Snap-N-Lock Insulated Panels clad with steel skins. 4" panels will be used for the walls, and 6" panels for the roof.
Casement/Awning Window Parts Reference Catalog
 Casement/Awning Window Parts Reference Catalog (Includes Miscellaneous Parts for Eyebrow Casement and Garden Bay Windows) #1028654 (Revised 03/02) Weather Shield Mfg., Inc. Medford, WI 54451 715/748-2100
BUILT-IN DISHWASHER INSTALLATION INSTRUCTIONS
 BUILT-IN DISHWASHER INSTALLATION INSTRUCTIONS PLEASE READ COMPLETE INSTRUCTIONS BEFORE YOU BEGIN LEAVE INSTALLATION INSTRUCTIONS AND USER'S GUIDE WITH OWNER ALL ELECTRIC WIRING AND PLUMBING MUST BE DONE
How to Install Hardwood Flooring Over a Sub Floor
 How to Install Hardwood Flooring Over a Sub Floor Installation Preparation Instructions Read the entire instructions before starting your project. 1) INSPECT EACH PLANK (see fig. a) Wood is a natural product
INSTALL INSTRUCTIONS KK-C-HVAC-1 HVAC UNIT 2003-2014 CHEVROLET/GMC VANS FOR
 INSTALL INSTRUCTIONS KK-C-HVAC-1 HVAC UNIT 2003-2014 CHEVROLET/GMC VANS FOR (For NEW 2007 ALL WHITE KWIK-KITS ONLY) Warning do not attempt to install A/C units unless you are experienced with servicing
Superform Products Ltd.
 TYPICAL CORNER REINFORCING NOTE : SEE ENGINEERED REBAR SCHEDULES SUPPLIED BY THE MANUFACTURER STEEL REINFORCEMENT WALL CORNER 90 Copyright 2012 Sept. 2012 5.1.1 Rebar Spacing 6" 12" Max. Load LB./FT. 2000
Unlike a porch, which is protected by a roof,
 Rehabbing a Rotted 34 Professional Deck Builder January/February 2013 Porch Stair A template helps to fit the bottom tread neatly around the posts by Emanuel Silva Unlike a porch, which is protected by
Wren Kitchens Installation Tips... 3. Carefully check your kitchen delivery... 4. Measuring out and marking up... 5. Fitting the base cabinets...
 tra 1 Index Wren Kitchens Installation Tips... 3 Carefully check your kitchen delivery... 4 Measuring out and marking up... 5 Fitting the base cabinets... 6 Fitting the corner cabinets... 7 The 972mm or
Tundra Series Windows January 2016
 Tundra Series Windows January 2016 New Construction Installation Instructions Nail Fin, J-Fin and Brickmold Aplications product. ATTENTION! Read and understand all installation instructions before installing
Solstice/Sky Water Pump Replacement
 Solstice/Sky Water Pump Replacement The water pump on the Solstice/Sky is starting to need replacement on some vehicles. This guide will help in replacing the water pump while the engine is still in the
Policy on Water Heater Installations Policy No. UPC 510-1-94 Effective: September 1, 1995 Revised: February 10, 1996
 CITY OF SAN JOSE BUILDING DIVISION POLICY Policy on Water Heater Installations Policy No. UPC 510-1-94 Effective: September 1, 1995 Revised: February 10, 1996 All new and replacement water heaters installed
Lathe Milling Attachment
 Lathe Milling Attachment By L C. MASON BY CLEVERLY stacking cold-rolled flat stock together, T-slots and slide for this lathe milling attachment are made without costly machinery. In fact, only two tools,