Dave s Sheet Metal Bending Brake
|
|
|
- Dortha George
- 9 years ago
- Views:
Transcription
1 Dave s Sheet Metal Bending Brake I started building a Zenith CH601XL from plans in mid January After several failed attempts to bend the rudder spar I ended up going to a local sheet metal shop for help. The problem with that is that their equipment is not set up for the 1/8 inch radius bend specified in the plans. I saw right away that some type of bending brake was going to be needed throughout the project. So, I started looking for an affordable solution. I found commercial brakes to be too expensive and most of the plans-built brakes on the internet to be either made of wood (too flimsy) or ones that required extensive welding. I don t know how to weld. I came up with the plan for this brake at 3 AM during a sleepless night. It s simple. inexpensive, and requires no welding whatsoever. I built it in a single afternoon and was bending parts the next day. It worked so well I felt I should share the plans with other homebuilders who needed a brake of their own. It s not a commercial brake costing hundreds or even thousands of dollars so, don t expect it to perform like one on the longer bends. However, it does most bends extremely well. Some bends require a little creative thinking. If you re smart enough to build and fly an airplane, you should be able to figure it out. Remembering my trials and tribulations as a new builder attempting to make a rudder spar, I decided this would be a good test for my brake. The spar is 1360mm long with 20mm flanges. Back in January I spent hours on this one part. Using my Olfa P800 knife and new bending brake, it took 10 minutes from layout to bending to make a perfect spar. Not too shabby for a brake that cost about $100. I am currently building a Sonex from plans. I have bent all of my control surface skins as well as all of the channel pieces. Being able to bend my own parts has resulted in substantial savings on this project.

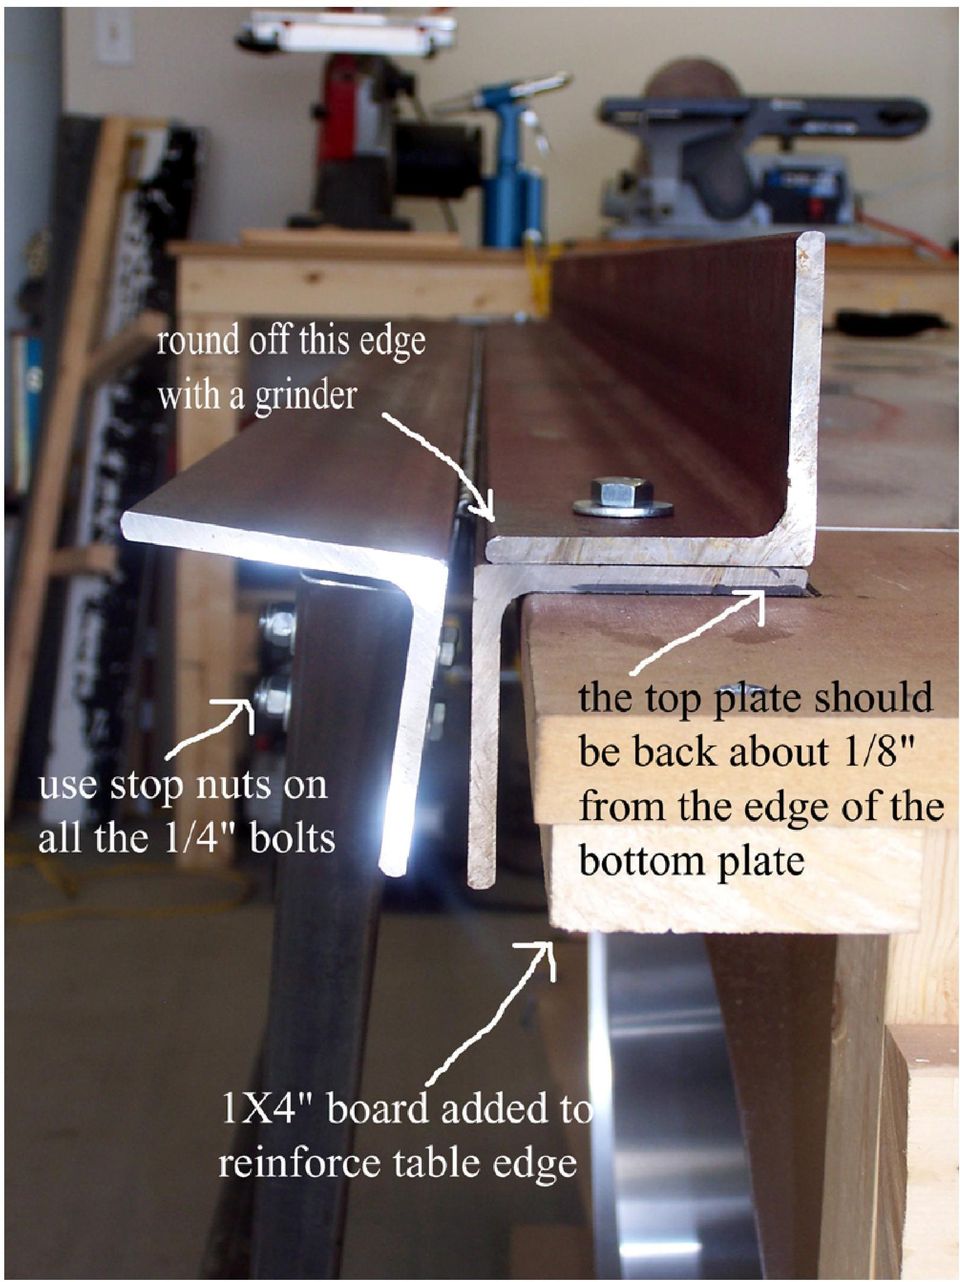
2 Parts List The steel angle and square tubing can be found at most metal suppliers or recyclers. Check your Yellow Pages for a local supplier. 3 pieces of 3x3x¼ inch angle to desired length (8feet will bend the flaps) 8 feet of 1.25 inch square steel tubing for the handle Full length stainless steel piano hinge (got mine from Airparts, Inc.) CCP-46 stainless steel cherry pop rivets to attach the hinge (60mm spacing) 4 bolts ¼ x 2 inches, 8 flat washers, and 4 stop nuts 2 bolts ¼ x 3 inches, 4 flat washers, and 2 stop nuts 4 to 6 bolts 3/8 x 3 inches, 2 flat washers and 1 nut for each bolt 1 board 1 x 4 inches by length of your table to reinforce the edge Countersunk wood screws to attach the board and the bottom plate to your table.
 CCP-46 stainless steel cherry pop rivets to attach the hinge (60mm spacing) 4 bolts ¼ x 2 inches, 8 flat washers, and 4 stop nuts 2 bolts ¼ x 3 inches, 4 flat washers, and 2 stop nuts")
3 Building Instructions Start by attaching the 1x4 reinforcement board under the edge of you table with glue and wood screws. This will make the edge much stronger. Attach the bottom plate over the edge of your table using countersunk wood screws. I used one size drill bit for the screw holes and a larger bit to countersink the screw heads. You don t want the heads to be above the bottom plate surface or they will scratch your sheet metal. I only used 6 screws for this. Set the top plate on top of the bottom plate and clamp in place with C clamps. The top plate front edge should be set back about 1/8 inch from the edge of the bottom plate (see photo). Drill 4 holes for the 3/8 inch bolts through the top and bottom plates, the table, and the 1x4 board. High quality sharp bits will stop the cursing!! Make the 2 end holes about an inch and one half from the ends and the other two evenly spaced along the length of the plates. Remove the top plate and round off the front edge to achieve a nice clean radiused bend. Find and mark the centerline of the hinge and the bend plate. Attach the hinge to the bend plate with stainless steel pop rivets using about 60mm spacing between rivets. The top of the hinge should be just level with the top surface of the bending plate. Remove the hinge pin and attach the other side of the hinge to the bottom plate making sure the hinge is facing the right direction. Make sure to center it correctly so the 2 sides of the hinge will line up correctly. Also be sure to line up the top of the hinge with the top surface of the bottom plate. Put the bottom plate and the bend plate together to reinsert the hinge pin. This requires 2 people and can be a little tricky. I found it easier to cut the pin in half and go in from either end of the hinge until the 2 halves meet in the middle. A little 3 in 1 oil also helped.
.")
4 Cut the square tubing to make the handle. I made 2 eighteen inch pieces for the ends and used what was left as the middle. Please see the photos for how this should look. Drill the holes for the ¼ bolts to attach the end pieces of the handle to the center piece. Attach the parts using the bolts, washers, and nuts. Don t tighten them really tight just yet. The end pieces should be at about a 60 degree angle to the center piece. This doesn t have to be exact. Have someone help you hold the handle up against the bend plate and mark where it will go. You can clamp the 2 together. Drill the holes for the ¼ inch bolts to attach the handles to the bend plate (2 each end). Attach the handle with the ¼ inch bolts. Tighten all the handle bolts snugly. Insert the 3/8 inch bolts through the top plate and push them all the way through. Use one flat washer on the top, and one flat washer and nut on the bottom and hand tighten. If confused by these instructions study the photos. You re done!
. Attach the handle with the ¼ inch bolts. Tighten all the handle bolts snugly.")
5
6 Using the Brake The number of 3/8 bolts you use will depend on the bending job. For long narrow bends such as channel flanges use all of the bolts. For parts like control surface skins, remove as many bolts as needed. I have found that for most smaller parts I only need to hand tighten the bolts. For long flanges tighten the bolts with a socket wrench. To open the brake first loosen the bolts then insert a large screwdriver between the top and bottom plate at either end. I m sure some bright person out there will probably come up with a more elegant way to do this. Next insert your sheet metal lining up the bend line with the edge of the top plate. Remove the screwdrivers, tighten the bolts, and bend away.

7 The Test Step 1: insert part and tighten the bolts. Step 2: raise the handle to make the bend.

8 Lining up for the second bend. Our beautiful spokes model, Jan, showing off the formed rudder spar.

9 Bending Sonex Control Surface Skins Cutting skins with the Olfa P800 knife Bending sequence

10 Using a piece of angle clamped to the brake to bend past 90 degrees Finished aileron skins

11 Bending Tips When bending long parts made of.032 and thicker aluminum, use the following method to avoid a bowed part: 1. Cut the blank with the flanges wider than the plans specify. At least 100mm wide will do. 2. Bend as usual. 3. Trim the flanges to specs. If you need to bend a part past 90 degrees bend as far as you can, then clamp a 1X2 board or a piece of angle to the bending plate and bend again to the desired angle. The Bottom Line Hey folks, I am not an engineer or any type of professional designer. I m a working-class guy trying to build an airplane. I am always looking for better or easier ways to accomplish this goal. This brake works for me. I hope it does for you, as well. I am sharing this design free of charge. There have been other homebuilders who have helped me with advice and encouragement. I want to do the same for others. People from all over the planet (no exaggeration) have built this brake and used it with success. Feel free to modify the design to suit your needs. Use some common sense when building and using this brake. By building it you are accepting personal responsibility for your own safety. If somehow you get injured, don t blame me. I am not some big corporation with deep pockets. Isn t it a shame I have to include this statement? If you have any questions or comment feel free to contact me at [email protected] Happy Building Dave Clay Temple, Texas Sonex 1095 from plans

STEADYfast Stabilizer Installation Notes Fifth Wheel and Travel Trailers 11/23/13
 STEADYfast Stabilizer Installation Notes Fifth Wheel and Travel Trailers 11/23/13 (See Supplemental Instructions for trailers with heavy duty round footplates and/or Power Leveling Systems) PHONE SUPPORT
How to Build a Poker Table
 How to Build a Poker Table www.pokertablematerials.com 10-Person Poker Table- 96 x 48 These are step by step instructions for building a poker table. The table will measure 48" x 96" and have a 4" wide
Hive Top Ventilation Shims
 Hive Top Ventilation Shims When preparing your bee hives for the winter, it is very important to provide for ventilation at the top of the hive. Through out the winter, the bees are expelling a lot of
BUILDINGA 1/10 SCALE FLATBED TRAILER
 VOLUME 1, ISSUE 1 BUILDINGA 1/10 SCALE FLATBED TRAILER BUILT, DESIGNED & WRITTEN BY NATHAN MYERS MATERIALS: FEATURES: While the design was kept simple to allow anyone to be able to build their own trailer,
www.cornholesupplies.com
 www.cornholesupplies.com How To Build Regulation Cornhole Boards Home of the Original Cornhole Bags and Boards Supply List: 1-4' X 8' Piece of Plywood (pre sanded) 4-2" X 4" X 8' Studs (2 by 4s make sure
DSM http://www.dsmmfg.com 1 (800) 886-6376
 886-6376") DESIGN GUIDE FOR BENT SHEET METAL This guide discusses how the bends are made, what thicknesses of sheet metal are commonly used, recommended bend radius to use when modeling the part, some practical limits
DESIGN GUIDE FOR BENT SHEET METAL This guide discusses how the bends are made, what thicknesses of sheet metal are commonly used, recommended bend radius to use when modeling the part, some practical limits
FREEBIRD THE ORIGINAL D.I.Y. ORNITHOPTER! Tools and Glue. Required Materials
 Do not try to make your ornithopter using "household materials". If you want it to fly, you have to build it right. FREEBIRD THE ORIGINAL D.I.Y. ORNITHOPTER! Wingspan: 16 inches Weight: 1/4 ounce The Ornithopter
Router Table Plans. www.bobsplans.com
 www.bobsplans.com Router Table Plans Increase the capabilities of your router with this weekend project. Features a sliding fence with EZ-Mount clamps. These clamps are simple to make and grip tightly
IKG Bar Grating: Anchoring
 IKG Bar Grating: Anchoring All bar grating must be tightly fastened in place. Welding of the grating panels to the supporting members provides a superior, permanent installation. Although, for gratings
SPRITE and BIGFOOT DESKTOP CNC MACHINE KIT ASSEMBLY INSTRUCTIONS
 SPRITE and BIGFOOT DESKTOP CNC MACHINE KIT ASSEMBLY INSTRUCTIONS README FIRST: Thank you for purchasing your MyDIYCNC Desktop CNC Machine Kit. We hope this versatile and innovative machine brings you many
Twist Drill Grinding Attachment By Steven Skiprat Jackson June 2009
 Twist Drill Grinding Attachment By Steven Skiprat Jackson June 2009 Part 1. About the tool Part 2. Mounting the tool Part 3. Using the tool Part 1. About the tool This little gadget while not a precision
How to Build Your Own CornHole Game
 How to Build Your Own CornHole Game DIMENSIONS Here is a diagram with the basic measurements for the Cornhole board game. SUPPLIES 1/2 thick sheet of plywood one 4 x4 or two 2 x4 s 8 long 2 4 s (4) 4 1/2
Splitting the feed screw nuts and adjusting backlash on a Bridgeport Milling Machine.
 Splitting the feed screw nuts and adjusting backlash on a Bridgeport Milling Machine. Bridgeport manufactures their milling machines with 0.005 backlash in the feedscrews, which increases over time due
FRONT BUMPER INSTALLATION INSTRUCTIONS 2007-2011 DODGE / MERCEDES SPRINTER
 Aluminess Products Inc 9402 Wheatlands Ct. #A Santee, CA 92071 619-449-9930 FRONT BUMPER INSTALLATION INSTRUCTIONS 2007-2011 DODGE / MERCEDES SPRINTER Please read before beginning Stainless steel hardware
1958-64 WINDOW CHANNEL, WEATHERSTRIP & WHISKER STRIP REPLACEMENT FOR 2-DOOR SEDANS
 By Denny Williams Photos by Denny Williams 1958-64 WINDOW CHANNEL, WEATHERSTRIP & WHISKER STRIP REPLACEMENT FOR 2-DOOR SEDANS Denny Williams - Technical Writer Denny is first and foremost a dyed-in-thewool
The tablesaw may be your shop s most valuable cutting. Crosscut Sleds. Foolproof. Innovative approach guarantees perfect results
 Foolproof Crosscut Sleds Innovative approach guarantees perfect results B Y A L A N T U R N E R The tablesaw may be your shop s most valuable cutting tool, but for precise, repeatable crosscuts it needs
Go-kart for little race-drivers
 Go-kart for little race-drivers Drill and drive. Go-kart What it lacks in speed, it more than makes up for in fun: the go-kart will excite little race-drivers. 1 Introduction It s only a go-kart, but it
AstroSystems Digital Setting Circles for Zhumell, GSO, Apertura and Astro-Tech
 AstroSystems Digital Setting Circles for Zhumell, GSO, Apertura and Astro-Tech Components 1 Sky Commander Digital Setting Circle Computer 2 Encoders 10,000 step 1 Sky Commander Digital Setting Circle Manual
VW Caddy W21-760-3503 INSTALLATION INSTRUCTIONS
 Unit 626 Kilshane Avenue, North West Business Park, Ballycoolin, Dublin 15, Ireland Telephone: +353 1 8612 632, Fax: +353 1 8612 647, email: [email protected] www.driveriteltd.com VW Caddy W21-760-3503
Lathe Milling Attachment
 Lathe Milling Attachment By L C. MASON BY CLEVERLY stacking cold-rolled flat stock together, T-slots and slide for this lathe milling attachment are made without costly machinery. In fact, only two tools,
Modular Locomotive System Instruction Manual for HBK8 George Body Kit
 Modular Locomotive System Instruction Manual for HBK8 George Body Kit Roundhouse Engineering Co. Ltd. Units 6-10 Churchill Business Park. Churchill Road, Wheatley. Doncaster. DN1 2TF. England. Tel. 01302
TUTORIAL. REbUILdING. front CALIpER O-RING CONVERSION CORVETTE 1965-82. Part #: HT-1
 Part #: HT-1 1965-82 CORVETTE O-RING CONVERSION front CALIpER REbUILdING TUTORIAL Choosing a Brake Caliper Rebuild Kit Standard Lip Seals vs. O-Ring Seals Lip seal design seals are used on 1965-1982 Corvette
2002 2005 Mini Cooper S Grille Install Instructions
 2002 2005 Mini Cooper S Grille Install Instructions Lower Front Grille BEFORE AFTER Package Contents 1 perforated grille (Stiletto, RAZR, or Monster) 6 Zip Tie Mounting Pads 1 is for the temp. sensor 5
Slide the new steering column shaft through the steering column from the driver compartment.
 Slide the new steering column shaft through the steering column from the driver compartment. Push the column shaft through the steering column until the machined end is out past the column lower bushing.
LYCOMING O-360. Engine Installation
 Engine Installation SECTION 4 Carburetor Heat Box Carb. Heat Box, hole at the bottom is the hot air exit when carb heat is not used. SECTION 4 - Page 1 of 13 Push Pull cable P/N 05-14084 Qty = 1 Length=7ft.
TUTORIAL. REbUILdING. REAR CALIpER O-RING CONVERSION CORVETTE 1965-82. Part #: HT-2
 Part #: HT-2 1965-82 CORVETTE O-RING CONVERSION REAR CALIpER REbUILdING TUTORIAL Choosing a Brake Caliper Rebuild Kit Standard Lip Seals vs. O-Ring Seals Lip seal design seals are used on 1965-1982 Corvette
Guidelines for Earthquake Bracing of Residential Water Heaters
 Guidelines for Earthquake Bracing of Residential Water Heaters Department of General Services Division of the State Architect 1102 Q Street, Suite 5100 Sacramento, CA 95814 Phone: (916) 324-7099 Fax: (916)
How To Launch A Rocket From A Formica
 Building the Basic Bottle Rocket Launch Pad Materials: -Formica double-sink countertop cutout. This can be easily and cheaply obtained from a local company that manufactures and/or installs countertops.
USER INSTRUCTIONS AND SPECIFICATIONS for use of SAFE APPROACH STANDING SEAM ANCHOR & SAFE APPROACH METAL ROOF SCREW-DOWN ANCHOR
 e) Allow the ring to slide over the end of the clevis pin and push the ring onto the clevis pin when it is centered. USER INSTRUCTIONS AND SPECIFICATIONS for use of SAFE APPROACH STANDING SEAM ANCHOR &
Installation instruction do88 Intercooler for Volvo S40 / V50 / C30
 Installation instruction do88 Intercooler for Volvo S40 / V50 / C30 This instruction shows how to replace the OEM intercooler with our performance intercooler. 2. 3. 1. 4. 5. Part number: ICM-170 6. At
KITCHENS. Tip PAGE 1 FITTING YOUR KITCHEN GUIDE. How to mark out a kitchen. Tools required for installing a kitchen STEP ONE STEP TWO STEP THREE
 FITTING YOUR KITCHEN GUIDE How to mark out a kitchen PAGE 1 Before starting on the installation, measure 870mm from the lowest point of the floor and mark a datum line around the room to indicate where
THE FLYING SCOT A BASIC GUIDE TUNING AND SAIL TRIM By Harry Carpenter
 THE FLYING SCOT A BASIC GUIDE TO TUNING AND SAIL TRIM By Harry Carpenter Tuning the Flying Scot Rig Boat set up In setting the mast rake on a Flying Scot, most Scot sailors run a tape measure up the mast
SHOP NOTES METAL SHAPER FOR YOUR SHOP
 SHOP NOTES METAL SHAPER FOR YOUR SHOP A METAL SHAPER is indispensable for certain machining operations where flat surfaces must be produced within very close limits, such as machining flats on castings,
2. This is a close up of a typical area where the rocker is rusted out leaving holes under where the rocker moulding would be..
 ROCKER PANELS 55,56,57 CHEVY REPLACEMENT Do not throw away any pieces when you first remove them. There are many supports that are not reproduced and will need to be used again. When disassembling try
Total Quantity: IMPORTANT: Plans are to be used with 3 x6 Plexiglass (SKU #298-017).
.") # Materials: Quantity Each: 4x4x8 3 2x4x8 2 2x8x8 1 4x8x3/4 plywood 1 3 x6 corkboard (can be 18 of the 1 x1 pieces) 1 3 x6 plexiglass 1 8 door casing 3 Primer 1 qt. Total Quantity: TIPS FOR SUCCESSFUL
# Materials: Quantity Each: 4x4x8 3 2x4x8 2 2x8x8 1 4x8x3/4 plywood 1 3 x6 corkboard (can be 18 of the 1 x1 pieces) 1 3 x6 plexiglass 1 8 door casing 3 Primer 1 qt. Total Quantity: TIPS FOR SUCCESSFUL
How To Make A Spiral Fluted And Wire Wrapped Dagger Handle
 Making A Spiral Fluted and Wire Wrapped Dagger Handle By: Steve Culver, MS Part 1 Making A Spiral Fluted and Wire Wrapped Dagger Handle By: Steve Culver, MS After the rough handle material is drilled through
HALE PET DOOR INSTALLATION INSTRUCTIONS HALE STANDARD PANEL MODEL
 HALE PET DOOR INSTALLATION INSTRUCTIONS HALE STANDARD PANEL MODEL Please read these instructions carefully and completely before attempting to install Hale Pet Doors; they will guide you through the steps
Building an Off-Center Fixture for Turning Pendants
 Building an Off-Center Fixture for Turning Pendants Turning a pendant off-center with most available metal pendant chucks means that you will have a significant amount of mass off center, which will limit
It's large enough to handle most welding job shop projects, yet small enough to make it a worth while home-workshop tool
 It's large enough to handle most welding job shop projects, yet small enough to make it a worth while home-workshop tool H Craft Print Project No. 272 ERE'S a metal bender that will enable you to bend
Figure 2 The fan and shroud also needs to be removed for access to the four a/c compressor bolts and removal of the compressor from the top.
 Here are some pictures to show what s required when replacing the A/C compressor, expansion valve and receiver/drier on a 2001 Volvo V70. Even if you don t replace these A/C parts these pictures can help
Installation Instructions GOOSENECK MOUNTING KIT Chevrolet/GMC 1500/2500/3500 All except 4-door Crew-Cab
 GOOSENECK MOUNTING KIT Equipment Required: Fastener Kit: F Wrenches: 3/4, 7/8, 15/16 Drill Bits: 1/4 Other Tools: Drill WARNING: Under no circumstances do we recommend exceeding the towing vehicle manufacturers
TOOLS FOR SELF RELIANCE REFURBISHING SHEET No 2. Registered Charity No 280437. Saws for Woodworking
 Registered Charity No 280437 Saws for Woodworking Issued December 2002 Registered Charity No 280437 page no 1 SAW TYPES Rip saw For cutting along the grain Crosscut saw [A smaller version is known as a
Speed-Mat Rectangle Cutter
 Speed-Mat Rectangle Cutter 1 Honeycomb baseboard. 2 Left hold down. 14 3 Bottom hold down. 4 4 Left / right rule. 8 5 8 5 Left / right rule pointer. 1 6 Top / bottom rule. 7 Top / bottom rule pointer.
1. Lay out 2 pieces of 7/8" tubing and mark for bending as shown. Remember that the bend is in the shaded area as shown below in Figure 1.
 MINI BIKE PLANS Page 1 INTRODUCTION Before starting to build your Mini-Bike, be sure that you have all the parts shown on the material list. You will note that tubing has been used in the construction.
POD Visor Instructions
 POD Visor Instructions Please read fully before beginning assembly and mounting the Visor Parts List - Visor Left Part (LV), Visor Right Part (RV) Qty 2, Aluminum Crossbars Hardware - Qty 17, 1/4" X 3/4"
Installation Instructions:
 Portable Guardrail System Model Numbers: 7900060, 7900061, 7900062, 7900063 Installation Instructions: Portable Guardrail System This instruction is intended to meet the Manufacturer s Instructions requirement
TopSky DLG Installation Manual
 TopSky DLG Installation Manual Attention: Because after the compound materials solidify, there will be ammonia iris on the surface, which affect the bonding strength afterwards. Please polish with sandpaper
Replacing the handbrake drum/rear output shaft oil seal. Series models.
 Replacing the handbrake drum/rear output shaft oil seal. Series models. You may notice oil coming out of your handbrake (transmission brake) drum. This will in all probability be a leak from the gearbox
Children s Furniture Projects
 This is an excerpt from the book Children s Furniture Projects by Jeff Miller Copyright 2002 by The Taunton Press www.taunton.com CHILD S ROCKER KIDS ARE ALWAYS IN MOTION. It s not easy to get them even
AWE Tuning Air/Air Intercooler Kit for 2000-04 Audi 2.7T
 AWE Tuning Air/Air Intercooler Kit for 2000-04 Audi 2.7T Congratulations on your purchase of the AWE Tuning Intercoolers for your 2.7T Audi. Hundreds of hours of design and operational testing were spent
16 April 2012 1032011-F 1994-2002 Dodge Adjustable Track bar with Relocation Bracket 1
 16 April 2012 1032011-F 1994-2002 Dodge Adjustable Track bar with Relocation Bracket 1 BD Adjustable Track Bar w/bracket Dodge 2500-3500 4WD Models 1994-2002 Dodge 1500 4WD Model 1994-2001 P/N# 1032011-F
Cedar Cottage Doghouse Plans
 Overlapping cedar shingles add an element of charm to this medium size doghouse. The walls, floor, and trim are constructed of solid cedar, making it naturally weather resistant and provides excellent
Things you need to assemble the tube actuator. Left to right. are small piece of masking tape, super glue,pen knife and small
 Things you need to assemble the tube actuator. Left to right are small piece of masking tape, super glue,pen knife and small crosspoint screwdriver. You will also need a few drops of light oil. Begin by
LG G5 Chassis Brace Gen 5 Camaro THE MOST POWERFUL HEADERS ON THE PLANET Brought to you by LG Motorsports 972-429-1963
 LG G5 Chassis Brace Gen 5 Camaro THE MOST POWERFUL HEADERS ON THE PLANET Brought to you by LG Motorsports 972-429-1963 Thank you for purchasing LG Motorsports products for your Gen 5 Camaro. Parts Inventory:
Time needed: ~3h for lid replacement only. Add 1h for operation harness in lid and ~2h more for installing drive unit and cable harness in trunk.
 DIY for replacing trunk lid and/or retrofitting electrical operation of trunk lid. This document is meant to be a support and give advice on the procedure but I will take no responsibility for any damage
READ THE INSTRUCTIONS SEVERAL TIMES BEFORE STARTING ASSEMBLY
 1954-87 CHEV BED INSTRUCTIONS (Revised Nov 2002) Thank you and congratulations on your purchase of the finest Street Rod Pickup Bed on the market today. The following instructions should help you assemble
OWNER S MANUAL Table Tennis Table Patent Pending
 OWNER S MANUAL Table Tennis Table Patent Pending Be sure to write your model number and serial number here for future reference. You can find these numbers printed on the bottom of the table. MODEL # T8179
SAFETY & OPERATING INSTRUCTIONS
 SAFETY & OPERATING INSTRUCTIONS EDLUND TOMATO LASER, Models ETL -316, -140 & -380 READ AND UNDERSTAND THIS MANUAL AND ALL INSTRUCTIONS BEFORE OPERATING THIS SLICER. 159 Industrial Parkway, Burlington,
The JIG is UP Or A couple hours up front pays in the long run.
 Ed Simon Page 1 of 5 The JIG is UP Or A couple hours up front pays in the long run. A large part of the fun of beekeeping is the construction and assembly of the equipment. Since it is a hobby, I decided
CAST IRON THE BASICS. Heatline - Cast Iron Radiators SMOOTH FLAT FILE TO REMOVE ANY SWARF. ONE TIME. ASSEMBLY. JOINTS SHOULD BE TIGHTENED.
 CAST IRON THE BASICS 1. DO NOT LIFT ON YOUR OWN. 2. ONLY LIFT THE RADIATOR VERTICALLY. 3. DO NOT LIFT MORE THAN 8/10 SECTIONS AT ANY ONE TIME. 4. POSITION THE RADIATOR BEFORE FINAL ASSEMBLY. 5. THIS PRODUCT
A Telescoping Hive Cover
 A Telescoping Hive Cover The telescoping hive cover is what keeps the weather and elements out of your bee hive; it is like the roof of your house (Figure 1). Commercial hive covers typically feature a
CETAC Z-Drive Assembly
 CETAC Z-Drive Assembly Replacement Guide Manual Part Number 610144 Rev 1, 2012 CETAC Technologies, Printed in USA Overview This guide describes the necessary steps to replace the Z-drive assembly on your
Stair Parts Installation. Tricks
 Stair Parts Installation Tips & Tricks Introduction Your DIY staircase guide Welcome to the Stairpart home installation guide. Your stairway is both a functional and focal point in your home, so keeping
Ford F-Series Column Shift Repairs
 Ford F-Series Column Shift Repairs I ve had it on my list to tighten up the linkage on my 52 s column shift setup for a long time. I tried to get it apart when I had all the front end sheet metal off,
Black Wolf POCKET BILLIARD TABLE INSTALLATION MANUAL. SERVICE DEPARTMENT P.O. BOX 68 BRISTOL, WI 53104
 Black Wolf TM POCKET BILLIARD TABLE INSTALLATION MANUAL www.brunswickbilliards.com SERVICE DEPARTMENT P.O. BOX 68 BRISTOL, WI 53104 51-905710-000 SEPTEMBER 2010 NOTE: Please use the instructions in this
Assembly and Usage Instructions
 Assembly and Usage Instructions A Product 5885 West Van Horn Tavern Road Columbia, MO 65203 www.caldwellshooting.com Instruction #1001667 Limited Warranty Every Caldwell product is warrantied to be free
Installation instruction CASAFLEX - Connecting piece DN 100
 1 CASAFLEX - 11 10 114,3 x 4,5 3 5 2 4 1 7 6 8 12 9 Do not begin work until you have read the installation instruction carefully. 1 internal backing sleeve 2 graphite packing 3 connecting piece 4 thrust
Balance Beam Plans. Copyright 2007 Ben MacLeod Email: [email protected] Website: www.betterplans.net
 Balance Beam Plans Copyright 2007 Ben MacLeod Email: [email protected] Website: www.betterplans.net Balance Beam Plans By Ben MacLeod Copyright 2007 Tools required: -Mitre saw, circular saw, jig saw,
KNIFE GRINDER MATERIALS LIST & CONSTRUCTION TIPS by Michael Clerc [email protected]
 KNIFE GRINDER MATERIALS LIST & CONSTRUCTION TIPS by Michael Clerc [email protected] Materials List Minimum tools required: Drill press & Drill bits ("#7", "F", 5 / 16 ", ¼", 17/64", ½", "O", 1") Tap Handle
Premier & Deluxe 3-Season Room Sliding Glass Door
 DTSSGD-11 Premier & Deluxe 3-Season Room Sliding Glass Door Installation Instructions Screen Door Seal Left Side Track Top Track Assembly Right Side Track Right Side Trim Sliding Glass Door Sliding Screen
Solstice/Sky Water Pump Replacement
 Solstice/Sky Water Pump Replacement The water pump on the Solstice/Sky is starting to need replacement on some vehicles. This guide will help in replacing the water pump while the engine is still in the
Do-It-Yourself- Hydraulic Press Make Your Own, by Marshel Rossow
 Do-It-Yourself- Hydraulic Press Make Your Own, by Marshel Rossow This press can be built from readily available metal. Materials and dimensions need not be exactly what is shown here. Much of the material
DIY CABINET REFACING INSTALLATION GUIDE
 DIY CABINET REFACING INSTALLATION GUIDE CABINET REFACING INSTALLATION Are you ready to reface your outdated cabinets? This guide will show you how to install your new Facelifters Cabinet Refacing Products
MGB Chrome Bumper Conversion
 MGB Chrome Bumper Conversion Installation Instructions For 1974 1/2-1980 MGB This kit requires cutting, welding, and painting. Professional installation recommended. Note: Every MGB body is slightly different
How to build a Pizza Oven in 4 days
 How to build a Pizza Oven in 4 days Preparation day (slab) 1. Foundation 1500 deep x 1300 wide x 75mm deep Required 20 bags cement pre mix. If you already have a concrete base, you save this prep day DAY
INSTALLATION INSTRUCTIONS
 Turbo Tube Slide INSTALLATION INSTRUCTIONS C A U T I O N Do not climb on the outside of the slide This slide is designed for home use only, not for Public Playgrounds PlayCore, Inc. 2004 Copyrighted Material.
Pole Lathe and Shave Horse Design
 Pole Lathe and Shave Horse Design These pictures and accompanying words are Copyright Michael Hughes February 2002. They are not to be re-produced, in part or whole, without permission from the author.
Gear PEPSI CAN STOVE INSTRUCTIONS
 Gear PEPSI CAN STOVE INSTRUCTIONS [NOTE: Updated Instructions are now available. The new stove is less likely to develop flame leaks and the fuel/air mixture is improved. Instructions for a simmer ring
M128 SERVICE MANUAL- M128 MODEL #S-11 MANUAL CAN OPENER
 SERVICE MANUAL- M128 MODEL #S-11 MANUAL CAN OPENER 1 Model S-11 Can Opener Assembly Procedure The Model S-11 can opener will be assembled according to the following procedure: I. Model S-11 Handle and
SIDE CURTAIN COVERING KITS for MG TC, TD & TF
 Created on 11/18/2005 4:15:00 PM Created by grantm Page 1 of 9 1 2 3 4 5 6 7 8 9 10 11 12 13 14 15 16 17 18 19 20 21 22 23 24 25 26 27 28 29 30 31 32 33 34 35 36 37 38 39 40 41 SIDE CURTAIN COVERING KITS
BUTTERFLY SHOWER DOOR INSTALLATION INSTRUCTIONS
 BUTTERFLY SHOWER DOOR INSTALLATION INSTRUCTIONS IMPORTANT DreamLine reserves the right to alter, modify or redesign products at any time without prior notice. For the latest up-to-date technical drawings,
Ceiling Mounted Folding Attic Ladders Installation Instructions
 Ceiling Mounted Folding Attic Ladders Installation Instructions WARNING Before you start installing your new Louisville Ceiling Mounted Folding Attic Ladder, you must read and understand the following:
Triple Threat 3-in-1 Game Table 3 IN 1 GAME TABLE
 NG0M Triple Threat 3-in- Game Table 3 IN GAME TABLE Thank 3 in Y Game Table Thank you for your purchase of our product. We work around the clock and around the globe to ensure that our products maintain
BOBBIN WINDER - TYPES & FUNCTION
 BOBBIN WINDER - TYPES & FUNCTION 13.1.006 The bobbin winder is a separate unit screwed on to the machine, adjacent to the balance wheel. Its function is to wind a reserve of cotton evenly onto an empty
1998-2002 Suzuki Katana Fender Eliminator
 1998-2002 Suzuki Katana Fender Eliminator The following are instructions and illustrations on the installation of the custom fender elimination. 1 Begin by removing seat, both rear fairings, and tail light
Gate Leg Drop Leaf Table Plans
 Preparing the table top blanks: Cut and glue enough 3/4 stock to make three panels 40 long by 24 wide (they will be cut to final size at a later time). While the glue dries we will work on the legs. Preparing
Chapter 3 Installing Over-the-Post Railing on an L-Shaped Stair
 49 Chapter 3 Installing Over-the-Post Railing on an L-Shaped Stair In this chapter: The Over-the-Post Balustrade System Determining the Rail Centerline Using Rail Bolts Making a Pitch Block Laying Out
FRONT WINDSHIELD SEAL INSTALLATION
 FRONT WINDSHIELD SEAL INSTALLATION Tech Article From Newsletter 16.1-1st Quarter of 2010 Replacing your Front Windshield Seal ISN T AS HARD AS YOU MAY THINK! Recently, we retooled our front window seal
Important: Please read these instructions carefully and completely before starting the installation. TITAN Fuel Tanks
 TITAN pt. no.: 03 0000 0120 Important: Please read these instructions carefully and completely before starting the installation. TITAN Fuel Tanks INSTALLATION INSTRUCTIONS G e n e r a t i o n V Extended
Convertible Top Hydraulic Cylinder Removal Manual for W124 E-Class Convertibles 1993-1995 Models 300CE (1993) and E320 (1994-1995)
 and E320 (1994-1995)") Convertible Top Hydraulic Cylinder Removal Manual for W124 E-Class Convertibles 1993-1995 Models 300CE (1993) and E320 (1994-1995) Written by Samit Ghosh with picture material from vexed of benzworld.org
Convertible Top Hydraulic Cylinder Removal Manual for W124 E-Class Convertibles 1993-1995 Models 300CE (1993) and E320 (1994-1995) Written by Samit Ghosh with picture material from vexed of benzworld.org
ROVs in a Bucket Building an Underwater Robot. 3.0 ROV Thrusters & Propeller Attachment. 3.1 Propulsion
 3.0 ROV Thrusters & Propeller Attachment 3.1 Propulsion ROV s move forward and back, up and down, and to the left and right. They can make all of these moves without the benefit of a rudder. With three
Installation Instructions: (Part # SB76880) XRC Armor Front Fender Kit
 XRC Armor Front Fender Kit") WARNING: Check with Local and State laws before installing this accessory! NOTE: Carefully read entire instructions thoroughly before attempting to install this part. Parts Included: Qty Parts Included:
WARNING: Check with Local and State laws before installing this accessory! NOTE: Carefully read entire instructions thoroughly before attempting to install this part. Parts Included: Qty Parts Included:
Roll-Up Door Maintenance Guide
 R Roll-Up Door Maintenance Guide Cable Replacement on Two Spring Type Balancer Page 1 Panel Replacement - Removable Roller Cover Type Bottom Panel Page 1 Panel Replacement - Removable Roller Cover Type
Traditional Sonar and DSI Sonar Installation
 Traditional Sonar and DSI Sonar Installation This document covers the installation of the transducer and display unit installation, which includes connecting the unit to power and installing the unit on
Sheet Metal Shearing & Bending
 Training Objective After watching the program and reviewing this printed material, the viewer will gain a knowledge and understanding of the principles and machine methods of shearing and bending sheetmetal
Assembly GUIDE. display wine cellar kits. Required. Suggested. Questions? 888.373.6057. or visit wineracksamerica.com
 Page 1 Middle Ladder End Ladder Display Tray Screwless Connector Package Contents * All models follow the same assembly procedure varying only in the number of middle ladders your rack will require. Depending
TRANS-05, Torque Tube Removal, Rebuilding, and Installation
 TRANS-05, Torque Tube Removal, Rebuilding, and Installation Tools Metric Wrench Set Metric Socket Set Jack Stands (6 minimum) Floor Jack 8mm Cheesehead socket (also referred to as 12 point internal socket
Installation of Sprinter Swivel Seat Mounts
 Installation of Sprinter Swivel Seat Mounts I purchased my Sprinter swivel seat mounts, manufactured by Sportscraft of Germany, from http://eurocampers.com. As my Sprinter has the deluxe seating package