GTC1843L-XE Australia New Zealand
|
|
|
- Silvia Henry
- 7 years ago
- Views:
Transcription
1 GTC1843L-XE Australia New Zealand

2 9 8 2
3 3
4 ENGLISH (Original instructions) Intended use Your Black & Decker hedgetrimmer has been designed for trimming hedges, shrubs and brambles. This tool is intended for consumer use only. Your Black & Decker charger has been designed for charging Black & Decker batteries of the type supplied with this tool. Safety instructions General power tool safety warnings! Warning! Read all safety warnings and all instructions. Failure to follow all instructions may result in electric shock, fire and/or serious injury. Save all warnings and instructions for future reference. The term power tool in all of the warnings listed below refers to your mains operated (corded) power tool or battery operated (cordless) power tool. 1. Work area safety a. Keep work area clean and well lit. Cluttered and dark areas invite accidents. b. Do not operate power tools in explosive atmospheres, such as in the presence of flammable liquids, gases or dust. Power tools create sparks which may ignite the dust or fumes. c. Keep children and bystanders away while operating a power tool. Distractions can cause you to lose control. 2. Electrical safety a. Power tool plugs must match the outlet. Never modify the plug in any way. Do not use any adapter plugs with earthed (grounded) power tools. Unmodified plugs and matching outlets will reduce risk of electric shock. b. Avoid body contact with earthed or grounded surfaces such as pipes, radiators, ranges and refrigerators. There is an increased risk of electric shock if your body is earthed or grounded. c. Do not expose power tools to rain or wet conditions. Water entering a power tool will increase the risk of electric shock. d. Do not abuse the cord. Never use the cord for carrying, pulling or unplugging the power tool. Keep cord away from heat, oil, sharp edges or moving parts. Damaged or entangled cords increase the risk of electric shock. e. When operating a power tool outdoors, use an extension cord suitable for outdoor use. Use of a cord suitable for outdoor use reduces the risk of electric shock. f. If operating a power tool in a damp location is unavoidable, use a residual current device (RCD) protected supply. Use of an RCD reduces the risk of electric shock. 3. Personal safety a. Stay alert, watch what you are doing and use common sense when operating a power tool. Do not use a power tool while you are tired or under the influence of drugs, alcohol or medication. A moment of inattention while operating power tools may result in serious personal injury. b. Use personal protective equipment. Always wear eye protection. Protective equipment such as dust mask, non-skid safety shoes, hard hat, or hearing protection used for appropriate conditions will reduce personal injuries. c. Prevent unintentional starting. Ensure the switch is in the off-position before connecting to power source and/or battery pack, picking up or carrying the tool. Carrying power tools with your finger on the switch or energising power tools that have the switch on invites accidents. d. Remove any adjusting key or wrench before turning the power tool on. A wrench or a key left attached to a rotating part of the power tool may result in personal injury. e. Do not overreach. Keep proper footing and balance at all times. This enables better control of the power tool in unexpected situations. f. Dress properly. Do not wear loose clothing or jewellery. Keep your hair, clothing and gloves away from moving parts. Loose clothes, jewellery or long hair can be caught in moving parts. g. If devices are provided for the connection of dust extraction and collection facilities, ensure these are connected and properly used. Use of dust collection can reduce dust-related hazards. 4. Power tool use and care a. Do not force the power tool. Use the correct power tool for your application. The correct power tool will do the job better and safer at the rate for which it was designed. b. Do not use the power tool if the switch does not turn it on and off. Any power tool that cannot be controlled with the switch is dangerous and must be repaired. 4
 power tool or battery operated (cordless) power tool. 1. Work area safety a.")
5 (Original instructions) ENGLISH c. Disconnect the plug from the power source and/or the battery pack from the power tool before making any adjustments, changing accessories, or storing power tools. Such preventive safety measures reduce the risk of starting the power tool accidentally. d. Store idle power tools out of the reach of children and do not allow persons unfamiliar with the power tool or these instructions to operate the power tool. Power tools are dangerous in the hands of untrained users. e. Maintain power tools. Check for misalignment or binding of moving parts, breakage of parts and any other condition that may affect the power tools operation. If damaged, have the power tool repaired before use. Many accidents are caused by poorly maintained power tools. f. Keep cutting tools sharp and clean. Properly maintained cutting tools with sharp cutting edges are less likely to bind and are easier to control. g. Use the power tool, accessories and tool bits etc. in accordance with these instructions, taking into account the working conditions and the work to be performed. Use of the power tool for operations different from those intended could result in a hazardous situation. 5. Battery tool use and care a. manufacturer. A charger that is suitable for one type b. another battery pack. battery packs. Use of any other battery packs may c. When battery pack is not in use, keep it away from other metal objects, like paper clips, coins, keys, nails, screws, or other small metal objects, that can make a connection from one terminal to another. Shorting the battery terminals together may cause burns d. Under abusive conditions, liquid may be ejected from the battery; avoid contact. If contact accidentally additionally seek medical help. Liquid ejected from the battery may cause irritation or burns. 6. Service a. person using only identical replacement parts. This will make sure that the safety of the power tool is maintained. b. Power to the tool should always be supplied via residual current device with a rated residual current of 30mA or less. Additional power tool safety warnings! Warning! Additional safety warnings for hedge trimmers Hold power tool by insulated gripping surfaces when performing an operation where the cutting tool may contact hidden wiring or its own cord. Contact with a live wire will also make exposed metal parts of the power tool live and give the operator an electric shock. Keep all parts of the body away from the cutter blade. Do not remove cut material or hold material to be cut when blades are moving. Make sure the switch is off when clearing jammed material. A moment of inattention while operating the tool can result in serious personal injury. Carry the hedge trimmer by the handle with the cutter blade stopped. When transporting or storing the Proper handling of the hedge trimmer will reduce possible personal injury from the cutter blades. Keep cable away from cutting area. During operation the cable can be hidden in shrubs and can be accidentally cut by the blade. The intended use is described in this instruction manual. The use of any accessory or attachment or performance of any operation with this tool other than those recommended in this instruction manual can present a risk of personal injury and/or damage to property. Do not carry the tool with your hands on the front handle, switch or the trigger switch unless the battery has been removed. If you have not used a hedge trimmer before, preferably seek practical instruction by an experienced user in addition to studying this manual. Never touch the blades while the tool is running. Never attempt to force the blades to come to a standstill. Do not put the tool down until the blades have come to a complete standstill. Regularly check the blades for damage and wear. Do not use the tool when the blades are damaged. Take care to avoid hard objects (e.g. metal wire, railings) when trimming. Should you accidentally hit any such object, immediately switch the tool off and check for any damage. Should the tool start to vibrate abnormally, immediately switch it off and check for any damage. If the tool stalls, immediately switch it off. Remove the battery before attempting to remove any obstructions. After use, place the blade sheath supplied over the blades. Store the tool, making sure that the blade is not exposed. 5

6 ENGLISH (Original instructions) Always ensure that all guards are fitted when using the tool. Never attempt to use an incomplete tool or a tool with unauthorised modifications. Never allow children to use the tool. Be aware of falling debris when cutting the higher slides of a hedge. Always hold the tool with both hands and by the handles provided. Always wear head and eye protection. To ensure continued safe operation, check the chain tension as described in this manual after every 10 minutes of use, and adjust back to a clearance of 3 mm as required. Safety of others This appliance is not intended for use by persons (including children) with reduced physical, sensory or mental capabilities, or lack of experience and knowledge, unless they have been given supervision or instruction concerning the use of the appliance by a person responsible for the their safety. Children should be supervised to ensure that they do not play with the appliance. Vibration The declared vibration emission values stated in the technical data and the declaration of conformity have been measured in accordance with a standard test method provided by EN and may be used for comparing one tool with another. The declared vibration emission value may also be used in a preliminary assessment of exposure. Warning! The vibration emission value during actual use of the power tool can differ from the declared value depending on the ways in which the tool is used. The vibration level may increase above the level stated. When assessing vibration exposure to determine safety measures required by 2002/44/EC to protect persons regularly using power tools in employment, an estimation of vibration exposure should consider, the actual conditions of use and the way the tool is used, including taking account of all parts of the operating cycle such as the times when the tool is switched off and when it is running idle in addition to the trigger time. Warning symbols The following warning symbols are shown on the tool: Warning! To reduce the risk of injury, the user must read the instruction manual. Do not expose the tool to rain or high humidity. Always wear non-slip safety footwear. Warning! Do not touch the chain at the chip ejection point. Beware of falling objects. Keep bystanders away. Electrocution hazard. Keep at least 10 m away from overhead lines. Residual risks Additional residual risks may arise when using the tool which may not be included in the enclosed safety warnings. These risks can arise from misuse, prolonged use etc. Even with the application of the relevant safety regulations and the implementation of safety devices, certain residual risks cannot be avoided. These include: Injuries caused by touching any rotating/moving parts. Injuries caused when changing any parts, blades or accessories. Injuries caused by prolonged use of a tool. When using any tool for prolonged periods make sure you take regular breaks. Impairment of hearing. Health hazards caused by breathing dust developed when using your tool (example:- working with wood, especially oak, beech and MDF). Additional safety instructions for batteries and chargers Batteries Never attempt to open for any reason. Do not expose the battery to water. Do not expose the battery to heat. Do not store in locations where the temperature may exceed 40 C. Charge only at ambient temperatures between 10 C and 40 C. Charge only using the charger provided with the appliance/tool. Using the wrong charger could result in an electric shock or overheating of the battery. When disposing of batteries, follow the instructions given in the section Protecting the environment. Do not damage/deform the battery pack either by puncture or impact, as this may create a risk of injury and fire. 6

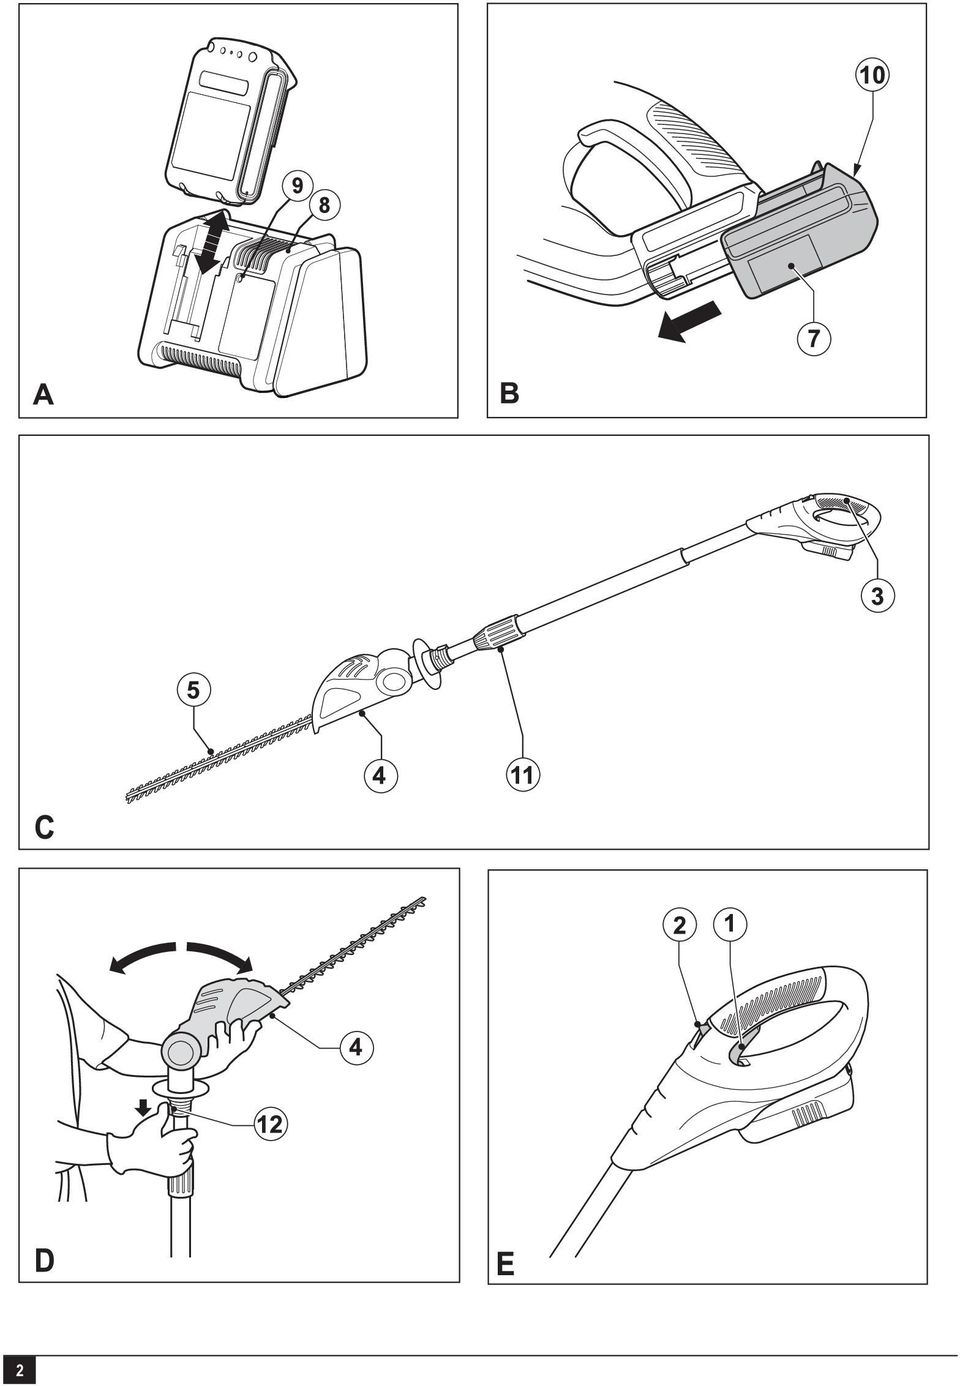
7 (Original instructions) ENGLISH Do not charge damaged batteries. Under extreme conditions, battery leakage may occur. When you notice liquid on the batteries, carefully wipe the liquid off using a cloth. Avoid skin contact. In case of skin or eye contact, follow the instructions below. Warning! The battery fluid may cause personal injury or damage to property. In case of skin contact, immediately rinse with water. If redness, pain or irritation occurs seek medical attention. In case of eye contact, rinse immediately with clean water and seek medical attention. Chargers Warning! Your charger has been designed for a specific voltage. Always check that the mains voltage corresponds to the voltage on the rating plate. Warning! Never attempt to replace the charger unit with a regular mains plug. Use your Black & Decker charger only to charge the battery in the appliance/tool with which it was supplied. Other batteries could burst, causing personal injury and damage. Never attempt to charge non-rechargeable batteries. If the supply cord is damaged, it must be replaced by the manufacturer or an authorised Black & Decker Service Centre in order to avoid a hazard. Do not expose the charger to water. Do not open the charger. Do not probe the charger. The charger must be placed in a well ventilated area when charging. Symbols on the charger The following symbols are found on your charger: Your charger is double insulated; therefore no earth wire is required. Always check that the mains voltage corresponds to the voltage on the rating plate. Never attempt to replace the charger unit with a regular mains plug. If the cord is damaged, it must be replaced by the manufacturer or an authorised Black & Decker Service Centre in order to avoid a hazard. The charger is intended for indoor use only. Read the instruction manual before use. Features 1. On/off switch 2. Lock-off button 3. Main handle 4. Trimmer head 5. Blade 6. Blade sheath 7. Battery Fig. A 8. Charger 9. Charging indicator Assembly Warning! To prevent accidental operation, ensure that the battery is removed and that the blade sheath is in place on the blades before performing the following operations. Failure to do this could result in serious personal injury. Fitting and removing the trimmer head (fig. C) Fitting the trimmer head Align the groove on the outside of the coupling end of the handle (3) with the tongue on the inside of the coupling end of the trimmer head (4). Push the trimmer head (4) onto the handle (3). Slide the collar (11) down and rotate it clockwise until it is fully tightened. Warning! Periodically check the connections to ensure that they are tightened securely. The collar is correctly secured if there are no orange threads visible. Removing the trimmer head Rest the handle (3) on the ground, loosen the collar (11) and take off the trimmer head (4). Adjusting the trimmer head angle (fig. D) The trimmer head pivots 180 and can be locked into 5 positions within that range. Warning! To avoid being pinched, wear gloves and hold the unit as shown. Rest the handle (3) on the ground, slide the collar (12) down and move the trimmer head (4) as required. Make sure the trimmer head clicks into place. Fitting and removing the battery (fig. B) To fit the battery (7), line it up with the receptacle on the tool. Slide the battery into the receptacle and push until the battery snaps into place. To remove the battery, push the release button (10) while at the same time pulling the battery out of the receptacle. 7

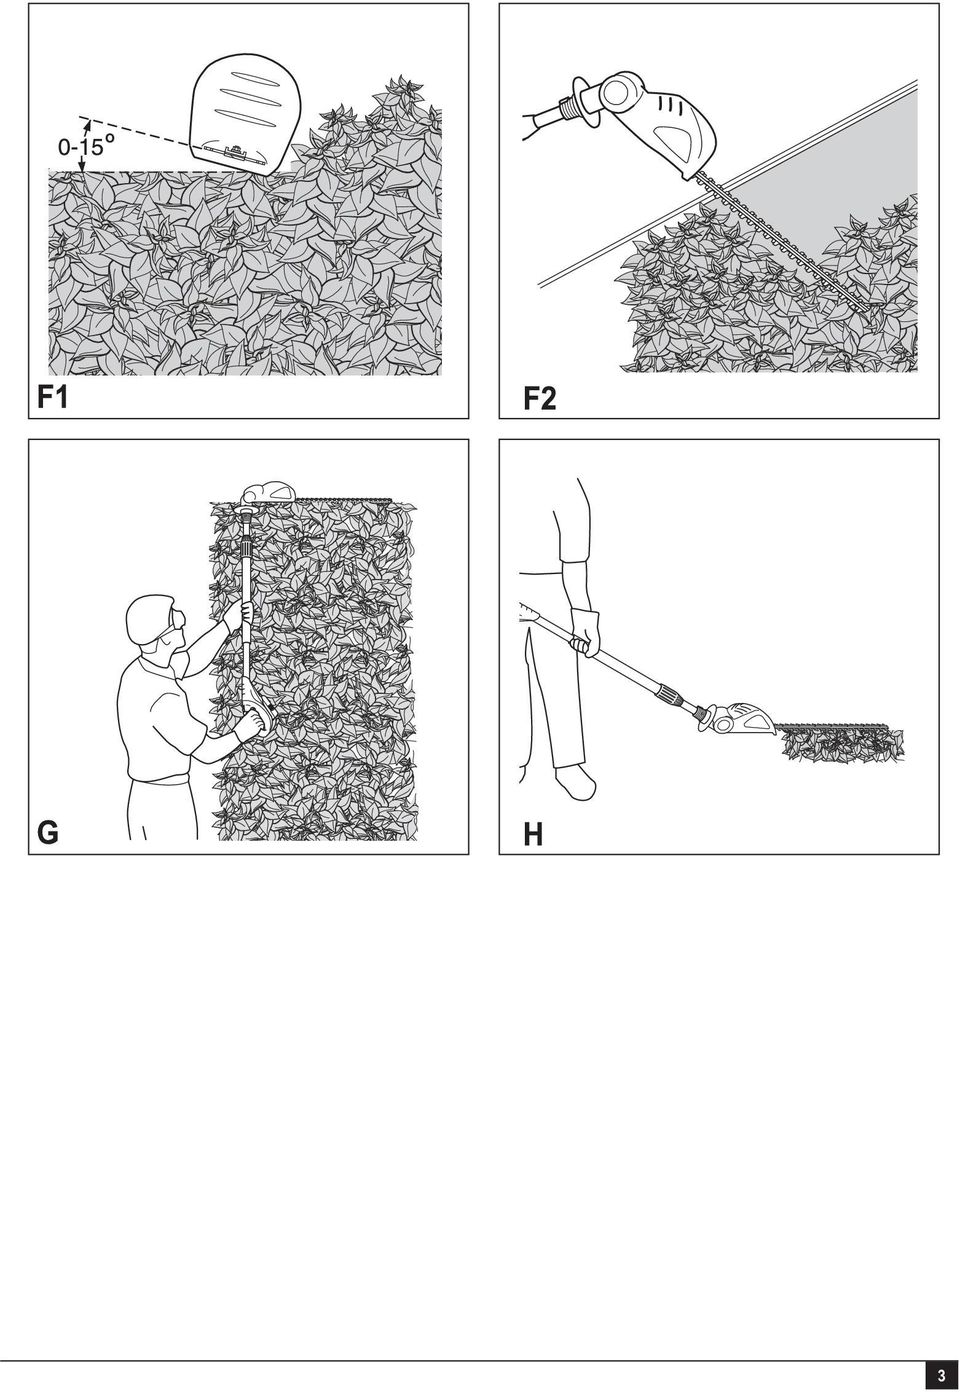
8 ENGLISH (Original instructions) Use Warning! Let the tool work at its own pace. Do not overload. Charging the battery (fig. A) The battery needs to be charged before first use and whenever it fails to produce sufficient power on jobs that were easily done before. The battery may become warm while charging; this is normal and does not indicate a problem. Warning! Do not charge the battery at ambient temperatures below 10 C or above 40 C. Recommended charging temperature: approx. 24 C. Note The charger will not charge a battery if the cell temperature is below approximately 10 C or above 40 C. The battery should be left in the charger and the charger will begin to charge automatically when the cell temperature warms up or cools down. To charge the battery (7), remove it from the tool and insert it into the charger (8). The battery will only fit into the charger in one way. Do not force. Be sure that the battery is fully seated in the charger. Plug in the charger and switch on at the mains. The charging indicator (9) will flash green continuously (slowly). The charge is complete when the charging indicator (9) lights green continuously. The charger and the battery can be left connected indefinitely with the LED illuminated. The LED will change to flashing green (charging) state as the charger occasionally tops off the battery charge. The charging indicator (9) will be lit as long as the battery is connected to the plugged-in charger. Charge discharged batteries within 1 week. Battery life will be greatly diminished if stored in a discharged state. Leaving the battery in the charger The charger and battery pack can be left connected indefinitely with the LED lit. The charger will keep the battery pack fresh and fully charged. Charger diagnostics If the charger detects a weak or damaged battery, the charging indicator (9) will flash red at a fast rate. Proceed as follows: Re-insert the battery (7). If the charging indicator continues flashing red at a fast rate, use a different battery to determine if the charging process works properly. If the replaced battery charges correctly, the original battery is defective and should be returned to a service centre for recycling. If the new battery gives the same indication as the original battery, take the charger to be tested at an authorised service centre. It may take as long as 60 minutes to determine that Note the battery is defective. If the battery is too hot or too cold, the LED will alternately blink red, fast and slow, one flash at each speed and repeat. Switching on and off (fig. E) For your safety, this tool is equipped with a double switching system. This system prevents starting the tool inadvertently. Switching on Push the lock-off button (2) backward using your thumb and at the same time squeeze the on/off switch (1). Release the lock-off button (2). Switching off Release the on/off switch (1). Warning! Never attempt to lock a switch in the on position. Hints for optimum use Start by trimming the top of the hedge. Slightly tilt the tool (up to 15 relative to the line of cut) so that the blade tips point slightly towards the hedge (fig. F1). This will cause the blades to cut more effectively. Hold the tool at the desired angle and move it steadily along the line of cut. The double-sided blade allows you to cut in either direction. In order to obtain a very straight cut, stretch a piece of string along the length of the hedge at the desired height. Use the string as a guideline, cutting just above it. In order to obtain flat sides, cut upwards with the growth. Younger stems move outwards when the blade cuts downwards, causing shallow patches in the hedge (fig. F2). Take care to avoid any foreign objects. Especially avoid hard objects such as metal wire and railings, as these could damage the blades. Regularly oil the blades. Guidelines for trimming (UK & Ireland) Trim hedges and shrubs with seasonal leaves (new leaves every year) in June and October. Trim evergreens in April and August. Trim conifers and other fast growing shrubs every six weeks from May until October. Guidelines for trimming (Australia & New Zealand) Trim hedges and shrubs with seasonal leaves (new leaves every year) in December and March. Trim evergreens in September and February. Trim conifers and other fast growing shrubs every six weeks from October until March. 8

9 (Original instructions) ENGLISH Cleaning maintenance and storage Your Black & Decker tool has been designed to operate over a long period of time with a minimum of maintenance. Continuous satisfactory operation depends upon proper tool care and regular cleaning. Your charger does not require any maintenance apart from regular cleaning. Warning! Before performing any maintenance on the tool, remove the battery from the tool. Unplug the charger before cleaning it. After use and before storage After use, carefully clean the blades. After cleaning, apply a film of light machine oil to prevent the blades from rusting. Regularly clean the ventilation slots in your tool using a soft brush or dry cloth. Regularly clean the motor housing using a damp cloth. Do not use any abrasive or solvent-based cleaner. Make sure all switches are free of debris before and after use. Storage When the tool will not be used for several months, ideally leave the battery connected to the charger. Otherwise proceed as follows: Fully charge the battery. Remove the battery from the tool. Store the tool and battery in a secure and dry location. The storage temperature must always remain in the range of +10 C to +40 C. Place the battery on a level surface. Before using the tool after prolonged storage, fully charge the battery again. Protecting the environment Separate collection. This product must not be disposed of with normal household waste. Should you find one day that your Black & Decker product needs replacement, or if it is of no further use to you, do not dispose of it with household waste. Make this product available for separate collection. Separate collection of used products and packaging allows materials to be recycled and used again. Re-use of recycled materials helps prevent environmental pollution and reduces the demand for raw materials. Local regulations may provide for separate collection of electrical products from the household, at municipal waste sites or by the retailer when you purchase a new product. Black & Decker provides a facility for the collection and recycling of Black & Decker products once they have reached the end of their working life. To take advantage of this service please return your product to any authorised repair agent who will collect them on our behalf. You can check the location of your nearest authorised repair agent by contacting your local Black & Decker office at the address indicated in this manual. Alternatively, a list of authorised Black & Decker repair agents and full details of our after-sales service and contacts are available on the Internet at: Batteries Troubleshooting If the tool does not operate correctly, check the following.: Fault Possible cause Action Tool will not start. Battery not installed properly. Check the battery installation. Battery discharged. Fit a (fully) charged battery. Battery will not charge. Lock-off button not actuated. Pole connections not properly tightened. Battery not installed properly. Observe the starting procedure. Check the connections. Check the battery installation. At the end of their useful life, discard batteries with due care for our environment: Do not short-circuit the battery terminals. Do not dispose of the battery(s) in a fire as this may result in a risk of personal injury or an explosion. Run the battery down completely, then remove it from the tool. Batteries are recyclable. Place the battery(s) in a suitable packaging to ensure that the terminals cannot be shortcircuited. Take them to any authorised repair agent or a local recycling station. 9

10 ENGLISH (Original instructions) Technical data GTC1843L-XE H1 Input voltage Vdc 18 No-load speed min -1 1,400 Blade length cm 43 Blade gap mm 12 Blade brake time s < 1.0 Weight (without battery) kg 3.2 Australia & New Zealand Stanley Black & Decker 82 Taryn Drive, Epping, VIC 3076 Australia Tel (Aust) or Tel (NZ) Battery BL1518 Voltage Vdc 18 Capacity Ah 1.5 Type Li-Ion Charger ** TYPE 1 Input voltage Vac 230 Output voltage Vdc 20 Output current A 2 Level of sound pressure according to EN60745: Sound pressure (L pa ) 82 db(a), uncertainty (K) 3 db(a) Sound power (L WA ) 93 db(a), uncertainty (K) 3 db(a) Vibration total values (triax vector sum) according to EN 60745: Vibration emission value (a h ) 1.1 m/s 2, uncertainty (K) 1.5 m/s 2 10
 82 db(a), uncertainty (K)")
11 (Original instructions) ENGLISH GTC1843L-XE

12 /12

GTC610 GTC610NM GTC610P
 GTC610 GTC610NM GTC610P English (Original instructions) 5 2 A B C 3 D1 D2 D3 4 D4 Intended use Your Black & Decker hedgetrimmer has been designed for trimming hedges, shrubs and brambles. This tool is
www.blackanddecker.com.au EGBL144 Australia
 www.blackanddecker.com.au 4 3 2 1 8 6 7 5 EGBL144 EGBL180 Australia New Zealand 5 7 2 C 1 9 3 4 2 8 3 EGBL144/ EGBL180 CORDLESS DRILL Technical data Voltage No-load speed Max. torque Chuck capacity Max.
Auto Feed Screwdriver
 ENGLISH (Original instructions) INSTRUCTION MANUAL Auto Feed Screwdriver 684 00607 DOUBLE INSULATION IMPORTANT: Read Before Using. ENGLISH (Original instructions) SPECIFICATIONS Model 684 Screw strip 4
Operating instructions in the back. www.blackanddecker.co.uk PD1020L
 Operating instructions in the back www.blackanddecker.co.uk PD1020L 2 ENGLISH (Original instructions) Intended use Your Black & Decker Dustbuster handheld vacuum cleaner has been designed for vacuum cleaning
National- Spencer Inc.
 9-27-2010 National- Spencer Inc. 19.2V HEAVY DUTY GREASE GUN PRODUCT SPECIFICATION Charger Input Power 110 VAC Battery Output Power 19.2V Battery Capacity 1500 MAH Battery Pack Charge Time 1 Hour Maximum
www.blackanddecker.co.uk Ireland Australia New Zealand
 www.blackanddecker.co.uk 8 6 7 5 3 4 1 2 UK Ireland Australia New Zealand 9 8 A 7 10 6 11 13 12 6 11 B C 16 14 15 17 5 D 2 13 E 8 9 F 3 Intended use Your Black & Decker rotary hammer drill has been designed
Cable Drum Machine. Operation Manual BC260 SERIES. Cleans 1 1/4" to 3" lines up to 50'
 Cable Drum Machine Operation Manual BC260 SERIES Cleans 1 1/4" to 3" lines up to 50' Used For: Sink, Shower & Floor Drains 42FM " WARNING - Read All Instructions, When Using Electric Tools, Basic Safety
www.blackanddecker.com.au Australia AD600-XE New Zealand
 www.blackanddecker.com.au Australia AD600-XE New Zealand 4 3 1 2 5 7 B 5 A Position Instructions 3 C 6 4 E D 2 Intended use Your Black & Decker drill/screwdriver has been designed for screwdriving applications
SAFETY AND OPERATING MANUAL. Cordless rotary hammer WX382 WX382.1 WX382.2 WX382.3
 SAFETY AND OPERATING MANUAL 2 General Power Tool Safety Warnings Warning! Read all safety warnings and all instructions. Failure to follow the warnings and instructions may result in electric shock, fire
Hammer Drill JCB-HD900-2
 Safety and operating manual Hammer Drill JCB-HD900-2 ORIGINAL INSTRUCTIONS GENERAL POWER TOOL SAFETY WARNINGS WARNING! Read all safety warnings and all instructions. Failure to follow the warnings and
Hand Held Metal Detector
 Hand Held Metal Detector Model 97245 Set up And Operating Instructions Diagrams within this manual may not be drawn proportionally. Due to continuing improvements, actual product may differ slightly from
Copyright Black & Decker
 KC9024FB1 2 Copyright Black & Decker 5 2 1 3 4 A 6 2 B 3 3 7 C D 1 8 E 4 CORDLESS SCREWDRIVER KC9024FB ENGLISH CONGRATULATIONS! You have chosen a Black & Decker tool. Our aim is to provide quality tools
6 FUNCTION HAMMER DRILL
 6 FUNCTION HAMMER DRILL MODEL NO: CON1500RHD PART NO: 6479508 OPERATION & MAINTENANCE INSTRUCTIONS GC0712 INTRODUCTION Thank you for purchasing this CLARKE 6 Function Hammer Drill. Before attempting to
NV2410N NV2420N NV3610N NV3620N NV4820N NV4820CN NV7210N NW3620N NW4820N
 NV2410N NV2420N NV3610N NV3620N NV4820N NV4820CN NV7210N NW3620N NW4820N A B C 2 D E F 3 G H I 4 (Original instructions) ENGLISH Intended use Your Black & Decker Dustbuster handheld vacuum cleaner has
DIGITAL MINI COMPRESSOR
 WHAT S IN THE BOX DIGITAL MINI COMPRESSOR 12V INSTRUCTION MANUAL SPECIFICATIONS Voltage: 12V Max Current: 10Amp Max Pressure: 100psi Flow Rate: 16 l/min Weight: 1kg ozito.com.au Digital Compressor Accessories
AMW. Robert Bosch GmbH Power Tools Division 70745 Leinfelden-Echterdingen Germany. www.bosch-garden.com F 016 L70 927 (2013.
 OBJ_DOKU-32616-002.fm Page 1 Tuesday, October 22, 2013 8:31 AM Robert Bosch GmbH Power Tools Division 70745 Leinfelden-Echterdingen Germany www.bosch-garden.com F 016 L70 927 (2013.10) O / 10 XXX AMW 10
www.blackanddecker.co.uk Ireland Australia New Zealand
 www.blackanddecker.co.uk 3 2 4 5 5 6 1 7 UK Ireland Australia New Zealand 1 8 9 10 11 12 13 1 A 14 15 B 7 18 19 16 18 19 21 17 20 C D E 2 Intended use Your Black & Decker distance and space measurer has
HAIR CLIPPER. Model No. HC5150 HC5150 2. 3.
 All technical modifications reserved. 09/08. TSC 08.0634 HAIR CLIPPER 2. 3. 1. Model No. HC5150 4. 10/UK/HC5150 Version 03/10 Part No. T22-29458 REMINGTON is a Registered Trade Mark of Spectrum Brands,
8" BENCH GRINDER OWNER'S MANUAL
 8" BENCH GRINDER OWNER'S MANUAL WARNING: Read carefully and understand all INSTRUCTIONS before operating. Failure to follow the safety rules and other basic safety precautions may result in serious personal
1 2 3 4 15 5 6 14 13 12 11 10 9 8 7 CD601 CD602
 1 2 3 4 15 5 6 14 13 12 11 10 9 8 7 CD601 CD602 English (Original instructions) 5 2 A B 21 20 11 C 7 22 D 3 12 5 6 E 8 13 8 F 23 15 G 4 Intended use Your Black & Decker saw has been designed for sawing
150W. Bench Grinder. Article number BGM6018. WEB: helpdesk@d u o n s.c o m.a u. After Sales Support TEL: 07 3188 2025 N26968
 150W Bench Grinder INSTRUCTION MANUAL MODEL NUMBER tbg-150 Article number BGM6018 AFTER SALES SUPPORT TEL: 07 3188 2025 WEB: HELPDESK@DUONS.COM.AU After Sales Support TEL: 07 3188 2025 N26968 WEB: helpdesk@d
Hammer Drill HP1630 HP1631 INSTRUCTION MANUAL
 ENGLISH INSTRUCTION MANUAL Hammer Drill HP630 HP63 008892 DOUBLE INSULATION WARNING: For your personal safety, READ and UNDERSTAND before using. SAVE THESE INSTRUCTIONS FOR FUTURE REFERENCE. ENGLISH SPECIFICATIONS
Vacuum Hair Clipper. 10,000 prize draw. Register online for HC6550. EXTRA year guarantee FREE rewards gallery
 Vacuum Hair Clipper HC6550 Register online for 10,000 prize draw EXTRA year guarantee FREE rewards gallery Visit www.remington.co.uk/productregister You must register within 28 days of purchase. Thank
15GAL STEEL OIL DRAIN WITH 110V PUMP
 15GAL STEEL OIL DRAIN WITH 110V PUMP OWNER S MANUAL WARNING: Read carefully and understand all ASSEMBLY AND OPERATION INSTRUCTIONS before operating. Failure to follow the safety rules and other basic safety
Operating instructions Cordless K 10253 impact wrench
 Operating instructions Cordless K 10253 impact wrench Operational precautions General safety instructions warning! 1. Consider work area environment. Do not expose tools to rain. Do not use tools in damp
tire inflator with pressure gauge
 tire inflator with pressure gauge Model 95583 Assembly And Operation Instructions Due to continuing improvements, actual product may differ slightly from the product described herein. 3491 Mission Oaks
SAFETY AND OPERATING MANUAL
 SAFETY AND OPERATING MANUAL 115MM ANGLE GRINDER Congratulations on your purchase of a power tool from Direct Power (UK) Ltd. We want you to continue getting the best performance from it so this handbook
1000-LB. TRAILER JACK OWNER S MANUAL
 1000-LB. TRAILER JACK OWNER S MANUAL WARNING: Read carefully and understand all INSTRUCTIONS before operating. Failure to follow the safety rules and other basic safety precautions may result in serious
staple gun with 5/16 Long staples
 staple gun with 5/16 Long staples Model 95718 Assembly And Operation Instructions Due to continuing improvements, actual product may differ slightly from the product described herein. 3491 Mission Oaks
14.4 VOLT CORDLESS HAMMER DRILL
 14.4V CORDLESS HAMMER DRILL PCC-1440 Name: Address Contact Telephone No.: 14.4 VOLT CORDLESS HAMMER DRILL User Guide & Warranty Fault Description: Please complete this section before sending in your warranty
SBC90. Abrasive Blast Cabinet Assembly & Operating Instructions
 SBC90 Abrasive Blast Cabinet Assembly & Operating Instructions READ ALL INSTRUCTIONS AND WARNINGS BEFORE USING THIS PRODUCT. SAVE THESE INSTRUCTIONS FOR FUTURE REFERENCE. This manual provides important
ENGLISH (Original instructions) INSTRUCTION MANUAL. Jig Saw DOUBLE INSULATION. IMPORTANT: Read Before Using.
 INSTRUCTION MANUAL. Jig Saw DOUBLE INSULATION. IMPORTANT: Read Before Using.") ENGLISH (Original instructions) INSTRUCTION MANUAL Jig Saw 46 47 48 49 00808 DOUBLE INSULATION IMPORTANT: Read Before Using. ENGLISH (Original instructions) SPECIFICATIONS Max. cutting capacities Model
ENGLISH (Original instructions) INSTRUCTION MANUAL Jig Saw 46 47 48 49 00808 DOUBLE INSULATION IMPORTANT: Read Before Using. ENGLISH (Original instructions) SPECIFICATIONS Max. cutting capacities Model
VACUUM CLEANER INSTRUCTION MANUAL
 VACUUM CLEANER INSTRUCTION MANUAL MODEL: SVC9702 PLEASE READ THIS MANUAL CAREFULLY BEFORE USING AND KEEP IT PROPERLY FOR FUTURE USE 1 Safety Cautions: WARNING: To reduce the risk of fire, electrical shock,
OPERATOR S MANUAL 18 VOLT, 1 HOUR CHARGER
 OPERATOR S MANUAL 18 VOLT, 1 HOUR CHARGER P110 Your battery charger has been engineered and manufactured to Ryobi s high standard for dependability, ease of operation, and operator safety. When properly
Jig Saw INSTRUCTION MANUAL. WARNING: For your personal safety, READ and UNDERSTAND before using. SAVE THESE INSTRUCTIONS FOR FUTURE 1 REFERENCE.
 ENGLISH (Original instructions) INSTRUCTION MANUAL Jig Saw 46 47 48 49 00808 DOUBLE INSULATION WARNING: For your personal safety, READ and UNDERSTAND before using. SAVE THESE INSTRUCTIONS FOR FUTURE REFERENCE.
Cordless Hammer Driver Drill
 ENGLISH (Original instructions) INSTRUCTION MANUAL Cordless Hammer Driver Drill BHP343 BHP453 009083 IMPORTANT: Read Before Using. ENGLISH (Original instructions) SPECIFICATIONS Model BHP343 BHP453 Concrete
ENGLISH (Original instructions) INSTRUCTION MANUAL. Hammer Drill HP1640 HP1640F HP1641 HP1641F DOUBLE INSULATION. IMPORTANT: Read Before Using.
 INSTRUCTION MANUAL. Hammer Drill HP1640 HP1640F HP1641 HP1641F DOUBLE INSULATION. IMPORTANT: Read Before Using.") ENGLISH (Original instructions) INSTRUCTION MANUAL Hammer Drill HP640 HP640F HP64 HP64F 009237 DOUBLE INSULATION IMPORTANT: Read Before Using. ENGLISH (Original instructions) SPECIFICATIONS Capacities
ENGLISH (Original instructions) INSTRUCTION MANUAL Hammer Drill HP640 HP640F HP64 HP64F 009237 DOUBLE INSULATION IMPORTANT: Read Before Using. ENGLISH (Original instructions) SPECIFICATIONS Capacities
1 HP MINI DUST COLLECTOR
 1 HP MINI DUST COLLECTOR 31810 Set up and Operating Instructions Visit our website at: http://www.harborfreight.com Read this material before using this product. Failure to do so can result in serious
2-SLICE COOL TOUCH TOASTER
 2-SLICE COOL TOUCH TOASTER PLA0405 Instruction Manual Due to on-going product improvements, specifications and accessories may change without notice. Actual product may differ slightly to that depicted.
Pet hair clipper. Model 96822. Diagrams within this manual may not be drawn proportionally.
 Pet hair clipper Model 96822 Cleaning And Operation Instructions Diagrams within this manual may not be drawn proportionally. Due to continuing improvements, actual product may differ slightly from the
Dear Neuton Owner, This is a helpful hint to guide you in getting the most out of your NEUTON Battery and Charger.
 Battery-Powered Mower NEUTON 24-Volt Charger Instructions Booklet Dear Neuton Owner, In order for you to get the most out of your Neuton Mower, we recently reviewed and revised our battery-charging instructions.
SAFETY AND OPERATING MANUAL
 SAFETY AND OPERATING MANUAL 5kg SDS Plus Rotary Hammer Drill BH26S3 Congratulations on your purchase of a power tool from Screwfix Direct Ltd. We want you to continue getting the best performance from
USER INSTRUCTIONS FOR 10 LITRE PORTABLE DEHUMIDIFIER MODEL NO. DHMD102
 USER INSTRUCTIONS FOR 10 LITRE PORTABLE DEHUMIDIFIER MODEL NO. DHMD102 THANK YOU FOR CHOOSING YOUR NEW DEHUMIDIFIER. BEFORE USING THE UNIT READ THESE INSTRUCTIONS FULLY AND RETAIN THEM FOR FUTURE REFERENCE
400 Amp Rechargeable Jump Start System RAC-HP082
 400 Amp Rechargeable Jump Start System RAC-HP082 MAINTENANCE Always inspect the tool before use to ensure the cables are in good condition and the clamps are clean and free from corrosion. Keep clean by
ROUTER TABLE INSERT ASSEMBLY AND OPERATING INSTRUCTIONS
 ROUTER TABLE INSERT 94331 ASSEMBLY AND OPERATING INSTRUCTIONS 3491 Mission Oaks Blvd., Camarillo, CA 93011 Visit our Web site at http://www.harborfreight.com Copyright 2006 by Harbor Freight Tools. All
Li Battery Pack & Charger Safety & Operating Instructions
 Li Battery Pack & Charger Safety & Operating Instructions NEUTON Power Equipment 75 Meigs Road Vergennes, VT 05491 Toll-Free phone: 1-866-NEUTON1 (638-8661) Fax: 1-802-877-1213 Website: www.neutonpower.com
EPC12 EPC14 EPC18 EPC96
 EPC12 EPC14 EPC18 EPC96 English (Original instructions) 5 2 3 4 Intended use Your Black & Decker drill/screwdriver has been designed for screwdriving applications and for drilling in wood, metal and plastics.
Hair Clipper. Hair Clipper HC365 HC365. Model No. HC365
 Seite 2 mm kürzer Seite 2 mm kürzer All technical modifi cations reserved. 02/08. TSC 08.0162 Hair Clipper Hair Clipper 3. 2. 1. 6. 5. 4. Model No. HC365 08/UK/HC365 Version 02/08 Part No. T22-25969 Remington
- 2 - IMPORTANT SAFETY REMINDERS
 USER MANUAL IMPORTANT SAFETY REMINDERS This appliance should only be used for domestic cleaning, as described in this user guide. Please ensure that this guide is fully understood before operating the
Congratulations on your purchase of the Great Planes SLOT MACHINE, the first truly easy way to cut hinge slots in your model airplanes.
 INSTRUCTION MANUAL Congratulations on your purchase of the Great Planes SLOT MACHINE, the first truly easy way to cut hinge slots in your model airplanes. The Slot Machine you have purchased is equipped
TABLE SAW. 250mm (10") 1500W INSTRUCTION MANUAL SPECIFICATIONS. ozito.com.au TSF-1210 WHAT S IN THE BOX. Rip Fence. Sliding Mitre Gauge
 1500W INSTRUCTION MANUAL SPECIFICATIONS. ozito.com.au TSF-1210 WHAT S IN THE BOX. Rip Fence. Sliding Mitre Gauge") WHAT S IN THE BOX TABLE SAW 250mm (10") 1500W INSTRUCTION MANUAL SPECIFICATIONS Motor: 1500W (S6 40%) Input: 230-240V ~ 50Hz No Load Speed: 5,700/min Blade: Ø250mm x Ø30 x 2.4mm Bevel Angle: 0-45 left
WHAT S IN THE BOX TABLE SAW 250mm (10") 1500W INSTRUCTION MANUAL SPECIFICATIONS Motor: 1500W (S6 40%) Input: 230-240V ~ 50Hz No Load Speed: 5,700/min Blade: Ø250mm x Ø30 x 2.4mm Bevel Angle: 0-45 left
Mini-led spotlight with magnetic base
 Mini-led spotlight with magnetic base Model 95799 Assembly And Operation Instructions Due to continuing improvements, actual product may differ slightly from the product described herein. 3491 Mission
MBSAW. Meat Cutting Band Saw With Meat Grinder Assembly & Operating Instructions
 06/2011 MBSAW Meat Cutting Band Saw With Meat Grinder Assembly & Operating Instructions READ ALL INSTRUCTIONS AND WARNINGS BEFORE USING THIS PRODUCT. This manual provides important information on proper
All technical modifications reserved. 09/08. TSC 08.0634
 All technical modifications reserved. 09/08. TSC 08.0634 REMINGTON is a Registered Trade Mark of Spectrum Brands, Inc., or one of its subsidiaries VARTA Consumer Batteries GmbH & Co. KGaA Alfred-Krupp-Str.9
Mini Pallet Jack OWNER S MANUAL
 Mini Pallet Jack OWNER S MANUAL WARNING: Read carefully and understand all ASSEMBLY AND OPERATION INSTRUCTIONS before operating. Failure to follow the safety rules and other basic safety precautions may
ZAPPY 3 OWNER S MANUAL. Read this manual completely before riding your Electric ZAPPY 3.
 ZAPPY 3 OWNER S MANUAL Read this manual completely before riding your Electric ZAPPY 3. TECHNICAL INFORMATION Model No. : ZAPPY 3 Product size Type of motor Motor power Battery type Battery Charger Charging
INFRARED QUARTZ WALL HEATER
 INFRARED QUARTZ WALL HEATER MODEL NO: IQ2000 PART NO: 6939004 MOUNTING & OPERATION INSTRUCTIONS GC0715 INTRODUCTION Thank you for purchasing this CLARKE Infrared Wall Heater. Before attempting to use this
www.blackanddecker.com Ireland Australia New Zealand 1
 www.blackanddecker.com 2 1 4 3 5 7 6 14 8 11 12 13 9 10 UK Ireland Australia New Zealand 1 5 6 7 A 11 10 17 B 16 C 15 15 D E 2 25 24 26 F G 25 24 27 29 28 30 31 H 26 I J 3 Intended use Your Black & Decker
MICA HEATER INSTRUCTION MANUAL Model No: UHM-786 230V 50Hz 2200W
 MICA HEATER INSTRUCTION MANUAL Model No: UHM-786 230V 50Hz 2200W Safety Precautions To reduce the risk of personal injury or damage to property, basic safety precautions must be observed including the
Notes. Material 1. Tools the employee is expected to operate
 OSHA Standard29 CFR 1910.211-.247, Subpart O, Machinery and Machine Guarding, and Subpart P, Hand and Portable-Powered Tools and other Hand- Held Equipment. Hand Tool Safety Preparation 1. Read Applicable
HAMMER DRILLS INSTRUCTIONS IMPORTANT: PLEASE READ THESE INSTRUCTIONS CAREFULLY TO ENSURE THE SAFE AND EFFECTIVE USE OF THIS TOOL.
 HAMMER DRILLS STOCK No.63171 PART No.PT500V 63172 PT710V INSTRUCTIONS IMPORTANT: PLEASE READ THESE INSTRUCTIONS CAREFULLY TO ENSURE THE SAFE AND EFFECTIVE USE OF THIS TOOL. 07/2000 GENERAL INFORMATION
User s Manual Before using the inverter, you need to read and save the safety instructions.
 User s Manual Before using the inverter, you need to read and save the safety instructions. STI SERIES (STI200, STI300, STI500, STI700, STI1000) Power Frequency Pure Sine Wave Inverter The information
Mini multi-purpose sewing machine
 TROUBLESHOOTING Problem Problem cause Amendment No power or the machine runs slowly Batteries are installed incorrectly Batteries are low Reinstall the batteries making sure they are the correct way around
User Guide. Bagless Cylinder White. Get Cleaning... vax.co.uk. Vax Careline: (UK) 0844 412 8455 (ROI) 1-800 928 308. White series
 0844 412 8455 (ROI) 1-800 928 308. White series") C88-VW-B UG [Update 10.05.12]_User guide 10/05/2012 09:40 Page 1 User Guide Vax Careline: (UK) 0844 412 8455 Bagless Cylinder White Get Cleaning... What s your Vax model number? (Located on the top flap
C88-VW-B UG [Update 10.05.12]_User guide 10/05/2012 09:40 Page 1 User Guide Vax Careline: (UK) 0844 412 8455 Bagless Cylinder White Get Cleaning... What s your Vax model number? (Located on the top flap
USER MANUAL. Bottom Loading Bottled Water Dispenser SAVE THIS MANUAL FOR FUTURE USE. Model # 900172
 Model # 900172: Page 1 USER MANUAL Bottom Loading Bottled Water Dispenser Model # 900172 TO REDUCE THE RISK OF INJURY AND PROPERTY DAMAGE, USER MUST READ THIS MANUAL BEFORE ASSEMBLING, INSTALLING & OPERATING
Operating instructions. SCORP 220 Plus SCORP 360. Pipe Cutter. Code 790 014 762 Machine-no.:
 precision. power. simplicity. Operating instructions Pipe Cutter SCORP 220 Plus SCORP 360 Code 790 014 762 Machine-no.: All rights reserved, in particular the rights of duplication and distribution as
NewAir AC-10000E, AC-10000H Portable Air Conditioner Owner s Manual PLEASE READ AND SAVE THESE INSTRUCTIONS
 NewAir AC-10000E, AC-10000H Portable Air Conditioner Owner s Manual PLEASE READ AND SAVE THESE INSTRUCTIONS BEFORE USE GENERAL SAFETY INSTRUCTIONS: ALWAYS OPERATE THE UNIT IN AN UPRIGHT POSITION AND PLACE
7 FUNCTION DIGITAL MULTIMETER
 7 FUNCTION DIGITAL MULTIMETER 90899 OPERATING INSTRUCTIONS 3491 Mission Oaks Blvd., Camarillo, CA 93011 Visit our Web site at http://www.harborfreight.com Copyright 2004 by Harbor Freight Tools. All rights
Cordless Circular Saw
 ENGLISH (Original instructions) INSTRUCTION MANUAL Cordless Circular Saw DSS60 DSS6 006699 IMPORTANT: Read Before Using. ENGLISH (Original instructions) SPECIFICATIONS Model DSS60 DSS6 Blade diameter 65
IMPORTANT SAFETY INSTRUCTIONS WARNING READ AND SAVE THESE OPERATING AND SAFETY INSTRUCTIONS BEFORE USING THIS HEATER.
 THERMAWAVE CERAMIC HEATER Model HZ-850 Series Model HZ-860 Series IMPORTANT SAFETY INSTRUCTIONS WARNING READ AND SAVE THESE OPERATING AND SAFETY INSTRUCTIONS BEFORE USING THIS HEATER. Warning Failure to
ENGLISH INSTRUCTION & INSTALLATION MANUAL DUCTLESS MINI SPLIT AIR CONDITIONING SYSTEMS
 ENGLISH INSTRUCTION & INSTALLATION MANUAL DUCTLESS MINI SPLIT AIR CONDITIONING SYSTEMS Céliera Corporation. All rights reserved. Unauthorized duplication, reproduction prohibited. CONTENTS SAFETY PRECAUTIONS...
Portable Air Conditioner
 Portable Air Conditioner Owner's Manual Model:3 in 1 12,000 Btu/h Series 3 Please read this owner s manual carefully before operation and retain it for future reference. CONTENTS 1. SUMMARY...1 2. PORTABLE
Instruction Manual. Image of SP-3015 & SP-3815. Important Safeguards. Automatic Dispensing Hot Water Pot with Reboil Function
 Important Safeguards READ ALL INSTRUCTIONS BEFORE USE. Instruction Manual Automatic Dispensing Hot Water Pot with Reboil Function Image of SP-3015 & SP-3815 SP-3015: 3.0L SP-3815: 3.8L SP-3017: 3.0L (Stainless
TURN TABLES 1.5 TON CAPACITY / 2 PC. Model 45742
 TURN TABLES 1.5 TON CAPACITY / 2 PC. Model 45742 OPERATING INFORMATION 3491 Mission Oaks Blvd., Camarillo, CA 93011 Visit our Web site at http://www.harborfreight.com Copyright 2001 by Harbor Freight Tools.
Carpet Washer. vax.co.uk VRS5W. Vax Careline: (UK) 0844 412 8455 (ROI) 1-800 928 308. Vax model number: Version 1.0
 0844 412 8455 (ROI) 1-800 928 308. Vax model number: Version 1.0") VRS5W Powermax User Guide V1.0.qxd:V1.0 23/7/10 15:35 Page 1 Vax Careline: (UK) 0844 412 8455 (ROI) 1-800 928 308 Carpet Washer Vax model number: VRS5W instruction manual Version 1.0 Please read carefully
VRS5W Powermax User Guide V1.0.qxd:V1.0 23/7/10 15:35 Page 1 Vax Careline: (UK) 0844 412 8455 (ROI) 1-800 928 308 Carpet Washer Vax model number: VRS5W instruction manual Version 1.0 Please read carefully
SUBMERSIBLE SEWAGE PUMP 66119
 SUBMERSIBLE SEWAGE PUMP 66119 Set up and Operating Instructions Distributed exclusively by Harbor Freight Tools. 3491 Mission Oaks Blvd., Camarillo, CA 93011 Visit our website at: http://www.harborfreight.com
Models AC2400 & AC2440 PowerLuber Grease Gun - 79 - D7. Section JULY - 2009. Page. Form 430233
 Models AC2400 & AC2440 C JULY - 2009 Form 430233 Section - D7 US Page - 79 NOTE: Grease cartridges are not included. Table of Contents General Power Tool Safety Warnings...2 Electrical Safety...2 Tool
Hydraulic Punch Driver Kit
 Hydraulic Punch Driver Kit Item 96718 Instructions and precautions Visit our website at: http://www.harborfreight.com Read this material before using this product. Failure to do so can result in serious
2 YEAR WARRANTY S7200PAU USE & CARE MANUAL ADVANCED CERAMIC TECHNOLOGY. To register your product go to www.remington-products.com.
 USE & CARE MANUAL PLEASE READ PRIOR TO USE To register your product go to www.remington-products.com.au ADVANCED CERAMIC TECHNOLOGY 2 YEAR WARRANTY S7200PAU 1 IMPORTANT SAFEGUARDS Warning: When the straightener
1100 LB. ELECTRIC HOIST
 1100 LB. ELECTRIC HOIST 93251 ASSEMBLY AND OPERATING INSTRUCTIONS Jib Boom not included. Diagrams within this manual may not be drawn proportionally. Due to continuing improvements, actual product may
Copyright Black & Decker
 KA2931 2 Copyright Black & Decker 10 9 7 2 1 8 4 6 5 3 A 3 A 5 B 15 12 13 4 11 6 B C 14 8 12 6 D E 4 2 1 7 G F H I J 5 ENGLISH Powerfile KA293E/KA293G CONGRATULATIONS! You have chosen a Black & Decker
LUCCI AIRFUSION QUEST II CEILING FAN
 LUCCI AIRFUSION QUEST II CEILING FAN WITH IR REMOTE INSTALLATION OPERATION MAINTENANCE WARRANTY INFORMATION CAUTION READ INSTRUCTIONS CAREFULLY FOR SAFE INSTALLATION AND FAN OPERATION. V1.0 QUEST II IR
MAP COFFEE MIA CAPSULE COFFEE MACHINE INSTRUCTION MANUAL MODEL: CM4725. Read this manual thoroughly before using and save it for future reference
 MAP COFFEE MIA CAPSULE COFFEE MACHINE INSTRUCTION MANUAL MODEL: CM4725 Read this manual thoroughly before using and save it for future reference Purchase MAP capsules at Harvey Norman stores nationwide
3 WATT LED SPOTLIGHT Model No. SLM - 3801
 3 WATT LED SPOTLIGHT Model No. SLM - 3801 OWNER'S MANUAL Customer Service Tel: 1-800-268-3319 Superex Canada Ltd, Toronto,M2H 3B8 Made in China Table of Contents A). Important Safety Instructions B). Charging
car + boat Box Contents x2 x2 22350_DC16_CAR_BOAT_OPSMAN.indd 1 29/7/08 15:27:01
 car + boat Box Contents x x 350_DC6_CAR_BOAT_OPSMAN.indd 9/7/08 5:7:0 SAVE THESE INSTRUCTIONS THIS APPLIANCE IS INTENDED FOR HOUSEHOLD USE ONLY IMPORTANT SAFETY INSTRUCTIONS READ ALL INSTRUCTIONS BEFORE
MODEL T-4 TRENCHER. Operators Manual
 DO NOT THROW AWAY IMPORTANT MANUAL MODEL TRENCHER Operators Manual P.O.BOX 290 San Bernardino, CA. 92402 Phone (909) 478-5700 (800) 922-4680 Fax (909) 478-5710 E-mail: sales@groundhoginc.com www.groundhoginc.com
MINI ELECTRIC SEWING MACHINE OPERATION MANUAL
 MINI ELECTRIC SEWING MACHINE OPERATION MANUAL 1 Parts & Accessories Takeup Lever(D) Spindle(C) Spool(E) MAIN UNIT Bobbin Holder(V) Bobbin winder Spool(T) Needle Clamp Screw(O) Adjusting Screw(Q) Needle
San josé OWNER S MANUAL
 San josé OWNER S MANUAL Assembling & operating manual San josé 30 mbar - PORTABLE GAS BARBECUE 1. 2. 3. Improper installation, adjustment, alteration, service or maintenance can injury or property damage.
Heated throw User manual
 Heated throw User manual OVELTHROWBB & OVELTHROWGB CONTENTS Safety & Warnings... 3 Product features.... 5 Controller... 5 Quick start guide.... 6 Using your heated throw.... 7 Before First Use... 7 Turning
Infrarot-Bewegungsmelder IP44
 Infrarot-Bewegungsmelder IP44 infrared motion sensors IP44 ODA (weiß) slim ODA (schwarz) slim 95174 96000 ODA (weiß) ODA (schwarz) 95175 96001 Betriebsanleitung User s Manual User s Manual infrared motion
GGS 27 GGS 27 C PROFESSIONAL
 GGS 27 GGS 27 C * Des idées en action. Bedienungsanleitung Operating instructions Instructions d emploi Instrucciones de servicio Manual de instruções Istruzioni d uso Gebruiksaanwijzing Betjeningsvejledning
FOR THE FOLLOWING MODELS: EE-8075W EE-8075O EE-8075R EE-8075BK
 FIREPLACE HEATER FOR THE FOLLOWING MODELS: EE-8075W EE-8075O EE-8075R EE-8075BK If you have any questions about the operation of your fireplace heater, please contact Crane Customer Care. Toll Free: 888-599-0992
PNEUMATIC PLANISHING HAMMER
 PNEUMATIC PLANISHING HAMMER 94847 ASSEMBLY AND OPERATING INSTRUCTIONS Due to continuing improvements, actual product may differ slightly from the product described herein. Distributed Exclusively by Harbor
Operating Manual Please Read Before Operating Unit
 Operating Manual Please Read Before Operating Unit Model RT2S Wire Stripper & Component Lead Cleaner Service and All Spare Parts Available The Eraser Company, Inc. PO Box 4961/ Oliva Drive Syracuse, NY
OPERATING MANUAL ASSEMBLY. Remote control docks magnetically. click. until it clicks and locks. REGISTER YOUR FREE 2 YEAR GUARANTEE TODAY
 OPERATING MANUAL ASSEMBLY Remote control docks magnetically. 1 2 Align the black arrows. click Then twist clockwise until it clicks and locks. YOUR FREE 2 YEAR GUARANTEE TODAY Controls 1. Power on 2. Thermostat
Bedienungsanleitung Akku-Bohrschrauber Manual de Instrucciones Taladro atornillador a batería Manual de operação Aparafusadora com bateria
 Art.-Nr. 1799-18 D E P GB F GR Bedienungsanleitung Akku-Bohrschrauber Manual de Instrucciones Taladro atornillador a batería Manual de operação Aparafusadora com bateria Instruction manual Cordless screwdriver/drill
OWNER S MANUAL. Model AE150/AE300/AE500 1.5AMP MULTI-USE SMART BATTERY CHARGER READ ENTIRE MANUAL BEFORE USING THIS PRODUCT
 Model AE150/AE300/AE500 MULTI-USE SMART BATTERY CHARGER Certified by Californiia BCS Regulations AE300E AE500E 5AMP MULTI-USE AUTOMOTIVE BATTERY CHARGER 3AMP MULTI-USE SMART BATTERY CHARGER AE500E 5AMP
GoFit Platinum Power Vibe
 GoFit Platinum Power Vibe GFVT011 GoFit Platinum Pty Ltd Phone 1800 446 348 fax 1300 446 348 www.gofit.com.au IMPORTANT PRECAUTIONS When using an electrical appliance, the basic following precautions
Power Trim 500 XT. Original Instructions IMPORTANT INFORMATION. Read before use. & retain for future reference
 Power Trim 500 XT Original Instructions IMPORTANT INFORMATION Read before use & retain for future reference 360º Carton Contents Switch Handle Steady Handle Tube Instruction Manual Safety- Guard Electric