Document Version Prusa i3 Rework USER GUIDE REV 1.5
|
|
|
- Bartholomew Cross
- 9 years ago
- Views:
Transcription
1 Documentation version Prusa i3 Rework USER GUIDE REV 1.5
2 2 INTRODUCTION Target : Prupose a visual guide of the differents steps to build and use a Prusa i3 Rework. Authors of this document : emotion Tech Hugo FLYE Quentin CESVET Anthony BERNA Photographics Credits : Pictures and 3D représentations made by emotion Tech Sources : Licences : Prusa i3 : GPL 3.0 This document : CC BY-NC-SA Update : Last update : 20/06/2016 Links : You can found more informations on the following links : RepRap community : Repetier-Host software : 3D models database : RepRap
3 / 3 SUMMARY INTRODUCTION 2 Summary 3 Driver and the firmware installation 4 Transfer of the firmware from Arduino 7 ANNEX 24 Adaptation of the Start G-code 25 Printing of a piece with Repetier Host 27 GCODE commands 37 Maintenance 38 Recommandations 38 Connection to Repetier-Host 8 Configuration and preset 11 Checking endstop 13 Invert motor s direction 15 Fan checking 15 HEATED PARTS CHECKING 16 Extruder 16 USING Z SENSOR 18 Checking the sensor 19 Balancing Z motors 20 Z-Axis calibration 21 Auto-Leveling 23
. Check if the board is identified by your computer.")
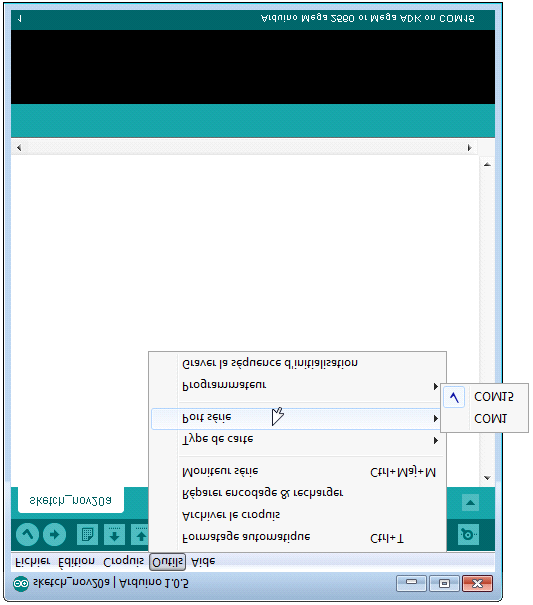
4 4 Driver and the firmware installation First : Install the Arduino software (Start the file.exe) on our website or download it on the official website of Arduino. After that, the RAMPS board must be connected on the Arduino board. Connect USB (do not connect the power supply). Check if the board is identified by your computer. You can to push on «Windows + Pause» -or go to your compute setup-, and on «Device manager» on the left. The Arduino Mega 2560 board must appeared in the device list. If it is not regognized, please install drivers manually by doing a right-click on it. Arduino s drivers is in the Arduino «drivers» folder. Note : If Windows 8 or higher is installed on your PC, you should deactivated automatic control of unsigned drivers. It s possible to find process about this on the web. System panel of Windows Device manager Read the COM port of your Arduino board (Arduino Mega 2560)

5 / 5 Run the Arduino software from the office. Arduino IDE launching Selecting the card
6 6

7 / 7 Transfer of the firmware from Arduino Open Arduino (file/open) the file of your USB drive: Prusa i3 Rework 1.5, and «Marlin.ino». Next, Click on Upload.
; The board need to be identified by your computer; The firmware is download.")
8 8 Connection to Repetier-Host Connect the RAMPS board to the power supply 12v and respect polarity. Before to begin this tutorial, you have to get: The electronic and mechanic parts (see the assembly instructions); The board need to be identified by your computer; The firmware is download. First we are going to settle the host software (Repetier host) communication. Interface of Repetier-Host and open of Printer settings
9 / 9 Choice of the COM port

10 10 Connect Repetier to your 3D printer by pushing on the button «Connect» Connexion à l'imprimante Check the message «idle» at the Bottom of the page. If you have waiting commands, it means that you have connection problem with your printer. Check the COM port and push on Reset button or reconnect the USB wiring.

11 / 11 Configuration and preset Let start to a material checking on your machine. Manual moving of axis Push your carriage X and Y to the center of their axis, -if you feel resistance don t force! -, You only need to unlocking your motors : Unblocking motors Unblocking of motors
12 12 For Z axis, move up the extruder for at least 20 mm above the PCB heatbed by turning the two couplers at the same time. Be sure that axis X stay horizontal to not damage plastic piece. Now you are ready to move safely.

13 / 13 Checking endstop To know if your endstop is functional, connect them and check that the red LED switch on when you do a contact. Emergency stop button
14 14 Press the X homing and check the X carriage stop to move after touching the endstop X. If there is a problem you can press on the emergency stop button to stop motors. Repeat the operation for Y axis. For Z axis, we will explain the prober in the fifth parts («using of the paper»). X and Y homing Moving command axis
15 / 15 Invert motor s direction Disconnect Repetier Host and all power sources (power supply 12V and USB).Then invert your motor plug on the RAMPS card. Reconnect your machine. Repeat the operation for Y and Z axis. For Z axis the positive direction means a vertical rise. Fan checking The extruder has two fans. One cool the extruder body and other one cool the piece. The first is above is activate when you connect the 12V supply. The second will be activated automatically or through the manual control interface (see below). Activate support fan If a fan does not work, check the polarity.
16 16 PCB heatbed and cartridge heater checking Launch the heating of the cartridge heater: Extrusion Check if the motor turn in the good direction (do not set up the filament). Use manual commands to extrude 10 mm: Note : extruder s temperature will progressively increase to the targeted temperature (here 200 C). 10 mm extrusion
17 / 17 If it is necessary, invert the direction connection of the motor connector on RAMPS board. Launch the heating according to the sort of plastic filament: Push Cut the filament extremely beveled to insert easily your filament in the extruder For PLA : from 200 to 210 and 50 for the PCB heatbed (Cover the plate with Polyimide for a better adhesion) For ABS : from 230 to 250 and 90 for the PCB heatbed, (spread ABS juice*, on the plate cover of polyimide, with a brush to have a better adhesion) * ABS juice: Dissolve ABS filament in some acetone to obtain a liquid mixture. For instance : In a glass, pour 10 cl of acetone and add 10cm of ABS filament, thicken with more filament if the adhesion is not sufficient. Insert plastic filament 1.75 mm in the extruder by pushing on the Extrudeur Idler (fixed on a spring) to free access to the filament. When you have reach the temperature, use manual command to extrude. Check that your hotend have no leak, if it is, it means that you had not well build or tighten your extruder. Check also that the drive wheel well train the filament continuously and without slippage. In a first time, you can re-tighten the spring.
18 18 Using Z Sensor The inductive sensor will allow you to automatically palpate 4 calibration points to correct mounting imperfections. This only detects metals (detection ~ 1mm for non-ferrous metals (aluminum,...) and ~ 3mm for ferrous metals (steel, cast iron,...). Caution: use of a glass plate is prohibited with the use of the bed of aluminum. Position the inductive sensor slightly above the nozzle. approximately 0,5 mm environ
19 / 19 Step 2 : checking sensor operation View the feedback (logs) : This button displays Repetier s logs Press this button to make visible the log Visibility button Position a metal object in your sensor and type «M119» in the command prompt of «manual control» tab. Type of response expected in the logs: Information returned by the machine (log visibility) Note: on some sensor model, the indicator light remains on power supply and not sign detection. Reporting endstop status x_min: open x_max: open y_min: open y_max: open z_min: TRIGGERED z_max: open inductive sensor This command allow you to check operation of printer s sensors. Note: try the M119 command when you do not have a metal part to recover the «open» mention in z_min. If you do not have feedback of your inductive sensor, check the orientation of the sensor connector and a possible false contact on RAMPS card + adapter board + inductive sensor.
20 20 Step 2 : Balancing Z motors To reduce the correction of the auto-leveling, it is highly advisable to balance the height difference between the two Z motors. With the power supply off, push the X carriage to the endstop and turn the coupler until your heating nozzle touches the bed: Left : Then, right : Step 3 : Adjusting motor power In manual control, make some upward and downward movement. If you find that motors struggle to move, adjust the potentiometer of the Z axis stepstick so that the movements are fluid and without missteps.
21 / 21 Step 4 : Z-Axis calibrating What is the target? To properly calculate the correction of the auto-leveling we need to determine the difference of our printhead with the heating bed when palpated with our sensor. Note: This difference is therefore a negative value beacause it will lower the heating head of measurement recorded up to get the point Z = 0. Note: the heat tends to influence the sensor signals, it is best to calibrate thereof taking care beforehand that the heating elements are already at target temperature. 1- Initialize X and Y axes by clicking the house icon 2 - Send the following GCODE command : G92 Z100 This sets the current Z axis point to Z = 100 so it can move down. 3 -Place a paper s sheet under the heating head. 4 - Using the cursor dedicated to the Z axis, move it down until the paper is slightly blocked. Paper * Note * : standard sheet of paper (80 grs)
22 Type the «G92 Z0» command to set the point Z = 0 of your printer 6 - Using the arrows, move your Z axis 30mm upward, so you will be at Z = Type the «G30» command to perform a probe and detect your metal bed 8 - Here is a typical example of a response in your logs: Note: For this example, we just measure a difference of 0.49mm from our printhead 9 - To set the value of the specified gap type the following command : In our previous example : M851 Z-0.49 Note: Replacing «-0.49» with the value you received without forget to mention the «-» sign Type the «M500» command to save permanently in the memory of your machine. Note: At any time you can use the «M851» command to retrieve the last saved value and modify it to adjust the height of the first print layer. The proper height of the nozzle corresponds to the fact that the top of the molten plastic strand either at the same level as the bottom of the nozzle. This is illustrated by the following scheme:
23 / 23 Auto-leveling The «G29» command launches probe of four calibration points. It is strongly recommended to do an initialization of the machine in the manual control before this command (or type the command «G28»). G29 The «M500» command save the calibration in the memory of your printer: M500
24 ANNEX 24 ANNEX

25 ANNEX / 25 Adaptation of the Start G-code Go in the tab «Slicer» and select the slicer «Slic3r». Next click on «configuration», and go in the tab «Printer Settings», click on «Custom G-code». After that, write in «Start G-code» the command below :
26 ANNEX 26 Copy paste the following sequence : G91 ; using relative distance G1 Z20 ; go to position Z 20 G90 ; absolute positioning G28 ; X, Y and Z homing G29 ; Auto leveling M500; save to EEPROM
 as comfortable as possible.")
27 ANNEX / 27 Printing of a piece with Repetier Host We will first choose a 3D model to print. We suggest you to start with a simple object like the «Y Motor», with a fairly large plate surface to be able to observe the printing of the first layer (decisive) as comfortable as possible. IYou can also go to the Thingiverse website and find a simple object to print (cube or another simple objet without difficulty). Also be sure to apply a grip coating (polyimide or blue tape) on the plate to optimize adhesion of the material, this is an important detail for a successful print. Functionalities for the placement

28 ANNEX 28 Select the tab «Slicer» and do the follow actions : Note: We will only detail the main parameter of slicing.
29 ANNEX / 29 Infill settings

30 ANNEX 30 Speed settings Saving of «Filament Settings»

31 ANNEX / Filament settings Saving of «Filament Settings»

32 ANNEX 32 Extruder settings Saving of «Printer Settings»
.")
33 ANNEX / 33 Slice : The slice transform a virtual polygonal meshed body into machine coordinates, It take several seconds (depend of the size and the complexity of the piece). You can follow the progression of the slice.
34 ANNEX 34 When the slice is finished, you are automatically send on preview s tab.

35 ANNEX / 35 Piece drawn in machines path

36 ANNEX 36 Now you can start the print : Congratulation for your first print!!
37 ANNEX / 37 Ccommandes GCODE G1 : linear motion (ex : G1 X100 Y100 F3000) G28 : back to home (ex : G28 X Y) M500 : save l EEPROM M851 : define «Z Probe Height» value (ex : M851 Z-0.49) M999 : restart printer G29 : inductive probe at actual place G30 : inductive probe at plate s corners M110 : Set the current Line Number M17 : Enable/Power all stepper motors M410 : Quickstop. Abort all planned moves, stopping the printer. M24 : Start/resume SD print M104 S205 : heating the extruder at 205 C and doesn t wait M109 S205 : heating the extruder at 205 C and wait until the temperature is reached M140 S55 : heating bed at 55 C and wait until the temperature is reached Note : all Marlin s GCODE at
38 ANNEX 38 Maintenance A monthly maintenance of the 3D printer is recommended. Below are some recommendations: with the help of a brush, dust the following elements : RAMPS board stepsticks heatsinks all fans and ensure that airflow is not blocked coldend of the print head - clean the print head with the help of the guide dedicated to the Hexagon print head, here is the link: : - clean the drive wheel s teeth with the aid of a needle, the end of a tweezers or a cutter blade - check the tightening of each screw equipping the 3D printer -lubricate all mechanical transmission elements with multipurpose grease or PTFE based oil spray (avoid WD40 product that has a tendency to be too aggressive for the mechanical elements) Recommandations Shut down the 3D printer : After printing, if you want to turn off the machine, wait until the print head has cooled to room temperature to ensure that the print head does not clog. Transport : If you have to move the machine by car or other means of transport, it is recommended to unplug stepper motors off the Teensylu board to avoid damaging components. Troubleshooting : A FAQ is available for the Prusa i3 Rework 1.5 on our website in the «Support» section, do not hesitate to consult it if you are having trouble with your machine, most failures are resolved through this tool, do not deprive yourself!
39 ANNEX / 39 CONGRATULATION! Your first print is a success!
40 ANNEX 40 Thank you for choosing Prusa i3 Rework rev
FOLGER TECHNOLOGIES, LLC 2020 i3 3D Printer Kit
 FOLGER TECHNOLOGIES, LLC 2020 i3 3D Printer Kit CONFIG GUIDE Rev. A http://www.folgertech.com 2020 Prusa i3 Config Guide Page: 1 / 15 You did it! You built your Folger Tech 2020 i3 Printer and now you
Documentation version 1.4 ASSEMBLY INSTRUCTIONS REV 1.1
 Documentation version 1.4 ASSEMBLY INSTRUCTIONS REV 1.1 / 2 INTRODUCTION / 3 INTRODUCTION Target : Prupose a visual guide of the differents steps to build and use a µdelta printer Designers : Hugo Flye
Documentation version 1.3.26. Prusa i3 Rework ASSEMBLY INSTRUCTIONS REV 1.5
 Documentation version 1.3.26 Prusa i3 Rework ASSEMBLY INSTRUCTIONS REV 1.5 INTRODUCTION / 2 INTRODUCTION INTRODUCTION / 3 INTRODUCTION Target : Prupose a visual guide of the differents steps to build and
RAMPS 1.4 Assembly Guide
 RAMPS 1.4 Assembly Guide 3D Printer Czar Version 1 Table of Content Getting to know RAMPS 1.4 ---------------------------------------------------3 Insert jumpers to RAMPS 1.4---------------------------------------------------4
WINDOWS 7/8 instruction guide for your Printrbot printer and computer software
 Software To start printing with your Printrbot Simple 3d printer, you need to download 3 pieces of software and two digital models (STL files). 1. The teensy Serial Driver. This connects the printer to
Printrbot Getting Started Guide. For models: Simple
 Printrbot Getting Started Guide For models: Simple Contents 4 4 4 5 5 5 6 6 6 6 7 8 Chapter 1: Welcome Overview Support Chapter 2: Your Printrbot has arrived... now what? Printrbot Kits Pre-Assembled Printrbots
Printrbot Getting Started Guide. For models: Printrbot Plus (v2) Printrbot LC (v2) Printrbot jr
 Printrbot LC (v2) Printrbot jr") Printrbot Getting Started Guide For models: Printrbot Plus (v2) Printrbot LC (v2) Printrbot jr Contents 4 Chapter 1: Welcome 4 Overview 4 Support 5 Chapter 2: Your Printrbot has arrived... now what? 5
Printrbot Getting Started Guide For models: Printrbot Plus (v2) Printrbot LC (v2) Printrbot jr Contents 4 Chapter 1: Welcome 4 Overview 4 Support 5 Chapter 2: Your Printrbot has arrived... now what? 5
FTDI VCP DRIVER (free) (WIN/MAC/LINUX) http://www.ftdichip.com/drivers/vcp.htm
 (WIN/MAC/LINUX) http://www.ftdichip.com/drivers/vcp.htm") 002 - CONNECTING THE PRINTER Now that you have an idea what 3D printing entails, we can continue and connect the printer to your computer. First make sure you have a computer with a decent amount of RAM
002 - CONNECTING THE PRINTER Now that you have an idea what 3D printing entails, we can continue and connect the printer to your computer. First make sure you have a computer with a decent amount of RAM
Creator Start-up Guide
 www.ff3dp.com Creator Start-up Guide Zhejiang Flashforge 3D Technology Co., Ltd. www.ff3dp.com Contents Precautions:... 1 1. What's in the box?...1 2. Unboxing... 2 3. Initial Hardware Installation...5
2014 Simplify3D. Quick Start Guide
 Quick Start Guide Preparation Installing Simplify3D Software 3 The Configuration Assistant 4 The Interface Layout 5 3D Printing Workflow Import Process Settings Preview Print! Import 7 Process Settings
Manual Leapfrog Creatr
 1 Leapfrog BV Dear customer, Congratulations with the purchase of your very own Leapfrog Creatr Single or Dual Extruder! We would like to help you get started so you can make your first 3D print on the
Cura for Type A Machines Quick Start Guide
 Cura for Type A Machines Quick Start Guide 1 Table of Contents About Cura for Type A Machines Downloading Cura for Type A Machines Installing Cura for Type A Machines Mac Windows Linux About the Configuration
3D Printer Extruder. Application Note. Martez Steverson ECE 480. Design Team 8 3/28/14. Abstract
 3D Printer Extruder Abstract Application Note By Martez Steverson ECE 480 Design Team 8 3/28/14 The purpose of this paper is to instruct the reader on how to construct an extruder for a 3D printer and
Leapfrog 3D Printers - Manual Xeed 1
 Leapfrog 3D Printers - Manual Xeed 1 Leapfrog 3D Printers - Manual Xeed 2 Dear customer, Congratulations with the purchase of your very own Leapfrog Xeed 3d-printer. We want to help you make your first
Practical 3D Printers
 Practical 3D Printers Brian Evans Apress* Contents J About the Author About the Technical Reviewer Acknowledgments Introduction xvii xix xxi xxiii Chapter 1: A World of 3D Printers 1 Tea. Earl Grey. Hot
Hot-End Replacement Guide. BFB 3000 plus & 3D Touch
 Hot-End Replacement Guide BFB 3000 plus & 3D Touch Pre assembly checks: Testing the hot-end before fitting: Check the heating cable: Set the multi-meter to read resistance (2000 ohms) Test the two outside
Table of Contents Getting Started... 3 The Motors... 4 The Control Board... 5 Setting up the Computer with Mach3... 6 Starting up the Equipment...
 User Manual Table of Contents Getting Started... 3 The Motors... 4 The Control Board... 5 Setting up the Computer with Mach3... 6 Starting up the Equipment... 12 G-Code Example... 13 2 Getting Started
5. Tutorial. Starting FlashCut CNC
 FlashCut CNC Section 5 Tutorial 259 5. Tutorial Starting FlashCut CNC To start FlashCut CNC, click on the Start button, select Programs, select FlashCut CNC 4, then select the FlashCut CNC 4 icon. A dialog
Manual Premium Builder
 Manual Premium Builder Version 1.0 We all become builders Specifications Printing Printer Print technology FDM / FFF Fused Deposition Method Weight: Small: 18 KG Medium: 22 KG Large: 24 KG Buildvolume
CONTENTS. 2 CHAPTER I: Welcome to Your ROBO 3D Experience! 3 CHAPTER II: Installing Software. 4 CHAPTER III: Connecting Your R1 3D Printer
 CONTENTS 2 CHAPTER I: Welcome to Your ROBO 3D Experience! 3 CHAPTER II: Installing Software 4 CHAPTER III: Connecting Your R1 3D Printer 8 CHAPTER IV: Software Navigation 21 CHAPTER V: Slice 34 CHAPTER
Prusa i3 Installation V2.1
 Prusa i3 Installation V2.1 1 Installation of Y-Axis Mount Material List: Plastic Items Screw Slide Guide Bearing Fastening piece y-corners * 4 M10-410mm* 2 M8-380mm * 2 605ZZ * 2 M10 Nut&Shim * 12 y-idler
OPERATION MANUAL. IWB Setup Software/EyeRIS NEC edition
 IWB Setup Software/EyeRIS NEC edition OPERATION MANUAL This manual describes installation and operation procedures of the driver / the calibration software Supported model NP03Wi NP04Wi UM352W (for the
QUICK GUIDE TO THE FIRST PRINT
 Please always refer to the http://www.prusa3d.com/drivers/ for updated version of this 3D printing handbook (PDF download). QUICK GUIDE TO THE FIRST PRINT 1. Place the printer on a flat and stable surface
WPI Laser Cutter User Guide
 WPI Laser Cutter User Guide The laser cutter is capable of cutting and engraving two-dimensional drawings in various materials including wood and plastic. The laser cutter owned by the WPI Department of
ASSEMBLY MANUAL MATERIA 101. Revision 04
 ASSEMBLY MANUAL MATERIA 101 Revision 04 24 NOVEMBER 2014 00 INDEX 03 01 - Introduction 42 08 - Board wiring 05 06 07 07 07 08 02 - KIT Contents Parts list Box A Box B Box C Notes 46 49 09 - Calibration
Quick Start Guide See Inside for Use and Safety Information
 3 rd Generation Personal 3D Printer Quick Start Guide See Inside for Use and Safety Information The USB Mass Storage Device Contains the User Guide and Quick Start Guide in other Languages Congratulations
Digital Postage Meter. Quick Install Guide US English Version
 Digital Postage Meter Quick Install Guide US English Version Lock. Lock Class *#_ Funds GHI Menu ABC JKL PQRS DEF TUV Back MNO WXYZ Space Shift. Review no Enter yes Contents mailstation 2 Scale (optional)
Original. The fast, easy to use, Open-source 3D printer. User manual. English Version 1.1
 Original The fast, easy to use, Open-source 3D printer User manual English Version 1.1 Table of Contents A. Welcome to the Ultimaker Original A1. The Ultimaker experience A2. Specifications of the Ultimaker
Model 288B Charge Plate Graphing Software Operators Guide
 Monroe Electronics, Inc. Model 288B Charge Plate Graphing Software Operators Guide P/N 0340175 288BGraph (80207) Software V2.01 100 Housel Ave PO Box 535 Lyndonville NY 14098 1-800-821-6001 585-765-2254
X30 Apollo System Upgrading Monitor Software & ECU Firmware
 X30 Apollo System Upgrading Monitor Software & ECU Firmware 3.18.513 3.18.513 1. Download zip file attachment to a folder on your computer. File name will be 3.18.513.zip 2. Extract files from the zip
Setting up the Hardware and Software. for a 3D Printer
 Setting up the Hardware and Software for a 3D Printer Caroline Kerbelis Application Note March 28th 2014 Design Team 8 ECE 480 Abstract The purpose of team 8 s project is to design, fabricate, simulate,
TABLE OF CONTENTS AIRWOLF 3D YOUTUBE CHANNEL 2 INTRODUCTION...3
 TABLE OF CONTENTS INTRODUCTION...3 TECHNICAL SPECIFICATIONS...4 BOX CONTENTS...5 PARTS DIRECTORY...6 HOW IT WORKS...7 VIKI LCD SCREEN...8 VIKI LCD SCREEN LAYOUT...9 VIKI LCD: HOW TO...10 GUIDE TO 3D PRINTING...24
FASCINATION 700 HVLP TANNING PRO SYSTEM USER MANUAL
 FASCINATION 700 HVLP TANNING PRO SYSTEM USER MANUAL Congratulations on choosing the Fascination 700 HVLP Tanning Pro System! Your system includes the following items: 1 Fascination 700 HVLP Tanning Pro
RACEAIR REMOTE PAGER SYSTEM
 Computech Systems, Inc. 301-884-5712 30071 Business Center Dr. Charlotte Hall, MD 20622 RACEAIR REMOTE PAGER SYSTEM TM Introduction: Computech s RaceAir Remote Competition Weather Station with the Data
MANUAL BUILDER. We all become builders. Version 3.02. Website link
 MANUAL Version 3.02 We all become builders Website link PRINTING SPECIFICATIONS PRINTER Print technology FDM / FFF Fused Deposition Method Dimensions printer (LxWxH): Solo/Dual: 385x370x400 mm (15.16x14.57x15.75
site monitoring Kit Site Monitoring Kit User Manual we prove it.
 site monitoring Kit 1 User Manual Site Monitoring Kit User Manual we prove it. 2 site monitoring Kit Content 1. Introduction 3 2. Content of the Site Monitoring Kit 4 3. Preparation 6 1. Positioning of
Monnit Wi-Fi Sensors. Quick Start Guide
 Monnit Wi-Fi Sensors Quick Start Guide Inside the Box You should find the following items in the box: Monnit Wi-Fi (MoWi ) Sensors 2 x AA Batteries for Each MoWi Sensor Quick Start Guide Note: A MoWi USB
Control Box Wiring For PRSstandard Tool
 888-680-4466 ShopBotTools.com Control Box Wiring For PRSstandard Tool Copyright 2016 ShopBot Tools, Inc. page 1 Copyright 2016 ShopBot Tools, Inc. page 2 Table of Contents Introduction:...5 Installation:...5
POWER NETWORK. 800-02577-iPcams 2/10 Rev. A
 POWER NETWORK Total Connect Online Help Guide for: ip Cameras ipcam-wi Camera ipcam-pt Pan and Tilt Camera 800-02577-iPcams 2/10 Rev. A POWER NETWORK ip Cameras Online Help Guide This guide covers the
Thermo Top - Troubleshooting Tree
 Thermo Top - Troubleshooting Tree 07-15-2002 CAUTION Troubleshooting requires comprehensive knowledge about the structure and theory of operation of the Thermo Top heater. Troubleshooting and repairs may
FX-BTCVT Bluetooth Commissioning Converter Commissioning Guide
 FX-BTCVT Bluetooth Commissioning Converter Commissioning Guide FX-BTCVT-1 (Bluetooth Commissioning Converter) Code No. LIT-12011665 Issued December 5, 2014 Refer to the QuickLIT website for the most up-to-date
ELECTRONIC THERMOSTAT AND THERMOMETER With SPEED CONTROL
 148 OLD CONCORD TURNPIKE, BARRINGTON NH 03825 USA TEL (603) 868-5720 FAX (603) 868-1040 1-800-435-6708 E-Mail:[email protected] www.seafrost.com ELECTRONIC THERMOSTAT AND THERMOMETER With SPEED CONTROL
Bluetooth + USB 16 Servo Controller [RKI-1005 & RKI-1205]
![Bluetooth + USB 16 Servo Controller [RKI-1005 & RKI-1205]](/thumbs/40/21161302.jpg "Bluetooth + USB 16 Servo Controller [RKI-1005 & RKI-1205]") Bluetooth + USB 16 Servo Controller [RKI-1005 & RKI-1205] Users Manual Robokits India [email protected] http://www.robokitsworld.com Page 1 Bluetooth + USB 16 Servo Controller is used to control up to
Bluetooth + USB 16 Servo Controller [RKI-1005 & RKI-1205] Users Manual Robokits India [email protected] http://www.robokitsworld.com Page 1 Bluetooth + USB 16 Servo Controller is used to control up to
WINBO 3D PRINTER USER MANUAL VERSION: WB20141117
 WINBO 3D PRINTER USER MANUAL VERSION: WB20141117 Table of Contents A. MACHINE SPECIFICATIONS... 2 B. SOFTWARE INSTALLATION... 2 B.1 SOFTWARE INSTALLTION... 2 B.2 SOFTWARE CONFIGURATION... 3 C. SOFTWARE
MAINTENANCE & TROUBLESHOOTING
 MAINTENANCE & TROUBLESHOOTING This section describes how to: clean the lens clean the fan intake filter replace the projection lamp replace the batteries in the remote control use the Kensington lock feature
AC1200 WiFi Range Extender
 Model EX6200 User Manual February 2014 202-11298-01 350 East Plumeria Drive San Jose, CA 95134 USA Support Thank you for selecting NETGEAR products. After installing your device, locate the serial number
User Manual. Thermo Scientific Orion
 User Manual Thermo Scientific Orion Orion Star Com Software Program 68X637901 Revision A April 2013 Contents Chapter 1... 4 Introduction... 4 Star Com Functions... 5 Chapter 2... 6 Software Installation
CNC USB dual layer PCB milling
 CNC USB dual layer PCB milling by tim23x I've recently built a CNC machine out of various pieces of high-quality salvage. With the money I saved in the construction of the system I bought a controller
Upgrade Instructions. View Manager 96 v. 5.1. Software Upgrade
 WORLD LEADER IN ELECTRONIC SECURITY Upgrade Instructions View Manager 96 v. 5.1 1 Software Upgrade This software permits you to upgrade your VM96 version 3.x or 4.x system to the latest version of VM96
Table of Contents. Use. Troubleshooting. Setup. Welcome. 11 How to arm/disarm system/camera(s) 19 Sync Module setup issues. 3 Installing the Blink app
 19 Sync Module setup issues. 3 Installing the Blink app") User Guide Table of Contents Welcome Setup Use Troubleshooting 2 What s in the box 2 What you need 3 Installing the Blink app 4 Setting up the Sync Module 5 Connecting the Sync Module to Your Wi-Fi 7 Adding
User Guide Table of Contents Welcome Setup Use Troubleshooting 2 What s in the box 2 What you need 3 Installing the Blink app 4 Setting up the Sync Module 5 Connecting the Sync Module to Your Wi-Fi 7 Adding
HP Scanjet G4000 series. User Guide
 HP Scanjet G4000 series User Guide Contents 1 How to use the scanner...2 Where to get additional information...2 Accessibility...2 How to use the HP Photosmart software...3 Front panel and accessories
PRODUCTIVITY THROUGH INNOVATION 600 CONTROL DIRECT DRIVE TECHNICAL/OPERATION MANUAL
 Rev. D PRODUCTIVITY THROUGH INNOVATION 600 CONTROL DIRECT DRIVE TECHNICAL/OPERATION MANUAL 10 BORIGHT AVENUE, KENILWORTH NEW JERSEY 07033 TELEPHONE: 800-524-0273 FAX: 908-686-9317 TABLE OF CONTENTS Page
Economy Combo Heat Press Manual Model No.: ECH-800
 Economy Combo Heat Press Manual Model No.: ECH-800 CONTENTS I. Assembly Drawing -----------------------------------------------------------------------------------2 II. Technical Parameters ------------------------------------------------------------------------------2
TROUBLESHOOTING AND MAINTENANCE
 TROUBLESHOOTING AND MAINTENANCE TABLE OF CONTENTS 1 TROUBLESHOOTING 04 Objects Do Not Stick to the Build Plate 05 Objects are Difficult to Remove from the Build Plate 05 Extrusion Stops 06 Replicator
VIVA 4G LTE Mini Router. Quick Start Guide
 VIVA 4G LTE Mini Router Quick Start Guide Thank you for choosing the VIVA 4G LTE Mini Router (hereinafter referred to as the E57) The supported functions and actual appearance are subject to the product
MFC7840W Windows Network Connection Repair Instructions
 Difficulty printing from your PC can occur for various reasons. The most common reason a networked Brother machine may stop printing, is because the connection between the computer and the Brother machine
product. Please read this instruction before setup your VenomXTM.
 Tuact Corp. Ltd. TM Venom X mouse controller combo Setup Software Instruction Thank you for purchasing our VenomXTM product. Please read this instruction before setup your VenomXTM. Introduction Venom
MAKERBOT DESKTOP. All instructions in this tutorial are for use with a Flashforge Creator X (replicator single) using Makerbot Desktop.
 using Makerbot Desktop.") MAKERBOT DESKTOP All instructions in this tutorial are for use with a Flashforge Creator X (replicator single) using Makerbot Desktop. Download Software Download software fromhttps://www.makerbot.com/desktop
MAKERBOT DESKTOP All instructions in this tutorial are for use with a Flashforge Creator X (replicator single) using Makerbot Desktop. Download Software Download software fromhttps://www.makerbot.com/desktop
Network Setup Guide. Introduction. Setting up for use over LAN
 Network Setup Guide This manual contains the setup information required to use the machine over wired LAN. If you use the machine with USB connection, refer to your setup sheet. Introduction To use the
CM HOST CM CardTransporter Fuel Communication and Management Software 10.10.06 Software version up to 3.1
 CM HOST CM CardTransporter Fuel Communication and Management Software 10.10.06 Software version up to 3.1 CM Host Manual For CardMaster Fuel Control www.cardlockvending.com customers call 888-487-5040
Cura 13.11.2. User manual. Ultimaker s software for making 3D prints. English Version 1.0
 Cura 13.11.2 Ultimaker s software for making 3D prints User manual English Version 1.0 Table of Contents A. Welcome to Cura A1. Cura for your Ultimaker A2. Latest upgrade and fixes B. Installing and configuring
GUARD SENIOR. manual
 GUARD SENIOR LISA manual Table of Contexts Basic description... 2 General Precautions... 2 SIM card install... 2 PC software install... 3 Running GUARD SENIOR LISA software...15 Configuration window...
Fading Red Tones on Color LaserJet 2600s
 Procedures Fading Red Tones on Color LaserJet 2600s HP Color LaserJets 2600n, 1600, and 2605 share the same basic Canon engine design. One aspect of the design brings the common problem of scanner optic
AXIS 205 Network Camera Quick Installation Guide
 AXIS 205 Quick Installation Guide Page 1 of 6 AXIS 205 Network Camera Quick Installation Guide Focus Ring Status Indicator (surrounding the focus ring) Serial number Network Indicator Control Button Power
How the uprint Rapidprotyping Machine Works
 The University of New Haven Tagliatela College of Engineering Industrial and System Engineering Laboratory, Buckman B225 How the uprint Rapidprotyping Machine Works Prepared By: Carolina White, MS Industrial
Scan2CRM for ACT! User Guide
 Scan2CRM for ACT! User Guide APPENDIX Warranty... I Notice to user...ii Publication...III Trademarks...IV Version 9.50 - Supports ACT! by Sage for windows, ACT! 2007 (Version 9) and above. This publication
MAINTENANCE & TROUBLESHOOTING
 MAINTENANCE & TROUBLESHOOTING This section describes how to: clean the lens replace the projection lamp replace the batteries in the remote use the security lock feature troubleshoot the projector Cleaning
INSTALL/REMOVAL INSTRUCTIONS: WINDOW REGULATOR
 REMOVAL/INSTALL OF WINDOW REGULATOR (741-306) Honda Accord 2003 07 General Tech Tips: Use painter s tape rather than duct tape to secure window. It will not damage paint or leave sticky residue. A plastic
T0118 T2118 T3118. Instruction Manual
 Programmable indoor transmitter of temperature T0118 Programmable indoor transmitter of atmospheric pressure T2118 Programmable indoor transmitter of temperature, relative humidity and other derived humidity
PLCM-T1 / PLCM-T2 Torch height controller
 www.purelogic.ru Operating guide СОДЕРЖАНИЕ: 1. General information... 2 2. Scope of delivery... 3 3. Specifications... 3 4. The differences between T1 and T2... 4 5. Principle of operation... 6 6. Wiring
BLU Vivo 4.3 User Manual
 BLU Vivo 4.3 User Manual 1 Table of Contents Phone Safety Information... 3 Appearance and Key Functions... 4 Installation and Charging... 5 Phone Operation... 7 Communication... 10 Camera... 11 Gallery...
4 Wire / 5 Wire Resistive Touchscreen
 4 Wire / 5 Wire Resistive Touchscreen Table of Contents Chapter 1 Introduction. 3 1.1 4 Wire Resistive Touch Screen.. 3 1.1.1 4 Wire Resistive Touch Sensor.. 3 1.1.2 4 Wire Resistive Controller.. 4 1.2
How To Use A Brother Ql700
 User's Guide QL-700 Be sure to read and understand this guide before using the machine. We recommend that you keep this guide nearby for future reference. www.brother.com US ENG ver.0 Thank you for purchasing
Weather Direct Displays show Lost Forecast (blank boxes in the picture icons)
") Weather Direct Displays show Lost Forecast (blank boxes in the picture icons) Many routine events can cause a Lost Forecast situation. Examples include: Power outage Change batteries Internet down in your
Weather Direct Displays show Lost Forecast (blank boxes in the picture icons) Many routine events can cause a Lost Forecast situation. Examples include: Power outage Change batteries Internet down in your
Inspiron 15. Service Manual. 3000 Series
 Inspiron 15 3000 Series Service Manual Computer Model: Inspiron 15 3541/Inspiron 15 3542/Inspiron 15 3543 Regulatory Model: P40F Regulatory Type: P40F001/P40F002 Notes, Cautions, and Warnings NOTE: A NOTE
Royal Mail Despatch Manager Online Printer Installation Guide
 Royal Mail Despatch Manager Online Printer Installation Guide Getting you started Thank you for opting to use Royal Mail s Despatch Manager Online (DMO) system. To help get you started successfully please
Tips and Techniques on the PR-620
 Techniques and Tips on the PR-620 Learn how to demonstrate the PR-620 and make it look as easy as it really is. Topics to be covered will be: basic operation, machine threading, screen icons, merging patterns,
Introduction to Autodesk Inventor for F1 in Schools
 Introduction to Autodesk Inventor for F1 in Schools F1 in Schools Race Car In this course you will be introduced to Autodesk Inventor, which is the centerpiece of Autodesk s digital prototyping strategy
CurveMaker v2.1 DYNAFS programmable ignition software
 CurveMaker v2.1 DYNAFS programmable ignition software Dynatek 164 S Valencia St. Glendora CA 91741 phone (626)963-1669 fax (626)963-7399 Contents 1) Installation...1 2) Overview...1 3) Programming a Curve...4
Type Message Description Probable Cause Suggested Action. Fan in the system is not functioning or room temperature
 Table of Content Error Messages List... 2 Troubleshooting the Storage System... 3 I can t access the Manager... 3 I forgot the password for logging in to the Manager... 3 The users can t access the shared
Service Guide 12/27/03 TESTING, SERVICE & REPAIR GUIDE (For SH Space Heating Models & RA Water Heating Models)
") TESTING, SERVICE & REPAIR GUIDE (For SH Space Heating Models & RA Water Heating Models) WARNING - HIGH VOLTAGE AC electrical circuits are connected to this heater. Do not attempt any service work on the
TESTING, SERVICE & REPAIR GUIDE (For SH Space Heating Models & RA Water Heating Models) WARNING - HIGH VOLTAGE AC electrical circuits are connected to this heater. Do not attempt any service work on the
Assembly instructions
 The fast, easy to use, Open-source 3D printer Assembly instructions English version 2.0 Ultimaker Original+ Assembly manual Dear customer, Thank you for purchasing the Ultimaker Original+ DIY kit and welcome
Lizard Standalone Mode Guide Version 1.0:
 Lizard Standalone Mode Guide Version 1.0: SECTION 1. DESCRIPTION The standalone Mode in Lizard will allow you go totally on the road, without having to carry a computer with you. The wiring for it its
NOTICE WELCOME MESSAGE
 WELCOME MESSAGE Thank you for choosing the U-Print CDP78 CD/DVD Printer. The U-Print is compact and extremely easy to use, giving you the ability to customize your CDs and DVDs by directly printing onto
Before installation it is important to know what parts you have and what the capabilities of these parts are.
 INSTALLATION GUIDE Before installation it is important to know what parts you have and what the capabilities of these parts are. The Recon XZT is the smallest and most powerful gauge of its kind. With
English version. Introduction. Hardware. Installation under Windows 98SE. PU006 Sweex 2 Port Serial PCI Card
 PU006 Sweex 2 Port Serial PCI Card Introduction First of all, many thanks for purchasing this Sweex 2 Port Serial PCI Card. This card enables you to easily add two serial ports to the PC. To ensure this
Zebra GC420t User Guide VIF-NA-BG-125, V3.0
 VIF - Maintenance of computer systems infrastructure Zebra GC420t User Guide VIF-NA-BG-125, V3.0 IZUM, 2016 COBISS, COMARC, COBIB, COLIB, IZUM are registered trademarks owned by IZUM. CONTENTS 1 Introduction...
Cart Interface Installation & Control Board Manual for M38 XP and RX Carts and Legacy M39 Carts
 Rubbermaid Medical Solutions Cart Interface Installation & Control Board Manual for M38 XP and RX Carts and Legacy M39 Carts REVISED FEBRUARY 25, 2010 Filename: Cart Interface Installation & Control Board
PR 50 Frymaster Universal Holding Cabinet (UHC)
") PREP EQUIPMENT PR 50 Frymaster Universal Holding Cabinet (UHC) Models UHCP2, UHCP4, UHCPN4 Daily maintenance tasks PR 50 D1 Clean UHC Monthly maintenance tasks PR 50 M1 Calibrate UHC Annual maintenance
PREP EQUIPMENT PR 50 Frymaster Universal Holding Cabinet (UHC) Models UHCP2, UHCP4, UHCPN4 Daily maintenance tasks PR 50 D1 Clean UHC Monthly maintenance tasks PR 50 M1 Calibrate UHC Annual maintenance
Autodesk Fusion 360 Badge Guide: Design an F1 in Schools Trophy
 Autodesk Fusion 360 Badge Guide: Design an F1 in Schools Trophy Abstract: Gain basic understanding of creating 3D models in Fusion 360 by designing an F1 in Schools trophy. This badge may be claimed by
SMART Board Software for Macintosh FAQ
 SMART Board Software for Macintosh FAQ NOTE: The following FAQs relate to the latest SMART Board Software for Macintosh release and apply only to Macintosh computers. SMART Board Software for Macintosh
Xerox WorkCentre 6655 Color Multifunction Printer Control Panel
 Control Panel Available services can vary on your printer setup. For details about services and settings, see the User Guide. 3 4 5 Touch screen Menus 6 6 Alphanumeric keypad 7 Job controls 7 Services
TRIMMING UNIT/DIAMOND MACHINE TST.13
 TRIMMING UNIT/DIAMOND MACHINE TST.13 REFERENCE BOOK rel. 02.15 TRIMMING UNIT/DIAMOND MACHINE TST.13 REL. 02.15 ENGLISH LANGUAGE 1 MACHINE DESCRIPTION TST.13 was designed and built for processing methacrylate.
USB Driver Installation for Windows XP
 USB Driver Installation for Windows XP USB Serial Converter Driver Installation for Windows XP CAUTION: You must use the drivers on the CD-ROM supplied with your USB Device. DO NOT download drivers from
Software Manual. For. MadgeTech 4 Data Logger Software
 Software Manual For MadgeTech 4 Data Logger Software Introduction 7 About MadgeTech, Inc... 8 Software Overview 9 Getting Started... 10 System Requirements...10 Software Installation: Installing the MadgeTech
Operating Manual for UVEX-p (JAN Scientific, Inc. Aug 2014)
") Operating Manual for UVEX-p (JAN Scientific, Inc. Aug 2014) [The beige shaded areas introduce the user interface in detail. For turn on and run operation, you may skip these descriptions. The blue shaded
Operating Manual for UVEX-p (JAN Scientific, Inc. Aug 2014) [The beige shaded areas introduce the user interface in detail. For turn on and run operation, you may skip these descriptions. The blue shaded
DIY 3D Printing Filament
 DIY 3D Printing Filament Created by Ruiz Brothers Last updated on 2014-12-11 11:01:00 AM EST Guide Contents Guide Contents Overview Tools & Supplies Print Cost $40 x 110 / 1000 = $4.40 Preparations Collect,
SPY-BATT Battery Tutor Device Installation Manual Rev. 1.1-07/04/2016
 SPY-BATT Battery Tutor Device Installation Manual Rev. 1.1-07/04/2016 1. GENERAL DESCRIPTION The SPY-BATT is a device that allows to monitor the state of your battery. The SPY-BATT stores over time the
AXIS 1440 Print Server For EPSON Printers: Product Update. Important Information for Windows
 Important Information for Windows AXIS 1440 Print Server For EPSON Printers: Product Update Important Information for Windows If you are using Windows 95, Windows 98, or Windows NT 4.0, you need to turn