LED MOTION ACTIVATED FLOOD LIGHT
|
|
|
- Debra Kelley
- 9 years ago
- Views:
Transcription
1 Utilitech & UT Design are registered trademarks of LF, LLC. All Rights Reserved. ITEM # , # LED MOTION ACTIVATED FLOOD LIGHT MODEL #SE1036-BP2-02LF0-U, SE1036-WH3-02LF0-U Français p. 10 Español p. 19 ATTACH YOUR RECEIPT HERE Serial Number Purchase Date Questions, problems, missing parts? Before returning to your retailer, call our customer service department at , 8 a.m. - 6 p.m., EST, Monday - Thursday, 8 a.m. - 5 p.m., EST, Friday. AB

2 PACKAGE CONTENTS D A B C PARTS DESCRIPTION QUANTITY A LED Head 2 B Sensor Arm 1 PARTS DESCRIPTION QUANTITY C Sensor Head 1 D Wall Plate 1 HARDWARE CONTENTS Note: Hardware shown actual size. BB EE FF GG Machine Screw Qty. 2 Machine Screw Qty. 2 Mounting Strap (Not shown to size) Qty. 1 Wire Nut Qty. 3 Long Machine Screw Qty. 1 Silcone Cap Qty. 1 Foam Gasket (Not shown to size) Qty. 1 SAFETY INFORMATION Please read and understand this entire manual before attempting to assemble, operate or install the product. SAVE THESE INSTRUCTIONS IN A LOCATION CLOSE TO YOUR LIGHT FIXTURE SO YOU CAN REFER TO THEM AT A LATER TIME. WARNING the new one. LED electronics can be damaged by electrostatic discharge (ESD) shock. Before installation, discharge yourself by touching a grounded bare metal surface to remove this hazard. To avoid damage, do not remove the clear lens over the LED module. CAUTION DO NOT USE THIS FIXTURE WITH A DIMMING CIRCUIT. If you currently have dimmer controls, you will need to remove them and replace them with regular electrical switches. If you have a three-way dimmer, you will have to replace it with a regular three-way switch. If you are unfamiliar with electrical 2
 shock.")
3 SAFETY INFORMATION IMPORTANT SAFETY INSTRUCTIONS 1. Turn power OFF before installing or servicing. 3. Do NOT remove the protective LED lens. 4. Do NOT look directly at lighted LEDs for any length of time. 5. Do NOT leave bare wires exposed outside the wall canopy enclosure. 6. Electrical requirements: 120 V AC, 60 Hz., 0.31A. Minimum 90 supply conductors. 7. Suitable for wall or eave mounting onto recessed or round surface mounted electrical boxes rated for wet locations. Not suitable for ground mount electrical boxes. 8. Do NOT allow the sensor head to touch the LED head housing. Maintain at least 1 in. spacing between the LED heads and the sensor head. 9. For proper operation and protection against water damage, the motion sensor adjustment controls MUST be facing downward. 10. Do NOT mount below 5 ft. 11. Do not mount near other light sources that can compromise the dusk to dawn sensor. 12. This device complies with Part 15 of the F rules. Operation is subject to the following two conditions: (1) This device may not cause harmful interference, and (2) this device must accept any interference received, including interference that may cause undesired operation. PREPARATION Before beginning installation of product, make sure all parts are present. Compare parts with package contents list and hardware contents list. If any part is missing or damaged, do not attempt to install the product. Estimated Assembly Time: 45 minutes. Tools Required for Assembly (not included): Phillips screwdriver and silicone adhesive caulking. pools or bodies of water, or trees/bushes that move in the wind. All of these may trigger the motion sensor security light and may be disruptive to the intended operation of the light. Do NOT install near other sources of light. The other light sources can fool the dusk to dawn sensor into thinking it is daylight. INSTALLATION INSTRUCTIONS FOR ROUND SURFACE MOUNT ELECTRICAL BOXES electrical box that has more than two wire leads, mark the wires to keep track of the correct ones to use. 1. Pull the supply wires out of the electrical box. Using box, secure the mounting strap () to the electrical box, making sure that the side marked is facing out. BB Machine Screws x 2 1 Mounting Strap x 1 3

4 INSTALLATION INSTRUCTIONS FOR ROUND SURFACE MOUNT ELECTRICAL BOXES 2. Remove the protective paper barrier from the adhesive face of the foam gasket (GG). Trace the supply wires through the openings in the gasket and adhere the gasket to the mounting strap and outer edge of the round surface mount electrical box. 2 GG GG Foam Gasket x 1 properly grounded. If unfamiliar with the methods of properly electrical box is made of plastic and/or has a green or bare 3 the electrical box ground wire should be connected together using one of the small wire nuts (included). If the electrical box is made of metal and already grounded, secure the bare using the green grounding screw. Connect the is connected to the white supply lead. Tighten the wire nuts properly to prevent them from coming loose. If needed, use electrical tape to secure the wire nuts onto the wire leads. Push the excess wires back into the electrical box. Wire Nut x 3 4 EE 4. Position the wall plate over the mounting strap so the center hole of the wall plate aligns with the center hole in the mounting strap. While holding the wall plate in place, put the long machine screw (EE) through the center hole of the wall plate and mounting strap. Tighten the screw properly to secure the wall plate onto the electrical box. NOTE: Make sure the gasket (GG) properly seals the gap between the wall plate and the electrical box to prevent water seepage into the electrical box. EE Long x 1 Machine Screw 5 head with the adjustment controls and drain holes facing downward to prevent water damage. The position of the sensor head should not exceed 45 degrees from horizontal. 4

5 INSTALLATION INSTRUCTIONS FOR ROUND SURFACE MOUNT ELECTRICAL BOXES 6. Restore power to the electrical box at the circuit breaker or fuse panel. Make sure the wall switch that controls the electrical box for your security light is returned to the ON position and check that your light is functioning properly. (FF) into the mounting screw opening to prevent water seepage into the housing. FF Silicone Cap x 1 16 INSTALLATION INSTRUCTIONS FOR RECESSED ELECTRICAL BOXES electrical box that has more than two wire leads, mark the wires to keep track of the correct ones to use. 1. Pull the supply wires out of the electrical box. Using box, secure the mounting strap () to the electrical box, making sure that the side marked is facing out. 1 BB Machine Screws x 2 Mounting Strap x 1 be properly grounded. If unfamiliar with the methods of 2 electrician. A green copper ground wire is pre-attached or has a green or bare copper grounding wire inside, the should be connected together using one of the small wire nuts (included). If the electrical box is made of metal ground wire to the mounting strap marked using the green grounding screw. Connect the supply leads from the to the white supply lead. Tighten the wire nuts properly to prevent them from coming loose. If needed, use electrical tape to secure the wire nuts onto the wire leads. Push the excess wires back into the electrical box. Wire Nut x 3 5

6 INSTALLATION INSTRUCTIONS FOR RECESSED ELECTRICAL BOXES 3. Position the wall plate over the mounting strap so the center hole of the wall plate aligns with the center hole in the mounting strap. While holding the wall plate place the long machine screw (EE) through the center hole of the wall plate and mounting strap. Tighten the screw properly to secure the wall plate onto the mounting surface. EE Long x 1 Machine Screw 3 EE head with the adjustment controls and drain holes facing downward to prevent water damage. The position of the sensor head should not exceed 45 degrees from horizontal Restore power to the electrical box at the circuit breaker or fuse panel. Make sure the wall switch that controls the electrical box for your security light is returned to the ON position and check that your light is functioning properly. 5 If the light is functioning properly, use silicone adhesive caulking (not included) to caulk the gap between the wall plate and the mounting surface to prevent water seepage into the electrical enclosure. 6. Fit the silicone cap (FF) into the mounting screw opening to prevent water seepage into the housing. 16 FF Silicone Cap x 1 6

7 OPERATING INSTRUCTIONS to-dawn sensor. The dusk-to-dawn sensor disables the motion detector during daylight hours and only allows the motion sensor to activate the light after dark. The security light will not activate during daylight hours regardless of whether it sees motion or not. 1. The slide switch on the bottom surface of the motion sensor has four settings: TEST In the TEST position, the motion sensor will turn the lights on for 40 seconds after power is applied to The lights will come on for 40 seconds regardless of whether there is motion or not, and regardless of whether it is day or night. Leave the slide switch in the TEST setting and adjust the sensitivity by crossing in the path of the sensor. The light will come on only if it senses movement. Once movement stops, it will turn off in 5 seconds. 2. There is also a rotary knob on the bottom of the motion sensor labeled: SENSITIVITY Rotating this knob clockwise raises the sensitivity of the motion sensor for up to 60 ft. of distance. Rotating the knob counterclockwise lowers the sensitivity down to as close as 5 ft. It may be necessary to adjust the SENSITIVITY knob several particular installation. NOTE: The higher sensitivity level for longer distances (up to 60 ft.) increases the likelihood of false triggering. For maximum range (with power) for at least 48 hours. 3. The 180 coverage of the motion sensor is measured side to side. Therefore, the sensor will better rather than motion coming straight at the sensor (in-and-out). Adjust the motion sensor head so that it sees motion moving across the coverage area. Make sure the sensor head is positioned with the front lens facing slightly downward (5-15 angle) to prevent water accumulation on the sensor head. Do not aim the motion sensor at a body of water, bushes or plants cars, etc., as this will trigger the motion sensor. NOTE: If the sensor arm becomes loose, it will not hold the sensor head at the proper angle. Readjust the sensor head and tighten the joint screw on the sensor arm. 4. Each light head can be adjusted at the sensor arm 7

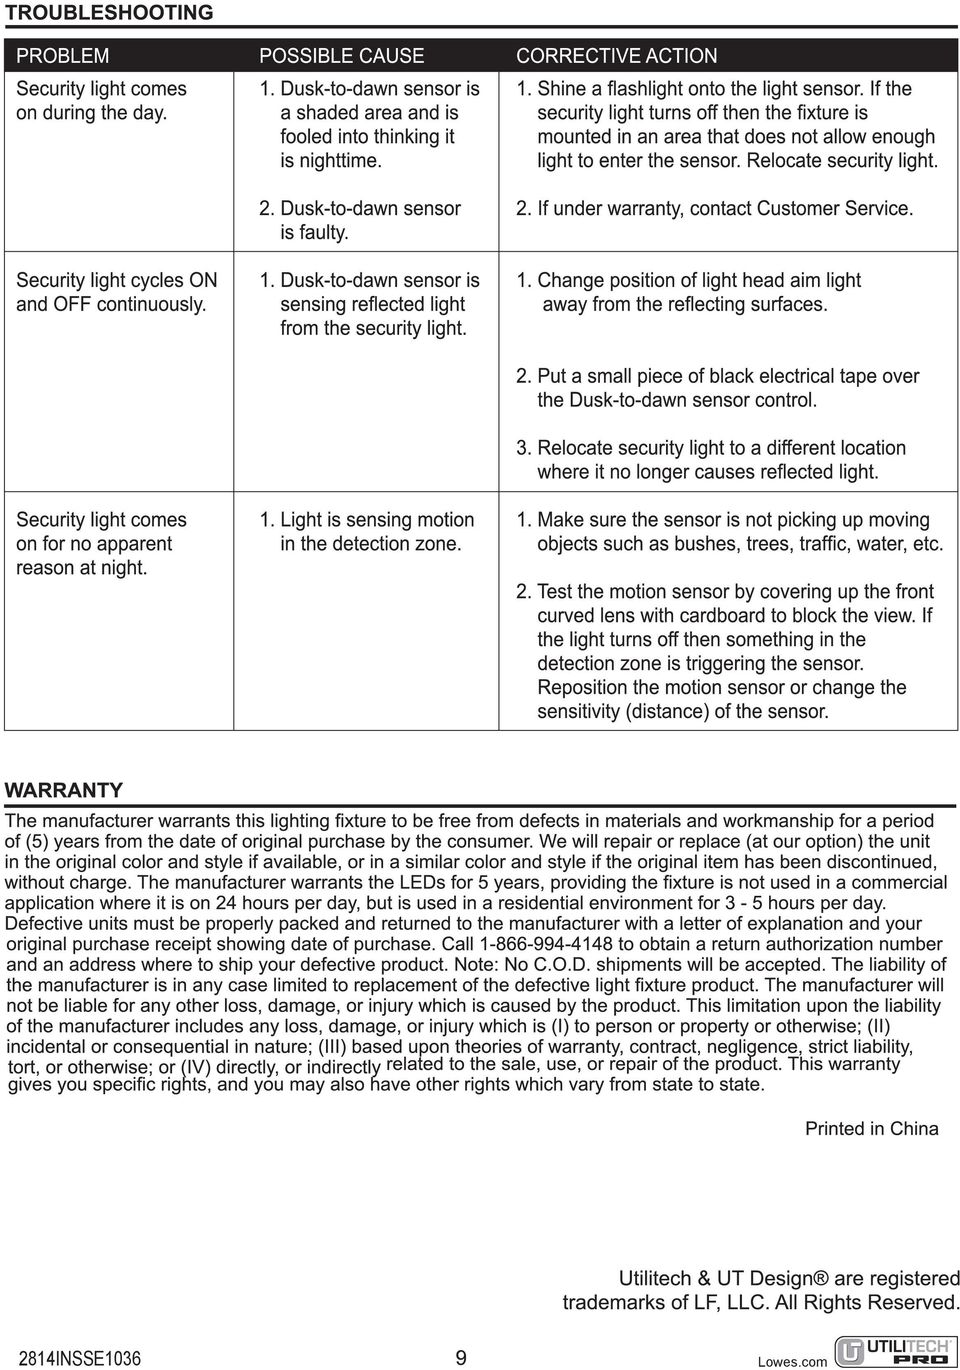
8 OPERATING INSTRUCTIONS operation and sensitivity, move the switch to the 1, 5, or 10 position. Each of these positions allows the 5 these settings indicates the time frame that the light will remain on after detecting motion. If set for the 1 setting, the lights will come on for 1 minute after detecting motion, and then will go off and return to the AUTO motion sensor mode. When set for 5, the lights will remain on for 5 minutes after detecting motion. If set for 10, the lights will remain on for 10 minutes after detecting motion. If motion is continuously detected during the lights ON cycle, the lights will remain on until the motion ceases. 6. To be able to manually turn on the security light from inside your home, toggle the wall light switch OFF and ON within 2 seconds. The security light will turn on and stay on for approximately 8 hours, or until the dusk-to-dawn sensor detects light in the morning. Once the dusk-to-dawn sensor detects light, the manual ON mode will automatically go back to its original settings of the AUTO motion sensor mode. At any point while in manual ON mode, return to the AUTO motion sensor mode by toggling the wall light switch OFF and ON again within 2 seconds. SECURITY LIGHT OPERATION MODE SLIDE SWITCH WALL SWITCH SENSITIVITY A Test Mode Test Turn on Any setting AUTO Motion Sensor 1, 5, or 10 Minutes ON Any setting Mode Manual ON Mode 1, 5, or 10 Minutes Toggle OFF and ON Any setting within 2 seconds Return to AUTO Motion 1, 5, or 10 Minutes Toggle OFF and ON Any setting Sensor Mode within 2 seconds CARE AND MAINTENANCE use solvents or cleaners containing abrasive agents. When clean NOT TROUBLESHOOTING Extreme hot or cold weather could affect the performance of the built-in sensors that detect body heat. Certain winter clothing can shield a person s body heat from the sensor during extreme cold weather. During extreme hot weather, the sensor may not be able to distinguish the difference between normal body temperatures and the surrounding high temperatures. The sensor will begin working normally once weather conditions return to normal. PROBLEM POSSIBLE CAUSE CORRECTIVE ACTION A Light does not come on 1. No power is being 1. Check that circuit breaker and/or wall at night when motion switch power is on. is detected. 2. Another light source is 2. Turn off surrounding lights and/or re-aim causing the security light the sensor head. to think it is daylight. came loose. 8 reconnect any loose wiring.

9 2814INSSE1036
LED MOTION ACTIVATED FLOOD LIGHT
 Utilitech & UT Design are registered trademarks of LF, LLC. All Rights Reserved. ITEM #0460794, 0459228 LED MOTION ACTIVATED FLOOD LIGHT MODEL #SE1019-WH3-02LF0-U, SE1019-TBZ-02LF0-U Français p. 8 Español
LED Security Spotlight User Manual
 MOT ION-TR ACKING LED Security Spotlight User Manual www.jascoproducts.com 1-800-654-8483 2 TABLE OF CONTENTS Parts List 3 Questions? Missing Parts? 4 Installation (Wall mount) 6-9 Installation (Eave mount)
LiteAide OWNER'S MANUAL PREASSEMBLED AUTOMATIC SECURITY FLOODLIGHTS MOTION SENSOR SECURITY LIGHTING SYSTEMS
 OWNER'S MANUAL PREASSEMBLED AUTOMATIC SECURITY FLOODLIGHTS MOTION SENSOR SECURITY LIGHTING SYSTEMS LiteAide HE-100B HE-100BW HE-112 HE-112W HE-117 HE-117W HE-117-2B OWNER'S MANUAL FLOOD LAMPS (BULBS) Your
BATTERY OPERATED LED MOTION SENSOR LIGHT MODEL #GU8002-LED-DC
 ITEM #009 BTTERY OPERTE LE MOTION SENSOR LIGHT MOEL #GU800-LE- Utilitech & UT esign and Grounded in Quality are registered trademarks of LF, LL. ll Rights Reserved. Français p. 7 Español p. TTH YOUR REEIPT
Die-Cast Metal, Motion- Activated Post Light
 TM Die-Cast Metal, Motion- Activated Post Light Model: SH-9392AU Installation and Operating Instructions FEATURES Automatically comes on when motion is detected. Automatically turns light off. Photocell
5800 Temperature Sensor Cable Assembly
 5800 Temperature Sensor Cable Assembly Removal and Replacement Instruction Sheet #60-4702-070 Revision D, January 14, 2013 Overview The 5800 has two refrigeration temperature sensors, one attached to the
GreenWay Solar LED Path and Trail Lighting System. Installation and Owner s Manual
 GreenWay Solar LED Path and Trail Lighting System Installation and Owner s Manual Important Notes and Warnings This installation and instruction manual provides installation, operation, and maintenance
2400W PIR LIGHT C O N T R O L L E R Cat No. SLW2400
 2400W PIR LIGHT C O N T R O L L E R Cat No. SLW2400 1 Introduction The SLW2400 utilises passive infrared technology to detect heat radiation of moving human bodies. Upon detection, the attached lighting
5W LED Energy Saver PIR Bulkhead
 5W LED Energy Saver PIR Bulkhead Model: LED88PIR Black I n s t a l l a t i o n & Ope r a t i n g I n s t r u c t i o n s 1. General information: The unit utilises passive infrared technology to detect
60W PIR BULKHEAD LIGHT SLB88-Black/SLW89-White INSTALLATION & OPERATING INSTRUCTIONS
 60W PIR BULKHEAD LIGHT SLB88-Black/SLW89-White INSTALLATION & OPERATING INSTRUCTIONS SLB88 PIR BULKHEAD LIGHT - BLACK WEATHERPROOF LAMP TYPE IP44 60w ES MAXIMUM PIR SWITCHING 500w MAXIMUM TIME ON DETECTION
AMERBRITE UNDERWATER WHITE LED POOL LAMP
 AMERBRITE UNDERWATER WHITE LED POOL LAMP FOR USE ONLY WITH PENTAIR AMERLITE LUMINAIRE INSTALLATION AND USER S GUIDE IMPORTANT SAFETY INSTRUCTIONS READ AND FOLLOW ALL INSTRUCTIONS SAVE THESE INSTRUCTIONS
SECTION G2: CABLE PROCESSOR MODULE MAINTENANCE
 SECTION G2: CABLE PROCESSOR MODULE MAINTENANCE Cable Processor Module overview WARNING! When tipping the Cable Processor Module back, (after removing the toggle arm pin), use extreme caution not to drop
Installation Instructions 6028.801
 DAZZLE Installation Instructions 08.80 Spread Lavatory Faucet with Speed Connect Drain* Congratulations on purchasing your American Standard faucet with Speed Connect drain, a feature found only on American
IMPORTANT INSTRUCTIONS & OPERATING MANUAL. Houston 50 Inch Electric Wall Mounted Fireplace Black / White
 IMPORTANT INSTRUCTIONS & OPERATING MANUAL Houston 50 Inch Electric Wall Mounted Fireplace Black / White Model Number:MFE5050BK Model Number:MFE5050WH Read these instructions carefully before attempting
Cooktop Low-Profile Ventilation Hoods
 INSTALLATION GUIDE Cooktop Low-Profile Ventilation Hoods Contents Wolf Cooktop Low-Profile Ventilation Hoods........ 3 Cooktop Low-Profile Hood Specifications.......... 4 Cooktop Low-Profile Hood Installation............
INSTALLATION INSTRUCTIONS
 INSTALLATION INSTRUCTIONS VOLT LED Edge-Lit Flat Panel VFP-22 and VFP-24 Series Help Hotline: 1-813-978-3700 Mon-Fri 8am-8pm Sat-Sun 10am - 6pm (EST) Specifications and product details subject to change
Table of Contents. www.hunterfan.com. What to Expect with. Preparation. Tools Needed. Wiring. Hanging the Fan. Blades. Motor Housing.
 www.hunterfan.com Table of Contents What to Expect with Your Installation 30 inches Hanging the Fan Wiring 8 Maintenance, Operation & Cleaning Light Kit 13??? 14 1 9 Troubleshooting 11 5 Blades Motor Housing
Installation and Troubleshooting Instructions for Electric Tankless Residential Water Heaters.
 Model Number: Serial Number: Information Manual Installation and Troubleshooting Instructions for Electric Tankless Residential Water Heaters. ATTENTION: IF YOU ARE NOT A LICENSED PLUMBER OR A LICENSED
GAERTNER SCIENTIFIC CORPORATION 3650 Jarvis Ave. Skokie, Illinois 60076 U.S.A. tel: 1 847 673-5006 fax: 1 847 673-5009 email@gaertnerscientific.
 7109-C-244E-R1 Field Installation of HeNe Laser in B, C, and D-Type Auto Gain Ellipsometers GAERTNER SCIENTIFIC CORPORATION 3650 Jarvis Ave. Skokie, Illinois 60076 U.S.A. tel: 1 847 673-5006 fax: 1 847
Owner s Guide and Installation Manual. Vancouver Model Name. 21321, 21328 Model No. English Español
 For Your Records and Warranty Assistance For reference, also attach your receipt or a copy of your receipt to the manual. Vancouver Model Name 21321, 21328 Model No. Type A Models Owner s Guide and Installation
Owners & Installation Manual for the Sheridan, Mountainair, Pine Valley and Old Forge Ceiling Fan Family
 Owners & Installation Manual for the Sheridan, Mountainair, Pine Valley and Old Forge Ceiling Fan Family Part of the Kiva Lighting Family Custom Lighting and Fans Since 1992 1312 12th St NW Albuquerque,
Installation Guide. Wyse D Class 4-GB RAM Upgrade Option Kit. Products: D90D7, D90DW. Issue: 121312 PN: 883884-35L Rev. A
 Installation Guide Wyse D Class 4-GB RAM Upgrade Option Kit Products: D90D7, D90DW Issue: 121312 PN: 883884-35L Rev. A Copyright Notices 2012, Wyse Technology Inc. All rights reserved. This manual and
Installation Instructions 4508 4508S
 SYMPHONY Spread Lavatory Faucet with Speed Connect Drain Congratulations on purchasing your American Standard faucet with Speed Connect drain, a feature found only on American Standard faucets. Speed Connect
LOS 2500 SUPER CEILING SENSOR. Installation Manual
 LOS 2500 SUPER CEILING SENSOR Installation Manual How Do RAB Occupancy Sensors Work? Selecting A Location: The L0S2500 sensor sees infrared heat changes caused by the motion of people within its detection
WARNING: FAILURE TO FOLLOW THESE RULES MAY RESULT IN SERIOUS PERSONAL INJURY CAUTION: INSTALLATION LOCATION:
 Revision Level: 01 Revision Date: 07/07/2011 Please read all instructions carefully to help ensure a correct and SAFE installation of your Second Wind Ultraviolet Germicidal Air Purifier. Failure to do
Installation Manual. Features SMART SWITCH OCCUPANCY SENSOR. Maximum Energy savings
 Features SMART SWITCH OCCUPANCY SENSOR Installation Manual Maximum Energy savings Sensitive 180º view passive infrared motion detector keeps lights on only when rooms are in use. No ON switch so lights
Arecont Vision H.264 Color or Day/Night SurroundVideo Series Installation Manual
 0 P a g e H.264 Color or Day/Night SurroundVideo Installation Manual Inside the box: A. Arecont Vision SurroundVideo camera B. Mounting template C. RJ45 female to female coupler D. Hex key E. Security
60" TulleTM. Instruction Manual. A Kichler Select ceiling fan
 60" TulleTM A Kichler Select ceiling fan Kichler Lighting 7711 East Pleasant Valley Road P.O. Box 318010 Cleveland, Ohio 44131-8010 Customer Service 866.558.5706 8:30 AM to 5:00 PM EST, Monday - Friday
GENUINE PARTS INSTALLATION INSTRUCTIONS
 GENUINE PARTS INSTALLATION INSTRUCTIONS DESCRIPTION: Illuminated Kick Plate APPLICATION: Rogue (2011) PART NUMBER: 999G6 GX010 KIT CONTENTS: Item A B C G H QTY 1 1 1 D 1 E 1 F 3 15 6 Description Kick Plate,
MBSAW. Meat Cutting Band Saw With Meat Grinder Assembly & Operating Instructions
 06/2011 MBSAW Meat Cutting Band Saw With Meat Grinder Assembly & Operating Instructions READ ALL INSTRUCTIONS AND WARNINGS BEFORE USING THIS PRODUCT. This manual provides important information on proper
Installation Instructions
 Installation Instructions One-Piece Deep Wall Sleeve For Use with Packaged Terminal Units Please read these instructions completely before attempting installation. NOTE: Ensure that the unit is only installed
RayClic Connection System Installation Instructions
 RayClic Connection System Installation Instructions Description RayClic-S Splice Kit RayClic-T Tee and End Seal Kit RayClic-X Cross and End Seal Kit These kits are for use with Raychem IceStop, XL-Trace
1000-LB. TRAILER JACK OWNER S MANUAL
 1000-LB. TRAILER JACK OWNER S MANUAL WARNING: Read carefully and understand all INSTRUCTIONS before operating. Failure to follow the safety rules and other basic safety precautions may result in serious
Application and Instruction Manual Motion Activated Solar Powered LED Security Light with Camera MODEL: XP-2H38WC
 Application and Instruction Manual Motion Activated Solar Powered LED Security Light with Camera MODEL: XP-2H38WC Please do not return this item to the store. If you have any questions, please contact
PT-6000 Power Tower INSTALLATION MANUAL SPECIFICATIONS
 PT-6000 Power Tower INSTALLATION MANUAL 10.5 9.75 12 22.75 10.75 MAXIMUM SOIL HEIGHT: DO NOT ALLOW FILL TO EXCEED THIS LEVEL! 11.5 4 4 13 Optional PT-BASE for new installations or when previous 2000/6000
1. SAFETY RULES WARNING TO REDUCE THE RISK OF FIRE, ELECTRIC SHOCK OR PERSONAL INJURY, MOUNT FAN TO OUTLET BOX MARKED "ACCEPTABLE FOR FAN SUPPORT".
 1 1. SAFETY RULES 1. To reduce the risk of electric shock, insure electricity has been turned off at the circuit breaker or fuse box before beginning. 2. All wiring must be in accordance with the National
RayClic Connection System Installation Instructions
 F M -W RayClic Connection System Installation Instructions RayClic WARNING: Shock Hazard 718K Pipe Heating Cable with HWAT, IceStop, also Listed De-icing and and XL-Trace heating Snow Melting Equipment
USER INSTRUCTIONS FOR 10 LITRE PORTABLE DEHUMIDIFIER MODEL NO. DHMD102
 USER INSTRUCTIONS FOR 10 LITRE PORTABLE DEHUMIDIFIER MODEL NO. DHMD102 THANK YOU FOR CHOOSING YOUR NEW DEHUMIDIFIER. BEFORE USING THE UNIT READ THESE INSTRUCTIONS FULLY AND RETAIN THEM FOR FUTURE REFERENCE
PIR Motion Detector INSTALLER GUIDE E-700. SF-SA-140 -B.qxd 16/05/2005 11:19 Page 1
 SF-SA-140 -B.qxd 16/05/2005 11:19 Page 1 PIR Motion Detector E-700 INSTALLER GUIDE V2.0-02/05 IQ-140-B IQ Europe Limited Sandbeck Lane, Wetherby LS22 7TW. Visit us at www.iq-europe.co.uk Installation helpline
IntelliBrite Controller (For IntelliBrite Pool, Spa and Landscape Lighting Fixtures) Installation and User s Guide
 Installation and User s Guide") IntelliBrite Controller (For IntelliBrite Pool, Spa and Landscape Lighting Fixtures) Installation and User s Guide *619751* P/N 619751 - Rev C IMPORTANT SAFETY INSTRUCTIONS READ AND FOLLOW ALL INSTRUCTIONS
IntelliBrite Controller (For IntelliBrite Pool, Spa and Landscape Lighting Fixtures) Installation and User s Guide *619751* P/N 619751 - Rev C IMPORTANT SAFETY INSTRUCTIONS READ AND FOLLOW ALL INSTRUCTIONS
Beadboard Wall Bookcase
 Beadboard Wall Bookcase Note: The maximum load for each shelf is 30lbs.This hanging system is meant for drywall/wood stud mounting only. If walls are concrete, brick or plaster, please consult your local
BUILT-IN DISHWASHER INSTALLATION INSTRUCTIONS
 BUILT-IN DISHWASHER INSTALLATION INSTRUCTIONS PLEASE READ COMPLETE INSTRUCTIONS BEFORE YOU BEGIN LEAVE INSTALLATION INSTRUCTIONS AND USER'S GUIDE WITH OWNER ALL ELECTRIC WIRING AND PLUMBING MUST BE DONE
CortezTM A Kichler Décor Ceiling Fan
 CortezTM A Kichler Décor Ceiling Fan Kichler Lighting 7711 East Pleasant Valley Road P.O. Box 318010 Cleveland, Ohio 44131-8010 Customer Service 866.558.5706 8:30 AM to 5:00 PM EST, Monday - Friday Instruction
GE Wireless Devices Battery Replacement
 60-506-319.5 Crystal Smoke Detector Two 9V Duracell 9V 1. Twist counter-clockwise until detector become loose from base. 2. Replace batteries observing correct polarity. 3. Replace detector by twisting
Trillium 40 Axis Spring Tensioner Wire Replacement Instructions
 Trillium 40 Axis Spring Tensioner Wire Replacement Instructions 1 Overview The objective is to replace the broken axis spring tensioner wire. This requires the following tasks: 1. Remove the seismometer
INSTALLATION & OPERATING INSTRUCTIONS
 INSTALLATION & OPERATING INSTRUCTIONS WARNING RISK OF ELECTRIC SHOCK. CONNECT ONLY TO A CIRCUIT PROTECTED BY A GROUND-FAULT CIRCUIT-INTERRUPTER. THE UNIT SHOULD BE INSTALLED BY A QUALIFIED SERVICE REPRESENTATIVE.
3. SEISCO PARTS & SERVICE REMOVAL AND REPAIR GUIDE
 4 3. SEISCO PARTS & SERVICE REMOVAL AND REPAIR GUIDE A. Changing the Control Board B. Replacing a Heating Element C. Thermistor Replacement D. High Limit Switch Replacement E. Level Detector Replacement
Installation Instructions For Slider Casement Air Conditioners
 Installation Instructions For Slider Casement Air Conditioners NOTE: These instructions describe installation in a typical wood framed window with a wood SLIDE-BY sash, or installation in a metal CASEMENT
TRANSFORMER 1-855-HD-HAMPTON HAMPTONBAY.COM
 Item #1001 509 794 Model DIY-300PS USE AND CARE GUIDE TRANSFORMER Questions, problems, missing parts? Before returning to the store, call HamptonBay Customer Service 8 a.m. - 7 p.m., EST, Monday Friday,
Installation Instructions
 READ BEFORE INSTALLING UNIT For Slider Casement Air Conditioners To avoid risk of personal injury, property damage, or product damage due to the weight of this device and sharp edges that may be exposed:
1. SAFETY RULES. 8. Avoid placing objects in the path of the blades.
 1 1. SAFETY RULES 1. To reduce the risk of electric shock, insure electricity has been turned off at the circuit breaker or fuse box before beginning. 2. All wiring must be in accordance with the National
Control Box Wiring For PRSstandard Tool
 888-680-4466 ShopBotTools.com Control Box Wiring For PRSstandard Tool Copyright 2016 ShopBot Tools, Inc. page 1 Copyright 2016 ShopBot Tools, Inc. page 2 Table of Contents Introduction:...5 Installation:...5
REDWALL-V adjustment procedures guide
 Page 1/18 Ver1.2 July 1. 2011 REDWALL-V adjustment procedures guide This document is provided as a reference tool for installing the Optex Redwall SIP passive infrared detector. Before starting, read the
NOTE: Additional user information for your printer may be available in the "Manuals" section at support.dell.com.
 CAUTION: General Safety Instructions Use the following safety guidelines to help ensure your own personal safety and to help protect your equipment and working environment from potential damage. NOTE:
SP AF 300mm F/2.8 LD [IF] for Canon (Model 360EE)
![SP AF 300mm F/2.8 LD [IF] for Canon (Model 360EE)](/thumbs/40/21493790.jpg "SP AF 300mm F/2.8 LD [IF] for Canon (Model 360EE)") SP AF 300mm F/2.8 LD [IF] for Canon (Model 360EE) We greatly appreciate your purchase of this Tamron lens. The Tamron SP AF 300mm F/2.8 LD [IF] is a fast telephoto lens developed for Canon AF single-reflex
SP AF 300mm F/2.8 LD [IF] for Canon (Model 360EE) We greatly appreciate your purchase of this Tamron lens. The Tamron SP AF 300mm F/2.8 LD [IF] is a fast telephoto lens developed for Canon AF single-reflex
MCR1900 Media Converter 19-Slot Chassis
 MCR1900 Media Converter 19-Slot Chassis Installation Guide Part #5500304-11 Copyright Statement This document must not be reproduced in any way whatsoever, either printed or electronically, without the
EasyNote TJ Series. Disassembly Manual
 EasyNote TJ Series Disassembly Manual CHAPTER3 Replacing notebook components Preventing static electricity discharge Preparing the work space Required tools Preparing the notebook Adding or replacing memory
Treasure Cove Metal Detector
 Treasure Cove Metal Detector Fortune Finder 1020 OWNER S MANUAL www.treasure-cove.com 805-658-2328 With your 1020 metal detector, you can hunt for coins, relics, jewelry, gold, and silver just about anywhere,
Installation Guide. Wyse Z Class 2 and 4-GB RAM Upgrade Option Kit. Products: Z90DW, Z90SW, Z90D7, Z90S7. Issue: 122211 PN: 883884-32L Rev.
 Installation Guide Wyse Z Class 2 and 4-GB RAM Upgrade Option Kit Products: Z90DW, Z90SW, Z90D7, Z90S7 Issue: 122211 PN: 883884-32L Rev. A Copyright Notices 2011, Wyse Technology Inc. All rights reserved.
MAINTENANCE & TROUBLESHOOTING
 MAINTENANCE & TROUBLESHOOTING This section describes how to: clean the lens replace the projection lamp replace the batteries in the remote use the security lock feature troubleshoot the projector Cleaning
PIR Motion Detector E-808
 SF-SA-180-D PIR HiLo 10A.qxd 16/05/2005 11:17 Page 1 PIR Motion Detector E-808 INSTALLER GUIDE Version 2 : 02/05 IQ-SA-180-D-GR IQ Europe Limited Sandbeck Lane, Wetherby LS22 7TW. Visit us at www.iq-europe.co.uk
UV100A Ultraviolet Air Treatment System
 UV100A Ultraviolet Air Treatment System INSTALLATION INSTRUCTIONS APPLICATION When installed in forced air heating and cooling systems, the UV100A Ultraviolet Air Treatment System kills airborne microorganism
Mounting Tripod Kit Installation Manual
 Mounting Tripod Kit Installation Manual For use with Davis s wireless and cabled Vantage Pro2 weather stations, the Mounting Tripod simplifies installation. The tripod supports the Integrated Sensor Suite
Service Guide 12/27/03 TESTING, SERVICE & REPAIR GUIDE (For SH Space Heating Models & RA Water Heating Models)
") TESTING, SERVICE & REPAIR GUIDE (For SH Space Heating Models & RA Water Heating Models) WARNING - HIGH VOLTAGE AC electrical circuits are connected to this heater. Do not attempt any service work on the
TESTING, SERVICE & REPAIR GUIDE (For SH Space Heating Models & RA Water Heating Models) WARNING - HIGH VOLTAGE AC electrical circuits are connected to this heater. Do not attempt any service work on the
OASIS-PLUS 120V READ ALL INSTRUCTIONS BEFORE OPERATING READ ALL INSTRUCTIONS BEFORE OPERATING OZONE IS A POWERFUL OXIDIZER AND MUST BE USED WITH CARE
 OASIS-PLUS 120V INFORMATION & OPERATING INSTRUCTIONS READ ALL INSTRUCTIONS BEFORE OPERATING READ ALL INSTRUCTIONS BEFORE OPERATING OZONE IS A POWERFUL OXIDIZER AND MUST BE USED WITH CARE 56041852 WARNING:
QWALL 4 ACRYLIC SHOWER WALL INSTALLATION INSTRUCTIONS
 QWALL 4 ACRYLIC SHOWER WALL INSTALLATION INSTRUCTIONS IMPORTANT DreamLine TM reserves the right to alter, modify or redesign products at any time without prior notice. For the latest up-to-date technical
IMPORTANT INSTALLATION GUIDE VALENCIA SQUARE CORNER SHOWER READ ALL INSTRUCTIONS CAREFULLY BEFORE STARTING THE INSTALLATION
 INSTALLATION GUIDE VALENCIA SQUARE CORNER SHOWER SEALANT REQUIRED TO COMPLETE THIS INSTALLATION: (Not supplied) Sika Sikasil NG (Arctic White) To seal the WHITE shower door and returns to the shower tray.
Hard Disk Drive (HDD)
") Installation Instructions Hard Disk Drive (HDD) Catalog Number 6189V-35HDDST80, 6189V-35HDDST160 Topic Page About This Publication 1 Important User Information 2 Electrostatic Discharge (ESD) Precautions
Installation Instructions Hard Disk Drive (HDD) Catalog Number 6189V-35HDDST80, 6189V-35HDDST160 Topic Page About This Publication 1 Important User Information 2 Electrostatic Discharge (ESD) Precautions
OWNER S MANUAL Table Tennis Table Patent Pending
 OWNER S MANUAL Table Tennis Table Patent Pending Be sure to write your model number and serial number here for future reference. You can find these numbers printed on the bottom of the table. MODEL # T8179
Auto Sentry-eXP Maintenance
 Auto Sentry-eXP Maintenance Maintenance Procedures for Auto Sentry exp Bill Dispenser Credit Card Reader Bill Acceptor Bill Dispenser Maintenance Bill Dispenser Problem / Cause Bill Dispenser Error Codes
Reachout Lock Replacement for Andersen 2-Panel and 4-Panel 400 Series Frenchwood Gliding, 200 Series Narroline, and Perma-Shield Gliding Patio Doors
 for Andersen 2-Panel and 4-Panel 400 Series Frenchwood Gliding, 200 Series Narroline, and Perma-Shield Gliding Patio Doors Thank you for choosing Andersen. For questions call 1-888-888-7020. For more information
FIXTURE INSTALLATION GUIDE Model T21T (Low Voltage Pendant Set 120V)
") FIXTURE INSTALLATION GUIDE Model T21T (Low Voltage Pendant Set 120V) 21T, Rev.4 6-13 IMPORTANT: Before proceeding, retrieve the GLASS SHADE INSTALLATION GUIDE, which is included with the pendant cord set
FIXTURE INSTALLATION GUIDE Model T21T (Low Voltage Pendant Set 120V) 21T, Rev.4 6-13 IMPORTANT: Before proceeding, retrieve the GLASS SHADE INSTALLATION GUIDE, which is included with the pendant cord set
PASSIVE INFRARED INTRUSION DETECTOR PASSIVE INFRAROOD DETECTOR DETECTEUR D INTRUSION PASSIF INFRAROUGE
 MODEL HAA51 PASSIVE INFRARED INTRUSION DETECTOR PASSIVE INFRAROOD DETECTOR DETECTEUR D INTRUSION PASSIF INFRAROUGE OPERATING MANUAL HAA51 PASSIVE INFRARED INTRUDER DETECTOR INTRODUCTION HAA51 Passive Infrared
Ducoterra Radiant Heating Panel Installation Manual
 Ducoterra Radiant Heating Panel Installation Manual 1. Introduction Your new radiant heating panels are designed to heat living and working spaces rapidly and efficiently by radiant heating. Like the sun,
INSTALLATION INSTRUCTION SPEC. SHEET 7/00. City of New York Calendar #40747 ETL LISTED UNDER U.L. STD. 2108 LOW VOLTAGE TRACK LIGHTING SYSTEM
 7/00 INSTALLATION INSTRUCTION SPEC. SHEET 99052 99063 City of New York Calendar #40747 Copyright c 2000 ALFA Lighting, Inc. All rights reserved. Call:1-415-975-8080 QUICK JACK QJS R LISTED 9901483 ETL
Replacement Instructions. Warning: During this procedure, keep small parts away from children.
 apple ibook G4 Memory Card Replacement Instructions Follow the instructions in this sheet carefully. Failure to follow these instructions could damage your equipment and void its warranty. Note: Written
Zebra RW 420 Mobile Battery Eliminator Kits
 Zebra Technologies Corporation 475 Half Day Road, Suite 500 Lincolnshire, IL 60069 USA Zebra RW 420 Mobile Battery Eliminator Kits Installation Instructions September, 2010 RW 420 Mobile Battery Eliminator
Arctic Leash Instruction Manual Alaskan Products Company LLC.
 Retractable Cord Reel for Engine Block Heaters Arctic Leash Instruction Manual Alaskan Products Company LLC. INSTALLATION INSTRUCTIONS This instruction manual is a reference guide for installing and operating
INTRODUCTION INTERLOCK KIT K-8110
 INTRODUCTION INTERLOCK KIT K-8110 This manual provides instructions for safe installation of the InterLock Kit onto a General Electric (GE) panel. The back plate sits securely on the face of the panel
BATHROOM FAUCET ITEM #0040242 0039992 MODEL #67510-6001 67510-6027H2. Francias / Español p. 9 ATTACH YOUR RECEIPT HERE
 quasource is a registered trademark of LF, LLC. ll Rights Reserved. ITEM #0040242 0039992 BTHROOM FUCET MODEL #67510-6001 67510-6027H2 Francias / Español p. 9 TTCH YOUR RECEIPT HERE Serial Number Purchase
Service manual. Website: www.andico.com.au CAUTION - BEFORE SERVICING THE UNIT, READ THE SAFETY - PRECAUTIONS IN THIS MANUAL.
 Website: www.andico.com.au Service manual CAUTION - BEFORE SERVICING THE UNIT, READ THE SAFETY - PRECAUTIONS IN THIS MANUAL. - ONLY FOR AUTHORISED SERVICE PERSONNEL. MODELS: MPK1-09CR-QB8 MPK1-12ER-QB6
PRODUCT: WASHER / WASHER-DRYER COMBO MODEL: AW 120 / AW 122 / AW 125 AWD 120 / AWD 121 / AWD 129
 PRODUCT: WASHER / WASHER-DRYER COMBO MODEL: The information included in this Splendide Repair Manual may change without notice. Please see our web site www.splendide.com/service/docs.html for updates,
Battery Charger For Nickel Cadmium and Nickel-Metal Hydride Rechargeable Batteries Model PSN Series
 Battery Charger For Nickel Cadmium and Nickel-Metal Hydride Rechargeable Batteries Model PSN Series Operating Instructions WARNING CONCERNING THE REMOVAL OF COVER: CAUTION: TO PREVENT THE RISK OF ELECTRIC
Andersen Electric Window Opener for Andersen Awning and Roof Windows
 W A Electric Window Opener Electric Window Opener for Awning and Roof Windows Congratulations! You have just purchased one of the many fine products. For ease of installation and continued enjoyment of
INSTALLATION INSTRUCTIONS 24" (61.0 CM) ELECTRIC SINGLE AND DOUBLE BUILT-IN OVEN
 ELECTRIC SINGLE AND DOUBLE BUILT-IN OVEN") INSTLLTION INSTRUTIONS 24" (61.0 M) LTRI SINGL N OUL UILT-IN OVN Table of ontents UILT-IN OVN SFTY... 1 INSTLLTION RQUIRMNTS... 2 Tools and Parts... 2 Location Requirements... 2 lectrical Requirements...
INSTLLTION INSTRUTIONS 24" (61.0 M) LTRI SINGL N OUL UILT-IN OVN Table of ontents UILT-IN OVN SFTY... 1 INSTLLTION RQUIRMNTS... 2 Tools and Parts... 2 Location Requirements... 2 lectrical Requirements...
Instruction / Installation Sheet DataComm Electronics 50-6623-WH-KIT Flat Panel TV Cable Organizer Kit with Duplex Power Solution
 Instruction / Installation Sheet DataComm Electronics 50-6623-WH-KIT Flat Panel TV Cable Organizer Kit with Duplex Power Solution DataComm Electronics, Inc. 6349 Peachtree Street Norcross, GA 30071-1725
MOTION SENSOR PIR LIGHT SWITCH INSTALLATION & OPERATING. Cat No. ZV810 INSTRUCTIONS
 MOTION SENSOR PIR LIGHT SWITCH Cat No. ZV810 INSTALLATION & OPERATING INSTRUCTIONS ZV810 Motion Sensor PIR Light Switch Please read the instructions before using the product and retain for future use.
Installation Instructions
 Installation Instructions READ BEFORE INSTALLING UNIT For Low Profile Window Air Conditioner INSTALLATION WARNINGS AND CAUTION Carefully read the installation manual before beginning. Follow each step
54 LinkTM. Instruction Manual. Includes our new CoolTouch Control System Looks permanent, but goes wherever you go! U.S.
 54 LinkTM Includes our new CoolTouch Control System TM Looks permanent, but goes wherever you go! U.S. Patent Pending A Kichler Décor ceiling fan HIGH EFFICIENCY DC MOTOR Kichler Lighting 7711 East Pleasant
430 Power/Electronics Replacement
 Replacing the main board WARNING Before proceeding, turn off the main power switch and unplug the power cord. Caution Make sure you are properly grounded with an ESD strap before continuing. The main printed
Generator Transfer Switch Model # HTS15-AUTO
 Generator Transfer Switch Model # HTS15-AUTO Congratulations on your purchase of our Single Circuit Generator Transfer Switch, We hope this meets and exceeds your expectations. If at anytime you have any
Your Simple Guide to Battery. www.firstalertpro.com. Replacement. Customer Care: 1-800-852-0086. www.firstalertpro.
 Previous Menu Your Simple Guide to Battery www.firstalertpro.com Replacement p e t s ts ep -by Customer Care: 1-800-852-0086 FA/1565 9/00 www.firstalertpro.com Table of Contents: page Introduction...............................
THERMOSTATIC MIXING VALVE TRIM K-T9493, K-T9494
 THERMOSTATIC MIXING VALVE TRIM K-T9493, K-T9494 1. BEFORE YOU BEGIN IMPORTANT INSTRUCTIONS READ AND SAVE FOR THE CONSUMER WARNING: Risk of scalding or other severe injury. Before completing installation,
ASSEMBLY &OPERATING INSTRUCTIONS Solar Motion-Activated Security Light - 80 LED Lights Model #40225
 MOTION-ACTIVATED SECURITY LIGHT ASSEMBLY &OPERATING INSTRUCTIONS Solar Motion-Activated Security Light - 80 LED Lights Model #40225 IMPORTANT: READ ALL INSTRUCTIONS CAREFULLY BEFORE USE ABOUT YOUR SOLAR
Installation Instructions Avalanche XUV Cap IMPORTANT! IMPORTANT!
 Installation Instructions Avalanche XUV Cap IMPORTANT! Read all instructions carefully before commencing any work. Always wear safety equipment. Some installation steps will require two or more installers.
Installation Instructions
 Installation Instructions Built-In Dishwasher If you have questions, call 1-800-4-MY-HOME (1-800-469-4663) or visit our website at: www.sears.com BEFORE YOU BEGIN Read these instructions completely and
Important Information
 Single Door Quadrant Instruction Manual ESQ Important Information Toughened glass is completely safe for use in our shower enclosures and bath screens; providing our products are installed according to
KEYPAD LOCK RETROFIT KIT
 KEYPAD LOCK RETROFIT KIT INSTRUCTIONS FOR ASSEMBLY IMPORTANT READ & SAVE THESE INSTRUCTIONS Tools Required for Assembly 5/32 hex (Allen) wrench #2 Phillips screwdriver Isopropyl alcohol or alcohol wipes
ScreenLogic Wireless Connection Kit. Installation Guide. pool/spa control system
 pool/spa control system ScreenLogic Wireless Connection Kit Installation Guide P/N 520663 - Rev B 8 Technical Support Contact Technical Support at: Sanford, North Carolina (8 A.M. to 5 P.M.) Phone: (800)
INFRARED QUARTZ WALL HEATER
 INFRARED QUARTZ WALL HEATER MODEL NO: IQ2000 PART NO: 6939004 MOUNTING & OPERATION INSTRUCTIONS GC0715 INTRODUCTION Thank you for purchasing this CLARKE Infrared Wall Heater. Before attempting to use this