Open Object Developer Book
|
|
|
- Hester Peters
- 8 years ago
- Views:
Transcription
1 Open Object Developer Book Release 1.0 Tiny SPRL

2

3 CONTENTS i

4 ii

5 I Forewords 5 1 Introduction 7 2 Who is this book for? 9 3 Content of the book 11 4 About the author(s) 13 II Part 1 : Getting Started with OpenERP 15 5 Development Environment Working with Launchpad Configuration Command line options OpenERP Server and Web Client - Start/Stop Shutting down the server Moulder Development Approach OpenObject Server and Modules Module Integrations Inheritance OpenObject Architecture - Mvc MVC - Model, View, Controller MVCSQL III Part 2 : Module Development 47 8 First Module to OpenERP The Modules - Introduction Objects, Fields and Methods OpenERP Objects The ORM - Object Relation Model OpenERP Object Attributes Object Inheritance - _inherit Inheritance by Delegation - _inherits Fields Introduction CONTENTS 1

6 9.7 Type of Fields ORM methods Views and Events Introduction to Views Form views Tree views Graph views Design Elements Inheritance in Views Events Menu and Actions Menus Actions Security IV Part 3 : Business Process Development Workflow-Business Process Introduction Defining Workflow General structure of a workflow XML file Activity Transition Expressions User Role Error handling Creating a Workflow Creating Wizard - (The Process) Introduction Wizards - Principles Specification Add A New Wizard osv_memory Wizard System Reports CONTENTS

7 14.1 OpenOffice.org reports XSL:RML reports Reports without corporate header Each report with its own corporate header Bar Codes How to add a new report Usual TAGS Unicode reports I18n - Internationalization Introduction V Part 4 : Business Process Advance Configuration Server Action Introduction Client Action Trigger Action Create Object Write Object Multi Action Dashboard 169 VI Part 5 : Migration, Upgradation, Testing Data Migration - Import / Export Data Importation Upgrading Server, Modules 177 VII Part 6 : Service base Integration Working with Web Services How to load data? The objects methods XML-RPC Web services 183 CONTENTS 3

8 21.1 Interfaces Python Example PHP Example VIII Part 7 : Other Topics RAD Tools DIA Open Office Report Designer IX Part 8 : Appendices Appendices Index Appendices A : Coding Conventions Releasing a module Translations Index CONTENTS

9 Part I Forewords 5
10

11 CHAPTER ONE INTRODUCTION Open ERP is a rich development environment. Thanks to its Python and PostgreSQL bindings, and above all, its Object Relational Mapping (ORM), you can develop any arbitrary complex module in Open ERP. 7
, you can")
12 8 Chapter 1. Introduction
13 CHAPTER TWO WHO IS THIS BOOK FOR? 9

14 10 Chapter 2. Who is this book for?

15 CHAPTER THREE CONTENT OF THE BOOK Book Contents 11

16 12 Chapter 3. Content of the book

17 CHAPTER FOUR ABOUT THE AUTHOR(S) 13
")
18 14 Chapter 4. About the author(s)
")
19 Part II Part 1 : Getting Started with OpenERP 15

20

21 CHAPTER FIVE DEVELOPMENT ENVIRONMENT 5.1 Working with Launchpad Registration and Configuration Before you can commit on launchpad, you need to create a login. Go to: > log in / register on top right. You enter your address and you wait for an which will guide you trough the process needed to create your login. This login is only needed if you intend to commit on bazaar on openerp-commiter or on your own branch. You can refer to this link : Any contributor who is interested to become a commiter must show his interest on working for openerp project and his ability to do it in a proper way as the selection for this group is based on meritocracy. It can be by proposing bug fixes, features requested on our bug tracker system. You can even suggest additional modules and/or functionalities on our bug tracker system. You contribute or join Open ERP team, : Contributors are people who wants to help the project getting better, add functionnality and improve stability. Everyone can contribute on the project with his own knowledge by reporting bugs, purposing smart improvment and posting patch. The community team is available on launchpad: Member of the quality and commiter team are automatically members of the community. Installing Bazaar Get Bazaar version control to pull the source from Launchpad. To install bazaar on any ubuntu distribution, you can edit /etc/apt/sources.list by sudo gedit /etc/apt/sources.list and put these lines in it: deb intrepid main deb-src intrepid main 17
22 Then, do the following sudo apt-get install bzr To work correctly, bzr version must be at least 1.3. Check it with the command: bzr --version If you don t have at least 1.3 version, you can check this url: On debian, in any distribution, the 1.5 version is working, you can get it on this url: If you experience problems with Bazaar, please read the F.A.Q on Bazaar version control system before asking any questions Working with Branch The combination of Bazaar branch hosting and Launchpad s teams infrastructure gives you a very powerful capability to collaborate on code. Essentially, you can push a branch into a shared space and anyone on that team can then commit to the branch. This means that you can use Bazaar in the same way that you would use something like SVN, i.e. centrally hosting a branch that many people commit to. You have the added benefit, though, that anyone outside the team can always create their own personal branch of your team branch and, if they choose, upload it back to Launchpad. This is the official and proposed way to contribute on OpenERP and OpenObject. Quick Summary To download the latest sources and create your own local branches of OpenERP, do this: bzr branch lp:openerp cd openerp./bzr_set.py This will download all the component of openerp (server, client, addons) and create links of modules in addons in your server so that you can use it directly. You can change the bzr_set.py file to select what you want to download exactly. Now, you can edit the code and commit in your local branch.: EDIT addons/account/account.py cd addons bzr ci -m "Testing Modifications" Once your code is good enough and follow the Coding Guidelines, you can push your branch in launchpad. You may have to create an account on launchpad first, register your public key, and subscribe to the openerp-community team. Then, you can push your branch. Suppose you want to push your addons: cd addons bzr push lp:~openerp-community/openobject-addons/yourlogin_yourbranchname bzr bind lp:~openerp-community/openobject-addons/yourlogin_yourbranchname After having done that, your branch is public on Launchpad, in the OpenObject project, and commiters can work on it, review it and propose for integration in the official branch. The last line allows you to rebind your branch to the 18 Chapter 5. Development Environment
23 one which is on launchpad, after having done this, your commit will be applied on launchpad directly (unless you use -local): bzr pull # Get modifications on your branch from others EDIT STUFF bzr ci # commit your changes on your public branch If your changes fixe a public bug on launchpad, you can use this to mark the bug as fixed by your branch: bzr ci --fixes=lp: # Where is a bug ID Once your branch is mature, mark it as mature in the web interface of launchpad and request for merging in the official release. Your branch will be reviewed by a commiter and then the quality team to be merged in the official release. [Read more about Open ERP Team] Pushing a new branch If you want to contribute on OpenERP or OpenObject, here is the proposed method: You create a branch on launchpad on the project that interest you. It s important that you create your branch on launchpad and not on your local system so that we can easily merge, share code between projects and centralize futur developments. You develop your own features or bugfixes in your own branch on launchpad. Don t forget to set the status of your branch (new, experimental, development, mature,...) so that contributors knows what they can use or not. Once your code is good enough, you propose your branch for merging Your work will be evaluated by one responsible of the commiters team. If they accept your branch for integration in the official version, they will submit to the quality team that will review and merge in the official branch. If the commiter team refuses your branch, they will explain why so that you can review your code to better fits guidelines (problem for futur migrations,...) The extra-addons branch, that stores all extra modules, is directly accessible to all commiters. If you are a commiter, you can work directly on this branch and commit your own work. This branch do not require a validation of the quality team. You should put there your special modules for your own customers. If you want to propose or develop new modules, we suggest you to create your own branch in the openobject-addons project and develop within your branch. You can fill in a bug to request that your modules are integrated in one of the two branches: extra-addons : if your module touches a few companies addons : if your module will be usefull for most of the companies We invite all our partners and contributors to work in that way so that we can easily integrate and share the work done between the different projects. After having done that, your branch is public on Launchpad, in the OpenObject project, and commiters can work on it, review it and propose for integration in the official branch. The last line allows you to rebind your branch to the one which is on launchpad, after having done this, your commit will be applied on launchpad directly (unless you use -local): 5.1. Working with Launchpad 19
24 bzr pull # Get modifications on your branch from others EDIT STUFF bzr ci # commit your changes on your public branch If your changes fixe a public bug on launchpad, you can use this to mark the bug as fixed by your branch: bzr ci --fixes=lp: # Where is a bug ID Once your branch is mature, mark it as mature in the web interface of launchpad and request for merging in the official release. Your branch will be reviewed by a commiter and then the quality team to be merged in the official release. How to commit Your Work If you want to contribute on OpenERP or OpenObject, here is the proposed method: You create a branch on launchpad on the project that interest you. It s important that you create your branch on launchpad and not on your local system so that we can easily merge, share code between projects and centralize futur developments. You develop your own features or bugfixes in your own branch on launchpad. Don t forget to set the status of your branch (new, experimental, development, mature,...) so that contributors knows what they can use or not. Once your code is good enough, you propose your branch for merging Your work will be evaluated by one responsible of the commiters team. If they accept your branch for integration in the official version, they will submit to the quality team that will review and merge in the official branch. If the commiter team refuses your branch, they will explain why so that you can review your code to better fits guidelines (problem for futur migrations,...) The extra-addons branch, that stores all extra modules, is directly accessible to all commiters. If you are a commiter, you can work directly on this branch and commit your own work. This branch do not require a validation of the quality team. You should put there your special modules for your own customers. If you want to propose or develop new modules, we suggest you to create your own branch in the openobject-addons project and develop within your branch. You can fill in a bug to request that your modules are integrated in one of the two branches: extra-addons branch : if your module touches a few companies addons : if your module will be usefull for most of the companies We invite all our partners and contributors to work in that way so that we can easily integrate and share the work done between the different projects Answer Tracker and Bugs Management We use launchpad on the openobject project to track all bugs and features request related to openerp and openobject. the bug tracker is available here: Bug Tracker : 20 Chapter 5. Development Environment
25 Ideas Tracker : FAQ Manager : Every contributor can report bug and propose bugfixes for the bugs. The status of the bug is set according to the correction. When a particular branch fixes the bug, a commiter (member of the Commiter Team) can set the status to Fix Commited. Only commiters have the right to change the status to Fix Committed., after they validated the proposed patch or branch that fixes the bug. The Quality Team have a look every day to bugs in the status Fix Commited. They check the quality of the code and merge in the official branch if it s ok. To limit the work of the quality team, it s important that only commiters can set the bug in the status Fix Commited. Once quality team finish merging, they change the status to Fix Released Translation Translations are managed by the Launchpad Web interface. Here, you ll find the list of translatable projects. Please read the FAQ before asking questions Blueprints Blueprint is a lightweight way to manage releases of your software and to track the progress of features and ideas, from initial concept to implementation. Using Blueprint, you can encourage contributions from right across your project s community, while targeting the best ideas to future releases. Launchpad Blueprint helps you to plan future release with two tools: milestones: points in time, such as a future release or development sprint series goals: a statement of intention to work on the blueprint for a particular series. Although only drivers can target blueprints to milestones and set them as series goals, anyone can propose a blueprint as a series goal. As a driver or owner, you can review proposed goals by following the Set goals link on your project s Blueprint overview page. By following the Subscribe yourself link on a blueprint page, you can ask Launchpad to send you notification of any changes to the blueprint. In most cases, you ll receive notification only of changes made to the blueprint itself in Launchpad and not to any further information, such as in an external wiki. However, if the wiki software supports change notifications, Launchpad can even notify you of changes to the wiki page. If you re a blueprint owner and want Launchpad to know about updates to the related wiki page, ask the wiki admin how to send notifications. Notifications should go to notifications@specs.launchpad.net. The Buleprints for OpenERP are listed here: Working with Launchpad 21
26 Development Environment Windows Linux Mac-OS Directory Structure Server GTK-Client Web Client Configuration Two configuration files are available: one for the client: ~/.terprc one for the server: ~/.terp_serverrc Those files follow the convention used by python s ConfigParser module. Lines beginning with # or ; are comments. Those files are not necessary. If they are not found, the server and the client will start with the default configuration. The client configuration file is automatically generated upon the first start. The one of the server can automatically be created using the command: tinyerp-server.py -s Server Configuration File The server configuration file.terp_serverrc is used to save server startup options. For the version 5.X configuration file is.openerp_serverrc. Here is the list of the available options: interface Address to which the server will be bound port Port the server will listen on database Name of the database to use user Username used when connecting to the database translate_in File used to translate Open ERP to your language translate_out File used to export the language Open ERP use language Use this language as the language of the server. This must be specified as an ISO country code, as specified by the W3C. verbose Will used debugged output 22 Chapter 5. Development Environment
27 init init a module (use all for all modules) update update a module (use all for all modules) upgrade Upgrade/install/uninstall modules db_name specify the database name db_user specify the database user name db_password specify the database password pg_path specify the pg executable path db_host specify the database host db_port specify the database port translate_modules Specify modules to export. Use in combination with i18n-export You can create your own configuration file by specifying -s or save on the server command line. If you would like to write an alternativve configuration file, use -c <config file> or config=<config file> Here is a basic configuration for a server: [options] verbose = False xmlrpc = True database = terp update = {} port = 8069 init = {} interface = reportgz = False Full Example for Server V5.0 [printer] path = none softpath_html = none preview = True softpath = none [logging] output = stdout logger = verbose = True level = error [help] index = context = [form] autosave = False toolbar = True [support] recipient = support@openerp.com support_id = [tip] position = 0 autostart = False 5.1. Working with Launchpad 23
28 [client] lang = en_us default_path = /home/user filetype = {} theme = none toolbar = icons form_tab_orientation = 0 form_tab = top [survey] position = 3 [path] pixmaps = /usr/share/pixmaps/openerp-client/ share = /usr/share/openerp-client/ [login] db = eo2 login = admin protocol = port = 8069 server = localhost GTK-Client Configuration login section login login name to use to connect to Tiny ERP server server address used by the server port port used by the server path section share path used to find Tiny ERP shared files pixmaps path used to find Tiny ERP pixmaps files tip section autostart Should the client display tips at startup position Tip number the client will display 24 Chapter 5. Development Environment
29 form section autosave Will the client automatically save the change you made to a record printer section preview Preview report before printing softpath Path to the pdf previewer softpath_html Path to the html previewer path Command used to print logging section logger log channels to display. List level logging level to show output file used by the logger verbose set the log level to INFO client section default_path Default path used by the client when saving/loading datas. Default values: [login] login = admin port = 8069 server = [printer] path = none preview = True softpath = none [logging] output = stdout logger = verbose = True level = ERROR [form] autosave = False 5.1. Working with Launchpad 25
30 [client] default_path = /home/user Web Client Configuration Get a clone of each repository: bzr clone lp:~openerp/openobject-server/trunk server bzr clone lp:~openerp/openobject-client/trunk client bzr clone lp:~openerp/openobject-client-web/trunk client-web bzr clone lp:~openerp/openobject-addons/trunk addons If you want to get a clone of the extra-addons repository, you can execute this command: bzr clone lp:~openerp-commiter/openobject-addons/trunk-extra-addons extra-addons run the setup scripts in the respective directories: python2.4 setup.py build python2.4 setup.py install Currently the initialisation procedure of the server parameter init=all to populate the database seems to be broken in trunk. It is recommended to create a new database via the gtk-client. Before that the web-client will not work. Start OpenERP server like this:./openerp-server.py --addons-path=/path/to/my/addons The bin/addons will be considered as default addons directory which can be overriden by the /path/to/my/addons/. That is if an addon exists in bin/addons as well as /path/to/my/addons (custom path) the later one will be given preference over the bin/addons (default path). Command line options General Options -{-}version show program version number and exit -h, -{-}help show this help message and exit -c CONFIG, -{-}config=config specify alternate config file -s, -{-}save save configuration to ~/.terp_serverrc -v, -{-}verbose enable debugging -{-}pidfile=pidfile file where the server pid will be stored -{-}logfile=logfile file where the server log will be stored -n INTERFACE, -{-}interface=interface specify the TCP IP address -p PORT, -{-}port=port specify the TCP port -{-}net_interface=netinterface specify the TCP IP address for netrpc -{-}net_port=netport specify the TCP port for netrpc 26 Chapter 5. Development Environment
31 -{-}no-netrpc -{-}no-xmlrpc disable netrpc disable xmlrpc -i INIT, -{-}init=init init a module (use all for all modules) -{-}without-demo=without_demo load demo data for a module (use all for all modules) -u UPDATE, -{-}update=update update a module (use all for all modules) -{-}stop-after-init -{-}debug -S, -{-}secure stop the server after it initializes enable debug mode launch server over https instead of http -{-}smtp=smtp_server specify the SMTP server for sending mail -{-}price_accuracy=price_accuracy specify the price accuracy Database related options: -d DB_NAME, -{-}database=db_name specify the database name -r DB_USER, -{-}db_user=db_user specify the database user name -w DB_PASSWORD, -{-}db_password=db_password specify the database password -{-}pg_path=pg_path specify the pg executable path -{-}db_host=db_host specify the database host -{-}db_port=db_port specify the database port Internationalization options: Use these options to translate Tiny ERP to another language.see i18n section of the user manual. Option -l is mandatory. -l LANGUAGE, -{-}language=language specify the language of the translation file. Use it with i18n-export and i18n-import -{-}i18n-export=translate_out export all sentences to be translated to a CSV file and exit -{-}i18n-import=translate_in import a CSV file with translations and exit -{-}modules=translate_modules specify modules to export. Use in combination with i18n-export OpenERP Server and Web Client - Start/Stop OpenERP 4.2 First check that all the required dependencies are installed. Then create the terp database. You have to make sure that your user has the correct credentials to create databases with PostgreSQL. For more information on this subject please refer to the PostgreSQL manual.: $ createdb terp --encoding=unicode 5.1. Working with Launchpad 27
32 Once the database created, you can start OpenERP. The content of the database will automatically be created at the first start.: $./tinyerp-server.py OpenERP 5.0 and above Check that all the required dependencies are installed. Make sure you are logged on as a user that has catalog admin rights in PostgreSQL. Refer to the PostgreSQL manual for more info on this. Start the OpenERP Server./openerp-server.py * Finally connect to the server with the GTK Client or etiny and use the Create Database option to c Shutting down the server The easiest way the shut down the server on a Linux type system is to send the SIG INT signal to the server. Find the Process ID. # ps ax grep -i tiny Use the kill comand with the PID. # kill -2 pid 5.2 Configuration Two configuration files are available: one for the client: ~/.terprc one for the server: ~/.terp_serverrc Those files follow the convention used by python s ConfigParser module. Lines beginning with # or ; are comments. Those files are not necessary. If they are not found, the server and the client will start with the default configuration. The client configuration file is automatically generated upon the first start. The one of the server can automatically be created using the command: tinyerp-server.py -s Server Configuration File The server configuration file.terp_serverrc is used to save server startup options. For the version 5.X configuration file is.openerp_serverrc. Here is the list of the available options: interface Address to which the server will be bound 28 Chapter 5. Development Environment
33 port Port the server will listen on database Name of the database to use user Username used when connecting to the database translate_in File used to translate Open ERP to your language translate_out File used to export the language Open ERP use language Use this language as the language of the server. This must be specified as an ISO country code, as specified by the W3C. verbose Will used debugged output init init a module (use all for all modules) update update a module (use all for all modules) upgrade Upgrade/install/uninstall modules db_name specify the database name db_user specify the database user name db_password specify the database password pg_path specify the pg executable path db_host specify the database host db_port specify the database port translate_modules Specify modules to export. Use in combination with i18n-export You can create your own configuration file by specifying -s or save on the server command line. If you would like to write an alternativve configuration file, use -c <config file> or config=<config file> Here is a basic configuration for a server: [options] verbose = False xmlrpc = True database = terp update = {} port = 8069 init = {} interface = reportgz = False Full Example for Server V5.0 [printer] path = none softpath_html = none preview = True softpath = none [logging] output = stdout logger = verbose = True level = error [help] index = context = Configuration 29
34 [form] autosave = False toolbar = True [support] recipient = support@openerp.com support_id = [tip] position = 0 autostart = False [client] lang = en_us default_path = /home/user filetype = {} theme = none toolbar = icons form_tab_orientation = 0 form_tab = top [survey] position = 3 [path] pixmaps = /usr/share/pixmaps/openerp-client/ share = /usr/share/openerp-client/ [login] db = eo2 login = admin protocol = port = 8069 server = localhost GTK-Client Configuration login section login login name to use to connect to Tiny ERP server server address used by the server port port used by the server path section share path used to find Tiny ERP shared files pixmaps path used to find Tiny ERP pixmaps files 30 Chapter 5. Development Environment
35 tip section autostart Should the client display tips at startup position Tip number the client will display form section autosave Will the client automatically save the change you made to a record printer section preview Preview report before printing softpath Path to the pdf previewer softpath_html Path to the html previewer path Command used to print logging section logger log channels to display. List level logging level to show output file used by the logger verbose set the log level to INFO client section default_path Default path used by the client when saving/loading datas. Default values: [login] login = admin port = 8069 server = [printer] path = none preview = True softpath = none 5.2. Configuration 31
36 [logging] output = stdout logger = verbose = True level = ERROR [form] autosave = False [client] default_path = /home/user Web Client Configuration Get a clone of each repository: bzr clone lp:~openerp/openobject-server/trunk server bzr clone lp:~openerp/openobject-client/trunk client bzr clone lp:~openerp/openobject-client-web/trunk client-web bzr clone lp:~openerp/openobject-addons/trunk addons If you want to get a clone of the extra-addons repository, you can execute this command: bzr clone lp:~openerp-commiter/openobject-addons/trunk-extra-addons extra-addons run the setup scripts in the respective directories: python2.4 setup.py build python2.4 setup.py install Currently the initialisation procedure of the server parameter init=all to populate the database seems to be broken in trunk. It is recommended to create a new database via the gtk-client. Before that the web-client will not work. Start OpenERP server like this:./openerp-server.py --addons-path=/path/to/my/addons The bin/addons will be considered as default addons directory which can be overriden by the /path/to/my/addons/. That is if an addon exists in bin/addons as well as /path/to/my/addons (custom path) the later one will be given preference over the bin/addons (default path). 5.3 Command line options General Options -{-}version show program version number and exit -h, -{-}help show this help message and exit -c CONFIG, -{-}config=config specify alternate config file 32 Chapter 5. Development Environment
37 -s, -{-}save -v, -{-}verbose save configuration to ~/.terp_serverrc enable debugging -{-}pidfile=pidfile file where the server pid will be stored -{-}logfile=logfile file where the server log will be stored -n INTERFACE, -{-}interface=interface specify the TCP IP address -p PORT, -{-}port=port specify the TCP port -{-}net_interface=netinterface specify the TCP IP address for netrpc -{-}net_port=netport specify the TCP port for netrpc -{-}no-netrpc -{-}no-xmlrpc disable netrpc disable xmlrpc -i INIT, -{-}init=init init a module (use all for all modules) -{-}without-demo=without_demo load demo data for a module (use all for all modules) -u UPDATE, -{-}update=update update a module (use all for all modules) -{-}stop-after-init -{-}debug -S, -{-}secure stop the server after it initializes enable debug mode launch server over https instead of http -{-}smtp=smtp_server specify the SMTP server for sending mail -{-}price_accuracy=price_accuracy specify the price accuracy Database related options: -d DB_NAME, -{-}database=db_name specify the database name -r DB_USER, -{-}db_user=db_user specify the database user name -w DB_PASSWORD, -{-}db_password=db_password specify the database password -{-}pg_path=pg_path specify the pg executable path -{-}db_host=db_host specify the database host -{-}db_port=db_port specify the database port Internationalization options: Use these options to translate Tiny ERP to another language.see i18n section of the user manual. Option -l is mandatory. -l LANGUAGE, -{-}language=language specify the language of the translation file. Use it with i18n-export and i18n-import -{-}i18n-export=translate_out export all sentences to be translated to a CSV file and exit -{-}i18n-import=translate_in import a CSV file with translations and exit -{-}modules=translate_modules specify modules to export. Use in combination with i18n-export 5.3. Command line options 33
38 5.4 OpenERP Server and Web Client - Start/Stop OpenERP 4.2 First check that all the required dependencies are installed. Then create the terp database. You have to make sure that your user has the correct credentials to create databases with PostgreSQL. For more information on this subject please refer to the PostgreSQL manual.: $ createdb terp --encoding=unicode Once the database created, you can start OpenERP. The content of the database will automatically be created at the first start.: $./tinyerp-server.py OpenERP 5.0 and above Check that all the required dependencies are installed. Make sure you are logged on as a user that has catalog admin rights in PostgreSQL. Refer to the PostgreSQL manual for more info on this. Start the OpenERP Server./openerp-server.py * Finally connect to the server with the GTK Client or etiny and use the Create Database option to c 5.5 Shutting down the server The easiest way the shut down the server on a Linux type system is to send the SIG INT signal to the server. Find the Process ID. # ps ax grep -i tiny Use the kill comand with the PID. # kill -2 pid 34 Chapter 5. Development Environment
39 CHAPTER SIX MOULDER DEVELOPMENT APPROACH 6.1 OpenObject Server and Modules OpenERP is a Client/Server system that works over a IP Network. OpenERP programming language is Python. OpenERP uses Object-Oriented technologies. OpenERP records its data with a PostgreSQL relational database. OpenERP business objects are modeled with an Object Relational Mapping (ORM) system. OpenERP offers three Human Machine Interfaces (HMI) a GTK client, a QT client and a web client (etiny). OpenERP uses ReportLab for report generation in (PDF). OpenERP uses XML for several purpose: describing data, view, reports, data transport (XML-RPC) Technical Architecture Server/client, XML-RPC Open ERP is a based on a client/server architecture. The server and the client communicate using the XML-RPC protocol. XML-RPC is a very simple protocol which allows the client to do remote procedure calls. The function called, its arguments, and the result are sent HTTP and encoded using XML. For more information on XML-RPC, please see: Since version 4.2, there is a new protocol between client/server that have been called net-rpc. It is based on the python cpickle function, it is faster than the xml-rpc. Client The logic of Open ERP is entirely on the server side. The client is very simple; his work is to ask data (forms, lists, trees) from the server and to send them back. With this approach, nearly all developments are made on the server side. This makes Open ERP easier to develop and to maintain. The client doesn t understand what it posts. Even actions like Click on the print icon are sent to the server to ask how to react. The client operation is very simple; when a user makes an action (save a form, open a menu, print,...) it sends this action to the server. The server then sends the new action to execute to the client. 35

40 There are three types of action; Open a window (form or tree) Print a document Execute a wizard Architecture Explanation of modules Server - Base distribution We use a distributed communication mechanism inside the Open ERP server. Our engine support most commonly distributed patterns: request/reply, publish/subscribe, monitoring, triggers/callback,... Different business objects can be in different computers or the same objects can be on multiple computers to perform load-balancing on multiple computers. Server - Object Relational Mapping (ORM) This layer provides additional object functionality on top of postgresql: Consistency: powerful validity checks, Work with objects (methods, references,...) Row-level security (per user/group/role) Complex actions on a group of resources Inheritance Server - Web-Services The web-service module offer a common interface for all web-services SOAP XML-RPC NET-RPC Business objects can also be accessed via the distributed object mechanism. They can all be modified via the client interface with contextual views. Server - Workflow Engine Workflows are graphs represented by business objects that describe the dynamics of the company. Workflows are also used to track processes that evolve over time. 36 Chapter 6. Moulder Development Approach
41 An example of workflow used in Open ERP: A sales order generates an invoice and a shipping order Server - Report Engine Reports in Open ERP can be rendered in different ways: Custom reports: those reports can be directly created via the client interface, no programming required. Those reports are represented by business objects (ir.report.custom) High quality personalized reports using openreport: no programming required but you have to write 2 small XML files: a template which indicates the data you plan to report an XSL:RML stylesheet Hard coded reports OpenOffice Writer templates Nearly all reports are produced in PDF. Server - Business Objects Almost everything is a business object in Open ERP, they described all data of the program (workflows, invoices, users, customized reports,...). Business objects are described using the ORM module. They are persistent and can have multiple views (described by the user or automatically calculated). Business objects are structured in the /module directory. Client - Wizards Wizards are graphs of actions/windows that the user can perform during a session. Client - Widgets Widgets are probably, although the origin of the term seems to be very difficult to trace, WIndow gadgets in the IT world, which mean they are gadgets before anything, which implement elementary features through a portable visual tool. All common widgets are supported: entries textboxes floating point numbers dates (with calendar) checkboxes... And also all special widgets: buttons that call actions references widgets one2one many2one many2many one2many in list... Widget have different appearances in different views. For example, the date widget in the search dialog represents two normal dates for a range of date (from...to...). Some widgets may have different representations depending on the context. For example, the one2many widget can be represented as a form with multiple pages or a multi-columns list OpenObject Server and Modules 37
42 Events on the widgets module are processed with a callback mechanism. A callback mechanism is a process whereby an element defines the type of events he can handle and which methods should be called when this event is triggered. Once the event is triggered, the system knows that the event is bound to a specific method, and calls that method back. Hence callback. 6.2 Module Integrations The are many different modules available for Open ERP and suited for different business models. Nearly all of these are optional (except ModulesAdminBase), making it easy to customize Open ERP to serve specific business needs. All the modules are in a directory named addons/ on the server. You simply need to copy or delete a module directory in order to either install or delete the module on the Open ERP platform. Some modules depend on other modules. See the file addons/module/ terp.py for more information on the dependencies. Here is an example of terp.py: { } "name" : "Open TERP Accounting", "version" : "1.0", "author" : "Bob Gates - Not So Tiny", "website" : " "category" : "Generic Modules/Others", "depends" : ["base"], "description" : """A Multiline Description """, "init_xml" : ["account_workflow.xml", "account_data.xml", "account_demo.xml"], "demo_xml" : ["account_demo.xml"], "update_xml" : ["account_view.xml", "account_report.xml", "account_wizard.xml"], "active": False, "installable": True When initializing a module, the files in the init_xml list are evaluated in turn and then the files in the update_xml list are evaluated. When updating a module, only the files from the update_xml list are evaluated. 6.3 Inheritance Traditional Inheritance Introduction Objects may be inherited in some custom or specific modules. It is better to inherit an object to add/modify some fields. It is done with: _inherit= object.name 38 Chapter 6. Moulder Development Approach
43 Extension of an object There are two possible ways to do this kind of inheritance. Both ways result in a new class of data, which holds parent fields and behaviour as well as additional fielda and behaviour, but they differ in heavy programatical consequences. While Example 1 creates a new subclass custom_material that may be seen or used by any view or tree which handles network.material, this will not be the case for Example 2. This is due to the table (other.material) the new subclass is operating on, which will never be recognized by previous network.material views or trees. Example 1: class custom_material(osv.osv): _name = network.material _inherit = network.material _columns = { manuf_warranty : fields.boolean( Manufacturer warranty? ), } _defaults = { manuf_warranty : lambda *a: False, } custom_material() Tip: Notice _name == _inherit In this example, the custom_material will add a new field manuf_warranty to the object network.material. New instances of this class will be visible by views or trees operating on the superclasses table network.material. This inheritancy is usually called class inheritance in Object oriented design. The child inherits data (fields) and behavior (functions) of his parent. Example 2: class other_material(osv.osv): _name = other.material _inherit = network.material _columns = { manuf_warranty : fields.boolean( Manufacturer warranty? ), } _defaults = { manuf_warranty : lambda *a: False, } other_material() Tip: Notice _name!= _inherit In this example, the other_material will hold all fields specified by network.material and it will additionally hold a new field manuf_warranty. All those fields will be part of the table other.material. New instances of this class will therefore never been seen by views or trees operating on the superclasses table network.material. This type of inheritancy is known as inheritance by prototyping (e.g. Javascript), because the newly created subclass copies all fields from the specified superclass (prototype). The child inherits data (fields) and behavior (functions) of his parent Inheritance 39
44 6.3.2 Inheritance by Delegation Syntax :: class tiny_object(osv.osv) _name = tiny.object _table = tiny_object _inherits = { tiny.object _1_ : name_col _1_, tiny.object _2_ : name_col _2_,..., tiny (...) The object tiny.object inherits from all the columns and all the methods from the n objects tiny.object _1_,..., tiny.object _n_. To inherit from multiple tables, the technique consists in adding one column to the table tiny_object per inherited object. This column will store a foreign key (an id from another table). The values name_col _1_ name_col _2_... name_col _n_ are of type string and determine the title of the columns in which the foreign keys from tiny.object _1_,..., tiny.object _n_ are stored. This inheritance mechanism is usually called instance inheritance or value inheritance. A resource (instance) has the VALUES of its parents. 40 Chapter 6. Moulder Development Approach
 and user interface (view) concerns, so that changes to the user interface do not")
45 CHAPTER SEVEN OPENOBJECT ARCHITECTURE - MVC 7.1 MVC - Model, View, Controller According to Wikipedia, a Model-view-controller (MVC) is an architectural pattern used in software engineering. In complex computer applications that present lots of data to the user, one often wishes to separate data (model) and user interface (view) concerns, so that changes to the user interface do not impact the data handling, and that the data can be reorganized without changing the user interface. The model-view-controller solves this problem by decoupling data access and business logic from data presentation and user interaction, by introducing an intermediate component: the controller. For example, in the diagram above, the solid lines for the arrows starting from the controller and going to both the view and the model mean that the controller has a complete access to both the view and the model. The dashed line for the arrow going from the view to the controller means that the view has a limited access to the controller. The reasons of this design are : From View to Model : the model sends notification to the view when its data has been modified in order the view to redraw its content. The model doesn t need to know the inner workings of the view to perform this operation. However, the view needs to access the internal parts of the controller. From View to Controller : the reason why the view has limited access to the controller is because the dependencies from the view to the controller need to be minimal: the controller can be replaced at any moment MVC Model in Tiny ERP In Tiny ERP, we can apply this model-view-controller semantic with model : The PostgreSQL tables. 41
46 view : views are defined in XML files in Tiny ERP. controller : The objects of TinyERP. 7.2 MVCSQL Example 1 Suppose sale is a variable on a record of the sale.order object related to the sale_order table. You can acquire such a variable doing this.: sale = self.browse(cr, uid, ID) (where cr is the current row, from the database cursor, uid is the current user s ID for security checks, and ID is the sale order s ID or list of IDs if we want more than one) Suppose you want to get: the country name of the first contact of a partner related to the ID sale order. You can do the following in Open ERP: country_name = sale.partner_id.address[0].country_id.name If you want to write the same thing in traditional SQL development, it will be in python: (we suppose cr is the cursor on the database, with psycopg) cr.execute( select partner_id from sale_order where id=%d, (ID,)) partner_id = cr.fetchone()[0] cr.execute( select country_id from res_partner_address where partner_id=%d, (partner_id,)) country_id = cr.fetchone()[0] cr.execute( select name from res_country where id=%d, (country_id,)) del partner_id del country_id country_name = cr.fetchone()[0] Of course you can do better if you develop smartly in SQL, using joins or subqueries. But you have to be smart and most of the time you will not be able to make such improvements: Maybe some parts are in others functions There may be a loop in different elements You have to use intermediate variables like country_id The first operation as an object call is much better for several reasons: It uses objects facilities and works with modules inheritances, overload,... It s simpler, more explicit and uses less code It s much more efficient as you will see in the following examples Some fields do not directly correspond to a SQL field (e.g.: function fields in Python) 42 Chapter 7. OpenObject Architecture - Mvc
47 7.2.2 Example 2 - Prefetching Suppose that later in the code, in another function, you want to access the name of the partner associated to your sale order. You can use this: partner_name = sale.partner_id.name And this will not generate any SQL query as it has been prefetched by the object relational mapping engine of Open ERP Loops and special fields Suppose now that you want to compute the totals of 10 sales order by countries. You can do this in Open ERP within a Open ERP object: def get_totals(self, cr, uid, ids): countries = {} for sale in self.browse(cr, uid, ids): country = sale.partner_invoice_id.country countries.setdefault(country, 0.0) countries[country] += sale.amount_untaxed return countries And, to print them as a good way, you can add this on your object: def print_totals(self, cr, uid, ids): result = self.get_totals(cr, uid, ids) for country in result.keys(): print [%s] %s: %.2f (country.code, country.name, result[country]) The 2 functions will generate 4 SQL queries in total! This is due to the SQL engine of Open ERP that does prefetching, works on lists and uses caching methods. The 3 queries are: 1. Reading the sale.order to get ID s of the partner s address 2. Reading the partner s address for the countries 3. Calling the amount_untaxed function that will compute a total of the sale order lines 4. Reading the countries info (code and name) That s great because if you run this code on 1000 sales orders, you have the guarantee to only have 4 SQL queries. Notes: IDS is the list of the 10 ID s: [12,15,18,34,...,99] The arguments of a function are always the same: the user id (for security checks) cr: the cursor database (from psycopg) * uid: If you run this code on 5000 sales orders, you may have 8 SQL queries because as SQL queries are not allowed to take too much memory, it may have to do two separate readings MVCSQL 43
48 7.2.4 A complete example Here is a complete example, from the Open ERP official distribution, of the function that does bill of material explosion and computation of associated routings: class mrp_bom(osv.osv):... def _bom_find(self, cr, uid, product_id, product_uom, properties=[]): bom_result = False # Why searching on BoM without parent? cr.execute( select id from mrp_bom where product_id=%d and bom_id is null order by sequence, (product_id,)) ids = map(lambda x: x[0], cr.fetchall()) max_prop = 0 result = False for bom in self.pool.get( mrp.bom ).browse(cr, uid, ids): prop = 0 for prop_id in bom.property_ids: if prop_id.id in properties: prop+=1 if (prop>max_prop) or ((max_prop==0) and not result): result = bom.id return result def _bom_explode(self, cr, uid, bom, factor, properties, addthis=false, level=10): factor = factor / (bom.product_efficiency or 1.0) factor = rounding(factor, bom.product_rounding) if factor<bom.product_rounding: factor = bom.product_rounding result = [] result2 = [] if bom.type== phantom and not bom.bom_lines: newbom = self._bom_find(cr, uid, bom.product_id.id, bom.product_uom.id, properties) if newbom: res = self._bom_explode(cr, uid, self.browse(cr, uid, [newbom])[0], factor*bom.product_qty, properties, addthis=true, level=level+10) result = result + res[0] result2 = result2 + res[1] else: return [],[] else: if addthis and not bom.bom_lines: result.append( { name : bom.product_id.name, product_id : bom.product_id.id, product_qty : bom.product_qty * factor, product_uom : bom.product_uom.id, }) if bom.routing_id: for wc_use in bom.routing_id.workcenter_lines: wc = wc_use.workcenter_id cycle = factor * wc_use.cycle_nbr result2.append({ name : bom.routing_id.name, workcenter_id : wc.id, sequence : level, 44 Chapter 7. OpenObject Architecture - Mvc
49 cycle : cycle, hour : wc_use.hour_nbr + ( wc.time_start+wc.time_stop+cycle*wc.time_cycle) * (wc.time_efficiency or 1 }) for bom2 in bom.bom_lines: res = self._bom_explode(cr, uid, bom2, factor, properties, addthis=true, level=level+10) result = result + res[0] result2 = result2 + res[1] return result, result MVCSQL 45
50 46 Chapter 7. OpenObject Architecture - Mvc
51 Part III Part 2 : Module Development 47
52
53 CHAPTER EIGHT FIRST MODULE TO OPENERP Open ERP is a Python based client/server program for Enterprise Resource Planning. It consist of a client tinyerpclient and a server tinyerp-server while the persistence is provided by Postgresql. Open ERP currently uses XML- RPC for communication over a network. Once installed Open ERP has a modular structure that allows modules to be added as needed. 8.1 The Modules - Introduction The usage of the modules is the way to extend Tiny ERP functionality. The default Tiny ERP installation is organized as a kernel and various modules among which we can distinguish : base : The most basic module. Defines ir.property, res.company, res.request, res.currency, res.user, res.partner crm : Customer & Supplier Relationship Management. sale : Sales Management. mrp : Manufacturing Resource Planning. New modules can be programed easily, and require a little practice of XML and Python Module Structure The Modules 1. Introduction 2. Files & Directories (a) terp.py (b) init.py (c) XML Files i. Actions ii. Menu Entries iii. Reports iv. Wizards 3. Profiles 49
54 Modules - Files and Directories All the modules are located in the server/addons directory. The following steps are necessary to create a new module: create a subdirectory in the server/addons directory create a module description file: terp.py create the Python file containing the objects create.xml files that download the data (views, menu entries, demo data,...) optionally create reports, wizards or workflows.!the Modules - Files And Directories - XML Files XML files located in the module directory are used to modify the structure of the database. They are used for many purposes, among which we can cite : initialization and demonstration data declaration, views declaration, reports declaration, wizards declaration, workflows declaration. General structure of Tiny ERP XML files is more detailed in the section Data Loading Files XML. Look here if you are interested in learning more about initialization and demonstration data declaration XML files. The following section are only related to XML specific to actions, menu entries, reports, wizards and workflows declaration. Python Module Descriptor File init.py The init.py file The init.py file is, like any Python module, executed at the start of the program. It needs to import the Python files that need to be loaded. So, if you create a module.py file, containing the description of your objects, you have to write one line in init.py: import module OpenERP Module Descriptor File terp.py In the created module directory, you must add a terp.py file. This file, which must be in Python format, is responsible to 1. determine the XML files that will be parsed during the initialization of the server, and also to 2. determine the dependencies of the created module. 50 Chapter 8. First Module to OpenERP
55 This file must contain a Python dictionary with the following values: name version description author website license depends init_xml The (Plain English) name of the module. The version of the module. The module description (text). The author of the module. The website of the module. The license of the module (default:gpl-2). List of modules on which this module depends. The base module must almost always be in the dependencies because some necessary data for the views, reports,... are in the base module. List of.xml files to load when the server is launched with the init=module argument. Filepaths must be relative to the directory where the module is. Open ERP XML File Format is detailed in this section. update_xml installable active Example List of.xml files to load when the server is launched with the update=module launched. Filepaths must be relative to the directory where the module is. Open ERP XML File Format is detailed in this section. True or False. Determines if the module is installable or not. True or False (default: False). Determines the modules that are installed on the database creation. Here is an example of terp.py file for the product module: 8.1. The Modules - Introduction 51
56 { } "name" : "Products & Pricelists", "version" : "1.0", "author" : "Open", "category" : "Generic Modules/Inventory Control", "depends" : ["base", "account"], "init_xml" : [], "demo_xml" : ["product_demo.xml"], "update_xml" : ["product_data.xml","product_report.xml", "product_wizard.xml","product_view.xml" "installable": True, "active": True The files that must be placed in init_xml are the ones that relate to the workflow definition, data to load at the installation of the software and the data for the demonstrations. The files in update_xml concern: views, reports and wizards. Objects All Tiny ERP resources are objects: menus, actions, reports, invoices, partners,... Tiny ERP is based on an object relational mapping of a database to control the information. Object names are hierarchical, as in the following examples: account.transfer : a money transfer account.invoice : an invoice account.invoice.line : an invoice line Generally, the first word is the name of the module: account, stock, sale. Other advantages of an ORM; simpler relations : invoice.partner.address[0].city objects have properties and methods: invoice.pay(3400 EUR), inheritance, high level constraints,... It is easier to manipulate one object (example, a partner) than several tables (partner address, categories, events,...) 52 Chapter 8. First Module to OpenERP
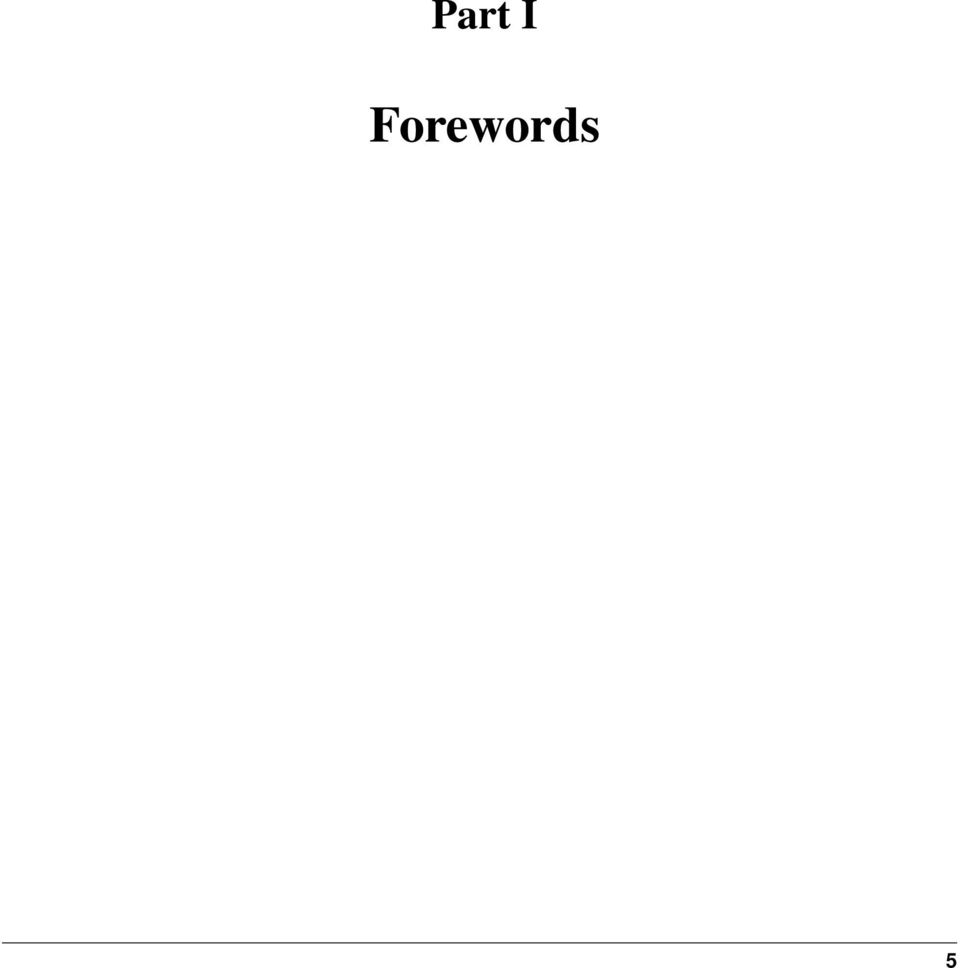
![Figure 8.1: The Physical Objects Model of [OpenERP version 3.0.3] PostgreSQL The ORM of Open ERP is constructed over PostgreSQL.](/docs-images/34/17004428/images/57-0.png "It is thus possible to query the object used by Open ERP using the object interface or by directly using SQL statements.")
57 Figure 8.1: The Physical Objects Model of [OpenERP version 3.0.3] PostgreSQL The ORM of Open ERP is constructed over PostgreSQL. It is thus possible to query the object used by Open ERP using the object interface or by directly using SQL statements. But it is dangerous to write or read directly in the PostgreSQL database, as you will shortcut important steps like constraints checking or workflow modification. Note: The Physical Database Model of OpenERP Pre-Installed Data %define=lightblue color=#27adfb% Data can be inserted or updated into the PostgreSQL tables corresponding to the Tiny ERP objects using XML files. The general structure of a Tiny ERP XML file is as follows: <?xml version="1.0"?> <terp> <data> <record model="model.name_1" id="id_name_1"> <field name="field1"> %lightblue%"field1 content" </field> <field name="field2"> %lightblue%"field2 content" </field> 8.1. The Modules - Introduction 53
58 (...) </record> <record model="model.name_2" id="id_name_2"> (...) </record> (...) </data> </terp> Fields content are strings that must be encoded as UTF-8 in XML files. Let s review an example taken from the TinyERP source (base_demo.xml in the base module): <record model="res.company" id="main_company"> <field name="name">tiny sprl</field> <field name="partner_id" ref="main_partner"/> <field name="currency_id" ref="eur"/> </record> <record model="res.users" id="user_admin"> <field name="login">admin</field> <field name="password">admin</field> <field name="name">administrator</field> <field name="signature">administrator</field> <field name="action_id" ref="action_menu_admin"/> <field name="menu_id" ref="action_menu_admin"/> <field name="address_id" ref="main_address"/> <field name="groups_id" eval="[(6,0,[group_admin])]"/> <field name="company_id" ref=" *main_company* "/> </record> This last record defines the admin user : The fields login, password, etc are straightforward. The ref attribute allows to fill relations between the records : <field name="company_id" ref="main_company"/> ->The is a many-to-one relation from the user object to the company object, and main_company is the id of to associate. The eval attribute allows to put some python code in the xml: here the groups_id field is a many2many. For such a field, [(6,0,[group_admin])] means : Remove all the groups associated with the current user and use the list [group_admin] as the new associated groups (and group_admin is the id of another record). The search attribute allows to find the record to associate when you do not know its xml id. You can thus specify a search criteria to find the wanted record. The criteria is a list of tuples of the same form than for the predefined search method. If there are several results, an arbitrary one will be chosen (the first one): <field name="partner_id" search="[]" model="res.partner"/> ->This is a classical example of the use in demo data: here we do not really care about which partner we want to use for the test, so we give an empty list. Notice the model attribute is currently mandatory. 54 Chapter 8. First Module to OpenERP
59 Record Tag Description The addition of new data is made with the record tag. This one takes a mandatory attribute : model. Model is the object name where the insertion has to be done. The tag record can also take an optional attribute: id. If this attribute is given, a variable of this name can be used later on, in the same file, to make reference to the newly created resource ID. A record tag may contain field tags. They indicate the record s fields value. If a field is not specified the default value will be used. Example <record model="ir.actions.report.xml" id="l0"> <field name="model">account.invoice</field> <field name="name">invoices List</field> <field name="report_name">account.invoice.list</field> <field name="report_xsl">account/report/invoice.xsl</field> <field name="report_xml">account/report/invoice.xml</field> </record> field tag The attributes for the field tag are the following: name eval ref mandatory attribute indicating the field name python expression that indicating the value to add reference to an id defined in this file function tag model: name: eval o should evaluate to the list of parameters of the method to be called, excluding cr and uid Example <function model="ir.ui.menu" name="search" eval="[[( name, =, Operations )]]"/> getitem tag Takes a subset of the evaluation of the last child node of the tag. type o int or list index int or string (a key of a dictionary) Example Evaluates to the first element of the list of ids returned by the function node <getitem index="0" type="list"> <function model="ir.ui.menu" name="search" eval="[[( name, =, Operations )]]"/> </getitem> 8.1. The Modules - Introduction 55
60 i18n Improving Translations Translating in launchpad Translations are managed by the Launchpad Web interface. Here, you ll find the list of translatable projects. Please read the FAQ before asking questions. Translating your own module Changed in version 5.0. Contrary to the 4.2.x version, the translations are now done by module. So, instead of an unique i18n folder for the whole application, each module has its own i18n folder. In addition, OpenERP can now deal with.po 1 files as import/export format. The translation files of the installed languages are automatically loaded when installing or updating a module. OpenERP can also generate a.tgz archive containing well organised.po files for each selected module. Process Defining the process Thourgh the interface and module recorder Then, put the generated XML in your own module Views (:title Technical Specifications - Architecture - Views:) Views are a way to represent the objects on the client side. They indicate to the client how to lay out the data coming from the objects on the screen. There are two types of views: form views tree views Lists are simply a particular case of tree views. A same object may have several views: the first defined view of a kind (tree, form,...) will be used as the default view for this kind. That way you can have a default tree view (that will act as the view of a one2many) and a specialized view with more or less information that will appear when one double-clicks on a menu item. For example, the products have several views according to the product variants. Views are described in XML. If no view has been defined for an object, the object is able to generate a view to represent itself. This can limit the developer s work but results in less ergonomic views. Usage example When you open an invoice, here is the chain of operations followed by the client: An action asks to open the invoice (it gives the object s data (account.invoice), the view, the domain (e.g. only unpaid invoices) ). The client asks (with XML-RPC) to the server what views are defined for the invoice object and what are the data it must show. The client displays the form according to the view Chapter 8. First Module to OpenERP
61 To develop new objects The design of new objects is restricted to the minimum: create the objects and optionally create the views to represent them. The PostgreSQL tables do not have to be written by hand because the objects are able to automatically create them (or adapt them in case they already exist). Reports Open ERP uses a flexible and powerful reporting system. Reports are generated either in PDF or in HTML. Reports are designed on the principle of separation between the data layer and the presentation layer. Reports are described more in details in the Reporting chapter. Wizards Here s an example of a.xml file that declares a wizard. <?xml version="1.0"?> <terp> <data> <wizard string="employee Info" model="hr.employee" name="employee.info.wizard" id="wizard_employee_info"/> </data> </terp> A wizard is declared using a wizard tag. See Add A New Wizard for more information about wizard XML. also you can add wizard in menu using following xml entry <?xml version="1.0"?> <terp> <data> <wizard string="employee Info" model="hr.employee" name="employee.info.wizard" id="wizard_employee_info"/> 8.1. The Modules - Introduction 57
62 <menuitem name="human Resource/Employee Info" action="wizard_employee_info" type="wizard" id="menu_wizard_employee_info"/> </data> </terp> Workflow The objects and the views allow you to define new forms very simply, lists/trees and interactions between them. But it is not enough : you have to define the dynamics of these objects. A few examples: a confirmed sale order must generate an invoice, according to certain conditions a paid invoice must, only under certain conditions, start the shipping order The workflows describe these interactions with graphs. One or several workflows may be associated to the objects. Workflows are not mandatory; some objects don t have workflows. Below is an example workflow used for sale orders. It must generate invoices and shipments according to certain conditions. 58 Chapter 8. First Module to OpenERP
63 In this graph, the nodes represent the actions to be done: create an invoice, cancel the sale order, generate the shipping order,... The arrows are the conditions; waiting for the order validation, invoice paid, click on the cancel button,... The squared nodes represent other Workflows; the invoice the shipping 8.1. The Modules - Introduction 59
64 8.1.2 OpenERP Module Descriptor File : terp.py Normal Module In the created module directory, you must add a terp.py file. This file, which must be in Python format, is responsible to 1. determine the XML files that will be parsed during the initialization of the server, and also to 2. determine the dependencies of the created module. This file must contain a Python dictionary with the following values: name version description author website license depends init_xml The (Plain English) name of the module. The version of the module. The module description (text). The author of the module. The website of the module. The license of the module (default:gpl-2). List of modules on which this module depends. The base module must almost always be in the dependencies because some necessary data for the views, reports,... are in the base module. List of.xml files to load when the server is launched with the init=module argument. Filepaths must be relative to the directory where the module is. Open ERP XML File Format is detailed in this section. update_xml installable active List of.xml files to load when the server is launched with the update=module launched. Filepaths must be relative to the directory where the module is. Open ERP XML File Format is detailed in this section. True or False. Determines if the module is installable or not. True or False (default: False). Determines the modules that are installed on the database creation. 60 Chapter 8. First Module to OpenERP
65 Example Here is an example of terp.py file for the product module: { } "name" : "Products & Pricelists", "version" : "1.0", "author" : "Open", "category" : "Generic Modules/Inventory Control", "depends" : ["base", "account"], "init_xml" : [], "demo_xml" : ["product_demo.xml"], "update_xml" : ["product_data.xml","product_report.xml", "product_wizard.xml","product_view.xml" "installable": True, "active": True The files that must be placed in init_xml are the ones that relate to the workflow definition, data to load at the installation of the software and the data for the demonstrations. The files in update_xml concern: views, reports and wizards. Profile Module The purpose of a profile is to initialize Open ERP with a set of modules directly after the database has been created. A profile is a special kind of module that contains no code, only dependencies on other modules. In order to create a profile, you only have to create a new directory in server/addons (you should call this folder profile_modulename), in which you put an empty init.py file (as every directory Python imports must contain an init.py file), and a terp.py whose structure is as follows : { } "name":" Name of the Profile, "version":" Version String ", "author":" Author Name ", "category":"profile", "depends":[ List of the modules to install with the profile ], "demo_xml":[], "update_xml":[], "active":false, "installable":true, Example Here s the code of the file server/bin/addons/profile_manufacturing/ terp.py, which corresponds to the manufacturing industry profile in Open ERP. { "name":"manufacturing industry profile", "version":"1.0", "author":"open", "category":"profile", "depends":["mrp", "crm", "sale", "delivery"], 8.1. The Modules - Introduction 61
66 } "demo_xml":[], "update_xml":[], "active":false, "installable":true, Create Module Getting the skeleton directory Creating a new module is quickly done by copying the module called simple or custom (depending on your OpenERP version) into a new directory. As an example on Ubuntu: $ cd /usr/lib/tinyerp-server/addons/ $ sudo cp -r custom travel You will need to give yourself permissions over that new directory if you want to be able to modify it: $ sudo chown -R whoami travel You got yourself the directory for a new module there, and a skeleton structure, but you still need to change a few things inside the module s definition... Changing the default definition To change the default settings of the custom module (which is now the travel module), get yourself into the travel directory and edit terp.py. gedit, in the following example, is just a simple text editor. Feel free to use another one. $ cd travel $ gedit terp.py The file looks like this: # # Use the custom module to put your specific code in a separate module. # { "name" : "Module for custom developments", "version" : "1.0", "author" : "Tiny", "category" : "Generic Modules/Others", "website": " "description": "Sample custom module where you can put your customer specific developments." "depends" : ["base"], "init_xml" : [], "update_xml" : ["custom_view.xml"], "active": False, "installable": True } 62 Chapter 8. First Module to OpenERP
67 You will want to change whichever settings you feel right and get something like this: { } "name" : "Travel agency module", "version" : "1.0", "author" : "Tiny", "category" : "Generic Modules/Others", "website": " "description": "A module to manage hotel bookings and a few other useful features.", "depends" : ["base"], "init_xml" : [], "update_xml" : ["custom_view.xml"], "active": True, "installable": True Note the active field becomes true. Changing the main module file Now you need to update the custom.py script to suit the needs of your module. We suggest you follow the Flash tutorial for this or download the travel agency module from the 20 minutes tutorial page. The documentation below is overlapping the two next step in this wiki tutorial, so just consider them as a help and head towards the next two pages first... The custom.py file should initially look like this (intentionally removing the comments): from osv import osv, fields #class custom_material(osv.osv): # _name = network.material # _inherit = network.material # _columns = { # } # _defaults = { # } #custom_material() The # signs represent comments. You ll have to remove them, rename the class and its attributes to something like this: from osv import osv, fields class travel_hostel(osv.osv): _name = travel.hostel _inherit = res.partner _columns = { rooms_id : fields.one2many( travel.room, hostel_id, Rooms ), quality : fields.char( Quality, size=16), } _defaults = { } travel_hostel() Ideally, you would copy that bunch of code several times to create all the entities you need (travel_airport, travel_room, travel_flight). This is what will hold the database structure of your objects, but you don t really need to worry too much about the database side. Just filling this file will create the system structure for you when you install the module The Modules - Introduction 63
68 Customizing the view You can now move on to editing the views. To do this, edit the custom_view.xml file. It should first look like this: <terp> <data> </data> </terp> <record model="res.groups" id="group_compta_user"> <field name="name">grcompta</field> </record> <record model="res.groups" id="group_compta_admin"> <field name="name">grcomptaadmin</field> </record> <menuitem name="administration" groups="admin,grcomptaadmin" icon="terp-stock" id="menu_admi This is, as you can see, an example taken from an accounting system (French people call accounting comptabilité, which explains the compta bit). Defining a view is defining the interfaces the user will get when accessing your module. Just defining a bunch of fields here should already get you started on a complete interface. However, due to the complexity of doing it right, we recommend, once again, that you take a look at the 20 minutes Flash tutorial or download the travel agency module example. Next you should be able to create different views using other files to separate them from your basic/admin view Creating Action Linking events to action The available type of events are: client_print_multi (print from a list or form) client_action_multi (action from a list or form) tree_but_open (double click on the item of a tree, like the menu) tree_but_action (action on the items of a tree) To map an events to an action: <record model="ir.values" id="ir_open_journal_period"> <field name="key2">tree_but_open</field> <field name="model">account.journal.period</field> <field name="name">open Journal</field> <field name="value" eval=" ir.actions.wizard,%d %action_move_journal_line_form_select"/> <field name="object" eval="true"/> </record> If you double click on a journal/period (object: (id= action_move_journal_line_form_select ). account.journal.period), this will open the selected wizard. You can use a res_id field to allow this action only if the user click on a specific object. 64 Chapter 8. First Module to OpenERP
69 <record model="ir.values" id="ir_open_journal_period"> <field name="key2">tree_but_open</field> <field name="model">account.journal.period</field> <field name="name">open Journal</field> <field name="value" eval=" ir.actions.wizard,%d %action_move_journal_line_form_select"/> <field name="res_id" eval="3"/> <field name="object" eval="true"/> </record> The action will be triggered if the user clicks on the account.journal.period n 3. When you declare wizard, report or menus, the ir.values creation is automatically made with these tags: <wizard... /> <menuitem... /> <report... /> So you usually do not need to add the mapping by yourself The Modules - Introduction 65
70 66 Chapter 8. First Module to OpenERP
71 CHAPTER NINE OBJECTS, FIELDS AND METHODS 9.1 OpenERP Objects Introduction All the ERP s pieces of data are accessible through objects. As an example, there is a res.partner object to access the data concerning the partners, an account.invoice object for the data concerning the invoices, etc... Please note that there is an object for every type of resource, and not an object per resource. We have thus a res.partner object to manage all the partners and not object per partner. If we talk in object oriented terms, we could also say that there is an object per level. The direct consequences is that all the methods of objects have a common parameter: the ids parameter. This specifies on which resources (for example, on which partner) the method must be applied. Precisely, this parameter contains a list of resource ids on which the method must be applied. For example, if we have two partners with the identifiers 1 and 5, and we want to call the res_partner method send_ , we will write something like: res_partner.send_ (..., [1, 5],...) We will see the exact syntax of object method calls further in this document. In the following section, we will see how to define a new object. Then, we will check out the different methods of doing this. For developers: Open ERP objects are usually called classes in object oriented programming. A Open ERP resource is usually called an object in OO programming, instance of a class. It s a bit confusing when you try to program inside Open ERP, because the language used is Python, and Python is a fully object oriented language, and has objects and instances... Luckily, an Open ERP resource can be converted magically into a nice Python object using the browse class method (Open ERP object method). 67
72 9.2 The ORM - Object Relation Model The Models ORM is for Object-Relational Mapping. OpenERP modeling is based on objects but is data is stored in a classical relational database named Postgresql. ORM job is to fill the gap between Open-objects and sql tables. Python is the programming langage giving the behavior and data description of Open-objects (This is not stored in the database). ORM is the python class ancestor of all Open-objects. A Open-object is modeling by a static python description for his behavior and data, an a miror sql description for his data storage. 9.3 OpenERP Object Attributes Objects Introduction To define a new object, you have to define a new Python class then instantiate it. This class must inherit from the osv class in the osv module Object definition The first line of the object definition will always be of the form: class name_of_the_object(osv.osv): _name = name.of.the.object _columns = {... }... name_of_the_object() An object is defined by declaring some fields with predefined names in the class. Two of them are required (_name and _columns), the rest is optional. The predefined fields are: Prefined names _auto Determines whether a corresponding PostgreSQL table must be generated automatically from the object. Setting _auto to False can be useful in case of Open ERP objects generated from PostgreSQL views. See the Reporting From PostgreSQL Views section for more details. _columns (required) The object fields. See the fields section for details. _constraints The constraints on the object. See the constraints section for details. 68 Chapter 9. Objects, Fields and Methods
73 _sql_constraints The SQL Constraint on the object. See theconstraints SQL section for more details. _defaults The default values for some of the object s fields. See the default value section for details. _inherit The name of the osv object which the current object inherits from. See the object inheritance section (first form) for details. _inherits The list of osv objects the object inherits from. This list must be given in a python dictionary of the form: { name_of_the_parent_object : name_of_the_field,...}. See the object inheritance section (second form) for details. Default value: {}. _log_access Determines whether or not the write access to the resource must be logged. If true, four fields will be created in the SQL table: create_uid, create_date, write_uid, write_date. Those fields represent respectively the id of the user who created the record, the creation date of record, the id of the user who last modified the record, and the date of that last modification. This data may be obtained by using the perm_read method. _name (required) Name of the object. Default value: None. _order Name of the fields used to sort the results of the search and read methods. Default value: id. Examples: _order = "name" _order = "date_order desc" _rec_name Name of the field in which the name of every resource is stored. Default value: name. Note: by default, the name_get method simply returns the content of this field. _sequence Name of the SQL sequence that manages the ids for this object. Default value: None. _sql SQL code executed upon creation of the object (only if _auto is True) _table Name of the SQL table. Default value: the value of the _name field above with the dots (. ) replaced by underscores ( _ ) OpenERP Object Attributes 69
74 9.4 Object Inheritance - _inherit Introduction Objects may be inherited in some custom or specific modules. It is better to inherit an object to add/modify some fields. It is done with: _inherit= object.name Extension of an object There are two possible ways to do this kind of inheritance. Both ways result in a new class of data, which holds parent fields and behaviour as well as additional fielda and behaviour, but they differ in heavy programatical consequences. While Example 1 creates a new subclass custom_material that may be seen or used by any view or tree which handles network.material, this will not be the case for Example 2. This is due to the table (other.material) the new subclass is operating on, which will never be recognized by previous network.material views or trees. Example 1: class custom_material(osv.osv): _name = network.material _inherit = network.material _columns = { manuf_warranty : fields.boolean( Manufacturer warranty? ), } _defaults = { manuf_warranty : lambda *a: False, } custom_material() Tip: Notice _name == _inherit In this example, the custom_material will add a new field manuf_warranty to the object network.material. New instances of this class will be visible by views or trees operating on the superclasses table network.material. This inheritancy is usually called class inheritance in Object oriented design. The child inherits data (fields) and behavior (functions) of his parent. Example 2: class other_material(osv.osv): _name = other.material _inherit = network.material _columns = { manuf_warranty : fields.boolean( Manufacturer warranty? ), } _defaults = { manuf_warranty : lambda *a: False, } other_material() 70 Chapter 9. Objects, Fields and Methods
75 Tip: Notice _name!= _inherit In this example, the other_material will hold all fields specified by network.material and it will additionally hold a new field manuf_warranty. All those fields will be part of the table other.material. New instances of this class will therefore never been seen by views or trees operating on the superclasses table network.material. This type of inheritancy is known as inheritance by prototyping (e.g. Javascript), because the newly created subclass copies all fields from the specified superclass (prototype). The child inherits data (fields) and behavior (functions) of his parent. 9.5 Inheritance by Delegation - _inherits Syntax :: class tiny_object(osv.osv) _name = tiny.object _table = tiny_object _inherits = { tiny.object _1_ : name_col _1_, tiny.object _2_ : name_col _2_,..., tiny (...) The object tiny.object inherits from all the columns and all the methods from the n objects tiny.object _1_,..., tiny.object _n_. To inherit from multiple tables, the technique consists in adding one column to the table tiny_object per inherited object. This column will store a foreign key (an id from another table). The values name_col _1_ name_col _2_... name_col _n_ are of type string and determine the title of the columns in which the foreign keys from tiny.object _1_,..., tiny.object _n_ are stored. This inheritance mechanism is usually called instance inheritance or value inheritance. A resource (instance) has the VALUES of its parents. 9.6 Fields Introduction Objects may contain different types of fields. Those types can be divided into three categories: simple types, relation types and functional fields. The simple types are integers, floats, booleans, strings, etc... ; the relation types are used to represent relations between objects (one2one, one2many, many2one). Functional fields are special fields because they are not stored in the database but calculated in real time given other fields of the view. Here s the header of the initialization method of the class any field defined in Open ERP inherits (as you can see in server/bin/osv/fields.py): def init (self, string= unknown, required=false, readonly=false, domain=[], context="", states={}, priority=0, change_default=false, size=none, ondelete="setnull", translate=false, select=false, **args) : 9.7 Type of Fields Basic Types boolean 9.5. Inheritance by Delegation - _inherits 71
76 A boolean (true, false). Syntax: fields.boolean( Field Name [, Optional Parameters]), integer An integer. Syntax: fields.integer( Field Name [, Optional Parameters]), float A floating point number. Syntax: fields.float( Field Name [, Optional Parameters]), Note: The optional parameter digits defines the precision and scale of the number. The scale being the number of digits after the decimal point whereas the precision is the total number of significant digits in the number (before and after the decimal point). If the parameter digits is not present, the number will be a double precision floating point number. Warning: these floating-point numbers are inexact (not any value can be converted to its binary representation) and this can lead to rounding errors. You should always use the digits parameter for monetary amounts. Example rate : fields.float( Relative Change rate, digits=(12,6) [, Optional Parameters]), char A string of limited length. The required size parameter determines its size. Syntax: fields.char( Field Name, size=n [, Optional Parameters]), # where n is an integer. Example city : fields.char( City Name, size=30, required=true), text A text field with no limit in length. Syntax: fields.text( Field Name [, Optional Parameters]), 72 Chapter 9. Objects, Fields and Methods
77 date A date. Syntax: fields.date( Field Name [, Optional Parameters]), datetime Allows to store a date and the time of day in the same field. Syntax: fields.datetime( Field Name [, Optional Parameters]), binary A binary chain selection A field which allows the user to make a selection between various predefined values. Syntax: fields.selection((( n, Unconfirmed ), ( c, Confirmed )), Field Name [, Optional Parameters]), Note: Format of the selection parameter: tuple of tuples of strings of the form: (( key_or_value, string_to_display ),... ) Example Using relation fields many2one with selection. In fields definitions add:..., my_field : fields.many2one( mymodule.relation.model, Title, selection=_sel_func),..., And then define the _sel_func like this (but before the fields definitions): def _sel_func(self, cr, uid, context={}): obj = self.pool.get( mymodule.relation.model ) ids = obj.search(cr, uid, []) res = obj.read(cr, uid, ids, [ name, id ], context) res = [(r[ id ], r[ name ]) for r in res] return res 9.7. Type of Fields 73
78 9.7.2 Relational Types one2one A one2one field expresses a one:to:one relation between two objects. It is deprecated. Use many2one instead. syntax: fields.one2one( other.object.name, Field Name ) many2one Associates this object to a parent object via this Field. For example Department an Employee belongs to would Many to one. i.e Many employees will belong to a Department syntax: fields.many2one( other.object.name, Field Name, optional parameter) TODO Optional parameters: ondelete: What should happen when the resource this field points to is deleted. * Predefined value: cascade, set null * Default value: set null required: True readonly: True select: True - (creates an index on the Foreign Key field) Example one2many syntax: commercial : fields.many2one( res.users, Commercial, ondelete= cascade ), fields.one2many( other.object.name, Field relation id, Fieldname, optional parameter) TODO Optional parameters: invisible: True/False states:? readonly: True/False Example address : fields.one2many( res.partner.address, partner_id, Contacts ), many2many syntax: 74 Chapter 9. Objects, Fields and Methods
79 fields.many2many( other.object.name, relation object, other.object.id, actual.object.id, Field Name ) where other.object.name is the other object which belongs to the relation relation object is the table that makes the link other.object.id and actual.object.id are the fields names used in the relation table Example: category_id : fields.many2many( res.partner.category, res_partner_category_rel, partner_id, category_id, Categories ), related Sometimes you need to refer the relation of a relation. For example, supposing you have objects: City <- State <- Country, and you need to refer Country in a City, you can define a field as below in the City object: country_id : fields.related( state_id, country_id, type="many2one", relation="module.country", string="country", store=false) Functional Field A functional field is a field whose value is calculated by a function (rather than being stored in the database). Parameters: fnct, arg=none, fnct_inv=none, fnct_inv_arg=none, type= %green%float%black%, fnct_search=none, obj=none, method=false, store=true where type is the field type name returned by the function. It can be any field type name except function. store If you want to store field in database or not. Default is False. method whether the field is computed by a method (of an object) or a global function fnct is the function or method that will compute the field value. It must have been declared before declaring the functional field. If method is True, the signature of the method must be: def fnct(self, cr, uid, ids, field_name, arg, context) otherwise (if it is a global function), its signature must be: 9.7. Type of Fields 75
80 def fnct(cr, table, ids, field_name, arg, context) Either way, it must return a dictionary of values of the form {id _1_ : value _1_, id _2_ : value _2_,...}. The values of the returned dictionary must be of the type specified by the type argument in the field declaration. fnct_inv is the function or method that will allow writing values in that field. If method is true, the signature of the method must be: def fnct(self, cr, uid, ids, field_name, field_value, arg, context) otherwise (if it is a global function), it should be: def fnct(cr, table, ids, field_name, field_value, arg, context) fnct_search allows you to define the searching behaviour on that field. If method is true, the signature of the method must be: def fnct(self, cr, uid, obj, name, args) otherwise (if it is a global function), it should be: def fnct(cr, uid, obj, name, args) The return value is a list countaining 3-part tuplets which are used in search funtion: return [( id, in,[1,3,5])] Example Of Functional Field Suppose we create a contract object which is : class hr_contract(osv.osv): _name = hr.contract _description = Contract _columns = { name : fields.char( Contract Name, size=30, required=true), employee_id : fields.many2one( hr.employee, Employee, required=true), function : fields.many2one( res.partner.function, Function ), } hr_contract() If we want to add a field that retrieves the function of an employee by looking its current contract, we use a functional field. The object hr_employee is inherited this way: class hr_employee(osv.osv): _name = "hr.employee" _description = "Employee" _inherit = "hr.employee" _columns = { 76 Chapter 9. Objects, Fields and Methods
81 contract_ids : fields.one2many( hr.contract, employee_id, Contracts ), function : fields.function(_get_cur_function_id, type= many2one, obj="res.partner.functio method=true, string= Contract Function ), } hr_employee() Note: three points type = many2one is because the function field must create a many2one field; function is declared as a many2one in hr_contract also. obj = res.partner.function is used to specify that the object to use for the many2one field is res.partner.function. We called our method _get_cur_function_id because its role is to return a dictionary whose keys are ids of employees, and whose corresponding values are ids of the function of those employees. The code of this method is: def _get_cur_function_id(self, cr, uid, ids, field_name, arg, context): for i in ids: #get the id of the current function of the employee of identifier "i" sql_req= """ SELECT f.id AS func_id FROM hr_contract c LEFT JOIN res_partner_function f ON (f.id = c.function) WHERE (c.employee_id = %d) """ % (i,) cr.execute(sql_req) sql_res = cr.dictfetchone() if sql_res: #The employee has one associated contract res[i] = sql_res[ func_id ] else: #res[i] must be set to False and not to None because of XML:RPC # "cannot marshal None unless allow_none is enabled" res[i] = False return res The id of the function is retrieved using a SQL query. Note that if the query returns no result, the value of sql_res[ func_id ] will be None. We force the False value in this case value because XML:RPC (communication between the server and the client) doesn t allow to transmit this value. store={...} Enhancement It will compute the field depends on other objects. Syntex store={ object_name :(function_name,[ field_name1, field_name2 ],priority)} It will call function function_name when any changes will be applied on field list [ field1, field2 ] on object object_name and output of the function will send as a parameter for main function of the field. Example In membership module membership_state : fields.function(_membership_state, method=true, string= Current membership state store={ account.invoice :(_get_invoice_partner,[ state ], 10), membership.membership_line :(_get_partner_id,[ state ], 10), res.partner :(lambda self,cr,uid,ids,c={}:ids, [ free_member ], 10)}), 9.7. Type of Fields 77
82 Property Fields Declaring a property A property is a special field: fields.property. class res_partner(osv.osv): _name = "res.partner" _inherit = "res.partner" _columns = { property_product_pricelist : fields.property( product.pricelist, type= many2one, relation= product.pricelist, string="sale Pricelist", method=true, view_load=true, group_name="pricelists Properties"), } Then you have to create the default value in a.xml file for this property: <record model="ir.property" id="property_product_pricelist"> <field name="name">property_product_pricelist</field> <field name="fields_id" search="[( model, =, res.partner ), ( name, =, property_product_pricelist )]"/> <field name="value" eval=" product.pricelist, +str(list0)"/> </record> Tip: if the default value points to a resource from another module, you can use the ref function like this: <field name= value eval= product.pricelist, +str(ref( module.data_id )) /> Putting properties in forms To add properties in forms, just put the <properties/> tag in your form. This will automatically add all properties fields that are related to this object. The system will add properties depending on your rights. (some people will be able to change a specific property, others won t). Properties are displayed by section, depending on the group_name attribute. (It is rendered in the client like a separator tag). How does this work? The fields.property class inherits from fields.function and overrides the read and write method. The type of this field is many2one, so in the form a property is represented like a many2one function. But the value of a property is stored in the ir.property class/table as a complete record. The stored value is a field of type reference (not many2one) because each property may point to a different object. If you edit properties values (from the administration menu), these are represented like a field of type reference. When you read a property, the program gives you the property attached to the instance of object you are reading. It this object has no value, the system will give you the default property. The definition of a property is stored in the ir.model.fields class like any other fields. In the definition of the property, you can add groups that are allowed to change to property. Using properties or normal fields When you want to add a new feature, you will have to choose to implement it as a property or as normal field. Use a normal field when you inherit from an object and want to extend this object. Use a property when the new feature is 78 Chapter 9. Objects, Fields and Methods
83 not related to the object but to an external concept. Here are a few tips to help you choose between a normal field or a property: Normal fields extend the object, adding more features or data. A property is a concept that is attached to an object and have special features: Different value for the same property depending on the company Rights management per field It s a link between resources (many2one) Example 1: Account Receivable The default Account Receivable for a specific partner is implemented as a property because: This is a concept related to the account chart and not to the partner, so it is an account property that is visible on a partner form. Rights have to be managed on this fields for accountants, these are not the same rights that are applied to partner objects. So you have specific rights just for this field of the partner form: only accountants may change the account receivable of a partner. This is a multi-company field: the same partner may have different account receivable values depending on the company the user belongs to. In a multi-company system, there is one account chart per company. The account receivable of a partner depends on the company it placed the sale order. The default account receivable is the same for all partners and is configured from the general property menu (in administration). Note: One interesting thing is that properties avoid spaghetti code. The account module depends on the partner (base) module. But you can install the partner (base) module without the accounting module. If you add a field that points to an account in the partner object, both objects will depend on each other. It s much more difficult to maintain and code (for instance, try to remove a table when both tables are pointing to each others.) Example 2: Product Times The product expiry module implements all delays related to products: removal date, product usetime,... This module is very useful for food industries. This module inherits from the product.product object and adds new fields to it: class product_product(osv.osv): _inherit = product.product _name = product.product _columns = { life_time : fields.integer( Product lifetime ), use_time : fields.integer( Product usetime ), removal_time : fields.integer( Product removal time ), alert_time : fields.integer( Product alert time ), } product_product() This module adds simple fields to the product.product object. We did not use properties because: We extend a product, the life_time field is a concept related to a product, not to another object Type of Fields 79
84 We do not need a right management per field, the different delays are managed by the same people that manage all products. 9.8 ORM methods create Description Create a new resource Signature: def create(cr, uid, vals, context={}) Parameters: Example: vals: a dictionary of values for every field. This dictionary must use this form: { name_of_the_field : value,...} context (optional): the actual context dictionary. Returns: the id of the newly created resource. id = pooler.get_pool(cr.dbname).get( res.partner.event ).create(cr, uid, { name : sent through mass mailing, partner_id : partner.id, description : The Description for Partner Event }) search Description Search all the resources which satisfy certain criteria Signature: def search(self, cr, uid, args, offset=0, limit=2000,order=none,context=none, count=false) Parameters args: a list of tuples containing the search criteria. This list must be of the form: [( name_of_the_field, operator, value) =, >, <, <=, >= IN (sql) LIKE, ILIKE (sql) child_of offset (optional): do not return the offset first results. limit (optional): maximum number of results to return. Returns: the list of ids of matching resources. Example: ids = pooler.get_pool(cr.dbname).get( res.partner ).search(cr, uid, [( category_id, =, Customer 80 Chapter 9. Objects, Fields and Methods
85 This example will return a list with all the partners that have the category Customer. read Description List of fields resources values. Example: Signature: def read(self, cr, uid, ids, fields=none, context={}) Parameters: ids: list of the identifiers of the resources to read (list of integers). fields (optional): the list of the interested fields. If a value is not provided for this parameter, the function will check all the fields. context (optional): the actual context dictionary. Returns: A list of dictionaries (a dictionary per resource asked) of the form [{ name_of_the_field : value,...},...] values = pooler.get_pool(cr.dbname).get( res.partner ). read(cr, uid, ids, [ name, category_id ], context=context) browse Description Return one or several resources with the objects form. These object fields can be reached directly with the pointed notation ( object.name_of_the_field ). The relations fields are also automatically evaluated to allow you to recover the values in the neighbors objects. Signature: def browse(self, cr, uid, select, offset=0, limit=2000) Parameters select: this parameter accept data of several types: a list of integers (list of identifiers) offset (optional): the number of results to pass. limit (optional): the maximum number of results to return. Returns: an integer : identifier of a resource if an integer (identifier) has been passed as select parameter, return an object having the properties described here above. if a list of integer (identifiers) has been passed, return the object list. Example Let s consider the case of a partner (object res.partner ) and of a partner contact (object res.partner.address ). Let s suppose that we know the identifier of a partner contact (name contact_id) and we want to recover his name and the account number of the company he works for. Knowing that the object res.partner contains the field: 9.8. ORM methods 81
86 bank :fields.char( Bank account,size=64), and the object res.partner.address contains the fields: partner_id : fields.many2one( res.partner, Partner, required=true), name : fields.char( Contact Name, size=64), the most simple way to proceed is to use the browse method: addr_obj = self.pool.get( res.partner.address ).browse(cr, uid, contact_id) so, to recover the two fields that interest us, you have to write: name = addr_obj.name account_num = addr_obj.partner_id.bank Note: This method is only useful locally (on the server itself) and not with the other interfaces!! write Description Writes values in one or several fields of one or several resources Example: Signature: def write(self, cr, uid, ids, vals, context={}) Parameters: ids: the resources identifiers list to modify. vals: a dictionary with values to write. This dictionary must be with the form: { name_of_the_field : value,...}. context (optional): the actual context dictionary. Returns: True self.pool.get( sale.order ).write(cr, uid, ids, { state : cancel }) unlink Description Delete one or several resources Signature: def unlink(self, cr, uid, ids) Parameters: ids: the identifiers resources list to delete. Returns: True Example: 82 Chapter 9. Objects, Fields and Methods
87 self.pool.get( sale.order ).unlink(cr,uid, ids) Methods to manipulate the default values default_get Description Get back the value by default for one or several fields. Signature: def default_get(self, cr, uid, fields, form=none, reference=none) Parameters: fields: the fields list which we want to recover the value by default. form (optional): TODO reference (optional): TODO Returns: dictionary of the default values of the form { field_name : value,... } Example: self.pool.get( hr.analytic.timesheet ).default_get(cr, uid, [ product_id, product_uom_id ]) default_set Description Change the default value for one or several fields. Example: TODO Signature: def default_set(self, cr, uid, field, value, for_user=false) Parameters: field: the name of the field that we want to change the value by default. value: the value by default. for_user (optional): boolean that determines if the new default value must be available only for the current user or for all users. Returns: True 9.8. ORM methods 83
88 9.8.2 Methods to manipulate the permissions perm_read Description Signature: def perm_read(self, cr, uid, ids) Parameters: perm_write ids: an integer list Returns: a list of dictionaries with the following keys level : access level uid : user id gid : group id create_uid: user who created the resource create_date: date when the resource was created write_uid: last user who changed the resource write_date: date of the last change to the resource Description Signature: def perm_write(self, cr, uid, ids, fields) Parameters: Returns: Example: self.pool.get( res.partner ).perm_read(cr, uid, ids, context) Methods to generate the fields and the views fields_get Example: Description Signature: def fields_get(self, cr, uid, fields = None, context={}) Parameters: fields: a list of fields that interest us, if None, all the fields context: context[ lang ] Result: In payment.line in account_payment module def fields_get(self, cr, uid, fields=none, context=none): res = super(payment_line, self).fields_get(cr, uid, fields, context) if communication2 in res: res[ communication2 ].setdefault( states, {}) res[ communication2 ][ states ][ structured ] = [( readonly, True)] res[ communication2 ][ states ][ normal ] = [( readonly, False)] return res fields_view_get 84 Chapter 9. Objects, Fields and Methods
89 Example: Description Signature: def fields_view_get(self, cr, uid, view_id=none, view_type= form, context={}, toolbar=false) Parameters: Result: In membership module [product.product]: def fields_view_get(self, cr, user, view_id=none, view_type= form, context=none, toolbar=false): if ( product in context) and (context[ product ]== membership_product ): model_data_ids_form = self.pool.get( ir.model.data ).search(cr,user,[( model, =, ir.ui.vie [ membership_products_form, membership_ resource_id_form = self.pool.get( ir.model.data ). read(cr,user,model_data_ids_form,fields=[ res_id, name ]) dict_model={} for i in resource_id_form: dict_model[i[ name ]]=i[ res_id ] if view_type== form : view_id = dict_model[ membership_products_form ] else: view_id = dict_model[ membership_products_tree ] return super(product,self).fields_view_get(cr, user, view_id, view_type, context, toolbar) distinct_field_get Example: TODO Description Signature: def distinct_field_get(self, cr, uid, field, value, args=[], offset=0, limit=2000) Parameters: Result: Methods concerning the name of the resources name_get Example: Description Signature: def name_get(self, cr, uid, ids, context={}) Parameters: Result: a list of tuples of the form [(id, name),...] In res.partner.address: def name_get(self, cr, user, ids, context={}): if not len(ids): return [] res = [] for r in self.read(cr, user, ids, [ name, zip, city ]): addr = str(r[ name ] or ) if r[ name ] and (r[ zip ] or r[ city ]): 9.8. ORM methods 85
90 addr +=, addr += str(r[ zip ] or ) + + str(r[ city ] or ) res.append((r[ id ], addr)) return res name_search Description Signature: def name_search(self, cr, uid, name=, args=[], operator= ilike, context={}) Parameters: Result: Example: In res.country: def name_search(self, cr, user, name=, args=none, operator= ilike, context=none, limit=80): if not args: args=[] if not context: context={} ids = False if len(name) == 2: ids = self.search(cr, user, [( code, =, name)] + args, limit=limit, context=context) if not ids: ids = self.search(cr, user, [( name, operator, name)] + args, limit=limit, context=context) return self.name_get(cr, user, ids, context) 86 Chapter 9. Objects, Fields and Methods
91 CHAPTER TEN VIEWS AND EVENTS 10.1 Introduction to Views As all data of the program is stored in objects, as explained in the Objects section, how are these objects exposed to the user? We will try to answer this question in this section. First of all, let s note that every resource type uses its own interface. For example, the screen to modify a partner s data is not the same as the one to modify an invoice. Then, you have to know that the Open ERP user interface is dynamic, it means that it is not described statically by some code, but dynamically built from XML descriptions of the client screens. From now on, we will call these screen descriptions views. A notable characteristic of these views is that they can be edited at any moment (even during the program execution). After a modification to a displayed view has occurred, you simply need to close the tab corresponding to that view and re-open it for the changes to appear Views principles Views describe how each object (type of resource) is displayed. More precisely, for each object, we can define one (or several) view(s) to describe which fields should be drawn and how. There are two types of views: 1. form views 2. tree views Note: Since Open ERP 4.1, form views can also contain graphs Form views The field disposition in a form view always follows the same principle. Fields are distributed on the screen following the rules below: By default, each field is preceded by a label, with its name. Fields are placed on the screen from left to right, and from top to bottom, according to the order in which they are declared in the view. 87
 by a label with its name, there will be two fields (and their respective labels) on each line of the screen.")
92 Every screen is divided into 4 columns, each column being able to contain either a label, or an edition field. As every edition field is preceded (by default) by a label with its name, there will be two fields (and their respective labels) on each line of the screen. The green and red zones on the screen-shot below, illustrate those 4 columns. They designate respectively the labels and their corresponding fields. Views also support more advanced placement options: A view field can use several columns. For example, on the screen-shot below, the zone in the blue frame is, in fact, the only field of a one to many. We will come back later on this note, but let s note that it uses the whole width of the screen and not only one column. We can also make the opposite operation: take a columns group and divide it in as many columns as desired. The surrounded green zones of the screen above are good examples. Precisely, the green framework up and on the right side takes the place of two columns, but contains 4 columns. As we can see below in the purple zone of the screen, there is also a way to distribute the fields of an object on different tabs. 88 Chapter 10. Views and Events

93 10.3 Tree views These views are used when we work in list mode (in order to visualize several resources at once) and in the search screen. These views are simpler than the form views and thus have less options. The different options of those views will be detailed into the next section Graph views A graph is a new mode of view for all views of type form. If, for example, a sale order line must be visible as list or as graph, define it like this in the action that open this sale order line. Do not set the view mode as tree,form,graph or form,graph - it must be graph,tree to show the graph first or tree,graph to show the list first. (This view mode is extra to your form,tree view and should have a seperate menu item): <field name="view_type">form</field> <field name="view_mode">tree,graph</field> Then, the user will be able to switch from one view to the other. Unlike forms and trees, Tiny ERP is not able to automatically create a view on demand for the graph type. So, you must define a view for this graph: Tree views 89
94 <record model="ir.ui.view" id="view_order_line_graph"> <field name="name">sale.order.line.graph</field> <field name="model">sale.order.line</field> <field name="type">graph</field> <field name="arch" type="xml"> <graph string="sales Order Lines"> <field name="product_id" group="true"/> <field name="price_unit" operator="*"/> </graph> </field> </record> The graph view A view of type graph is just a list of fields for the graph Graph tag The default type of the graph is a pie chart - to change it to a barchart change <graph string= Sales Order Lines > to <graph string= Sales Order Lines type= bar > You also may change the orientation. :Example : <graph string="sales Order Lines" orientation="horizontal" type="bar"> Field tag The first field is the X axis. The second one is the Y axis and the optionnal third one is the Z axis for 3 dimensional graphs. You can apply a few attributes to each field/axis: group: if set to true, the client will group all item of the same value for this field. For each other field, it will apply an operator operator: the operator to apply is another field is grouped. By default it s +. Allowed values are: +: addition *: multiply **: exponent min: minimum of the list max: maximum of the list Defining real statistics on objects The easiest method to compute real statistics on objects is: 1. Define a statistic object wich is a postgresql view 2. Create a tree view and a graph view on this object You can get en example in all modules of the form: report_... Example: report_crm. 90 Chapter 10. Views and Events
95 10.5 Design Elements The common structure to all the XML files of Tiny ERP is described in the DataLoadXML Data Loading Using XML Files section The files describing the views are also of the form: Example <?xml version="1.0"?> <terp> <data> [view definitions] </data> </terp> The view definitions contain mainly three types of tags: <record> tags with the attribute model= ir.ui.view, which contain the view definitions themselves <record> tags with the attribute model= ir.actions.act_window, which link actions to these views <menuitem> tags, which create entries in the menu, and link them with actions New : You can precise groups for whom the menu is accessible using the groups attribute in menuitem tag. New : You can now add shortcut using the shortcut tag. Example <shortcut name="draft Purchase Order (Proposals)" model="purchase.order" logins="demo" menu="m"/> Note that you should add an id attribute on the menuitem which is refered by menu attribute. <record model="ir.ui.view" id="v"> <field name="name">sale.order.form</field> <field name="model">sale.order</field> <field name="priority" eval="2"/> <field name="arch" type="xml"> <form string="sale Order">... </form> </field> </record> Default value for the priority field : 16. When not specified the system will use the view with the lower priority Grouping Elements Separator Adds a separator line Example Design Elements 91
96 <separator string="links" colspan="4"/> The string attribute defines its label and the colspan attribute defines his horizontal size (in number of columns). Notebook <notebook>: With notebooks you can distribute the view fields on different tabs (each one defined by a page tag). You can use the tabpos properties to set tab at: up, down, left, right. Example <notebook colspan="4">...</notebook> Group <group>: groups several columns and split the group in as many columns as desired. colspan: the number of columns to use rowspan: the number of rows to use expand: if we should expand the group or not col: the number of columns to provide (to its children) string: (optional) If set, a frame will be drawn around the group of fields, with a label containing the string. Otherwise, the frame will be invisible. Example <group col="3" colspan="2"> <field name="invoiced" select="2"/> <button colspan="1" name="make_invoice" states="confirmed" string="make Invoice" type="object"/> </group> Page Defines a new notebook page for the view. Example <page string="order Line">... </page>: string: defines the name of the page. 92 Chapter 10. Views and Events
97 Data Elements Field attributes for the field tag select= 1 : mark this field as being one of the research criteria for this resource search view. colspan= 4 : the number of columns on which a field must extend. readonly= 1 : set the widget as read only required= 1 : the field is marked as required. If a field is marked as required, a user has to fill it the system won t save the resource if the field is not filled. This attribute supersede the required field value defined in the object. nolabel= 1 : hides the label of the field (but the field is not hidden in the search view). invisible= True : hides both the label and the field. string= : change the field label. Note that this label is also used in the search view: see select attribute above). domain: can restrict the domain. Example: domain= [( partner_id, =,partner_id)] widget: can change the widget. * one2many_list * many2one_list * many2many * url * * image * float_time * reference Example: widget= one2many_list * one2one_list on_change: define a function that is called when the content of the field changes. on_change= onchange_partner(type,partner_id) See ViewsSpecialProperties for details Example: attrs: Permits to define attributes of a field depends on other fields of the same window. (It can be use on page, group, button Format: { attribute :[( field_name, operator, value ),( field_name, operator, value )], attribute2 :[( field_name, opera where attribute will be readonly, invisible, required Default value: {}. Example: (in product.product) <field digits="(14, 3)" name="volume" attrs="{ readonly :[( type, =, service )]}"/> Example Here s the source code of the view of a sale order object. This is the same object as the object shown on the screen shots of the presentation. Example Design Elements 93
98 <?xml version="1.0"?> <terp> <data> <record id="view_partner_form" model="ir.ui.view"> <field name="name">res.partner.form</field> <field name="model">res.partner</field> <field name="type">form</field> <field name="arch" type="xml"> <form string="partners"> <group colspan="4" col="6"> <field name="name" select="1"/> <field name="ref" select="1"/> <field name="customer" select="1"/> <field domain="[( domain, =, partner )]" name="title"/> <field name="lang" select="2"/> <field name="supplier" select="2"/> </group> <notebook colspan="4"> <page string="general"> <field colspan="4" mode="form,tree" name="address" nolabel="1" select="1"> <form string="partner Contacts"> <field name="name" select="2"/> <field domain="[( domain, =, contact )]" name="title <field name="function"/> <field name="type" select="2"/> <field name="street" select="2"/> <field name="street2"/> <newline/> <field name="zip" select="2"/> <field name="city" select="2"/> <newline/> <field completion="1" name="country_id" select="2"/> <field name="state_id" select="2"/> <newline/> <field name="phone"/> <field name="fax"/> <newline/> <field name="mobile"/> <field name=" " select="2" widget=" "/> </form> <tree string="partner Contacts"> <field name="name"/> <field name="zip"/> <field name="city"/> <field name="country_id"/> <field name="phone"/> <field name=" "/> </tree> </field> <separator colspan="4" string="categories"/> <field colspan="4" name="category_id" nolabel="1" select="2"/> </page> <page string="sales & Purchases"> <separator string="general Information" colspan="4"/> <field name="user_id" select="2"/> <field name="active" select="2"/> <field name="website" widget="url"/> <field name="date" select="2"/> <field name="parent_id"/> <newline/> 94 </page> Chapter 10. Views and Events <page string="history"> <field colspan="4" name="events" nolabel="1" widget="one2many_li </page>
99 Button <button/>: add a button using the string attribute as label. When clicked, it can trigger methods on the object, workflow transitions or actions (reports, wizards,...). string: define the button s label confirm: the message for the confirmation window, if needed. Eg: confirm= Are you sure? name: the name of the function to call when the button is pressed. In the case it s an object function, it must take 4 argum cr is a database cursor uid is the userid of the user who clicked the button ids is the record ID list **args is a tuple of additional arguments states: a comma-separated list of states (from the state field or from the workflow) in which the button must appear. If the states attribute is not given, the button is always visible. type: this attribute can have 3 values workflow (value by default): the function to call is a function of workflow object : the function to call is a method of the object action : call an action instead of a function Example <button name="order_confirm" states="draft" string="confirm Order" icon="gtk-execute"/> Label Adds a simple label using the string attribute as caption. Example <label string="test"/> New Line Force a return to the line even if all the columns of the view are not filled in. Example <newline/> 10.6 Inheritance in Views When you create and inherit objects in some custom or specific modules, it is better to inherit (than to replace) from an existing view to add/modify/delete some fields and preserve the others. Example Inheritance in Views 95
100 <record model="ir.ui.view" id="view_partner_form"> <field name="name">res.partner.form.inherit</field> <field name="model">res.partner</field> <field name="inherit_id" ref="base.view_partner_form"/> <field name="arch" type="xml"> <notebook position="inside"> <page string="relations"> <field name="relation_ids" colspan="4" nolabel="1"/> </page> </notebook> </field> </record> The inheritance engine will parse the existing view and search for the the root nodes of <field name="arch" type="xml"> It will append or edit the content of this tag. If this tag has some attributes, it will look for the matching node, including the same attributes (unless position). This will add a page to the notebook of the res.partner.form view in the base module. You can use these values in the position attribute: inside (default): your values will be appended inside this tag after: add the content after this tag before: add the content before this tag replace: replace the content of the tag. Second Example <record model="ir.ui.view" id="view_partner_form"> <field name="name">res.partner.form.inherit</field> <field name="model">res.partner</field> <field name="inherit_id" ref="base.view_partner_form"/> <field name="arch" type="xml"> <page string="extra Info" position="replace"> <field name="relation_ids" colspan="4" nolabel="1"/> </page> </field> </record> Will replace the content of the Extra Info tab of the notebook by one relation_ids field. The parent and the inherited views are correctly updated with update=all argument like any other views. To delete a field from a form, an empty element with position= replace atribute is used. Example: <record model="ir.ui.view" id="view_partner_form3"> <field name="name">res.partner.form.inherit</field> <field name="model">res.partner</field> <field name="inherit_id" ref="base.view_partner_form"/> <field name="arch" type="xml"> <field name="lang" position="replace"/> 96 Chapter 10. Views and Events
101 </field> </record> Take into account that only one position= replace attribute can be used per inherited view so multiple inherited views must be created to make multiple replacements Events On Change The on_change attribute defines a method that is called when the content of a view field has changed. This method takes at least arguments: cr, uid, ids, which are the three classical arguments and also the context dictionary. You can add parameters to the method. They must correspond to other fields defined in the view, and must also be defined in the XML with fields defined this way: <field name="name_of_field" on_change="name_of_method(other_field _1_,..., other_field _n_ )"/> The example below is from the sale order view. You can use the context keyword to access data in the context that can be used as params of the function.: <field name="shop_id" select="1" on_change="onchange_shop_id(shop_id)"/> def onchange_shop_id(self, cr, uid, ids, shop_id): v={} if shop_id: shop=self.pool.get( sale.shop ).browse(cr,uid,shop_id) v[ project_id ]=shop.project_id.id if shop.pricelist_id.id: v[ pricelist_id ]=shop.pricelist_id.id v[ payment_default_id ]=shop.payment_default_id.id return { value :v} When editing the shop_id form field, the onchange_shop_id method of the sale_order object is called and returns a dictionary where the value key contains a dictionary of the new value to use in the project_id, pricelist_id and payment_default_id fields. Note that it is possible to change more than just the values of fields. For example, it is possible to change the value of some fields and the domain of other fields by returning a value of the form: return { domain : d, value : value} context in <record model= ir.actions.act_window id= a > you can add a context field, which will be pass to the action. See the example below: Events 97
102 <record model="ir.actions.act_window" id="a"> <field name="name">account.account.tree1</field> <field name="res_model">account.account</field> <field name="view_type">tree</field> <field name="view_mode">form,tree</field> <field name="view_id" ref="v"/> <field name="domain">[( code, =, 0 )]</field> <field name="context">{ project_id : active_id}</field> </record> view_type: tree = (tree with shortcuts at the left), form = (switchaable view form/list) view_mode: tree,form : sequences of the views when switching Getting Defaults Description Get back the value by default for one or several fields. Signature: def default_get(self, cr, uid, fields, form=none, reference=none) Parameters: fields: the fields list which we want to recover the value by default. form (optional): TODO reference (optional): TODO Returns: dictionary of the default values of the form { field_name : value,... } Example: self.pool.get( hr.analytic.timesheet ).default_get(cr, uid, [ product_id, product_uom_id ]) default_set Description Change the default value for one or several fields. Signature: def default_set(self, cr, uid, field, value, for_user=false) Parameters: field: the name of the field that we want to change the value by default. value: the value by default. for_user (optional): boolean that determines if the new default value must be available only for the current user or for all users. 98 Chapter 10. Views and Events
103 Example: TODO Returns: True Events 99
104 100 Chapter 10. Views and Events
105 CHAPTER ELEVEN MENU AND ACTIONS 11.1 Menus Here s the template of a menu item : <menuitem id="menuitem_id" name="position/of/the/menu/item/in/the/tree" action="action_id" icon="name_from_list" groups="groupname" sequence="<integer>"/> Where id specifies the identifier of the menu item in the menu items table. This identifier must be unique. Mandatory field. name defines the position of the menu item in the menu hierarchy. Elements are separated by slashes ( / ). A menu item name with no slash in its text is a top level menu. Mandatory field. action specifies the identifier of the action that must have been defined in the action table (ir.actions.act_window). Note that this field is not mandatory : you can define menu elements without associating actions to them. This is useful when defining custom icons for menu elements that will act as folders (for example this is how custom icons for Projects, Human Resources in Open ERP are defined). icon specifies which icon will be displayed for the menu item using the menu item. The default icon is STOCK_OPEN. The available icons are : STOCK_ABOUT, STOCK_ADD, STOCK_APPLY, STOCK_BOLD, STOCK_CANCEL, STOCK_CDROM, STOCK_CLEAR, STOCK_CLOSE, STOCK_COLOR_PICKER, STOCK_CONNECT, STOCK_CONVERT, STOCK_COPY, STOCK_CUT, STOCK_DELETE, STOCK_DIALOG_AUTHENTICATION, STOCK_DIALOG_ERROR, STOCK_DIALOG_INFO, STOCK_DIALOG_QUESTION, STOCK_DIALOG_WARNING, STOCK_DIRECTORY, STOCK_DISCONNECT, STOCK_DND, STOCK_DND_MULTIPLE, STOCK_EDIT, STOCK_EXECUTE, STOCK_FILE, STOCK_FIND, STOCK_FIND_AND_REPLACE, STOCK_FLOPPY, STOCK_GOTO_BOTTOM, STOCK_GOTO_FIRST, STOCK_GOTO_LAST, STOCK_GOTO_TOP, STOCK_GO_BACK, STOCK_GO_DOWN, STOCK_GO_FORWARD, STOCK_GO_UP, STOCK_HARDDISK, STOCK_HELP, STOCK_HOME, STOCK_INDENT, STOCK_INDEX, STOCK_ITALIC, STOCK_JUMP_TO, STOCK_JUSTIFY_CENTER, STOCK_JUSTIFY_FILL, STOCK_JUSTIFY_LEFT, STOCK_JUSTIFY_RIGHT, STOCK_MEDIA_FORWARD, STOCK_MEDIA_NEXT, STOCK_MEDIA_PAUSE, STOCK_MEDIA_PLAY, STOCK_MEDIA_PREVIOUS, STOCK_MEDIA_RECORD, STOCK_MEDIA_REWIND, STOCK_MEDIA_STOP, STOCK_MISSING_IMAGE, 101
106 STOCK_NETWORK, STOCK_NEW, STOCK_NO, STOCK_OK, STOCK_OPEN, STOCK_PASTE, STOCK_PREFERENCES, STOCK_PRINT, STOCK_PRINT_PREVIEW, STOCK_PROPERTIES, STOCK_QUIT,STOCK_REDO, STOCK_REFRESH, STOCK_REMOVE, STOCK_REVERT_TO_SAVED, STOCK_SAVE, STOCK_SAVE_AS, STOCK_SELECT_COLOR, STOCK_SELECT_FONT, STOCK_SORT_ASCENDING, STOCK_SORT_DESCENDING, STOCK_SPELL_CHECK, STOCK_STOP, STOCK_STRIKETHROUGH, STOCK_UNDELETE, STOCK_UNDERLINE, STOCK_UNDO, STOCK_UNINDENT, STOCK_YES, STOCK_ZOOM_100, STOCK_ZOOM_FIT, STOCK_ZOOM_IN, STOCK_ZOOM_OUT, terpaccount, terp-crm, terp-mrp, terp-product, terp-purchase, terp-sale, terp-tools, terp-administration, terp-hr, terp-partner, terp-project, terp-report, terp-stock groups specifies which group of user can see the menu item (example : groups= admin ). See section Management of Access Rights for more information. Multiple groups should be separated by a, (example: groups= admin,user ) sequence is an integer that is used to sort the menu item in the menu. The higher the sequence number, the downer the menu item. This argument is not mandatory: if sequence is not specified, the menu item gets a default sequence number of 10. Menu items with the same sequence numbers are sorted by order of creation (_order = sequence,id ) Example In server/bin/addons/sale/sale_view.xml, we have, for example <menuitem name="sales Management/Sales Order/Sales Order in Progress" id="menu_action_order_tree4" a 11.2 Actions Introduction The actions define the behavior of the system in response to the actions of the users ; login of a new user, double-click on an invoice, click on the action button,... There are different types of simple actions: Window: Opening of a new window Report: The printing of a report o Custom Report: The personalized reports o RML Report: The XSL:RML reports Wizard: The beginning of a Wizard Execute: The execution of a method on the server side Group: Gather some actions in one group The actions are used for the following events; User connection, The user double-clicks on the menu, The user clicks on the icon print or action. 102 Chapter 11. Menu and Actions
107 Example of events In Open ERP, all the actions are described and not configured. Two examples: Opening of a window when double-clicking in the menu User connection Opening of the menu When the user open the option of the menu Operations > Partners > Partners Contact, the next steps are done to give the user information on the action to undertake. 1. Search the action in the IR. 2. Execution of the action (a) If the action is the type Opening the Window; it indicates to the user that a new window must be opened for a selected object and it gives you the view (form or list) and the filed to use (only the pro-forma invoice). (b) The user asks the object and receives information necessary to trace a form; the fields description and the XML view. User connection When a new user is connected to the server, the client must search the action to use for the first screen of this user. Generally, this action is: open the menu in the Operations section. The steps are: 1. Reading of a user file to obtain ACTION_ID 2. Reading of the action and execution of this one The fields Action Name The action name Action Type Always ir.actions.act_window View Ref The view used for showing the object Model The model of the object to post Type of View The type of view (Tree/Form) Domain Value The domain that decreases the visible data with this view The view The view describes how the edition form or the data tree/list appear on screen. The views can be of Form or Tree type, according to whether they represent a form for the edition or a list/tree for global data viewing. A form can be called by an action opening in Tree mode. The form view is generally opened from the list mode (like if the user pushes on switch view ) Actions 103
108 The domain This parameter allows you to regulate which resources are visible in a selected view.(restriction) For example, in the invoice case, you can define an action that opens a view that shows only invoices not paid. The domains are written in python; list of tuples. The tuples have three elements; the field on which the test must be done the operator used for the test (<, >, =, like) the tested value For example, if you want to obtain only Draft invoice, use the following domain; [( state, =, draft )] In the case of a simple view, the domain define the resources which are the roots of the tree. The other resources, even if they are not from a part of the domain will be posted if the user develop the branches of the tree Window Action Actions are explained in more detail in section Administration Modules - Actions. Here s the template of an action XML record : <record model="ir.actions.act_window" id="action_id_1"> <field name="name">action.name</field> <field name="view_id" ref="view_id_1"/> <field name="domain">["list of 3-tuples (max 250 characters)"]</field> <field name="context">{"context dictionary (max 250 characters)"}</field> <field name="res_model">open.object</field> <field name="view_type">form tree</field> <field name="view_mode">form,tree tree,form form tree</field> <field name="usage">menu</field> <field name="target">new</field> </record> Where id is the identifier of the action in the table ir.actions.act_window. It must be unique. name is the name of the action (mandatory). view_id is the name of the view to display when the action is activated. If this field is not defined, the view of a kind (list or form) associated to the object res_model with the highest priority field is used (if two views have the same priority, the first defined view of a kind is used). domain is a list of constraints used to refine the results of a selection, and hence to get less records displayed in the view. Constraints of the list are linked together with an AND clause : a record of the table will be displayed in the view only if all the constraints are satisfied. context is the context dictionary which will be visible in the view that will be opened when the action is activated. Context dictionaries are declared with the same syntax as Python dictionaries in the XML file. For more information about context dictionaries, see section The context Dictionary. res_model is the name of the object on which the action operates. view_type is set to form when the action must open a new form view, and is set to tree when the action must open a new tree view. 104 Chapter 11. Menu and Actions

109 view_mode is only considered if view_type is form, and ignored otherwise. The four possibilities are : form,tree : the view is first displayed as a form, the list view can be displayed by clicking the alternate view button ; tree,form : the view is first displayed as a list, the form view can be displayed by clicking the alternate view button ; form : the view is displayed as a form and there is no way to switch to list view ; tree : the view is displayed as a list and there is no way to switch to form view. (version 5 introduced graph and calendar views) usage is used [+ *TODO* +] target the view will open in new window like wizard. They indicate at the user that he has to open a new window in a new tab. Administration > Custom > Low Level > Base > Action > Window Actions Examples of actions This action is declared in server/bin/addons/project/project_view.xml. <record model="ir.actions.act_window" id="open_view_my_project"> <field name="name">project.project</field> <field name="res_model">project.project</field> <field name="view_type">tree</field> <field name="domain">[( parent_id, =,False), ( manager, =, uid)]</field> <field name="view_id" ref="view_my_project" /> </record> This action is declared in server/bin/addons/stock/stock_view.xml. <record model="ir.actions.act_window" id="action_picking_form"> <field name="name">stock.picking</field> <field name="res_model">stock.picking</field> <field name="type">ir.actions.act_window</field> <field name="view_type">form</field> <field name="view_id" ref="view_picking_form"/> <field name="context">{ contact_display : partner }</field> </record> Actions 105
110 Url Action Wizard Action Here s an example of a.xml file that declares a wizard. <?xml version="1.0"?> <terp> <data> <wizard string="employee Info" model="hr.employee" name="employee.info.wizard" id="wizard_employee_info"/> </data> </terp> A wizard is declared using a wizard tag. See Add A New Wizard for more information about wizard XML. also you can add wizard in menu using following xml entry <?xml version="1.0"?> <terp> <data> <wizard string="employee Info" model="hr.employee" name="employee.info.wizard" id="wizard_employee_info"/> <menuitem name="human Resource/Employee Info" action="wizard_employee_info" type="wizard" id="menu_wizard_employee_info"/> </data> </terp> Report Action Report declaration Reports in Open ERP are explained in chapter Reports Reporting. Here s an example of a XML file that declares a RML report : <?xml version="1.0"?> <terp> <data> <report id="sale_category_print" string="sales Orders By Categories" model="sale.order" name="sale_category.print" rml="sale_category/report/sale_category_report.rml" menu="true" auto="false"/> </data> </terp> 106 Chapter 11. Menu and Actions
111 A report is declared using a report tag inside a data block. The different arguments of a report tag are : id : an identifier which must be unique. string : the text of the menu that calls the report (if any, see below). model : the Open ERP object on which the report will be rendered. rml : the.rml report model. Important Note : Path is relative to addons/ directory. menu : whether the report will be able to be called directly via the client or not. Setting menu to False is useful in case of reports called by wizards. auto : determines if the.rml file must be parsed using the default parser or not. Using a custom parser allows you to define additional functions to your report Security Three concepts are differentiated into Tiny ERP; 1. The users: person identified by his login/password 2. The groups: define the access rights of the resources 3. The roles: determine the roles/duties of the users The users They represent physical persons. These are identified with a login and a password. A user may belong to several groups and may have several roles. A user must have an action set up. This action is executed when the user connects to the program with his login and password. An example of action would be to open the menu at Operations Security 107
112 The preferences of the user are available with the preference icon. You can, for example, through these preferences, determine the working language of this user. English is set by default. A user can modify his own preferences while he is working with Tiny ERP. To do that, he clicks on this menu: User > Preferences. The Open ERP administrator can also modify some preferences of each and every user. The groups The groups determine the access rights to the different resources. There are three types of right: The writing access: recording & creation, The reading access: reading of a file, The execution access: the buttons of workflows or wizards. A user can belong to several groups. If he belongs to several groups, we always use the group with the highest rights for a selected resource. The roles The roles define a hierarchical structure in tree. They represent the different jobs/roles inside the company. The biggest role has automatically the rights of all the inferior roles. Example: CEO Technical manager Chief of projects * Developers * Testers Commercial manager Salesmen... If we want to validate the test of a program (=role Testers), it may be done by a user having one of the following roles: Testers, Chief of the project, Technical manager, CEO. The roles are used for the transition of Workflow actions into confirmation, choice or validation actions. Their implications will be detailed in the Workflow section Menu Access It s easy (but risky) to grant grained access to menu based on the user s groups. First of all, you should know that if a menu is not granted to any group then it is accessible to everybody! If you want to grant access to some groups just go to Menu > Administration > Security > Define access to Menu-items and select the groups that can use this menu item. 108 Chapter 11. Menu and Actions

113 Beware! If the Administrator does not belong to one of the group, he will not be able to reach this menu again Security 109
114 110 Chapter 11. Menu and Actions
115 Part IV Part 3 : Business Process Development 111
116
117 CHAPTER TWELVE WORKFLOW-BUSINESS PROCESS 12.1 Introduction The workflow system in Open ERP is a very powerful mechanism that can describe the evolution of documents (model) in time. Workflows are entirely customizable, they can be adapted to the flows and trade logic of almost any company. The workflow system makes Tiny ERP very flexible and allows it to easily support changing needs without having to program new functionalities. Goals description of document evolution in time automatic trigger of actions if some conditions are met management of company roles and validation steps management of interactions between the different objects/modules graphical tool for visualization of document flows To understand its utility, see these three examples: WkfExample1: Discount On Orders The first diagram represent a very basic workflow of an order: 113
 2. the order is canceled Let s suppose a company has a need not implemented in OpenERP.")
118 The order starts in the draft state, when it is in redaction and not approved. When the user press on the Confirm button, the invoice is created and the order comes into the CONFIRMED state. Then, two operations are possible: 1. the order is done (shipped) 2. the order is canceled Let s suppose a company has a need not implemented in OpenERP. For example, suppose their sales staff can only offer discounts of 15% or less. Every order having a discount above 15% must be approved by the sales manager. This modification in the sale logic doesn t need any line of python code! A simple modification of the workflow allows us to take this new need into account and add the extra validation step. 114 Chapter 12. Workflow-Business Process
119 The workflow is thus modified as above and the orders will react as we want to. We then only need to modify the order form view and add a validation button at the desired location. We could then further improve this workflow by sending a request to the sales manager when an order enters the Validation state. Workflow nodes can execute object methods; only two lines of Python are needed to send a request asking the sales manager to validate or not the order Introduction 115
120 WkfExample2: A sale order that generates an invoice and a shipping order. WkfExample3: Acount invoice basic workflow 116 Chapter 12. Workflow-Business Process
121 12.2 Defining Workflow Workflows are defined in the file server/bin/addons/base/ir/workflow/workflow.py. The first three classes defined in this file are workflow, wkf_activity and wkf_transition. They correspond to the three types of resources that are necessary to describe a workflow : workflow : the workflow, wkf_activity : the activities (nodes), wkf_transition : the transitions between the activities General structure of a workflow XML file The general structure of a workflow XML file is as follows : <?xml version="1.0"?> <terp> <data> <record model="workflow" id=workflow_id> <field name="name">workflow.name</field> <field name="osv">resource.model</field> <field name="on_create">true False</field> </record> </data> </terp> Where id (here workflow_id ) is a workflow identifier. Each workflow must have an unique identifier. name (here workflow.name ) is the name of the workflow. The name of the workflow must respect the Open ERP syntax of dotted names. osv (here resource.model ) is the name of the Tiny object we use as a model [-(Remember a Open object inherits from osv.osv, hence the <field name= osv > )-]. on_create is True if workflow.name must be instantiated automatically when resource.model is created, and False otherwise Defining Workflow 117
122 Example The workflow sale.order.basic defined in addons/sale/sale_workflow.xml follows exactly this model, the code of its workflow tag is : <record model="workflow" id="wkf_sale"> <field name="name">sale.order.basic</field> <field name="osv">sale.order</field> <field name="on_create">true</field> </record> 12.4 Activity Introduction The wkf_activity class represents the nodes of workflows. These nodes are the actions to be executed The fields split_mode XOR: One necessary transition, takes the first one found (default). OR : Take only valid transitions (0 or more) in sequential order. AND: All valid transitions are launched at the same time (fork). In the OR and AND separation mode, certain workitems can be generated. In the AND mode, the activity waits for all transitions to be valid, even if some of them are already valid. They are all triggered at the same time. join_mode join_mode: XOR: One transition necessary to continue to the destination activity (default). 118 Chapter 12. Workflow-Business Process
123 AND: Waits for all transition conditions to be valid to execute the destination activity kind: The type of the activity can take several values DUMMY: Do nothing (default). FUNCTION: Execute the function selected by an action. SUBFLOW: Execute a sub-workflow SUBFLOW_ID. The action method must return the ID of the concerned resource by the subflow! If the action returns False, the workitem disappears! STOPALL: A sub-workflow is executed when an activity is of the type SUBFLOW. This activity ends when the sub-workflow has finished. While the sub-workflow is active, the workitem of this activity is frozen action: The action indicates the method to execute when a workitem comes into this activity. The method must be defined in a object which belongs this workflow and have the following signature: def object_method(self, cr, uid, ids): In the action though, they will be called by a statement like: object_method() signal_send flow_start Indicates if the node is a start node. When a new instance of a workflow is created, a workitem is activated for each activity marked as a flow_start. Be warned to not use this flag unless your activity really is a flow start. There are tiny versions that do not care about the tags contents like true or false. Using such tag and tiny version, you will always end up whith an activity which is tagged as flow start = true, leaving u with a nasty hunt to find out where your workflowdesign could be wrong flow_stop Indicates if the node is an ending node. When all the active workitems for a given instance come in the node marked by flow_stop, the workflow is finished. Be warned to not use this flag unless your activity really is a flow stop. There are tiny versions that do not care about the tags contents like true or false. Using such tag and tiny version, you will always end up whith an activity which is tagged as flow stop = true, leaving u with a nasty hunt to find out where your workflowdesign could be wrong wkf_id The workflow which this activity belongs to. Defining activities using XML files Activity 119
124 The general structure of an activity record is as follows <record model="workflow.activity" id=" activity_id "> <field name="wkf_id" ref=" workflow_id "/> <field name="name"> activity.name </field>:: <field name="split_mode">xor OR AND</field> <field name="join_mode">xor AND</field> <field name="kind">dummy function subflow stopall</field> <field name="action"> (...) </field> <field name="signal_send"> (...) </field> <field name="flow_start">true False</field> <field name="flow_stop">true False</field> </record> The first two arguments wkf_id and name are mandatory. Be warned to not use flow_start and flow_stop unless your activity really is a flow start or flow_stop. There are tiny versions that do not care about the tags contents like True or False. Examples There are too many possibilities of activity definition to choose from using this definition. We recommend you to have a look at the file server/bin/addons/sale/sale_workflow.xml for several examples of activity definitions Transition Introduction Workflow transitions are the conditions to be satisfied to go from one activity to the next one. They are represented by one-way arrows joining two activities. The conditions are of different types: role to satisfy by the user button pressed in the interface end of a subflow through a selected activity of subflow The roles and signals are evaluated before the expression. If a role or a signal is false, the expression will not be evaluated. Transition tests may not write values in objects. The fields act_from Source activity. When this activity is over, the condition is tested to determine if we can start the ACT_TO activity. act_to The destination activity. condition 120 Chapter 12. Workflow-Business Process
125 Expression to be satisfied if we want the transition done. signal When the operation of transition comes from a button pressed in the client form, signal tests the name of the pressed button. If signal is NULL, no button is necessary to validate this transition. role_id The role that a user must have to validate this transition. Defining Transitions Using XML Files The general structure of a transition record is as follows <record model="workflow.transition" id="transition_id"> <field name="act_from" ref="activity_id _1_ "/> <field name="act_to" ref="activity_id _2_ "/> <field name="signal">(...)</field> <field name="role_id" ref="role_id _1_ "/> <field name="condition">(...)</field> <field name="trigger_model">(...)</field> <field name="trigger_expr_id">(...)</field> </record> Only the fields act_from and act_to are mandatory Expressions Expressions are written as in python: True 1==1 hello in [ hello, bye ] Any field from the resource the workflow refers to can be used in these expressions. For example, if you were creating a workflow for partner addresses, you could use expressions like: zip==1400 phone==mobile 12.7 User Role Roles can be attached to transitions. If a role is given for a transition, that transition can only be executed if the user who triggered it possess the necessary role Expressions 121
126 Each user can have one or several roles. Roles are defined in a tree of roles, parent roles having the rights of all their children. Example: CEO Technical manager Lead developper Sales manager * Developpers * Testers Commercials... Let s suppose we handle our own bug database and that the action of marking a bug as valid needs the Testers role. In the example tree above, marking a bug as valid could be done by all the users having the following roles: Testers, Lead developper, Technical manager, CEO Error handling As of this writing, there is no exception handling in workflows. Workflows being made of several actions executed in batch, they can t trigger exceptions. In order to improve the execution efficiency and to release a maximum of locks, workflows commit at the end of each activity. This approach is reasonable because an activity is only started if the conditions of the transactions are satisfied. The only problem comes from exceptions due to programming errors; in that case, only transactions belonging to the entirely terminated activities are executed. Other transactions are rolled back Creating a Workflow Steps for creating a simple state-changing workflow for a custom module called mymod Define the States of your object The first step is to define the States your object can be in. We do this by adding a state field to our object, in the _columns collection _columns = {... state : fields.selection([ ( new, New ), ( assigned, Assigned ), ( negotiation, Negotiation ), ( won, Won ), ( lost, Lost )], Stage, readonly=true), } 122 Chapter 12. Workflow-Business Process
127 Define the State-change Handling Methods Open Object Developer Book, Release 1.0 Add the following additional methods to your object. These will be called by our workflow buttons def mymod_new(self, cr, uid, ids): self.write(cr, uid, ids, { state : new }) return True def mymod_assigned(self, cr, uid, ids): self.write(cr, uid, ids, { state : assigned }) return True def mymod_negotiation(self, cr, uid, ids): self.write(cr, uid, ids, { state : negotiation }) return True def mymod_won(self, cr, uid, ids): self.write(cr, uid, ids, { state : won }) return True def mymod_lost(self, cr, uid, ids): self.write(cr, uid, ids, { state : lost }) return True Obviously you would extend these methods in the future to do something more useful! Create your Workflow XML file There are three types of records we need to define in a file called mymod_workflow.xml 1. Workflow header record (only one of these) <record model="workflow" id="wkf_mymod"> <field name="name">mymod.wkf</field> <field name="osv">mymod.mymod</field> <field name="on_create">true</field> </record> 2. Workflow Activity records These define the actions that should be executed when the workflow reaches a particular state <record model="workflow.activity" id="act_new"> <field name="wkf_id" ref="wkf_mymod" /> <field name="flow_start">true</field> <field name="name">new</field> <field name="kind">function</field> <field name="action">mymod_new()</field> </record> <record model="workflow.activity" id="act_assigned"> <field name="wkf_id" ref="wkf_mymod" /> <field name="name">assigned</field> <field name="kind">function</field> <field name="action">mymod_assigned()</field> </record> <record model="workflow.activity" id="act_negotiation"> <field name="wkf_id" ref="wkf_mymod" /> Creating a Workflow 123
128 <field name="name">negotiation</field> <field name="kind">function</field> <field name="action">mymod_negotiation()</field> </record> <record model="workflow.activity" id="act_won"> <field name="wkf_id" ref="wkf_mymod" /> <field name="name">won</field> <field name="kind">function</field> <field name="action">mymod_won()</field> <field name="flow_stop">true</field> </record> <record model="workflow.activity" id="act_lost"> <field name="wkf_id" ref="wkf_mymod" /> <field name="name">lost</field> <field name="kind">function</field> <field name="action">mymod_lost()</field> <field name="flow_stop">true</field> </record> 3. Workflow Transition records These define the possible transitions between workflow states <record model="workflow.transition" id="t1"> <field name="act_from" ref="act_new" /> <field name="act_to" ref="act_assigned" /> <field name="signal">mymod_assigned</field> </record> <record model="workflow.transition" id="t2"> <field name="act_from" ref="act_assigned" /> <field name="act_to" ref="act_negotiation" /> <field name="signal">mymod_negotiation</field> </record> <record model="workflow.transition" id="t3"> <field name="act_from" ref="act_negotiation" /> <field name="act_to" ref="act_won" /> <field name="signal">mymod_won</field> </record> <record model="workflow.transition" id="t4"> <field name="act_from" ref="act_negotiation" /> <field name="act_to" ref="act_lost" /> <field name="signal">mymod_lost</field> </record> Add mymod_workflow.xml to terp.py Edit your module s terp.py and add mymod_workflow.xml to the update_xml array, so that OpenERP picks it up next time your module is loaded. Add Workflow Buttons to your View The final step is to add the required buttons to mymod_views.xml file. Add the following at the end of the <form> section of your object s view definition: 124 Chapter 12. Workflow-Business Process
129 <separator string="workflow Actions" colspan="4"/> <group colspan="4" col="3"> <button name="mymod_assigned" string="assigned" states="new" /> <button name="mymod_negotiation" string="in Negotiation" states="assigned" /> <button name="mymod_won" string="won" states="negotiating" /> <button name="mymod_lost" string="lost" states="negotiating" /> </group> Testing Now use the Module Manager to install or update your module. If you have done everything correctly you shouldn t get any errors. You can check if your workflow is installed in Administration -> Customisation -> Workflow Definitions When you are testing, remember that the workflow will only apply to NEW records that you create Troubleshooting If your buttons do not seem to be doing anything, one of the following two things are likely: 1. The record you are working on does not have a Workflow Instance record associated with it (it was probably created before you defined your workflow) 2. You have not set the osv field correctly in your workflow XML file Creating a Workflow 125
130 126 Chapter 12. Workflow-Business Process
131 CHAPTER THIRTEEN CREATING WIZARD - (THE PROCESS) 13.1 Introduction Wizards describe interaction sequences between the client and the server. Here is, as an example, a typical process for a wizard: 1. A window is sent to the client (a form to be completed) 2. The client sends back the data from the fields which were filled in 3. The server gets the result, usually execute a function and possibly sends another window/form to the client 127
: 128 Chapter 13.")
132 Here is a screenshot of the wizard used to reconcile transactions (when you click on the gear icon in an account chart): 128 Chapter 13. Creating Wizard - (The Process)
133 13.2 Wizards - Principles A wizard is a succession of steps. A step is composed of several actions; 1. send a form to the client and some buttons 2. get the form result and the button pressed from the client 3. execute some actions 4. send a new action to the client (form, print,...) To define a wizard, you have to create a class inheriting from wizard.interface and instantiate it. Each wizard must have a unique name, which can be chosen arbitrarily except for the fact it has to start with the module name (for example: account.move.line.reconcile). The wizard must define a dictionary named states which defines all its steps. Here is an example of such a class: class wiz_reconcile(wizard.interface): states = { init : { actions : [_trans_rec_get], result : { type : form, arch : _transaction_form, Wizards - Principles 129
134 fields : _transaction_fields, state :[( reconcile, Reconcile ),( end, Cancel )]} }, reconcile : { actions : [_trans_rec_reconcile], result : { type : state, state : end } } } wiz_reconcile( account.move.line.reconcile ); The states dictionary define all the states of the wizard. In this example; init and reconcile. There is another state which is named end which is implicit. A wizard always starts in the init state and ends in the end state. A state define two things: 1. a list of actions 2. a result The list of actions Each step/state of a wizard defines a list of actions which are executed when the wizard enters the state. This list can be empty. The function (actions) must have the following signatures: def _trans_rec_get(self, uid, data, res_get=false): Where: self is the pointer to the wizard object uid is the user ID of the user which is executing the wizard data is a dictionary containing the following data: ids: the list of ids of resources selected when the user executed the wizard id: the id highlighted when the user executed the wizard form: a dictionary containing all the values the user completed in the preceding forms. If you change values in this dictionary, the following forms will be pre-completed. The result Here are some result examples: Result: next step result : { type : state, state : end } Indicate that the wizard has to continue to the next state: end. If this is the end state, the wizard stops. Result: new dialog for the client 130 Chapter 13. Creating Wizard - (The Process)
135 result : { type : form, arch : _form, fields : _fields, state :[( reconcile, Reconcile ),( end, Cancel )]} The type=form indicate that this step is a dialog to the client. The dialog is composed of: 1. a form : with fields description and a form description 2. some buttons : on wich the user press after completing the form The form description (arch) is like in the views objects. Here is an example of form: _form = """<?xml version="1.0"?> <form title="reconciliation"> <separator string="reconciliation transactions" colspan="4"/> <field name="trans_nbr"/> <newline/> <field name="credit"/> <field name="debit"/> <separator string="write-off" colspan="4"/> <field name="writeoff"/> <newline/> <field name="writeoff_acc_id" colspan="3"/> </form> """ The fields description is similar to the fields described in the python ORM objects. Example: _transaction_fields = { trans_nbr : { string : # of Transaction, type : integer, readonly :True}, credit : { string : Credit amount, type : float, readonly :True}, debit : { string : Debit amount, type : float, readonly :True}, writeoff : { string : Write-Off amount, type : float, readonly :True}, writeoff_acc_id : { string : Write-Off account, type : many2one, relation : account.account }, } Each step/state of a wizard can have several buttons. Those are located on the bottom right of the dialog box. The list of buttons for each step of the wizard is declared in the state key of its result dictionary. For example: state :[( end, Cancel, gtk-cancel ), ( reconcile, Reconcile,, True)] 1. the next step name (determine which state will be next) 2. the button string (to display for the client) 3. the gtk stock item without the stock prefix (since 4.2) 4. a boolean, if true the button is set as the default action (since 4.2) Wizards - Principles 131
136 Here is a screenshot of this form: Result: call a method to determine which state is next def _check_refund(self, cr, uid, data, context):... return datas[ form ][ refund_id ] and wait_invoice or end... result : { type : choice, next_state :_check_refund} Result: print a report def _get_invoice_id(self, uid, datas):... return { ids : [...]}... actions : [_get_invoice_id], result : { type : print, report : account.invoice, get_id_from_action : True, state : check_refund } Result: client run an action 132 Chapter 13. Creating Wizard - (The Process)
137 def _makeinvoices(self, cr, uid, data, context):... return { domain : "[( id, in, ["+,.join(map(str,newinv))+"])]", name : Invoices, view_type : form, view_mode : tree,form, res_model : account.invoice, view_id : False, context : "{ type : out_refund }", type : ir.actions.act_window }... result : { type : action, action : _makeinvoices, state : end } The result of the function must be an all the fields of an ir.actions.* Here it is an ir.action.act_window, so the client will open an new tab for the objects account.invoice For more information about the fields used click here. It is recommended to use the result of a read on the ir.actions object like this: def _account_chart_open_window(self, cr, uid, data, context): mod_obj = pooler.get_pool(cr.dbname).get( ir.model.data ) act_obj = pooler.get_pool(cr.dbname).get( ir.actions.act_window ) result = mod_obj._get_id(cr, uid, account, action_account_tree ) id = mod_obj.read(cr, uid, [result], [ res_id ])[0][ res_id ] result = act_obj.read(cr, uid, [id])[0] result[ context ] = str({ fiscalyear : data[ form ][ fiscalyear ]}) return result... result : { type : action, action : _account_chart_open_window, state : end } 13.3 Specification Form _form = <?xml version="1.0"?> <form string="your String"> <field name="field 1"/> <newline/> <field name="field 2"/> </form> Specification 133
138 Fields Standard Field type: char, integer, boolean, float, date, datetime _fields = { str_field : { string : product name, type : char, readonly :True}, } string: Field label (required) type: (required) readonly: (optional) Relational Field type: one2one,many2one,one2many,many2many _fields = { field_id : { string : Write-Off account, type : many2one, relation : account.account } } string: Field label (required) type: (required) relation: name of the relation object 13.4 Add A New Wizard To create a new wizard, you must: create the wizard definition in a.py file wizards are usually defined in the wizard subdirectory of their module as in server/bin/addons/module_name/wizard/your_wizard_name.py add your wizard to the list of import statements in the init.py file of your module s wizard subdirectory. declare your wizard in the database The declaration is needed to map the wizard with a key of the client; when to launch which client. To declare a new wizard, you need to add it to the module_name_wizard.xml file, which contains all the wizard declarations for the module. If that file does not exist, you need to create it first. Here is an example of the account_wizard.xml file; <?xml version="1.0"?> <terp> <data> <delete model="ir.actions.wizard" search="[( wiz_name, like, account. )]" /> <wizard string="reconcile Transactions" model="account.move.line" 134 Chapter 13. Creating Wizard - (The Process)
139 name="account.move.line.reconcile" /> <wizard string="verify Transac steptions" model="account.move.line" name="account.move.line.check" keyword="tree_but_action" /> <wizard string="verify Transactions" model="account.move.line" name="account.move.line.check" /> <wizard string="print Journal" model="account.account" name="account.journal" /> <wizard string="split Invoice" model="account.invoice" name="account.invoice.split" /> <wizard string="refund Invoice" model="account.invoice" name="account.invoice.refund" /> </data> </terp> Attributes for the wizard tag: id (optional): string: The string which will be displayed if there are several wizards for one resthe user will be presented a list with wizards names). model: The name of the model where the data needed by the wizard is. name: The name of the wizard. It is used internally and should be unique. replace (optional): Whether or not the wizard should override all existing wizards for this model. Default value: False. menu (optional): Whether or not (True False) to link the wizard with the gears button (i.e. show the button or not). Default value: True. keyword (optional): Bind the wizard to another action (print icon, gear icon,...). Possible values for the keyword attribute client_print_multi: the print icon in a form client_action_multi: the gears icon in a form tree_but_action: the gears icon in a tree view (with the shortcuts on the left) tree_but_open: the double click on a branch of a tree (with the shortcuts on the left). For example, this is used, to bind wizards in the menu. terp.py If the wizard you created is the first one of its module, you probably had to create the modulename_wizard.xml file yourself. In that case, it should be added to the update_xml field of the terp.py file of the module. Here is, for example, the terp.py file for the account module. { } "name": Open ERP Accounting", "version": "0.1", "depends": ["base"], "init_xml": ["account_workflow.xml", "account_data.xml"], "update_xml": ["account_view.xml","account_report.xml", "account_wizard.xml"], Add A New Wizard 135
140 13.5 osv_memory Wizard System To develop osv_memory wizard, just create a normal object, But instead of inheriting from osv.osv, Inherit from osv.osv_memory. Methods of wizard are in object and if the wizard is complex, You can define workflow on object. osv_memory object is managed in memory instead of storing in postgresql. That s all, nothing more than just changing the inherit. So what makes them looks like old wizards? In the action that opens the object, you can put <field name="target">new</field> It means the object will open in a new window instead of the current one. On a button, you can use <button special= cancel.../> to close the window. Example : In project.py file. class config_compute_remaining(osv.osv_memory): _name= config.compute.remaining def _get_remaining(self,cr, uid, ctx): if active_id in ctx: return self.pool.get( project.task ).browse(cr,uid,ctx[ active_id ]).remaining_hours return False _columns = { remaining_hours : fields.float( Remaining Hours, digits=(16,2),), } _defaults = { remaining_hours : _get_remaining } def compute_hours(self, cr, uid, ids, context=none): if active_id in context: remaining_hrs=self.browse(cr,uid,ids)[0].remaining_hours self.pool.get( project.task ).write(cr,uid,context[ active_id ], { remaining_hours : remaining_hrs}) return { type : ir.actions.act_window_close, } config_compute_remaining() View is same as normal view (Note buttons). Example : <record id="view_config_compute_remaining" model="ir.ui.view"> <field name="name">compute Remaining Hours </field> <field name="model">config.compute.remaining</field> <field name="type">form</field> <field name="arch" type="xml"> <form string="remaining Hours"> <separator colspan="4" string="change Remaining Hours"/> <newline/> <field name="remaining_hours" widget="float_time"/> 136 Chapter 13. Creating Wizard - (The Process)
141 <group col="4" colspan="4"> <button icon="gtk-cancel" special="cancel" string="cancel"/> <button icon="gtk-ok" name="compute_hours" string="update" type="object"/> </group> </form> </field> </record> Action is also same as normal action (don t forget to add target attribute) Example : <record id="action_config_compute_remaining" model="ir.actions.act_window"> <field name="name">compute Remaining Hours</field> <field name="type">ir.actions.act_window</field> <field name="res_model">config.compute.remaining</field> <field name="view_type">form</field> <field name="view_mode">form</field> <field name="target">new</field> </record> osv_memory Wizard System 137
142 138 Chapter 13. Creating Wizard - (The Process)
 This chapter mainly describes OpenOffice.org reports, and then XSL:RML reports.")
143 CHAPTER FOURTEEN REPORTS There are mainly three types of reports in Open ERP: OpenOffice.org reports RML reports custom reports (based on PostgreSQL views and displayed within the interface) This chapter mainly describes OpenOffice.org reports, and then XSL:RML reports. Custom reports are described in section Advanced Modeling - Reporting With PostgreSQL Views OpenOffice.org reports The document flow OpenOffice.org reports are the most commonly used report formats. OpenOffice.org Writer is used (in combination with [[1]]) to generate a RML template, which in turn is used to generate a pdf printable report. The internal process 139

144 The.SXW template file We use a.sxw file for the template, which is the OpenOffice 1.0 format. The template includes expressions in brackets or OpenOffice fields to point where the data from the Open ERP server will be filled in. This document is only used for developers, as a help-tool to easily generate the.rml file. Open ERP does not need this.sxw file to print reports. The.RML template We generate a.rml file from the.sxw file using Open SXW2RML. A.RML file is a XML format that represent a.pdf document. It can be converted to a.pdf after. We use RML for more easy processing: XML syntax seems to be more common than PDF syntax. The report engine The Open Report Engine process the.rml file inserting data from the database at each expression. in the.rml file will be replaced by the name of the country of the partner of the printed invoice. This report engine produce the same.rml file where all expressions have been replaced by real data. The final document Finaly the.rml file is converted to PDF or HTML according to the need, using OpenReport s scripts Creating a SXW You can design reports using OpenOffice. Here s, as an example, the 140 Chapter 14. Reports
145 Dynamic content in your report Dynamic content In the.sxw/.rml reports, you can put some Python code that accesses the Open ERP objects in brackets. The context of the code (the variable s values you can use) is the following: Available variables Here are Python objects/variables available: objects : the list of objects to be printed (invoices for example). data : comes from the wizard time : the Python time module (see Python documentation for more information). user : the user object launching the report. Available functions Here are Python functions you can use: setlang( fr ) : change the language used in automated translation (fields...). repeatin(list,varname) : repeat the current part of the template (whole document, current section, current row in the table) for each object in the list. Use varname in the template s tags. Since versions 4.1.X, you can use an optionnal third argument that is the name of the.rml tag you want to loop on. settag( para, xpre ) : change the enclosing RML tag (usually para ) by an other (xpre is a preformatted paragraph), in the (converted from sxw)rml document (?) OpenOffice.org reports 141
146 removeparentnode( tr ) : removes the parent node of type tr, this parameter is usually used together with a conditional (see examples below) Example of useful tags: [[ repeatin(objects, o ) ]] : Loop on each objects selected for the print [[ repeatin(o.invoice_line, l ) ]] : Loop on every line [[ (o.prop== draft )and YES or NO ]] : Print YES or NO according the field prop [[ round(o.quantity * o.price * 0.9, 2) ]] : Operations are OK. [[ %07d % int(o.number) ]] : Number formating [[ reduce(lambda x, obj: x+obj.qty, list, 0 ) ]] : Total qty of list (try objects as list) [[ user.name ]] : user name [[ setlang(o.partner_id.lang) ]] : Localized printings [[ time.strftime( %d/%m/%y ) ]] : Show the time in format=dd/mm/yyyy, check python doc for more about %d,... [[ time.strftime(time.ctime()[0:10]) ]] or [[ time.strftime(time.ctime()[-4:]) ]] : Prints only date. [[ time.ctime() ]] : Prints the actual date & time [[ time.ctime().split()[3] ]] : Prints only time [[ o.type in [ in_invoice, out_invoice ] and Invoice or removeparentnode( tr ) ]] : If the type is in_invoice or out_invoice then the word Invoice is printed, if it s neither the first node above it of type tr will be removed SXW2RML Open Report Manual About The Open ERP s report engine. Open Report is a module that allows you to render high quality PDF document from an OpenOffice template (.sxw) and any relational database. It can be used as a OpenERP module or as a standalone program. Open Report has been developed by Fabien Pinckaers. tiny_sxw2rml can be found at SXW to RML script setup - Windows users In order to use the tiny_sxw2rml.py Python script you need the following packages installed: Pyhton ( ReportLab ( Libxml for Python ( 142 Chapter 14. Reports
147 SXW to RML script setup - Linux (Open source) users Ensure normalized_oo2rml.xsl is available to tiny_sxw2rml otherwise you will get an error like: failed to load external entity normalized_oo2rml.xsl Running tiny_sxw2rml When you have all that installed just edit your report template and run the script with the following command: tiny_sxw2rml.py template.sxw > template.rml Note: tiny_sxw2rml.py help suggests that you specify the output file with: -o OUTPUT but this does not seem to work as of V Tiny ERP Server PDF Output Server PDF Output About To generate the pdf from the rml file, OpenERP needs a rml parser. Parser The parsers are generally put into the folder report of the module. Here is the code for the sale order report: import time from report import report_sxw class order(report_sxw.rml_parse): def init (self, cr, uid, name, context): super(order, self). init (cr, uid, name, context) self.localcontext.update({ time : time, }) report_sxw.report_sxw( report.sale.order, sale.order, addons/sale/report/order.rml, parser=order, header=true) The parser inherit from the report_sxw.rml_parse object and it add to the localcontext, the function time so it will be possible to call it in the report. After an instance of report_sxw.report_sxw is created with the parameters: the name of the report the object name on which the report is defined the path to the rml file the parser to use for the report (by default rml_parse) a boolean to add or not the company header on the report (default True) OpenOffice.org reports 143
148 The xml definition To be visible from the client, the report must be declared in an xml file (generally: module_name _report.xml) that must be put in the terp.py file Here is an example for the sale order report: <?xml version="1.0"?> <terp> <data> <report </terp> </data> The arguments are: id="report_sale_order" string="print Order" model="sale.order" name="sale.order" rml="sale/report/order.rml" auto="false"/> header="false"/> id: the id of the report like any xml tag in OpenERP string: the string that will be display on the Client button model: the object on which the report will run name: the name of the report without the first report. rml: the path to the rml file auto: boolean to specify if the server must generate a default parser or not header: allows to enable or disable the report header located in [server_dir]/bin/addons/custom 14.2 XSL:RML reports RML reports don t require programming but require two simple XML files to be written: a file describing the data to export (*.xml) a file containing the presentation rules to apply to that data (*.xsl) The role of the XML template is to describe which fields of the resource have to be exported (by the server). The XSL:RML style sheet deals with the layout of the exported data as well as the static text of reports. Static text is referring to the text which is common to all reports of the same type (for example, the title of table columns). Example 144 Chapter 14. Reports
149 Here is, as an example, the different files for the simplest report in the ERP. XML Template <?xml version="1.0"?> <ids> <id type="fields" name="id"> </id> </ids> <name type="field" name="name"/> <ref type="field" name="ref"/> XML data file (generated) <?xml version="1.0"?> <ids> <id> <name>tiny sprl</name> <ref>pnk00</ref> </id><id> <name>asus</name> <ref></ref> </id><id> <name>agrolait</name> <ref></ref> </id><id> <name>banque Plein-Aux-As</name> <ref></ref> XSL:RML reports 145
150 </id><id> <name>china Export</name> <ref></ref> </id><id> <name>ditrib PC</name> <ref></ref> </id><id> <name>ecole de Commerce de Liege</name> <ref></ref> </id><id> <name>elec Import</name> <ref></ref> </id><id> <name>maxtor</name> <ref></ref> </id><id> <name>mediapole SPRL</name> <ref></ref> </id><id> <name>opensides sprl</name> <ref>os</ref> </id><id> </id> </ids> XSL stylesheet <name>tecsas sarl</name> <ref></ref> <?xml version="1.0" encoding="utf-8"?> <xsl:stylesheet version="1.0" xmlns:xsl=" <xsl:template match="/"> <xsl:apply-templates select="ids"/> </xsl:template> <xsl:template match="ids"> <document> 146 Chapter 14. Reports
151 <template pagesize="21cm,29.7cm"> <pagetemplate> <frame id="col1" x1="2cm" y1="2.4cm" width="8cm" height="26cm"/> <frame id="col2" x1="11cm" y1="2.4cm" width="8cm" height="26cm"/> </pagetemplate> </template> <stylesheet> <blocktablestyle id="ids"> <blockfont name="helvetica-boldoblique" size="12" start="0,0" stop="-1,0"/> <linestyle kind="box" colorname="black" start="0,0" stop="-1,0"/> <linestyle kind="box" colorname="black" start="0,0" stop="-1,-1"/> </blocktablestyle> </stylesheet> <story> <blocktable colwidths="2cm, 6cm" repeatrows="1" style="ids"> <tr> <td t="1">ref.</td> <td t="1">name</td> </tr> <xsl:apply-templates select="id"/> </blocktable> </story> </document> </xsl:template> <xsl:template match="id"> <tr> </tr> <td><xsl:value-of select="ref"/></td> <td><para><xsl:value-of select="name"/></para></td> </xsl:template> </xsl:stylesheet> Resulting RML file (generated) XSL:RML reports 147
152 <?xml version="1.0"?> <document>... <story> <blocktable colwidths="2cm, 6cm" repeatrows="1" style="ids"> <tr> </tr> <tr> </tr> <tr> </tr> <tr> </tr> <tr> </tr> <tr> </tr> <tr> </tr> <tr> </tr> <td t="1">ref.</td> <td t="1">name</td> <td>pnk00</td> <td><para>tiny sprl</para></td> <td></td> <td><para>asus</para></td> <td></td> <td><para>agrolait</para></td> <td></td> <td><para>banque Plein-Aux-As</para></td> <td></td> <td><para>china Export</para></td> <td></td> <td><para>ditrib PC</para></td> <td></td> <td><para>ecole de Commerce de Liege</para></td> 148 Chapter 14. Reports
153 <tr> </tr> <tr> </tr> <tr> </tr> <tr> <td></td> <td><para>elec Import</para></td> <td></td> <td><para>maxtor</para></td> <td></td> <td><para>mediapole SPRL</para></td> <td>os</td> <td><para>opensides sprl</para></td> </tr> <tr> <td></td> </tr> </blocktable> </story> </document> Fore more information on the formats used: <td><para>tecsas sarl</para></td> RML : XSL - Specification : XSL - Tutorial : All these formats use XML: XML Template XML templates are simple XML files describing which fields among all available object fields are necessary for the report XSL:RML reports 149
154 File format Tag names can be chosen arbitrarily (it must be valid XML though). In the XSL file, you will have to use those names. Most of the time, the name of a tag will be the same as the name of the object field it refers to. Nodes without type attribute are transferred identically into the XML destination file (the data file). Nodes with a type attribute will be parsed by the server and their content will be replaced by data coming from objects. In addition to the type attribute, nodes have other possible attributes. These attributes depend on the type of the node (each node type supports or needs different attributes). Most node types have a name attribute, which refers to the name of a field of the object on which we work. As for the browse method on objects, field names in reports can use a notation similar to the notation found in object oriented programming languages. It means that relation fields can be used as bridges to fetch data from other (related) objects. Let s use the account.transfer object as an example. It contains a partner_id field. This field is a relation field ( many to one ) pointing to the res.partner object. Let s suppose that we want to create a report for transfers and in this report, we want to use the name of the recipient partner. This name could be accessed using the following expression as the name of the field: partner_id.name Possible types Here is the list of available field types: field: It is the simplest type. For nodes of this type, the server replaces the node content by the value of the field whose name is given in the name attribute. fields: when this type of node is used, the server will generate a node in the XML data file for each unique value of the field whose name is given in the name attribute. Notes: ** This node type is often used with id as its name attribute. This has the effect of creating one node for each resource selected in the interface by the user. ** The semantics of a node <node type= fields name= field_name > is similar to an SQL statement of the form SELECT FROM object_table WHERE id in identifier_list GROUP BY field_name where identifier_list is the list of ids of the resources selected by the ::user (in the interface). eval: This node type evaluate the expression given in the expr attribute. This expression may be any Python expression and may contain objects fields names. zoom: This node type allows to enter into the resource referenced by the relation field whose name is given in the name attribute. It means that its child nodes will be able to access the fields of that resource without having to prefix them with the field name that makes the link with the other object. In our example above, we could also have accessed the field name of the partner with the following: <partner type="zoom" name="partner_id"> </partner> <name type="field" name="name"/> In this precise case, there is of course no point in using this notation instead of the standard <name type="field" name="partner_id.name"/> 150 Chapter 14. Reports
155 The zoom type is only useful when we want to recover several fields in the same object. function: returns the result of the call to the function whose name is given in the name attribute. This function must be part of the list of predefined functions. For the moment, the only available function is today, which returns the current date. call: calls the object method whose name is given in the name attribute with the arguments given in the args attribute. The result is stored into a dictionary of the form { name_of_variable : value,... } and can be accessed through child nodes. These nodes must have a value attribute which correspond to one of the keys of the dictionary returned by the method. Example: <cost type="call" name="compute_seller_costs" args=""> </cost> <name value="name"/> <amount value="amount"/> TODO: documenter format methode appellée def compute_buyer_costs(self, cr, uid, ids, *args): attachment: extract the first attachment of the resource whose id is taken from the field whose name is given in the name attribute, and put it as an image in the report. Example: <image type= attachment name= id /> Example Here is an example of XML file: <?xml version="1.0" encoding="iso "?> <transfer-list> <transfer type="fields" name="id"> <name type="field" name="name"/> <partner_id type="field" name="partner_id.name"/> <date type="field" name="date"/> <type type="field" name="type"/> <reference type="field" name="reference"/> <amount type="field" name="amount"/> <change type="field" name="change"/> </transfer> </transfer-list> Introduction to RML For more information on the RML format, please refer to the official Reportlab documentation XSL:RML reports 151
156 XSL:RML Stylesheet There are two possibilities to do a XSL style sheet for a report. Either making everything by yourself, or use our predefined templates Either freestyle or use corporate_defaults + rml_template import rml_template.xsl required templates: frames? stylesheet story optional templates: Translations As Open ERP can be used in several langages, reports must be translatable. But in a report, everything doesn t have to be translated : only the actual text has to be translated, not the formatting codes. A field will be processed by the translation system if the XML tag which surrounds it (whatever it is) has a t= 1 attribute. The server will translate all the fields with such attributes in the report generation process. Useful links: RML UserGuide (pdf) (reportlab.com) XSL Tutorial (zvon.org) XSL Reference (zvon.org) XSL tutorial and references (W3Schools) XSL Specification (W3C) Example (with corporate defaults): <xsl:stylesheet version="1.0" xmlns:xsl=" :xmlns:fo=" <xsl:import href="../../custom/corporate_defaults.xsl"/> <xsl:import href="../../base/report/rml_template.xsl"/> <xsl:variable name="page_format">a4_normal</xsl:variable> <xsl:template match="/"> <xsl:call-template name="rml"/> </xsl:template> <xsl:template name="stylesheet"> </xsl:template> <xsl:template name="story"> <xsl:apply-templates select="transfer-list"/> 152 Chapter 14. Reports
157 </xsl:template> <xsl:template match="transfer-list"> <xsl:apply-templates select="transfer"/> </xsl:template> <xsl:template match="transfer"> <setnexttemplate name="other_pages"/> <para> Document: <xsl:value-of select="name"/> </para><para> Type: <xsl:value-of select="type"/> </para><para> Reference: <xsl:value-of select="reference"/> </para><para> Partner ID: <xsl:value-of select="partner_id"/> </para><para> Date: <xsl:value-of select="date"/> </para><para> Amount: <xsl:value-of select="amount"/> </para> <xsl:if test="number(change)>0"> <para> </para> Change: <xsl:value-of select="change"/> </xsl:if> <setnexttemplate name="first_page"/> <pagebreak/> </xsl:template> </xsl:stylesheet> 14.3 Reports without corporate header Example (with corporate defaults): Reports without corporate header 153
158 <xsl:stylesheet version="1.0" xmlns:xsl=" :xmlns:fo=" <xsl:import href="../../base/report/rml_template.xsl"/> <xsl:variable name="page_format">a4_normal</xsl:variable> <xsl:template match="/"> <xsl:call-template name="rml"/> </xsl:template> <xsl:template name="stylesheet"> </xsl:template> <xsl:template name="story"> <xsl:apply-templates select="transfer-list"/> </xsl:template> <xsl:template match="transfer-list"> <xsl:apply-templates select="transfer"/> </xsl:template> <xsl:template match="transfer"> <setnexttemplate name="other_pages"/> <para> Document: <xsl:value-of select="name"/> </para><para> Type: <xsl:value-of select="type"/> </para><para> Reference: <xsl:value-of select="reference"/> </para><para> Partner ID: <xsl:value-of select="partner_id"/> </para><para> Date: <xsl:value-of select="date"/> </para><para> Amount: <xsl:value-of select="amount"/> </para> <xsl:if test="number(change)>0"> <para> Change: <xsl:value-of select="change"/> </para> </xsl:if> <setnexttemplate name="first_page"/> <pagebreak/> </xsl:template> </xsl:stylesheet> 14.4 Each report with its own corporate header Example (with corporate defaults): <xsl:stylesheet version="1.0" xmlns:xsl=" :xmlns:fo=" <xsl:import href="../../custom/corporate_defaults.xsl"/> 154 Chapter 14. Reports
159 <xsl:import href="../../base/report/rml_template.xsl"/> <xsl:variable name="page_format">a4_normal</xsl:variable>... </xsl:template> </xsl:stylesheet> 14.5 Bar Codes Barcodes in RML files Barcodes can be generated using the <barcode> tag in RML files. The following formats are supported: codabar code11 code128 (default if no code specified ) standard39 standard93 i2of5 extended39 extended93 msi fim postnet You can change the following attributes for rendering your barcode: code : char ratio : float xdim : unit height : unit checksum : bool quiet : bool Examples: <barcode code= code128 xdim= 28cm ratio= 2.2 > SN </barcode> Bar Codes 155
160 14.6 How to add a new report In 4.0.X Administration -> Custom -> Low Level -> Base->Actions -> ir.actions.report.xml 14.7 Usual TAGS Code find in [[ ]] tags is python code. The context of the code (the variable s values you can use) is the following: python objects/variables, available when the report start: objects the list of objects to be printed (invoices for example) data comes from the wizard time see python documentation. user the user object launching the report. python functions you can use: setlang( fr ) change the langage used in automated translation (fields...). repeatin(list,varname) repeat the template (whole doc. or current paragraph?) for each object in the list. Use varname in the template s tags. settag( para, xpre ) change the enclosing RML tag (usually para ) by an other (xpre is a preformatted paragraph), in the (converted from sxw)rml document (?) removeparentnode Useful tags: [ repeatin(objects, o ) ] objects to be printed repeatin(o.invoice_line, l ) print every line o.quantity * o.price Operations are OK. 07d int(o.number) number formating reduce(lambda x obj: x+obj.qty, list, 0 ) total qty of list (try objects as list) user.name user name. setlang(o.partner_id.lang) Localized printings time.strftime( %d/%m/%y ) format=dd MM YYYY, check python doc for more about %d,... [[ time.strftime(time.ctime()[0:10]) ]] [[ time.strftime(time.ctime()[-4:]) ]] prints only date. time.ctime() it prints the actual date & time. [[ time.ctime().split()[3] ]] prints only time one more interesting tag: if you want to print out the creator of an entry (create_uid) or the last one who wrote on an entry (write_uid) you have to add something like this to the class your report refers to: create_uid : fields.many2one( res.users, User, readonly=1) and then in your report it s like this to print out the corresponding name: o.create_uid.name Sometimes you might want to print out something only if a certain condition is fullfilled. You can construct it with the pyhton logical operators not, and and or. Because every object in python has a logical value (TRUE or FALSE) you can construct something like this: 156 Chapter 14. Reports
161 (o.prop== draft ) and YES or NO print YES or NO it works like this: and: first value is TRUE then print out the second value. First value is FALSE print out first value. or: first value is TRUE then print out the first value. First value is FALSE print out second value. in this example if o.prop== draft -> TRUE then (o.prop== draft ) and YES reads Yes. Next step is Yes or No which leads to a printed YES (because a string s logical value is TRUE). If o.prop== draft -> FALSE then it reads FALSE or No. So No is printed. One can use very comlpex structures. To learn more search for some pyhton reference regarding logical opertors. python function filter can... filter: try something like: repeatin(filter( lambda l: l.product_id.type== service,o.invoice_line), line ) for printing only product with type= service in a line s section. To display binary field image on report (to be checked) [[ settag( para, image,{ width : 100.0, height : 80.0 }) ]] o.image or settag( image, para ) 14.8 Unicode reports As of OpenERP 5.0-rc3 unicode printing with ReportLab is still not available. The problem is that OpenERP uses the PDF standard fonts (14 fonts, they are not embedded in the document but the reader provides them) that are Type1 and have only Latin1 characters The solution consists of 3 parts Provide TrueType fonts and make them accessible for ReportLab. Register the TrueType fonts with ReportLab before using them in the reports. Replace the old fontnames in xsl and rml templates with the TrueType ones All these ideas are taken from the forums Free TrueType fonts that can be used for this purpose are in the DejaVu family. They can be installed in the ReportLab s fonts directory, system-wide and include that directory in rl_config.py, in a subdirectory of the OpenERP installation and give that path to ReportLab during the font registration. In the server/bin/report/render/rml2pdf/ init.py Unicode reports 157
162 import reportlab.rl_config reportlab.rl_config.warnonmissingfontglyphs = 0 from reportlab.pdfbase import pdfmetrics from reportlab.pdfbase.ttfonts import TTFont import reportlab enc = UTF-8 #repeat these for all the fonts needed pdfmetrics.registerfont(ttfont( DejaVuSans, DejaVuSans.ttf,enc)) pdfmetrics.registerfont(ttfont( DejaVuSans-Bold, DejaVuSans-Bold.ttf,enc)) from reportlab.lib.fonts import addmapping #repeat these for all the fonts needed addmapping( DejaVuSans, 0, 0, DejaVuSans ) #normal addmapping( DejaVuSans-Bold, 1, 0, DejaVuSans ) #normal trml2pdf.py should be modified to load this if invoked from the command line. All the xsl and rml files have to be modified A list of possible alternatives: Times-Roman, Times-BoldItalic, Times-Bold, Times-Italic, DejaVuSerif.ttf DejaVuSerif-BoldItalic.ttf DejaVuSerif-Bold.ttf DejaVuSerif-Italic.ttf Helvetica, DejaVuSans.ttf Helvetica-BoldItalic, DejaVuSans-BoldOblique.ttf Helvetica-Bold, DejaVuSans-Bold.ttf Helvetica-Italic, DejaVuSans-Oblique.ttf Courier, DejaVuSansMono.ttf Courier-Bold, DejaVuSansMono-Bold.ttf Courier-BoldItalic, DejaVuSansMono-BoldOblique.ttf Courier-Italic, DejaVuSansMono-Oblique.ttf Helvetica-ExtraLight, DejaVuSans-ExtraLight.ttf TimesCondensed-Roman, DejaVuSerifCondensed.ttf TimesCondensed-BoldItalic, DejaVuSerifCondensed-BoldItalic.ttf TimesCondensed-Bold, DejaVuSerifCondensed-Bold.ttf TimesCondensed-Italic, DejaVuSerifCondensed-Italic.ttf HelveticaCondensed, DejaVuSansCondensed.ttf HelveticaCondensed-BoldItalic, DejaVuSansCondensed-BoldOblique.ttf HelveticaCondensed-Bold, DejaVuSansCondensed-Bold.ttf HelveticaCondensed-Italic, DejaVuSansCondensed-Oblique.ttf 158 Chapter 14. Reports
163 CHAPTER FIFTEEN I18N - INTERNATIONALIZATION Explain about the multiple language application 15.1 Introduction 159
164 160 Chapter 15. I18n - Internationalization
165 Part V Part 4 : Business Process Advance Configuration 161
166
167 CHAPTER SIXTEEN SERVER ACTION 16.1 Introduction Server action is an new feature to the OpenERP available since the version 5.0 beta, This is the interesting features for the customizer, to full fill the customers requirements, This features enables to provides the quick and easy configuration some process which is day to day requirements. Like send on confirmation of the sale order, or confirmation of the Invoice, log the operation of the invoice (confirm, cancel, etc..). or need to develope some system which runs wizard / report on the confirmation of the sales, purchase, or invoice. So Server action is the only one answer to solve all this kind of problems without doing any development, just a few configuration and the system is ready to answer few of above questions. Following are the list of action types which are supplied under the Server Action. Client Action Trigger SMS Create Object Write Object Multi Action Each type of action have the special features and different configuration parameters. We will see one by one all type of action how to configure and list of parameters that affect the system 16.2 Client Action This action executes at client side, this is a good idea to run the wizard or report at client side. Using this type of action we can make the system like ERP will print the invoice after confirmation of the Invoice. Like it will run the payment wizard after confirmation of the invoice. Technically we can run all client action which execute at client side. We can execute ir.actions.report.custom, ir.actions.report.xml, ir.actions.act_window, ir.actions.wizard, or ir.actions.url. Here is an example to show how we can configuration Client action to print the invoice after confirmation of the invoice. 163

168 This is an good and seems easy to configure the action. Important fields are Object Select the object on which we want to implement the Server Action when work flow will execute on this object Client Action Select the client action that is to execute at client side. Any of the following types. ir.actions.report.custom ir.actions.report.xml ir.actions.act_window ir.actions.wizard ir.actions.url 16.3 Trigger Trigger is an really excellent when we want to deal with the work flow of the other object which working the work flow of the first object. For example we want to configure the system like when we confirm the purchase order and create the invoice that newly created invoice should confirm it self automatically by the server action. This is the easy configuration for the trigger to have the system where the created invoice will confirm it self. Important fields are 164 Chapter 16. Server Action

169 Object Select the object on which we want to implement the Server Action when work flow will execute on this object Work-flow on Here we select invoice, need to select the model on which the automatic workflow will be called by the action system Trigger On We need to provide the id of the newly record, here in this case, Purchase order store the id of the Invoice after creating of the invoice in invoice_id field. Trigger Name This is the signal name which we want to generate on the newly created object Action This is the common requirement for all business process, like send the confirmation by the when sales order, purchase order, invoice, payment, shipping of goods will takes place. For that we need only few things to configure and tiny will send the very quickly and in easy way. Even not need to setting up the your own server, you can use your exciting server and account, of you not have your server you can use from the free account by Gmail, Yahoo!, etc.. Server Configuration supply the following parameters when we run OpenERP Server. user address --smtp=smtp.mail.yahoo.co.in smtp server name or ip --smtp-port=587 smtp port --smtp-user=gajjarmantavya user name usually same as the address name without domain name --smtp-password=************* password to the user account --smtp-ssl=false use in case if the server required ssl for sending Action Configuration Important Fields are Object Select the object on which we want to implement the Server Action when work flow will execute on this object Contact We need to select the fields from which action will select the address to whom we would like to send the , system will display all the fields related to the current object selected in the Object field Action 165

170 Message You can provide the message template with the fields that related to the current object. And it will be merge when it is going to send the . This is the same language then the rml which is used to design the report here we can use the [[ ]] + html tage to design in the html format Working with You can select the any fields from the current object, like here we select the [[ ]] invoice in the object. For example to get the partner name we can use [[ object.partner_id.name ]]like the same, object refers to the current object and we can access any fields which exist in the model. After confirmation the invoice we get the confirmation from the action Create Object This is an interesting feature for the tiny partners those who want to track the transaction in the OpenERP, like currently in the ERP you can get the Event history on the Partners which logs the only the sales order events. But if we want to start logging the invoice like the same we can easily do like that using the Create object Actions. Create Object action have the easy but tricky configuration, for the movement you have to remember the fields name or check it out from the code it self, in future we will develop the expression builder inside OpenERP so you can build the complex expression. Important fields are Object Select the object on which we want to implement the Server Action when work flow will execute on this object Model This is the target model where the new object is to be created, if its empty it refers to the current object and allow to select the fields from the same, but its advisable to provide the model in all case if different or if the same. Fields Mapping Need to provide the 3 values 1. Field: any of the fields from the target model 2. type of the value you can give either value or expression 3. provide the value or expression the expression again start with the object keyword and its refers to the current object which selected in to the Object field. You must select the all required fields from the object 166 Chapter 16. Server Action

171 Record Id After creating the new record where the id of the new record if going to store. So in future we can refer the same for the other operations Write Object The same configuration as defined for the Create Object, here we take an example that it will write the Additional Information on the same object Important Fields are same as the Create Object 16.7 Multi Action This is the most interesting action, which allows to execute the multiple server action on the same business operations. Like if you want to print and send the on confirmation of the invoice. We need to create the 3 Server Actions for that. Print Invoice Invoice Confirmation !! Multi Action The only problem with the Multi Action is that it will execute many actions at the server side, but only one client action will be executed. For example we would like to print report + execute the wizard this 2 operation is not allowd in the one multi action Write Object 167

172 Important Fields are Object Select the object on which we want to implement the Server Action when work flow will execute on this object Other Actions We need to select the server action in this fields, we are free to select the as many as actions as we can. Just we need to take care for the problem of the multi action, other things is very easy. Link it up with the Work flow The important things is to link the server action with the work flow, its bit easy to link with action with the work flow. Open the work flow editor in GTK, select the work flow and go to the start and select the Sever Action. This will automatically be called when the object comes to that state. Here in this example I added the Action to print the Invoice, when the Invoice will be confirmed. 168 Chapter 16. Server Action
SysPatrol - Server Security Monitor
 SysPatrol Server Security Monitor User Manual Version 2.2 Sep 2013 www.flexense.com www.syspatrol.com 1 Product Overview SysPatrol is a server security monitoring solution allowing one to monitor one or
SyncThru Database Migration
 SyncThru Database Migration Overview Database Migration for SyncThru application is an intuitive tool that enables the data stored in the database of an older version of SyncThru, to be moved to the database
http://docs.trendmicro.com
 Trend Micro Incorporated reserves the right to make changes to this document and to the products described herein without notice. Before installing and using the product, please review the readme files,
There are numerous ways to access monitors:
 Remote Monitors REMOTE MONITORS... 1 Overview... 1 Accessing Monitors... 1 Creating Monitors... 2 Monitor Wizard Options... 11 Editing the Monitor Configuration... 14 Status... 15 Location... 17 Alerting...
DiskPulse DISK CHANGE MONITOR
 DiskPulse DISK CHANGE MONITOR User Manual Version 7.9 Oct 2015 www.diskpulse.com info@flexense.com 1 1 DiskPulse Overview...3 2 DiskPulse Product Versions...5 3 Using Desktop Product Version...6 3.1 Product
Bitrix Site Manager ASP.NET. Installation Guide
 Bitrix Site Manager ASP.NET Installation Guide Contents Introduction... 4 Chapter 1. Checking for IIS Installation... 5 Chapter 2. Using An Archive File to Install Bitrix Site Manager ASP.NET... 7 Preliminary
User s Guide for OpenERP Microsoft Outlook Free Plug-in 1.0 By Axelor http://www.axelor.com
 User s Guide for OpenERP Microsoft Outlook Free Plug-in 1.0 By Axelor http://www.axelor.com Contents 1. Introduction...3 Outlook Plug-in Free Edition Feature:... 3 Dependencies / Prerequisites... 3 More
www.novell.com/documentation Jobs Guide Identity Manager 4.0.1 February 10, 2012
 www.novell.com/documentation Jobs Guide Identity Manager 4.0.1 February 10, 2012 Legal Notices Novell, Inc. makes no representations or warranties with respect to the contents or use of this documentation,
WebSpy Vantage Ultimate 2.2 Web Module Administrators Guide
 WebSpy Vantage Ultimate 2.2 Web Module Administrators Guide This document is intended to help you get started using WebSpy Vantage Ultimate and the Web Module. For more detailed information, please see
ORACLE BUSINESS INTELLIGENCE WORKSHOP
 ORACLE BUSINESS INTELLIGENCE WORKSHOP Integration of Oracle BI Publisher with Oracle Business Intelligence Enterprise Edition Purpose This tutorial mainly covers how Oracle BI Publisher is integrated with
Open Object Installation Manuals
 Open Object Installation Manuals Release 1.0 Tiny SPRL 2009-04-09 CONTENTS i ii I OpenERP Installation on Linux 3 1 Open ERP Server Installation 5 1.1 Installing the required packages.....................................
Rochester Institute of Technology. Finance and Administration. Drupal 7 Training Documentation
 Rochester Institute of Technology Finance and Administration Drupal 7 Training Documentation Written by: Enterprise Web Applications Team CONTENTS Workflow... 4 Example of how the workflow works... 4 Login
MassTransit 6.0 Enterprise Web Configuration for Macintosh OS 10.5 Server
 MassTransit 6.0 Enterprise Web Configuration for Macintosh OS 10.5 Server November 6, 2008 Group Logic, Inc. 1100 North Glebe Road, Suite 800 Arlington, VA 22201 Phone: 703-528-1555 Fax: 703-528-3296 E-mail:
IceWarp Server. Log Analyzer. Version 10
 IceWarp Server Log Analyzer Version 10 Printed on 23 June, 2009 i Contents Log Analyzer 1 Quick Start... 2 Required Steps... 2 Optional Steps... 2 Advanced Configuration... 5 Log Importer... 6 General...
Version 1.0 January 2011. Xerox Phaser 3635MFP Extensible Interface Platform
 Version 1.0 January 2011 Xerox Phaser 3635MFP 2011 Xerox Corporation. XEROX and XEROX and Design are trademarks of Xerox Corporation in the United States and/or other countries. Changes are periodically
Results CRM 2012 User Manual
 Results CRM 2012 User Manual A Guide to Using Results CRM Standard, Results CRM Plus, & Results CRM Business Suite Table of Contents Installation Instructions... 1 Single User & Evaluation Installation
FileMaker Server 10 Help
 FileMaker Server 10 Help 2007-2009 FileMaker, Inc. All Rights Reserved. FileMaker, Inc. 5201 Patrick Henry Drive Santa Clara, California 95054 FileMaker, the file folder logo, Bento and the Bento logo
http://docs.trendmicro.com
 Trend Micro Incorporated reserves the right to make changes to this document and to the products described herein without notice. Before installing and using the product, please review the readme files,
FileMaker Server 11. FileMaker Server Help
 FileMaker Server 11 FileMaker Server Help 2010 FileMaker, Inc. All Rights Reserved. FileMaker, Inc. 5201 Patrick Henry Drive Santa Clara, California 95054 FileMaker is a trademark of FileMaker, Inc. registered
User Guide. Version 3.2. Copyright 2002-2009 Snow Software AB. All rights reserved.
 Version 3.2 User Guide Copyright 2002-2009 Snow Software AB. All rights reserved. This manual and computer program is protected by copyright law and international treaties. Unauthorized reproduction or
Two new DB2 Web Query options expand Microsoft integration As printed in the September 2009 edition of the IBM Systems Magazine
 Answering the Call Two new DB2 Web Query options expand Microsoft integration As printed in the September 2009 edition of the IBM Systems Magazine Written by Robert Andrews robert.andrews@us.ibm.com End-user
Novell ZENworks Asset Management 7.5
 Novell ZENworks Asset Management 7.5 w w w. n o v e l l. c o m October 2006 USING THE WEB CONSOLE Table Of Contents Getting Started with ZENworks Asset Management Web Console... 1 How to Get Started...
Log Analyzer Reference
 IceWarp Unified Communications Log Analyzer Reference Version 10.4 Printed on 27 February, 2012 Contents Log Analyzer 1 Quick Start... 2 Required Steps... 2 Optional Steps... 3 Advanced Configuration...
kalmstrom.com Business Solutions
 HelpDesk OSP User Manual Content 1 INTRODUCTION... 3 2 REQUIREMENTS... 4 3 THE SHAREPOINT SITE... 4 4 THE HELPDESK OSP TICKET... 5 5 INSTALLATION OF HELPDESK OSP... 7 5.1 INTRODUCTION... 7 5.2 PROCESS...
System Administration Training Guide. S100 Installation and Site Management
 System Administration Training Guide S100 Installation and Site Management Table of contents System Requirements for Acumatica ERP 4.2... 5 Learning Objects:... 5 Web Browser... 5 Server Software... 5
GP REPORTS VIEWER USER GUIDE
 GP Reports Viewer Dynamics GP Reporting Made Easy GP REPORTS VIEWER USER GUIDE For Dynamics GP Version 2015 (Build 5) Dynamics GP Version 2013 (Build 14) Dynamics GP Version 2010 (Build 65) Last updated
Novell Identity Manager
 AUTHORIZED DOCUMENTATION Manual Task Service Driver Implementation Guide Novell Identity Manager 4.0.1 April 15, 2011 www.novell.com Legal Notices Novell, Inc. makes no representations or warranties with
PORTAL ADMINISTRATION
 1 Portal Administration User s Guide PORTAL ADMINISTRATION GUIDE Page 1 2 Portal Administration User s Guide Table of Contents Introduction...5 Core Portal Framework Concepts...5 Key Items...5 Layouts...5
Magento OpenERP Integration Documentation
 Magento OpenERP Integration Documentation Release 2.0dev Openlabs Technologies & Consulting (P) Limited September 11, 2015 Contents 1 Introduction 3 1.1 Installation................................................
Department of Veterans Affairs VistA Integration Adapter Release 1.0.5.0 Enhancement Manual
 Department of Veterans Affairs VistA Integration Adapter Release 1.0.5.0 Enhancement Manual Version 1.1 September 2014 Revision History Date Version Description Author 09/28/2014 1.0 Updates associated
Secure Messaging Server Console... 2
 Secure Messaging Server Console... 2 Upgrading your PEN Server Console:... 2 Server Console Installation Guide... 2 Prerequisites:... 2 General preparation:... 2 Installing the Server Console... 2 Activating
ServerView Inventory Manager
 User Guide - English FUJITSU Software ServerView Suite ServerView Inventory Manager ServerView Operations Manager V6.21 Edition October 2013 Comments Suggestions Corrections The User Documentation Department
Dashboard Admin Guide
 MadCap Software Dashboard Admin Guide Pulse Copyright 2014 MadCap Software. All rights reserved. Information in this document is subject to change without notice. The software described in this document
Team Foundation Server 2012 Installation Guide
 Team Foundation Server 2012 Installation Guide Page 1 of 143 Team Foundation Server 2012 Installation Guide Benjamin Day benday@benday.com v1.0.0 November 15, 2012 Team Foundation Server 2012 Installation
NovaBACKUP xsp Version 15.0 Upgrade Guide
 NovaBACKUP xsp Version 15.0 Upgrade Guide NovaStor / November 2013 2013 NovaStor, all rights reserved. All trademarks are the property of their respective owners. Features and specifications are subject
Integrating with BarTender Integration Builder
 Integrating with BarTender Integration Builder WHITE PAPER Contents Overview 3 Understanding BarTender's Native Integration Platform 4 Integration Builder 4 Administration Console 5 BarTender Integration
Wakanda Studio Features
 Wakanda Studio Features Discover the many features in Wakanda Studio. The main features each have their own chapters and other features are documented elsewhere: Wakanda Server Administration Data Browser
Your complete guide to installing the info@hand Self-Service Portal and estore.
 Your complete guide to installing the info@hand Self-Service Portal and estore. Install the Portal & estore as shrink-wrapped software, or as add-ons to an existing Joomla! installation. Then configure
Legal Notes. Regarding Trademarks. 2012 KYOCERA Document Solutions Inc.
 Legal Notes Unauthorized reproduction of all or part of this guide is prohibited. The information in this guide is subject to change without notice. We cannot be held liable for any problems arising from
Richmond SupportDesk Web Reports Module For Richmond SupportDesk v6.72. User Guide
 Richmond SupportDesk Web Reports Module For Richmond SupportDesk v6.72 User Guide Contents 1 Introduction... 4 2 Requirements... 5 3 Important Note for Customers Upgrading... 5 4 Installing the Web Reports
MFPConnect Monitoring. Monitoring with IPCheck Server Monitor. Integration Manual Version 2.05.00 Edition 1
 MFPConnect Monitoring Monitoring with IPCheck Server Monitor Integration Manual Version 2.05.00 Edition 1 TABLE OF CONTENTS 1. INTRODUCTION...3 2. REQUIREMENTS...4 3. RESTRICTIONS...5 4. INSTALLATION...6
User Manual. Onsight Management Suite Version 5.1. Another Innovation by Librestream
 User Manual Onsight Management Suite Version 5.1 Another Innovation by Librestream Doc #: 400075-06 May 2012 Information in this document is subject to change without notice. Reproduction in any manner
Copyright 2012 Trend Micro Incorporated. All rights reserved.
 Trend Micro Incorporated reserves the right to make changes to this document and to the products described herein without notice. Before installing and using the software, please review the readme files,
Users Guide. SelenioFlex File. Version 2.10.0
 SelenioFlex File Version 2.10.0 August 2015 Publication Information 2015 Imagine Communications Corp. Proprietary and Confidential. Imagine Communications considers this document and its contents to be
How To Set Up A Xerox Econcierge Powered By Xerx Account
 Xerox econcierge Account Setup Guide Xerox econcierge Account Setup Guide The free Xerox econcierge service provides the quickest, easiest way for your customers to order printer supplies for all their
Administration and Business Collaboration. User Manual
 Administration and Business Collaboration User Manual Copyright 2007 by Eurekify Ltd., 8 Hasadna Street Raanana 43651, ISRAEL. All Rights Reserved. This document maybe used in its complete form only and
How To Test Your Web Site On Wapt On A Pc Or Mac Or Mac (Or Mac) On A Mac Or Ipad Or Ipa (Or Ipa) On Pc Or Ipam (Or Pc Or Pc) On An Ip
 On A Mac Or Ipad Or Ipa (Or Ipa) On Pc Or Ipam (Or Pc Or Pc) On An Ip") Load testing with WAPT: Quick Start Guide This document describes step by step how to create a simple typical test for a web application, execute it and interpret the results. A brief insight is provided
Load testing with WAPT: Quick Start Guide This document describes step by step how to create a simple typical test for a web application, execute it and interpret the results. A brief insight is provided
for Sage 100 ERP Business Insights Overview Document
 for Sage 100 ERP Business Insights Document 2012 Sage Software, Inc. All rights reserved. Sage Software, Sage Software logos, and the Sage Software product and service names mentioned herein are registered
MGC WebCommander Web Server Manager
 MGC WebCommander Web Server Manager Installation and Configuration Guide Version 8.0 Copyright 2006 Polycom, Inc. All Rights Reserved Catalog No. DOC2138B Version 8.0 Proprietary and Confidential The information
Tivoli Endpoint Manager BigFix Dashboard
 Tivoli Endpoint Manager BigFix Dashboard Helping you monitor and control your Deployment. By Daniel Heth Moran Version 1.1.0 http://bigfix.me/dashboard 1 Copyright Stuff This edition first published in
TSM Studio Server User Guide 2.9.0.0
 TSM Studio Server User Guide 2.9.0.0 1 Table of Contents Disclaimer... 4 What is TSM Studio Server?... 5 System Requirements... 6 Database Requirements... 6 Installing TSM Studio Server... 7 TSM Studio
Elgg 1.8 Social Networking
 Elgg 1.8 Social Networking Create, customize, and deploy your very networking site with Elgg own social Cash Costello PACKT PUBLISHING open source* community experience distilled - BIRMINGHAM MUMBAI Preface
Spectrum Technology Platform. Version 9.0. Spectrum Spatial Administration Guide
 Spectrum Technology Platform Version 9.0 Spectrum Spatial Administration Guide Contents Chapter 1: Introduction...7 Welcome and Overview...8 Chapter 2: Configuring Your System...9 Changing the Default
ALERT installation setup
 ALERT installation setup In order to automate the installation process of the ALERT system, the ALERT installation setup is developed. It represents the main starting point in installing the ALERT system.
FileMaker Server 14. FileMaker Server Help
 FileMaker Server 14 FileMaker Server Help 2007 2015 FileMaker, Inc. All Rights Reserved. FileMaker, Inc. 5201 Patrick Henry Drive Santa Clara, California 95054 FileMaker and FileMaker Go are trademarks
Note: With v3.2, the DocuSign Fetch application was renamed DocuSign Retrieve.
 Quick Start Guide DocuSign Retrieve 3.2.2 Published April 2015 Overview DocuSign Retrieve is a windows-based tool that "retrieves" envelopes, documents, and data from DocuSign for use in external systems.
Getting Started With Halo for Windows For CloudPassage Halo
 Getting Started With Halo for Windows For CloudPassage Halo Protecting your Windows servers in a public or private cloud has become much easier and more secure, now that CloudPassage Halo is available
Forms Printer User Guide
 Forms Printer User Guide Version 10.51 for Dynamics GP 10 Forms Printer Build Version: 10.51.102 System Requirements Microsoft Dynamics GP 10 SP2 or greater Microsoft SQL Server 2005 or Higher Reporting
OpenERP Server Developers Documentation
 OpenERP Server Developers Documentation Release 7.0b OpenERP s.a. August 21, 2014 Contents 1 Howto 1 1.1 Howto: build a website with OpenERP................................. 1 2 OpenERP Server 9 2.1 Getting
EMC Documentum Webtop
 EMC Documentum Webtop Version 6.5 User Guide P/N 300 007 239 A01 EMC Corporation Corporate Headquarters: Hopkinton, MA 01748 9103 1 508 435 1000 www.emc.com Copyright 1994 2008 EMC Corporation. All rights
Documentum Content Distribution Services TM Administration Guide
 Documentum Content Distribution Services TM Administration Guide Version 5.3 SP5 August 2007 Copyright 1994-2007 EMC Corporation. All rights reserved. Table of Contents Preface... 7 Chapter 1 Introducing
UH CMS Basics. Cascade CMS Basics Class. UH CMS Basics Updated: June,2011! Page 1
 UH CMS Basics Cascade CMS Basics Class UH CMS Basics Updated: June,2011! Page 1 Introduction I. What is a CMS?! A CMS or Content Management System is a web based piece of software used to create web content,
TRUSTWAVE VULNERABILITY MANAGEMENT USER GUIDE
 .trust TRUSTWAVE VULNERABILITY MANAGEMENT USER GUIDE 2007 Table of Contents Introducing Trustwave Vulnerability Management 3 1 Logging In and Accessing Scans 4 1.1 Portal Navigation and Utility Functions...
NetIQ. How to guides: AppManager v7.04 Initial Setup for a trial. Haf Saba Attachmate NetIQ. Prepared by. Haf Saba. Senior Technical Consultant
 How to guides: AppManager v7.04 Initial Setup for a trial By NetIQ Prepared by Haf Saba Senior Technical Consultant Asia Pacific 1 Executive Summary This document will walk you through an initial setup
Contents Overview... 5 Configuring Project Management Bridge after Installation... 9 The Project Management Bridge Menu... 14
 Portfolio Management Bridge for Microsoft Office Project Server User's Guide June 2015 Contents Overview... 5 Basic Principles and Concepts... 5 Managing Workflow... 7 Top-Down Management... 7 Project-Based
Veeam Backup Enterprise Manager. Version 7.0
 Veeam Backup Enterprise Manager Version 7.0 User Guide August, 2013 2013 Veeam Software. All rights reserved. All trademarks are the property of their respective owners. No part of this publication may
User Guide. Version R91. English
 AuthAnvil User Guide Version R91 English August 25, 2015 Agreement The purchase and use of all Software and Services is subject to the Agreement as defined in Kaseya s Click-Accept EULATOS as updated from
Sophos Mobile Control Startup guide. Product version: 3
 Sophos Mobile Control Startup guide Product version: 3 Document date: January 2013 Contents 1 About this guide...3 2 What are the key steps?...5 3 Log in as a super administrator...6 4 Activate Sophos
Advanced Event Viewer Manual
 Advanced Event Viewer Manual Document version: 2.2944.01 Download Advanced Event Viewer at: http://www.advancedeventviewer.com Page 1 Introduction Advanced Event Viewer is an award winning application
F-Secure Messaging Security Gateway. Deployment Guide
 F-Secure Messaging Security Gateway Deployment Guide TOC F-Secure Messaging Security Gateway Contents Chapter 1: Deploying F-Secure Messaging Security Gateway...3 1.1 The typical product deployment model...4
MadCap Software. Upgrading Guide. Pulse
 MadCap Software Upgrading Guide Pulse Copyright 2014 MadCap Software. All rights reserved. Information in this document is subject to change without notice. The software described in this document is furnished
School account creation guide
 School account creation guide Contents Your welcome email Page 2 The CSV file Page 3 Uploading the CSV and creating the accounts Page 5 Retrieving staff usernames and passwords Page 8 Retrieving student
SharePoint Integration Framework Developers Cookbook
 Sitecore CMS 6.3 to 6.6 and SIP 3.2 SharePoint Integration Framework Developers Cookbook Rev: 2013-11-28 Sitecore CMS 6.3 to 6.6 and SIP 3.2 SharePoint Integration Framework Developers Cookbook A Guide
The Bazaar Version Control System. Michael Hudson, Canonical Ltd michael.hudson@canonical.com
 The Bazaar Version Control System Michael Hudson, Canonical Ltd michael.hudson@canonical.com What is Bazaar? Bazaar is a Distributed Version Control System (DVCS) You probably know what a VCS is by now:
Salesforce Integration
 Salesforce Integration 2015 Bomgar Corporation. All rights reserved worldwide. BOMGAR and the BOMGAR logo are trademarks of Bomgar Corporation; other trademarks shown are the property of their respective
2X ApplicationServer & LoadBalancer Manual
 2X ApplicationServer & LoadBalancer Manual 2X ApplicationServer & LoadBalancer Contents 1 URL: www.2x.com E-mail: info@2x.com Information in this document is subject to change without notice. Companies,
SourceAnywhere Service Configurator can be launched from Start -> All Programs -> Dynamsoft SourceAnywhere Server.
 Contents For Administrators... 3 Set up SourceAnywhere... 3 SourceAnywhere Service Configurator... 3 Start Service... 3 IP & Port... 3 SQL Connection... 4 SourceAnywhere Server Manager... 4 Add User...
mypro Installation and Handling Manual Version: 7
 mypro Installation and Handling Manual Version: 7 Date: JAN 2016 Thank you for using mypro on your PC. myscada is a full featured HMI/SCADA system with advanced options such as vector graphics views, advanced
How To Install An Openerp Server On A Cdx (Amd64) Or Ipa (Amd) Or Ds (Amd86) On A Linux Computer
 Or Ipa (Amd) Or Ds (Amd86) On A Linux Computer") Open ERP Server Installation These instructions are not to replace the Openerp Project instructions. I made these instructions for those of you who are newbies to linux (just like me) and just want to
Open ERP Server Installation These instructions are not to replace the Openerp Project instructions. I made these instructions for those of you who are newbies to linux (just like me) and just want to
Web+Center Version 7.x Windows Quick Install Guide 2 Tech Free Version Rev March 7, 2012
 Web+Center Version 7.x Windows Quick Install Guide 2 Tech Free Version Rev March 7, 2012 1996-2012 Internet Software Sciences Welcome to the Web+Center Installation and Configuration guide. This document
NSi Mobile Installation Guide. Version 6.2
 NSi Mobile Installation Guide Version 6.2 Revision History Version Date 1.0 October 2, 2012 2.0 September 18, 2013 2 CONTENTS TABLE OF CONTENTS PREFACE... 5 Purpose of this Document... 5 Version Compatibility...
Spectrum Technology Platform. Version 9.0. Administration Guide
 Spectrum Technology Platform Version 9.0 Administration Guide Contents Chapter 1: Getting Started...7 Starting and Stopping the Server...8 Installing the Client Tools...8 Starting the Client Tools...9
FrontRange Solutions IT Service Management ITSM7.0.2.1 Patch Release Notes Copyright 2011
 FrontRange Solutions IT Service Management ITSM7.0.2.1 Patch Release Notes Copyright 2011 Table of Contents ITSM 7.0.2.1Patch issues... 1 Installing ITSM 7.0.2.1 Patch... 1 Known Issues with workaround...
Tracking Network Changes Using Change Audit
 CHAPTER 14 Change Audit tracks and reports changes made in the network. Change Audit allows other RME applications to log change information to a central repository. Device Configuration, Inventory, and
Git - Working with Remote Repositories
 Git - Working with Remote Repositories Handout New Concepts Working with remote Git repositories including setting up remote repositories, cloning remote repositories, and keeping local repositories in-sync
RoomWizard Synchronization Software Manual Installation Instructions
 2 RoomWizard Synchronization Software Manual Installation Instructions Table of Contents Exchange Server Configuration... 4 RoomWizard Synchronization Software Installation and Configuration... 5 System
HP Service Manager. Software Version: 9.40 For the supported Windows and Linux operating systems. Application Setup help topics for printing
 HP Service Manager Software Version: 9.40 For the supported Windows and Linux operating systems Application Setup help topics for printing Document Release Date: December 2014 Software Release Date: December
USING MYWEBSQL FIGURE 1: FIRST AUTHENTICATION LAYER (ENTER YOUR REGULAR SIMMONS USERNAME AND PASSWORD)
") USING MYWEBSQL MyWebSQL is a database web administration tool that will be used during LIS 458 & CS 333. This document will provide the basic steps for you to become familiar with the application. 1. To
USING MYWEBSQL MyWebSQL is a database web administration tool that will be used during LIS 458 & CS 333. This document will provide the basic steps for you to become familiar with the application. 1. To
AVG 8.5 Anti-Virus Network Edition
 AVG 8.5 Anti-Virus Network Edition User Manual Document revision 85.2 (23. 4. 2009) Copyright AVG Technologies CZ, s.r.o. All rights reserved. All other trademarks are the property of their respective
Crystal Reports Installation Guide
 Crystal Reports Installation Guide Version XI Infor Global Solutions, Inc. Copyright 2006 Infor IP Holdings C.V. and/or its affiliates or licensors. All rights reserved. The Infor word and design marks
Sage 200 Web Time & Expenses Guide
 Sage 200 Web Time & Expenses Guide Sage (UK) Limited Copyright Statement Sage (UK) Limited, 2006. All rights reserved If this documentation includes advice or information relating to any matter other than
ACHIEVE THIRD PARTY MANAGEMENT (3PL)
") ACHIEVE THIRD PARTY MANAGEMENT (3PL) USER MANUAL Version 6.5 PRESENTED BY ACHIEVE IT SOLUTIONS Copyright 2012-2016 by Achieve IT Solutions These materials are subject to change without notice. These materials
ACHIEVE THIRD PARTY MANAGEMENT (3PL) USER MANUAL Version 6.5 PRESENTED BY ACHIEVE IT SOLUTIONS Copyright 2012-2016 by Achieve IT Solutions These materials are subject to change without notice. These materials
Visual Basic. murach's TRAINING & REFERENCE
 TRAINING & REFERENCE murach's Visual Basic 2008 Anne Boehm lbm Mike Murach & Associates, Inc. H 1-800-221-5528 (559) 440-9071 Fax: (559) 440-0963 murachbooks@murach.com www.murach.com Contents Introduction
Contents About the Contract Management Post Installation Administrator's Guide... 5 Viewing and Modifying Contract Management Settings...
 Post Installation Guide for Primavera Contract Management 14.1 July 2014 Contents About the Contract Management Post Installation Administrator's Guide... 5 Viewing and Modifying Contract Management Settings...
enicq 5 System Administrator s Guide
 Vermont Oxford Network enicq 5 Documentation enicq 5 System Administrator s Guide Release 2.0 Published November 2014 2014 Vermont Oxford Network. All Rights Reserved. enicq 5 System Administrator s Guide
QAD Enterprise Applications. Training Guide Demand Management 6.1 Technical Training
 QAD Enterprise Applications Training Guide Demand Management 6.1 Technical Training 70-3248-6.1 QAD Enterprise Applications February 2012 This document contains proprietary information that is protected
Event Manager. LANDesk Service Desk
 Event Manager LANDesk Service Desk LANDESK SERVICE DESK EVENT MANAGER GUIDE This document contains information that is the proprietary and confidential property of LANDesk Software, Inc. and/or its affiliated
Sharp Remote Device Manager (SRDM) Server Software Setup Guide
 Server Software Setup Guide") Sharp Remote Device Manager (SRDM) Server Software Setup Guide This Guide explains how to install the software which is required in order to use Sharp Remote Device Manager (SRDM). SRDM is a web-based
Sharp Remote Device Manager (SRDM) Server Software Setup Guide This Guide explains how to install the software which is required in order to use Sharp Remote Device Manager (SRDM). SRDM is a web-based
Sophos Mobile Control Startup guide. Product version: 3.5
 Sophos Mobile Control Startup guide Product version: 3.5 Document date: July 2013 Contents 1 About this guide...3 2 What are the key steps?...5 3 Log in as a super administrator...6 4 Activate Sophos Mobile