C.L.A.M. C omputer L ogbook A nd M anagement. A User s Guide for Commercial Hard Clam Growers Beta Version. Leslie Sturmer Mike Zylstra Chuck Adams
|
|
|
- Sabina Harvey
- 8 years ago
- Views:
Transcription

1 C.L.A.M. C omputer L ogbook A nd M anagement A User s Guide for Commercial Hard Clam Growers Beta Version Leslie Sturmer Mike Zylstra Chuck Adams Institute of Food and Agricultural Sciences Unversity of Florida TP 122

2 This technical paper was supported by the National Sea Grant College Program of the U.S. Department of Commerce s National Oceanic and Atmospheric Administration, with assistance from the Institute of Food and Agricultural Sciences at the University of Florida. Additional funding was provided by the USDA Cooperative State Research, Education, and Extension Service. The views expressed herein do not necessarily reflect the views of these agencies. Additional copies are available by contacting Florida Sea Grant, University of Florida, PO Box , Gainesville, FL, , (352) ,

3 C.L.A.M. Computer Logbook And Management A User s Guide for Commercial Hard Clam Growers Beta Version Designed, Developed and Written by Leslie Sturmer 1, Mike Zylstra 2, and Chuck Adams 3 Institute of Food and Agricultural Sciences University of Florida 1 Aquaculture Extension Agent, PO Box 89, Cedar Key, FL Food and Resource Economics Department, PO Box , Gainesville, FL Marine Economics Specialist, Florida Sea Grant and Food and Resource Economics Department, PO Box , Gainesville, FL September 2002 TP 122 i

4 CLAM Table of Contents Page Introduction... 1 Software and Hardware Requirements... 1 How To Open the CLAM Software... 2 Moving Around Within CLAM... 2 How To Use the CLAM Modules... 2 Begin Here... 7 Clam Seed Purchases... 9 Nursery Plants Growout Plants Lease Parcel Map Clam Harvests and Sales Inventory Summary Production Report Expenses Capitalized Assets Financial Report Suggestions on How to Use the CLAM Software Summary References Appendices - Blank Module Report Forms iii

5 CLAM - Computer Logbook And Management A User s Guide for Commercial Hard Clam Growers Introduction The CLAM software package was developed to assist commercial hard clam growers in managing the information concerning their nursery and growout operations. CLAM will allow growers to better track their clam inventory, from the original purchase of seed to the sale of market clams to final buyers. CLAM provides growers with a tool to determine the status of their standing inventory of nursery and growout clams at any point in time. CLAM allows growers to map their lease sites and keep track of where clams are located within each lease. CLAM will also provide growers a means to keep track of their costs and earnings over the course of a production cycle. The resulting set of information will be a powerful tool in keeping track of costs and profits, monitoring survival and growth, retrieving information needed for year-end tax reporting, and documenting any losses that might be covered by crop insurance and other financial assistance programs. CLAM was developed with funding from the USDA Cooperative State Research Service. The software was developed by the Food and Resource Economics Department at the University of Florida, with assistance from IFAS Cooperative Extension Service and Florida Sea Grant. In addition, representatives from the Florida commercial hard clam growing industry provided invaluable input during development of CLAM. As a result, CLAM has been designed to fulfill the informational needs of the industry, from the industry s point of view. This User s Guide is designed to assist the user in understanding how to use the CLAM software as an effective business management tool. Software and Hardware Requirements CLAM has been developed utilizing the Microsoft Excel 2000 system. Utilizing an earlier version of Excel may result in some features of CLAM to not be accessible. Thus, it is highly recommended that the user have access to and familiarity with Excel The software has been designed for an IBM-compatible PC. Other system requirements needed to run CLAM are as follows: - PC with a Pentium 75 Megahertz (Hz) or higher processor - Microsoft Windows 95 or later operating system, or Microsoft Windows NT Workstation operating system version 4.0 Service Pack 3 or later - For Windows 95 or Windows 98: o 16 MB of RAM for the operating system, and o 4 MB of RAM for Excel - For Windows NT Workstation: o 32 MB of RAM for the operating system, and o 4 MB or RAM for Excel MB of available hard-disk space - CD-ROM drive 1

6 - VGA or higher resolution monitor; Super VGA recommended - Microsoft Mouse, Microsoft IntelliMouse, or compatible pointing device How To Open the CLAM Software The user will need to have experience utilizing a PC, as well as a basic familiarity with Excel The CLAM software is contained on the provided CD as a file named CLAM. The user will need to open Excel and then insert the CD into the appropriate drive. Open CLAM within Excel by selecting the File from the menu bar. Select the CLAM file. An Excel message window will appear, in which the user will select the Enable Macros button. Alternatively, CLAM can be included as a desk-top selection which will allow quicker access to the program and bypass the need to first access Excel. Regardless of the method chosen, the CLAM program will initially open with the CLAM logo and module selection menu displayed (Figure 1). CLAM is now ready to be used. Moving Around Within CLAM CLAM consists of several worksheets, or modules, in which the user will be inputting information. These modules are designed to be utilized in a certain order by the user. For example, the user will be asked about initial planting of nursery seed, and some of that information will then be used in a later module. The user will be encouraged to utilize a map of the lease site to visually locate where nursery and growout clams are located. If desired, the user can provide information about expenses so that a detailed financial report can be prepared. A detailed discussion of the information required and purpose for each module will be presented in the next chapter of the User s Guide. But for now, the following flow-diagram should provide for a basic understanding of the information you will need to have available in order to utilize CLAM, as well as the various record keeping and inventory management tasks you can perform with CLAM (Figure 2). Not shown in Figure 2 is the ability to develop and maintain a map of the lease parcel. This provides a visual aid for better managing inventory located on the lease site. How To Use the CLAM Modules To access the various modules within CLAM, the user can select from the main menu displayed to the right-hand side of the screen at the initiation of the software program (refer to Figure 1). The user can access all of the modules from this starting point. To get back to the main menu, the user can click on the clam logo in the upper left hand corner of each module. In addition, tabs for all modules in the program are located at the bottom of each module page. Tabs are identified with the initials of the module title. A shortcut for the user in moving through the software is to click on the tabs for access to the various modules. 2

7 Figure 1. 3

8 Moving Through CLAM Begin Here Enter the information needed to describe your farm and lease, and when initially stocked. Nursery Plants Did you plant any seed in nursery bags? If so, enter the ID #, how many planted, when planted, and where planted on your lease site (use the map). then and/or Clam Seed Purcheses Describe the clam seed you bought, how many, from who, when and give the seed an ID # that will be used all through CLAM. Growout Plants Did you plant any seed directly into growout bags, or have you moved any seed from nursery to growout bags? Use the map to keep track of what is on your lease site. Clam Harvests/Sales When you harvest, keep track of how many, what size, and where it came from on your lease site. Enter the prices and total sales will be calculated. Inventory Summary CLAM will keep track of what is on your lease, both in terms of nursery and growout inventory. Production Report CLAM will keep track of each group of seed planted, in terms of length of time and survival in both nursery and growout. Expenses Keep track of your operating expenses by category. These are used later to provide an estimate of how much money you are making or losing. Capitalized Assets Describe your capital assets and fixed costs so these can be used with your operating costs to figure out how much you are making or losing. Financial Report Prepared by CLAM as a summary of your business for the production run. Figure 2. Flow Diagram Linking the Major Components of the CLAM Software. In this section of the CLAM User s Guide, the user is introduced to each module in detail. A list of inputs that are required and outputs that are provided in each module are described. In addition, error messages that may appear in the module are identified. Each of the modules is designed to obtain information, or inputs, from the user about the clam farm operation. The user enters this information in rows under the designated column headings (see Figure 3). Those cells requiring input from the user are displayed in white on the monitor screen. Each module also provides the user with information, or outputs, that are calculated in the module. Those cells providing information are displayed in blue and orange on a color monitor screen, or gray on a black and white screen. The cells containing output are protected, meaning that the user cannot change the contents of the cell. An error message will appear if the user tries to do so. 4


9 Figure 3. 5

10 Before moving on to the modules, let s first identify several tools that are utilized throughout the modules. These tools will assist the user in entering information as well as using the CLAM software program. Comment Box - In the upper right-hand corners of the column headings there is a small red triangle. When the user places the cursor over the triangle, a comment box appears on the monitor screen. The comments displayed in the boxes provide the user with additional information as to what input is needed or what output is provided in the column. To display all of the comments within a module, click on View in the menu bar, and then click on Comments. Then, to remove the displayed comments, click again on Comments. Figure 3 is an example of the Nursery Plants Module with all of the comment boxes displayed. Scroll Bar - Scroll bars allow the user to move quickly around the module screen by using the mouse. The bar located on the right hand side of the module moves up and down through the rows; whereas the bar located at the bottom of the module moves left and right through the columns. Frozen Title - This process keeps certain top rows and/or left columns always in view, no matter where the cursor is located. This is beneficial to the user in keeping column headings displayed, especially when certain modules contain large numbers of rows for input (for example, the Expenses Module). Drop Down Menu This device provides the user with a list of information that has been entered in previous modules. The user can then choose from this list without going back to another module to obtain it. For example, most of the Plant ID rows provide drop down menus. In the Nursery Plants Module, the rows under the Nursery Plant ID column have a small downward-pointing arrow. The user first clicks on the cell using the left mouse key, then left clicks on the arrow to drop the list down of all Nursery Plant IDs previously entered in the Clam Seed Purchases Module. By using the scroll bar on the left hand side of the menu, the user can view all of the IDs listed. The user can then click on the appropriate ID so it can be automatically entered into the cell. After a brief description of each module, including input requirements and outputs, an example of the module page will follow. Each example will show the user how information about the clam farm is entered, what information is calculated and what the module page looks like on the computer screen. 6

11 Begin Here (BH): This module provides information needed for the user to start the CLAM software program. (see Figure 4) Inputs: The following information is entered when the user first starts-up CLAM. Name of Farm: Enter farm or business name. Start Date: Enter the date you started this program or began planting seed on this lease using the two-digit format for month (MM), day (DD), and year (YY): MM/DD/YY. For example, January 1, 2001 would be 01/01/01. Lease Area Name: Enter name of the high-density lease area or aquaculture use zone. Parcel Number: Enter number of the lease or lease parcel. Comments: Use this column to enter any comments regarding start-up of CLAM. Outputs: The information entered will appear in the headings of all of the following modules. Errors: None Note: For this module to be displayed upon opening CLAM, the program must be closed and saved while in this module. Otherwise, CLAM will reopen in the module in which the program was closed. 7


12 Figure 4. 8

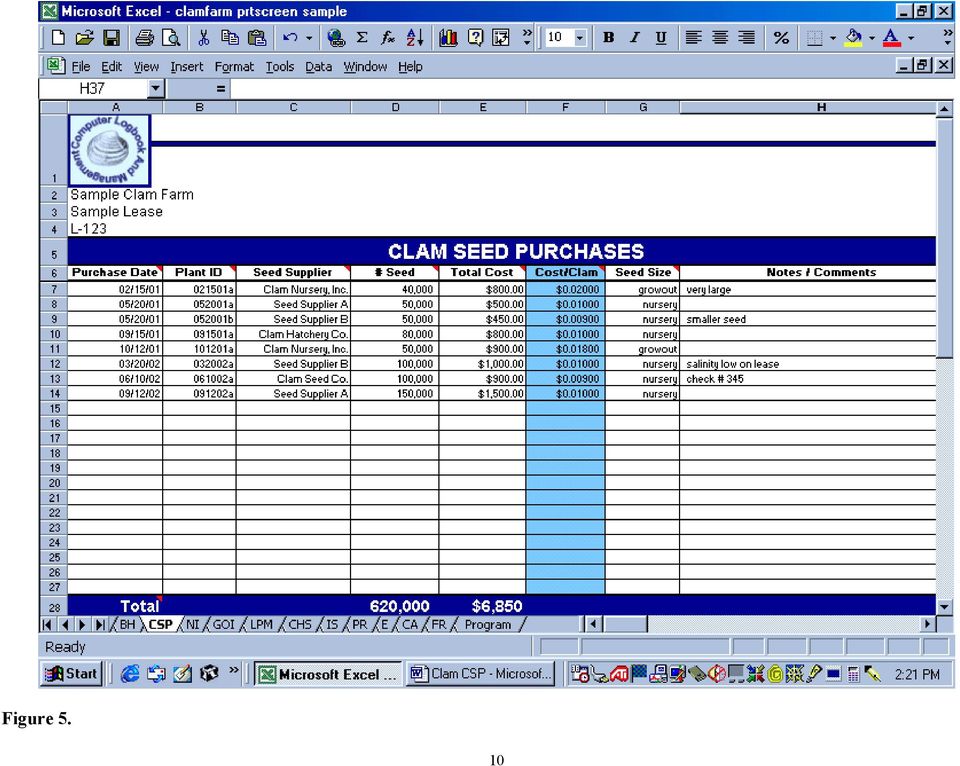
13 Clam Seed Purchases (CSP): This module provides information needed by the user to record seed purchases. (see Figure 5) Inputs: This module allows the user to report up to 40 separate purchases of nursery and/or growout clam seed. Purchase Date: Enter each date clam seed were purchased using this format: MM/DD/YY. Plant ID: The Plant ID allows the spreadsheet software to track a batch of clams, or a plant, throughout the various modules and provide information in the Inventory Summary Module and Production Report Module. For this reason, the Plant ID needs to be unique to each batch of clam seed purchased and planted. A suggestion would be to enter a combination of purchase date and letter for the Plant ID for each batch of seed purchased. But, seed purchased on the same day from different suppliers should not have the same Plant ID. For example, the Plant IDs for two batches of seed purchased on May 20, 2001 are a and b. The month of May is represented by 05, the twentieth day by 20, and the year 2001 by 01. The batch of seed purchased from Supplier A is represented by the letter a and the batch purchased from Supplier B by the letter b. The Plant ID will be maintained for the corresponding purchase date and subsequent plant date. Seed Supplier: Enter name of seed supplier. # Seed: Enter quantity of clam seed purchased on the particular date. Total Cost: Enter total cost of clam seed purchased on the particular date. Seed Size: Enter size of clam seed purchased. For example, nursery or growout seed. Comments: Use this column to enter comments regarding the seed purchase. Outputs: Cost/Clam: The cost per individual clam seed for each supplier is calculated in this cell. Total: The total number of clam seed purchased and reported in this module is calculated on the last row. The total cost for all clam seed purchased is also calculated. The totals are across all suppliers. Errors: None 9


14 Figure 5. 10
15 Nursery Plants (NI): This module provides information needed by the user to describe seed planted in nursery bags. (see Figure 6) Inputs: This module allows the user to report up to 49 nursery plants. Date Planted: Enter date clam seed were planted in nursery bags using this format: MM/DD/YY. If a single batch of seed was not all planted on the same day, then use the same Plant ID in a different row and assign a subsequent date(s) when the remainder of the seed was planted. Nursery Plant ID: Either choose a Plant ID from the drop down menu or enter the Plant ID previously assigned in the Clam Seed Purchases Module for the same batch of seed. If an incorrect ID is entered, an error message will appear in the cell. # Nursery Bags Planted: Enter number of nursery bags planted at this location (see Nursery Location below). Clams/Bag: Enter number of clams stocked in each nursery bag. Notes/Comments: Use this column to enter comments regarding the nursery plant. Outputs: Nursery Clams Planted: The total number of nursery clam seed planted at this location is calculated. Nursery Location: The location number (1-49) is automatically assigned for this planting of seed. Click on the Nursery Location hyperlink (i.e., the red number found in the Nursery Location column) to go to the Lease Parcel Map (see Lease Parcel Map section for discussion of how to use the map feature). Nursery plants can be positioned according to their location on the lease parcel. Note a nursery plant can be placed in more than one nursery location. For example, some bags for a given plant may be planted in one location, while the remainder are planted somewhere else. The nursery location is maintained throughout the spreadsheet for these nursery seed. Total: The total number of nursery bags planted and reported in this module is calculated in the last row. The total number of nursery clams planted is also calculated. 11


16 Figure 6. 12

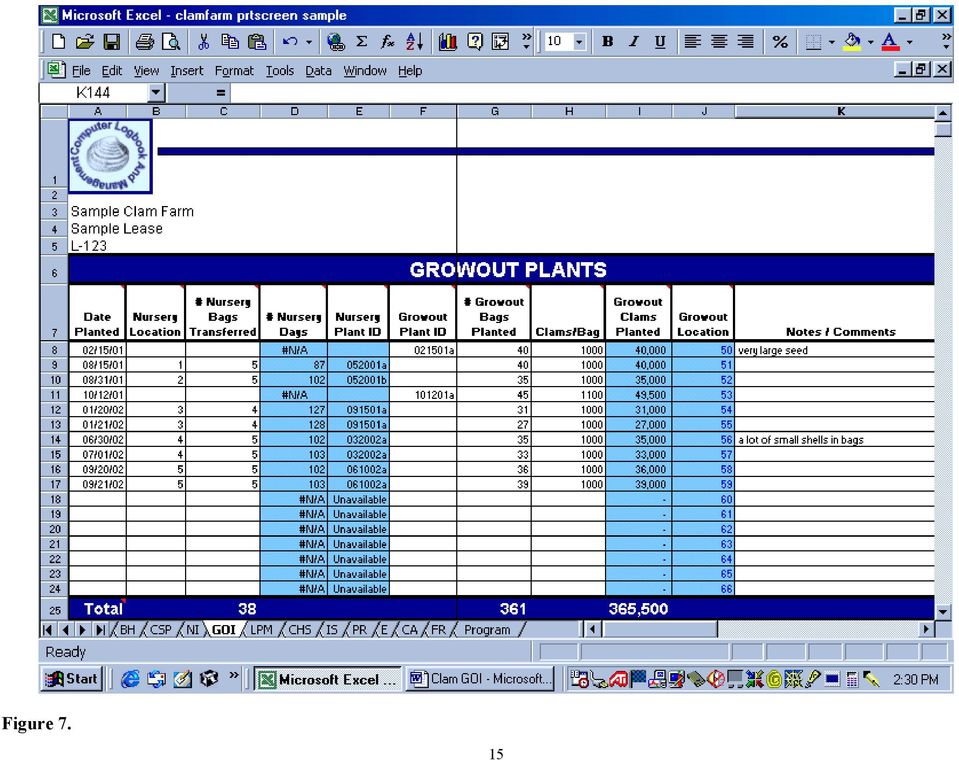
17 Errors: Nursery Plant ID: If you enter a wrong Nursery Plant ID in that column, an error box appears stating: Incorrect Nursery Plant ID Either choose a Nursery Plant ID from the drop down menu by scrolling through the list or enter a Plant ID for the nursery seed previously assigned in the Clam Seed Purchases Module. Press the <Delete> key to clear the cell. Growout Plants (GOI): This module provides information needed by the user to describe seed planted in growout bags. (see Figure 7) Inputs: This module allows the user to report up to 76 growout plants. Date Planted: Enter date clams were planted in growout bags using this format: MM/DD/YY. If a single batch of growout seed was not all planted on the same day, then use the same Plant ID in a different row and assign a subsequent date(s) when the remainder of the seed was planted. Nursery Location: Either choose a Nursery Location from the drop down menu or enter the location automatically assigned in the Nursery Plants Module. If the growout-sized seed were not nursed on the lease, then leave the cell blank. Instead enter a Plant ID in the Growout Plant ID column. If an incorrect location is entered, an error message will appear in the cell. # Nursery Bags Transferred: Enter number of nursery bags from which clams were transferred to growout bags, if seed were nursed on the lease. Growout Plant ID: Only use this column if clams were either not nursed on the lease or growout-sized seed were initially purchased. Either choose a Plant ID from the drop down menu or enter a Plant ID for the growout seed previously assigned in the Clam Seed Purchases Module. Leave cell blank if a Plant ID was automatically provided in the Nursery Plant ID column (seed were originally planted into nursery bags). If an incorrect ID is entered, an error message will appear in the cell. # Growout Bags Planted: Enter number of bags planted at this growout location. Clams/Bag: Enter number of clams stocked in each growout bag. If stocking rates differ, enter as separate growout locations. Notes/Comments: Use this column to enter comments regarding the growout plant. 13
 Inputs: This module allows the user to report up to 76 growout plants. Date Planted: Enter date clams were planted in growout bags using this format: MM/DD/YY.")
18 Outputs: # Nursery Days: The number of days clams were in nursery bags at this location prior to being transferred to growout bags is calculated. The message #N/A will appear if a date is not entered in the Date Planted column or if the clams were not nursed on the lease. Nursery Plant ID: The Plant ID assigned in the Clam Seed Purchases Module for this nursery location is automatically provided. If a Nursery Plant ID is provided, then the Growout Plant ID cell should remain blank. If clams were not nursed on the lease, then the message Unavailable will appear in the cell and an entry must be made in the Growout Plant ID Column. Growout Clams Planted: The total number of growout-sized clam seed planted at this location is calculated. Growout Location: This location number (50-125) is automatically assigned. Click on the Growout Location hyperlink (i.e., the blue number found in the Growout Location column) to go to the Lease Parcel Map (see Lease Parcel Map section for discussion of how to use the map feature). Growout plants can be positioned according to their location on the lease parcel. Note: A growout plant can be placed in more than one growout location. Total: The total number of nursery bags transferred, as well as the total number of growout bags planted and reported in this module, is calculated in the last row. The total number of growout-sized clams planted is also calculated. Errors: Nursery Location: If you enter a wrong Nursery Location in that column, an error box appears stating: Incorrect Nursery Location Either choose a Nursery Location from the drop down menu by scrolling through the list or enter a location previously assigned in the Nursery Plants Module. Press the <Delete> key to clear the cell. 14


19 Figure 7. 15
20 Growout Plant ID Error: If you enter a wrong Growout Plant ID in that column, an error box appears stating: Incorrect Growout Plant ID Either choose a Growout Plant ID from the drop down menu by scrolling through the list or enter a Plant ID for the growout seed previously assigned in the Clam Seed Purchases Module. Press the <Delete> key to clear the cell. Lease Parcel Map (LPM): This module allows the user to position, or site, nursery and growout plants on the lease site as needed. (see Figure 8) Inputs: The orange markers, which are double bordered squares, represent Nursery Plants # 1 through 49. The blue markers, which are single bordered squares, represent Growout Plants #50 through 125. To position a marker on the Lease Parcel Map, click on the numbered marker using the right mouse key. Point to a section of the gray border and then left click. While holding down on the left mouse key, drag the marker to the desired location on the map and release. If you left click on one of the sizing handles (these are the white squares) instead of the gray border, you can change the size of the marker. Outputs: Planting information is available by left clicking on the chosen marker. A hyperlink (i.e., the blue number found in the markers) connects the marker to either the Nursery Plants Module or the Growout Plants Module and provides information specific to that nursery or growout plant. 16
 Inputs: The orange markers, which are double bordered squares, represent Nursery Plants # 1 through 49.")

21 Figure 8. 17
22 Clam Harvests and Sales (CHS): This module allows the user to keep track of clam sales by batch, or plant. (see Figure 9) Inputs: This module allows the user to enter up to 101 clam harvests and sales. Date Harvested: Enter date growout bags were harvested using this format: MM/DD/YY. Growout Location: Either choose a Growout Location from the drop down menu or enter the location automatically assigned in the Growout Plants Module. If an incorrect location is entered, an error message will appear in this cell. # Bags Harvested: Enter number of growout bags harvested. <7/8 : Enter number of individual clams harvested that were less than 7/8 inch in shell width (Category A). Price (A): Enter per each price of clams that were less than 7/8 inch in size (Category A). Enter the price as dollars and cents. For example, a dime is entered as 0.10 or.10. The dollar symbol is created automatically. This format applies to prices for all size categories. >7/8 and <1 : Enter number of individual clams harvested that were between 7/8 inch and 1 inch in shell width (Category B). Price (B): Enter per each price of clams that were between 7/8 and 1 inch in size (Category B). 1 : Enter number of individual clams harvested that were 1 inch in shell width (Category C). Price (C): Enter per each price of clams that were 1 inch in size (Category C). >1 : Enter number of individual clams harvested that were greater than 1 inch in shell width (Category D). Price (D): Enter per each price of clams that were greater than 1 inch in size (Category D). Other: Enter number of individual clams harvested that were in a size category previously undefined (Category E). This is an optional category. 18
23 Price (E): Enter per each price of clams that were in a size category previously undefined (Category E). Wholesaler/Comments: Use this column to enter wholesaler s name or for comments regarding the clam harvest and sale. Outputs: Plant ID: The Plant ID assigned in the Clams Seed Purchases Module for the particular growout location is automatically provided. # Growout Days: The number of days clams were in growout bags at this location is calculated by using information from the Date Planted column in the Growout Plants Module and from the Date Harvested column in this module. Total Clams Harvested: The total number of clams harvested at this location per harvest date is calculated. Average Clams/Bag: The average number of clams harvested per bag is calculated. Revenue: The revenue or total sales of clams harvested per date is calculated. Total Clams by Category: The total number of clams harvested and sold by size category is calculated in the third to the last row. The overall total number of clams harvested and sold is also calculated. Average Price by Category: The average price of clams per size category is calculated in the second to the last row. Revenue by Category: The total revenue of clams sold by size category is calculated in the last row. The overall total revenue of clams harvested and sold is also calculated. Errors: Growout Location Error: If you enter a wrong Growout Location in that column, an error box appears stating: Incorrect Growout Location Either choose a Growout Location from the drop down menu by scrolling through the list or enter a location previously assigned in the Growout Plants Module. Press the <Delete> key to clear the cell. 19

24 Figure 9. 20
25 Inventory Summary (IS): This module supplies the user with a current review, or snapshot, of what has been planted in nursery bags, transferred to growout bags, or harvested, as well as what is still remaining on the lease parcel. (see Figure 10) Inputs: No input is required from the user. However, the UPDATE! button must be clicked to obtain current information. This button is located in the blue cell immediately below the Inventory Summary heading. Outputs: Once the UPDATE! button has been clicked, a current inventory of the field nursery and growout is generated. The following information is provided. Nursery Inventory: Bags Planted: The number of nursery bags planted since the initial start date (see Begin Here Module) is summarized from the Nursery Plants Module. Bags Transferred to Growout: The number of nursery bags transferred and planted into growout bags since the initial start date (see Begin Here Module) is summarized from the Growout Plants Module. Bags Still in Nursery: The number of nursery bags currently on the lease parcel is calculated. Seed Clams Planted: The number of clam seed planted in nursery bags since the initial start date (see Begin Here Module) is summarized from the Nursery Plants Module. Seed Clams Transferred to Growout: The number of clam seed transferred from nursery bags and planted into growout bags since the initial start date (see Begin Here Module) is summarized from the Growout Plants Module. Note that nursery mortality, or the number of clam seed that died in nursery bags, over this time period is not calculated in this module, but will be computed in the Production Report Module. Growout Inventory: Bags Planted: The number of growout bags planted since the initial start date (see Begin Here Module) is summarized from the Growout Plants Module. Bags Harvested: The number of growout bags harvested since the initial start date (see Begin Here Module) is summarized from the Clam Harvests and Sales Module. 21

26 Figure
27 Bags Still in Growout: The number of growout bags currently on the lease parcel is calculated. Growout Clams Planted: The number of clams planted in growout bags since the initial start date (see Begin Here Module) is summarized from the Growout Plants Module. Growout Clams Harvested: The number of clams harvested from growout bags since the initial start date (see Begin Here Module) is summarized from the Clam Harvests and Sales Module. Note that growout mortality, or the number of clams that died in growout bags, over this time period is not calculated in this module, but will be computed from the information provided here in the Production Report Module. Production Report (PR): This module provides a summary for the user of all nursery and growout production on the lease parcel. (see Figure 11) Inputs: No input is required from the user. However, the UPDATE! button must be clicked to obtain current information. This button is located in the blue cell to the left of the Production Report heading. Outputs: Once the UPDATE! button has been clicked, a nursery and growout production report is generated. The following information is provided. Nursery Production: (Note: Although the Plant ID column is displayed in white, no input is required. The nursery output in the next six columns is displayed in orange, and no input is required.) Plant ID: All Plant IDs previously entered in the Clam Seed Purchases Module are reported. Start Plant Date: The first date entered in the Nursery Plants Module for each Plant ID is reported. Note if a complete batch of seed was all planted on one date, then the start and end dates will be the same. End Plant Date: The last date entered in the Nursery Plants Module for each Plant ID is reported. Note if a complete batch of seed was all planted on one date, then the start and end dates will be the same. Nursery Clams Planted: The total number of clam seed planted in nursery bags for each Plant ID is summarized from the Nursery Plants Module. 23

28 Figure
29 Nursery Clams Transferred: The total number of clams transferred from nursery bags to growout bags for each Plant ID is summarized from the Growout Plants Module. Average Nursery Days: The average number of days clam seed from each Plant ID were in the field nursery is calculated. Survival Rate - Nursery to Growout: The survival rate of clam seed in the field nursery for each Plant ID is calculated. Growout Production: (Note: The six columns of growout output are displayed in blue and no input is required.) Start Plant Date: The first date entered in the Growout Plants Module for each Plant ID is reported. Note if a complete batch of clams was all planted or transferred on one date, then the start and end dates will be the same. End Plant Date: The last date entered in the Growout Plants Module for each Plant ID is reported. Note if a complete batch of clams was all planted or transferred on one date, then the start and end dates will be the same. Growout Clams Planted: The total number of clams planted in growout bags for each Plant ID is summarized from the Growout Plants Module. Growout Clams Harvested: The total number of clams harvested from growout bags for each Plant ID is summarized from the Clam Harvests and Sales Module. Average Growout Days: The average number of days clams from each Plant ID were on the lease parcel is calculated. Survival Rate - Growout to Harvest: The survival rate of clams on the lease parcel for each Plant ID is calculated. Overall Production: (Note: The three columns of overall output are displayed in blue, and no input is required.) Average Total Days: The average total number of days clams from each Plant ID were on the lease is calculated from information generated in the Nursery Production and Growout Production Reports. Note: If clams from a plant were not nursed on the lease, then the message # N/A will appear in the cell. Overall Survival Rate: The overall survival rate of clams for each Plant ID is calculated from information generated in the Nursery and Growout Production Reports. Note: If clams from a plant were nursed on the lease but growout seed was planted instead, then the message # N/A will appear in the cell. 25
30 Revenue: The revenue or total sales of clams harvested for each Plant ID is summarized from the Clam Harvests and Sales Module. Errors: The message #N/A will appear in a cell if information pertaining to the Plant ID is not entered in previous modules or culture activities (such as transferring nursery clams or harvesting growout clams) for the plant are not completed. The message #N/A will appear under Columns B through G in Nursery Production if seed for a particular plant was not nursed on the lease. Expenses (E): This module provides the user a means to record all operating expenses incurred since the initial start date. (see Figure 12) Printing Instructions: Due to the large number of records that can be entered in this module, the user may want to limit what is printed out. To do so, select the area to be printed by using the mouse. Click File on the Menu Bar and select Print. In the Print Menu, click on Selection in Print What. Then click OK. Inputs: This module allows the user to enter up to 997 expenses. Vendor: Enter name of vendor or supplier. Purchase Date: Enter date of purchase using this format: MM/DD/YY. Cost: Enter cost of the item or service purchased in dollars and cents. For example, a dollar is entered as The dollar symbol is created automatically. Category: Expenses are identified by various categories to be defined by the user. There is a limit of 10 categories. Example categories include bags, supplies, materials, fuel, repairs, rent, fees, labor, and miscellaneous. Note clam seed expenses are already identified in the Clam Seed Purchases Module and should not be entered in this module. Otherwise, expenses for clam seed will be counted twice. Expenses in each category are totaled in the Financial Report Module. (Note: If a category is not specified in this column, then the cost will not appear in the report.) If more than 10 categories are used, all of the expenses in the additional categories will be totaled in the Financial Report Module in a category defined as Other. Description: Enter a brief description of the expenditure. 26

31 Figure
32 Outputs: The UPDATE! button must be clicked to obtain current expense summary information. This blue button is located in the upper left hand corner of the module under the CLAM logo. Vendor Report: Once the UPDATE! button has been clicked, a summary of expenses by vendor is generated. Errors: See above comments under Category. Capitalized Assets (CA): This module provides the user with a means to estimate depreciation on all capitalized assets. (see Figure 13) Inputs: This module allows the user to report up to 17 capitalized assets. Asset: Enter name of asset. Purchase Date: Enter date of purchase using this format: MM/DD/YY. Cost: Enter the cost of the asset in dollar and cents. Useful Life: Enter the useful life of the asset for tax purposes. If the useful life is one year or less then record the item in the Expenses Module. Description: Enter a brief description of the capitalized item. Outputs: Annual Depreciation: The annual depreciation which is used in generating the Net Income in the Financial Report Module is calculated. Straight-line depreciation with a zero salvage value is used. Total: The total cost of assets reported in this module is calculated in the last row. The total annual depreciation for capitalized assets is also calculated. Errors: None 28

33 Figure
34 Financial Report (FR): This module provides the user with an up-to-date estimate of profit or loss since the initial start date. (see Figure 14) Inputs: Projected Tax Rate: Enter projected tax rate (individual, sole proprietor, corporate, etc.) for the year. The user must scroll down the page to find this input. This tax rate is used in generating the After-Tax Income. The blue UPDATE! button must be clicked to obtain current information. This blue button is located in the upper left hand corner of the module above the Financial Report heading, and to the right of the CLAM logo. Outputs: Once the UPDATE! button has been clicked, a current summary of the financial status of the clam farm or lease is reported. The following information is provided. Clam Revenue: Revenues from the sales of clams in various size categories, including <7/8, >7/8 and <1, 1, >1, and Other, are reported from the Clam Harvests and Sales Module. Total Revenue: The total revenue from all clam sales to date is calculated. Expenses: The total amount of expenses related to clam seed purchases is summarized from the Clam Seed Purchases Module. Other operating costs are summarized from the Expenses Module and reported for up to 10 categories. These categories are specified earlier by the user. Non Operating Expenses: The annual depreciation estimates generated in the Capitalized Asset Module is reported for up to 17 items. Similar to the expenses categories, these items are identified by the user. Total Expenses: Clam seed purchases, operating expenses, and non operating expenses are totaled. Net Income: The net income of the clam farm is calculated by subtracting the Total Expenses from the Total Revenue. Projected Taxes: The projected tax rate entered by the user is used to calculate the projected taxes. After-Tax Income: After-tax income is calculated by subtracting the Projected Taxes from the Net Income. 30

35 Figure
36 Suggestions on How to Use the CLAM Software This chapter discusses a few of the issues that may arise while using the CLAM software program and offers some suggestions on how to address different situations in the real world of clam farming. Because clams can be planted and harvested almost year round, as opposed to other crops, such as corn or watermelons, which are planted and harvested within a season, keeping track of information on clam plants is ongoing and never reaches a distinct ending point. Just like any computer program, failures can occur. To minimize losing information, backup your CLAM file on another diskette or CD periodically. Also, the user should print out the reports for each module to have a hard copy of the information on record. When the program is first opened, the user may want to save it under a different file name, for example, c:\ CLAM_lease123.xls or c:\clam_johndoe.xls. The renamed file is what the user should work on, while the original program can then be stored and used when another file needs to be made. What happens when I run out of space to enter information? The CLAM software program cannot run indefinitely. There are a limited number of rows to enter information. When the user runs out of space, there are several options to choose from. First, the user can set up another file and continue on. Caution would have to be taken in remembering which file to enter information on the various clam plants. A second option is that the user can delete those plants completely harvested, making room for the new plants. To do so, the user would highlight only those rows in which information has been entered by the user and then hit the delete key. These are the cells that are white. The user cannot delete information in the cells that are colored. However, before the user deletes anything, a copy of the file should be printed and stored. How do I use the CLAM program for income tax reporting? The user can organize the CLAM file to provide information for calculating annual income taxes. The file should include clam sales, or income, expenses, and depreciation on capitalized assets for the calendar year. After December, the user can resave the original file, renaming it for the upcoming year. However, the user will also have to make some changes to the new file. It certainly would be the time to delete information on those plants that have been completely harvested. In addition, input pertaining to sales that occurred in the previous year, as well as expenses, would have to be deleted. If a plant has not been completely harvested, the user can delete information in cells in the Clam Harvests and Sales Module pertaining only to pricing. This will allow harvest information for that plant to be incorporated in the Inventory Summary and Production Report. How do I use the CLAM program for reporting crop losses? The report periods used by the U. S. Department of Agriculture for financial assistance programs do not follow a calendar year. For example, the pilot crop insurance program, administered by the USDA Risk Management Agency, begins in December, whereas the non-insured assistance program, administered by the USDA Farm Service Agency, begins in October. The user only needs to make sure that records generated through the CLAM program pertain to these time 32
37 frames. A suggestion would be to print out a copy of the CLAM module reports once a month and save. The frequency with which these reports would be printed would depend on the level of activity (i.e., planting, transferring, harvesting) on the lease parcel. What if I have more than one lease area? The CLAM software program is designed to address a clam farm consisting of one lease parcel. The parcel could be from one acre in size to five acres. The amount of acreage the user is reporting on will certainly determine how much information can be entered on one file. Remember the modules have a limited number of rows. However, many clam farmers have multiple lease parcels, some of which are in different lease areas or even in different counties. In this case, the user will have to set up several files, one for each lease. In other words, the user will have a separate CLAM program (file) running for each lease site. Remember to name each file differently. One caution would be that some of the calculations (for example, overall survival rate in the Production Report Module) would be inaccurate or would not reflect the actual culture activities if seed are planted on several lease sites. For example, let s say a clam farmer nurses most of his seed on a particular lease and then transfers the growout-sized seed to several leases. The CLAM software program can account for those activities but, again, the calculations for that batch of seed, or Plant ID, would be limited to only what occurred on a given lease area. Summary CLAM provides the user with the tools to accurately record the various activities that occur on a commercial hard clam lease site. The user can record seed purchases, nursery and growout planting, clam harvests, selling prices, operating expenses, capital purchases, and other information. CLAM also provides the user with the ability to create a map of the lease site, which can be used to depict what is on the lease at a given point in time. The information archived by CLAM can be used for periodic business planning, loan applications, income tax reporting, and documenting losses for crop insurance purposes. CLAM is flexible enough to allow the user a variety of methods and strategies for inputting important information necessary to accurately describe activities that occur on a given lease site. Any questions about the use of CLAM should be directed to either the IFAS Aquaculture Extension Agent in Cedar Key, FL or the Florida Sea Grant Marine Economics Specialist. Both addresses are located on the first page of this guide. For additional copies of the CLAM software and user s guide, contact: Florida Sea Grant Program University of Florida PO Box Gainesville, FL (352)
38 References Excel 2000 For Windows For Dummies, Quick Reference John Walkenbach. Hungry Minds, Inc., New York, NY. 208 pages. This is an excellent computer reference book on how to use Excel. To order, call (800) or check out their web site: Microsoft Excel The web site for Microsoft Excel is You can buy the Excel software from this site as well as update your existing software. This site also has a bookstore for Excel learning materials. 34
39 Appendix The following set of forms represent the reports that can be obtained from each of the CLAM modules. These blank forms are designed for data entry where a computer is not available. These forms may be useful in a situation where data collection must continue while a computer system is temporarily unavailable (i.e., power outage, downtime for computer hardware repair and maintenance, software problems, etc.). If used in this manner, the user will need to have access to a hand-held calculator to perform the various computations necessary to produce the various totals, averages and other values that CLAM would have generated automatically. The authors highly recommend that these forms not be used as permanent substitute for the software version of CLAM. 35
40 CLAM SEED PURCHASES Purchase Date Plant ID Seed Supplier # Seed Total Cost Cost/Clam Seed Size Notes/Comments Total 36
41 NURSERY PLANTS Date Planted Nursery Plant ID # Nursery Bags Planted Clams/Bag Nursery Clams Planted Nursery Location Notes/Comments Total 37
42 GROWOUT PLANTS Date Planted Nursery Location # Nursery Bags Transferred # Nursery Days Nursery Plant ID Growout Plant ID # Growout Bags Planted Clams/Bag Growout Clams Planted Growout Location Notes/Comments Total 38
43 CLAM HARVESTS AND SALES SIZE / PRICE CATEGORIES A B C D E Date Harvested Growout Location Plant ID # Growout Days # Bags Harvested < 7/8" Price (A) > 7/8" < 1" Price (B) 1" Price (C) > 1" Price (D) Other Price (E) Total Clams Harvested Average Clams/Bag Revenue Wholesaler/Comments Total by Category Revenue by Category 39
44 Starting Date: Today s Date: EXPENSES Vendor Purchase Date Cost Category Description 40
45 Total Starting Date: Today s Date: CAPITALIZED ASSETS Asset Purchase Date Cost Useful Life Annual Depreciation Description Total 41
Drawing a histogram using Excel
 Drawing a histogram using Excel STEP 1: Examine the data to decide how many class intervals you need and what the class boundaries should be. (In an assignment you may be told what class boundaries to
Farmland Lease Analysis: Program Overview. Navigating the Farmland Lease Analysis program
 Farmland Lease Analysis: Program Overview The farmland lease analysis program is used to aid tenants and landlords in determining the returns and risks from different farmland leases. The program offers
Basic Pivot Tables. To begin your pivot table, choose Data, Pivot Table and Pivot Chart Report. 1 of 18
 Basic Pivot Tables Pivot tables summarize data in a quick and easy way. In your job, you could use pivot tables to summarize actual expenses by fund type by object or total amounts. Make sure you do not
TimeValue Software Due Date Tracking and Task Management Software
 User s Guide TM TimeValue Software Due Date Tracking and Task Management Software File In Time Software User s Guide Copyright TimeValue Software, Inc. (a California Corporation) 1992-2010. All rights
Nursery Inventory Software (EPLPPS) Frequently Asked Questions Eligible Plant List and Plant Price Schedule (EPLPPS) December, 2014
 Frequently Asked Questions Eligible Plant List and Plant Price Schedule (EPLPPS) December, 2014") Nursery Inventory Software (EPLPPS) Frequently Asked Questions Eligible Plant List and Plant Price Schedule (EPLPPS) December, 2014 This document supplements the more thorough "Help" available within the
Nursery Inventory Software (EPLPPS) Frequently Asked Questions Eligible Plant List and Plant Price Schedule (EPLPPS) December, 2014 This document supplements the more thorough "Help" available within the
1. Pack boxes according to their classification (file) number. Keep similar records together in one box.
 number. Keep similar records together in one box.") Box Inventory Form Procedures The Box Inventory form is used to: Transfer boxes of records to the Records Centre for storage Transfer boxes of records to the Records Centre that have met their total retention
Box Inventory Form Procedures The Box Inventory form is used to: Transfer boxes of records to the Records Centre for storage Transfer boxes of records to the Records Centre that have met their total retention
APPLYING BENFORD'S LAW This PDF contains step-by-step instructions on how to apply Benford's law using Microsoft Excel, which is commonly used by
 APPLYING BENFORD'S LAW This PDF contains step-by-step instructions on how to apply Benford's law using Microsoft Excel, which is commonly used by internal auditors around the world in their day-to-day
APPENDIX B: FEMA 452: Risk Assessment Database V5.0. User Guide
 APPENDIX B: FEMA 452: Risk Assessment Database V5.0 User Guide INTRODUCTION... 5 DATABASE ADMINISTRATOR INFORMATION... 6 INSTALLATION PROCESS... 8 USE OF THE DATABASE... 10 OPENING THE DATABASE... 12 FACILITY
Inventory and Work Order System
 INFORMATION MANAGEMENT SERVICES, INC. Inventory and Work Order System User s Manual 2 2001 Information Management Services, Inc. All rights reserved. Reproduction, adaptation, or translation without prior
Computerized Farm Records
 Computerized Farm Records Peg Brune ~ Dodge, NE 402-693-2801 Email: brune@skyww.net Agricultural Bookkeeping: Quickbooks or Quicken???? Accounting: Accountants prefer Quickbooks, mostly because a lot of
SECTION 2-1: OVERVIEW SECTION 2-2: FREQUENCY DISTRIBUTIONS
 SECTION 2-1: OVERVIEW Chapter 2 Describing, Exploring and Comparing Data 19 In this chapter, we will use the capabilities of Excel to help us look more carefully at sets of data. We can do this by re-organizing
A Guide To Using. Box-Office 2000. Version 2. By Nortech Software. The main booking screen
 A Guide To Using Box-Office 2000 Version 2 By Nortech Software The main booking screen Contents Features 4 Event Bookings...4 Ticket Book Printing & Layouts...4 Installation 5 Requirements...5 Software
Appointment Scheduler
 EZClaim Appointment Scheduler User Guide Last Update: 11/19/2008 Copyright 2008 EZClaim This page intentionally left blank Contents Contents... iii Getting Started... 5 System Requirements... 5 Installing
Instructions for creating a data entry form in Microsoft Excel
 1 of 5 You have several options when you want to enter data manually in Excel. You can enter data in one cell, in several cells at the same time, or on more than one worksheet (worksheet/spreadsheet: The
Microsoft Access 2010 handout
 Microsoft Access 2010 handout Access 2010 is a relational database program you can use to create and manage large quantities of data. You can use Access to manage anything from a home inventory to a giant
QUICK START GUIDE. Draft twice the documents in half the time starting now.
 QUICK START GUIDE Draft twice the documents in half the time starting now. WELCOME TO PRODOC Thank you for choosing ProDoc, your forms solution to save time and money, reduce errors, and better serve your
Notes on Excel Forecasting Tools. Data Table, Scenario Manager, Goal Seek, & Solver
 Notes on Excel Forecasting Tools Data Table, Scenario Manager, Goal Seek, & Solver 2001-2002 1 Contents Overview...1 Data Table Scenario Manager Goal Seek Solver Examples Data Table...2 Scenario Manager...8
Time & Attendance Manager Basics
 Time & Attendance Manager Basics Handout Manual V03261272136EZ18CMB2 2012 ADP, Inc. ADP s Trademarks The ADP Logo, ADP Workforce Now, and ezlabormanager are registered trademarks of ADP, Inc. In the Business
Institution/Department Administrator Manual
 ETS Major Field Tests Institution/Department Administrator Manual Updated: December 2010 Table of Contents 1.0 WELCOME... 1 1.1 INTRODUCTION... 1 1.2 COMPUTER HARDWARE AND SOFTWARE REQUIREMENTS... 1 2.0
Word 2007: Basics Learning Guide
 Word 2007: Basics Learning Guide Exploring Word At first glance, the new Word 2007 interface may seem a bit unsettling, with fat bands called Ribbons replacing cascading text menus and task bars. This
Excel Spreadsheet Activity Redo #1
 Excel Spreadsheet Activity Redo #1 Melissa Ebling 11/9/06 Directions: Please follow all directions in this packet. This assignment will consist of your tracking ten different stocks over a period of a
Microsoft Dynamics GP. Cash Flow Management
 Microsoft Dynamics GP Cash Flow Management Copyright Copyright 2010 Microsoft. All rights reserved. Limitation of liability This document is provided as-is. Information and views expressed in this document,
ACCESS 2007. Importing and Exporting Data Files. Information Technology. MS Access 2007 Users Guide. IT Training & Development (818) 677-1700
 677-1700") Information Technology MS Access 2007 Users Guide ACCESS 2007 Importing and Exporting Data Files IT Training & Development (818) 677-1700 training@csun.edu TABLE OF CONTENTS Introduction... 1 Import Excel
Information Technology MS Access 2007 Users Guide ACCESS 2007 Importing and Exporting Data Files IT Training & Development (818) 677-1700 training@csun.edu TABLE OF CONTENTS Introduction... 1 Import Excel
Provider Electronic Solutions Software User s Guide
 Vermont Title XIX Provider Electronic Solutions Software User s Guide HP ENTERPRISE SERVICES 312 HURRICANE LANE, STE 101 PO BOX 888 WILLISTON VT 05495 Table of Contents 1 Introduction... 2 1.1 Provider
CREATING EXCEL PIVOT TABLES AND PIVOT CHARTS FOR LIBRARY QUESTIONNAIRE RESULTS
 CREATING EXCEL PIVOT TABLES AND PIVOT CHARTS FOR LIBRARY QUESTIONNAIRE RESULTS An Excel Pivot Table is an interactive table that summarizes large amounts of data. It allows the user to view and manipulate
Creating tables in Microsoft Access 2007
 Platform: Windows PC Ref no: USER 164 Date: 25 th October 2007 Version: 1 Authors: D.R.Sheward, C.L.Napier Creating tables in Microsoft Access 2007 The aim of this guide is to provide information on using
Almyta Control System Advanced Reference Contents
 Almyta Control System Advanced Reference Contents Almyta Control System Advanced Reference... 1 Software Maintenance... 2 Sharing Your Local Company with Other Users. Networked Installation.... 5 Connecting
Using Excel as a Management Reporting Tool with your Minotaur Data. Exercise 1 Customer Item Profitability Reporting Tool for Management
 Using Excel as a Management Reporting Tool with your Minotaur Data with Judith Kirkness These instruction sheets will help you learn: 1. How to export reports from Minotaur to Excel (these instructions
Using Excel to find Perimeter, Area & Volume
 Using Excel to find Perimeter, Area & Volume Level: LBS 4 V = lwh Goal: To become familiar with Microsoft Excel by entering formulas into a spreadsheet in order to calculate the perimeter, area and volume
Guide to Using AMS 4.0 Marking Software
 Guide to Using AMS 4.0 Marking Software Guide to Using AMS 4.0 Marking Software Contents System Requirements...2 Software Installation...2 Selecting the Output Device and Changing Settings...2 Definitions...
How to Create a Data Table in Excel 2010
 How to Create a Data Table in Excel 2010 Introduction Nicole Bernstein Excel 2010 is a useful tool for data analysis and calculations. Most college students are familiar with the basic functions of this
OPERATION MANUAL. MV-410RGB Layout Editor. Version 2.1- higher
 OPERATION MANUAL MV-410RGB Layout Editor Version 2.1- higher Table of Contents 1. Setup... 1 1-1. Overview... 1 1-2. System Requirements... 1 1-3. Operation Flow... 1 1-4. Installing MV-410RGB Layout
Rochester Institute of Technology. Oracle Training: Advanced Financial Application Training
 Rochester Institute of Technology Oracle Training: Advanced Financial Application Training Table of Contents Introduction Lesson 1: Lesson 2: Lesson 3: Lesson 4: Creating Journal Entries using Excel Account
FrontDesk Installation And Configuration
 Chapter 2 FrontDesk Installation And Configuration FrontDesk v4.1.25 FrontDesk Software Install Online Software Activation Installing State Related Databases Setting up a Workstation Internet Transfer
Productivity Software Features
 O P E R A T I O N S A N D P R O C E D U R E S F O R T H E P R O D U C T I V I T Y S O F T W A R E Productivity Software Features Remote CS-230 calibration and set-up on a personal computer. CS-230 calibration
PA Payroll Exercise for Intermediate Excel
 PA Payroll Exercise for Intermediate Excel Follow the directions below to create a payroll exercise. Read through each individual direction before performing it, like you are following recipe instructions.
Introduction to Microsoft Access 2003
 Introduction to Microsoft Access 2003 Zhi Liu School of Information Fall/2006 Introduction and Objectives Microsoft Access 2003 is a powerful, yet easy to learn, relational database application for Microsoft
WEBFOCUS QUICK DATA FOR EXCEL
 WEBFOCUS QUICK DATA FOR EXCEL BRIAN CARTER INFORMATION BUILDERS SUMMIT 2008 USERS CONFERENCE JUNE 2008 Presentation Abstract: Even with the growing popularity and evolvement of Business Intelligence products
ARCHDIOCESE OF LOUISVILLE FOOD SERVICE POS TRAINING MANUAL
 ARCHDIOCESE OF LOUISVILLE FOOD SERVICE POS TRAINING MANUAL Archdiocese of Louisville Food Service Director Juanita Bisig 212 East College Street P.O. Box 1073 Louisville, KY 40201 (502) 585-3291 ext 1123
Instructions for Formatting APA Style Papers in Microsoft Word 2010
 Instructions for Formatting APA Style Papers in Microsoft Word 2010 To begin a Microsoft Word 2010 project, click on the Start bar in the lower left corner of the screen. Select All Programs and then find
Microsoft Office Access 2007 Basics
 Access(ing) A Database Project PRESENTED BY THE TECHNOLOGY TRAINERS OF THE MONROE COUNTY LIBRARY SYSTEM EMAIL: TRAININGLAB@MONROE.LIB.MI.US MONROE COUNTY LIBRARY SYSTEM 734-241-5770 1 840 SOUTH ROESSLER
Microsoft Access Basics
 Microsoft Access Basics 2006 ipic Development Group, LLC Authored by James D Ballotti Microsoft, Access, Excel, Word, and Office are registered trademarks of the Microsoft Corporation Version 1 - Revision
EXCEL PIVOT TABLE David Geffen School of Medicine, UCLA Dean s Office Oct 2002
 EXCEL PIVOT TABLE David Geffen School of Medicine, UCLA Dean s Office Oct 2002 Table of Contents Part I Creating a Pivot Table Excel Database......3 What is a Pivot Table...... 3 Creating Pivot Tables
Access I 2010. Tables, Queries, Forms, Reports. Lourdes Day, Technology Specialist, FDLRS Sunrise
 Access I 2010 Tables, Queries, Forms, Reports Lourdes Day, Technology Specialist, FDLRS Sunrise Objectives Participants will 1. create and edit a table 2. create queries with criteria 3. create and edit
CLOCKWORK Training Manual and Reference: Inventory. TechnoPro Computer Solutions, Inc.
 CLOCKWORK Training Manual and Reference: Inventory TechnoPro Computer Solutions, Inc. Table of Contents Inventory Learning Objectives License Key 5 Create a Catalog 6 Assign Permissions 9 Categories and
ECDL. European Computer Driving Licence. Spreadsheet Software BCS ITQ Level 2. Syllabus Version 5.0
 European Computer Driving Licence Spreadsheet Software BCS ITQ Level 2 Using Microsoft Excel 2010 Syllabus Version 5.0 This training, which has been approved by BCS, The Chartered Institute for IT, includes
Creating a PowerPoint Poster using Windows
 Creating a PowerPoint Poster using Windows Copyright 2001 Michael Dougherty (michael@nmsu.edu) Purpose The purpose of this tutorial is to illustrate how to create a 3 x 4 ft. poster using PowerPoint. This
Instruction manual. testo easyheat Configuration and Analysis software
 Instruction manual testo easyheat Configuration and Analysis software en 2 General Information General Information This documentation includes important information about the features and application of
SPSS: Getting Started. For Windows
 For Windows Updated: August 2012 Table of Contents Section 1: Overview... 3 1.1 Introduction to SPSS Tutorials... 3 1.2 Introduction to SPSS... 3 1.3 Overview of SPSS for Windows... 3 Section 2: Entering
Joomla Article Advanced Topics: Table Layouts
 Joomla Article Advanced Topics: Table Layouts An HTML Table allows you to arrange data text, images, links, etc., into rows and columns of cells. If you are familiar with spreadsheets, you will understand
Creating and Using Forms in SharePoint
 Creating and Using Forms in SharePoint Getting started with custom lists... 1 Creating a custom list... 1 Creating a user-friendly list name... 1 Other options for creating custom lists... 2 Building a
Point of Sale Procedures. Quick Reference
 Point of Sale Procedures Quick Reference Hard Copy Not Controlled Controlled Copy Available On-line Table of Contents How To Charge to Charge Accounts... 1 Closing an Open Check... 2 Creating a Recipe...
Lesson #10: Importing Yield Data
 Lesson #10: Importing Yield Data This lesson introduces students to the steps of importing harvest yield data from a Case IH yield monitor. Yield monitors provide the first level of precision agriculture.
Unemployment Insurance Data Validation Operations Guide
 Unemployment Insurance Data Validation Operations Guide ETA Operations Guide 411 U.S. Department of Labor Employment and Training Administration Office of Unemployment Insurance TABLE OF CONTENTS Chapter
Basic Excel Handbook
 2 5 2 7 1 1 0 4 3 9 8 1 Basic Excel Handbook Version 3.6 May 6, 2008 Contents Contents... 1 Part I: Background Information...3 About This Handbook... 4 Excel Terminology... 5 Excel Terminology (cont.)...
Excel 2007: Basics Learning Guide
 Excel 2007: Basics Learning Guide Exploring Excel At first glance, the new Excel 2007 interface may seem a bit unsettling, with fat bands called Ribbons replacing cascading text menus and task bars. This
MS Excel. Handout: Level 2. elearning Department. Copyright 2016 CMS e-learning Department. All Rights Reserved. Page 1 of 11
 MS Excel Handout: Level 2 elearning Department 2016 Page 1 of 11 Contents Excel Environment:... 3 To create a new blank workbook:...3 To insert text:...4 Cell addresses:...4 To save the workbook:... 5
Microsoft Excel Tutorial
 Microsoft Excel Tutorial by Dr. James E. Parks Department of Physics and Astronomy 401 Nielsen Physics Building The University of Tennessee Knoxville, Tennessee 37996-1200 Copyright August, 2000 by James
How to make a line graph using Excel 2007
 How to make a line graph using Excel 2007 Format your data sheet Make sure you have a title and each column of data has a title. If you are entering data by hand, use time or the independent variable in
Operating Systems. and Windows
 Operating Systems and Windows What is an Operating System? The most important program that runs on your computer. It manages all other programs on the machine. Every PC has to have one to run other applications
File Management Windows
 File Management Windows : Explorer Navigating the Windows File Structure 1. The Windows Explorer can be opened from the Start Button, Programs menu and clicking on the Windows Explorer application OR by
Sage Timesheet Web Access How To Use Timesheet
 View and Enter Hours The majority of your projects, called tasks in Timesheet Professional, have already been set up for you. Because the names of the projects are very long, your view has been changed
Dynamics GP Year End Closing Processes
 Dynamics GP Year End Closing Processes FOLLOWING ARE THE COMBINED STEPS FROM THE MICROSOFT DYNAMICS GP YEAR END CLOSING PROCEDURES. WHEN TO CLOSE AND THE ORDER FOR CLOSING MODULES (1) Inventory Fiscal
SPSS Workbook 1 Data Entry : Questionnaire Data
 TEESSIDE UNIVERSITY SCHOOL OF HEALTH & SOCIAL CARE SPSS Workbook 1 Data Entry : Questionnaire Data Prepared by: Sylvia Storey s.storey@tees.ac.uk SPSS data entry 1 This workbook is designed to introduce
Training Guide. Customizing Your Food/Service Items in Menu Manager
 Training Guide Customizing Your Food/Service Items in Menu Manager Customizing Your Food/Service Items in Menu Manager Copyright 2014 TABLE OF CONTENTS Unit 1: Menu Manager Setup Functions 5 Setting Up
PERFORMING REGRESSION ANALYSIS USING MICROSOFT EXCEL
 PERFORMING REGRESSION ANALYSIS USING MICROSOFT EXCEL John O. Mason, Ph.D., CPA Professor of Accountancy Culverhouse School of Accountancy The University of Alabama Abstract: This paper introduces you to
paragraph(s). The bottom mark is for all following lines in that paragraph. The rectangle below the marks moves both marks at the same time.
. The bottom mark is for all following lines in that paragraph. The rectangle below the marks moves both marks at the same time.") MS Word, Part 3 & 4 Office 2007 Line Numbering Sometimes it can be helpful to have every line numbered. That way, if someone else is reviewing your document they can tell you exactly which lines they have
MS Word, Part 3 & 4 Office 2007 Line Numbering Sometimes it can be helpful to have every line numbered. That way, if someone else is reviewing your document they can tell you exactly which lines they have
Integrated Accounting System for Mac OS X and Windows
 Integrated Accounting System for Mac OS X and Windows Program version: 6.2 110111 2011 HansaWorld Ireland Limited, Dublin, Ireland Preface Books by HansaWorld is a powerful accounting system for the Mac
In-Depth Guide Advanced Spreadsheet Techniques
 In-Depth Guide Advanced Spreadsheet Techniques Learning Objectives By reading and completing the activities in this chapter, you will be able to: Create PivotTables using Microsoft Excel Create scenarios
CowCalf5. for Dummies. Quick Reference. D ate: 3/26 / 2 0 10
 CowCalf5 for Dummies Quick Reference D ate: 3/26 / 2 0 10 Page 2 Email: Support@COWCALF.COM Page 3 Table of Contents System Requirement and Installing CowCalf5 4 Creating a New Herd 5 Start Entering Records
Integrated Accounting System for Mac OS X
 Integrated Accounting System for Mac OS X Program version: 6.3 110401 2011 HansaWorld Ireland Limited, Dublin, Ireland Preface Standard Accounts is a powerful accounting system for Mac OS X. Text in square
Event Record Monitoring and Analysis Software. Software Rev. 3.0 and Up. User s Guide
 Event Record Monitoring and Analysis Software Software Rev. 3.0 and Up User s Guide 2 Contents Contents Chapter 1: About ERMAWin 4 Chapter 2: Overview 5 About this Manual 5 System Requirements 5 Installing
Table of Contents. 1. Overview... 3. 1.1 Materials Required. 3 1.2 System Requirements. 3 1.3 User Mode 3. 2. Installation Instructions..
 Table of Contents 1. Overview..... 3 1.1 Materials Required. 3 1.2 System Requirements. 3 1.3 User Mode 3 2. Installation Instructions.. 4 2.1 Installing the On Call Diabetes Management Software. 4 2.2
Sample Table. Columns. Column 1 Column 2 Column 3 Row 1 Cell 1 Cell 2 Cell 3 Row 2 Cell 4 Cell 5 Cell 6 Row 3 Cell 7 Cell 8 Cell 9.
 Working with Tables in Microsoft Word The purpose of this document is to lead you through the steps of creating, editing and deleting tables and parts of tables. This document follows a tutorial format
Nursery Inventory Software (EPLPPS) Frequently Asked Questions
 Frequently Asked Questions") 1 of 6 11/20/2006 3:18 PM Nursery Inventory Software (EPLPPS) Frequently Asked Questions EPLPPS Frequently Asked Questions This document supplements the more thorough Help section of the FCIC/DataScape
1 of 6 11/20/2006 3:18 PM Nursery Inventory Software (EPLPPS) Frequently Asked Questions EPLPPS Frequently Asked Questions This document supplements the more thorough Help section of the FCIC/DataScape
Price, Yield and Enterprise Revenue Risk Management Analysis Using Combo Insurance Plans, Futures and/or Options Markets
 Price, Yield and Enterprise Revenue Risk Management Analysis Using Combo Insurance Plans, Futures and/or Options Markets Authors: Duane Griffith, Montana State University, Extension Farm Management Specialist
Getting Started with Excel 2008. Table of Contents
 Table of Contents Elements of An Excel Document... 2 Resizing and Hiding Columns and Rows... 3 Using Panes to Create Spreadsheet Headers... 3 Using the AutoFill Command... 4 Using AutoFill for Sequences...
Table of Contents TASK 1: DATA ANALYSIS TOOLPAK... 2 TASK 2: HISTOGRAMS... 5 TASK 3: ENTER MIDPOINT FORMULAS... 11
 Table of Contents TASK 1: DATA ANALYSIS TOOLPAK... 2 TASK 2: HISTOGRAMS... 5 TASK 3: ENTER MIDPOINT FORMULAS... 11 TASK 4: ADD TOTAL LABEL AND FORMULA FOR FREQUENCY... 12 TASK 5: MODIFICATIONS TO THE HISTOGRAM...
Creating Custom Crystal Reports Tutorial
 Creating Custom Crystal Reports Tutorial 020812 2012 Blackbaud, Inc. This publication, or any part thereof, may not be reproduced or transmitted in any form or by any means, electronic, or mechanical,
Profit Developers, Inc. (PDI) 2015 SAXTAX Software Installation Guide
 2015 SAXTAX Software Installation Guide") 2015 SAXTAX Software Installation Guide 1. Installation: Installing from a Link: Please click on the link provided in the setup email received. Some email accounts will not allow access to executable links
2015 SAXTAX Software Installation Guide 1. Installation: Installing from a Link: Please click on the link provided in the setup email received. Some email accounts will not allow access to executable links
Shopping Cart Manual. Written by Shawn Xavier Mendoza
 Shopping Cart Manual Written by Shawn Xavier Mendoza Table of Contents 1 Disclaimer This manual assumes that you are using Wix.com for website creation, and so this method may not work for all other online
How to Use the Cash Flow Template
 How to Use the Cash Flow Template When you fill in your cash flow you are trying to predict the timing of cash in and out of your bank account to show the affect and timing for each transaction when it
NDA-30141 ISSUE 1 STOCK # 200893. CallCenterWorX-Enterprise IMX MAT Quick Reference Guide MAY, 2000. NEC America, Inc.
 NDA-30141 ISSUE 1 STOCK # 200893 CallCenterWorX-Enterprise IMX MAT Quick Reference Guide MAY, 2000 NEC America, Inc. LIABILITY DISCLAIMER NEC America, Inc. reserves the right to change the specifications,
Quick Cash Flow Projections
 Quick Cash Flow Projections The Quick Cash Flow Projections tool assists farm operators in projecting cash needs, farm profitability, and debt servicing capabilities. The program also aids users in performing
In this Tutorial you will learn how to: Overview of this Tutorial Important
 2 - Tutorial FotoBiz is about your images, your clients and paperwork. FotoBiz has many features but the primary function of the program is to help you keep track of your images, so you can make a sale.
QUICK START GUIDE EDI Claims Link for Windows version 3.5
 QUICK START GUIDE EDI Claims Link for Windows version 3.5 System Requirements - Operating system: Windows XP or later - Computer/Processor: Pentium 2, 233 MHz or greater - Memory: 64MB Ram - Minimum Screen
Microsoft Access XP Session 1 Week 8
 Creating a Database Click-on the Start button in the lower left corner of the screen, then click-on Programs, and then click-on Microsoft Access. New File The Access XP New File Task Pane will appear on
Using Microsoft Excel to Analyze Data from the Disk Diffusion Assay
 Using Microsoft Excel to Analyze Data from the Disk Diffusion Assay Entering and Formatting Data Open Excel. Set up the spreadsheet page (Sheet 1) so that anyone who reads it will understand the page (Figure
Order Manager Help. v. 4.2
 Order Manager Help v. 4.2 Last Update: June 2005 Table Of Contents About Help... 1 Using Online Help... 1 Legal Information... 3 Using the IntraLearn Platform... 5 Product Description... 5 Frame Structure...
Inventory Tracking Software Operations Manual
 Version 4.1 Inventory Tracking Software Operations Manual Shipping Address: 7201 N. 98th St., Lincoln, NE 68507 Mailing Address: P.O. Box 29709, Lincoln, NE 68529 Toll Free: 800-278-4241 System Requirements
Moneyspire Help Manual. 2015 Moneyspire Inc. All rights reserved.
 Moneyspire Help Manual 2015 Moneyspire Inc. All rights reserved. Getting Started Getting started with Moneyspire is easy. When you first start the program, you will be greeted with the welcome screen.
Search help. More on Office.com: images templates
 Page 1 of 14 Access 2010 Home > Access 2010 Help and How-to > Getting started Search help More on Office.com: images templates Access 2010: database tasks Here are some basic database tasks that you can
Excel Guide for Finite Mathematics and Applied Calculus
 Excel Guide for Finite Mathematics and Applied Calculus Revathi Narasimhan Kean University A technology guide to accompany Mathematical Applications, 6 th Edition Applied Calculus, 2 nd Edition Calculus:
Ansur Test Executive. Users Manual
 Ansur Test Executive Users Manual April 2008 2008 Fluke Corporation, All rights reserved. All product names are trademarks of their respective companies Table of Contents 1 Introducing Ansur... 4 1.1 About
Excel 2010: Create your first spreadsheet
 Excel 2010: Create your first spreadsheet Goals: After completing this course you will be able to: Create a new spreadsheet. Add, subtract, multiply, and divide in a spreadsheet. Enter and format column
Data Entry Guidelines for the Logistics Indicators Assessment Tool (LIAT)
") Data Entry Guidelines for the Logistics Indicators Assessment Tool (LIAT) MARCH 2011 This publication was produced for review by the U.S. Agency for International Development. It was prepared by the USAID
Data Entry Guidelines for the Logistics Indicators Assessment Tool (LIAT) MARCH 2011 This publication was produced for review by the U.S. Agency for International Development. It was prepared by the USAID
MICROSOFT ACCESS 2003 TUTORIAL
 MICROSOFT ACCESS 2003 TUTORIAL M I C R O S O F T A C C E S S 2 0 0 3 Microsoft Access is powerful software designed for PC. It allows you to create and manage databases. A database is an organized body
Pastel Evolution BIC. Getting Started Guide
 Pastel Evolution BIC Getting Started Guide Table of Contents System Requirements... 4 How it Works... 5 Getting Started Guide... 6 Standard Reports Available... 6 Accessing the Pastel Evolution (BIC) Reports...
Analyzing Data Using Excel
 Analyzing Data Using Excel What you will do: Create a spreadsheet Use formulas and basic formatting Import text files Save worksheets as web pages Add interactivity to web worksheets Use pivot tables Create
This activity will guide you to create formulas and use some of the built-in math functions in EXCEL.
 Purpose: This activity will guide you to create formulas and use some of the built-in math functions in EXCEL. The three goals of the spreadsheet are: Given a triangle with two out of three angles known,