WS1093 PROFESSIONAL WIRELESS WEATHER STATION WITH TOUCHSCREEN AND USB UPLOAD
|
|
|
- Hugh Fox
- 8 years ago
- Views:
Transcription
1 PROFESSIONAL WIRELESS WEATHER STATION WITH TOUCHSCREEN AND USB UPLOAD - 1 -

2 PROFESSIONAL WIRELESS WEATHER STATION WITH TOUCHSCREEN AND USB UPLOAD Operation Manual Thank you and congratulations on selecting this professional weather station. We are positive you will enjoy the benefits of accurate weather readings and information that our weather stations offer. This manual will guide you step-by-step through setting up your device. Use this manual to become familiar with your professional weather station, and save it for future reference. Important! Warranty and Support We warrant our products to be free of defects in components and workmanship, under normal use and service, for one year from the date of original purchase. For product support and warranty claims please contact the following: Purchased in the EU: As many issues can be a result of incorrect setup please contact our local distributor and their team will be happy to help. Genuine faults can typically be diagnosed by our technicians without requiring the unit to be returned and replacement parts sent quickly if needed. Purchased in AUSTRALIA: As many issues can be a result of incorrect setup please contact our local distributor Monax Test & Weather and their team will be happy to help. Genuine faults can typically be diagnosed without requiring the unit to be returned and replacement parts sent quickly if needed. Purchased in NEW ZEALAND: As many issues can be a result of incorrect setup please contact our local distributor Scientific Sales and their team will be happy to help. Genuine faults can typically be diagnosed without requiring the unit to be returned and replacement parts sent quickly if needed. For all others please contact the seller who sold you this item

3 Getting Started The touch screen weather station includes a base station (receiver), a transmitter unit, one wind direction sensor, one wind speed sensor, one rain gauge, one mounting tree, one USB cable and a downloadable PC software package. The Base Station is equipped with a Touch Screen LCD Monitor and allows the display of a large variety of time and weather data: Top Line - Time and Memory Data Usage Left Middle - Wind, Air Pressure and Air Pressure History Right Middle - Date, Rain measurement and Weather Forecast (Tendency) Bottom Line - In-Out Temperature and Humidity Note: The presence of the "Alarm-On icon" means that the particular alarm has been enabled
 Bottom Line - In-Out Temperature and")
4 Important Operation Notes All actions and functions of the weather station are started on the touch screen by slightly touching (not pressing) the related areas with the stylus, touch the flashing +, ON/OFF or to make the corresponding selection increase or decrease. Note: the stylus can be found on the top rear of the console and can sometimes be stiff to remove the first time. Every time a programming step is activated by touching the related area on the Touch Screen a tone will sound and the back light will come on for a few seconds. If no areas are pressed for 30 seconds the LCD will automatically revert to the normal display mode (automatic time out). Important Notes System Start Insert two LR6 (AA) size batteries into the transmitter. The LED located in the middle on the front of the transmitter will illuminate for 4 seconds, then go off. The transmitter will make an initial data transmission and then start the radio controlled time reception routine. When reception of the time signal is not possible the transmitter will terminate radio controlled time reception after no more than five minutes and resume normal transmission. During the radio controlled time reception period there is no transmission of the outdoor weather data to the console. Note: no time signal is available in Aus/NZ. Insert two LR6 (AA size) batteries into the Base Station. The console will illuminate for a few seconds with all the display segments illuminated for checking. After this the Base Station will make an initial measurement and start to register the transmitter (the Outdoor Reception Signal icon between the two humidity readings will be turned on). Do not touch the Base Station before the outdoor data is received or the outdoor sensor learning mode will be terminated. When the outdoor transmitter has been registered the Base Station will automatically switch to the normal display mode from which all further settings can be adjusted by the user. If no radio controlled clock (RCC) signal is detected during the initial setup, the transmitter will try once every hour to get the RCC signal until a signal is received. Once the transmitter receives the RCC signal it will transmit the signal to the Base Station which will display the Radio Controlled Clock icon and the time will synchronise to the RCC time. If the Base Station does not receive the RCC signal or loses the signal the RCC icon will not be displayed. Positioning Once you have verified that all of the components of the weather station are working they can be positioned in their permanent places. Before permanently mounting make sure that all the components work properly together at their chosen mounting or standing locations. If there appear to be problems with the 433 MHz radio transmission they can mostly be overcome by moving the mounting locations. Note: The radio communication between the receiver and transmitter in an open field can reach a distance of up to 100m providing that there are no interfering obstacles such as buildings, trees, vehicles, high voltage lines, etc. Radio interferences such as PC screens, radios or TV sets, can in bad cases entirely cut off radio communication. Please take this into consideration when choosing standing or mounting locations
.")
5 Reconnecting Lost Signal If no outdoor weather data is displayed as a result of loss of signal during set up, mounting, changing of batteries in the transmitter or plugging or unplugging cables, simply remove the batteries from the Base Station wait 2 minutes and reinsert. After this the Base Station will make an initial measurement and start to register the transmitter (the Outdoor Reception Signal icon will be turned on). Do not touch the Base Station before the outdoor data is received (this may take several minutes) or the outdoor sensor learning mode will be terminated. When the outdoor transmitter has been registered the Base Station will automatically switch to the normal display mode from which all further settings can be adjusted by the user. Note: When replacing batteries in the transmitter wait two minutes before re-inserting for a proper reset. Wind Direction On the edge of the wind direction sensor, there are four letters - N, E, S and W representing the directions North, East, South and West. The wind direction sensor has to be adjusted so that the directions on the sensor are matching your real location. A permanent wind direction error will be introduced when the wind direction sensor is not positioned correctly during installation. Batteries Note: Incorrectly inserting the batteries may cause a fault and invalidate the warranty so take care to insert them with the correct polarity. Note: Many rechargeable batteries are 1.2V and as such are not suitable for this unit which requires 1.5V batteries. Rechargeable batteries also often leak their peak charge quickly which can cause reduced transmission range. As such we recommend avoiding the use of rechargeable batteries. Note: The performance of Alkaline batteries can be significantly reduced in colder environments resulting in loss of signal. In this case we recommend the use of Lithium batteries in the thermo-hygro sensor. Low Battery Indicator The transmitter low battery indicator may illuminate when temperatures are outside the range of 10-35C. This does not necessarily indicate low batteries and will switch off once the temperature returns to this range (also see note above on the use of Alkaline batteries)
 or the outdoor sensor learning mode will be terminated.")
6 Setup - Sensors - 6 -

7 - 7 -
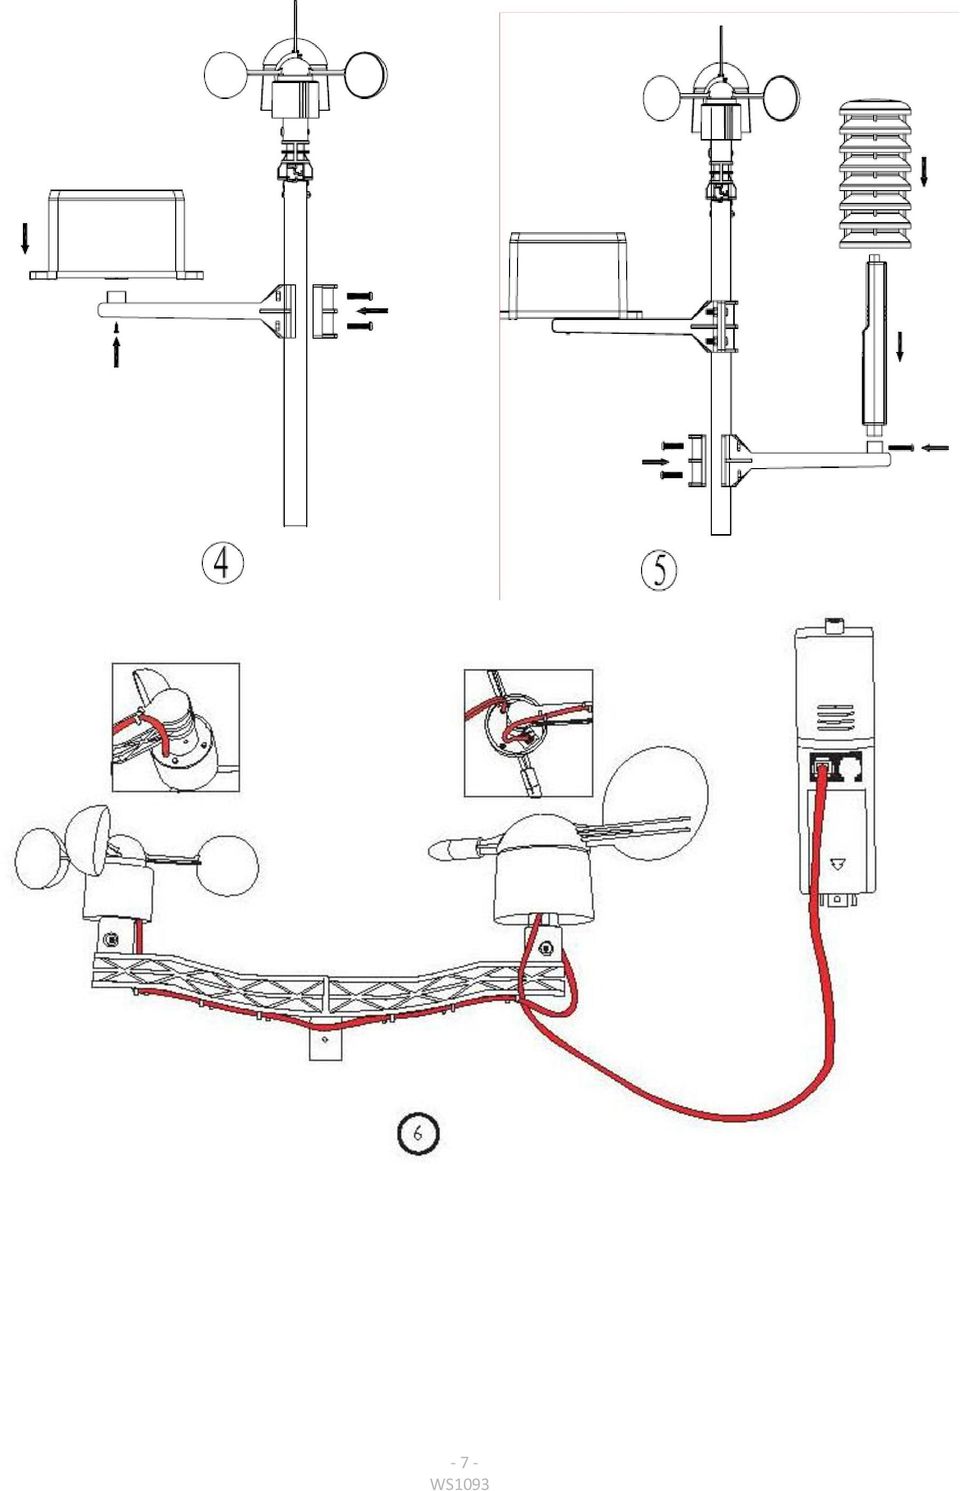
8 The wind speed sensor s cable is connected to the wind direction sensor. The wind direction sensor s cable is connected to the input marked Wind on the thermo-hygro sensor. The rain sensor s cable is connected to the input marked Rain on the thermo-hygro sensor

9 Setting Up For basic settings touch the Touch Screen in the desired display area using the stylus. Note: setting procedure can be exited at any time by touching any other function area (except +, - or ON/OFF. The basic settings can be performed as follows: Time 1) Touch the TIME section, the + and button will be flashing. Touch the + button or button to adjust the contrast level from 0 to 8 (default 5). 2) Touch the TIME section again, the + and button will be flashing. Touch the + button or button to set the time zone. 3) Touch the TIME section a third time, the + and button will be flashing. Touch the + button or button to shift between the 12 and 24 hour formats. 4) Touch the TIME section a fourth time to set the hour setting, the + and button will be flashing. Touch the + button or button to change the value. 5) Touch the TIME section a fifth time to set the minute setting, the + and button will be flashing. Touch the + button or button to change the value. Note: The radio controlled clock (RCC) works off the German DCF77 time signal received across large parts of Europe and the UK so set your time zone as follows: Country Time Zone setting Country Time Zone setting Iceland (-2 for German DST) -1 Poland 0 Ireland -1 Slovakia 0 Portugal -1 Spain 0 United Kingdom -1 Sweden 0 Albania 0 Switzerland 0 Austria 0 Bulgaria +1 Belgium 0 Estonia +1 Croatia 0 Finland +1 Denmark 0 Greece +1 France 0 Latvia +1 Germany 0 Lithuania +1 Hungary 0 Moldova +1 Italy 0 Romania +1 Netherlands 0 Turkey +1 Norway 0 Ukraine +1 Note: Because of the default settings already determined by the manufacturer it may not be necessary for the majority of users to perform any further basic settings - except for the Relative Air Pressure (see below). Changes, however, can be easily made
 Touch the TIME section again, the + and button will be flashing. Touch the + button or button to set the time zone. 3) Touch the TIME section a third time, the + and button will be flashing.")
10 Memory 1) Touch the Memory section to activate the history data toggle display, the + and button will be flashing. Press the button to toggle back to see earlier weather history data together with its time stamp, press the + button to see more recent weather history data. When the history data is displayed the corresponding time will be displayed in the time section area (the history data saving interval is preset to 30 minutes). Note: Historical values for some variables are only available once downloaded to PC and will appear as dashes on the Base Station. 2) Touching the Memory section again will trigger the memory clear procedure, the word CLEAR will be flashing and the full memory usage icon will be flashing. Pressing and holding the memory full icon for 3 seconds will clear the memory. Wind Speed 1) Touch the WIND SPEED section, the + and button will be flashing. Touch the + button or button to shift the display between the Wind Average Speed and Gust Speed. Note: Average wind speed is the average speed over the 48 second period between signal transmissions. In gusty conditions this may appear as though wind speed is being under reported as low winds and high winds are averaged across the 48 second interval. Setting wind speed to Gust will display the maximum wind speed during the 48 second period which can often be more meaningful in these conditions. 2) Touch the WIND SPEED section again, the + and button will be flashing. Touch the + button or button to select the wind speed unit - km/h, mph, m/s, knots, or bft. 3) Touch the WIND SPEED section a third time to set the high alarm function, the +, ON/OFF and button will be flashing, the HI AL icon will light up. Touch the + button or button to change the value, hold the + button or button for 3 seconds to change the number faster. Touch the ON/OFF button to turn the alarm on or off (the alarm icon will be turned on indicating the alarm function has been activated). 4) Touch the WIND SPEED section a fourth time to set the wind direction alarm function, the wind direction arrow will start flashing. Touch the + or button to select the desired alarm for wind direction, press ON/OFF to enable or disable the wind direction alarm. 5) Touch the WIND SPEED section a fifth time to display the maximum wind speed record, the recorded maximum value will be flashing, the MAX icon will light up. If you hold the maximum value for 3 seconds the maximum value will be reset to the current reading

11 Date 1) Touch the DATE section, the + and button will be flashing. Touch the + button or button to shift between alarm, date and day of the week format. 2) Touch the DATE section again, the + and button will be flashing. Touch the + button or button to Shift between DD-MM format and MM-DD format for the date. 3) Touch the DATE section a third time, the + and button will be flashing. Touch the + button or button to set the year. Hold the + button or button for 3 seconds to change the number faster. 4) Touch the DATE section a fourth time, the + and button will be flashing. Touch the + button or button to set the month. Hold the + button or button for 3 seconds to change the number faster. 5) Touch the DATE section a fifth time, the + and button will be flashing. Touch the + button or button to set the day. Hold the + button or button for 3 seconds to change the number faster. 6) Touch the DATE section a sixth time, the + and button will be flashing. Touch the + button or button to set the alarm hour. Hold the + button or button for 3 seconds to change the number faster. 7) Touch the DATE section a seventh time, the + and button will be flashing. Touch the + button or button to set the alarm minute. Hold the + button or button for 3 seconds to change the number faster. Touch ON/OFF to enable or disable the time alarm function. Rain 1) Touch the rain section, the + and button will be flashing. Touch the + button or button to shift the display between 1h, 24h, week, month and total rain. Note: The measurement intervals are rolling intervals. For example the 24 hour mode is a rolling 24 hours so whenever you look at it it will show the rainfall for the immediately preceding 24 hours. If you look at it at 8am Monday it will show the total rainfall from 8am Sunday through to 8am Monday. If you look at it at 9am Monday it will show the total rainfall from 9am Sunday through to 9am Monday and so on. 2) Touch the rain section again, the + and button will be flashing. Touch the + button or button to select the rain fall unit - mm or inches. 3) Touch the rain section a third time to set the high alarm function, the +, ON/OFF and buttons will be flashing, the HI AL icon will light up. Touch the + button or button to change the value, hold the
 Touch the DATE section a fourth time, the + and button will be flashing. Touch the + button or button to set the month. Hold the + button or button for 3 seconds to change the number faster.")
12 + button or button for 3 seconds to change the number faster. Touch the ON/OFF button to turn the alarm on or off (the alarm icon will be turned on indicating the alarm function has been activated). 4) Touch the rain section a fourth time to display the current maximum rain fall record. Touching the rain section for 3 seconds will reset the maximum rain fall value to the current value. 5) Touch the rain section a fifth time to reset the rain fall value to 0. By pressing the rain section for 3 seconds the 1h, 24h, week, month and total rain will be reset to 0. Pressure 1) Touch the PRESSURE section, the + and button will be flashing. Touch the + button or button to shift the display between Absolute pressure and Relative pressure. Relative pressure value - if you are significantly above sea level you will need to calibrate the air pressure reading to allow for your altitude. To do so make sure you have selected Relative as above and change the pressure reading to match with a local benchmark such as the local air pressure provided for your area on the Met Service or Bureau of Meteorology websites. If Absolute pressure is selected, skip this step. 2) Touch the PRESSURE section again, the + and button will be flashing. Touch the + button or button to shift the display unit between hpa, inhg and mmhg. 3) Touch the PRESSURE section a third time to set the Relative Pressure value. The + and button will be flashing, the rel icon will light up. Touch the + button or button to change the value, hold the + button or button for 3 seconds to change the number faster. 4) Touch the PRESSURE section a fourth time to set the pressure high alarm function, the +, ON/OFF and button will be flashing, the HI AL icon will light up. Touch the + button or button to change the value, hold the + button or button for 3 seconds to change the number faster. Touch the ON/OFF button to turn the alarm on or off (the alarm icon will be turned on indicating the alarm function has been activated). 5) Touch the PRESSURE section a fifth time to set the pressure low alarm function, the +, ON/OFF and button will be flashing, the LO AL icon will light up. Touch the + button or button to change the value, hold the + button or button for 3 seconds to change the number faster. Touch the ON/OFF button to turn the alarm on or off (the alarm icon will be turned on indicating the alarm function has been activated). 6) Touch the PRESSURE section a sixth time to display the maximum pressure record, the recorded maximum value will be flashing, the MAX icon will light up. By pressing the maximum value for 3 seconds the maximum value will be reset to the current reading. 7) Touch the PRESSURE section a seventh time to display the minimum pressure record, the recorded minimum value will be flashing, the MIN icon will light up. By pressing the minimum value for 3 seconds the minimum value will be reset to the current reading. Note: when absolute pressure is selected, step 3 will be skipped since absolute pressure is selected for display
 Touch the PRESSURE section, the + and button will be flashing. Touch the + button or button to shift the display between Absolute pressure and Relative pressure.")
13 Pressure bar graph Touch the PRESSURE BAR GRAPH section and then press the + or button to toggle the bar graph time scale between 12 hrs or 24 hrs for pressure history. Weather Forecast 1) Touch the WEATHER FORECAST section, the + and button will be flashing. Touch the + button or button to shift the display between SUNNY, PARTLY CLOUDY, CLOUDY and RAINY icon (not generally required as this will adjust automatically over a few days as the unit collects data and begins forecasting). 2) Touch the WEATHER FORECAST section again, the + and button will be flashing. Touch the + button or button to set the pressure threshold from 2-4hPa (default 2hPa). 3) Touch the WEATHER FORECAST section a third time, the + and button will be flashing. Touch the + button or button to set the storm threshold from 3-9hPa (default 4 hpa). Note: The prediction is for the upcoming hours and does not necessarily reflect the current weather situation. It calculates on the basis of the pressure changes that have occurred during the past 24 hours the most likely weather forecast for the upcoming hours. The weather forecast predicted has a probability of 70%. This means that observed over a period of several weeks, 7 from 10 forecasts for the upcoming hours will be correct. Observing the forecast for only a few days is not sufficient to draw any conclusions re accuracy. Notes on the pressure sensitivity setting for weather forecasting The pressure threshold can be set to suit the user s requirements for weather forecasting - anywhere from 2-4hPa (default 2hPa). Areas that experience frequent changes in air pressure require a higher setting compared to areas where the air pressure is stagnant. For example if 4hPa is selected, then there must be a fall or rise in air pressure of at least 4hPa before the weather station will register this as a change in weather. Notes on the storm threshold setting The storm threshold can be set to suit the user s requirements for storm forecasting - anywhere from 3-9hPa (default 4hPa). When there is a fall below the pressure threshold within any given 3 hour period, the storm forecasting will be activated and the clouds with rain icon as well as the tendency arrows will flash for 3 hours indicating the storm warning feature has been activated
. 2) Touch the WEATHER FORECAST section again, the + and button will be flashing. Touch the + button or button to set the pressure threshold from 2-4hPa (default 2hPa).")
14 Indoor Temperature 1) Touch the INDOOR TEMPERATURE section, the + and button will be flashing. Touch the + button or button to shift the display unit between C and F. 2) Touch the INDOOR TEMPERATURE section again to set the indoor temperature high alarm function, the +, ON/OFF and button will be flashing, the HI AL icon will light up. Touch the + button or button to change the value, hold the + button or button for 3 seconds to change the number faster. Touch the ON/OFF button to turn the alarm on or off (the alarm icon will be turned on indicating the alarm function has been activated). 3) Touch the INDOOR TEMPERATURE section a third time to set the indoor temperature low alarm function, the +, ON/OFF and button will be flashing, the LO AL icon will light up. Touch the + button or button to change the value, hold the + button or button for 3 seconds to change the number faster. Touch the ON/OFF button to turn the alarm on or off (the alarm icon will be turned on indicating the alarm function has been activated). 4) Touch the INDOOR TEMPERATURE section a fourth time to display the maximum indoor temperature record, the maximum records will be flashing, the MAX icon will light up. By pressing the flashing max value for 3 seconds the maximum value will be reset to the current reading. 5) Touch the INDOOR TEMPERATURE section a fifth time to display the minimum indoor temperature record, the minimum records will be flashing, the MIN icon will light up. By pressing the flashing min value for 3 seconds the minimum value will be reset to the current reading. Outdoor Temperature 1) Touch the OUTDOOR TEMPERATURE section, the + and button will be flashing. Touch the + button or button to shift the display between Outdoor Temperature, Wind Chill and Dew Point. 2) Touch the OUTDOOR TEMPERATURE section again, the + and button will be flashing. Touch the + button or button to shift the display unit between C and F. 3) Touch the OUTDOOR TEMPERATURE section a third time to set the outdoor temperature high alarm function, the +, ON/OFF and button will be flashing, the HI AL icon will light up. Touch the + button or button to change the value, hold the + button or button for 3 seconds to change the number faster. Touch the ON/OFF button to turn the alarm on or off (the alarm icon will be turned on indicating the alarm function has been activated). 4) Touch the OUTDOOR TEMPERATURE section a fourth time to set the outdoor temperature low alarm
.")
15 function, the +, ON/OFF and button will be flashing, the LO AL icon will light up. Touch the + button or button to change the value, hold the + button or button for 3 seconds to change the number faster. Touch the ON/OFF button to turn the alarm on or off (the alarm icon will be turned on indicating the alarm function has been activated). 5) Touch the OUTDOOR TEMPERATURE section a fifth time to display the maximum outdoor temperature record, the recorded maximum value will be flashing, the MAX icon will light up. By pressing the flashing max value for 3 seconds the maximum value will be reset to the current reading. 6) Touch the OUTDOOR TEMPERATURE section a sixth time to display the minimum outdoor temperature record, the recorded minimum value will be flashing, the MIN icon will light up. By pressing the flashing minimum value for 3 seconds the minimum value will be reset to the current reading. Indoor Humidity 1) Touch the INDOOR HUMIDITY section to set the indoor humidity high alarm function, the +, ON/OFF and button will be flashing, the HI AL icon will light up. Touch the + button or button to change the value, hold the + button or button for 3 seconds to change the number faster. Touch the ON/OFF button to turn the alarm on or off (the alarm icon will be turned on indicating the alarm function has been activated). 2) Touch the INDOOR HUMIDITY section again to set the indoor humidity low alarm function, the +, ON/OFF and button will be flashing, the LO AL icon will light up. Touch the + button or button to change the value, hold the + button or button for 3 seconds to change the number faster. Touch the ON/OFF button to turn the alarm on or off (the alarm icon will be turned on indicating the alarm function has been activated). 3) Touch the INDOOR HUMIDITY section a third time to display the maximum indoor humidity record, the recorded maximum value will be flashing, the MAX icon will light up. By pressing the maximum value for 3 seconds the maximum value will be reset to the current reading. 4) Touch the INDOOR HUMIDITY section a fourth time to display the minimum indoor humidity record, the recorded minimum value will be flashing, the MIN icon will light up. By pressing the minimum value for 3 seconds the minimum value will be reset to the current reading. Outdoor Humidity Procedures and settings are similar to Indoor humidity
 Touch the OUTDOOR TEMPERATURE section a fifth time to display the maximum outdoor temperature record, the recorded maximum value will be flashing, the MAX icon will light up.")
16 PC Connection An important feature of the is the capability for the recorded data to be downloaded, stored and displayed on your PC. Data Storage The Base Station allows the internal storage of up to 4,080 complete sets of weather data with time and date. Note: this data is lost when the batteries are removed so download to your PC prior to removing the batteries if you wish to retain this information. When the memory capacity of the weather station is exhausted the oldest data sets stored will be overwritten by the new ones. Data Recall Certain weather data or setting values can only be read out, processed, and displayed by means of a PC. Software Download Note: No CD is contained with this unit please download the latest software and Basic Installation Guide by entering the link below into your browser s address bar: This software allows the display, storage, and printing of historical data. the data to be uploaded and displayed on a website. In addition the software allows Cumulus has a comprehensive Wiki and Support Forum for any software related issues: Note: To get accurate sunrise and sunset data make sure to enter the Latitude and Longitude for your location in the boxes provided in the centre of the Station Settings panel. Latitude and Longitude for your location can be found here:

17 Trouble Shooting Problem I am not receiving any outside data. Solution Check that batteries in both units are fresh and fully charged. Alkaline batteries slow down and freeze in colder temperatures which leads to signal dropouts so we recommend Lithium batteries in colder climates. Also avoid rechargeable batteries as many are 1.2V (standard 1.5V required) and they also leak their peak charge quickly even if they are 1.5V. Put the batteries in the receiver last to force a proper resync. Check that the transmitter is not out of range. Test this by taking the receiver closer to the transmitter, remove and reinsert the batteries and wait for a few minutes to see whether the signal is picked up. Check for sources of interference (cordless phones, baby monitors, PC monitors etc). If this is an issue the console and/or transmitter will need to be relocated. If none of these is causing the problem you may have a faulty transmitter. My wind speed appears to be under reporting. My rain gauge is under reporting rainfall or not recording it at all. My rain gauge is over reporting rainfall. When set to Average, wind speed is measured as the average speed recorded over the 48 second period between transmissions. In gusty weather this can appear as though it is under reading. Set this to Gust (see Wind section above) to view the maximum wind speed during each 48 second period. Remove the cover from the rain gauge and check for spider webs etc that may be impeding the tipper s motion. Tip the tipper back and forth, each tip should register as 0.3mm on the console if it is operating correctly (remember the transmission interval is every 48 seconds so allow sufficient time for the console to register the tips). On rare occasions wind can enter the rain gauge from underneath and cause the rain gauge s tipper mechanism to tip and register false rain readings. In this case mount the rain gauge on a flat surface or mount a plastic plate under the rain gauge to prevent the wind entering. Insecurely mounted sensor trees can also sway in strong winds and cause false rain readings

18 Specifications Outdoor data Transmission distance in open field: Up to 100m (line of site) Frequency: 433 MHZ Temperature range: - 40C to +65C (show OFL if outside range) Resolution: 0.1C Measuring range rel. humidity: 10% to 99% Rain volume display: mm (show OFL if outside range) Resolution: 0.3mm (if rain volume < 1000mm) 1mm (if rain volume > 1000mm) Wind speed: 0-160kph (show OFL if outside range) Measuring interval thermo-hygro sensor: Water proof level: 48 sec IPX3 Indoor data Measuring interval pressure / temp: 48 sec Indoor temperature range: 0C to + 50C (show OFL if outside range) Resolution: 0.1C Measuring range rel. humidity: 10% to 99% Resolution: 1% Measuring range air pressure: hPa ( inHg) Accuracy: +/-3hpa between hPa Resolution: 0.1hPa Alarm duration: 120 sec Power consumption Base station Remote sensor: 2XAA 1.5V batteries 2xAA 1.5V batteries Contact Information Purchased in UK/EU: Please contact our local distributor Greenfrog Scientific and their team will be happy to help. Genuine faults can typically be diagnosed without requiring the unit to be returned and replacement parts sent quickly if needed. Purchased in AUSTRALIA: Please contact our local distributor Monax Test & Weather and their team will be happy to help. Genuine faults can typically be diagnosed without requiring the unit to be returned and replacement parts sent quickly if needed. Purchased in NEW ZEALAND: Please contact our local distributor Scientific Sales and their team will be happy to help. Genuine faults can typically be diagnosed without requiring the unit to be returned and replacement parts sent quickly if needed. For all others please contact the retailer who sold you this item
 Resolution: 0.1C Measuring range rel.")
19 EU DECLARATION OF CONFORMITY Hereby, Aercus Instruments, declares that this Wireless Weather Station (Model: ) is in compliance with the essential requirements and other relevant provisions of Directive 1999/5/EC. A copy of the signed and dated Declaration of Conformity is available on request from contact@aercusinstruments.com. COUNTRIES RTTE APPROVAL COMPLIED All EU countries This handbook may contain mistakes and printing errors. The information in this handbook is regularly checked and corrections made in the next issue. We accept no liability for technical mistakes or printing errors - or their consequences

TOUCH SCREEN WEATHER STATION (WIND AND AIR PRESSURE) WH-1080PC. Operation Manual
 WH-1080PC. Operation Manual") TOUCH SCREEN WEATHER STATION (WIND AND AIR PRESSURE) WH-1080PC Operation Manual About this manual Thank you and congratulations on selecting this professional weather station! We are positive you will
TOUCH SCREEN WEATHER STATION (WIND AND AIR PRESSURE) WH-1080PC Operation Manual About this manual Thank you and congratulations on selecting this professional weather station! We are positive you will
Estação Meteorológica sem fio VEC-STA-003
 Estação Meteorológica sem fio VEC-STA-003 The Weatherwise Instruments professional touch-screen weather station is designed for easy everyday use and fits right into any home or office. The indoor base
PROFESSIONAL WEATHER STATION (WIND AND AIR PRESSURE) Operation Manual
 Operation Manual") PROFESSIONAL WEATHER STATION (WIND AND AIR PRESSURE) Operation Manual About this manual Thank you and congratulations on selecting this professional weather station! We are positive you will enjoy the
PROFESSIONAL WEATHER STATION (WIND AND AIR PRESSURE) Operation Manual About this manual Thank you and congratulations on selecting this professional weather station! We are positive you will enjoy the
TOUCH SCREEN WEATHER STATION MODEL WS-3500. Operation Manual
 TOUCH SCREEN WEATHER STATION MODEL WS-3500 Operation Manual 28 Table of Contents 1... General 2... Important Touch Screen Operating Notes generally applicable 3... Putting into Operation 3.1... Wiring
PROFESSIONAL WEATHER CENTER WS-1510-IT Instruction Manual. PROFESSIONAL WEATHER CENTER WS-1510-IT Instruction Manual. Table of Contents FEATURES:
 PROFESSIONAL WEATHER CENTER WS-1510-IT Instruction Manual Table of Contents Topic Page Features 2 Setting up 4 Function keys 7 LCD Screen 9 Manual Setting 10 Time alarm setting 13 Weather alarm operations
WEATHER STATION Instruction Manual Cat. No. 35.1115.IT
 WEATHER STATION Instruction Manual Cat. No. 35.1115.IT Thank you for choosing this wireless weather station from TFA. BEFORE YOU USE IT Please be sure to read the instruction manual carefully. This information
The Weather Station. Hanging Hole. LCD Display Battery Cover. Function Keys. Detachable Stand
 WIRELESS 433 MHz WEATHER STATION Instructions Manual INTRODUCTION: Congratulations on purchasing this Weather Station with wireless 433 MHz transmission of outdoor temperature and display of indoor temperature
IN-OUT Thermometer with Cable Free Sensor and Clock
 IN-OUT Thermometer with Cable Free Sensor and Clock MODEL: RAR232 USER'S MANUAL INTRODUCTION Congratulations on your purchase of the RAR232 In-Out Thermometer with 433MHz cable free sensor and calendar
WIRELESS WEATHER STATION
 WIRELESS WEATHER STATION INSTRUCTION MANUAL MODEL: WS1151 Page 1. Inventory of contents...2 2. Feature...2 3. Set up guide... 2 3.1 Battery installation... 2 3.2 Mounting... 3 4. LCD overview... 3 4.1
Reference Guide. Vantage PRO2 Quick
 3465 Diablo Avenue, Hayward, CA 94545-2778 U.S.A. 510-732-9229 Fax: 510-732-9188 E-mail: info@davisnet.com www.davisnet.com Vantage PRO2 Quick Reference Guide Part Number: 07395.235 Rev C (1/6/2012) 2012
Solar Weather Station Model: BAR806 / BAR806A
 Solar Weather Station Model: BAR806 / BAR806A EN CONTENTS USER MANUAL Overview... 2 Front view... 2 Back view... 3 Remote sensor... 3 Getting started... 3 Solar panel... 3 Insert batteries... 4 Remote
Operation Manual Professional Remote Weather Station
 Operation Manual Professional Remote Weather Station Table of Contents WIRELESS WEATHER STATION 433MHZ This Operation Manual is part of this product and should be kept in a safe place for future reference.
Model: 308-1412 Manual DC: 080215 WIRELESS COLOR FORECAST STATION
 Model: 308-1412 Manual DC: 080215 WIRELESS COLOR FORECAST STATION FRONT VIEW SENSOR TX141TH-Bv2 LED TX Sensor Battery Cover Sensor Battery Compartment 2 AA Buttons Battery Compartment 3 AAA BACK VIEW Battery
FAMILY WEATHER STATION Instruction Manual
 FAMILY WEATHER STATION Instruction Manual INTRODUCTION: Congratulations on purchasing this state-of-the-art weather station as an example of excellent design and innovative measuring technique. Featuring
WIRELESS MULTI-ZONE DIGITAL WEATHER CENTER. Model No. 91905 User s Manual
 WIRELESS MULTI-ZONE DIGITAL WEATHER CENTER Model No. 91905 User s Manual BASE STATION REMOTE SENSOR FEATURES AND SPECIFICATIONS BASE STATION Indoor / wireless outdoor temperature, C / F selectable Indoor
Please read the operating instructions carefully to familiarize yourself with the features and modes of operation before using the instrument.
 WS 6750 weather station user manual Please read the operating instructions carefully to familiarize yourself with the features and modes of operation before using the instrument. Technical Details Six
Model: 616-146v2 Quick Setup Guide DC: 071015 Atomic Projection Alarm with Indoor and Outdoor Temperature
 Model: 616-146v2 Quick Setup Guide DC: 071015 Atomic Projection Alarm with Indoor and Outdoor Temperature Snooze/Backlight BUTTONS Time, Alarm with Snooze, & Calendar Projection Arm Rotates 180 Indoor/Outdoor
RADIO CONTROLLED DIGITAL CLOCK MODELS 88905 / 88906
 RADIO CONTROLLED DIGITAL CLOCK MODELS 88905 / 88906 QUICK SETUP GUIDE IMPORTANT! INSTALL BATTERIES IN THE OUTDOOR TRANSMITTER BEFORE INSTALLING BATTERIES IN THE RADIO-CONTROLLED CLOCK. ALKALINE BATTERIES
Welcome to the ClimeMET CM9088 Wireless Desktop Weather Station.
 Welcome to the ClimeMET CM9088 Wireless Desktop Weather Station. Congratulations on the purchase of your new desktop weather station, the latest in home weather technology from ClimeMET Welcome to the
OPUS WIRELESS WEATHER STATION Instructions Manual Cat. Nr. 35.1112.IT
 OPUS WIRELESS WEATHER STATION Instructions Manual Cat. Nr. 35.1112.IT TABLE OF CONTENTS TABLE OF CONTENTS... 35 INTRODUCTION... 38 INVENTORY OF CONTENTS... 39 FEATURES:... 40 WIRELESS DISPLAY... 40 THERMO-HYGRO
WIRELESS FORECAST STATION
 Model: 308-1451 Instruction Manual DC: 072915 WIRELESS FORECAST STATION Table of Contents INITIAL SETUP... 2 LCD FFEATURES... 3 BUTTONS... 3 SET TIME, DATE, ETC.... 4 BACKLIGHT... 6 CITY SELECTION-SUNRISE/SUNSET
WIRELESS WEATHER STATION Model 81690 USER'S INSTRUCTIONS
 WIRELESS WEATHER STATION Model 81690 USER'S INSTRUCTIONS The multifunctional weather station is equipped with many functions providing thorough weather information to you. The receiver unit has a clear,
Digital Wireless Rain Gauge & Thermometer
 2753 Digital Wireless Rain Gauge & Thermometer Indoor/Outdoor Thermometer with Remote Rain Gauge Leading the Way in Accuracy Required: Screw Driver & 4 AAA Batteries Instruction Manual Welcome to the Taylor
For more detailed information, see your Vantage Vue Console manual.
 For more detailed information, see your Vantage Vue Console manual. Current Weather Mode Moon phase, alarm & forecast icons Wind Rose Compass Antenna icon shows active transmission Graph of selected variable
Atomic Alarm Clock Instruction Manual
 Atomic Alarm Clock Instruction Manual Introduction: Congratulations on purchasing the Atomic Alarm Clock with WWVB Radio controlled time, calendar, 12/24 hours display, time zone with US map, indoor temperature
USER MANUAL INTRODUCTION CONTENTS PACKAGING CONTENTS BASE STATION WIND SENSOR TEMPERATURE & HUMIDITY SENSOR
 EN Wireless Pro Weather Station with USB upload Model: WMR88 / WMR88A INTRODUCTION Thank you for selecting the Oregon Scientific Wireless Pro Weather Station with USB upload (WMR88 / WMR88A). The base station
MEMO ALARM CLOCK Operating Manual
 MEMO ALARM CLOCK Operating Manual INTRODUCTION Congratulations on purchasing this state-of-the-art Alarm clock with radio controlled time. The operation of this product is simple and straightforward and
LCD Display. Function keys. Stand. Adapter socket
 433 MHz RADIO CONTROLLED PROJECTION ALARM CLOCK Instructions manual INTRODUCTION: Congratulations on purchasing this innovative 433MHz Projection alarm clock which displays indoor temperature and humidity
WEATHER STATION Instruction Manual Cat. No. 35.1111.IT
 WEATHER STATION Instruction Manual Cat. No. 35.1111.IT Thank you for choosing this wireless weather station from TFA. BEFORE YOU USE IT Please be sure to read the instruction manual carefully. This information
Touch Screen Wireless Weather Station WS-2510 Operating instructions
 Touch Screen Wireless Weather Station WS-2510 Operating instructions Contents 1. General information and functioning... 3-5 Quick overview of the display fields on the main display... 3-4 Weather station
WIRELESS 433 MHz WEATHER CLOCK Instruction Manual
 WIRELESS 433 MHz WEATHER CLOCK Instruction Manual INTRODUCTION: Congratulations on purchasing this fancy Weather clock with wireless 433MHz transmission of outdoor temperature and display of indoor temperature
CABLE FREE TM WEATHER STATION
 CABLE FREE TM WEATHER STATION MODEL: WMR968 USER S MANUAL SECTION 1 INTRODUCTION Congratulations on your purchasing the WMR968 Cable Free TM Weather Station. An all-purpose easy-to-use system, the WMR968
Water Tank Level Monitor
 Water Tank Level Monitor INSTRUCTION MANUAL MODEL NO: WTL001 Table of Contents 1. INTRODUCTION... 2 1.1 Package Contents... 2 1.2 Features... 2 2. INSTALLATION... 3 2.1 Water Tank Sensor Battery Installs...
it500 Internet Thermostat INSTALLER MANUAL
 it500 Internet Thermostat INSTALLER MANUAL 1. Product compliance & safety information These instructions are applicable to the SALUS Controls model stated on the front cover of this manual only, and must
Weather@Home Bluetooth-enabled Weather Station Model: BAR218HG. User Manual
 Weather@Home Bluetooth-enabled Weather Station Model: BAR218HG User Manual Weather@Home Bluetooth-enabled Weather Station Model: BAR218HG TABLE OF CONTENT User Manual Introduction-----------------------------------------------------------------3
WS 2810U Wireless Professional Weather Center
 WS 2810U Wireless Professional Weather Center Operations Manual (A) Wireless Professional Weather Center (B) Wireless Thermo Hygro (C) Wireless Rain Gauge (D) Wireless Wind Sensor (E) USB Transceiver with
INSTALLING A/C ADAPTER
 WS 6502 INTRODUCTION 1. SNOOZE/LIGHT BUTTON 2. BASE 3. ALM SET BUTTON 4. + / C/F BUTTON 5. HISTORY BUTTON 6. MODE BUTTON 7. CHANNEL BUTTON 8. - / RCC BUTTON 9. MAX/MIN BUTTON 10. BATTERY COMPARTMENT 11.
WIRELESS 433 MHz TEMPERATURE STATION Instruction Manual Cat. No. 30.3015
 WIRELESS 433 MHz TEMPERATURE STATION Instruction Manual Cat. No. 30.3015 Thank you for choosing this wireless temperature station from TFA. BEFORE YOU USE IT Please be sure to read the instruction manual
WIRELESS 868 MHz WEATHER STATION Instruction Manual
 WIRELESS 868 MHz WEATHER STATION Instruction Manual INTRODUCTION: Congratulations on purchasing this fancy Weather Station with wireless 868MHz transmission of outdoor temperature and display of indoor
User Manual. Humidity-Temperature Chart Recorder. Model RH520
 User Manual Humidity-Temperature Chart Recorder Model RH520 Introduction Congratulations on your purchase of the Extech RH520 Temperature + Humidity Chart Recorder. The RH520 measures and displays Temperature,
WS-9005TWC 915MHz WIRELESS RAIN GAUGE INSTRUCTION MANUAL
 WS-9005TWC 915MHz WIRELESS RAIN GAUGE INSTRUCTION MANUAL CONTENTS 03 introduction 03 features 04 setting up 06 function keys 06 operations 07 mounting 08 maintenance 09 specifications 09 liability disclaimer
External Hard Drive esata & USB 2.0 Combo. User Guide English
 External Hard Drive esata & USB 2.0 Combo User Guide English Contents Introduction 3 Controls, Connectors and Indicators 3 Front Panel Area 3 Rear Panel Area 3 About the Hard Drive 4 Locating the Drive
WIRELESS 868 MHz WEATHER CLOCK Instruction Manual
 WIRELESS 868 MHz WEATHER CLOCK Instruction Manual INTRODUCTION: Congratulations on purchasing this fancy Weather Clock with wireless 868MHz transmission of outdoor temperature and display of indoor temperature
Weather Capture Software Guide Version 1.4 Revision: June 10 2008
 Weather Capture Software Guide Version 1.4 Revision: June 10 2008 1 Introduction 2 Menu screen structure and navigation Menu Bar i. File ii. Display iii. Settings Alarm User Download Language iv. Help
Jumbo Atomic Clock. Model 86931 With Indoor Temperature Instruction Manual THE SKYSCAN ATOMIC CLOCK
 Jumbo Atomic Clock Model 86931 With Indoor Temperature Instruction Manual THE SKYSCAN ATOMIC CLOCK With the SkyScan Atomic Clock, you have the most accurate timepiece within the continent. It can receive
Alarm Clock USER GUIDE
 Alarm Clock USER GUIDE Jazwares, Inc. 2012 CONTENTS Please read the instructions along with the Alarm Clock carefully before you use it, so that you can operate it conveniently. WELCOME & Warnings Page
REMOTE TERMOMETER TE 219 LED USER MANUAL
 INTRODUCTION REMOTE TERMOMETER TE 219 LED USER MANUAL Thank you for purchasing this unit with indoor thermometer, wireless thermometer sensor and radiocontrolled clock. This device is also equipped with
Installation. Ventus Wireless Weather station. Owner s Manual
 Ventus Wireless Weather station Owner s Manual Thank you for purchasing the new generation of professional weather station. Designed and engineered with the state-of-art technology and components, this
RF Projection Barometer With Remote Thermo Sensor
 RF Projection Barometer With Remote Thermo Sensor Model No.: BAR338P (UK VERSION BAR338PU) User s Manual MAIN UNIT CONTROLS GB INTRODUCTION Congratulations on your purchasing the BAR338P RF Projection
Ambient Weather WS-1173A Advanced Weather Station User Manual
 Ambient Weather WS-1173A Advanced Weather Station User Manual Table of Contents 1. Introduction... 2 2. Getting Started... 2 2.1 Parts List... 2 2.2 Recommend Tools... 2 2.3 Thermo-Hygrometer Sensor Set
Atomic Projection Alarm with Indoor and Outdoor Temperature
 Model: WS-5220U-IT Instruction Manual DC: 082415 Atomic Projection Alarm with Indoor and Outdoor Temperature SNOOZE button Time, Alarm + WWVB Icon Projection arm Indoor Temp., Outdoor Temp. Battery Compartment
Get Support: www.lacrossetechnology.com/308-146
 Model: 308-146/308-146W Instruction Manual The Wireless Color Forecast Station features atomic time, weather forecast, indoor and outdoor temperature/humidity as well as heat index and dew point, on a
Wireless Home Security Alarm System AM 500
 Wireless Home Security Alarm System AM 500 12 MONTH GUARANTEE Installation & Operating Instructions INTRODUCTION The AM500 is a simple self-contained alarm system. It protects the home by sounding a siren
BEL-AIR WIRELESS THERMO-HYGROMETER Instructions manual Cat. No. 30.3045.IT
 BEL-AIR WIRELESS THERMO-HYGROMETER Instructions manual Cat. No. 30.3045.IT Thank you for choosing this wireless thermo-hygrometer from TFA. BEFORE YOU USE IT Please be sure to read the instruction manual
BSCAN DW VOX SAVE BEEP CHANNEL CALL VOX
 The World in Communication Content 2 ALAN 441 transceivers 2 1 user instructions 8 CHANNELS PMR446 TRANSCEIVER Congratulations on your purchase! ALAN 441 is a new generation PMR 446 transceiver which may
EM8676 Indoor Siren with flashlight
 EM8676 Indoor Siren with flashlight EM8676 - Indoor Siren with flashlight 2 ENGLISH Table of contents 1.0 Introduction... 2 2.0 General Instruction... 2 3.0 Functions... 3 4.0 Connect the siren to the
Rapier V1. Laser Gaming Mouse. User Guide English
 Rapier V1 Laser Gaming Mouse User Guide English Contents Welcome 3 Whats in the Pack 3 Key Features 3 Button Assignment 3 Rapier V1 Installation 4 Software Introduction 4 Rapier V1 Gamer Toolkit 4 Funtion
GETTING TO KNOW YOUR TELSTRA PRE-PAID 3G WI-FI
 GETTING TO KNOW YOUR TELSTRA PRE-PAID 3G WI-FI LET S GET THIS SHOW ON THE ROAD You must be excited about your brand new Telstra Pre-Paid 3G Wi-Fi. This guide will help you get connected as quickly and
WIRELESS 868MHZ WEATHER STATION Instruction Manual Cat. No. 35.1064.10.50.IT
 WIRELESS 868MHZ WEATHER STATION Instruction Manual Cat. No. 35.1064.10.50.IT Thank you for choosing this wireless weather station from TFA. BEFORE YOU USE IT Please be sure to read the instruction manual
Wireless Mouse USER GUIDE. for Mac. www.targus.com/us/formac ONE YEAR LIMITED WARRANTY N2953
 AMW43US / 410-1514-001C N2953 www.targus.com/us/formac 2008 Manufactured or imported by Targus Group International, Inc. (for U.S. sales: 1211 North Miller Street, Anaheim, CA 92806 USA, for Australia
Wireless Indoor/ Outdoor Thermometer
 Wireless Indoor/ Outdoor Thermometer Owner s Manual Please read before using this equipment. ˆ Contents FCC Information... 3 FCC Declaration of Conformity... 5 Preparation... 5 Installing Batteries...
EM6556 e-domotica Mini Switch
 EM6556 e-domotica Mini Switch EM6556 e-domotica Mini Switch 2 ENGLISH Table of contents 1.0 Introduction...2 1.1 Functions and features...2 1.2 Packing contents...2 2.0 Using the mini switch...3 2.1 Use
User's Guide. Integrating Sound Level Datalogger. Model 407780. Introduction
 User's Guide 99 Washington Street Melrose, MA 02176 Phone 781-665-1400 Toll Free 1-800-517-8431 Visit us at www.testequipmentdepot.com Back to the Extech 407780 Product Page Integrating Sound Level Datalogger
ST815 Illumination Sensor with LCD
 ST815 Illumination Sensor with LCD The Illumination Sensor with LCD (refer to as Illumination Sensor hereafter) is a Z-Wave TM enabled device which is fully compatible with any Z-Wave TM enabled network.
4-Channel Thermometer / Datalogger
 USER GUIDE 4-Channel Thermometer / Datalogger RTD and Thermocouple Inputs Model SDL200 Introduction Congratulations on your purchase of the Extech SDL200 Thermometer, an SD Logger Series meter. This meter
MAKING MODERN LIVING POSSIBLE. living connect. Installation and User Guide. Danfoss heating
 MAKING MORN LIVING POSSIBLE Danfoss heating living connect Installation and User Guide Contents 1.0 System overview... 3 2.0 Overview of display and control buttons... 3 3.0 Installation - step by step...
C846 12 F AQ S C84612 FAQS Batteries Weather Station Factory Restart Quick Connect Remote Sensors Wind Sensor Wireless Rain Sensor
 C84612 FAQS The links below will work in most PDF viewers and link to the topic area by clicking the link. We recommend Adobe Reader version 10 or greater available at: http://get.adobe.com/reader CONTENTS
QFP910. Water detector. Building Technologies. CE1N2732en. Synco living
 2 732 Synco living Water detector QFP910 Wireless radio sensor to record water puddles RF communication based on KNX standard (868 MHz unidirectional) Battery operation with standard 1.5 V batteries Use
MagIC 6100. Installation Manual. Point of Sales Terminals TD06014B
 MagIC 6100 Installation Manual Point of Sales Terminals TD06014B Contents Description 3 Introduction 3 Presentation of the MagIC 6100 terminal 3 Technical Data 4 Installation 5 Unpacking 5 Safety recommendations
User Guide. Temperature and Humidity Datalogger. Model 42280
 User Guide Temperature and Humidity Datalogger Model 42280 Introduction Congratulations on your purchase of the Extech 42280 Thermometer and Relative Humidity Datalogger. The 42280 is a wall-mount, tripod
Advanced Software Upgrade Guide
 Advanced Guide Applicable models: LCD TV and PDP TV are released on 2008 For Europe HD DTV model (LE**A7/A8/A9 series, PS**A7 series MX(XC/XH/XU/ZG/XQ/RU/UA/CS) For France HD DTV model (LE**A4/A5/A6***MXZF,
Indoor Remote Controlled Power Points
 Indoor Remote Controlled Power Points Model Number: HE214039 INSTRUCTION MANUAL Description goes here Indoor Remote Controlled Power Points Warranty Details The product is guaranteed to be free from defects
EL-USB-2-LCD FEATURES WINDOWS CONTROL SOFTWARE DISPLAY FUNCTIONS. www.lascarelectronics.com Page 1 of 5
 This standalone data logger measures and stores up to 16,379 relative humidity and 16,379 temperature readings over 0 to 100%RH and -35 to +80 C (-31 to +176 F) measurement ranges. The user can easily
La Crosse Technology. Heavy Weather. Software User s Guide. (for 2800 series weather stations with USB connectivity) Revision: 1.3
 Revision: 1.3") La Crosse Technology Heavy Weather Pro Software User s Guide (for 2800 series weather stations with USB connectivity) Revision: 1.3 CONTENTS Contents... 2 Overview... 6 Getting Started... 7 Licensing...
La Crosse Technology Heavy Weather Pro Software User s Guide (for 2800 series weather stations with USB connectivity) Revision: 1.3 CONTENTS Contents... 2 Overview... 6 Getting Started... 7 Licensing...
GETTING TO KNOW YOUR PRE-PAID TELSTRA WI-FI 4G
 GETTING TO KNOW YOUR PRE-PAID TELSTRA WI-FI 4G LET S GET THIS SHOW ON THE ROAD You must be excited about your brand new Pre-Paid Telstra Wi-Fi 4G. This guide will help you get connected as quickly and
T0118 T2118 T3118. Instruction Manual
 Programmable indoor transmitter of temperature T0118 Programmable indoor transmitter of atmospheric pressure T2118 Programmable indoor transmitter of temperature, relative humidity and other derived humidity
Targus Wireless RF Mouse USER S GUIDE. Making Your Mobile Life Easier.
 Targus Wireless RF Mouse Visit our Web site at: www.targus.com Features and specifications are subject to change without notice. 2004 Targus Group International and Targus, Inc.. 400-0111-001B USER S GUIDE
How does the Review Program work?
 Welcome Welcome to the Heavy Weather Review application (Review), the essential tool for analysis & visualization. Review works together with Heavy Weather Software and uses the collected data to generate
CONTENTS --------------------------------------------------------------------------------------
 en WiFi USB DONGLE CONTENTS -------------------------------------------------------------------------------------- 9 SAFETY AND SET-UP 10 WiFi USB DONGLE 10 Packing contents 10 Special features 10 Connection
Stove Guard Kit User Manual
 Stove Guard Kit User Manual Innohome improves the Safety of your Home. inno home www.innohome.com Stove Guard Kit User Manual Stove Guard Kit User Manual Congratulations! You now own one of the most intelligent
Jabra LINK 220 Jabra LINK 220a
 Jabra LINK 220 Jabra LINK 220a USER MANUAL www.jabra.com 1 2009 GN Netcom A/S. All Rights Reserved. This user guide is published by GN Netcom A/S. The information in this user guide is furnished for informational
3465 Diablo Avenue, Hayward, CA 94545-2778 U.S.A. 510-732-9229 Fax: 510-732-9188 E-mail: info@davisnet.com www.davisnet.com
 FCC Part 15 Class B Registration Warning This equipment has been tested and found to comply with the limits for a Class B digital device, pursuant to Part 15 of the FCC Rules. These limits are designed
2-Disk RAID USB and esata External Hard Drive. User Guide English
 2-Disk RAID USB and esata External Hard Drive User Guide English 1 Contents Introduction 3 Drive Contents: IMPORTANT Notice 3 Nero BACKITUP 2 Software 3 Controls, Connectors and Indicators 4 Front Panel
Weather Station TE 529EL USER MANUAL
 Weather Station TE 529EL USER MANUAL INTRODUCTION : Congratulations on your purchase of the weather station TE529EL with wireless sensor and radio controlled clock. The basic package comes with a main
Getting started with
 PART NO. CMA113 MADE IN CHINA 1. Measuring CAT II 2. Max. voltage 250V ~ 3. Max. current 71 Amp Getting started with Electricity consumption monitoring single phase for homes and some smaller light commercial
USER S MANUAL FH052EAV1 FH070EAV1. System Air Conditioner (Cooling and Heating) ENGLISH ESPAÑOL FRANÇAIS ITALIANO PORTUGUÊS DEUTSCH E HNIKA
 ENGLISH ESPAÑOL FRANÇAIS ITALIANO PORTUGUÊS DEUTSCH E HNIKA") USER S MANUAL FH052EAV1 FH070EAV1 E HNIKA PORTUGUÊS ENGLISH ESPAÑOL ITALIANO DEUTSCH FRANÇAIS System Air Conditioner (Cooling and Heating) E S F I P D G DB98-29263A(1) Safety Precautions Register your
USER S MANUAL FH052EAV1 FH070EAV1 E HNIKA PORTUGUÊS ENGLISH ESPAÑOL ITALIANO DEUTSCH FRANÇAIS System Air Conditioner (Cooling and Heating) E S F I P D G DB98-29263A(1) Safety Precautions Register your
125 8880 telstra.com/ppmbb visit a telstra store or partner GETTING TO KNOW YOUR
 FOR MORE INFORMATIoN: 125 8880 telstra.com/ppmbb visit a telstra store or partner GETTING TO KNOW YOUR Telstra PRE-paid 4G wi-fi LET S GET THIS SHOW ON THE ROad WHAT S INSIDE Your Telstra Pre-Paid 4G Wi-Fi
Weather Radio Alarm Clock
 1200093 User s Guide Weather Radio Alarm Clock Thank you for purchasing your Weather Radio Alarm Clock from RadioShack. Please read this user s guide before installing, setting up, and using your new weather
DX-395. FM/AM/SW1/SW2 PLL Synthesized Receiver OWNER S MANUAL. Cat. No. 20-225. Please read before using this equipment.
 20-225.fm Page 1 Wednesday, August 4, 1999 10:07 AM Cat. No. 20-225 OWNER S MANUAL Please read before using this equipment. DX-395 FM/AM/SW1/SW2 PLL Synthesized Receiver 20-225.fm Page 2 Wednesday, August
41 T Korea, Rep. 52.3. 42 T Netherlands 51.4. 43 T Japan 51.1. 44 E Bulgaria 51.1. 45 T Argentina 50.8. 46 T Czech Republic 50.4. 47 T Greece 50.
 Overall Results Climate Change Performance Index 2012 Table 1 Rank Country Score** Partial Score Tendency Trend Level Policy 1* Rank Country Score** Partial Score Tendency Trend Level Policy 21 - Egypt***
PROFESSIONAL WIRELESS INTERNET WEATHER STATION. Operation Manual - 1 -
 PROFESSIONAL WIRELESS INTERNET WEATHER STATION Operation Manual - 1 - OVERVIEW Outdoor sensor: 1. Wind Vane 2. Wind Speed Sensor 3. Solar panel 4. Battery compartment 5. LED Indicator: light on for 4s
308-146CA FAQS CONTENTS
 308-146CA FAQS The links below will work in most PDF viewers and link to the topic area by clicking the link. We recommend Adobe Reader version 10 or greater available at: http://get.adobe.com/reader CONTENTS
Pocket Tach 99 (PT99) Non-Contact Tachometer
 Non-Contact Tachometer") CE DECLARATION OF CONFORMITY As Manufacturer: Monarch Instrument Division of Monarch International Inc. 15 Columbia Drive, Amherst NH 03031 USA declares under Monarch s sole responsibility that the product:
CE DECLARATION OF CONFORMITY As Manufacturer: Monarch Instrument Division of Monarch International Inc. 15 Columbia Drive, Amherst NH 03031 USA declares under Monarch s sole responsibility that the product:
DCMT-2500 Wireless Transmitter. Owner s Manual
 DCMT-2500 Wireless Transmitter Owner s Manual Warnings This device complies with Part 15 of the FCC rules, Operation of this device is subject to the following conditions: 1. This device may not cause
Atomic Alarm Clock model 13131W2
 Instruction Manual Atomic Alarm Clock model 13131W2 CONTENTS Unpacking Instructions... 2 Package Contents... 2 Product Registration... 2 Features & Benefits... 3 Clock Setup... 4 Atomic Clock... 5 Set
www.burntec.com User's Guide Integrating Sound Level Datalogger Model 407780
 User's Guide Integrating Sound Level Datalogger Model 407780 Introduction Congratulations on your purchase of the Extech 407780 Integrating Sound Level Meter. The 407780 with programmable integrating time
Pad. Quick Start Guide
 Pad Quick Start Guide Copyright 2008 Mimio Congratulations on your mimio Pad purchase! mimio Pad is a 4 GHz wireless pad. To configure mimio Pad for use, install the mimio Studio software and plug the
Wireless Alarm System. Window/Door Sensor. User s Manual. Choice ALERT. Control all Sensors & accessories from one location
 45131 Wireless Alarm System Window/Door Sensor User s Manual Choice ALERT Control all Sensors & accessories from one location Table of Contents Important Safeguards 4 Introduction 5 Installation 6 Assigning
Wireless Home Security System Product Manual (Model #80355)
") Wireless Home Security System Product Manual (Model #80355) Installation Instructions During set-up, if no key is pressed for 15 seconds it will come out of the setup mode and you will have to start over.
Wireless Home Security System Product Manual (Model #80355) Installation Instructions During set-up, if no key is pressed for 15 seconds it will come out of the setup mode and you will have to start over.
WMT-3000 Wireless Transmitter. Owner s Manual
 WMT-3000 Wireless Transmitter Owner s Manual Warnings This device complies with Part 15 of the FCC rules, Operation of this device is subject to the following conditions: 1. This device may not cause harmful