Macerator toilet Instruction manual. MasterFlush 7600 Series Toilet
|
|
|
- Liliana Merritt
- 5 years ago
- Views:
Transcription

1 EN Macerator toilet Instruction manual MasterFlush 7600 Series Toilet 1


2 Dometic MasterFlush Toilet 1 I 2 A J B B C D E F E C G H K L A D 3 F G E G F A D 4 B C 5 A B C D E 2
3 s on using the manual/ General safety Table of contents 1 s on using the manual General safety instructions Intended use Specifications Components Installation Operation Maintenance and winterizing Troubleshooting Customer service Limited warranty EN 1 s on using the manual Caution! Safety Instruction: Failure to observe this instruction can cause material damage and impair the function of the device. Supplementary information for operating the device. fig. 1 A, p. 2 : This refers to an element in an illustration. In this example, item A in figure 1 on page 2. 2 General safety instructions The manufacturer will not be held liable for claims for damage resulting from the following: Faulty installation or connection Damage to the unit from mechanical influences, misuse or abuse Alterations to the unit without express written permission from the manufacturer Use for purposes other than those described in this manual 2.1 Warnings The following statement must be read and understood before installing, servicing and/or operating this product. Modification of this product may result in property damage. Dometic recommends that a qualified RV technician or electrician install or service this product with regard to all applicable codes and regulations. Equipment damage, personal injury or death could result from improper installation. DOMETIC ACCEPTS NO RESPONSIBILITY OR LIABILITY FOR DAMAGE TO EQUIPMENT, OR PERSONAL INJURY OR DEATH THAT MAY RESULT FROM IMPROPER INSTALLATION, SERVICE OR OPERATION OF THIS PRODUCT. 3
4 Dometic MasterFlush Toilet Intended use / Specifications Caution! Overfilling the holding tank can create serious damage to the sanitation system, such as rupturing the holding tank and releasing tank contents into the motorhome. To prevent this possibility, Dometic recommends using the full tank shut-down circuitry in the toilet s electronic control module. The full signal from the holding tank can be generated by an optional Dometic DTM01C tank monitor or DTM04 four-level tank monitor system. 3 Intended use The MasterFlush 7640 toilet provides an electric-flush toilet that macerates waste and pumps it to a holding tank or other effluent storage/disposal system. Operated by a flush pedal, the toilet allows the user to add water to the bowl (before using or flushing) and to flush the toilet. 3.1 Benefits Convenient electronic flush. Add water or flush by pressing on the flush pedal. Choice of two water consumption settings. Normal flush uses 0.83 gal. (3.1 liters) per flush and adds water to bowl after flush; Dry Bowl setting uses only 0.21 gal. (0.79 liters) per flush and does not add water to the bowl. Versatile installation. Powerful macerator pump allows toilet to be located up to 40 ft. (12.2 m) away from holding tank or other discharge line destination. Automatic full tank shut-down. When connected to a holding tank level indication system (such as Dometic DTM01 system), the MasterFlush 7640 toilet will not flush when the holding tank is full. This safety features prevents overfilling the holding tank, which may cause damage to the motorhome. 4 Specifications 4.1 Materials Materials Toilet bowl: vitreous ceramic Toilet seat: enameled wood Toilet base: polypropylene Macerator pump body: glass-filled polypropylene Water valve: polypropylene Foot pedal: polypropylene Vacuum breaker: ABS/polypropylene Floor flange seal: nitrile rubber, foam 4
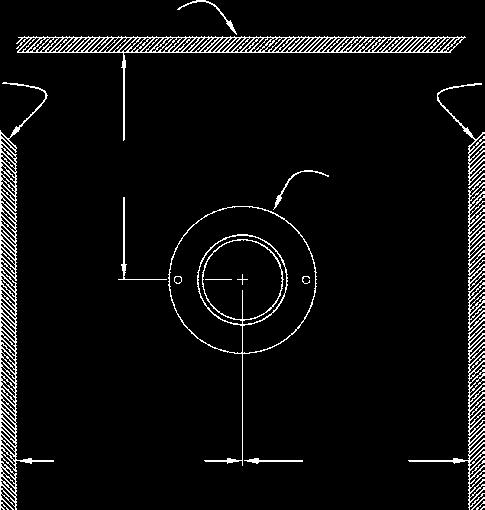
5 Specifications 4.2 Minimum installation requirements Electrical Water Supply Discharge (2 options) Power draw Circuit breaker/fuse Wiring Fitting Flow rate Static pressure Floor flange Remote (not on flange directly above waste tank) 15 amps/12 V DC 20 amps/12 V DC Refer to ANSI/RVIA LV and NFPA 70/NEC Standards for recommended wire gauge (USA). Refer to CEC I and II Standards for recommended wire gauge (Canada). 1/2 in. NPT gpm / lpm recommended* 2.0 gpm / 9.5 lpm minimum PSI / kpa Floor flange 3 in./76 mm ID, 1/4-7/16 in. (6-11 mm) thick Sanitation hose size 1.5 in. / 38 mm or 1 in. / 25 mm ID Horizontal hose run 40 ft. / 12.2 m maximum** * Water supply that exceeds 5.0 gpm / 18.9 lpm may require a flow restrictor at toilet inlet. ** Check for adequate discharge flow if installation nears this distance. Refer to ANSI 1192 and Z240 RV Series standards, where applicable, for additional RV toilet installation guidelines. Specifications are subject to change without notice. 4.3 Toilet dimensions (fig. 2, page 2) All dimensions may vary ±3/8 inch (10 mm) Ref. Model 7640 A 20 in. / 508 mm B 15 in. / 381 mm C 19 in. / 483 mm D in. / 467 mm - seat height E in. / 860 mm - seat lid up F in. / 375 mm - back to front of base G 10 in. / 254 mm - rough-in 4.4 Rough-in dimensions (fig. 3, page 2) Ref. Dimensions/Description Ref. Dimensions/Description A 10 in. / 254 mm E Left wall B 11 in. / 279 mm F Back wall C 11 in. / 279 mm G Right wall D Floor flange 5
6 Dometic MasterFlush Toilet Components / Installation 5 Components (fig. 1, page 2) Ref. Description Ref. Description A Toilet seat H Electrical wires B Toilet bowl I Vacuum breaker cover C Toilet base J Vacuum breaker D Flush pedal K Pump/base cover E F G Water valve Macerator pump Floor flange seal L NS Floor flange mounting hardware kit Remote mounting hardware kit Please refer to complete parts list (printed separately) for more details. 6 Installation Be sure foot pedal, when pressed, touches same flat surface on which toilet is installed. Be sure to follow recommended installation requirements in section 4.2 of this manual. NOT INTENDED FOR INSTALLATION IN A SHOWER. 6.1 Tools required pliers or adjustable wrench 7/16-in. / 11 mm wrench electrical connection tools 6.2 Installation on floor flange 1. To replace an older toilet, turn off water supply to toilet. Remove and drain water supply line. Remove toilet hold-down bolts/screws. Remove toilet from floor. Remove and discard old floor flange seal and hold-down bolts. Verify center of floor flange is at least the recommended rough-in distance from back wall (fig. 3 A, p. 2). See Rough-in dimensions. Make sure top surface of floor flange is clean and free of any debris or sealant. 2. If installing a new floor flange, make certain that toilet mounting holes are at the correct location (fig. 3 D, p. 2). Floor flange must be secured to floor with a minimum of four screws (8 is preferred). Insert two supplied T-bolts into slots in floor flange (fig. 4 p. 2). 3. Verify that floor flange seal is installed on base of toilet (fig. 5 A, p. 2). Carefully set toilet over floor flange. Align holes in toilet base with T-bolts as toilet is lowered onto floor flange. Toilet must be aligned so that outlet of base fits inside of floor flange outlet hole. Entire toilet base does not rest completely on floor yet. Floor seal must be compressed in following steps. 6
 6.")
. Turn on electrical power to toilet. 8. Turn on water supply to toilet.")
, position toilet in location with same clearances as flangemounted toilet (fig. 3, p. 2)")
 in back of toilet (fig. 7 ). 4. Route either 1.5 in. ID flexible sanitation hose or 1.5 in. ID PVC or ABS pipe from waste tank to check valve.")
7 Installation / Operation 4. Install floor mounting nuts and washers onto T-bolts. Carefully torque nuts to inchpounds. DO NOT OVERTIGHTEN. Alternate between sides when tightening to prevent distortion of base. When tight, base should be securely attached and flat against floor. Attach bolt covers onto nuts. (fig. 5 B, p. 2) 6. Connect water supply line and torque connection to inch-pounds. DO NOT OVERTIGHTEN. (fig. 5 C, p. 2) 7. Connect electrical power to toilet according to wiring diagram on 6 toilet s parts list (printed separately). Turn on electrical power to toilet. 8. Turn on water supply to toilet. Flush toilet several times and check for leaks. 9. Attach pump/base cover (fig. 5 E, p. 2) to base with screws on sides of toilet base (fig. 6 ) and with locking tabs on sides and back. 6.3 Remote installation To install toilet separate from holding tank (not on typical floor flange), position toilet in location with same clearances as flangemounted toilet (fig. 3, p. 2). See Rough-in dimensions. 2. Mark fastener hole locations through two holes in base. Drill pilot holes for hex screws in Remote Mounting Hardware Kit. 3. Remove black rubber elbow from check valve (fig. 5 D, p. 2) in back of toilet (fig. 7 ). 4. Route either 1.5 in. ID flexible sanitation hose or 1.5 in. ID PVC or ABS pipe from waste tank to check valve. Plumbing can be routed either above- or below-floor as required. Access holes may need to be drilled through floor or wall depending on installation layout (fig. 8 ). (Flexible sanitation hose can be connected directly to check valve with hose clamps.) 5. Route and connect appropriate wiring and water line according to instructions in section Fasten toilet to floor with hex-head screws on each side of base. Cover fasteners with plastic caps. Then, follow steps 8 and 9 from section 6.2 to complete the toilet installation. 7 Operation 7.1 Add water to bowl To add water to the toilet, press the flush pedal part way down. (To avoid possible overflow, water flow will stop automatically if pedal is pressed too long.) More water is usually added only when flushing solids. 7.2 Flush toilet Add water to bowl To flush, press pedal down completely, then partially press pedal release it. This activates a powerful macerator pump that siphons water and waste from the toilet bowl, macerates and propels the effluent to the holding tank. Flush press pedal completely down ( Operation continued on next page) 7
8 Dometic MasterFlush Toilet Operation / Maintenance and winterizing Residual water trickle in ceramic bowls: Due to integrated rim of this toilet bowl, water may continue to slowly trickle into toilet bowl for up to 20 minutes after flushing. If water trickle continues after 30 minutes, replace water valve. Caution Do Not Flush Foreign Objects! Flush only water, bodily wastes and rapid-dissolving toilet tissue. Do not flush wet wipes, sanitary napkins, diapers, paper cups, cotton swabs, food, hair or liquids such as oils or solvents as clogging or damage to the toilet or toilet system may occur. Make sure all guests understand toilet operation before use. 7.3 Changing Flush modes MasterFlush 7640 toilets offer two flush settings to help manage water consumption: Normal flush Uses 0.83 gal. (3.1 liters) per flush. Adds water to bowl after every flush. Dry Bowl flush Uses 0.21 gal. (0.79 liters) per flush. Does not add water to bowl after flush. To change from Normal to Dry Bowl flush setting, press flush pedal for about 10 seconds. Flush mode has been changed to Dry Bowl setting. Change mode to Normal flush by following the same procedure. 8 Maintenance and winterizing 8.1 Routine toilet cleaning For routine cleaning, use SeaLand Toilet Bowl Cleaner. If this cleaner cannot be found in your area, contact Dometic for your nearest dealer. If the cleaner is not available, use most any nonabrasive bathroom and toilet bowl cleaner. Please follow label instructions. Caution To avoid damaging internal seals, do not clean toilet with abrasive cleaners, caustic chemicals, or lubricants and cleaners that contain alcohols or petroleum distillates. 8.2 Routine maintenance MONTHLY 1. Inspect toilet, plumbing, and plumbing connections, wires, and wire connections. 2. Open and close all plumbing valves. 3. Check in-line water filters, if any, for blockage. YEARLY Check water valve filter. Also check water valve filter if water flow into toilet becomes insufficient. 8.3 During extended periods of non-use The macerator toilet and sanitation system should be protected if toilet will not be needed for an extended period of time (more than two weeks, especially in hot weather). 1. Flush toilet in Normal mode and add 4 oz. (118 ml) of liquid biodegradable laundry detergent (should NOT contain bleach or environmentally harmful substances). ( Maintenance continued on next page) 8
9 Maintenance and winterizing 2. Flush toilet at least five times. 3. Turn off water supply to toilet. 4. Flush the toilet without water. Repeat three times. (This procedure will minimize any remaining water in the macerator pump.) 5. Turn off power to the toilet. If system will be subjected to freezing temperatures, please follow above procedure, and then winterize system as described below. 8.4 Winterizing At the end of each camping season, or when the vehicle is stored for long periods of time during which the MasterFlush macerator toilet may be exposed to freezing temperatures, the toilet system should be winterized for storage by using potable water-safe antifreeze. Caution This toilet is not intended for use when exposed to temperatures below freezing. Caution Never use automotive-type antifreeze (ethylene glycol) in freshwater systems. Use nontoxic antifreeze (propylene glycol) designated for potable water systems. (See vehicle owner s manual.) Non-toxic Antifreeze Winterization 1. Drain potable water tank and empty waste holding tank. 2. Add freshwater antifreeze to potable water tank according to mixture instructions from antifreeze manufacturer. 3. Flush toilet several times until antifreeze mixture has flowed completely through toilet, macerator pump and holding tank. 4. Turn off power to toilet. Each installation is different, so antifreeze mixture amounts may vary. User discretion is required to assure adequate protection. Never leave vehicle unoccupied for extended periods of time with municipal water supply or onboard water pump turned on when there is a possibility of freezing temperature. 9


. a. Water supply line is pinched or kinked. b.")
10 Dometic MasterFlush Toilet Troubleshooting / Customer Service 9 Troubleshooting Problem Possible Cause Service Instruction 1. Flush cycle operates correctly but water in the bowl empties slowly or not at all. 2. Macerator pump makes unusually loud noise or continually trips breaker. 3. Flush cycle is not activated after pressing flush pedal. 4. Insufficient or no water enters the toilet bowl. a. Discharge piping is pinched or kinked. b. The macerator pump or discharge piping is blocked. a. Foreign material in pump chamber. a. Electrical power to toilet is shut off or disrupted. b. Flush pedal is malfunctioning. c. Circuit board is malfunctioning. d. Holding tank is full and signal from tank has shut down electrical power to toilet (if tank level monitor system is installed). a. Water supply line is pinched or kinked. b. Screen in water valve is blocked. c. Water valve is malfunctioning. a. Check discharge piping. b. Clear blockage. a. Clear foreign material from pump chamber. a. Check wiring and circuit breakers (or fuses). b. Replace switch in flush pedal. c. Replace circuit board. d. Empty holding tank. a. Check water supply line. b. Clear blockage at water valve. c. Replace water valve. 10 Customer service 10.1 Toilet model identification The toilet model identification label is located on the back of the toilet bowl under the base cover. Please have this information ready if contacting Dometic for customer service Contact information There is a strong, worldwide network to assist in servicing and maintaining your toilet system. For the Authorized Service Center near you, please call from 8:00 a.m. to 5:00 p.m. (ET) Monday through Friday. You may also contact or have your local dealer contact the Parts Distributor nearest you for quick response to your replacement parts needs. They carry a complete inventory for the Dometic product line. Telephone: U.S.A. and Canada International Fax: U.S.A. and Canada International Web site: 10

11 Limited Warranty THE SELLER NAMED BELOW MAKES THE FOLLOWING WARRANTY WITH RESPECT TO DOMETIC MASTERFLUSH MODEL 7640 ONLY 1. ONE-YEAR LIMITED WARRANTY 1A. This Limited Warranty will be in effect for one year from the date of purchase. 1B. This Limited Warranty is made only to the First Purchaser (hereinafter called the Original Purchaser ) who acquired the product for Original Purchaser s personal, family, or household-type use. The Original Purchaser should retain a copy of the sales receipt or invoice as evidence of the date of purchase because proof of purchase is required to obtain warranty service. 1C. If this product is placed in commercial or business use, it will be warranted, to the Original Purchaser only, to be free of defects in material and workmanship for a period of 90 days from the date of purchase. 1D. This warranty covers all parts of the Dometic toilet which is warranted to be free of defects in material and workmanship under normal use. This warranty does not cover conditions unrelated to the material and workmanship of the product. Such unrelated conditions include, but are not limited to, (a) faulty installation and any damage resulting from such; (b) the need for normal maintenance and any damage resulting from failure to provide such maintenance; (c) failure to follow Seller s instructions for use of this product, including failure which may result from not following winterization procedures; (d) any accident that results in damage to this product; (e) scratching or staining of any ceramic or plastic component; and (f) acts of God, or misuse of any part of this product and any alteration by anyone other than the Seller. 1E. For Original Purchaser (ONLY) to obtain the benefits of this Warranty during the 1-year period (for personal use) or 90-day period (for commercial use), the following shall apply: (a) Original Purchaser shall contact the local dealer from whom the product was purchased; or contact the Seller Customer Service Department at (8 a.m.-5 p.m. ET, USA) and provide the local dealer or Seller Customer Service Department with sales receipt or invoice, product model and serial number from product. The product model identification label is located on the back of the toilet bowl under the pump/base cover (see illustration). (b) If product, while still under warranty, is returned to local dealer where purchased, the local dealer will repair, replace or refund the product per this Warranty and as authorized by the Seller. Seller will provide necessary replacement parts or product free of charge to Original Purchaser, including freight on such replacement parts or product, and Seller will pay Location of product ID label direct labor charges for such repair or replacement. (c) Under no circumstances will Seller pay or be liable for any of Original Purchaser s or dealer s travel charges or other expenses associated with bringing the product or recreation vehicle to the dealer for repair, for providing dealer with access to the product or vehicle, or for downtime of the product or vehicle. (d) Original Purchaser may be required to return defective product or parts when requested by Seller; in such event, Seller will pay related freight costs. 2. THE SELLER DOES NOT AUTHORIZE ANY PERSON OR COMPANY TO CREATE OR EXTEND ANY WARRANTY OBLIGATIONS OR LIABILITY ON ITS BEHALF. 3. REPAIR OR REPLACEMENT OF, OR REFUND FOR, DEFECTIVE PRODUCT, AT SELLER S OPTION, SHALL BE THE ORIGINAL PURCHASER S SOLE REMEDY UNDER THIS LIMITED WARRANTY. IN NO EVENT SHALL SELLER BE LIABLE FOR PURCHASER S INCIDENTAL OR CONSEQUENTIAL DAMAGES. SOME STATES DO NOT ALLOW THE EXCLUSION OR LIMITATION OF INCIDENTAL OR CONSEQUENTIAL DAMAGES, SO THE ABOVE LIMITATION OR EXCLUSION MAY NOT APPLY TO YOU. 4. SELLER DISCLAIMS ALL OTHER WARRANTIES WITH RESPECT TO THE PRODUCT, WHETHER EXPRESS OR IMPLIED, AND SPECIFICALLY DISCLAIMS THE IMPLIED WARRANTIES OF MERCHANTABILITY AND FITNESS FOR A PARTICULAR PURPOSE. SOME STATES DO NOT ALLOW LIMITATIONS ON IMPLIED WARRANTIES OR HOW LONG AN IMPLIED WARRANTY LASTS, SO THE ABOVE LIMITATION MAY NOT APPLY TO YOU. 5. THIS WARRANTY GIVES YOU SPECIFIC LEGAL RIGHTS, AND YOU MAY ALSO HAVE OTHER RIGHTS WHICH VARY FROM STATE TO STATE. SELLER: Dometic Corporation - Sanitation Div SR 226 Big Prairie, Ohio USA
12 Dometic MasterFlush Toilet 2016 Dometic Corporation All rights reserved /16 12 DOMETIC CORPORATION, SANITATION DIVISION SR 226 PO BOX 38 BIG PRAIRIE, OHIO USA
Gravity-flush toilet Instruction manual. 310 and 320 Series Gravity-Flush Toilets
 EN Gravity-flush toilet Instruction manual 310 and 320 Series Gravity-Flush Toilets 1 STOP IF SERVICE OF THIS TOILET IS EVER REQUIRED, READ THIS EFORE SERVICING PRODUCT. DO NOT REMOVE TOILET FROM VEHICLE.
DTM04 TANK MONITOR DTM08 TANK MONITOR Dtm12 TANK MONITOR. Installation and Operation Manual
 DTM04 TANK MONITOR DTM08 TANK MONITOR Dtm12 TANK MONITOR Installation and Operation Manual 1 ENGLISH Safety Instructions 2 Features 2-3 Specifications 3 Installation 4-5 Wiring Diagrams 6-7 Warranty 8
TRAVELER LITE FINE CHINA TOILET OWNER S MANUAL
 TRAVELER LITE FINE CHINA TOILET OWNER S MANUAL Traveler Lite Toilet Model 210 Dometic Corporation Sanitation Systems 13128 State Rt 226, PO Box 38, Big Prairie, OH 44611 SeaLand Product Hotline 1-800-321-9886
DVS01. VacuFlush Status Panel. Instruction manual. vierstufige Füllstandsanzeige Einbauanleitung... 13
 EN VacuFlush Status Panel Instruction manual DE vierstufige Füllstandsanzeige Einbauanleitung... 13 FR Système de surveillance de réservoir Mode d'emploi... 19 ES NL IT Sistema de control del depósito
Overview PARTS LIST. B. Lever mounting base C. Flush handle assembly D. Grey/Blue float stop E. Grey float (Full Flush) F. Flush valve washer
 F. Flush valve washer") Overview READ ENTIRE INSTRUCTIONS BEFORE STARTING INSTALLATION PARTS LIST A. Flush valve B. Lever mounting base C. Flush handle assembly D. Grey/Blue float stop E. Grey float (Full Flush) F. Flush valve
Overview READ ENTIRE INSTRUCTIONS BEFORE STARTING INSTALLATION PARTS LIST A. Flush valve B. Lever mounting base C. Flush handle assembly D. Grey/Blue float stop E. Grey float (Full Flush) F. Flush valve
Ceiling Mount Air Handler Manual
 www.surna.com 303.993.5271 Ceiling Mount Air Handler Manual Models: CMAH12, CMAH18, CMAH24, CMAH30, CMAH36, CMAH48, CMAH60 Revised: September 2014 Table of Contents Warranty Information 4 Limited Warranty
123 Industrial Loop Road Paynesville, MN 56362 Phone: 1-800-864-1649 www.master-mfg.com
 123 Industrial Loop Road Paynesville, MN 56362 Phone: 1-800-864-1649 www.master-mfg.com INTRODUCTION The purpose of this manual is to assist you in the assembly, operation and maintenance of your sprayer
Installation Instructions
 PUSH Installation Instructions A DA C O M PLIA NT shown with optional Bradley 90-75 faucet Front-Mounted Barrier Free Rectangular Bowl Stainless Steel Lav Table of Contents Pre-Installation Information...........2
123 Industrial Loop Road Paynesville, MN 56362 Phone: 1-800-864-1649 www.master-mfg.com
 123 Industrial Loop Road Paynesville, MN 56362 Phone: 1-800-864-1649 www.master-mfg.com INTRODUCTION The purpose of this manual is to assist you in the assembly, operation and maintenance of your sprayer
USE &CARE GUIDE. Remote Faucet Pump System. See Important Safeguards on page 2
 Remote Faucet Pump System USE &CARE GUIDE See Important Safeguards on page 2 An exclamation point within an equilateral triangle is intended to alert user to the presence of important operating and maintenance
Installation and Operating Instructions Installation Instructions for SS EPE-316L Series
 INSTR3010 0406 Installation and Operating Instructions Installation Instructions for SS EPE-316L Series Congratulations on your purchase of this Aqua-Pure high flow, single housing filtration system. This
Select Radiators Installation Guide
 Select Radiators Installation Guide Table of Contents Informational Symbols...3 Before You Begin...4 Select Rough-In... 5 Connection Installation...6 Optional Piping Arrangements...7 Conventional Wall
MODEL VG08008 CONTENT PACKING LIST / TOOLS NEEDED PANEL DIMENSIONS FITTINGS / TECHNICAL DATA WALL/CORNER INSTALLATION CARE AND TROUBLE SHOOTING
 CONTENT PACKING LIST / TOOLS NEEDED PANEL DIMENSIONS FITTINGS / TECHNICAL DATA WALL/CORNER INSTALLATION CARE AND TROUBLE SHOOTING WARRANTY 1 PACKING LIST DESCRIPTION MODEL NUMBER - PANEL HOUSING 88062
15GAL STEEL OIL DRAIN WITH 110V PUMP
 15GAL STEEL OIL DRAIN WITH 110V PUMP OWNER S MANUAL WARNING: Read carefully and understand all ASSEMBLY AND OPERATION INSTRUCTIONS before operating. Failure to follow the safety rules and other basic safety
3M Water Filtration Products. CFS01 Series, CFS02 Series, CFS11 Series, and CFS12 Series Housings. Installation and Instruction Manual For:
 3M Water Filtration Products Installation and Instruction Manual For: CFS01 Series, CFS02 Series, CFS11 Series, and CFS12 Series Housings Installer: Please leave this manual with owner/operator. Owner/Operator:
Seaward Products OWNER S MANUAL WATER HEATERS. Serial Number:
 Seaward Products WATER HEATERS OWNER S MANUAL Serial Number: IMPORTANT SAFETY INSTRUCTIONS WARNING When using electrical appliances, basic safety precautions to reduce the risk of fire, electrical shock,
INSTANT HOT WATER RECIRCULATING SYSTEM
 INSTANT HOT WATER RECIRCULATING SYSTEM INSTALLATION AND OPERATING INSTRUCTIONS Save manual for future reference MODEL 500800 Warning Please read carefully before proceeding with installation. Your failure
PNEUMATIC PLANISHING HAMMER
 PNEUMATIC PLANISHING HAMMER 94847 ASSEMBLY AND OPERATING INSTRUCTIONS Due to continuing improvements, actual product may differ slightly from the product described herein. Distributed Exclusively by Harbor
123 Industrial Loop Road Paynesville, MN 56362 Phone: 1-800-864-1649 www.master-mfg.com MASTER MANUFACTURING MASTER GARDNER
 123 Industrial Loop Road Paynesville, MN 56362 Phone: 1-800-864-1649 www.master-mfg.com MASTER MANUFACTURING MASTER GARDNER Part Number PCD E3 009B MM Rev 1 Nov. 2010 INTRODUCTION The purpose of this manual
ATS Overhead Table Shelf System INSTRUCTION MANUAL
 ATS Overhead Table Shelf System INSTRUCTION MANUAL ATS Overhead Table Shelf System Instruction Manual Warranty Newport Corporation warrants this product to be free of defects in material and workmanship
PALLET JACK - 2.5 TON
 PALLET JACK - 2.5 TON 39939 SET UP AND OPERATING INSTRUCTIONS Visit our website at: http://www.harborfreight.com Read this material before using this product. Failure to do so can result in serious injury.
What you can expect from your Solar Hot Water System
 Owner s Manual Your Solar Hot Water System Thank you for your investment in the FAFCO Solar Hot Water System. Since 1969 our goal has been to design, test, and produce solar heating systems that save you
FAUCET SPECIFICATIONS. Vessel Bathroom Faucet Model VG03023 MODEL VG03023
 FAUCET SECIFICATIONS Vessel Bathroom Faucet Model VG03023 MODEL VG03023 FEATURES Solid brass construction Single hole construction Ceramic disk cartridge Single lever faucet Standard plumbing connections
TECHNICAL ASSISTANCE TOLL FREE TELEPHONE NUMBER 1.800.591.9360 TECHNICAL ASSISTANCE FAX: 1.626.855.4894
 ACORN SAFETY P.O. BOX 3527 CITY OF INDUSTRY, CA 9744-0527 UNITED STATES OF AMERICA WWW.ACORNSAFETY.COM INSTALLATION, OPERATION AND MAINTENANCE INSTRUCTIONS FREEZE RESISTANT WALL MOUNTED EMERGENCY EYEWASH
Installation Manual DIAPHRAGM WELL TANK
 Installation Manual DIAPHRAGM WELL TANK IN-LINE SERIES: 2-5 & 7 GALLON VERTICAL SERIES: 14-20-25-32-36-52-65-86-96-119 GALLON HORIZONTAL SERIES: 7-14 & 20 GALLON NO LEAD NO LEAD: The weighted average of
Sealant. 30" Model No. 35020. D: 17-7/8" TO 18-3/8" (454 to 466mm) W: 29-3/4" TO 30-1/4" (756 to 768mm) Under Countertop Installation
 W: 29-3/4 TO 30-1/4 (756 to 768mm) Under Countertop Installation") INSTALLATION INSTRUCTIONS CARE AND MAINTENANCE London Kitchen Sinks 24" Sink model number 35030 30" Sink model number 35020 36" Sink model number 35040 Thank you for selecting Porcher. To ensure this product
INSTALLATION INSTRUCTIONS CARE AND MAINTENANCE London Kitchen Sinks 24" Sink model number 35030 30" Sink model number 35020 36" Sink model number 35040 Thank you for selecting Porcher. To ensure this product
Instructions. Complete RPS 2900 Pump Kit for RoadLazer RoadPak Line Striping System 3A1304A ENG. Pressure Relief Procedure.
 Instructions Complete RPS 2900 Pump Kit for RoadLazer RoadPak Line Striping System 3A1304A ENG Model 24G766 Important Safety Instructions For complete warnings and safety instructions see RoadLazer RoadPak
Digital Fingerprint safe
 Digital Fingerprint safe Model 96846 Operation Instructions Diagrams within this manual may not be drawn proportionally. Due to continuing improvements, actual product may differ slightly from the product
Installation Instructions
 520 Installation Instructions Thank you very much for purchasing PIAA product. Please read this entire manual before installation and use of this product. For Installers Please give this Installation Manual
Failure to comply with the following cautions and warnings could cause equipment damage and personal injury.
 1.0 IMPORTANT RECEIVING INSTRUCTIONS Visually inspect all components for shipping damage. Shipping Damage is not covered by warranty. If shipping damage is found, notify carrier at once. The carrier is
OPL BASIC. Dosing System for Professional Laundry machines. Contents
 OPL BASIC Dosing System for Professional Laundry machines Contents 1 Getting Started. Page 2 2 Installation. Page 4 3 Set Up & Operation. Page 8 4 Maintenance & Accessories. Page 10 5 Troubleshooting Page
WARNING: FAILURE TO FOLLOW THESE RULES MAY RESULT IN SERIOUS PERSONAL INJURY CAUTION: INSTALLATION LOCATION:
 Revision Level: 01 Revision Date: 07/07/2011 Please read all instructions carefully to help ensure a correct and SAFE installation of your Second Wind Ultraviolet Germicidal Air Purifier. Failure to do
OWNER S MANUAL DRAINVAC ATOMIK PRINTED APRIL 4-2011
 OWNER S MANUAL th DRAINVAC ATOMIK PRINTED APRIL 4-2011 INTRODUCTION We take this opportunity to express our gratitude and extend our congratulations for your decision to purchase a Drainvac product. A
TITAN 13 x 2 ½ BRAKES
 INSTALLATION INSTRUCTION AND SERVICE MANUAL Actuator/Trailer Dealer - Please provide these instructions to the consumer. Consumer - Read and follow these instructions. Keep them with the trailer for future
Installation Instructions
 Installation Instructions E19-120 (Plastic showerhead) E19-120A (Stainless steel showerhead) E19-120SS (All Stainless Steel) Drench Shower - Horizontal Supply Table of Contents Pre-Installation Information..........................2.............................3
WWW.CALIFORNIAAIRTOOLS.COM Customer Support 1-866-409-4581
 sound proof AIr CoMprEssor CAbInEt owner's MAnuAl spc03 WWW.CALIFORNIAAIRTOOLS.COM Customer Support 1-866-409-4581 TAbLe OF CONTeNTS INTROduCTION IntroductIon 2 Important Safety InStructIonS 5 components
MODEL NO. QWIK JON 100/101/102 SYSTEMS DATE CODE: INSTALLATION INSTRUCTIONS DATE INSTALLED: PREINSTALLATION CHECKLIST
 NOTICE TO INSTALLER: Instructions must remain with installation. SECTION: 6.10.065 FM1469 Product information presented here reflects conditions at time of publication. Consult factory regarding discrepancies
MODEL G300 BRAKE BLEEDER
 MODEL G300 BRAKE BLEEDER Installation, Operation & Repair Parts Information Branick Industries, Inc. 4245 Main Avenue P.O. Box 1937 Fargo, North Dakota 58103 REV060616 P/N: 81-0035G 1 THIS PAGE INTENTIONALLY
DREAMLINE EXCLUSIVE LIMITED WARRANTY
 DREAMLINE EXCLUSIVE LIMITED WARRANTY This warranty applies to DreamLine products purchase after June 1, 2015. DreamLine offers the following warranty for its products and components thereof. This warranty
Installation and Operation Manual
 Model WHED20 How to install, operate and maintain your Undersink Drinking Water Filter System Do not return unit to store If you have any questions or concerns when installing, operating or maintaining
Table of Contents WARNING SYMBOLS AND DEFINITIONS
 Table of Contents SAFETY INSTALLATION OPERATION MAINTENANCE Safety... 2 Specifications... 4 Installation... 5 Operation... 8 WARNING SYMBOLS AND DEFINITIONS Maintenance... 9 Parts List and Assembly Diagram...
THERMOSTATIC MIXING VALVE TRIM K-T9493, K-T9494
 THERMOSTATIC MIXING VALVE TRIM K-T9493, K-T9494 1. BEFORE YOU BEGIN IMPORTANT INSTRUCTIONS READ AND SAVE FOR THE CONSUMER WARNING: Risk of scalding or other severe injury. Before completing installation,
MBA-MM-1040/10/13/1665 MULTI MEDIA FILTERS
 MASTER Water Conditioning Corp. www.masterwater.com Installation and Operation Manual MBA-MM-1040/10/13/1665 MULTI MEDIA FILTERS with the 263/742 Logix Control Valve June 2010 Table of Contents Page No.
tire inflator with pressure gauge
 tire inflator with pressure gauge Model 95583 Assembly And Operation Instructions Due to continuing improvements, actual product may differ slightly from the product described herein. 3491 Mission Oaks
EVAPORATIVE AIR COOLER INSTRUCTION MANUAL
 EVAPORATIVE AIR COOLER INSTRUCTION MANUAL Model: SF-614P Please read this manual thoroughly before using this product. Keep in a safe place for future reference. CONTENTS A. PRODUCT INTRODUCTION 2 B. TECHNICAL
NIAGARA Shower Cabin Installation Instructions
 NIAGARA Shower Cabin Installation Instructions IMPORTANT Please read carefully the following instructions before installing your shower cabin. If you have any questions on this shower cabin installation
Whole House Water Treatment System. Installation, Operation and Maintenance Manual. Multi-Pure Model TO15000
 Multi-Pure Whole House Water Treatment System Installation, Operation and Maintenance Manual Multi-Pure Model TO15000 Warning Please read manual carefully before proceeding with installation. It is recommended
SeaLand. SeaLand 711-M28 Toilet WARNING
 SeaLand Gravity discharge Toilet Owner s Manual SeaLand 711-M28 Toilet! WARNING This manual must be read and understood before adjustment, maintenance, or service is performed. Modification of this product
S33 Sump Pump INSTRUCTIONS AND SERVICE MANUAL VERTICAL FLOAT SWITCH S33V1 & S33V1C AUTOMATIC S33P1 & S33PC-1 (CONTROL WITH SERIES PLUG) NOT SHOWN
 NOT SHOWN") S33 Sump Pump INSTRUCTIONS AND SERVICE MANUAL VERTICAL FLOAT SWITCH S33V1 & S33V1C AUTOMATIC S33P1 & S33PC-1 (CONTROL WITH SERIES PLUG) NOT SHOWN AUTOMATIC S33A1 & S33A1C R WARNING risk of electric shock.
S33 Sump Pump INSTRUCTIONS AND SERVICE MANUAL VERTICAL FLOAT SWITCH S33V1 & S33V1C AUTOMATIC S33P1 & S33PC-1 (CONTROL WITH SERIES PLUG) NOT SHOWN AUTOMATIC S33A1 & S33A1C R WARNING risk of electric shock.
USER MANUAL. Bottom Loading Bottled Water Dispenser SAVE THIS MANUAL FOR FUTURE USE. Model # 900172
 Model # 900172: Page 1 USER MANUAL Bottom Loading Bottled Water Dispenser Model # 900172 TO REDUCE THE RISK OF INJURY AND PROPERTY DAMAGE, USER MUST READ THIS MANUAL BEFORE ASSEMBLING, INSTALLING & OPERATING
BUILT-IN DISHWASHER INSTALLATION INSTRUCTIONS
 BUILT-IN DISHWASHER INSTALLATION INSTRUCTIONS PLEASE READ COMPLETE INSTRUCTIONS BEFORE YOU BEGIN LEAVE INSTALLATION INSTRUCTIONS AND USER'S GUIDE WITH OWNER ALL ELECTRIC WIRING AND PLUMBING MUST BE DONE
Installation Instructions
 Installation Instructions Built-In Dishwasher If you have questions, call 1-800-4-MY-HOME (1-800-469-4663) or visit our website at: www.sears.com BEFORE YOU BEGIN Read these instructions completely and
CDS TROUBLESHOOTING SECTION I. VACUUM. 1.0. Weak vacuum at wand. Gauge reads normal (10hg to 14hg)
") CDS TROUBLESHOOTING SECTION I. VACUUM 1.0. Weak vacuum at wand. Gauge reads normal (10hg to 14hg) 1.1. Clogged hoses or wand tube. Disconnect hoses and carefully check for an obstruction. 1.2. Excessive
CDS TROUBLESHOOTING SECTION I. VACUUM 1.0. Weak vacuum at wand. Gauge reads normal (10hg to 14hg) 1.1. Clogged hoses or wand tube. Disconnect hoses and carefully check for an obstruction. 1.2. Excessive
TOLL FREE: (866) 591-7792. E-Mail: techmail@vigoindustries.com. www.vigoindustries.com VANITY SPECIFICATIONS. VANITY COMPONENTS Model VG09042K1
 591-7792. E-Mail: techmail@vigoindustries.com. www.vigoindustries.com VANITY SPECIFICATIONS. VANITY COMPONENTS Model VG09042K1") VANITY SPECIFICATIONS VANITY COMPONENTS Model VG09042K1 MODEL VG09042K1 FEATURES Freestanding cabinet Soft closing sliding cabinet drawer hardware White, single hole ceramic sink Cabinet ships assembled
VANITY SPECIFICATIONS VANITY COMPONENTS Model VG09042K1 MODEL VG09042K1 FEATURES Freestanding cabinet Soft closing sliding cabinet drawer hardware White, single hole ceramic sink Cabinet ships assembled
SE-100-1, SE-200-1, SE-500-1, and SE-1000-1 AIR CHAMP PRODUCTS. User Manual SE BRAKE MODELS: (i) MTY (81) 83 54 10 18 ventas@industrialmagza.
 MTY (81) 83 54 10 18 ventas@industrialmagza.") AIR CHAMP PRODUCTS User Manual SE BRAKE MODELS: SE-00-, SE-200-, SE-500-, and SE-000- (i) FORM NO. L-20084-E-040 In accordance with Nexen s established policy of constant product improvement, the specifications
AIR CHAMP PRODUCTS User Manual SE BRAKE MODELS: SE-00-, SE-200-, SE-500-, and SE-000- (i) FORM NO. L-20084-E-040 In accordance with Nexen s established policy of constant product improvement, the specifications
Triple Threat 3-in-1 Game Table 3 IN 1 GAME TABLE
 NG0M Triple Threat 3-in- Game Table 3 IN GAME TABLE Thank 3 in Y Game Table Thank you for your purchase of our product. We work around the clock and around the globe to ensure that our products maintain
SERIES 12-600 VOLT ELECTRIC INSTANTANEOUS WATER HEATER FOR EMERGENCY SAFTEY EQUIPMENT INSTALLATION AND OWNERS MANUAL REQUIRED MANTENANCE
 Eemax Inc., 353 Christian Street, Oxford, CT 06478 1 E ema X SERIES 12-600 VOLT ELECTRIC INSTANTANEOUS WATER HEATER FOR EMERGENCY SAFTEY EQUIPMENT INSTALLATION AND OWNERS MANUAL REQUIRED MANTENANCE WARNING
AKRON EDUCTORS TROUBLESHOOTING GUIDE OPERATION & THEORY OF EDUCTORS GENERAL OPERATING AND MAINTENANCE INSTRUCTIONS
 AKRON EDUCTORS TROUBLESHOOTING GUIDE OPERATION & THEORY OF EDUCTORS GENERAL OPERATING AND MAINTENANCE INSTRUCTIONS Products Include: 60 gpm eductors Style 3060, 3061, 3062 & 3070 95 gpm eductors Style
FLUSHMATE FLUSHMATE FLUSHOMETER - TANK SYSTEM. Owner s Service Manual 503 and 504 Series
 Owner s Service Manual 503 and 504 Series FLUSHMATE FLUSHOMETER - TANK SYSTEM 503 504 FLUSHMATE A Division of Sloan Valve Company 30075 Research Drive New Hudson, MI 48165 800-533-3460 248-446-5300 http://www.flushmate.com
Owner s Manual. Pelican Custom Premium WHWF 1865/2162
 Owner s Manual Pelican Custom Premium WHWF 1865/2162 Page 2 Copyright 2013 Enviro Water Solutions Inc. All rights reserved. All information contained herein is the property of Pelican Water Systems. Pelican
PAINT SPRAY GUN WASHER
 PAINT SPRAY GUN WASHER 94996 ASSEMBLY AND OPERATING INSTRUCTIONS Visit our website at: http://www.harborfreight.com Read this material before using this product. Failure to do so can result in serious
Indirect-Fired Storage Water Heater Models WH-30 through WH-80 INSTALLATION AND OPERATING INSTRUCTIONS
 Indirect-Fired Storage Water Heater Models WH-30 through WH-80 INSTALLATION AND OPERATING INSTRUCTIONS Contents Page Ratings and Specifications..................... 2 Installation Requirements......................
OWNER S MANUAL FORCE 10 MARINE COMPANY 23080 HAMILTON ROAD RICHMOND, BC CANADA V6V 1C9 TEL: (604) 522-0233 FAX: (604) 522-9608
 522-0233 FAX: (604) 522-9608") Electric Water Heater OWNER S MANUAL FORCE 10 MARINE COMPANY 23080 HAMILTON ROAD RICHMOND, BC CANADA V6V 1C9 TEL: (604) 522-0233 FAX: (604) 522-9608 If your water Heater is Damaged or you have questions
Electric Water Heater OWNER S MANUAL FORCE 10 MARINE COMPANY 23080 HAMILTON ROAD RICHMOND, BC CANADA V6V 1C9 TEL: (604) 522-0233 FAX: (604) 522-9608 If your water Heater is Damaged or you have questions
LiteAide OWNER'S MANUAL PREASSEMBLED AUTOMATIC SECURITY FLOODLIGHTS MOTION SENSOR SECURITY LIGHTING SYSTEMS
 OWNER'S MANUAL PREASSEMBLED AUTOMATIC SECURITY FLOODLIGHTS MOTION SENSOR SECURITY LIGHTING SYSTEMS LiteAide HE-100B HE-100BW HE-112 HE-112W HE-117 HE-117W HE-117-2B OWNER'S MANUAL FLOOD LAMPS (BULBS) Your
ROUTER TABLE INSERT ASSEMBLY AND OPERATING INSTRUCTIONS
 ROUTER TABLE INSERT 94331 ASSEMBLY AND OPERATING INSTRUCTIONS 3491 Mission Oaks Blvd., Camarillo, CA 93011 Visit our Web site at http://www.harborfreight.com Copyright 2006 by Harbor Freight Tools. All
Wireless Indoor/ Outdoor Thermometer
 Wireless Indoor/ Outdoor Thermometer Owner s Manual Please read before using this equipment. ˆ Contents FCC Information... 3 FCC Declaration of Conformity... 5 Preparation... 5 Installing Batteries...
Hommage 2 PIECE WATER CLOSET BOWL MODEL 6662 10 TANK MODEL 7721 U1 SEAT MODEL 8809 61
 Hommage 2 PIECE WATER CLOSET BOWL MODEL 6662 10 TANK MODEL 7721 U1 SEAT MODEL 8809 61 HOMMAGE - 2 PIECE WATER CLOSET The Company Creativity, inventiveness and entrepreneurial far-sightedness have been
OAK WORKBENCH WITH 2 DRAWERS
 OAK WORKBENCH WITH 2 DRAWERS Model 93991 ASSEMBLY Instructions Visit our website at: http://www.harborfreight.com Read this material before using this product. Failure to do so can result in serious injury.
Installation Instructions
 Installation Instructions SELECTRONIC DC POWERED PROXIMITY EXPOSED TOILET FLUSH VALVE.,.8,.,./. &.8/. GPF Certified to comply with ASME A.9. 0 AS America, Inc. Exposed Flushometer for -/" Top Spud Bowls
el-720 Carbon Dioxide Gas Leak Detector User s Guide
 el-720 Carbon Dioxide Gas Leak Detector User s Guide Congratulations on the purchase of the AccuTools el-720 Carbon Dioxide Gas Leak Detector, the most technologically advanced instrument of its kind.
CARING FOR YOUR WATER HEATER
 http://waterheatertimer.org/troubleshoot-rheem-tankless-water-heater.html Water Heater Inspections CARING FOR YOUR WATER HEATER Venting System (Direct Vent Only) The venting system should be inspected
1/3 HP Submersible Sump Pump with Vertical Float Switch
 1/3 HP Submersible Sump with Vertical Float Switch Item 68476 Specifications Float Switch Operation Height 7.1 IN. ON / 2.8 IN. OFF Electrical Requirements 120V~ / 60Hz / 7.6A Power Length Maximum Capacity
Important: Please read these instructions carefully and completely before starting the installation. TITAN Fuel Tanks
 TITAN pt. no.: 03 0000 0120 Important: Please read these instructions carefully and completely before starting the installation. TITAN Fuel Tanks INSTALLATION INSTRUCTIONS G e n e r a t i o n V Extended
Retractable Screen. Replacement Screen Instructions
 Retractable Screen Patent Pending Replacement Screen Instructions For RTS, RET, & RTM Products ATTENTION! Retractable screens are not intended to provide security or provide for the retention of objects,
UNIVERSAL LUMBAR INSTALLATION INSTRUCTIONS
 UNIVERSAL LUMBAR INSTALLATION INSTRUCTIONS CONTENTS Parts List... 2 Parts Diagram... 2 Helpful Hints... 3 Installation... 4 Operation and Troubleshooting Guide... 6 Warranty Information... 8 Form #3132,
Installation Instructions 4508 4508S
 SYMPHONY Spread Lavatory Faucet with Speed Connect Drain Congratulations on purchasing your American Standard faucet with Speed Connect drain, a feature found only on American Standard faucets. Speed Connect
Installation Instructions
 7.3L & 6.0L 5/8 FUEL TANK PICKUP KIT Fits 94-07 7.3L & 6.0L Powerstroke Diesel Trucks & Excursions Installation Instructions These instructions are intended simply to be a guide for the installation of
Installation Operation Maintenance Troubleshooting Version 2.1, Apr/09 DAYTONA
 Installation Operation Maintenance Troubleshooting Version 2.1, Apr/09 1607 DAYTONA Congratulations! All of us at Summit Dental Systems want you to know that your 1607 Daytona Cuspidor has been built with
Artisan Thermostatic basin mixer. Fitting Instructions & Contents List
 Artisan Thermostatic basin mixer Fitting Instructions & Contents List Please keep these instructions for future reference and request of replacement parts 1. Introduction Thank you for choosing Bristan,
8 ton air/hydraulic long ram jack
 8 ton air/hydraulic long ram jack Model 94562 Set up and Operating Instructions Visit our website at: http://www.harborfreight.com Read this material before using this product. Failure to do so can result
Ice Maker. User Manual HI6LMK. www.haieramerica.com. Haier America New York, NY 10018 2013 Haier America Trading, LLC.
 Ice Maker User Manual HI6LMK www.haieramerica.com Model # HI6LMK Issue Date: April 2013 120 V, 60 Hz Made in China Haier America New York, NY 10018 2013 Haier America Trading, LLC. TABLE OF CONTENTS SAFETY
Water Tec of Tucson Water Systems
 Water Tec of Tucson Water Systems Water Filter Owner s Manual Water Tec of Tucson www.water-tec.com 4601 S. 3 RD Avenue Tucson, AZ 85714 (520) 790-1512 Fax (520) 745-0549 1 MAIN COMPONENTS Your water treatment
MASTER. Installation and Operation Manual. Water Conditioning Corp. MCA Time Clock Series Residential Softeners. February 2011 Version
 MASTER Water Conditioning Corp. Installation and Operation Manual MCA Time Clock Series Residential Softeners February 2011 Version Table of Contents Page No. Topic Description 1 Model # and Packaging
*PATENT PENDING. NS1100 / NS2200 Installation Manual & Owner s Guide
 *PATENT PENDING NS1100 / NS2200 Installation Manual & Owner s Guide Installation Tips Contents 1 Control Panel 1 Spool of Signal Wire 2 Mounting Screws & Drywall Inserts 2 Wire Clips 3 Wire Ties Tools
WINEGARD MOTORIZED SENSAR ANTENNA Models MA1055W & MA1055G MADE IN U.S.A. U.S. Patents D500,496 and 7,358,909 INSTALLATION MANUAL
 WINEGARD MOTORIZED SENSAR ANTENNA Models MA1055W & MA1055G MADE IN U.S.A. U.S. Patents D500,496 and 7,358,909 INSTALLATION MANUAL CAUTION: This system is not for use with antenna in raised position while
Equipped with AEM Dryflow Filter No Oil Required! INSTALLATION INSTRUCTIONS PART NUMBER 21-754DS. 2012-2015 BMW 335i 3.0L
 Equipped with AEM Dryflow Filter No Oil Required! INSTALLATION INSTRUCTIONS PART NUMBER 21-754DS 2012-2015 BMW 335i 3.0L 1 ITEM NO. PART NUMBER DESCRIPTION QTY. 1 21-2057DK AIR FILTER 1 2 9-0442 TUBE;
REDI-LINE ELECTRIC GENERATORS USER'S GUIDE. Rugged, Reliable, DC to AC Power Conversion
 REDI-LINE ELECTRIC GENERATORS USER'S GUIDE Rugged, Reliable, DC to AC Power Conversion REDI-LINE ELECTRIC GENERATOR MODEL INPUT ACTUAL OUTPUT ACTUAL OUTPUT WATTS SERIAL NO. PACIFIC SCIENTIFIC MOTOR PRODUCTS
Use & Care. of your Iron. All about the TA B L E O F C O N T E N T S. USA and Canada 1-888-845-7330
 All about the Use & Care of your Iron Important Safeguards... 2 Iron Safety Instructions... 3 Parts and Features...4 TA B L E O F C O N T E N T S Using Your Iron...6 Cleaning and Maintenance... 8 Warranty...9
SunMaxx Solar Filling Station Operating Instructions
 SunMaxx Solar Filling Operating Instructions Content 1. Declaration of conformity... 2 2. Introduction... 2 3. Transportation and unpacking... 4 4. Mounting and commissioning... 5 5. End of operation...
Graymills. Air Operated Double Diaphragm Pumps. Operations and Maintenance Instructions
 795 08690 GM 12 00 Graymills Air Operated Double Diaphragm Pumps Operations and Maintenance Instructions /S Read all these SAFETY INSTRUCTIONS BEFORE installing or using this equipment. Keep this manual
User Manual. Instructions for installing the Sure Stitch on the Next Generation Quilting Frame. Parts Included:
 User Manual Instructions for installing the Sure Stitch on the Next Generation Quilting Frame. Parts Included: 1: Display Console 1: Control Box 2: Encoder (Wires attached) (Not Shown) 1: 5v Power Supply
Close Coupled & Back To Wall WC Saintaryware. Fitting Instructions
 Close Coupled & Back To Wall WC Saintaryware Fitting Instructions Before starting any installation project please consider the following: Prior to drilling into walls, check there are no hidden electrical
Air Conditioner Water Heater - A Product of HotSpot Energy LLC
 Air Conditioner Water Heater - A Product of HotSpot Energy LLC PLEASE READ THIS BEFORE YOU INSTALL THE UNIT 1. This air conditioner must be installed and/or repaired by a qualified technician. If you perform
12-Volt 10-Amp Regulated Power Supply
 22-506.fm Page 1 Friday, August 6, 1999 12:55 PM Cat. No. 22-506 OWNER S MANUAL Please read before using this equipment. 12-Volt 10-Amp Regulated Power Supply 22-506.fm Page 2 Friday, August 6, 1999 12:55
Acrylic Walls Installation Instructions
 Acrylic Walls Installation Instructions IMPORTANT Please read carefully the following instructions before installing your shower acrylic walls. If you have any questions on this shower acrylic walls installation
55-Gallon Dispenser Package
 INSTRUCTIONS-PARTS LIST Husky 515 55-Gallon ispenser Package 08666 Rev. C INSTRUCTIONS This manual contains important warnings and information. REA AN KEEP FOR REFERENCE. 100 psi (6.9 bar) Maximum Air
Destiny Shower Enclosure Installation Instructions
 Destiny Shower Enclosure Installation Instructions IMPORTANT Please read carefully the following instructions before installing your shower enclosure. If you have any questions on this shower enclosure
Model 37045-Series. PumpAgents.com - buy pumps and parts online QUIET - FLUSH ELECTRIC TOILET. Model 37045-Series FEATURES SPECIFICATIONS INSTALLATION
 PumpAgents.com - Click here for Pricing/Ordering Model 37045-Series QUIET - FLUSH ELECTRIC TOILET FEATURES Very quiet flush cycle - like a household toilet Single button flush actuator - with dual function
Twist/Sunberry 2 PIECE WATER CLOSET BOWL MODEL 5C02 01, 5C03 01, 5C04 01, 5C05 01
 Twist/Sunberry 2 PIECE WATER CLOSET BOWL MODEL 5C02 01, 5C03 01, 5C04 01, 5C05 01 TANK MODEL 5D01 U1 SEAT MODEL 9M07 S1, 9M08 S1 TWIST/SUNBERRY - 2 PIECE WATER CLOSET The Company Creativity, inventiveness