Netwrix Auditor. Administrator's Guide. Version: /30/2015
|
|
|
- Britney Chase
- 8 years ago
- Views:
Transcription
1 Netwrix Auditor Administrator's Guide Version: /30/2015

2 Legal Notice The information in this publication is furnished for information use only, and does not constitute a commitment from Netwrix Corporation of any features or functions, as this publication may describe features or functionality not applicable to the product release or version you are using. Netwrix makes no representations or warranties about the Software beyond what is provided in the License Agreement. Netwrix Corporation assumes no responsibility or liability for the accuracy of the information presented, which is subject to change without notice. If you believe there is an error in this publication, please report it to us in writing. Netwrix is a registered trademark of Netwrix Corporation. The Netwrix logo and all other Netwrix product or service names and slogans are registered trademarks or trademarks of Netwrix Corporation. Active Directory is a trademark of Microsoft Corporation. All other trademarks and registered trademarks are property of their respective owners. Disclaimers This document may contain information regarding the use and installation of non-netwrix products. Please note that this information is provided as a courtesy to assist you. While Netwrix tries to ensure that this information accurately reflects the information provided by the supplier, please refer to the materials provided with any non-netwrix product and contact the supplier for confirmation. Netwrix Corporation assumes no responsibility or liability for incorrect or incomplete information provided about non-netwrix products Netwrix Corporation. All rights reserved. 2/233

3 Table of Contents 1. Introduction Netwrix Auditor Overview How It Works Netwrix Auditor Workflow Launch Netwrix Auditor Administrator Console Start Auditing Your IT Infrastructure Managed Objects Overview Create Managed Objects Group Managed Objects Modify Managed Objects Delete Managed Objects Create Managed Objects to Audit Active Directory Create Managed Objects to Audit Exchange Create Managed Objects to Audit File Servers Create Managed Objects to Audit SharePoint Create Managed Objects to Audit SQL Server Create Managed Objects to Audit VMware Create Managed Objects to Audit Windows Server Create Managed Objects to Audit Event Log Create Managed Objects to Audit Group Policy Create Managed Objects to Audit Inactive Users in Active Directory Start Auditing Mailbox Access Create Managed Objects to Audit and Alert on Password Expiration in Active Directory Create Managed Objects to Audit User Activity Data Collection Data Collection Workflow Launch Data Collection Manually Change Summary 76 3/233

4 5.1. Event Log Collection Status Non-Owner Mailbox Access Reports User Activity Summary Report Modify Change Summary Delivery Schedule Initiate On-Demand Change Summary Delivery Manage Data in AuditArchive Manage Long-Term Archive Migrate Legacy Data From Old Audit Archive Manage Audit Database Configure Default Audit Database Settings Configure Custom Audit Database Settings Import Audit Data to Investigation Database AuditIntelligence Reports Available in Netwrix Auditor Report Types View Reports Additional Reports Available in Netwrix Auditor Administrator Console Inactive Users Ad-hoc Report Password Expiration Ad-hoc Report User Activity Recordings Real-Time Alerts Create Real-Time Alerts for Active Directory Identify Correct Attributes Create Custom Alerts Create Real-Time Alerts for Event Log Create Real-Time Alerts for Non-Owner Mailbox Access Events Review Event Description Configure Settings Configure Notifications Settings Configure Data Collection Settings Configure Syslog Platforms Settings 122 4/233

5 9.4. Update Licenses Notes for Managed Service Providers Additional Configuration Configure Audit Automatically with Active Directory Audit Configuration Wizard Enable Auditing of Active Directory Partitions Configure Audit Archiving Filters Exclude Objects from Auditing Scope Exclude Data from Active Directory Auditing Scope Exclude Data from Exchange Auditing Scope Exclude Data from File Servers Auditing Scope Exclude Data from SharePoint Auditing Scope Exclude Data from SQL Server Auditing Scope Exclude Data from VMware Auditing Scope Exclude Data from Windows Server Auditing Scope Exclude Data from Event Log Auditing Scope Exclude Data from Group Policy Auditing Scope Exclude Data from Inactive Users Auditing Scope Exclude Data from Mailbox Access Auditing Scope Exclude Data from Password Expiration Auditing Scope Fine-tune Netwrix Auditor with Registry Keys Registry Keys for Auditing Active Directory Registry Keys for Auditing Exchange Registry Keys for Auditing File Servers Registry Keys for Auditing Windows Server Registry Keys for Auditing Event Log Registry Keys for Auditing Group Policy Registry Keys for Auditing Expiring Passwords Registry Keys for Auditing Inactive Users Enable Integration with Third-Party SIEM Solutions Enable Integration Netwrix Audit Events 163 5/233

6 10.7. Roll Back Changes with Active Directory Object Restore Modify Schema Container Settings Roll Back Unwanted Changes Netwrix Auditor System Health Log Netwrix Auditor Health Status Report Appendix Audited Object Types and Components Object Types and Attributes Audited in Active Directory Object Types and Attributes Audited on File Servers Object Types and Attributes Audited on SharePoint Object and Data Types Audited on SQL Server Audited Object Types Audited Data Types Object Types and Attributes Audited on VMware Components and Settings Audited on Windows Server Actions Captured When Auditing Mailbox Access Install ADSI Edit Install Microsoft SQL Server Install Microsoft SQL Server 2012 Express Verify Reporting Services Installation 228 Index 230 6/233

7 1. Introduction 1. Introduction This guide is intended for Netwrix Auditor administrators and provides step by step instructions on how to start auditing IT infrastructure with Netwrix Auditor Administrator Console, configure Audit Database settings and notifications. It also provides information on fine- tuning the product, additional configuration, etc Netwrix Auditor Overview Netwrix Auditor is a change and configuration auditing platform that streamlines compliance, strengthens security and simplifies root cause analysis across the entire IT infrastructure. Netwrix Auditor enables complete visibility into both security configuration and data access by providing actionable audit data about who did what, when and where, and who has access to what. Netwrix Auditor helps prevent security breaches caused by insider attacks, pass audits and minimize compliance costs or just keep tabs on what privileged users are doing in the environment and why. With over 6,000 customers from 28 industries and more than 70 industry awards, Netwrix Auditor is the only platform that combines both security configuration management and data access governance across the broadest variety of IT systems, including Active Directory, Exchange, File Servers, SharePoint, SQL Server, VMware, Windows Server and others. It also supports privileged user activity monitoring on all other systems, even if they do not produce any logs, via user activity video recording with the ability to search and replay. Netwrix Auditor brings AuditIntelligence with: Change and access auditing: determine who changed what, when, and where. AuditIntelligence search: browse audit data, investigate incidents and keep track of changes. Configuration assessment: analyze current and past configurations with the state in time reports. Predefined reports: pass audits with a variety of out of the box reports and stay compliant with international standards. Netwrix Auditor employs AuditAssurance, a patent pending technology that does not have the disadvantages of native auditing or SIEM (Security Information and Event Management) solutions that rely on a single source of audit data. Netwrix Auditor utilizes an efficient, enterprise grade architecture that consolidates audit data from multiple independent sources and scalable two tiered AuditArchive (the file based local Long Term Archive and the short-term SQL-based Audit Database) holding consolidated audit data for 10 years or more. The table below provides an overview of each Netwrix Auditor solution: 7/233

8 1. Introduction Solution Netwrix Auditor for Active Directory Netwrix Auditor for Exchange Netwrix Auditor for File Servers Netwrix Auditor for SharePoint Netwrix Auditor for SQL Server Netwrix Auditor for VMware Netwrix Auditor for Windows Server Features Netwrix Auditor for Active Directory detects and reports on all changes made to the managed Active Directory domain, including AD objects, Group Policy configuration, directory partitions, and more. It makes daily snapshots of the managed domain structure that can be used to assess its state at present or at any moment in the past. Also, Netwrix Auditor for Active Directory helps detect and manage inactive users and expiring passwords. In addition, Netwrix Auditor for Active Directory provides a built in Active Directory Object Restore tool that allows reverting unwanted changes to AD objects down to their attribute level. Netwrix Auditor for Exchange detects and reports on all changes made to Microsoft Exchange configuration and permissions. In addition, it tracks mailbox access events in the managed Exchange organization, and notifies the users whose mailboxes have been accessed by non owners. Netwrix Auditor for File Servers detects and reports on all changes made to Windows based file servers, EMC storages and NetApp Filer appliances, including modifications of files, folders, shares and permissions, as well as failed and successful access attempts. Netwrix Auditor for SharePoint detects and reports on all changes made to SharePoint farms, servers and sites, including modifications of content, security settings and permissions. Netwrix Auditor for SQL Server detects and reports on all changes to SQL Server configuration and database content. Netwrix Auditor for VMware detects and reports on all changes made to ESX servers, folders, clusters, resource pools, virtual machines and their virtual hardware configuration. Netwrix Auditor for Windows Server detects and reports on all changes made to Windows based server configuration, including hardware devices, drivers, software, services, applications, networking settings, registry settings, DNS, and more. It also provides automatic consolidation and archiving of event logs data. Netwrix Auditor collects Windows event logs and syslog events from multiple computers across the network, stores them centrally in a compressed format, and enables convenient analysis of event log data. In addition, Netwrix Auditor for Windows Server can be configured to capture a video of users' activity on the audited computers. 8/233

9 1. Introduction 1.2. How It Works The image below provides overview of Netwrix Auditor architecture and gives a brief description of product components and incorporated technologies. The AuditIntelligence technology is a brand new way of dealing with audit data, investigating incidents and enabling complete visibility across the entire IT infrastructure. AuditIntelligence is brought by the Netwrix Auditor client that provides easy access to audit data for IT managers, business analysts and other relevant employees via a straightforward and user-friendly interface. The Netwrix Auditor client allows generating reports, searching and browsing your audit data. You can install as many Netwrix Auditor clients as needed on workstations in your network, so that your authorized team members can benefit from using audit data collected by a single Netwrix Auditor Server to investigate issues and keep track of changes. AuditAssurance is a technology that consolidates audit data from multiple independent sources (event logs, configuration snapshots, change history records, etc.). This allows detecting who changed what, where and when, and who has access to what even if one or several sources of information do not contain all of the required data, for example because it was deleted, overwritten, and so on. 9/233

10 1. Introduction AuditAssurance is provided by Netwrix Auditor Server, a core part of Netwrix Auditor that collects, transfers and processes audit data. Netwrix Auditor Server contains several internal components, including so-called collectors responsible for gathering audit data from audited systems. Netwrix Auditor Server is managed via Netwrix Auditor Administrator Console, an interface for IT administrators designed to configure IT infrastructure for auditing, define auditing scope, specify data collection, Audit Database and SMTP settings. Netwrix Auditor Administrator Console does not provide access to audit data. Netwrix Auditor Server interacts with the Two-Tiered AuditArchive that is a scalable repository used for storing audit data collected by Netwrix Auditor. The Two-Tiered AuditArchive includes: The file-based Long-Term Archive The SQL-based short-term (Audit Database) 1.3. Netwrix Auditor Workflow This section describes a typical workflow in Netwrix Auditor. Having installed Netwrix Auditor A user who installed Netwrix Auditor Administrator Console is referred to as Netwrix Auditor administrator. 1. Netwrix Auditor administrator configures audit settings for systems that are going to be audited with the product. 2. Netwrix Auditor administrator creates the Data Processing Account that is going to collect data from the audited systems. Netwrix recommends to create a special account for it. 3. The Netwrix Auditor administrator grants permissions to the dedicated users (IT managers, business analysts, etc.) to access the Netwrix Auditor client. See Netwrix Auditor Installation and Configuration Guide for more information. In Netwrix Auditor Administrator Console 1. An administrator configures Managed Objects containers that store information on the auditing scope, the Data Processing Account used for data collection, the Change Summary and reports delivery settings, etc. See Managed Objects Overview for more information. 2. The administrator configures the Audit Database settings (SQL Server and SSRS settings). See Manage Audit Database for more information. 3. Netwrix Auditor audits IT infrastructure and collects data on changes and state-in-time configuration snapshots. See Data Collection Workflow for more information. NOTE: Collected audit data is written to the AuditArchive that includes both the file-based Long- Term Archive and the short-term SQL Server-based Audit Database. 10/233


11 1. Introduction 4. For some audited systems, the administrator can configure alerts to be triggered if some critical event is detected. In this case an notification is sent immediately to the specified recipients. See Real-Time Alerts for more information. 5. By default, the product s Change Summaries that list all changes that occurred during last 24- hours to the specified recipients daily at 3:00 AM. See Change Summary for more information. 6. The administrator can generate ad-hoc reports to detect inactive users and expiring passwords, and review user's activity videos. See Additional Reports Available in Netwrix Auditor Administrator Console for more information. In the Netwrix Auditor client 1. An IT manager or any user, who is granted permissions to access to the product, logs in. 2. In the Netwrix Auditor client this user can: Search across audit data Generate reports 11/233

12 1. Introduction Create subscriptions Save your favorite data searches to access them instantly Export audit data in the pdf and csv files. See Netwrix Auditor User Guide for more information. 12/233


13 2. Launch Netwrix Auditor Administrator Console 2. Launch Netwrix Auditor Administrator Console To start using Netwrix Auditor Administrator Console Navigate to Start Netwrix Auditor Netwrix Auditor Administrator Console. You will see the Welcome page: 13/233

14 3. Start Auditing Your IT Infrastructure 3. Start Auditing Your IT Infrastructure 3.1. Managed Objects Overview To start auditing your IT Infrastructure with Netwrix Auditor, you must create a Managed Object. A Managed Object is a container within Netwrix Auditor that stores information on the auditing scope, the Data Processing Account used for data collection, Audit Database settings, etc. Review the table below to find out what Managed Object types can be created depending on the system you want to audit: With this Managed Object... Domain You can audit... Active Directory Exchange Group Policy Inactive users in your AD domain Password expiration in your AD domain Organizational Unit Inactive users in your AD organizational unit Password expiration in your AD organizational unit Computer Collection File Servers: Windows file servers EMC Storages NetApp filer appliances SQL Server Windows Server Event Log, including IIS User Activity SharePoint Farm VMware Virtual Center SharePoint VMware 14/233

15 3. Start Auditing Your IT Infrastructure NOTE: In the current Netwrix Auditor version, auditing of non-owner mailbox access is performed without the use of Managed Objects. For detailed instructions on how to configure auditing of mailbox access, refer to Start Auditing Mailbox Access. For instructions on how to perform different operations with Managed Objects, refer to the following sections; Create Managed Objects Group Managed Objects Modify Managed Objects Delete Managed Objects Create Managed Objects To create a Managed Object, do one of the following: On the main Netwrix Auditor Administrator Console page, click the system you want to audit. Some systems can be audited under several Managed Object types (for example, you can audit inactive users within the Domain or Organizational Unit Managed Object), so you will be prompted to select a Managed Object type on the next step of the New Managed Object wizard. 15/233


16 3. Start Auditing Your IT Infrastructure In the left pane, navigate to the Managed Objects node and select Create New Managed Object in the right pane. In the New Managed Object wizard, select a Managed Object type. Some Managed Objects allow auditing several target systems (for example, within the Domain Managed Object you can audit Active Directory, Exchange and Group Policy). You will be prompted to select the systems you want to audit on the further steps of the New Managed Object wizard. 16/233
.")

17 3. Start Auditing Your IT Infrastructure Perform the following procedures to start auditing your IT Infrastructure: Create Managed Objects to Audit Active Directory Create Managed Objects to Audit Exchange Create Managed Objects to Audit File Servers Create Managed Objects to Audit SharePoint Create Managed Objects to Audit SQL Server Create Managed Objects to Audit VMware Create Managed Objects to Audit Windows Server Create Managed Objects to Audit Event Log Create Managed Objects to Audit Group Policy Create Managed Objects to Audit Inactive Users in Active Directory Start Auditing Mailbox Access Create Managed Objects to Audit and Alert on Password Expiration in Active Directory Create Managed Objects to Audit User Activity Group Managed Objects For your convenience, you can group Managed Objects into folders. To create a folder, navigate to the Managed Objects node, select Create New Folder in the right pane, and specify the folder name. You can drag-and-drop existing Managed Objects into folders, or create new Managed Objects inside folders. 17/233

18 3. Start Auditing Your IT Infrastructure Modify Managed Objects To modify your Managed Object settings, perform the following procedures depending on the Managed Object type, your audited system and changes you want to apply: To... To modify a list of systems audited within a Managed Object Do In the left pane, navigate to your Managed Object under the Managed Objects node. 2. In the right pane, click Modify Managed Object. 3. In the Modify Managed Object wizard on the Add/Remove Systems step, select or clear checkboxes to add or remove systems. 4. Complete the wizard. To modify common settings that affect all Managed Objects and all audited systems (such as SMTP settings, licensing, the default Data Processing Account, etc.) To modify the settings that affect a specific audited system (for example, enable or disable audit, modify the auditing scope, enable or disable lightweight agents, modify the list of Change Summary recipients, modify the Change Summary delivery schedule, etc.). To change the default Data Processing Account for a Managed Object 1. In the left pane, navigate to Settings. 2. In the right pane, select a subnode depending on the settings you want to modify. 3. Apply the new settings. See Configure Settings for more information. 1. In the left pane, navigate to your Managed Object under the Managed Objects node. 2. Expand your Managed Object and select an audited system. 3. In the right pane, modify the required settings. Depending on the audited system, some settings are located in the right pane and can be modified there, while others are invoked as a pop-up dialog after clicking Configure next to Advanced Options/ Configure Options/Advanced Settings. NOTE: For more information on the available options and settings, see the Managed Objects creation procedures and Additional Configuration topics. 1. In the left pane, navigate to your Managed Object under the Managed Objects node. 2. Right-click your Managed Object and select Properties. 3. Update the Data Processing Account. 18/233

19 3. Start Auditing Your IT Infrastructure To... Do... NOTE: A custom account must be granted the same permissions and access rights as the default Data Processing Account. See Netwrix Auditor Installation and Configuration Guide for more information. To modify Active Directory/Exchange/Group Policy audit settings within your Managed Object To modify the auditing scope and recording settings of the Managed Object that audits user activity 1. In the left pane, navigate to your Managed Object under the Managed Objects node. 2. Expand your Managed Object and select an audited system. 3. In the right pane, select Configure Audit next to Audit Configuration. 1. In the left pane, navigate to your Managed Object under the Managed Objects node. 2. Expand your Managed Object and select User Activity. 3. In the right pane, do one of the following: Click Specify Users next to Users to limit auditing to certain users. Create a list of users, specify exceptions if necessary. Click Specify Applications next to Applications to limit auditing to certain applications. Create a list of applications, specify exceptions if necessary. Click Configure Video next to Video Recording Settings to modify recording quality, duration and retention settings Delete Managed Objects 1. In the left pane, navigate to your Managed Object under the Managed Objects node. 2. Right-click a Managed Object and select Delete Create Managed Objects to Audit Active Directory 1. Do one of the following: On the main Netwrix Auditor Administrator Console page, click the Active Directory tile. In this case you will be prompted to select Domain as a Managed Object type on the next step. Select the Managed Objects node in the left pane and click Create New Managed Object in the right pane. Select Domain as a Managed Object type in the Create New Managed Object 19/233

20 3. Start Auditing Your IT Infrastructure wizard. In this case you will prompted to select Active Directory as the audited system later in the wizard. See Managed Objects Overview for more information. 2. On the Specify Default Data Processing Account step, click Specify Account. NOTE: If you have already configured Netwrix Auditor to audit other systems, and specified the default Data Processing Account and the settings on their configuration, the Specify Default Data Processing Account and Configure Settings steps of the wizard will be omitted. Enter the default Data Processing Account (in the DOMAIN\user format) that will be used by Netwrix Auditor for data collection. For a full list of the rights and permissions required for the Data Processing Account, and instructions on how to configure them, refer to Netwrix Auditor Installation and Configuration Guide. 3. On the Specify Settings step, specify the settings that will be used for Change Summaries, reports and real-time alerts delivery: Setting SMTP server Port Sender address Description Enter your SMTP server name. Specify your SMTP server port number. Enter the address that will appear in the From field. NOTE: It is recommended to click Verify. The system will send a test message to the specified address and inform you if any problems are detected. SMTP Authentication User name Password Confirm password Use Secure Sockets Layer encrypted connection (SSL) Implicit SSL connection mode Select this checkbox if your mail server requires the SMTP authentication. Enter a user name for the SMTP authentication. Enter a password for the SMTP authentication. Confirm the password. Select this checkbox if your SMTP server requires SSL to be enabled. Select this checkbox if the implicit SSL mode is used, which means that an SSL connection is established before any meaningful data is sent. 20/233

21 3. Start Auditing Your IT Infrastructure 4. On the Specify Domain Name step, specify the audited domain name in the FQDN format. If you want to use a specific account to access data from this domain (other than the one you specified as the default Data Processing Account), select Custom and enter the credentials. This account must be granted the same permissions and access rights as the default Data Processing Account. 5. On the Audit Database Settings step, make sure that the Make audit data available via summary s only checkbox is cleared. By default, the Audit Database is created automatically and is used to store collected audit data. NOTE: Select the Make audit data available via summary s only checkbox only if you do not want to generate reports and run data searches in the Netwrix Auditor client. With this checkbox selected audit data will not be written to the Audit Database. In this case information on changes will be available via Change Summary s only. Even if you select this checkbox now, you will still be able to configure these settings later, but already collected audit data will not be imported in the Audit Database. Refer to Manage Audit Database for detailed instructions on how to configure the Audit Database settings. Select one of the following: Automatically install and configure a new instance of SQL Server Express Edition to automatically install and configure SQL Server 2012 Express with Advanced Services. NOTE: It is recommended to consider the maximum database size in different SQL Server versions, and make your choice based on the size of the environment you are going to audit, the number of users and other factors. Note that the maximum database size in SQL Server Express editions may be insufficient. Use an existing SQL Server instance with SQL Server Reporting Services to use an already installed SQL Server instance. Complete the following fields: Option Description SQL Server Settings SQL Server instance Specify the name of the SQL Server instance to store audit data. NOTE: If you have more than one Netwrix Auditor Server running in your network, make sure to configure them to use different SQL Server instances. The same SQL Server instance cannot be used to store audit data collected by several Netwrix Auditor Servers. Authentication Select the authentication type you want to use to connect to the SQL Server instance: 21/233
22 3. Start Auditing Your IT Infrastructure Option Description Windows authentication SQL Server authentication User name Specify the account to be used to connect to the SQL Server instance. NOTE: This account must be granted the database owner (db_ owner) role and the dbcreator server role. See Netwrix Auditor Installation and Configuration Guide for more information. Password Enter a password. SQL Server Reporting Services Settings Report Server URL Report Manager URL User name Password Specify the Report Server URL. Make sure that the resource is reachable. Specify the Report Manager URL. Make sure that the resource is reachable. Specify the account to be used to connect to SSRS. Enter a password. If you have already created other Managed Objects, and configured Audit Database settings for them, on this step you will be prompted to enable or disable this feature (by selecting or clearing the Make audit data available via summary s only checkbox). Fields will be prepopulated with default SQL Server settings that you can update if necessary (e.g., update connection information, select another SQL Server instance where to write audit data to). You can also change these settings later. See Manage Audit Database for more information. 6. On the State-in-Time Reports step, you can enable or disable State-in-Time Reports. This feature allows generating reports on your system configuration state at a specific moment of time in addition to change reports. If enabled, snapshots will be created daily and written to the Audit Database. This option is unavailable if the Audit Database settings are not configured. 7. On the Select Data Collection Method step, you can enable the Use Lightweight Agents option. If enabled, an agent will be installed automatically on the audited computer, collect and prefilter data, and return it in a highly compressed format. This significantly improves data transfer and minimizes the impact on the target computer performance. 8. On the Configure Audit in Target Environment step, select one of the following: 22/233
23 3. Start Auditing Your IT Infrastructure Automatically for the selected audited systems Click the arrow button next to an audited system to expand the list of settings that are required for the product to function properly. If you select to automatically configure audit in the target environment, your current audit settings will be checked on each data collection and adjusted if necessary. NOTE: This method is recommended for evaluation purposes in test environments. For a full list of audit settings required for Netwrix Auditor to collect comprehensive audit data and instructions on how to configure them, refer to Netwrix Auditor Installation and Configuration Guide. Manually For a full list of audit settings, and instructions on how to configure them, refer to Netwrix Auditor Installation and Configuration Guide. 9. On the Specify Active Directory Change Summary Recipients step, click Add to specify the s where Change Summaries are to be sent. NOTE: It is recommended to click Verify. The system will send a test message to the specified address and inform you if any problems are detected. 10. On the Configure Real-Time Alerts step, enable or disable the predefined alerts, or click Add to configure custom alerts. See Real-Time Alerts for more information. 11. On the last step, review your Managed Object settings and click Finish to exit the wizard. The newly created Managed Object will appear under the Managed Objects node Create Managed Objects to Audit Exchange 1. Do one of the following: On the main Netwrix Auditor Administrator Console page, click the Exchange Server tile. In this case you will be prompted to select Domain as a Managed Object type on the next step. Select the Managed Objects node in the left pane and click Create New Managed Object in the right pane. Select a Domain as a Managed Object type in the Create New Managed Object wizard. In this case you will prompted to select Exchange Server as the audited system later in the wizard. See Managed Objects Overview for more information. 2. On the Specify Default Data Processing Account step, click Specify Account. NOTE: If you have already configured Netwrix Auditor to audit other systems, and specified the default Data Processing Account and the settings on their configuration, the Specify 23/233
24 3. Start Auditing Your IT Infrastructure Default Data Processing Account and Configure Settings steps of the wizard will be omitted. Enter the default Data Processing Account (in the DOMAIN\user format) that will be used by Netwrix Auditor for data collection. For a full list of the rights and permissions required for the Data Processing Account, and instructions on how to configure them, refer to Netwrix Auditor Installation and Configuration Guide. 3. On the Specify Settings step, specify the settings that will be used for Change Summaries, reports and real-time alerts delivery: Setting SMTP server Port Sender address Description Enter your SMTP server name. Specify your SMTP server port number. Enter the address that will appear in the From field. NOTE: It is recommended to click Verify. The system will send a test message to the specified address and inform you if any problems are detected. SMTP Authentication User name Password Confirm password Use Secure Sockets Layer encrypted connection (SSL) Implicit SSL connection mode Select this checkbox if your mail server requires the SMTP authentication. Enter a user name for the SMTP authentication. Enter a password for the SMTP authentication. Confirm the password. Select this checkbox if your SMTP server requires SSL to be enabled. Select this checkbox if the implicit SSL mode is used, which means that an SSL connection is established before any meaningful data is sent. 4. On the Specify Domain Name step, specify the audited domain name in the FQDN format. If you want to use a specific account to access data from this domain (other than the one you specified as the default Data Processing Account), select Custom and enter the credentials. This account must be granted the same permissions and access rights as the default Data Processing Account. 5. On the Audit Database Settings step, make sure that the Make audit data available via summary s only checkbox is cleared. By default, the Audit Database is created automatically 24/233
25 3. Start Auditing Your IT Infrastructure and is used to store collected audit data. NOTE: Select the Make audit data available via summary s only checkbox only if you do not want to generate reports and run data searches in the Netwrix Auditor client. With this checkbox selected audit data will not be written to the Audit Database. In this case information on changes will be available via Change Summary s only. Even if you select this checkbox now, you will still be able to configure these settings later, but already collected audit data will not be imported in the Audit Database. Refer to Manage Audit Database for detailed instructions on how to configure the Audit Database settings. Select one of the following: Automatically install and configure a new instance of SQL Server Express Edition to automatically install and configure SQL Server 2012 Express with Advanced Services. NOTE: It is recommended to consider the maximum database size in different SQL Server versions, and make your choice based on the size of the environment you are going to audit, the number of users and other factors. Note that the maximum database size in SQL Server Express editions may be insufficient. Use an existing SQL Server instance with SQL Server Reporting Services to use an already installed SQL Server instance. Complete the following fields: Option Description SQL Server Settings SQL Server instance Specify the name of the SQL Server instance to store audit data. NOTE: If you have more than one Netwrix Auditor Server running in your network, make sure to configure them to use different SQL Server instances. The same SQL Server instance cannot be used to store audit data collected by several Netwrix Auditor Servers. Authentication Select the authentication type you want to use to connect to the SQL Server instance: Windows authentication SQL Server authentication User name Specify the account to be used to connect to the SQL Server instance. 25/233
26 3. Start Auditing Your IT Infrastructure Option Description NOTE: This account must be granted the database owner (db_ owner) role and the dbcreator server role. See Netwrix Auditor Installation and Configuration Guide for more information. Password Enter a password. SQL Server Reporting Services Settings Report Server URL Report Manager URL User name Password Specify the Report Server URL. Make sure that the resource is reachable. Specify the Report Manager URL. Make sure that the resource is reachable. Specify the account to be used to connect to SSRS. Enter a password. If you have already created other Managed Objects, and configured Audit Database settings for them, on this step you will be prompted to enable or disable this feature (by selecting or clearing the Make audit data available via summary s only checkbox). Fields will be prepopulated with default SQL Server settings that you can update if necessary (e.g., update connection information, select another SQL Server instance where to write audit data to). You can also change these settings later. See Manage Audit Database for more information. 6. On the Select Data Collection Method step, you can enable the Use Lightweight Agents option. If enabled, an agent will be installed automatically on the audited computer, collect and prefilter data, and return it in a highly compressed format. This significantly improves data transfer and minimizes the impact on the target computer performance. 7. On the Configure Audit in Target Environment step, select one of the following: Automatically for the selected audited systems Click the arrow button next to an audited system to expand the list of settings that are required for the product to function properly. If you select to automatically configure audit in the target environment, your current audit settings will be checked on each data collection and adjusted if necessary. NOTE: This method is recommended for evaluation purposes in test environments. For a full list of audit settings required for Netwrix Auditor to collect comprehensive audit data and instructions on how to configure them, refer to Netwrix Auditor Installation and Configuration Guide. 26/233
27 3. Start Auditing Your IT Infrastructure Manually For a full list of audit settings, and instructions on how to configure them, refer to Netwrix Auditor Installation and Configuration Guide. 8. On the Specify Exchange Servers Change Summary Recipients step, click Add to specify the s where Change Summaries are to be sent. NOTE: It is recommended to click Verify. The system will send a test message to the specified address and inform you if any problems are detected. 9. On the last step, review your Managed Object settings and click Finish to exit the wizard. The newly created Managed Object will appear under the Managed Objects node Create Managed Objects to Audit File Servers 1. Do one of the following: On the main Netwrix Auditor Administrator Console page, click the File Servers tile. In this case you will be prompted to select Computer Collection as a Managed Object type on the next step. Select the Managed Objects node in the left pane and click Create New Managed Object in the right pane. Select Computer Collection as a Managed Object type in the Create New Managed Object wizard. In this case you will prompted to select File Servers as the audited system later in the wizard. See Managed Objects Overview for more information. 2. On the Specify Default Data Processing Account step, click Specify Account. NOTE: If you have already configured Netwrix Auditor to audit other systems, and specified the default Data Processing Account and the settings on their configuration, the Specify Default Data Processing Account and Configure Settings steps of the wizard will be omitted. Enter the default Data Processing Account (in the DOMAIN\user format) that will be used by Netwrix Auditor for data collection. For a full list of the rights and permissions required for the Data Processing Account, and instructions on how to configure them, refer to Netwrix Auditor Installation and Configuration Guide. 3. On the Specify Settings step, specify the settings that will be used for Change Summaries, reports and real-time alerts delivery: 27/233
28 3. Start Auditing Your IT Infrastructure Setting SMTP server Port Sender address Description Enter your SMTP server name. Specify your SMTP server port number. Enter the address that will appear in the From field. NOTE: It is recommended to click Verify. The system will send a test message to the specified address and inform you if any problems are detected. SMTP Authentication User name Password Confirm password Use Secure Sockets Layer encrypted connection (SSL) Implicit SSL connection mode Select this checkbox if your mail server requires the SMTP authentication. Enter a user name for the SMTP authentication. Enter a password for the SMTP authentication. Confirm the password. Select this checkbox if your SMTP server requires SSL to be enabled. Select this checkbox if the implicit SSL mode is used, which means that an SSL connection is established before any meaningful data is sent. 4. On the Specify Computer Collection Name step, enter the computer collection name. If you want to use a specific account to access data from this computer collection (other than the one you specified as the default Data Processing Account), select Custom and enter credentials. This account must be granted the same permissions and access rights as the default Data Processing Account. 5. On the Audit Database Settings step, make sure that the Make audit data available via summary s only checkbox is cleared. By default, the Audit Database is created automatically and is used to store collected audit data. NOTE: Select the Make audit data available via summary s only checkbox only if you do not want to generate reports and run data searches in the Netwrix Auditor client. With this checkbox selected audit data will not be written to the Audit Database. In this case information on changes will be available via Change Summary s only. Even if you select this checkbox now, you will still be able to configure these settings later, but already collected audit data will not be imported in the Audit Database. Refer to Manage Audit Database for detailed instructions on how to configure the Audit Database settings. Select one of the following: 28/233
29 3. Start Auditing Your IT Infrastructure Automatically install and configure a new instance of SQL Server Express Edition to automatically install and configure SQL Server 2012 Express with Advanced Services. NOTE: It is recommended to consider the maximum database size in different SQL Server versions, and make your choice based on the size of the environment you are going to audit, the number of users and other factors. Note that the maximum database size in SQL Server Express editions may be insufficient. Use an existing SQL Server instance with SQL Server Reporting Services to use an already installed SQL Server instance. Complete the following fields: Option Description SQL Server Settings SQL Server instance Specify the name of the SQL Server instance to store audit data. NOTE: If you have more than one Netwrix Auditor Server running in your network, make sure to configure them to use different SQL Server instances. The same SQL Server instance cannot be used to store audit data collected by several Netwrix Auditor Servers. Authentication Select the authentication type you want to use to connect to the SQL Server instance: Windows authentication SQL Server authentication User name Specify the account to be used to connect to the SQL Server instance. NOTE: This account must be granted the database owner (db_ owner) role and the dbcreator server role. See Netwrix Auditor Installation and Configuration Guide for more information. Password Enter a password. SQL Server Reporting Services Settings Report Server URL Specify the Report Server URL. Make sure that the resource is reachable. 29/233
30 3. Start Auditing Your IT Infrastructure Option Report Manager URL User name Password Description Specify the Report Manager URL. Make sure that the resource is reachable. Specify the account to be used to connect to SSRS. Enter a password. If you have already created other Managed Objects, and configured Audit Database settings for them, on this step you will be prompted to enable or disable this feature (by selecting or clearing the Make audit data available via summary s only checkbox). Fields will be prepopulated with default SQL Server settings that you can update if necessary (e.g., update connection information, select another SQL Server instance where to write audit data to). You can also change these settings later. See Manage Audit Database for more information. 6. On the State-in-Time Reports step, you can enable or disable State-in-Time Reports. This feature allows generating reports on your system configuration state at a specific moment of time in addition to change reports. If enabled, snapshots will be created daily and written to the Audit Database. This option is unavailable if the Audit Database settings are not configured. NOTE: You cannot generate state-in-time reports for NetApp and EMC. 7. On the Add Items to Computer Collection step, click Add to select items that you want to audit. You can add several items to collection. In the Computer Collection New Item dialog that opens, select the item type: EMC Celerra/VNX On the Specify Items step, provide a server name by entering its FQDN, NETBIOS or IP address. You can click Browse to select a computer from the list of computers in your network. Clear Audit all file shares and click Add to select shared folders. Otherwise, all file shares (except hidden) hosted on this server will be audited. NetApp Filer Complete the following: 1. On the Specify Items step, provide a server name by entering its FQDN, NETBIOS or IP address. You can click Browse to select a computer from the list of computers in your network. Clear Audit all file shares and click Add to select shared folders. Otherwise, all file shares (except hidden) hosted on this server will be audited. 2. On the Configure NetApp Filer auditing step, complete the following fields: Option Use protocol Description Select one of the following: Automatically detected If selected, a connection 30/233
31 3. Start Auditing Your IT Infrastructure Option Description protocol will be detected automatically. HTTP HTTPS NOTE: Refer to Netwrix Auditor Installation and Configuration Guide for detailed instructions on how to enable HTTP or HTTPS admin access. Specify account Select an account to be used to collecting data from NetApp Filer. If you want to use a specific account (other than the one you specified as the default Data Processing Account), select Custom and enter credentials. The credentials are case sensitive. NOTE: See Netwrix Auditor Installation and Configuration Guide for more information on required rights and permissions. Specify file share to provide access to the audit logs Select one of the following: Automatically detected If selected, a shared resource will be detected automatically. UNC path Path to the file share located on a NetApp Filer with event log files (e.g., \\CORP\ETC$\log\). Windows File Share Provide a path to a shared resource. Windows Server Complete the following fields: Option Computer name Active Directory container Description Allows specifying a single computer by entering its FQDN, NETBIOS or IP address. You can click Browse to select a computer from the list of computers in your network. Allows specifying a whole AD domain, OU or container. Click Browse to select from the list of containers in your network. You can also: Select a particular computer type to be audited within the chosen AD container: Domain controllers, Servers 31/233
32 3. Start Auditing Your IT Infrastructure Option Description (excluding domain controllers), or Workstations. Click Exclude to specify AD domains, OUs, and containers you do not want to audit. In the Exclude Computers dialog, click Add and specify an object. NOTE: The list of containers does not include child domains of trusted domains. Use other options (Computer name, IP address range, or Import computer names from a file) to specify the target computers. IP address range Allows specifying an IP range for the audited computers. To exclude computers from within the specified range, click Exclude. Enter the IP range you want to exclude, and click Add. Import computer names from a file Allows specifying multiple computer names by importing a list from a.txt file (one computer name/ip address per line is accepted). You can choose whether to import the list once, or to update it automatically. If you select the Import on every data collection option, you can later modify the list of your audited computers by editing the.txt file. The audited computers list will be updated on the next data collection. NOTE: Netwrix Auditor supports auditing of DFS and clustered file servers provided that Object Access Auditing is enabled on DFS file shares or every node belonging to the cluster correspondingly. When adding a clustered file server for auditing, it is recommended to specify its FQDN name. When adding a DFS file share for auditing, add items using the UNC path. For example: "\\domain\dfsnamespace\" (domain-based namespace) or "\\server\dfsnamespace\" (in case of stand-alone namespace). 8. On the Select Data Collection Method step, you can enable the Use Lightweight Agents option. If enabled, an agent will be installed automatically on the audited computer, collect and prefilter data, and return it in a highly compressed format. This significantly improves data transfer and minimizes the impact on the target computer performance. 9. On the Configure File Server Auditing Settings step, add recipients, to whom the audit reports on file/folder modifications and audit reports on file/folder read access will be sent. Specify actions you 32/233
33 3. Start Auditing Your IT Infrastructure want to track. Click Configure next to Advanced settings or Audit trail settings to customize settings with advanced options. Review the following for additional information: Option Description Advanced settings Attach as a CSV file Select this option to receive reports as attachments. Otherwise, you will receive reports as a part of the body. You can select Archive reports before sending to receive reports in a compressed format. Enable integration with third party SIEM products See Enable Integration with Third-Party SIEM Solutions for more information. Audit trail settings Basic mode (large servers) Select this option to process only native audit events generated by Windows Security event log. This option is recommended to speed up data collection from file servers storing a large amount of data ( and more files). Enhanced mode (small servers) Select this option to process attributes and permissions in addition to native Windows audit events. 10. On the last step, review your Managed Object settings and click Finish to exit the wizard. The newly created Managed Object will appear under the Managed Objects node Create Managed Objects to Audit SharePoint 1. Do one of the following: On the main Netwrix Auditor Administrator Console page, click the SharePoint tile. Select the Managed Objects node in the left pane and click Create New Managed Object in the right pane. See Managed Objects Overview for more information. 2. On the Select Managed Object Type step, select SharePoint Farm as a Managed Object type. 3. On the Specify Default Data Processing Account step, click Specify Account. 33/233
34 3. Start Auditing Your IT Infrastructure NOTE: If you have already configured Netwrix Auditor to audit other systems, and specified the default Data Processing Account and the settings on their configuration, the Specify Default Data Processing Account and Configure Settings steps of the wizard will be omitted. Enter the default Data Processing Account (in the DOMAIN\user format) that will be used by Netwrix Auditor for data collection. For a full list of the rights and permissions required for the Data Processing Account, and instructions on how to configure them, refer to Netwrix Auditor Installation and Configuration Guide. 4. On the Specify Settings step, specify the settings that will be used for Change Summaries, reports and real-time alerts delivery: Setting SMTP server Port Sender address Description Enter your SMTP server name. Specify your SMTP server port number. Enter the address that will appear in the From field. NOTE: It is recommended to click Verify. The system will send a test message to the specified address and inform you if any problems are detected. SMTP Authentication User name Password Confirm password Use Secure Sockets Layer encrypted connection (SSL) Implicit SSL connection mode Select this checkbox if your mail server requires the SMTP authentication. Enter a user name for the SMTP authentication. Enter a password for the SMTP authentication. Confirm the password. Select this checkbox if your SMTP server requires SSL to be enabled. Select this checkbox if the implicit SSL mode is used, which means that an SSL connection is established before any meaningful data is sent. 5. On the Specify SharePoint Farm step, enter the SharePoint Central Administration website URL. If you want to use a specific account to access data from this SharePoint Farm (other than the one you specified as the default Data Processing Account), select Custom and enter credentials. This account must be granted the same permissions and access rights as the default Data Processing Account. 34/233
35 3. Start Auditing Your IT Infrastructure NOTE: Netwrix Auditor cannot verify the Central Administration URL address if your Data Processing Account does not belong to the Farm Administrators group on your SharePoint Central Administration site. It does not affect the product operability, you can proceed with the Managed Object creation. 6. On the Audit Database Settings step, make sure that the Make audit data available via summary s only checkbox is cleared. By default, the Audit Database is created automatically and is used to store collected audit data. NOTE: Select the Make audit data available via summary s only checkbox only if you do not want to generate reports and run data searches in the Netwrix Auditor client. With this checkbox selected audit data will not be written to the Audit Database. In this case information on changes will be available via Change Summary s only. Even if you select this checkbox now, you will still be able to configure these settings later, but already collected audit data will not be imported in the Audit Database. Refer to Manage Audit Database for detailed instructions on how to configure the Audit Database settings. Select one of the following: Automatically install and configure a new instance of SQL Server Express Edition to automatically install and configure SQL Server 2012 Express with Advanced Services. NOTE: It is recommended to consider the maximum database size in different SQL Server versions, and make your choice based on the size of the environment you are going to audit, the number of users and other factors. Note that the maximum database size in SQL Server Express editions may be insufficient. Use an existing SQL Server instance with SQL Server Reporting Services to use an already installed SQL Server instance. Complete the following fields: Option Description SQL Server Settings SQL Server instance Specify the name of the SQL Server instance to store audit data. NOTE: If you have more than one Netwrix Auditor Server running in your network, make sure to configure them to use different SQL Server instances. The same SQL Server instance cannot be used to store audit data collected by several Netwrix Auditor Servers. Authentication Select the authentication type you want to use to connect to the 35/233
36 3. Start Auditing Your IT Infrastructure Option Description SQL Server instance: Windows authentication SQL Server authentication User name Specify the account to be used to connect to the SQL Server instance. NOTE: This account must be granted the database owner (db_ owner) role and the dbcreator server role. See Netwrix Auditor Installation and Configuration Guide for more information. Password Enter a password. SQL Server Reporting Services Settings Report Server URL Report Manager URL User name Password Specify the Report Server URL. Make sure that the resource is reachable. Specify the Report Manager URL. Make sure that the resource is reachable. Specify the account to be used to connect to SSRS. Enter a password. If you have already created other Managed Objects, and configured Audit Database settings for them, on this step you will be prompted to enable or disable this feature (by selecting or clearing the Make audit data available via summary s only checkbox). Fields will be prepopulated with default SQL Server settings that you can update if necessary (e.g., update connection information, select another SQL Server instance where to write audit data to). You can also change these settings later. See Manage Audit Database for more information. 7. On the Configure Audit in Target Environment step, select one of the following: Automatically for the selected audited systems Click the arrow button next to an audited system to expand the list of settings that are required for the product to function properly. If you select to automatically configure audit in the target environment, your current audit settings will be checked on each data collection and adjusted if necessary. 36/233
37 3. Start Auditing Your IT Infrastructure NOTE: This method is recommended for evaluation purposes in test environments. For a full list of audit settings required for Netwrix Auditor to collect comprehensive audit data and instructions on how to configure them, refer to Netwrix Auditor Installation and Configuration Guide. Manually For a full list of audit settings, and instructions on how to configure them, refer to Netwrix Auditor Installation and Configuration Guide. 8. On the Select SharePoint Auditing Scope step, select the type of changes you want to track and the scope of objects that will be audited in addition to SharePoint farm configuration. Netwrix Auditor allows auditing the entire SharePoint farm. Alternatively, you can limit the auditing scope to separate web applications and site collections. To do it, select Specified SharePoint objects and click Specify. In the Specify SharePoint Objects dialog, do one of the following: Click Add and provide URL to web application or site collection. Click Import and browse for a file that contains a list of web applications or site collections. NOTE: Netwrix Auditor ignores changes to system data (for example, hidden and system lists or items are not audited). Netwrix Auditor also ignores the content changes to sites and objects on the site collections located on Central Administration web application, but the security changes that occurred there are tracked and reported anyway. 9. On the SharePoint Change Summary Delivery step, click Add to specify s where the Change Summaries are to be sent. By default, the s are generated at 3 AM, modify the schedule if necessary. NOTE: It is recommended to click Verify. The system will send a test message to the specified address and inform you if any problems are detected. 10. On the Deploy Netwrix Auditor Agent for SharePoint step, specify the agent deployment method. Select one of the following: Automatically The installation will run under the Data Processing Account on the New Managed Object wizard completion. Prior to the agent installation, review the following prerequisites and make sure that: Netwrix Auditor Agent for SharePoint is going to be installed on the computer that hosts SharePoint Central Administration in the audited SharePoint farm. The SharePoint Administration (SPAdminV4) service is started on the target computer. See Netwrix Auditor Installation and Configuration Guide for more information. 37/233
38 3. Start Auditing Your IT Infrastructure The user that is going to run the agent installation: Is a member of the local Administrators group on SharePoint server, where the agent will be deployed. Is granted the SharePoint_Shell_Access role on SharePoint SQL Server configuration database. See Netwrix Auditor Installation and Configuration Guide for more information. Manually See Netwrix Auditor Installation and Configuration Guide for more information. NOTE: During the agent installation / uninstallation your SharePoint sites may be unavailable. 11. On the last step, review your Managed Object settings and click Finish to exit the wizard. The newly created Managed Object will appear under the Managed Objects node Create Managed Objects to Audit SQL Server 1. Do one of the following: On the main Netwrix Auditor Administrator Console page, click the SQL Server tile. In this case you will be prompted to select Computer Collection as a Managed Object type on the next step. Select the Managed Objects node in the left pane and click Create New Managed Object in the right pane. Select a Computer Collection as a Managed Object type in the Create New Managed Object wizard. In this case you will prompted to select SQL Server as the audited system later in the wizard. See Managed Objects Overview for more information. 2. On the Specify Default Data Processing Account step, click Specify Account. NOTE: If you have already configured Netwrix Auditor to audit other systems, and specified the default Data Processing Account and the settings on their configuration, the Specify Default Data Processing Account and Configure Settings steps of the wizard will be omitted. Enter the default Data Processing Account (in the DOMAIN\user format) that will be used by Netwrix Auditor for data collection. For a full list of the rights and permissions required for the Data Processing Account, and instructions on how to configure them, refer to Netwrix Auditor Installation and Configuration Guide. 3. On the Specify Settings step, specify the settings that will be used for Change Summaries, reports and real-time alerts delivery: 38/233
39 3. Start Auditing Your IT Infrastructure Setting SMTP server Port Sender address Description Enter your SMTP server name. Specify your SMTP server port number. Enter the address that will appear in the From field. NOTE: It is recommended to click Verify. The system will send a test message to the specified address and inform you if any problems are detected. SMTP Authentication User name Password Confirm password Use Secure Sockets Layer encrypted connection (SSL) Implicit SSL connection mode Select this checkbox if your mail server requires the SMTP authentication. Enter a user name for the SMTP authentication. Enter a password for the SMTP authentication. Confirm the password. Select this checkbox if your SMTP server requires SSL to be enabled. Select this checkbox if the implicit SSL mode is used, which means that an SSL connection is established before any meaningful data is sent. 4. On the Specify Computer Collection Name step, enter the computer collection name. If you want to use a specific account to access data from this computer collection (other than the one you specified as the default Data Processing Account), select Custom and enter credentials. This account must be granted the same permissions and access rights as the default Data Processing Account. 5. On the Audit Database Settings step, make sure that the Make audit data available via summary s only checkbox is cleared. By default, the Audit Database is created automatically and is used to store collected audit data. NOTE: Select the Make audit data available via summary s only checkbox only if you do not want to generate reports and run data searches in the Netwrix Auditor client. With this checkbox selected audit data will not be written to the Audit Database. In this case information on changes will be available via Change Summary s only. Even if you select this checkbox now, you will still be able to configure these settings later, but already collected audit data will not be imported in the Audit Database. Refer to Manage Audit Database for detailed instructions on how to configure the Audit Database settings. Select one of the following: 39/233
40 3. Start Auditing Your IT Infrastructure Automatically install and configure a new instance of SQL Server Express Edition to automatically install and configure SQL Server 2012 Express with Advanced Services. NOTE: It is recommended to consider the maximum database size in different SQL Server versions, and make your choice based on the size of the environment you are going to audit, the number of users and other factors. Note that the maximum database size in SQL Server Express editions may be insufficient. Use an existing SQL Server instance with SQL Server Reporting Services to use an already installed SQL Server instance. Complete the following fields: Option Description SQL Server Settings SQL Server instance Specify the name of the SQL Server instance to store audit data. NOTE: If you have more than one Netwrix Auditor Server running in your network, make sure to configure them to use different SQL Server instances. The same SQL Server instance cannot be used to store audit data collected by several Netwrix Auditor Servers. Authentication Select the authentication type you want to use to connect to the SQL Server instance: Windows authentication SQL Server authentication User name Specify the account to be used to connect to the SQL Server instance. NOTE: This account must be granted the database owner (db_ owner) role and the dbcreator server role. See Netwrix Auditor Installation and Configuration Guide for more information. Password Enter a password. SQL Server Reporting Services Settings Report Server URL Specify the Report Server URL. Make sure that the resource is reachable. 40/233
41 3. Start Auditing Your IT Infrastructure Option Report Manager URL User name Password Description Specify the Report Manager URL. Make sure that the resource is reachable. Specify the account to be used to connect to SSRS. Enter a password. If you have already created other Managed Objects, and configured Audit Database settings for them, on this step you will be prompted to enable or disable this feature (by selecting or clearing the Make audit data available via summary s only checkbox). Fields will be prepopulated with default SQL Server settings that you can update if necessary (e.g., update connection information, select another SQL Server instance where to write audit data to). You can also change these settings later. See Manage Audit Database for more information. 6. On the Add Items to Computer Collection step, select items that you want to audit. Click Add, select an item type and specify a SQL Server instance. You can add several instances to collection. 7. On the Configure SQL Server Auditing Settings step, specify Change Summary recipients. To audit database content, select Enable database content audit. Netwrix Auditor allows setting rules for the data to be audited and therefore to receive change reports on the selected data only. Click Specify to create columns auditing rules and set the number of data changes per SQL transaction to be included in reports. In this case Netwrix Auditor-specific data will be written to the audited tables. NOTE: The following column types are currently not supported: text, ntext, image, binary, varbinary, timestamp, sql_variant. You can also configure the format of reports sent by . Click Configure to edit the settings. In the Change Summary Format dialog that opens, the following options are available: Attach as a CSV file If selected, the Сhange Summary report will be sent as a file attached to an . Otherwise, you will receive the report as html text. Compress before sending If selected, the attached file will be sent in the compressed format. 8. On the last step, review your Managed Object settings and click Finish to exit the wizard. The newly created Managed Object will appear under the Managed Objects node. 41/233
42 3. Start Auditing Your IT Infrastructure 3.7. Create Managed Objects to Audit VMware 1. Do one of the following: On the main Netwrix Auditor Administrator Console page, click the VMware tile. Select the Managed Objects node in the left pane and click Create New Managed Object in the right pane. See Managed Objects Overview for more information. 2. On the Select Managed Object Type step, select VMware Virtual Center as a Managed Object type. 3. On the Specify Default Data Processing Account step, click Specify Account. NOTE: If you have already configured Netwrix Auditor to audit other systems, and specified the default Data Processing Account and the settings on their configuration, the Specify Default Data Processing Account and Configure Settings steps of the wizard will be omitted. Enter the default Data Processing Account (in the DOMAIN\user format) that will be used by Netwrix Auditor for data collection. For a full list of the rights and permissions required for the Data Processing Account, and instructions on how to configure them, refer to Netwrix Auditor Installation and Configuration Guide. 4. On the Specify Settings step, specify the settings that will be used for Change Summaries, reports and real-time alerts delivery: Setting SMTP server Port Sender address Description Enter your SMTP server name. Specify your SMTP server port number. Enter the address that will appear in the From field. NOTE: It is recommended to click Verify. The system will send a test message to the specified address and inform you if any problems are detected. SMTP Authentication User name Password Select this checkbox if your mail server requires the SMTP authentication. Enter a user name for the SMTP authentication. Enter a password for the SMTP authentication. 42/233
43 3. Start Auditing Your IT Infrastructure Setting Confirm password Use Secure Sockets Layer encrypted connection (SSL) Implicit SSL connection mode Description Confirm the password. Select this checkbox if your SMTP server requires SSL to be enabled. Select this checkbox if the implicit SSL mode is used, which means that an SSL connection is established before any meaningful data is sent. 5. On the Specify VMware Virtual Center Name step, specify the VMware Center URL. If you want to use a specific account to access data from your virtual machines (other than the one you specified as the default Data Processing Account), select Custom and enter credentials. This account must be granted the same permissions and access rights as the default Data Processing Account. 6. On the Audit Database Settings step, make sure that the Make audit data available via summary s only checkbox is cleared. By default, the Audit Database is created automatically and is used to store collected audit data. NOTE: Select the Make audit data available via summary s only checkbox only if you do not want to generate reports and run data searches in the Netwrix Auditor client. With this checkbox selected audit data will not be written to the Audit Database. In this case information on changes will be available via Change Summary s only. Even if you select this checkbox now, you will still be able to configure these settings later, but already collected audit data will not be imported in the Audit Database. Refer to Manage Audit Database for detailed instructions on how to configure the Audit Database settings. Select one of the following: Automatically install and configure a new instance of SQL Server Express Edition to automatically install and configure SQL Server 2012 Express with Advanced Services. NOTE: It is recommended to consider the maximum database size in different SQL Server versions, and make your choice based on the size of the environment you are going to audit, the number of users and other factors. Note that the maximum database size in SQL Server Express editions may be insufficient. Use an existing SQL Server instance with SQL Server Reporting Services to use an already installed SQL Server instance. Complete the following fields: 43/233
44 3. Start Auditing Your IT Infrastructure Option Description SQL Server Settings SQL Server instance Specify the name of the SQL Server instance to store audit data. NOTE: If you have more than one Netwrix Auditor Server running in your network, make sure to configure them to use different SQL Server instances. The same SQL Server instance cannot be used to store audit data collected by several Netwrix Auditor Servers. Authentication Select the authentication type you want to use to connect to the SQL Server instance: Windows authentication SQL Server authentication User name Specify the account to be used to connect to the SQL Server instance. NOTE: This account must be granted the database owner (db_ owner) role and the dbcreator server role. See Netwrix Auditor Installation and Configuration Guide for more information. Password Enter a password. SQL Server Reporting Services Settings Report Server URL Report Manager URL User name Password Specify the Report Server URL. Make sure that the resource is reachable. Specify the Report Manager URL. Make sure that the resource is reachable. Specify the account to be used to connect to SSRS. Enter a password. If you have already created other Managed Objects, and configured Audit Database settings for them, on this step you will be prompted to enable or disable this feature (by selecting or clearing the Make audit data available via summary s only checkbox). Fields will be prepopulated with default SQL Server settings that you can update if necessary (e.g., update connection information, select another SQL Server instance where to write audit data to). You can also change these settings later. See Manage Audit Database for more information. 44/233
45 3. Start Auditing Your IT Infrastructure 7. On the VMware Change Summary Delivery step, click Add to specify s where audit reports should be sent. NOTE: It is recommended to click Verify. The system will send a test message to the specified address and inform you if any problems are detected. In the VMware Credentials section, specify a user name and a password to be used when connecting to VMware instance. 8. On the last step, review your Managed Object settings and click Finish to exit the wizard. The newly created Managed Object will appear under the Managed Objects node Create Managed Objects to Audit Windows Server NOTE: DNS changes can be audited under the Window Server auditing scope. 1. Do one of the following: On the main Netwrix Auditor Administrator Console page, click the Windows Server tile. In this case you will be prompted to select Computer Collection as a Managed Object type on the next step. Select the Managed Objects node in the left pane and click Create New Managed Object in the right pane. Select Computer Collection as a Managed Object type in the Create New Managed Object wizard. In this case you will prompted to select Windows Server as the audited system later in the wizard. See Managed Objects Overview for more information. 2. On the Specify Default Data Processing Account step, click Specify Account. NOTE: If you have already configured Netwrix Auditor to audit other systems, and specified the default Data Processing Account and the settings on their configuration, the Specify Default Data Processing Account and Configure Settings steps of the wizard will be omitted. Enter the default Data Processing Account (in the DOMAIN\user format) that will be used by Netwrix Auditor for data collection. For a full list of the rights and permissions required for the Data Processing Account, and instructions on how to configure them, refer to Netwrix Auditor Installation and Configuration Guide. 3. On the Specify Settings step, specify the settings that will be used for Change Summaries, reports and real-time alerts delivery: Setting SMTP server Description Enter your SMTP server name. 45/233
46 3. Start Auditing Your IT Infrastructure Setting Port Sender address Description Specify your SMTP server port number. Enter the address that will appear in the From field. NOTE: It is recommended to click Verify. The system will send a test message to the specified address and inform you if any problems are detected. SMTP Authentication User name Password Confirm password Use Secure Sockets Layer encrypted connection (SSL) Implicit SSL connection mode Select this checkbox if your mail server requires the SMTP authentication. Enter a user name for the SMTP authentication. Enter a password for the SMTP authentication. Confirm the password. Select this checkbox if your SMTP server requires SSL to be enabled. Select this checkbox if the implicit SSL mode is used, which means that an SSL connection is established before any meaningful data is sent. 4. On the Specify Computer Collection Name step, enter the computer collection name. If you want to use a specific account to access data from this computer collection (other than the one you specified as the default Data Processing Account), select Custom and enter credentials. This account must be granted the same permissions and access rights as the default Data Processing Account. 5. On the Audit Database Settings step, make sure that the Make audit data available via summary s only checkbox is cleared. By default, the Audit Database is created automatically and is used to store collected audit data. NOTE: Select the Make audit data available via summary s only checkbox only if you do not want to generate reports and run data searches in the Netwrix Auditor client. With this checkbox selected audit data will not be written to the Audit Database. In this case information on changes will be available via Change Summary s only. Even if you select this checkbox now, you will still be able to configure these settings later, but already collected audit data will not be imported in the Audit Database. Refer to Manage Audit Database for detailed instructions on how to configure the Audit Database settings. Select one of the following: 46/233
47 3. Start Auditing Your IT Infrastructure Automatically install and configure a new instance of SQL Server Express Edition to automatically install and configure SQL Server 2012 Express with Advanced Services. NOTE: It is recommended to consider the maximum database size in different SQL Server versions, and make your choice based on the size of the environment you are going to audit, the number of users and other factors. Note that the maximum database size in SQL Server Express editions may be insufficient. Use an existing SQL Server instance with SQL Server Reporting Services to use an already installed SQL Server instance. Complete the following fields: Option Description SQL Server Settings SQL Server instance Specify the name of the SQL Server instance to store audit data. NOTE: If you have more than one Netwrix Auditor Server running in your network, make sure to configure them to use different SQL Server instances. The same SQL Server instance cannot be used to store audit data collected by several Netwrix Auditor Servers. Authentication Select the authentication type you want to use to connect to the SQL Server instance: Windows authentication SQL Server authentication User name Specify the account to be used to connect to the SQL Server instance. NOTE: This account must be granted the database owner (db_ owner) role and the dbcreator server role. See Netwrix Auditor Installation and Configuration Guide for more information. Password Enter a password. SQL Server Reporting Services Settings Report Server URL Specify the Report Server URL. Make sure that the resource is reachable. 47/233
48 3. Start Auditing Your IT Infrastructure Option Report Manager URL User name Password Description Specify the Report Manager URL. Make sure that the resource is reachable. Specify the account to be used to connect to SSRS. Enter a password. If you have already created other Managed Objects, and configured Audit Database settings for them, on this step you will be prompted to enable or disable this feature (by selecting or clearing the Make audit data available via summary s only checkbox). Fields will be prepopulated with default SQL Server settings that you can update if necessary (e.g., update connection information, select another SQL Server instance where to write audit data to). You can also change these settings later. See Manage Audit Database for more information. 6. On the Add Items to Computer Collection step, select items that you want to audit. You can add several items to collection. Click Add, select an item type and add/browse for a computer name. Review the following for additional information: Option Computer name Active Directory container Description Allows specifying a single computer by entering its FQDN, NETBIOS or IP address. You can click Browse to select a computer from the list of computers in your network. Allows specifying a whole AD domain, OU or container. Click Browse to select from the list of containers in your network. You can also: Select a particular computer type to be audited within the chosen AD container: Domain controllers, Servers (excluding domain controllers), or Workstations. Click Exclude to specify AD domains, OUs, and containers you do not want to audit. In the Exclude Computers dialog, click Add and specify an object. NOTE: The list of containers does not include child domains of trusted domains. Use other options (Computer name, IP address range, or Import computer names from a file) to specify the target computers. IP address range Allows specifying an IP range for the audited computers. 48/233
49 3. Start Auditing Your IT Infrastructure Option Description To exclude computers from within the specified range, click Exclude. Enter the IP range you want to exclude, and click Add. Import computer names from a file Allows specifying multiple computer names by importing a list from a.txt file (one computer name/ip address per line is accepted). You can choose whether to import the list once, or to update it automatically. If you select the Import on every data collection option, you can later modify the list of your audited computers by editing the.txt file. The audited computers list will be updated on the next data collection. 7. On the Select Data Collection Method step, you can enable the Use Lightweight Agents option. If enabled, an agent will be installed automatically on the audited computer, collect and prefilter data, and return it in a highly compressed format. This significantly improves data transfer and minimizes the impact on the target computer performance. NOTE: If you disable the Use Lightweight Agents option, you will not be able to configure audit automatically on the next step of the wizard. 8. On the Configure Audit in Target Environment step, select one of the following: Automatically for the selected audited systems Click the arrow button next to an audited system to expand the list of settings that are required for the product to function properly. If you select to automatically configure audit in the target environment, your current audit settings will be checked on each data collection and adjusted if necessary. NOTE: This method is recommended for evaluation purposes in test environments. For a full list of audit settings required for Netwrix Auditor to collect comprehensive audit data and instructions on how to configure them, refer to Netwrix Auditor Installation and Configuration Guide. Manually For a full list of audit settings, and instructions on how to configure them, refer to Netwrix Auditor Installation and Configuration Guide. 9. On the Select Monitored Systems Components step, select the system components that you want to audit for changes. 10. On the Configure Windows Server Change Summary Delivery Settings step, specify the Change Summary recipients. 49/233
50 3. Start Auditing Your IT Infrastructure 11. On the last step, review your Managed Object settings and click Finish to exit the wizard. The newly created Managed Object will appear under the Managed Objects node Create Managed Objects to Audit Event Log NOTE: Along with event logs, you can audit Cisco and Internet Information Services (IIS). See Netwrix Knowledge base articles How to audit Cisco devices with Netwrix Auditor and How to audit Internet Information Services (IIS) with Netwrix Auditor for more information. 1. Do one of the following: On the main Netwrix Auditor Administrator Console page, click the Event Log tile. In this case you will be prompted to select Computer Collection as a Managed Object type on the next step. Select the Managed Objects node in the left pane and click Create New Managed Object in the right pane. Select Computer Collection as a Managed Object type in the Create New Managed Object wizard. In this case you will prompted to select Event Log as the audited system later in the wizard. See Managed Objects Overview for more information. 2. On the Specify Default Data Processing Account step, click Specify Account. NOTE: If you have already configured Netwrix Auditor to audit other systems, and specified the default Data Processing Account and the settings on their configuration, the Specify Default Data Processing Account and Configure Settings steps of the wizard will be omitted. Enter the default Data Processing Account (in the DOMAIN\user format) that will be used by Netwrix Auditor for data collection. For a full list of the rights and permissions required for the Data Processing Account, and instructions on how to configure them, refer to Netwrix Auditor Installation and Configuration Guide. 3. On the Specify Settings step, specify the settings that will be used for Change Summaries, reports and real-time alerts delivery: Setting SMTP server Port Sender address Description Enter your SMTP server name. Specify your SMTP server port number. Enter the address that will appear in the From field. NOTE: It is recommended to click Verify. The system will send a 50/233
51 3. Start Auditing Your IT Infrastructure Setting Description test message to the specified address and inform you if any problems are detected. SMTP Authentication User name Password Confirm password Use Secure Sockets Layer encrypted connection (SSL) Implicit SSL connection mode Select this checkbox if your mail server requires the SMTP authentication. Enter a user name for the SMTP authentication. Enter a password for the SMTP authentication. Confirm the password. Select this checkbox if your SMTP server requires SSL to be enabled. Select this checkbox if the implicit SSL mode is used, which means that an SSL connection is established before any meaningful data is sent. 4. On the Specify Computer Collection Name step, enter the computer collection name. If you want to use a specific account to access data from this computer collection (other than the one you specified as the default Data Processing Account), select Custom and enter credentials. This account must be granted the same permissions and access rights as the default Data Processing Account. 5. On the Audit Database Settings step, make sure that the Make audit data available via summary s only checkbox is cleared. By default, the Audit Database is created automatically and is used to store collected audit data. NOTE: Select the Make audit data available via summary s only checkbox only if you do not want to generate reports and run data searches in the Netwrix Auditor client. With this checkbox selected audit data will not be written to the Audit Database. In this case information on changes will be available via Change Summary s only. Even if you select this checkbox now, you will still be able to configure these settings later, but already collected audit data will not be imported in the Audit Database. Refer to Manage Audit Database for detailed instructions on how to configure the Audit Database settings. Select one of the following: Automatically install and configure a new instance of SQL Server Express Edition to automatically install and configure SQL Server 2012 Express with Advanced Services. NOTE: It is recommended to consider the maximum database size in different SQL Server versions, and make your choice based on the size of the environment you are going to 51/233
52 3. Start Auditing Your IT Infrastructure audit, the number of users and other factors. Note that the maximum database size in SQL Server Express editions may be insufficient. Use an existing SQL Server instance with SQL Server Reporting Services to use an already installed SQL Server instance. Complete the following fields: Option Description SQL Server Settings SQL Server instance Specify the name of the SQL Server instance to store audit data. NOTE: If you have more than one Netwrix Auditor Server running in your network, make sure to configure them to use different SQL Server instances. The same SQL Server instance cannot be used to store audit data collected by several Netwrix Auditor Servers. Authentication Select the authentication type you want to use to connect to the SQL Server instance: Windows authentication SQL Server authentication User name Specify the account to be used to connect to the SQL Server instance. NOTE: This account must be granted the database owner (db_ owner) role and the dbcreator server role. See Netwrix Auditor Installation and Configuration Guide for more information. Password Enter a password. SQL Server Reporting Services Settings Report Server URL Report Manager URL User name Password Specify the Report Server URL. Make sure that the resource is reachable. Specify the Report Manager URL. Make sure that the resource is reachable. Specify the account to be used to connect to SSRS. Enter a password. 52/233
53 3. Start Auditing Your IT Infrastructure If you have already created other Managed Objects, and configured Audit Database settings for them, on this step you will be prompted to enable or disable this feature (by selecting or clearing the Make audit data available via summary s only checkbox). Fields will be prepopulated with default SQL Server settings that you can update if necessary (e.g., update connection information, select another SQL Server instance where to write audit data to). You can also change these settings later. See Manage Audit Database for more information. 6. On the Add Items to Computer Collection step, select items that you want to audit. You can add several items to collection. Click Add and select one of the predefined platform types: Windows Server or Syslog-based Platform. NOTE: If you have configured custom syslog platforms previously, they will appear in the Syslogbased Platforms list. Depending on the platform type selected, specify the object to be audited. Review the following for additional information: Option Computer name / Single computer or device Active Directory container (available for Windows Server platform only) Description Allows specifying a single computer by entering its FQDN, NETBIOS or IP address. You can click Browse to select a computer from the list of computers in your network. Allows specifying a whole AD container. Click Browse to select from the list of containers in your network. You can also: Select a particular computer type to be monitored within the chosen AD container: Domain controllers, Servers (excluding domain controllers), or Workstations. Click Exclude to specify domains, OUs, and containers you do not want to audit. NOTE: The list of containers does not include child domains of trusted domains. Use other options (Computer name, IP address range, or Import computer names from a file) to specify the target computers. IP address range / Computers within an IP range Import computer names from a file / Import servers or devices list Allows specifying an IP range for the audited computers. To exclude computers from within the specified range, click Exclude. Enter the IP range you want to exclude, and click Add. Allows specifying multiple computer names by importing a list from a.txt file (one computer name/ip address per line is accepted). You can choose whether to import the list once, or to update it on every 53/233
54 3. Start Auditing Your IT Infrastructure Option Description data collection. If you select the Import on every data collection option, you can later modify the list of your monitored computers by editing the.txt file. The audited computers list will be updated on the next data collection. 7. On the Select Data Collection Method step, you can enable the Use Lightweight Agents option. If enabled, an agent will be installed automatically on the audited computer, collect and prefilter data, and return it in a highly compressed format. This significantly improves data transfer and minimizes the impact on the target computer performance. 8. On the Specify Notifications Recipients step, click Add to specify the s where Event Log Collection Status notifications are to be sent. NOTE: It is recommended to click Verify. The system will send a test message to the specified address and inform you if any problems are detected. 9. On the Configure Real-Time Alerts step, enable or disable the predefined alerts, or click Add to configure custom alerts. See Real-Time Alerts for more information. 10. On the Configure Audit Archiving Filters step, enable or disable predefined filters, or click Add to configure custom filters. Audit Archiving filters define what event will be stored to the Long-Term Archive or the Audit Database, and what will be skipped. With no filters applied, your reports may be excessively large and contain unnecessary information. See Configure Audit Archiving Filters for more information. NOTE: If you are going to track Netwrix Auditor health status, enable the Netwrix Auditor System Health filter. 11. On the last step, review your Managed Object settings and click Finish to exit the wizard. The newly created Managed Object will appear under the Managed Objects node Create Managed Objects to Audit Group Policy 1. Do one of the following: On the main Netwrix Auditor Administrator Console page, click the Group Policy tile. In this case you will be prompted to select Domain as a Managed Object type on the next step. Select the Managed Objects node in the left pane and click Create New Managed Object in the right pane. Select Domain as a Managed Object type in the Create New Managed Object wizard. In this case you will prompted to select Group Policy as the audited system later in the wizard. 54/233
55 3. Start Auditing Your IT Infrastructure See Managed Objects Overview for more information. 2. On the Specify Default Data Processing Account step, click Specify Account. NOTE: If you have already configured Netwrix Auditor to audit other systems, and specified the default Data Processing Account and the settings on their configuration, the Specify Default Data Processing Account and Configure Settings steps of the wizard will be omitted. Enter the default Data Processing Account (in the DOMAIN\user format) that will be used by Netwrix Auditor for data collection. For a full list of the rights and permissions required for the Data Processing Account, and instructions on how to configure them, refer to Netwrix Auditor Installation and Configuration Guide. 3. On the Specify Settings step, specify the settings that will be used for Change Summaries, reports and real-time alerts delivery: Setting SMTP server Port Sender address Description Enter your SMTP server name. Specify your SMTP server port number. Enter the address that will appear in the From field. NOTE: It is recommended to click Verify. The system will send a test message to the specified address and inform you if any problems are detected. SMTP Authentication User name Password Confirm password Use Secure Sockets Layer encrypted connection (SSL) Implicit SSL connection mode Select this checkbox if your mail server requires the SMTP authentication. Enter a user name for the SMTP authentication. Enter a password for the SMTP authentication. Confirm the password. Select this checkbox if your SMTP server requires SSL to be enabled. Select this checkbox if the implicit SSL mode is used, which means that an SSL connection is established before any meaningful data is sent. 4. On the Specify Domain Name step, specify the audited domain name in the FQDN format. If you want to use a specific account to access data from this domain (other than the one you specified as 55/233
56 3. Start Auditing Your IT Infrastructure the default Data Processing Account), select Custom and enter the credentials. This account must be granted the same permissions and access rights as the default Data Processing Account. 5. On the Audit Database Settings step, make sure that the Make audit data available via summary s only checkbox is cleared. By default, the Audit Database is created automatically and is used to store collected audit data. NOTE: Select the Make audit data available via summary s only checkbox only if you do not want to generate reports and run data searches in the Netwrix Auditor client. With this checkbox selected audit data will not be written to the Audit Database. In this case information on changes will be available via Change Summary s only. Even if you select this checkbox now, you will still be able to configure these settings later, but already collected audit data will not be imported in the Audit Database. Refer to Manage Audit Database for detailed instructions on how to configure the Audit Database settings. Select one of the following: Automatically install and configure a new instance of SQL Server Express Edition to automatically install and configure SQL Server 2012 Express with Advanced Services. NOTE: It is recommended to consider the maximum database size in different SQL Server versions, and make your choice based on the size of the environment you are going to audit, the number of users and other factors. Note that the maximum database size in SQL Server Express editions may be insufficient. Use an existing SQL Server instance with SQL Server Reporting Services to use an already installed SQL Server instance. Complete the following fields: Option Description SQL Server Settings SQL Server instance Specify the name of the SQL Server instance to store audit data. NOTE: If you have more than one Netwrix Auditor Server running in your network, make sure to configure them to use different SQL Server instances. The same SQL Server instance cannot be used to store audit data collected by several Netwrix Auditor Servers. Authentication Select the authentication type you want to use to connect to the SQL Server instance: Windows authentication 56/233
57 3. Start Auditing Your IT Infrastructure Option Description SQL Server authentication User name Specify the account to be used to connect to the SQL Server instance. NOTE: This account must be granted the database owner (db_ owner) role and the dbcreator server role. See Netwrix Auditor Installation and Configuration Guide for more information. Password Enter a password. SQL Server Reporting Services Settings Report Server URL Report Manager URL User name Password Specify the Report Server URL. Make sure that the resource is reachable. Specify the Report Manager URL. Make sure that the resource is reachable. Specify the account to be used to connect to SSRS. Enter a password. If you have already created other Managed Objects, and configured Audit Database settings for them, on this step you will be prompted to enable or disable this feature (by selecting or clearing the Make audit data available via summary s only checkbox). Fields will be prepopulated with default SQL Server settings that you can update if necessary (e.g., update connection information, select another SQL Server instance where to write audit data to). You can also change these settings later. See Manage Audit Database for more information. 6. On the State-in-Time Reports step, you can enable or disable State-in-Time Reports. This feature allows generating reports on your system configuration state at a specific moment of time in addition to change reports. If enabled, snapshots will be created daily and written to the Audit Database. This option is unavailable if the Audit Database settings are not configured. 7. On the Select Data Collection Method step, you can enable the Use Lightweight Agents option. If enabled, an agent will be installed automatically on the audited computer, collect and prefilter data, and return it in a highly compressed format. This significantly improves data transfer and minimizes the impact on the target computer performance. 8. On the Configure Audit in Target Environment step, select one of the following: 57/233
58 3. Start Auditing Your IT Infrastructure Automatically for the selected audited systems Click the arrow button next to an audited system to expand the list of settings that are required for the product to function properly. If you select to automatically configure audit in the target environment, your current audit settings will be checked on each data collection and adjusted if necessary. NOTE: This method is recommended for evaluation purposes in test environments. For a full list of audit settings required for Netwrix Auditor to collect comprehensive audit data and instructions on how to configure them, refer to Netwrix Auditor Installation and Configuration Guide. Manually For a full list of audit settings, and instructions on how to configure them, refer to Netwrix Auditor Installation and Configuration Guide. 9. On the Specify Group Policy Change Summary Recipients step, click Add to specify the s where Change Summaries are to be sent. NOTE: It is recommended to click Verify. The system will send a test message to the specified address and inform you if any problems are detected. 10. On the last step, review your Managed Object settings and click Finish to exit the wizard. The newly created Managed Object will appear under the Managed Objects node Create Managed Objects to Audit Inactive Users in Active Directory Inactive User Tracking within Netwrix Auditor discovers inactive user and computer accounts. It performs the following tasks: Checks the managed domain or specific organizational units by inquiring all domain controllers, and sends reports to managers and system administrators listing all accounts that have been inactive for the specified number of days. Automatically deactivates inactive accounts by settings a random password, disabling, deleting or moving them to a specified organizational unit. To create a Managed Object to audit inactive users 1. Do one of the following: On the main Netwrix Auditor Administrator Console page, click the Inactive User Tracking tile. In this case you will be prompted to select Domain or Organizational Unit as a Managed Object type on the next step. 58/233
59 3. Start Auditing Your IT Infrastructure Select the Managed Objects node in the left pane and click Create New Managed Object in the right pane. Select a Domain or Organizational Unit as a Managed Object type in the Create New Managed Object wizard. In this case you will prompted to select Inactive User Tracking as the audited system later in the wizard. 2. On the Specify Default Data Processing Account step, click Specify Account. NOTE: If you have already configured Netwrix Auditor to audit other systems, and specified the default Data Processing Account and the settings on their configuration, the Specify Default Data Processing Account and Configure Settings steps of the wizard will be omitted. Enter the default Data Processing Account (in the DOMAIN\user format) that will be used by Netwrix Auditor for data collection. For a full list of the rights and permissions required for the Data Processing Account, and instructions on how to configure them, refer to Netwrix Auditor Installation and Configuration Guide. 3. On the Specify Settings step, specify the settings that will be used for Change Summaries, reports and real-time alerts delivery: Setting SMTP server Port Sender address Description Enter your SMTP server name. Specify your SMTP server port number. Enter the address that will appear in the From field. NOTE: It is recommended to click Verify. The system will send a test message to the specified address and inform you if any problems are detected. SMTP Authentication User name Password Confirm password Use Secure Sockets Layer encrypted connection (SSL) Implicit SSL connection mode Select this checkbox if your mail server requires the SMTP authentication. Enter a user name for the SMTP authentication. Enter a password for the SMTP authentication. Confirm the password. Select this checkbox if your SMTP server requires SSL to be enabled. Select this checkbox if the implicit SSL mode is used, which means that an SSL connection is established before any meaningful data is sent. 59/233
60 3. Start Auditing Your IT Infrastructure 4. Depending on your Managed Object, on the Specify Domain Name or Specify Organizational Unit Name step, specify the target domain name or OU name in the FQDN format. If you want to use a specific account to access data from this domain (other than the one you specified as the default Data Processing Account), select Custom and enter credentials. This account must be granted the same permissions and access rights as the default Data Processing Account. 5. On the Configure Inactive User Tracking step, specify the following settings: Parameters Consider user inactive after Notify manager after Set random password after Disable account after Move to a specific OU after Delete accounts after Process user accounts Process computer accounts Delete account with all its subnodes (Windows Server 2008 or above) Notify managers only once Description Specify account inactivity period, after which a user is considered to be inactive. Specify account inactivity period, after which the account owner's manager must be notified. Specify account inactivity period, after which a random password will be set for this account. Specify account inactivity period, after which the account will be disabled. Specify account inactivity period, after which the account will be moved to a specified organizational unit. Specify account inactivity period, after which the account will be deleted. Select this checkbox to audit user accounts. Select this checkbox to audit computer accounts. Select this checkbox to delete an account that is a container for objects. If this checkbox is selected, managers receive one notification on account inactivity and one on every action on accounts. Managers will receive a notification in the day when the account inactivity time will be the same as specified in the inactivity period settings. By default, managers receive notifications every day after the time interval of inactivity specified in the Notify managers after entry field. 60/233
61 3. Start Auditing Your IT Infrastructure Parameters Send report to Description Enter the addresses where reports are to be delivered. NOTE: It is recommended to click Verify. The system will send a test message to the specified address and inform you if any problems are detected. 6. On the last step, review your Managed Object settings and click Finish to exit the wizard. The newly created Managed Object will appear under the Managed Objects node. NOTE: Once the Managed Object is configured, you can set additional options under Managed Objects your_ Managed_ Object_ name Inactive User Tracking (for example, edit template) Start Auditing Mailbox Access To ensure security of sensitive information such as intellectual property, personally identifiable information, business plans, and trade secrets, you need to collect detailed information on unauthorized mailbox access. 1. When you have already created a Managed Object for tracking Exchange changes, navigate to this Managed Object in Netwrix Auditor Administrator Console, select Exchange Server audited system in the left pane, and click Track Access next to Non-owner Mailbox Access Auditing in the right pane. See Create Managed Objects to Audit Exchange for more information. 2. In the dialog that opens, specify the following settings and parameters. Click Apply. Option Enable Description Make sure the Enable option is checked. NOTE: If later you disable the product by clearing this checkbox, and then re-enable it after some time, data will start to be collected only after the first scheduled data collection task is run (at 3 AM by default). As a result, events that occur after the product is re-enabled and before the first scheduled task will not be reported. To avoid audit data loss, it is recommended to run a scheduled data collection task manually immediately after the product is re-enabled. 61/233
62 3. Start Auditing Your IT Infrastructure Option Description Monitored Exchange Servers Specify the Exchange servers you want to monitor Use agents to collect detailed audit data (Exchange 2007 and 2010 only) Click Add and enter the FQDN name of audited server, or import the list of audited servers from a file. You can import a list of servers from a *.txt file containing one FQDN computer name per line. Select this checkbox to enable agents that collect the information required for detailed reports. NOTE: If this option is disabled, only summary reports will be available. If you choose not to use agents for audit data collection, you must configure native auditing on the audited Exchange. See Netwrix Auditor Installation and Configuration Guide for more information. Reports Report delivery schedule (daily at 3:00 AM by default) Summary report Detailed report Click Modify to configure the data processing and report delivery schedule. NOTE: To be able to configure this schedule, you must save your configuration first by clicking Apply at the bottom of the dialog. Select this option to receive summary reports. These reports contain information on who accessed what mailbox and when. Select this option to receive detailed reports. These reports contain information on who accessed what mailbox and when, and what actions were performed on the accessed mailbox contents, including information on unauthorized access to calendar, contacts and tasks. See Actions Captured When Auditing Mailbox Access for more information. NOTE: To receive detailed reports, the Use agents to collect detailed audit data option must be enabled. Only report on mailboxes whose owners belong to these OUs Select this checkbox to filter data in reports by organizational units. Click Select OUs and specify the organizational units you want to audit for non- owner mailbox access. Reports will include information only on non-owner access to mailboxes that belong to 62/233
63 3. Start Auditing Your IT Infrastructure Option Description users from the specified OUs. Report recipients Attach reports as CSV files Notify users on non-owner access to their mailboxes Customize report template Notify only selected users Enter the addresses where reports are to be delivered, separated by commas. Select this checkbox to receive reports attached to s as CSV files. Select this checkbox if you want to notify on non-owner access to their mailboxes. Click Customize to edit the notification template, for example, modify the text of the message. Select this checkbox and click Specify Users to specify the list of users who will receive notifications on non-owner access to their mailboxes. Users not included in this list will not be notified. Report delivery settings SMTP server Port From address Enter your SMTP server name. Specify your SMTP server port number. Enter the address that will appear in the "From" field in reports. NOTE: It is recommended to click Verify. The system will send a test message to the specified address and inform you if any problems are detected. Authentication Use authentication User name Password Confirm password Use Secure Sockets Layer encrypted connection (SSL) Click this button to specify authentication settings. Select this checkbox if your mail server requires the SMTP authentication. Enter a user name for the SMTP authentication. Enter a password for the SMTP authentication. Confirm the password. Select this checkbox if your SMTP server requires SSL to be enabled. 63/233
64 3. Start Auditing Your IT Infrastructure Option Use Implicit SSL connection mode Description Select this checkbox if the implicit SSL mode is used, which means that an SSL connection is established before any meaningful data is sent. Audit Archive Location Click Browse to select the location for your Long-Term Archive. NOTE: If later you change the location of the Long-Term Archive, you will need to manually move the contents of this folder to the new location. Otherwise, the next data collection will be performed as the initial analysis, and events that occurred between the last data collection and the move of the Long-Term Archive will not be reflected in reports. Also, you will not be able to generate reports in the Report Viewer that involve data stored in the old location. Enable long-term audit archiving for (months) Select this checkbox to enable long-term archiving and specify how long collected audit data must be stored. NOTE: If this option is disabled, the product will only store the information on non- owner access events that took place between the last two data collections. 3. In the Scheduled Task Credentials dialog, enter the account (in the DOMAIN\user format) and password that will be used for data collection. To audit several Exchange organizations in the domain where Netwrix Auditor is installed, specify the user that belongs to the Domain Admins group. To monitor Exchange organizations in different domains of the same forest, specify the user that belongs to the Enterprise Admins group. NOTE: You will be prompted to specify the default account every time you save your current configuration. 4. Run the first data collection based on instructions provided in the dialog. The first data collection creates the initial snapshot of the audited servers current state. After the second data collection, which will take place at 3.00 AM the next day, you will receive a report on non-owner mailbox access: 64/233

65 3. Start Auditing Your IT Infrastructure Non-Owner Mailbox Access Summary lists actions performed by someone other than the person who owns the mailbox, including both administrators and users, called delegated users, who have been assigned permissions to a mailbox Create Managed Objects to Audit and Alert on Password Expiration in Active Directory Password Expiration Alerting within Netwrix Auditor checks which domain accounts and/or passwords are about to expire in the specified number of days and sends notifications to users. It also generates summary reports that can be delivered to system administrators and/or users' managers. Besides, Netwrix Auditor allows checking the effects of a password policy change before applying it to the managed domain. To create a Managed Object to audit expiring passwords 1. Do one of the following: On the main Netwrix Auditor Administrator Console page, click the Password Expiration Alerting tile. In this case you will be prompted to select Domain or Organizational Unit as a Managed Object type on the next step. Select the Managed Objects node in the left pane and click Create New Managed Object in the right pane. Select Domain or Organizational Unit as a Managed Object type in the Create New Managed Object wizard. In this case you will prompted to select Password Expiration Alerting as the audited system later in the wizard. 65/233
66 3. Start Auditing Your IT Infrastructure See Managed Objects Overview for more information. 2. On the Specify Default Data Processing Account step, click Specify Account. NOTE: If you have already configured Netwrix Auditor to audit other systems, and specified the default Data Processing Account and the settings on their configuration, the Specify Default Data Processing Account and Configure Settings steps of the wizard will be omitted. Enter the default Data Processing Account (in the DOMAIN\user format) that will be used by Netwrix Auditor for data collection. For a full list of the rights and permissions required for the Data Processing Account, and instructions on how to configure them, refer to Netwrix Auditor Installation and Configuration Guide. 3. On the Specify Settings step, specify the settings that will be used for Change Summaries, reports and real-time alerts delivery: Setting SMTP server Port Sender address Description Enter your SMTP server name. Specify your SMTP server port number. Enter the address that will appear in the From field. NOTE: It is recommended to click Verify. The system will send a test message to the specified address and inform you if any problems are detected. SMTP Authentication User name Password Confirm password Use Secure Sockets Layer encrypted connection (SSL) Implicit SSL connection mode Select this checkbox if your mail server requires the SMTP authentication. Enter a user name for the SMTP authentication. Enter a password for the SMTP authentication. Confirm the password. Select this checkbox if your SMTP server requires SSL to be enabled. Select this checkbox if the implicit SSL mode is used, which means that an SSL connection is established before any meaningful data is sent. 4. Depending on your Managed Object, on the Specify Domain Name or Specify Organizational Unit Name step, specify the target domain name or OU name in the FQDN format. If you want to use a 66/233
67 3. Start Auditing Your IT Infrastructure specific account to access data from this domain (other than the one you specified as the default Data Processing Account), select the Custom option and enter credentials. This account must be granted the same permissions and access rights as the default Data Processing Account. 5. On the Configure Password Expiration Alerting step, specify the following settings: Parameters Send report to administrators Description Enable this option and specify one or several addresses for administrators to receive daily reports with a list of users whose accounts/passwords are going to expire in the specified number of days. Use semicolon to separate several addresses. NOTE: It is recommended to click Verify. The system will send a test message to the specified address and inform you if any problems are detected. Send report to the users managers Enable this option to deliver reports to the user s managers. To review and edit the user's managers 1. Start Active Directory Users and Computers. 2. Navigate to each group where the user belongs to, right-click it and select Properties. 3. In the <group> Properties dialog, select the Managed By tab and review a manager. Update it if necessary. NOTE: To edit a report template, click Customize. You can use HTML tags when editing a template. List users whose accounts or passwords expire in <> days or less Notify users Every day if their password expires in <> days or less Specify the expiration period for accounts and/or passwords to be included in the administrators and managers reports. Select this option to notify users that their passwords and/or accounts are about to expire. Select this option for users to be notified daily that their passwords are going to expire, and specify the number of days before the expiration date. NOTE: To edit a report template, click Customize. You can use 67/233
68 3. Start Auditing Your IT Infrastructure Parameters Description HTML tags when editing a template. First/Second/Last time when their password expires in <> days Select this option for users to be notified three times, and specify the number of days before the expiration date for each of three notifications. NOTE: To edit a report template, click Customize. You can use HTML tags when editing a template. Notify users every day if their account expires in Filter users by organizational unit Filter users by group Select this option for users to be notified daily that their account is going to expire, and specify the number of days before the expiration date. To audit users for expiring accounts/passwords that belong to certain organizational units within your Active Directory domain, select this option and click Select OUs. In the dialog that opens, specify the OUs that you want to audit. Only users belonging to these OUs will be notified and included in the administrators and managers reports. To audit users for expiring accounts/passwords that belong to certain groups within your Active Directory domain, select this option and click Select Groups. In the dialog that opens, specify the groups that you want to audit. Only users belonging to these groups will be notified and included in the administrators and managers reports. 6. On the last step, review your Managed Object settings and click Finish to exit the wizard. The newly created Managed Object will appear under the Managed Objects node Create Managed Objects to Audit User Activity 1. Do one of the following: On the main Netwrix Auditor Administrator Console page, click the User Activity tile. In this case you will be prompted to select Computer Collection as a Managed Object type on the next step. Select the Managed Objects node in the left pane and click Create New Managed Object in the right pane. Select Computer Collection as a Managed Object type in the Create New Managed Object wizard. In this case you will prompted to select User Activity as the audited system later in the wizard. 68/233
69 3. Start Auditing Your IT Infrastructure See Managed Objects Overview for more information. 2. On the Specify Default Data Processing Account step, click Specify Account. NOTE: If you have already configured Netwrix Auditor to audit other systems, and specified the default Data Processing Account and the settings on their configuration, the Specify Default Data Processing Account and Configure Settings steps of the wizard will be omitted. Enter the default Data Processing Account (in the DOMAIN\user format) that will be used by Netwrix Auditor for data collection. For a full list of the rights and permissions required for the Data Processing Account, and instructions on how to configure them, refer to Netwrix Auditor Installation and Configuration Guide. 3. On the Specify Settings step, specify the settings that will be used for Change Summaries, reports and real-time alerts delivery: Setting SMTP server Port Sender address Description Enter your SMTP server name. Specify your SMTP server port number. Enter the address that will appear in the From field. NOTE: It is recommended to click Verify. The system will send a test message to the specified address and inform you if any problems are detected. SMTP Authentication User name Password Confirm password Use Secure Sockets Layer encrypted connection (SSL) Implicit SSL connection mode Select this checkbox if your mail server requires the SMTP authentication. Enter a user name for the SMTP authentication. Enter a password for the SMTP authentication. Confirm the password. Select this checkbox if your SMTP server requires SSL to be enabled. Select this checkbox if the implicit SSL mode is used, which means that an SSL connection is established before any meaningful data is sent. 4. On the Specify Computer Collection Name step, enter the computer collection name. If you want to use a specific account to access data from this computer collection (other than the one you 69/233
70 3. Start Auditing Your IT Infrastructure specified as the default Data Processing Account), select Custom and enter credentials. This account must be granted the same permissions and access rights as the default Data Processing Account. 5. On the Audit Database Settings step, make sure that the Make audit data available via summary s only checkbox is cleared. By default, the Audit Database is created automatically and is used to store collected audit data. NOTE: Select the Make audit data available via summary s only checkbox only if you do not want to generate reports and run data searches in the Netwrix Auditor client. With this checkbox selected audit data will not be written to the Audit Database. In this case information on changes will be available via Change Summary s only. Even if you select this checkbox now, you will still be able to configure these settings later, but already collected audit data will not be imported in the Audit Database. Refer to Manage Audit Database for detailed instructions on how to configure the Audit Database settings. Select one of the following: Automatically install and configure a new instance of SQL Server Express Edition to automatically install and configure SQL Server 2012 Express with Advanced Services. NOTE: It is recommended to consider the maximum database size in different SQL Server versions, and make your choice based on the size of the environment you are going to audit, the number of users and other factors. Note that the maximum database size in SQL Server Express editions may be insufficient. Use an existing SQL Server instance with SQL Server Reporting Services to use an already installed SQL Server instance. Complete the following fields: Option Description SQL Server Settings SQL Server instance Specify the name of the SQL Server instance to store audit data. NOTE: If you have more than one Netwrix Auditor Server running in your network, make sure to configure them to use different SQL Server instances. The same SQL Server instance cannot be used to store audit data collected by several Netwrix Auditor Servers. Authentication Select the authentication type you want to use to connect to the SQL Server instance: Windows authentication 70/233
71 3. Start Auditing Your IT Infrastructure Option Description SQL Server authentication User name Specify the account to be used to connect to the SQL Server instance. NOTE: This account must be granted the database owner (db_ owner) role and the dbcreator server role. See Netwrix Auditor Installation and Configuration Guide for more information. Password Enter a password. SQL Server Reporting Services Settings Report Server URL Report Manager URL User name Password Specify the Report Server URL. Make sure that the resource is reachable. Specify the Report Manager URL. Make sure that the resource is reachable. Specify the account to be used to connect to SSRS. Enter a password. If you have already created other Managed Objects, and configured Audit Database settings for them, on this step you will be prompted to enable or disable this feature (by selecting or clearing the Make audit data available via summary s only checkbox). Fields will be prepopulated with default SQL Server settings that you can update if necessary (e.g., update connection information, select another SQL Server instance where to write audit data to). You can also change these settings later. See Manage Audit Database for more information. 6. On the Add Items to Computer Collection step, select items that you want to audit. You can add several items to collection. Click Add and define the items. Review the following for additional information: Option Computer name Active Directory container Description Allows specifying a single computer by entering its FQDN, NETBIOS or IP address. You can click Browse to select a computer from the list of computers in your network. Allows specifying a whole AD domain, OU or container. Click Browse to select from the list of containers in your network. You 71/233
72 3. Start Auditing Your IT Infrastructure Option Description can also: Select a particular computer type to be audited within the chosen AD container: Domain controllers, Servers (excluding domain controllers), or Workstations. Click Exclude to specify AD domains, OUs, and containers you do not want to audit. In the Exclude Computers dialog, click Add and specify an object. NOTE: The list of containers does not include child domains of trusted domains. Use other options (Computer name, IP address range, or Import computer names from a file) to specify the target computers. IP address range Allows specifying an IP range for the audited computers. To exclude computers from within the specified range, click Exclude. Enter the IP range you want to exclude, and click Add. Import computer names from a file Allows specifying multiple computer names by importing a list from a.txt file (one computer name/ip address per line is accepted). You can choose whether to import the list once, or to update it automatically. If you select the Import on every data collection option, you can later modify the list of your audited computers by editing the.txt file. The audited computers list will be updated on the next data collection. 7. On the Specify Users step, select the users whose activity should be recorded. You can select All users or create a list of Specific users. Certain users can also be added to Exceptions list. 8. On the User Activity Video Reporter Activity Summary Delivery step, set the delivery schedule and click Add to specify s where Activity Summaries will be sent. NOTE: It is recommended to click Verify. The system will send a test message to the specified address and inform you if any problems are detected. 9. On the last step, review your Managed Object settings and click Finish to exit the wizard. The newly created Managed Object will appear under the Managed Objects node. 72/233
73 4. Data Collection 4. Data Collection This chapter explains the Netwrix Auditor data collection workflow, describes how to launch it manually and explains how to check data collection status in Netwrix Auditor Administrator Console. For more information see: Data Collection Workflow Launch Data Collection Manually 4.1. Data Collection Workflow The Netwrix Auditor data collection workflow is as follows: 1. Once a Managed Object is created, Netwrix Auditor starts collecting audit data from the managed Active Directory domain or organizational unit, computer collection, a SharePoint farm, or VMware Virtual Center. For most of the audited systems, a dedicated scheduled task is created and it runs periodically to collect audit data. The first data collection gathers information on the audited system's current configuration state. Netwrix Auditor uses this information as a benchmark to collect data on changes to the audited environment. After the first data collection has finished, an notification is sent to the specified recipients stating that the analysis has completed. If you do not want to wait until a scheduled data collection, you can launch it manually. See Launch Data Collection Manually for more information. NOTE: When auditing SharePoint farms and User Activity, Netwrix Auditor employs a different data collection method. Instead of using a scheduled task for data collection, Netwrix Auditor creates a service and also requires an agent to be installed on the audited computers/sharepoint server. The agent starts collecting data immediately and does not require to run the first data collection to gather information on the audited system's current configuration state. For all audited systems, the latest data collection status can be reviewed in Netwrix Auditor Administrator Console. To do it, navigate to the Managed Object which includes the audited system whose data collection status you want to check. Review data collection status in the Status column. NOTE: The status is updated automatically every time you navigate to a Managed Object. 2. If a critical event is detected, an notification an alert is sent immediately to the specified recipients. NOTE: This functionality is currently available for the following audited systems: 73/233
74 4. Data Collection Active Directory Event Log Refer to Real-Time Alerts for detailed instructions on how to use predefined alerts and create custom alerts. 3. Once a day (at 3:00 AM by default for most of audited systems), Netwrix Auditor writes collected audit data to the local file-based Long-Term Archive. If Audit Database is configured, audit data is imported into the Audit Database. Refer to Manage Audit Database for detailed instructions on how to configure the Audit Database settings. 4. If the State- in-time Reports functionality is enabled, Netwrix Auditor also writes a state- in-time snapshot of the audited system current state to the Audit Database. NOTE: This functionality is currently available for the following audited systems: Active Directory File Servers Group Policy 5. At the same time, Netwrix Auditor generates a Change Summary and s it to the specified recipients. Refer to Change Summary for detailed instructions on how to modify the default Change Summary delivery schedule and generate on-demand Change Summary Launch Data Collection Manually If you do not want to wait until a scheduled data collection, you can launch it manually. Along with data collection, the following actions will be performed: A Change Summary will be generated and sent to the specified recipients. It will list all changes that occurred since the last scheduled or on-demand Change Summary delivery. Changes that occurred between data collections will be imported to the Audit Database and become available in the Netwrix Auditor client. To launch data collection manually Audited System Instructions Active Directory Exchange File Servers 1. In Netwrix Auditor Administrator Console, navigate to Managed Objects your_managed_object_name. 2. In the right pane, select the audited system and click Run. SharePoint 74/233
75 4. Data Collection Audited System Instructions SQL Server VMware Windows Server Event Log Group Policy Inactive users in Active Directory Password expiration in Active Directory Mailbox access within Exchange 1. Start Task Scheduler, select the Task Scheduler Library node and locate the Netwrix Non-owner Mailbox Access Reporter for Exchange task. 2. Right-click the task and select Run. User Activity You cannot launch on-demand data collection and Activity Summary generation. NOTE: Depending on the size of the audited environment and the number of changes, data collection may take quite long. 75/233
76 5. Change Summary 5. Change Summary A Change Summary is that lists all changes/ recorded user sessions that occurred since the last Change Summary delivery. Notifications on user activity (Activity Summaries) and event log collection (Event Log Collection Status) are a bit different and do not show changes. By default, for most of audited systems a Change Summary is generated daily at 3:00 AM and delivered to the specified recipients. You can also launch data collection and a Change Summary generation manually. NOTE: The Change Summary example applies to Active Directory. Other Change Summaries generated and delivered by Netwrix Auditor may vary slightly depending on the audited system. The example Change Summary provides the following information on Active Directory changes: Column Action Description Shows the type of action that was performed on the object. Added Removed Modified Object Type What Where Shows the type of the modified AD object, for example, 'user'. Shows the path to the modified AD object. Shows the name of the domain controller where the change was made. 76/233
77 5. Change Summary Column Who When Workstation Details Description Shows the name of the account under which the change was made. Shows the exact time when the change occurred. Shows the name / IP address of the computer where the user was logged on when the change was made. Shows the before and after values of the modified AD object. Refer to the following procedures for instructions on how to modify the default Change Summary delivery schedule and initiate an on-demand Change Summary delivery: Modify Change Summary Delivery Schedule Initiate On-Demand Change Summary Delivery The following audited systems have another format of regular Change Summary s: Event Log. See Event Log Collection Status for more information. Non-Owner Mailbox Access for Exchange. See Non-Owner Mailbox Access Reports for more information. User Activity. See User Activity Summary Report for more information Event Log Collection Status The Event Log Collection Status shows whether data collection for your Computer Collection completed successfully or with warnings and errors. 77/233
78 5. Change Summary 5.2. Non-Owner Mailbox Access Reports The example provides the following information on non-owner access to your Exchange: Column Who Accessed When Accessed Mailbox Server Details NOTE: Only when the Detailed reports option is selected. Description Shows the account name that accessed the mailbox. Shows the exact time when access was performed. Shows the name of the mailbox affected by non-owner access. Shows the name of the Exchange Server to which the accessed account belongs to. Shows actions performed by unauthorized users. See Actions Captured When Auditing Mailbox Access for more information. 78/233
79 5. Change Summary 5.3. User Activity Summary Report The example Activity Summary provides detailed information on User Activity in your IT infrastructure Modify Change Summary Delivery Schedule To modify the Change Summary generation and delivery schedule, follow the instructions in the table below depending on audited system: Audited System Active Directory Exchange Group Policy Instructions 1. In Netwrix Auditor Administrator Console, navigate to Managed Objects your_managed_object_name Active Directory. 2. In the right pane, modify the Change Summary delivery time and interval. SharePoint 1. In Netwrix Auditor Administrator Console, navigate to Managed Objects your_managed_object_name SharePoint. 2. In the right pane, click Configure Delivery in the Change Summary Delivery section and modify the Change Summary delivery time. 79/233
80 5. Change Summary Audited System File Servers SQL Server VMware Inactive users in Active Directory Password expiration in Active Directory Instructions 1. In Netwrix Auditor Administrator Console, navigate to Settings Data Collection. 2. Click Modify next to Default Data Collection and Change Summary generation schedule. 3. Modify data collection and Change Summary generation schedule. NOTE: See Configure Data Collection Settings for more information. Windows Server Event Log 1. In Netwrix Auditor Administrator Console, navigate to Managed Objects your_managed_object_name Event Log. 2. In the right pane, modify the Event Log Collection Status notification delivery time. Mailbox access within Exchange 1. In Netwrix Auditor Administrator Console, navigate to Managed Objects your_managed_object_name Exchange Server. 2. In the right pane, click Track Access in the Non-owner Mailbox Access Auditing section. 3. In the dialog that opens, click Modify in the Reports section and edit the default Change Summary delivery schedule. 4. Click Apply to save the changes. User Activity 1. In Netwrix Auditor Administrator Console, navigate to Managed Objects your_managed_object_name User Activity. 2. In the right pane, click Configure Delivery in the Activity Summary Delivery section and modify the Activity Summary delivery time and interval Initiate On-Demand Change Summary Delivery If you do not want to wait until a scheduled delivery, you can generate a Change Summary on-demand. Force the data collection, after which a Change Summary will be generated and sent to the specified recipients. It will list all changes that occurred since the last scheduled or on-demand Change Summary delivery. See Launch Data Collection Manually for more information. 80/233
81 6. Manage Data in AuditArchive 6. Manage Data in AuditArchive AuditArchive is a scalable repository that stores audit data collected by Netwrix Auditor. AuditArchive consists of two tiers: Tier Description Default retention Audit Database The SQL- based operational storage used for browsing audit data with the Netwrix Auditor client. 180 days Long-Term Archive The file-based repository used to store past audit data for future reference. 120 months By default, audit data is written to both the Audit Databaseand the Long-Term Archive that is designed to store data in a compressed format for a longer period of time. With two-tiered AuditArchive you can store your audit data as long as required in the Long-Term Archive, but keep your operational storage fast and clean and use it for browsing recent data. At the same time, Netwrix Auditor allows you to extract data from the Long- Term Archive and import it to the Audit Database if you want to investigate past issues. Review the following for additional information: Manage Audit Database Manage Long-Term Archive Import Audit Data to Investigation Database 6.1. Manage Long-Term Archive To review and update the Long-Term Archive location and the retention period for the local repository of audit data, navigate to AuditArchive Long-Term Archive and click Modify to configure these settings. Setting Write audit data to Description Specify the path to the folder where your audit data will be stored. NOTE: It is not recommended to store your Long-Term Archive on a system disk. If you want to move the Long-Term Archive to another location, refer to the following Netwrix Knowledge base article: How to move Long-Term Archive to a new location. Keep audit data for (in months) Specify the number of months for which audit data will be stored. 81/233
82 6. Manage Data in AuditArchive Setting Description By default, it is set to 120 months. Data will be deleted automatically when its retention period is over. If the retention period is set to 0, data will be automatically stored for the last 4 data collections for most of the audited systems (event if the retention period is set to 0 data on SQL Server, file servers and Windows Server changes will be stored for the last 2 data collections, and 7 data collections for user activity). If you want to regularly access audit data collected with the previous versions of the product, you can migrate your AuditArchive. See Migrate Legacy Data From Old Audit Archive for more information. NOTE: Netwrix Auditor informs you if you are running out of space on a system disk where the Long-Term Archive is stored by default. You will see events in the Netwrix Auditor System Health log once the free disk space starts approaching minimum level. When the free disk space is less than 3 GB all Netwrix services will be stopped (except for services responsible for user activity, SharePoint and syslog auditing) Migrate Legacy Data From Old Audit Archive Netwrix Auditor 7.0 introduced a new format for storing audit data Long- Term Archive. For your convenience, Netwrix provides the AuditArchive Migration tool that allows you to import data from the old file-based Audit Archive (available in Netwrix Auditor 6.5 or below) to the new file-based Long-Term Archive. To migrate audit data 1. In the Netwrix Auditor Administrator Console, navigate to AuditArchive Long-Term Archive and select the Migrate link. 2. In the Audit Archive Migration Tool window, browse for your Netwrix Auditor 6.5 AuditArchive (the default path is C:\ProgramData\NetWrix\Management Console\Data). 3. Click Migrate to start the migration process. AuditArchive Migration Tool automatically moves your audit data to the new location. NOTE: Depending on the amount of your Netwrix Auditor 6.5 audit data, migration may take a while to complete. You can minimize the AuditArchive Migration Tool screen and keep working with Netwrix Auditor. Once migration completes, you will see a message with migration status successful or with warnings/errors. 82/233
83 6. Manage Data in AuditArchive 6.2. Manage Audit Database If you want to enable AuditIntelligence (including reports and search capabilities) provided by the Netwrix Auditor client, Audit Database settings must properly configured in Netwrix Auditor Administrator Console. Review the following for additional information: Option SQL Server settings Description Define the Audit Database location to store audit data, connection information, etc. Netwrix Auditor allows you to specify SQL Server settings (SQL Server instance, connection information, etc.) for each audited system within a Managed Object individually or use default settings and synchronize them across all Managed Objects. See To configure SQL Server and SSRS settings for more information. Database retention settings Can be configured if you want audit data to be deleted automatically from your Audit Database after a certain period of time. Netwrix Auditor allows you to specify retention settings for each audited system within a Managed Object or use default settings and synchronize them across all Managed Objects. See To configure database retention for more information. SQL Server Reporting Services settings Define the Report Server URL and account used to upload data to Report Server. These settings are common and cannot be modified for a certain Managed Object. See To configure SQL Server and SSRS settings for more information. State-in-time reports settings Can be configured to create snapshots on the system's configuration state at a specific moment of time in addition to change reports. Available for Active Directory, Group Policy and File Servers audited systems. These settings are configured for each audited system that supports this functionality individually. See Report Types for more information on state-in-time reports available in the Netwrix Auditor client. NOTE: Use this section to import historical snapshots for reporting. See To configure State- in- Time reports and import historical snapshots to the Audit Database for more information. 83/233
84 6. Manage Data in AuditArchive Configure Default Audit Database Settings Normally, Audit Database settings are configured when you create a first Managed Object. The settings you specified then are set as default and are listed on the AuditArchive Audit Database page. Later, when you create other Managed Objects these settings prepopulate fields on the Audit Database Settings step of the wizard. To review and update default Audit Database settings (including SQL Server, SSRS, retention settings), navigate to AuditArchive Audit Database and click Modify. If you have not specified the default settings before, click Configureto launch the Audit Database Settings wizard. NOTE: To synchronize SQL Server settings across all Managed Objects and overwrite custom settings with default, click Apply. The settings are not updated until you click Apply. Audit data stored in databases with custom names will become unavailable. Netwrix Auditor will create new databases with default names (e.g., Netwrix_Auditor_Active_Directory) and store new audit data there. To configure SQL Server and SSRS settings Option Description SQL Server Settings SQL Server instance Specify the name of the SQL Server instance to store audit data. NOTE: If you have more than one Netwrix Auditor Server running in your network, make sure to configure them to use different SQL Server instances. The same SQL Server instance cannot be used to store audit data collected by several Netwrix Auditor Servers. Authentication Select the authentication type you want to use to connect to the SQL Server instance: Windows authentication SQL Server authentication User name Specify the account to be used to connect to the SQL Server instance. NOTE: This account must be granted the database owner (db_owner) role and the dbcreator server role. See Netwrix Auditor Installation and Configuration Guide for more information. Password Enter a password. 84/233
85 6. Manage Data in AuditArchive Option Description SQL Server Reporting Services Settings Report Server URL Report Manager URL User name Password Specify the Report Server URL. Make sure that the resource is reachable. Specify the Report Manager URL. Make sure that the resource is reachable. Specify the account to be used to connect to SSRS. Enter a password. To configure database retention Option Database retention enabled Store audit data in database for Description Select if you want audit data to be deleted automatically from your Audit Database after a certain period of time. Specify the number of months for which audit data will be stored. By default, it is set to 180 days. If you have migrated from Netwrix Auditor 6.5 and below, retention will be set to 3650 days (10 years) by default. Data will be deleted automatically when its retention period is over Configure Custom Audit Database Settings You can configure Netwrix Auditor to use custom Audit Database settings for a certain audited system within a Managed Object, e.g., store your audit data on another SQL Server instance, change database name, connection information, change retention settings. NOTE: To employ AuditIntelligence (including reports and search capabilities) provided by the Netwrix Auditor client, you must configure Audit Database settings for the audited systems you are interested in under each Managed Object individually or apply default. Also, make sure all databases that store audit data reside on the same default SQL Server instance. Otherwise, this data will not be available in the search results and reports. To enable and update custom Audit Database settings 1. In Netwrix Auditor Administrator Console, navigate to Managed Objects your_managed_object_ name audited_system Audit Database Settings. 85/233
86 6. Manage Data in AuditArchive 2. Make sure the Make audit data available via summary s only checkbox is cleared. If the checkbox is selected, no audit data will be written to the Audit Database. 3. Review settings and update them if necessary. You can also import historical state-in-time snapshots to the Audit Database. NOTE: It is recommended to check custom settings for each audited system under each Managed Object. If custom Audit Database settings differ from those listed on the AuditArchive Audit Database page, audit data is written to the Audit Database according to the settings specified on the audited system page, as they overwrite default settings. To configure State-in-Time reports and import historical snapshots to the Audit Database 1. In Netwrix Auditor Administrator Console, navigate to Managed Objects your_managed_object_ name audited_system Audit Database Settings and click Modify next to State-in-Time Reports. 2. Select Enable State-in-Time Reports. When auditing file servers, changes to both access and audit permissions are tracked. To disable auditing of access permissions, clear the Enable Reporting on Access Permissions checkbox. 3. In the Historical Snapshot Management section, select the snapshots that you want to import to the Audit Database, and move them to the Snapshots available for reporting list using the arrow button. NOTE: By default, only a latest snapshot is available for reporting in the Netwrix Auditor client. If you want to generate reports based on different snapshots, you must import snapshots to the Audit Database. 4. Click Apply to save the changes and wait until connection to SQL Server is established and snapshots are imported Import Audit Data to Investigation Database By default, the Audit Database stores data up to 180 days. Once the retention period is over, the data is deleted from the Audit Database and becomes unavailable for reporting and search in the Netwrix Auditor client. Depending on your company requirements you may need to investigate past incidents and browse old data stored in the Long-Term Archive. Netwrix Auditor allows importing data from the Long-Term Archive to a special "investigation" database. Having imported data there, you can run AuditIntelligence searches and generate reports with your past data. 86/233
87 6. Manage Data in AuditArchive To extract past audit data collected by Netwrix Auditor, use one of the following data import tools depending on your audited system: Audited System Active Directory (including Group Policy) Data import tool Archive Data Investigation. See To import audit data with the Archive Data Investigation wizard for more information. Exchange File Servers Share Point SQL Server VMware Windows Server Event Log User Activity DB Importer. See To import audit data with the DB Importer for more information. To import audit data with the Archive Data Investigation wizard 1. In Netwrix Auditor Administrator Console, navigate to AuditArchive Investigations. 2. Complete your SQL Server settings. 87/233
88 6. Manage Data in AuditArchive Option SQL Server Instance Description Specify the name of the SQL Server instance to import your audit data to. NOTE: If you want to run AuditIntelligence searches and generate reports in the Netwrix Auditor client, select the same SQL Server instance as the one specified on AuditArchive Audit Database page. See Manage Audit Database for more information. Database Authentication Select import database name. Select the authentication type you want to use to connect to the SQL Server instance: Windows authentication SQL Server authentication User name Specify the account to be used to connect to the SQL Server instance. NOTE: This account must be granted the database owner (db_ owner) role and the dbcreator server role. See Netwrix Auditor Installation and Configuration Guide for more information. Password Clear imported data Enter a password. Select to delete all previously imported data. NOTE: To prevent SQL Server from overfilling, it is recommended to clear imported data once it is longer needed. 3. Review your Import to investigation database configuration. Click Configure to specify the Archive Data Investigation settings. Option From... To... Audited Systems Description Specify the time range for which you want to import past audit data. Select audited systems whose audit data you want to import to the Audit Database. 88/233
89 6. Manage Data in AuditArchive Option Managed Objects Description Select Managed Objects whose audit data you want to import to the Audit Database. Netwrix Auditor lists Managed Objects that are currently available in the product configuration. NOTE: Select All to import audit data for all Managed Objects, including those that were removed from Netwrix Auditor Administrator Console (or removed and then recreated with the same name Netwrix Auditor treats them as different Managed Objects). For example, you had a Managed Object corp.local used for auditing Active Directory. You removed this Managed Object from Netwrix Auditor Administrator Console, but its audit data was preserved in the Long-Term Archive. Then, you created a new Managed Object for auditing Exchange and named it corp.local again. Its data is also stored in the Long-Term Archive. Netwrix Auditor treats both corp.local Managed Objects the removed and the current as different. If you select corp.local in the Managed Objects list, only Exchange data will be imported to Audit Database (as it corresponds to the current Managed Object configuration). To import Active Directory data from the removed Managed Object, select All Managed Objects. 4. Click Run. To import audit data with the DB Importer 1. In the %Netwrix Auditor installation folder% folder, navigate to one of the following locations: Event Log Management User Activity Video Recording 2. Locate DB Importer, and double-click to launch it. 3. Select the Managed Object and the time range for which you want to import data. 4. Click Import. 89/233

90 7. AuditIntelligence 7. AuditIntelligence Besides notifying on changes a daily basis, Netwrix Auditor brings real AuditIntelligence into your IT infrastructure and enables its complete visibility. The technology works as follows: Netwrix Auditor can be configured to write collected audit trails to the SQL-based Audit Database and the file-based Long-Term Archive. The Netwrix Auditor client uses data stored in the Audit Database to generate reports and run data searches. The product provides a variety of predefined reports for each audited system that help you keep track of all changes in your IT infrastructure and validate compliance with various standards and regulations (FISMA, HIPAA, PCI, SOX, etc.). A straight-forward search interface allows a user to run custom searches. NOTE: To employ AuditIntelligence (including reports and search capabilities) provided by the Netwrix Auditor client, you must configure Audit Database settings for the audited systems you are interested in under each Managed Object individually or apply default. Also, make sure all databases that store audit data reside on the same default SQL Server instance. Otherwise, this data will not be available in the search results and reports. Review the following for additional information: Manage Audit Database Reports Available in Netwrix Auditor Additional Reports Available in Netwrix Auditor Administrator Console Import Audit Data to Investigation Database 90/233

91 7. AuditIntelligence 7.1. Reports Available in Netwrix Auditor Netwrix Auditor provides a wide variety of predefined reports for each audited system that help you keep track of all changes in your IT infrastructure and validate compliance with various standards and regulations (FISMA, HIPAA, PCI, SOX, etc.). See Netwrix Auditor User Guide for detailed instructions how to use Reports functionality Report Types In the Netwrix Auditor client, the following report types are available: Organization Level reports Aggregate data from all audited systems and Managed Objects. They list all changes that occurred across the audited IT infrastructure. Enterprise Overview aggregates information on changes from all audited systems and provides a centralized overview. Overview diagrams System- specific diagram reports that aggregate audit data for an auditing system. They provide a high-level overview of changes within a selected time period. Overviews consist of four charts, showing the activity trends by date, user, object type or server, and drill through to detailed reports for further analysis. Change reports System-specific reports that aggregate audit data for a specific audited system within an individual Managed Object. Change reports show detailed data on changes and provide grouping, sorting and filtering capabilities. Each change report has a different set of filters allowing you to manage collected data in the most convenient way. 91/233
92 7. AuditIntelligence State-in-time reports System-specific reports that aggregate data for a specific audited system within an individual Managed Object and allow reviewing the point-in- time state of the audited system. These reports are based on daily snapshots and help you paint a picture of your system configuration at a specific moment in time. Changes with Video Provide video recordings of user activity on audited computers. Changes with Review Status System-specific reports that aggregate data for a specific audited system within an individual Managed Object and can be used as a tool in the basic change management process. These reports allow setting a review status for each change and providing comments. If you are looking for some specific information and cannot find it in reports, try browsing audit data with Search. You can also order custom report templates from Netwrix View Reports Reports can be viewed in the Netwrix Auditor client, or in a web browser. A user can also create a subscription to receive reports by on a regular basis. NOTE: Users who are going to view reports must be assigned the Browser role on the Report Server. See Netwrix Auditor Installation and Configuration Guide for more information. To view reports in the Netwrix Auditor client Navigate to Reports and select a report you are interested in and click View. See Netwrix Auditor User Guide for more information. To view reports in a web browser 1. Open a web browser and type the Report Manager URL (it can be found in Netwrix Auditor Administrator Console under AuditArchive Audit Database). In the page that opens, navigate to the report you want to generate and click the report name. You can modify the report filters and click View Report to apply them. To receive reports by Create a subscription in the Netwrix Auditor client Additional Reports Available in Netwrix Auditor Administrator Console In Netwrix Auditor Administrator Console, you can generate additional reports to review inactive users, expiring passwords, and user activity. Review the following for additional information: 92/233

93 7. AuditIntelligence Inactive Users Ad-hoc Report Password Expiration Ad-hoc Report User Activity Recordings Inactive Users Ad-hoc Report After creating a Managed Object for Inactive User Tracking, you can schedule daily s listing all inactive user and computer accounts. This report can be also generated on demand and reviewed in a web browser. To generate an ad-hoc report on inactive users 1. In the left pane, navigate to your Managed Object Inactive Users Tracking. 2. Make sure that the Enable inactive users tracking checkbox is selected. 3. In the right pane, specify the account inactivity period, after which a user is considered to be inactive in the Consider user inactive after < > days of inactivity field. 4. Apply the corresponding filters under the Scope section. 5. Navigate to Ad-hoc Report under the Inactive Users Tracking node and click Run to generate a report. The report will be displayed in the default web browser: Password Expiration Ad-hoc Report After creating a Managed Object for Password Expiration Alerting, you can schedule daily s listing users with expiring passwords. This report can be also generated on demand and reviewed in a web browser. 93/233

94 7. AuditIntelligence To generate an ad-hoc report on expiring passwords 1. In the left pane, navigate to your Managed Object Password Expiration Alerting. 2. Make sure that the Enable password expiration alerting checkbox is selected. 3. Navigate to Ad-hoc Report under the Password Expiration Alerting node and click Run to generate the report. 4. In the Maximum Password Age Setting dialog, select domain policy settings or specify the maximum password age in days. 5. The report will be displayed in the default web browser: User Activity Recordings After creating a Managed Object for User Activity, you can generate an on-demand summary of video recordings. NOTE: Only users that belong to the Netwrix User Activity Video Reporter Auditors group have remote access to video records. To generate a summary of video recordings 1. In the left pane, navigate to your Managed Object User Activity. 2. Make sure that Enable user activity video recording checkbox is selected. 94/233
95 7. AuditIntelligence 3. Navigate to Managed Object User Activity Activity Records and apply the following filters: Parameter From... To... Group by Computers Users Show detailed user activity log Application description Window title Description Specify the time range to collect video recordings. Select the data sorting type. Click Specify to select computers to view video recordings from. Click Specify to select users whose recorded sessions you want to be included in the report. Select the checkbox to receive detailed video recordings summary. Click Specify to select applications whose recorded sessions you want to be included in the report. Specify a full name of the application window to view video recordings from. For example, Active Directory Users and Computers. NOTE: Available only when Show detailed user activity log checkbox is selected. The report is displayed in Netwrix Auditor Administrator Console: 95/233
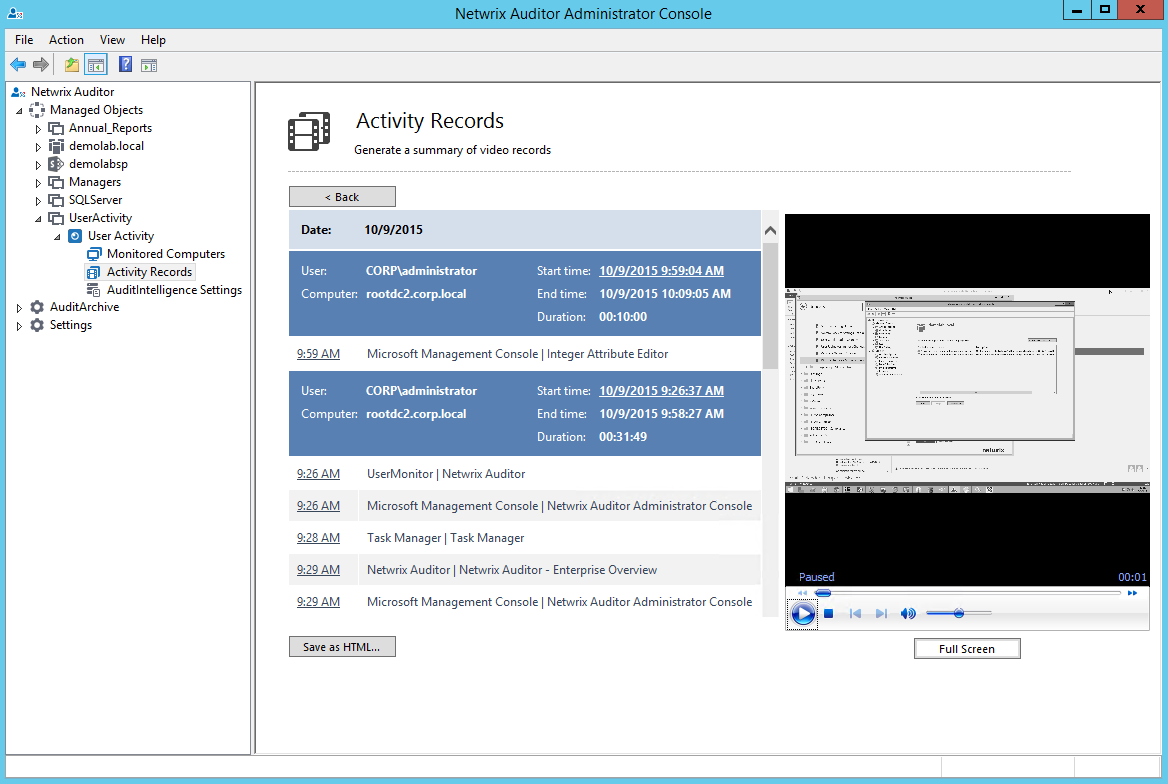
96 7. AuditIntelligence 96/233
97 8. Real-Time Alerts 8. Real-Time Alerts If you want to be notified immediately about changes to certain objects, you can configure real-time alerts that will be triggered by specific events. Alerts are ed immediately after the specified event has been detected. This functionality is currently available for the following audited systems: Active Directory Event Log (including alerts for non-owner mailbox access events) You can create your own custom alerts, enable/disable and modify the predefined real- time alerts provided by Netwrix. To do it, perform the following procedures: To.. Enable/ disable an existing alert In the Netwrix Auditor Administrator Console 1. Navigate to one of the following locations: Managed Objects your_ Managed_Object_name Active Directory Real- Time Alerts. Managed Objects your_ Managed_Object_name Event Log Real-Time Alerts. 2. Select an alert from the list in the left pane. 3. Right-click an alert and select Enable or Disable. In the Managed Object wizard 1. Proceed to the Configure Real- Time Alerts step. 2. Double- click an alert to enable or disable it. Modify an existing alert 1. Navigate to one of the following locations: Managed Objects your_ Managed_Object_name Active Directory Real- Time Alerts. Managed Objects your_ Managed_Object_name Event Log Real-Time 1. Proceed to the Configure Real- Time Alerts step. 2. Select an alert and click Edit. The Edit Real-Time Alert wizard will open. 97/233
98 8. Real-Time Alerts To.. In the Netwrix Auditor Administrator Console In the Managed Object wizard Create a new alert Alerts. 2. Select an alert from the list in the left pane. 3. In the right pane, check Enable since only the enabled alerts can be modified. 4. Navigate to the options that require modification and update them. 1. Navigate to one of the following locations: Managed Objects your_ Managed_Object_name Active Directory Real- Time Alerts. Managed Objects your_ Managed_Object_name Event Log Real-Time Alerts. 2. Right-click the Real-Time Alerts node and select New Real-Time Alert. The New Real- Time Alert wizard will open. 1. Proceed to the Configure Real- Time Alerts step. 2. Click Add. The New Real-Time Alert wizard will open. Review the following for additional information: Create Real-Time Alerts for Active Directory Create Real-Time Alerts for Event Log Create Real-Time Alerts for Non-Owner Mailbox Access Events The table below lists the predefined real-time alerts, provided by Netwrix: Alert Description Active Directory Changes to Admin Group Alerts on changes to the Domain Admins and the Enterprise Admins 98/233
99 8. Real-Time Alerts Alert Membership Changes to AD Objects by Administrator Changes to Any Active Directory Objects Changes to Domain Configuration Domain Controller Demotion Domain Controller Promotion Organizational Unit Deletion Description group. Alerts on any changes to Active Directory objects made under the Administrator account. Alerts on any changes made to any Active Directory object. Alerts on changes to objects in domain configuration partition, such as sites, trusts, and so on. Alerts on a domain controller demotion. Alerts on a domain controller promotion. Alerts on an Organizational Unit deletion. Event Log System Errors Application Errors Alerts on errors in the System event log. Alerts on errors in the Application event log Create Real-Time Alerts for Active Directory 1. Start the New Real-Time Alert wizard. See Real-Time Alerts for more information. 2. On the Specify Real-Time Alert Name step, specify the alert name and enter alert description (optional). 3. On the Configure Real- Time Alert Filters and Notifications step, specify the alert filters and configure notifications. Click Add in the Alert Filters section to specify a condition that will trigger the alert. 4. Complete the Alert Filter wizard. Complete the following fields: In the General tab: Option Name Description Specify the filter name. 99/233
100 8. Real-Time Alerts Option Description Alert severity Description Enter the description for this filter (optional). Select alert severity level from the drop-down list (Critical/High/ Normal/Low). NOTE: Alert severity level will be displayed in the notification. In the Change tab: Option Who changed Description Specify the name of the user whose actions must trigger the alert. In case a group membership is audited, you can specify a group name. Click to select users from your domain. Alternatively, you can use a wildcard (*). In this case, the alert will be triggered if the action is performed by any user. If the product is configured to collect the information on group membership of the users who make changes, you can also select a group if you want to be notified when a change is made by any member of this group. Change type Object path Select a change type (Add/Modify/Remove) from the drop-down list. Specify the object path, e.g., the path to the AD object whose modification you want to track. Click to select a container within your domain (e.g., \local\enterprise\file Servers).You can use wildcard (*). Include child objects Select this option if you want the filter to be applied to all child objects in the specified path. In the Attributes tab, click Add to specify an AD object attribute whose modification must trigger the alert: Option Object type Description Select object type from the drop-down list. This list contains all Active Directory object types. You can use wildcard (*). 100/233
.")
101 8. Real-Time Alerts Option Object name Attribute name Values Description (Optional) Select object name to limit alerting to certain objects. You can use wildcard (*). Select the attribute whose modification must trigger the alert. This list is populated depending on the selected object type. You can use wildcard (*). This field is displayed if a multi-value attribute is selected (e.g., "photo"). Select the type of change (e.g., Added or Removed), and specify the filter values. Previous value This field is displayed if a single-value attribute is selected. Select a value (possible values are: Equals, Not equal to, Starts with, Ends with, Less than, Greater than, Less or equal, Greater or equal) and specify the previous value of the attribute. You can use wildcard (*). Current value This field is displayed if a single-value attribute is selected. Select a value (possible values are: Equals, Not equal to, Starts with, Ends with, Less than, Greater than, Less or equal, Greater or equal) and specify the current value of the attribute. You can use wildcard (*). 101/233
102 8. Real-Time Alerts NOTE: Sometimes, it can be quite difficult to select the appropriate attribute for the type of change that must trigger an alert. If you are unsure which attribute is responsible for the type of change you want to track, refer to Identify Correct Attributes for detailed instructions on how to identify an attribute. Click OK to save the changes and close the Attribute Filters dialog. And OK to save the changes and close the Alert Filter dialog. 5. In the Notifications section of the New Real-Time Alert wizard, click Add and select one of the following: Specify the address where notifications will be delivered. You can add as many recipients as necessary. Click Verify to check your settings. The product will send a test message to the specified address and will inform you if any problems are detected. Text (SMS) Specify the phone number where SMS-notifications will be delivered. Select you Carrier in the drop-down list. NOTE: In the current Netwrix Auditor version only AT&T, Sprint, Verizon and T-Mobile carriers are supported. 6. Review your real-time alert settings and click Finish to exit the wizard. The new alert will be created under the Real-Time Alerts node. If an event occurs that triggers an alert, an notification like in the example below will be sent immediately to the specified recipients: 102/233

103 8. Real-Time Alerts Refer to Create Custom Alerts for detailed instructions on how to create some popular custom alerts ("User granted VPN permissions", "User account lockout") Identify Correct Attributes 1. On the domain controller, make a test change that you want to configure a real-time alert for and that will act as a trigger. 2. In the Netwrix Auditor Administrator Console, navigate to Managed Objects your_managed_ Object_name and click Run in the right pane. On data collection completion, you will receive a Change Summary containing a list of changes that have been detected. 3. In this , look for the parameter name in the Details column of the corresponding change. 4. Open the propnames.txt file located in the %Netwrix Auditor installation folder%\active Directory Auditing folder and search for this parameter name. The value corresponding to this parameter is the name of the attribute you are looking for. NOTE: If you are unable to locate the parameter name in the propnames.txt file, that means that the Change Summary contains the internal AD name for this attribute instead of a 103/233
104 8. Real-Time Alerts friendly name. In this case, this is the name of the attribute you are looking for that must be specified in the Attribute Filters dialog. For example, if you want to create an alert that is triggered by modifications of a user s Dial-in/VPN permissions, and you are unsure which attribute is responsible for this change, do the following: 1. On the domain controller, navigate to Start Administrative Tools Active Directory Users and Computers. 2. Expand the domain node and select Users. 3. Right-click a user and select Properties from the pop-up menu. 4. In the Dial-in tab, select Allow access in the Network Access Permission section. 5. In the Netwrix Auditor Administrator Console, navigate to Managed Objects your_managed_ Object_name and click Run in the right pane. On data collection completion, you will receive a Change Summary containing the change you have made. 6. In the Details column, locate the change parameter: Allow Dial-in. 7. Open the propnames.txt file and search for this parameter name. The entry in this file must say: *.msnpallowdialin=allow Dial-In. msnpallowdialin is the name of the attribute that must be selected from the drop-down list in the Attribute Filters dialog when creating the alert Create Custom Alerts 1. Start the New Real-Time Alert wizard: In the Netwrix Auditor Administrator Console Navigate to Managed Objects your_ Managed_ Object_ name Active Directory, right-click the Real- Time Alerts node and select New Real-Time Alert. In the Managed Object wizard Proceed to the Configure Real-Time Alerts step and click Add. 2. On the Specify Real-Time Alert Name step, specify the alert name, e.g., "User Account Lockout" or "User Granted VPN Permissions", and enter alert description (optional). 3. On the Configure Real- Time Alert Filters and Notifications step, specify the alert filters and configure notifications. Click Add in the Alert Filters section to specify a condition that will trigger the alert. 4. Complete the Alert Filter wizard. Depending on the alert you want to create, complete the following fields: 104/233
.")
105 8. Real-Time Alerts Option The User Account Lockout Alert The User Granted VPN The General tab Permissions Alert Name E.g., User Account Lockout E.g., "User Granted VPN Permissions" Description Enter the description for this filter (optional). Alert severity Normal Normal NOTE: Alert severity level will be displayed in the notification. NOTE: The picture below corresponds to the User Granted VPN Permissions alert. Option The User Account Lockout Alert The User Granted VPN Permissions The Change tab Alert 105/233

106 8. Real-Time Alerts Option The User Account Lockout Alert The User Granted VPN Permissions Alert Who changed Change type *\* NOTE: Active Directory is responsible for locking accounts. An account used by the system will be returned as the Who changed parameter. Modify *\* NOTE: This alert will be triggered if any user s VPN permissions are modified. Modify Object path Include child objects Leave this field empty. NOTE: This alert will be triggered by any account lockout in your Active Directory domain. Select this option. Leave this field empty. Select this option. NOTE: The picture below corresponds to the User Granted VPN Permissions alert. 106/233
107 8. Real-Time Alerts Option The User Account Lockout Alert The User Granted VPN Permissions The Attributes tab Alert Object type Object name User Leave this field empty. User Leave this field empty. Attribute name Previous value lockouttime NOTE: If you cannot locate this attribute in the list, type it in manually. Equals Leave the second entry field empty. msnpallowdialin Equals Leave the second entry field empty. Current value Equals Select User Account Locked Out from the second drop-down list. Equals Select True from the second drop-down list. NOTE: If you cannot locate this value in the list, type it in manually. NOTE: The picture below corresponds to the User Granted VPN Permissions alert. 107/233

108 8. Real-Time Alerts Click OK to save the changes and close the Attribute Filters dialog. And OK to save the changes and close the Alert Filter dialog. 5. In the Notifications section of the New Real-Time Alert wizard, click Add and select . Specify the address where notifications will be delivered. You can add as many recipients as necessary. NOTE: It is recommended to click Verify. The system will send a test message to the specified address and inform you if any problems are detected. 6. Review your Real-Time Alert settings and click Finish to exit the wizard. The new alert will be created under the Real-Time Alerts node and triggered if a specified change is detected. 108/233

109 8. Real-Time Alerts Now, if a specified event is detected in your IT infrastructure, an notification will be sent the recipients. For example, if VPN access is allowed for any user in your Active Directory domain, the following will be sent: 109/233
110 8. Real-Time Alerts 8.2. Create Real-Time Alerts for Event Log 1. Start the New Real-Time Alert wizard. See Real-Time Alerts for more information. 2. On the Specify Real-Time Alert Properties step, specify the alert name and enter alert description (optional). Specify the number alerts per . Grouped alerts for different computers will be delivered in separate messages. This value is set to 1 by default, which means that each alert will be delivered as a separate message. 3. On the Configure Real- Time Alert Filters and Notifications step, specify the alert filters and configure notifications. Click Add in the Event Filters section to specify an event that will trigger the alert. 4. Complete the Event Filters wizard. Complete the following fields: In the Event tab: Option Name Description Event Log Description Specify the filter name. Enter the description for this filter (optional). Select an event log from the drop-down list. You will be alerted on events from this event log. You can also input a different event log. To find out a log s name, navigate to Start Control Panel Administrative Tools Event Viewer Applications and Services Logs Microsoft Windows and expand the required Log_Name node, right-click the file under it and select Properties. Find the event log s name in the Full Name field. Netwrix Auditor does not collect the Analytic and Debug logs, so you cannot configure alerts for these logs. NOTE: You can use a wildcard (*). In this case you will be alerted on events from all Windows logs except for the ones mentioned above. Syslog events will be ignored. In the Event Fields tab: Option Event ID Description Enter the identifier of a specific event that you want to be alerted on. You can add several IDs separated by comma. 110/233
111 8. Real-Time Alerts Option Event Level Computer Description Select the event types that you want to be alerted on. If the Event Level checkbox is cleared, you will be alerted on all event types of the specified log. Specify a computer. You will only be alerted on events from this computer. NOTE: If you want to specify several computers, you can define a mask for this parameter. Below is an example of a mask: * - any machine computer a machine named computer *computer* - machines with names like xxxcomputerxxx or newcomputer computer? machines with names like computer1 or computerv co?puter - machines with names like computer or coxputer????? any machine with a 5-character name???* - any machine with a 3-character name or longer User Enter a user s name. You will be alerted only on the events generated under this account. NOTE: If you need to specify several users, you can define a mask for this parameter in the same way as described above. Source Specify this parameter if you want to be alerted on the events from a specific source. NOTE: If you need to specify several users, you can define a mask for this parameter in the same way as described above. Category Specify this parameter if you want to be alerted on a specific event category. 111/233
. Click Add and specify Insertion String. Click OK to save the changes and close the Event Filters dialog. 5.")
112 8. Real-Time Alerts In the Insertion Strings tab: Option Consider the following event Insertion Strings Description Specify this parameter if you want to receive alerts on events containing a specific string in the EventData. You can use a wildcard (*). Click Add and specify Insertion String. Click OK to save the changes and close the Event Filters dialog. 5. On the Configure Real-Time Alerts Filers and Notifications step of the New Real-Time Alert dialog, navigate to the Notifications section. Select Event Log Collection Status notification recipients, if you want the notifications to be delivered to the same addresses as specified for daily Event Log Collection Status notifications (the list of Event Log Collection Status notification recipients is configured during the Managed Object creation and can be modified under Managed Objects your_ Managed_ Object_ name Event Log). Alternatively, select Specify recipients, click Add and specify the address where notifications are to be delivered. NOTE: It is recommended to click Verify. The system will send a test message to the specified address and inform you if any problems are detected. 6. On the Configure Real-Time Alerts Filers and Notifications step, customize the notification template if needed. Click Edit next to Customize notifications template. Edit the template by deleting or inserting information fields. 7. Review your Real-Time Alert settings and click Finish to exit the wizard. The new alert will be created 112/233
 using the event log alerts.")
113 8. Real-Time Alerts under the Real-Time Alerts node. If an event occurs that triggers an alert, an notification like in the example below will be sent immediately to the specified recipients Create Real-Time Alerts for Non-Owner Mailbox Access Events You can configure real-time alerts to be triggered by non-owner mailbox access events (e.g., opening a message folder, opening/modifying/deleting a message) using the event log alerts. To enable real-time alerts for non-owner mailbox access events, you need to create a Computer Collection Managed Object for auditing event logs. To create real-time alerts for non-owner mailbox access events NOTE: The procedure below describes the basic steps, required for creation of the Computer Collection Managed Object that will be used to collect data on non-owner mailbox access events. See Create Managed Objects to Audit Event Log for more information. 113/233
114 8. Real-Time Alerts 1. On the Netwrix Auditor Administrator Console page, click the Event Log tile. In this case you will be prompted to select Computer Collection as a Managed Object type on the next step. 2. On the Specify Computer Collection Name step, enter the computer collection name. 3. On the Audit Database Settings step, make sure that the Make audit data available via summary s only checkbox is cleared. 4. On the Add Items to Computer Collection step, select the Windows Server item type and add a server where your Exchange organization resides. 5. On the Specify Notifications Recipients step, do not provide address to receive the summary as you have already configured notification delivery via Netwrix Mailbox Access Auditing tool. 6. On the Configure Real-Time Alerts step, make sure the predefined Real-Time Alerts are disabled. Click Add to create an alert for non-owner mailbox access event. 7. On the Specify Real-Time Alert Properties step of the New Real-Time Alert wizard, specify the alert name and enter alert description (optional). Specify the number alerts per . Grouped alerts for different computers will be delivered in separate messages. This value is set to 1 by default, which means that each alert will be delivered as a separate message. 8. On the Configure Real-Time Alert Filters and Notifications step of the New Real-Time Alert wizard, specify the alert filters and configure notifications. Click Add in the Event Filters section to specify an event that will trigger the alert. 9. Complete the Event Filter dialog. In the Event tab, specify the filter name and description. In the Event Log field enter "Netwrix Non-owner Mailbox Access Agent". In the Event Fields tab, complete the following fields: Event ID Enter the identifier of a specific event that you want to be alerted on. You can add several IDs separated by comma. Review the event IDs available in the Netwrix Nonowner Mailbox Access Agent event log: ID Description Access Type (as displayed in XML view of event details) 1 A folder was opened actfolderopen 2 A message was opened actmessageopened 3 A message was sent actmessagesubmit 4 A message was changed and saved actchangedmessagesaved 114/233
115 8. Real-Time Alerts ID Description Access Type (as displayed in XML view of event details) 5 A message was deleted actmessagedeleted 6 A folder was deleted actfolderdeleted 7 The entire contents of a folder was deleted actallfoldercontentsdeleted 8 A message was created and saved actmessagecreatedandsaved 9 A message was moved or/and copied actmessagemovecopy 10 A folder was moved or/and copied actfoldermovecopy 14 A folder was created actfoldercreated See Review Event Description for more information. Source Enter "Netwrix Non-owner Mailbox Access Agent". In the Insertion Strings tab, select Consider the following event Insertion Strings to receive alerts on events containing a specific string in the EventData. Click Add and specify Insertion String. Click OK to save the changes and close the Event Filters dialog. 10. On the Configure Real-Time Alerts Filers and Notifications step of the New Real-Time Alert dialog, navigate to the Notifications section. Select Specify recipients, click Add and specify the address where notifications will be delivered. NOTE: It is recommended to click Verify. The system will send a test message to the specified address and inform you if any problems are detected. 11. On the Configure Real-Time Alerts Filers and Notifications step, customize the notification template if needed. Click Edit next to Customize notifications template. Edit the template by deleting or inserting information fields. 12. Review your Real-Time Alert settings and click Finish to exit the New Real-Time Alert wizard. The new alert will be added to the Real-Time Alerts list on the Configure Real-Time Alerts step of the New Managed Object wizard. If an event occurs that triggers an alert, an notification will be sent immediately to the specified recipients. 13. On the Configure Audit Archiving Filters step, in the Inclusive Filters section clear the filters you do not need, click Add and specify the following information: 115/233

116 8. Real-Time Alerts The filter name and description (e.g., Non-owner mailbox access event) In Event Log, enter "Netwrix Non-owner Mailbox Access Agent". In Write to, select Long-Term Archive. The events will be saved into the local repository. 14. On the last step, review your Managed Object settings and click Finish to exit the wizard. The newly created Managed Object will appear under the Managed Objects node Review Event Description Review the example of the MessageOpened event in the XML view: Depending on the event, the strings in the description may vary. The first eight strings are common for all events: String String1 String2 String3 String4 String5 String6 Description The event type: info or warning The event date and time in the following format: YYYY_MM_DD_hh_mm_ss_000 The name of the user accessing mailbox The SID of the user accessing mailbox The GUID of the mailbox being accessed Shows whether the user accessing mailbox is the owner: it is always false 116/233
117 8. Real-Time Alerts String String7 String8 Description The IP of the computer accessing the mailbox The access type The following strings depend on the non-owner access type, represented by different Event IDs: Event ID Access type (String 8) Strings Description 1 actfolderopen String9 The internal folder URL 2 actmessageopened String9 The internal message URL String10 The message subject String11 The message type: IPM.Note , IPM.Contact contact, etc. 3 actmessagesubmit String9 The internal message URL String10 String11 The message subject addresses of the message recipients, separated by a semicolon String12 The message type: IPM.Note , IPM.Contact contact, etc. 4 actchangedmessagesaved String9 The internal message URL String10 The message subject String11 The message type: IPM.Note , IPM.Contact contact, etc. 5 actmessagedeleted String9 The internal message URL String10 String11 The message subject The message type: IPM.Note , IPM.Contact contact, etc. 6 actfolderdeleted String9 The internal folder URL 7 actallfoldercontentsdeleted String9 The internal folder URL 117/233
118 8. Real-Time Alerts Event ID Access type (String 8) Strings Description 8 actmessagecreatedandsaved String9 The internal message URL 9 actmessagemovecopy String9 The message being moved/copied the final part of the message URL, e.g., /Inbox/testMessage.EML String10 String11 String12 String13 The action copy or move The folder URL the message is copied/moved from The destination folder URL The message type: IPM.Note , IPM.Contact contact, etc. 10 actfoldermovecopy Strings 9-13 The string descriptions for the folder are similar to those for messages. 14 actfoldercreated String9 The new folder URL NOTE: With different Exchange versions and/or different clients, the same non-owner action (e.g., copying a message) may generate different events: e.g., actmessagemovecopy with one server/client or actmessagecreatedandsaved with another. You can add the required strings contained in % symbols for your own custom alert separated by a <br> tag in <b>event Parameters:</b>. Event parameter descriptions can also be added. In the example below, the following information has been added: The description for String 3 User accessing mailbox String 8 with the description String 9 with the description 118/233

119 8. Real-Time Alerts 119/233
120 9. Configure Settings 9. Configure Settings Netwrix Auditor provides a convenient interface for configuring or modifying settings that are applied to all existing Managed Objects and target systems audited within them. This chapter provides detailed instructions on how to configure these settings. NOTE: For instructions on how to configure or modify settings for each Managed Object individually, or the target system audited with the product, refer to Modify Managed Objects. To modify global settings 1. In Netwrix Auditor Administrator Console, navigate to Settings. 2. In the right pane, click on the setting name to see details. Review the following for additional information: Configure Notifications Settings Configure Data Collection Settings Configure Syslog Platforms Settings Update Licenses 9.1. Configure Notifications Settings The SMTP settings are configured when you create the first Managed Object in the New Managed Object wizard. Navigate to Settings Notifications to review the SMTP settings used to deliver notifications, reports, etc., and click Modify to adjust them if necessary. Setting SMTP server Port Sender address Description Enter your SMTP server name. Specify your SMTP server port number. Enter the address that will appear in the From field. NOTE: It is recommended to click Verify. The system will send a test message to the specified address and inform you if any problems are detected. SMTP Authentication Select this checkbox if your mail server requires the SMTP authentication. 120/233
121 9. Configure Settings Setting User name Password Confirm password Use Secure Sockets Layer encrypted connection (SSL) Implicit SSL connection mode Description Enter a user name for the SMTP authentication. Enter a password for the SMTP authentication. Confirm the password. Select this checkbox if your SMTP server requires SSL to be enabled. Select this checkbox if the implicit SSL mode is used, which means that an SSL connection is established before any meaningful data is sent Configure Data Collection Settings Navigate to Settings Data Collection to review the default data collection settings, including the default Data Processing Account and data collection schedule, and update them if necessary. NOTE: These settings affect auditing of the following systems: File Servers SQL Server VMware Windows Server Inactive users in Active Directory Password expiration in Active Directory To modify default data collection and Change Summary generation schedule 1. Click Modify next to Default data collection and Change Summary generation schedule. 2. In the Modify Schedule dialog, set the new schedule (for example, increase the number of data collections per day or the start time). You can also create several scheduled tasks to collect data. To do it, select Show multiple schedules. After selecting this checkbox you will be able to expand the scheduled tasks list and create new tasks and modify them separately. Click Advanced to customize your scheduled data collection task. In the Advanced Schedule Options dialog, you can specify the Start and the End dates, frequency, task duration, etc. 121/233
122 9. Configure Settings To modify the default Data Processing Account 1. Click Modify next to Default Data Processing Account. 2. Provide the account credentials. NOTE: Make sure that the new account is granted all required rights and permissions to collect data from the audited systems. See Netwrix Auditor Installation and Configuration Guide for more information Configure Syslog Platforms Settings To review a list of Syslog-based platforms those event logs can be audited, navigate to Settings Syslog Platforms. Netwrix Auditor provides the following predefined platform types: Generic, Red Hat Enterprise Linux 5, and Ubuntu. You can also create and configure new Syslog-based platforms that can be subsequently selected as item types for your Managed Objects. Do one of the following: Contact Netwrix Support to order a custom platform from Netwrix if the predefined platforms do not cover your needs. Click Add to add a new platform. See To create a Syslog-based platform for more information. Select a platform from the list and click Edit to modify it. NOTE: You cannot edit a predefined platform. If you try to edit it, a copy of this platform will be created, which can be modified. Select a custom platform and click Remove to delete a platform. NOTE: The predefined platforms cannot be deleted. Click View to view platform rules. Click Modify next to Syslog server port to update a port number. To create a Syslog-based platform 1. Click Add. 2. In the New Syslog Platform dialog, select the following parameters: Select the platform type. Select New to create a new platform and define its rules. Alternatively, you can select Copy, and create a platform based on a predefined platform, thus inheriting its rules and edit it afterwards. Specify a platform name and add a description. 122/233
123 9. Configure Settings 3. On the Configure Rules step, click Add to add events processing rules. You can also edit, re-order and delete rules on this step. To store events that do not match any of the rule patterns, select the corresponding checkbox. 4. In the dialog that opens, specify the following parameters: Parameter Enable Rule name Description Regular expression pattern Description Make sure that this option is selected. Specify the rule name. Specify the rule description (optional). Specify a pattern, according to which events will be collected. When an event matches this pattern, this event will be logged. The rows below contain information that will be added to a Syslog event if it matches a specified pattern. This information can be used to filter events and sort them by. Source User name Specify the name of a source. It can be any word that will help you identify the platform where an event was generated. Specify the number of a capturing group which defines a user name in a pattern in the following format: %Сapturing_Group_Number. If needed, you can add more information, for example: Domain_ Name\%Сapturing_ Group_ Number. The right Сapturing_ Group_ Number can be calculated if you enumerate capturing groups in a pattern starting from 0. Event ID Event level Specify a number which will be added to an event as its ID. Specify the event level. 5. Review the details and complete the wizard. The platform will be added to the Available platforms list Update Licenses The Licenses node allows you to review the status of your current licenses, update them and add new licenses. 123/233
124 9. Configure Settings To update/add a license 1. Click Update Licenses. 2. In the dialog that opens, do one of the following: Select Load from file, click Browse and point to a license file received from your sales representative. Select Enter manually and type in your company name, license count and license codes Notes for Managed Service Providers Being a Managed Service Provider (MSP) you are supplied with a special MSP license that allows you to deploy Netwrix Auditor on several servers with the same license key. In this case the license count is based on total number of users across all managed client environments. To ensure that licenses are calculated correctly (per heartbeat) by Netwrix, perform the following steps: 1. Create organizational units within audited domains and add there service accounts you want to exclude from license count. 2. Navigate to Netwrix Auditor installation folder\netwrix Auditor\Administrative Console and locate MSP.xml. 3. In MSP.xml, provide the following: CustomInstanceIdentificator Is used to identify a server where Netwrix Auditor is installed. It can be any custom name, for example a server name, code name or any other name you use to distinguish this server from another (e.g., CompanyABCServer). The identifier must be unique for each client as this information is used when counting licenses. NOTE: Netwrix gathes the following information about MSP licenses: identificator, license key and license count. ServiceAccount Path Is a path to OU that contains service accounts. You can add several OUs to MSP.xml, one per line. For example: <?xml version="1.0" encoding="utf-8"?> <MSPSettings> <CustomInstanceIdentificator>CompanyABCServer</CustomInstanceIdentificator> <ServiceAccounts> <ServiceAccount Path="domain.com/Users/Service Accounts" /> <ServiceAccount Path="domain2.com/Users/Service Accounts" /> </ServiceAccounts> 124/233
125 9. Configure Settings </MSPSettings> 4. Navigate to Netwrix Auditor installation folder\netwrix Auditor\Administrative Console and start Netwrix.NAC.MSPTool.exe. The tool transfers information on service accounts to Netwrix Auditor. Netwrix Auditor uses this information to exclude service accounts from license count so that only heartbeat users will be calculated. NOTE: You must run Netwrix.NAC.MSPTool.exe every time you update MSP.xml. 125/233
126 10. Additional Configuration 10. Additional Configuration This chapter provides instructions on how to fine tune Netwrix Auditor using the additional configuration options. Review the following for additional information: Configure Audit Automatically with Active Directory Audit Configuration Wizard Enable Auditing of Active Directory Partitions Configure Audit Archiving Filters Exclude Objects From Auditing Scope Fine tune Netwrix Auditor Using Registry Keys Enable Integration with Third-Party SIEM Solutions Roll Back Changes with Active Directory Object Restore Netwrix Auditor System Health Log Configure Audit Automatically with Active Directory Audit Configuration Wizard If you have already configured a Managed Object to audit your Active Directory domain and Exchange organization, but for some reason decided to disable automatic audit configuration in the New Managed Object wizard, you can still configure audit settings automatically through the Active Directory Audit Configuration wizard. To configure audit automatically through the Active Directory Audit Configuration wizard NOTE: For the wizard to work properly, you must run it under an account that is a member of the Domain Admins or Enterprise Admins group. 1. In Netwrix Auditor Administrator Console, navigate to your Managed Object that audits domain. Refer to Create Managed Objects to Audit Active Directory for detailed instructions on how to create a Managed Object that audits Active Directory domain. 2. Select Active Directory in the left pane, and click Configure Audit next to Audit Configurationto launch the Active Directory Audit Configuration wizard. 3. On the first step, specify the name of the domain that you want to configure for auditing. 126/233

127 10. Additional Configuration 4. Enable the Apply to the forest root domain option if you want to audit changes to Active Directory schema and configuration, as the forest root domain contains audit settings for the Configuration and Schema partitions. NOTE: Refer to Enable Auditing of Active Directory Partitions for detailed instructions on how to enable monitoring of changes to the Schema partition in the target AD domain. 5. Select the effective policy that is currently applied to the domain controllers and that is subject to change. 6. On the Domain Audit Policies step, specify the Data Processing Account that will be used by Netwrix Auditor to collect data from the audited domain. 127/233

128 10. Additional Configuration 7. Click Detect. If your current settings do not match the configuration required for the product to function properly, a report will be displayed showing the current audit policy settings in the monitored domain as in the example below: NOTE: If any of your other policies conflict with the settings required for the product to function properly, a warning message will be displayed listing these conflicts. If this happens, analyze carefully how your environment will be affected before applying the required settings. The Active Directory Audit Configuration wizard cannot reconnize whether advanced audit policies are applied and configure them. To apply the required configuration automatically, click Adjust. Your audit policy settings and the Manage auditing and security log right will be adjusted and the confirmation dialog will be displayed on successful operation completion. 8. On the Object-Level Audit Settings step, click Detect to verify your object-level audit settings for the Domain, Configuration and Schema partitions. Click Adjust to configure the required settings 128/233

129 10. Additional Configuration automatically. 9. On the Event Log Size and Retention Settings step, click Detect to verify your Security event log size and retention settings. Click Adjust to configure the required settings automatically. 10. On the Exchange Server Administrator Audit Logging Settings step, click Detect to verify your Exchange Administrator Audit Logging settings. Click Adjust to configure the required settings automatically. NOTE: This step is required only if the audited AD domain has an Exchange organization running Microsoft Exchange 2010 or Otherwise, skip this step. 129/233

130 10. Additional Configuration 11. Review your audit settings and complete the wizard Enable Auditing of Active Directory Partitions NOTE: This topic applies to auditing Active Directory only. Active Directory environment consists of the following directory partitions: Domain partition Stores users, computers, groups and other objects. Updates to this partition are replicated only to domain controllers within the domain. Configuration partition Stores configuration objects for the entire forest. Updates to this partition are replicated to all domain controllers in the forest. Configuration objects store the information on sites, services, directory partitions, etc. Schema partition Stores class and attribute definitions for all existing and possible Active Directory objects. Updates to this partition are replicated to all domain controllers in the forest. By default, Netwrix Auditor only tracks changes to the Domain partition and the Configuration partition of the audited domain. If you also want to audit changes to the Schema partition, or to disable auditing of changes to the Configuration partition do the following: NOTE: You cannot disable auditing the Domain partition for changes. To enable auditing of the Configuration and Schema partitions 1. In Netwrix Auditor Administrator Console, navigate to Managed Objects your_managed_object_ name Active Directory. 130/233
131 10. Additional Configuration 2. In the right pane, click Configure next to Advanced Options. 3. In the Advanced Options dialog, select Configuration and Schema. Information on changes to the selected partitions will be available in reports and will be saved in snapshots Configure Audit Archiving Filters NOTE: Currently this functionality is available only for auditing event logs. Audit archiving filters define what events will be saved to the Long-Term Archive or the Audit Database, and provide more granular reporting. You can also skip certain events with exclusive filters (e.g., computer logons). You can enable or disable, and modify existing filters, and create new filters in one of the following locations: Configure audit archiving filters while creating a Managed Object for auditing event logs. See Create Managed Objects to Audit Event Log for more information. If you have a Managed Object configured to audit event logs, proceed with following steps. In Netwrix Auditor Administrator Console, navigate to Managed Objects your_managed_object_ name Event Log Audit Archiving Filters. Netwrix Auditor allows creating inclusive and exclusive audit archiving filters. To configure audit archiving filters, perform the following: To create or modify an audit archiving filter, see To create or edit an audit archiving filter. To collect events required to generate a specific report, you must select a filter which name coincides with this report s name. Click Enable and select Filters for Reports. All filters required to store events for all available reports will be selected automatically. To select filters required to collect events for regulatory compliances (GLBA, HIPAA, PCI, SOX), click Enable, click Select compliance and choose a required regulation. To create or edit an audit archiving filter 1. On the Audit Archiving Filters page, click Add or select a filter and click Edit. 2. Complete the fields. Review the following for additional information: Option Description The Event tab Name Specify the filter name. 131/233
132 10. Additional Configuration Option Description Event Log Description Enter the description for this filter (optional). Select an event log from the drop-down list. You will be alerted on events from this event log. You can also input a different event log. To find out a log s name, navigate to Start Control Panel Administrative Tools Event Viewer Applications and Services Logs Microsoft Windows and expand the required <Log_Name> node, right-click the file under it and select Properties. Find the event log s name in the Full Name field. Netwrix Auditor does not collect the Analytic and Debug logs, so you cannot configure alerts for these logs. By selecting the Syslog option, only the events from Syslog-based platforms will be processed. Events from custom Windows logs with the same names will not be collected. NOTE: You can use a wildcard (*). For inclusive filters: all Windows logs except for the ones mentioned above will be saved. Syslog events will be ignored. For exclusive: all Windows logs events will be excluded. Syslog events will be stored. Write to/don't write to Select the location to write/not to write events to, depending on the filter type (inclusive or exclusive). NOTE: It is recommended to write events both to the Long-Term Archive and to the Audit Database, because if your database is corrupted, you will be able to import the necessary data from the Long-Term Archive using the DB Importer tool. See Import Audit Data to Investigation Database for more information. The Event Fields tab Event ID Event Level Enter the identifier of a specific event that you want to be save. You can add several IDs separated by comma. Select the event types that you want to be save. If the Event Level check box is cleared, all event types will be saved. NOTE: If you want to select the inclusive Success Audit/Failure Audit filters, note that on these platforms these events 132/233
133 10. Additional Configuration Option Description belong to the Information level, so they will not be collected if you select the Information checkbox in the Exclusive Filters. Computer Specify a computer (as it is displayed in the Computer field in the event properties). Only events from this computer will be saved. NOTE: If you want to specify several computers, you can define a case-sensitive mask for this parameter. Below is an example of a mask: * - any machine computer a machine named computer *computer* - machines with names like xxxcomputerxxx or newcomputer computer? machines with names like computer1 or computerv co?puter - machines with names like computer or coxputer????? any machine with a 5-character name???* - any machine with a 3-character name or longer User Enter a user s name. Only events created by this user will be saved. NOTE: If you need to specify several users, you can define a mask for this parameter in the same way as described above. Source Specify this parameter if you want to save events from a specific source. Input the event source as it is displayed in the Source field in the event properties. NOTE: If you need to specify several sources, you can define a mask for this parameter in the same way as described above. Category Specify this parameter if you want to save a specific events category. The Insertion Strings tab Consider the following Specify this parameter if you want to store events containing a 133/233
134 10. Additional Configuration Option event Insertion Strings Description specific string in the EventData. You can use a wildcard (*). Click Add and specify Insertion String Exclude Objects from Auditing Scope You can fine-tune Netwrix Auditor by specifying data that you want to exclude from the auditing scope. This can be helpful if you want to reduce time required for the data collection, reduce the disk space, required to store the collected data and customize your reports and data searches. To exclude data from the auditing scope, perform the following procedures: Exclude Data from Active Directory Auditing Scope Exclude Data from Exchange Auditing Scope Exclude Data from File Servers Auditing Scope Exclude Data from SharePoint Auditing Scope Exclude Data from SQL Server Auditing Scope Exclude Data from VMware Auditing Scope Exclude Data from Windows Server Auditing Scope Exclude Data from Event Log Auditing Scope Exclude Data from Group Policy Auditing Scope Exclude Data from Inactive Users Auditing Scope Exclude Data from Mailbox Access Auditing Scope Exclude Data from Password Expiration Auditing Scope Exclude Data from Active Directory Auditing Scope You can fine-tune Netwrix Auditor by specifying data that you want to exclude from the Active Directory auditing scope. To exclude data from the Active Directory auditing scope 1. Navigate to the %Netwrix Auditor installation folder%\active Directory Auditing folder. 2. Edit the *.txt files, based on the following guidelines: 134/233
135 10. Additional Configuration Each entry must be a separate line. A wildcard (*) is supported. For example, you can use * for a class name to specify an attribute for all classes. Lines that start with the # sign are treated as comments and are ignored. File Description Syntax addprops.txt allowedpathlist.txt omitallowedpathlist.txt Allows adding properties to appear in the Change Summaries for newly created AD objects. When a new object is added, Netwrix Auditor does not show any data in the Details column in the Change Summary s. If you want to see the information on certain attributes of a newly created object, specify these attributes in this file. Contains a list of AD paths to be included in change reports. This file can be used, for example, if you only want to monitor specific OU(s) inside your AD domain, but not the entire domain. In this case, put a wildcard (*) in the omitpathlist.txt file to exclude all paths, and then specify the OU(s) you want to monitor in the allowedpathlist.txt file. Contains a list of AD paths to be excluded from Change Summaries and reports. This file can be used if you want to exclude certain paths inside those specified in the allowedpathlist.txt file. In this Object type:property: For example, to show a group description on this group s creation, add the following line: group:description: Path NOTE: The path must be in the format displayed in the Object Name column in the Change Summary or the What column in reports. For example, to monitor only the Users OU in domain CORP, add the following line: \local\corp\users\* In the omitpathlist.txt file, specify the wildcard (*) Path NOTE: The path must be in the format displayed in the Object Name column in the Change Summary or the What column in reports. For example, to monitor the Users OU, but to exclude users jsmith and pbrown, 135/233
136 10. Additional Configuration File Description Syntax case, put a wildcard (*) in the omitpathlist.txt file to exclude all paths, then specify the OU (s) you want to audit in the allowedpathlist.txt file, and then specify the paths you want to exclude from within them in the omitallowedpathlist.txt file. do the following: 1. Add the wildcard (*) to the omitpathlist.txt file. 2. Add the following line to the allowedpathlist.txt file: *\Users\* 3. Add the following lines to the omitallowedpathlist.txt file: omitobjlist.txt omitpathlist.txt omitproplist.txt omitreporterrors.txt Contains a list of object types to be excluded from change reports. Contains a list of AD paths to be excluded from change reports. Contains a list of object types and properties to be excluded from change reports. Contains a list of errors to be excluded from Change Summaries. *\pbrown *\jsmith Object type For example, to omit changes to the printqueue object, add the following line: printqueue. Path NOTE: The path must be in the format displayed in the Object Name column in the Change Summary or the What column in reports. For example, to exclude changes to the Service Desk OU, add the following line: *\Service Desk\*. object_type.property_name NOTE: If there is no separator (.) between an object type and a property, the whole entry is treated as an object type. For example to exclude the admincount property from reports, add the following line: *.admincount. Error message text For example, if you have advanced audit 136/233
137 10. Additional Configuration File Description Syntax settings applied to your domain controllers policy, the following error will be returned in the Change Summary s: Auditing of Directory Service Access is not enabled for this DC. Adjust the audit policy settings using the Active Directory Audit Configuration Wizard or see the product documentation for more information. Add the text of this error message to this file to stop getting it in the Change Summary s. omitsnapshotpathlist.txt omitstorelist.txt processaddedprops.txt Contains a list of AD paths to be excluded from AD snapshots. Contains a list of object types and properties to be excluded from AD snapshots. Allows adding properties to appear in change reports (SSRS-based) for newly created AD objects. When a Path NOTE: The path must be in the format displayed in the Object Name column in the Change Summary or the What column in reports. For example, to exclude data on the Disabled Accounts OU from the the Snapshot report, add the following line: *\Disabled Accounts*. object_type.property_name NOTE: If there is no separator (.) between an object type and a property, the whole entry is treated as an object type. For example to exclude data on the AD admindescription property, add the following line: *.admindescription. object type:property: For example, if you want a user s Description property to be displayed in the reports when a user is added, add the 137/233
138 10. Additional Configuration File Description Syntax processdeletedprops.txt propnames.txt new object is created, Netwrix Auditor does not show any data in the Details column in reports. If you want to see the information on certain attributes of a newly created object, specify these attributes in this file. Allows adding properties to appear in change reports (SSRS- based) for deleted AD objects. When an object is deleted, Netwrix Auditor does not show any data in the Details column in reports. If you want to see the information on certain attributes of a deleted object, specify these attributes in this file. Contains a list of humanreadable names for object types and properties to be displayed in change reports. following line: User:Description: object type:property: For example, if you want a user s Description property to be displayed in the reports when a user is deleted, add the following line: User:Description: classname.attrname= intelligiblename For example, if you want the admindescription property to be displayed in the reports as Admin Screen Description, add the following line: *.admindesciption=admin Screen Description Exclude Data from Exchange Auditing Scope You can fine-tune Netwrix Auditor by specifying data that you want to exclude from the Exchange auditing scope. To exclude data from Exchange Auditing scope 1. Navigate to the %Netwrix Auditor installation folder%\active Directory Auditing folder. 2. Edit the *.txt files, based on the following guidelines: 138/233
139 10. Additional Configuration Each entry must be a separate line. A wildcard (*) is supported. For example, you can use * for a class name to specify an attribute for all classes. Lines that start with the # sign are treated as comments and are ignored. File Description Syntax aal_omitlist.txt For Exchange 2010 and above, the file contains a list of changes performed by cmdlets. To exclude a change from reports, specify name of a cmdlet and the attribute that is changed by the selected cmdlet. cmdlet.attrname For example: Set-User Set-ContactSet-Group #Update-AddressList Add-ADPermissionRemove- ADPermission #RBAC: aal_propnames.txt omitobjlist_ecr.txt omitpathlist_ecr.txt For Exchange 2010 and above, the file contains a list of human-readable names of changed attributes to be displayed in change reports. To exclude a change from the reports, specify name of a cmdlet and the attribute that is changed by the selected cmdlet. Contains a list of humanreadable names of object classes to be excluded from change reports. Contains a list of AD paths to be excluded from change reports. *-MailboxAuditLogSearch *-AdminAuditLogSearch classname.attrname= intelligiblename For example: *- OutlookAnywhere.SSLOffloading = Allow secure channel (SSL) offloading Classname For example: exchangeadminservice msexchmessagedeliveryconfig Exchange_DSAccessDC Path For example: *\Microsoft Exchange System Objects\SystemMailbox* 139/233
140 10. Additional Configuration File Description Syntax omitproplist_ecr.txt Contains a list of object types and properties to be excluded from change reports. object_type.property_name NOTE: If there is no separator (.) between an object type and a property, the whole entry is treated as an object type. omitreporterrors_ecr.txt omitexchangeserverlist.txt omitstorelist_ecr.txt Contains a list of errors to be excluded from Change Summaries. Defines Exchange 2010 and 2013 to be excluded from data collection. Contains a list of classes and attributes names to be excluded from Exchange snapshots. For example: msexchsystemmailbox.* *.msexchedgesynccredential *.msexchmailboxmovetargetmdblink *.admindescription Error message text For example, to omit the error The HTTP service used by Public Folders is not available, possible causes are that Public stores are not mounted and the Information Store service is not running. ID no: c1030af3, add *c1030af3* to the file. FQDN_server_name For example: mailserver01.ent.local object_type.property_name NOTE: If there is no separator (.) between an object type and a property, the whole entry is treated as an object type. For example: Exchange_ Server.AdministrativeGroup Exchange_ Server.AdministrativeNote Exchange_Server.CreationTime 140/233
141 10. Additional Configuration File Description Syntax propnames_ecr2007.txt Contains a list of humanreadable names for object classes and attributes of Exchange 2007 to be displayed in change reports. classname.attrname= intelligiblename For example: msexchmdbavailabilitygroup= Database Availability Group Exclude Data from File Servers Auditing Scope You can fine-tune Netwrix Auditor by specifying data that you want to exclude from the Windows File Server, NetApp Filer and EMC Storage auditing scope. To exclude data from Windows File Server, NetApp Filer and EMC Storage auditing scope 1. Navigate to the %Netwrix Auditor installation folder%\file Server Auditing folder. 2. Edit the *.txt files, based on the following guidelines: Each entry must be a separate line. Wildcards (*,?) are supported. For example, you can use * for a class name to specify an attribute for all classes. Lines that start with the # sign are treated as comments and are ignored. A backslash (\) must be put in front of (*), (?) and (,) if they are a part of an entry value. File Description Syntax omitcollectlist.txt Contains a list of objects to be excluded from being audited. Managed Object name,server name,resource path NOTE: Wildcards are not supported for the Server Name field. To disable filtering for this field, specify an empty string. omiterrors.txt Contains a list of errors/warnings to be omitted from logging to the Netwrix Auditor System Health event For example: *,,\\\\*\\System Volume Information* Managed Object Name,server name,error text For example: *,productionserver1.corp.local,*access is denied* 141/233
142 10. Additional Configuration File Description Syntax log. omitreportlist.txt Contains a list of objects to be excluded from reports and Change Summary s. In this case audit data is still being collected. Managed Object name,change Type,who changed,resource type,resource path,property name NOTE: Wildcards are not supported for the Change Type For example: and Property Name fields. To disable filtering for these fields, specify an empty string. omitstorelist.txt omitstoreprocessl ist.txt Contains a list of objects to be excluded from being stored to the AuditArchive and showing up in reports. In this case audit data is still being collected. Contains a list of processes to be excluded from being stored to the AuditArchive and showing up in reports. *,,CORP\\jsmith,*,*, Managed Object name,change Type,who changed,resource type,resource path,property name NOTE: Wildcards are not supported for the Change Type For example: and Property Name fields. To disable filtering for these fields, specify an empty string. *,,*,*,\\\\productionserver1.corp.local\\bu ilds\\*,attributes Managed Object name,resource path,executable path NOTE: Only local applications can be excluded. For example: *,*,*notepad.exe Exclude Data from SharePoint Auditing Scope You can fine- tunenetwrix Auditor by specifying data that you want to exclude from the SharePoint auditing scope. To exclude data from SharePoint auditing scope 1. Navigate to the %ProgramData%\Netwrix Auditor\Netwrix Auditor for SharePoint\Configuration\<Managed_Object_GUID folder. 142/233
143 10. Additional Configuration 2. Edit the *.txt files, based on the following guidelines: Each entry must be a separate line. A wildcard (*) is supported, except for omiteventloglist.txt. Lines that start with the # sign are treated as comments and are ignored. File Description Syntax omitscstorelist.txt Contains a list of site collections to be excluded from audit data collection. http(s)://url NOTE: Enter the root web site URLs. omitwastorelist.txt Contains a list of web applications to be excluded from audit data collection. If you have alternate access mapping configured in your SharePoint farm, and one web application has different URLs for different zones, you can use any of these URLs to specify a child site collection. For example: http(s)://url NOTE: Enter the root web site URLs. If you have alternate access mapping configured in your SharePoint farm, and one web application has different URLs for different zones, you can use any of these URLs. For example: omiteventloglist.txt Contains a list of event IDs to be excluded from the Event Log. event ID For example: 1001 NOTE: Only add known error or warning events, otherwise you may lose important data. 143/233
144 10. Additional Configuration Exclude Data from SQL Server Auditing Scope You can fine-tune Netwrix Auditor by specifying data that you want to exclude from the SQL Server auditing scope. To exclude data from the SQL Server auditing scope 1. Navigate to the %Netwrix Auditor install folder%\sql Server Auditing folder. 2. Edit the *.txt files, based on the following guidelines: Each entry must be a separate line. A wildcard (*) is supported. Lines that start with the # sign are treated as comments and are ignored. File Description Syntax omitobjlist.txt Contains a list of object types to be excluded from Change Summaries and reports. Object_type For example: Database Column omitpathlist.txt omitproplist.txt Contains a list of resource paths to the objects to be excluded from Change Summaries and reports. In this case data is still being collected and saved to the AuditArchive. Contains a list of attributes to be excluded from being audited and stored to the AuditArchive. Server_instance:resource_path whereresource_path is shown in the What column in the reports. For example, to exclude information about databases whose names start with "tmp" on the SQL Server instance "PROD.SQL2012": PROD.SQL2012:Databases\tmp*. object_type_name.property_ name.attribute_name where: object_ type_ name Can be found in the found in the Object Type column in change reports. property_name Can be found in the Details column (property name is bold). attribute_name Can be found 144/233
145 10. Additional Configuration File Description Syntax in the Details column (attribute name is not bold). If an object does not have an attribute name, use the * character. For example to exclude information about the Size attribute of the Database File property in all databases: Database.Database File.Size. omitstorelist.txt omittracelist.txt Contains a list of objects you want to exclude from being stored to the AuditArchive. Contains a list of SQL Server instances you do not want to enable SQL tracing on. In this case the "Who", "Workstation" and "When" values will not be reported correctly (except for content changes). server_instance.resource_path where resource_path is shown in the What column in the reports. server\instance name pathtotracelogs.txt Contains a list of SQL Server instances whose traces must be stored locally. SQLServer\Instance UNC path For example: server\instance C:\Program Files\Microsoft SQL Server\MSSQL\LOG\ propnames.txt Contains a list of humanreadable names for object types and properties to be displayed in the change reports. object_type_name.attribute_ name=friendlyname For example: *.Date modified=modification Time Exclude Data from VMware Auditing Scope You can fine-tune Netwrix Auditor by specifying various data types that you want to exclude/include from/in the VMware reports. 145/233
146 10. Additional Configuration To exclude data from VMware auditing scope 1. Navigate to the %Netwrix Auditor installation folder%\vmware Auditing folder. 2. Edit the *.txt files, based on the following guidelines: Each entry must be a separate line. A wildcard (*) is supported. For example, you can use * for a class name to specify an attribute for all classes. Lines that start with the # sign are treated as comments and are ignored. File Description Syntax omitproplist.txt hidepropvalues.txt proplist.txt Contains a list of object types and properties to be excluded from change reports. Contains a list of object types and properties to be excluded from the reports when the property is set to certain value. Containsa list of humanreadable names for object types and properties to be displayed in the reports. object_type.property_name NOTE: If there is no separator (.) between an object type and a property, the whole entry is treated as an object type. For example, to exclude the config.flags.monitortype property from reports, add the following line: *.config.flags.monitortype. object_type.property_name=property_ value:object_type.hidden_property For example, to exclude the config.cpuallocation.shares.level property when it equals to "Low", add the following line: *.config.cpuallocation.shares.level=low:*.config.cpuallocation.shar es.shares. inner_type:object_ type.property=intelligiblename NOTE: Inner_type is optional. For example, if you want the configstatus property to be displayed in the reports as Configuration Status, add the following line: *.configstatus=configuration Status. 146/233
147 10. Additional Configuration Exclude Data from Windows Server Auditing Scope You can fine-tune Netwrix Auditor by specifying data that you want to exclude from the Windows Server auditing scope. To exclude data from the Windows Server auditing scope 1. Navigate to the %Netwrix Auditor installation folder%\windows Server Auditing folder. 2. Edit the *.txt files, based on the following guidelines: Each entry must be a separate line. Wildcards (* and?) are supported. A backslash (\) must be put in front of (*) and (?) if they are a part of an entry value. Lines that start with the # sign are treated as comments and are ignored. File Description Syntax omitcollectlist.txt omiterrors.txt omitreportlist.txts omitstorelist.txt Contains a list of objects to be excluded from being audited. Contains a list of errors/warnings to be omitted from logging to the Netwrix Auditor System Health event log. Contains a list of objects to be excluded from reports and Change Summary s. In this case audit data is still being collected. Contains a list of objects to be excluded from being stored to the AuditArchive and showing up in reports. In this case audit data is still being collected. Managed Object name,server name,class name,property name,property value For example: *,*,StdServerRegProv,name,HKEY_ LOCAL_MACHINE\\SECURITY Managed Object Name,server name,error text For example: *,productionserver1.corp.local,*ac cess is denied* Managed Object name,who changed,server name,object type,resource path,property name For example: *,CORP\\jsmith,*,*,*,* Managed Object name,who changed,server name,object type,resource path,property name For example: *,*,*,Scheduled task,scheduled Tasks\\User_Feed_ Synchronization*,* 147/233
148 10. Additional Configuration Exclude Data from Event Log Auditing Scope You can fine-tune Netwrix Auditor by specifying data that you want to exclude from the Event Log auditing scope. To exclude data from the Event Log auditing scope 1. Navigate to the %Netwrix Auditor installation folder%\event Log Management folder. 2. Edit the *.txt files, based on the following guidelines: Each entry must be a separate line. Wildcards (* and?) are supported. Lines that start with the # sign are treated as comments and are ignored. File Description Syntax OmitErrorsList.txt Contains a list of data collection errors and warnings to be excluded from the Netwrix Auditor System Health event log. Error text omitserverlist.txt Contains a list of server names or servers IP addresses to be excluded from processing. ip address or server name For example: * Exclude Data from Group Policy Auditing Scope You can fine-tune Netwrix Auditor by specifying data that you want to exclude from the Group Policy auditing scope. To do it, edit the omitobjlist_gp.txt, omitproplist_gp.txt and omituserlist_gp.txt files. To exclude data from the Group Policy Auditing scope 1. Navigate to the %Netwrix Auditor installation folder%\active Directory Auditing folder. 2. Edit omitobjlist_gp.txt, omitproplist_gp.txt and omituserlist_gp.txt files, based on the following guidelines: Each entry must be a separate line. A wildcard (*) is supported and can be used to replace any number of characters. Lines that start with the # sign are treated as comments and are ignored. 148/233
149 10. Additional Configuration File Description Syntax omitobjlist_gp.txt omitproplist_gp.txt omituserlist_gp The file contains a list of the Group Policy Object (GPO) names to be excluded from change reports. The file contains a list of the Group Policy Object settings to be excluded from change reports. The file contains a list of user names to be excluded from change reports. <object name> For example, to exclude changes to the Default Domain Policy GPO, add the following line: Default Domain Policy. <settingname> For example, to exclude data on changes made to the Maximum password length setting, add the following line: Maximum password length. <domain\user> For example, to exclude changes made by the user usertest in the domain domaintest, add the following line: domaintest\usertest Exclude Data from Inactive Users Auditing Scope You can fine-tune Netwrix Auditor by specifying data that you want to exclude from the Inactive User auditing scope. To exclude data from the Inactive Users auditing scope 1. Navigate to the %ProgramData%\Netwrix Auditor\Inactive Users Tracker folder. 2. Edit the *.txt files, based on the following guidelines: Each entry must be a separate line. Wildcards (* and?) are supported. Lines that start with the # sign are treated as comments and are ignored. File Description Syntax filter.txt Contains a list of accounts to be excluded from processing. Username omitdclist.txt Contains a list of domain Full DNS name or NetBIOS name 149/233
150 10. Additional Configuration File Description Syntax controllers to from processing. be excluded NOTE: IP addresses are not supported. Netwrix Auditor skips all automated deactivation actions for inactive accounts (disable, move, delete) even if one domain controller is unavailable during scheduled task execution. Add the unavailable domain controllers to this file to ensure Netwrix Auditor functions properly. omitoulist.txt Contains a list of organizational units to be excluded from processing. Path For example: *OU=C,OU=B,OU=A* Exclude Data from Mailbox Access Auditing Scope Netwrix Auditor allows specifying users and mailboxes that you do not want to audit for non-owner mailbox access events. To do this, edit the mailboxestoexclude.txt, userstoexclude.txt, and agentomitusers.txt files. To exclude users or mailboxes from the Mailbox Access auditing scope 1. Navigate to the %Netwrix Auditor installation folder%\non-owner Mailbox Access Reporter for Exchange folder. 2. Edit mailboxestoexclude.txt, userstoexclude.txt, or agentomitusers.txt files, based on the following guidelines: Each entry must be a separate line. Wildcards (* and?) are supported. Lines that start with the # sign are treated as comments and are ignored. File mailboxestoexclude.txt Description This file contains a list of mailboxes and folders that must be excluded from reports. 150/233
151 10. Additional Configuration File Description You can specify a Mailbox_Name, a Mailbox_Name/Folder_Name, or use wildcards (*/Folder_Name). In the last example, the specified folder will be excluded in all mailboxes. If agents are disabled, the Mailbox_Name/Folder_ Name lines are ignored. userstoexclude.txt This file contains a list of users in the DOMAIN\username format, who must be excluded from reports if they perform non-owner access to mailboxes (audit data on these users will still be stored in the snapshots). If a user is removed from this list, the information on this user s actions can be viewed with the Report Viewer. agentomitusers.txt This file contains a list of users in the DOMAIN\username format, who must be excluded from reports and snapshots. If a user is removed from this list, audit data on this user will only be available after the next data collection. Writing new users to this file affect reports and snapshots only if Use agents to collect detailed audit data is enabled Exclude Data from Password Expiration Auditing Scope You can fine-tune Netwrix Auditor by specifying data that you want to exclude from auditing and alerting on password expiration. To exclude data from the Password Expiration Alerting auditing scope 1. Navigate to the %Netwrix Auditor install folder%\password Expiration Alerting folder. 2. Edit the omitoulist.txt file, based on the following guidelines: Each entry must be a separate line. A wildcard (*) is supported. Lines that start with the # sign are treated as comments and are ignored. File Description Syntax omitoulist.txt Contains a list of organizational units to be Path 151/233
152 10. Additional Configuration File Description Syntax excluded from processing. For example: *OU=C,OU=B,OU=A* Fine-tune Netwrix Auditor with Registry Keys You can fine- tune Netwrix Auditor using the Registry keys as described below. This functionality is currently available for the following audited systems: Registry Keys for Auditing Active Directory Registry Keys for Auditing Exchange Registry Keys for Auditing File Servers Registry Keys for Auditing Windows Server Registry Keys for Auditing Event Log Registry Keys for Auditing Group Policy Registry Keys for Auditing Expiring Passwords Registry Keys for Auditing Inactive Users Registry Keys for Auditing Active Directory Review the basic registry keys that you may need to configure for auditing Active Directory with Netwrix Auditor. Navigate to Start Run and type "regedit". Registry key (REG_DWORD type) Description / Value HKEY_LOCAL_MACHINE\SOFTWARE\WOW6432Node\Netwrix Auditor\AD Change Reporter CleanAutoBackupLogs Defines the retention period for the security log backups: 0 Backups are never deleted from Domain controllers [X] Backups are deleted after [X] hours IgnoreAuditCheckResultError Defines whether audit check errors should be displayed in the Change Summary footer: 0 Display errors 1 Do not display errors IgnoreRootDCErrors Defines whether to display audit check errors for the root domain 152/233
153 10. Additional Configuration Registry key (REG_DWORD type) Description / Value (when data is collected from a child domain) in the Change Summary footer: 0 Display errors 1 Do not display errors LogonResolveOptions Defines what will be shown in the Workstation field: 2 MAC address 4 FQDN or IP address (set by default) 6 Both MonitorModifiedAndRevertedBack Defines whether the Change Summary must display the attributes whose values were modified and then restored between data collections: 0 These attributes are not displayed 1 These attributes are displayed as "modified and reverted back" Short Subjects Defines whether to contract the subjects: 0 No 1 Yes ProcessBackupLogs Defines whether to process security log backups: 0 No 1 Yes NOTE: Even if this key is set to "0", the security log backups will not be deleted regardless of the value of the CleanAutoBackupLogs key. HKEY_LOCAL_MACHINE\SOFTWARE\WOW6432Node\Netwrix Auditor\AD Change Reporter\<Managed Object Name> CollectLogsMaxThreads Defines the number of Domain Controllers to simultaneously start log collection on. HKEY_LOCAL_MACHINE\SOFTWARE\WOW6432Node\Netwrix Auditor\Management Console\Database settings 153/233
154 10. Additional Configuration Registry key (REG_DWORD type) SqlOperationTimeout timeout Description / Value Defines the timeout for executing SQL queries such as data selection, insertion or deletion (in seconds). Defines the Audit Database connection timeout (in seconds) Registry Keys for Auditing Exchange Review the basic registry keys that you may need to configure for auditing Exchange with Netwrix Auditor. Navigate to Start Run and type "regedit". Registry key (REG_DWORD type) Description / Value HKEY_LOCAL_MACHINE\SOFTWARE\WOW6432Node\Netwrix Auditor\AD Change Reporter CleanAutoBackupLogs Defines the retention period for the security log backups: 0 Backups are never deleted from Domain controllers [X] Backups are deleted after [X] hours IgnoreAuditCheckResultError Defines whether audit check errors should be displayed in the Change Summary footer: 0 Display errors 1 Do not display errors IgnoreRootDCErrors Defines whether to display audit check errors for the root domain (when data is collected from a child domain) in the Change Summary footer: 0 Display errors 1 Do not display errors LogonResolveOptions Defines what will be shown in the Workstation field: 2 MAC address 4 FQDN or IP address (set by default) 6 Both Short Subjects Defines whether to contract the subjects (e.g., Netwrix Auditor: Change Summary): 0 No 154/233
155 10. Additional Configuration Registry key (REG_DWORD type) Description / Value 1 Yes ProcessBackupLogs Defines whether to process security log backups: 0 No 1 Yes NOTE: Even if this key is set to "0", the security log backups will not be deleted regardless of the value of the CleanAutoBackupLogs key. ShowReportFooter Defines whether to display the footer in the Change Summary 0 No 1 Yes ShowReportGeneratorServer Defines whether to display the report generation server in the Change Summary footer: 0 No 1 Yes ShowSummaryInFooter Defines whether to display the summary in the Change Summary footer: 0 No 1 Yes ShowSummaryInHeader Defines whether to display the summary in the Change Summary header: 0 No 1 Yes HKEY_LOCAL_MACHINE\SOFTWARE\WOW6432Node\Netwrix Auditor\AD Change Reporter\<Managed Object Name> CollectLogsMaxThreads Defines the number of Domain Controllers to simultaneously start log collection on. HKEY_LOCAL_MACHINE\SOFTWARE\WOW6432Node\Netwrix Auditor\Management Console\Database settings 155/233
156 10. Additional Configuration Registry key (REG_DWORD type) overwrite_datasource Description / Value Defines whether to overwrite the database connection settings (stored in the reports data source) if they differ from the SQL server settings specified when configuring the Managed Object: 0 No 1 Yes SqlOperationTimeout timeout Defines the timeout for executing SQL queries such as data selection, insertion or deletion (in seconds). Defines the Audit Database connection timeout (in seconds) Registry Keys for Auditing File Servers Review the basic registry keys that you may need to configure for auditing file servers with Netwrix Auditor. Navigate to Start Run and type "regedit". Registry key (REG_DWORD type) Description / Value HKEY_LOCAL_MACHINE\SOFTWARE\WOW6432Node\Netwrix Auditor\File Server Change Reporter CleanAutoBackupLogs Defines the retention period for the security log backups: 0 Backups are never deleted from file servers [X] Backups are deleted after [X] hours ProcessBackupLogs Defines whether to process security log backups: 0 No 1 Yes NOTE: Even if this key is set to "0", the security log backups will not be deleted regardless of the value of the CleanAutoBackupLogs key Registry Keys for Auditing Windows Server Review the basic registry keys that you may need to configure for auditing Windows Server with Netwrix Auditor. Navigate to Start Run and type "regedit". 156/233
157 10. Additional Configuration Registry key (REG_DWORD type) Description / Value HKEY_LOCAL_MACHINE\SOFTWARE\WOW6432Node\Netwrix Auditor\Windows Server Change Reporter CleanAutoBackupLogs Defines the retention period for the security log backups: 0 Backups are never deleted from Domain controllers [X] Backups are deleted after [X] hours ProcessBackupLogs Defines whether to process security log backups: 0 No 1 Yes NOTE: Even if this key is set to "0", the security log backups will not be deleted regardless of the value of the CleanAutoBackupLogs key Registry Keys for Auditing Event Log Review the basic registry keys that you may need to configure for auditing event logs with Netwrix Auditor. Navigate to Start Run and type "regedit". Registry key (REG_DWORD type) Description / Value HKEY_LOCAL_MACHINE\SOFTWARE\WOW6432NODE\Netwrix Auditor\Event Log Manager\<Managed Object Name>\Database Settings ConnectionTimeout Defines SQL database connection timeout (in seconds). HKEY_LOCAL_MACHINE\SOFTWARE\WOW6432NODE\Netwrix Auditor\Event Log Manager\<Managed Object Name>\ElmDbOptions BatchTimeOut DeadLockErrorCount Defines batch writing timeout (in seconds). Defines the number of write attempts to a SQL database. HKEY_LOCAL_MACHINE\SOFTWARE\WOW6432NODE\Netwrix Auditor\Event Log Manager\<Managed Object Name> CleanAutoBackupLogs Defines the retention period for the security log backups: 0 Backups are never deleted from Domain controllers [X] Backups are deleted after [X] hours 157/233
158 10. Additional Configuration Registry key (REG_DWORD type) ProcessBackupLogs Description / Value Defines whether to process security log backups: 0 No 1 Yes NOTE: Even if this key is set to "0", the security log backups will not be deleted regardless of the value of the CleanAutoBackupLogs key. WriteAgentsToApplicationLog Defines whether to write the events produced by the agent to the Application Log of a monitored machine: 0 Disabled 1 Enabled WriteToApplicationLog Defines whether to write events produced by Netwrix Auditor to the Application Log of the machine where the product is installed: 0 No 1 Yes Registry Keys for Auditing Group Policy Review the basic registry keys that you may need to configure for auditing Group Policy with Netwrix Auditor. Navigate to Start Run and type "regedit". Registry key (REG_DWORD type) Description / Value HKEY_LOCAL_MACHINE\SOFTWARE\WOW6432Node\Netwrix Auditor\AD Change Reporter CleanAutoBackupLogs Defines the retention period for the security log backups: 0 Backups are never deleted from Domain controllers [X] Backups are deleted after [X] hours GPOBackup Defines whether to backup GPOs during data collection: 0 No 1 Yes GPOBackupDays Defines the backup frequency: 0 Backup always 158/233
159 10. Additional Configuration Registry key (REG_DWORD type) Description / Value X Once in X days NOTE: GPOBackup must be set to "1". IgnoreAuditCheckResultError Defines whether audit check errors should be displayed in the Change Summary footer: 0 Display errors 1 Do not display errors IgnoreRootDCErrors Defines whether to display audit check errors for the root domain (when data is collected from a child domain) in the Change Summary footer: 0 Display errors 1 Do not display errors LogonResolveOptions Defines what will be shown in the Workstation field: 2 MAC address 4 FQDN or IP address (set by default) 6 Both Short Subjects Defines whether to contract the subjects (e.g., Netwrix Group Policy Change Reporter: Summary Report GPCR Report): 0 No 1 Yes ProcessBackupLogs Defines whether to process security log backups: 0 No 1 Yes NOTE: Even if this key is set to "0", the security log backups will not be deleted regardless of the value of the CleanAutoBackupLogs key. ShowReportFooter Defines whether to display the footer in the Change Summary 0 No 159/233
160 10. Additional Configuration Registry key (REG_DWORD type) Description / Value 1 Yes ShowReportGeneratorServer Defines whether to display the report generation server in the Change Summary footer: 0 No 1 Yes ShowSummaryInFooter Defines whether to display the summary in the Change Summary footer: 0 No 1 Yes ShowSummaryInHeader Defines whether to display the summary in the Change Summary header: 0 No 1 Yes HKEY_LOCAL_MACHINE\SOFTWARE\WOW6432Node\Netwrix Auditor\AD Change Reporter\<Managed Object Name> CollectLogsMaxThreads Defines the number of Domain Controllers to simultaneously start log collection on. HKEY_LOCAL_MACHINE\SOFTWARE\WOW6432Node\Netwrix Auditor\ AD Change Reporter\<Managed Object Name>\Database settings SessionImportDays Defines the frequency of a full snapshot upload: X Once in X days HKEY_LOCAL_MACHINE\SOFTWARE\WOW6432Node\Netwrix Auditor\Management Console\Database settings overwrite_datasource Defines whether to overwrite the database connection settings (stored in the reports data source) if they differ from the SQL server settings specified when configuring the Managed Object: 0 No 1 Yes SqlOperationTimeout Defines the timeout for executing SQL queries such as data 160/233
161 10. Additional Configuration Registry key (REG_DWORD type) Description / Value selection, insertion or deletion (in seconds). timeout Defines the Audit Database connection timeout (in seconds) Registry Keys for Auditing Expiring Passwords Review the basic registry keys that you may need to configure for auditing expiring passwords within your Active Directory domain with Netwrix Auditor. Navigate to Start Run and type "regedit". Registry key (REG_DWORD type) Description / Value HKEY_LOCAL_MACHINE\SOFTWARE\WOW6432Node\Netwrix Auditor\Password Expiration Notifier Hide AdditionalInfo Defines whether to show or hide the header and footer in s sent to users and their managers ( s sent to administrators always have default header and footer): 0 Show Any other number Hide Registry Keys for Auditing Inactive Users Review the basic registry keys that you may need to configure for auditing inactive users within your Active Directory domain with Netwrix Auditor. Navigate to Start Run and type "regedit". Registry key (REG_DWORD type) Description / Value HKEY_LOCAL_MACHINE\SOFTWARE\WOW6432Node\Netwrix Auditor\Inactive Users Tracker Hide AdditionalInfo Defines whether to show or hide the header and footer in s sent to managers ( s sent to administrators always have default header and footer): 0 Show Any other number Hide RandomPasswordLength WriteEventLog Defines the length of a random password to be set for inactive user. Defines whether to write events to the Application Log: 161/233
162 10. Additional Configuration Registry key (REG_DWORD type) Description / Value 0 No 1 Yes Enable Integration with Third-Party SIEM Solutions If your organization is already using a third-party Security Information and Event Management (SIEM) solution, Netwrix Auditor can help protect these investments by integrating with major SIEM systems. Netwrix Auditor allows you to manage audit data in your usual way, but with improved performance and increased reliability of the collected audit data. When auditing Active Directory, Exchange, File Servers, and Group Policy, Netwrix Auditor can integrate with all major SIEM solutions, including: Microsoft System Center Operations Manager (SCOM) 2007 R2 and 2012 RSA envision Arc-Sight Logger Novell Sentinel NetIQ Security Manager IBM Tivoli Security Information Event Manager and many others. When integration with SIEM products is enabled, a custom Windows event log called Netwrix Auditor is created. This event log will generate events for each detected change. You can configure custom processing rules, alerts and reports in your SIEM solution to track these events Enable Integration 1. In Netwrix Auditor Administrator Console, navigate to Managed Objects your_managed_object_ name. Depending on the audited system you want to integrate with SIEM solution, select a corresponding node: Active Directory, Exchange, File Servers or Group Policy. 2. In the right pane, select Configure next to Advanced Options/Advanced Settings. 3. In the Advanced Options dialog that opens, select Third-party SIEM products to integrate the product with a SIEM solution. 162/233
163 10. Additional Configuration 4. Customize your solution to use the Netwrix Auditor event log and create rules to trigger alerts on certain events. Review the Netwrix event types and their structure below Netwrix Audit Events Property Audit event Source Netwrix Auditor for Active Directory Corresponds to auditing Active Directory and Group Policy. Netwrix Auditor for Exchange Corresponds to auditing Exchange. Netwrix Auditor for File Servers Corresponds to auditing file servers. Category Level Audit (id=1) Success Audit / Failure Audit ID To review event properties 1. On the computer where Netwrix Auditor Administrator Console is installed, navigate to Start Administrative Tools Event Viewer. 2. In the right pane, locate the Netwrix Auditor event log and double-click it. 3. Double-click an event. 4. In the Event Properties dialog, select one of the following tabs: The Event Properties General tab shows the event description in the upper grid and the general properties information below the grid. The Details tab shows the event details. The table below provides a description of the audit events sorted by their ID. ID Name Description Change type string in description Change detail string in description Applies to the following audited systems: 1001 Add Object added Added Active Directory Exchange File Servers Group Policy 163/233
164 10. Additional Configuration ID Name Description Change type string in description Change detail string in description Applies to the following audited systems: 1002 Remove Object removed Removed Active Directory Exchange File Servers Group Policy 1003 Modify Single-valued string was modified. Empty values reported as empty quoted strings in description templates Modified <attribute > changed from <old value> to <new value> Active Directory Exchange File Servers Group Policy 1004 Modify by Events Information extracted from Windows Event Log. (e.g., user account enabled/disabled, account locked/unlocked) Modified <attribute > Active Directory Exchange 1005 Value Value was added to the Modified <attribute>: Active Directory Added multi- valued attribute (e. g., a new member was added to a group) Added: <new value> Exchange File Servers 1006 Value Value was removed Modified <attribute >: Active Directory Removed from the multi-valued attribute, (e. g., a member was removed Removed: <old value> Exchange File servers from a group) 1007 Modified Attribute was modified Modified <attribute >: Active Directory and Reverted and then rolled back to its previous value. Modified and Reverted back Exchange Back Intermediate values are unknown Access Access to file system objects (e.g., successful Read File Servers 164/233
165 10. Additional Configuration ID Name Description Change type string in description Change detail string in description Applies to the following audited systems: or failure file reads; failure attempts to access a folder or share) NOTE: (when auditing Group Policy) The Add/Remove events (Event ID 1001 or 1002) are generated only when a Group Policy object is added or removed. Changes to policy settings are always displayed as the Modified event (ID 1003). The table below provides a description of the insertion strings that are displayed in the Details tab of the Event Properties dialog: String Generic content Active Directory Exchange Group Policy File Servers 1 Managed Object 2 When detected (local) 3 When detected (UTC) 4 When changed (local) 5 When changed (UTC) 6 The name of the user who made the change (DOMAIN\use r) Domain Domain Domain Computer Collection -//- -//- -//- -//- -//- -//- -//- -//- -//- -//- -//- -//- -//- -//- -//- -//- -//- -//- -//- -//- 7 Object type AD object type AD object type "Policy" File / folder / 165/233
166 10. Additional Configuration String Generic content Active Directory Exchange Group Policy File Servers (computer/ user/ (computer/user/grou share group, etc.) p, etc.) 8 Object path AD path: AD path: \zone\domai \\server\ \local\amdom\ \local\amdom\ n\ GPO share\ Users\testUser1 Users\testUser1 Display folder\file Name\Path 9 The name of the server where Netwrix Auditor is installed 10 The server where the change was made (DC, file server, etc.) -//- -//- -//- -//- -//- -//- -//- -//- 11 Custom field Depends on type. Schema-based name, GPO Display n/a The Active Directory specific events have the e.g., msexchexchangeserv er Name following custom field values: Distribution Domain Local Group Distribution Global Group Distribution Universal Group Security Domain Local Group 166/233
167 10. Additional Configuration String Generic content Active Directory Exchange Group Policy File Servers Security Global Group Universal Security Group 12 Internal name of the attribute that was changed 13 Display name of the attribute that was changed -//- -//- GPO setting attribute name (currently is equivalent to [13]) -//- -//- Friendly attribute name (GPO setting attribute name) -//- n/a 14 The previous value of the attribute (or removed values if a multi-valued attribute). Can be empty. 15 The current value of the attribute (or added values if a multivalued attribute). Can be empty. -//- -//- -//- -//- -//- -//- -//- -//- 16 Object GUID AD object GUID AD object GUID Group Policy n/a 167/233
 UTC value is written the SQL date format (MM-DD-YYYY hh:mm:ss) Review the")
168 10. Additional Configuration String Generic content Active Directory Exchange Group Policy File Servers object GUID 17 Custom field n/a n/a Group Policy Change Type: 1 - policy added, 2 - policy removed, 3- policy modified n/a NOTE: Local time is written in the default locale format (for example 03/16/2011 6:37:43 PM) UTC value is written the SQL date format (MM-DD-YYYY hh:mm:ss) Review the event example: 168/233
169 10. Additional Configuration Roll Back Changes with Active Directory Object Restore With Netwrix Auditor you can quickly restore deleted and modified objects using the Active Directory Object Restore tool integrated with the product. This tool enables AD object restore without rebooting a domain controller and affecting the rest of the AD structure, and goes beyond the standard tombstone capabilities. Perform the following procedures: Modify Schema Container Settings Roll Back Unwanted Changes Modify Schema Container Settings By default, when a user or computer account is deleted from Active Directory, its password is discarded as well as a domain membership. When you restore deleted accounts with the Active Directory Object Restore tool, it rolls back a membership in domain and sets random passwords which then have to be changed manually. If you want to be able to restore AD objects with their passwords preserved, you must modify the Schema container settings so that account passwords are retained when accounts are being deleted. To modify schema container settings NOTE: To perform this procedure, you will need the ADSI Edit utility. In Windows Server 2008 and above, this component is installed together with the AD DS role, or it can be downloaded and installed along with Remote Server Administration Tools. 1. Navigate to Start Programs Administrative Tools ADSI Edit. 2. Right-click the ADSI Edit node and select Connect To. In the Connection Settings dialog, enable Select a well-known Naming Context and select Schema from the drop-down list. 3. Expand the Schema your_ Root_Domain_ name node. Right-click the CN=Unicode-Pwd attribute and select Properties. 169/233

170 10. Additional Configuration 4. Double-click the searchflags attribute and set its value to "8". Now you will be able to restore deleted accounts with their passwords preserved Roll Back Unwanted Changes 1. In Netwrix Auditor Administrator Console, navigate to Managed Objects your_managed_object_ name Active Directory. 170/233
171 10. Additional Configuration 2. In the right pane, click Restore AD Objects next to Active Directory Object Restore. The wizard opens. 3. On the Select Rollback Period step, specify the period of time when the changes that you want to revert occurred. You can either select a period between a specified date and the present date, or between two specified dates. 4. On the Select Rollback Source step, specify the rollback source and monitored domain. The following restore options are available: Restore from state- in- time snapshots This option allows restoring objects from configuration snapshots made by Netwrix Auditor. This option is more preferable since it allows to restore AD objects with all their attributes. You can select the Select a state-in-time snapshot option if you want to revert to a specific snapshot. Otherwise, the program will automatically search for the most recent snapshot that will cover the selected time period. Restore from AD tombstones This option is recommended when no snapshot is available. This is a last resort measure as the tombstone holds only the basic object attributes. 5. On the Analyzing Changes step, the product analyzes the changes made during the specified time period. When reverting to a snapshot, the tool reviews the changes that occurred between the specified snapshots. When restoring from a tombstone, the tool reviews all AD objects put in the tombstone during the specified period of time. 6. On the Select Changes to Roll Back step, the analysis results are displayed. Select a change to see its rollback details in the bottom of the window. Select an attribute and click Details to see what changes will be applied if this attribute is selected for rollback. Check the changes you want to roll back to their previous state. 7. Wait until the tool has finished restoring the selected objects. On the last step, review the results and click Finish to exit the wizard Netwrix Auditor System Health Log When an error occurs, a system administrator or support engineer must determine what caused this error and prevent it from recurring. For your convenience, Netwrix Auditor records important events in the proprietary Netwrix Auditor System Health log. There are three types of events that can be logged: Event Type Information Description An event that describes the successful operation beginning and/or completion. For example, the product successfully completed data collection for a Managed Object. 171/233
172 10. Additional Configuration Event Type Warning Error Description An event that is not necessarily significant, but may indicate a possible future problem. For example, the product failed to process a domain controller. An event that indicates a significant problem such as loss of data or loss of functionality. For example, the product failed to retrieve settings for your audited system. Perform the following steps to view the Netwrix Auditor System Health: 1. On the computer where Netwrix Auditor Administrator Console is installed, navigate to Start All Programs Event Viewer. 2. In the Event Viewer dialog, navigate to Event Viewer (local) Applications and Services Logs Microsoft Netwrix Auditor System Health log Netwrix Auditor Health Status Report Now a system administrator is able to review all Netwrix Auditor warnings and errors in a dedicated report in Netwrix Auditor client and be notified on significant events with real-time alerts. To configure Netwrix Auditor to audit Netwrix Auditor System Health Log events To generate a report on Netwrix Auditor System Health Log events To create a real-time alert for Netwrix Auditor System Health Log events To configure Netwrix Auditor to audit Netwrix Auditor System Health Log events 1. Create a new Computer Collection Managed Object and add the computer where Netwrix Auditor Server resides as an item. You can also add a new item to an existing Managed Object. See Create Managed Objects to Audit Event Log for more information. 2. Navigate to Managed Objects your_managed_object_name Event Log. Select Write event descriptions to Audit Database if you want to see the exact error or warning text. 3. Navigate to the Audit Archiving Filters page and select the Netwrix Auditor System Health Log filter in the Inclusive Filters list. 4. Run initial data collection for your Managed Object. 5. Make sure that Audit Database settings are configured properly. See Manage Audit Database for more information. 172/233

173 10. Additional Configuration To generate a report on Netwrix Auditor System Health Log events 1. Launch the Netwrix Auditor client and navigate to Reports Windows Server Event Log, and then select the Netwrix Auditor System Health report. To create a real-time alert for Netwrix Auditor System Health Log events 1. Start the New Real-Time Alert wizard. Refer to Create Real-Time Alerts for Event Log for detailed instructions on how to configure real-time alerts. 2. On the Configure Real-Time Alert Filters and Notifications step, click Add in the Event Filters section and type "Netwrix Auditor" in the Event Log field. Specify events you want to be alerted about (errors, warnings, etc.) Review your new alert settings and click Finish. Once the event that triggers an alert occurs, an notification like in the example below will be 173/233
Netwrix Auditor for Windows Server
 Netwrix Auditor for Windows Server Quick-Start Guide Version: 7.0 7/7/2015 Legal Notice The information in this publication is furnished for information use only, and does not constitute a commitment from
Netwrix Auditor for Active Directory
 Netwrix Auditor for Active Directory Quick-Start Guide Version: 7.1 10/26/2015 Legal Notice The information in this publication is furnished for information use only, and does not constitute a commitment
Netwrix Auditor for SQL Server
 Netwrix Auditor for SQL Server Quick-Start Guide Version: 7.1 10/26/2015 Legal Notice The information in this publication is furnished for information use only, and does not constitute a commitment from
Netwrix Auditor for File Servers
 Netwrix Auditor for File Servers Quick-Start Guide Version: 7.0 7/7/2015 Legal Notice The information in this publication is furnished for information use only, and does not constitute a commitment from
Netwrix Auditor for Exchange
 Netwrix Auditor for Exchange Quick-Start Guide Version: 8.0 4/22/2016 Legal Notice The information in this publication is furnished for information use only, and does not constitute a commitment from Netwrix
Netwrix Auditor for SQL Server
 Netwrix Auditor for SQL Server Quick-Start Guide Version: 8.0 4/22/2016 Legal Notice The information in this publication is furnished for information use only, and does not constitute a commitment from
NETWRIX EVENT LOG MANAGER
 NETWRIX EVENT LOG MANAGER ADMINISTRATOR S GUIDE Product Version: 4.0 July/2012. Legal Notice The information in this publication is furnished for information use only, and does not constitute a commitment
Netwrix Auditor for Windows File Servers
 Netwrix Auditor for Windows File Servers Quick-Start Guide Version: 8.0 4/22/2016 Legal Notice The information in this publication is furnished for information use only, and does not constitute a commitment
NETWRIX EVENT LOG MANAGER
 NETWRIX EVENT LOG MANAGER QUICK-START GUIDE FOR THE ENTERPRISE EDITION Product Version: 4.0 July/2012. Legal Notice The information in this publication is furnished for information use only, and does not
NETWRIX FILE SERVER CHANGE REPORTER
 NETWRIX FILE SERVER CHANGE REPORTER ADMINISTRATOR S GUIDE Product Version: 3.3 April/2012. Legal Notice The information in this publication is furnished for information use only, and does not constitute
Netwrix Auditor. CEF Export Add-on Quick-Start Guide. Version: 8.0 6/3/2016
 Netwrix Auditor CEF Export Add-on Quick-Start Guide Version: 8.0 6/3/2016 Legal Notice The information in this publication is furnished for information use only, and does not constitute a commitment from
NETWRIX USER ACTIVITY VIDEO REPORTER
 NETWRIX USER ACTIVITY VIDEO REPORTER ADMINISTRATOR S GUIDE Product Version: 1.0 January 2013. Legal Notice The information in this publication is furnished for information use only, and does not constitute
NETWRIX CHANGE REPORTER SUITE
 NETWRIX CHANGE REPORTER SUITE QUICK-START GUIDE Product Version: 2.0 November/2011. Legal Notice The information in this publication is furnished for information use only, and does not constitute a commitment
NetWrix SQL Server Change Reporter
 NetWrix SQL Server Change Reporter Version 2.2 Administrator Guide Contents NetWrix SQL Server Change Reporter Administrator Guide 1. INTRODUCTION... 3 1.1 KEY FEATURES... 3 1.2 LICENSING... 4 1.3 HOW
NetWrix File Server Change Reporter. Quick Start Guide
 NetWrix File Server Change Reporter Quick Start Guide Introduction... 3 Product Features... 3 Licensing... 3 How It Works... 4 Getting Started... 5 System Requirements... 5 Setup... 5 Additional Considerations...
NetWrix SQL Server Change Reporter
 NetWrix SQL Server Change Reporter Version 2.2 Enterprise Edition Quick Start Guide Contents NetWrix SQL Server Change Reporter Enterprise Edition Quick Start Guide 1. INTRODUCTION... 3 1.1 KEY FEATURES...
NetWrix Exchange Change Reporter
 NetWrix Exchange Change Reporter Version 7 Administrator s Guide Contents NetWrix Exchange Change Reporter Administrator s Guide 1. INTRODUCTION... 4 1.1 KEY FEATURES... 5 1.2 LICENSING... 6 1.3 HOW IT
Netwrix Auditor. Сomplete visibility into who changed what, when and where and who has access to what across the entire IT infrastructure
 Netwrix Auditor Сomplete visibility into who changed what, when and where and who has access to what across the entire IT infrastructure netwrix.com netwrix.com/social 01 Product Overview Netwrix Auditor
NETWRIX CHANGE NOTIFIER
 NETWRIX CHANGE NOTIFIER FOR SQL SERVER QUICK-START GUIDE Product Version: 2.6.194 February 2014. Legal Notice The information in this publication is furnished for information use only, and does not constitute
NetWrix Server Configuration Monitor
 NetWrix Server Configuration Monitor Version 2.2 Quick Start Guide Contents NetWrix Server Configuration Monitor Quick Start Guide 1. INTRODUCTION... 3 1.1 KEY FEATURES... 3 1.2 LICENSING... 4 1.3 HOW
NETWRIX ACCOUNT LOCKOUT EXAMINER
 NETWRIX ACCOUNT LOCKOUT EXAMINER ADMINISTRATOR S GUIDE Product Version: 4.1 July 2014. Legal Notice The information in this publication is furnished for information use only, and does not constitute a
Netwrix Auditor. Installation and Configuration Guide. Version: 7.0 8/10/2015
 Netwrix Auditor Installation and Configuration Guide Version: 7.0 8/10/2015 Legal Notice The information in this publication is furnished for information use only, and does not constitute a commitment
NETWRIX DISK SPACE MONITOR
 NETWRIX DISK SPACE MONITOR QUICK-START GUIDE Product Version: 1.2 February 2015 Copyright 2015 Netwrix Corporation. All Rights Reserved Legal Notice The information in this publication is furnished for
CONFIGURING TARGET ACTIVE DIRECTORY DOMAIN FOR AUDIT BY NETWRIX AUDITOR
 CONFIGURING TARGET ACTIVE DIRECTORY DOMAIN FOR AUDIT BY NETWRIX AUDITOR TECHNICAL ARTICLE Product Version: 5.0 July 2013. Legal Notice The information in this publication is furnished for information use
NetWrix Account Lockout Examiner Version 4.0 Administrator Guide
 NetWrix Account Lockout Examiner Version 4.0 Administrator Guide Table of Contents Concepts... 1 Product Architecture... 1 Product Settings... 2 List of Managed Domains and Domain Controllers... 2 Email
NETWRIX WINDOWS SERVER CHANGE REPORTER
 NETWRIX WINDOWS SERVER CHANGE REPORTER INSTALLATION AND CONFIGURATION GUIDE Product Version: 4.0 March 2013. Legal Notice The information in this publication is furnished for information use only, and
Netwrix Auditor. Role-Based Access. Version: 7.1 10/27/2015
 Netwrix Auditor Role-Based Access Version: 7.1 10/27/2015 Legal Notice The information in this publication is furnished for information use only, and does not constitute a commitment from Netwrix Corporation
NetWrix SQL Server Change Reporter. Quick Start Guide
 NetWrix SQL Server Change Reporter Quick Start Guide NetWrix SQL Server Change Reporter Quick Start Guide Contents Introduction...3 Product Features...3 Licensing...4 How It Works...5 Getting Started...6
File Auditor for NAS, Net App Edition
 File Auditor for NAS, Net App Edition Installation Guide Revision 1.2 - July 2015 This guide provides a short introduction to the installation and initial configuration of NTP Software File Auditor for
Netwrix Auditor. Virtual Appliance Deployment Guide. Version: 8.0 8/1/2016
 Netwrix Auditor Virtual Appliance Deployment Guide Version: 8.0 8/1/2016 Legal Notice The information in this publication is furnished for information use only, and does not constitute a commitment from
NetWrix Exchange Mail Archiver Version 1.5 Administrator Guide
 NetWrix Exchange Mail Archiver Version 1.5 Administrator Guide Contents 1. Introduction... 3 1.1. What is the NetWrix Exchange Mail Archiver?...3 1.2. Product Architecture...4 1.3. Licensing...5 1.4. System
NETWRIX EVENT LOG MANAGER
 NETWRIX EVENT LOG MANAGER USER GUIDE Product Version: 4.0 July/2012. Legal Notice The information in this publication is furnished for information use only, and does not constitute a commitment from NetWrix
Lepide Software. LepideAuditor for File Server [CONFIGURATION GUIDE] This guide informs How to configure settings for first time usage of the software
![Lepide Software. LepideAuditor for File Server [CONFIGURATION GUIDE] This guide informs How to configure settings for first time usage of the software](/thumbs/33/16328811.jpg "Lepide Software. LepideAuditor for File Server [CONFIGURATION GUIDE] This guide informs How to configure settings for first time usage of the software") Lepide Software LepideAuditor for File Server [CONFIGURATION GUIDE] This guide informs How to configure settings for first time usage of the software Lepide Software Private Limited, All Rights Reserved
Lepide Software LepideAuditor for File Server [CONFIGURATION GUIDE] This guide informs How to configure settings for first time usage of the software Lepide Software Private Limited, All Rights Reserved
NetWrix Privileged Account Manager Version 4.0 Quick Start Guide
 NetWrix Privileged Account Manager Version 4.0 Quick Start Guide Table of Contents Table of Contents... 2 1. Introduction... 3 1.1. What is NetWrix Privileged Account Manager?... 3 1.2. Licensing... 3
LepideAuditor Suite for File Server. Installation and Configuration Guide
 LepideAuditor Suite for File Server Installation and Configuration Guide Table of Contents 1. Introduction... 4 2. Requirements and Prerequisites... 4 2.1 Basic System Requirements... 4 2.2 Supported Servers
RoomWizard Synchronization Software Manual Installation Instructions
 2 RoomWizard Synchronization Software Manual Installation Instructions Table of Contents Exchange Server Configuration... 4 RoomWizard Synchronization Software Installation and Configuration... 5 System
NetWrix Logon Reporter V 2.0
 NetWrix Logon Reporter V 2.0 Quick Start Guide Table of Contents 1. Introduction... 3 1.1. Product Features... 3 1.2. Licensing... 4 1.3. How It Works... 5 1.4. Report Types Available in the Advanced Mode...
CONFIGURING MICROSOFT SQL SERVER REPORTING SERVICES
 CONFIGURING MICROSOFT SQL SERVER REPORTING SERVICES TECHNICAL ARTICLE November/2011. Legal Notice The information in this publication is furnished for information use only, and does not constitute a commitment
Keeping Tabs on the Top 5 Critical Changes in Active Directory with Netwrix Auditor
 Keeping Tabs on the Top 5 Critical Changes in Active Directory with Netwrix Auditor www.netwrix.com Toll-free: 888.638.9749 Table of Contents #1: User Account Creations #2: Administrative Password Resets
Quadro Configuration Console User's Guide. Table of Contents. Table of Contents
 Epygi Technologies Table of Contents Table of Contents About This User s Guide... 3 Introducing the Quadro Configuration Console... 4 Technical Specification... 6 Requirements... 6 System Requirements...
NETWRIX IDENTITY MANAGEMENT SUITE
 NETWRIX IDENTITY MANAGEMENT SUITE FEATURES AND REQUIREMENTS Product Version: 3.3 February 2013. Legal Notice The information in this publication is furnished for information use only, and does not constitute
Active Directory Change Notifier Quick Start Guide
 Active Directory Change Notifier Quick Start Guide Software version 3.0 Mar 2014 Copyright 2014 CionSystems Inc., All Rights Reserved Page 1 2014 CionSystems Inc. ALL RIGHTS RESERVED. This guide may not
MadCap Software. Upgrading Guide. Pulse
 MadCap Software Upgrading Guide Pulse Copyright 2014 MadCap Software. All rights reserved. Information in this document is subject to change without notice. The software described in this document is furnished
Server Installation Guide ZENworks Patch Management 6.4 SP2
 Server Installation Guide ZENworks Patch Management 6.4 SP2 02_016N 6.4SP2 Server Installation Guide - 2 - Notices Version Information ZENworks Patch Management Server Installation Guide - ZENworks Patch
Releasing blocked email in Data Security
 Releasing blocked email in Data Security IN-TopicInfo:Topic 41101/ Updated: 02-May-2011 Applies To: Websense Data Security v7.1.x Websense Data Security v7.5.x Websense Data Security v7.6.x - v7.8x SMTP
Sophos for Microsoft SharePoint startup guide
 Sophos for Microsoft SharePoint startup guide Product version: 2.0 Document date: March 2011 Contents 1 About this guide...3 2 About Sophos for Microsoft SharePoint...3 3 System requirements...3 4 Planning
Direct Storage Access Using NetApp SnapDrive. Installation & Administration Guide
 Direct Storage Access Using NetApp SnapDrive Installation & Administration Guide SnapDrive overview... 3 What SnapDrive does... 3 What SnapDrive does not do... 3 Recommendations for using SnapDrive...
TROUBLESHOOTING INCORRECT REPORTING OF THE WHO CHANGED PARAMETER
 TROUBLESHOOTING INCORRECT REPORTING OF THE WHO CHANGED PARAMETER TECHNICAL ARTICLE Product Version: 3.0 December/2011. Legal Notice The information in this publication is furnished for information use
Deploying System Center 2012 R2 Configuration Manager
 Deploying System Center 2012 R2 Configuration Manager This document is for informational purposes only. MICROSOFT MAKES NO WARRANTIES, EXPRESS, IMPLIED, OR STATUTORY, AS TO THE INFORMATION IN THIS DOCUMENT.
Secrets of Event Viewer for Active Directory Security Auditing Lepide Software
 Secrets of Event Viewer for Active Directory Security Auditing Windows Event Viewer doesn t need any introduction to the IT Administrators. However, some of its hidden secrets, especially those related
Configuration Information
 This chapter describes some basic Email Security Gateway configuration settings, some of which can be set in the first-time Configuration Wizard. Other topics covered include Email Security interface navigation,
Enterprise Manager. Version 6.2. Installation Guide
 Enterprise Manager Version 6.2 Installation Guide Enterprise Manager 6.2 Installation Guide Document Number 680-028-014 Revision Date Description A August 2012 Initial release to support version 6.2.1
How To Enable A Websphere To Communicate With Ssl On An Ipad From Aaya One X Portal 1.1.3 On A Pc Or Macbook Or Ipad (For Acedo) On A Network With A Password Protected (
 On A Network With A Password Protected (") Avaya one X Portal 1.1.3 Lightweight Directory Access Protocol (LDAP) over Secure Socket Layer (SSL) Configuration This document provides configuration steps for Avaya one X Portal s 1.1.3 communication
Avaya one X Portal 1.1.3 Lightweight Directory Access Protocol (LDAP) over Secure Socket Layer (SSL) Configuration This document provides configuration steps for Avaya one X Portal s 1.1.3 communication
How To Install Powerpoint 6 On A Windows Server With A Powerpoint 2.5 (Powerpoint) And Powerpoint 3.5.5 On A Microsoft Powerpoint 4.5 Powerpoint (Powerpoints) And A Powerpoints 2
 And Powerpoint 3.5.5 On A Microsoft Powerpoint 4.5 Powerpoint (Powerpoints) And A Powerpoints 2") DocAve 6 Service Pack 1 Installation Guide Revision C Issued September 2012 1 Table of Contents About the Installation Guide... 4 Submitting Documentation Feedback to AvePoint... 4 Before You Begin...
DocAve 6 Service Pack 1 Installation Guide Revision C Issued September 2012 1 Table of Contents About the Installation Guide... 4 Submitting Documentation Feedback to AvePoint... 4 Before You Begin...
VERITAS Backup Exec TM 10.0 for Windows Servers
 VERITAS Backup Exec TM 10.0 for Windows Servers Quick Installation Guide N134418 July 2004 Disclaimer The information contained in this publication is subject to change without notice. VERITAS Software
Dell Enterprise Reporter 2.5. Configuration Manager User Guide
 Dell Enterprise Reporter 2.5 2014 Dell Inc. ALL RIGHTS RESERVED. This guide contains proprietary information protected by copyright. The software described in this guide is furnished under a software license
INSTALLING MICROSOFT SQL SERVER AND CONFIGURING REPORTING SERVICES
 INSTALLING MICROSOFT SQL SERVER AND CONFIGURING REPORTING SERVICES TECHNICAL ARTICLE November 2012. Legal Notice The information in this publication is furnished for information use only, and does not
CTERA Agent for Windows
 User Guide CTERA Agent for Windows May 2012 Version 3.1 Copyright 2009-2012 CTERA Networks Ltd. All rights reserved. No part of this document may be reproduced in any form or by any means without written
Novell ZENworks Asset Management 7.5
 Novell ZENworks Asset Management 7.5 w w w. n o v e l l. c o m October 2006 USING THE WEB CONSOLE Table Of Contents Getting Started with ZENworks Asset Management Web Console... 1 How to Get Started...
Configuration Information
 Configuration Information Email Security Gateway Version 7.7 This chapter describes some basic Email Security Gateway configuration settings, some of which can be set in the first-time Configuration Wizard.
HTTP communication between Symantec Enterprise Vault and Clearwell E- Discovery
 Securing HTTP communication between Symantec Enterprise Vault and Clearwell E- Discovery Requesting and Applying an SSL Certificate to secure communication ion from Clearwell E-Discovery to Enterprise
NSi Mobile Installation Guide. Version 6.2
 NSi Mobile Installation Guide Version 6.2 Revision History Version Date 1.0 October 2, 2012 2.0 September 18, 2013 2 CONTENTS TABLE OF CONTENTS PREFACE... 5 Purpose of this Document... 5 Version Compatibility...
WhatsUp Gold v16.2 Installation and Configuration Guide
 WhatsUp Gold v16.2 Installation and Configuration Guide Contents Installing and Configuring Ipswitch WhatsUp Gold v16.2 using WhatsUp Setup Installing WhatsUp Gold using WhatsUp Setup... 1 Security guidelines
NTP Software VFM Administration Web Site for EMC Atmos
 NTP Software VFM Administration Web Site for EMC Atmos User Manual Revision 1.1 - July 2015 This guide details the method for using NTP Software VFM Administration Web Site, from an administrator s perspective.
WhatsUp Gold v16.3 Installation and Configuration Guide
 WhatsUp Gold v16.3 Installation and Configuration Guide Contents Installing and Configuring WhatsUp Gold using WhatsUp Setup Installation Overview... 1 Overview... 1 Security considerations... 2 Standard
WhatsUp Gold v16.1 Installation and Configuration Guide
 WhatsUp Gold v16.1 Installation and Configuration Guide Contents Installing and Configuring Ipswitch WhatsUp Gold v16.1 using WhatsUp Setup Installing WhatsUp Gold using WhatsUp Setup... 1 Security guidelines
WebSpy Vantage Ultimate 2.2 Web Module Administrators Guide
 WebSpy Vantage Ultimate 2.2 Web Module Administrators Guide This document is intended to help you get started using WebSpy Vantage Ultimate and the Web Module. For more detailed information, please see
Management Center. Installation and Upgrade Guide. Version 8 FR4
 Management Center Installation and Upgrade Guide Version 8 FR4 APPSENSE MANAGEMENT CENTER INSTALLATION AND UPGRADE GUIDE ii AppSense Limited, 2012 All rights reserved. part of this document may be produced
LifeSize Control Installation Guide
 LifeSize Control Installation Guide April 2005 Part Number 132-00001-001, Version 1.0 Copyright Notice Copyright 2005 LifeSize Communications. All rights reserved. LifeSize Communications has made every
Group Management Server User Guide
 Group Management Server User Guide Table of Contents Getting Started... 3 About... 3 Terminology... 3 Group Management Server is Installed what do I do next?... 4 Installing a License... 4 Configuring
TSM Studio Server User Guide 2.9.0.0
 TSM Studio Server User Guide 2.9.0.0 1 Table of Contents Disclaimer... 4 What is TSM Studio Server?... 5 System Requirements... 6 Database Requirements... 6 Installing TSM Studio Server... 7 TSM Studio
How To Manage Storage With Novell Storage Manager 3.X For Active Directory
 www.novell.com/documentation Installation Guide Novell Storage Manager 4.1 for Active Directory September 10, 2015 Legal Notices Condrey Corporation makes no representations or warranties with respect
INTEGRATION WITH THIRD PARTY SIEM SYSTEMS
 INTEGRATION WITH THIRD PARTY SIEM SYSTEMS TECHNICAL ARTICLE November 2012. Legal Notice The information in this publication is furnished for information use only, and does not constitute a commitment from
Product Manual. MDM On Premise Installation Version 8.1. Last Updated: 06/07/15
 Product Manual MDM On Premise Installation Version 8.1 Last Updated: 06/07/15 Parallels IP Holdings GmbH Vordergasse 59 8200 Schaffhausen Switzerland Tel: + 41 52 632 0411 Fax: + 41 52 672 2010 www.parallels.com
Enterprise Manager. Version 6.2. Administrator s Guide
 Enterprise Manager Version 6.2 Administrator s Guide Enterprise Manager 6.2 Administrator s Guide Document Number 680-017-017 Revision Date Description A August 2012 Initial release to support version
NTP Software File Auditor
 NTP Software File Auditor User Manual June 2012 This manual details the method for using NTP Software File Auditor, from an administrator s perspective. Upon completion of the steps within this document,
White Paper. Installation and Configuration of Fabasoft Folio IMAP Service. Fabasoft Folio 2015 Update Rollup 3
 White Paper Fabasoft Folio 2015 Update Rollup 3 Copyright Fabasoft R&D GmbH, Linz, Austria, 2016. All rights reserved. All hardware and software names used are registered trade names and/or registered
Lepide Exchange Recovery Manager
 Configuration Guide Lepide Exchange Recovery Manager Lepide Software Private Limited, All Rights Reserved This User Guide and documentation is copyright of Lepide Software Private Limited, with all rights
NETWRIX PASSWORD MANAGER
 NETWRIX PASSWORD MANAGER ADMINISTRATOR S GUIDE Product Version: 6.1 February/2012 Legal Notice The information in this publication is furnished for information use only, and does not constitute a commitment
NTP Software File Auditor for NAS, EMC Edition
 NTP Software File Auditor for NAS, EMC Edition Installation Guide June 2012 This guide provides a short introduction to the installation and initial configuration of NTP Software File Auditor for NAS,
LAB 1: Installing Active Directory Federation Services
 LAB 1: Installing Active Directory Federation Services Contents Lab: Installing and Configuring Active Directory Federation Services... 2 Exercise 1: installing and configuring Active Directory Federation
User Guide. CTERA Agent. August 2011 Version 3.0
 User Guide CTERA Agent August 2011 Version 3.0 Copyright 2009-2011 CTERA Networks Ltd. All rights reserved. No part of this document may be reproduced in any form or by any means without written permission
Secure IIS Web Server with SSL
 Secure IIS Web Server with SSL EventTracker v7.x Publication Date: Sep 30, 2014 EventTracker 8815 Centre Park Drive Columbia MD 21045 www.eventtracker.com Abstract The purpose of this document is to help
Advanced Service Design
 vcloud Automation Center 6.0 This document supports the version of each product listed and supports all subsequent versions until the document is replaced by a new edition. To check for more recent editions
VERITAS Backup Exec 9.1 for Windows Servers Quick Installation Guide
 VERITAS Backup Exec 9.1 for Windows Servers Quick Installation Guide N109548 Disclaimer The information contained in this publication is subject to change without notice. VERITAS Software Corporation makes
IT SECURITY GURU PRODUCT REVIEW Netwrix Auditor 6.5
 IT SECURITY GURU PRODUCT REVIEW Netwrix Auditor 6.5 Supplier: Netwrix Corporation Product: Netwrix Auditor 6.5 Website: www.netwrix.com Price: Active Directory per user, 8 ex VAT File Server per user,
How To Use Gfi Mailarchiver On A Pc Or Macbook With Gfi Email From A Windows 7.5 (Windows 7) On A Microsoft Mail Server On A Gfi Server On An Ipod Or Gfi.Org (
 On A Microsoft Mail Server On A Gfi Server On An Ipod Or Gfi.Org (") GFI MailArchiver for Exchange 4 Manual By GFI Software http://www.gfi.com Email: info@gfi.com Information in this document is subject to change without notice. Companies, names, and data used in examples
GFI MailArchiver for Exchange 4 Manual By GFI Software http://www.gfi.com Email: info@gfi.com Information in this document is subject to change without notice. Companies, names, and data used in examples
Introduction to Hyper-V High- Availability with Failover Clustering
 Introduction to Hyper-V High- Availability with Failover Clustering Lab Guide This lab is for anyone who wants to learn about Windows Server 2012 R2 Failover Clustering, focusing on configuration for Hyper-V
Citrix XenServer Workload Balancing 6.5.0 Quick Start. Published February 2015 1.0 Edition
 Citrix XenServer Workload Balancing 6.5.0 Quick Start Published February 2015 1.0 Edition Citrix XenServer Workload Balancing 6.5.0 Quick Start Copyright 2015 Citrix Systems. Inc. All Rights Reserved.
Configuration Guide for SQL Server This document explains the steps to configure LepideAuditor Suite to add and audit SQL Server.
 LEPIDE SOFTWARE Configuration Guide for SQL Server This document explains the steps to configure LepideAuditor Suite to add and audit SQL Server. LepideAuditor Suite Lepide Software Private Limited, All
WEBCONNECT INSTALLATION GUIDE. Version 1.96
 WEBCONNECT INSTALLATION GUIDE Version 1.96 Copyright 1981-2015 Netop Business Solutions A/S. All Rights Reserved. Portions used under license from third parties. Please send any comments to: Netop Business
DriveLock Quick Start Guide
 Be secure in less than 4 hours CenterTools Software GmbH 2012 Copyright Information in this document, including URL and other Internet Web site references, is subject to change without notice. Unless otherwise
2.0. Quick Start Guide
 2.0 Quick Start Guide Copyright Quest Software, Inc. 2007. All rights reserved. This guide contains proprietary information, which is protected by copyright. The software described in this guide is furnished
Enterprise Vault Installing and Configuring
 Enterprise Vault Installing and Configuring Enterprise Vault 6.0 Legal Notice Copyright 2005 Symantec Corporation. All rights reserved. Symantec, the Symantec Logo, VERITAS, the VERITAS Logo, and Enterprise
Installing GFI MailArchiver
 Installing GFI MailArchiver Introduction This chapter highlights important points you should take into consideration before installing GFI MailArchiver on your network, so that you can make the best decisions
Installing RMFT on an MS Cluster
 Installing RMFT on an MS Cluster RMFT Software Version 2.4.3 Supported on: Windows Server 2003 Enterprise Edition Windows Server 2000 Advanced Windows Server 2003 Datacenter Edition Windows Server 2008
safend a w a v e s y s t e m s c o m p a n y
 safend a w a v e s y s t e m s c o m p a n y SAFEND Data Protection Suite Installation Guide Version 3.4.5 Important Notice This guide is delivered subject to the following conditions and restrictions:
Configuration Guide. Follow the simple steps given in this document when you are going to run Lepide Active Directory Cleaner for the first time.
 Configuration 2015 Guide Follow the simple steps given in this document when you are going to run Lepide Active Directory Cleaner for the first time. Configuration Guide for the Lepide Active Directory
How To Take Advantage Of Active Directory Support In Groupwise 2014
 White Paper Collaboration Taking Advantage of Active Directory Support in GroupWise 2014 Flexibility and interoperability have always been hallmarks for Novell. That s why it should be no surprise that