PRELIMINARY MANUAL STAGE COLOR 48. Preliminary User Guide. Official version will follow soon on: TABLE OF CONTENTS
|
|
|
- Cordelia Allison
- 8 years ago
- Views:
Transcription
1 STGE COO 48 Preliminary User Guide Official version will follow soon on: TBE OF COTETS 1. Safety Instruction 2. Technical Specification 3. How To Set The Unit 4. How To Control The Unit 5. Troubleshooting 6. Fixture Cleaning PEIMIY MU 1C

2 1. Safety Instruction The housing, the lenses must be replaced if they are visibly damaged. Please read carefully the instruction, which includes important information about the installation, usage and maintenance. WIG Please keep this User Guide for future consultation. If you sell the unit to another user, be sure that they also receive this instruction booklet. Unpack and check carefully there is no transportation damage before using the unit. Before operating, ensure that the voltage and frequency of power supply match the power requirements of the unit. It s important to ground the yellow/green conductor to earth in order to avoid electric shock. The unit is for indoor use only. Use only in a dry location. The unit must be installed in a location with adequate ventilation, at least 50cm from adjacent surfaces. Be sure that no ventilation slots are blocked. Disconnect main power before replacement or servicing. Make sure there is no flammable materials close to the unit while operating as it is fire hazard. Use safety cable when fixes this unit. Maximum ambient temperature is T: 40. Don t operate it where the temperature is higher than this. In the event of serious operating problem, stop using the unit immediately. ever try to repair the unit by yourself. epairs carried out by unskilled people can lead to damage or malfunction. Please contact the nearest authorized technical assistance center. lways use the same type spare parts. Do not touch any wire during operation as high voltage might be causing electric shock. Warning For power supply, do not connect in series much more than 10 units, use another mains supply for next 10 units. To prevent or reduce the risk of electrical shock or fire, do not expose the unit to rain or moisture. Do not open the unit within five minutes after switching off. Caution There are no user serviceable parts inside the unit. Do not open the housing or attempt any repairs yourself. In the unlikely event your unit may require service, please contact your nearest dealer. Installation The unit should be mounted via its metal hole on the bracket. lways ensure that the unit is firmly fixed to avoid vibration and slipping while operating. lways ensure that the structure to which you are attaching the unit is secure and is able to support a 10 times weight of the unit. 2. Technical Specification DMX 512 control channels: 4/7/8/11/16/19 channels switchable Individual control of each ED cluster Great built-in programs under Master/Slave mode triggered by music Dimmer and Strobe adjustable High efficiency optical system vailable in 15 degree and 25 degree CD display for easy addressing and setting Voltage: C V~50/60Hz Power consumption: 56.6W ight Source: total:48pcs, red: 12pcs, green: 12pcs, blue:12pcs, white/amber:12pcs Fuse: T 6.3 Dimension: 422 x 169 x 174 mm Weight: 4.9 kgs PEIMIY MU 2C 3C

3 3. How To Set The Unit 3.1 Control Panel Display To show the various menus and the selected functions ED DMX On DMX input present MSTE On Master Mode SVE On Slave Mode SOUD Flashing Sound activation Button MEU DOW UP To select the programming functions To go backward in the selected functions To go forward in the selected functions ETE To confirm the selected functions Mains input Connect to supply mains power. Mains output Connect to supply mains power for other units. Fuse For over current protection. Channel Mode DMX input/output For DMX512 link, use 3/5-pin X plug cable to link the unit together. Only for remote control By connect to the 1/4 microphone jack to control the unit for Stand by, Function and Mode function. Safety ing Keep the installation safe. 3.2 Main Function To select any of the given functions, press the MEU button up to when the required one is showing on the display. Select the function by ETE button and the display will blink. Use DOW and UP button to change the mode. Once the required mode has been selected, Press ETE button to store. Back to the main functions without any change press the MEU button or wait for 8 seconds. Hold MEU button to quit menu mode, the unit will run the built-in program you selected. t this time you can press DOW and UP button to change show, the new show will effect immediately. If you change to show 1-8 or uto Fade, you can press ETE button to choose speed. The unit will run in the speed that selected or it will run to the music. The main functions are shown on the drawing: DMX ddress Press the MEU button up to when the DMX ddress is showing on the display. Press ETE button and the display will blink. Use DOW and UP button to change the DMX512 address. Once the address has been selected, press the ETE button to store. Back to the main functions without any change press the MEU button or wait for 8 seconds. Press the MEU button up to when the Channel Mode is showing on the display. Press ETE button and the display will blink. Use DOW and UP button to select the 4, 7, 8, 11, 16 or 19 channels mode. Once selected, press the ETE button to store. Back to the main functions without any PEIMIY MU 4C 5C

4 change press the MEU button or wait for 8 seconds. Show Mode Press the MEU button up to when the Show Mode is showing on the display. Press ETE button, the display will blink. Press DOW and UP button to select Show 0 (uto show), Show 1 or or Show 8 or uto Fade, once selected, press MEU button to store and back to the last menu, then the unit will run to music. If you choose Show 1-8 or uto Fade, press the ETE button to confirm, then you can press DOW and UP button to select Speed 1 (slow speed) or Speed 2 (middle speed) or Speed 3 (fast speed), press ETE button to store, the unit will run in the speed that selected. Back to the main functions without any change press the MEU button or wait for 8 seconds. Color Mode Press the MEU button up to when the Color Mode is showing on the display. Press ETE button, the display will blink. Press DOW and UP button to select Manu (manual setting), Color 1 or or Color 32, once selected, press MEU button to store. If you choose Maun, press the ETE button to confirm, you can press DOW and UP button to select ed or Green or Blue or White/mber, press ETE button to confirm and press DOW and UP button to adjust the value, then press ETE button to store. Back to the main functions without any change press the MEU button or wait for 8 seconds. Slave Mode Press the MEU button up to when the Slave Mode is showing on the display. Press ETE button and the display will blink. Use DOW and UP button to select the slave 1 or button to choose next optional. Back to the main functions without any change please press slave 2 mode. Once selected, press the ETE button to store. Back to the main functions without any change press the MEU button or wait for 8 seconds. Sound State Press the MEU button up to when the Sound State is showing on the display. Press ETE button and the display will blink. Use DOW and UP button to select the on (sound control on) or off (sound control off) mode. Once selected, press the ETE button to store. Back to the main functions without any change press the MEU button or wait for 8 seconds. Sound Sense Press the MEU button up to when the Sound Sense is showing on the display. Press ETE button and the display will blink. Use DOW and UP button to adjust the sound sensitively (1-100) of the unit. Once the value has been selected, press the ETE button to store. Back to the main functions without any change press the MEU button or wait for 8 seconds. 6C Black Out Press the MEU button up to when the Black Out is showing on the display. Pressing ETE button and the display will blink. Use DOW and UP button to select the yes (yes blackout) or no (no blackout) mode. Once selected, press the ETE button to store. Back to the main functions without any change press the MEU button or wait for 8 seconds. Back ight Press the MEU button up to when the Back ight is showing on the display. Pressing ETE button and the display will blink. Use DOW and UP button to select the on (back light on) or off (back light off 1 minute after auto show) mode. Once selected, press the ETE button to store. Back to the main functions without any change press the MEU button or wait for 8 seconds. uto Test Press the MEU button up to when the uto Test is showing on the display. Pressing ETE button and the display will show Test and the unit will run self-test by built-in program. To go back to the functions press the MEU button. Manual Test Press the MEU button up to when the Manual Test is showing on the display. Press ETE button and ed 1 will blink, use DOW and UP button to choose Green 1 or Blue 1 or White/mber 1 or ed2 or or White/mber 4 or Dimmer or Strobe, press ETE button to enter, then press DOW and UP button to adjust the value and press ETE the MEU button. White Balance Press the MEU button up to when the White Balance is showing on the display. Press ETE button and the r 255 will blink, press DOW and UP button to adjust the value, press ETE button to store and g 255 will blink on the display, press DOW and UP button to adjust the value, press ETE button to store and b 255 will blink on the display, press DOW and UP button to adjust the value, and press ETE button to store. Back to the main functions without any change please press the MEU button. Fan Speed Press the MEU button up to when the Fan Speed is showing on the display. Pressing ETE button and the display will blink. Use DOW and UP button to select uto Speed (When the temperature of the unit under 40, F stops; between 45 ~55, F runs at half speed; above 60, F runs at full speed. The EDs will be off if the temperature 7C PEIMIY MU

5 higher than 75 )or High Speed, press ETE button to store. To go back to the functions press the MEU button. Fixture Temp Press the MEU button up to when the Fixture Temp is blinking on the display. Pressing ETE button and the display will show the temperature of the unit. To go back to the functions press the MEU button. Fixture Time Press the MEU button up to when the Fixture Time is blinking on the display. Pressing ETE button and the display will show the number of working hours of the unit. To go back to the functions press the MEU button. Firmware Version Press the MEU button up to when the Firmware Version is blinking on the display. Pressing ETE button and the display will show the version of software of the unit. To go back to the functions press the MEU button. 4. How To Control The Unit You can operate the unit in three ways: 1. By master/slave built-in preprogram function 2. By easy controller 3. By universal DMX controller 4.1 Master/Slave Built In Preprogrammed Function By linking the units in master/slave connection, the first unit will control the other units to give an automatic, sound activated, synchronized light show. This function is good when you want an instant show. 2-light show In slave mode, slave 1 means the unit run as the master unit and slave 2 means 2-light show. In order to create a great light show, you can set slave 2 on the second unit to get contrast movement to each other, even if you have two units only. 4.2 Easy Controller The easy remote control is used only in master/slave mode. By connecting to the 1/4 microphone jack of the first unit, you will find that the remote controller on the first unit will control all the other units for Stand by, Function and Mode selection. Stand By Blackout the unit Function 1. Sync. Strobe Select Select show Select Speed 2. sync strobe 3. Sound Strobe 4.3 DMX Controller Manual Color or Color or uto Use universal DMX controller to control the units, you have to set DMX address from 1 to 512 channel so that the units can receive DMX signal. Press the MEU button up to when the DMX ddress is showing on the display. Press ETE button and the display will blink. Use DOW and UP button to change the DMX512 address. Once the address has been selected, press and keep ETE button to store when. To go back to the functions without any change press the MEU button or wait for 8 seconds. Please refer to the following diagram to address your DMX512 channel for the first 4 units: Channel Mode Unit 1 Unit 2 Unit 3 Unit 4 4 channels channels channels channels channels channels fade 1. Fast 2. Middle 3.Slow Mode Sound (ED OFF) ED On Slow blinking Fast blinking PEIMIY MU 8C 9C

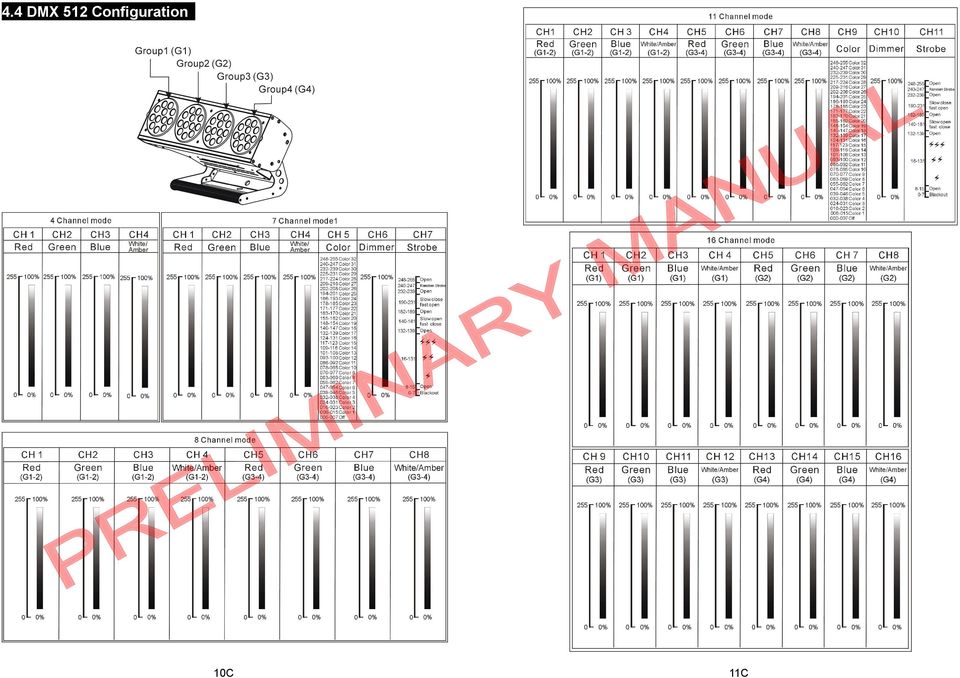
6 4.4 DMX 512 Configuration U P 10C M I IM E Y 11C
7 4.5 DMX512 Connection U M 1. If you using a controller with 5 pins DMX output, you need to use a 5 to 3 pin adapter-cable. Y 2. t last unit, the DMX cable has to be terminated with a terminator. Solder a 120 ohm 1/4W resistor between pin 2(DMX-) and pin 3(DMX+) into a 3-pin I IM E P X-plug and plug it in the DMX-output of the last unit. 3. Connect the unit together in a `daisy chain` by X plug from the output of the unit to the input of the next unit. The cable can not branched or split to a `Y` cable. DMX 512 is a very high-speed signal. Inadequate or damaged cables, soldered joints or corroded connectors can easily distort the signal and shut down the system. 4. The DMX output and input connectors are pass-through to maintain the DMX circuit, when power is disconnected to the unit. 5. Each lighting unit needs to have an address set to receive the data sent by the controller. The address number is between (usually 0 & 1 are equal to 1). 6. The end of the DMX 512 system should be terminated to reduce signal errors pin X connectors are more popular than 5 pin X. 3 pin X: Pin 1: GD, Pin 2: egative signal (-), Pin 3: Positive signal (+) 5 pin X: Pin 1: GD, Pin 2: egative signal (-), Pin 3: Positive signal (+) Pin 4/5: ot used. 12C 13C

8 5. Troubleshooting 6. Fixture Cleaning The cleaning of internal and external optical lenses and/or mirrors must be carried Following are a few common problems that may occur during operation. Here are out periodically to optimize light output. Cleaning frequency depends on the some suggestions for easy troubleshooting: environment in which the fixture operates: damp, smoky or particularly dirty U surrounding can cause greater accumulation of dirt on the unit s optics.. The unit does not work, no light and the fan does not work Clean with soft cloth using normal glass cleaning fluid. 1. Check the connection of power and main fuse. lways dry the parts carefully. 2. Measure the mains voltage on the main connector. Clean the external optics at least every 20 days. Clean the internal optics at least 3. Check the power on ED. every 30/60 days. B. ot responding to DMX controller 1. DMX ED should be on. If not, check DMX connectors, cables to see if link properly. 2. If the DMX ED is on and no response to the channel, check the address settings and M EC - Declaration of Conformity DMX polarity. Y 3. If you have intermittent DMX signal problems, check the pins on connectors or on PCB of the unit or the previous one. We declare that our products (lighting equipments) comply with the 4. Try to use another DMX controller. 5. Check if the DMX cables run near or run alongside to high voltage cables that may cause damage or interference to DMX interface circuit. I IM C. Some units don t respond to the easy controller 1. You may have a break in the DMX cabling. 2. Check the ED for the response of the master/ slave mode signal. E D. o response to the sound 1. Make sure the unit does not receive DMX signal. P 2. Check if the sound sensitively is too low. E. One of the channels is not working well 1. The cable connected to the PCB may broken. following specification and bears CE mark in accordance with the provision of the Electromagnetic Compatibility (EMC) Directive 89/336/EEC. E : : 2001, E : 1995; E : 2002; E : 1995; E : 1995, E : 1996, E : & Harmonized Standard E : 2000+: : 2002 Safety of household and similar electrical appliances Part 1: General requirements 14C 15C

Ref. Nr. 150.662 LCP-288 LED COLOR PANEL 288X LED 5MM MANUAL
 Ref. Nr. 150.662 LCP-288 LED COLOR PANEL 288X LED 5MM MANUAL Thank you for purchasing our company products. Please read these instructions carefully to enjoy optimum performance and a longer service life
K E E P E TH T I H S I MA M N A U N A U L A FO F R
 Quad-C LED Moving Wash Pro SI-055 User Manual KEEP THIS MANUAL FOR FUTURE NEEDS 1. Unpacking Thank you for choosing Color Imagination s Quad-C LED Moving Wash Pro. For your own safety, please read this
ComPar KIT 1 & 2 DMX LED light set
 ComPar KIT 1 & 2 DMX LED light set User manual 1 Safety precautions WARNING: This unit may cause serious injury to the eyes when used incorrectly. It is therefore strongly advised to read this user manual
Fixture One Power Cord One User Manual One Omega Bracket One DMX Cable - One
 1. INTRODUCTION AND UNPACKING Thank you for purchasing the MICROH LED NEO SPOT 60R moving head fixture. For your own safety and knowledge, please read this manual before installing or operating the device.
LED BAR 126 / 252 RGB. Owner s Manual LED BAR RGB
 LED BAR 126 / 252 RGB Owner s Manual LED BAR RGB Thank you for choosing one of our LED bars. Please read this user manual carefully and follow the instructions to avoid danger or damage to the unit due
ORLAND FOLLOW PR-1211
 ORLAND FOLLOW PR-1211 This product manual contains important information about the safe installation and use of this projector. Please read and follow these instructions carefully and keep this manual
Moving Head - One Signal Cable - One Omega Clamp One Power Cable - One Safety
 TABLE OF CONTENTS 1. INTRODUCTION AND UNPACKING 1 2. SAFTEY INSTRUCTIONS 1-2 3. OPERATION INSTRUCTIONS 2-3 4. MOUNTING AND INSTALLATION 4 5. DMX-512 CONTROL CONNECTIONS 5 6. MENU NAVIGATION 6 7. PHOTOMETRIC
K E E P E TH T I H S I MA M N A U N A U L A FO F R
 IP65 LED Wall Washer W-010 User Manual KEEP THIS MANUAL FOR FUTURE NEEDS 1. Unpacking Thank you for our Color Imagination's IP65 LED Wall Washer. For your own safety, please read this manual before installing
1. BEFORE YOU BEGIN... 3 2. INTRODUCTION... 5 3. SETUP... 7. AC POWER... 7 Power Linking... 7 MOUNTING... 8 Orientation... 8 Rigging...
 User Manual TABLE OF CONTENTS 1. BEFORE YOU BEGIN... 3 WHAT IS INCLUDED... 3 UNPACKING INSTRUCTIONS... 3 MANUAL CONVENTIONS... 3 ICONS... 3 SAFETY INSTRUCTIONS... 4 2. INTRODUCTION... 5 PRODUCT OVERVIEW...
DMX CONTROL 24 PRO. Table of contents
 1 2 DMX CONTROL 24 PRO Table of contents 1. Safety instructions... 4 2. Operating determinations... 4 3. Description of the device... 5 4. Installation... 7 4.1.Sound-control... 7 4.2.DMX-512 connection
LED Cube Direct Control 30 ORDERCODE 41131
 LED Cube Direct Control 30 ORDERCODE 41131 Congratulations! You have bought a great, innovative product from Showtec. The Showtec LED Cube Direct Control 30 brings excitement to any venue. Whether you
Ref. Nr. 150.569 WI-PAR 8X 3W LED TRI COLOR BATTERY 2.4GHZ DMX MANUAL
 Ref. Nr. 150.569 WI-PAR 8X 3W LED TRI COLOR BATTERY 2.4GHZ DMX MANUAL Thank you for purchasing our company products. Please read these instructions carefully to enjoy optimum performance and a longer service
Snapshot. LEDrain 38 USER MANUAL. Ok on Dimmer. Outdoor OK. Sound Activated. DMX/Master/Slave. 115V/230V Switch. Replaceable Fuse.
 LEDrain 38 Snapshot Ok on Dimmer Outdoor OK Sound Activated DMX/Master/Slave 5V/30V Switch Replaceable Fuse User Serviceable Duty Cycle USER MANUAL CHAUVET, 3000 N 9 th Ct, Hollywood, FL 3300 U.S.A (800)
LED Matrix Blinder 5x5 DMX blinder. user manual
 LED Matrix Blinder 5x5 DMX blinder user manual Musikhaus Thomann Thomann GmbH Hans-Thomann-Straße 1 96138 Burgebrach Germany Telephone: +49 (0) 9546 9223-0 E-mail: info@thomann.de Internet: www.thomann.de
Warning! To prevent or reduce the risk of electrical shock or fire, do
 Introduction Rev. 7/07 User Instructions American DJ 495 Charter Street Los Angeles Ca. 90058 www.americandj.com Unpacking: Thank you for purchasing the by American DJ. Every has been thoroughly tested
19 LED Tube Controller ORDERCODE 41003
 19 LED Tube Controller ORDERCODE 41003 Congratulations! You have bought a great, innovative product from Showtec. The Showtec 19 LED Tube Controller brings excitement to any venue. Whether you want simple
TABLE OF CONTENTS. Returns... 20 Contact Us... 20
 User Manual TABLE OF CONTENTS 1. Before You Begin...3 What Is Included... 3 Unpacking Instructions... 3 Claims... 3 Text Conventions... 3 Symbols... 3 Disclaimer... 3 Product at a Glance... 4 Safety Notes...
Warning! To prevent or reduce the risk of electrical shock or fire, do. Caution! There are no user serviceable parts inside this unit.
 Rev. 2/08 American DJ User Instructions American DJ 622 S. Eastern Ave. Los Angeles Ca. 90040 www.americandj.com Introduction Unpacking: Thank you for purchasing the by American DJ. Every has been thoroughly
USER MANUAL PLEASE KEEP THIS FOR FUTURE USE
 LED Super Beam USER MANUAL PLEASE KEEP THIS FOR FUTURE USE 1. Unpacking 10. Maintenance and Cleaning Thank you for choosing Super beam light. For your own safety, please read this manual before installing
TABLE OF CONTENTS. 6. Technical Specifications... 20. Page 2 of 20 COLORband PiX User Manual (Rev. 02)
") User Manual TABLE OF CONTENTS 1. Before You Begin... 3 What Is Included... 3 Unpacking Instructions... 3 Claims... 3 Text Conventions... 3 Icons... 3 Document Information... 3 Product at a Glance... 4
User Manual TABLE OF CONTENTS 1. Before You Begin... 3 What Is Included... 3 Unpacking Instructions... 3 Claims... 3 Text Conventions... 3 Icons... 3 Document Information... 3 Product at a Glance... 4
LED Par 56 Short DMX ORDERCODE 42421
 LED Par 56 Short DMX ORDERCODE 42421 Congratulations! You have bought a great, innovative product from Showtec. The Showtec LED Par 56 brings excitement to any venue. Whether you want simple plug-&-play
Bubble King. User Manual
 Bubble King User Manual TABLE OF CONTENTS 1. Before You Begin... 3 What Is Included... 3 Unpacking Instructions... 3 Claims... 3 Text Conventions... 3 Icons... 3 Document Information... 3 Product at a
Warning! To prevent or reduce the risk of electrical shock or fire, do. Caution! There are no user serviceable parts inside this unit.
 Introduction 7/08 User Instructions American DJ 6 S. Eastern Ave. Los Angeles Ca. 90040 www.americandj.com Unpacking: Thank you for purchasing the by American DJ. Every has been thoroughly tested and has
OPTI TRI PAR. User Instructions. Elation Professional 6122 S. Eastern Ave. Los Angeles CA. 90040 www.elationlighting.com
 Introduction OPTI TRI PAR Rev. 5/09 User Instructions Elation Professional 6122 S. Eastern Ave. Los Angeles CA. 90040 www.elationlighting.com Unpacking: Thank you for purchasing the by Elation Professional.
PART 1 PRODUCT (GENERAL)...1.
...1.") TABLE OF CONTENTS PART 1 PRODUCT (GENERAL)...1. 1.1--PRODUCT INTRODUCTION...1. 1.2--PRODUCT FEATURES...1. 1.3--TECHNICAL SPECIFICATIONS...2. 1.4--PHOTOMETRIC DATA...3. 1.5--SAFETY WARNING...4. PART 2 INSTALLATION...5.
TABLE OF CONTENTS PART 1 PRODUCT (GENERAL)...1. 1.1--PRODUCT INTRODUCTION...1. 1.2--PRODUCT FEATURES...1. 1.3--TECHNICAL SPECIFICATIONS...2. 1.4--PHOTOMETRIC DATA...3. 1.5--SAFETY WARNING...4. PART 2 INSTALLATION...5.
TABLE OF CONTENTS. Hurricane 1300 User Manual 2 Rev. 4
 User Manual TABLE OF CONTENTS 1. BEFORE YOU BEGIN... 3 What Is Included... 3 Unpacking Instructions... 3 Claims... 3 Product at a Glance... 3 Safety Instructions... 4 2. INTRODUCTION... 5 Product Overview...
ComPar KIT 1 & 2 DMX LED light set with power outputs
 ComPar KIT 1 & 2 DMX LED light set with power outputs User manual Introduction Thank you for purchasing the Ayra ComPar Kit. You have either purchased the ComPar Kit 1 or ComPar Kit 2. This user manual
User Instructions. Warning! To prevent or reduce the risk of electrical shock or fire, do not expose this unit to rain or moisture.
 Introduction User Instructions Unpacking: Thank you for purchasing the by American DJ. Every has been thoroughly tested and has been shipped in perfect operating condition. Carefully check the shipping
User Instructions. Warning! To prevent or reduce the risk of electrical shock or fire, do
 0/08 User Instructions American DJ 622 S. Eastern Ave. Los Angeles CA. 90040 www.americandj.com Introduction Unpacking: Thank you for purchasing the by American DJ. Every has been thoroughly tested and
50W/100W LED Zoom User Manual
 50W/100W LED Zoom User Manual Code: ELUM042-50W - (5600K) Code: ELUM042A - 100W - (5600K) Code: ELUM042D - 100W - (3200K) 1 2 FUSE F2A~250V Overview: You should find inside the Elemen8 carton the following
FT-100 Fire Training Fog Machine User Manual English
 FT-100 Fire Training Fog Machine User Manual English 2015 Antari Lighting and Effects Ltd. User Manual - English Safety Information Please read the following safety information carefully before operating
STAGE SETTER-8. User Instructions. Elation Professional
 STAGE SETTER-8 User Instructions Elation Professional A Division of the American DJ Group of Companies 4295 Charter Street Los Angeles, CA 90058 USA Tel: 323-582-2650 Fax: 323-582-2610 Web: www.elationlighting.com
TABLE OF CONTENTS. Page 2 of 13 MotionFaçade LED User Manual (Rev. 6)
") User Manual TABLE OF CONTENTS 1. Before You Begin...3 What Is Included... 3 Unpacking Instructions... 3 Claims... 3 Text Conventions... 3 Icons... 3 Document Information... 3 Product at a Glance... 4 Safety
User Manual TABLE OF CONTENTS 1. Before You Begin...3 What Is Included... 3 Unpacking Instructions... 3 Claims... 3 Text Conventions... 3 Icons... 3 Document Information... 3 Product at a Glance... 4 Safety
DP-DMX20L 4 CHANNEL DMX DIMMER PACK MODE MENU DISPLAY. OUTPUT: 10A/CH, TOTAL 20A Max. DMX CHANNEL RECEIVE TOTAL DMX CHANNEL DIMMER / SWITCH
 DP-DMX0L OUTPUT: 0A/CH, TOTAL 0A Max. CHANNEL DMX DIMMER PACK DISPLAY RECEIVE DMX CHANNEL TOTAL DMX CHANNEL DIMMER / SWITCH 8888 CHASE PROGRAM CHASE CHASE SPEED CHASE DIMMER MODE MENU Elation Professional
Snapshot. User Manual. Use on Dimmer. Outdoor Use. Sound Activated DMX. Master/Slave Autoswitching Power Supply Replaceable Fuse.
 Snapshot Use on Dimmer Outdoor Use Sound Activated DMX Master/Slave Autoswitching Power Supply Replaceable Fuse User Serviceable Duty Cycle User Manual Chauvet, 3000 N 29 th Ct, Hollywood, FL 33020 U.S.A.
PART 1 PRODUCT (GENERAL)...1.
...1.") 11 T ABLE OF CONTENTS PART 1 PRODUCT (GENERAL)...1. 1.1--PRODUCT INTRODUCTION...1. 1.2--PRODUCT FEATURES...1. 1.3--TECHNICAL SPECIFICATIONS...2. 1.4--PHOTOMETRIC DATA...3. 1.5--SAFETY WARNING...4. PART
11 T ABLE OF CONTENTS PART 1 PRODUCT (GENERAL)...1. 1.1--PRODUCT INTRODUCTION...1. 1.2--PRODUCT FEATURES...1. 1.3--TECHNICAL SPECIFICATIONS...2. 1.4--PHOTOMETRIC DATA...3. 1.5--SAFETY WARNING...4. PART
The Foundation User Manual LED Battery Slim Par Fixture (RGBA, DMX 7Ch/4CH)
") The Foundation User Manual LED Battery Slim Par Fixture (RGBA, DMX 7Ch/4CH) Page 1 I. Security: 1. Make sure the user voltage cannot higher or lower than the regulating voltage. 2. Please use proper and
The Foundation User Manual LED Battery Slim Par Fixture (RGBA, DMX 7Ch/4CH) Page 1 I. Security: 1. Make sure the user voltage cannot higher or lower than the regulating voltage. 2. Please use proper and
WARNING DATA. Indicates a skill or other useful information for special situations. Attention!
 Version: 2.0 This manual contains important laser system safety and operation information. Read and understand all instructions prior to powering on laser unit the first time, to avoid laser eye injury
7x10W 4IN1 Indoor Par Light User Manual
 7x10W 4IN1 Indoor Par User Manual Introduction Welcome to use High Power 4IN1 Indoor LED PAR under Neo-Neon Brand, This fixture applies high power LED technology and enjoys long life span. It can work
CB-100 LED Color Beam LED spotlight. user manual
 CB-100 LED Color Beam LED spotlight user manual Musikhaus Thomann Thomann GmbH Hans-Thomann-Straße 1 96138 Burgebrach Germany Telephone: +49 (0) 9546 9223-0 E-mail: info@thomann.de Internet: www.thomann.de
Acrobat. user manual
 Acrobat user manual 1 mounting bracket 2 swivel locks 3 focus adjustment 4 effects cover 5 lamp access 6 13 mm clamp hole 7 air vent 8 AC input & main fuse 9 data sockets 10 DIP-switch 1999-2001 Martin
POWER INPUT: AC 230V~50Hz F6.3A 250V 5x20mm OUTPUT: 1.5A / Channel, 6A / Total. FUSES CH2
 CHINA POWER INPUT: AC 230V~50Hz USE: 6.3A 250V 5x20mm OUTPUT: 1.5A / Channel, 6A / Total. POWER INPUT: AC 220V~50Hz USE: 6.3A 250V 5x20mm OUTPUT: 5A /Channel, 20A / Total. USE(Internal): 0.315A 250V CAUTION
Shogun Blue Laser Head ORDERCODE 30972
 Shogun Blue Laser Head ORDERCODE 30972 Congratulations! You have bought a great, innovative product from Showtec. The Showtec Shogun Laser Head brings excitement to any venue. Whether you want simple plug-&-play
LASER SHOW SYSTEM LUNA. User's Manual
 LASER SHOW SYSTEM LUNA User's Manual DMX Address Chart This chart lists the DMX dipswitch setting for DMX address 1 through 511. Follow the instructions below to configure fixture dipswitches with you
IS200-MH. User Manual. 10. Specifications. Input Voltage: AC90-260V 50/60Hz. LED Quantities: 1*150W High brightness white LED unit
 10. Specifications Input Voltage: AC90-260V 50/60Hz LED Quantities: 1*150W High brightness white LED unit Control Signal: DMX512, master-slave and sound activated or auto operation Control Channel: 16
Dotz Bar 1.4. User Instructions
 0 ADJ Products, LLC all rights reserved. Information, specifications, diagrams, images, and instructions herein are subject to change without notice. ADJ Products, LLC logo and identifying product names
LED Par 56 Ultra Bright RGB Black ORDERCODE 42450 Polished ORDERCODE 42451
 LED Par 56 Ultra Bright RGB Black ORDERCODE 42450 Polished ORDERCODE 42451 Congratulations! You have bought a great, innovative product from Showtec. The Showtec LED Par 56 Ultra Bright RGB brings excitement
MultiDim MKII V.2 ORDERCODE 50386
 MultiDim MKII V.2 ORDERCODE 50386 Congratulations! You have bought a great, innovative product from Showtec. The Showtec MultiDim brings excitement to any venue. Whether you want simple plug-&-play action
User Instructions. Warning! To prevent or reduce the risk of electrical shock or fire, do not expose this unit to rain or moisture.
 Introduction Rev. /06 User Instructions American DJ 495 Charter Street Los Angeles Ca. 90058 www.americandj.com Unpacking: Thank you for purchasing the by American DJ. Every has been thoroughly tested
1. Dispacking. 2. Safety Instructions
 1. Dispacking Thank you purchasing G-Lites Moving Head Beam 300. For your own safety, please read this manual before installing the device. This manual covers the important information on installation
User Instructions. Warning! To prevent or reduce the risk of electrical shock or fire, do not expose this unit to rain or moisture.
 User Instructions General Information Unpacking: Thank you for purchasing the by American DJ. Every has been thoroughly tested and has been shipped in perfect operating condition. Carefully check the shipping
Business Audio System: Music & Messaging MP3 Player. by Grace Digital Audio. User Guide. Model No. GDI-USBM10
 Business Audio System: Music & Messaging MP3 Player by Grace Digital Audio User Guide Model No. GDI-USBM10 User Guide Contents Introduction 2 Safety & General Use Information 2 Features 3 Set Up & Operation
Light Source User Guide
 Light Source User Guide Compact DMX Light Source Models covered by this manual: UFO 150 CDMXG Glass, DMX - 240V UFO 150 CDMXP Plastic, DMX - 240V Universal Fibre Optics Issue 2 Revised: 23092013 Universal
TS1200 Intelligent Lead Free Soldering Station. Operation Manual
 TS1200 Intelligent Lead Free Soldering Station Operation Manual Thank you for purchasing an Intelligent Lead Free Soldering Station. It is designed for lead free soldering. Please read this manual before
TIG INVERTER INSTRUCTION MANUAL
 TIG INVERTER INSTRUCTION MANUAL Contents Warning General Description Block Diagram Main Parameters Circuit Diagram Installation and Operation Caution Maintenance Spare Parts List Troubleshooting 3 4 4
Portable Air Conditioner
 Portable Air Conditioner Owner's Manual Model:3 in 1 12,000 Btu/h Series 3 Please read this owner s manual carefully before operation and retain it for future reference. CONTENTS 1. SUMMARY...1 2. PORTABLE
US Installation Manual Smappee Monitor
 US Installation Manual Smappee Monitor Version 1.3 English, US, version 1.3, revision 23, as of October 23, 2014, 2013 Smappee NV. All rights reserved. Specifications are subject to change without notice.
ITA3D 710. RGB DMX laser with 3D effect. User manual
 ITA3D 710 RGB DMX laser with 3D effect User manual 1 Safety precautions WARNING: This unit may cause serious injury to eyesight when used incorrect. It therefore is strongly advised to read this user manual
User s Manual Before using the inverter, you need to read and save the safety instructions.
 User s Manual Before using the inverter, you need to read and save the safety instructions. STI SERIES (STI200, STI300, STI500, STI700, STI1000) Power Frequency Pure Sine Wave Inverter The information
INNO POCKET SPOT. User Instructions
 INNO POCKET SPOT 2014 ADJ Products, LLC all rights reserved. Information, specifications, diagrams, images, and instructions herein are subject to change without notice. ADJ Products, LLC logo and identifying
Galactic Polar MKII DMX
 Galactic Polar MKII DMX Version: 3.0 This manual contains important laser system safety and operation information. Read and understand all instructions prior to powering on laser unit the first time, to
LOXONE 12 Channel Amplifier
 LOXONE 12 Channel Amplifier Item no.: 200110 Thank you for purchasing the Loxone Twelve Channel Amplifier. The versatility of the Amplifier makes it the perfect choice for almost every type of custom multi-room
LED Par 64 Short V2 ORDERCODE 42464
 LED Par 64 Short V2 ORDERCODE 42464 Congratulations! You have bought a great, innovative product from Showtec. The Showtec LED Par 64 brings excitement to any venue. Whether you want simple plug-&-play
1. BEFORE YOU BEGIN... 3 2. INTRODUCTION... 5 3. SETUP... 6
 User Manual TABLE OF CONTENTS 1. BEFORE YOU BEGIN... 3 WHAT IS INCLUDED... 3 UNPACKING INSTRUCTIONS... 3 MANUAL CONVENTIONS... 3 ICONS... 3 SAFETY INSTRUCTIONS... 4 2. INTRODUCTION... 5 PRODUCT OVERVIEW...
LEDPAR64 USER MANUAL
 LEDPAR64 USER MANUAL 1 Table of Content Part I General Information 1.1 Introduction...3 1.2 Safety Information.. 3 1.3 Unpacking..4 1.4 Specifications....4 1.5 Features.. 4 Part II Installation and Operation
Mania SCX500. user manual
 Mania SCX500 user manual DIMENSIONS All dimensions are in millimeters 442 364 178 138 200 2004-2005 Martin Professional A/S, Denmark. All rights reserved. No part of this manual may be reproduced, in any
user manual smappee monitor
 user manual smappee monitor January 2014 (English), version 2.02 2013 smappee NV. All rights reserved. Specifications are subject to change without notice. All product names are trademarks of their respective
MADRIX NEO Quick Start Guide & User Manual
 MADRIX NEO Quick Start Guide & User Manual 4 th Edition, Last Update: March 2011 Thank You for Purchasing MADRIX NEO Please read this manual carefully and thoroughly before using the MADRIX NEO. Make sure
The Bouncer Bluetooth Stereo Speaker
 The Bouncer Bluetooth Stereo Speaker 1 Welcome to JLab! Thank you for purchasing The Bouncer Bluetooth Speaker! Enjoy your music wirelessly from any smartphone, tablet, laptop, or other Bluetooth enabled
American DJ. User Instructions. American DJ
 /05 American DJ User Instructions American DJ 495 Charter Street Los Angeles Ca. 90058 www.americandj.com Introduction Unpacking: Thank you for purchasing the by American DJ. Every has been thoroughly
162 CB CABLE TRACER. Filter Probe & Tone Generator INSTRUCTION MANUAL
 162 CB CABLE TRACER Filter Probe & Tone Generator INSTRUCTION MANUAL INDEX PAGE 1. INTRODUCTION... 1 2. FILTER PROBE... 1-3 3. TONE GENERATOR... 3-6 4. SPECIFICATION... 7-8 5. MAINTENANCE... 8 1. INTRODUCTION
Four Way 220 LED DMX Moonflower
 Four Way 220 LED DMX Moonflower Model: QUADRA MOON www.pulse-light.co.uk 1 Safety Information The lightning bolt within a triangle is intended to alert the user to the presence of dangerous voltage levels
Installation and safety instructions for AC/DC built-in devices
 The device type and date of manufacture (week/year) can be found on the device rating plate. In the event of any queries about the device, please quote all the details given on the rating plate. For further
Showmaster 48 ORDERCODE 50356
 Showmaster 48 ORDERCODE 50356 Congratulations! You have bought a great, innovative product from Showtec. The Showtec Showmaster 48 brings excitement to any venue. Whether you want simple plug-&-play action
esata External Storage
 esata External Storage Operation Manual DA-ES110 Before reading this manual This operation manual contains basic instruction on installing and using esata External Storage, an IDIS product. Users who are
VIDEO DOOR PHONE SYSTEM
 ENGLISH VIDEO DOOR PHONE SYSTEM USER MANUAL Manual covers IH-692 Master and IH-692 Slave Monitors PRECAUTIONS BEFORE INSTALLATION Connect this unit ONLY to other compatible units. Do not connect it to
OWNER'S MANUAL HIGH PERFORMANCE AMPLIFIERS
 OWNER'S MANUAL HIGH PERFORMANCE AMPLIFIERS B2 has through years of dedication introduced our line of Ref 0.5 & Anno amplifiers. The B2 line up are made to fullfil our philosophy for amplifiers; A variety
Par 56 90W COB RGB ORDERCODE 43300
 Par 56 90W COB RGB ORDERCODE 43300 Highlite International B.V. Vestastraat 2 6468 EX Kerkrade The Netherlands Phone: +31 45-5667700 Congratulations! You have bought a great, innovative product from Showtec.
PROFESSIONAL WIRELESS DMX CONTROLLER USER S MANUAL EWDMXSYSTEM
 PROFESSIONAL WIRELESS DMX CONTROLLER USER S MANUAL EWDMXSYSTEM KEEP THIS MANUAL FOR FUTURE NEEDS For your own safety, please read this user manual carefully before installing the device. Keep this device
VIEW. SLX300 SpeakerLinX IP Zone. Amplifier Installation and Setup Guide. AVoIP
 VIEW SLX300 SpeakerLinX IP Zone Amplifier Installation and Setup Guide TM AVoIP ClearOne 5225 Wiley Post Way Suite 500 Salt Lake City, UT 84116 Telephone 1.800.283.5936 1.801.974.3760 Tech Sales 1.800.705.2103
VFS24/32HDIP. Public Display IP Monitor User Manual
 VFS24/32HDIP Public Display IP Monitor User Manual 2 Contents Before You Begin...4 Side Panel Control buttons...6 Connections...7 OSD Function...7 LCD monitor Mounting Guide...9 Getting started... 10 Power
Congratulations! Thank you!
 TM-47 ORDERCODE D1370 Congratulations! You have bought a great, innovative product from DAP Audio. The DAP Audio Microphone range brings excitement to any venue. Whether you want simple plug-&-play action
aseries A13B Mini Bullet Camera User Manual
 aseries A13B Mini Bullet Camera User Manual Thank you for purchasing our product. If there are any questions, or requests, please do not hesitate to contact the dealer. This manual applies to the MicroView
TABLE OF CONTENTS. 1. Before You Begin... 3
 User Manual TABLE OF CONTENTS 1. Before You Begin... 3 What Is Included... 3 Unpacking Instructions... 3 Claims... 3 Text Conventions... 3 Icons... 3 Document Information... 3 Product at a Glance... 4
LED PAR 64 SHORT FLOOR 20X3W PWM RGB
 USER S MANUAL LED PAR 64 SHORT FLOOR 20X3W PWM RGB Table of contents 1. Safety instructions... 3 2. DMX Mode... 5 3. Set Up... 6 3.1. DMX ADD... 6 3.2. Display settings... 6 3.3. Manual Dimmer... 6 3.4.
MODEL 2202IQ (1991-MSRP $549.00)
") F O R T H E L O V E O F M U S I C F O R T H E L O V E O F M U S I C MODEL 2202IQ (1991-MSRP $549.00) OWNER'S MANUAL AND INSTALLATION GUIDE INTRODUCTION Congratulations on your decision to purchase a LINEAR
F O R T H E L O V E O F M U S I C F O R T H E L O V E O F M U S I C MODEL 2202IQ (1991-MSRP $549.00) OWNER'S MANUAL AND INSTALLATION GUIDE INTRODUCTION Congratulations on your decision to purchase a LINEAR
Daker DK 1, 2, 3 kva. Manuel d installation Installation manual. Part. LE05334AC-07/13-01 GF
 Daker DK 1, 2, 3 kva Manuel d installation Installation manual Part. LE05334AC-07/13-01 GF Daker DK 1, 2, 3 kva Index 1 Introduction 24 2 Conditions of use 24 3 LCD Panel 25 4 Installation 28 5 UPS communicator
Stage Color LED. Elation Professional 4295 Charter Street Los Angeles, Ca 90058 www.elationlighting.com. Rev. 06/21/07
 Elation Professional 4295 Charter Street Los Angeles, Ca 90058 www.elationlighting.com Rev. 06/21/07 Elation Professional, Los Angeles Ca. 1 www.elationlighting.com Stage Color LED TABLE OF CONTENS CONTENTS
RIGOL. Quick Guide. DS1000CA Series Oscilloscope. Aug. 2011. RIGOL Technologies, Inc.
 Quick Guide DS1000CA Series Oscilloscope Aug. 2011 Technologies, Inc. Guaranty and Declaration Copyright 2011 Technologies, Inc. All Rights Reserved. Trademark Information is a registered trademark of
CX Zoner Installation & User Guide
 CX Zoner Installation & User Guide Cloud Electronics Limited 140 Staniforth Road, Sheffield, S9 3HF England Tel +44 (0)114 244 7051 Fax +44 (0)114 242 5462 e-mail info@cloud.co.uk web site http://www.cloud.co.uk
Sunstrip Active DMX ORDERCODE 30710
 Sunstrip Active DMX ORDERCODE 30710 Congratulations! You have bought a great, innovative product from Showtec. The Showtec Sunstrip Active DMX brings excitement to any venue. Whether you want simple plug-&-play
Getting started with
 PART NO. CMA113 MADE IN CHINA 1. Measuring CAT II 2. Max. voltage 250V ~ 3. Max. current 71 Amp Getting started with Electricity consumption monitoring single phase for homes and some smaller light commercial
American DJ. User Instructions
 American DJ User Instructions Introduction Unpacking: Thank you for purchasing the by American DJ. Every has been thoroughly tested and has been shipped in perfect operating condition. Carefully check
MANUAL ENGLISH. Ordercode: 50701. Highlite International B.V. Vestastraat 2 6468 EX Kerkrade the Netherlands
 MANUAL ENGLISH SM-16/2 V1 Highlite International B.V. Vestastraat 2 6468 EX Kerkrade the Netherlands Table of contents Warning... 2 Unpacking Instructions... 2 Safety Instructions... 2 Operating Determinations...
Operation Manual for Users
 Operation Manual for Users Model No.: FLTAMFMRCD!!!!!!!!!! ATTENTION!!!!!!!!!! THE RESET BUTTON MUST BE PRESSED TO ENSURE PROPER OPERATION. SEE INSTRUCTION MANUAL Table of Contents Table of Contents ---------------------------------------------------------------------------------------------
INSTRUCTION MANUAL PLEASE READ ALL THE INSTRUCTIONS COMPLETELY BEFORE USE AND SAVE THIS MANUAL FOR FUTURE REFERENCE
 INSTRUCTION MANUAL PLEASE READ ALL THE INSTRUCTIONS COMPLETELY BEFORE USE AND SAVE THIS MANUAL FOR FUTURE REFERENCE m Before Use Please read IMPORTANT SAFETY INSTRUCTIONS on page 10 before use. It is important
FMT600BT Transmitter
 Technaxx FMT600BT Transmitter User Manual Transfer of music and calls directly from your Bluetooth device to your car radio This device complies with the requirements of the standards referred to the Directive
Online UPS. PowerWalker VFI 1000R/1U
 Online UPS PowerWalker VFI 1000R/1U Manual Uninterruptible Power Supply System Table of Contents 1. Important Safety Warning... 1 1-1. Transportation... 1 1-2. Preparation... 1 1-3. Installation... 1 1-4.
Operating Instructions Bedienungsanleitung Mode d emploi
 Operating Instructions Bedienungsanleitung Mode d emploi DW 400 www.bron-kobold.com Operating instructions DW 400 Before use Please read all the information contained in these operating instructions carefully.
American DJ. User Instructions. American DJ
 American DJ American DJ American DJ World Headquarters: 4295 Charter Street Los Angeles, CA 90058 USA Tel: 323-582-2650 / Fax: 323-582-2610 Web: www.americandj.com / E-mail: info@americandj.com American