User Manual of Omnik Internal Data Collector
|
|
|
- Beryl Rodgers
- 8 years ago
- Views:
Transcription
1 User Manual of Omnik Internal Data Collector Omnik New Energy Co. Ltd.

2 Catalog Part 1. WiFi Card Install SOP Disassembly Preparation Installation... 5 Part 2. Wifi card user manual Unpacking PV data collector interface and buttons Set up antenna S/N Label Connect the PV data collector to the inverter (Shown in Pic.5-1) Connection IP Address Display and settings LED Indicators Network Settings (In AP mode by WiFi) Troubleshooting Register on monitoring website Click Register button to go to registering interface for new account Fill in user s information as required Login the PV monitoring system to manage the power station Owner User Interface IPhone & ipad application Contact

3 Part 1. WiFi Card Install SOP 1. Disassembly Picture 1-1 Unscrew the four screws on the interface panel with the screwdriver as shown in Picture1-1 and keep the screws aside. Picture 1-2 Unscrew the two-holed water-proofing connector from the interface panel. The standard connector coming with the inverter is two-holed as shown in Picture1-2, circled in red. 2. Preparation Pick out the antenna and the water-proofing connector from the package and plug the antenna into the socket circled in red in Picture2-1 A, as shown in Picture2-1 B: 3

4 Picture 2-1 The water-proofing connector for WiFi card is single-holed. Screw the connector onto the interface panel with a torque of 2.0N.m, as shown in Picture2-2: Picture 2-2 4

5 3. Installation Insert the WiFi card into the socket marked in red rectangular in Picture3-1 A. Gently insert the card until it fully and tightly contacts with the connecting fingers as shown in Picture3-1 B. Picture3-1 Power on the inverter and check if the red LED is lit to indicate the installation is successful, as shown in Picture3-2. If the red LED is not lit, check if the WiFi card is properly connected to the inverter. Picture3-2 Power off the inverter and put the antenna through the water-proofing connector on the interface panel, as shown in Picture3-3: 5

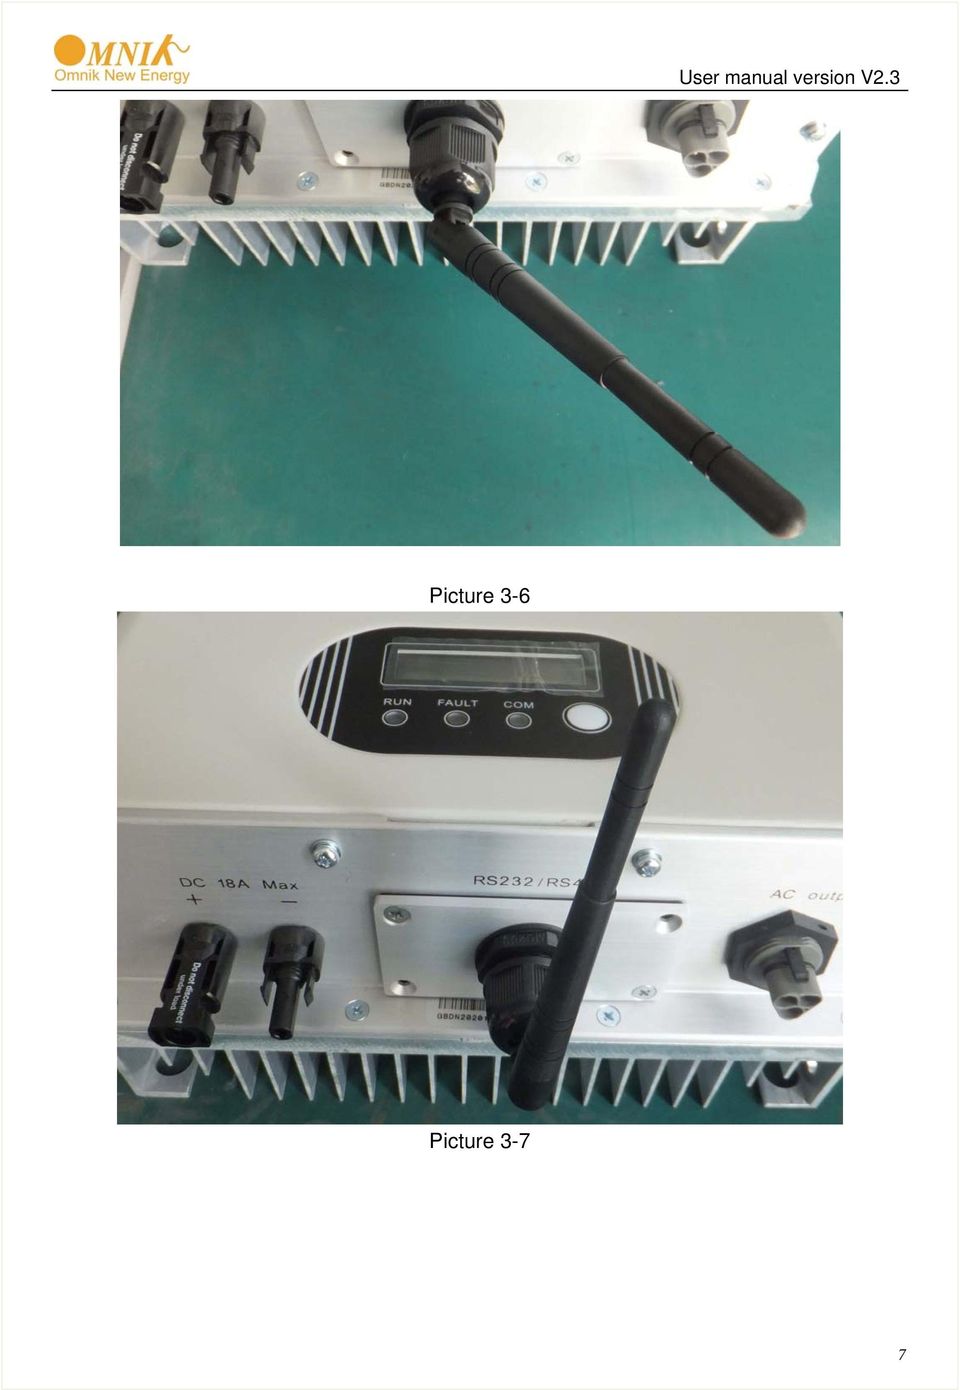
6 Picture3-3 User manual version V2.3 Screw the interface panel tight onto the inverter with a torque of 1.2N.m as shown in Picture3-4: Picture3-4 Screw the water-proofing connector tight to fixate the antenna with a torque of 1.5N.m in a way that the antenna is properly mounted and can be turned in 360 degrees as shown in below pictures: Picture 3-5 6

7 Picture 3-6 Picture 3-7 7
8 Part 2. Wifi card user manual 1. Unpacking After unpacking the box, please check the parts according to the below list. Contact the manufacturer immediately, should you find any damage, missing or wrong model of the device or any parts. No. Name Quantity A PV data collector 1 B WIFI antenna 1 2. PV data collector interface and buttons Picture1-1 No. A Name 12pin connecting fingers B C A B Reset Button C I-PEX Interface picture2 3. Set up antenna Picture2-1 Connect the WIFI antenna with the data collector through I-PEX interface as shown in Pic.3-1: 1 Picture.3-1 8

9 4. S/N Label Picture Connect the PV data collector to the inverter (Shown in Pic.5-1) 5.1 Connection 1. Power off the inverter; 2. Open the RS232/RS485 interface panel; 3. Plug the data collector with antenna onto the inverter through the connecting fingers; 4. Power on the inverter. Note: Due to the shielding of the metal case, please keep the antenna outside of the inverter. Otherwise, the signal of wireless communication will be too weak. 5.2 IP Address Display and settings Picture 5-1 9

10 Picture. 5-2 Press the function button and the display will change to IP address, as shown in picture 5-4 Picture. 5-3 Picture. 5-4 When you see the IP address, Press Function button for 5 seconds,the default value will be Displayed as in picture

11 Picture. 5-5 Continue to press the function key, you will see the following picture: YES Pac=xxxw Picture. 5-6 When you see Picture 5-6,Press Function button for 5 seconds,you will see SET OK as in picture 5-7 Picture. 5-7 Pic5-7, automatically quit setting after 5 seconds, it will show IP, Pic 5-8 Picture

12 6. LED Indicators LINK RUN STATUS picture6 1 LED Name Status Description RUN LINK STATUS On/Blinking Off On Blinking Off On Blinking Off Module is working Module is not working Module is successfully connected to the server by WiFi under STA mode The WiFi module is in AP mode In STA mode; No WiFi connection or no connection to the server Communication with the inverter is working Communicating with the inverter (transferring data) Communication with the inverter is not working 12
 Communication with the inverter is not working")
13 7. Network Settings (In AP mode by WiFi) Insert the module, and turn on the DC power,three minutes later enter the next step. Choose My network place click right hand 七 13

14 Left click 选 择 WiFi 热 点, 左 键 双 击 14

15 Connect successfully Enter in your browser Fill in the user name admin and password admin Left button Search 15

16 Choose your regional WiFi and click Apply If your WiFi has a password, click confirm Do not fill in Fill in the password of your wifi Whether display your password Disable or Enable, Enable suggested Lest button Apply Note: this default setting is router DHCP is on, if you can not connect the network, please check if you open the DHCP function. 16

17 8. Troubleshooting Status Possible Causes Solution STATUS LINK RUN On/ Blink On On Connection is successful No need ing On/ Blink Communicating with the Blink On ing inverter ing No need Off Off Off No power connection Check if the connecting fingers are contacting properly Check if the inverter is working properly Inverter connection is abnormal Check if the inverter is working properly On/ Resetting or initializing Check the LEDs again after 1 minutes Blink ing Off Off WiFi connection is not successful Change the position of the inverter or the antenna to get better signal reception Antenna is not properly connected Check if antenna is connected properly. Screw tight if loose On/ Communication with the Check if the connecting fingers are contacting Blink On Off inverter is abnormal properly ing On/ Check the setting of AP wireless router Connection of the data Blink On Χ collector is abnormal Check the WiFi settings ing Note 1:Χ means status unknown. Note 2:If the device is still not working after above operations in the table, please try resetting the device. If it is still not working after the reset, please contact customer service of the manufacturer. 17

18 9. Register on monitoring website Our products supported by PV monitoring system Web site browser:ie8,firefox, Chrome,safari,log into the website Click on register, enter the user registration page, follow the requirements for registration, after successful registration, enter the mailbox and activity the account, then complete the registration. 9.1 Click Register button to go to registering interface for new account Click and enter the register interface Picture Fill in user s information as required choose Owner Click and enter the configure interface 18

19 9.2.1 Owner Account Picture 9-2 Remarks: please read the <Omnik service agreement >carefully, the enclosure is the cost list for all the countries, please choose your operators Owner means the final user * you must fill it Click and choose the aim pic Click OK save the pic Fill in WiFi card s S/N code, see pic 9-4 Click the map, choose the installation site Select, and choose it to be the share mode, other user can see 19

20 Finish the register Picture 9-3 Picture

21 10. Login the PV monitoring system to manage the power station User manual version V2.3 After the successful register and account activation,open the login interface as below picture 9-1, input the correct and code and enter the PV monitoring system, then you can monitor and manage the power station. Input the correct and code 10.1 Owner User Interface Picture 10-1 Power station list Picture
22 Choose your station and enter Edit or delete the case Picture 10-3 List of power Not yet open Back to 9-2 Enter the sharing case Enter the configure company account interface Add one case under your account, Reset password same as 9-3 Picture 10-4 navigation bar 22
23 Change case Case info search Real-time power and generated energy Print current Power station info Energy saving Picture 10-5 Main interface of power station 23
24 Internal temperature Latest data collecting time Picture 10-6 Real Time Interface Choose the aim inverter Parameter options Picture 10-7 History Interface 24
25 Click, turn to picture 9-7 Picture 10-8 Alert Interfaces The interface same as picture 9-3 Picture 10-9 System Setting Interface 25
26 Picture System Setting Interface 11. IPhone & ipad application After registration of the power station, you can input the key words: Omnik,solar, inverter, PV, energy,plant, monitor at the app store, then you can download the Omnik solar (iphone) and Omnik Solar HD(iPad) at app store. After the download input your user name and password, then visit your station,(we supply a free demo, for the users who do not register)choose the power station and enter the main interface, then you the daily energy etc. will be displayed. Meanwhile, you can view the relevant date to view the curve as below: 26
27 1. Log in interface 2. Power station list interface 3. Main interface 4. Daytime curve interface Picture
28 12. Contact If you have any technical problems about our products,please contact us,you should confirm the follow things before contact us: Device model Data collector serial number The number of connected inverter Add: Xinghu Road No.218 biobay Park A4, Suzhou China Zip code: Fax: Tel: Mail: 28
User s Manual of Web monitor HMI-901
 User s Manual of Web monitor HMI-901 Version:UM02EN-140306 AforeUK Ltd Unit 6 The Maltsters Wetmore Road Burton on Trent Staffordshire DE14 1LS www.aforeuk.com info@aforeuk.com 01283 845039 1. Installation
Installation. N300 WiFi Range Extender Model WN3100RP
 Installation N300 WiFi Range Extender Model WN3100RP Getting Started The NETGEAR WiFi Range Extender increases the distance of a WiFi network by boosting the existing WiFi signal and enhancing the overall
Aolynk DR814Q ADSL2+ Broadband Router Quick Start
 Aolynk DR814Q ADSL2+ Broadband Router 1 Packing List Quick Start Unpack the shipping carton carefully and check the following items listed below: One Aolynk DR814Q ADSL2+ Broadband Router One power adapter
Quick Installation Guide
 Quick Installation Guide (For Windows & Mac OS) Outdoor Wireless IP Camera Package Contents V1.1 IP Camera Power Adapter Resource CD Ethernet Cable Mounting Bracket(except FI8919) Wi-Fi Antenna Quick Installation
How to configure Linksys SPA 941 942 for VOIP Connections
 How to configure Linksys SPA 941 942 for VOIP Connections Congratulations. Welcome to VOIP Connections family. 1.) Connect the phone properly. Make sure the phone is connected securely to your router or
10/2011 - English Edition 1. Quick Start Guide. NWA1100N-CE CloudEnabled Business N Wireless Access Point
 10/2011 - English Edition 1 Quick Start Guide NWA1100N-CE CloudEnabled Business N Wireless Access Point Package Contents - 1 x ZyXEL NWA1100N-CE Access Point - 2 x Detachable Antennas - 1 x Power Adapter
WIFI Module setup guide
 WIFI Module setup guide How to set up the Wifi dongle? 1. Plug Wifi module to the RS232 port of the inverter. If the RS232 port has DIP switch, DIP1 should be set to 1; 2. Connect to the wireless network
Installation Guide. Wireless N Access Point EAP110/EAP120/EAP220
 Installation Guide Wireless N Access Point EAP110/EAP120/EAP220 CONTENTS Network Topology 01 Hardware Overview 02 Hardware Installation 05 1. Installation Requirements... 05 2. Mounting Bracket... 05
Chapter1. Interface Introduction
 Robustel GoRugged R3000 Quick Guide Chapter1. Interface Introduction 1.1 LED Indicators After inserting the SIM card into the router and power on, the LED indicators status should be as follow when work
Energy Communication Unit (ECU)
") Altenergy Power System Energy Communication Unit (ECU) Installation and User Manual (For ECU-3 V3.8) ALTENERGY POWER SYSTEM INC. All rights reserved TABLE OF CONTENTS 1.0 Introduction... 2 2.0 Installation...
Altenergy Power System Energy Communication Unit (ECU) Installation and User Manual (For ECU-3 V3.8) ALTENERGY POWER SYSTEM INC. All rights reserved TABLE OF CONTENTS 1.0 Introduction... 2 2.0 Installation...
Homeguard Wireless Home Camera Quick Start Guide
 Homeguard Wireless Home Camera Quick Start Guide Congratulations on your purchase of this Homeguard Wireless Home Camera. This leaflet will guide you through setting up your camera for basic use with a
Quick Installation Guide
 V46.01 Model: FI8918W Quick Installation Guide Indoor Pan/Tilt Wireless IP Camera Black White For Windows OS ------- Page 1 For MAC OS ------- Page 11 ShenZhen Foscam Intelligent Technology Co., Ltd Quick
Installation & Quick Start Guide inavconnect Wireless Router
 Installation & Quick Start Guide inavconnect Wireless Router QUICK START inavconnect VR1.01 1. Introduction Congratulations on the purchase of your inavconnect Wireless Router. It is recommended that your
Quick Installation Guide
 V2.01 IP Wired / Wireless Camera Quick Installation Guide (For Windows OS) Model: FI8602/FI8602W ShenZhen Foscam Intelligent Technology Co., Ltd Packing List Quick Installation Guide 1) IP CAMERA X 1 2)
Live Streaming Camera GV-LS2 / GV-LS1. Connection Guide. Other information can be found in the Reference Manual.
 C2N LYT2644-002A 0513YHM-YH-OT Live Streaming Camera GV-LS2 / GV-LS1 Connection Guide This PDF will give you the steps in order to connect the Live Streaming Camera to your network and digital devices.
Quick Installation Guide-For MAC users
 Quick Installation Guide-For MAC users Packing List 1) IP CAMERA X 1 2) Wi-Fi Antenna (only available for wireless model) 3) DC Power Supply X 1 4) Network Cable X 1 5) Mounting bracket 1 6) CD X 1 (Include
PePWave Surf Series PePWave Surf Indoor Series: Surf 200, AP 200, AP 400
 PePWave Surf Series PePWave Surf Indoor Series: Surf 200, AP 200, AP 400 PePWave Surf Outdoor Series: Surf AP 200/400-X, PolePoint 400-X, Surf 400-DX User Manual Document Rev. 1.2 July 07 COPYRIGHT & TRADEMARKS
Quick Installation Guide
 V48.01 Model: FI8919W Quick Installation Guide Outdoor Pan/Tilt Wireless IP Camera For Windows OS ------- Page 1 For MAC OS ------- Page 15 ShenZhen Foscam Intelligent Technology Co., Ltd Quick Installation
D-Link DAP-1360 Repeater Mode Configuration
 D-Link DAP-1360 Repeater Mode Configuration Outline 1. Package Contents 2. System Requirements 3. Hardware Overview Connections LED s WPS LED/Button 4. Default Settings 5. Configuring your LAN Adapter
Thank you for choosing HUAWEI E5331 Mobile Wi-Fi
 Thank you for choosing HUAWEI E5331 Mobile Wi-Fi This guide briefly describes the functions of the E5331 Mobile Wi-Fi. Copyright Huawei Technologies Co., Ltd. 2012. All rights reserved. THIS DOCUMENT IS
Installer guide. Release 2.2
 Installer guide Release 2.2 Important safety notice h r j n l s The following safety regulations must be observed at all times. Failure to observe precautions could result in severe injury or death. jj
user manual smappee monitor
 user manual smappee monitor January 2014 (English), version 2.02 2013 smappee NV. All rights reserved. Specifications are subject to change without notice. All product names are trademarks of their respective
Quick Installation Guide
 IP Wireless / Wired Camera Quick Installation Guide (For Mac OS) Model:FI8908W Color: Black Model:FI8908W Color: White ShenZhen Foscam Intelligent Technology Co., Ltd Quick Installation Guide-For MAC users
Energy Communication Unit (ECU)
") Altenergy Power System Energy Communication Unit (ECU) Installation and User Manual (For ECU-3 V3.7) Version:3.0 ALTENERGY POWER SYSTEM INC. All rights reserved TABLE OF CONTENTS 1.0 Introduction... 2
Altenergy Power System Energy Communication Unit (ECU) Installation and User Manual (For ECU-3 V3.7) Version:3.0 ALTENERGY POWER SYSTEM INC. All rights reserved TABLE OF CONTENTS 1.0 Introduction... 2
Shield Pro. Quick Start Guide
 Shield Pro In the box: Power Adapter Shield Network Cables Let s get started! Before installing Shield you will first need to determine which operating mode best fits your needs. To help with this process,
Technical Support. Package Contents. CENTRIA WNDR4700/WNDR4720 Installation Guide
 Technical Support After installing your device, locate the serial number on the label of your product and use it to register your product at https://my.netgear.com. You must register your product before
Quickstart Guide Vodafone Mobile Wi-Fi R216-Z
 Quickstart Guide Vodafone Mobile Wi-Fi R216-Z Welcome to the world of mobile communications 1 Welcome 2 Device overview 3 Getting started 5 Mobile Wi-Fi Web app 6 Web app overview 7 Current network panel
Quick Installation Guide For Mac users
 Quick Installation Guide For Mac users Packing List 1) IP CAMERA X 1 2) Wi-Fi Antenna (only available for wireless model) 3) DC Power Supply X 1 4) Network Cable X 1 5) Mounting bracket 1 6) CD X 1 (Include
Quick Installation Guide
 V2.01 Model: FI9821W Quick Installation Guide Indoor HD Pan/Tilt Wireless IP Camera Black White For Windows OS ------- Page 1 For MAC OS ------- Page 16 ShenZhen Foscam Intelligent Technology Co., Ltd
Turn on all of your network devices and then check to see if the LEDs on the Access Point display normally as the diagram below describes.
 Connect to the Access Point with the Ethernet cable or via wireless. The default SSID of the Access Point is TP-LINK_ XXXXXX. The XXXXXX is the last 6 characters of the Access Point s MAC address. Plug
Installation Guide (No Router)
") Installation Guide (No Router) This installation guide will show you how to get your voip phone service working. This installation guide should be used if you have a standard DSL or cable modem and no
Installation Guide (No Router) This installation guide will show you how to get your voip phone service working. This installation guide should be used if you have a standard DSL or cable modem and no
Mobile Router MR600 User Guide
 Mobile Router MR600 User Guide HANTZ + PARTNER The Upgrade Company! www.hantz.com 1. Connections and LEDS The following pictures show you various connectors and status LED indicators on the MR600 Mobile
N300 WiFi Range Extender
 Model EX2700 User Manual July 2014 202-11395-01 350 East Plumeria Drive San Jose, CA 95134 USA Support Thank you for selecting NETGEAR products. After installing your device, locate the serial number on
Assign a static IP address 192.168.1.100 for your computer. Please refer to the T3 in Troubleshooting guide if you need assistance.
 Assign a static IP address 192.168.1.100 for your computer. Please refer to the T3 in Troubleshooting guide if you need assistance. Connect to the Access Point with the Ethernet cable or via wireless.the
EM6230 e-camview HD outdoor IP camera
 EM6230 e-camview HD outdoor IP camera 2 ENGLISH EM6230 e-camview HD outdoor IP camera Table of contents 1.0 Introduction... 3 1.1 Packing contents... 3 1.2 Requirements to access the camera.... 3 1.3 Major
Quick Installation Guide
 IP Wireless / Wired Camera Quick Installation Guide (For Windows OS) Model:FI8908W Color: Black Model:FI8908W Color: White ShenZhen Foscam Intelligent Technology Co., Ltd Packing List FI8908W Quick Installation
Networking. General networking. Networking overview. Common home network configurations. Wired network example. Wireless network examples
 Networking General networking Networking overview A network is a collection of devices such as computers, printers, Ethernet hubs, wireless access points, and routers connected together for communication
Step by Step Guide for Upgrading Your NetCamPro Camera to Cloud Mode Using an Android Device
 Step by Step Guide for Upgrading Your NetCamPro Camera to Cloud Mode Using an Android Device Table of Contents Introduction...2 Backing Out Cloud Mode...2 Indoor Camera Factory Reset...2 Outdoor Camera
Wireless IP Camera. Quick Installation Guide
 Wireless IP Camera Quick Installation Guide 1 Packing List IP Camera X1 DC Power Supply X1 CD X1 Certificate of Quality X1 Warranty Card X1 Mounting bracket X1 Mounting screw X1 Key Features 1.720P HD
* DISCLAIMER: Contents. How to Use This Guide: COMMERCIAL INSTALL GUIDE 2
 COMMERCIAL INSTALL GUIDE 2 Contents How to Use This Guide: The first section of this guide is designed to assist you with the installation of your DECK Monitoring hardware. The revenue grade meter and
WiFi DSL Modem Router
 Support Thank you for purchasing this NETGEAR product. After installing your device, locate the serial number on the label of your product and use it to register your product at https://my.netgear.com.
How To Set Up A Power Logger On A Pv Data Logger On An Ipad Or Ipad (S-We01S) With A Wifi Kit (Swe01) With An Ipa Data Logger (S01S Or S01
 With A Wifi Kit (Swe01) With An Ipa Data Logger (S01S Or S01") USER MANUAL External Data Logger WiFi Kit S-WE01S Version 1.0 www.solarmanpv.com 1. GENERAL INFORMATION... 2 1.1 SYMBOL DESCRIPTION...2 2. INSTRUCTIONS & NOTES... 2 2.1 INSTRUCTIONS...2 2.2 NOTES... 2
USER MANUAL External Data Logger WiFi Kit S-WE01S Version 1.0 www.solarmanpv.com 1. GENERAL INFORMATION... 2 1.1 SYMBOL DESCRIPTION...2 2. INSTRUCTIONS & NOTES... 2 2.1 INSTRUCTIONS...2 2.2 NOTES... 2
Energy Smart Electric Water Heater Controller
 Installation, Operation and Troubleshooting Instructions Energy Smart Electric Water Heater Controller Table of Contents Installation and Setup, 2 Operation, 5 Troubleshooting, 7 Regulatory Notices, 11
Quick Start Guide. the world in my eyes
 2013 the world in my eyes Quick Start Guide For security s sake, please update the default user name and password of your IP camera. The exact process is on page 5 & 9. Please download the latest Quick
Please use only wired network connections to configure the router.
 Note Please use only wired network connections to configure the router. Connect the WAN port on your Router to the Modem s LAN port with an Ethernet cable. Note If connecting the TL-WR543G to the WISP
Using the T&D Thermo App with TR-7wf Data Loggers
 Using the T&D Thermo App with TR-7wf Data Loggers T&D Thermo The T&D Thermo App from T&D Corporation can be used to accomplish a variety of functions with the TR-7wf Series of Wi-Fi enabled wireless Data
Thank you for choosing HUAWEI Mobile WiFi
 Thank you for choosing HUAWEI Mobile WiFi Supported functions and actual appearance depend on the specific models you purchased. The illustrations are provided for your reference only. For details about
Link Link sys E3000 sys RE1000
 User Guide High Performance Extender Wireless-N Router Linksys Linksys RE1000 E3000Wireless-N Table of Contents Contents Chapter 1: Product Overview 1 Front 1 Top 1 Bottom 1 Back 2 Chapter 2: Advanced
How to setup EW-7438RPn with a Windows computer to extend an existing Wi-Fi network
 2 How to setup EW-7438RPn with a Windows computer to extend an existing Wi-Fi network Note: 1. This instruction use pictures from EW-7438RPn firmware v1.13. 2. If you need to restore to the default settings,
MXview ToGo Quick Installation Guide
 MXview ToGo Quick Installation Guide First Edition, July 2015 2015 Moxa Inc. All rights reserved. P/N: 18020000000C0 Overview MXview ToGo allows you to use your mobile devices to monitor network devices
802.11n Wireless Broadband Router WNRT-625
 802.11n Wireless Broadband Router WNRT-625 Quick Installation Guide Table of Contents Introduction... 3 Package Content... 4 Hardware Installation... 5 Web Configuration... 8 Further Configuration...11
Troubleshooting Guide
 Troubleshooting Guide Before you start troubleshooting: Power down the Tooway modem for 60 seconds. Connect a computer directly (via Ethernet cable) to the Tooway modem Power the Tooway modem and wait
Assign a static IP address 192.168.1.100 for your computer. Please refer to the T3 in Troubleshooting guide if you need assistance.
 Note The product model shown in this QIG is TL-WA701ND, as an example. Assign a static IP address 192.168.1.100 for your computer. Please refer to the T3 in Troubleshooting guide if you need assistance.
BiPAC 7404V series. VoIP/(802.11g) ADSL2+ (VPN) Firewall Router. Quick Start Guide
 ADSL2+ (VPN) Firewall Router. Quick Start Guide") BiPAC 7404V series VoIP/(802.11g) ADSL2+ (VPN) Firewall Router Quick Start Guide VoIP/(802.11g) ADSL2+ (VPN) Firewall Router For more detailed instructions on configuring and using the Billion VoIP/(802.11g)
BiPAC 7404V series VoIP/(802.11g) ADSL2+ (VPN) Firewall Router Quick Start Guide VoIP/(802.11g) ADSL2+ (VPN) Firewall Router For more detailed instructions on configuring and using the Billion VoIP/(802.11g)
Home Wi-Fi Gateway Instructions
 Home Wi-Fi Gateway Instructions 1. Connect the gateway. Use the coaxial cable provided by BendBroadband to connect the cable port (A) to your cable outlet. 2. Connect your computer to the cable modem gateway
Chapter 1 Connecting the Router to the Internet
 Chapter 1 Connecting the Router to the Internet This chapter describes how to set up the router on your Local Area Network (LAN) and connect to the Internet. It describes how to set up your wireless ADSL
English version. LW320/LW321 Sweex Wireless 300N Router. Package Contents. Terminology list
 LW320/LW321 Sweex Wireless 300N Router Do not expose the Sweex Wireless 300N Router to extreme temperatures. Do not place the device in direct sunlight or in the direct vicinity of heating elements. Do
User's Guide. [Home Network] app. Model No.
![User's Guide. [Home Network] app. Model No.](/thumbs/26/8329814.jpg "User's Guide. [Home Network] app. Model No.") User's Guide [Home Network] app Model No. Table of Contents Table of Contents 1 Welcome to the Panasonic Home Network System!...5 1.1 What is the Panasonic Home Network System?...5 1.2 What can I use it
User's Guide [Home Network] app Model No. Table of Contents Table of Contents 1 Welcome to the Panasonic Home Network System!...5 1.1 What is the Panasonic Home Network System?...5 1.2 What can I use it
Getting started guide Turbo Hub
 Getting started guide Turbo Hub NETGEAR MVBR1210C Welcome and thanks for choosing Bell. Your new Turbo Hub will enable you to connect to the Internet and make voice calls using a landline phone. This guide
Ethernet Radio Configuration Guide
 Ethernet Radio Configuration Guide for Gateway, Endpoint, and Repeater Radio Units April 20, 2015 Customer Service 1-866-294-5847 Baseline Inc. www.baselinesystems.com Phone 208-323-1634 FAX 208-323-1834
Installation. Note Please use only wired network connections to configure the router.
 Installation Note Please use only wired network connections to configure the router. Power down all your network devices, including your computer(s) and the Modem Router. If you currently use a modem,
Disclaimers. Important Notice
 Disclaimers Disclaimers Important Notice Copyright SolarEdge Inc. All rights reserved. No part of this document may be reproduced, stored in a retrieval system, or transmitted, in any form or by any means,
AC1200 WiFi Range Extender
 Model EX6200 User Manual February 2014 202-11298-01 350 East Plumeria Drive San Jose, CA 95134 USA Support Thank you for selecting NETGEAR products. After installing your device, locate the serial number
Quick Installation Guide
 Packing List Quick Installation Guide Quick Installation Guide 1) IP CAMERA X 1 2) Wi-Fi Antenna (only available for wireless model) 3) DC Power Supply X 1 4) Network Cable X 1 5) Mounting bracket 1 6)
Turn off all of your network devices, including your computer, Modem and the Router.
 Note Please use only wired network connections to configure the Router. Turn off all of your network devices, including your computer, Modem and the Router. Connect the WAN port on your Router to the Modem
Enjoy Music over Your Wi-Fi Network
 Personal Audio System Enjoy Music over Your Wi-Fi Network Read this document first. Enjoy Music over Your Wi-Fi Network GB SRS-X7 This manual introduces how to play music connecting this unit to your Wi-Fi
If no telephone is needed, please connect the LINE port of the Modem Router to the wall jack using the telephone line directly.
 Note Please use only wired network connections to configure the Router. Power down all of your network devices, including your computer(s) and the Modem Router. If you currently use a modem, disconnect
DVG-2101SP VoIP Telephone Adapter
 This product can be set up using any current web browser, i.e., Internet Explorer 6 or Netscape Navigator 6.2.3. DVG-2101SP VoIP Telephone Adapter Before You Begin 1. If you purchased this VoIP Telephone
Please prepare the following items
 Note Before you start, please make sure all the computers that want to share the printer have successfully installed the printer driver. For details, please refer to your printer s installation guide.
Amcrest 960H DVR Quick Start Guide
 Amcrest 960H DVR Quick Start Guide Welcome Thank you for purchasing our Amcrest 960H DVR! This quick start guide will help you become familiar with our DVR in a very short time. Before installation and
WLAN600 Wireless IP Phone Administrator s Guide
 WLAN600 Wireless IP Phone Administrator s Guide Trademark Acknowledgement All brand names are trademarks or registered trademarks of their respective companies. Disclaimer This document is supplied by
801.11n Wireless Broadband Router
 801.11n Wireless Broadband Router WNRT-626 Quick Installation Guide Table of Contents Hardware Installation... 4 Web Configuration... 6 Further Configuration... 8 Thank you for purchasing PLANET 801.11n
Quick setup guide for business Vodafone Sure Signal
 Quick setup guide for business Vodafone Sure Signal About this guide This guide will help you quickly set up your Vodafone Sure Signal. After you ve done this the Sure Signal will carry on working automatically
Technical Support. Package Contents. D6300 WiFi ADSL Modem Router Installation Guide
 Technical Support Thank you for selecting NETGEAR products. After installing your device, locate the serial number on the label of your product and use it to register your product at NETGEAR.com/register.
P-870HN-51b. 802.11n VDSL2 4-port Gateway DEFAULT LOGIN DETAILS. Firmware v1.00 Edition 1, 9/2009. IP Address: http://192.168.1.1.
 P-870HN-51b 802.11n VDSL2 4-port Gateway Firmware v1.00 Edition 1, 9/2009 DEFAULT LOGIN DETAILS IP Address: http://192.168.1.1 Username: admin Password: 1234 www.zyxel.com Copyright 2009 ZyXEL Communications
PITE 3921 Battery Monitoring System User Manual P-140606-V1.0
 User Manual P-140606-V1.0 4/F, Bldg A, Chiwan Industrial Park, Shaodi Rd., Chiwan, Shekou Area, Shenzhen, China TEL: +86-755-2680 5759 FAX: +86-755-2688 0310 www.pitetech.com 1 Catalog 1. INTRODUCTION...
Home Station ADSL. You may also use the following address (regardless of whether you have changed the primary address or not):
:") TABLE OF CONTENTS 1 Introduction 1 2 User interface overview 2 3 LAN and WLAN settings 8 4 Setting the Internet connection 11 5 Settings and status of devices connected to your router 13 6 Configure applications
TABLE OF CONTENTS 1 Introduction 1 2 User interface overview 2 3 LAN and WLAN settings 8 4 Setting the Internet connection 11 5 Settings and status of devices connected to your router 13 6 Configure applications
Quick Start. Nighthawk X8 AC5300 Tri-Band WiFi Router Model R8500. Package Contents. NETGEAR, Inc. 350 East Plumeria Drive San Jose, CA 95134 USA
 Support Thank you for purchasing this NETGEAR product. You can visit www.netgear.com/support to register your product, get help, access the latest downloads and user manuals, and join our community. We
Quick Installation Guide
 Wired/Wireless IP Camera Quick Installation Guide (IE Browser) Model: APM-J803-WS Black White Shenzhen Apexis Electronic Co., Ltd. Step 1: Hardware Installation. 1. Install the Wi-Fi antenna. 2. Plug the
From a Finder window choose Applications (shown circled in red) and then double click the Tether icon (shown circled in green).
 and then double click the Tether icon (shown circled in green).") From a Finder window choose Applications (shown circled in red) and then double click the Tether icon (shown circled in green). You will be presented with a dialog box asking for you to enter an ad-hoc
From a Finder window choose Applications (shown circled in red) and then double click the Tether icon (shown circled in green). You will be presented with a dialog box asking for you to enter an ad-hoc
ESC Mobile App Guide
 ESC Mobile App Guide General Info and Installation Guide For iphone and ipad Note: If you re just trying to demo the ESC Mobile app in our sample database, then all that is required is to download it from
Nighthawk AC1900 WiF Range Extender
 Nighthawk AC1900 WiF Range Extender Model EX7000 User Manual December 2014 202-11469-01 350 East Plumeria Drive San Jose, CA 95134 USA Nighthawk AC1900 WiF Range Extender Support Thank you for selecting
Thank you for purchasing the Huawei E5332 Mobile WiFi. This quick start guide will help you to get started right away.
 Thank you for purchasing the Huawei E5332 Mobile WiFi. This quick start guide will help you to get started right away. You can connect your Huawei E5332 to the internet through any WiFi enabled device
AC750 WiFi Range Extender
 Model EX6100 User Manual April 2014 202-11307-03 350 East Plumeria Drive San Jose, CA 95134 USA Support Thank you for selecting NETGEAR products. After installing your device, locate the serial number
FEATURE GUIDE AeroSphère / Small / Large / Base
 FEATURE GUIDE AeroSphère / Small / Large / Base Content: Wi-Fi Setup - advanced topics WPS - advanced topics Wi-Fi Setup with the AeroSphère Network Setup webpage Troubleshooting & FAQ Version v0.52 WI-FI
Getting Started. Linksys RE1000 Wireless-N Extender
 Getting Started Linksys RE1000 Wireless-N Extender Introduction This Getting Started guid e can help you connect the extend er to your network and solve common setup issues. You can find more help from
Setting Up the ZigBee Ethernet Gateway
 Setting Up the ZigBee Ethernet Gateway MAN-01-00030-1.4 This manual describes how to install and set up ZigBee communication between a SolarEdge device (Inverters or Safety and Monitoring Interface) and
FI8910W Quick Installation Guide. Indoor MJPEG Pan/Tilt Wireless IP Camera
 Model: FI8910W Quick Installation Guide (For Windows OS) (For MAC OS please go to page 17) Indoor MJPEG Pan/Tilt Wireless IP Camera Black White Package Contents IP Camera FI8910W with IR-Cut.x 1 DC Power
Changing the Wireless Settings on the WCB3000N
 Changing the Wireless Settings on the WCB3000N ere are a couple of ways to configure the wireless settings of the Extender to match that of an existing wireless network and create a single wireless network
How to setup the UCW232C Serial WiFi adapter
 How to setup the UCW232C Serial WiFi adapter (based on Windows 7, 32/64-bit) This step-by-step guide explains how to get started using the Serial RS232 WiFi Adapter part UCW232C and Serial RS485 / RS422
FirstClass for Mobile - Email
 FirstClass for Mobile - Email There is a FirstClass app that is available for iphone, ipad, and ipod Touch. WiFi or 3G connectivity is required to use the FirstClass app. NOTE: FirstClass email is not
Before You Begin You must have at least the following: Web Browser Wired Hub/Switch/Router OR Wireless 802.11b Router CD-ROM Drive
 This product can be set up using any current Web browser, i.e., Internet Explorer 6.0 or Netscape Navigator 7.0 DCS-1000W D-Link 2.4Ghz Wireless Internet Camera Before You Begin You must have at least
iphone Application User Guide
 iphone Application User Guide Download the Windsor Brokers Ltd iphone Mobile trading application directly from our website. Download Mobile Trader Platform Once it is has been installed on your device,
N600 WiFi USB Adapter
 Model WNDA3100v3 User Manual December 2014 202-11470-01 350 East Plumeria Drive San Jose, CA 95134 USA Support Thank you for selecting NETGEAR products. After installing your device, locate the serial
Quick Start Guide. RV 120W Wireless-N VPN Firewall. Cisco Small Business
 Quick Start Guide Cisco Small Business RV 120W Wireless-N VPN Firewall Package Contents Wireless-N VPN Firewall Ethernet Cable Power Adapter Quick Start Guide Documentation and Software on CD-ROM Welcome
Turn off all of your network devices, including your computer, Modem and the Router.
 Note The product model shown in this part is TL-R460, as an example. Turn off all of your network devices, including your computer, Modem and the Router. Connect the WAN port on your Router to the Modem
Error! Bookmark not defined. Error! Bookmark not defined. Error! Bookmark not defined.
 Remote Lighting Kit Table of Contents Lighting Kit Overview 2 System Requirements 3 Basic Concepts of Wireless Routers and Networks 4 Basic Concepts of Network Light Bulbs 8 Planning Your Lighting Network
Chapter 1 Installing the Gateway
 Chapter 1 Installing the Gateway This chapter describes how to set up the wireless voice gateway on your Local Area Network (LAN), connect to the Internet, and perform basic configuration. For information
WN1000RP WiFi Booster for Mobile Installation Guide
 WN1000RP WiFi Booster for Mobile Installation Guide Contents Getting Started......................................... 3 Meet Your WiFi Booster.................................. 4 Front Panel and Side Panel...........................
Quickstart Guide Vodafone Mobile Wi-Fi R207
 Quickstart Guide Vodafone Mobile Wi-Fi R207 Welcome to the world of mobile communications 1 Welcome 2 Device overview 3 Getting started 5 Mobile Wi-Fi Web app 6 Web app overview 7 Current network panel