National Optical & Scientific Instruments Inc Landmark 35 Drive San Antonio, Texas Phone (210) Fax (210)
|
|
|
- Ernest Booth
- 8 years ago
- Views:
Transcription
1 National Optical & Scientific Instruments Inc Landmark 35 Drive San Antonio, Texas Phone (210) Fax (210) INSTRUCTIONS FOR MODELS 130, 131, 132, 138 & 139 COMPOUND MICROSCOPES NOTE: These models share common features, nomenclature and method of operation. The only difference are Model 130 features mirror for reflected illumination from natural or other light source. Models 131 & 132 feature electric illumination from a tungsten bulb. Models 138 & 139 feature electric illumination from a fluorescent bulb. Models 132 & 139 have both 30 inclined and vertical eyepiece tubes, each supplied with WF10x eyepiece. National Optical & Scientific Instrument Inc. Copyright 1/2/01

2
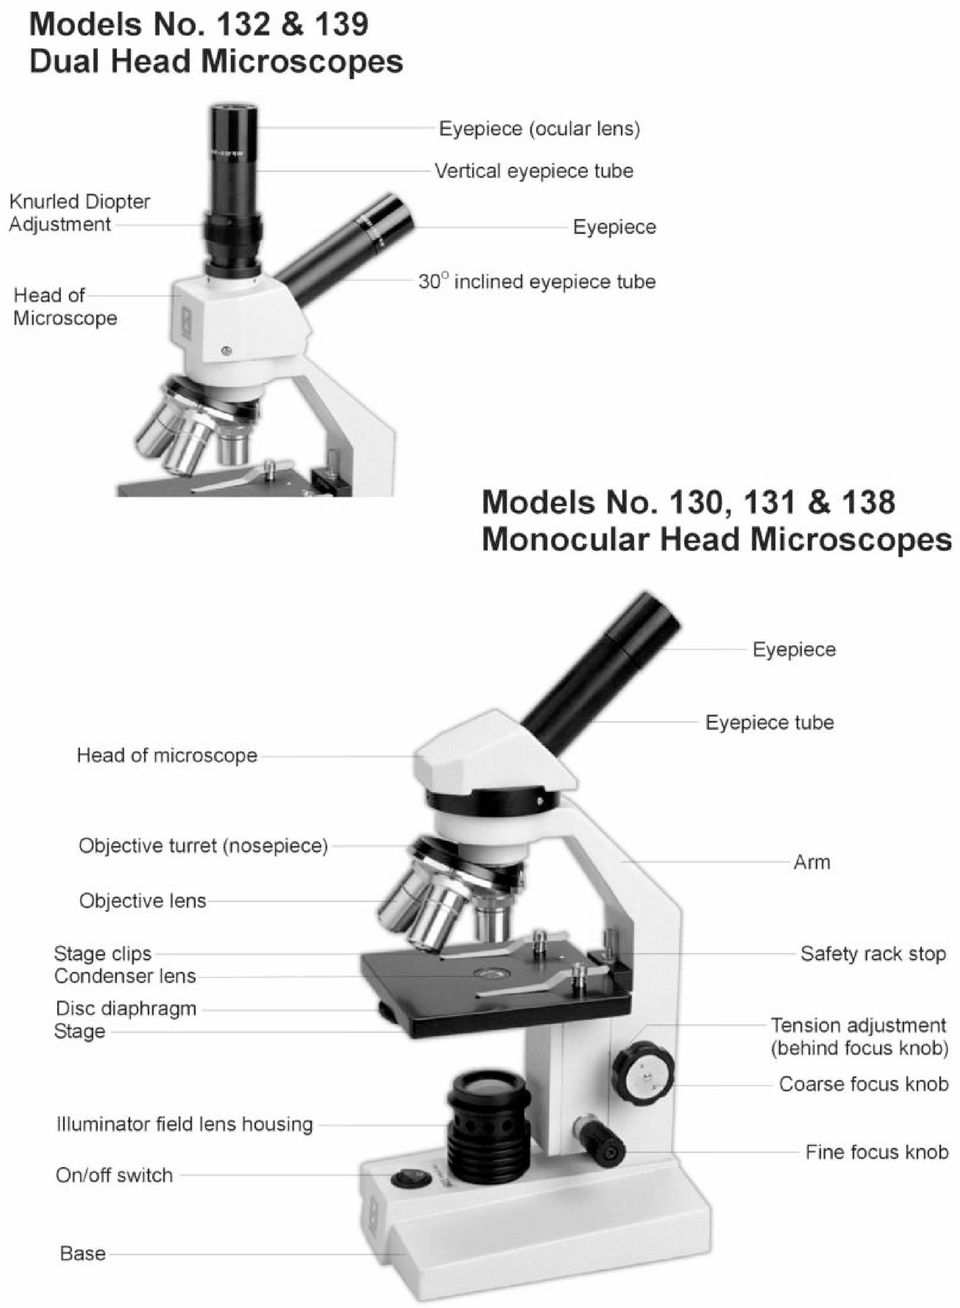
3 For optimum viewing satisfaction, follow these simple procedures. Nomenclature used to describe components and controls can be identified by referring to the diagram at left. UNPACKING 1. Carefully remove microscope, dustcover and warranty card. Always handle and move microscope by securely holding the arm of microscope. Avoid touching any of the lens surfaces while handling the microscope. Dust, dirt, or fingerprints can damage the delicate lens surfaces or adversely affect image quality. 2. Examine packing material before you discard it. Retain the styrofoam container in case you need to transport, store, or return the microscope for service. If it becomes necessary to ship the microscope for any reason, pack it in the styrofoam container, and then pack the styrofoam in another corrugated shipping container for optimum protection. Use of the styrofoam alone will not provide adequate protection in transit, and will void your warranty. DESCRIPTION OF COMPONENTS 1. EYEPIECE (ocular lens) Lens closest to the eye, magnifies the primary image formed by the objective lens. Dual head models 132 and 139 feature both an inclined eyepiece (for primary viewing) and a vertical eyepiece for second viewer or for mounting a camera. The inclined eyepiece is equipped with a pointer that rotates as the eyepiece is turned. 2. DIOPTER ADJUSTMENT (on models 132 and 139 only) Permits focusing adjustment of image for any difference in vision between primary and secondary viewers. 3. OBJECTIVE TURRET (nosepiece) Revolving turret which holds objective lenses, permits changes of magnification by rotating different powered objective lenses into optical path. 4. OBJECTIVE LENS Lens closest to the object being viewed, forms first magnified image of the specimen. 5. STAGE CLIPS Two locked-on clips hold specimen slide in place on stage. Note: Your microscope is already drilled and tapped to accept an optional mechanical stage. Mechanical stage replaces stage clips and permits precise, mechanical manipulation of the specimen slide. 6. STAGE Platform of the microscope where the specimen slide is placed. 7. CONDENSER LENS An 0.65 N.A. condenser lens, fixed in center of stage, condenses light rays from substage illumination and fills the back lens element of objective lens to improve image resolution. 8. DISC DIAPHRAGM Rotating disc located below stage, with holes of various apertures, designed to help achieve optimum resolution of the objective lens. Larger apertures used for higher magnifications, and smaller apertures used for lower magnifications. 9. SAFETY RACK STOP When properly adjusted, controls maximum upward travel of stage. Prevents higher power objectives from breaking specimen slides, prevents damage to objective lenses. This stop has been pre-adjusted at the factory. 10. FOCUSING KNOBS Coarse focusing knobs (larger knobs) located on each side of arm, raise or lower stage to bring specimen image into focus. Fine focus knobs (smaller knobs located just below coarse focusing knobs) permit more precise image adjustment. 11. ILLUMINATION Depending on model purchased, microscope is equipped with either a substage plano-concave mirror or built-in electrical illumination. a. Mirror provides illumination of specimen by reflecting light from an artificial source or natural sunlight. b. Built-in substage electric illuminator provides constant, reliable, pre-focusing illumination. Observe that the main voltage of your microscope is labeled on the back of the base. Make certain that the main voltage of your microscope corresponds to the voltage of your power outlet, either 120v or 220v. 3

4 OPERATION 1. Place microscope directly in front of you in a manner which permits you to comfortably look into the eyepiece. Note that the head of microscope rotates 360º, permitting you to operate the microscope from the front or from the back, whichever is most convenient for you. It also permits convenient sharing of microscope by more than one user, by simply rotating head, without needing to move entire microscope. Most users will position the microscope with the arm facing them so that focusing knobs are most convenient to reach. 2. Assure that light is available for illuminating the specimen. a. For mirror models, assure that there is a good nearby source of overhead light, tabletop lamp or reasonably bright natural light. Position the plano (flat) side of mirror upward. Looking through the microscope eyepiece, tilt mirror (mirror tilts on either of two axis) until light appears to fill the entire field of view. b. For electric illuminator models, make certain that the main voltage of your microscope corresponds to the voltage of your power outlet, either 120v or 220v. Insert microscope plug into matched voltage outlet. Flip switch located on base to ON position. In case of equipment malfunction, see troubleshooting procedure located at back of this manual. 3. Rotate coarse focus knobs to move stage down (away) from objective lens as far as possible. 4. Place specimen slide, cover slip facing up, on stage with specimen centered over condenser lens in middle of stage. 5. Rotate disc diaphragm until largest aperture is positioned beneath condenser in center of stage. 6. Turn the objective turret until the 4x (smallest) objective lens clicks into position in the optical path. Note that each time you change from one objective lens to another you should turn the turret until you hear the click, which indicates that the lens is properly indexed in the optical path. 7. While looking through the eyepiece, rotate coarse focusing knobs until specimen comes into focus. If image does not appear in field of view, move specimen slide slightly until image appears in field of view. 8. Adjust fine focus controls until specimen is in sharp focus. 9. Turn the disc diaphragm, observing that different apertures affect the sharpness of the image. Turn diaphragm until sharpest possible image is obtained. Note that when turning the disc diaphragm, you should hear a click as each aperture comes into proper position under the condenser lens. If aperture is not properly positioned, you will observe shadows in the field of view when looking through the microscope. 10. Changing magnification a. Magnification is changed by rotating objective turret until different objective lens is moved into optical path. Always turn turret until you hear the click, indicating that lens is properly indexed. Otherwise, you will not be able to see anything when looking through the microscope. b. Standard lenses provided with your microscope are a widefield 10x eyepiece (two eyepieces supplied with models 132 and 139). 4x. 10x, and 40x objectives. The 40x objective lens has a special spring retractable mechanism which retracts slightly if front of lens comes in contact with the specimen slide. See chart below for specifications on objectives. Objective Specification Chart Objective N.A. Color Code Ring Field of View Working Distance Magnification with WF10X eyepiece Din 4X 0.10 Red 4.5mm 18.5mm 40X Din 10X 0.25 Yellow 1.8mm 6.4mm 100X Din 40X retractable 0.65 Blue 0.45mm 0.5mm 400X 4

5 c. Also note that each objective has a color ring, which permits you to instruct changes in magnification by referring to an easily observed color rather than to a number. d. The microscope has been parfocalled at the factory, which allows easy change from one magnification to another, requiring little or no adjustment of the fine focus knobs. e. As magnification is increased, the field of view (area of specimen seen through the microscope) will decrease. That is why it is easier to find the specific area of interest on the specimen by starting with the lowest 4x objective lens, before increasing magnification with the 10x or 40x objective lens. f. NOTE: Care must be taken when rotating the 40x objective into place. This lens has a spring retractable mechanism which retracts slightly into its housing if the front of the lens strikes the specimen slide. With fine focus adjustment at mid-range, the rack stop has been adjusted at the factory to assure the 40x lens will clear the thickness of a normal specimen slide and cover slip. However, if the rack stop has been improperly adjusted, or if using a thicker than normal slide or cover slip, moving the 40x lens too quickly or carelessly could cause damage to the front lens element or to the slide. g. Do not let the front lens element come into contact with a wet slide surface, as prolonged contact with any moisture could damage the lens. If lens is exposed to moisture, promptly wipe with soft tissue to remove moisture. 11. Diopter adjustment for models 132 and 139 dual head. These dual head models have a 30 inclined eyepiece to provide comfortable viewing for the primary viewer. They also have a vertical eyepiece so that a second viewer can observe the image simultaneously. The primary viewer will have focused the microscope using the coarse and fine focus knobs. To compensate for differences in vision between primary and second viewer, second viewer may have to adjust image in vertical eyepiece by turning the knurled diopter adjustment. 12. Camera adaptation for models 132 and 139. Specific instructions for adapting a video camera to your microscope are not included in this manual, as the electronic equipment used will vary. Please consult the dealer from whom you purchased the microscope. A video camera can be mounted on the vertical eyepiece tube, using a simple adaptor available through your dealer. Note that when using a video camera with the microscope, focusing of the image is accomplished by turning the microscope focusing knobs while observing the image on the TV monitor screen. Under these circumstances, the image observed through the inclined eyepiece will not be in focus. Generally, there are two types of adaptors used to fit the microscope to a camera. One requires removal of the eyepiece from the vertical eyepiece tube so that the adaptor can be inserted into the tube in place of the eyepiece. The inside diameter of the eyepiece tube is 23.18mm. To remove eyepiece, observe that between the lower edge of the eyepiece and the knurled diopter ring there is one small screw that prevents the eyepiece from being removed. Using a very small screwdriver, loosen this screw just enough to permit removal of eyepiece from tube. Do not remove the three small setscrews on the knurled diopter ring. The second type of adaptor sometimes used is one that fits over the eyepiece. This type does not require removal of the eyepiece. The outside diameter of the eyepiece is 27.95mm. MAINTENANCE WARNING: For your own safety, turn switch off and remove plug from power source before maintaining your microscope. If the power cord is worn, cut or damaged in any way, have it replaced immediately to avoid shock or fire hazard. 5

6 1. OPTICAL MAINTENANCE Do not attempt to disassemble any lens components. Consult a microscope service technician when any repairs not covered by instructions are needed. Prior to cleaning any lens surface, brush dust or dirt off lens surfaces using a camel hair brush. Or use air to blow dust and lint off surfaces. Use of compressed air in a can, available at any computer supply store, is a good source of clean air. Do not remove eyepieces or objective lenses to clean. Clean only the outer lens surface. Breath on lens to dampen surface, then wipe with lens paper or tissue or use a cotton swab moistened with distilled water. Wipe lenses with a circular motion, applying as little pressure as possible. Avoid wiping dry lens surface as lenses are scratched easily. If excessive dirt or grease gets on lens surfaces, a small amount of xylene or Windex can be used on a cotton swab or lens tissue. To clean objective lenses, do not remove objectives from microscope. Clean front lens element only, following same procedure. NOTE: Fingerprints or other matter on the front lens element of the objective lens is the single most common reason that you will have difficulty in focusing the microscope. Before having costly servicing done, or before returning to National for warranty repair, make certain to examine the front lens element with a magnifying glass or eye loupe for the presence of such contaminants. If a microscope is returned to National for warranty repair, and it is determined that such contaminants are the problem, this is not covered under warranty and National will submit a cost estimate for cleaning. 2. MECHANICAL MAINTENANCE a. The rack stop screw has been pre-adjusted at the factory and should not require re-adjustment. However, if you do attempt re-adjustment, note the following procedure. Loosen round knurled locking nut by turning counter-clockwise. Then loosen stop screw. With fine focus adjustment at mid-range, focus on standard slide until sharp image is obtained. Rotate rack stop screw in clockwise direction until tight. Lock into position with the locking nut. A needle nose pliers might be needed to loosen the round locking nut. b. Coarse focus tension adjustment prevents the stage from drifting down from its own weight and causing the image to move out of focus. This has been adjusted at the factory, but over the course of time it may loosen and cause the stage of the microscope to slip downward on the focusing block. The tension adjustment collar is located between arm and coarse focus knob on left side of microscope. With a small jewelers screwdriver, loosen the set screw located in only one of the four holes on tension adjustment collar. Turn collar clockwise to tighten tension, counter-clockwise to loosen tension. Use of a wide rubberband will provide a better grip on the tension adjustment collar. After adjusting, tighten the set screw to lock collar in place. NOTE: It is recommended that you leave the tension as loose as possible for ease of focusing, yet not so loose that it permits the stage of microscope to drift downward from its own weight and cause the microscope to drift out of focus. c. Metal parts: Use a clean, damp cloth to remove dust or dirt from metal parts, followed by a dry cloth. 3. ELECTRICAL MAINTENANCE The extent of electrical maintenance, by other than a qualified technician, should be bulb replacement. BE CERTAIN TO TURN SWITCHES OFF AND REMOVE PLUG FROM POWER SOURCE OUTLET BEFORE CHANGING BULBS. a. Changing bulb on Models 131 and 132 6

7 Make sure that illuminator field lens housing and lamp are cool before attempting to remove. Remove illuminator field lens housing by rotating in a counter-clockwise direction. This housing is secured tightly, to prevent easy removal by students, so a very firm grip and some strength will be required. Note that lamp does not screw out. Remove lamp by depressing lamp slightly and rotate in a counter-clockwise direction until it pops up slightly. Replace with a 110v 20 watt lamp with double contact, medium bayonet base. This is a standard, commonly used replacement bulb. National # Carefully wipe lamp to insure it is clean and free of all fingerprints. Replace field lens housing assembly. b. Changing bulb on Models 138 and 139 (fluorescent bulb) Gently lay microscope on side. Using a screwdriver, remove screw in center of each rubber foot on bottom of base. Remove metal cover plate to expose bulb. Bulb is held in place by spring pressure clips and is removed by gently pulling bulb straight out from socket. Replace with new bulb. National # Replace metal cover plate and rubber feet. TROUBLESHOOTING PROBLEM REASON FOR PROBLEM SOLUTION Light fails to operate. Outlet inoperative. Have qualified service technician repair outlet. Image does not remain in focus Poor resolution (image not sharp) AC power cord not connected. Lamp burned out. Stage of microscope drops from its own weight. Rack stop not set at proper position. Slide upside down. Slide cover slip too thick. Objective lenses dirty. Eyepiece lens dirty. Plug into outlet. Replace lamp. Adjust tension control. Adjust rack stop. Place slide on stage with cover slip up. Use 0.17mm thick cover slip (No.1 cover slip) Clean objective lenses. Clean eyepiece lenses. Too much light. Adjust disc diaphragm. Spots in field of view. Eyepiece or condenser lens dirty. Clean lens. *** Specimen slide dirty. Clean slide. ***Spots in field of view can also result from dirt on inside of eyepiece. It is recommended that you have service technician clean inside of lens. OPTIONAL ACCESSORIES AND PARTS: # R WF10x eyepiece w/reticle, 10mm/100div. # WF15x eyepiece w/pointer # DIN 60xR objective lens, N.A #910 Graduated mechanical stage, top mounted adjustment knobs #951 Dustcover, 16 tall x 13, heavy vinyl with stitched seams. # Carrying case, anodized aluminum, fabric lining, accessory pockets, Velcro straps, keyed lock. Fits all models in series, except dual head models. # Carrying case, anodized aluminum, fabric lining, accessory pockets, Velcro straps, keyed lock. Fits dual head models. # Carrying case, heavy plastic w/foam liner. Fits all models in series, except dual head models. 7
 Gently lay microscope on side.")
8 LIMITED LIFETIME WARRANTY National warrants this microscope to be free from defects in material and workmanship under normal use and service for the life of the instrument. The warranty does not cover damage resulting from abuse or misuse, repairs or alterations performed by other than authorized repair technicians, or damage occurring in transit. The warranty does not cover bulbs, batteries, fuses, cords, or add-on accessories such as mechanical specimen holders that are not built into the microscope stage as an integral part of original manufacture. Warranty does not cover lenses that have become inoperable due to excessive dirtiness as a result of misuse or lack of normal maintenance. Any cameras and software supplied with this microscope are warranted from date of purchase as follows: Cameras, 1-year limited warranty. Software, 90-day limited warranty. Other than set forth above, National hereby disclaims all warranties, express or implied, of fitness for a particular purpose. While it is not necessary to register your purchase of a microscope, any camera or software must be registered by completing and mailing the warranty registration card enclosed with such product. For warranty service, instrument should be well packed to avoid damage in transit, accompanied by a description of the difficulty and return instructions, and shipped postage prepaid to National at the address below. National will repair or replace at no charge and return postage prepaid. If failure was caused by misuse, alterations, accident or abnormal conditions of operation, an estimate for repairs will be submitted for approval prior to work being performed. This warranty gives you specific legal rights, and you may also have other rights that vary from state to state. If you have questions concerning this product or warranty, contact the dealer from which it was purchased. You may also contact National at the following address and ask for warranty assistance. (Revised 1/27/04) 8

National Optical & Scientific Instruments Inc. 11113 Landmark 35 Drive San Antonio, Texas 78233 Phone (210) 590-9010 Fax (210) 590-1104
 590-9010 Fax (210) 590-1104") National Optical & Scientific Instruments Inc. 11113 Landmark 35 Drive San Antonio, Texas 78233 Phone (210) 590-9010 Fax (210) 590-1104 INSTRUCTIONS FOR MODELS 106, 106-L 107, 107-L 108, 108-L 109-L ELEMENTARY
National Optical & Scientific Instruments Inc. 11113 Landmark 35 Drive San Antonio, Texas 78233 Phone (210) 590-9010 Fax (210) 590-1104 INSTRUCTIONS FOR MODELS 106, 106-L 107, 107-L 108, 108-L 109-L ELEMENTARY
National Optical & Scientific Instruments Inc. 11113 Landmark 35 Drive San Antonio, Texas 78233 Phone (210) 590-9010 Fax (210) 590-1104
 590-9010 Fax (210) 590-1104") National Optical & Scientific Instruments Inc. 11113 Landmark 35 Drive San Antonio, Texas 78233 Phone (210) 590-9010 Fax (210) 590-1104 INSTRUCTIONS FOR MODELS 156, 156-S, 157 COMPOUND BIOLOGICAL MICROSCOPES
National Optical & Scientific Instruments Inc. 11113 Landmark 35 Drive San Antonio, Texas 78233 Phone (210) 590-9010 Fax (210) 590-1104 INSTRUCTIONS FOR MODELS 156, 156-S, 157 COMPOUND BIOLOGICAL MICROSCOPES
National Optical & Scientific Instrument Inc. 11113 Landmark 35 Drive San Antonio, Texas 78233 Phone (210) 590-9010 Fax (210) 590-1104
 590-9010 Fax (210) 590-1104") National Optical & Scientific Instrument Inc. 11113 Landmark 35 Drive San Antonio, Texas 78233 Phone (210) 590-9010 Fax (210) 590-1104 INSTRUCTIONS FOR STEREOSCOPIC MICROSCOPES MODEL NUMBERS 400 400TL
National Optical & Scientific Instrument Inc. 11113 Landmark 35 Drive San Antonio, Texas 78233 Phone (210) 590-9010 Fax (210) 590-1104 INSTRUCTIONS FOR STEREOSCOPIC MICROSCOPES MODEL NUMBERS 400 400TL
National Optical & Scientific Instruments Inc. 11113 Landmark 35 Drive San Antonio, Texas 78233 Phone (210) 590-9010 Fax (210) 590-1104
 590-9010 Fax (210) 590-1104") National Optical & Scientific Instruments Inc. 11113 Landmark 35 Drive San Antonio, Texas 78233 Phone (210) 590-9010 Fax (210) 590-1104 INSTRUCTIONS FOR MODEL DC5-163 COMPOUND BIOLOGICAL MICROSCOPE WITH
National Optical & Scientific Instruments Inc. 11113 Landmark 35 Drive San Antonio, Texas 78233 Phone (210) 590-9010 Fax (210) 590-1104 INSTRUCTIONS FOR MODEL DC5-163 COMPOUND BIOLOGICAL MICROSCOPE WITH
MT-30 & MT-90 Series. Advanced Academic Microscopes/ Advanced Academic Polarizing Microscope INSTRUCTION MANUAL
 Introduction With your purchase of an MT-30/MT-90 series type microscope you have chosen for a quality product. The MT-30/MT-90 series type microscopes are developed for use at schools and laboratories.
OPERATING INSTRUCTIONS XJL 101/101A REFLECTED LIGHT METALLURGICAL MICROSCOPE
 OPERATING INSTRUCTIONS XJL 0/0A REFLECTED LIGHT METALLURGICAL MICROSCOPE M.R.C.LTD. OFFICES: HAHYSTADRUT 84, HOLON 58394 P.O.B. 684, TEL-AVIV 606, ISRAEL TEL: 97-3-559305,97-3-55955 FAX: 97-3-559459 www.mrclab.com
Care and Use of the Compound Microscope
 Revised Fall 2011 Care and Use of the Compound Microscope Objectives After completing this lab students should be able to 1. properly clean and carry a compound and dissecting microscope. 2. focus a specimen
ROTOR LOADER OWNER S MANUAL
 ROTOR LOADER OWNER S MANUAL ROTOR LOADER OWNER S MANUAL WARNING IMPORTANT SAFETY INSTRUCTIONS AND GUIDELINES. Misuse of paintball equipment may cause serious injury or death. QUICK SET-UP GUIDE BATTERY
16/32 Channel 1U Rack Mount CCTV Power Supply
 16/32 Channel 1U Rack Mount CCTV Power Supply Manual PH-A3224-GUQ Shown 16-Channel 32-Channel PTC PH-A1612-PUQ PH-A3224-PUQ Glass Fuse PH-A1612-GUQ PH-A3224-GUQ Industrial design 12 Amp 3 Amps per channel
Name Class Date Laboratory Investigation 4B Chapter 4: Cell Structure
 Name Class Date Laboratory Investigation 4B Chapter 4: Cell Structure The Microscope: A Tool of the Scientist You may refer to pages 66-67, 72-73 in your textbook for a general discussion of microscopes.
Chapter 1 Parts C. Robert Bagnell, Jr., Ph.D., 2012
 Chapter 1 Parts C. Robert Bagnell, Jr., Ph.D., 2012 Figure 1.1 illustrates the parts of an upright compound microscope and indicates the terminology that I use in these notes. Figure 1.1. Parts of a Compound
Auto Sentry-eXP Maintenance
 Auto Sentry-eXP Maintenance Maintenance Procedures for Auto Sentry exp Bill Dispenser Credit Card Reader Bill Acceptor Bill Dispenser Maintenance Bill Dispenser Problem / Cause Bill Dispenser Error Codes
DSV-2 ALTITUDE-AZIMUTH TELESCOPE MOUNT User Manual
 DSV-2 ALTITUDE-AZIMUTH TELESCOPE MOUNT User Manual Your New Mount Thanks for choosing the Desert Sky Astro Products DSV-2 mount. Take some time to familiarize yourself with its features (Figure 1). Please
ST-80 MICROSCOPE With Electronic Eyepiece #6810. User Guide
 ST-80 MICROSCOPE With Electronic Eyepiece #6810 User Guide The ST-80 Microscope Thank you for purchasing your student microscope from ioptron. The ST-80 Microscope is both versatile and easy to use with
MICROSCOPY. To demonstrate skill in the proper utilization of a light microscope.
 MICROSCOPY I. OBJECTIVES To demonstrate skill in the proper utilization of a light microscope. To demonstrate skill in the use of ocular and stage micrometers for measurements of cell size. To recognize
SP AF 300mm F/2.8 LD [IF] for Canon (Model 360EE)
![SP AF 300mm F/2.8 LD [IF] for Canon (Model 360EE)](/thumbs/40/21493790.jpg "SP AF 300mm F/2.8 LD [IF] for Canon (Model 360EE)") SP AF 300mm F/2.8 LD [IF] for Canon (Model 360EE) We greatly appreciate your purchase of this Tamron lens. The Tamron SP AF 300mm F/2.8 LD [IF] is a fast telephoto lens developed for Canon AF single-reflex
SP AF 300mm F/2.8 LD [IF] for Canon (Model 360EE) We greatly appreciate your purchase of this Tamron lens. The Tamron SP AF 300mm F/2.8 LD [IF] is a fast telephoto lens developed for Canon AF single-reflex
Features: Mounting the Optic
 MICRO GREEN DOT with INTEGRATED RED LASER The Patented Micro Green Dot with Integrated Red Laser is a compact optical system packed with many features. The Green Dot is designed as the primary targeting
INFRARED QUARTZ WALL HEATER
 INFRARED QUARTZ WALL HEATER MODEL NO: IQ2000 PART NO: 6939004 MOUNTING & OPERATION INSTRUCTIONS GC0715 INTRODUCTION Thank you for purchasing this CLARKE Infrared Wall Heater. Before attempting to use this
TEC APO140. This telescope is closer to optical perfection more than any instrument I have ever used before. R.Renzi, Italy.
 140 manuals 2013_110 manuals 1/13/2013 10:40 PM Page 1 TEC APO140 This telescope is closer to optical perfection more than any instrument I have ever used before. R.Renzi, Italy. OWNER S MANUAL 2013 140
Dome Security Camera with IR night vision
 Dome Security Camera with IR night vision EN INSTRUCTION MANUAL 1 Before you begin Limited Warranty Terms & Conditions Swann Communications warrants this product against defects in workmanship and material
Be careful not to scratch or hit front edge of the side viewing micro prisms onto hard objects!
 Instructions Manual Flexia BGA Inspection Systems This manual describes how to use Flexia BGA Inspection System Optilia Instruments 1 AB Contents 1. Safety and maintenance Instructions 3 2. About Flexia
ATS Overhead Table Shelf System INSTRUCTION MANUAL
 ATS Overhead Table Shelf System INSTRUCTION MANUAL ATS Overhead Table Shelf System Instruction Manual Warranty Newport Corporation warrants this product to be free of defects in material and workmanship
Compound microscope (Hund)
") 1 2 3 4 5 6 7 8 9 10 11 12 13 14 Compound microscope (Hund) 15 16 17 18 19 20 1) Eyepieces (magnifies 10x), one with diopter adjustment, 2) Interp[upillary adjustment, 3) Head, 4) Revolving nosepiece,
1 2 3 4 5 6 7 8 9 10 11 12 13 14 Compound microscope (Hund) 15 16 17 18 19 20 1) Eyepieces (magnifies 10x), one with diopter adjustment, 2) Interp[upillary adjustment, 3) Head, 4) Revolving nosepiece,
A new advance in routine inspections INVERTED MICROSCOPE CKX41/CKX31
 A new advance in routine inspections INVERTED MICROSCOPE CKX41/CKX31 Phase contrast Relief contrast Incorporation of advanced UIS2 optics ensures the highest level of clarity for cell checking applications.
VISM CQB Scope Series
 1 VISM CQB Scope Series Congratulations on the purchase of your new VISM CQB Scope! The CQB Series of Scopes give you many great options so you can choose the scope that best fits your needs. Backed by
DMSG_0152_0112_V4 Mamas & Papas (Holdings) Ltd. 2012 Dream Swing - 1 -
 Ltd. 2012 Dream Swing - 1 -") DMSG_0152_0112_V4 Mamas & Papas (Holdings) Ltd. 2012 Dream Swing - 1 - DREAM SWING THESE INSTRUCTIONS ARE IMPORTANT. PLEASE READ CAREFULLY AND RETAIN FOR FUTURE REFERENCE. Read the entire instruction before
DMSG_0152_0112_V4 Mamas & Papas (Holdings) Ltd. 2012 Dream Swing - 1 - DREAM SWING THESE INSTRUCTIONS ARE IMPORTANT. PLEASE READ CAREFULLY AND RETAIN FOR FUTURE REFERENCE. Read the entire instruction before
Owner s Guide and Installation Manual. Vancouver Model Name. 21321, 21328 Model No. English Español
 For Your Records and Warranty Assistance For reference, also attach your receipt or a copy of your receipt to the manual. Vancouver Model Name 21321, 21328 Model No. Type A Models Owner s Guide and Installation
V-500-PRE. 500mm F/8.0 Telephoto Lens INSTRUCTION MANUAL
 V-500-PRE 500mm F/8.0 Telephoto Lens INSTRUCTION MANUAL Limited Five Year Warranty Vivitar warrants this quality product to be free of defects in material and workmanship for a period of five years from
EnduraLAM 150 User Manual
 EnduraLAM 150 User Manual SIGNWarehouse, Inc. 2614 Texoma Drive Denison, Texas 75020 800-699-5512 Website: www.signwarehouse.com Email: TechSupport@signwarehouse.com Copyright 2014 SIGNWarehouse, Inc.
Foodservice Equipment Specialists P.O. Box 880 Saco, ME. / U.S.A. 04072 877-854-8006 * FAX (207) 283-8080
 283-8080") Foodservice Equipment Specialists P.O. Box 880 Saco, ME. / U.S.A. 04072 877-854-8006 * FAX (207) 283-8080 FOR SERVICE ASSISTANCE U.S. AND CANADA CALL: 1-877-854-8006 24 HOURS/DAY 7 DAYS/WEEK TABLE OF CONTENTS
Foodservice Equipment Specialists P.O. Box 880 Saco, ME. / U.S.A. 04072 877-854-8006 * FAX (207) 283-8080 FOR SERVICE ASSISTANCE U.S. AND CANADA CALL: 1-877-854-8006 24 HOURS/DAY 7 DAYS/WEEK TABLE OF CONTENTS
PROFESSIONAL REFRACTOR MODEL 78-0040 25
 30 0 30 60 90 1 2 3 4 PROFESSIONAL REFRACTOR MODEL 78-0040 25 24 22 21 20 19 5 9060 18 6 7 17 16 15 8 14 13 9 11 12 10 Figure 1 1. Objective Lens 2. Mounting Screws (2) 3. Declination Axis 4. Equatorial
GreenWay Solar LED Path and Trail Lighting System. Installation and Owner s Manual
 GreenWay Solar LED Path and Trail Lighting System Installation and Owner s Manual Important Notes and Warnings This installation and instruction manual provides installation, operation, and maintenance
Operator s Maintenance Manual STEINER BINOCULARS. Military ruggedness and precision 07/03
 Operator s Maintenance Manual STEINER BINOCULARS Military ruggedness and precision 07/03 W arning! When using the binocular, never point it directly at the sun. The heat generated by the focused rays of
Powers Controls TH 192 HC Heating/Cooling Room Thermostat
 Powers Controls TH 192 HC Heating/Cooling Room Thermostat Technical Instructions Document No. 155-066P25 TH 192-2 50 60 70 80 70 TH0356R1 60 80 POWERS Description The TH 192 HC thermostats are proportional
Owners & Installation Manual for the Sheridan, Mountainair, Pine Valley and Old Forge Ceiling Fan Family
 Owners & Installation Manual for the Sheridan, Mountainair, Pine Valley and Old Forge Ceiling Fan Family Part of the Kiva Lighting Family Custom Lighting and Fans Since 1992 1312 12th St NW Albuquerque,
ELECTRIC KNIFE SHARPENER
 PRODUCT MANUAL- M109 MODEL 401 ELECTRIC KNIFE SHARPENER Please read thoroughly before operation and keep for future reference Model 401 Knife Sharpener Specifications Model No. #401 Power Requirements
Instruction Manual. Image of SP-3015 & SP-3815. Important Safeguards. Automatic Dispensing Hot Water Pot with Reboil Function
 Important Safeguards READ ALL INSTRUCTIONS BEFORE USE. Instruction Manual Automatic Dispensing Hot Water Pot with Reboil Function Image of SP-3015 & SP-3815 SP-3015: 3.0L SP-3815: 3.8L SP-3017: 3.0L (Stainless
The Vortex Spitfire 1x Prism Scope
 REPLACE image The Vortex Spitfire 1x Prism Scope Perfect for the AR platform, the Vortex Spitfire 1x prism scope combines a compact, prism-based design with the intuitive, glass-etched DRT (Dual Ring Tactical)
Congratulations on your purchase of the Great Planes SLOT MACHINE, the first truly easy way to cut hinge slots in your model airplanes.
 INSTRUCTION MANUAL Congratulations on your purchase of the Great Planes SLOT MACHINE, the first truly easy way to cut hinge slots in your model airplanes. The Slot Machine you have purchased is equipped
3 WATT LED SPOTLIGHT Model No. SLM - 3801
 3 WATT LED SPOTLIGHT Model No. SLM - 3801 OWNER'S MANUAL Customer Service Tel: 1-800-268-3319 Superex Canada Ltd, Toronto,M2H 3B8 Made in China Table of Contents A). Important Safety Instructions B). Charging
USER MANUAL. Bottom Loading Bottled Water Dispenser SAVE THIS MANUAL FOR FUTURE USE. Model # 900172
 Model # 900172: Page 1 USER MANUAL Bottom Loading Bottled Water Dispenser Model # 900172 TO REDUCE THE RISK OF INJURY AND PROPERTY DAMAGE, USER MUST READ THIS MANUAL BEFORE ASSEMBLING, INSTALLING & OPERATING
VISM Evolution Scope Series
 1 VISM Evolution Scope Series Congratulations on the purchase of your New VISM Evolution (EVO) Series Scope! The EVO Series of Scopes give you many great high end features and various magnification ranges
Bottom Loading Water Dispenser
 Bottom Loading Water Dispenser Model # 601000 TO REDUCE THE RISK OF INJURY AND PROPERTY DAMAGE, USER MUST READ THIS MANUAL BEFORE ASSEMBLING, INSTALLING & OPERATING DISPENSER. SAVE THIS MANUAL FOR FUTURE
MIST DECORATIVE LAMP WITH ESSENTIAL OIL DIFFUSER
 EN MIST DECORATIVE LAMP WITH ESSENTIAL OIL DIFFUSER OPERATING INSTRUCTIONS Read the instructions carefully before operating the appliance or carrying out maintenance operations. Observe all the safety
TV Ears 5.0 Digital & Dual Digital Quick Start Guide
 TV Ears 5.0 Digital & Dual Digital Quick Start Guide Voice Clarifying Circuitry CUSTOM FIT YOUR HEADSET Follow these directions to adjust the width of the headset for your comfort. TV EARS All TV Ears
OASIS-PLUS 120V READ ALL INSTRUCTIONS BEFORE OPERATING READ ALL INSTRUCTIONS BEFORE OPERATING OZONE IS A POWERFUL OXIDIZER AND MUST BE USED WITH CARE
 OASIS-PLUS 120V INFORMATION & OPERATING INSTRUCTIONS READ ALL INSTRUCTIONS BEFORE OPERATING READ ALL INSTRUCTIONS BEFORE OPERATING OZONE IS A POWERFUL OXIDIZER AND MUST BE USED WITH CARE 56041852 WARNING:
1,000,000 CANDLE POWER CORDED-CORDLESS RECHARGEABLE SPOTLIGHT WITH BUILT-IN STAND AND AREA UTILITY LIGHT
 VEC137Y 1,000,000 CANDLE POWER CORDED-CORDLESS RECHARGEABLE SPOTLIGHT WITH BUILT-IN STAND AND AREA UTILITY LIGHT OWNER S MANUAL & WARRANTY INFORMATION THIS MANUAL CONTAINS IMPORTANT INFORMATION REGARDING
FirstView 3 Reflector Telescope Owner s Manual
 FirstView 3 Reflector Telescope Owner s Manual 1. Horizontal Locking Auxiliary Screw 2. Main Mount 3. Pitching Auxiliary Knob 4. Pitching Shaft Screw 5. Rack and Pinion Focusing Knob 6. Thumb Nut for Finder
Installation Instructions
 520 Installation Instructions Thank you very much for purchasing PIAA product. Please read this entire manual before installation and use of this product. For Installers Please give this Installation Manual
TERMINATION EQUIPMENT INSTRUCTION MANUAL TELE-PIERCE P/N 356-246
 TERMINATION EQUIPMENT INSTRUCTION MANUAL TELE-PIERCE P/N 356-246 OPERATION AND SERVICE INSTRUCTIONS AMPHENOL 157 SERIES TELE-PIERCE MULTI-WIRE TERMINATION TOOL 356-246 AMPHENOL TERMINATION SYSTEMS 1830
TS-E24mm f/3.5l TS-E45mm f/2.8 TS-E90mm f/2.8 Instructions
 TS-E24mm f/3.5l TS-E45mm f/2.8 TS-E90mm f/2.8 ENG Instructions Thank you for purchasing a Canon product. Canon s TS-E lenses are tilt-shift lenses designed for EOS cameras. The tilt-shift mechanism enables
GAERTNER SCIENTIFIC CORPORATION 3650 Jarvis Ave. Skokie, Illinois 60076 U.S.A. tel: 1 847 673-5006 fax: 1 847 673-5009 email@gaertnerscientific.
 7109-C-244E-R1 Field Installation of HeNe Laser in B, C, and D-Type Auto Gain Ellipsometers GAERTNER SCIENTIFIC CORPORATION 3650 Jarvis Ave. Skokie, Illinois 60076 U.S.A. tel: 1 847 673-5006 fax: 1 847
Replacing the vacuum tube
 wunder cm7 This microphone has been meticulously created to meet the demand for the U47 sound using historically correct components around the heart of the microphone the original, specially selected EF14
LT SERIES User s Manual
 LT SERIES User s Manual 1 - LT Series Operations Manual TABLE OF CONTENTS Specifications... 2 Introduction... 3 LT Series Models... 4 Optional Features... 4 Getting Started... 5 Installation... 5 Registration...
Use & Care. of your Iron. All about the TA B L E O F C O N T E N T S. USA and Canada 1-888-845-7330
 All about the Use & Care of your Iron Important Safeguards... 2 Iron Safety Instructions... 3 Parts and Features...4 TA B L E O F C O N T E N T S Using Your Iron...6 Cleaning and Maintenance... 8 Warranty...9
MIRAGE. Set-Up Instructions. www.skyline-exhibits.com
 MIRAGE Set-Up Instructions www.skyline-exhibits.com Table of Contents Mirage is available in many sizes from 32 tall tabletops to 92 tall backwalls. The following set-up and repacking instructions depict
Micro Cart User's Guide
 Micro Cart User's Guide To take full advantage of the ergonomic features of your new Sun Mountain Micro Cart, please read the following information. SUN MOUNTAIN 1 Your Micro Cart has several innovative
WARNING: FAILURE TO FOLLOW THESE RULES MAY RESULT IN SERIOUS PERSONAL INJURY CAUTION: INSTALLATION LOCATION:
 Revision Level: 01 Revision Date: 07/07/2011 Please read all instructions carefully to help ensure a correct and SAFE installation of your Second Wind Ultraviolet Germicidal Air Purifier. Failure to do
NewAir AC-10100E / AC-10100H Portable Air Conditioner Owner s Manual PLEASE READ AND SAVE THESE INSTRUCTIONS
 NewAir AC-10100E / AC-10100H Portable Air Conditioner Owner s Manual PLEASE READ AND SAVE THESE INSTRUCTIONS ELECTRICAL SAFETY This appliance is for indoor use only. Always turn off the unit and unplug
THE COMPOUND MICROSCOPE
 THE COMPOUND MICROSCOPE In microbiology, the microscope plays an important role in allowing us to see tiny objects that are normally invisible to the naked eye. It is essential for students to learn how
4.3-inch Back-Up Camera
 TM 4.-inch Back-Up Camera Model No.: PKC0BU4 Owner s Manual and Warranty Information Read these instructions completely before using this product. Retain this Owner s Manual for future reference. INTRODUCTION
Wiper Motor Marinco 2.5. Installation Instructions
 Wiper Motor Marinco 2.5 Installation Instructions Wiper Motor Marinco-2.5 The Marinco 2.5 Wiper Motor Offers the Following Features: Fully sealed base and housing which allows installation in outdoor wet
User s Guide. Oreck Air Purifier with HEPA Filtration. Important! Read this manual carefully, and keep for future reference.
 User s Guide Oreck Air Purifier with HEPA Filtration Important! Read this manual carefully, and keep for future reference. Enjoy Congratulations on your purchase of the Oreck Air Purifier with HEPA Filtration.
Infrared Viewers. Manual
 Infrared Viewers Manual Contents Introduction 3 How it works 3 IR viewer in comparison with a CCD camera 4 Visualization of infrared laser beam in mid-air 4 Power Density 5 Spectral sensitivity 6 Operation
LASER DIAGRAM TABLE OF CONTENTS. SKY Technologies Inc. www.skytechlasers.com. Laser Diagram. Technical Specifications. Laser Operation.
 TABLE OF CONTENTS LASER DIAGRAM Laser Diagram 1 Technical Specifications 2 Laser Operation 3 Laser Safety 5 Maintanence 6 Limitation of Liability 7 Warranty 8 Laser Pointer Series Operations Manual Page
Original Assembly Guide
 TCT Multipurpose Single Bevel Sliding Compound Mitre Saw Original Assembly Guide Read instructions before assembling this tool. Table of Contents GB Assembly Guide Read instructions before assembling this
R/T TACTICAL MONOCULAR
 R/T TACTICAL MONOCULAR MANUAL 36 mm Model The Vortex Solo Tactical R/T Monocular The 36mm Solo Tactical R/T monocular delivers bright images, is compact, and easy to handle. Built to withstand use in just
FOR THE FOLLOWING MODELS: EE-8075W EE-8075O EE-8075R EE-8075BK
 FIREPLACE HEATER FOR THE FOLLOWING MODELS: EE-8075W EE-8075O EE-8075R EE-8075BK If you have any questions about the operation of your fireplace heater, please contact Crane Customer Care. Toll Free: 888-599-0992
Instructional & Operating Manual
 Instructional & Operating Manual For CoolFreeze Series Portable Refrigerators/Freezers CF-18, CF-25, CF-35, CF-40, CF-50, CF-80, CF-110 WAECO USA Clinton, CT www.waecousa.com ! Safety indications in the
30 mm Diameter Main Tube 1-4x24 Models
 CrossFire RIFLESCOPE RIFLESCOPE MANUAL 30 mm Diameter Main Tube 1-4x24 Models The Vortex Crossfire Riflescopes Specifically designed for discriminating hunters and shooters, the Crossfire series of riflescopes
Triple Threat 3-in-1 Game Table 3 IN 1 GAME TABLE
 NG0M Triple Threat 3-in- Game Table 3 IN GAME TABLE Thank 3 in Y Game Table Thank you for your purchase of our product. We work around the clock and around the globe to ensure that our products maintain
MITOSIS IN ONION ROOT TIP CELLS: AN INTRODUCTION TO LIGHT MICROSCOPY
 MITOSIS IN ONION ROOT TIP CELLS: AN INTRODUCTION TO LIGHT MICROSCOPY Adapted from Foundations of Biology I; Lab 6 Introduction to Microscopy Dr. John Robertson, Westminster College Biology Department,
Name of Equipment Silver King Model SKMCD1P/C1. This equipment chapter is to be inserted in the appropriate section of the Equipment Manual.
 Name of Equipment Silver King Model SKMCD1P/C1 This equipment chapter is to be inserted in the appropriate section of the Equipment Manual. Manufactured exclusively for McDonald s By Silver King Refrigeration,
Multi-Pitch Pitching Machine USER MANUAL
 Multi-Pitch Pitching Machine USER MANUAL TABLE OF CONTENTS Thank you for purchasing the Cimarron Multi-Pitch Pitching Machine. The Cimarron Multi-Pitch Pitching Machine is a high performance pitching machine
ALL WEATHER W-SERIES QUARTZ TUBE ELECTRIC INFRARED RADIANT HEATER INSTALLATION USE & CARE MANUAL
 ALL WEATHER W-SERIES QUARTZ TUBE ELECTRIC INFRARED RADIANT HEATER TABLE OF CONTENTS: INSTALLATION USE & CARE MANUAL IMPORTANT INFORMATION Assembly Instructions 2 Wiring Instructions 2 Outdoor Installation
PALLET JACK - 2.5 TON
 PALLET JACK - 2.5 TON 39939 SET UP AND OPERATING INSTRUCTIONS Visit our website at: http://www.harborfreight.com Read this material before using this product. Failure to do so can result in serious injury.
TWIN EAGLES ALL WEATHER ELECTRIC RADIANT HEATER
 TWIN EAGLES, INC. Defining the Art of Outdoor Cooking TWIN EAGLES ALL WEATHER ELECTRIC RADIANT HEATER OWNER S MANUAL MODEL TEEH-1512 TEEH-2524 TEEH-3524 NEED ASSISTANCE? PLEASE CALL: (562) 802-3488 This
2006 JUDY SERVICE GUIDE
 2006 JUDY SERVICE GUIDE For exploded diagram and part number information, refer to the Spare Parts Catalog available on our website at www.rockshox.com. Information contained in this publication is subject
SBC90. Abrasive Blast Cabinet Assembly & Operating Instructions
 SBC90 Abrasive Blast Cabinet Assembly & Operating Instructions READ ALL INSTRUCTIONS AND WARNINGS BEFORE USING THIS PRODUCT. SAVE THESE INSTRUCTIONS FOR FUTURE REFERENCE. This manual provides important
Pet hair clipper. Model 96822. Diagrams within this manual may not be drawn proportionally.
 Pet hair clipper Model 96822 Cleaning And Operation Instructions Diagrams within this manual may not be drawn proportionally. Due to continuing improvements, actual product may differ slightly from the
Advantium 2 Plus Alarm
 ADI 9510-B Advantium 2 Plus Alarm INSTALLATION AND OPERATING INSTRUCTIONS Carefully Read These Instructions Before Operating Carefully Read These Controls Corporation of America 1501 Harpers Road Virginia
Operation Manual. 150 Watt Halogen Light Source for Endoscopy Model # s ESS-150, ESS-150A ESS-220, ESS-220A
 Operation Manual 150 Watt Halogen Light Source for Endoscopy Model # s ESS-150, ESS-150A ESS-220, ESS-220A Endoscopy Support Services, Inc. Croton River Executive Park Route 22, Bldg. 3 Brewster, NY 10509
SECURITY LIGHT. motion-activated. Assembly & operating instructions Solar Motion-Activated Security Light - 80 LED Lights
 motion-activated SECURITY LIGHT Model #: 40225, 40226 Assembly & operating instructions Solar Motion-Activated Security Light - 80 LED Lights Important: Read all instructions carefully before use About
Indoor/Outdoor Color Camera with Built-in 2.4 GHz Wireless Transmitter, plus X10 controlled power supply, and Video Receiver.
 Indoor/Outdoor Color Camera with Built-in 2.4 GHz Wireless Transmitter, plus X10 controlled power supply, and Video Receiver. OWNER'S MANUAL VR36A XC18A XM13A MODEL VK69A (INCLUDES XC18A CAMERA, XM13A
K E E P E TH T I H S I MA M N A U N A U L A FO F R
 Quad-C LED Moving Wash Pro SI-055 User Manual KEEP THIS MANUAL FOR FUTURE NEEDS 1. Unpacking Thank you for choosing Color Imagination s Quad-C LED Moving Wash Pro. For your own safety, please read this
Trillium 40 Axis Spring Tensioner Wire Replacement Instructions
 Trillium 40 Axis Spring Tensioner Wire Replacement Instructions 1 Overview The objective is to replace the broken axis spring tensioner wire. This requires the following tasks: 1. Remove the seismometer
TS93 EMR T/PT/TDE. Surface applied door closer
 TS EMR T/PT/TDE Surface applied door closer Installation instructions: Pull side track mount door closer with smoke detector (EMR T) Push side track mount door closer with smoke detector (EMR PT) Double
2006 HEADSHOK Service Video #1
 LEFTY SPEED DLR DAMPING CARTRIDGE This document explains how to properly remove, disassemble, inspect, reassemble and reinstall the Lefty Speed DLR2 damping cartridge. It is a document to be used in conjunction
How To Use An Asbestos Microscope
 Asbestos Microscopes and Accessories Pyser-SGI has been supplying microscopes and accessories into Asbestos Laboratories for over 40 years PS12 Stage Micrometer with UKAS Certificate of Calibration - For
WWW.CALIFORNIAAIRTOOLS.COM Customer Support 1-866-409-4581
 sound proof AIr CoMprEssor CAbInEt owner's MAnuAl spc03 WWW.CALIFORNIAAIRTOOLS.COM Customer Support 1-866-409-4581 TAbLe OF CONTeNTS INTROduCTION IntroductIon 2 Important Safety InStructIonS 5 components
The Krasnogorsk-3. Operating Instructions. Sold by NCS Products, New York
 The Krasnogorsk-3 Operating Instructions Sold by NCS Products, New York [6] Viewfinder [7] Light Meter FPS Dial [8] Light Meter Power Switch [9] Light Meter ASA/ISO Knob [10] Pistol Grip [11] Lens Focus
Powers Controls Free Energy Band TH 193 HC Heating/Cooling Room Thermostat
 Document No. 155-068P25 TH 193-4 Powers Controls Free Energy Band TH 193 HC Heating/Cooling Room Thermostat 50 60 70 80 70 TH0356R1 60 80 POWERS Description The TH 193 HC thermostats are proportional dual
Gold Century GC-1023 Metal Detector
 Gold Century GC-1023 Metal Detector Discriminating Pin Pointing Metal Detector OWNER S MANUAL And Warranty With your GC-1023 metal detector, you can hunt for coins, relics, jewelry, gold, and silver just
PlaneWave CDK Telescope Instructions CDK12.5, 17, 20 and 24
 PlaneWave CDK Telescope Instructions CDK12.5, 17, 20 and 24 V112712 1 Collimation and Secondary Spacing Procedure The CDK optical design has four optical elements shown in Figure 1. The primary mirror
SETTING UP YOUR 6000 SERIES TIME RECORDER
 INTRODUCTION The Pyramid 6000 Series Time Recorder is an electronic time recorder designed to make payroll processing easier and more efficient. The 6000 series will meet your business needs whether your
UNIVERSAL LUMBAR INSTALLATION INSTRUCTIONS
 UNIVERSAL LUMBAR INSTALLATION INSTRUCTIONS CONTENTS Parts List... 2 Parts Diagram... 2 Helpful Hints... 3 Installation... 4 Operation and Troubleshooting Guide... 6 Warranty Information... 8 Form #3132,
Owner s Manual & Safety Instructions
 Owner s Manual & Safety Instructions Save This Manual Keep this manual for the safety warnings and precautions, assembly, operating, inspection, maintenance and cleaning procedures. Write the product s
MP-4V Heavy Duty Riveter / 39048
 MP-4V Heavy Duty Riveter / 39048 This newly designed heavy-duty air/hydraulic riveter is ergonomically designed with the professional in mind. The light weight 3.7 lbs. well balanced MP-4V includes a Vacuum
MAINTENANCE & TROUBLESHOOTING
 MAINTENANCE & TROUBLESHOOTING This section describes how to: clean the lens clean the fan intake filter replace the projection lamp replace the batteries in the remote control use the Kensington lock feature
UV100A Ultraviolet Air Treatment System
 UV100A Ultraviolet Air Treatment System INSTALLATION INSTRUCTIONS APPLICATION When installed in forced air heating and cooling systems, the UV100A Ultraviolet Air Treatment System kills airborne microorganism