Doro PhoneEasy 612. English
|
|
|
- Bertina McCarthy
- 8 years ago
- Views:
Transcription
1 Doro PhoneEasy 612 English

2
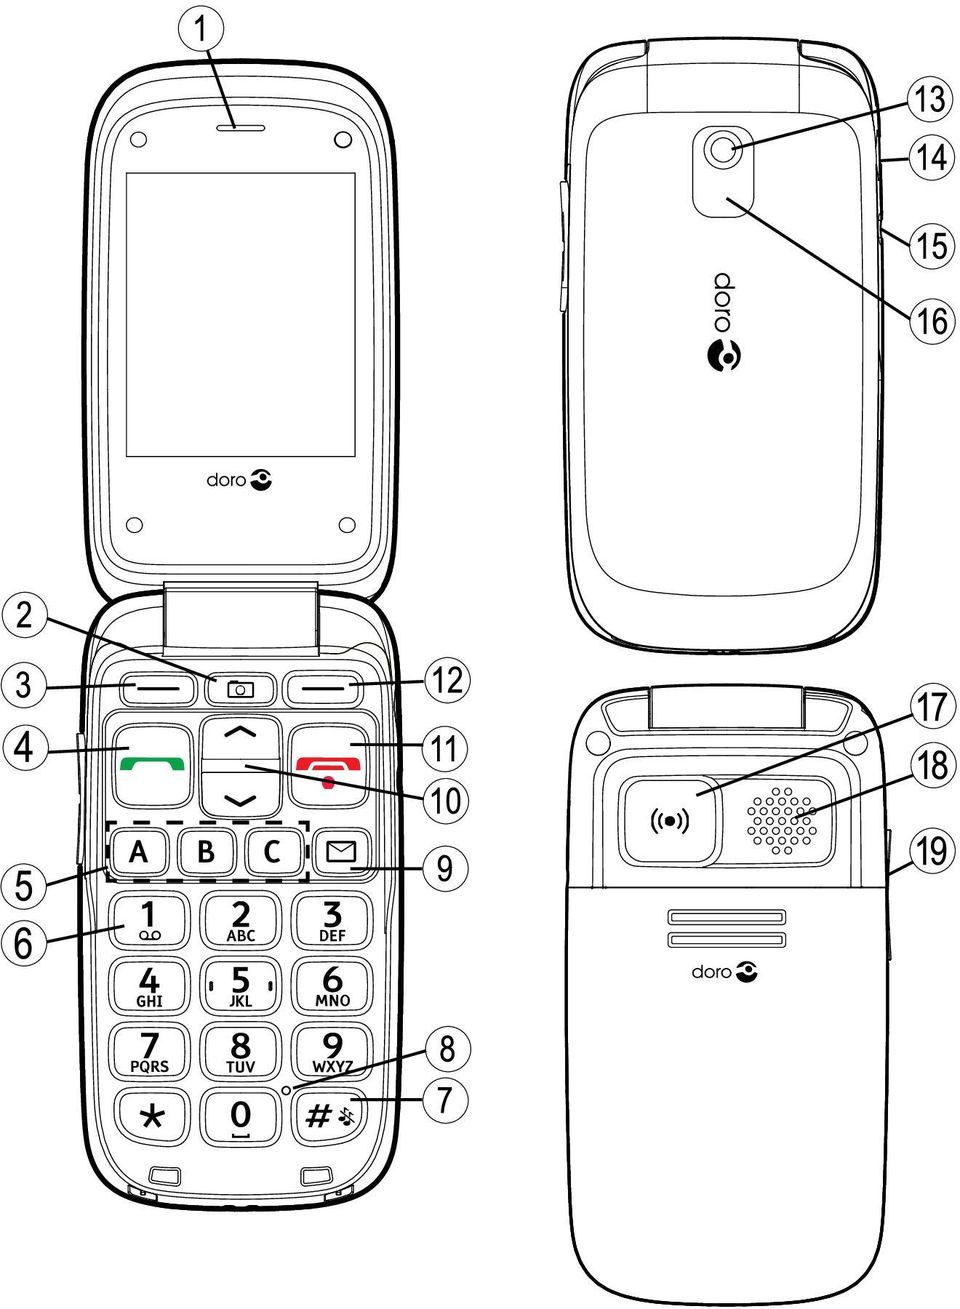
3 1. Earpiece 2. Camera shortcut 3. Left selection button 4. Call button 5. Speed dial 6. Voice mail 7. Silent/Input method 8. Microphone 9. SMS shortcut 10. Arrow buttons 11. End call/power on/off 12. Right selection button 13. Camera lens 14. Charging socket 15. Headset socket 16. LED light (Red=Battery level low / charging, Green=New message / Missed call) 17. Assistance button 18. Loudspeaker 19. Volume control 20. Lanyard 21. Charging stand 20 21
 17. Assistance button 18.")
4 Contents Installation... 1 Installing the SIM card, memory card and the battery... 1 Charging... 2 Symbols... 3 Assistive functions... 3 Phone indicators... 3 Display status symbols... 3 Display main symbols... 4 Operation... 5 Activating the phone... 5 Making a call... 6 Making a call from the Phonebook... 6 Receiving a call... 6 Volume control... 6 Entering text... 7 Call options... 8 Call waiting... 8 Call information... 9 Speed dial... 9 Silent... 9 Headset... 9 SOS calls... 9 Assistance button... 9 Phonebook...11 Creating a phonebook entry...11 Creating ICE entry (In Case of Emergency)...12 Managing phonebook entries...12 ICE (In Case of Emergency)...13 Messages...14 Creating and sending SMS...14 Creating and sending voice message...15 Creating and sending MMS...15 Inbox, Sent, Outbox Call log...18 Retrieving and dialling...18
...12 Managing phonebook entries...12 ICE (In Case of Emergency)...13 Messages...14 Creating and sending SMS...14 Creating and sending voice message.")
5 Camera (take photos)...19 Camera, options...19 Camera adjustments...20 Image viewer...20 Image viewer, options...20 Connecting the phone to a computer...21 Drag and drop content between phone and a computer...22 Disconnect the USB cable safely...22 Settings...22 General...22 Sound...26 Display...28 Calls...29 Messages...33 Camera...37 Assistance...38 Bluetooth...40 Security File manager...43 Additional functions...45 Alarm...45 Organizer...46 Calculator FM radio Games...49 Instructions for the REMOTE USER...49 Troubleshooting...53 Safety instructions...55 Network services and costs...55 Operating environment...55 Medical units...55 Areas with explosion risk...56 Li-ion battery...56 Protect your hearing...56 Emergency calls...57 Vehicles...57

6 Care and maintenance...57 Warranty...58 Specifications...58 Hearing aid...59 Specific Absorption Rate (SAR)...59 Declaration of Conformity...59

7 Installation IMPORTANT! Turn off the phone and disconnect the charger before removing the battery cover. Installing the SIM card, memory card and the battery The SIM and memory card holders are located inside the battery compartment. GB SIM Remove the battery cover and the battery if it is already installed. 2. Insert the SIM card by gently sliding it into the holder. Make sure that the SIM card s contacts are facing inwards and that the cut off corner is pointing downwards. Take care not to scratch or bend the contacts on the SIM card. 3. To insert a memory card by gently sliding it into the holder. Make sure that the memory card s contacts are facing inwards and that the cut off corner is pointing upwards. Take care not to scratch or bend the contacts on the memory card. To remove the memory card: find the small ridge on the exposed end of the memory card. Put your fingernail into the ridge and gently pull the memory card out. 4. Insert the battery by sliding it into the battery compartment with the contacts facing upwards to the left. Replace the battery cover. IMPORTANT! Use only compatible memory cards for use with this device. Compatible card type: microsd, microsdhc. Incompatible cards may damage the card itself, the device and corrupt data stored on the card. Depending on the market some phones may have a pre-installed memory card. 1

8 Charging CAUTION Only use batteries, charger and accessories that have been approved for use with this particular model. Connecting other accessories may be dangerous and may invalidate the phones type approval and guarantee. When the battery is running low, is displayed and a warning signal is heard. To charge the battery, connect the mains adapter to a wall socket and to the charging socket y. is displayed briefly when the charger is connected to the phone, and when it is disconnected. The battery charge indicator will be animated while charging. It takes approximately 3 hours to fully charge the battery. is displayed on the screen when charging is completed. If the phone is turned off when the charger is connected to the phone only the battery charge indicator will be shown on the display. Note! To save power the LCD backlight goes off after a while. Press any button to illuminate the display. Full battery capacity will not be reached until the battery has been charged 3 4 times. Batteries degrade over time, which means that call time and standby time will normally decrease with regular use. Save energy When you have fully charged the battery and disconnected the charger from the device, unplug the charger from the wall outlet. 2

9 Symbols Assistive functions The following symbols indicate information in the manual about assistive functions for: Seeing Hearing Handling Safety Phone indicators LED light on the phone will: flash green when you have a new message or a missed call. After reading the new message/missed call, the flashing will stop. flash red when the battery is running low and during charging. Display status symbols Signal strength No network coverage Ring only 5 Unread message in Inbox Ring + vibration Vibration only Silent Roaming (in other network) Missed call Headset connected Voice mail message received Alarm active Battery level Call forward activated Bluetooth on, visible to others Bluetooth on, invisible to others Bluetooth connected Data transmission 3
 Missed call Headset")
10 Display main symbols Mute Message sending successful Message sending failed Error Warning Query Done (confirmed) New message Battery level low Searching Assistance call Volume control Charger connected Charger removed Headset in Headset out Speaker on Speaker off Incoming call Outgoing call Call ended Missed call. Press Read to see the missed calls. Call on-hold SOS calls only vcard message Processing, please wait 4

11 Activating the phone on the phone to turn it on/off. Con- Press and hold the red button firm with Yes to power off. English Operation If the SIM card is valid but protected with a PIN code (Personal Identification Number), PIN is displayed. Enter the PIN code and press OK ( upper left corner of keypad). Delete with Clear ( upper right corner of keypad). Note! If PIN and PUK codes were not provided with your SIM card, please contact your service provider. Attempts: # shows the number of PIN attempts left. When no more attempts remain, PIN blocked is displayed. The SIM card must now be unlocked with the PUK code (Personal Unblocking Key). 1. Enter the PUK code and confirm with OK. 2. Enter a new PIN code and confirm with OK. 3. Re-enter new PIN code and confirm with OK. Start-up wizard When starting the phone for the first time, you can use the Start-up wizard to set some basic settings. Press Yes to change or No if you do not want to change. Tip: You can run the Start-up wizard later if you want, see Start-up wizard, p.24. Standby (Idle mode) When the phone is ready to use, and you have not keyed in any characters, the phone is in standby. Left selection button in standby is Menu. Right selection button in standby is Name. Tip: You can always press to return to standby. 5
. 1.")
12 Changing the language, time and date The default language is determined by the SIM card. See General, p.22 on how to change language, time and date. Making a call 1. Enter the phone number including the area code. Delete with Clear. 2. Press to dial. Press Abort to cancel dialling. 3. Press to end the call. Tip: For international calls, always use + before the country code for best operation. Press * twice for the international prefix +. Making a call from the Phonebook 1. Press Name to open the phonebook. 2. Use the arrow buttons / to scroll through the phonebook or quick search by pressing the key corresponding to the first letter of the entry, see Entering text, p Press Call to dial the selected entry, or press Back. Receiving a call To answer an incoming call when the flip is closed, open the flip. To answer an incoming call when you have set Open to answer to Off, see Answer mode, p Open the flip and press to answer, or press Silent to switch off the ring signal and then Reject to reject the call (busy signal). Alternatively, press to reject the call directly. 2. Press to end the call. Tip: Press and hold + or to temporarily switch off the ring signal without opening the flip. Volume control Use the side buttons +/ to adjust the sound volume during a call. The volume level is indicated on the display. If you use hearing aid or have hearing difficulties when using the telephone in noisy environment, you can customise the phones audio settings, see Audio setup, p.26. 6

13 Entering text Press a numerical key repeatedly until the desired character is shown. Wait a few seconds before entering the next character. Press * for a list of special characters. Select the desired character with / and press OK to enter it. Use the side keys +/ or / to move the cursor within the text. Press # to cycle upper case, lower case and numerals. Press and hold # to change input language. Entering text with predictive text In some languages you can use the Smart ABC (ezitype ) input method which uses a dictionary to suggest words. See Predictive text, p.33 on how to activate predictive text. Press each key once, even if the displayed character is not the one you want. The dictionary will suggest words based on the keys you have pressed. 1. To write the word Fred, press 3, 7, 3, 3. Complete the word before looking at the suggestions. 2. Use / to view the suggested words. 3. Press Select and continue with the next word. Alternatively, press 0 to continue with the next word. If none of the suggested words are correct, use manual input mode. The icon on the top left of the display indicates the input mode: Abc Sentence case with predictive text ABC UPPER CASE with predictive text abc lower case with predictive text Abc Sentence case ABC UPPER CASE abc lower case 123 Numerals 7

14 Call options During a call the selection buttons 1 ( functions: ) give access to additional Options (left selection button) A menu with the following options is displayed: Hold single call/retrieve single End single call New call Phonebook Messages Mute Hold/retrieve the current call. End the current call (same as ). Call another number (Conference). Search the phonebook. Write or read SMS messages. Disable the microphone. SPK on (right selection button) Activates handsfree mode, which allows you to speak without holding the phone. Speak clearly into the microphone at a maximum distance of 1 m. Use the side keys +/ to adjust the loudspeaker volume. Press SPK off to return to normal mode. Note! The handsfree function allows only one person at a time to talk. Switching between talk/listen is triggered by the sound of the person talking. Loud noises (music, etc.) in the background may interfere with the function. Call waiting An alert tone will be heard if there is an incoming call while talking. To put the current call on hold and answer the incoming call, press Options, select Answer and then OK. Tip: Call waiting must be activated, see Call setup, p selection buttons have multiple functions. The current key function is shown above the selection button on the display. 8

15 Call information During a call, the outgoing or incoming phone number and the elapsed call time is displayed. If the identity of the caller is withheld, Unknown is displayed. Speed dial You can use keys A, B and C and you can also use the numerical keys 0 and 2 9. To speed dial an entry from standby, press and hold the corresponding key. See Speed dial, p.30. Silent Silent is a fixed profile with Keypad tone, Message tone and Ringtone disabled, while Vibration, Tasks and Alarm are unchanged. Tip: Press and hold shortcut button # to activate/deactivate Silent. Headset When a headset is connected, the internal microphone in the phone is automatically disconnected. When receiving a call you can use the answer key on the headset cable (if it has one) to answer and end calls. CAUTION Using a headset at high volume may damage your hearing. Adjust the volume level carefully when using a headset. SOS calls As long as the phone is switched on, it is always possible to make an emergency call by entering the main local emergency number for your present location followed by. Some networks accept calls to emergency numbers without a valid SIM card. Contact your service provider for more information. Assistance button IMPORTANT! Always inform recipients in the Number list that they are listed as your assistance contacts. 9

16 CAUTION When an assistance call is activated the phone is pre-set to handsfree/ speakerphone mode. Do not hold the device near your ear when the handsfree mode is in use, because the volume may be extremely loud. The Assistance button allows easy access to contact your predefined help numbers (Number list) should you need help. The Assistance function may need to be activated before use. See Assistance, p.38 on how to activate as described or with 3 button presses, how to enter recipients in the numbers list, and how to edit the text message. Press and hold the Assistance button for 3 seconds, or press it twice within 1 second. The assistance call begins after a delay of 5 seconds. In this time you can prevent a possible false alarm by pressing. An assistance SMS is sent to all recipients. The first recipients in the list is dialled. If the call is not answered within 25 seconds, the next number is dialled. Dialling is repeated 3 times or until the call is answered, or until is pressed. The assistance function may be configured so that the receiver of the call must press "0" (zero) to confirm, in order to stop the alarm sequence. If there is a risk that the assistance call will be answered by a voice mail/answering service, please activate the function Confirm with "0". See Confirm with "0", p.39. Note! Some private security companies can accept automatic calls from their clients. Always contact the security company before using their phone number. 10

17 IMPORTANT! Information to the receiver of an assistance call, when Confirm with "0" is activated: After receiving the assistance message, each number in the Number list will be called sequentially. To confirm the assistance call, the receiver needs to press 0. If the receiver doesn t press 0 within 60 seconds (after answering) the call will be disconnected and the next number in sequence will be called. If the receiver presses 0 within 60 seconds, the call is confirmed and no further call attempts will be made (assistance sequence interrupted). Phonebook The phonebook can store 300 entries with 3 phone numbers to each entry. Creating a phonebook entry 2. Select -New contact- and press Add. 3. Enter a Name for the contact, see Entering text, p.7. Delete with Clear. 4. Use / to select Mobile, Home or Office, and enter the phone number(s) including the area code. 5. Select Picture and press Edit to associate a picture to the contact. This picture will be displayed when you call the corresponding contact or when they are calling you, see Phonebook picture, p.26. Select Take picture and press OK to use the camera to take a picture. Select My pictures and press OK to select an existing picture. 6. Press Save. Tip: For international calls, always use + before the country code for best operation. Press * twice for the international prefix +. 11
.")
18 Creating ICE entry (In Case of Emergency) With this additional information and medical information, first responders can access this information from the victim's phone in case of emergency. In the event of a trauma, it is critical to have this information as early as possible which can increase the chances of survival. All fields are optional, but the more information provided the better. See ICE (In Case of Emergency), p.13 on how to configure your ICE information. Managing phonebook entries 2. Select a contact and press Options. 3. Select one of the following options and press OK. View Show details for the selected contact. Edit 1. Use / to move the cursor. Delete with Clear. 2. Press Save. Add See Creating a phonebook entry, p.11. Call Press OK to call the contact. Send SMS Press OK to write a SMS message, see Creating and sending SMS, p.14. Send MMS Press OK to write a MMS message, see Creating and sending MMS, p.15. Delete Press OK to delete the selected phonebook entry. Press Yes to confirm or No to abort. 12

19 Delete all Select From SIM or From phone and press OK to delete all phonebook entries from the SIM card or phone memory. Enter the phone code and press OK to confirm. The default phone code is Copy all Select From SIM and press OK to copy all phonebook entries from the SIM card to the phone memory. Press Yes to confirm or No to abort. Select From phone and press OK to copy all phonebook entries from the phone memory to the SIM card. Press Yes to confirm or No to abort. Send vcard Select Send by SMS and press OK to send the selected phonebook entry as a vcard via SMS. Enter the phone number of the recipient. Alternatively use the arrow keys / to scroll through the phonebook, or quick search by pressing the key corresponding to the first letter of the entry, see Entering text, p.7. Press OK to send. Select Send by MMS and press OK to send the selected phonebook entry as a vcard via MMS. Type your message, then press Options. Add items to your message from the options Add subject, Add picture, Add sound and Add video. Add recipients with To and Send when ready. Select Send by Bluetooth and press OK to send the selected phonebook entry as a vcard via Bluetooth. See Bluetooth, p.40 on how to connect with Bluetooth. ICE (In Case of Emergency) First responders can access important information such as medical information from the victim's phone in case of emergency. In the event of a trauma, it is critical to have this information as early as possible to increase the chances of survival. All fields are optional, but the more information provided the better. 13

20 2. Select and press OK, then use / to scroll the list of entries. 3. Press Edit to add or edit information in each entry, see Entering text, p.7. Delete with Clear. Press Save when done. Name: Birth: Height: Weight: Language: Insurance: Contact 1: Contact 2: Doctor: Condition: Allergies: Blood type: Vaccination: Medication: Other info: Your own name. Your date of birth. Your height. Your weight. Your language. Creating and sending SMS Your insurance provider and policy number. Press Options and then OK to Add or Delete a contact from the phonebook, or Save to accept the current entry. If possible, add your relationship to your ICE contacts in the phonebook, such as ICE Wife Mary Smith. Any medical conditions/medical devices (e.g. diabetic, pacemaker). Any known allergies (e.g. penicillin, bee stings). Your blood type. Any relevant vaccinations. Any medication that you are treated with. Other information (e.g. organ donor, living will, consent to treat). Messages Note! Before you can send any SMS, you need to save your message centre number. The number to your service centre is supplied by your service provider and is usually set on the SIM card. If not, you can enter the number yourself. See SMS centre, p Press shortcut button or press Menu, scroll to and press OK. 2. Select SMS and press OK. 3. Type your message, see Entering text, p.7, then press To. 4. Select a recipient from the Phonebook and press Add. 14

21 Alternatively, select Enter number and press Select to add recipient manually and press Done. 5. Select Add to add more recipients or select Send to send and then press OK. 6. You can also modify the recipients by selecting one and press Options to Edit, Delete or Delete all. Note! If you choose to add multiple recipients, you will be charged for each recipient (maximum 10). For international calls, always use + before the country code for best operation. Press * twice for the international prefix +. Creating and sending voice message A voice message use the same technology as an MMS. Both you and the recipient must have subscriptions that support MMS. The settings for MMS is supplied by your service provider and can be sent to you automatically via SMS. If not, see MMS settings, p.35 on how to set your MMS profile. 2. Select Voice message and press OK. 3. Recording will start immediately. Press Stop when done and press Yes to save. 4. Select a recipient from the Phonebook and press Add. Alternatively, select Enter number and press Select to add recipient manually and press Done. 5. Select Add to add more recipients or select Send to send and then press OK. 6. You can also modify the recipients by selecting one and press Options to Edit, Delete or Delete all. Note! If you choose to add multiple recipients, you will be charged for each recipient (maximum 10). For international calls, always use + before the country code for best operation. Press * twice for the international prefix +. Creating and sending MMS A MMS message can contain text and media objects such as pictures, sound recordings and video. Both you and the recipient must have 15
22 subscriptions that support MMS. The settings for MMS is supplied by your service provider and can be sent to you automatically via SMS. If not, see MMS settings, p.35 on how to set your MMS profile. 2. Select MMS and press OK. 3. Type your message, see Entering text, p.7, then press Options. 4. Add items to your message from the options Add subject, Add picture, Add sound and Add video. 5. Add recipients with To and Send when ready. Add subject 1. Select Add subject and press OK. 2. Type your subject, then press Done. Add picture 1. Select Add picture and press OK. 2. Select My pictures and press OK Alternatively, select Take picture and press OK for using the camera to take a picture. 3. Select Phone/Memory card and press Open. 4. Select a folder, eg Photos and press Open. 5. Select a file and press OK. Add sound 1. Select Add sound and press OK. 2. Select My sounds and press OK. Alternatively, select Record sound and press OK for using the microphone to record sound. Recording will start immediately. Press Stop when done and press Yes to save. 3. Select Phone/Memory card and press Open. 4. Select a folder, eg Audio and press Open. 5. Select a file and press OK. Add video 1. Select Add video and press OK. 2. Select My videos and press OK. 3. Select Phone/Memory card and press Open. 4. Select a folder, eg Received and press Open. 16
23 5. Select a file and press OK. English Add recipients (To) 1. Select To and press OK to select recipient from Phonebook and press Add. Alternatively, select Enter number and press Select to add recipient manually and press Done. 2. Select Add to add more recipients or select Send to send and then press OK. 3. You can also modify the recipients by selecting one and press Options to Edit, Delete or Delete all. Inbox, Sent, Outbox / SMS/MMS unread / SMS/MMS sent / SMS/MMS read / SMS/MMS unsent 2. Select Inbox/Sent/Outbox and press OK. 3. Select a message and press Read. Use / to scroll the message up/down. 4. Press Options for the following options: View (MMS only) To view the message. Call Press OK to call the contact. Resend Send again to the same receiver. Reply Type your reply, then press Done. The message will be sent immediately. Delete Press Yes to delete the message, or No to return. 17
24 Download/Cancel download If the message has not downloaded yet, press Download. Edit Edit the message, then press Send. Forward Forward a message. Edit the message (if desired), then press Send. Use number Displays all phone numbers contained in the message as well as the sender's number. Call Save Send SMS Send MMS Call the selected number. Save the number in the Phonebook. Write a new SMS message. Write a new MMS message. Save objects (MMS only) To save text and media objects such as pictures, sound recordings and video. Details (MMS only) To view details of the message. Call log Received, missed and dialled calls are saved in a combined call log. 20 calls of each type can be stored in the log. For multiple calls relating to the same number, only the most recent call is saved. Retrieving and dialling 1. Press. Alternatively, press Menu, scroll to and press OK. 2. Use / to scroll through the Call log. 18
25 Received call Dialled call Missed call 3. Press to dial the number or press Options for the following settings: View Delete Delete all Save Show details for the selected call. Delete the call. Delete all calls in the Call log. Save the number in the Phonebook. Camera (take photos) To get sharp photos, wipe the lens clean with a dry cloth. 1. Press shortcut or press Menu, scroll to and press OK. 2. Press to take photo. 3. Press Options or Back (if you do not make any selection the picture is saved). Camera, options Send Select an option, then press OK: Send by MMS Send as MMS. Press OK to create a message, see Creating and sending MMS, p.15. Send by Send to other Bluetooth devices, see Bluetooth, p.40. Bluetooth Delete Press OK to delete selected image. Press Yes to confirm or No to return. Use Select an option from the list, then press OK. 19
26 Wallpaper Phonebook picture Save as display background. Press OK Save as phonebook contact. Press OK. Camera adjustments Use / to zoom in and out. Use the side buttons +/ to adjust EV/Light sensitivity. Note! Zoom may reduce image quality. For more camera settings, see Camera, p.37. View your saved images. Image viewer 2. Select an image, then press Options. 3. Select one of the following options and press OK. Image viewer, options View Single view. Press Back when done. Send Select an option, then press OK: Send by MMS Send image as MMS. Press OK to create a message, see Creating and sending MMS, p.15. Send by Send image to other Bluetooth devices, see Bluetooth, Bluetooth p.40. Delete Press OK to delete selected image. Press Yes to confirm or No to return. Use Select an option from the list, then press OK to confirm. 20
27 Wallpaper Phonebook picture Save as display background. Press OK. Save as phonebook contact. Press OK. Details View detailed information about the file, e.g. date, size, copyright. Rename Rename image. Delete with Clear and press Done to confirm. Browse style You can change image view. Default is Large, you can also select List or Medium. In List the file name, the date and the size of the image is shown. Sort by Select if you want to sort your images by Name or Time. Storage Select where the phone should save files if you have memory card installed. Delete all Press OK to delete all images. Press Yes to confirm or No to return. Connecting the phone to a computer 21
28 Connect the phone to a computer and start transferring pictures, music and other file types. All you have to do is connect a USB cable between the phone and computer. From your computer's file explorer, you can drag and drop content between your phone and the computer. Note! You might not be able to transfer some copyright-protected material. Drag and drop content between phone and a computer 1. Connect your phone to a computer using a USB cable. 2. Wait until the phone/memory card appears as external disks in the file explorer. 3. Drag and drop selected files between the phone and the computer. Note! When the phone/memory card is mounted to the computer, the phone cannot access the memory card. Some functionality and applications in the phone, such as the camera, may not be accessible. You can transfer files by using a USB cable on most devices and operating systems supporting a USB Mass Storage interface. Disconnect the USB cable safely 1. Make sure to enable the hardware to be safely removed. 2. Disconnect the USB cable. Note! Do not disconnect the USB cable when transferring content as this may corrupt the content. Computer instructions may vary depending on your operating system. See the documentation of your computer's operating system for more information. Settings Note! The settings described in this chapter are carried out in standby mode. Press to return to standby mode. General Time & date Setting the time and date 22
29 2. Select General and press OK. 3. Select Time & date and press OK. 4. Select Set time and press OK. 5. Enter the time (HH:MM), then press OK. 6. Select Set date and press OK. 7. Enter the date (DD/MM/YYYY), then press OK. Setting the time/date format 2. Select General and press OK. 3. Select Time & date and press OK. 4. Select Set format and press OK. 5. Select Time format and press OK. 6. Select 12 hours or 24 hours and press OK. 7. Select Date format and press OK. 8. Select the desired date format and press OK. Setting Auto time on/off 2. Select General and press OK. 3. Select Time & date and press OK. 4. Select Auto time and press OK. 5. Select On/Off and press OK. To set the phone to automatically update the time and date according to the current time zone, select On. Automatic update of date and time does not change the time you have set for the alarm clock or the calendar. They are in local time. Updating may cause some alarms you have set to expire. Depending on network support and subscription. Language The default language for the phone menus, messages etc. is determined by the SIM card. You can change this to any other language supported by the phone. 2. Select General and press OK. 23
30 3. Select Language and press OK. 4. Scroll / to select a language, then press OK. Start-up wizard Use the Start-up wizard to set some basic settings. Press Yes to change Language, Time & date, Ringtone, Volume, Text size or Themes. Press No if you do not want to change. Owner number The phone numbers assigned to your SIM card are saved if this is allowed by the card. To view/edit the numbers: 2. Select General and press OK. 3. Select Owner number and press OK. See Phonebook, p.11 on how to add names/numbers. To edit or delete an existing entry, select it and press Options, then select Edit or Delete and press OK. Block function You can disable functions to simplify the use of the phone. 2. Select General and press OK. 3. Select Block function and press OK. 4. Select each function you want to disable and press Off. 5. Press Done to confirm. Network setup Your phone automatically selects your (service providers) home network if this is within range. If not within range, you may use another network, provided your network operator has an agreement that allows you to do so. This is called roaming. Contact your service provider for more information. 24
Doro PhoneEasy 607. English
 Doro PhoneEasy 607 English 1 13 2 3 4 5 12 11 14 15 16 17 18 19 20 6 10 7 9 8 1. Earpiece 2. Microphone 3. Arrow buttons 4. Left selection button 5. Call button 6. Speed dial 7. Voice mail 8. Silent /
Doro PhoneEasy 612. English
 Doro PhoneEasy 612 English 17 18 19 1. Earpiece 2. Camera shortcut 3. Left selection button 4. Call button 5. Speed dial 6. Voice mail 7. Silent/Input method 8. Microphone 9. SMS shortcut 10. Arrow buttons
Doro PhoneEasy 606. English
 Doro PhoneEasy 606 English 1 2 14 15 3 4 5 6 7 12 11 10 9 13 16 17 18 19 8 1. Earpiece 2. Display 3. Arrow buttons 4. Left selection button 5. Call button 6. Speed dial 7. Voice mail 8. Silent / Input
Doro PhoneEasy 626. English (US)
") Doro PhoneEasy 626 English (US) 1 2 3 4 5 6 7 8 14 13 12 11 10 9 15 20 19 18 17 16 25 24 23 22 21 Note! All illustrations are for illustrative purposes only and may not accurately depict the actual device.
Doro PhoneEasy 626 English (US) 1 2 3 4 5 6 7 8 14 13 12 11 10 9 15 20 19 18 17 16 25 24 23 22 21 Note! All illustrations are for illustrative purposes only and may not accurately depict the actual device.
 Doro 6030 English 1 2 3 4 5 6 7 8 14 13 12 11 10 9 15 16 17 18 19 20 21 22 The items supplied with your phone might vary depending on the software and accessories available in your region or offered by
Doro PhoneEasy 631. English
 Doro PhoneEasy 631 English 1 14 20 2 3 4 5 6 7 13 12 11 10 9 8 15 16 17 19 18 Note! All illustrations are for illustrative purposes only and may not accurately depict the actual device. English 1. Earpiece
Doro PhoneEasy 621. English
 Doro PhoneEasy 621 English 1 2 21 20 3 4 5 6 7 14 13 12 11 10 9 15 16 18 17 19 8 English 1. Earpiece 2. Display 3. Arrow buttons 4. Left selection button 5. Call button 6. Speed dials 7. Voice mail 8.
Doro PhoneEasy 620. English (US)
") Doro PhoneEasy 620 English (US) 1 2 20 23 19 22 3 4 5 6 7 14 13 12 11 10 9 15 16 18 17 21 8 English 1. Earpiece 2. Display 3. Arrow buttons 4. Left selection button 5. Call button 6. Speed dial 7. Voice
Doro PhoneEasy 620 English (US) 1 2 20 23 19 22 3 4 5 6 7 14 13 12 11 10 9 15 16 18 17 21 8 English 1. Earpiece 2. Display 3. Arrow buttons 4. Left selection button 5. Call button 6. Speed dial 7. Voice
Doro PhoneEasy 632. English
 Doro PhoneEasy 632 English 1 2 3 4 5 6 7 8 14 13 12 11 10 9 15 16 17 18 19 23 22 21 20 Note! All illustrations are for illustrative purposes only and may not accurately depict the actual device. English
Doro PhoneEasy 508. English
 Doro PhoneEasy 508 English 1 14 15 2 3 4 5 13 12 11 10 9 8 6 7 16 17 18 19 The items supplied with your phone might vary depending on the software and accessories available in your region or offered by
English. Doro PhoneEasy. 332gsm
 Doro PhoneEasy 332gsm 23 24 English 1. Key lock 2. Side key (volume) 3. Torch key 4. Display 5. Left soft key 6. Call key 7. Speed dial keys 8. 1 / Voice mail 9. Numeric keypad 10. # / Change profile
Primo 413 by Doro. Operating Instructions. by Doro
 Primo 413 by Doro Operating Instructions by Doro 23 U2 i 1. Receiver loudspeaker Making phone calls holding the cell phone to the ear 2. Display 3. Speed-dial buttons Speed-dialling of the numbers saved
User Manual. Vogue2.8-D6
 User Manual Vogue2.8-D6 S L E E C Index 1. iball Vogue2.8-D6...1 1.1 Phone Overview...1 1.2 Functions of Keys...2 2. Getting Started...3 2.1 Installing the SIM Cards and the Battery...3 2.2 Installing
Primo 305 by Doro User Manual
 Primo 305 by Doro User Manual U2 1. Speaker Phone with the mobile phone at the ear. 2. Navigation buttons For navigating in menus and text input. In addition by default quick access (see also page 58):
GLOBAL. The world s local mobile phone. Quick Start Guide
 GLOBAL The world s local mobile phone Quick Start Guide 1 SAR This mobile phone meets applicable national SAR limits of 2.0 W/Kg. The specific maximum SAR values can be found in the SAR information section
Optional. The Rugged Phone RUGGED MOBILE PHONE. Language. Type of product
 The Rugged Phone RUGGED MOBILE PHONE Language Type of product WELCOME Thank you for choosing the WORKZONE mobile phone. The phone is shockproof, waterproof and dustproof. Please take some time to read
User s Guide 9357246 Issue 5
 Electronic user's guide released subject to "Nokia User's Guides Terms and Conditions, 7th June, 1998" User s Guide 9357246 Issue 5 DECLARATION OF CONFORMITY We, NOKIA CORPORATION declare under our sole
Thank you for choosing our mobile phone! Please read this manual before use.
 Thank you for choosing our mobile phone! Please read this manual before use. We reserve the right to upgrade the software and product and/or to make changes to this user manual without prior notice. from
Doro PhoneEasy 621. Quick Start Guide. English
 Doro PhoneEasy 621 Quick Start Guide English Overview 1 2 21 20 3 4 5 6 7 14 13 12 11 10 9 15 16 18 17 19 8 Complete manual For the complete user guide please visit www.doro.co.uk/support/ or contact our
Contents. Getting started 3 Make and receive the first call.
 Contents Getting started 3 Make and receive the first call. Getting to know your phone 6 Key functions, quick keys, entering letters and characters. Personalizing your phone 15 Choose ring signal, theme
User guide. T250i. This is the Internet version of the User's guide. Print only for private use.
 User guide T250i Congratulations on your purchase of the Sony Ericsson T250i. For additional phone content, go to www.sonyericsson.com/fun. Register now to get free online storage and special offers at
User Guide. BlackBerry Storm 9530 Smartphone. Version: 4.7
 BlackBerry Storm 9530 Smartphone Version: 4.7 SWD-490426-0909090640-001 Contents Shortcuts... 9 BlackBerry basics shortcuts... 9 Phone shortcuts... 9 Camera shortcuts... 9 Media shortcuts... 9 Typing shortcuts...
WiFi Phone WP589 User Guide
 WiFi Phone WP589 User Guide 001.001.024 2010/06/22 1 n CONTENTS For your safety...5 Getting Started...6 Phone Overview...6 To insert the battery...6 Charging the battery...7 Turn on and turn off the phone...7
Back, start, and search key... 3. Lock the keys and screen... 6. Unlock the keys and screen... 7. Set the keys and screen to lock automatically...
 Userguide Nokia Lumia 620 Table of Contents Keys and parts... 3 Back, start, and search key... 3 How to Insert a SIM card... 4 First start-up... 6 Switching Phone ON and OFF... 6 Switch the phone on...
Otium Gear S Smart Watch User Guide Please read the manual before use. * For further information, please visit www.otiumobile.com
 Otium Gear S Smart Watch User Guide Please read the manual before use. * For further information, please visit www.otiumobile.com 1 About this manual You can use this Gear S as a companion device to some
Nokia 6303 classic User Guide
 Nokia 6303 classic User Guide 9214002 Issue 3 2 Contents Contents Safety 4 Start up 5 Keys and parts 5 Install SIM card and battery 5 Insert and remove the memory card 6 Charge the battery 6 Antenna 7
F2400 User Guide - ENGLISH
 F2400 User Guide F2400 User Guide Some of contents in this manual may differ from your phone depending on the software of the phone or your service provider. Part No. MMBB0163204 Issue 1.0 Printed in Korea
Nokia 603 User Guide. Issue 3.0
 Nokia 603 User Guide Issue 3.0 2 Contents Contents Safety 5 Get started 6 Keys and parts 6 Insert the SIM card 6 Insert a memory card 8 Charge your phone 10 Switch the phone on or off 11 Lock the keys
Nokia 6700 classic User Guide
 Nokia 6700 classic User Guide Issue 5.2 2 Contents Contents Safety 4 General information 5 About your device 5 Network services 5 Access codes 5 Configuration setting service 6 My Nokia 6 Download content
UK s best selling phone brand. User Guide. BT3710 Digital Cordless Phone With Answering Machine
 UK s best selling phone brand User Guide BT3710 Digital Cordless Phone With Answering Machine 2 This User Guide provides you with all the information you need to get the most from your phone You must set
Nokia N8-00 User Guide
 Nokia N8-00 User Guide Issue 3.2 2 Contents Contents Safety 5 Get started 6 Keys and parts 6 Change the volume of a call, song, or video 8 Lock or unlock the keys and screen 8 Insert or remove the SIM
Instruction Manual GSM Cell phone Easiphone MM910
 Instruction Manual GSM Cell phone Easiphone MM910 If you need technical assistance, call the following hotline (+48) 32 325 07 00 or serwis@maxcom.pl Our website: http://www.maxcom.pl/ Set content: GSM
2011 ZTE CORPORATION.
 LEGAL INFORMATION Copyright 2011 ZTE CORPORATION. All rights reserved. No part of this publication may be quoted, reproduced, translated or used in any form or by any means, electronic or mechanical, including
BT Synergy 5500 User Guide
 BT Synergy 5500 User Guide Welcome to your BT Synergy 5500 Digital Cordless Telephone Answering Machine Display with blue backlight. 250 Name and number phonebook. Copy phonebook entries between other
BT Paragon 550. User Guide
 BT Paragon 550 User Guide Section Welcome to your BT Paragon 550 corded digital telephone and answering machine Directory lets you store up to 100 names and numbers for easy dialling. Send and receive
User Guide. BT Graphite 2500. Think before you print!
 BT Graphite 2500 User Guide This new interactive user guide lets you navigate easily through the pages and allows you to be directed straight to any websites or email addresses that are referenced Simply
UK s best selling phone brand. Quick Set-up and User Guide. BT3510 Digital Cordless Phone with Answering Machine
 UK s best selling phone brand Quick Set-up and User Guide BT3510 Digital Cordless Phone with Answering Machine 2 Important please read first Only use the line cord, power supply and rechargeable batteries
UK s best selling phone brand. User Guide. BT Decor 2200 Corded Phone
 UK s best selling phone brand User Guide BT Decor 2200 Corded Phone 2 This User Guide provides you with all the information you need to get the most from your phone. Before you make your first call you
KYOCERA Kona. User Guide
 KYOCERA Kona User Guide Table of Contents Phone Basics... 1 Battery... 1 Install the Battery... 1 Charge the Battery... 2 Turn Your Phone On and Off... 2 Turn Your Phone On... 2 Turn Your Phone Off...
Home Phone with Answering Machine Aura 1500. Quick set-up and user guide
 Home Phone with Answering Machine Aura 1500 Quick set-up and user guide 2 Important please read first Only use the line cord, power supply and rechargeable batteries supplied with your phone. Make sure
Z222 Mobile Phone User guide
 Z222 Mobile Phone User guide LEGAL INFORMATION Copyright 2013 ZTE CORPORATION. All rights reserved. No part of this publication may be excerpted, reproduced, translated or utilized in any form or by any
V173 GSM. motorola.com
 V173 GSM motorola.com Welcome Welcome to the world of Motorola digital wireless communications! We are pleased that you have chosen the Motorola V173 wireless phone.. Earpiece Listen to your voice calls
Home Phone with Answering Machine Sonus 1500. Quick set-up and user guide
 Home Phone with Answering Machine Sonus 1500 Quick set-up and user guide 2 Important please read first Only use the line cord, power supply and rechargeable batteries supplied with your phone. Make sure
GSM Desktop phone DPH101. User manual v1.00
 GSM Desktop phone DPH101 User manual v1.00 LEGAL NOTICE Copyright 2011 TELTONIKA Ltd. All rights reserved. Reproduction, transfer, distribution or storage of part or all of the contents in this document
User s Guide for Nokia 3530
 User s Guide for Nokia 3530 List of menu functions 1. Phone book 1. Search 2. Add name 3. Edit name 4. Delete 5. Copy 6. Add number 7. Settings 1. Memory in use 2. Phone book view 3. Memory status 8. Speed
Motorola C12A. Digital Cordless Telephone with Digital Answering Machine. For C1211A, C1212A, C1213A and C1214A
 Digital Cordless Telephone with Digital Answering Machine Motorola C12A For C1211A, C1212A, C1213A and C1214A Warning: Charge the handset for 24 hours before use. Welcome... to your new Motorola C12A Digital
PowerTel M7500. mobile phone. Operating Instructions
 PowerTel M7500 mobile phone Operating Instructions M7500 Hearing aid compatibility This telephone is equipped with T Coil coupler making it compatible with most popular hearing aids. Due to the wide range
BT Freestyle 750. User Guide
 BT Freestyle 750 User Guide Welcome to your BT Freestyle 750 Digital Cordless Telephone Answering Machine Answering machine with up to 15 minutes digital recording time and helpful voice prompts. 50 Name
User Guide. Lynx A100. www.poshmobile.com
 User Guide Lynx A100 www.poshmobile.com POSH LYNX User Manual A100 Directory Before Using... 2 Phone Unlock... 2 SIM Unlock... 2 Function menu Introduction... 2 Phonebook... 2 Call history... 3 Settings...
Samba W - Table of Contents
 Samba W - Table of Contents 1.Getting Started... 3 1.1 Installing the SIM Card, SD Card and Battery... 3 2. Input Type... 4 3. Menu Guide... 6 1.2 Messaging... 6 1.3 Call History... 6 1.4 Calculator...
Quick Set-up and User Guide. BT8500 Advanced Call Blocker Digital Cordless Phone with Answering Machine 100% Block. Nuisance Calls
 Block up to 100% Nuisance Calls Call Guardian Block up to 100% of Nuisance Calls Quick Set-up and User Guide BT8500 Advanced Call Blocker Digital Cordless Phone with Answering Machine PQ RS PQ RS Volume
ENGLISH. User Guide. www.lg.com MFL68623901 (1.0)
") ENGLISH User Guide MFL68623901 (1.0) www.lg.com User Guide Screen displays and illustrations may differ from those you see on the actual phone. Some of the contents of this guide may not apply to your
ENGLISH User Guide MFL68623901 (1.0) www.lg.com User Guide Screen displays and illustrations may differ from those you see on the actual phone. Some of the contents of this guide may not apply to your
Your Phone This section introduces you to the hardware of the device.
 Your Phone This section introduces you to the hardware of the device. No. Items Functions 1 Earphone jack 2 Strap hole 3 LED / Speaker Use a headset for hands-free conversation or listening to music. It
User Guide. Welcome to HUAWEI
 User Guide Welcome to HUAWEI Contents Introduction.................................... 1 Installation..................................... 2 Keys and Functions.................................. 2 Installation..........................................
OfficeSuite Mitel IP Phone User Reference Guide Release 4.1
 OfficeSuite Mitel IP Phone User Reference Guide Release 4.1 2004-2009 Broadview Networks & Natural Convergence Inc. All rights reserved. Table of Contents TABLE OF CONTENTS...I INTRODUCTION...4 WHAT'S
Get started. Issue 1
 Get started Issue 1 2008 Nokia. All rights reserved. Nokia, Nokia Connecting People, Nseries, N85, Navi, and Nokia Care are trademarks or registered trademarks of Nokia Corporation. Other product and company
User guide. Xperia M 1904/C1905
 User guide Xperia M 1904/C1905 Contents Getting started...6 Android what and why?...6 Overview...6 Assembly...7 Turning the device on and off...9 Locking and unlocking the screen...9 Setup guide...10 Accounts
DIGITAL WIRELESS TELEPHONE. Reference Guide
 DIGITAL WIRELESS TELEPHONE Reference Guide Welcome Welcome to the world of Motorola digital wireless communications! Motorola is a global leader in communications technology. We are pleased that you have
2.4 GHz Dual Handset Cordless Telephone Answering System 2255 with Caller ID/Call Waiting
 USER S MANUAL Part 2 2.4 GHz Dual Handset Cordless Telephone Answering System 2255 with Caller ID/Call Waiting Please also read Part 1 Important Product Information AT&T and the globe symbol are registered
Professional answering machine with time control, SMS service and message transfer. Retell 540 office
 Manual (UK) Professional answering machine with time control, SMS service and message transfer Retell 540 office Safety instructions Safety instructions When installing, connecting and operating the Retell
SW10. User Guide. Smart Watch. Please read the manual before use.
 SW10 Smart Watch User Guide www. ScinexUSA.com Please read the manual before use. 1 About this manual You can use this Watch as a companion device to most Android and IOS mobile devices. This user manual
User Manual Ascom d62 DECT Handset
 User Manual Contents 1 Introduction... 1 1.1 Abbreviations and Glossary... 1 1.2 Functions and Accessories... 2 2 Descriptions... 4 2.1 The...5 2.2 Chargers... 6 2.2.1 Desktop Charger... 6 2.2.2 Charging
SGH-S275. User Manual Please read this manual before operating your phone and keep it for future reference.
 SGH-S275 M O B I L E P H O N E User Manual Please read this manual before operating your phone and keep it for future reference. Intellectual Property All Intellectual Property, as defined below, owned
Sprint iden Digital Multi-service Data-capable Phone. i580 Phone User s Guide
 Sprint iden Digital Multi-service Data-capable Phone i580 Phone User s Guide Contents Getting Started... 1 Removing the Battery Door...3 Locating Your SIM Card...3 Battery...4 Powering On and Off...6 Activating
using your Orange user guide for the Ericsson er100 phone
 using your Orange phone user guide for the Ericsson er100 phone Antenna The antenna is supplied with the phone and will need to be attached before the phone is switched on. Indicator Light The indicator
TABLE OF CONTENTS. Legend:
 user guide Android Ed. 1.1 TABLE OF CONTENTS 1 INTRODUCTION... 4 1.1 Indicators on the top tool bar... 5 1.2 First control bar... 7 1.3 Second control bar... 7 1.4 Description of the icons in the main
How To Use An Isat Phone On A Cell Phone On Your Ipod Or Ipod
 37 personalising personalised settings user guide The mobile satellite company Congratulations on buying your IsatPhone Pro. It offers the ultimate combination: Global coverage Robust handset Clear voice
English User s Manual for GSM/GPRS Digital Mobile Phone Model No. L1 LIFE
 User s Manual for GSM/GPRS Digital Mobile Phone Model No. L1 LIFE 1 Congratulations on your purchase of the GSM mobile phone. Please read this User Guide before you use your mobile phone. Notice: If there
Sprint WeGo User Guide
 Sprint WeGo User Guide [UG template version 14a] [Sprint_OEM_S155_ug_en_140305_d1] i Table of Contents Get Started... 4 Your Phone at a Glance... 4 Set Up Your Phone... 5 Activate Your Phone... 8 Sprint
User s Guide for Nokia 1108
 User s Guide for Nokia 1108 DECLARATION OF CONFORMITY We, NOKIA CORPORATION declare under our sole responsibility that the product Rh-18 is in conformity with the provisions of the following Council Directive:
MOTO. Quick Start Guide
 MOTO 9h Quick Start Guide welcome Technology promised to make things easier... but then it gave you more to do phone calls, e-mails, music, photos, videos, the Internet, and more. It s time to take back
i560 TELUS Handset User s Guide
 i560 TELUS Handset User s Guide Contents Getting Started... 1 Battery... 3 Activating your Mike Account... 6 Powering On and Off... 6 Finding Your Phone Number and Private ID... 7 Handset Basics... 7
Information Technology Services. *** Please visit tlc.dadeschools.net/blackberry for more information on your BlackBerry model.
 *** Please visit tlc.dadeschools.net/blackberry for more information on your BlackBerry model. *** BlackBerry Training Presented by Information Technology Services Before we begin If you have a problem
Nokia N8 00 User Guide
 Nokia N8 00 User Guide Issue 2.1 2 Contents Contents Safety 5 Get started 6 Keys and parts 6 Change the volume of a call, song, or video 8 Lock or unlock the keys and screen 8 Insert or remove the SIM
Welcome to the GreatCall Family.
 pms2603 pms1235 pms226 pms298 How-To Guide Welcome to the GreatCall Family. Thank you for choosing the Jitterbug. At GreatCall, we ve made it easy for you to stay Orange - pms 143 connected to friends
User s Guide for Nokia 6510
 User s Guide for Nokia 6510 List of menu functions 1. Messages 1. Write message 2. Inbox 3. Outbox 4. Archive 5. Templates 6. My folders 7. Erase messages 8. Voice messages 9. Info messages 10.Service
Designed to block nuisance calls. Quick Set-up and User Guide. BT6500 Digital Cordless Phone with Answering Machine
 Designed to block nuisance calls Quick Set-up and User Guide BT6500 Digital Cordless Phone with Answering Machine 2 Important please read first Only use the line cord, power supply and rechargeable batteries
inmarsat.com/isatphone
 1 inmarsat.com/isatphone Congratulations on buying your IsatPhone 2. The satellite phone that delivers: Dependable connectivity High quality voice Rugged design Assistance button, call alerts and tracking
USER GUIDE. Cisco Small Business Pro. SPA 500 Series IP Phones Models 504G, 508G, and 509G. Provided by
 USER GUIDE Cisco Small Business Pro SPA 500 Series IP Phones Models 504G, 508G, and 509G Provided by Understanding Your Phoneʼs Lines and Buttons Use the following graphic and table to identify the parts
2 line (1 symbol, 1 display) / 16 character display
 / 16 character display") Aastra Office 60 & 60IP Overview of the phone 2 line (1 symbol, 1 display) / 16 character display Message and Phone Status LEDs Absence Redial Phone Book Loudspeaker Microphone key Volume (+ / -) Call
Aastra Office 60 & 60IP Overview of the phone 2 line (1 symbol, 1 display) / 16 character display Message and Phone Status LEDs Absence Redial Phone Book Loudspeaker Microphone key Volume (+ / -) Call
GT-B2710. user manual
 GT-B2710 user manual Using this manual Thank you for purchasing this Samsung mobile phone. This phone will provide you with high quality mobile communication and entertainment based on Samsung s exceptional
User Manual GSM Alarm System. www.deltasecurity.cn. All rights reserved by Delta Security Co., Ltd
 User Manual GSM Alarm System All rights reserved by Delta Security Co., Ltd Dear Clients, Thank you for using our GSM Alarm System. We are committed to giving you the best home security available today
Premium Design Phone with Smartphone Connect
 Smartphone Connect App Guide Premium Design Phone with Smartphone Connect Model No. KX-PRW130 Thank you for purchasing a Panasonic product. This document explains how to use the Smartphone Connect app.
Nokia 700 User Guide. Issue 1.1
 Nokia 700 User Guide Issue 1.1 2 Contents Contents Safety 5 Get started 7 Keys and parts 7 Insert the SIM card 7 Insert a memory card 9 Charge the battery 11 Charge the battery over USB 12 Change the volume
Mobile Phone UMX MXE-570. User Guide
 Mobile Phone UMX MXE-570 User Guide 1 Table of Contents 1. Safety and Cautions 4 2. Look and Feel 7 3. Specifications 8 4. Essential Topics 10 5. Getting Started 15 6. Basic Operations 19 7. Using the
Your HTC Explorer User guide
 Your HTC Explorer User guide 2 Contents Contents Getting started Inside the box 8 HTC Explorer 8 Back cover 10 SIM card 11 Storage card 12 Battery 13 Switching the power on or off 14 Entering your PIN
Your HTC Wildfire S User guide
 Your HTC Wildfire S User guide 2 Contents Contents Getting started Inside the box 8 HTC Wildfire S 8 Back cover 10 SIM card 11 Storage card 14 Battery 15 Switching the power on or off 17 Entering your
Mitel IP Phone User Reference Guide Release 5.0
 830 Parkview Drive North, El Segundo, CA 90245 Tel: 310 747 3232 Fax: 310 747 3233 WWW.UNIVOIP.COM OfficeConnect Mitel IP Phone User Reference Guide Release 5.0 Note: The information contained in this
User guide. Xperia E1
 User guide Xperia E1 D2004/D2005 Contents Getting started...6 Overview...6 Assembly...7 Starting your device for the first time...8 Why do I need a Google account?...9 Charging your device...9 Learning
Android Mobile Phone User Manual
 Android Mobile Phone User Manual The manual is applicable for the Grand X mobile phone. Contents Let s get started... 1 Getting to know your phone... 2 Screen control... 2 Open and switch applications...
User s Guide EKT-824
 User s Guide EKT-824 The Communiqué Telephone Station Table of Contents Introduction 3 About This Guide 3 The Basics Answering and Making Calls 4 Answering an External Call 4 Answering an Internal Call
TABLE OF CONTENTS CHAPTER 2. BASIC OPERATION TURNING THE PHONE ON / OFF...16. DO s...14 DON Ts...14
 TABLE OF CONTENTS CHAPTER 1. BEFORE USING YOUR PHONE PACKAGE CONTENTS...6 HANDSET DESCRIPTION...7 BATTERY USAGE...11 POWER CONNECTION...13 BATTERY HANDLING INFORMATION...14 DO s...14 DON Ts...14 CHAPTER
Nokia 8800 Gol d Arte User s Guide
 Nokia 8800 Gol d Arte User s Guide DECLARATION OF CONFORMITY Hereby, NOKIA CORPORATION declares that this RM-233 product is in compliance with the essential requirements and other relevant provisions of
Your HTC Inspire 4G. User guide
 Your HTC Inspire 4G User guide 2 Conventions used in this guide In this user guide, we use the following symbols to indicate useful and important information: This is a note. A note often gives additional
Device Information This section introduces you to the hardware of the device.
 Device Information This section introduces you to the hardware of the device. No. Items Functions 1 Touch Screen Display screen. Use stylus to select items on screen. 2 3 Windows Flag Key Phone Settings
Dialog 4220 Lite/Dialog 4222 Office
 Dialog 4220 Lite/Dialog 4222 Office System telephones for MD110 Communication System User Guide Flinders University Table of Contents Description 2 Incoming Calls... 10 Outgoing Calls... 12 During Calls
Available applications and services are subject to change at any time.
 Available applications and services are subject to change at any time. Table of Contents Get Started 1 Your Phone at a Glance 1 Set Up Your Phone 2 Activation and Service 4 Set Up Voicemail 4 Phone Basics
GT-B7722. user manual
 GT-B7722 user manual Using this manual Thank you for purchasing this Samsung mobile phone. This phone will provide you with high quality mobile communication and entertainment based on Samsung s exceptional
Version: 01310310 Printed in Poland
 1 Content List 1. Security...3 2. Enjoy Your Cell Phone Trip...9 2.1. Install/remove the battery...9 2.1.1. Install the battery...9 2.1.2. Remove the battery...10 2.2. Install/Remove SIM Card (phone card)...12