My Mediasite and Desktop Recorder user manual
|
|
|
- Clement Holland
- 7 years ago
- Views:
Transcription
1 My Mediasite and Desktop Recorder user manual To enable them to record knowledge clips (in the Do-It-Yourself studio) or their lectures and seminars, teachers have been given access to My Mediasite. My Mediasite is an expansion of the Mediasite environment LectureNet was already using for producer-assisted recordings. My Mediasite is a personalised environment, accessed with SolisID, where you can store, tag, and share recordings. The Desktop Recorder is an application (downloadable from My Mediasite) that you install on your computer. You will use Desktop Recorder to record videos that are then automatically uploaded to your personalised My Mediasite environment.
 that you install on your computer.")
2 How does this manual work? This manual will quickly and easily get you started using My Mediasite and the Desktop Recorder. Additional information is available through the My Mediasite online manual or the manual for Mediasite Desktop Recorder, which is accessible through the help function inside the application. This manual will use slides with clear instructions to guide you through the recording process, starting with the first time you sign into the site. The steps detailed in the first section of the manual should only be necessary once. It may be useful to review sections 2, 3, and 4 (or parts thereof) before or during future recording sessions. They can be accessed through the menu on the right side of this page.

3 1. Getting Started with My Mediasite To use My Mediasite, you will need a registered account and the Mediasite Desktop Recorder. If a My Mediasite account has not been created for you yet, you can request one from this page. Use this link to sign into My Mediasite:

4 1. Getting Started with My Mediasite 1.1 Signing in for the first time

5 Sign in with your current SolisID here:

6 If this is your first time signing in, enter a screen name and address here. Click Continue.

7 You are now signed in to My Mediasite.

8 1. Getting Started with My Mediasite 1.2 Entering personal details

9 Click your user name, then select profile.

10 Enter your personal information under Presenter Information.

11 Click Save at the top of the page.

12 1. Getting Started with My Mediasite 1.3 Downloading the Desktop Recorder If you are on a dedicated Utrecht University workstation and signed in with your SolisID, this application comes pre-installed so you can skip this step.

13 In the lower left corner of the page, click Download the Desktop Recorder.

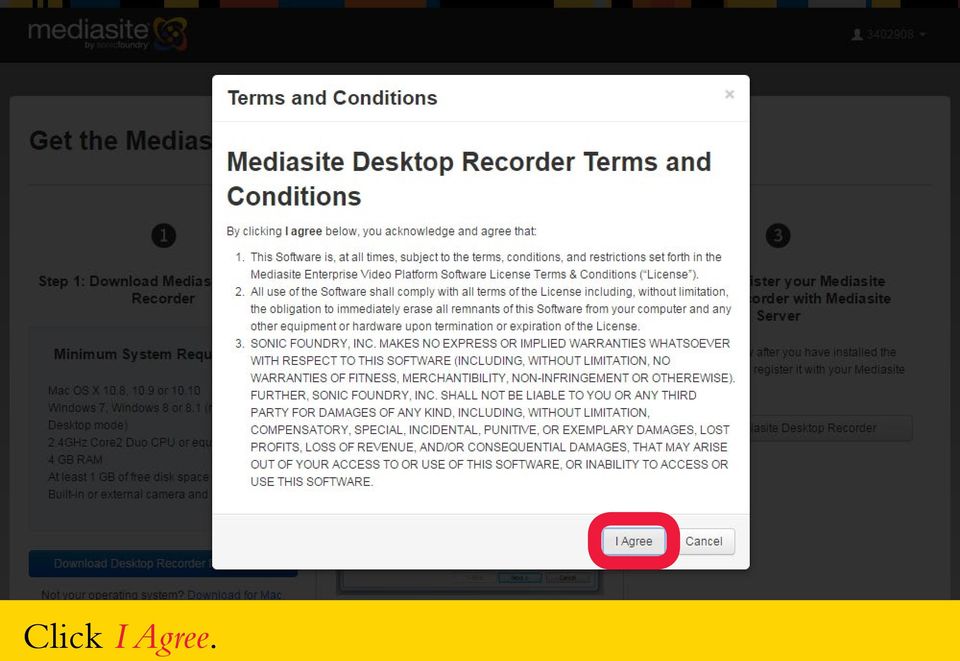
14 Click Download Desktop Recorder for Windows. This message may differ if you re using another operating system.

15 Click I Agree.
16 Click Run.

17 Click Next.

18 Click Install.

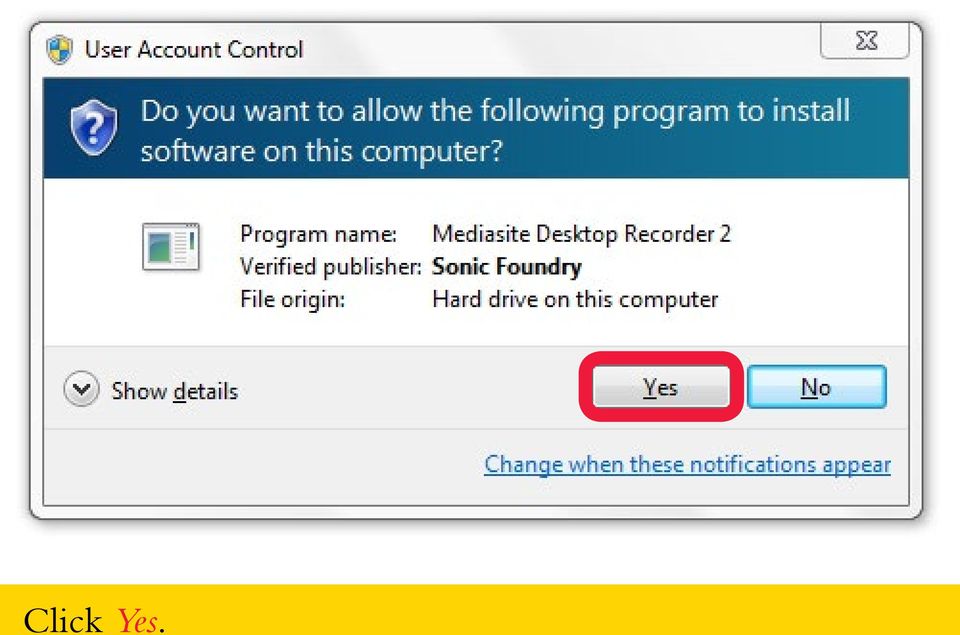
19 Click Yes.
20 Click Finish.

21 1. Getting Started with My Mediasite 1.4 Registering Desktop Recorder
22 In the lower left corner of the page, click Download the Desktop Recorder.
23 Click Register Mediasite Desktop Recorder.
24 Click Launch Application.
25 Mediasite Desktop Recorder is now installed on your system!
26 1. Getting Started with My Mediasite You will see your SolisID displayed in the top left corner of the Desktop Recorder window. This means you are signed in to Desktop Recorder. You are now signed in to both the My Mediasite web environment and the Desktop Recorder application. Both are required before you can record. You will now return to your My Mediasite web environment.
27 2. Recording a presentation This is where you create a presentation in My Mediasite for the Desktop Recorder to record into. You will need to create a new presentation for each lecture or knowledge clip you wish to record.
28 2. Recording a presentation 2.1 Creating a new presentation
29 Click +Create Presentation.
30 Click Record Desktop.
31 Enter a title and description for your presentation and optionally select a channel. Click Launch Desktop Recorder.
32 Click Launch Application.
33 Click Record Now.
34 You can select what type of presentation to record here. More information on that later.
35 2. Recording a presentation 2.2 Preparing to record While preparing to record, you ll have the option to select either Screencast + Video, Screencast + Audio, Slideshow + Video, or Slideshow + Audio. Use the arrows on the left and right side of the screen to cycle through all the options. A Screencast is a complete recording of everything that happens on your computer screen. A Slideshow is a simplified representation of what happens on your screen in the form of screenshots. This type of recording also allows you to include video from your webcam or audio from your microphone. A Slideshow + Video is usually the best option. It will show video of you alongside the slides you re using.
36 Select a type of presentation. The arrows pointing left and right indicate additional options. Click Next.
37 Speak into the microphone to test it. For the best audio results, the indicator bar should light up green.
38 Check the video and select a different resolution or input for your camera if required. Then click Next.
39 Make sure your presentation is ready to go by, for instance, opening the presentation you re using. Click Next.
40 Put a checkmark next to Select the entire desktop. Click Next to continue.
41 Remove the checkmark next to Show recording control panel You are now ready to record your presentation.
42 2. Recording a presentation 2.3 Recording
43 When you re ready to begin, click Record. To end your presentation, press CTRL+F8.
44 The programme will count down and start recording. To end your presentation, press CTRL+F8.
45 If you re done, click Finish Recording. If not, Resume Recording will let you continue.
46 There will be an uploading or verifying progress bar. Please be patient.
47 Once the recording has been uploaded, the button will let you continue. You can edit the recording on My Mediasite.
48 2. Recording a presentation You have now created a recording in the Desktop Recorder. You will be able to edit it with My Mediasite.
49 3. Editing the recording You will be able to edit your recording and add supplementary data to it in My Mediasite. Recordings have to be processed before they can be edited. Note: to find out whether My Mediasite has finished processing your recording, you have to refresh the page (F5). You can enter additional information about the presentation in My Mediasite. This will make the recording viewable and findable. My Mediasite also includes functionality for adding polls and a forum to your presentations, making them more interactive.
50 3. Editing the recording 3.1 Adding a title and description The title and description you enter are vital in making your presentation easy to find. The title must include the name of the course as it s listed in Osiris and your description must include the course code as listed in Osiris.
51 You will see This desktop recording is being processed. Periodically refresh (F5) the page to check for completion.
52 Click Edit.
53 Under Title, enter the course name as listed in Osiris followed by a title for the presentation itself.
54 Enter a Description of your presentation. This should include the course code as listed in Osiris.
55 Add any Tags to your presentation.
56 Click Save.
57 3. Editing the recording 3.2 Adding polls and/or a forum To engage with your students as they watch the presentation, you can add polls and offer them the opportunity to ask questions through a forum.
58 Click Edit.
59 Click Player.
60 Select Use Q&A Forum to enable forum support. Select Enable Polls if desired.
61 Click Save.
62 Click Summary.
63 If you enabled polls, click Polls Enabled here to enter the details of your poll(s).
64 Enter the question, question type, and answers on the right. Then click Save Question.
65 Add more questions with the New Question button on the left. Always finish with Save Question.
66 3. Editing the recording 3.3 Editing video My Mediasite includes an online video-editor with limited functionality. This manual details a few simple functions, like cutting material from the beginning or end of your recording. For more detailed instructions, please refer to the video-editor s full manual.
67 Click Edit Video.
68 Drag the triangle icon on the left around to pick a starting point for the video.
69 Drag an initial slide to the new start of the video to ensure it opens on one of your slides.
70 Drag the triangle icon on the right around to choose where to end your video.
71 Drag individual slides left and right to decide when they are displayed. This also allows you to change the order.
72 Select a slide and click Delete Slides to remove it.
73 Click Commit. For a new presentation, select Commit to New. Select Commit to Current to save in this presentation.
74 Click Commit.
75 Once the progress bar under Commit Jobs fills completely, the video is done and you can close the window.
76 4. Publishing the presentation When it s finished, you can share your presentation with others. A convenient way to share your presentation is to put it into a channel. To do that, first you have to create a channel. Once that s done, you will be able to share the presentation with students for viewing and coworkers for viewing and/or editing. In any case, it is important that you change your presentation from the default private to viewable. There is an explanation of how to do that at the end of this manual.
77 4. De opname publiceren 4.1 Creating a channel Before you can put your recording into a channel, you will have to create one. Similarly, when you want to share a collection of presentations with a coworker, creating a channel is the way to do it.
78 Click on the + next to My Channels.
79 Enter a name for your channel and click + again.
80 Your channel will appear in the left sidebar. Click Edit Channel in the top right.
81 Enter a description of your channel and click Save.
82 Click Security to share this channel with a coworker. If this channel is personal, nothing more is required.
83 Use the Add people or groups field to assign rights on your channel to one or more coworkers.
84 Enter the name of a coworker or group, then select the right one from the drop-down list.
85 Select Editor to grant a coworker the ability to edit your channel.
86 Click Add.
87 Your Coworker has been added to the list. Add others if you wish.
88 Click Save to confirm your changes.
89 4. Publishing the presentation 4.2 Putting your presentation into a channel
90 Click Publish.
91 Select Place this presentation in a Channel or possibly a Shared Folder.
92 Select the desired Channel (or Shared Folder).
93 Click Save to finalise the placement of this presentation in this channel.
94 4. Publishing the presentation 4.3 Sharing with students You can make your presentation available for viewing by your students and coworkers through Blackboard and , among other means. If you want to allow your coworkers to edit the presentation, use the slides below, under sharing with your coworkers.
95 Click Share.
96 Use the Link field to share the presentation through channels like Blackboard or your .
97 Use Embed to embed the video into a web page. will send a link to the video directly from My Mediasite.
98 4. Publishing the presentation 4.4 Sharing with your coworkers To allow your coworkers to edit your presentations, you must assign them the right to do so through My Mediasite. This can be done for entire channels, as shown earlier, but also separately for each presentation. If you are assigning rights on a per-channel basis, make sure that all presentations in the channel are set to enable inheritance. That setting is in the Security tab of each presentation.
99 Click Security.
100 Note: for the presentation to be shared according to your channel or folder settings, be sure to Enable inheritance.
101 Use the Add people or groups field to assign rights on your presentation to one or more coworkers.
102 Enter the name of a coworker or group, then select the right one from the drop-down list.
103 Select Editor to grant a coworker the ability to edit your presentation.
104 Click Add.
105 Your Coworker has been added to the list. Add others if you wish.
106 Click Save to confirm your changes.
107 4. Publishing the presentation 4.5 Making your presentation viewable Once you have completely finished your presentation, only one thing remains to be done, which is to set it to be viewable. This final step is detailed below.
108 Click Edit.
109 Under Visibility, select Viewable to make the presentation available to others.
110 Click Save.
111 5. View results Once your presentation has been online for a while, you will be able to results from it through My Mediasite. If you enabled polls, you ll be able to see the results of those polls, and you will in any event be able to review data about how often your presentation was viewed.
112 5. View results 5.1 Poll results
113 Click Watch in New Window.
114 Click the Polls icon.
115 Click View Results to expand the results for each question.
116 This is what a results overview might look like.
117 5. View results 5.2 Analytics
118 Click Analytics and select Dashboard.
119 This will show you an overview of data about your presentation.
Inside Blackboard Collaborate for Moderators
 Inside Blackboard Collaborate for Moderators Entering a Blackboard Collaborate Web Conference 1. The first time you click on the name of the web conference you wish to enter, you will need to download
Camtasia Recording Settings
 Camtasia Recording Settings To Capture Video Step 1: Resolution and Recording Area In the select area section, you can choose either to record the full screen or a custom screen size. Select the dropdown
MyMediasite Web Interface Overview:
 MyMediasite Web Interface Overview: 1. Visit http://mymediasite.bloomu.edu from any web browser. 2. Log in using your complete email address and university password. 3. You should now see the following
Publishing with Adobe Presenter 10 (Detailed)
") Publishing with Adobe Presenter 10 (Detailed) Open PowerPoint Find PowerPoint and open it by clicking its icon. The PowerPoint icon may be found in one of the following locations: 1. Desktop 2. Start Menu
Publishing with Adobe Presenter 10 (Detailed) Open PowerPoint Find PowerPoint and open it by clicking its icon. The PowerPoint icon may be found in one of the following locations: 1. Desktop 2. Start Menu
Click the Presenation (monitor) icon.
 icon.") : Lync Presenters in the Lync Web App can share their computer desktops, a particular program, a PowerPoint, run a Q&A or poll, or annotate a whiteboard in a meeting. These instructions assume that you
: Lync Presenters in the Lync Web App can share their computer desktops, a particular program, a PowerPoint, run a Q&A or poll, or annotate a whiteboard in a meeting. These instructions assume that you
ECHO360 PERSONAL CAPTURE
 ECHO360 PERSONAL CAPTURE Echo360 - Personal Capture allows a User an easy way to capture, edit, publish, and view lectures from their personal computers. Users and/or Instructors can use Echo360 to capture
Screencast-o-matic ProPage Basics
 Screencast-o-matic software can be used to create presentations, lectures, demos and other courserelated recordings anything you can capture on your computer screen and/or webcam including live action,
Camtasia Studio. Creating Screen Videos
 Camtasia Studio Creating Screen Videos WORKSHOP DESCRIPTION... 1 Overview 1 Prerequisites 1 Objectives 1 INTRODUCTION... 1 WHY USE CAMTASIA STUDIO?... 2 WHERE CAN I GET CAMTASIA STUDIO?... 2 HOW TO USE
Peru State College Distance Education Student s Guide
 Using YouTube for Online Courses - Peru State College Distance Education Student s Guide - YouTube Videos & Your Blackboard Course Introduction & Reasons for Using YouTube 1 Creating a YouTube Account
To create a course home page, after you complete an export/import:
 CREATING COURSE HOME PAGE AFTER EXPORT/IMPORT To create a course home page, after you complete an export/import: Step 1: Open your course Step 2: Create the Course Overview Content Area 1. Click the plus
PANOPTO: THE RECORDER (WINDOWS)
") The Panopto Recorder is a desktop application that is installed on the classroom computers and allows instructors to capture and upload a lecture. If the classroom you are using has been set up for lecture
The Panopto Recorder is a desktop application that is installed on the classroom computers and allows instructors to capture and upload a lecture. If the classroom you are using has been set up for lecture
After you complete the survey, compare what you saw on the survey to the actual questions listed below:
 Creating a Basic Survey Using Qualtrics Clayton State University has purchased a campus license to Qualtrics. Both faculty and students can use Qualtrics to create surveys that contain many different types
An Introduction to Box.com
 An Introduction to Box.com Box is an online file sharing and cloud content management service and it provides features such as: Security controls Space Mobility Online collaboration Mobile access Version
Create a Basic Skype* Account. Intel Easy Steps 1 2012 Intel Corporation All rights reserved.
 Create a Basic Skype* Account Intel Easy Steps 1 2012 Intel Corporation Using Skype* to Communicate: Create and use a Basic Skype Account There are different ways of communicating and sharing through the
STEPfwd Quick Start Guide
 CERT/Software Engineering Institute June 2016 http://www.sei.cmu.edu Table of Contents Welcome to STEPfwd! 3 Becoming a Registered User of STEPfwd 4 Learning the Home Page Layout 5 Understanding My View
Using VoiceThread in Your Online Course (Faculty) Step 1: Create a Link for Yourself to Voicethread (1X per course)
 Step 1: Create a Link for Yourself to Voicethread (1X per course)") Using VoiceThread in Your Online Course (Faculty) Step 1: Create a Link for Yourself to Voicethread (1X per course) 1. Navigate to the MyGateway course where you wish to add VoiceThread. You will first
Using VoiceThread in Your Online Course (Faculty) Step 1: Create a Link for Yourself to Voicethread (1X per course) 1. Navigate to the MyGateway course where you wish to add VoiceThread. You will first
Voice-Over PowerPoint (VOPP) and FTP Instructions for Online Courses (for Windows PC Computers) December 2009
 and FTP Instructions for Online Courses (for Windows PC Computers) December 2009") Voice-Over PowerPoint (VOPP) and FTP Instructions for Online Courses (for Windows PC Computers) December 2009 A. How to add narration to a PowerPoint presentation: 1. Attach a microphone to your computer
Voice-Over PowerPoint (VOPP) and FTP Instructions for Online Courses (for Windows PC Computers) December 2009 A. How to add narration to a PowerPoint presentation: 1. Attach a microphone to your computer
Create Video Lectures with Panopto
 Create Video Lectures with Panopto Table of Contents Adding Panopto to your BeachBoard Course Navigation... 2 Installation & Setup for Windows... 2 Windows Specifications... 2 Windows Install.NET Framework
Learning Management System
 User Manual for Faculty Members Learning Management System Adding Course Materials (Resources) Manal Al Shehri 1/8/2014 Contents Resource... 2 How to add Book... 3 How to add file... 7 How to add Folder...
GUIDE. Give PowerPoint a Voice: Developing. Narrated Presentations on a Windows PC. Donna Carnduff. dcarnduf@utk.edu.
 GUIDE Give PowerPoint a Voice: Developing Narrated Presentations on a Windows PC Donna Carnduff dcarnduf@utk.edu Revised 6/10/2015 To register for workshops, visit http://oit.utk.edu/training Configure
All-in-one webinar solution. User Guide For Account Holders and Moderators
 All-in-one webinar solution. User Guide For Account Holders and Moderators CHAPTER 1 Quick Start Guide You will learn how to schedule your first session in 5 easy steps. STEP ONE: Login to Onstream Webinars
Inking in MS Office 2013
 VIRGINIA TECH Inking in MS Office 2013 Getting Started Guide Instructional Technology Team, College of Engineering Last Updated: Fall 2013 Email tabletteam@vt.edu if you need additional assistance after
MnSCU MediaSpace. Getting Started with MediaSpace
 MnSCU MediaSpace Minnesota State Colleges & Universities Getting Started with MediaSpace Logging In Login to MediaSpace at http://mediaspace.mnscu.edu Use your StarID and password. If you do not know your
Live Streaming on YouTube
 Do-It-Yourself Live Streaming What is it? Live Streaming on YouTube Google offers a free services that allows live streaming to your YouTube channel via Google +. The process is easy and uses consumer
Audience Response System (Turning Point) A Quick Start Guide
 A Quick Start Guide") Audience Response System (Turning Point) A Quick Start Guide What is Turning Point? Turning Point is an audience response system and by downloading a plug-in for PowerPoint it enables you to add interactivity
Audience Response System (Turning Point) A Quick Start Guide What is Turning Point? Turning Point is an audience response system and by downloading a plug-in for PowerPoint it enables you to add interactivity
D2L to Panopto v4.7 Student Viewing and Recording
 D2L to Panopto v4.7 Student Viewing and Recording PC Instructions Admin: Joe Lipari 651-690-6006 Important: You must use Firefox as your browser. Silverlight, a Microsoft product must be downloaded and
D2L: An introduction to CONTENT University of Wisconsin-Parkside
 D2L: An introduction to CONTENT University of Wisconsin-Parkside FOR FACULTY: What is CONTENT? The Content and Course Builder tools both allow you to organize materials in D2L. Content lets you and your
If you want to upload media files to Moodle, please refer to the alternative documentation in Moodle help How to add video and audio in Moodle
 Using MediaSpace MediaSpace is a service that allows you to easily upload and share media files. All University staff at all campuses can upload, browse and search for media, and create their own media
Subscribe to RSS in Outlook 2007. Find RSS Feeds. Exchange Outlook 2007 How To s / RSS Feeds 1of 7
 Exchange Outlook 007 How To s / RSS Feeds of 7 RSS (Really Simple Syndication) is a method of publishing and distributing content on the Web. When you subscribe to an RSS feed also known as a news feed
Work Smart: Using Lync 2010 Attendee
 Work Smart: Using Lync 2010 Attendee With Microsoft Lync 2010 Attendee communications software, you can join Microsoft Lync 2010 meetings with attendee and presenter privileges, and can also join as an
Comparisons and Contrasts Between imovie 2 and Movie Maker 2
 Comparisons and Contrasts Between imovie 2 and Movie Maker 2 imovie 2 and Movie Maker 2 are both very simple digital video editing programs. Essentially, Movie Maker was created by Microsoft to mimic the
SeeVogh Video Conferencing
 SeeVogh Video Conferencing SeeVogh runs on Windows, Mac OS X, and Linux. SeeVogh works best when using a network connection connected with a physical cable instead of a wireless network connection. The
MOBILE APP TRAINING MANUAL
 MOBILE APP TRAINING MANUAL TABLE OF CONTENTS DOWNLOAD THE JIGSAW MOBILE APP... 3 LOGIN... 4 VIRTUAL CLASSROOM MOBILE APP... 6 PARTICIPANT WINDOW... 7 CHAT OPTIONS... 9 RESIZE OPTIONS... 10 MAXIMIZE PANE
Installing Lync. Configuring and Signing into Lync
 Microsoft Lync 2013 Contents Installing Lync... 1 Configuring and Signing into Lync... 1 Changing your Picture... 2 Adding and Managing Contacts... 2 Create and Manage Contact Groups... 3 Start an Instant
Adobe Connect Quick Guide
 Leicester Learning Institute Adobe Connect Quick Guide Request an account If you want to publish materials to Adobe Connect or run online meetings or teaching sessions, contact the IT Service Desk on 0116
Blackboard Collaborate Classroom in Desire2Learn. Presenters
 Blackboard Collaborate Classroom in Desire2Learn Presenters Copyright 2014 Information Technology Services Kennesaw State University This document may be downloaded, printed, or copied, for educational
Skype for Business 2015 - Online Meetings
 Skype for Business 2015 - Online Meetings Acknowledgement: Many thanks to the University of Aberdeen for providing us with this fact sheet and allowing us to amend it for use at the University of Leicester.
Mastering Lync Meetings
 Mastering Lync Meetings cd_mastering_lync_meetings_v2 1 8/25/2014 Course Title Contents Overview of scheduled Online Lync meetings... 3 General Best Practices... 3 Scheduling the meeting... 4 Recurring
HOW TO ORGANIZE PICTURES
 Get started When you upload your pictures to Shutterfly, you can do much more than view them. Our workspace offers tools that let you quickly and easily organize your photos as well. We re going to show
Submitting Student Assignments With Kaltura
 Submitting Student Assignments With Kaltura Kaltura media can be used for Blackboard assignments that receive grades in multiple ways. Any standard discussion board, blog, wiki, or journal that you might
Frog VLE Update. Latest Features and Enhancements. September 2014
 1 Frog VLE Update Latest Features and Enhancements September 2014 2 Frog VLE Update: September 2014 Contents New Features Overview... 1 Enhancements Overview... 2 New Features... 3 Site Backgrounds...
ANYWHERE POLLING - POLLING WITH A QUESTION LIST
 Anywhere Polling - Polling with a Question List 1 ANYWHERE POLLING - POLLING WITH A QUESTION LIST Before Class This section covers question lists and participant lists. Question lists and participant lists
How To Create a Movie in WeVideo
 How To Create a Movie in WeVideo 1 WeVideo is an online video-editing tool to help you create book trailers or promotional videos for your library, and it s also a great tool to teach to kids. WeVideo
What is OneDrive for Business at University of Greenwich? Accessing OneDrive from Office 365
 This guide explains how to access and use the OneDrive for Business cloud based storage system and Microsoft Office Online suite of products via a web browser. What is OneDrive for Business at University
Make Voice Calls and Share Documents using Skype*
 Make Voice Calls and Share Documents using Skype* Intel Easy Steps 1 2012 Intel Corporation Using Skype for making Voice Calls and Sharing Documents In the previous activity Using Skype to Communicate
Step 1: Customize your channel
 Your Cabrillo YouTube Account: This handout contains instructions for setting up a YouTube Channel using your Cabrillo College Google account. If you have a personal Google account, go ahead and log in
Getting Started with Adobe Connect. Div of IT Learning Technologies
 Getting Started with Adobe Connect Div of IT Learning Technologies Contents Introduction to Adobe Connect... 3 Technical Specifications... 3 Creating Meetings... 4 Meeting User Roles... 5 Managing Audio
VISUAL QUICK START GUIDE ADOBE CONNECT PRO 8
 VISUAL QUICK START GUIDE ADOBE CONNECT PRO 8 Getting started with Adobe Connect meetings Create and Access Your Meetings 1. Navigate to : https://brookdalecc.adobeconnect.com in your web browser. 2. Log
Interactive Video Quizzes Information Guide For Quiz Creators. Version: 1.0
 Interactive Video Quizzes Information Guide For Quiz Creators Version: 1.0 Kaltura Business Headquarters 250 Park Avenue South, 10th Floor, New York, NY 10003 Tel.: +1 800 871 5224 Copyright 2016 Kaltura
Avaya Flare Experience for Windows Quick Reference
 Avaya Flare Experience for Windows Quick Reference Making voice calls Making a voice call using the dialpad 1. Click the Call button under the center spotlight or press the CONTROL + D keys on your keyboard
Maximizing Microsoft Office Communicator
 Maximizing Microsoft Office Communicator Microsoft Office Communicator is an instant messaging tool on the standard image for CG workstations. This Tech Tip contains basic instructions on how to use the
Movie Maker 2 Beginning
 Movie Maker 2 Beginning Quick Overview...3 Preparing a Folder...3 Collecting Resources...3 Pictures...4 Screen Resolution...4 Starting Windows Movie Maker...4 Which Version?...4 Windows Movie Maker 2 Window...4
Getting Started with Zoom
 Getting Started with Zoom The Institute of Agriculture has recently purchased a site license for a new cloud-based video conferencing service known as Zoom. If you have ever connected to a GoToMeeting,
Skype for Business User Guide
 Skype for Business User Guide Contents Accessing Skype for Business... 2 Starting Skype for Business on your desktop... 2 Subsequent access to Skype for Business... 3 Changing Skype for Business startup
OnSync All-in-one web conferencing solution. User Guide For Account Holders and Moderators
 OnSync All-in-one web conferencing solution. User Guide For Account Holders and Moderators CHAPTER 1 Quick Start Guide You will learn how to schedule your first session in 5 easy steps. Page 2 Watch it
Bb Collaborate Online Rooms Faculty Support Guide
 Bb Collaborate Online Rooms Faculty Support Guide D2L Services West Chester University of Pennsylvania www.wcupa.edu/d2l 610-436-3350, option 2 Anderson Hall d2l@wcupa.edu D2L v10.5 BB Collaborate 12.6.4
Bb Collaborate Online Rooms Faculty Support Guide
 Bb Collaborate Online Rooms Faculty Support Guide D2L Services West Chester University of Pennsylvania www.wcupa.edu/d2l 610-436-3350, option 2 Anderson Hall, room 20 d2l@wcupa.edu v10.3 June 2014 Contents
E-Commerce Manual. A brief overview of your website s E-commerce system with screenshots. E-commerce Manual
 E-Commerce A brief overview of your website s system with screenshots. 1 Contents Categories:...3 Products:...4 Adding a New Product:...5 Adding an Image to a Product:...7 Creating a New Attribute:...8
Microsoft Migrating to PowerPoint 2010 from PowerPoint 2003
 In This Guide Microsoft PowerPoint 2010 looks very different, so we created this guide to help you minimize the learning curve. Read on to learn key parts of the new interface, discover free PowerPoint
Piazza in Blackboard for Instructors
 Piazza in Blackboard for Instructors Piazza is an online platform designed to facilitate interaction among students and instructors and efficiently manage class Q&A s. Students can post questions and collaborate
Cisco Jabber IM v11 Mac Reference Guide
 Cisco Jabber IM v11 Mac Reference Guide ICIT Technology Training Department Training@uww.edu Updated on June 29, 2015 1 TABLE OF CONTENTS 1 Table of Contents... 2 2 About Cisco Jabber... 4 3 Installing
Panopto Recording. Click the Panopto Recorder icon found on the Desktop. Click the Log in with Blackboard button. Page 1
 Panopto Recording The Panopto Recorder allows for a great deal of flexibility in how and what can be recorded. This guide will cover all aspects of recording with one computer (meaning all presentation
Transitioning from TurningPoint 5 to TurningPoint Cloud - NO LMS 1
 Transitioning from TurningPoint 5 to TurningPoint Cloud - NO LMS 1 A Turning Account is a unique identifier that is used to tie together all software accounts and response devices. A Turning Account is
Virtual Office Online and Virtual Office Desktop
 Virtual Office Online and Virtual Office Desktop Quick Start Guide Version 3.6 April 2014 The Champion For Business Communications Contents Virtual Office Overview...3 Getting Started...3 Login to Virtual
Time Tracking for Employees
 Purpose and Overview The purpose of this quick guide is to help you enter time in Workday. This quick guide covers different time entry methods. Enter Time enter hours per individual day Auto-fill from
BLACKBOARD CONTENT COLLECTION FACULTY TRAINING GUIDE
 BLACKBOARD CONTENT COLLECTION FACULTY TRAINING GUIDE Table of Contents About the Guide... 1 Overview... 2 Navigating the Content Collection... 3 Accessing the Content Collection... 3 Content Collection
USING WINDOWS MOVIE MAKER TO CREATE THE MOMENT BEHIND THE PHOTO STORY PART 1
 PART 1 Windows Movie Maker lets you assemble a range of video, pictures, and sound elements to create a story. It is an application that comes with most PC computers. This tip sheet was created using Windows
Blackboard Learn 9.1 Screencast Collaboration Tools in Blackboard 9.1
 Blackboard Learn 9.1 Screencast Collaboration Tools in Blackboard 9.1 Introduction This video/pdf is an informational directive to locate and identify the features of Blackboard Collaboration Tools. Learning
Activities Manual. Product Manual. Table of Contents. 1. efolio. 1.1. Overview. 1.2. Benefits
 Activities Manual Table of Contents 1. efolio 1.1. Overview 1.2. Benefits 1.3. User Documentation 1.4. Teacher Documentation 2. Page Menu 2.1. Overview 2.2. Teacher Documentation 2.3. Permissions 3. Product
Introduction to using Skype. Install Skype on your Computer. Getting Started
 Introduction to using Skype Getting Started Skype is software that allows users to make telephone calls over the Internet. Calls to other users of Skype are free; while calls to other landlines and mobile
Getting Started Guide for WebEx Hosts and Presenters. Scheduling a Meeting in Outlook
 Getting Started Guide for WebEx Hosts and Presenters Scheduling a Meeting in Outlook First, install the WebEx Productivity Tools. Then you can schedule your online Meeting using Outlook just like you schedule
Coursar WebMeeting Manual
 At the end of this tutorial, you will be able to answer the following questions: What is Coursar WebMeeting?... 1 What are the minimum requirements to run a meeting?... 2 What are the Roles in an online
Windows Movie Maker 2012
 Windows Movie Maker 2012 Open Windows Movie Maker A shortcut for Movie Maker should be on the desktop, but if it is not, you can search for the program by touching the right edge of the screen and swiping
About SharePoint Server 2007 My Sites
 SharePoint How To s / My Sites of 6 About SharePoint Server 007 My Sites Use your My Site to store files and collaborate with your co-workers online. My Sites have public and private pages. Use your public
Note Google and YouTube may change the appearance of their sites from time to time, so the buttons or links may not always appear in the same place.
 Uploading to YouTube and Posting in Blackboard This document will explain 1. How to upload videos from your computer to Youtube 2. How to obtain the URL (web link) or embed code for your video 3. How to
College of Continuing Education Video Production Room
 College of Continuing Education Video Production Room To Begin a Session: Step 1: Turn on the Station by pressing the red switch near the desktop monitor. By doing this the following equipment will be
BIG BLUE BUTTON TRAINING
 BIG BLUE BUTTON TRAINING Contents Introduction... 2 Objectives... 2 Connecting to BigBlueButton Through Canvas... 2 Using BigBlueButton... 6 Saving Your BigBlueButton Conference... 15 Minimum Requirements
Getting started with OneDrive
 Getting started with OneDrive What is OneDrive? OneDrive is an online storage area intended for business purposes. Your OneDrive library is managed by the University. You can use it to share documents
Virtual Office Remote Installation Guide
 Virtual Office Remote Installation Guide Table of Contents VIRTUAL OFFICE REMOTE INSTALLATION GUIDE... 3 UNIVERSAL PRINTER CONFIGURATION INSTRUCTIONS... 12 CHANGING DEFAULT PRINTERS ON LOCAL SYSTEM...
HP Webcam User s Guide. Version 1.0
 HP Webcam User s Guide Version 1.0 Copyright 2008 Hewlett-Packard Development Company, L.P. The information contained herein is subject to change without notice. The only warranties for HP products and
USER GUIDE Chapter 20 Using Podcasts. Schoolwires Academic Portal Version 4.1
 USER GUIDE Chapter 20 Schoolwires Academic Portal Version 4.1 TABLE OF CONTENTS Introduction... 1 Adding a New Podcast Page... 3 Adding a New Episode... 5 Supported File Types... 5 What is an MP3 File?...
How to Create a Voicethread PowerPoint Presentation
 CREATE A FREE VOICETHREAD ACCOUNT 1. Open a browser like Internet Explorer, Firefox, or Safari. Navigate to http://voicethread.com. 2. To create an account, click Sign in or Register. 3. Underneath the
How to Use the Verified Learning Upload Portals
 Verified Learning Management System Upload Training Manual 2 Verified Learning Management System Upload Training Manual Introduction Author Profile How to Upload Training The Review Training Process How
In order to take advantage of the free GVSU business plan, you must download oovoo from GVSU s oovoo website:
 How to oovoo Download oovoo In order to take advantage of the free GVSU business plan, you must download oovoo from GVSU s oovoo website: www.gvsu.edu/oovoo If you already have an oovoo account, you will
Windows Live Movie Maker Tutorial
 Introduction Welcome to the Windows Live Movie Maker (WLMM) Tutorial. This tutorial will help you create, edit, and finalize your WLMM video project. Table of Contents Creating and Saving a Project.. Importing
Table of Contents. Begin Here: Getting Started with WebEx. What is WebEx? Why would I use it?
 Table of Contents Begin Here: Getting Started with WebEx... 1 Scheduling a Meeting from the WebEx Website... 4 Scheduling a Meeting from Outlook 2010... 5 Selecting Audio Conference Settings... 6 Joining
Mail Chimp Basics. Glossary
 Mail Chimp Basics Mail Chimp is a web-based application that allows you to create newsletters and send them to others via email. While there are higher-level versions of Mail Chimp, the basic application
CAMTASIA - Screen Recorder
 CAMTASIA - Screen Recorder Upon opening the program, you should see a Welcome screen that allows you to open a Recent Project, view Tutorials under the Free Training section, or begin working with a new
Digital Story Telling with Windows Movie Maker Step by step
 . PAGE 1 Superhighways 2013 CONTENTS Before you open Windows Movie Maker (WMM)... 3 Organising your digital assets... 3 Windows Live Photo Gallery... 3 Your First Project in WMM... 4 Adding Audio... 6
Using Impatica for Power Point
 Using Impatica for Power Point What is Impatica? Impatica is a tool that will help you to compress PowerPoint presentations and convert them into a more efficient format for web delivery. Impatica for
Module 1. 4 Login-Send Message to Teacher
 Module 1. 4 Login-Send Message to Teacher Students, in this lesson you will 1. Learn to login to your InterAct account. 2. Learn how to send an email message. Logging on to Students Online 1. Launch the
User Guide. emoney for Outlook
 User Guide emoney for Outlook Table of Contents INTRODUCTION... 2 SYSTEM REQUIREMENTS... 2 Required Installations... 2 INSTALLATION PROCESS... 2 FIRST TIME SETUP... 8 EMONEY CLIENT PANE... 17 Client Contact
Egnyte for Power and Standard Users. User Guide
 Egnyte for Power and Standard Users User Guide Egnyte Inc. 1350 West Middlefield Road. Mountain View, CA 94043, USA Phone: 877-7EGNYTE (877-734-6983) Revised June 2015 Table of Contents Chapter 1: Getting
1. Contents... 2 2. What is AGITO Translate?... 3 2.1. Supported formats... 3 3. Translation memory & termbase... 4 4. Access, login and support...
 1. Contents... 2 2. What is AGITO Translate?... 3 2.1. Supported formats... 3 3. Translation memory & termbase... 4 4. Access, login and support... 5 4.1. Accessing AGITO Translate... 5 4.2. Login... 5
Blackboard Collaborate Ultra
 Blackboard Collaborate Ultra These instructions are accurate as of 10/21/2015. The Collaborate Ultra program has not been rolled out to the campus community as of yet. To use Ultra with any of your classes
mybullard Personal Control Panel User Guide
 Page 1 mybullard Personal Control Panel User Guide Go to www.bullard.com/mybullard and click on the setup file in order to download the mybullard installer to your PC. Your browser / anti-virus software
Audio Recordings in PowerPoint
 Audio Recordings in PowerPoint Instructions for Mac OS X PowerPoint 2011 Embedded Audio vs. Linked Audio and why we recommend the latter As you may know, PowerPoint comes equipped with its own audio recorder,
Clickers Basic Windows Training Session. Downloading TurningPoint: 5.3.1 Software
 Clickers Basic Windows Training Session Today s Session 1. Clickers Overview 2. Exercises (Hands On) Downloading TurningPoint: 5.3.1 Software TurningPoint software is available for free to all University
Presentations and PowerPoint
 V-1.1 PART V Presentations and PowerPoint V-1.2 Computer Fundamentals V-1.3 LESSON 1 Creating a Presentation After completing this lesson, you will be able to: Start Microsoft PowerPoint. Explore the PowerPoint
ontact Building a FREE church website Department of Communications THE OKLAHOMA UNITED METHODIST
 Building a FREE church website Department of Communications ontact THE OKLAHOMA UNITED METHODIST Contactwww.okumc.org Slide 2 - Reasons to use WordPress Cost effective way to build a website Doesn t cost