v Simbirsk Technologies Ltd.
|
|
|
- Thomasina Harrell
- 7 years ago
- Views:
Transcription

1 Community v Reference Guide

2 I CS-Cart Community Reference Guide Table of Contents 1. Administration Panel Environment Dashboard Orders View... orders Sales... reports Order... statuses Products 4.1. Categories Products Products... features Google... export features Global... options Promotions Customers 5.1. Users Administrators Customers Profile... fields Abandoned... / Live carts Website 6.1. Content Tags SEO... rules Banners Shipping & Taxes 7.1. Shipping... Methods Taxes States Countries Locations Administration 8.1. Add-ons Banners... m anagem ent Bestsellers Form... builder 53

3 Contents II Google... Analytics Google... sitem ap My changes Price... list Searchanise Send... the page link to a friend SEO Tags Tw igm... o Wish... List Payment... methods Database Credit... cards Titles Currencies Import... data Export... data Logs Upgrade center Languages Design mode Settings 9.1. Appearance Company Dynamic... HTML s General Google... Base Image... verification Logging Reports Security settings Shipping settings Site Map Thumbnails Upgrade center Design Logos Block manager Locations Fram... ew ork Blocks Product tabs Quick links 122

4 III CS-Cart Community Reference Guide Menus Sitemap Template editor Skin selector 127


5 Administration Panel Environment 1 1. Administration Panel Environment The user interface of CS-Cart administration panel is similar to many other web application. It includes meaningful menus to ensure clear navigation and handy toolbars to provide quick access to the most frequently used parts of the administration panel. So, you are likely to feel at home with CS-Cart administration panel very soon even if didn't have experience in running a web store in the past. Please have a look at the map below. It will help you familiarize yourself with the layout and navigation structure, which are common throughout the administration panel. Map of the CS-Cart administration panel

6 2 CS-Cart Community Reference Guide [1] Top navigation menu [2] Administration header Menu bar with drop-down menus to access operational Menu bar with drop down menus to access administrative parts of the administration panel. Each item of the menu parts of the administration panel. Use this menus to has a short description so that you can easily decide access store settings and perform maintenance routine. which section to use to perform certain tasks. [3] Operation area [4] Quick menu This is the main element of administration panel Floating list of the most frequently used sections and interface. It includes all controls to manage and configure commands. Simply click on this element to expand the your web store. The collection of controls is specific to list, then click on the necessary link. The list is fully each section that you have opened by using the top customizable, so you can define your own set of items by navigation menu, administration header or the quick using the Edit link at the bottom of the menu. The Show menu. menu on mouse over mode will enable opening the menu without clicking on it. [5] Search form [6] Administration footer Enables quick search for products, orders, users and Menu bar used for opening and closing the storefront, content pages from anywhere in the administration panel changing currency and language preferences on the without specifying the type of data being searched. Please current user, switching between modes, watching users learn more about quick search later in this topic. who are online at the moment. You can also review a list of your recent actions. Items in the list have icons to indicate that (a) product data has been has been edited edited -, (b) order data, or (c) some other data has been. Viewing the Storefront When working with the administration panel, you may need to view the storefront. To quickly open the storefront, click the icon in the top left-hand corner (next to the store name). The storefront will be opened in a new browser tab. This icon also appears on pages that naturally require a preview before saving changes. Such a page may be a product details page, a category details page, etc. Using Quick Search The Quick Search form allows conducting the search for items that belong to one of the following types of data: products, orders, users, content pages and site news. You does not need to specify the type of object being searched. Instead, search results will be divided into five separate groups.


7 Administration Panel Environment 3 Here is a list of fields which are searched through: 1. Products - Product ID, Product code, Name, Short description, Full description, Search words, Meta keywords, Meta description, SEO name. 2. Orders - First name, Last name, , Order ID. 3. Users - First name, Last name, Username, Pages - Name, Description, SEO name. 5. News - Name, Description, SEO name. Navigating Between Congeneric Items Many pages of the administration panel are equipped with the navigation links Previous and Next and a link to the search results. These links allow administrators to easily move around and go back to the search results. Advanced Search Options Along with the regular search facility, most sections of the administration panel provide for the advanced search option. Advanced search is activated by using the button and allows filtering search results by a larger number of parameters, thereby making the output more precise. For example, in Orders View orders you can search customer orders by the following parameters: Tax exempt Orders placed by users having exemptions from taxes or vice versa Order status Orders with the selected statuses only Period Orders placed within a specific time period Order ID Order with a specific ID number

 Shipping Orders shipped with the selected shipping methods Payment methods - Orders paid using the selected shipping methods New orders Orders that have")
8 4 CS-Cart Community Reference Guide Invoice ID Invoice with a specific ID number Has invoice Orders having invoices (paid orders) Credit memo ID Credit memo with a specific ID number Has credit memo Orders having credit memos (returned orders) Shipping Orders shipped with the selected shipping methods Payment methods - Orders paid using the selected shipping methods New orders Orders that have not been viewed yet Gift certificate code Orders containing gift certificates with a specific code Ordered products Orders containing specific products Customer files Orders containing customized products (for which customers loaded their own files, e.g. images). Besides, with the advanced search option you can create different search patterns and save them for further use. Just set the search options, type the name of the pattern in the Save this search as input box and click Save. Once the search pattern has been saved, it is displayed in the drop-down list box at the top. After completing any of the search fields, click on Search to display the search results.
. Besides, with the advanced search option you can create different search patterns and save them for further use.")

9 Dashboard 5 2. Dashboard Dashboard is the first screen that you see after logging in to the administration panel. It contains a summary of the recent activity in your store - latest orders, customer comments and reviews - as well as the a synopsis of the store inventory and general user statistics.

10 6 CS-Cart Community Reference Guide 3. Orders This section of the Administration panel is used to manage and control order procedures in your store. Here you can review and edit orders that have been placed in your store, place new orders on behalf of other users, handle return requests and issue gift certificates, create product subscriptions, etc. For accounting purposes, orders have continuous ID numbers disregarding their current state and number. At that, CSCart keeps track of successful and returned orders assigning them separate IDs. That is how it works. All orders can be one of the three conditions: Order - The order has been placed, but not paid out; Invoice - The order has been paid and processed successfully; Credit memo - The order has been paid and processed, but then returned. So, invoice IDs and credit memo IDs are generated continuously for the appropriate orders only: 0005 Order ID Order Status Complete 0001 Invoice ID - Credit Memo ID 0006 Incomplete Canceled Complete View orders In the View orders section, you can carry out the following tasks: Display a sorted list of all orders in the store or display a filtered list of orders that meets your search pattern only View orders that were not completed (the Incompleted orders link). An order receives the status "incompleted" after a customer has placed the order until the order has been processed by a payment system. For example, during the period when a customer is entering credit card details on the payment system's website up until the customer is redirected back to your store. Change order statuses on the fly View and edit order details Add comments to the order which are visible to the customer who placed the order Export order details in the CSV, Quickbooks and MYOB formats Print invoices and package slips both separately for each order or in bulk Create orders Delete existing orders Displaying orders When you open the View Orders section, the system automatically lists all orders from the database, i.e. the orders that have ever been placed and not deleted. By default, the list is arranged according to the date the orders were placed with the most recent orders at the top. If necessary, you can rearrange the list according to the order IDs or statuses,


11 Orders 7 names or addresses of users who placed the orders, or order totals. To display the orders that satisfy a certain criterion or a combination of multiple criteria only, use the form above the order list. By default, the form allows you to filter orders against names and addresses of users who placed the orders and the range of order totals. To access more filtering criteria, expand the form by clicking. If you filter orders against a particular search pattern regularly (e.g., to list all new orders that were paid with a gift certificate), you will find it convenient to save the pattern and add it to the list of pre-defined patterns appearing in the top left corner of the View Orders section (see the picture below). For more information about using advanced search, please see section "Administration Panel Environment". Changing order status To change an order status quickly without opening the order for editing, click on the current order status to expand a list of all applicable statuses. Then simply click on the required status.


12 8 CS-Cart Community Reference Guide Quick order printing, exporting and deleting The View orders section allows you to carry out many routine tasks for multiple orders, including bulk order exporting and invoice printing, in one click. 1. In the list of orders, select the check boxes for the orders you want to take action on. 2. Click on the Choose Action button beneath the list. This displays a list of applicable actions. 3. Click on the required action in the list. Viewing and editing order details To display order details, click on View link corresponding to the order that you want to review. This opens the order

13 Orders details page. Here you can add comments to the order and define shipment details. To edit the order details, click on the Edit order link. This opens a four-step wizard that guides you through the process of editing order details. 9


14 CS-Cart Community Reference Guide 10 At the first step, you can edit the set of products in the order (remove products from the order or add new products) as well as change the product cost as it appears in the order. This doesn't affect the product cost in the catalog. Here you can also edit the product. At the second step, you can edit customer's contact info together with the billing and shipping address. At the third step, you can apply a gift certificate and an affiliate code, change shipping and payment methods as well as edit the applied tax rate and shipping charges. At the fourth step, you can edit payment details, which are specific to the order's payment method Sales reports In this section, you can find a detailed statistics on the sales that have been made in your web store. Statistics may be represented in a form of graphical or tabular charts. For convenience, charts are grouped into separate reports. You are encouraged to use several pre-defined reports or create your own reports. To switch between the reports, use the toggle on the left. Creating a report To create a custom report: 1. In the Orders -> Sales reports section, click on the Manage reports link to display a list of all available reports. 2. Click the Add Report button. This will open a form with the report details. 3. Complete the form. Name - Name of the report as it will appear in the list of reports. Pos. - Position of the report relatively to the position of the reports in the list. Status - Status of the report (active or disabled). 4. Click the Create button at the bottom of the form. The new report will be listed among the other reports. Now proceed to edit the report and add charts.

15 Orders 11 Creating a chart Data charts must be assigned to a particular report. To add a chart to a report: 1. In the Orders -> Sales reports section, click on the Manage reports link to display a list of all available reports. 2. Click on the Edit link corresponding to the required report. This will open a page with the report details. The Charts section contains a list of assigned reports (if any). 3. Click the Add chart button. This will open a form with the chart details. 4. Complete the form. Use the General tab to define the chart's scope. Name - Name of the chart as it will appear in the reports. Position - Position of the chart relatively to the position of the charts in the report. Type - How the data should be represented: graphically or in a table. Object to analyze - Type of data to be reported on (users, orders and order statuses, products, categories, etc.). Value to display - Aspect to be analyzed. Time interval - Analyzed periods (day, week, month, year). Is not applicable to the chart type Graphic [Pie 3D]. The tabs Orders, Order statuses, Payment methods, Locations, Users, Categories and Products are used to filter or limit chart contents so that it covers specific items only. For example, in the Order statuses tab you can select to show statistics on orders with specific statuses only, and in the Products tab you can choose the products which statistics should be represented in the chart. Statistics on the unchosen products will not be included in the chart. 5. Click the Save button. The new chart will be listed among the other charts Order statuses This section allows you to adjust the default set of order statuses. You can edit the details of the existing statuses as well as adding custom statuses. The following 7 statuses are available by default and cannot be deleted: Backordered Order hasn't been processed yet as it contains out-of-stock items. Canceled Order was canceled by a customer. Complete All work on the order has been completed. Declined Order has been canceled by the store administrator. Failed Payment transaction hasn't been completed. Open Order has been placed and created in the store database, but it hasn't been processed yet. Processed Payment has been received. That is how order statuses are assigned: 1. A customer places an order, and the order is placed with the status "incomplete", which does not change the

16 CS-Cart Community Reference Guide 12 inventory. 2. If the customer uses an offline payment method, the order status changes to "open" until the store administrator assigns a different status to the order. 3. If the customer uses an online payment method, a positive response of the payment gateway changes the order status to "complete" while with a negative response the customer is suggested to replace the order. In the latter case, no new order is created. Adding custom order statuses To add a new order status: 1. In the administration panel, open the section Order statuses (Orders -> Order statuses). 2. Click the Add Status button. This will open a pop-up window with a form for the new status details. 3. Fill out the form. Fields marked with an asterisk (*) are mandatory. Please find the meaning of every field in the form under the Order status heading further in this section. 4. Click the Create button. Editing order status details To edit the attributes of an existing order status: 1. In the administration panel, open the section Order statuses (Orders -> Order statuses). 2. Click on the Edit link corresponding to the necessary order status. This will open a pop-up form with the status details. 3. Edit the values of the fields in the form. Fields marked with an asterisk (*) are mandatory. Please find the meaning of every field in the form under the Order status attributes heading further in this section. 4. Click the Save button. Order status attributes Here is the list of order status attributes that you can change when adding a new order status or editing the details of an existing order status. Name - Name of the status. Status - Letter symbol to identify the status in the database. subject - Subject of an message that is sent to customers automatically when the order status changes to this status. header - Header of an message that is sent to customers automatically when the order status changes to this status. Color - Color to be used to visually distinguish orders in this status from other orders in the order list in the administration panel. Either enter an RGB code into the text field, or click the sign to open a palette and pick the color. Notify customer - Select to send customers an automatic notification when the order status changes to this status. Notify orders department - Select to send the store administrator an automatic notification when the order status changes to this status.

17 Orders 13 Note: The address of the order department to receive notification at is specified in the section Administration -> Settings -> Company. Inventory - Choose whether to decrease or increase the number of items in stock for products included in the order. Pay order again - Select to allow customers to pay for the order again if the previous attempt failed. Invoice/Credit memo - Chose the condition of the order after receiving this status: Invoice - The order has been paid and processed successfully; Order - The order has been placed, but not paid out; Credit memo - The order has been paid and processed, but then returned.

18 14 CS-Cart Community Reference Guide 4. Products This section of the Administration panel assembles control elements for managing the product catalog. The two key concepts to describe the cataloguing in CS-Cart are the product and the category of products, or simply the category. Finding a right product in a web store becomes much easier if the products in the catalog are categorized, i.e. are sensibly arranged into groups of related products, or categories. Each product category can include an unlimited number of child categories which, in return, can include own child categories. Child categories are referred to as sub categories while the categories that do not have parent categories, i.e. categories of the highest level, are called root categories. The system of categories enables you to build the catalog in the way of a tree with multiple branches, making the navigation structured, intuitive and clear. On the storefront, categories generally appear in a special side bar. Yet, you can show them as a horizontal menu or even differently depending on the skin that you use for the storefront. Tip: Individual products cannot appear outside a product category, so every product that you have in your catalog must be assigned to at least one category Categories Use this section to manage product categories. When you open the section, it displays a list of all categories and subcategories in the store.

19 Products 15 Actions on categories The store administrator can carry out the following actions on the categories: Add individual categories (Add Category button) or several categories at a time (Bulk category addition link). Change attributes per category or simultaneously for several categories (Choose Action -> Edit selected). Delete categories (Choose Action -> Delete selected). Caution: Be careful when deleting a category! Child categories and the products under the category will be deleted automatically. Category attributes When you create or edit a category, your should specify a number of category attributes. For convenience, attributes are

20 CS-Cart Community Reference Guide 16 grouped under several tabs. General tab: Information Name Name of the category as it appears on the storefront and in the Administration panel. Location - Position of the category in the category tree: a root category or a child category of a parent category. Description - Description of the category as it appears on the storefront. The description that you enter here follows the category name and helps visitors understand what kind of product they should expect to find under the category. Besides, an informative description is just another SEO-wise opportunity. The description can be either a plain text or a formatted HTML text. If you are not familiar with HTML, you are encouraged to add a formatted description using the built-in WYSIWYG HTML editor. Status Status of the category (Active - category is available on the storefront, Disab led - category is not available on the storefront, or Hidden - category does not appear on the storefront, but customers can access it via a direct link). Images - Pair of images to illustrate the category: a category thumbnail and a large category image. Both images can be either uploaded from a local computer or the server file system, or linked to a remote location where the required image is physically located. An alternative text describes the image and is shown when the image is missing or cannot be displayed. It is good practice to have an alternative text associated with the image as an additional SEO-wise opportunity. Images must be of one of the following formats only: JPEG, GIF, PNG. Maximum size of an uploaded image depends on your server configuration. As a rule, it should not exceed 2 MB. SEO / Meta data Page title - Title of the category page on the storefront, which is displayed in the web browser when somebody is viewing the page. Required for SEO purposes. META description Contents of the HTML meta tag describing the category. Required for SEO purposes. META keywords Contents of the HTML tag containing a list of search keywords for the category. Required for SEO purposes. Availability Position Position of the category relatively to the other categories of the same level. If no category positions are defined, categories are sorted alphabetically. Creation date - Date when the category was added to the catalog. Blocks tab (the category contents): This tab duplicates the global layout of the location to which this storefront page belongs (see Design Blocks). By using this tab, you can disable blocks that are globally enabled, and, on the contrary, enable blocks that are globally disabled. This makes it possible to configure an individual layout for different storefront pages. Any modification that you make under this tab will not affect other storefront pages. Tip For more information on blocks, see Design > Block manager. Layout tab (appearance of the product under the category): Product details layout - Choose a template for all product details pages within the category.

21 Products 17 Use custom layout - If selected, you can choose a non-default layout. Product columns - Number of columns that the products under the category are displayed in. This option works for the Grid layout only, but you can still use it with a custom layout. Available layouts - Select the category layouts that customers should be able to select from when viewing the category. Default category layout - Select the default category layout Products Use this section to manage the products in your catalog. When you open the section, it displays a sorted list of all products in the store. To filter the list, use the search form above the list. Each entry in the list has the following attributes: Image Product thumbnail. Name Name of the product and the internal product code (SKU number). This number must not necessarily be unique, or it can even be missing. Price Product price. List price Price suggested by the product manufacturer. Good practice is to show that your price is lower than the list price. Quantity Number of products in the stock. Status (Active product is available on the storefront, Disab led product is not available on the storefront, or Hidden category does not appear on the storefront, but customers can access it via a direct link). These attributes can be changed on the fly without opening the product for editing. Actions on products The store administrator can carry out the following actions on the products: Add products individually (Add Product button) or in bulk (Bulk product addition link) and clone products ( Choose Action Clone selected). Change product attributes per product or simultaneously for several products (Global update link). Export products (Choose Action Export selected). See topic Administration/Export data for more information about export procedures. Delete products. Product attributes When you create or edit a product, you should specify a number of product attributes. For convenience, attributes are grouped under several tabs. General tab: Information Name Name of the product as it appears on the storefront and in the Administration panel. Categories Categories that the product will be assigned to. To define the product's main category, select the
22 18 CS-Cart Community Reference Guide corresponding radio button. Price Base product price in your store's main currency. Full description Full product description appearing on the product details page of the storefront. The description can be either a plain text or a formatted HTML text. If you are not familiar with HTML, you are encouraged to add a formatted description using the built-in WYSIWYG HTML editor. An informative description not only helps your customers better understand whether they need this product, but it is also just another SEO-wise opportunity. Status (Active product is available on the storefront, Disab led product is not available on the storefront, or Hidden product does not appear on the storefront, but customers can access it via a direct link).. Images Pair of images to illustrate the product: a product thumbnail and a large product image. Both images can be either uploaded from a local computer or the server file system, or linked to a remote location where the required image is physically located. An alternative text describes the image and is shown when the image is missing or cannot be displayed. It is good practice to have an alternative text associated with the image as an additional SEO wise opportunity. Images must be of one of the following formats only: JPEG, GIF, PNG. Maximum size of an uploaded image depends on your server configuration. As a rule, it should not exceed 2 MB. Pricing / inventory Product code Internal product code (SKU number). List price Price suggested by the product manufacturer. Good practice is to show that your price is lower than the list price. In stock Number of products in the stock. By default, products that are out of stock do not appear on the storefront until you enable the Allow negative amount in inventory option in Settings General/Catalog. Zero price action Allowed action on the product if the product has zero price. Allow or disallow users to add the products to the cart or ask users to enter a custom price. Inventory Way of tracking the inventory of the current product: track with product options or without product options or do not track at all. If the product is selected to be tracked with options, the common product quantity becomes unavailable, and you are supposed to specify the number of in-stock items individually for each product option/variant. Minimum order quantity - Minimum number of product items that a customer must add to the cart to be able to order the product. The minimum amount always appears on a product details page of the storefront right after the product price. Maximum order quantity Maximum number of product items that a customer can order at a time. 0 means no maximum limit. Quantity step Number of product items between the two ing choices in the Quantity select box. List quantity count Maximum of choices in the Quantity select box. Taxes Select applicable taxes. To configure the set of available taxes, use the section Shipping/Taxes. SEO / Meta data Page title Title of the product page on the storefront, which is displayed in the web browser when somebody is viewing the page. Required for SEO purposes. META description Contents of the HTML meta tag describing the product. Required for SEO purposes.
23 Products 19 META keywords Contents of the HTML tag containing a list of search keywords for the product. Required for SEO purposes. Availability Creation date Date when the product was added to the catalog. Avail since Date when the product becomes available for sale. Out-of-stock action Select if customers should be able to buy the product in advance before it is not yet available for sale, or sign up to receive an notification when the product is available. Note that the "Buy in advance" option requires that you have the product in stock, while the "Sign up for notification" option requires that you have it out-of-stock. Also, the "Sign up for notification" option cannot apply to products which are tracked with options. Extra Product details layout - Choose a template for the page layout. Feature comparison If selected, the product can be chosen for comparison. Availability of the feature comparison chart on the storefront is controlled by a separate block with the Feature Comparison content type (see section Design -> Blocks for details). Downloadable If selected, the product is labeled as downloadable, i.e. distributed by download. Enable shipping for downloadable product If selected, the downloadable product is labeled as having a tangible component that requires shipping (e.g., a printed manual). Time-unlimited download If selected, the product's download period never expires. As a rule, download links expire after a certain period of time that is controlled by Download key TTL option in Settings General. Short description Short product description appearing on a product list page of the storefront. The description can be either a plain text or a formatted HTML text. If you are not familiar with HTML, you are encouraged to add a formatted description using the built-in WYSIWYG HTML editor. If you leave this field blank, the short description will be automatically taken from the full product description (first 300 characters). Popularity Integer conveying the product popularity, which is calculated automatically. This rating depends on the number of product views as well as the number of times the product was added to the cart and purchased. If necessary, you can manually adjust this value. Product popularity influences the way the products are arranged on the storefront. Search words List of words by which the product should be easily found in the built-in search facility. Images tab (additional product images): This tab contains additional images for the product. Each additional image is represented as a pair of images: a thumbnail and a large pop-up image. Additional thumbnails appear on the product details page of the storefront beneath the main image thumbnail. And when a customer chooses to enlarge the active thumbnail, it expands into the large pop-up window.

24 20 CS-Cart Community Reference Guide Both images can be either uploaded from a local computer or the server file system, or linked to a remote location where the required image is physically located. An alternative text describes the image and is shown when the image is missing or cannot be displayed. It is good practice to have an alternative text associated with the image as an additional SEO-wise opportunity. Images must be of one of the following formats only: JPEG, GIF, PNG. Maximum size of an uploaded image depends on your server configuration. As a rule, it should not exceed 2 MB. To add two or more image pairs, use these graphic controls:. Options tab (product options and variants): This tab allows you to manage the product options and option variants as well as controlling the option combinations and adding forbidden/allowed combinations (also see Options settings). Note: In this tab, you can also add a global option to the product. For instructions on how to use global options, please refer to the Global options section further in this guide. Product options appear on the product details page on the storefront as selectable or input parameters to the product. Options can have the following attributes: Name Name of the product option as it appears on the storefront. Position Position of the product option relatively to the position of the other options in the list.
25 Products 21 Inventory If selected, the option has a separate number of items in stock, which is tracked separately. Type Type of the product option: Select b ox, Radio group, Check b ox, Text, Text area or File. For a specification of some of the option types, please refer to the CS-Cart knowledge base at Description Description of the product option as it appears on the storefront under the question sign (?) next to the option name. Comment Comment to be displayed below the option on the storefront. Required - If selected, this option is mandatory for selection/completion. Missing variants handling - Select how impermissible/missing option combinations should be handled: Display message - the option will be marked as not available, if the option is mandatory (see the previous setting) customers will not be able to add the product to the cart; Hide option completely - the option will be hidden, if the option is mandatory (see the previous setting) customers will be able to add the product to the cart. An option variant is an extension to the product option of type select box, radio group or check box, which may have a separate status, icon and amount of reward points as well as a weight modifier and a price modifier. Option variants have the following attributes: Position Position of the variant relatively to the position of the other variants in the list. Name Name of the product variant. For example, if the option is titled Size, the product variants to the option can be small, medium, large, etc. Modifier/Type Positive or negative value that modifies the original product price. The modifier can be either an absolute value or a percentage. Weight modifier/type Positive or negative value that modifies the original product weight. The modifier can be either an absolute value or a percentage. Status Status of the product option (Active or Disab led). Icon Thumbnail to represent the option variant. The image can be either uploaded from a local computer or the server file system or linked to a remote location where the required image is physically located. An alternative text describes the image and is shown when the image is missing or cannot be displayed. It is good practice to have an alternative text associated with the image as an additional SEO-wise opportunity. Earned point modifier/type Positive or negative value that modifies the original number of reward points that customers receive at their accounts when they buy the product. The modifier can be either an absolute value or a percentage. Option comb inations are used to set up an independent inventory for a particular combination of products as well as assign a separate thumbnail and large image to the combination. In order to access the special subsection for managing the combinations, please use the Option combinations link below the list of options. The inventory is normally updated automatically. Yet, if you suppose that combination s inventory displays wrong values, please click on the Rebuild combinations link to update the inventory. Shipping Properties tab: This tab contains a number of product properties that are important for shipping this product to customers. Weight Weight of a single product item in the store's default weight unit. Free shipping If selected, the product is delivered to the customer free of charge, i.e. no shipping cost for the
26 CS-Cart Community Reference Guide 22 product is calculated. Shipping freight Handling fee (insurance, packaging, etc.) added to the product cost. Items in a box Minimum and maximum number of product items to be shipped in a separate box. Box length Length of a separate box. Box width Width of a separate box. Box height Height of a separate box. The last four options are required for a more accurate shipping cost estimation when a real-time shipping method with the support for multi-box shipping is used (UPS, FedEx and DHL). If you do not specify box dimensions, values will be taken from the global configuration settings of a particular shipping carrier. Also see topic Shipping & Taxes. Quantity Discounts tab (product wholesale prices): This tab contains a list of the product wholesale prices that have the following attributes: Quantity Minimum number of product items to qualify for the product wholesale price. Value Product wholesale price (per item). Type Type of the discount: Ab solute - cost of 1 discounted item; Percent - percent discount off the base product item price. Percentage discount has certain natural limitations: the discount cannot be more than 100%, and the discount will not be saved as long as it applies to 1 product item and all user groups. Files tab (files for the downloadable product): This tab contains a list of files that are associated with this downloadable product. Each file may have the following attributes: Name Name of the file as you customers will see it on the product page. Note that it does not change the original file name. Position Position of the file relatively to the position of the other files in the list. File File to be downloaded. The file can be uploaded from a local computer or the server file system, or be linked to a remote location where the file is physically located. Preview Preview file that can be freely downloaded from the product details page on the storefront. Activation mode Mode of download link activation: Immediately = immediately after the order has been placed; After full payment = once the order status has changed to Processed or Complete; Manually = manually by the store administrator. Max downloads Maximum number of allowed product downloads per customer. License agreement Text of the file's license agreement. Agreement required Option to persuade customers accept the license agreement at checkout. Readme Text of the files's "read me" file (e.g., installation instructions, etc.). Subscribers tab: This tab contains a list of addresses that visitors have left to receive a notification when the product is back in stock. To allow visitors to subscribe to an out-of-stock product, set the Out of stock actions option (see the General tab) to Sign up for notifications.
27 Products 23 Blocks tab (contents of the product details page): This tab duplicates the global layout of the location to which this storefront page belongs (see Design Blocks). By using this tab, you can disable blocks that are globally enabled, and, on the contrary, enable blocks that are globally disabled. This makes it possible to configure an individual layout for different storefront pages. Any modification that you make under this tab will not affect other storefront pages. Tip For more information on blocks, see Design > Block manager. Add-ons tab (product attributes that depend on the active add-on modules): Sales amount Number of sold product items. This value is calculated automatically if the Bestsellers add-on is available (Administration Add-Ons). Yet, you can change the current value manually. Features tab (extra fields): This tab allows you to define the values of the extra fields that are valid for the product. The set of extra fields is controlled in Catalog Product features. Tags tab: This tab includes a list of tags associated with the product. Tags appear on the storefront in a special side box titled Tag cloud. For more information about the product tags, please refer to the section Website > Tags further in this guide. Popular tags Tags that have been added to the product by all users. My tags Tags that have been added to the product by you. Also read in CS-Cart Knowledge Base: Wholesale Prices Downloadable Products Displaying Same Product under Several Categories Attaching Files to Products Feature Comparison Applying Same Value to All Products Product Options Exceptions/Forbidden Combinations Adding Images to Product Option Combinations 4.3. Products features Use this section to add and manage extra product fields. Later, these features may be used to supplement standard product information. For example, it can be a field for ISBN, if you sell printed books, a field for audio formats, if you sell music, etc.
28 CS-Cart Community Reference Guide 24 The section contains a list of all product features that are available in your store. Optionally, you can arrange features into groups and then edit the settings of the whole group instead of editing every single feature. Product feature and feature group attributes General tab: Name - Name of the feature as it appears on the storefront and in the Administration panel. Position - Position of the feature relatively to the position of the other features in the list. Description - Product feature description that appears on the storefront if the customer clicks the question sign (?) next to the feature name in the Feature tab. Type - Type of the field for the feature: Check b ox (Single, Multiple), Select b ox (Text, Numb er, Extended) or Others (Text, Numb er, Date). Selecting the Extended type enables you to extend feature values with several extra attributes like a separate image, description, page title, META description and keywords. Group - Group that the product feature belongs to. If you assign the feature to a group, the next two attributes ( Product and Catalog pages) will apply to the whole group, not just the feature. Product - If selected, the feature appears on the storefront on a product details page. Catalog pages - If selected, the feature appears on the storefront on a product list page among the other product details. Prefix - Characters to come before the feature value. Suffix - Characters to come after the feature value. Variants tab: Pos. - Position of the feature value relatively to the position of the other values in the list. Variant - Feature value. Extra - Includes a number of additional fields for the feature with the type Extended.
29 Products 25 Categories tab: List of categories which products may utilize this feature. If no category is specified, the feature will apply to all categories. Also read in CS-Cart Knowledge Base: Product Features Google export features These product features were added automatically as part of the Google Export add-on functionality. They are critical for correct data feed export to Google Product Search Global options Use this section to manage global product options and option variants in your store. Global options work in the same manner as the product specific options, but they can apply to multiple products. Option attributes Product options appear on the product details page on the storefront as selectable or input parameters to the product. Options can have the following attributes: Name - Name of the product option as it appears on the storefront. Position Position of the product option relatively to the position of the other options in the list. Inventory If selected, the option has its own number of items in stock, which is tracked separately. Type Type of the product option: Select b ox, Radio group, Check b ox, Text, Text area or File. For a specification
30 26 CS-Cart Community Reference Guide of some of the option types, please refer to the CS-Cart knowledge base at Description - Description of the product option as it appears on the storefront under the question sign (?) next to the option name. Comment Comment to be displayed below the option on the storefront. Required - If selected, this option is mandatory for selection/completion. Missing variants handling - Select how impermissible/missing option combinations should be handled: Display message - the option will be marked as not available, if the option is mandatory (see the previous setting) customers will not be able to add the product to the cart; Hide option completely - the option will be hidden, if the option is mandatory (see the previous setting) customers will be able to add the product to the cart. Variants attributes An option variant is an extension to the product option of types Select box, Radio group or Check box, which may have its own status, icon and amount of reward points as well as a weight modifier and a price modifier. Option variants have the following attributes: Position Position of the variant relatively to the position of the other variants in the list. Name Name of the product variant. For example, if the option is titled Size, the product variants to the option can be small, medium, large, etc. Modifier/Type - Positive or negative value that modifies the original product price. The modifier can be either an absolute value or a percentage. Weight modifier/type - Positive or negative value that modifies the original product weight. The modifier can be either an absolute value or a percentage. Status - Status of the product option (Active or Disab led). Icon Thumbnail to represent the option variant. The image can be either uploaded from a local computer or the server file system, or linked to a remote location where the required image is physically located. An alternative text describes the image and is shown when the image is missing or cannot be displayed. It is good practice to have an alternative text associated with the image as an additional SEO-wise opportunity. Also read in CS-Cart Knowledge Base: Global Product Options 4.5. Promotions This section introduces another tool to promote goods and offer bonuses basing on customers memberships. Here you can specify the conditions that must be met to qualify for a bonus and the available bonuses. The page contains a list of all promotions in your store.
31 Products 27 CS-Cart supports two types of promotions that differ in the type of the bonus: Catalog promotions - Discounts on products. Attributes of promotions General tab: Name Name of the promotion. Detailed description Description of the promotion. The description can be either a plain text or a formatted HTML text. If you are not familiar with HTML, you are encouraged to add a formatted description using the built-in WYSIWYG HTML editor. Short description Description of the promotion as it appears on the storefront on the order info page (My account -> Orders -> Order info). The description can be either a plain text or a formatted HTML text. If you are not familiar with HTML, you are encouraged to add a formatted description using the built-in WYSIWYG HTML editor. Use available period - If selected, the promotion is available for the period of time specified below. Available from Date when the promotion becomes available for customers. Available till Date until the promotion is available. Priority Order in which the promotion applies relatively to the order of the other promotions. If two promotions have the same priority, they are applied in the same order as they are retrieved from the database. Stop other rules If selected, other promotions do not apply. Status Status of the promotion (Active, Hidden or Disab led). Conditions tab: Use this tab to state conditions that must be met in order that the customer could receive a bonus. Conditions that you set up here use different attributes and values connected with basic logical constants and comparison operations. To allow for more flexible rules, conditions can be arranged into groups. Bonuses tab: Use this tab to configure the bonuses that the customer receives if the conditions of the promotion are met. When creating a bonus, you are expected to choose the bonus type and then specify its value.
32 28 CS-Cart Community Reference Guide Discount on products Give a discount on the selected products. Also read in CS-Cart Knowledge Base: Discount on Order If Order Total Exceeds Certain Value Applying Discount to Specific User Groups Discount on Products From Specific Categories Discount on Order if Total Number of Products Exceeds Certain Value

33 Customers Customers In this section of the Administration panel, you can manage user accounts that are registered at your store and configure related settings. A user account is literally a record in the store database that identifies a registered user and associates the user with the related data, which includes order statistics, personal info, subscriptions, etc. Furthermore, user accounts are used to control the activity and privileges of the store users. CS-Cart has the following types of user accounts: Administrator - Type of the user who can access both the storefront and the Administration panel and manage and/or view the store contents and configuration. Customer - Type of the user who can access the storefront and buy products in your store. Although the storefront is normally available to non-registered users as well, registered users are supposed to enjoy greater privileges Users The Users subsection contains a sorted list of all registered users regardless of their account type. Records in the list can be arranged according to the users details (name, login or address), registration date, account type and status. To display the records that satisfy a certain criterion or a combination of multiple criteria only, use the form above the list. To access more filtering criteria, expand the form by clicking. If you filter accounts against a particular search pattern regularly (e.g., to list users from a certain country), you will find it convenient to save the pattern and add it to the list of predefined patterns appearing in the top left corner. Quick actions The rightmost column of the list contains controls to action on the respective record. If multiple quick actions are applicable to the account, the actions are grouped under the more pad. The set of applicable actions depends on the type of the account.
. Delete - Permanently deletes the user account.")
34 30 CS-Cart Community Reference Guide View all orders - Takes you to the list of all orders placed by the user (customer or affiliate). Act on behalf of - Takes you to the storefront as if you are logged in as the current user (customer or affiliate). Delete - Permanently deletes the user account. Warning: This operation is irrevocable. It is recommended that you never delete user accounts, but disable them instead. Enabling and disabling user accounts Availability of a user account is controlled through the account's status. In order to enable or disable the account, you need to change its status to Active or Disab led, respectively. To change the status, click on the current status to expand a list of all applicable statuses and then simply click on the new status. Adding a user To add a user account: 1. In Customers Users, click the button corresponding to the type of a user. This will open a form with the user account details. 2. Complete the form. The exact set of fields may vary depending on the account type and the profile configuration, which is managed in the Profile fields section. Please pay attention that a user can have a shipping address that is different from this user's billing address. 3. Click the Create button. Now the new account will appear among the other user accounts. 4. Click the Save button to apply the changes.

35 Customers Administrators This sections contains a sorted list of store administrators, registered users with an administrator account. The section functions similarly to the section Users Customers This sections contains a sorted list of store customers, registered users with a customer account. The section functions in the same manner as the section Users. Customer's reward points log This page shows the current reward point balance and the history of the balance changes. It enables the store administrator to manually credit or withdraw reward points (the Add & Subtract Points button).
36 32 CS-Cart Community Reference Guide 5.4. Profile fields Use this section to configure the set of fields included in the profile forms of different types of user accounts. Configuring existing fields It is convenient to regard the section as a table where each row is a field and the columns control the availability of the field and its options (see the picture below). The PROFILE column controls administrator and customer profiles, the CHECKOUT column defines the set of fields to be completed if the customer prefers not to register and checkout anonymously.
37 Customers 33 Pos. - Position of the field relatively to the position of the other fields in the profile. Description - Field name as it appears in the profile. Type - Type of the field. Show/required - These two check boxes are used to define whether the field must be included in the profile (show) and whether it must be mandatory for completion (required). Mandatory fields are marked in the form with an asterisk (*). Important: If you deactivate shipping address fields for a particular type of users, shipping will not work for users this type of users. Adding custom fields You are encouraged to extend the default set of fields so that user profiles could better suit your business requirements. To add a new field: 1. Click the Add Field button. This will open a form with the field options. 2. Complete the form. Description - Field name as it should appear in a profile.
38 34 CS-Cart Community Reference Guide Position - Position of the field relatively to the position of the other fields in a profile. Type - Type of the field. Section - Section of the profile to which the field should be added. Show/required - Check boxes are used to define whether the field must be included in the particular type of the profile (show) and whether it must be mandatory for completion (required). Mandatory fields are marked in the form with an asterisk (*). Profile stands for administrator and customer profiles, Checkout stands for the form to be completed by anonymous buyers at checkout 3. Click the Create button. The new field will appear among the other fields in the list Abandoned / Live carts This section keeps personal lists of products that your store visitors added to their carts and wishlist, but that have not been purchased for some reason or another. For registered customers, the products from the list are automatically added to the cart when they visit your store again. The section is equipped with a handy advanced search option allowing you to filter carts/wishlists against versatile
39 Customers parameters. Use to expand the advanced search facility. 35
40 CS-Cart Community Reference Guide Website In a nutshell, this section of the Administration panel provides a sort of a built-in content management system (CMS) allowing you to create, edit and publish supplementary content. Although such content is generally irrelative to the main content of the web store (the product catalog) and the ecommerce functionality of the website, it makes the store complete by providing additional information like the description of your company, your privacy policy, terms and conditions of your affiliate program, forms to contact the store administration, surveys and questionnaires, etc. Besides, this section provides facilities to create and publish store news, including newsletters and bulletins, edit the language variables that constitute the interface of the storefront and the Administration panel Content In this section, you can create and publish new contents of the following type: Page - Simple page that can contain formatted HTML description only. Good for various descriptions and policies. Form - Page that contains a contact form and optionally a formatted HTML description. Forms are built with a user-friendly form builder that requires no HTML skills and knowledge. Tip: To make it possible to create forms in your store, ensure that the Form Builder module is enabled and configured in Administration Add-ons. Link - Reference to an external web resource or any page in your web site. Page attributes General tab: Parent page Page that will contain a simple text link to this page. The parent page can belong to any type of content. If it is not intended that the page has a parent page, select the Root level option. Name - Name of the page as it appears on the storefront. Description Plain text or formatted HTML description appearing on the page. If you are not familiar with HTML, you are encouraged to add a formatted description using the built-in WYSIWYG editor. Status - Status of the page (Active = page is available on the storefront; Disab led = page is not available on the storefront; Hidden = page is not displayed on the storefront, but is available via a direct link). Page title - Title of the page, which is displayed in the title bar of the web browser. Required for SEO purposes. META description Contents of the HTML meta tag describing the page. Required for SEO purposes. META keywords Contents of the HTML tag containing a list of search keywords for the page. Required for SEO purposes. Creation date Date when the page was created.
41 Website 37 Use available period If selected, the page is available for a certain period of time only. Available from: Date when the page becomes available for visitors. Available till: Date until the page is available for visitors. Blocks tab: This tab duplicates the global layout of the location to which this storefront page belongs (see Design Blocks). By using this tab, you can disable blocks that are globally enabled, and, on the contrary, enable blocks that are globally disabled. This makes it possible to configure an individual layout for different storefront pages. Any modification that you make under this tab will not affect other storefront pages. Tip For more information on blocks, see Design > Block manager. Tags tab: This tab includes a list of tags associated with the page. Tags appear on the storefront in a special side box titled Tag cloud. For more information about the tags, please refer to the section Content -> Tags further in this guide. Popular tags Tags that have been added to the product by all users. My tags Tags that have been added to the product by you. Note: Make sure the Tags add-on is enabled and has the Tags for pages option selected (Administration -> Addons section). Form builder tab (if the page type is Form): Form submit text - Text that is shown to the user after the form is submitted. to - address at which you want to receive the submitted data. Form is secure (SSL) - If selected, the form is submitted through the secure protocol. Position - Position of the form field relatively to the position of the other fields of the form. Name - Name of the field as it appears in the form. Type - Type of the field. If the field type involves a selection, you can specify as many choices and alternatives as you need. Required - If selected, the field is mandatory for completion. Status - Status of the field (Active or Disab led).
42 38 CS-Cart Community Reference Guide Also read in CS-Cart Knowledge Base: Translating Fields From the 'Contact us' Form 6.2. Tags Use this section to manage the tags that are added to different pages of your store. Tags can be considered as freeform keywords or labels associated with a page or product making it easier to find the page/product. Tags created by the store customers and the store administrators appear on the storefront in the Tag cloud side box. Customers are also allowed to see their personal tags in the My tag cloud side box. To display side boxes on the storefront, use controls in Design Blocks.
43 Website Tip: To use tags in your store, you must have the Tags add-on enabled and configured (Administration 39 Add-ons). Tag attributes Tag - Name of the tag as it appears on the storefront. Popularity - Number of items (products and pages) to which the tag is assigned. Users - Number of users who added this tag. Products - Number of products to which the tag is assigned. Pages - Number of pages to which the tag is assigned. Status - Status of the tag (approved/disapproved/pending). Tags added by the administrator automatically get the Approved status SEO rules Use this section to define global rules for URL rewriting in your store. This ensures that auxiliary URLs like will be replaced with user-friendly and SE-optimized URLs (e.g., Tip: In order to control URL names in your store, first you need to enable and configure SEO add-on in Administration Add-Ons. Here you need to specify the URLs that should be rewritten and their substitution names. You can use the following list as an example: Dispatch value - The value of the dispatch parameter from the standard URL that will indicate the replacement (e.g., auth.login_form for the URL SEO Name - The value to which the standard URL will be changed (e.g. login for auth.login_form). The value can be specified with.html extension if required.
44 40 CS-Cart Community Reference Guide 6.4. Banners In this section, you can create graphic and text banners that can then be placed on the storefront. Banners can lead your store visitors to any of the store pages or to a third party resource. Note: To display a banner on a page, you need to add a separate block with the content type Banner. For details, see Design > Blocks. Banner attributes Banners can have the following attributes: Name - Name of the banner. Type - Type of the banner (text or graphics). Description (text banners only) - Text of the banner. This can be either a plain test or formatted HTML text. If you are not familiar with HTML, you are encouraged to add a formatted description using the built-in WYSIWYG HTML editor. Note: Banner description can be different for different languages. Simply switch to the required language when editing the banner description. Image (graphic banner only) - An image for the banner. The images can be either uploaded from a local computer or the server file system or linked to a remote location where the required image is physically located. An alternative text describes the image and is shown when the image is missing or cannot be displayed. It is good practice to have an alternative text associated with the image as an additional SEO wise opportunity. Images must be of one of the following formats only: JPEG, GIF, PNG. Or it can be an SWF file (flash multimedia). Maximum size of an uploaded image depends on your server configuration. As a rule, it should not exceed 2 MB. Open in new window (graphic banner only) - If selected, the URL under the banner is opened in a new window/tab. URL (graphic banner only) - URL to which the banner is linked. Creation date - Date, when the banner was created. Status - Status of the banner (Active, Hidden or Disab led).

45 Shipping & Taxes Shipping & Taxes This section of the Administration panel assembles control elements to manage and customize shipping and tax settings in your store Shipping Methods A shipping method is a set of rules and parameters to calculate the cost of shipping orders to buyers. This section contains an editable list of shipping methods present in the store. In the list, you can quickly edit certain attributes of a shipping method, including the name and status. To access more attributes, like the applicable rates and charges, click the Edit link which corresponds to the required shipping method. Shipping method attributes General tab: Position - Position of the shipping method relatively to the position of the other methods in the list. Name - Name of the shipping method as it appears on the storefront. Icon - Graphics to represent the shipping method. The graphics can be either uploaded from a local computer or the server file system or linked to a remote location where the required image is physically located. An alternative text describes the image and is shown when the image is missing or cannot be displayed. It is
46 CS-Cart Community Reference Guide 42 good practice to have an alternative text associated with the image as an additional SEO-wise opportunity. Images must be of one of the following formats only: JPEG, GIF, PNG. Maximum size of an uploaded image depends on your server configuration. As a rule, it should not exceed 2 MB. Remember that the icon appears on the storefront in a special block with the content type Shipping methods. Make sure to create such a block in Design Blocks. Delivery time - Time until the order is delivered. This info is displayed on the storefront so that customers could decide if the delivery time meets their requirements. Weight limit - Minimum and maximum weight of the order to be delivered through this method. Rate calculation - Mode in which the shipping cost must be calculated: manual (table-based) or real-time. Table-based, or manual, calculation is based on the custom charges and rates that you define in the Shipping charges tab. Real-time calculation is based on the rates that your store receives from the carrier who will deliver the order. The rates are received in the real-time mode at the moment the order is being placed. In order to use the carrierdependent estimation, you need to enable the support for the particular service provider in Settings Shipping settings. Carrier-specific settings are defined in the Configure tab. Shipping service - Shipping service provider/carrier that will be in charge of delivering the order. This select box is available only if the rate calculation mode is set to Realtime. Test - A special form to test the selected real-time shipping rate estimation service. Test estimation considers the weight that you specify in the form as well as the company (Settings address (Settings Company) and the default customer General/Default location). Taxes - Tax rates that apply to the shipping method. Status - Status of the shipping method (Active or Disab led). Configuration tab: This tab appears only if you have selected real-time shipping rate calculation in the General tab of this section. Here you should configure the selected shipping service and specify its settings. Such settings vary depending on the shipping service provider. So, if you do not know what values/options should be entered or selected, please refer to the carrier's help pages and documentation. Shipping charges tab: The rates that you define here are used to calculate the shipping cost regardless of whether you use real-time shipping rate estimation or not. If you have chosen to receive rates from a carrier in the real-time mode, the charges from this section will be simply added to the carrier's charge. You can use this to add a shipping markup in order to compensate for your actual expenses if they exceed the values returned by the carrier (e.g., packing, insurance, etc.). The rates can depend on the product cost, weight or quantity as well as being specific to the customer's location, when table-based rate calculation is used. To adjust the set of available locations, use section Shipping & Taxes Locations.
47 Shipping & Taxes Product Cost/Weight/Amount - Minimum value when the rate must apply. Rate Value - Shipping rate itself. 43
48 CS-Cart Community Reference Guide 44 Type - Type of the rate: absolute monetary value or a percentage of the product cost. Per <default weight measurement unit> - If selected, the final rate is the sum of costs of each measurement unit, which are calculated separately. Per Item - If selected, the final rate is the sum of costs of each item, which are calculated separately Taxes This section contains an editable list of tax calculation rules available in your store. Use this section to add new rules and manage existing rules. In the list, you can quickly edit certain attributes of a tax calculation rules. To specify rates, click the Edit link which corresponds to the required rule, then switch to the Tax rates tab. Actions on taxes The store administrator can carry out the following actions on the taxes: Add new tax calculation rules; Edit existing tax calculation rules; Apply multiple tax calculation rules to all products in the catalog; Cancel multiple tax calculation rules for all products in the catalog; Delete tax calculation rules. Tax attributes General tab: Name - Name of the tax as it appears on the storefront. Registration number Internal registration number of the tax calculation rule in the store. Priority Position of this tax calculation rule in a sequence of multiple tax calculation rules being applied to a product. If two rules have the same priority, they are applied in the same order as they are retrieved from the database. In this situation, the correct sequence may be breached. So, it is highly recommended that you set priority of every tax calculation rule in the store. Rates depend on Type of customers' addresses that the calculation rule depends on: shipping address or billing address. Status Status of the tax calculation rule in the store: Active or Disab led. Price includes tax If selected, the tax represented by this rule will be already included in the product price specified on the product details page. Otherwise, the calculated tax will be added to the order subtotal when a customer places the order.
49 Shipping & Taxes 45 Tax rates tab: Location - Location of the customer who places the order. To adjust the available locations, use the controls in Shipping & Taxes Locations. Rate value - Tax calculation rate that is specific to the given location. When the value is set to zero (0), the tax will not apply to the order if it has been placed by a customer whose address falls within the corresponding location. Please note that locations do not override each other. So, the value specified for the hard-coded default location ( all countries) will apply only if a customer comes from a location which is not defined or activated in Shipping & Taxes Locations, but will never apply to active locations, even those with zero values. Type - Type of the tax: absolute value in the primary currency (see Administration > Currencies) or a percentage of the product cost States This section provides an editable list of states and provinces (per country) that are supported in your store. These states/provinces are used to define users' location (see Shipping & Taxes > Locations). Here you can add missing states/provinces, or delete and modify existing states/provinces for each country registered and activated in Shipping & Taxes Countries.
50 CS-Cart Community Reference Guide 46 State attributes Code Unique code to identify the state or province. State/Province Name of the state or province. Status Status of the state/province: Active (i.e. can be selected in a user profile) or Disab led Countries Use this section to manage the set of countries that are supported in your store. Countries are used to define users' location.
 or Disab led. 7.5.")
51 Shipping & Taxes Country attributes Code - 2-digit code to identify the country. Code A3-3-digit official ISO code to identify the country. Code N3 - Numeric code to identify the country. Country - Name of the country. Region - Part of the world where the country is situated. Status - Status of the country: Active (i.e. can be selected in a user profile) or Disab led Locations Use this section to manage the set of locations that are supported in your store. A location is a combination of parameters to represent a geographical area. Locations are used to calculate shipping rates and tax charges. Location attributes General section: Name - Name of the location. Status Status of the location (Active or Disab led). 47
52 48 CS-Cart Community Reference Guide Countries section (countries to be included in the location): The list box on the right contains a list of all available countries, the list box on the left contains a list of countries included in the location. To adjust the list of countries supported in your store, go to Shipping & Taxes Countries. To move items from one list to the other one, use the twin horizontal arrows between the lists. To select multiple items, press and hold the Ctrl or Shift key. States section (states to be included in the location): The list box on the right contains a list of all available states, the list box on the left contains a list of states included in the location. To adjust the list of states supported in your store, go to Shipping & Taxes States.. To move items from one list to the other one, use the twin horizontal arrows between the lists. To select multiple items, press and hold the Ctrl or Shift key.
53 Shipping & Taxes 49 Zip/Postal code section (zip/postal codes to be included in the location): The text box contains the zip/postal codes included in the location. Entries must be separated by a paragraph break (appear in different lines). It is not necessary to specify the exact codes, you can use wildcards (? = any single character, * = any series of characters) instead. For example, 98?78 stands for 98178, 98278, 98378, 98478, 98578, 98678, 98778, 98878, and 98078; 12* stands for 12345, 12876, 12098, etc. Cities section (cities to be included in the location): The text box contains the cities included in the location. Entries must be separated by a paragraph break (appear in different lines). It is not necessary to specify the exact names of the cities, you can use wildcards (? = any single character, * = any series of characters) instead. For example, New Y* would stand for New York, etc.; L?s* would stand for Las Vegas, Los Angeles, etc.
54 50 CS-Cart Community Reference Guide Addresses section (addresses to be included in the location): The text box contains the addresses included in the location. Entries must be separated by a paragraph break (appear in different lines). It is not necessary to specify the exact addresses, you can use wildcards (? = any single character, * = any series of characters) instead. For example, * street would stand for 1st street, 2nd street, etc.
55 Administration Administration This area of the Administration panel is literally the main part of the administrator interface. It is used to configure and maintain the store. Here you can adjust global settings, enable and configure add-ons, import and export store data, make a back up copy of the store database, control the accessibility of the store, etc Add-ons CS-Cart is a scalable solution, and its core capacity can be greatly enhanced through many add-on modules included in the regular distribution package. Each module introduces a particular functionality or feature that can be easily turned on or off without affecting other components. For convenience, the administration panel has a special section to manage all add-on modules in one place ( Administration Add-Ons). The section contains a list of modules and a few control elements to manage the modules.
56 52 CS-Cart Community Reference Guide Enabling/disabling add-on modules To turn a module on or off, click on the current module status to expand a list of applicable statuses and finally select the required status. Configuring add-on modules For some modules you can adjust module-specific options and preferences. Note Modules with a grayed out Edit link do not have editable parameters and cannot be configured. To configure a module: 1. Click on the Edit link next to the order status. This will open a form containing editable parameters. 2. Edit the values of the fields in the form. 3. Click Save to apply the changes Banners management The Banners management module enables you to have custom logos and banners on the storefront. This add-on does not have configurable settings.
57 Administration Bestsellers The Bestsellers module empowers you to have a list of bestsellers on the storefront. This add-on does not have configurable settings Form builder The Form builder module enables you to create forms and add them to store page. This add-on does not have configurable settings Google Analytics This module helps you integrate your store with Google Analytics, an advanced web analytics solution that generates detailed statistics about the visitors to your website and gives you rich insights into your website traffic and marketing effectiveness. Information on Google Analytics is available on the official website at Tracking code Your Google Analytics tracking code (the value of the variable _uacct). Track e-commerce transactions If selected, Google Analytics tracks ecommerce activity in your store and generates appropriate reports Google sitemap This module generates an XML sitemap of your web store, which is adapted to be easily parsed and understood by web crawlers. This makes website indexing easier and more qualitative. This improves the standing of your web store among popular search engines, including Google, Yahoo and MSN/Bing. Having an XML sitemap is highly recommended if you run a large store with a significant number of products and categories in the catalog. The module allows you to configure options of each web store element that can be described in the sitemap: homepage, product pages, category pages, content pages, news, extended feature pages. Include in sitemap - If selected, the component is included in the sitemap. Update frequency - Time interval between two updates of an element. Priority - Priority of the element relatively to the other elements My changes This module enables CS-Cart to keep track of changes that you make in the code of the store. Changes are kept in the directory <cscart_dir>\addons\my_changes, and the changes are applied as a separate add-on. This considerably simplifies the upgrade process. For instructions and recommendations on how to customize CS-Cart, please refer to

58 CS-Cart Community Reference Guide 54 the API documentation at docs.cs-cart.com. The add-on does not have configurable settings Price list This module empowers you to generate and public your product catalog in the PDF and XLS formats. Fields - Fields to be included in the price list. Sort by - Order in which products are arranged in the price list. Group by category - If selected, products in the price list are grouped according to categories that they belong to. Include product options - If selected, the price list contains product options Searchanise The Searchanise add-on integrates CS-Cart with the SaaS-solution of the same name ( It adds enhanced instant product search to the storefront by replacing its regular search bar with a special search widget. Shoppers see search results as they type in the search bar, and can quickly review the found products. So, customers can get to the right product way much faster because they don t even have to finish typing while the preview box forms the first impression of the product.

59 Administration Syncing up data Under the hood, search results are received from Searchanise in the real-time mode. However, Searchanise doesn't retrieve data from your store database at the moment when the shoppers type in their requests as this would load the database server and significantly slow down the performance. Instead, Searchanise keeps a snapshot of the store products on its servers, and returns search results based on this snapshot. Such data includes the product description, price, features and images/thumbnails. Every time when you make any changes to the products in the store catalog, these changes need to be updated on the side of Searchanise so that the service could return relevant search results. The add-on tracks such changes and automatically syncs then with Searchanise. Usually, it takes two or three minutes to complete. However, you can force to synchronize data by clicking Resync on the add-on's configuration page Administration Add-ons Searchanise Connection. This is rather a time-consuming operation that is unnecessary in most cases. Manual syncing is required only when the product catalog has been updated in an unconventional manner. For example, directly in the MySQL database or as a result of custom programming Fine-tuning the search widget The new search bar gets seamlessly integrated with the current skin of the storefront. Still there is a room for fine-tuning the outwards appearance of the auto-complete form and the product preview box. This is done on the add-on's configuration page in Administration Add-ons Searchanise Configuration.
60 CS-Cart Community Reference Guide 56 Style These controls regulate the style behavior of the widget. Autocomplete with item preview - If selected, the search auto-completion form suggests words and word combinations that are found in the names and descriptions of products as well as certain products that are likely to meet the request being typed. Autocomplete with search per suggestions - If selected, the search auto-completion form suggests only words and word combinations that are found in the names and descriptions. General These controls regulate the general behavior of the widget. Show autocomplete box - Controls whether the search auto-completion should be enabled in the widget. When cleared, the widget does not suggest words and products disregarding any other selected options. Show product preview in autocomplete box - Controls whether the product preview box should be enabled in the widget. When cleared, quick product preview of for the suggested words and products is disabled. Product description length - Length to which the product description will be truncated in the product preview box. Layout These controls regulate the appearance of the auto-complete box and the product preview box. Template for the item in autocomplete box - Look and feel of an item in the drop-down list of suggested products. In this text field, you can specify variables that stand for a particular product attribute (see below) and a
61 Administration 57 custom HTML/CSS-based layout. Make sure to use CSS classed defined in under the CSS tab on this page. Template for the preview in autocomplete box - Look and feel of the product preview box. In this text field, you can specify variables that stand for a particular product attribute (see below) and a custom HTML/CSS-based layout. Make sure to use CSS classed defined under the CSS tab on this page. Variable Substitution for ${product_id} Product ID in the store base. ${title} Product name. ${description} Full product description. ${link} Link to the product's detailed page. ${price} Product price. Note that it does not consider the currency, so you need add the currency sign to the price. ${quantity} Number of product items in stock. ${product_code} Product's SKU. ${image_link} Physical location of the original product image in the store. ${image1} HTML-wrapped 120x120px product image. This variable is transformed to HTML tag like <img scr="physical_location" class="snize-item-image" width="120" height="120" border="0"> ${image2} HTML-wrapped 50x100px product image. ${image3} HTML-wrapped 100x150px product image. ${image4} HTML-wrapped 200x300px product image. ${image5} HTML-wrapped 300x400px product image. ${image1_src} Physical location of a 120x120px product image on the Searchanise servers. ${image2_src} Physical location of a 50x100px product image on the Searchanise servers. ${image3_src} Physical location of a 100x150px product image on the Searchanise servers. ${image4_src} Physical location of a 200x300px product image on the Searchanise servers. ${image5_src} Physical location of a 300x400px product image on the Searchanise servers. CSS CSS classes that can be used to for the layout of items in the drop-down list of suggested products and the product preview box Send the page link to a friend This add-on module adds the Send To Friend form to every product details page allowing your store visitors to tell their friends about the products in your store.
62 58 CS-Cart Community Reference Guide SEO SEO is a common acronym for "search engine optimization". Obviously, the module aims at helping you optimize your web store for search engines and improve its ranking. Optimization consists in replacing unattractive dynamic URLs like containing query strings and ancillary data with clean search engine friendly URLs like Such URLs not only help search engines to index store pages, but they also improve your customers' experience as clean URLs are human-readable and thus are easy to perceive and remember. Product/page SEF URL format - Pattern for clean URLs for storefront product pages. Category SEF URL format - Pattern for clean URLs for storefront category pages. Use single URL for all languages - If selected, the same URL is used to address a page disregarding the current page language. Otherwise, the page is referred to by several separate URLs according to the languages that the page can appear in.

63 Administration 59 Show language in the URL - If selected, URLs include the code of the language in which the referred page is displayed. The code follows the host name and the directory name. Important: The module requires that your web server have a URL rewriter installed. For the Apache HTTP Server or any Apache interchangeable implementation it must be the mod_rewrite module. For Microsoft's Internet Information Server (IIS) it must be ISAPI_Rewrite Tags This module introduces support for tags assigned to product and content pages. Tags for products If selected, customers are allowed to add tags to product pages. Tags for pages If selected, customers are allowed to add tags to static content Twigmo Add-on overview Use this module to connect your store to the Twigmo service. This service enables you to control your online store from your mobile phone. Once connected, the module will process requests sent from this service and return the requested information, and you will be able to review the sales statistics and recent orders as well as searching and editing the most important data - products, orders and customers - just looking at and touching the screen of your mobile phone. Furthermore, this module equips your store with a special storefront designed for mobile devices. When this option is enabled, the store automatically detects the type of device from which a customer has opened the store in the web
64 CS-Cart Community Reference Guide 60 browser, and switches the storefront in accordance. This means that your customers will fill perfectly comfortable whether they browse your online store from a desktop/laptop computer or a cutting-edge mobile device. To learn more about the Twigmo service features, please visit Configuring the add-on Service This tab contains a list of options to control the connection of your store to the Twigmo service. - Your existing address. Store name - Text label that you should enter during the store registration / connection to the service. Do not use HTTPS connection - If selected, secure data transfer between your web store and the Twigmo service will not be used. Use my store admin password - If selected, your current password will be used to access your Twigmo account. In this case, the next two options (Password and Confirm password) will be unavailable. Password - If the "Use my store admin password" option is not selected, enter the password to access you Twigmo account. Confirm password - If the "Use my store admin password" option is not selected, confirm the password that you have entered in the Password field. Version - Current version of the module. Note To use HTTPS connection, an SSL certificate must be installed on your website. To check it, try to log in to the Administration panel via HTTPS. If it works, you can use secure connection. Otherwise, select "Do not use HTTPS connection" option on the add-on settings page. Once you have properly configured the module and clicked Connect, you will see the Access ID field on the Twigmo options page and will be able to view and edit your store data using Twigmo Mobile Admin application on your phone. Storefront Options under this tab control the mobile storefront. Use mobile frontend - Select to enable a special skin for mobile device users. Company name - Name of the store as it will appear on the mobile storefront. Display company name - Select to show the box with the company name on the storefront. Location (URL) of logo - URL of the logo for the mobile storefront. Currency prefix - Prefix to be added to product prices. For example, type "$"to show prices as $ Currency postfix - Postfix to be added to product prices. For example, type " USD"to show prices as USD. Disable anonymous checkout - Clear to enable anonymous checkout in the store. HTTP location - HTTP address of the store. Please use the default value unless you have a significant reason to do otherwise. HTTPS location - HTTP address of the store. Please use the default value unless you have a significant reason to do otherwise. Customer index file - Mobile storefront index file. Please use the default value unless you have a significant
65 Administration 61 reason to do otherwise. Production mode - If selected, the mobile storefront connects directly to your online store. Otherwise, all data is sent through Twigmo servers. Please enable this option unless you are debugging the storefront Wish List This module enables customer wish lists on the storefront. The module does not have configurable settings Payment methods In this section, you can adjust the set of payment methods that your customers can use to pay for their orders. For convenience, all methods are arranged in a single list representing the name of the method, its current status (active or disabled) and a few control elements. Adding a payment method To add a payment method: 1. Go to Administration Payment Methods. A list of the available payment methods is displayed. 2. Click the Add Payment button. This opens a form for creating/editing a payment method.
66 62 CS-Cart Community Reference Guide 3. Complete the form. See Configuring a payment method for details. 4. Click the Create button below the form. Configuring a payment method To configure a payment method: 1. Go to Administration -> Payment methods. This displays a list of the available payment methods. 2. Click on the Edit link corresponding to the name of the method you need to configure. This opens a form for creating/editing a payment method. 3. Complete the form.
67 Administration 63 The General tab contains basic parameters of the method: Name - Name of the payment method as it appears at the checkout; Processor - Online payment system that will process the payments made through this payment method. Leave Offline if this method does not involve online processing. Tip: To accept payments through an online payment system, first you need to register an account with this payment system. Template - Template to display all necessary input fields on the customer storefront. Description - Small description of the payment method that appears on the checkout page. Surcharge - Extra amount of money to be added to the order totals. This can be a flat rate or a percentage. If you specify both a percentage and a flat rate, the percentage is added first. Taxes - Select tax calculation rules that should apply to the surcharge defined above. To configure the available tax calculation rules in the store, use section Shipping & Taxes Taxes. Payment instructions - Administrator's instructions to customers on the usage of the payment method. The instructions can be either a plain text or a formatted HTML text. If you are not familiar with HTML, you are encouraged to add a formatted description using the built-in WYSIWYG HTML editor. Status - Status of the payment method: active means that the method can be selected on the storefront. Icon - Icon to depict the payment method on the storefront. Important: Icons that you upload (or refer to) here are displayed in a special block having Payment methods specified as the block's content. Remember to create such a block in Design Blocks. The Configuration tab appears only if you have selected to use an online payment system. It contains the settings that are specific to the payment system. 4. Click the Save button to apply the changes. Also read in CS-Cart Knowledge Base: Setting PayPal in CS-Cart 8.3. Database This section is designed to help you maintain your store database. In particular, you can back up the database and restore it from a backup copy. Another task that you can carry out here is to optimize the store database. Besides, the section contains a link to the database logs and a link to the information about the PHP environment on your server (function phpinfo). Creating a database backup Making a database backup consists in creating a database dump, an SQL file that contains a record of the table structure and the data from a database. The file is saved to the directory <cscart_dir>/var/database/backup/. For security reasons, it is recommended that you move the dump from the default directory and keep it in a directory that

68 64 CS-Cart Community Reference Guide cannot be accessed through the web. To back up the database: 1. Go to Administration Database Backup. 2. Specify the parameters of the backup. Select tables List of the database tables to be included in the backup. The tables with the "cscart" prefix are selected in the list by default. Note: To select multiple entries, press and hold the CTRL or SHIFT key. Backup database schema If selected, the backup includes the structure of the database tables. Normally, this option should be enabled unless you have reason to do otherwise. Backup database data If selected, the backup includes the database data proper. Normally, this option should be enabled unless you have a reason to do otherwise. Compress backup file If selected, the backup (SQL file containing the database dump) will be compressed into a TAR archive. Backup file name Name of the SQL file containing backup (database dump). Important: If you have chosen to compress the backup file, the filename that you enter here will be expanded with the.tgz extension. 3. Click the Backup button. The system will create the database dump displaying the progress and finally save it to the SQL file. Restoring the database from a backup Restoring the database consists in restoring the SQL dump that was created during the backup. Important: When you restore the database from an SQL dump, the existing database tables get overwritten. To restore the database: 1. Go to Administration Database Restore. 2. Locate the file containing the SQL dump (local computer, this server or a remote location) or select the appropriate dump if it is located in the default directory <cscart_dir>/var/database/backup/. 3. Click the Restore button. Optimizing the database Database optimization that you carry out here consists in reclaiming the unused disk space and defragmenting the
69 Administration 65 database files. To optimize the database, go to Administration Database Maintenance and click Optimize database. The system will optimize the database files displaying the progress. Important: We strongly recommend that you make a backup copy of the database before you start optimizing the database. In this case, you'll be able to restore the original database if something goes wrong during the optimization. Also read in CS-Cart Knowledge Base: Making Backup of Store Database Restoring Backup of Store Database 8.4. Credit cards Use this section to adjust the set of credit card types that you want to accept in your store. Adding a credit card type To add a credit card type: 1. Go to Administration Credit Cards. This section a list of available credit card types. 2. Click the Add Credit Card button. This will open a form to specify parameters that apply to the credit card type (see Configuring a credit card type). 3. Complete the form. 4. Click the Save button to apply the changes. Configuring a credit card type To configure a credit card type: 1. In Administration Credit Cards, click on the Edit link corresponding to the name of the credit card type you want to configure. This will open a form to specify parameters that apply to the credit card type. 2. Complete the form. Card name Name of the credit card type. Card code - Code of the credit card type. Icon - Icon to depict the credit card type. CVV2 - If selected, customers are required to enter a CVV2 code located on the card they pay with. Start date - If selected, customers must enter the date when their card was issued. Issue number - If selected, customers must enter the issue number located on the card that they pay with. Localization - Select a localization to which the credit card type is applicable.
70 CS-Cart Community Reference Guide Click the Save button to apply the changes Titles In this section, you can define traditional titles that are used to address people. Adding/editing titles To add a title: 1. Go to Administration Titles. 2. Click the Add Title button to create a new title or click on the Edit link to edit an existing title. This will open a form with the title details. 3. Complete the form. Title Title itself. ID ID of the title. 4. Click the Save button Currencies This section contains a list of currencies that are in use in the store. As a rule, multiple currencies are used to display
 currency.")
71 Administration 67 prices on the storefront while payments are usually accepted in the store's primary currency only. However, if your payment gateway is configured to accept payments in different currencies, customers that use this gateway will be charged in an alternative (not primary) currency. And the order total will be calculated according to the store's currency exchange rate that you define here. Note: All prices that you enter in the Administration panel are assumed to be in the primary currency. Name - Name of the currency as it appears on the storefront (USD, Euro, etc.). Code - Unique code of the currency. Sign - Currency symbol. After sum - If selected, the currency symbol appears after the price. Otherwise, it appears before the price. Ths sign - Symbol for the thousands separator. Dec sign - Symbol for the decimal separator. Decimals - Number of digits after the decimal sign. Status - Currency status: Active - the currency is available on the storefront, Disab led - the currency is not available on the storefront Import data Use this section for bulk data import in the CSV (comma-separated values) format. An appropriate.csv file can be created or edited in a third-party application that supports this format. For example, it can be a spreadsheet editor or an accounting software. For convenience, the section is divided into 4 subsections according to the data type. To switch between the subsections, use the toggle on the left. Orders - Use this subsection to import order details. Please keep it in mind that you can only update order details - adding new records is not supported. Products - Use this subsection to import product details, including wholesale prices (i.e., quantity-based discounts). Subscribers - Use this subsection to import mailing list subscribers. Translations - Use this subsection to import language variables and country states. Users - User this section to import user profiles. Each subsection may consist of several tabs. Each tab includes two areas: The upper area contains a list of fields that
72 CS-Cart Community Reference Guide 68 the imported file can include. Mandatory fields are highlighted in bold type. The lower area contains import options that may vary depending on the type of the imported data. Importable fields Below are listed and described all fields that can be included in an import file. The list is arranged in alphabetical order. Important: This list describes all fields that can be imported into CS-Cart. However, the imported data must reflect a certain type of information, and all these fields cannot be imported in a single CSV file therefore. To know which fields can be imported at a time, please refer to the list of applicable fields inside the tab for importing the particular data type. Activation key - Subscription activation key. Active User's account status. Y = user is active, N = user is disabled. Amount Number of items of a certain product combination. --- User's billing info --Billing: address. Billing: address (line 2). Billing: city. Billing: country - Two-letter country code as it appears in the first column of the Manage countries page (e.g., US). Billing: first name. Billing: last name. Billing: state. Billing: title. Billing: zipcode. --- End of user's billing info --Category Path to the product category starting from the parent directory (e.g., Directory///Subdirectory1/// Subdirectory2). Code - ISO code of the state (e.g., NY). Combination - Description of the option combination. E.g., "Size: X-Large, Color: Black". Combination code - Code of the option combination. Company Company name. Confirmed - Flag to denote that the subscription has been confirmed (1 or 0). Country code - ISO code of the country (e.g., US). Coupons Discount coupon number. Date Date when the order was placed. Must be in the MM/DD/YYYY format (e.g., 12/25/2009). Date added Date when the product was added. Must be in the MM/DD/YYYY format (e.g., 12/25/2009). Description Product description. Detailed image - Absolute path to the file with a detailed product image. If you specify the directory for images in import options, this field should contain the filename only. Details Administrator notes. Discount Order discount.
73 Administration 69 Downloadable Downloadable product. Y = yes, N = no. User's/subscriber's address. Extra - Additional information about the order item. Extra fields - Order's extra fields in the following format: {Field1: value, Field2: value, Field3: value}. Fax Fax number. Feature comparison - Product can be added to the comparison list. Y = yes, N = no. Features - Product features. Please refer to the embedded help (the? link ) for more details. Files - Absolute path to files assigned to the downloadable product. If you specify the file directory in import options, this field should contain the filename only. Several filenames must be separated by a comma (e.g., file1. pdf, file2.exe, file3.ogg, etc.). First name User's first name. Format - Mailing list receipt format: HTML or Plain text. Free shipping - Product is shipped free of charge. Y = yes, N = now. Inventory tracking - Track the product inventory. D = disabled, B = track with product options, O - track without product options). IP address Customer's IP address (e.g., ). Item ID Unique ID that is assigned to every product in the order. Item IDs are required to avoid conflicts in situations when an order contains two identical products with different options. Language - Two-letter language code (e.g., EN). Last name User's last name. List price Product's market price (in 0.00 format). Login - User's login. Lower limit - Minimum number of product items to qualify for the corresponding wholesale price. For example, with the regular price of $5 per item you can offer the product for only $3 per item if a customer orders 15 or more product items at a time. In this case the Price field must have the value "$3" and the Lower Limit field must have the value "15". Mailing list - Mailing list assigned to a subscriber. One subscriber can have multiple mailing lists assigned. Mailing list date - Date when the mailing list has been registered in the store. Meta description - Product's meta-description. Meta keywords - Product's meta-keywords. Min quantity - Minimum product quantity. Name - Name of the language variable. Notes Customer's notes of the order. Options - Product options. Please refer to the embedded help (the? link ) for more details. Order ID - Order identification number. Override exchange rate - Override global point exchange rate. Y = yes, N = no. Override points Recalculate points that go together with the product. Y = yes, N = no. Page title - Title of the product page as it appears in a web browser. Pair type Type of the product image. M = main, A = additional. The M image appears in the Detailed
74 70 CS-Cart Community Reference Guide Information tab while the A image appears in the Images tab. Password - User's password encrypted through the MD5 cryptographic hash function. Pay by points Product can be paid for with points. Y = yes, N = no. Payment ID Numerical ID of the payment method. Payment information Payment details (encrypted). Payment surcharge Amount of the surcharge on the payment. Percentage discount - Flag to denote percentage discount (1 or 0). Phone - Company's (the Orders tab) or user's (the Users tab) phone number. Price - Product price or the wholesale price (the Qty discounts tab). Product code Product's SKU (stock-keeping unit) code. Product ID Numerical ID of the product. Product name Name of the product. Quantity Number of ordered items or the current number of product items in stock. Registration date - Date when the user registered. Must be in the format MM/DD/YYYY (e.g., 12/25/2009). Search words - Product search words. Secondary categories Additional categories to which the product is assigned. Categories are separated by a semicolon (e.g., b///c; d///e). Ship downloadable Calculate shipping cost for downloadable products. Y = yes, N = no. Shipping Shipping details (in the native format). Shipping cost Shipping charge for the order. Shipping freight Product's shipping cost. --- User's shipping info --Shipping: address. Shipping: address (line 2). Shipping: city. Shipping: country - Two-letter country code as it appears in the first column of the Manage countries page (e. g., US). Shipping: first name. Shipping: last name. Shipping: state. Shipping: title. Shipping: zipcode. --- End of user's shipping info --Short description Short product description. State - Name of the state (e.g. New York). Status - Product (A - active, D - disabled, H hidden) or order (C - Completed, O - Open, etc.) status. Subscribers date - Date when the subscriber has been registered in the store. Subtotal Order subtotal. Supplier - Name of the product supplier according to the "Company" field. Tax exempt Taxes are exempt from the product cost. Y = yes, N = no.
75 Administration 71 Taxes List of taxes applicable to the product or the order's tax info (in the native format). Thumbnail - Path to the file with the product thumbnail. If you specify the directory for images in import options, this field should contain the filename only. Title User s title (Mr, Ms, etc.). Total Order total. Unsubscribe key - Subscription deactivation key. User group - User group that the discount is applied to. User group ID - Numerical ID of the user group that the user belongs to. User ID Numerical ID of the user. User type Type of the user's account (A = administrator, C = customer, P = affiliate, S = supplier). Value - Value/content of the language variable. Web site Company or user's web site. Weight - Product weight in the store's default unit. The default weight unit is set up in the section Administration -> Settings -> General. Zero price action - Allowed action on the product if the product has zero price. R = Disallow users to add the product to the cart, P = Allow users to add the product to the cart, A = Ask users to enter a custom product price. Import options Below are listed all the available import options that may appear or not appear in a subsection. Language - Language of the imported data. Category delimiter - Delimiter to separate child and parent categories. Images directory - Directory where images are located. Used for images without a path specified. Files directory - Directory where files for downloadable products are located. Used for files without a path specified. Delete all existing product files before import - If selected, the files assigned to the product are removed from the files directory before the product import. Reset inventory - If selected, the number of items in stock for each imported product is zeroed before the product import. CSV delimiter - Delimiter to separate the imported values. Select file - Location of the imported file. It can be either a local path or a URL to a remote resource. Features delimiter - Delimiter to separate multiple product features. Price decimal separator - Decimal separator for product prices. Also read in CS-Cart Knowledge Base: Product Import Imported Fields Format Example of Product Import
76 72 CS-Cart Community Reference Guide 8.8. Export data This section is capable of exporting data in the CSV (comma-separated values) format. For convenience, the section is divided into 4 subsections according to the data type. To switch between the subsections, use the toggle on the right. Orders - Use this subsection to export order details. Products - Use this subsection to export product details, including wholesale prices (i.e., quantity-based discounts). Subscribers - Use this subsection to export mailing list subscribers Translations - Use this subsection to export language variables and country states. Users - Use this section to export user profiles. Each subsection may consist of several tabs. Each tab includes two areas: The upper area controls the content of the export file, and the lower area controls the export options that may vary depending on the type of the exported data. Export file contents The contents of an export file are controlled by two list boxes. The Exported fields list box contains a list of fields that will be included in the export file while the Available fields list box contains fields that can be added to the export file. Exportable fields and their meaning are listed below. In order to move fields from one list to another, use the twin horizontal arrows between the lists. To re-arrange the items in the list of exported fields, use the twin vertical arrows below the list box. If necessary, you can save and then re-use a
77 Administration 73 particular layout of the exported fields. Note: Highlighted fields in the Exported fields list are mandatory and thus cannot be removed from the list. Below are listed all fields that can be included in an export file. The list is arranged in alphabetical order. Important: This list describes all fields that can be exported from CS-Cart in the CSV format. However, the exported data must reflect a certain of information, and all these fields cannot be exported in a single CSV file therefore. To know which fields that can be exported at a time, please refer to the list of applicable fields inside the tab for exporting the particular data type. Activation key - Subscription activation key. Amount - Number of items of a certain product combination. --- User's billing info --Billing: address. Billing: address (line 2). Billing: city. Billing: country - Two-letter country code as it appears in the first column of the Manage countries page (e.g., US). Billing: first name. Billing: last name. Billing: state. Billing: title. Billing: zipcode. --- End of user's billing info --Category Path to the product category starting from the parent directory. Code - ISO code of the state. Combination - Description of the option combination. E.g., "Size: X-Large, Color: Black". Combination code - Code of the option combination. Company Company name. Confirmed - Flag to denote that the subscription has been confirmed. Country code - ISO code of the country. Coupons Discount coupon number. Date Date when the order was placed. Date added Date when the product was added to the catalog. Description Product description. Detailed image - Path to the file with a detailed product image. Details Administrator notes. Discount Order discount. Downloadable Flag to indicate a downloadable product. User's/subscriber's address.
78 74 CS-Cart Community Reference Guide Extra - Additional information about the order item. Fax Fax number. Feature comparison - Flag to indicate a product that can be added to the comparison list. Features - Product features. Files - Path to files assigned to the downloadable product. Format - Mailing list receipt format: HTML or Plain text. First name User's first name. Free shipping - Flag to indicate that a product is shipped free of charge. Image URL - URL of the product image. Inventory tracking - Flag to indicate a product's inventory tracking options. IP address Customer's IP address. Item ID Unique ID that is assigned to each product in the order. Item IDs are required to avoid conflicts in situations when an order contains two identical products with different options. Language - Two-letter language code. Last name User's last name. List price Product's market price. Localizations - Localizations for which the product is available. Login - User's login. Lower limit - Minimum number of product items to qualify for the corresponding wholesale price. Meta description - Product's meta-description. Meta keywords - Product's meta-keywords. Min quantity - Minimum product quantity. Name - Name of the language variable. Notes Customer's notes of the order. Options - Product options. Order ID - Order identification number. Override exchange rate - Flag to indicate that global point exchange rate is overridden. Override points Flag to indicate that the points that go together with the product must be recalculated. Page title - Title of the product page as it appears in a web browser. Pair type Type of the product image. Password - User's password encrypted through the MD5 cryptographic hash function. Pay by points Flag to indicate that the product can be paid for with points. Payment ID Numerical ID of the payment method. Payment information Payment details (encrypted). Payment surcharge Amount of the surcharge on the payment. Percentage discount - Flag to denote percentage discount (1 or 0). Phone - Company's (the Orders tab) or user's (the Users tab) phone number. Price - Product price or the wholesale price (the Qty discounts tab). Product code Product's SKU (stock-keeping unit) code. Product ID Numerical ID of the product.
79 Administration 75 Product name Name of the product. Product URL - The URL of the product details page. Quantity Number of ordered items or the current number of product items in stock. Search words - Product search words. Secondary categories Additional categories to which the product is assigned. Ship downloadable Flag to indicate that a shipping cost must be calculated for the downloadable products. Shipping Shipping details in the native format. Shipping cost Shipping charge for the order. Shipping freight Product's shipping cost. --- User's shipping info --Shipping: address. Shipping: address (line 2). Shipping: city. Shipping: country - Two-letter country code as it appears in the first column of the Manage countries page. Shipping: first name. Shipping: last name. Shipping: state. Shipping: title. Shipping: zipcode. --- End of user's shipping info --Short description Short product description. State - Name of the state. Status - Product status. Subtotal Order subtotal. Supplier - Name of the product supplier according to the "Company" field. Tax exempt Flag to indicate that taxes are exempt from the product cost. Taxes List of taxes applicable to the product or the order's tax info in the native format. Thumbnail - Path to the file with the product thumbnail. Title User s title. Total Order total. Unsubscribe key - Subscription deactivation key. User group - User group that the discount is applied to. User ID Numerical ID of the user. User type Type of the user's account. Value - Value/content of the language variable. Web site Company or user's web site. Weight - Product weight in the store's default unit. Zero price action - Flag to indicate the allowed action on the product if the product has zero price. Export options
80 76 CS-Cart Community Reference Guide Below are listed all the available export options that may appear or not appear in a subsection (in alphabetical order). Category delimiter - Delimiter to separate child and parent categories. CSV delimiter - Delimiter to separate the exported values. Filename - Name of the exported file. Files directory - Directory where files for downloadable products are located. Used for files without a path specified. Images directory - Directory where images are located. Used for images without a path specified. Language - Language of the exported data. Output - Output type: Direct download - export file will be downloaded to you computer; Screen - file contents will be shown in the web browser; Server - file will be saved on the server where CS-Cart is installed. Whichever you choose, the export file will be available for further download from the list of exported files (Administration Export Data, Exported files link). Features delimiter - Delimiter to separate multiple product features. Price decimal separator - Decimal separator for product prices. Also read in CS-Cart Knowledge Base: Product Export 8.9. Logs This section contains all logs of the store. By default, you can filter logs against a period within which they were created. To access more filtering criteria, expand the form by clicking. If you filter logs against a particular search pattern regularly, you will find it convenient to save the pattern and add it to the list of predefined patterns. Just set the search options, type the name of the pattern in the Save this search as input box and click the Save button. Once the search pattern is saved, it is displayed in the drop-down list box at the top.
81 Administration 77 The following information is given in the list of logs: Time - Date and time the event was logged; User - User who performed the action registered in the log; Type - What action was performed and what it is related to (categories, database, news, orders, products, requests or users); Content - Content of the log Upgrade center Use this section to upgrade your CS-Cart installation to the latest version directly from the web interface. The upgrade center automatically receives information about available updates from our server and lists the applicable upgrade packages (see the picture below). Original files that are replaced during the upgrade get saved to the directory <cscart_dir>var/upgrade/pack_name. If some files cannot be upgraded due to access permission issues, you will be prompted to provide FTP access details to your server. This information is not sent to our servers. Important: Before using the upgrade center, make sure you have your CS-Cart license number specified in Settings Upgrade Center.

82 78 CS-Cart Community Reference Guide To start applying a pack, click the Install button corresponding to the pack. Then simply follow the instruction on the screen. Finally you will see a notification that your store has been successfully upgraded. Click the Upgrade center button to return to upgrade center. To see a list of changes, click on the Installed Upgrades link. If there are files containing custom code, click the changes link to see the difference between the files. For non-critical modifications you can just click on the mark as resolved link to apply the changes. Otherwise, edit the corresponding file(s) manually and apply your changes.
83 Administration Languages This section provides the facilities to control the set of languages that are available in your store as well as editing and translating the text of language variables appearing both on the storefront and in the Administration panel. Translations tab (list of language variables for the selected language): Language variable - Name of the language variable as it is used in template (*.tpl) files. Value - Value of the language variable as it appears on the storefront or in the Administration panel. `.
84 80 CS-Cart Community Reference Guide Design mode This section provides facilities for translating the store interface (both the storefront and the Administration panel) and editing the current skin templates (the storefront only). Translating the interface Enabling the translation mode allows you to translate the necessary interface elements on the fly. Switch to the translation mode by clicking Enable Translation Mode. Now all the editable interface elements are highlighted in green. You can continue navigating through the interface just if you were using the regular mode. To translate an element, which is literally to change the value of the corresponding language variable, hover the mouse pointer over the element and click the book icon ( ) on the left. Then change the text of the element that appears in an editable text box. Save the changes. Once you have finished translating the interface, navigate back to this section and click Disable Translation Mode to restore the regular mode. Customization of the skin templates When using the customization mode, you can edit the storefront templates on the fly. Note: When you edit the templates, you are supposed to be familiar with the PHP Smarty template engine. Also consult the help pages at docs.cs-cart.com to learn the basics of the CS-Cart architecture. To start editing the templates, switch to the customization mode by clicking the Enable Customization Mode button. Then click on the View storefront in customization mode link to move to the storefront. Editable templates now have an edit icon ( ) assigned to them. Hover the mouse point over the necessary icon to highlight the corresponding template or group of related templates, then click the name of the template you want to edit. The template's source code will appear in the template editor (see the image below). Edit the template and save your changes. To restore the original template, use the Restore from the repository button. Once you have finished editing the templates, navigate back to this section and click the Disable Customization Mode button to restore the regular mode.

85 Administration Also read in CS-Cart Knowledge Base: Translating CS-Cart 81

86 82 CS-Cart Community Reference Guide 9. Settings Use this section to configure the settings of your store. For convenience, settings are arranged into groups. To switch between the groups, use the toggle on the left Appearance In this section, you can adjust some parameters that affect general appearance and behavior of your store (both the storefront and Administration panel). These parameters are common for all storefront skins and themes. Administrator settings Note: The following parameters apply to the appearance of the Administration panel only. Administration panel default language - Language in which all text variables are displayed. Orders per page - Number of orders displayed per page. Products per page - Number of products displayed per page. CMS pages per page - Number of content pages displayed per page. Display quick menu - If selected, the floating quick menu is displayed in the administration panel.
87 Settings 83 Default WYSIWYG editor - Select one of the supported WYSIWYG editors, or select not to use any at all. Elements per page - Number of other items displayed per page. Customer settings Note: The following parameters apply to the appearance of the customer storefront only. Customer area default language - Language in which all text variables are displayed. Orders per page - Number of orders displayed per page. Products per page - Number of products displayed per page. Elements per page - Number of other items displayed per page.. Number of columns in the product list - Number of columns that is used to arrange products on a product list page. Note, this option applies to the Grid layout only. Product list default sorting - Default order in which products are sorted on a products list page: Name - by name in alphabetical order, Price - from lowest to highest product price, Popularity - by product rating (highest to lowest), Bestsellers - by the number of sold items (highest to lowest). Estimate taxes using default address on cart/checkout pages - If selected, customers whose addresses are not registered in the database will see taxes calculated according to the default address. Display prices with taxes on category/product pages if the method of calculating taxes is based on a unit's price - If selected, product will be displayed on product and category pages having taxes included in the product price. Display prices with taxes on cart/checkout pages if the method of calculating taxes is based on a unit's price - If selected, product will be displayed on the cart and checkout pages having taxes included in the product price. Display In stock as a field - If selected, products will be displayed with the exact number of available items. Otherwise, product will be marked as simply being in stock. Use "Value changer" for the Quantity field - If selected, the ordinary quantity field in the product list and on the product details page is supplemented with a widget to increase/decrease the product quantity. Display mini thumbnail images as a gallery - If selected, multiple product thumbnails are displayed as a small gallery. Display the "Pagination section" on the top of the listed object - If selected, the pagination bar appears both on the top and at the bottom of a product list. Default image previewer - Select one of the available tools for displaying images and image galleries. Product detailed page layout - Choose a template for the default product details page layout. If necessary, the layout can be set up separately for every product details page or a category of products. Display product details in tabs - If selected, product details (description, features and so on) are arranged in multiple tabs. Tip: To manage product tabs, use section Design Product tabs. Display track my orders section - If selected, the My Account section has a special form where a customers can enter an order ID in order to quickly access the order details.
88 CS-Cart Community Reference Guide 84 Product list layouts settings Default layouts for products list - Available templates to arrange products on a product list. The default templates can be expanded with custom templates, which must be placed to the directory <store_dir>/skins/ [ACTIVE_SKIN]/customer/views/categories/custom_templates. Product list default layout - Default layout to display categories that have no specific layout defined. Use the selected layout for current category or search page only - If selected, customers are allowed to change the layout of the category or product list page that they are browsing at the moment. And moving to another category or product list page will restore the default layout. When this option is disabled, a customer can select to use a different layout, and the selected layout will apply to all category and product list pages that the customer visits during one session. Common settings The following settings apply both to the storefront and the Administration panel: Date format. Time format. Time zone. Calendar date format. Calendar week starts from. Unsaved changes warning - If selected, administrators are warned of unsaved changes before they leave the page. Show menu description - If selected, drop-down menus in the administration panel have a short description of each item. Notice displaying time - Number of seconds to display pop-up notices that follow an event like changing a status of an item in the Administration panel, or adding a product to the cart Company Use this section to specify your company details and contact information. Company name - Name of your store. The value that you enter here is included in the copyright notes and invoices. The following parameters are used to specify the geographical location of your business and your contact info. These details are also mentioned in invoices. Company address; Company city; Company country; Company state; Company zip code; Company phone;
89 Settings 85 Company phone 2; Company fax; Company website. Year when the store started its operation - The year since your company has been in business. This value is used in copyright notes. User department address - address to receive notifications about newly created, modified and deleted user profiles. Tip: To receive notifications about newly registered customer accounts, make sure to enable Administrator must activate new user accounts in Settings General. Site administrator address - address to receive notifications about any technical issues. Order department address - address to receive notifications about placed orders and changed order statuses. Help/Support department address - address to receive messages submitted through the Contact Us form. Reply-To newsletter address - address to include in newsletters as a reply-to address Dynamic HTML In this section, you can set up to which extent JavaScript will be used to generate dynamic HTML content on the storefront and in the Administration panel. Note: The following parameters apply to the customer storefront only. AJAX-based "Add to cart" button - If selected, products are added to the cart dynamically without reloading the whole page. AJAX-based "Add to compare list" button - If selected, products are added to the comparison list dynamically without reloading the whole page. AJAX-based pagination - If selected, customers can navigate between multiple pages of a single product or category list without having the whole page reloaded s Settings in this section define the way CS-Cart will send messages and notifications. The three available options are: Via an external SMTP server; Via the PHP mail() function;
90 86 CS-Cart Community Reference Guide Via Sendmail (a popular routing facility). If you want to use an external SMTP server, specify connection details. If you want to use Sendmail, specify the absolute path to the executable file. If you choose to use the PHP mail() function, s will be sent directly from the script General Settings and preferences in this section control a great number of parameters that affect different aspects of your store. Enable secure connection at checkout - If enabled, checkout pages work through the HTTPS protocol. This option requires an SSL certificate to be installed on your server. Enable secure connection in the administration panel - If enabled, the Administration panel works through the HTTPS protocol. This option requires an SSL certificate to be installed on your server. Enable secure connection for authentication, profile and orders pages - If enabled, login and profile registration/update pages on the customer storefront work through the HTTPS protocol. This option requires an SSL certificate to be installed on your server. Keep HTTPS connection once a secure page is visited - If selected, visitors continue browsing through the HTTPS protocol after they visit a secure page for the first time. Template debugging console - If selected, the Smarty debug console, a JavaScript pop-up window, appears on the customer storefront and the Administration panel when you log in with your administrator account. The console shows the hierarchy of templates that were used to build the current page. It is helpful to use the console when you customize the look and feel of your store.
. Weight symbol - Symbol of the unit of weight that you use in your store (e.g., lb, kg, etc.). Grams in the unit of weight defined by the weight symbol - Number of grams in the unit of weight that you use in your store.")
91 Settings 87 Alternative currency display format - This option controls whether product prices are shown in one currency (selected by the customer) or two currencies (default store currency and the currency selected by the customer). Weight symbol - Symbol of the unit of weight that you use in your store (e.g., lb, kg, etc.). Grams in the unit of weight defined by the weight symbol - Number of grams in the unit of weight that you use in your store. Access key to temporarily closed store - Key to access the storefront when the store is temporarily closed for maintenance. For example, with the key = , the closed store can be accessed through the following URL only: Initial order ID value - Integer number to open the order ID numbering. The value you enter here will be used as the ID of the next order placed in your store. With every new order, its ID will increase by 1. The value of this field cannot be less than any order ID number that is already in the database. Tax calculation method based on - Select whether taxes should apply to individual products in the order (Unit price) or the order subtotal, which also considers all discounts (Sub total).
92 CS-Cart Community Reference Guide 88 Here is a complex example of how taxes are calculated if the tax calculation method is based on the order subtotal. Provided the order contains three products: Product A - $100 x 2 (tax1 = 10%) Product B - $50 x 3 (tax2 = 5%) Product C - $70 x 4 (tax1 + tax2 = 10% + 5%) Order total = $630 Order discount = $60 --Step 1: Calculating the discounted subtotal = 570 Step 2: Allocating the discount by the tax group subtotal $570 / $630 = $ tax1 subtotal = (($100 * 2) + ($70 * 4)) * $ = $ tax2 subtotal = (($50 * 3) + ($70 * 4)) * $ = $ Step 3: Calculating taxes tax1 (10%) = $ * 0.1 = $43.43 tax2 (5%) = $ * 0.05 = $19.45 Step 4: Calculating the total (discounted subtotal + taxes) = $ Help us improve CS-Cart - Select whether snapshots of your store should be sent to the development team automatically by CS-Cart or manually by the store administrator. Snapshots include no personal data, but they only reflect the current condition of the store: its settings and configuration, the modules that you use, etc. This information allows the development team to learn what CS-Cart features and options are used most intensively, and adjust the development processes accordingly. Default location The values you enter here are automatically considered as the geographic location of all unregistered store visitors. You can define the following details: Default address; Default zipcode; Default city; Default country; Default state;
93 Settings 89 Default phone. Catalog Enable inventory tracking - If enabled, the system automatically updates the product inventory every time products are ordered or returned. Allow negative amount in inventory - If enabled, customers can order products that are out of stock. Download key TTL - Number of hours after a download link for a downloadable product was sent to a customer, during which the customer can download the product. After that the link expires and becomes invalid. Low stock notification threshold - Minimum number of product items in stock that the order department must be warned about when this quantity is reached. Show products from subcategories of the selected category - If selected, products from subcategories are displayed on the parent category page. Display modifiers for product options - If selected, product option and variant selectors reveal how choosing a particular variant/option will change the original product price (if at all). Show out of stock products - If selected, products are displayed on the storefront even if they are out of stock. Count product options when quantity discounts are calculated - This option controls how CS-Cart counts the number of product items in order to apply a quantity discount. If selected, product options and option combinations are regarded as a separate product. Otherwise, CS-Cartproduct options and totally disregarded, and CS-Cart simply counts the number of ordered items. For example, a customer buys a $10 t-shirt that two color options - red and blue. The quantity discount rule for the t-shirt is to sell each item at $8 if there are 5 or more t-shirts in the order. When this option is selected, a customer needs to order 5 red or 5 blue t-shirt to qualify for the quantity discount. When this option is cleared, a customer can order 2 blue and 3 red t-shirt to get the discount as 2 plus 3 gives 5 in total. Promotions Allow customers to use single discount coupon only - If selected, customers can apply only one discount coupon per order. Users/cart Allow users to create multiple profiles for one account - If selected, users are allowed to specify multiple shipping and billing addresses for a single account. This may be useful when a user needs separate profiles for personal and business use, for example. Define minimum order amount by - Choose whether the minimum order amount should include the shipping cost (Products with shipping) or be a bare cost of products in the order (Products). Minimum order amount - Minimum amount of order subtotal required to place an order. Allow shopping for unlogged customers - If selected, store visitors can add products to their carts even if they are not logged in. Disable anonymous checkout - When selected, only registered customers are allowed to place orders in your store.
94 90 CS-Cart Community Reference Guide Redirect customer to the cart contents page if non-ajax addition to a cart is used - If selected, customers are redirected to their carts after adding a product to the cart if dynamic AJAX-based adding is disabled. When the customer clicks on any Checkout button/link in the store, redirect to the Cart content page first - If selected, a customer is redirected to the cart after clicking the Checkout button. Otherwise, the customer goes directly to the checkout page. Administrator must activate new user accounts - If selected, newly created customer accounts are inactive until the store administrator activates them manually. Profile address section order - Choose which customer address should go first on the checkout page: billing address or shipping address. User is used as login - If selected, user addresses can be used instead of regular usernames to log in to the storefront and Administration panel. Ask customers to agree with terms & conditions during checkout - If selected, customers are asked to accept your store's terms and conditions at checkout. Allow customers to pay order again if transaction was declined - If selected, customers are allowed to carry out the same transaction if it previously failed. Checkout style - Select the behavior of the checkout pages: One-page checkout - checkout is represented on a single page; One-page checkout with cart contents - checkout is represented a single page that also includes an editable list of products in the cart; Multi-page checkout - checkout is represented as a four-step wizard. Estimate shipping cost on cart page - If selected, a form for estimating shipping cost is displayed on the cart page. Allow guest to create an account after successful order - If selected, at guest checkout, the buyer is offered to register an account if the order was placed successfully. Proxy server for outgoing connections If your store works under a proxy-server, specify your connection details here. Proxy host - Name of the proxy server (e.g., example.com). Proxy port - Proxy server port number (e.g., 8080). Proxy user - Username to connect to the proxy server. Proxy password - Password to connect to the proxy server. Search options Search also in - If selected, the search is additionally conducted in Pages and/or Site News Google Base With CS-Cart, you can automatically submit your product feeds to Google Base so that your products can be easily found via Google Product Search. To start submitting automatic product feeds to Google, specify the following parameters:
95 Settings 91 Google host - uploads.google.com by default; Google login - Your login to access the FTP server of Google Base; Google password - Your password to access the FTP server of Google Base. Tip: To make this available, PHP on your server must be configured with --enable-ftp key switched on. If you are not sure if this parameter is enabled, please contact your server administrator for help Image verification Image verification is used to ensure that forms in your store are completed by humans, not automated systems. This allows you to avoid lots of spam and fake user accounts. You can adjust parameters of verification images as well as specify when image verification is required. Image width Width of a verification image. Image height Height of a verification image. String length Number of characters in an image. Number of grid lines - Number of grid lines in an image. Grid color Color of grid lines in an image (hexadecimal code). Minimal font size Minimum font size of characters in an image. Maximal font size Maximum font size of characters in an image. String type Type of characters to appear in a string (digits, letters or both). Character shadows If selected, characters are displayed with shadows. Color If selected, characters are displayed in color. Path to background image Image that is used as a background for a verification image. This field must contain a relative path to the graphic file with the image. Do not use verification if user is logged in If selected, customers who have logged in to the store are not asked to verify images. Do not use verification after first valid answer If selected, store visitors are not asked to verify images after they have verified the first image. Use for Here you should specify forms for which image verification is required. Login form. Register form. Custom forms. Send to friend form. Comments and reviews forms. Checkout (user information) form. Polls. Track my order form.
96 92 CS-Cart Community Reference Guide 9.8. Logging In this section, you can specify what kind of events must be registered in the system logs. Log files are kept in the directory <cscart_dir>/var/log. Since log files can gradually grow larger, it is recommended that you clean the directory from time to time. Or you can view and clean up the logs in Administration Logs. Requests Select to track and record all HTTP and HTTPS requests. Users Select to track and record events related to user activity. Products Select to track and record events concerning products in the catalog. Orders Select to track and record events concerning orders. Database Select to track and record events concerning your store database. Categories Select to track and record events concerning product categories Reports Use this section to specify the format of time intervals displayed in report charts Security settings Use this section to adjust security settings for accessing the administration panel. Minimum administrator password length - Minimum number of characters that in an administrator password. Administrator password must contain both letters and numbers - If selected, the system demands that an administrator password contain both letters and numerals. This improves password strength and thus makes it more effective in resisting guessing and brute-force attacks. Force administrators to change password on the first login - If selected, store administrators are demanded to change their passwords once they have logged in to the administration panel for the first time. Password validity period in days - Days before an administrator password expires and the user is demanded to change the password. Set the value of this field to 0 (zero) so that passwords never expire. Cron password - Key to access the cron script that reminds the store administrator to change the password. To activate the script, open in your web browser password_reminder&cron_password=access_key replacing the access_key part with the key you enter in this field Shipping settings Use this section to enable/disable automatic shipping rate calculation in your store as well as activating real-time shipping rate estimation for the integrated shipping services: Australia Post, Canada Post, DHL, FedEx, Swiss Post,
97 Settings 93 UPS and USPS. When real-time shipping rate estimation is enabled, your store sends the necessary information (e.g., destination address, order weight, etc.) to the server of a particular shipping carrier and receives the relevant shipping cost at the moment when the buyer places an order. As a result, there is no need of manual setup and maintenance of rates and locations. Nevertheless, you are still able to add a surcharge when configuring a particular service to cover auxiliary costs like wrapping, insurance, etc. In addition to the above-mentioned shipping services, CS-Cart is integrated with InterShipper, the service that can estimate shipping rates for UPS, USPS, FedEx and DHL/Airborne. Particular shipping services are configured in Shipping & Taxes Shipping Methods. Tip: In order to start using real-time shipping rate estimation, you need to register an account with the respective shipping carrier. For details, please refer to the website of a particular carrier. The same rule applies to using InterShipper Site Map Use this section to adjust the details of the sitemap that is automatically generated for your web store. Show the Categories section - If selected, the sitemap includes links to root categories and every subcategory. Show only root level categories links in the Categories section - If selected, the sitemap includes links to root categories only. Show the Site info section - If selected, the sitemap includes links to pages from the Information section Thumbnails Use this section to specify parameters and properties of automatic thumbnail creation. Thumbnail background color - Background color of a thumbnail in hexadecimal HTML color code. Thumbnail format - Format of a resized thumbnail. You can choose to keep the original format or convert it to GIF, JPEG or PNG. JPEG format quality - Quality of resized JPEG images starting from 100%, which is hard to distinguish from the uncompressed original but that takes most storage space, down to 10% showing serious image degradation. It is recommended that you not compress that aggressively and use the quality of no less than 60%. In most cases, the optimum quality level is 80%. Product list (category, search, etc.) thumbnail width - Width of a resized product thumbnail in the product list. Product list (category, search, etc.) thumbnail height - Height of a resized product thumbnail in the product list.. Product details page thumbnail width - Width of a resized product thumbnail on the product details page.
98 CS-Cart Community Reference Guide 94 Product details page thumbnail height - Height of a resized product thumbnail on the product details page. Detailed product image width - Width of a detailed product image on the product details page. Detailed product image height - Height of a detailed product image on the product details page. Product cart page thumbnail width - Width of the resized product thumbnail on the cart contents page. Product cart page thumbnail height - Height of the resized product thumbnail on the cart contents page. Categories list thumbnail width - Width of a resized category thumbnail in the category list. Categories list thumbnail height - Height of a resized category thumbnail in the category list. Category details page thumbnail width - Width of a resized category thumbnail on the category details page. Category details page thumbnail height - Height of a resized category thumbnail on the category details page. Detailed category image width - Width of a detailed category image on the category details page. Detailed category image height - Height of a detailed category image on the category details page Upgrade center Use this section to adjust the settings of the CS-Cart upgrade center available in Administration Upgrade center. License number - Your CS-Cart license number. Updates server - Server from which the store receives the updates ( by default). Hostname - Name of your FTP server. Username - FTP account username. Password - Password for the FTP account username. Directory - Directory where CS-Cart files are located. Note: FTP access details are required to adjust file permissions if there are access permission issues during the upgrade.
99 Design Design This section of the administration panel assembles control elements and facilities to manage and customize the storefront appearance. Here you can arrange the layout of different types of pages, edit the templates that constitute the interface, easily change the store logos, apply a different skin, define product tabs, etc. Note: Once you have made any changes to the storefront appearance, make sure that everything displays correctly. If it does not, try to adjust the components that you have edited, or revert to the original appearance Logos Use this section to define the set of the store logos that are shown on the customer area and in the store invoices. Logo images can be uploaded from a local computer of the server file system. Alternatively, you can specify the URL to a remote location where the image is physically located. An alternative text describes the image and is shown when the image is missing or cannot be displayed. It is good practice to have an alternative text associated with the image as an additional SEO-wise opportunity Block manager CS-Cart Block Manager enables you to manage and customize the layout of storefront pages. The storefront is built by the use of the framework where pages are assembled out of blocks nested inside containers. Such a block conveys a certain piece of information like a logo, mini cart, product details, breadcrumbs, search form, navigation menu, etc.
100 96 CS-Cart Community Reference Guide You can add, edit, remove or simply move blocks around a page to organize the new look and feel. The following sketch presents the storefront structure and illustrates how a page may be composed.
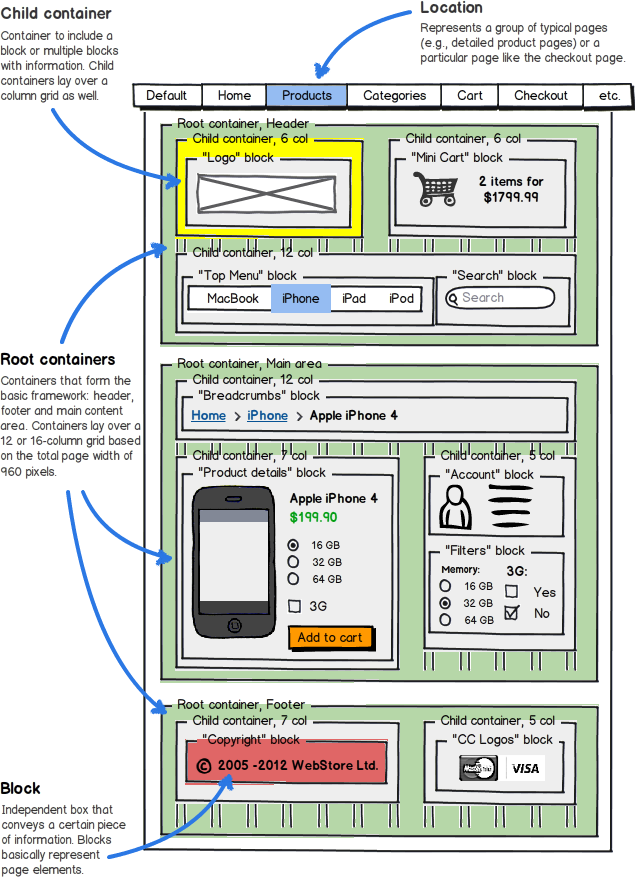
101 Design 97
102 98 CS-Cart Community Reference Guide Locations A location can represent either a certain type of the storefront pages (for example, detailed product pages, category pages, etc.) or a specific storefront page (for example, checkout page, cart page, etc). By changing the layout of a specific location, you automatically change all storefront pages that this location represents. Although a location cannot represent a specific page that belongs to a particular page type, you can configure individual blocks to appear on specific pages only. This feature makes it possible to create a unique look and feel for individual storefront pages. For more details, please refer to Design > Block Manager > Blocks. Tip: To associate a location with a specific page or page type, use the Dispatch option on the location attributes form. Default location A storefront must have a default location assigned. This property is assigned to a location by selecting the Default check box on the location attributes form. The default location defines the storefront header and footer that are inherited by the other pages. Also, the layout of the default location is used by the storefront paged that do not have a separate location defined. The location with the default property cannot be removed until you re-assign a new default location Actions on locations Locations are not hard-coded or anyhow limited. You can have as many locations as you need. However, the default set of locations is generally enough. When you need to perform an action on the locations, go to the block manager page (Design Blocks). General actions Adding a location To add a location, click + Add Location. A popup window with location properties opens. Specify the new location's properties and save the changes. Removing a location To remove a location, select the location and click the icon on the tab. This irrevocably removes the location and its layout. Editing location properties To change a location's properties, select the location and click the icon on the tab. A special form with the location attributes opens. Edit the location properties, then click Save to apply the changes and close the form. Exporting/importing locations Storefront locations can be imported and exported in an XML file. This feature becomes useful when you need to clone the layout among several storefront. It is also recommended that you export location before making any changes to the storefront layout. In case of emergency, you will be able to restore the original layout by importing the locations.
103 Design 99 Exporting locations To export locations: 1. Click + Export Locations. This opens the export settings form. 2. Select the locations to be exported. 3. Choose the other export settings: Clean up locations on import - If selected, original locations will be replaced with the location in the export file during an import operation. Otherwise, location will be added to the original location upon an import operation. Output - Output type: Direct download - export file will be downloaded to you computer; Server - file will be saved on the server where CS-Cart is installed. File name - Name of the export file. By default, it is layouts_<timestamp>.xml. 4. Click Export. Importing locations To import locations: 1. Click + Import Locations. This opens the form for selecting the import file. 2. Choose the import file or enter the file's URL. 3. Click Import Location properties To edit location attributes, select a location in Design Blocks and click the icon on the tab. This opens a special form with the location attributes. Once you have finished, click Save to apply the changes and close the form. A location has the following attributes: Dispatch - Choose a specific page or page type that the location will be associated with. Or select "Custom" to manually define the parameter 's value manually. The "dispatch" parameter has the following format: [controller_name].[mode_name], where [controller_name] is the name of the controller, and [mode_name] is the mode in which the controller works. This value is added to index.php?dispatch= part of the page and points to a specific location. For example, index.php?dispatch=checkout.cart points to the cart contents page while index.php?dispatch=checkout.checkout points to the checkout page. Name - Name of the location as it appears in the block manager. SEO attributes Along to adjusting the layout, you can define SEO attributes of a particular location. These attributes will be automatically assigned to all pages of this type. Page title - Title of the page as it appears in the title bar of a browser. META description - Contents of the HTML meta tag describing the page. META keywords - Contents of the HTML tag containing a list of search keywords for the page.
104 100 CS-Cart Community Reference Guide Framework Root containers As illustrated in Design > Block Manager, the basic storefront framework consists of three horizontal containers referred to as root containers. This basic frame is the same for all locations. Root containers cannot be added or removed. Moreover, the header and footer containers of the default location are inherited by other locations. This means that the changes that you make to these two areas automatically apply to all locations. Each root container is associate with a particular area of the storefront page - header, main content area or footer. However, root containers themselves do not generate the corresponding parts of the storefront pages. In fact, they only accommodate and form boundaries for multiple smaller containers referred to as child containers. Note: Although a root container may consist of zero child containers, you are supposed to include at least one. Child containers Child containers ensure a more detailed and sophisticated layout of the storefront paged. Multiple child containers with certain sizes, positions and styles can be nested inside a root container or inside other child containers. And each such container may include one or more blocks - boxed with information of certain type. Both the root and child containers are fixed to the storefront grid system used in CS-Cart. To create a child container: 1. Click on the container that will be the parent on the new container, then select Add Grid. The software opens a form with the new container's attributes. 2. Specify the new container's attributes. 3. Click Save when finished Grid system Under the hood, the CS-Cart storefront is built around the 960 Grid System ( It provides commonly used dimensions for the storefront elements based on the total page width of 960 pixels. There are two variants - 12 or 16 columns. They can be used separately or in tandem. The 12- and 16-column grids consist of 60- and 40-pixel columns, respectively. Each column has a 10 pixel margin on both the left and right sides. This creates 20 pixel gutters between the columns. Have a look at the demo scheme at to see how the elements are placed on the grid. In CS-Cart, the root containers always occupy the full page length, i.e. all columns in the grid. The number of columns is defined through the container settings. It determines the possible dimensions of child containers. Their length cannot exceed the number of columns in the grid. Also read in CS-Cart Knowledge Base: Full- and Custom-width Layouting with 960.gs
105 Design Container properties When you create or edit a containers, you can define the following attributes: Width - Number of columns used in the container. For child containers, this number cannot exceed the the length of the root container. Alignment (child containers only) - Container's position inside the root (or parent) container: Right Side, Left Side or Full Length. Prefix - Number of non-occupied buffer columns left to the container. Suffix - Number of non-occupied buffer columns right to the container. User-defined CSS class - Custom CSS class used by the container Blocks While containers form the storefront structure, blocks basically populate this structure with contents and function elements. It is convenient to regard blocks an separate boxes which represent a particular storefront component. This can be a search form, currency or language selector, top menu, product filter, banner, list of products, text, HTML insertion, etc. Just everything what can appear on the storefront is created by using blocks. Blocks differ from each other in the type of data they represent. However, blocks with the same data type can have different filling, appearance and configuration. Moreover, certain blocks may be assigned to specific items/pages only. This makes blocks a highly powerful and flexible tool for building custom storefronts and creating individual pages out of a typical framework. CS-Cart already offers a number of pre-defined blocks. Use them to quickly add the most popular and common storefront components. In addition, you can create custom blocks based on the available templates. Actions on blocks By using the block manager, you can re-arrange blocks in the frame, add and remove blocks, edit block properties, activate and disable blocks, assign blocks to specific items/pages. When you need to perform an action on the blocks, go to Design Blocks and select the location where the necessary block appears or should appear. Tip: For blocks that refer to the footer or header container, make sure to select the default location. Moving blocks To move a block to a different position inside the frame: Drag-n-drop the block to the required position. Tip: Remember that blocks must be nested inside a child container. Adding blocks When adding a block, you can use one of the following options:
106 102 CS-Cart Community Reference Guide Add a pre-defined block. Create and add a custom block with a specific configuration. To add an existing block: 1. Click on the container where the block should be placed and select Add Block. 2. Select Use Existing Block. 3. Choose a block from the list and click its icon. The block will appear among the other objects in the frame. To create and add a new block: 1. Click on the container where the block should be placed and select Add Block. 2. Select Create New Block. 3. Choose a block type and click its icon. This opens a window with the new block configuration. 4. Set up the block's parameters. 5. Click Create when finished. The block will appear among the other objects in the frame. Also, it will be added to the list of the existing blocks. Tip: Block types and properties are described in the "Block types and properties" topic later in this the guide. Editing blocks To edit a block: 1. Move the cursor over the block and click. This opens the block's configuration form. 2. Edit the block's parameters. 3. Click Save to apply the changes. Tip: Block types and properties are described in the "Block types and properties" topic later in this the guide. Deleting blocks To remove a block from the frame Move the cursor over the block and click. When prompted, confirm the action. Assigning blocks If a location represents a group of pages (for example, detailed product pages on the storefront), blocks are automatically assigned to all items in the group. However, you can hide a block individually for an item (product, category, page, etc.), if you want to hide the block on the corresponding storefront page. Similarly, you can force a block to appear on a particular storefront page if the block is deactivated in the location's settings. To hide/show a block on an item's storefront page: 1. Open the item's detailed page in the administration panel. 2. Shift to the Blocks tab. 3. Deactivate (hide) or activate (show) the block.

107 Design Block types and properties When you create a block, you need to choose a block type and also specify the block's properties. The block type defines the type of information that the block will contain. Block properties enables you to fine-tune the block to meet you specific requirements. The set of available properties may vary depending on the block type. After a block has been created, you can edit its properties at any time. Common properties Blocks have the following common properties regardless of their type: Name - Name/title of the block as it appears in the block manager and your block gallery. Wrapper - Template to border the block. User-defined CSS-class - Name of a custom CSS-class that you want to use for the block. The CSS-class itself is to be defined in the file styles.css located inside the skin directory.
108 104 CS-Cart Community Reference Guide Type-dependent properties The following is the list of available block types and the applicable type-specific properties: Banners Description Related add- One or more banners that were created in section Website Banners. Banners Management ons Templates Original Carousel Content Filling Manually Newest Block None settings Breadcrumbs Description Breadcrumbs, a navigation aid for visitors to keep track of their location on the storefront. Breadcrumbs provide links to the parent pages of the current one. Related add- None ons Templates Breadcrumbs Content Automatic Block None settings Cart content Description Mini-cart, a summary of the cart contents on a regular storefront page. Related add- None ons Templates Content Cart content Automatic Block Display bottom buttons settings Display delete icons Products links type
109 Design Categories Description Hierarchical hyperlinked list of product categories. Related add- None ons Templates Dropdown Emenu Multicolumns Text links Content Filling (depends on the template) Manually Newest Dynamic tree Full tree Rating Parent category Root element of the hierarchy. Block None settings Checkout Description Pieces of information and features that are to the checkout page. Related add- None ons Templates Order information Products in cart Summary Gift certificate Content Automatic Block None settings HTML block Description Custom HTML content. Related None 105

110 106 CS-Cart Community Reference Guide add-ons Templates HTML block Content Box with custom HTML content. Block None settings Main Description Main content area of a page. The content depends on the location type and is fully controlled by the Dispatch value in the location properties. For details, see Location properties. For example, the block's content on a product page include the product details like the price, product options, images, add to cart button, and so on. Related None add-ons Templates Automatic Content Automatic Block None settings Menu Description A custom menu created in Design Menus.
111 Design Related None add-ons Templates Dropdown Emenu Text links Content A custom menu created in Design Block None Menus. settings My account Description Links to a page with the customer's account details. Related None add-ons Templates My account Content Automatic Block None settings Pages Description Hierarchical hyperlinked list of static pages. Related None add-ons Templates Dropdown Emenu Text links Content Filling Manually Newest Dynamic tree Neighbours Parent page Root element of the hierarchy. Block None settings 107
112 108 CS-Cart Community Reference Guide Payment methods Description Icons that represent the available payment methods in the store. Related None add-ons Templates Payments Content Automatic Block None settings Products Description One or more products from the product catalog. Related add- Bestsellers ons Customers also bought Templates Central banner Grid Grid 2 Links thumb Multicolumns small Products Products2 Scroller Scroller2 Scroller3 Side box first item Small items Text link Without image Content Filling Manually Newest Recently viewed Popularity Best sellers Rating Block Hide add to cart button
113 Design settings Shipping methods Description Icons that represent the available shipping methods in the store. Related add- None ons Templates Shippings Content Automatic Block None settings Tags Description List of product and category tags. Related Tags add-ons Templates Tag cloud My tag cloud Content Filling Tag cloud My tags Limit Maximum number of items in the list. Block None settings Template Description A collection of versatile templates that represent different controls and pieces of information. Related None add-ons Templates Authentication information Copyright information Feature comparison Store logo My account links Payment systems icons 109
114 110 CS-Cart Community Reference Guide Profile information Quick links Search field Shipping estimation Newsletter subscription form Content Automatic Block None settings Block filling types Block filling type is defined under the Content tab of the block properties form. Best sellers With this filling type, the block contains links to products that are sold best in the store. This filling type is available when the Bestseller add-on add-on is installed and activated. Dynamic With this filling type, items are dynamically added to the block according to the block type. In practice, this include all available options. Dynamic tree With this filling type, the block contains a hierarchical list of items down the specified root element. Filters With this filling type, the block contains product filters created in Products Product filters. Full tree With this filling type, the block contains a hierarchical list of items down the hierarchy's root element. Manually With this filling type, you manually add items to the block (see instruction below).

115 Design 111 To add items: 1. Click +Add <ItemType>. The software opens a list of items. The <ItemType> part in the name of the control corresponds to the type of items to be added. For example, Add Product, Add Banner, and so on. 2. Select one or more items from the list. To facilitate the process, you can use the search form on the top of the list. 3. Click Add products and close to save the results and display the block properties form. My tags With this filling type, the block contains a list of tags added by the visitors. This filling type is available when the Tags add-on add-on is installed and activated. Neighbours With this filling type selected, the block contain a list of items, pages, that belong to the same echelon of the hierarchy as the item (page) being viewed at the moment. Let's consider a simple example. Imagine you have static pages organized in the hierarchy demonstrated below. When a visitor studies the page named "Reviews & award" (highlighted in bold), the block with the Neighbour filling type will contain only the pages named "About us", "Brick-n-mortar superstore", "Career opportunities" and "Contact".

116 112 CS-Cart Community Reference Guide Newest With this filling type, items are added automatically according to the parameters that you specify. The following parameters are available: Period Period of time over which items were added to the store database. The following choices are available: Any date - The block will display the latest items. The output is not bound to any time period. Today - The block will display the items that have been added on the day when the visitor opens the storefront. Last days - The block will display the items that have been added over a certain time period before the moment the visitor opens the storefront. The time period is specified in the Last days field below. Last days Number of days over which items were added to the store database before the visitor has opened the storefront. Limit Maximum number of items that will be displayed in the block. Plain With this filling type, the block contains plain text with no links. Popularity With this filling type, items are added automatically based on a greater number of views. Rating With this filling type, items are added automatically based on a greater ratings. This filling type is available when the Comments & Reviews add-on add-on is installed and activated.
117 Design 113 Recently viewed Block contains the items that have been recently viewed by the customer. Tag clouds With this filling type, the block contains a list of tags added that you have defined in the store. This filling type is available when the Tags add-on add-on is installed and activated Block templates The following templates are used in blocks. Affiliate Box with links to pages with the affiliate account details Authentication information Standard use authentication form. Breadcrumbs Standard breadcrumbs navigation aid. Carousel Items appear in a carousel-like manner: a horizontally scrollable list with pagination where only one item at a time is displayed. This template has the following settings: Navigation - Type of the item switcher in the list: dots, digits, or arrows. You can also disable manual switching between the items by selecting None. In this case, items will be switching automatically. Delay (in seconds) - Number of second to pass before items switch over. Cart content Standard mini-cart to be placed on the storefront pages. Central Layout intended for the content appearing in the center of the page. Central banner Layout intended for the content appearing in the center of the page. Copyright information Copyright information that you have specified in Settings Company.

118 114 CS-Cart Community Reference Guide Currencies A list of supported currencies defined in Administration Currencies. Appearance options should be configured in the block settings. Dropdown List of categories with drop-down lists of categories. This template is best for horizontal menus. For hierarchical list, the following menu options are supported: Second level elements - Maximum number of second-level elements within a menu item. Third level elements - Maximum number of third-level elements within a second-level menu item. Emenu List of categories with a fly-out list of subcategories. This template is best for side-box menus.
119 Design Events Box with the current events in the store. Extended Box with a custom set of product filters that are specified in the Contents tab of the block properties. Feature comparison List of products selected for comparison. Gift certificate Form to apply a gift certificate to the order. Grid Items (product thumbnail next to a text link) arranged in a grid. Grid 2 Items (product thumbnail above a text link) arranged in a grid. HTML block Custom HTML content Icon Regular RSS feed icon ( ) to the store's RSS feed. Languages 115

120 116 CS-Cart Community Reference Guide List of storefront languages defined in Administration Languages. Links thumb Product thumbnail with a text link to the product page. Live help Live help icon. When a visitor clicks the icon, the live help chat window opens. Multicolumns List of items arranged in multiple columns. Number of columns is defined through the template option Numb er of columns in the ob jects list. Multicolumns small List of small items arranged in multiple columns. My account Links to the account details of the logged in customer. My account links Links to the account pages of the customer who has logged in. My tag cloud List of customer's tags. Newsletter subscription form Form to subscribe to newsletters.
121 Design Order information Order details on the checkout page. Original Box with all available product filters and a price slider. Payment systems icons Icons of the supported payment systems in the store. Payments Icons of all the available payment methods in the store. Products Product are displayed in the box just the same as they are displayed in a typical product list. Products in cart Cart contents displayed during the checkout process. Products2 Product are displayed with thumbnails and price, and are arranged in multiple columns. Profile information Profile details of a customer who has logged in. These include login credentials and personal data. Quick links Active quick links defined in Design Quick links. Scroller Scrolled list of products (product thumbnail is at the top). Scroller2 Scrolled list of products (product thumbnail is on the left). Scroller3 Scrolled list of products (no thumbnails). Search field Regular search form. Shipping estimation 117
122 118 CS-Cart Community Reference Guide Box with estimated shipping rates Shippings Icons of all the available shipping methods in the store. Side box Template for a poll or questionnaire that is placed inside a side box.s Side box first item The first product is displayed with a thumbnail and a text link, and the rest of the products are represented as a link to the products page. Small items Product thumbnail with a text link to the product page. Store locator Location of your store on Google's map as specified in Administration Store Locator. Store logo Storefront logo as specified in Design Logos. Subscribe Form to subscribe to a newsletter. Summary Template to display the order summary on the checkout page. Tag cloud List of tags that the store administrator created in Website Tags. Testimonials List of testimonials submitted by the customers. To manage testimonials, use section Website Testimonials. Text links A simple list of text links.

123 Design Vendors List of active vendors accounts in the store. Without image Simple text link together with the product price Block settings Blocks can have the following specific settings: Display bottom buttons Select to display View cart and Checkout buttons in the mini-cart. 119
124 120 CS-Cart Community Reference Guide Display delete icons Select to display the Delete icon in the mini-cart. Feed description Description of the RSS feed. Feed title Title of the RSS feed. Format Format to display items - text titles or icons. Hide add to cart button If selected, the Add to cart button does not appear in the block. Limit Maximum number of testimonials displayed in the block. Minimal number if items to be placed in a dropdown list If the number of available items is equal or exceeds the number that you enter here, the selector is displayed as a dropdown list. Number of items

125 Design 121 Number of items (products or pages) to be included in an RSS feed. Products links type Select whether to display (Thumb nail) or not (Text) a product thumbnail in the mini-cart. Random Select to display testimonials randomly. Otherwise, the latest testimonials will be displayed in the box. Text A short text to be displayed right to the selector. This can be something like Select a language or Choose a currency Product tabs Use this section to manage the set of tabs that appear on detailed product pages on the storefront.
126 CS-Cart Community Reference Guide 122 Tip: To display additional product information in tabs, make sure to select Display product details in tabs in Settings Appearance. CS-Cart already has several pre-defined product tabs that are suitable for most situation. However, you can add more tabs by clicking + Add tab button and selecting a block to represent the contents. In addition, you can perform the following actions on product tabs: Change product tab names To change the name of a product tab, click the Edit link corresponding to the tab. This opens the tab's properties page. There enter the new name in the Name field and click Save. Enable and disable product tabs To enable or disable a product tab, change the status of the tab. - Product tab is enabled. - Product tab is disabled. Change the position of the product tab To change the position of a product tab relatively to other product tabs, drag and drop the tab. Enable/disable product tab for specific products To enable a product tab for specific products, click Enable for. This opens a form for adding products from the catalog. Add product's which must have the tab on their details pages. Other products will not use this tab. To disable a product tab for specific products, click Disable for. This opens a form for adding products from the catalog. Add product's which must not have the tab on their details pages. Other products will continue using this tab. To enable a tab for all products in the catalog, click Enable for all Quick links Use this section to manage the set of quick links. Literally, quick links are the shortcuts that improve the store navigation by providing immediate access to some of the storefront pages. Quick links are added to the storefront though a block of type "Custom" (Quick links template).
127 Design 123 Link attributes Link text - Name of the shortcut as it appears on the storefront. URL - URL of the page under the shortcut. It should not necessarily be an absolute URL consisting of the access protocol, the domain name and the path to the page. A relative link like index.php? dispatch=gift_certificates.add would be enough Menus Use this section to create custom storefront menus. Each such menu can be added to the storefront through a block of type "Menu".
128 124 CS-Cart Community Reference Guide Tab attributes Parent item - Choose whether it must be a root level item (a tab) or an item appearing in a drop-down submenu. Link text Name of the item/tab as it appears on the storefront. Position Position of the item relatively to the position of the other items of the same level. URL URL of the linked page. It should not necessarily be an absolute URL consisting of the access protocol, the domain name and the path to the page. A relative link like index.php?dispatch=pages.view&page_id=3 would be enough. Activate menu tab for - Storefront components pages where the items appear. Generate submenu - Select whether the system should generate a submenu containing child elements of the selected object (None = no submenu; Category = subcategories of the selected category; Page = child pages of the selected page). Pop-up direction - Side on which the popup menu will appear Sitemap Use this section to extend the store's site map that, by default, may include links to category and information pages only. Here you define a set of custom sections that should be included in the site map as well. Each new section can nest additional references/links which are added under the section's Edit link). Section attributes
129 Design 125 Position - Position of the section relatively to the position of the other custom sections in the map. Section name - Name of the section as it appears in the map. Status - Status of the section (Active or Disab led). Link attributes Position - Position of the section link entry relatively to the position of the other section link entries in the map. Section name - Name of the shortcut for the link as it appears in the map. URL - URL of the page under the shortcut. It should not necessarily be an absolute URL consisting of the access protocol, the domain name and the path to the page. A relative link like index.php?dispatch=profiles. update would be enough.

130 126 CS-Cart Community Reference Guide Template editor This section provides a facility to edit the source code of the skin files directly from a web browser. Note: The template editor is based on Javascript. So, Javascript must be enabled in your web browser. Controls The editor includes a file explorer that is used to locate the elements inside the /skins directory, and a number of controls to manage the files and folders. Pay attention to the Show active skins only check box that, if selected, hides inactive skins, which makes the editing less confusing. The other controls perform the following operations: Change permissions - Changing permissions on the selected file or folder (r = readable; w = writeable; x = executable). Create file - Creating a new file.
Bitrix Site Manager 4.1. User Guide
 Bitrix Site Manager 4.1 User Guide 2 Contents REGISTRATION AND AUTHORISATION...3 SITE SECTIONS...5 Creating a section...6 Changing the section properties...8 SITE PAGES...9 Creating a page...10 Editing
Ecommerce User Manual 105
 Ecommerce User Manual 105 Shopping Lists (Premium Only) A new feature for our Pro-Store clients is the Shopping List option. Now you can offer your customers the ability to create Shopping Lists which
Melbourne IT The Ecommerce Widget Guide - user guide
 Melbourne IT The Ecommerce Widget Guide - user guide TABLE OF CONTENT Overview 3 Creating the Online Store 3 The Shopping Bag 5 Store Management 7 Getting Started 8 Catalog 9 Adding a Product 10 Removing
Getting Started Guide. Getting Started With Quick Shopping Cart. Setting up and configuring your online storefront.
 Getting Started Guide Getting Started With Quick Shopping Cart Setting up and configuring your online storefront. Getting Started with Quick Shopping Cart Version 1.2 (12.17.08) Copyright 2007. All rights
graphxevolution, Inc. Shopping Cart Features SEARCH ENGINE OPTIMIZATION IMAGE MANAGEMENT
 IMAGE MANAGEMENT Supports image magnify, zoom, lightbox and enlarge Unlimited number of secondary images Image tags for better Search Engine Optimization (SEO) Upload images via the bulk image loader or
Bitrix Site Manager 4.0. Quick Start Guide to Newsletters and Subscriptions
 Bitrix Site Manager 4.0 Quick Start Guide to Newsletters and Subscriptions Contents PREFACE...3 CONFIGURING THE MODULE...4 SETTING UP FOR MANUAL SENDING E-MAIL MESSAGES...6 Creating a newsletter...6 Providing
3dCart Shopping Cart Software Release Notes Version 3.0
 Release Overview The latest installment in the 3dCart shopping software (version 3.0), is a complete redesign of the 3dCart platform. It includes performance improvements, new features, and usability enhancements.
Advanced Order Management Module Hosted Ecommerce Service Module Help Document
 Advanced Order Management Module Hosted Ecommerce Service Module Help Document This module is available as Optional Add On Module at one time charges of US $125.00 * on hosting plans as available at ecommercehosted.com
Document Services Online Customer Guide
 Document Services Online Customer Guide Logging in... 3 Registering an Account... 3 Navigating DSO... 4 Basic Orders... 5 Getting Started... 5 Attaching Files & Print Options... 7 Advanced Print Options
How To Build An Online Store On Ecwid
 Using Ecwid to Build an Online Store Ecwid provides all you need for a one-stop online shop, including a built-in 'drag and drop' shopping cart, the recording of customer registration details, destination
Online sales management software Quick store setup. v 1.1.3
 Online sales management software Quick store setup v 1.1.3 Table of Contents 1Shopizer urls...3 2Configure your store...3 Store and profile...4 Store Front Configuration...4 3Integration...6 4Configure
This guide provides additional information about topics covered in the webinar
 This guide provides additional information about topics covered in the webinar Scan to go there now! Copyright 2012 X.commerce, Inc. All rights reserved. Contents CHAPTER 1: Leveraging Store Content 1
nopcommerce User Guide
 nopcommerce User Guide Open source ecommerce solution Version 1.90 Copyright Notice Information in this document, including URL and other Internet Web site references, is subject to change without notice.
AJ Shopping Cart. Administration Manual
 AJ Shopping Cart Administration Manual AJ Square Consultancy Services (p) Ltd., The Lord's Garden, #1-12, Vilacheri Main Road, Vilacheri, Madurai-625 006.TN.INDIA, Ph:+91-452-2485553, 2485554. Fax : 2484600
nopcommerce User Guide
 nopcommerce User Guide Open source ecommerce solution Version 2.40 Copyright Notice Information in this document, including URL and other Internet Web site references, is subject to change without notice.
E-Commerce User Manual
 Table of Contents Welcome!...13 How to Find Topics in This Manual...13 Getting Started: Where Should I Begin?...13 What's New?...13 Store Setup Checklist...14 Using the Store Setup Checklist...14 The E-Commerce
Alfresco Online Collaboration Tool
 Alfresco Online Collaboration Tool USER MANUAL BECOMING FAMILIAR WITH THE USER INTERFACE... 4 MY DASHBOARD... 4 MY PROFILE... 6 VIEWING YOUR FULL PROFILE... 6 EDITING YOUR PROFILE... 7 CHANGING YOUR PASSWORD...
Kentico CMS 7.0 User s Guide. User s Guide. Kentico CMS 7.0. 1 www.kentico.com
 User s Guide Kentico CMS 7.0 1 www.kentico.com Table of Contents Introduction... 4 Kentico CMS overview... 4 Signing in... 4 User interface overview... 6 Managing my profile... 8 Changing my e-mail and
SiteBuilder E-Shop User Guide
 SiteBuilder E-Shop User Guide Contents What is eshop?... 3 Setting up eshop for the first time... 4 Setting up your ordering information... 4 Deciding how to process orders... 5 Setting your general configuration
VEDATRAK CRM 2.1. User's Guide
 VEDATRAK CRM 2.1 User's Guide 2 (C) 2006-2010 SUI SOLUTIONS. All rights reserved. 3 Contents Overview...9 System Requirements...11 Installation Notes...12 Vedatrak Basics...13 User Roles...13 System Administrator...13
Magento module Documentation
 Table of contents 1 General... 4 1.1 Languages... 4 2 Installation... 4 2.1 Search module... 4 2.2 Installation in Magento... 6 2.3 Installation as a local package... 7 2.4 Uninstalling the module... 8
Kentico CMS 7.0 E-commerce Guide
 Kentico CMS 7.0 E-commerce Guide 2 Kentico CMS 7.0 E-commerce Guide Table of Contents Introduction 8... 8 About this guide... 8 E-commerce features Getting started 11... 11 Overview... 11 Installing the
Order Manager Toolkit
 Order Manager Toolkit Magento Extension User Guide Official extension page: Order Manager Toolkit Page 1 Table of contents: 1. Order Manager Toolkit: functionality on the order grid.. 3 2. Extended grid:
Table of Contents. Introduction... 1 Technical Support... 1
 E-commerce Table of Contents Introduction... 1 Technical Support... 1 Introduction... 1 Getting Started... 2 Data Synchronization... 2 General Website Settings... 2 Customer Groups Settings... 3 New Accounts
EBOX Digital Content Management System (CMS) User Guide For Site Owners & Administrators
 User Guide For Site Owners & Administrators") EBOX Digital Content Management System (CMS) User Guide For Site Owners & Administrators Version 1.0 Last Updated on 15 th October 2011 Table of Contents Introduction... 3 File Manager... 5 Site Log...
EBOX Digital Content Management System (CMS) User Guide For Site Owners & Administrators Version 1.0 Last Updated on 15 th October 2011 Table of Contents Introduction... 3 File Manager... 5 Site Log...
E-Commerce Installation and Configuration Guide
 E-Commerce Installation and Configuration Guide Rev: 2011-05-19 Sitecore E-Commerce Fundamental Edition 1.1 E-Commerce Installation and Configuration Guide A developer's guide to installing and configuring
for Sage 100 ERP Business Insights Overview Document
 for Sage 100 ERP Business Insights Document 2012 Sage Software, Inc. All rights reserved. Sage Software, Sage Software logos, and the Sage Software product and service names mentioned herein are registered
Magento Handbook. Client Name. agency.info@nublue.co.uk 0800 033 7074 1
 Magento Handbook Client Name agency.info@nublue.co.uk 0800 033 7074 1 Content 1. What is Magento? 3 2. Logging in 4 Your Login Information 4 The Magento Dashboard 4 3. Understanding Products 5 Simple Products
Information Server Documentation SIMATIC. Information Server V8.0 Update 1 Information Server Documentation. Introduction 1. Web application basics 2
 Introduction 1 Web application basics 2 SIMATIC Information Server V8.0 Update 1 System Manual Office add-ins basics 3 Time specifications 4 Report templates 5 Working with the Web application 6 Working
Content Author's Reference and Cookbook
 Sitecore CMS 6.5 Content Author's Reference and Cookbook Rev. 110621 Sitecore CMS 6.5 Content Author's Reference and Cookbook A Conceptual Overview and Practical Guide to Using Sitecore Table of Contents
INVENTORY MANAGEMENT
 support@magestore.com sales@magestore.com Phone: 084 4 8585 4587 INVENTORY MANAGEMENT PLATINUM VERSION USER GUIDE Version 1.4 1 Table of Contents 1. INTRODUCTION... 4 2. HOW TO USE... 9 2.1. Manage Suppliers...
2013, Active Commerce 1
 2013, Active Commerce 1 Active Commerce User Guide Terminology / Interface Login Adding Media to the Media Library Uploading an Item to the Media Library Editing the Media Meta Data Adding Streaming Videos
!!!!!!!! Startup Guide. Version 2.7
 Startup Guide Version 2.7 Installation and initial setup Your welcome email included a link to download the ORBTR plugin. Save the software to your hard drive and log into the admin panel of your WordPress
CoreCommerce Administrator Guide
 Welcome to CoreCommerce, an E-Commerce Software Solution for your business. Whether you are creating a small catalog, or you are looking to upgrade to a newer solution, CoreCommerce is the solution for
For a full comparison of Magento Enterprise and Magento Community, visit http://www.magentocommerce.com/product/compare. Magento Feature List
 Magento is a feature-rich, professional Open Source ecommerce platform solution that offers merchants complete flexibility and control over the user experience, content, and functionality of their online
NDSU Technology Learning & Media Center. Introduction to Google Sites
 NDSU Technology Learning & Media Center QBB 150C 231-5130 www.ndsu.edu/its/tlmc Introduction to Google Sites Get Help at the TLMC 1. Get help with class projects on a walk-in basis; student learning assistants
business.officedepot.com User Guide
 business.officedepot.com User Guide https://business.officedepot.com CONTACT INFORMATION Contact For Customer Service: Call 888.263.3423 (888.2.OFFICE) For Technical Support: Call 800.269.6888 or e-mail
Kentico CMS 5.5 User s Guide
 Kentico CMS 5.5 User s Guide 2 Kentico CMS User s Guide 5.5 Table of Contents Part I Introduction 4 1 Kentico CMS overview... 4 2 Signing in... 5 3 User interface overview... 7 Part II Managing my profile
DataPA OpenAnalytics End User Training
 DataPA OpenAnalytics End User Training DataPA End User Training Lesson 1 Course Overview DataPA Chapter 1 Course Overview Introduction This course covers the skills required to use DataPA OpenAnalytics
Virtual Exhibit 5.0 requires that you have PastPerfect version 5.0 or higher with the MultiMedia and Virtual Exhibit Upgrades.
 28 VIRTUAL EXHIBIT Virtual Exhibit (VE) is the instant Web exhibit creation tool for PastPerfect Museum Software. Virtual Exhibit converts selected collection records and images from PastPerfect to HTML
Getting Started with Mamut Online Desktop
 // Mamut Business Software Getting Started with Mamut Online Desktop Getting Started with Mamut Online Desktop Contents Welcome to Mamut Online Desktop... 3 Getting Started... 6 Status... 23 Contact...
SAHARA DIGITAL8 RESPONSIVE MAGENTO THEME
 SAHARA DIGITAL8 RESPONSIVE MAGENTO THEME This document is organized as follows: Chater I. Install ma_sahara_digital8 template Chapter II. Features and elements of the template Chapter III. List of extensions
E-Commerce Installation and Configuration Guide
 E-Commerce Installation and Configuration Guide Rev: 2012-02-17 Sitecore E-Commerce Services 1.2 E-Commerce Installation and Configuration Guide A developer's guide to installing and configuring Sitecore
Custom Reporting Basics for ADP Workforce Now. Automatic Data Processing, LLC ES Canada
 Custom Reporting Basics for ADP Workforce Now Automatic Data Processing, LLC ES Canada ADP s Trademarks The ADP Logo, ADP, ADP Workforce Now and IN THE BUSINESS OF YOUR SUCCESS are registered trademarks
Sitecore E-Commerce Cookbook
 Sitecore E-Commerce Cookbook Rev: 2013-07-23 Sitecore E-Commerce Services 2.1 on CMS 7.0 Sitecore E-Commerce Cookbook A marketer's guide to Sitecore E-Commerce Services Sitecore E-Commerce Cookbook Table
SAHARA FASHION15 RESPONSIVE MAGENTO THEME
 SAHARA FASHION15 RESPONSIVE MAGENTO THEME This document is organized as follows: Chater I. Install ma_sahara_fashion15 template Chapter II. Features and elements of the template Chapter III. List of extensions
BusinessMan CRM. Contents. Walkthrough. Computech IT Services Ltd 2011. Tuesday, June 1 st 2014 Technical Document -1015 Version 6.
 Contents. Table of Figures... 2 Businessman Enterprise Overview... 3 System Settings... 3 Human Resources... 4 User Management... 5 Customers... 7 Prospects... 9 Document Management 9 Sales Dashboard...
Power Monitoring Expert 7.2
 Power Monitoring Expert 7.2 PDF version of the Web Applications online help 7ENxx-00xx-00 07/2013 PDF version of the Web Applications online help Safety information Safety information Important information
JOOMLA 2.5 MANUAL WEBSITEDESIGN.CO.ZA
 JOOMLA 2.5 MANUAL WEBSITEDESIGN.CO.ZA All information presented in the document has been acquired from http://docs.joomla.org to assist you with your website 1 JOOMLA 2.5 MANUAL WEBSITEDESIGN.CO.ZA BACK
Salesforce Classic Guide for iphone
 Salesforce Classic Guide for iphone Version 37.0, Summer 16 @salesforcedocs Last updated: July 12, 2016 Copyright 2000 2016 salesforce.com, inc. All rights reserved. Salesforce is a registered trademark
Excel 2003 PivotTables Summarizing, Analyzing, and Presenting Your Data
 The Company Rocks Excel 2003 PivotTables Summarizing, Analyzing, and Presenting Step-by-step instructions to accompany video lessons Danny Rocks 5/19/2011 Creating PivotTables in Excel 2003 PivotTables
E-Mail Campaign Manager 2.0 for Sitecore CMS 6.6
 E-Mail Campaign Manager 2.0 Marketer's Guide Rev: 2014-06-11 E-Mail Campaign Manager 2.0 for Sitecore CMS 6.6 Marketer's Guide User guide for marketing analysts and business users Table of Contents Chapter
Starting User Guide 11/29/2011
 Table of Content Starting User Guide... 1 Register... 2 Create a new site... 3 Using a Template... 3 From a RSS feed... 5 From Scratch... 5 Edit a site... 6 In a few words... 6 In details... 6 Components
Index. Terminology Pg. 2 Your Backend Pg. 3. Settings Pg. 5 Shipping methods Pg. 5 Tax settings Pg. 6 Store settings Pg. 7 SEO Settings Pg.
 Index Terminology Pg. 2 Your Backend Pg. 3 Settings Pg. 5 Shipping methods Pg. 5 Tax settings Pg. 6 Store settings Pg. 7 SEO Settings Pg. 8 Content Pg. 9 Homepage Image Pg. 9 Events Pg. 9 News Articles
Getting Started Guide. Getting Started With Web Store Design
 Getting Started Guide Getting Started With Web Store Design Getting Started with Web Store Design Copyright 2009. All rights reserved. Distribution of this work or derivative of this work is prohibited
Customizing forms and writing QuickBooks Letters
 LESSON 15 Customizing forms and writing QuickBooks Letters 15 Lesson objectives, 398 Supporting materials, 398 Instructor preparation, 398 To start this lesson, 398 About QuickBooks forms, 399 Customizing
Table of Contents INTRODUCTION... 2 HOME PAGE... 3. Announcements... 7 Personalize & Change Password... 8 Reminders... 9 SERVICE CATALOG...
 Table of Contents INTRODUCTION... 2 HOME PAGE... 3 Announcements... 7 Personalize & Change Password... 8 Reminders... 9 SERVICE CATALOG... 11 Raising a Service Request... 12 Edit the Service Request...
SEO Toolkit Magento Extension User Guide Official extension page: SEO Toolkit
 SEO Toolkit Magento Extension User Guide Official extension page: SEO Toolkit Page 1 Table of contents: 1. SEO Toolkit: General Settings..3 2. Product Reviews: Settings...4 3. Product Reviews: Examples......5
Chapter 15: Forms. User Guide. 1 P a g e
 User Guide Chapter 15 Forms Engine 1 P a g e Table of Contents Introduction... 3 Form Building Basics... 4 1) About Form Templates... 4 2) About Form Instances... 4 Key Information... 4 Accessing the Form
Intellect Platform - Tables and Templates Basic Document Management System - A101
 Intellect Platform - Tables and Templates Basic Document Management System - A101 Interneer, Inc. 4/12/2010 Created by Erika Keresztyen 2 Tables and Templates - A101 - Basic Document Management System
1. E-commerce features... 4 1.1 Getting started with the E-commerce Solution... 6 1.1.1 Installing your sample E-commerce Site... 6 1.1.
 Kentico 8 E-commerce features..................................................................................... 4 1 Getting started with the E-commerce Solution.............................................................
CentralMass DataCommon
 CentralMass DataCommon User Training Guide Welcome to the DataCommon! Whether you are a data novice or an expert researcher, the CentralMass DataCommon can help you get the information you need to learn
Magento - Feature Set
 Magento - Feature Set Marketing Promotions and Tools Flexible Coupons (pricing rules) with ability to restrict to stores, customer groups, time period, products, and categories. For example: Percent Discount
WELCOME TO REVEL SYSTEMS RETAIL SERVICE... 5 STARTING YOUR WORK... 6. Logging In to Your POS... 7. Refreshing the POS Settings...
 Retail Service User Guide. Page 2 of 81 Table of Contents WELCOME TO REVEL SYSTEMS RETAIL SERVICE... 5 STARTING YOUR WORK... 6 Logging In to Your POS... 7 Refreshing the POS Settings... 8 Clocking In and
For a full comparison of Magento Enterprise and Magento Community, visit http://www.magentocommerce.com/product/compare. Magento Feature List
 Magento is a feature-rich, professional Open Source ecommerce platform solution that offers merchants complete flexibility and control over the user experience, content, and functionality of their online
Manual. Version: 1.0.0
 Manual Version: 1.0.0 Table of Contents I. INTRODUCTION... 3 II. INSTALLATION... 5 a. System Requirements... 5 b. Installation... 5 c. Configure PayPal IPN... 5 d. Cron Setup... 6 e. Upload Email Logo...
Improved Navigation Magento Extension User Guide
 Improved Navigation Magento Extension User Guide Page 1 Table of contents: 1. Creation of attribute filters and navigation configuration 3 2. Creation of blocks with featured attribute options.. 11 3.
Web Dashboard. User Manual. Build 2.0 2015-09-17
 Web Dashboard User Manual Build 2.0 2015-09-17 This is the official user manual on using SAMLite web dashboard to perform reporting and administrative tasks. This manual describes each section of reporting
PORTAL ADMINISTRATION
 1 Portal Administration User s Guide PORTAL ADMINISTRATION GUIDE Page 1 2 Portal Administration User s Guide Table of Contents Introduction...5 Core Portal Framework Concepts...5 Key Items...5 Layouts...5
UNIVERSITY OF CALGARY Information Technologies WEBFORMS DRUPAL 7 WEB CONTENT MANAGEMENT
 UNIVERSITY OF CALGARY Information Technologies WEBFORMS DRUPAL 7 WEB CONTENT MANAGEMENT Table of Contents Creating a Webform First Steps... 1 Form Components... 2 Component Types.......4 Conditionals...
Single Property Website Quickstart Guide
 Single Property Website Quickstart Guide Win More Listings. Attract More Buyers. Sell More Homes. TABLE OF CONTENTS Getting Started... 3 First Time Registration...3 Existing Account...6 Administration
Includes: Ordering Setting up Selection Lists What's on ipage Managing Your Relationship with Ingram Through ipage
 Includes: Ordering Setting up Selection Lists What's on ipage Managing Your Relationship with Ingram Through ipage Welcome to ipage, Ingram Library Services total online solution for your library's needs.
SellerDeck 2013 Reviewer's Guide
 SellerDeck 2013 Reviewer's Guide Help and Support Support resources, email support and live chat: http://www.sellerdeck.co.uk/support/ 2012 SellerDeck Ltd 1 Contents Introduction... 3 Automatic Pagination...
inconcert Tutorials Using the Magento ecommerce System
 inconcert Tutorials Using the Magento ecommerce System Domain: Administration Area: Username: Password: MagentoTrainingDoc2011.doc 1 of 32, 1/3/2012 Table of Contents I. Your Dashboard... 3-4 1. Logging
Web Forms for Marketers 2.3 for Sitecore CMS 6.5 and
 Web Forms for Marketers 2.3 for Sitecore CMS 6.5 and later User Guide Rev: 2013-02-01 Web Forms for Marketers 2.3 for Sitecore CMS 6.5 and later User Guide A practical guide to creating and managing web
Last Updated on November 16, 2004
 Last Updated on November 16, 2004 Copyright 1998-2004. All rights reserved. Page - 1 TABLE OF CONTENTS SECTION 1: LOGIN... 3 SECTION 2:QUICKSTART WIZARD... 4 SECTION 3: PAGE MANAGER... 9 SECTION 4:GENERAL
Salesforce Customer Portal Implementation Guide
 Salesforce Customer Portal Implementation Guide Salesforce, Winter 16 @salesforcedocs Last updated: December 10, 2015 Copyright 2000 2015 salesforce.com, inc. All rights reserved. Salesforce is a registered
Modular Merchant. Quick Set-Up Guide
 Modular Merchant Quick Set-Up Guide Version 1.51 7/19/2004 A Quick Introduction to the Quick-Start Guide The purpose of this Quick-Start Guide is to assist new Modular Merchant clients get their store
1: 2: 2.1. 2.2. 3: 3.1: 3.2: 4: 5: 5.1 5.2 & 5.3 5.4 5.5 5.6 5.7 5.8 CAPTCHA
 Step by step guide Step 1: Purchasing a RSMembership! membership Step 2: Download RSMembership! 2.1. Download the component 2.2. Download RSMembership! language files Step 3: Installing RSMembership! 3.1:
Kentico CMS User s Guide 5.0
 Kentico CMS User s Guide 5.0 2 Kentico CMS User s Guide 5.0 Table of Contents Part I Introduction 4 1 Kentico CMS overview... 4 2 Signing in... 5 3 User interface overview... 7 Part II Managing my profile
Site Management Abandoned Shopping Cart Report Best Viewed Products Report Control multiple websites and stores from one
 Site Management Abandoned Shopping Cart Report Best Viewed Products Report Control multiple websites and stores from one Best Purchased Products Report Administration Panel with ability to share as much
Event Management Do-It-Yourself User Guide
 ) Event Management Do-It-Yourself User Guide Last Revised 9/6/11 Version 1 Powered by TABLE OF CONTENTS MODULES: 3-74 ereg Module: 3-58 Event Info Tab 4-13 Categories Tab 14-16 Attendee Info Tab 17-19
2011 ithemes Media LLC. All rights reserved in all media. May be shared with copyright and credit left intact
 Meet Builder. Introducing ithemes Builder, the innovative WordPress theme that operates more like web design software. Unlike other premium WordPress themes, Builder stretches the possibilities of WordPress
Sage Abra SQL HRMS Reports. User Guide
 Sage Abra SQL HRMS Reports User Guide 2010 Sage Software, Inc. All rights reserved. Sage, the Sage logos, and the Sage product and service names mentioned herein are registered trademarks or trademarks
magento features list
 features list magento features list Magento is a feature-rich ecommerce platform solution that offers merchants complete flexibility and control over the functionality of their online channel. Magento
Microsoft Access 2010 Part 1: Introduction to Access
 CALIFORNIA STATE UNIVERSITY, LOS ANGELES INFORMATION TECHNOLOGY SERVICES Microsoft Access 2010 Part 1: Introduction to Access Fall 2014, Version 1.2 Table of Contents Introduction...3 Starting Access...3
DIY Email Manager User Guide. http://www.diy-email-manager.com
 User Guide http://www.diy-email-manager.com Contents Introduction... 3 Help Guides and Tutorials... 4 Sending your first email campaign... 4 Adding a Subscription Form to Your Web Site... 14 Collecting
Retail POS User s Guide. Microsoft Dynamics AX for Retail
 Retail POS User s Guide Microsoft Dynamics AX for Retail January 2011 Microsoft Dynamics is a line of integrated, adaptable business management solutions that enables you and your people to make business
INVENTORY MANAGEMENT. TechStorm. http://www.gotechstorm.com/howto/inventorymanagement.pdf
 INVENTORY MANAGEMENT TechStorm http://www.gotechstorm.com/howto/inventorymanagement.pdf Inventory Management Table Of Contents Add Inventory Items In Tablet... 3 Transaction Flow for Adding Inventory in
Table of Contents INTRODUCTION...2 HOME PAGE...3. Announcements... 6 Personalize... 7 Reminders... 9 Recent Items... 11 SERVICE CATALOG...
 Table of Contents INTRODUCTION...2 HOME PAGE...3 Announcements... 6 Personalize... 7 Reminders... 9 Recent Items... 11 SERVICE CATALOG...12 REQUEST...14 Request List View... 15 Creating a New Incident...
PDG Shopping Cart 4.0. Quick Start Guide
 PDG Shopping Cart 4.0 Quick Start Guide , Inc. 1751 Montreal Circle, Suite B Tucker, Georgia 30084-6802 Copyright 1998-2004 PDG Software, Inc.; All rights reserved. PDG Software, Inc. ("PDG Software")
Welcome to 360 Reporting... 3. Accessing 360 Reporting... 3 MicroEdge Support Program... 3. Using 360 Reporting... 4. Setting up Quick Find...
 Legal Notice The software described in this document is furnished under a license agreement. The software may be used or copied only in accordance with the terms of the agreement. No part of this document
Setting Up Solar Web Commerce. Release 8.6.9
 Setting Up Solar Web Commerce Release 8.6.9 Legal Notices 2011 Epicor Software Corporation. All rights reserved. Unauthorized reproduction is a violation of applicable laws. Epicor and the Epicor logo
quick start guide A Quick Start Guide inflow Support GET STARTED WITH INFLOW
 GET STARTED WITH INFLOW quick start guide Welcome to the inflow Community! This quick-start guide includes all the important stuff to get you tracking your inventory before you know it! Just follow along
BIG LOTS VENDOR COMPLIANCE WEB PORTAL USER GUIDE - VENDOR 300 PHILLIPI RD. COLUMBUS, OH 43228
 BIG LOTS VENDOR COMPLIANCE WEB PORTAL USER GUIDE - VENDOR 300 PHILLIPI RD. COLUMBUS, OH 43228 Contents Getting Started...4 Tips for Using Actionable Intelligence... 4 Logging into Actionable Intelligence...
Integrated Accounting System for Mac OS X
 Integrated Accounting System for Mac OS X Program version: 6.3 110401 2011 HansaWorld Ireland Limited, Dublin, Ireland Preface Standard Accounts is a powerful accounting system for Mac OS X. Text in square
Cloud. Hosted Exchange Administration Manual
 Cloud Hosted Exchange Administration Manual Table of Contents Table of Contents... 1 Table of Figures... 4 1 Preface... 6 2 Telesystem Hosted Exchange Administrative Portal... 7 3 Hosted Exchange Service...
ImageNow Report Library Catalog
 ImageNow Report Library Catalog Business Insight Version: 6.6.x Written by: Product Documentation, R&D Date: February 2012 ImageNow and CaptureNow are registered trademarks of Perceptive Software, Inc.
5.2.3 Thank you message 5.3 - Bounce email settings Step 6: Subscribers 6.1. Creating subscriber lists 6.2. Add subscribers 6.2.1 Manual add 6.2.
 Step by step guide Step 1: Purchasing an RSMail! membership Step 2: Download RSMail! 2.1. Download the component 2.2. Download RSMail! language files Step 3: Installing RSMail! 3.1: Installing the component