Build and Fly the Fokker D- 8
|
|
|
- Bonnie Stephanie Lawson
- 7 years ago
- Views:
Transcription
1 Details are carefully carried out. Note movable controls The high wing gives it unusual stability Build and Fly the Fokker D- 8 Complete Data From Which You Can Build a Successful Model of a Famous German World War Fighter By HARRY SHAFFER WHEN a flying scale model is to be built, it is wise to select a type of ship which lends itself to stability. As a rule, the type which fulfills this requirement to the highest degree is a high-wing monoplane or parasol. In such ships the center of gravity is low and the wing area smaller in proportion to the tail surfaces. Then again, the monoplane type is usually superior in flying qualities to the biplane. In looking through our list of planes and giving consideration at the same time to these factors in order to make a wise selection, we could not help being impressed with the general design of the Fokker D-8. Examining the design of this plane more carefully, we found that it had the necessary factors to the fullest degree. It is a monoplane, the wing is parasol, the center of gravity is low and the tail surfaces are quite large in proportion to the wing area. Only one drawback is apparent; the wing is located quite near the nose. This fact might make it difficult to balance the model actively for flight. However this fault may easily be corrected by addling a little weight to the forward end of the ship. This selection was well justified after I had made the first flying model for it proved to be an excellent flyer. Another factor which makes this ship interesting to build is the history that it made for itself during the World War. It made its appearance in the fall of 1918, though very few of these fighters actually saw combat. The planes that actually reached the front were outstanding in their ability to cope with Allied machines. It was powered with a 110 h.p. Oberursel rotary motor which grave the ship a speed of approximately 115 m.p.h. Like many German ships, this plane was ahead of its time as regards its general design. The wings were cantilever without any brace wires. Since the World War the trend of development has progressed continuously toward this type of plane. The Douglas Transport, Boeing model 247 and other similar ships are good examples. Before trying to construct the model, it is wise to look over the plans carefully and familiarize yourself with the details of construction. Do not start until you have a clear picture in your mind of the entire ship. A great deal of material has been wasted by such procedure. After you feel that you understand the plans thoroughly, gather all the necessary material together and commence your work.

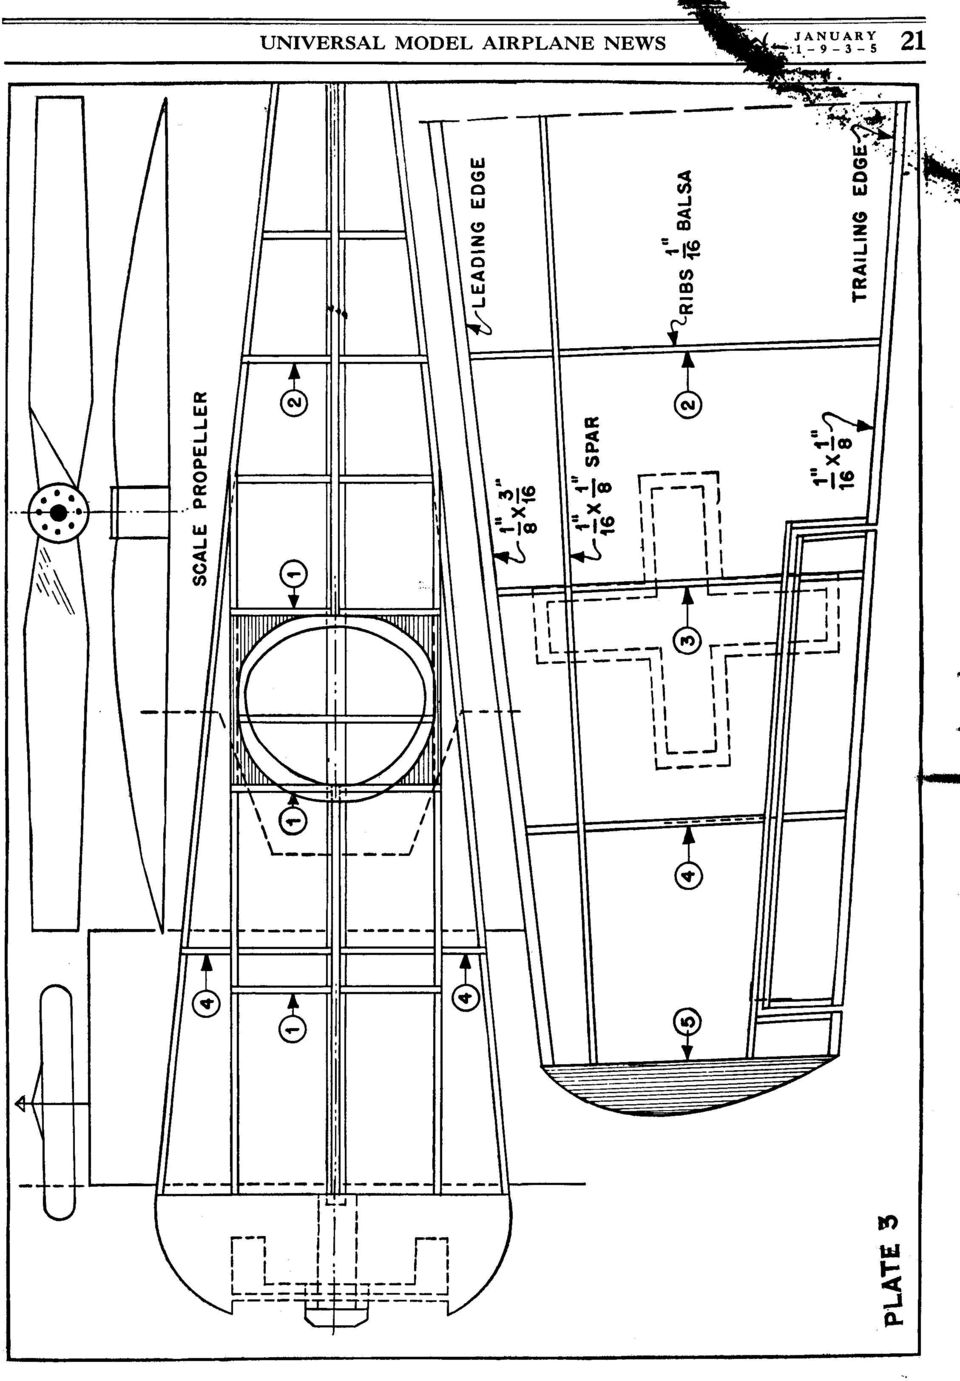
2 Fuselage Plates No. 1 and 2, giving the side view, are used to construct the sides. of this model. By placing the drawing over a board and using pins, the longerons are thus held in place. Both sides of the fuselage are made at one time, thus assuring them of being the same. The vertical braces are now cut and placed in by gluing the bottom one first and then putting the top ones in and gluing them. When the two sides are completely dry, separate and begin to glue the cross braces starting at the front of the model. This makes the frame of the fuselage. We must next cut the bulkheads which are found on plate 1. These are made from 1/16 flat balsa and glued in their proper places. The cowling must now be made. This will have to he carved or made on a lathe, the latter being the best way. The drawing on plate 3 shows the exact shape. Take the best of cart in making the cowling, the point where the nose button joins the cowling is rather thin, thus requiring much care in turning. After it is completely shaped, sand smooth with very fine sandpaper and give about three coats of banana oil. This when doped will dry with a bright luster. The inside of the cowling is painted black and then the cylinders are made, painted and glued in place. This complete the cowling. Now that the cowling is made, glue to front of fuselage and the stringers are now glued in place. The motor stick is glued in place; (Note the 1/l6" x 1/8" support); the rear hook being placed on the motor stick before being glued in the fuselage. The cockpit is built up from 1/16" flat balsa. Give the fuselage a light sanding so as to secure a smooth covering job. Cover all of the straight surfaces first, using banana oil as adhesive, talking a small strip at a time. The curved parts of the fuselage are covered now taking them in small sections also. After the fuselage is covered, spray lightly with water. An insect spray works very well, and let it dry. As soon as it is dry, give it two coats of dope. Any of the leading model airplane supply houses handle a good grade of dopes. In the model pictured it is colored red fuselage with cream wings and Black details. The dark fuselage and light wing color combination seems to be as attractive as any two color combination. After the two coats of dope are applied, start on the details of the fuselage. The steps and handles are made of No. I 2 music wire and glued in place. The breather pipe, which is made from 1/16" square balsa, is colored black and glued in place and the shell ejector chute, also made of 1/ 16" square balsa, is colored Black and glued in place. The cockpit padding is cut from 1/16" flat balsa, colored black and glued in place. In gluing this, be careful not to drop any glue on the paper covering or it will draw it, thus forming wrinkles. The tail skid is made from 1/8" flat balsa colored black and glued in place. Make the wind shield from thin celluloid and glue in place, thus completing the fuselage. Landing Gear The landing gear is made from 1/8" x 3/16" hard balsa, or bamboo strips (preferred). Make the struts as shown and streamline. They are now painted black and glued in their proper places. Lift Bar The lift bar is made the same as if it were a wing. Five ribs are cut from 1/16" flat balsa and notched. The main spar ( I /16" x 3/16") is pinned to the drawing and the ribs glued in their place to it. The trailing edge (1/16" x 1/8") and the leading edge (1/8" x 3/16") are now glued in place. The axle is one solid piece of No. 12 music wire. Glue it to the side of the main spar. When it is dry, give a light sanding and cover. Spray it with water and let it dry. When dry, give two coats of cream dope and attach to the landing gear struts now on the fuselage. The wheels are 1-7/8" in diameter, turned on a lathe like the cowling and are colored with black and red discs and placed on axles. They are held on by small clots of glue. This completes the landing gear.

3 The finished model in full flight provides a real thrill Tail Surfaces The rudder is built completely of 1/16" square and 1/ 16" flat balsa. Cut the curved piece, or trailing edge of the rudder from 1/16" flat balsa. Start by pinning the 1/16" square pieces to the drawing and gluing them together. The copper wire hinges are now glued in place, making the rudder movable with the fin. Sand the whole framework lightly, cover, water dope it and then give two coats of cream dope to the fin and two coats of red dope to rudder. The stabilizer is also built completely of 1/16" square and 1/16" flat balsa. The 1/16" flat curved parts are now cut and pinned to the drawings. The 1/16" square is now cut to fit and glued in place. The copper wire hinges are now glued in place, thus making the elevators movable with the stabilizer. Sand the completed frameworks lightly, cover, water dope and give two coats of cream dope to the stabilizer and two coats of red dope to the elevators, the tail surfaces being done and glued to the fuselage in their proper places. The elevator and rudder horns, with the thread cables are now glued in place. The horns are colored black. This completes the tail surfaces or rear part of the plane. Wing Struts The wing struts are made from 1/8 x 3/16" hard balsa sanded to a streamline section. The full size of these struts will be found on plate 4. After they are cut to size and streamlined, they are painted black. When they are dry, pin to the fuselage in their proper places and glue. They are now ready to receive the wing. Wing Make all ribs from 1/16" flat balsa. The size and number of each is shown on plate 5. One must always remember that the flying properties of a plane lie almost completely in accurate airfoil section. Therefore, cut them to the exact size shown on the drawings. The two sub-spars are pinned on the drawing and the ribs are glued in their proper places on the sub-spars. The leading edge (3/16" x 1/8 ) is now pinned to the drawing and glued to the center section ribs. The trailing edge (1/16" x 1/8") is done in the same manner. The main spar is now glued to the section ribs. This makes the center section with the main spar, leading and trailing edges extending from it. Crack the leading and trailing edges at the center section and pin to their places on the drawing. The solid wing tips are now made and are glued to the leading and trailing edges in the proper place. Now, put No. 2 to No. 4 ribs in their places and then crack the main spar at the center section and glue to the notches in the ribs just added. Cut and fit main spar snug with wing tip and glue to it. The aileron spar is glued to the aileron ribs which are cut to allow it to pass through. The small sub-ribs must now he glued in place. The copper wire hinges are now added, making the ailerons movable with the wing. A slight dihedral is best for best flying results, although it is not to scale. Give the wing a light sanding, cover, water dope and give two coats of cream dope. The ailerons are given two coats of red dope. Add the aileron horns and control thread wires. The horns are colored black. The wing is pinned down over waxed paper after doping. The wing is now

4 glued to the wing struts now on the fuselage. You can now put on the aileron control wire tubes number C-C on drawings. General Assembly The propeller is carved from a hard balsa block 1-1/4" x 5/8" x 8" and is laid out as shown on plate 2. After it is carved, sand smooth and balance. Give two coats of banana oil and two coats of cream dope. After it is dry, assemble with three washers to the nose bearing, one washer glued to the propeller, the other to the nose button and the other being free. This plane is powered with six strands of 1/8" flat rubber which is now put in the fuselage and connected to the propeller. The iron crosses are made from black and white tissue paper and glued in their places. They are shown by dotted line on the drawings. Flying instructions The best place to fly your model is in a large field with tall grass. Give about fifty turns and hand-launch it. If it dives, raise the elevators a bit. If it climbs, lower the elevators. Do this until you get it perfectly balanced. To make it circle, bend the rudder in the way you want it to go. If these plans have been followed closely, you will have a beautiful model and a wonderful flyer. (If the model proves to be tail heavy, weight the nose to create the proper balance). Scanned from January 1935 Universal Model Airplane News

5

6

7
8

Micro. Pitts Special for the RFFS-100 by Chris O Riley
 Micro Pitts Special for the RFFS-100 by Chris O Riley F1 F2 F3 F4 1 2 3 4 All wood 1/32 inch sheet unless otherwise stated. F1 F2 F3 F4 Small balsa blocks for LG reinforcement Small balsa blocks for LG
COMPLETE KIT PARTS LIST
 Your kit contains the following parts. Please check your kit for any missing or damaged parts before starting construction. Wood Bag: COMPLETE KIT PARTS LIST 1 LC-504-01 3/32"x4"x24" Laser Cut Balsa Sheet
TopSky DLG Installation Manual
 TopSky DLG Installation Manual Attention: Because after the compound materials solidify, there will be ammonia iris on the surface, which affect the bonding strength afterwards. Please polish with sandpaper
Front landing gear legs. Carve from balsa block
 0 Carve these parts from balsa blocks C-1(2) C-2(3) Note: these cross pieces do not have formers attached. They help establish the proper curve of each fuselage side. Front landing gear legs Carve from
FREEBIRD THE ORIGINAL D.I.Y. ORNITHOPTER! Tools and Glue. Required Materials
 Do not try to make your ornithopter using "household materials". If you want it to fly, you have to build it right. FREEBIRD THE ORIGINAL D.I.Y. ORNITHOPTER! Wingspan: 16 inches Weight: 1/4 ounce The Ornithopter
Junkers Ju 88 Manual Version 1.2 13 March 2008
 Junkers Ju 88 Manual Version 1.2 13 March 2008 Specifications Wingspan: 49.75 inches Area: 339 square inches Length: 36.12 inches Power: 2x BP21 Brushless 2x Speed-400 Copyright 2007 Thomas A. Jacoby and
98 Turbine Vulcan Build photos
 98 Turbine Vulcan Build photos Just some of the useful tools needed plus a quality razor plane FUSELAGE Note: Fitting parts back to front is an easy mistake to make with this build, so mark all part with
DL50 Discus Launch Glider
 DL50 Discus Launch Glider DL50 Specifications Length: 39 in. (99 cm.) Wingspan: 50in. (127 cm.) Wing Area: 275in 2 (1774 cm 2 ) Weight: 8oz. (227 g.) Revision History Date Revision Notes/Comments 6/12/2004
Katana EP. Specifications. 301 sq in / 19.4 sq dm. * Specifications are subject to change without notice.*
 INSTRUCTION MANUAL Katana EP Outrunner Motor Requires: -channel radio w/ micro servos, 0A Brushless ESC, 3 cells.v 00mAh Li-Po battery & charger. Wing Span Wing Area Flying Weight Fuselage Length HIGH
Specifications. *Specifications are subject to change without notice.*
 INSTRUCTION MANUAL Extra 300 EP (0) 50W Motor System Requires : -channel radio w/ mini servos, Outrunner Motor KM37810, w/ Propeller Adaptor HW3010, 0A Brushless ESC with 11x8E proepller, cells 1.8V 300mAh
1/5 PIPER J-3 CUB. Before commencing assembly,please read these instructions thoroughly. Wing Span:84. 0 in / 2130 mm
 INSTRUCTION MANUAL Before commencing assembly,please read these instructions thoroughly. 1/5 PIPER J-3 CUB 1/5 PIPER J-3 CUB Wing Span:8. 0 in / 130 mm Wing Area:968 sq in / 6. 5 sq dm Flying Weight:8.
30a. 31a. 30b 12. 31b. 29a 28a 1/48SCALEHEMSDAUPHIN PAGE2/10
 9 11 10 43 42 49 50 32 7 51 52 48 58 5 6 8 59 2 3 4 1 24 30a 31a 30 30b 12 31b 31 28 13 29 29a 28a 1/48SCALEHEMSDAUPHIN PAGE2/10 38 82 38f 85 84 86 83 37d 35 38a 37 60 17 21 20 16 15 87 27 34 40c 36b 36a
AIRCRAFT GENERAL www.theaviatornetwork.com GTM 1.1 2005 1-30-05 CONTENTS
 www.theaviatornetwork.com GTM 1.1 CONTENTS INTRODUCTION... 1.2 GENERAL AIRPLANE... 1.2 Fuselage... 1.2 Wing... 1.2 Tail... 1.2 PROPELLER TIP CLEARANCE... 1.2 LANDING GEAR STRUT EXTENSION (NORMAL)... 1.2
SILVER WINGS 1/32 GLOSTer gladiator Mk1/mk2 build guide
 SILVER WINGS 1/32 GLOSTer gladiator Mk1/mk2 build guide Parts Cleanup As with other Silver Wings kits, parts cleanup is fairly simple, and due to the soft resin they use for their kit, a sprue cutter can
Technical data. Assembly: Introduction. Before starting construction. Equipment needed. Glider or Electro Glider?
 Palio pro S2084 Technical data Wing span: Lenght: Weight: Wing area: Wing loading: El. Motor/ no. of cells: Controls: Introduction 2150 mm 1150 mm 1120 g 1860 g 42 dm2 27 g/dm2 44 g/dm2 600 / 7-8 cells
BUILDING INSTRUCTION ERWIN XL slope ERWIN XL ultralight - ERWIN XL ultralight Elektro. Erwin XL building Instruction October 2012. www.pcm.
 Wing span [mm]: 3000 Aspect ratio: 14,67 Wing area [dm2]: 61,33 Wing loading: Erwin XL slope: 45,6-70,1 Erwin XL ultralight: 20,4 Erwin XL ultralight Elektro: 23,6-24,5 Weight [g]: Erwin XL slope: 2800-4300
Super Stunts 60. Specifications. * Specifications are subject to change without notice.*
 A L M O S T- R E A D Y- T O - F LY INSTRUCTION MANUAL Super Stunts 60 0.60-0.75 cu. in. displacement 2-stroke Requires : 4- channel radio w / Specifications 5 standard servos Wing Span Wing Area Flying
BUILDING INSTRUCTION SAL-DLG MINI-FIREWORKS. MINI-Fireworks building instruction May 2015. www.pcm.at 1
 Wingspan [mm]: 950 Aspect ratio: 7,7 Wing area [dm2]: 11,7 Wing loading [g/dm²] : 12-13 Takeoff weight [g]: 155 (Mini-S), 165 (Mini-Q) Airfoil: AG03 mod 3-side-view version with ailerons BUILDING INSTRUCTION
Assembly and Operating Manual Nano warbirds FW 190 Specification: *Length: 18 1/2"(470mm) *Wing Span: 21 7/10"(550mm)
 *Wing Span: 21 7/10(550mm)") Assembly and Operating Manual Nano warbirds FW 190 Specification: *Length: 18 1/2"(470mm) *Wing Span: 21 7/10"(550mm) *Flying Weight: 6 1/2 oz (185g) Dear customer, Congratulations on your choice of a
Assembly and Operating Manual Nano warbirds FW 190 Specification: *Length: 18 1/2"(470mm) *Wing Span: 21 7/10"(550mm) *Flying Weight: 6 1/2 oz (185g) Dear customer, Congratulations on your choice of a
Assembly Manual For. Dolphine Jet. Wingspan: 88 in Wingarea: 1479.8 sp in Length: 78.8 in Engine: 50CC. www.pilot-rc.com
 Assembly Manual For Dolphine Jet Wingspan: 88 in Wingarea: 1479.8 sp in Length: 78.8 in Engine: 50CC www.pilot-rc.com INTRODUCTION Thank you for purchasing our Dolphin Jet. we strive to achieve the real
Focke-Wulf Fw 190 INSTRUCTION MANUAL SAFETY PRECAUTIONS. Specification:
 Focke-Wulf Fw 90 Specification: Length :9 mm(57") Wing Span :00 mm(70.9") Wing Area :5. sq. dm.0 sq. ft Wing Loading :0. g/sq. dm.7 oz/sq. ft Flying Weight :5. kg(. lbs) Radio :ch& servos Engine :0 -cycle
harbor cub Electric Remote Control Airplane Model 92906 assembly & Operating Instructions
 harbor cub Electric Remote Control Airplane Model 92906 assembly & Operating Instructions IMPORTANT: If damage is caused due to a crash, your warranty is void. Visit our website at: http://www.harborfreight.com
DIY CABINET REFACING INSTALLATION GUIDE
 DIY CABINET REFACING INSTALLATION GUIDE CABINET REFACING INSTALLATION Are you ready to reface your outdated cabinets? This guide will show you how to install your new Facelifters Cabinet Refacing Products
FLY SYNTHESIS STORCH HS-CL
 STORCH HS-CL MAINTENANCE MANUAL (ALID FOR ROTAX 912 UL AND JABIRU 2200 ENGINES) 00 28/05/07 New manual issue Num. Date Description Issued erify Approvation REISION The FlySynthesis s.r.l. it reserves him
Have fun, nevertheless!
 Nanomum The Nanomum is a small pusher gyro for flying indoors or outdoors in very calm weather. It's got a dc head and is easy to build and easy to fly - I hope. Specs: AUW 70 g / 2.5 oz. Rotor diameter:
parts of an airplane Getting on an Airplane BOX Museum Aeronautics Research Mission Directorate in a Series
 National Aeronautics and Space Administration GRADES K-2 Aeronautics Research Mission Directorate Museum in a BOX Series www.nasa.gov parts of an airplane Getting on an Airplane MUSEUM IN A BOX Getting
60 Sbach 342 Electric Aerobatic Aircraft
 60 Sbach 342 Electric Aerobatic Aircraft Specifications: Wing Span: 60 inches Length: 58 inches Power: Hacker A50-14S (or equivalent) Battery: 3800 5-cell LiPo ESC: 60-70 amp Flying Weight: 4.75-5.25 lbs
Wright Brothers Flying Machine
 Original broadcast: November, 00 Wright Brothers Flying Machine Program Overview NOVA presents the story of Orville and Wilbur Wright, who invented the first powered airplane to achieve sustained, controlled
SebArt professional line
 SebArt professional line New Sukhoi 29S 50E ARF ASSEMBLY MANUAL The new Sukhoi 29S 50E ARF was designed by Italy aerobatic pilot, Sebastiano Silvestri and the design is based on of his new Tournament Of
SebArt professional line AngelS 30E ARF
 SebArt professional line AngelS 30E ARF ASSEMBLY MANUAL The new AngelS 30E ARF, was designed by the 10 times F3A Italian Champion Sebastiano Silvestri, it is the replica of his 2 meter size F3A competition
The. FockeWulf FW-190. Phoenix Part 2 (refinishing) Roy Vaillancourt. By:
 Roy Vaillancourt. By:") The Phoenix Part 2 (refinishing) FockeWulf FW-190 By: Roy Vaillancourt Overview: This is part 2 of the continuing story of the resurrection, rebuilding and restoration of my latest Focke Wulf FW-190. In
The Phoenix Part 2 (refinishing) FockeWulf FW-190 By: Roy Vaillancourt Overview: This is part 2 of the continuing story of the resurrection, rebuilding and restoration of my latest Focke Wulf FW-190. In
How To Build A Roc Plane
 SebArt professional line AngelS EVO 50E ARF ASSEMBLY MANUAL The new AngelS EVO 50E ARF, was designed by the 10 times F3A Italian Champion Sebastiano Silvestri, it is the replica of his 2 meter size F3A
RC HELICOPTER INSTRUCTION MANUAL
 AGE 14+ RC HELICOPTER INSTRUCTION MANUAL 1. Smart R/C system 2. Full scale remote control 3. Omnidirectional flight 4. Smooth hover performance 5. Newly designed electricity saving functionality 6. Longer
So begin by making up the two fuselage halves known as FS1 & FS2.
 72 MOSQUITO BUILD ARTICLE FUSELAGE Before you start thinking about building the fuselage, you will need the assistance of a building jig otherwise a twisted or distorted fuselage will be net result i can
It's large enough to handle most welding job shop projects, yet small enough to make it a worth while home-workshop tool
 It's large enough to handle most welding job shop projects, yet small enough to make it a worth while home-workshop tool H Craft Print Project No. 272 ERE'S a metal bender that will enable you to bend
Introduction. Table of Contents. Specifications
 Assembly Manual Table of Contents Introduction...2 Table of Contents...2 Warning...3 Additional Required Equipment...3 Additional Tools and Adhesives...3 Contents of Kit/Parts Layout...4 Warranty Information...5
Build a Junior Solar Sprint Model Car Kit Materials: 1 PITSCO Ray Catcher Sprint Kit or Solar Made Junior Solar Sprint Kit 1 White Sheet of Plastic
 Build a Junior Solar Sprint Model Car Kit Materials: 1 PITSCO Ray Catcher Sprint Kit or Solar Made Junior Solar Sprint Kit 1 White Sheet of Plastic Coated Paper 2 Balsa Sheets (10-1/2 x4 x3/16 ) 2 Alligator
MS:158 ASSEMBLY MANUAL. Graphics and specifications may change without notice.
 MS:158 ASSEMBLY MANUAL Graphics and specifications may change without notice. Specifications: Wing span ------------------------------70.9in (180cm). Wing area -----------------644.8sq.in (41.6sq dm).
Introduction to RC Airplanes. RC Airplane Types - Trainers, Sport RC Planes, 3D Acrobat RC Airplanes, Jets & More
 Introduction to RC Airplanes RC Airplane Types - Trainers, Sport RC Planes, 3D Acrobat RC Airplanes, Jets & More RC Airplane Types RC airplanes come in a few distinct categories. Each category generally
INSTRUCTION MANUAL. Black Angel. www.copterx.com. Features. Kit Helicopter. Copyright 2009 KY MODEL Company Limited.
 INSTRUCTION MANUAL Features - Carbon fiber main blade, tail blade, fly paddle, tail fin for extra weight saving and durability. - CNC machined high grade aluminum rotor head and tail gear box to ensure
How To Repair A Model Frame With Tissue
 TECHNIQUES & TIPS FOR COVERING MODELS I use a combination of techniques learned by trial, error or sharing (the best and most enjoyable means associated with being a member of the Flying Aces Club). If
Basic Rocket Stability
 Basic Rocket Stability Adapted from Ed Bertchy s web site : http://www.azstarnet.com/%7eelb/rockets/ Model Rocket Stability: The Basics If you want to start scratch building your own rockets, it helps
How to Build Your Own CornHole Game
 How to Build Your Own CornHole Game DIMENSIONS Here is a diagram with the basic measurements for the Cornhole board game. SUPPLIES 1/2 thick sheet of plywood one 4 x4 or two 2 x4 s 8 long 2 4 s (4) 4 1/2
Filling Grain and Finishing Calls With CA Glue
 Filling Grain and Finishing Calls With CA Glue Call makers use dozens if not hundreds of different products and techniques to finish their calls. The emphasis is on sealing the wood, and giving the call
Lightening Holes. Plastics and Fiberglass. Engine Options. Retract Options. CAD Design. CAD Drawn Plans. Flaps. Cockpit Detail.
 messerschmitt ME109E The ME109 was the standard by which all other fighters of WWII were judged. It served the Luftwaffe in almost every capacity, from interceptor to night-fighter to ground attack and
MILITARY INTELLIGENCE
 MHI Copy 3.FM 30-39 WAR DEPARTMENT BASIC FIELD MANUAL MILITARY INTELLIGENCE IDENTIFICATION OF ITALIAN AIRCRAFT October.24, 1941 remi oed UNCLASIFIED sy AUTrof DOD DIR. 5200. 1 R FM 30-39 BASIC FIELD MANUAL
Assembly Manual For. 30cc 88 Skywolf. www.pilot-rc.com. Note: some photos on the manual is not from Skywolf. But the installation way is the same.
 Assembly Manual For 30cc 88 Skywolf Wingspan: 88 in www.pilot-rc.com Wingarea: 1479.8 sp in Length: 78.8 in Engine: 50CC Note: some photos on the manual is not from Skywolf. But the installation way is
How to Build a Poker Table
 How to Build a Poker Table www.pokertablematerials.com 10-Person Poker Table- 96 x 48 These are step by step instructions for building a poker table. The table will measure 48" x 96" and have a 4" wide
MGB Chrome Bumper Conversion
 MGB Chrome Bumper Conversion Installation Instructions For 1974 1/2-1980 MGB This kit requires cutting, welding, and painting. Professional installation recommended. Note: Every MGB body is slightly different
SHELVES. www.tedswoodworking.com
 SHELVES It's rare that bookshelves look as interesting as the objects you display on them. After all, how much can you decorate the edges of your shelves and sides? This unit is unusual because the shelves
CIRRUS AIRPLANE MAINTENANCE MANUAL
 UNSCHEDULED MAINTENANCE CHECKS 1. DESCRIPTION The following describes those maintenance checks and inspections on the aircraft which are dictated by special or unusual conditions which are not related
Chapter 6 Lateral static stability and control - 3 Lecture 21 Topics
 Chapter 6 Lateral static stability and control - 3 Lecture 21 Topics 6.11 General discussions on control surface 6.11.1 Aerodynamic balancing 6.11.2 Set back hinge or over hang balance 6.11.3 Horn balanace
Chapter 2. Basic Airplane Anatomy. 2008 Delmar, Cengage Learning
 Chapter 2 Basic Airplane Anatomy Objectives Identify components of basic aircraft anatomy Understand aircraft size and weight categories List different types and examples of General aviation aircraft Military
Sopwith Camel 60 ARF
 Sopwith Camel 60 ARF Assembly manual Specifications Wingspan... 61 in (1551mm) Wing Area... 1236 sq in (79.7 sq dm) Length... 41.3 in (1050mm) Weight... 7.25 8.75 lb (3.3kg 4.0kg) Table of Contents Contents
PRODUCT MANUAL SPECIFICATIONS SAFETY PRECAUTIONS. 1460mm/57.48in 1112mm/43.78in 27.74dm²/429.96in² 1600g/56.50oz 57.68g/dm²
 SPECIFICATIONS SAFETY PRECAUTIONS PRODUCT MANUAL Wing span: Length: Wing area: Flying weight: Wing loading: 1460mm/57.48in 1112mm/43.78in 27.74dm²/429.96in² 1600g/56.50oz 57.68g/dm² This electric R/C model
Build Your Own Solar Car Teach build learn renewable Energy! Page 1 of 1
 Solar Car Teach build learn renewable Energy! Page 1 of 1 Background Not only is the sun a source of heat and light, it s a source of electricity too! Solar cells, also called photovoltaic cells, are used
The Paper Aeroplane Book
 The Paper Aeroplane Book by Seymour Simon Illustrated by Byron Barton What makes paper aeroplanes soar and plummet, loop and glide? Why do they fly at all? This book will show you how to make them and
Drum set : Assembly Instructions
 Front Right side View of completed model Back Left side A drum set is a collection of various types of drums, cymbals and other percussion instruments that are lined up in a formation that makes them easily
Dave s Sheet Metal Bending Brake
 Dave s Sheet Metal Bending Brake I started building a Zenith CH601XL from plans in mid January 2006. After several failed attempts to bend the rudder spar I ended up going to a local sheet metal shop for
Children s Furniture Projects
 This is an excerpt from the book Children s Furniture Projects by Jeff Miller Copyright 2002 by The Taunton Press www.taunton.com CHILD S ROCKER KIDS ARE ALWAYS IN MOTION. It s not easy to get them even
Building an Off-Center Fixture for Turning Pendants
 Building an Off-Center Fixture for Turning Pendants Turning a pendant off-center with most available metal pendant chucks means that you will have a significant amount of mass off center, which will limit
Go-kart for little race-drivers
 Go-kart for little race-drivers Drill and drive. Go-kart What it lacks in speed, it more than makes up for in fun: the go-kart will excite little race-drivers. 1 Introduction It s only a go-kart, but it
Skywalker X8. Assembly manual January 2013
 Skywalker X8 Assembly manual January 2013 This Manual Was Created by Ray Grauberger www.raygrauberger.com Technical Data This is the X-8 FPV wing from Skywalker Technology. The BIG FPV wing! The X-8 has
Aviation Supplies & Academics, Inc. 7005 132nd Place SE Newcastle, Washington 98059-3153 www.asa2fly.com
 The Pilot s Manual 1: Flight School Aviation Supplies & Academics, Inc. 7005 132nd Place SE Newcastle, Washington 98059-3153 www.asa2fly.com Originally published by Aviation Theory Centre 1990 1993. Fourth
2003 ACCORD - Automatic Transmission Removal
 2003 ACCORD - Automatic Transmission Removal Special Tools Required Engine support hanger, A and Reds AAR-T-12566 Engine hanger balancer bar VSB02C000019 Front subframe adapter VSB02C000016 These special
WE GET PEOPLE FLYING INSTRUCTION MANUAL
 TM WE GET PEOPLE FLYING INSTRUCTION MANUAL 90% prebuilt Great sport scale appearance Factory installed retracts Precovered in genuine UltraCote Prepainted fiberglass cowl Specifications Wingspan:... 65.5
Brief introduction----------------------------------------------------------------------------03
 A-1 skyraider Brief introduction----------------------------------------------------------------------------03 Specification----------------------------------------------------------------------------------03
40% EXTRA 330L ARF Manual
 40% EXTRA 330L ARF Manual Please read through the entire manual first. It contains important instructions and warnings concerning the finishing of the model. WARRANTY AND PRODUCT DISCLAIMER Radiowave Hobby
INSTRUCTION MANUAL. 90% Pre-Built Build as Tail dragger or Tricycle Landing Gear System All Hardware Included
 90% Pre-Built Build as Tail dragger or Tricycle Landing Gear System All Hardware Included INSTRUCTION MANUAL Specifications for.40 Wingspan: 52-3/4" Length: 48" Wing Area: 593 sq. in. Weight (Approx):
Installing Window and Door Mouldings
 Installing Window and Door Mouldings About Window and Door Mouldings The trim around windows and doors greatly influences the look and style of your interior. They also bridge the gaps and cover spaces
LU6X-130 Instructions and Parts List (including LU6X Basic) Operating Instructions
 Operating Instructions") LORTONE LU6X-130 Item # 061-092 LU6X Basic Item # 061-090 LU6X-130 Instructions and Parts List (including LU6X Basic) Operating Instructions Introduction The LU6X is one the most versatile pieces of equipment
LORTONE LU6X-130 Item # 061-092 LU6X Basic Item # 061-090 LU6X-130 Instructions and Parts List (including LU6X Basic) Operating Instructions Introduction The LU6X is one the most versatile pieces of equipment
DTU Animal Cart Programme
 DTU Animal Cart Programme TECHNICAL 21 RELEASE PIPE AND ROLLER DONKEY CART AXLES Development Technology Unit, Department of Engineering, University of Warwick, Coventry, CV4 7AL UK, tel: +44 (0)1203 523523
LONDON JUBILEE AND OLYMPIC CELEBRATION ITEMS BY HILARY GOODING FOR MAKOWER UK
 LONDON JUBILEE AND OLYMPIC CELEBRATION ITEMS BY HILARY GOODING FOR MAKOWER UK 118 Grey s Road, Henley on Thames, Oxon RG9 1QW www.makoweruk.com Email: info@makoweruk.com www.andoverfabrics.com LONDON Designed
Recommended Procedure For How to Prepare and Paint Carbon Fiber and Composite Parts
 FRP Techniques Recommended Procedure For How to Prepare and Paint Carbon Fiber and Composite Parts Figure 1. A primered composite tailbase with a carbon fiber top wing element. Figure 2. Installing and
Chapter 3 Installing Over-the-Post Railing on an L-Shaped Stair
 49 Chapter 3 Installing Over-the-Post Railing on an L-Shaped Stair In this chapter: The Over-the-Post Balustrade System Determining the Rail Centerline Using Rail Bolts Making a Pitch Block Laying Out
How To Build A Plane From Scratch
 BUILDING INSTRUCTIONS FOR THE SOLANGE (SUN ANGEL) The Solange has had a very long period in which to develop. It was originally designed for flying from the Bwlch in South Wales during 1993 as a glider
3 Pocket Purse by Sherry Titzer - http://www.atimetostitch.com
 3 Pocket Purse by Sherry Titzer - http://www.atimetostitch.com Purse size - 10 H x 12 ½ W (3 1/2 wide flat bottom) See text file for supply list & cutting instructions Both Front curved side pockets designs
HOW TO MAKE A MOTOR BRACKET
 HOW TO MAKE A MOUNTING BRACKET FOR AN ELECTRIC MOTOR Often, brackets supplied with purchased items (e.g. electric motors or servos) are not ideally suited for fitting into our models or they are not supplied
BUILDINGA 1/10 SCALE FLATBED TRAILER
 VOLUME 1, ISSUE 1 BUILDINGA 1/10 SCALE FLATBED TRAILER BUILT, DESIGNED & WRITTEN BY NATHAN MYERS MATERIALS: FEATURES: While the design was kept simple to allow anyone to be able to build their own trailer,
Industrial Strength Rocket Launcher
 Industrial Strength Rocket Launcher Description: Instructions for the construction of an industrial strength rocket launcher for use with paper rockets. Materials: Schedule 40 PVC piping and bushings from
REALISTIC FUN SCALE MODEL HUGE, 84 WINGSPAN (IMAA Legal) 1/4 SCALE MODEL BUILDS QUICKLY
 1/4 SCALE MODEL BUILDS QUICKLY") 84" Fun Scale Fly Baby REALISTIC FUN SCALE MODEL HUGE, 84 WINGSPAN (IMAA Legal) 1/4 SCALE MODEL BUILDS QUICKLY READ THROUGH THIS INSTRUCTION MANUAL FIRST. IT CONTAINS IMPORTANT INSTRUCTIONS AND WARNINGS
84" Fun Scale Fly Baby REALISTIC FUN SCALE MODEL HUGE, 84 WINGSPAN (IMAA Legal) 1/4 SCALE MODEL BUILDS QUICKLY READ THROUGH THIS INSTRUCTION MANUAL FIRST. IT CONTAINS IMPORTANT INSTRUCTIONS AND WARNINGS
1. Lay out 2 pieces of 7/8" tubing and mark for bending as shown. Remember that the bend is in the shaded area as shown below in Figure 1.
 MINI BIKE PLANS Page 1 INTRODUCTION Before starting to build your Mini-Bike, be sure that you have all the parts shown on the material list. You will note that tubing has been used in the construction.
Basic Shapes. Most paintings can be broken down into basic shapes. See how this famous painting by Cézanne can be broken down into basic shapes.
 Basic Shapes Squares, rectangles, triangles, cones, cylinders, circles, ovals...these are the basic shapes that will aid you in drawing objects more accurately. This technique can be used when doing a
Night Flying 101. By: Bob Beswetherick
 Night Flying 101 By: Bob Beswetherick As a member of a southern Tennessee R/C club, I have been night flying with other members for 3 years now. We night fly sometimes till the wee hours of the morning
INSTRUCTION MANUAL WARRANTY
 INSTRUCTION MANUAL Wing Span - 44-3/4 in Wing Area - 305.7 sq in Weight - 9.5 13.5 oz Wing Loading - 4.5 6.4 oz/sq ft Fuse Length - 28-5/8 in MADE IN USA WARRANTY Great Planes Model Manufacturing Co. guarantees
INSTRUCTION MANUAL. Specification: collective pitch 3D quadcopter. TYPE: Collective Pitch Electric 3D Quadcopter. Rotor Diameter: 118MM.
 collective pitch 3D quadcopter INSTRUCTION MANUAL Specification: TYPE: Collective Pitch Electric 3D Quadcopter Rotor Diameter: 118MM Length:635 MM Width: 365 MM Weight: 986g w/out battery Flying weight
Alfa Romeo 147 On board instruments installation guide
 Alfa Romeo 147 On board instruments installation guide Alfa Romeo 147 On board instruments installation guide This guide is describing how I installed oil temperature and oil pressure gauges to my Alfa
Gate Leg Drop Leaf Table Plans
 Preparing the table top blanks: Cut and glue enough 3/4 stock to make three panels 40 long by 24 wide (they will be cut to final size at a later time). While the glue dries we will work on the legs. Preparing
Note there are many options for how this model can be built, including:
 Page 1 Introduction Welcome to the Su-37 park jet! This model was designed for twin Littlescreamers Park Jet (LSPJ) motors and features a working 3- axis thrust vectoring (TV) system, just like the real
Planning for Learning - Record of Validation
 Children s University Planning for Learning - Record of Validation Part A To be completed by the Learning Destination provider prior to the visit / conversation Name of Learning Destination Lead Person
Cedar Cottage Doghouse Plans
 Overlapping cedar shingles add an element of charm to this medium size doghouse. The walls, floor, and trim are constructed of solid cedar, making it naturally weather resistant and provides excellent
DASH KIT INSTALLATION
 ÿÿÿÿÿ ÿÿÿÿÿÿÿÿÿÿÿÿ ÿÿÿ ÿÿÿÿÿ ÿÿ ÿÿÿ ÿÿÿÿÿÿÿÿÿÿÿÿÿÿ ÿÿÿÿÿÿÿÿÿÿ ÿÿÿÿ ÿÿÿÿ ÿÿ ÿÿÿÿÿ ÿÿÿÿÿÿÿÿ PROUDLY MADE IN THE USA DASH KIT INSTALLATION These instructions are aimed at the do-it-yourself installer. Read
Deluxe Welding Tool Chest
 Item# 164782 OPERATOR S MANUAL Read carefully and understand RULES FOR SAFE OPERATION and instructions before operating. Failure to follow the safety rules and other basic safety precautions may result
The Hive Bodies. In the Beekeeper s Work Shop. Building a Bee Hive: The Hive Bodies. by Stephen E. Tilmann
 The Hive Bodies In the Beekeeper s Work Shop The hive body is the heart of a managed bee hive colony (Figure 1). It is where the queen lays her eggs, the house bees raise the brood and the workers store
www.cornholesupplies.com
 www.cornholesupplies.com How To Build Regulation Cornhole Boards Home of the Original Cornhole Bags and Boards Supply List: 1-4' X 8' Piece of Plywood (pre sanded) 4-2" X 4" X 8' Studs (2 by 4s make sure
THE MINI AERO GRILL INSTALLATION ON MCS STOCK FRONT BUMPER
 THE MINI AERO GRILL INSTALLATION ON MCS STOCK FRONT BUMPER Original instructions (from www.r53w11.com): Some basic rules: Take your time, re-read all you instructions, and make sure you have all your parts
Raised Panel Doors Made Simple With Freud s 2+2 Raised Panel Bit Set
 Raised Panel Doors Made Simple With Freud s 2+2 Raised Panel Bit Set Congratulations on your purchase of Freud s world class 2 + 2 Raised Panel Bit Set. This revolutionary design combines two small wings
Mini Wire Jewelry Tutorials for Beginners Created by XQ Designs www.handmade-jewelry-club.com,
 Mini Wire Jewelry Tutorials for Beginners Created by XQ Designs www.handmade-jewelry-club.com, www.diylessons.org Please do not distribute, lend or copy. Do not mass produce. Copyrights 2010 XQ Designs
Note. One - point Advice. To begin. Basic working method and markings. Fold along these lines. The printed surface should be
 Note To begin Basic working method and markings Tools and materials needed -Ruler - scissors - blade cutter or "Exacto-knife" - awl or other pointed tool (for making a folding crease) - felt pen - pin
STEADYfast Stabilizer Installation Notes Fifth Wheel and Travel Trailers 11/23/13
 STEADYfast Stabilizer Installation Notes Fifth Wheel and Travel Trailers 11/23/13 (See Supplemental Instructions for trailers with heavy duty round footplates and/or Power Leveling Systems) PHONE SUPPORT