900X70 Refractor Telescope Instruction Manual
|
|
|
- Agatha Ball
- 7 years ago
- Views:
Transcription
1 900X70 Refractor Telescope Instruction Manual For products #6001 & #6002

2 Table of Contents Table of Contents Telescope Assembly X70 Assembly Terms Telescope Assembly Understanding Celestial Motion and Coordinates Getting Started Selecting an Eyepiece Focusing Telescope Aligning Finderscope: Balancing the Telescope Polar Alignment of the Equatorial mount Using the Telescope Getting familiar with you mount and telescope Star observation Observation Tips How to use setting circles Calculating the Power Maintenance Technical Specifications IOPTRON ONE YEAR LIMITED WARRANTY

3 1. Telescope Assembly X70 Assembly Terms RA Axis DEC Axis Figure X70 (1). Accessory holder tray (2). Aluminum tripod (3). Leg lock brackets (4). Tripod base (5). Diagonal mirror (6). Eyepiece (7). Finderscope bracket (8). Finderscope (9). Finderscope collimation screws (10). Scope mounting ring (11). Main optical tube (12). Declination locking knob (13). Declination setting circle (14). Right ascension locking knob (15). Right ascension gear (16). Right ascension setting circle (17). Counterweight shaft (18). Counterweight (19). Counterweight safety washer (20). Counterweight locking knob (21). Equatorial mount head (22). Lens cell (23). Azimuth adjustment knob (24). Latitude adjustment knob (25). Eyepiece holder tube (26). Focusing knob (27). Right ascension control cable (28). Declination control cable (29). Sunshade (30). Sliding inner tripod leg extension (31). Leg extension locking knob (32). Tripod leg bolts (33). Front lens dust cap 3
. Counterweight locking knob (21). Equatorial mount head (22). Lens cell (23). Azimuth adjustment knob (24). Latitude adjustment knob (25). Eyepiece holder tube (26).")
4 Figure 2. Parts List 4
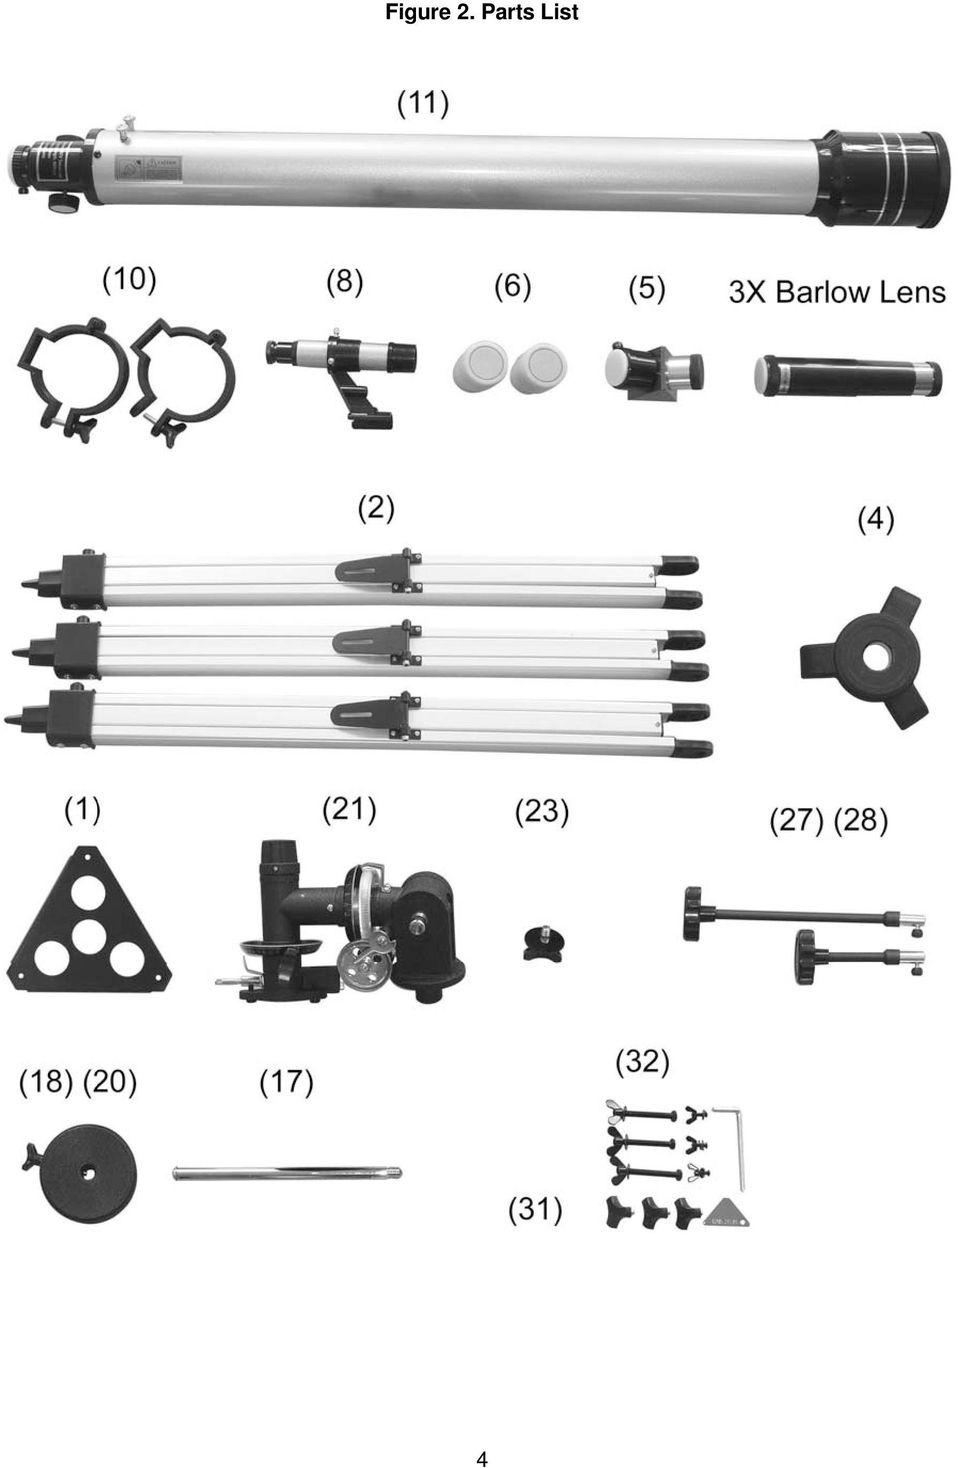
5 1.2. Telescope Assembly The numbers in brackets refer to the keys shown in Figures 1 & Unpack and identify the components of your telescope using the list shown in previous page. 2. Take the tripod legs (2) out of the package. Make sure the locking knobs (31) are tightened. (31) 6. Insert the base of the equatorial mount head into the hole of the tripod base (4) and secure it using azimuth adjustment knob (23). Make sure the right ascension (R.A.) gear (21) is below the R.A. setting circle (13). R.A. setting circle (13) Equatorial mount Head (15) 3. Mount three tripod's legs (2) to the tripod base (4) using the three long tripod leg bolts (32) with their washers and wing nuts. Make sure that the three hinged leg lock brackets (3) are facing inside (as shown in figure. 1 ) Tripod base (4) R.A. gear (21) Azimuth Adjustment knob (23) 7. Put the optical tube mounting (10) onto the equatorial mount and secure it using 2 supplied hex head screws. Tripod leg bolts and nuts (32) 4. Stand the telescope's tripod mount upright by spreading the tripod's legs out uniformly. Attach the accessory holder tray (1) to the leg lock brackets (3) using the short screws and wing nuts supplied. Short screw Leg lock brackets (3) Accessory tray (1) 5. Unlock the tripod leg extension locking knob (31). Extend tripod legs to desired height and lock the leg locks afterwards. 8. Slide counterweight (18) onto the counterweight shaft (17) and secure the counterweight by tightening the counterweight locking knob (20). Screw counterweight shaft (17) onto the base of the declination (Dec) axis on the equatorial mount. Once this shaft is firmly in place, release the locking knob (20), adjust the counterweight up some 50 mm from the end of the shaft and retightening the locking knob (20). Counter weight is heavy. Please handle with care to avoid injury! 5
 to the tripod base (4) using the three long tripod leg bolts (32) with their washers and wing nuts.")
6 9. Assemble the right ascension (R.A.) control cable (27, short cable) and declination (Dec) control cable (28). These cables are locked into position by firmly tightening the screws at the end of each cable. Lock trench R.A. control cable (27) 11. Loosen two screws at the end of the OTA. Mount the finderscope bracket (7) onto the telescope using these two knurled screws. Finderscope Screws to mount finderscope 10. Place the optical tube assembly (OTA) (11) into the scope mounting rings (10) and tighten the two wing screws on the tube mounting to secure the OTA. 12. Insert the diagonal (5) into the eyepiece holder tube (25) and the eyepiece (6) into the diagonal. Tighten the thumbscrews to a firm feel only. If the 3X Barlow lens is needed, insert the Barlow into the eyepiece holder tube first. Mounting Rings Eyepiece (6) OTA Diagonal (5) Eyepiece holder tube (25) The telescope is now fully assembled and ready to use. You can move the telescope in altitude direction (up and down) and azimuth direction (left or right) by slightly release the latitude adjustment knob (24) and azimuth adjustment knob (23). Or you can move the telescope along the right ascension and declination direction by loosen the right ascension locking knob (14) and declination locking knob (12). 6
 (11) into the scope mounting rings (10) and tighten the two wing screws on the tube mounting to secure the OTA. 12.")
7 2. Understanding Celestial Motion and Coordinates Understanding where to locate celestial objects and how these objects move through the sky is fundamental to fully appreciating astronomy as a hobby. Most amateur astronomers use the same visual path (or star-hopping) method for locating celestial objects. To do this they use maps of the sky or an astronomy program that identifies bright stars and constellations of stars that serve as "roadmaps" and "markers" in the sky. These visual reference points guide amateur astronomers in their search for astronomic objects and although the visual path method is the preferred approach giving thought to whether or not to use circles of digital coordinates for locating objects is desirable as your telescope offers this function. Be warned however, when compared with a visual path approach, looking for objects using circles of digital coordinates requires a greater investment in terms of patience and time in order to achieve a more precise alignment of the telescope's polar axis on the celestial pole. This is partially why the visual path approach is preferred since it s the simplest (and quickest) way to get started. Celestial North Pole (close to the North Star (Polaris)) Celestial South Pole Earth's rotation Right ascension Figure 2: Celestial Sphere Understanding how astronomic objects move Given the earth's rotation, celestial bodies (stars) appear to move from east to west along a curved trajectory across the sky. The trajectory that they follow is known as the right ascension line (R.A.). The angle of the trajectory that they follow is known as the declination line (Dec.). The right ascension and the declination form a system that is similar to the terrestrial system of latitude and longitude. In the system of R.A. and Dec. coordinates, stars are projected onto the "celestial sphere", i.e. onto the imaginary sphere where all of the stars appear to be located. Understanding celestial coordinates In the system of celestial coordinates, the poles are defined as being the two points where the earth's rotation axis, when prolonged infinitely to the north and to the south, intersects with the celestial sphere. Consequently, the celestial North Pole is the point in the sky where the prolongation of the earth's axis passing through the North Pole intersects the celestial sphere. In fact this point in the sky is located close to the North Star or pole star (Polaris). So-called "longitude lines" are drawn on the earth's surface between the north and south poles. In the same way, "latitude lines" are drawn along an east-west direction, parallel to the earth's equator. The celestial equator is simply a projection of the earth's equator into the celestial sphere. Just like on the earth's surface, imaginary lines have been drawn on the celestial sphere to form a grid of coordinates. The positions of the stars on the earth's surface are specified by their latitude and longitude. Star The celestial equivalent to terrestrial latitude is called Declination "Declination" or simply "Dec", expressed in degrees, minutes, and seconds north ( + ) or south ("-") of the celestial equator. Celestial equator Consequently any point located along the celestial equator (e.g. passing through the constellations of Orion, Virgo and Aquarius) is specified by its declination of 0º0 0. The declination of the North Star or pole star located very close to the North Celestial Pole is +89.2º. The celestial equivalent to terrestrial longitude is called "Right Ascension" or "R.A.", expressed in hours, minutes and seconds from a "zero" R.A. line defined arbitrarily and which passes through the constellation of Pegasus. The coordinates of the Right Ascension range from 0h 0mn 0s to 24h 0mn 0s (not inclusive). Therefore, there are 24 primary 7

8 R.A. lines located at 15 degree intervals along the celestial equator. The objets that are further away, eastwards, from the primary Right Ascension grid line (0h 0mn 0s) carry rising R.A. coordinates. Consequently, once it is possible to specify the position of all of these celestial objects using their Right Ascension and Declination coordinates the task of searching for objects (especially low brightness stars) using the astronomer's telescope may be simplified. The digital, R.A. (16) and Dec. (13) setting circles for your telescope can be made up, in practice to read the object's coordinates, by positioning it close to the telescope's telescopic field of view (FOV). The advantage of using these setting circles is however only justified after first correctly aligning the telescope with the North Celestial Pole. 3. Getting Started Before you can use the telescope effectively, there are still a few steps to be performed Selecting an Eyepiece 1. Always begin viewing with the lowest power eyepiece. (Note: a 20 mm focal length eyepiece is lower power than a 12.5 mm one.) A formula can be used to determine the power of each eyepiece: Telescope focal length divided by eyepiece focal length equals magnification. Ex. 900mm 20mm = 45X (magnification) 2. Included with this telescope is a 90 Star Diagonal Focusing Telescope 1. After selecting the desired eyepiece aim the main telescope tube at a land-based target at least 200 yards away (e.g. A telephone pole or a building). Fully extend focusing tube by turning the focus knob. 2. While looking through selected eyepiece, slowly retract focusing tube by turning focusing knob until object comes into focus Aligning Finderscope: The extended field of vision offered by the 5x24 mm finderscope (8) makes it easier to aim at an object before viewing it through the main telescope tube with a higher magnification. 1). Remove the front lens cover (33) from the sunshade (29). Look through Main Telescope Tube and establish a well-defined target (see focusing telescope section). Tighten all lock knobs (Declination, Latitude, Right Ascension, Horizontal Axis) so that telescope s aim is not disturbed. 2). Looking through the finderscope, alternate tightening or loosing each finderscope Adjustment Screw (9) until the crosshairs of the finderscope are precisely centered on the same object already centered in Main Telescope Tube s field of view. 3). Now, objects located with the finderscope first will be centered in FOV of the main telescope. They can be focused by turning the finderscope s threaded eyepiece. The image in the finderscope will be reversed Balancing the Telescope To insure smooth movement of the telescope on both axes of the equatorial mount, it is imperative that the optical tube be properly balanced. We will first balance the telescope with respect to the right ascension (R.A.) axis and then in the declination (Dec.) axis. 1. Keeping one hand on the telescope optical tube (11), loosen the R.A. lock knob (14). Make sure the Dec. lock knob (12) is locked. The telescope should now be able to rotate freely about the R.A. axis. Rotate it until the counterweight shaft (17) is parallel to the ground (i.e., horizontal). 2. Now loosen the counterweight lock knob (20) and slide the weight along the shaft until it exactly counterbalances the telescope. That s the point at which the shaft remains horizontal even when you let go of the telescope with both hands. 3. Retighten the counterweight lock knob. The telescope is now balanced on the R.A. axis. 4. To balance the telescope on the Dec. axis, first tighten the R.A. lock knob (14), with the counterweight shaft (17) still in the horizontal position. 5. With one hand on the telescope optical tube (11), loosen the Dec. lock knob (12). The telescope should now be able to move freely on the Dec. axis. Loosen the ring clamps on the tube rings (10) a few turns, until you can slide the telescope tube forward and back inside the rings (this can be aided by using a slight twisting motion on the optical tube while you push or pull on it). 6. Position the telescope in the tube rings (10) so it 8
 setting circles for your telescope can be made up, in practice to read the object's coordinates, by positioning it close to the telescope's telescopic field of view (FOV).")
9 remains horizontal when you carefully let go with both hands. This is the balance point for the optical tube (11) with respect to the Dec. axis. 7. Retighten the ring clamps Polar Alignment of the Equatorial mount Objects located in the sky appear to revolve around the celestial pole. In northern latitudes, the North Star (Polaris) is close to the pole. (In actual fact, stars are essentially "fixed" in place and their apparent motion is caused by the earth rotating around its own axis.) Over a 24 hour period, stars will perform a complete revolution around the pole, generating concentric circles with the pole at their center. By aligning the telescope's polar axis with the celestial north pole (or with the celestial south pole for observers located in the earth's southern hemisphere), astronomic objects may be followed (or tracked) by simply moving the telescope around an axis, the polar axis. If the telescope is reasonably aligned with the pole, changing the instrument's declination using its flexible control cable will consequently be of little use almost all the telescope motion required will take place using the Right Ascension coordinates. (If the telescope is perfectly aligned with the pole no declination change will be required to follow stellar objects). For occasional visual observations through the telescope, aligning the telescope's polar axis by one or two degrees in relation to the pole is more than enough. With this level of aiming precision the telescope can achieve precise tracking if the R.A. flexible control cable is used while maintaining the objects within the telescope's FOV for some 20 to 30 minutes. the Dec. lock knob. 4. Loosen the azimuth adjustment knob (23) on the mount and rotate the mount so the telescope tube (and R.A. axis) points roughly at Polaris. If you cannot see Polaris directly from your observing site, consult a compass and rotate the mount so the telescope points north. Retighten the azimuth adjustment knob. Ursa major Ursa minor Polaris Figure 3: Finding Polaris The equatorial mount is now polar aligned. Cassiopeia From this point on in your observing session, you should not make any further adjustments in the azimuth or the latitude of the mount, nor should you move the tripod. Doing so will undo the polar alignment. The telescope should be moved only about its R.A. and Dec. axes. To polar-align the telescope: 1. Level the equatorial mount by adjusting the length of the three tripod legs (2). 2. Loosen the latitude adjustment knob (24) and tilt the mount until the pointer on the latitude scale is set at the latitude of your observing site. If you don t know your latitude, consult a geographical atlas or search the internet. For example, if your latitude is 35 north, set the pointer to 35. Then retighten the latitude knob. The latitude setting should not have to be adjusted again unless you move to a different viewing location some distance away. 3. Loosen the Dec. lock knob (12) and rotate the telescope optical tube (11) until it is parallel with the R.A. axis, as it is in Figure 1. The pointer on the Dec. setting circle (13) should read 90. Retighten 9
 Over a 24 hour period, stars will perform a complete revolution around the pole, generating concentric circles with the pole at their center.")
10 4. Using the Telescope With the telescope aligned on the pole, you are now ready to start your observations Getting familiar with you mount and telescope Before observing a celestial object, looking at terrestrial objects during the day provides a good exercise on how to operate the mount and telescope Star observation First of all you will need to choose an object that is easy to find. The Moon or a bright star is a good target to start with. 1. Slightly loose the telescope's Right Ascension locking knob (14) and the Declination locking knob (12), located close to the Declination adjustment ring (13). By applying slight pressure by hand, the telescope should now move freely along its two axes. 2. Move the telescope along R.A. and Dec axes and using the aligned finderscope to find the Moon. With the object centered in the finderscope's cross hairs, retighten the R.A. and Dec. knobs. 3. The Moon should be visible somewhere within the FOV of main telescope. Focus the image by adjusting the focusing knob (26). Center the Moon by adjusting the mount using RA and DEC control cable (27, 28). 4. You ll find that the object immediately starts to shift across the FOV. This motion is due to the earth rotation. To "track" the object and keep it in the FOV, turn the cable that controls R.A. slow motion (27). Objects will appear to move faster at higher magnifications. The Declination control cable (28) is only used for centering the object and not for tracking Observation Tips When selecting a location for observing, get as far away as possible from direct artificial light such as street lights, porch lights, and automobile headlights. The glare from these lights will greatly impair your dark-adapted night vision. Set up on a grass or dirt surface, not asphalt, because asphalt radiates more heat, which disturbs the surrounding air and degrades the images seen through the telescope. Avoid viewing over rooftops and chimneys, as they often have warm air currents rising from them. Avoid observing from indoors through an open (or closed) window, because the temperature difference between the indoor and outdoor air will cause image blurring and distortion. Furthermore, it is preferable to let your telescope reach outside ambient (surrounding) temperature before starting an observation cycle. Wait a few minutes to allow your eyes to become used to the darkness before attempting any serious observations. Use a flashlight with a red filter to preserve your night vision when looking at star maps or checking telescope parts. Avoid touching the eyepiece during observation. Vibration generated by this contact may cause the view to move. Also avoid observing from locations where terrestrial vibrations are significant. Observing from the upper floors of buildings may also cause the images vibrating. Warning! Never attempt to observe the sun through your telescope without a proper solar filter. Observing the sun, even for a fraction of a second, may cause immediate and irreversible harm to your eye as well as physical damage to the telescope. Some atmospheres may deform the image that you are observing. Planets in particular, when observed low on the horizon, often present a fuzziness the same object when observed at a higher altitude in the sky may benefit from far better definition and a far higher degree of contrast. Furthermore, air turbulence in the upper layers of the atmosphere may cause "trembling" to affect the view observed through the eyepiece. In this case, reduce the magnification factor until the picture stabilizes. Keep in mind that even a small sized but bright and well defined image will reveal far more interesting details than a larger, but less bright and slightly fuzzy, view How to use setting circles Understanding the Setting Circles The setting circles on an equatorial mount enable you to locate celestial objects by their celestial coordinates. The R.A. and Dec. values for celestial objects can be found in any star atlas or star catalog. 10
 and the Declination locking knob (12), located close to the Declination adjustment ring (13).")
11 Dec. setting circle R.A. setting circle Dec. mark R.A. mark Finding Objects With the Setting Circles Now that both setting circles are calibrated, look up in a star atlas the coordinates of an object you wish to view. Loosen the Dec. lock knob (12) and rotate the telescope until the Dec. value from the star atlas matches the reading on the Dec. setting circle (13). Remember that values of the Dec. setting circle are positive when the telescope is pointing north of the celestial equator (Dec. = 0 ), and negative when the telescope is pointing south of the celestial equator. Retighten the lock knob. The mount s R.A. setting circle (16) is scaled in hours, from 1 through 24, with small marks in between representing 6-minute increments. The numbers closest to the R.A. axis gear apply to viewing in the Southern Hemisphere, while the numbers above them apply to viewing in the Northern Hemisphere. The Dec. setting circle (13) is scaled in degrees, with each mark representing 2 increments. Values of Dec. coordinates range from +90 to -90. The 0 mark indicates the celestial equator. When the telescope is pointed north of the celestial equator, values of the Dec. setting circle are positive, while when the telescope is pointed south of the celestial equator, values of the Dec. setting circle are negative. Before you can use the setting circles to locate objects, the mount must be correctly polar aligned, and the R.A. setting circle must be calibrated. The Dec. setting circle has been permanently calibrated at the factory, and should read 90 whenever the telescope optical tube is parallel with the R.A. axis. Calibrating the Right Ascension Setting Circle 1. Identify a bright star in the sky near the celestial equator (Dec. = 0 ) and look up its coordinates in a star atlas. 2. Loosen the R.A. and Dec. lock knobs (14, 12) on the equatorial mount, so the telescope optical tube can move freely. Loosen the R.A. lock knob (14) and rotate the telescope until the R.A. value from the star atlas matches the reading on the R.A. setting circle (16). Remember to use the upper set of numbers on the R.A. setting circle. Retighten the lock knob. Most setting circles are not accurate enough to put an object dead-center in the telescope s eyepiece, but they should place the object somewhere within the field of view of the finderscope, assuming the equatorial mount is accurately polar aligned. Use the R.A. and Dec control cables to center the object in the finderscope, and it should appear in the telescope s field of view. The R.A. setting circle must be re-calibrated every time you wish to locate a new object. Do so by calibrating the setting circle for the centered object before moving on to the next one Calculating the Power The power or magnification offered by a telescope is determined by two factors: the optical or focal length of the telescope's lens and the eyepiece's focal length. This telescope's focal length is 900 mm. To calculate the magnification factor, divide the lens' focal length by that of the eyepiece. The resulting value represents the magnification factor offered by the telescope when it is used with this eyepiece. For example, using a 20 mm eyepiece provides a magnification factor of: Magnification = 900 mm/20 mm = 45X 3. Point the telescope at the bright star whose coordinates you know. Lock the R.A. and Dec. lock knobs. Center the star in the telescope s field of view with the R.A. and Dec control cables. 4. Rotate the setting circle until the metal arrow indicates the R.A. coordinate listed in the star atlas for the object 11
 is scaled in hours, from 1 through 24, with small marks in between representing 6-minute increments. The numbers closest to the R.A. axis gear apply to viewing in the Southern Hemisphere, while the numbers above them apply to viewing in the Northern Hemisphere.")
12 A Barlow lens is used to increase the magnification of each eyepiece. First insert the Barlow 3X lens in the telescope s eyepiece holder, then the diagonal mirror and the eyepiece itself. Secure the lens using thumbnail screws. The total magnification will be 135X when a 20 mm eyepiece (45X) and a 3X Barlow lens are used together. Barlow lens although storage in a garage or shed is OK. Small components like eyepieces and other accessories should be kept in a protective box or storage case. Keep the caps on the front of the telescope and on the focuser drawtube when not in use. Your 900X70 telescope requires very little mechanical maintenance. The optical tube is aluminum and has a smooth painted finish that is fairly scratch resistant. If a scratch does appear, it will not harm the telescope. Cleaning Lenses Some words of caution on magnification. Although the theoretical power or magnification of a telescope is virtually limitless, there are practical limits, such as he earth's atmosphere. Every telescope has a useful magnification limit of about 2X per millimeter of aperture. This comes to 140X for the 900X70. Moderate magnifications are what give the best views. It is better to view a small, but bright and detailed image than a dim, unclear, oversized image. 5. Maintenance If you give your telescope reasonable care, it will last a lifetime. Store it in a clean, dry, dust free place, safe from rapid changes in temperature and humidity. Do not store the telescope outdoors, Any quality optical lens cleaning tissue and optical lens cleaning fluid specifically designed for multi-coated optics can be used to clean the objective lens and the exposed lenses of your eyepieces. Never use regular glass cleaner or cleaning fluid designed for eyeglasses. Before cleaning with fluid and tissue, blow any loose particles off the lens with a blower bulb or compressed air. Then apply some cleaning fluid to a tissue, never directly on the optics. Wipe the lens gently in a circular motion, then remove any excess fluid with a fresh lens tissue. Oily fingerprints and smudges may be removed using this method. Use caution rubbing too hard may scratch the lens. For the larger surface of the objective lens, clean only a small area at a time, using a fresh lens tissue on each area. Never reuse tissues. 6. For further assistance visit for FAQ s, technical support, and other helpful tips. 12

13 Technical Specifications Optical tube Optical Design Objective lens Clear Aperture Focal Length Focal Ratio Focuser Eyepiece Aluminum Achromatic Refractor Air-spaced, fully coated 70 mm 900mm f/12.8 Rack and pinion, accepts 1.25" eyepieces and accessories H12.5mm, H20mm Diagonal 90º star diagonal, 1.25 Magnification with supplied eyepiece Barlow Lens 45X (w/ 20mm), 72X (w/12.5mm) 3X Finding Scope Mount Tripod Motor drive Total Weight 5X24 EQ-2, German equatorial Aluminum Optional 20 lbs. 13
, 72X (w/12.")
14 IOPTRON ONE YEAR LIMITED WARRANTY A. ioptron warrants your telescope, mount, or controller to be free from defects in materials and workmanship for one year. ioptron will repair or replace such product or part which, upon inspection by ioptron, is found to be defective in materials or workmanship. As a condition to the obligation of ioptron to repair or replace such product, the product must be returned to ioptron together with proof-of-purchase satisfactory to ioptron. B. The Proper Return Authorization Number must be obtained from ioptron in advance of return. Call ioptron at to receive the number to be displayed on the outside of your shipping container. All returns must be accompanied by a written statement stating the name, address, and daytime telephone number of the owner, together with a brief description of any claimed defects. Parts or product for which replacement is made shall become the property of ioptron. The customer shall be responsible for all costs of transportation and insurance, both to and from the factory of ioptron, and shall be required to prepay such costs. ioptron shall use reasonable efforts to repair or replace any telescope, mount, or controller covered by this warranty within thirty days of receipt. In the event repair or replacement shall require more than thirty days, ioptron shall notify the customer accordingly. ioptron reserves the right to replace any product which has been discontinued from its product line with a new product of comparable value and function. The repairing and replacement carry a 90 day limited labor and/or parts warranty. This warranty shall be void and of no force of effect in the event a covered product has been modified in design or function, or subjected to abuse, misuse, mishandling or unauthorized repair. Further, product malfunction or deterioration due to normal wear is not covered by this warranty. IOPTRON DISCLAIMS ANY WARRANTIES, EXPRESS OR IMPLIED, WHETHER OF MERCHANTABILITY OF FITNESS FOR A PARTICULAR USE, EXCEPT AS EXPRESSLY SET FORTH HERE. THE SOLE OBLIGATION OF IOPTRON UNDER THIS LIMITED WARRANTY SHALL BE TO REPAIR OR REPLACE THE COVERED PRODUCT, IN ACCORDANCE WITH THE TERMS SET FORTH HERE. IOPTRON EXPRESSLY DISCLAIMS ANY LOST PROFITS, GENERAL, SPECIAL, INDIRECT OR CONSEQUENTIAL DAMAGES WHICH MAY RESULT FROM BREACH OF ANY WARRANTY, OR ARISING OUT OF THE USE OR INABILITY TO USE ANY IOPTRON PRODUCT. ANY WARRANTIES WHICH ARE IMPLIED AND WHICH CANNOT BE DISCLAIMED SHALL BE LIMITED IN DURATION TO A TERM OF ONE YEARS FROM THE DATE OF ORIGINAL RETAIL PURCHASE. Some states do not allow the exclusion or limitation of incidental or consequential damages or limitation on how long an implied warranty lasts, so the above limitations and exclusions may not apply to you. This warranty gives you specific legal rights, and you may also have other rights which vary from state to state. ioptron reserves the right to modify or discontinue, without prior notice to you, any model or style telescope. If warranty problems arise, or if you need assistance in using your telescope, mount, or controller contact: ioptron Corporation Customer Service Department 6F Gill Street Woburn, MA Tel. (866) (Toll Free in US) Tel: Fax: Monday-Friday 9AM-5PM EST NOTE: This warranty is valid to U.S.A. and Canadian customers who have purchased this product from an authorized ioptron dealer in the U.S.A. or Canada or directly from ioptron. Warranty outside the U.S.A. and Canada is valid only to customers who purchased from an ioptron Distributor or Authorized ioptron Dealer in the specific country. Please contact them for any warranty services. 14

PROFESSIONAL REFRACTOR MODEL 78-0040 25
 30 0 30 60 90 1 2 3 4 PROFESSIONAL REFRACTOR MODEL 78-0040 25 24 22 21 20 19 5 9060 18 6 7 17 16 15 8 14 13 9 11 12 10 Figure 1 1. Objective Lens 2. Mounting Screws (2) 3. Declination Axis 4. Equatorial
Orion EQ-1 Equatorial Mount
 INSTRUCTION MANUAL Orion EQ-1 Equatorial Mount #9011 Providing Exceptional Consumer Optical Products Since 1975 Customer Support (800) 676-1343 E-mail: support@telescope.com Corporate Offices (831) 763-7000
Orion Atlas. EQ Mount INSTRUCTION MANUAL #9830. Customer Support (800) 676-1343 E-mail: support@telescope.com. IN 177 Rev. A 11/02
 676-1343 E-mail: support@telescope.com. IN 177 Rev. A 11/02") INSTRUCTION MANUAL Orion Atlas EQ Mount #9830 Providing Exceptional Consumer Optical Products Since 1975 Customer Support (800) 676-1343 E-mail: support@telescope.com Corporate Offices (831) 763-7000 P.O.
INSTRUCTION MANUAL Orion Atlas EQ Mount #9830 Providing Exceptional Consumer Optical Products Since 1975 Customer Support (800) 676-1343 E-mail: support@telescope.com Corporate Offices (831) 763-7000 P.O.
ST-80 MICROSCOPE With Electronic Eyepiece #6810. User Guide
 ST-80 MICROSCOPE With Electronic Eyepiece #6810 User Guide The ST-80 Microscope Thank you for purchasing your student microscope from ioptron. The ST-80 Microscope is both versatile and easy to use with
FirstView 3 Reflector Telescope Owner s Manual
 FirstView 3 Reflector Telescope Owner s Manual 1. Horizontal Locking Auxiliary Screw 2. Main Mount 3. Pitching Auxiliary Knob 4. Pitching Shaft Screw 5. Rack and Pinion Focusing Knob 6. Thumb Nut for Finder
Instruction Manual Genesis 200 EQ
 Instruction Manual Genesis 200 EQ English version 8.2014 Rev A 1 The Zoomion Genesis 200 EQ Congratulations on the purchase of the new Zoomion Genesis 200 EQ. This advanced telescope will give you hours
SkyTracker Camera Mount Instruction Manual
 SkyTracker Camera Mount Instruction Manual Product #3300B, #3300W and #3301 Table of Content Table of Content... 2 1. SkyTracker TM Camera Mount Overview... 3 2. SkyTracker TM Camera Mount Assembly...
CAUTION: READ THIS SECTION BEFORE USING YOUR TELESCOPE
 PowerSeeker 60 INSTRUCTION MANUAL #21041 INTRODUCTION Congratulations on your purchase and welcome to the Celestron world of amateur astronomy. Some of the terms and parts described in these instructions
E q u a t o r i a l M o d e l Figure 1
 Model # 31032 FIRSTSCOPE 76 3" NEWTONIAN EQUATORIAL TELESCOPE Model # 31044 FIRSTSCOPE 114 EQ 4.5" NEWTONIAN TELESCOPE Model # 31041 FIRSTSCOPE 114 SHORT 4.5" NEWTONIAN EQUATORIAL TELESCOPE INSTRUCTION
Meade Instruments Corporation 6001 OAK CANYON, IRVINE, CALIFORNIA 92618-5200 U.S.A. (949) 451-1450 FAX: (949) 451-1460 www.meade.
 451-1450 FAX: (949) 451-1460 www.meade.") Instruction Manual Polaris 60AZ-D: 60mm (2.4 ) Altazimuth Refracting Telescope Meade Instruments Corporation 6001 OAK CANYON, IRVINE, CALIFORNIA 92618-5200 U.S.A. (949) 451-1450 FAX: (949) 451-1460 www.meade.com
Instruction Manual Polaris 60AZ-D: 60mm (2.4 ) Altazimuth Refracting Telescope Meade Instruments Corporation 6001 OAK CANYON, IRVINE, CALIFORNIA 92618-5200 U.S.A. (949) 451-1450 FAX: (949) 451-1460 www.meade.com
Your first. Buying a scope for the first time can be daunting. We reveal what you shoud look for and how to get up and running.
 telescope Your first Buying a scope for the first time can be daunting. We reveal what you shoud look for and how to get up and running. By Will ater what type of telescope should I buy? A good all-round
Instruction Manual Meade 50AZ-P 50mm (2 ) Altazimuth Refracting Telescope
 Altazimuth Refracting Telescope") Instruction Manual Meade 50AZ-P 50mm (2 ) Altazimuth Refracting Telescope 27 Hubble, Irvine, California 92618 (800) 626-3233 www.meade.com Looking at or near the Sun will cause irreversable damage to your
Instruction Manual Meade 50AZ-P 50mm (2 ) Altazimuth Refracting Telescope 27 Hubble, Irvine, California 92618 (800) 626-3233 www.meade.com Looking at or near the Sun will cause irreversable damage to your
90 EQ # 21064 130 EQ # 31045 90 EQ-MD # 21069 130 EQ-MD
 ENGLISH AstroMaster Series Telescopes INSTRUCTION MANUAL AstroMaster 90 EQ # 21064 AstroMaster 130 EQ # 31045 AstroMaster 90 EQ-MD # 21069 AstroMaster 130 EQ-MD # 31051 Table of Contents INTRODUCTION...3
ASTRO-PHYSICS MODEL 400 GERMAN EQUATORIAL MOUNT WITH DUAL AXIS QUARTZ DRIVE AND MANUAL CONTROL KNOB (400HDA)
") MODEL 400 PARTS LIST ASTRO-PHYSICS MODEL 400 GERMAN EQUATORIAL MOUNT WITH DUAL AXIS QUARTZ DRIVE AND MANUAL CONTROL KNOB (400HDA) 1 400 Equatorial Head with stepper motors on right ascension and declination
MODEL 400 PARTS LIST ASTRO-PHYSICS MODEL 400 GERMAN EQUATORIAL MOUNT WITH DUAL AXIS QUARTZ DRIVE AND MANUAL CONTROL KNOB (400HDA) 1 400 Equatorial Head with stepper motors on right ascension and declination
ENGLISH Omni XLT Series Telescopes INSTRUCTION MANUAL Omni XLT 102 Omni XLT 102ED Omni XLT 120 Omni XLT127 Omni XLT 150 Omni XLT 150R
 ENGLISH Omni XLT Series Telescopes INSTRUCTION MANUAL Omni XLT 102 Omni XLT 102ED Omni XLT 120 Omni XLT127 Omni XLT 150 Omni XLT 150R Table of Contents INTRODUCTION... 4 Warning... 4 ASSEMBLY... 8 Setting
Model 4500: 4.5" Equatorial Reflecting Telescope
 60 90 60 90 Instruction Manual Model 4500: 4.5" Equatorial Reflecting Telescope MEADE 30 0 30 ADVANCED PRODUCTS DIVISION Meade Instruments Corporation World s Leading Manufacturer of Astronomical Telescopes
OWNER S MANUAL Table Tennis Table Patent Pending
 OWNER S MANUAL Table Tennis Table Patent Pending Be sure to write your model number and serial number here for future reference. You can find these numbers printed on the bottom of the table. MODEL # T8179
SP AF 300mm F/2.8 LD [IF] for Canon (Model 360EE)
![SP AF 300mm F/2.8 LD [IF] for Canon (Model 360EE)](/thumbs/40/21493790.jpg "SP AF 300mm F/2.8 LD [IF] for Canon (Model 360EE)") SP AF 300mm F/2.8 LD [IF] for Canon (Model 360EE) We greatly appreciate your purchase of this Tamron lens. The Tamron SP AF 300mm F/2.8 LD [IF] is a fast telephoto lens developed for Canon AF single-reflex
SP AF 300mm F/2.8 LD [IF] for Canon (Model 360EE) We greatly appreciate your purchase of this Tamron lens. The Tamron SP AF 300mm F/2.8 LD [IF] is a fast telephoto lens developed for Canon AF single-reflex
DSV-2 ALTITUDE-AZIMUTH TELESCOPE MOUNT User Manual
 DSV-2 ALTITUDE-AZIMUTH TELESCOPE MOUNT User Manual Your New Mount Thanks for choosing the Desert Sky Astro Products DSV-2 mount. Take some time to familiarize yourself with its features (Figure 1). Please
CGEM Series INSTRUCTION MANUAL CGEM 800 CGEM 925 CGEM 1100
 CGEM Series INSTRUCTION MANUAL CGEM 800 CGEM 925 CGEM 1100 INTRODUCTION...4 Warning... 4 ASSEMBLY...6 Setting up the Tripod... 6 Attaching the Equatorial Mount... 7 Attaching the Accessory Tray... 8 Installing
IDENTIFYING PARTS OF YOUR FIRSTSCOPE
 POWERSEEKER 80 EQ TELESCOPE INSTRUCTION MANUAL #21048 1 15 16 17 14 13 2 12 3 11 4 10 5 9 6 8 7 PowerSeeker 80EQ Refractor 2 IDENTIFYING PARTS OF YOUR FIRSTSCOPE PowerSeeker 80EQ 1. Objective Lens 10 Right
V-500-PRE. 500mm F/8.0 Telephoto Lens INSTRUCTION MANUAL
 V-500-PRE 500mm F/8.0 Telephoto Lens INSTRUCTION MANUAL Limited Five Year Warranty Vivitar warrants this quality product to be free of defects in material and workmanship for a period of five years from
Equatorial Mount. instruction Manual #9996. Customer Support (800) 676-1343 E-mail: support@telescope.com. IN 279 Rev. C 01/09
 676-1343 E-mail: support@telescope.com. IN 279 Rev. C 01/09") instruction Manual Orion Atlas EQ-G Equatorial Mount #9996 Providing Exceptional Consumer Optical Products Since 1975 Customer Support (800) 676-1343 E-mail: support@telescope.com Corporate Offices (831)
instruction Manual Orion Atlas EQ-G Equatorial Mount #9996 Providing Exceptional Consumer Optical Products Since 1975 Customer Support (800) 676-1343 E-mail: support@telescope.com Corporate Offices (831)
Celestial Sphere. Celestial Coordinates. Lecture 3: Motions of the Sun and Moon. ecliptic (path of Sun) ecliptic (path of Sun)
 ecliptic (path of Sun)") Lecture 3: Motions of the and Moon ecliptic (path of ) ecliptic (path of ) The 23.5 degree tilt of Earth s spin axis relative to its orbital axis around the causes the seasons Celestial Sphere Celestial
Lecture 3: Motions of the and Moon ecliptic (path of ) ecliptic (path of ) The 23.5 degree tilt of Earth s spin axis relative to its orbital axis around the causes the seasons Celestial Sphere Celestial
GOTOSTAR HAND CONTROLLER AND DUAL-AXIS DC SERVO-MOTOR DRIVER
 GOTOSTAR HAND CONTROLLER AND DUAL-AXIS DC SERVO-MOTOR DRIVER The new GOTOSTAR hand controller and our specially designed dual-axis DC servomotor driver is our new patent product. The controlling accuracy
INTRODUCTION... 4 Warning... 4 ASSEMBLY... 7 Assembling the NexStar... 7 Attaching the Hand Control Holder... 8 Attaching the Fork Arm to the
 INSTRUCTION MANUAL NexStar 60. NexStar 80. NexStar 102. NexStar 114. NexStar 130 T A B L E O F C O N T E N T S INTRODUCTION... 4 Warning... 4 ASSEMBLY... 7 Assembling the NexStar... 7 Attaching the Hand
INSTRUCTION MANUAL. Telescopes with EQ1 & EQ2 Mount 060103V1
 INSTRUCTION MANUAL Telescopes with EQ1 & EQ2 Mount 060103V1 EQ1 REFRACTOR C B A. K B. C. D. E. F. G. H. L I. J. K. L. M. J I M H 1 a b EQ1 G 2 F 3 Dust Cap/Mask (Remove before Viewing) Dew Cap/Sun Shade
TEC APO140. This telescope is closer to optical perfection more than any instrument I have ever used before. R.Renzi, Italy.
 140 manuals 2013_110 manuals 1/13/2013 10:40 PM Page 1 TEC APO140 This telescope is closer to optical perfection more than any instrument I have ever used before. R.Renzi, Italy. OWNER S MANUAL 2013 140
Figure 2.1 Advanced Series (Advanced C8-S Shown)
") A Advanced Series CG-5 & CG-5 GT INSTRUCTION MANUAL 91517 91518 Figure 2.1 Advanced Series (Advanced C8-S Shown) 1 12 2 3 11 10 4 9 5 8 6 7 1 Optical Tube 7 Tripod 2 Finderscope 8 Counterweight(s) 3 Finderscope
A Advanced Series CG-5 & CG-5 GT INSTRUCTION MANUAL 91517 91518 Figure 2.1 Advanced Series (Advanced C8-S Shown) 1 12 2 3 11 10 4 9 5 8 6 7 1 Optical Tube 7 Tripod 2 Finderscope 8 Counterweight(s) 3 Finderscope
HOW TO EQUATORIALLY MOUNT AND POLAR ALIGN YOUR NEXSTAR 8i TELESCOPE
 HOW TO EQUATORIALLY MOUNT AND POLAR ALIGN YOUR NEXSTAR 8i TELESCOPE Anjal C. Sharma Disclaimer I have no vested interest in any of the manufacturers or products identified in this article. All equipment
Advanced Series Advanced Series GT INSTRUCTION MANUAL C5-S C8-S C9.25-S
 Advanced Series Advanced Series GT INSTRUCTION MANUAL C5-S C8-S C9.25-S INTRODUCTION...4 Warning...4 ASSEMBLY...7 Setting up the Tripod...7 Attaching the Equatorial Mount...8 Attaching the Center Leg Brace...8
National Optical & Scientific Instruments Inc. 11113 Landmark 35 Drive San Antonio, Texas 78233 Phone (210) 590-9010 Fax (210) 590-1104
 590-9010 Fax (210) 590-1104") National Optical & Scientific Instruments Inc. 11113 Landmark 35 Drive San Antonio, Texas 78233 Phone (210) 590-9010 Fax (210) 590-1104 INSTRUCTIONS FOR MODELS 106, 106-L 107, 107-L 108, 108-L 109-L ELEMENTARY
National Optical & Scientific Instruments Inc. 11113 Landmark 35 Drive San Antonio, Texas 78233 Phone (210) 590-9010 Fax (210) 590-1104 INSTRUCTIONS FOR MODELS 106, 106-L 107, 107-L 108, 108-L 109-L ELEMENTARY
The MiniTower GOTO AltAz Mount with GPS and dual Mount set-up #8300
 The MiniTower GOTO AltAz Mount with GPS and dual Mount set-up #8300 FEATURES 25 lb Payload 8 lbs of additional payload on the balancing side All metal (aluminum alloy and stainless steel) heavy duty tripod
Installation Instructions
 520 Installation Instructions Thank you very much for purchasing PIAA product. Please read this entire manual before installation and use of this product. For Installers Please give this Installation Manual
TS-E24mm f/3.5l TS-E45mm f/2.8 TS-E90mm f/2.8 Instructions
 TS-E24mm f/3.5l TS-E45mm f/2.8 TS-E90mm f/2.8 ENG Instructions Thank you for purchasing a Canon product. Canon s TS-E lenses are tilt-shift lenses designed for EOS cameras. The tilt-shift mechanism enables
SECURITY LIGHT. motion-activated. Assembly & operating instructions Solar Motion-Activated Security Light - 80 LED Lights
 motion-activated SECURITY LIGHT Model #: 40225, 40226 Assembly & operating instructions Solar Motion-Activated Security Light - 80 LED Lights Important: Read all instructions carefully before use About
Orientation to the Sky: Apparent Motions
 Chapter 2 Orientation to the Sky: Apparent Motions 2.1 Purpose The main goal of this lab is for you to gain an understanding of how the sky changes during the night and over the course of a year. We will
CALIBRATION FOR LAL20X & LAL24X
 CALIBRATION AND FAULT FINDING FOR LAL20X & LAL24X DUMPY LEVELS MEASURING EXPERTS SINCE 1869 How The LAL20X & LAL24X Works The Automatic level is called Automatic because it requires only a simple basic
Series Telescopes. For Models: 91519 32054 32062 22020 12079 12026 12046 12067 12031
 Series Telescopes Instruction Manual For Models: 91519 32054 32062 22020 12079 12026 12046 12067 12031 Table of Contents Introduction 5 Advanced VX Mount 6 Assembly 7 Computerized Hand Control 12 Object
Triple Threat 3-in-1 Game Table 3 IN 1 GAME TABLE
 NG0M Triple Threat 3-in- Game Table 3 IN GAME TABLE Thank 3 in Y Game Table Thank you for your purchase of our product. We work around the clock and around the globe to ensure that our products maintain
PlaneWave CDK Telescope Instructions CDK12.5, 17, 20 and 24
 PlaneWave CDK Telescope Instructions CDK12.5, 17, 20 and 24 V112712 1 Collimation and Secondary Spacing Procedure The CDK optical design has four optical elements shown in Figure 1. The primary mirror
Choosing a Telescope
 Where Astronomy is looking up Choosing a Telescope There is no best telescope for everyone. The one that s right for you will depend on your lifestyle and your astronomy goals. The best telescope is the
7 Watt Solar Charger Solar Panel
 7 Watt Solar Charger Solar Panel Owner s Manual Warning: Read carefully and understand all ASSEMBLY AND OPERATION INSTRUCTIONS before operating. Failure to follow the safety rules and other basic safety
Multi-Pitch Pitching Machine USER MANUAL
 Multi-Pitch Pitching Machine USER MANUAL TABLE OF CONTENTS Thank you for purchasing the Cimarron Multi-Pitch Pitching Machine. The Cimarron Multi-Pitch Pitching Machine is a high performance pitching machine
ECM-D70T / ECM-D70T1.5
 Elliptical Ceiling Dual Mount for 37 to 50 Flat Panels INSTALLATION INSTRUCTIONS CREATING POSITIVE CUSTOMER EXPERIENCES 9531-041-001-01 Contents ECM-D70T / ECM-D70T1.5 Installation Tools... 3 Parts List...
Assembly and Usage Instructions
 Assembly and Usage Instructions A Product 5885 West Van Horn Tavern Road Columbia, MO 65203 www.caldwellshooting.com Instruction #1001667 Limited Warranty Every Caldwell product is warrantied to be free
EF70-300mm f/4-5.6 IS USM
 EF70-300mm f/4-5.6 IS USM ENG Instruction Thank you for purchasing a Canon product. Dedicated to EOS cameras, the Canon EF70-300mm f/4-5.6 IS USM lens is a highperformance telephoto zoom lens equipped
Basic Coordinates & Seasons Student Guide
 Name: Basic Coordinates & Seasons Student Guide There are three main sections to this module: terrestrial coordinates, celestial equatorial coordinates, and understanding how the ecliptic is related to
VISM Evolution Scope Series
 1 VISM Evolution Scope Series Congratulations on the purchase of your New VISM Evolution (EVO) Series Scope! The EVO Series of Scopes give you many great high end features and various magnification ranges
1000-LB. TRAILER JACK OWNER S MANUAL
 1000-LB. TRAILER JACK OWNER S MANUAL WARNING: Read carefully and understand all INSTRUCTIONS before operating. Failure to follow the safety rules and other basic safety precautions may result in serious
National Optical & Scientific Instrument Inc. 11113 Landmark 35 Drive San Antonio, Texas 78233 Phone (210) 590-9010 Fax (210) 590-1104
 590-9010 Fax (210) 590-1104") National Optical & Scientific Instrument Inc. 11113 Landmark 35 Drive San Antonio, Texas 78233 Phone (210) 590-9010 Fax (210) 590-1104 INSTRUCTIONS FOR STEREOSCOPIC MICROSCOPES MODEL NUMBERS 400 400TL
National Optical & Scientific Instrument Inc. 11113 Landmark 35 Drive San Antonio, Texas 78233 Phone (210) 590-9010 Fax (210) 590-1104 INSTRUCTIONS FOR STEREOSCOPIC MICROSCOPES MODEL NUMBERS 400 400TL
ASSEMBLY &OPERATING INSTRUCTIONS Solar Motion-Activated Security Light - 80 LED Lights Model #40225
 MOTION-ACTIVATED SECURITY LIGHT ASSEMBLY &OPERATING INSTRUCTIONS Solar Motion-Activated Security Light - 80 LED Lights Model #40225 IMPORTANT: READ ALL INSTRUCTIONS CAREFULLY BEFORE USE ABOUT YOUR SOLAR
RIFLESCOPE RIFLESCOPE MANUAL
 MANUAL The Vortex Diamondback Riflescopes The perfect match for hunters. Solid construction from a rugged singlepiece tube of aircraft-grade aluminum is the foundation for highly reliable performance features
The Celestial Sphere. Questions for Today. The Celestial Sphere 1/18/10
 Lecture 3: Constellations and the Distances to the Stars Astro 2010 Prof. Tom Megeath Questions for Today How do the stars move in the sky? What causes the phases of the moon? What causes the seasons?
A Telescope Operating Manual
 A Telescope Operating Manual for Celestron 8-inch Schmidt Cassegran Telescopes I. Introduction This booklet is a handbook for the use of the lab telescopes. In it you should find all the information necessary
Meade114EQAR 3/28/07 9:52 AM Page 1. www.meade.com 114EQ-AR. MEADE INSTRUCTION MANUAL 114mm 4.5" Equatorial Reflecting Telescope
 Meade114EQAR 3/28/07 9:52 AM Page 1 www.meade.com MEADE INSTRUCTION MANUAL 114mm 4.5" Equatorial Reflecting Telescope 114EQ-AR Meade114EQAR 3/28/07 9:52 AM Page 2 WARNING! Never use a Meade Telescope to
MALONER. Installation & Loading Instructions - Please Read Before Beginning. Step 1: Installing Carriers to Cross Bars
 SeaWing V-STYLE KAYAK CARRIER 60mm 50mm Rubber Plugs SeaWing Kayak Carriers 12 Load Straps Jawz Universal Adapters Mounting Bolts T-Knobs 12 Safety Lines MD Series Only Installation & Loading Instructions
Be careful not to scratch or hit front edge of the side viewing micro prisms onto hard objects!
 Instructions Manual Flexia BGA Inspection Systems This manual describes how to use Flexia BGA Inspection System Optilia Instruments 1 AB Contents 1. Safety and maintenance Instructions 3 2. About Flexia
Owner s Manual Read and keep this manual. Patents World Wide
 Owner s Manual Read and keep this manual. Patents World Wide S & S Industries, Inc., Sarasota, FL, USA www.trail-gator.com Copyright 2008 All Rights Reserved The following manual is provided to assist
INSTALLATION INSTRUCTIONS
 INSTALLATION INSTRUCTIONS Video Conference Shelf for Low Profile Flat-Panel Mounts NORTH AMERICA 3130 East Miraloma Avenue Anaheim, CA 92806 USA USA and Canada Phone: 1.800.368.9700 Fax: 1.800.832.4888
EF-S18-135mm f/3.5-5.6 IS
 EF-S18-135mm f/3.5-5.6 IS ENG Instruction Thank you for purchasing a Canon product. The Canon EF-S18-135mm f/3.5-5.6 IS lens is a high-performance high-magnification zoom lens equipped with an Image Stabilizer,
SOLAR ELECTRIC MODULE ES-124 & ES-62T Owners Manual and Installation Guide
 SOLAR ELECTRIC MODULE ES-124 & ES-62T Owners Manual and Installation Guide circuit. Reverse connection will damage the module and may result in fire. CAUTIONS Solar electric modules produce DC electricity
Table of Contents WARNING SYMBOLS AND DEFINITIONS
 Table of Contents SAFETY INSTALLATION OPERATION MAINTENANCE Safety... 2 Specifications... 4 Installation... 5 Operation... 8 WARNING SYMBOLS AND DEFINITIONS Maintenance... 9 Parts List and Assembly Diagram...
EF-S18-55mm f/3.5-5.6 IS II COPY ENG. Instruction
 EF-S18-55mm f/3.5-5.6 IS II ENG Instruction Thank you for purchasing a Canon product. The Canon EF-S18-55mm f/3.5-5.6 IS II lens is a high-performance standard zoom lens developed for digital SLRs compatible
Ultraviolet Germicidal Lamps Owner s Manual MODELS 1910 & 1930
 Ultraviolet Germicidal Lamps Owner s Manual MODELS 1910 & 1930 WARNING Ultraviolet light is harmful to eyes and skin. Never look at light produced by this lamp. Unplug lamp before servicing. Electrical
Installation and use of Millett Tactical TRS-1 and TRS-2 scopes TRS-1 TRS-2. Before starting, make sure firearm is UNLOADED!!
 I N S T R U C T I O N a n d O P E R A T I O N TRS-1 TRS-2 Tactical Rifle scope Installation and use of Millett Tactical TRS-1 and TRS-2 scopes TRS-1 TRS-2 Before starting, make sure firearm is UNLOADED!!
Instruction Manual. ETX-90EC Astro Telescope ETX-105EC Astro Telescope ETX-125EC Astro Telescope. Meade Instruments Corporation
 Instruction Manual ETX-90EC Astro Telescope ETX-105EC Astro Telescope ETX-125EC Astro Telescope Meade Instruments Corporation CONTENTS WARNING! Never use a Meade ETX Astro Telescope to look at the Sun!
30 mm Diameter Main Tube 1-4x24 Models
 CrossFire RIFLESCOPE RIFLESCOPE MANUAL 30 mm Diameter Main Tube 1-4x24 Models The Vortex Crossfire Riflescopes Specifically designed for discriminating hunters and shooters, the Crossfire series of riflescopes
149mm. Walk-Thru Assembly Gate. MODEL NO: 1161, 1167 Owner s Manual. www.regalo-baby.com
 149mm 210mm Walk-Thru Assembly Gate MODEL NO: 1161, 1167 Owner s Manual READ ALL INSTRUCTIONS BEFORE ASSEMBLY AND USE OF GATE. KEEP INSTRUCTIONS FOR FUTURE USE. www.regalo-baby.com... Regalo International,
VISM CQB Scope Series
 1 VISM CQB Scope Series Congratulations on the purchase of your new VISM CQB Scope! The CQB Series of Scopes give you many great options so you can choose the scope that best fits your needs. Backed by
AstroSystems Digital Setting Circles for Zhumell, GSO, Apertura and Astro-Tech
 AstroSystems Digital Setting Circles for Zhumell, GSO, Apertura and Astro-Tech Components 1 Sky Commander Digital Setting Circle Computer 2 Encoders 10,000 step 1 Sky Commander Digital Setting Circle Manual
ATS Overhead Table Shelf System INSTRUCTION MANUAL
 ATS Overhead Table Shelf System INSTRUCTION MANUAL ATS Overhead Table Shelf System Instruction Manual Warranty Newport Corporation warrants this product to be free of defects in material and workmanship
NIGHT VISION MONOCULAR PHANTOM
 Operation Manual NIGHT VISION MONOCULAR PHANTOM 20 105 Sparks Ave., Toronto, ON, M2H 2S5, Canada IMPORTANT INFORMATION Read prior to activation You have just purchased a complicated electronic device.
ROTOR LOADER OWNER S MANUAL
 ROTOR LOADER OWNER S MANUAL ROTOR LOADER OWNER S MANUAL WARNING IMPORTANT SAFETY INSTRUCTIONS AND GUIDELINES. Misuse of paintball equipment may cause serious injury or death. QUICK SET-UP GUIDE BATTERY
Alpy guiding User Guide. Olivier Thizy (olivier.thizy@shelyak.com) François Cochard (francois.cochard@shelyak.com)
 François Cochard (francois.cochard@shelyak.com)") Alpy guiding User Guide Olivier Thizy (olivier.thizy@shelyak.com) François Cochard (francois.cochard@shelyak.com) DC0017A : april 2013 Alpy guiding module User Guide Olivier Thizy (olivier.thizy@shelyak.com)
Alpy guiding User Guide Olivier Thizy (olivier.thizy@shelyak.com) François Cochard (francois.cochard@shelyak.com) DC0017A : april 2013 Alpy guiding module User Guide Olivier Thizy (olivier.thizy@shelyak.com)
Operator s Maintenance Manual STEINER BINOCULARS. Military ruggedness and precision 07/03
 Operator s Maintenance Manual STEINER BINOCULARS Military ruggedness and precision 07/03 W arning! When using the binocular, never point it directly at the sun. The heat generated by the focused rays of
In this project, you will be observing at least three objects with a telescope or binoculars, and drawing what you see.
 Telescopic Observations Materials: Paper, pencil, camera, Telescope or Binoculars In this project, you will be observing at least three objects with a telescope or binoculars, and drawing what you see.
3 WATT LED SPOTLIGHT Model No. SLM - 3801
 3 WATT LED SPOTLIGHT Model No. SLM - 3801 OWNER'S MANUAL Customer Service Tel: 1-800-268-3319 Superex Canada Ltd, Toronto,M2H 3B8 Made in China Table of Contents A). Important Safety Instructions B). Charging
GreenWay Solar LED Path and Trail Lighting System. Installation and Owner s Manual
 GreenWay Solar LED Path and Trail Lighting System Installation and Owner s Manual Important Notes and Warnings This installation and instruction manual provides installation, operation, and maintenance
READ CAREFULLY - FAILURE TO FOLLOW INSTRUCTIONS AND SAFETY RULES MAY RESULT IN SERIOUS INJURY
 Owner s Manual LSP16H LS3001 LS3002H LS3003 LSP21H LS3101 LS3102H LS3103 LSP24H LS3201 LS3102H LS3103 LSP28H LS3301 LS3302H LS3303 mainframe bundle H-unit bundle accessory box mainframe bundle H-unit bundle
TWIN EAGLES ALL WEATHER ELECTRIC RADIANT HEATER
 TWIN EAGLES, INC. Defining the Art of Outdoor Cooking TWIN EAGLES ALL WEATHER ELECTRIC RADIANT HEATER OWNER S MANUAL MODEL TEEH-1512 TEEH-2524 TEEH-3524 NEED ASSISTANCE? PLEASE CALL: (562) 802-3488 This
Lenses and Telescopes
 A. Using single lenses to form images Lenses and Telescopes The simplest variety of telescope uses a single lens. The image is formed at the focus of the telescope, which is simply the focal plane of the
THE LOSMANDY GM-8 EQUATORIAL MOUNT. User's Manual
 CHECKING THE PARTS THE LOSMANDY GM-8 EQUATORIAL MOUNT User's Manual Depending on which accessories you ordered, your GM-8 mount was shipped in two to four boxes. The contents of each box are as follows:
Celestial Observations
 Celestial Observations Earth experiences two basic motions: Rotation West-to-East spinning of Earth on its axis (v rot = 1770 km/hr) (v rot Revolution orbit of Earth around the Sun (v orb = 108,000 km/hr)
Orion SkyQuest IntelliScope XT6, XT8, XT10
 INSTRUCTION MANUAL Orion SkyQuest IntelliScope XT6, XT8, XT10 #9985, #9986, #9987 Providing Exceptional Consumer Optical Products Since 1975 Customer Support (800) 676-1343 E-mail: support@telescope.com
FIRST GRADE 1 WEEK LESSON PLANS AND ACTIVITIES
 FIRST GRADE 1 WEEK LESSON PLANS AND ACTIVITIES UNIVERSE CYCLE OVERVIEW OF FIRST GRADE UNIVERSE WEEK 1. PRE: Describing the Universe. LAB: Comparing and contrasting bodies that reflect light. POST: Exploring
CrossFireII. 1-Inch Diameter Main Tube RIFLESCOPE MANUAL RIFLESCOPE RIFLESCOPE
 CrossFireII MANUAL 1-Inch Diameter Main Tube The Vortex Crossfire II Riflescopes Specifically designed for discriminating hunters and shooters, the Crossfire II series of riflescopes offer the highest
cbperformance.com Please read this entire brochure prior to installing your CB Performance Products MAGNASPARK II distributor.
 - Easy -wire installation with no external spark box necessary, but can be used with one. - Precision CNC machining and hand assembled construction. This is a premium product. - Accurate super hot spark
Infrared Viewers. Manual
 Infrared Viewers Manual Contents Introduction 3 How it works 3 IR viewer in comparison with a CCD camera 4 Visualization of infrared laser beam in mid-air 4 Power Density 5 Spectral sensitivity 6 Operation
Stellarium a valuable resource for teaching astronomy in the classroom and beyond
 Stellarium 1 Stellarium a valuable resource for teaching astronomy in the classroom and beyond Stephen Hughes Department of Physical and Chemical Sciences, Queensland University of Technology, Gardens
MODEL T10023 ACCESSORY KIT #1 FOR T10010/T10097 WET GRINDER
 MODEL T0023 ACCESSORY KIT # FOR T000/T0097 WET GRINDER INSTRUCTION SHEET Introduction The Model T0023 Accessory Kit # for the Model T000/T0097 Wet Grinder includes fixtures for sharpening small knives,
Retractable Screen. Replacement Screen Instructions
 Retractable Screen Patent Pending Replacement Screen Instructions For RTS, RET, & RTM Products ATTENTION! Retractable screens are not intended to provide security or provide for the retention of objects,
Dome Security Camera with IR night vision
 Dome Security Camera with IR night vision EN INSTRUCTION MANUAL 1 Before you begin Limited Warranty Terms & Conditions Swann Communications warrants this product against defects in workmanship and material
Parts List. The HyperStar Lens Assembly includes three pieces: HyperStar Lens Secondary Mirror Holder Counterweight
 The HyperStar Lens allows CCD imaging at f/2.3 with compatible Celestron 9.25 Schmidt-Cassegrain telescopes and compatible CCD cameras. These instructions show the proper methods for installing the HyperStar
Mounting Tripod Kit Installation Manual
 Mounting Tripod Kit Installation Manual For use with Davis s wireless and cabled Vantage Pro2 weather stations, the Mounting Tripod simplifies installation. The tripod supports the Integrated Sensor Suite
Pet hair clipper. Model 96822. Diagrams within this manual may not be drawn proportionally.
 Pet hair clipper Model 96822 Cleaning And Operation Instructions Diagrams within this manual may not be drawn proportionally. Due to continuing improvements, actual product may differ slightly from the
Features: Mounting the Optic
 MICRO GREEN DOT with INTEGRATED RED LASER The Patented Micro Green Dot with Integrated Red Laser is a compact optical system packed with many features. The Green Dot is designed as the primary targeting
Name Class Date Laboratory Investigation 4B Chapter 4: Cell Structure
 Name Class Date Laboratory Investigation 4B Chapter 4: Cell Structure The Microscope: A Tool of the Scientist You may refer to pages 66-67, 72-73 in your textbook for a general discussion of microscopes.
Collimation of an Alluna Ritchey-Chrétien telescope
 Collimation of an Alluna Ritchey-Chrétien telescope This guide describes how to use your Alluna Ritchey Chrétien telescope in a few steps and adjust it perfectly in a matter of minutes. Collimation is
Guide to buying & using your first telescope. By www.nztelescopes.co.nz
 Let's start with some basic rules: Guide to buying & using your first telescope By www.nztelescopes.co.nz Never buy a telescope in a department store. I used to qualify this rule, but I've decided to make