Duda Solar Water Heating Systems
|
|
|
- Janis Mitchell
- 7 years ago
- Views:
Transcription
1 Duda Solar Water Heating Systems Operation and Maintenance Manual Duda Energy LLC 1112 Brooks St SE Decatur, AL Phone Contact:

2 Table of Contents General Information... 5 Local Standards... 5 Qualified Installer... 5 Warnings and Cautions... 5 Pressure Release & Relief Valve... 6 Water Quality... 6 Metallic Corrosion... 7 Connection of Piping... 8 Freeze Protection of the Closed Loop System... 8 Freeze Protection of the Copper Heat Pipes... 8 SRCC Certification & collector specifications... 9 Manifold Connections Wind Stress Snow Loading Storage Tanks Hail Resistance Pipe Sealant Scope of Manual Definitions Equipment Supplied by Duda Energy For a Complete System Additional Parts/Equipment Recommended From Duda Energy Tools & Materials Needed System Operation Explanation of components Solar collector Accessory Frame Construction Working Station Electrical Installation Pressure relief Valve Mounting the Electronic Controller Flow Meter

3 Tubing Electronic Controller Controller display Controller Backup Heating function System Set-up Solar water Tank Mounting Feet Temperature/Pressure Relief Cold water Inlet Port Lower Circulation Loop Ports Bottom temperature Sensor Port Electric Water Heating Backup Upper Circulation Loop Ports (Optional) Magnesium Rod / Anode rod Hot Water Outlet Drain port (Bottom side of the tank) Thermostatic Mixing valve Duda s Flex Tubing / Corrugated Stainless Steel Tubing Step 1: Slide the fitting over the tubing Step 2: Flatten the corrugations using the special fitting tool Step 3: Apply the c-ring to the tubing Step 4: Pull the fitting forward Step 5: Apply the washer Step 6: Attach to your piping Installation Transport Unpacking and Inspection Location Requirements Electrical Requirements System Design Direction and Angle of Installation Mounting the Frame

4 Slope Roof Installation Bracing Flat Roof or Ground Installation Wall Mounting Installing the Components to the Frame Mounting the Manifold Piping & Automatic Air Vent Insulation Charging the System Installing the Vacuum Tubes Reflectors Maintenance Cleaning Leaves Broken Evacuated Tubes Flushing the System Instructions for long periods of inactivity Anode Rod Maintenance Draining the Solar Water Tank Emergency Shutdown Procedures To Turn off the solar system To turn off the water Troubleshooting No Hot Water Warranty Disclaimer

5 General Information Please read this manual in its entirety prior to installing your Duda Solar water heater. This manual covers the general installation of the solar water heater but may not be a complete resource for the full installation or safety requirements for performing an installation. These systems should be installed in accordance with all local building codes. Local Standards This installation must be done in accordance with all local, state and federal regulations. Check with your local building code and code enforcement prior to installing a solar water heater. Local codes/regulations take precedence over the guidelines in this manual. Qualified Installer Duda Energy LLC does not take responsibility for improper installation of its Solar Water Heaters. Only people with plumbing, roofing and electrical knowledge should install a solar water heater. Duda Energy LLC recommends that a qualified/certified plumber or solar installer who holds a license required for such industry should install this product. This water heater should be installed in accordance with the local code authority which has such jurisdictions over the installation, the utility company and this installation manual. If there are no local code requirements, follow the regulations found in the latest edition of The National Electric Code, NFPA 70. This may be obtained from the following organizations: National Fire Protection Agency 1 Batterymarch Park Quincy, MA American National Standards Institute 1430 Broadway New York, NY 1001 Use your phonebook listings for the local authorities having jurisdiction over your installation. Warnings and Cautions When the term Warning is used it means that a person could be injured or killed if the procedure is not adhered to. The term Caution means that a person has a chance of being injured or worse if the procedure is not adhered to. Notes signify something regarding general tips for operation of the unit. 5

6 Pressure Release & Relief Valve Caution: The closed system solar loop must operate at less than 87 psi and have an expansion tank installed to accommodate expansion from the working fluid. Caution: The closed loop system design must eject fluid at no more than 113 psi. It is recommended that the pressure relief valve be operated every 6 months to ensure reliability and operation. Please raise and lower the release lever gently and carefully as the working fluid of the system can be extremely hot. Caution: The solar water tank must be equipped with a temperature/pressure relief valve. It must relieve pressure at no higher than 99 C / 100 psi. The T/P valve should be operated every 6 months to ensure reliability and operation. Please raise and lower the release lever gently and carefully as the working fluid of the system can be extremely hot. Warning: Failure to operate the pressure temperature relief valves on a regular basis could lead to failure of the component or possible solar storage tank explosion and damage to the solar system. Water Quality Water needs to be added to propylene glycol for the working fluid of the system. It is recommended that distilled water be used to help prevent corrosion to the plumbing and system parts and to also ensure efficient heat transfer. The water quality must meet the following requirements: Chloride < 250 ppm Hardness < 200 ppm Magnesium < 10 ppm Dissolved Solids < 600 ppm Chlorine < 5 ppm Caution: Only food grade propylene glycol mixed with water may be used to make an antifreeze solution in the solar loop. The Duda Energy Inhibited Propylene Glycol has special corrosion inhibitors which will coat the inside of the piping in the solar loop. This helps prevent corrosion within the closed loop system, especially in the case of the propylene glycol becoming acidic over time. Warning: Do not use ethylene glycol (automotive antifreeze) for your solar loop. This chemical is toxic and may cause death should failure occur within the system causing it to mix in with the water in the tank. Only Food Grade Propylene glycol may be used in a solar water heater system. 6

7 When mixing the propylene glycol with water, do not use a solution of more than 60% propylene glycol to 40% water by volume unless otherwise instructed by the manufacturer. The propylene glycol solution should only be concentrated enough to avoid the coldest possible temperatures in the region. Higher propylene glycol concentrations will reduce the heat transfer and pumping efficiency. Propylene glycol solutions will gradually become more acidic over time and should be changed out every 3 to 5 years to prevent excessive corrosion to the pipes. If the propylene glycol solution exceeds 250ºF on a regular basis, it should be changed more frequently as propylene glycol will become rapidly acidic when kept above this temperature. You should obtain a water quality analysis of your water supply prior to installing the solar water tank. Most of the time, these tests can be obtained from your water authority as they are required to perform this test and keep the results on record. If the water comes from a well, a water quality test should still be performed. If your location has hard water, the inside of the solar tank will become coated with lime scale, thus reducing the efficiency and life expectancy of the tank. It is recommended that a sufficient softening device be utilized for effective long term operation of the tank. The anode rod in the solar water tank is used to protect the inner walls of the tank from corrosion by use of the phenomenon known as galvanic corrosion. The anode rod, which is less noble than stainless steel, will corrode first before the stainless steel walls can corrode. Regular replacement of the rod will greatly extend the life of the tank. This rod should be checked every few years or replaced according to the below anode replacement schedule. Dissolved Solids in Water (ppm) Replacement Interval of Anode Years Years Year or Less The Duda Solar water heating tank is initially equipped with a magnesium anode rod. Magnesium anode rods dissolve into the water as they corrode and provide healthy minerals to the water supply. Alternatives to the magnesium rods are aluminum or zinc-aluminum combinations. The aluminum-type rods are nobler than magnesium rods and will last a little bit longer than magnesium rods. Aluminum anode rods are preferred if your water supply contains very hard water. Zinc-aluminum (10% zinc, 90% Aluminum) rods can be used if the water has a sulfur dioxide odor. The zinc can help remove this order. Metallic Corrosion Duda Energy does not warrant the solar collector or solar water heater tank against corrosion related damage. Always use high grade copper or Duda s Flex tubing (corrugated stainless steel tubing) in the solar loop. The heat generated by the solar collectors can leach impurities into the working fluid of the system. 7

8 Warning: Do not use iron or PEX tubing in the closed loop section of the solar system. Iron piping fails easily due to corrosion effects of the working fluid and the ambient air. PEX tubing or any kind of plastic piping will melt from the extreme temperatures of the solar water collector. Connection of Piping Copper must be soldered using high temperature silver solder. The use of compression fittings or such equivalent fittings are acceptable for connecting copper pipes. Flexible stainless steel tubing must be attached using the threads and a high temperature gasket. Freeze Protection of the Closed Loop System The manifold and piping could become damaged from cold temperatures due to expansion of the working fluid in the case of freezing. A Food Grade Propylene Glycol solution should be used for maximum freeze protection in the closed solar loop. Refer to the temperature chart below for the appropriate mixture ratio based on your location. It is best to recognize that solar collectors on a roof will experience the coldest parts of the night and should have a solution able to withstand the coldest possible climate in your area. While the highest concentration may seem the best for the highest freeze protection, the lowest concentration permissible by weather should be used as heat transfer and pumping is more efficient with higher concentrations of water. Note: No more than 60% propylene glycol should be used as higher concentrations have low heat conduction and high viscosity which may hinder performance of the circulation pump. Solution (% by *mass) Freeze Temp ( F) Boiling Temp ( F) *The density of propylene glycol is very similar to that of water so a volume/volume ratio may be used in substitute to mass/mass. Note: Duda Energy s Special Inhibited Food Grade Propylene Glycol is highly recommended. It will coat the inner parts of the metal piping with corrosion inhibitors. This will help prevent corrosion to the pipes as the glycol solution becomes acidic over time. Freeze Protection of the Copper Heat Pipes The evacuated tubes and heat pipes are not normally susceptible to damage in mild cold climates. The standard Duda Solar copper heat pipes (0.6mm thickness) are rated for -10 C (14 F) operating temperatures. It is generally acceptable for the heat pipes to endure 5 10 C (9-18 F) lower than their rated minimum operating temperatures for intermediate periods. However, if cold temperatures are expected to normally exceed this minimum temperature requirement, Duda Solar freeze resistant heat pipes should be considered to avoid cracking of the heat pipes. Use the below chart as a guide for Duda Solar Freeze Resistant Heat Pipes. Model Low Temperature High Temperature Heat Pipe Condenser 8

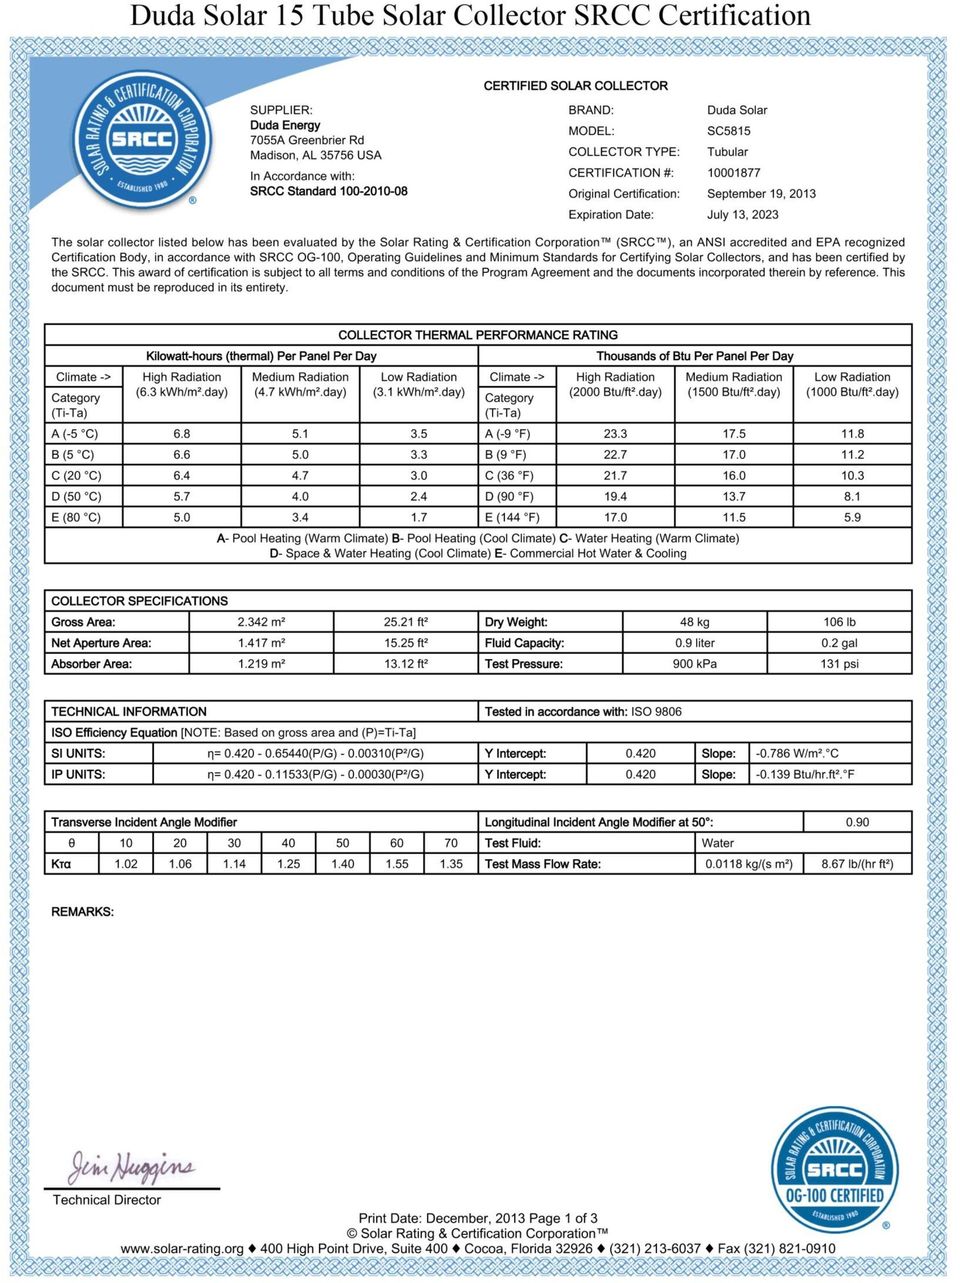
9 Rating Rating Thickness Cover Standard -10 C (14 F) 230 C (446 F) 0.6mm No Freeze Resistant -25 C (-13 F) 250 C (482 F) 0.7mm No Super Freeze Resistant -50 C (-58 F) 250 C (482 F) 0.8mm Yes SRCC Certification & collector specifications The Duda Solar Water Heater Collectors are OG-100 SRCC Certified. They are one of the most efficient solar water heaters in the market. They have a very high performance in both warm and cold weather due to its excellent design in manifold technology and quality evacuated tubes. OG-100 certified collectors are eligible for the 30% Federal Tax Rebate for alternative energy. All components involved in the installation and labor may be considered for the tax rebate. Following are copies of the SRCC report for each collector offered by Duda Energy LLC. To view the full pages of the SRCC report, please visit and go to Ratings and search by entering the corresponding SRCC certification number into the appropriate field for search Duda Energy LLC by company name. 9

10 10
11 11

12 12

13 13

14 Manifold Connections There are two connections on the manifold, an inlet and an outlet. The fluid can flow in either direction. The flow of the fluid should be oriented so that the outlet of the manifold is also where the solar collector temperature sensor is installed. This is especially important for systems which have many collectors linked together since there can be great temperature differences between the inlet of the collectors and the outlet of the collectors. Note: The manifold must be elevated at a minimum of 5 above the vacuum tubes in order for rapid transfer of the heat from the tubes to the manifold to through the use of evaporation of the special fluid inside of the heat pipes. The header pipes on the manifold are ¾ copper pipes. Pipe connections may be made by soldering with a high quality silver solder or with the use of compression fittings. Warning: Only high quality silver solder should be used as the high temperature of the operating unit can cause failure in low temperature products. Wind Stress When installing the collector, consider orienting the collector for wind resistance and take notice to the stresses on the attachment points. The installation must be made according to building codes/regulations regarding the installation of the unit. Caution: When installing in windy conditions take precautions as the unit can be caught by the wind and damage to the unit or persons can occur. It is the responsibility of the installer to ensure that the frame mounting area is of suitable strength. When applicable, a building inspector or equivalent should authorize the location of the installation to ensure that it will be done within all relevant regulations. Proper safety techniques should be practiced when installing the unit. If there are any doubts, contact your building inspector. Caution: Placement of the solar unit should consider the possibility of broken tubes and glass shards falling on people or animals from incidental contact. 14

15 Snow Loading In areas where significant amounts of snow accumulation can occur, it is recommended that the solar collectors be elevated. Please refer to local and other regulations regarding snow loading precautions. Storage Tanks Tanks must be installed in accordance with local building codes. Use additional braces or straps when installing the tank in earthquake zones. Warning: When solar storage tanks are operated for an extended period of time without any hot water use, there can be a buildup of hydrogen gas in the top of the tank. If the tank s water supply is not operated frequently, run the hot water for several minutes to drain out all of the hydrogen gas. Do not operate a dishwasher or other hot water appliance until this gas has been discharged to avoid a potential ignition of the gas. When draining this gas from the tank, it will sound like air in the pipelines. Hail Resistance The solar water heater vacuum tube is extremely tough against hard impacts. The tubes are tested to withstand impact from hail up to 25mm in diameter (about one inch diameter). Even larger hail bombardment can be tolerated if the collector is oriented at an angle greater than 45. If you live in an area where storms often generate hail greater than 25mm in diameter, it is highly recommended to orient the solar collector greater than 45. Pipe Sealant High quality Teflon tape should be used for all NPT threaded fitting connections. We offer a yellow gas line Teflon tape which meets Mil SPEC T27730A, a military specification. Use of this Teflon tape will ensure a leak-free connection for years to come. Scope of Manual This manual is written for the reference of a qualified plumber or solar installer. This manual is not a full encompassing manual. Other resources should be gathered prior to installing the system. If conflicting information is found, the owner s manual takes president. Duda Energy LLC is not responsible for damages to property or persons due to solar water heater installations. Definitions Automatic Air Vent A vent installed at the highest point of the system to ensure the closed-loop system remains free of air. Closed Loop Pressurized System - A solar system which uses a separate fluid to transfer heat to a solar tank. The system is closed from other fluids and pressurized. 15

16 Tank Coil Coils or heat exchangers are immersed inside of the solar tank which permits transfer of heat from the closed loop pressurized system to the water. These coils are ½ or ¾ OD copper tubing coils which keep the solar loop working fluid from mixing with the domestic water. Heat Dissipater Similar to a car radiator. A devise used to radiate off excess heat from the solar system. Heat Pipe A high grade copper pipe which transfers heat to the manifold. The pipe contains a fluid which rapidly transfers heat to the manifold through evaporation in the bottom of the pipe and condensation in the top of the pipe. The top of this heat pipe is called the condenser. The condenser is inserted directly into the manifold. Solar Panel or Solar Collector A complete unit which mounts to the roof or ground consisting of a manifold and vacuum tubes. Solar Tank The water storage tank which the solar collector delivers heat to through the use of the closed loop. Solenoid Valve An electrically controlled valve which is used to control flow through the heat dissipater when the solar loop reaches maximum working temperature. Temperature Pressure Relief Valve (T/P Valve) This is a safety valve which ejects water if the temperature or pressure inside the solar tank exceeds maximum specifications. Thermostatic Mixing Valve A mechanical valve which automatically mixes cold and hot water to an adjustable temperature. Working Station The assembled unit containing the circulation pump, pressure gauge, tempering valve, pressure relief valve and flow meter. Equipment Supplied by Duda Energy for a Complete System Box with Manifold, mounting frame, optional back legs for stand, tube holders/end caps, mounting feet and thermal conducting compound Boxes of vacuum tubes with heat pipes and aluminum fines inserted Box of spare vacuum tubes for breakage insurance during freight Working Station (pump assembly and electronic controller) Solar Water Tank Inhibited food grade propylene glycol, automatic air vent, thermostatic mixing valve, submersible water pump for initial charging of the system Note: Larger Systems may have more than one manifold with corresponding parts and also more vacuum tubes with and without heat pipes. Additional Parts/Equipment Recommended From Duda Energy Flexible corrugated stainless steel tubing and corresponding fittings with fittings installation tool or copper pipe (stainless is preferred over copper for better corrosion resistance, less heat loss and easier installation) Enough pipe will be needed for connecting the solar collector to the working station and water tank. 16

17 Nitrile/NBR/Buna/EPDM or other high temperature resistant pipe insulation Aluminum Pipe Wrap for protection of insulation exposed to weather Copper wire for extending connections to the solar collector temperature sensor Compression fittings for connecting the system components to the piping PVC tubing for connecting the High Quality Teflon Tape for NPT pipe connections 5 Gallon Pail for holding the working fluid during initial charging of the system Note: Duda Energy offers most of the needed components in a turn-key option. Call for details. Tools & Materials Needed 2 Adjustable Crescent Wrenches 1 small pipe wrench High temperature lubricant Ladder(s) for access to roof and attic as needed Measuring tape, square, marking pencil or chalk (for marking rafters and holes on roof) ½ wood bit or a circular hole bit for roof penetration (for feed and return lines through the roof) 8 Bolts/washers/Screws/Nuts to mount unit to the roof (8 per collector) 2 rubber roof penetration boots and screws to mount Pipe clamps to hold pipes in place Caulking gun with a quality silicone roofing caulk (to fill lag holes and seal flashing to prevent leaks) Pipe cutters Drain pan for solar water tank Strapping for any part of the system (for earthquake zones or high wind areas) Small and Large Philips screwdrivers Small flat head screwdriver Hammer Plastic zip ties to hold wires in place Necessary copper connections for ¾ pipe on manifold to attach to stainless tubing or copper pipe Fittings to connect your water system to the tank and any necessary plugs if any ports will not be used Electric ring terminal for grounding the water heater element to thermostat housing screw Pipes for connecting water supply to the solar water tank System Operation The operation of the closed loop solar water heater system incorporates simple and reliable products which collect heat from the sun through the solar collector and transfer the heat using the working fluid (propylene glycol) to the solar water tank by use of the heat exchanger coil in the bottom of the tank. 17
 for access to roof and attic as needed Measuring tape, square, marking pencil or chalk")
18 Solar water heater vacuum tubes are a state of the art technology which were originally used only in commercial applications but have now become affordable as the ultimate use in energy conservation for both residential and commercial applications. The following diagram displays an overview of the system and how it operates: Duda Energy Closed Loop Solar Water Heater System 18

19 Explanation of components Solar collector The solar collector consists of the manifold, vacuum tubes and frame. Warning: Ensure the roof is structurally secure before installing the solar collector. If in doubt, consult an engineer or the local building inspector. The roof must be able to support the weight of the collector with tubes installed and able to withstand any additional weather loads such as snow and wind. Additional bracing may be required. Caution: Do not install the vacuum tubes into the manifold until the unit is ready to operate with water in the solar tank and the closed loop is charged with the propylene glycol mix. The solar loop must be tested for leaks and proper pump operation must be confirmed. Keep the vacuum tubes out of the sunlight until they are ready to be installed into the manifold. The heat pipes will heat rapidly when the tubes are exposed to the sun and may cause serious burns to the installer. Perform the installation of the tubes in the late afternoon or early morning or wear temperature retardant gloves when inserting the heat pipes with tubes into the manifold. See below for a photo of the heat pipe and aluminum fins which keep the heat pipe centered inside of the vacuum tube. The aluminum fins help heat rapidly transfer from the hot air to the heat pipe. The silicon gasket is used to seal the open end of the vacuum tube to the manifold to help contain the hot air within the tube and to prevent dust from entering the tube. Copper Heat Pipe with Silicon Gasket Stopper and One-Piece Aluminum Fin 19

20 Accessory Frame Construction Below are photos of the solar collector frame to reference when building the frame. For the flat roof stands, the back legs on the frame are optional and can be removed if you wish to mount the collector flush to the roof. Our slope roof frames may also be used for flush to the roof installations and also have the special ability of mounting underneath the tiles on a tile roof for a leak-proof design. Note: It is best to make the bolts hand-tight on initial building of the frame. Secure the bolts tightly using a wrench when everything is pieced together and verified to fit correctly. Note: The Flat Roof / Ground Stand has holes drilled specifically for the left and holes drilled specifically for the right side of the frame. Be sure to check where the holes are drilled for the cross-members to ensure that each piece is connected to the proper side of the frame, otherwise the cross-members will not have holes to mount to properly 37 /45 Flat Roof/Ground Stand Rear view of Flat Roof / Ground Stand 20

21 Side Angle of Flat Roof / Ground Stand Flat Roof / Ground Stand with manifold mounted and tube holders in place (ready for tubes) 21
22 Slope Roof Frame Front View of Slope Roof Frame Back-Side View of Slope Roof Frame 22
23 Slope Roof Frame with Manifold Mounted Caution: Care should be used when attaching the manifold to the frame to ensure proper bolt tightness. Supplemental strapping should be used in high wind and hurricane areas. Working Station The Duda Solar Water Heater System comes with the SR961s working station or its equivalent. The SR961s working station is an advanced device which circulates the working fluid of the closed loop with a varying flow rate from the collector to the tank based on collector, tank and return temperature coming from the tank. It has higher performance in heat gathering and is energy efficient in operation. 23
24 SR961s Working Station A 3 speed German WILO star RS high temperature fluid pump with pressure gauge, pressure relief valve, flow meter, shut-off valve(s), check valve and charging valves are incorporated into the system. The pump station is encased with a foam insulation that helps retain heat. The metal casing helps protect electronic components from getting damaged by external forces. Long screws or bolts may be used for mounting the working station to a wall. It should be mounted in the lower part of the closed loop system, preferably near the water tank for easy access to sensor ports. Be sure to mount the working station without obstruction to the charging valves, pressure relief valve and expansion tank port. Electrical Installation Please refer to the working station manual for instructions on wiring the device and connecting the temperature RTD sensors. Caution: Prior to operating the pump, ensure that any shut-off valves in the closed loop are on the on position. If the pump operates with a closed shut-off valve, it can cause excessive heat build-up and burn out the pump. The SR961s and similar models have a pump protection mode where if it cannot achieve flow within 3 minutes of operation, it will shut down the circulation mode. Pressure relief Valve 24
25 The pressure relief valve is located at the top right of the working station enclosure. It has a knob which is used to test its functionality and for manual draining. A drain hose or pipe should be attached to this valve so that if the valve opens, fluid can be directly to an appropriate container. Pressure Relief Valve for Closed Loop Mounting the Electronic Controller The controller is integrated into the SR961s working station and does not require additional mounting. Other working stations may be separate from the controller. In this case, the controller should be installed somewhere near the working station. It is best to install it above the working station. Ideally, the pump should be located as low as possible, ideally at the bottom of the solar loop and the controller display above the working station at eye level for easy operation of the owner. Flow Meter The SR961s working station has an integrated flow meter with digital display. The flow rate is shown on the bottom portion of the display screen. It will measure the flow in liters per minute when the pump is operating and when flow is occurring. Other controllers may use a mechanical flow meter which utilities a float inside of a pipe. The flow meter shows the flow of the solar loop in liters per minute. A white washer floats up to the appropriate level indicator to show the approximate flow when the pump turns on. The bottom of the flow meter (inlet to the working station) should be connected to the outlet of the coil on the solar tank so that the colder glycol solution enters the working station (after heat transfer to the tank). 25
26 On these mechanical flow meters is typically a tempering valve which can be used to restrict the flow of the fluid to the suction side of the pump. This valve should normally be set to full open (vertical position) by use of a flat head screwdriver unless the application requires higher temperature fluid to approach the tank (not normal). Tubing Copper pipe or Duda s Flex Tubing (corrugated stainless steel tubing) may be used for the solar loop. The latter is preferred as it conducts less heat, resists corrosion better and is very flexible and easy to run through an installation. This tubing, fittings and the necessary tools can be found on The piping used should be ½ for most installations. If several solar collectors are connected in series or more flow is required for the particular installation, ¾ piping may be used. Generally speaking, the smaller the pipe, the less heat loss and the less fluid that needs to be added or heated up on each day in operation of the water heater system. Electronic Controller Follow the installation instructions supplied with the controller. The following information and photos will help with the installation procedure. Controller display The display is used for setting various parameters, controls and shows operation of the unit. It connects to the controller Controller Three sensors are provided with the controller. The black wire sensor is the pt1000. This high temperature sensor is to be used for the solar collector temperature detection and must be connected to T1 on the solar controller / working station. It withstands the high temperatures of the collector and works differently from the 10k sensors and cannot be interchanged. Note: Be sure to put the pt1000 sensor into the side of the manifold which is also the outlet for the closed loop. Secure the wire appropriately so that there is no risk of the sensor falling out of the sensor port during operation due to external forces such as wind. 26
27 Note: Apply some thermal conducting paste to the tip of the probe to aid in rapid temperature detection with the sensor. Properly Secured pt1000 sensor The 2 gray wire sensors are to be installed into the top and bottom ports on the solar tank. T2 is the bottom sensor; T3 is the top sensor. One of the various options of the controller is to circulate water from the tank, through the piping in the house and back to the tank. This keeps the water hot at all times so there is no waiting period for hot water when the tap is opened. This function can also be set with time intervals so that hot water is not wasted during non-use hours (while sleeping or gone to work). In order to use this feature, a 2 nd circulation pump is required. A 3 rd 10k (gray) sensor and a thermowell will be required (must be purchased separately). Install the 3 rd sensor into the thermowell and put the thermowell into the return hot water pipe. The thermowell is typically installed into the pipeline just before returning to the tank using a 27
28 tee to allow insertion into the pipeline. The controller can then sense when the pipe has cooled off in order to operate the circulation pump to provide the pipes with more hot water. Copper Thermowell Backup Heating function Our tanks come with a manual thermostat for electric water heating backup. The controller has a backup heating function as well which can be used for this electric water heating element or another backup source such as an external gas heater. The advantage to using the controller for electric backup heating is it can be set with a timed function so that it will not activate the backup heating during times when water is not used i.e.: 4am. This can help save electricity by allowing the sun to continue the heating on the next day rather than relying on the element when the hot water is not even needed. Caution: The controller will have a limited amount of output current which can activate a water heating element. For any high power applications which the controller cannot handle, a high power relay must be utilized. The controller will activate the relay so that high current passes through the relay to the element without passing through the controller. Duda Energy sells the SR802 High Power Relay for this application. System Set-up The controller out of the box is ready to go for the solar water heater system with the exception of the maximum tank temperature protection mode. This mode is highly recommended for the case where the solar water tank is overheated and the system needs to stop transferring heat to the tank. There are two functions which can be used for maximum temperature protection. System shut down If overheating is unlikely, it is best to use the function which shuts down the pump when the tank reaches max temperature. Once the tank temperature reaches the set maximum temperature, the controller discontinues operation of the pump. The fluid in the solar loop will boil off into a vapor and push all of the remaining liquid into the expansion tank connected to the working station. The solar water system will resume as normal after the system 28
29 cools down and the solar water tank drops 2 C below the set maximum temperature (for the SR961s). For instructions on how to set up this feature, please refer to the working station manual. This method may not be preferred if tank overheating is likely to occur often, such as with an oversized collector or during the summer in southern locations when hot water consumption is not high. This method may also not be preferred if water usage may be spontaneously high and resumed system heating is desired as soon as cold water enters the tank. Heat Dump Function Propylene glycol becomes rapidly acidic if kept above 280 F. If it is kept at high temperatures for extended periods of time, it will need to be changed more often than normal to prevent excessive corrosion to the pipes and heat exchanger coil(s). If over-heating is likely to happen often, it is best to use a heat dissipater (sold separately) with electronic solenoid valves for controlled use of the heat dissipater when needed. When overheat protection mode occurs on the controller, the electronic valves open to allow flow of the glycol solution through the heat dissipater, thus cooling the working fluid and preventing additional overheating of the tank. When the tank temperature drops below the maximum again, the system will resume heating. Please refer to the working station / controller manual for activating this function. Another method for utilizing a heat dump is to use a diverting mixing valve. Diverting mixing valves are usually set for a high operating temperature such as 95 C (203 F). When the working fluid reaches this temperature, the diverting valve mechanically diverts the fluid to pass through the heat dissipater prior to returning to the tank. This method allows for minimal electrical consumption, but has a little less control than with the use of solenoid valves. For example, if you desire to heat the tank close to 95 C, the diverting valve will begin dumping heat before the tank temperature reaches the maximum desired temperature. Solar water Tank Caution: Ensure that the solar water tank is installed in an area where the weight of the tank full of water can be supported. Be sure to install a drain pain under the tank. Duda Energy will not be responsible for water or structural damage due to improper placement or plumbing techniques. Caution: Do not turn on the water heating element until the tank is filled with water or damage to the heating element will result. Mounting Feet 29
30 Attach the bottom plastic or rubber feet to the tank so it stands a few inches from the floor. Screws are provided in the tank packaging. Bottom of Duda Solar Tank with Threaded Holes for Mounting Feet & Drain Port Temperature/Pressure Relief The T/P valve should be installed into the T/P port or top of the tank. Connect piping to the outlet of the T/P valve to direct ejected fluid to the drain pan or directly to the sewer. Test functionality of the valve when the tank is initially filled with water prior to operation and also every 6 months. Replace with a 100 psi maximum T/P valve if it is found not to function correctly. Cold water Inlet Port The cold water inlet port is for your city or well water supply to the tank. This enters in through the bottom side of the tank. Above this port is the solar loop inlet and outlet. The recommended cold water supply pressure is 60 psi. The cold water inlet pressure should not exceed 100 psi. Test your water pressure to be sure it does not exceed the maximum. Use a pressure regulation device to control the water inlet pressure if needed. 30
31 Lower Circulation Loop Ports The solar loop is to be connected so that the return from the collector passes through the hot circulation inlet and out the hot circulation outlet to the working station. Caution: Do not over-tighten the nut that holds the upper and lower coils in place. Doing so can twist the copper coil which will restrict fluid flow within the coil. Over-tightening can also crush the seal between the coil and the tank resulting in domestic water leakage through the port. Note: It is best to connect to the coils with an elbow traveling downward to prevent a thermo siphon phenomenon from cooling the tank during no sun hours. The hot fluid inside of the coil will be unable to exit the coil beyond the downward bend of the elbow where cooler fluid will be resting since higher density/colder fluids sink while the hotter/lower density fluids rise to the top. 31
32 Elbows used on Solar Loop Connections to Tank to Prevent Thermo Siphon Effects Bottom temperature Sensor Port The bottom temperature sensor port is for detecting the temperature of the water which the bottom coil heats via the solar loop. This is recognized as T2 on the controller. Apply a little bit of the thermal conducting compound supplied with the manifold and slide it into this port. Electric Water Heating Backup The part you will find is the thermostat housing for the backup water heating element. Remove the screws to the panel to access the water heating element, wiring and thermostat sensor. Make sure that the thermostat sensor is installed inside of the temperature sensing port that is covered by the thermostat housing. 32
33 There is a water heating element pre-installed into the tank. It is usually a 3000w/220 VAC element. A 220v/240v AC power source should be used to activate this element for proper usage. This element can be easily removed and replaced with any element of your choosing from a local plumbing store which utilizes a 1 screw thread type connection. The port is 1 and uses an O-ring gasket to seal into the port, which is common for most standard water heating elements. The thermostat is capable of handling 110 VAC heating elements if desired. Caution: The maximum power rating on the thermostat housing is 25 amps. Do not use water heating elements that will draw more than 25 amps or it can burn out the on/off switch and destroy the thermostat housing. Wire your power source through the electrical housing and connect to the thermostat and then to the water heating element. Only one wire needs to go to the thermostat while the other can go directly to the element. The circuit on both wires must have full continuity in order for the element to operate (when the thermostat engages). The element should be grounded to the tank by one of the screws which connects to the tank. Note: If you prefer to control the water heating element with the electronic controller, a high power relay must be used. Be sure that the relay matches the appropriate output voltage of the controller. The Duda Energy store carries the SR802 relay for these applications. Caution: Do no exceed the rated amperage capacity of the relay. Upper Circulation Loop Ports (Optional) The upper coil of the tank can be used for a variety of applications. It can be used for alternate backup heating methods such as a boiler or external gas heater. It can also be used for retrieving heat for other systems such as radiant floor heating. Connect to this coil the same as the lower coil. Depending on the application, it may be advisable to use elbows on the top coil to prevent a thermo siphon from occurring. Note: While dual coil tanks are useful for some applications, it is best to use a single coil tank for general water heating applications. Most single coil tanks have a longer bottom coil than do the dual coil tanks. Use of a dual coil tank for a single coil tank application may result in some minor thermal efficiency losses in the circulation loop. See the Duda Energy website for specifications on coil lengths for different size tanks. Magnesium Rod / Anode rod 33
34 The anode rod port already has a new magnesium rod pre-installed. This rod should be checked regularly for corrosion and be replaced as needed to ensure a long lasting life to the tank. The rod can be replaced with an aluminum rod if the water supply is very hard water or with a zinc-aluminum rod if the water has a sulfur dioxide smell. Hot Water Outlet There is a hot water outlet port on the top side of the tank and also on the top of the tank. Use a plug to block off flow from one of the unused ports if applicable. Connect piping from the hot water outlet to your hot water supply to the building. Note: It is strongly recommended to connect an elbow facing downward to the hot water outlet prior to connecting to the piping of the building to avoid a thermo siphon which will cause significant heat loss to the tank, especially through the night when water is not used. An alternative way to prevent the thermo siphon phenomenon is to install a spring loaded (vertical) check valve directly to the hot water outlet. Hot Water Outlet with Elbow to Prevent Unnecessary Thermo Siphon Drain port (Bottom side of the tank) On the very bottom of the tank there is a drain port. It is recommended that piping and a ball valve be installed to this port for when the tank needs to be drained. This can be very useful when checking the anode rod or 34
35 when the tank needs to be serviced. Connect an elbow directly to the drain port, run piping far enough out from under the tank and install a valve for easy draining access. The valve should be able to eject water to the drain pan or have a garden hose fitting attached so that a garden hose can be used to direct draining water outside. In order for the tank to fully drain, the exit point for the water must be lower than the bottom of the tank. Note: It is best to open the T/P valve when draining the tank to allow adequate air flow into the tank. Thermostatic Mixing valve WARNING: Solar water heaters heat whenever the sun is out. If the hot water is not used, it will continue heating the water to the point of boiling and may cause scalding or serious burns. Extremely hot water may damage appliances such as dish washers or laundry machines if a thermostatic mixing valve is not installed. CAUTION: Adults may suffer slight burns from hot water from open taps. Children and elderly people may not have the proper reaction time to remove hands from a tap before severe scalding may occur. Households with children and elderly people should take additional precautions against scalding, such as installing thermostatic mixing faucets and showers. Maximum temperatures for the tank can be set by the controller. But when the sun is available with free heat, it is normally not desirable to shut the heating down for the day. To combat the risk of scalding from extra hot water or damage to appliances, a thermostatic mixing valve must be installed to the hot water outlet. 35
36 1 Thermostatic Mixing Valve Connected to Hot Water Outlet and Cold Water Inlet The thermostatic mixing valve must be used in a solar water heater to prevent scalding at the faucet. Since the sun can vary based on weather and time of year, solar systems will experience anywhere from mild to extreme hot water. Install the thermostatic mixing valve on the hot water outlet in conjunction with a cold water source so that it will mix in cold water automatically. This will ensure that the water exiting from the solar water tank will not exceed the maximum temperature set by the valve. To adjust the temperature on the valve: turn the knob clockwise to decrease the maximum output temperature or counter-clockwise to increase the maximum temperature. The Markings show the approximate mixed temperature output in degrees Celsius. The consumer product safety commission recommends a maximum of 120 F output temperature. This is approximately 50 C. Some appliances such as dishwashers may require higher input temperatures. In this case, it may be preferred to add a tee to the hot water outlet on the tank and use a secondary thermostatic mixing valve for supplying such appliances. Alternatively, the thermostatic mixing valve on the tank can be set to the maximum appliance temperature while thermostatic faucets and showers are used to regulate the water temperature to lower temperatures when coming in contact with humans. Thermostatic mixing valve faucets and showers can also be quite convenient as the exact desired temperature can be selected every time and the user does not need to spend time adjusting the water accordingly each time of use. 36
37 Example of Thermostatic Mixing Faucet Example of Thermostatic Mixing Shower Duda s Flex Tubing / Corrugated Stainless Steel Tubing A special tool is required to flatten the corrugations on the end of the tubing. There are a few different types of tools available. There is an economical tool which can be used for flattening the corrugations by striking it with a hammer. There is also more expensive tools or toolboxes which are capable of performing the flattening by hand and they can also do multiple sizes of piping installs. We recommend the economical tool for anyone installing fittings to a single size of tubing who will not be doing many fitting installs and the professional kit for multiple tube sizings or when many fitting installations are to be performed. Note: Take special care when cutting the stainless tubing. The tubing should be cut as clean as possible with no burs left on the edges or it could make it difficult to make a good seal with the fitting. Step 1: Slide the fitting over the tubing 37
38 Slide the fitting you will use over the end of the tubing with the threads facing the end of the fitting. Leave enough room so you can clamp the tubing. Step 2: Flatten the corrugations using the special fitting tool Place the tubing into the clamp which holds the tubing in place in the special tool for flattening the corrugations. We recommend clamping down on 2-3 corrugations. You can clamp one corrugation, but if there is an error in the flattening, there's a chance of leakage, and the durability will be lower. We usually use 2 corrugations as it seems to be enough for most applications. In the photo, the professional tool is shown with only 1 corrugation setting into place for clamping. Once the tubing is in place, use the tool to flatten the corrugations. 2-3 hits may be necessary to make it perfectly flat. Step 3: Apply the c-ring to the tubing 38
39 Once the ending corrugations are flattened as shown in the above photo, apply the c-ring between the last flattened corrugation and the first unflattened corrugation as shown in the above photo. Once in place, crimp the c- ring closed. This C-ring will prevent the fitting from coming off the tubing. Step 4: Pull the fitting forward Pull the fitting forward so it is against the c-ring. You will notice that the fitting can no longer be pulled from the tubing. Step 5: Apply the washer 39
40 Apply the washer to the inside of the fitting. The photo shows a Teflon washer which is generally acceptable for most solar installations. Step 6: Attach to your piping Thread the fitting end onto the pipe you are attaching to. Do not use Teflon tape or any pipe dope. The seal is made by the washer. It can connect to both NPT and straight thread fittings. The washer will need to seal against the end of the fitting which the stainless tubing is attaching to in order to prevent leaks. Thread by hand until the fitting is hand tight. Once hand tight, use a wrench to turn it no more than 1/4-1/2 a turn. You should be able to bend the tubing back and forth without the back end of the fitting allowing the tubing to flex at all. When it is stiff on the back side of the fitting, it is tight enough. Pressurize the tubing and checking for leaks. If there are slight leaks, you can try tightening a little bit more. Avoid over tightening the fitting as it can cause the washer to compress too much and the tubing could shred it against the pipe fitting. If leaks still persist after the fitting is tightened, remove and check for problems in the installation of the c-ring and flattening of the corrugations. 40
SunMor SM-V30 Solar Water Heater Installation Manual
 SunMor SM-V30 Solar Water Heater Installation Manual Rev. 1.02 Congratulations on the purchase of your new SunMor SM-V30 from Nature s Comfort LLC! You must read this entire instruction manual before beginning
I N S T A L L A T I O N I N S T R U C T I O N S F O R T H E H i l k o i l Energy S aving Hot Water Kit
 I N S T A L L A T I O N I N S T R U C T I O N S F O R T H E H i l k o i l Energy S aving Hot Water Kit IMPORTANT: These installation instructions are meant to be used as a guide for woodstove owners and
BUILT-IN DISHWASHER INSTALLATION INSTRUCTIONS
 BUILT-IN DISHWASHER INSTALLATION INSTRUCTIONS PLEASE READ COMPLETE INSTRUCTIONS BEFORE YOU BEGIN LEAVE INSTALLATION INSTRUCTIONS AND USER'S GUIDE WITH OWNER ALL ELECTRIC WIRING AND PLUMBING MUST BE DONE
Installation Manual Gravity Solar Water Heater Evacuated Tube Integrated (Direct) System, unpressurized
 System, unpressurized") Installation Manual Gravity Solar Water Heater Evacuated Tube Integrated (Direct) System, unpressurized Gravity Solar System Installation Manual: This manual explains how to install a system of evacuated
Installation Manual Gravity Solar Water Heater Evacuated Tube Integrated (Direct) System, unpressurized Gravity Solar System Installation Manual: This manual explains how to install a system of evacuated
Indirect-Fired Storage Water Heater Models WH-30 through WH-80 INSTALLATION AND OPERATING INSTRUCTIONS
 Indirect-Fired Storage Water Heater Models WH-30 through WH-80 INSTALLATION AND OPERATING INSTRUCTIONS Contents Page Ratings and Specifications..................... 2 Installation Requirements......................
USE &CARE GUIDE. Remote Faucet Pump System. See Important Safeguards on page 2
 Remote Faucet Pump System USE &CARE GUIDE See Important Safeguards on page 2 An exclamation point within an equilateral triangle is intended to alert user to the presence of important operating and maintenance
INDIRECT WATER HEATER. Installation and Operating Instruction Manual
 INDIRECT WATER HEATER Installation and Operating Instruction Manual Maximum supply temperature to heat exchanger must not exceed 180 F (82 C). Safety Warning: Indirect water heaters are heat-producing
Seaward Products OWNER S MANUAL WATER HEATERS. Serial Number:
 Seaward Products WATER HEATERS OWNER S MANUAL Serial Number: IMPORTANT SAFETY INSTRUCTIONS WARNING When using electrical appliances, basic safety precautions to reduce the risk of fire, electrical shock,
Hot, Warm and Cold Mineral Water Cooler [Models Cool18, Cool25, Cool36, Cool50, Cool75, Cool100]
![Hot, Warm and Cold Mineral Water Cooler [Models Cool18, Cool25, Cool36, Cool50, Cool75, Cool100]](/thumbs/26/7741864.jpg "Hot, Warm and Cold Mineral Water Cooler [Models Cool18, Cool25, Cool36, Cool50, Cool75, Cool100]") Hot, Warm and Cold Mineral Water Cooler [Models Cool18, Cool25, Cool36, Cool50, Cool75, Cool100] PLEASE READ BEFORE INSTALLATION TO PREVENT DAMAGE TO THE COOLER HOT WATER TANK STEAM EXAUST VENT (CAUTION!)
Hot, Warm and Cold Mineral Water Cooler [Models Cool18, Cool25, Cool36, Cool50, Cool75, Cool100] PLEASE READ BEFORE INSTALLATION TO PREVENT DAMAGE TO THE COOLER HOT WATER TANK STEAM EXAUST VENT (CAUTION!)
OWNER S MANUAL FORCE 10 MARINE COMPANY 23080 HAMILTON ROAD RICHMOND, BC CANADA V6V 1C9 TEL: (604) 522-0233 FAX: (604) 522-9608
 522-0233 FAX: (604) 522-9608") Electric Water Heater OWNER S MANUAL FORCE 10 MARINE COMPANY 23080 HAMILTON ROAD RICHMOND, BC CANADA V6V 1C9 TEL: (604) 522-0233 FAX: (604) 522-9608 If your water Heater is Damaged or you have questions
Electric Water Heater OWNER S MANUAL FORCE 10 MARINE COMPANY 23080 HAMILTON ROAD RICHMOND, BC CANADA V6V 1C9 TEL: (604) 522-0233 FAX: (604) 522-9608 If your water Heater is Damaged or you have questions
Thermo Siphon Solar Systems
 Thermo Siphon Solar Systems Thermo Siphon Solar Systems are a very cost effective way of producing hot water due to their simplicity in design and installation requirements. Usually more common in hotter
INSTALLATION INSTRUCTIONS & HOME OWNERS MANUAL ECO 18 ECO 24 ECO 27 IMPORTANT SAFETY INFORMATION
 INSTALLATION INSTRUCTIONS & HOME OWNERS MANUAL ECO 18 ECO 24 ECO 27 IMPORTANT SAFETY INFORMATION As when installing or using any high voltage electrical appliance, basic safety precautions should always
Installation Manual. Solar Pool Heating System. Read the complete manual before beginning the installation
 Solar Pool Heating System Installation Manual Read the complete manual before beginning the installation 1. Sizing the System Visit www.techno-solis.com to size the system using the sizing calculator.
Electric Water Heater
 Electric Water Heater Operation and Installation Manual (LIMITED WARRANTY AND TANK REPLACEMENT POLICY) The following information should be noted at time of installation and retained for future reference.
STATFlow. Direct-to-Drain System. For use with STATIM 2000 and STATIM 5000 Autoclaves. Installation Guide and Operator s Manual
 STATFlow Direct-to-Drain System For use with STATIM 2000 and STATIM 5000 Autoclaves Installation Guide and Operator s Manual STATFlow Installation Guide and Operator s Manual 95-113193 Rev 2.0. Copyright
I N S T ALLATION INSTRUCTIONS & HOME OWNERS MANUAL IMPORTANT SAFETY INFORMATION
 I N S T ALLATION INSTRUCTIONS & HOME OWNERS MANUAL MODELS: HA018240 HA024240 HA027240 HA036240 IMPORTANT SAFETY INFORMATION As when installing or using any high voltage electrical appliance, basic safety
ELECTRIC WATER HEATER INSTALLATION & OPERATING INSTRUCTION MANUAL
 ELECTRIC WATER HEATER A Spanish language version of these instructions is available by contacting the manufacturer listed on the rating plate. La version espanola de estas instruccions se puede obtener
Air Conditioner Water Heater Model ACWH18
 Air Conditioner Water Heater Model ACWH18 Installation Guide IMPORTANT! READ THIS FIRST! Commissioning of this unit must be done by a licensed HVAC technician. Commissioning includes making the electrical
INSTALLATION & MAINTENANCE MANUAL TURBOPOWER GAS, OIL & GAS/OIL WATER HEATER
 INSTALLATION & MAINTENANCE MANUAL TURBOPOWER GAS, OIL & GAS/OIL WATER HEATER Installation and service must be performed by a qualified service installer, service agency or the gas supplier. Oil Gas/Oil
Installation Instructions
 Installation Instructions Built-In Dishwasher If you have questions, call 1-800-4-MY-HOME (1-800-469-4663) or visit our website at: www.sears.com BEFORE YOU BEGIN Read these instructions completely and
UNIT 7: PLUMBING KEY CONCEPTS. 1. Identify tools for plumbing. 2. Location of shutoff valves for the main and individual fixtures
 KEY CONCEPTS 1. Identify tools for plumbing 2. Location of shutoff valves for the main and individual fixtures 3. How water is supplied to your home 4. How waste water is removed and treated 5. Common
What you can expect from your Solar Hot Water System
 Owner s Manual Your Solar Hot Water System Thank you for your investment in the FAFCO Solar Hot Water System. Since 1969 our goal has been to design, test, and produce solar heating systems that save you
Installation and Operating Instruction Manual
 Electric Mini Tank Water Heaters CMT-1.3 CMT-2.5 CMT-4.0 CMT-ST70 Tempering valve Optionally available Installation and Operating Instruction Manual Table of Contents Important Safety Instructions 3 General
Stainless Steel Single and Dual Circulation Kits
 Instruction Sheet P/N 160780 01 Stainless Steel Single and Dual Circulation Kits Introduction The single and dual high-pressure circulation kits allow you to vary and control the circulation rate of coating
INSTALLATION AND SERVICE MANUAL EPJ SERIES INDIRECT WATER HEATERS
 INSTALLATION AND SERVICE MANUAL EPJ SERIES INDIRECT WATER HEATERS FOR MODELS EPJ-40 AND EPJ-56 SEE REAR COVER FOR INDEX Read this instruction manual before installation, operation, or service. Failure
INSTRUCTIONS FOR USE, MAINTENANCE AND INSTALLATION OF THE
 SUN & HEAT SOLAR PRODUCTS INSTRUCTIONS FOR USE, MAINTENANCE AND INSTALLATION OF THE SOLAR DOMESTIC WATER HEATER THERMOSIPHON 150/2.5 (TYPICAL INSTRUCTIONS FOR A CLOSED LOOP THERMOSIPHONIC SYSTEM ON A FLAT
Geyser-R Heat pump water heater Installation manual
 Geyser-R Heat pump water heater Installation manual 1 Version 2.9 SAFETY INFORMATION Please read carefully to prevent serious accidents or injury. The Geyser-R Heat Pump Water Heater must be installed
Vacuum Tube Solar Water heater Non-pressure. User manual
 Vacuum Tube Solar Water heater Non-pressure User manual Please read this manual carefully before beginning installation Specification Tubes 12 --- 30 58X1800 Nominal volume tank capacity 100L --- 300L
Solar Collector Series. Product List
 Solar Collector Series List FULL COLLECTORS (MANIFOLD, TUBES & ROOF FRAME) : CSR00051 Apricus Collector : AP10 10-Way Manifold, 10 Tubes and Standard Roof Frame CSR00052 Apricus Collector : AP20 20-Way
PARTS CATALOG RPPCR01111_Front_Backcx.indd 1 RPPCR01111_Front_Backcx.indd 1 11/21/11 1:41 PM 11/21/11 1:41 PM
 PARTS CATALOG RPPCR01111_Front_Backcx.indd 1 11/21/11 1:41 PM RELIANCE Has Everything Your Customers Need to Do the Job Right! Reliance Water Heater Company was founded in 1981 to provide a water heater
2010 Residential Water Heater Replacement Check List
 2010 Residential Water Heater Replacement Check List The intent of this check list is to provide installers a general reference for the enforcement of code requirements in the Greater San Diego Area. This
Select Radiators Installation Guide
 Select Radiators Installation Guide Table of Contents Informational Symbols...3 Before You Begin...4 Select Rough-In... 5 Connection Installation...6 Optional Piping Arrangements...7 Conventional Wall
What to Expect From the Examination. How to Study the Plumbing Codes
 Texas State Board of Plumbing Examiners Plumbing Inspector Examination Review Course The following Examination Review Course is designed to assist an applicant in preparing for the Plumbing Inspector examination.
TECHNICAL SERVICE DEPARTMENT Technical Service Bulletin 1-800-432-8373. Anode Rods, Cathodic Protection and the Porcelain (glass) Lining
 Lining") Corrosion can be defined as the destructive attack of a metal by an electrochemical reaction with its environment. Steel exposed to moisture and oxygen will rust and corrode. Corrosion is defined as the
Corrosion can be defined as the destructive attack of a metal by an electrochemical reaction with its environment. Steel exposed to moisture and oxygen will rust and corrode. Corrosion is defined as the
Installation and User Instructions Unvented Electric Storage Water Heater Models: S10UNV, S15UNV.
 Installation and User Instructions Unvented Electric Storage Water Heater Models: S10UNV, S15UNV. MULTIPOINT Please read and understand these instructions before starting work. Please leave this leaflet
Mini Tank. Electric Mini Tank Water Heaters WM-1.0 WM-2.5 WM-4.0 WM-6.0. Installation and Operating Instruction Manual
 Mini Tank Electric Mini Tank Water Heaters WM-1.0 WM-2.5 WM-4.0 WM-6.0 Installation and Operating Instruction Manual Table of Contents Important Safety Instructions 3 General Information 3/6 Technical
3. SEISCO PARTS & SERVICE REMOVAL AND REPAIR GUIDE
 4 3. SEISCO PARTS & SERVICE REMOVAL AND REPAIR GUIDE A. Changing the Control Board B. Replacing a Heating Element C. Thermistor Replacement D. High Limit Switch Replacement E. Level Detector Replacement
Solar Skies Stainless Tank Series Water Heater
 Solar Skies Stainless Tank Series Water Heater Installation Operation Maintenance Solar Skies Stainless Tank CD1051A.doc Last Revision: 1/31/2011 1 CONTENTS Part 1 Product and Safety Information.....................................
INSTALL INSTRUCTIONS KK-C-HVAC-1 HVAC UNIT 2003-2014 CHEVROLET/GMC VANS FOR
 INSTALL INSTRUCTIONS KK-C-HVAC-1 HVAC UNIT 2003-2014 CHEVROLET/GMC VANS FOR (For NEW 2007 ALL WHITE KWIK-KITS ONLY) Warning do not attempt to install A/C units unless you are experienced with servicing
Your safety and the safety of others are very important.
 NATURAL GAS TO PROPANE CONVERSION KIT 090 INSTALLATION INSTRUCTIONS FOR ALTITUDES 0 -,00 FT. ONLY PROPANE CONVERSION KIT SAFETY... INSTALLATION REQUIREMENTS... Tools and Parts... LP Gas Requirements...
One Year Warranty. Stock U.S. # of Volts Weight CONN. Height Dia. Watts # GAL. Elements INS. Inches NATURAL GAS* Six Year Warranty
 One Year Warranty ELECTRIC Stock U.S. # of Volts Weight CONN. Height Dia. Watts # GAL. Elements INS. Inches Fused Ceramic Shield tank lining is corrosion-resistant for years of dependability. Adjustable
Overview PARTS LIST. B. Lever mounting base C. Flush handle assembly D. Grey/Blue float stop E. Grey float (Full Flush) F. Flush valve washer
 F. Flush valve washer") Overview READ ENTIRE INSTRUCTIONS BEFORE STARTING INSTALLATION PARTS LIST A. Flush valve B. Lever mounting base C. Flush handle assembly D. Grey/Blue float stop E. Grey float (Full Flush) F. Flush valve
Overview READ ENTIRE INSTRUCTIONS BEFORE STARTING INSTALLATION PARTS LIST A. Flush valve B. Lever mounting base C. Flush handle assembly D. Grey/Blue float stop E. Grey float (Full Flush) F. Flush valve
AMX300 DirectConnect Mixing Valve Kits
 AMX300 DirectConnect Mixing Valve Kits INSTALLATION INSTRUCTIONS Tools needed (not supplied) 1. Wrench 2. Pliers Safety Definitions These safety terms identify information you must read. CAUTION Indicates
Sun Bandit Hybrid Water Heater Installation, Operation and Solar Hybrid Energy Systems Patent(s) Pending
 Pending") Solar Hybrid Energy Systems Patent(s) Pending Sun Bandit Hybrid Water Heater Installation, Operation and Solar Hybrid Energy Systems Patent(s) Pending Maintenance Manual Solar Hybrid Energy Systems Patent(s)
Solar Hybrid Energy Systems Patent(s) Pending Sun Bandit Hybrid Water Heater Installation, Operation and Solar Hybrid Energy Systems Patent(s) Pending Maintenance Manual Solar Hybrid Energy Systems Patent(s)
AMERICAN SOLAR WATER HEATING SYSTEM The Best Water Heating Solution Under The Sun
 AMERICAN SOLAR WATER HEATING SYSTEM The Best Water Heating Solution Under The Sun American Solar Water Heating Systems The American solar thermal system is more than just a solar water heater - it s the
Installation and Troubleshooting Instructions for Electric Tankless Residential Water Heaters.
 Model Number: Serial Number: Information Manual Installation and Troubleshooting Instructions for Electric Tankless Residential Water Heaters. ATTENTION: IF YOU ARE NOT A LICENSED PLUMBER OR A LICENSED
COMMERCIAL ELECTRIC WATER HEATER INSTALLATION & OPERATING INSTRUCTION MANUAL
 COMMERCIAL ELECTRIC WATER HEATER La A version Spanish espanola language de version estas of instrucciones these instructions se puede is available obtener al by escribirle contacting a la the fábrica company
VOYAGER 570G. 744A Sprayer Control
 VOYAGER 570G 744A Sprayer Control U S E R M A N U A L U S E R M A N U A L Table of Contents CHAPTER 1 - INTRODUCTION...1 SYSTEM CONFIGURATIONS...1 KIT CONTENTS...3 CONTROL HOUSING ASSEMBLY...5 CHAPTER
Installation Instructions
 GE Consumer & Industrial Appliances Installation Instructions Junction Box Cover Within this user bag, you will find a junction box cover and a #10 hex head screw used to attach the junction box cover
SHC 2.5, SHC 4 MINI-TANK ELECTRIC WATER HEATERS INSTALLATION INSTRUCTIONS FOR THE LICENSED PLUMBER SHC 2.5 SHC 4. English. English
 SHC 2.5, SHC 4 MINI-TANK ELECTRIC WATER HEATERS INSTALLATION INSTRUCTIONS FOR THE LICENSED PLUMBER The SHC series is tested and certified by WQA against NSF/ANSI 372 for lead free compliance. SHC 2.5 Table
Use & Care Manual. Electric Tankless Water Heaters. With Installation Instructions for the Installer AP15447 (10/10)
") Use & Care Manual With Installation Instructions for the Installer Electric Tankless Water Heaters The purpose of this manual is twofold: one, to provide the installer with the basic directions and recommendations
Use & Care Manual With Installation Instructions for the Installer Electric Tankless Water Heaters The purpose of this manual is twofold: one, to provide the installer with the basic directions and recommendations
Builder Specifications for Solar Ready Homes
 Builder Specifications for Solar Ready Homes This document specifies the essential elements required to make a new home ready for the future installation of roof-mounted solar domestic hot water and photovoltaic
USER MANUAL INSTALLATION INSTRUCTION WARRANTY REGISTER. Free Hot Water Solar Storage Tank (SST) with Single/Double coil heat exchanger
 with Single/Double coil heat exchanger") Installer / Service Provider details USER MANUAL INSTALLATION INSTRUCTION WARRANTY REGISTER Free Hot Water Solar Storage Tank (SST) with Single/Double coil heat exchanger Customer / User Congratulations
Installer / Service Provider details USER MANUAL INSTALLATION INSTRUCTION WARRANTY REGISTER Free Hot Water Solar Storage Tank (SST) with Single/Double coil heat exchanger Customer / User Congratulations
Replacement parts. WM97+ gas-fired water boiler Boiler Manual. OBTAIN PARTS ONLY THROUGH WEIL-McLAIN THE BOILER CONTAINS CERAMIC FIBER MATERIALS
 Replacement parts DO NOT SERVICE THE BOILER WITHOUT A WM97+ MAINTENANCE KIT AVAILABLE Failure to adhere to these guidelines can result in severe personal injury, death or substantial property damage. The
OPL BASIC. Dosing System for Professional Laundry machines. Contents
 OPL BASIC Dosing System for Professional Laundry machines Contents 1 Getting Started. Page 2 2 Installation. Page 4 3 Set Up & Operation. Page 8 4 Maintenance & Accessories. Page 10 5 Troubleshooting Page
Electric Mini Tank Water Heaters WM-2.5 & WM-4.0
 Electric Mini Tank Water Heaters WM-2.5 & WM-4.0 Installation and Operating Instruction Manual Table of Contents Important Safety Instructions 2 Technical Data 3-4 General Information 5 Technical Description
HOW TO-SOLAR HOT WATER
 HOW TO-SOLAR HOT WATER GREENPOWERSCIENCE.COM February 21,2008 Heat your water or home for less than $500. Heating water for a shower or water to circulate in a floor radiator or underfloor heating system
USE & CARE MANUAL. Non-Metallic Electric Water Heater. Residential Electric Models 30-105 Gallon Capacity
 Non-Metallic Electric Water Heater USE & CARE MANUAL WITH INSTALLATION INSTRUCTIONS FOR THE INSTALLER Residential Electric Models 30-05 Gallon Capacity TM The purpose of this manual is twofold: one, for
Oil and Coolant Circulating Heating System. Model - OCSM
 Oil and Coolant Circulating Heating System Model - OCSM Installation & Operation Manual 216280-000 REV 2 Identifying Your System The HOTSTART heating system is designed to heat fluids for use in marine
Pre-Fab Easy Installation For Models: 006-CT-USK, 008-CT-USK Installation and Operating Instructions for Existing Homes with Standard Piping
 Instruction Sheet 102-140 Pre-Fab Easy Installation For Models: 006-CT-USK, 008-CT-USK Installation and Operating Instructions for Existing Homes with Standard Piping Plant I.D. 001-1024 EFFECTIVE: November
Solar Storage Tank Water Heater. Table Of Contents PAGE 2 3-8 3 4 4-5 6-8 9 10-12 10 11 12 12-13 14 15
 Solar Storage Tank Water Heater Installation Instructions and Use & Care Guide To obtain technical, warranty or service assistance during or after the installation of this water heater, call toll free
INSTALLATION INSTRUCTIONS Fan Coil Replacement Coil Kit EBX & EBXX
 Fan Coil Replacement Coil Kit EBX & EBXX These instructions must be read and understood completely before attempting installation. These instructions covers the installation of replacement coil kit into
Installation Instructions 6028.801
 DAZZLE Installation Instructions 08.80 Spread Lavatory Faucet with Speed Connect Drain* Congratulations on purchasing your American Standard faucet with Speed Connect drain, a feature found only on American
Guidelines for Earthquake Bracing of Residential Water Heaters
 Guidelines for Earthquake Bracing of Residential Water Heaters Department of General Services Division of the State Architect 1102 Q Street, Suite 5100 Sacramento, CA 95814 Phone: (916) 324-7099 Fax: (916)
Techtanium Solar Indirect Water Heater Instruction Manual
 To the Installer: Please attach these instructions next to the water heater. To the Consumer: Please read these and all component instructions and keep for future reference. Techtanium Solar Indirect Water
Installation and Commissioning Manual Solar Stations FlowCon Max Evolution II
 Installation and Commissioning Manual Solar Stations FlowCon Max Evolution II 1 For your safety Table of Contents 1 For your safety... 3 1.1 About this manual... 3 1.2 Designated use... 3 1.3 Qualification
TABLE 1. Rugged cast aluminum alloy casing,celcon waterways with nichrome parts White (unless stainless steel housing)
") CHRONOMITE INSTANT-FLOW MICRO WATER HEATER INSTALLATION AND OPERATION INSTRUCTIONS - (LOW FLOW MODELS) (Before installation, compare electrical needed for the model of heater selected) TABLE 1 Model No.
CHRONOMITE INSTANT-FLOW MICRO WATER HEATER INSTALLATION AND OPERATION INSTRUCTIONS - (LOW FLOW MODELS) (Before installation, compare electrical needed for the model of heater selected) TABLE 1 Model No.
THE CLOSED SYSTEM. removed except for maintenance. The closed system is not connected to the potable domestic water source.
 THE CLOSED SYSTEM HEATING SYSTEM INSTALLATION SUPPLEMENT 230 A closed heating system is one in which the heating fluid is permanently contained within the heating system and is never removed except for
Mini Tank water heater Electric undersink Water heaters GL 2.5 - GL 4 - GL 6+
 Mini Tank water heater Electric undersink Water heaters GL 2.5 - GL 4 - GL 6+ IMPORTANT SAFETY INSTRUCTIONS WARNING When using electrical appliances, safety precautions to reduce the risk of fire, electric
Making Your Home Ready For Solar Water Heating
 Making Your Home Ready For Solar Water Heating During construction or a major renovation, making a home ready to use solar energy can be easy and inexpensive. When the time comes to install your solar
INSTALLATION INSTRUCTIONS BL-8704
 INSTALLATION INSTRUCTIONS BL-8704 EXPOSED BLACK LEVER THERMOSTATIC MIXING VALVE WITH RISER KIT, HANDSET, LEVER DIVERTER, 8 ROSE AND ADJUSTABLE RISER PIPE BRACKET. Dimensions in Inches (& Millimetres) 1
LIGHT DUTY COMMERCIAL ELECTRIC WATER HEATER INSTALLATION & OPERATING INSTRUCTION MANUAL
 LIGHT DUTY COMMERCIAL ELECTRIC WATER HEATER A Spanish language version of these instructions is available by contacting the company listed on the rating plate. La versión espãnola de estas instrucciones
How To Replace A Reverse Osmosis Water Tank
 ALL MODELS REVERSE OSMOSIS WITH NONAIRGAP FAUCET 1. Read all instructions carefully before starting installation. 2. Find the cold water line beneath your sink. The cold water is typically on the right.
EXPRESS STILL WARNING It is legal in New Zealand to own and operate a still for the purpose of producing alcohol for your own consumption.
 THE EXPRESS STILL This still represents the next generation in home distillation equipment. It eliminates the problem of having to spend all day processing a 25 litre wash. Taking 1 hour to heat up, then
Energy Smart Residential Electric Water Heater Installation Instructions
 Use & Care Guide http://waterheatertimer.org/whirlpool-energy-smart-electric.html Energy Smart Residential Electric Water Heater Installation Instructions and Use & Care Guide To obtain technical, warranty,
Constantemp Double Wall Low pressure steam-water Heater F-340LDW,F-640LDW, F-940LDW and F-1240LDW
 Installation, Operating and Maintenance Instructions 90/4.5.5 Rev. 0 Constantemp Double Wall Low pressure steam-water Heater F-340LDW,F-640LDW, F-940LDW and F-1240LDW Table of Contents SECTION I... 2 INSTALLATION...
Boiler & Pressure Vessel Inspection discrepancies and failures
 Boiler & Pressure Vessel Inspection discrepancies and failures Water Heaters / Pressure Vessels Pressure Vessels are inspected once every three years. This requires a test of A: safety relief devices B:
SERVICE MANUAL Order No.WH0911S001V0
 SERVICE MANUAL Order No.WH0911S001V0 Electrical Water Heater Model No. FCD-JTSA50-III FCD-JTSA60-III FCD-JTSA70-III FCD-JTSA80-III! WARNING This service information is designed for experienced repair technicians
Watts Pure Water Systems
 Watts Pure Water Systems WM-120-PT Installation and Operation Manual Premier Water Systems Do not use with water that is microbiologically unsafe or of unknown quality without adequate disinfection before
Installation Instructions 4508 4508S
 SYMPHONY Spread Lavatory Faucet with Speed Connect Drain Congratulations on purchasing your American Standard faucet with Speed Connect drain, a feature found only on American Standard faucets. Speed Connect
INSTALLATION INSTRUCTIONS MK-8704
 INSTALLATION INSTRUCTIONS MK-8704 EXPOSED MACKINTOSH THERMOSTATIC MIXING VALVE WITH RISER KIT, HANDSET, LEVER DIVERTER, 8 ROSE AND ADJUSTABLE RISER PIPE BRACKET. Dimensions in Inches (& Millimetres) 1
Service Guide 12/27/03 TESTING, SERVICE & REPAIR GUIDE (For SH Space Heating Models & RA Water Heating Models)
") TESTING, SERVICE & REPAIR GUIDE (For SH Space Heating Models & RA Water Heating Models) WARNING - HIGH VOLTAGE AC electrical circuits are connected to this heater. Do not attempt any service work on the
TESTING, SERVICE & REPAIR GUIDE (For SH Space Heating Models & RA Water Heating Models) WARNING - HIGH VOLTAGE AC electrical circuits are connected to this heater. Do not attempt any service work on the
Operators manual Basic water heater
 Operators manual Basic water heater Isotemp Basic water heater has been designed and produced to ensure that your water heater will give long and trouble free operation for many years. It is important,
CALIFORNIA PROPOSITION 65 WARNING:
 Residential Solar Water Heater USE & CARE MANUAL WITH INSTALLATION INSTRUCTIONS FOR THE CONTRACTOR LISTED 786H The purpose of this manual is twofold: one, for the installing contractor, to provide requirements
INSTANT HOT WATER RECIRCULATING SYSTEM
 INSTANT HOT WATER RECIRCULATING SYSTEM INSTALLATION AND OPERATING INSTRUCTIONS Save manual for future reference MODEL 500800 Warning Please read carefully before proceeding with installation. Your failure
Air Conditioner Duct Construction & Repair
 PROPER ROOF AIR CONDITIONER MOUNTING At Newmar, there are two different models of air conditioners available on all towable and motorized units. The different models are the Dometic Brisk and Penguin models,
! WARNING. McDonnell & Miller Installation & Maintenance Instructions MM-217(I) Series 150S and 157S (Snap Switch, All Models except 157S-RB-P)
 Series 150S and 157S (Snap Switch, All Models except 157S-RB-P)") Series 150S and 157S (Snap Switch, All Models except 157S-RB-P) Low Water Cut-Off/Pump Controllers For Steam Boilers and Other Level Control Applications McDonnell & Miller Installation & Maintenance Instructions
Series 150S and 157S (Snap Switch, All Models except 157S-RB-P) Low Water Cut-Off/Pump Controllers For Steam Boilers and Other Level Control Applications McDonnell & Miller Installation & Maintenance Instructions
Plumbing. Helpful Hints Residential Construction. Lincoln County. Bert Polk Plumbing Inspector
 Plumbing Helpful Hints Residential Construction Bert Polk Plumbing Inspector Lincoln County 2015 Waste and vent fittings Vent 90 medium 90 long 90 1/16 bend,1/8 bend,1/6 bend, medium 90 san tee combination
Installation Instructions For Slider Casement Air Conditioners
 Installation Instructions For Slider Casement Air Conditioners NOTE: These instructions describe installation in a typical wood framed window with a wood SLIDE-BY sash, or installation in a metal CASEMENT
8 plumbing. plumbing. 2010 PulteGroup, Inc. All Rights Reserved.
 8 90 2010 PulteGroup, Inc. All Rights Reserved. drains All the water you use leaves the home through a drain. Maintaining drains prevents clogging, overflows, water damage, and other problems. care and
CHEMICAL CLEANING UNIT Product number: 737189
 CHEMICAL CLEANING UNIT Product number: 737189-1 - v.05/16 Content Page Intro 3 Specifications 4 Installation 5 Safety precautions 7 Maintenance 8 Spares and Accessories 8 Unitor Chemicals 9 Notes 10-2
Refrigeration Installation 101
 Refrigeration Installation 101 Hundreds of Installations Refrigerated Cases 2 Compressor Racks 3 Condensing Units 4 Walk-in Boxes 5 Some were done very well 6 Some had some issues... 7 8 Some seemingly
THERMOSTATIC MIXING VALVE TRIM K-T9493, K-T9494
 THERMOSTATIC MIXING VALVE TRIM K-T9493, K-T9494 1. BEFORE YOU BEGIN IMPORTANT INSTRUCTIONS READ AND SAVE FOR THE CONSUMER WARNING: Risk of scalding or other severe injury. Before completing installation,
Installation Instructions and Use & Care Guide
 Residential Electric Water Heater Installation Instructions and Use & Care Guide To obtain technical, warranty or service assistance during or after the installation of this water heater, call toll free
Solar Hot Water Heaters
 Solar Hot Water Heaters Three High Vacuum Water inlet Stainless Steel screw Gel seal and insulation Water outlet Dust proof seals Non Pressure Models Details ASWH-1b ( Color Painted 304 ) ASWH-1c ( stainless
CARING FOR YOUR WATER HEATER
 http://waterheatertimer.org/troubleshoot-rheem-tankless-water-heater.html Water Heater Inspections CARING FOR YOUR WATER HEATER Venting System (Direct Vent Only) The venting system should be inspected
Split-type Air-Conditioner INSTALLATION MANUAL CONTENTS FOR INSTALLER MXZ-3A30NA MXZ-4A36NA ATTENTION. English. Français. Español
 Split-type Air-Conditioner MXZ-3A30NA MXZ-4A36NA INSTALLATION MANUAL Refer to the installation manual of each indoor unit for indoor unit installation. English Français Español ATTENTION This manual mentions
http://waterheatertimer.org/troubleshoot-rheem-tankless-water-heater.html
 http://waterheatertimer.org/troubleshoot-rheem-tankless-water-heater.html TECHNICAL SERVICE DEPARTMENT Removal, Cleaning, & Reinstallation of the Burner Assembly For models 74 & GT199 Required tools -
ASME Packaged Indirect Fired Water Heater
 Utilizes Or HTHW To Heat Domestic Water, Semi-Instantaneous or Storage Type Model BW Features Reliable Only high grade materials used in construction to ensure long operating life Hydrastone cement lining
ENGINE COOLING SYSTEM
 ENGINE COOLING SYSTEM 1988 Toyota Celica 1987-88 TOYOTA Engine Cooling Systems Celica DESCRIPTION The basic liquid cooling system consists of a radiator, water pump, thermostat, cooling fan, pressure cap,