Getting the Most out of NEO 2
|
|
|
- Dominic Morris
- 8 years ago
- Views:
Transcription
1 Getting the Most out of NEO 2

2

3 Getting the Most out of NEO 2

4 2Know!, Accelerated Math, Accelerated Math Enterprise, the Accelerated products design, Accelerated Reader, AccelScan, AccelTest, AlphaHub, AlphaSmart, AlphaSmart Manager, AlphaWord, AR, AR BookFinder, Beamer, Getting Results with MathFacts in a Flash, KeyWords, MathFacts in a Flash, NEO 2, NEO 2 for MY Access!, NEO Manager, NEO Share, NEO Text2Speech, Renaissance Home Connect, Renaissance Learning, Renaissance Learning logo, Renaissance Place, Renaissance Place Real Time, Renaissance Receiver, Renaissance Responder, Renaissance Training Center, SmartApplet, SmartOption, and Write On! are trademarks of Renaissance Learning, Inc., and its subsidiaries, registered, common law, or pending registration in the United States and other countries. ISBN by Renaissance Learning, Inc. All rights reserved. Printed in the United States of America. This publication is protected by U.S. and international copyright laws. It is unlawful to duplicate or reproduce any copyrighted material without authorization from the copyright holder. If this publication contains pages marked Reproducible Form, only these pages may be photocopied and used by teachers within their own schools. They are not to be reproduced for private consulting or commercial use. 12/12 For more information, contact: Renaissance Learning, Inc Peach Street Wisconsin Rapids, WI (800)

5 Contents Introduction q NEO 2 in the Classroom... 9 Changing Classroom Dynamics NEO 2 and Your First Grain of Rice Guiding Principles Keyboarding Is Essential Effective Writing Instruction Is Purposeful Formative Assessment Is the Key to Powerful Instruction Classroom Technologies Should Work Well Together Ideal Classroom Tools Support All Learners How to Use This Guide w NEO 2 Basics Familiarize Yourself with NEO 2 Components Hardware Software SmartApplets Built-in Instructional Content Resources at the Renaissance Training Center Decide How to Manage Your NEO 2 Classroom One-to-One Implementations Shared Implementations e Keyboarding with NEO Introduce Keyboarding Informally Incorporate Keyboarding Games Start Formal Instruction with KeyWords Built-in Resources Set-Up Tasks Getting Started After Students Have Completed the Curriculum Monitor Progress Assess Keyboarding Skills

6 r Developing Writers with NEO Word Processing Spell Check Thesaurus Cut, Copy, and Paste Collaborating and Communicating: NEO 2 Connectivity USB Send Beaming NEO Share Instructional Content and NEO Use Your Own Content Pull from Other Resources Create Favorite Folders Built-in Instructional Content: Write On! Lessons Built-in Instructional Content: Linked Files Building Integrated Lessons into NEO Share Teach with It Now (TWIN) Lesson Ideas Classroom Scenarios Scenario 1: Developing Writing Skills Scenario 2: Writing in the Content Areas Scenario 3: Process Writing t Assessment and Classroom Engagement Using the 2Know! Toolbar for Formative Assessment and Classroom Engagement How It Works Gather Information Strategically Customize Your Options Using AccelTest for Formative and Summative Assessment How It Works Set-up Tasks AccelTest Database Types of Assignments A Classroom Example Review Student Data Integrating NEO Share for Assessment and Engagement Scenario 1: What Caused the Titanic to Sink? Scenario 2: Ancient Rome across the Curriculum Other Assessment Tools

7 y Using NEO 2 with Renaissance Learning Reading and Math Programs Set up for Renaissance Place Connectivity Accelerated Reader Accelerated Math MathFacts in a Flash (Renaissance Place and Offline) MathFacts in a Flash Renaissance Place (RP) MathFacts in a Flash Offline Teacher Tips u Third-Party Software and Technology Partners Wireless File Transfer Partners NEO 2 and Google Docs NEO 2 and MY Access! Responder Partners NEO 2 and Study Island NEO 2 and Ignite! Learning Co:Writer Applet i Supporting All Learners Unique Visual Needs Unique Physical Needs Unique Learning Needs Purchased Resources to Support All Learners o Maintenance and Troubleshooting Routine Maintenance Batteries Storage Cleaning Keep Hardware and Software up to Date The SmartOption Mobile Lab Troubleshooting Appendix... A1 Glossary... A2 Software Installation Instructions... A7 NEO Manager (and Renaissance Wireless Server Utility)... A7 5

8 NEO Share... A9 2Know! Toolbar... A10 AccelTest... A11 NEO 2 for MY Access!.... A12 Renaissance Responder Scoring Software.... A13 Common Software Tasks... A14 Renaissance Wireless Server Utility... A14 NEO Manager Common Software Tasks.... A15 NEO Manager Advanced Software Tasks.... A18 NEO Share... A20 2Know! Toolbar... A25 AccelTest Common Software Tasks... A27 AccelTest Advanced Software Tasks... A35 Renaissance Responder Scoring Software.... A40 KeyWords.... A41 Linked Files... A42 Write On! Lessons... A43 Text2Speech... A44 AlphaWord Plus... A45 Keyboard Commands... A45 AlphaWord Plus Common Keyboard Commands... A45 Linked Files Keyboard Commands... A46 AlphaWord Plus Passwords.... A47 AlphaWord Plus Accessibility Features... A48 Accelerated Reader on NEO 2 Reproducible Form... A50 Keyboarding Resources and Reproducible Forms... A51 Keyboarding Activities.... A51 Technique Checklist.... A53 Progress Report.... A54 Finger Zones... A55 Lessons in KeyWords... A56 References... A61 Index... A62 6

9 Introduction Congratulations! You have purchased the NEO 2, designed specifically for K-12 classrooms. Now you have access to affordable, effective classroom technology with built-in tools and instructional resources to support teaching and learning in interactive classrooms. This book is one of the resources intended to guide you throughout your NEO 2 implementation. We hope that what you find here will inform and inspire you. Even so, please understand that this is only an introduction. NEO 2 is incredibly versatile and has the capacity to meet your most innovative approaches to teaching and learning. To learn more about other professional-development opportunities, please visit our website at 7

10


11 q NEO 2 in the Classroom Mrs. Brown has been a fifth-grade teacher for more than 15 years. She used to spend long hours grading hand-written work, only to find out at times that many of her students didn t understand a concept she had taught them. Even worse, she often would discover this only after a considerable lag, having already gone on to the next lesson. So she d go back and review or reteach the previous lesson, hoping that she could gauge through a show of hands whether her lesson had been successful. Mrs. Brown also used Accelerated Reader in her classroom to check comprehension and motivate students to read. But when students were ready to quiz, they often had to wait several days before they could go to the computer lab to take a quiz, or they had to take turns at the two computers in the classroom. To teach keyboarding, an essential skill that serves as a gateway not only to effective writing but also to being successful in our technology-driven world, Mrs. Brown used a software program with her students in the computer lab. Yet the students didn t get daily practice, and she had no idea whether they were progressing because she never got any feedback or data from this program. Mrs. Brown is a good teacher and a dedicated one. She put a lot of time and thought into creating engaging, well-organized lessons and using research-based instructional strategies. Yet her classroom was neither as interactive nor as seamlessly integrated with technology as she envisioned. She didn t have immediate formative assessment tools to help guide her instruction. She didn t have access to affordable technology that would enable all of her students to communicate with her and collaborate with each other throughout the day. Then one year, Mrs. Brown started using NEO 2s. Now, her classroom is a completely different place. The NEO 2s are an essential part of her teaching every day. They have changed the way she teaches and the way her students learn. Here s what her class looks like now: At the beginning of the day, Mrs. Brown s students power up their NEO 2s for 10 minutes of keyboarding drills. Mrs. Brown prints out a report each week that shows how her students are doing, allowing her to keep tabs on their progress. Plus, the keyboarding curriculum that comes with the NEO 2s is language-based, so it helps her students learn vocabulary words while learning keyboarding. 9

12 Getting the Most out of NEO 2 During the reading period, Mrs. Brown uses NEO 2s to review vocabulary and to check comprehension. She does this by using the NEO 2s as classroom responders with a software program designed to work with NEO 2. Her students respond to questions anonymously and she instantly can see and project these responses. When her students are ready to take Accelerated Reader quizzes, they do so using the NEO 2 rather than waiting for their turn at the classroom computer or computer lab. During math, Mrs. Brown has her students start with 10 minutes of math fact practice on the NEO 2 using MathFacts in a Flash. In addition, her students use their NEO 2s to score Accelerated Math assignments right from their desks. The data she gets from these two programs helps her to identify which students are struggling and might need additional help. Throughout the day, Mrs. Brown uses a NEO 2 software program called AccelTest as she teaches various content areas, including social studies, science, and math. She asks verbal questions, her students enter their answers on the NEO 2, and Mrs. Brown is able to immediately check to see if her students understand the material. In addition, she uses AccelTest to go over homework. While Mrs. Brown projects the homework and goes over the questions verbally, the students use the NEO 2 to score their own work, see which problems they got wrong, and correct their work. In order to see how her students came to their answers, she asks the students to show their work on their paper copies before turning them in. Finally, Mrs. Brown has her students take tests and quizzes using the NEO 2 with AccelTest. Because AccelTest automatically grades each assignment, this saves a great deal of time and shows the students immediately how they did. When it comes to writing instruction, having one-to-one student access to NEO 2s has opened many new possibilities. After organizing their thoughts, Mrs. Brown s students compose their essays on the NEO 2. They can check spelling and revise right at the keyboard. Because Mrs. Brown uses a software program called NEO Share, her students wirelessly retrieve writing prompts from her computer and then submit their writing assignments wirelessly back to her. While they are working on their assignments, the students wirelessly beam writing to each other for interactive, collaborative inclass writing activities. Later, Mrs. Brown gathers samples of her students work on her computer and workshops them with the whole class. For on-the-spot feedback that informs her instruction in all subjects, Mrs. Brown uses the NEO 2s as responders. For instance, when she wants to gauge her students prior knowledge before starting a lesson, she asks a series of questions. During the lesson, she periodically checks for understanding. When the lesson concludes, she reinforces key concepts by asking targeted wrap-up questions. Responses are gathered anonymously, so students can take part without fear of being wrong. The result is that every student in the class participates and feels engaged. Finally, Mrs. Brown occasionally uses NEO 2s at learning centers in her classroom. Several students practice keyboarding at one center, while others practice math facts at another center. At still other centers, students read books and take Accelerated Reader quizzes, work on writing assignments together, or receive small-group instruction using the NEO 2s as classroom responders. Integrating NEO 2 technology into every aspect of her teaching has made it easier for Mrs. Brown to inspire her students and deliver quality, effective instruction. 10


13 NEO 2 in the Classroom Changing Classroom Dynamics As you can see, NEO 2 truly changes classroom dynamics. It makes the classroom an interactive place, facilitates real-time feedback during instruction, provides access to affordable keyboarding technology, makes writing lessons more effective and collaborative, and allows students to access crucial instructional content without having to wait for their turn at a computer. NEO 2 can be integrated across the curriculum. In every content area, you can use traditional and electronic resources with NEO 2 to support instruction. Even if you already have some technology integrated into your classroom, such as an interactive whiteboard, online resources, or other educational software programs, the NEO 2 can serve as a connector, or hub. When used in this way, NEO 2 allows you to control instruction and focus activities for students. The NEO 2 is a versatile hub. Writing Keyboarding Web-based Renaissance Learning software Other classroom technology and content (the Internet, interactive whiteboards, document cameras, projectors, etc.) Classroom response Assessment Third-party technology partners The uses of NEO 2s are as varied as the subjects you teach. In English language arts, students can use NEO 2 to compose poetry, prose, personal narratives, and responses to literature; practice spelling words; and explore vocabulary. They can use NEO 2 for science logs and math journals. In social studies and humanities, they can develop timelines and biographies, write about elections, develop debates, and learn to support a position. NEO 2 can be used in whole group, small group, and individualized instruction. Rather than having to make up new lessons from scratch, you can use the NEO 2 along with its accompanying software with resources that already exist, such as multimedia presentations, end-of-chapter quizzes, and practice for state assessment exams. All of these things help your students develop a passion for learning. They get valuable immediate feedback throughout the day. They develop confidence as they become more proficient. And the classroom becomes an interactive, technology-rich place. 11

14 Getting the Most out of NEO 2 NEO 2 and Your First Grain of Rice The mathematical folk tale, One Grain of Rice (Demi, 1997), shows how a young girl from a starving village in India uses her understanding of exponential growth to outwit the ruling raja. As a reward for a small favor, the young girl asked the raja for only one grain of rice, and for her rice to be doubled every day for 30 days. For the first few days when she received one grain, then two, then four the reward seemed pitiful, and the raja all too happy to comply. As the 30 days continued, the few grains of rice became cups of rice, then bowls, until, by the 30th day, the raja s warehouses were emptied as that first grain of rice grew into more than one billion grains of rice. Guiding Principles If you are new to the NEO 2, your challenge is to find your first grain of rice. Will it be keyboarding or writing? Will it be classroom response or Accelerated Reader quizzing? Once you gain confidence with your first NEO 2 integration, you can build upon that success. Before long, you ll be experiencing the exponential growth of your NEO 2 implementation. The NEO 2 was designed with a few key principles in mind. As you think about where to begin, learning about these principles can help you visualize how NEO 2 best fits in your classroom. They are as follows. Keyboarding Is Essential It s well established that keyboarding proficiency is linked to positive educational and economic outcomes (Hearn and Lewis, 1993). For example, students who keyboard efficiently show greater gains in writing than their peers who write by hand (Russell, 1999). The impact is even stronger with students who struggle with writing (Graham, 2008; Graham and Perin, 2007). Because keyboarding skills are essential for 21st century classrooms, in recent years, discussions have moved from Should we teach keyboarding? to When should we teach keyboarding? Previously reserved for high school business classes, keyboarding instruction is now considered a routine part of the elementary curriculum. While kindergarten through second-grade students should be exposed to basic keyboarding skills, such as using both the right and left hands on the keyboard, the optimum time to begin formal keyboarding instruction is at the third grade. Why so young? The answer is found in the subtle distinction between typing and keyboarding. Typing is transposing text from paper to machine be it a typewriter or a computer. The text is prepared beforehand and remains static. Keyboarding, on the other hand, is composing at the keyboard. The text is developed as it is entered. It remains dynamic and subject to reflection and revision. Starting in third grade, efficient keyboarding skills offer fluency and automaticity so that students mental energies are focused on developing ideas, organizing, and communicating with their readers. The relationship between keyboarding efficiency and writing is similar to the relationship between math-fact fluency and problem solving. If students who are engaged in a complex equation interrupt their problem-solving processes to work through simple computations, the process can be compromised. In the same way, when students 12

15 NEO 2 in the Classroom who are engaged in meaningful writing tasks interrupt the process to hunt and peck for individual letters on a keyboard, fluency is lost, and as a result, communication compromised. Because keyboarding is a gateway skill, it is an essential component of writing instruction and should be a routine part of the English language arts curriculum. Effective Writing Instruction Is Purposeful It s critical that students learn to write. Communicating ideas with clarity and persuading others are just two important writing skills that they will need throughout their academic careers and for the rest of their lives. Yet evidence shows that high school graduates are not equipped with the writing skills they need to succeed in college and in the workplace. In order to reverse this trend, researchers have identified a number of characteristics of effective writing instruction. For instance, Writing Next, a meta-analysis of more than 20 years of research, highlights specific teaching techniques that work in the classroom (Graham and Perin, 2007). Not surprisingly, using a word processor is listed as one of the 11 elements of effective writing instruction. The others include teaching writing strategies, explicitly teaching summarization and sentence combining skills, incorporating collaborative writing, using writing as a tool for content learning, and using the process writing approach. While they do not constitute a full writing curriculum, these elements can be combined in the classroom in flexible ways. What they have in common is that they involve purposeful, systematic ways of helping students develop writing skills and learn information in a variety of different disciplines. Writing across the curriculum, which emphasizes the practice of helping students develop critical literacies specific to diverse content areas, is equally vital. While writing for content learning can help students learn and retain information, writing across the curriculum helps students learn to master the modes of writing specific to different disciplines, such as lab reports in science or procedural explanations in math, leading to greater success in those subjects. In fact, in Literacy Instruction in the Content Areas: Getting to the Core of Middle and High School Improvement, Heller and Greenleaf (2007) present writing across the curriculum as a cornerstone for school improvement. Specifically, they recommend extensive work developing content vocabulary and learning to write in content-specific genres. Formative Assessment Is the Key to Powerful Instruction When teachers use formative assessment to guide their teaching, they strategically gather information and make small, continual adjustments in their instruction. This process allows them to gauge students understanding, assess prior knowledge, reinforce key concepts, and respond to the learning needs of their students. At the same time, students remain more deeply engaged in the material when they are encouraged to interact in this way, and they constantly get meaningful feedback to help them reach their learning goals. Much of the research on formative assessment over the past two decades has stemmed from the influential article Inside the Black Box, by Paul Black and Dylan Wiliam (1998). This piece argues that traditional policies treated the classroom as a black box into 13

16 Getting the Most out of NEO 2 which inputs were fed and out of which outputs were measured. Instead, Black and Wiliam argue, teachers should be interested in what is happening inside the box. Formative assessment can help teachers uncover this previously hidden information and help raise standards of achievement. Leahy, Lyon, Thompson, and Wiliam (2005) lay out further guidelines of how teachers can continually adapt instruction to meet student needs, using classroom assessment minute by minute, day by day. Classroom Technologies Should Work Well Together Many teachers have already begun integrating some technology into their classrooms, for instance by using interactive whiteboards and document cameras and drawing from numerous online resources to enhance their teaching. Additionally, a wide variety of software programs have been developed to support educational goals. These technologies offer many advantages for today s classrooms. Sometimes when schools purchase technological tools for the classroom, they choose highly specialized tools that stand on their own. Yet it s even better to seek out technological tools for the classroom that help to connect and leverage other technologies. Such tools help focus instruction by streamlining use and enabling the teacher to fully utilize the technological resources at her disposal. In other words, core classroom tools should play well together and help facilitate the use of the other tools. Ideal Classroom Tools Support All Learners Effective teachers are constantly adapting instruction to the needs of various learners, remaining flexible and cognizant of each student s differences. Correspondingly, core tools in the classroom should be ones that every student can use. They should be adaptable and provide seamless avenues for differentiated instruction. Ideal classroom technology includes options and configurations to support all learners and address specific learning needs for each student. If that technology facilitates differentiation by making it easier to tailor assignments and instructional material, it s an even more valuable teaching tool. How to Use This Guide As you ll learn throughout this guide, NEO 2 aligns with all of these guiding principles. In this first chapter, we provide an overview. In Chapter 2, we cover the NEO 2 basics: the hardware, software, built-in instructional content, resources, and how to manage NEO 2 in your classroom. The chapters that follow are broken into discrete topics, covering keyboarding, writing, assessment and classroom engagement, integrating NEO 2 with Renaissance Learning reading and math software programs, and using third-party software and technology partners with NEO 2. The last two chapters discuss the features of NEO 2 that help to support all learners and maintenance tips to keep your NEO 2s in great working condition. In the appendix, you ll find a glossary, software installation instructions, common software tasks, several reproducible forms and resources, a list of keyboard commands, references, and an index. If you purchased NEO 2s for a specific purpose, such as writing or Accelerated Reader quizzing, you may wish to jump ahead to those specific chapters or sections. Then when you re ready to do more, you can return to the other chapters and discover what 14

17 NEO 2 in the Classroom else NEO 2 has to offer. One thing to keep in mind is that Chapters 4 and 5 build on one another, since NEO 2 s writing software can be used in a very powerful way in conjunction with its classroom response software. If you wish to integrate assessment, writing, and classroom engagement into your lessons, please consider those two chapters together. Throughout this guide, you ll learn about many different components and software programs that can be used with NEO 2. The following visual provides an overview of the main functions of NEO 2, the names of the corresponding software programs used for each of these purposes, and the advantages offered by its many components. The Power and Potential of NEO 2 Writing Word processing (AlphaWord Plus) Wireless file transfer (NEO Share) File sharing (Beaming) Built-in writing activities and lessons (Write On!) Ability to attach rubrics, supports, and instructions (Linked Files) Keyboarding Language-based keyboarding curriculum (KeyWords) Assessment and Classroom Engagement Anonymous classroom response system (2Know! Toolbar) Real-time scoring and data collection (AccelTest) Third-Party Software Wireless file transfer partners (Google Docs, MY Access!) Responder partners (Study Island, Ignite! Learning) Co:Writer applet NEO 2 Reading and Math Programs and Content Accelerated Reader Accelerated Math MathFacts in a Flash Vocabulary strategies Literacy skills activities Transforming Classrooms One-to-one computing Wireless printing and file transfer Interactivity Collaboration Communication Access to technology Connecting other technologies Supporting all learners Increasing participation Encouraging critical thinking Immediate feedback Monitoring progress Writing across the curriculum Automating the grading of assignments 15

18 Getting the Most out of NEO 2 Summary NEO 2 in the Classroom NEO 2 changes classroom dynamics, making instruction more interactive and giving students one-to-one access to technology. It also has the power to connect many other classroom technologies and content. Start small and build your NEO 2 implementation as you feel ready. NEO 2 was designed with several guiding principles in mind: keyboarding is essential, effective writing instruction is purposeful, formative assessment is the key to powerful instruction, classroom technologies should work well together, and ideal classroom tools support all learners. There are many components and software programs associated with different functions of NEO 2. This guide introduces you to each one. 16

19 w NEO 2 Basics The purpose of NEO 2 is to create a passion for learning, but NEO 2 alone cannot create that passion. You as the teacher make it happen by thoughtfully considering how you ll integrate the technology into your classroom and by using your NEO 2 implementation to best support your instructional goals. How do you begin? The best way to start is by familiarizing yourself with the hardware, software, built-in instructional content, and resources you ll use with NEO 2. Then, decide how you ll manage NEO 2 in your classroom and prepare a system for student use. Finally, make sure the software is installed and configured for your needs. Throughout this chapter, we introduce many terms associated with the NEO 2 that may be new to you. We give brief definitions when a new term is introduced, but at any point while reading this guide, you can refer to the glossary located in the appendix for quick reference as well. Familiarize Yourself with NEO 2 Components Driving an unfamiliar car takes a little getting used to. Before heading out onto the highway, you need to locate the turn signals, figure out how to turn on the wipers, adjust the mirrors, and make sure you ve filled up with gas. Once you learn to use the NEO 2, you ll find that it will become second nature just as easy as driving your own car. But at the beginning, take some time to get your bearings, getting to know the physical pieces of hardware, the software you ll install on your computer, the programs available on the NEO 2s, the instructional content that comes with NEO 2, and the resources to assist you with your teaching. Hardware Think of the hardware as the body of your car. The main two pieces of hardware in your NEO 2 implementation are the classroom set of NEO 2s, which your students will use, and the Renaissance Receiver, which will connect to your computer. In addition, some teachers also use a cart called the SmartOption Mobile Lab to store, configure, and manage a classroom set of NEO 2s. NEO 2 The NEO 2 includes a full-size keyboard, runs on batteries, and is durable yet lightweight. It can print, send, and receive information wirelessly using radio frequency waves. It can also send and receive files through an infrared beamer. Plus, it has ports for connecting to a computer or printer. The screen displays between two and six lines of text, depending on font size. Renaissance Receiver The Renaissance Receiver connects to your computer via a USB cable. It does not require batteries and instead receives its power from the computer. You ll need one Renaissance Receiver for every teacher. The Renaissance Receiver 17


20 Getting the Most out of NEO 2 receives NEO 2 data wirelessly and sends it to the appropriate place on your computer. This makes it possible to print wirelessly with NEO 2s and to use many of the software programs detailed in this guide. In order to use the Renaissance Receiver effectively, make sure to avoid interference with its signal. The Renaissance Receiver uses radio frequency (RF) connectivity and has a range of approximately 150 feet. The signal will travel through classroom walls; however, like all RF devices, the Renaissance Receiver signal is subject to interference from nearby cell phone towers and other physical barriers. Teacher Tip The Renaissance Receiver does not use the Internet to communicate, so you don t need to worry about interference from your school s wireless Internet connection. To avoid interference, position the Renaissance Receiver so that the signal will not be interrupted by physical barriers, such as large bookshelves. Generally, teachers connect the Renaissance Receiver and place it on top of a computer tower or a shelf in their classroom. If there is a cell phone tower just outside your classroom, place the Renaissance Receiver near an opposite wall, as far away as possible from the tower. SmartOption Mobile Lab The SmartOption Mobile Lab is an optional mobile cart for NEO 2 customers. It includes all NEO 2 software and allows you to conveniently connect, configure, and manage a set of up to 30 NEO 2s. Software If the hardware is the body of your car, the software is what makes it run. Just as you could never drive a car that doesn t have a transmission installed, gas in the tank, and the right kind of oil in the engine, you can t use NEO 2s without installing and customizing your software. Usually, your school s technical staff will install and configure NEO 2 software, but we provide an overview here so you are familiar with the components and what needs to be done. Once the initial set-up tasks are complete, you ll use several of the software components on a regular basis as part of your NEO 2 implementation. Teacher Tip Basic software is shipped with your NEO 2; however, we recommend downloading software instead from the Renaissance Learning Download Center at renlearn.com/neo/downloads. This helps ensure that you always get the latest version. (Please see the appendix for detailed instructions to install all software and configure your wireless network.) 18
 connectivity and has a range of approximately 150 feet.")
21 NEO 2 Basics Basic NEO 2 software includes the following: NEO Manager and Renaissance Wireless Server Utility. These two programs, which install at the same time, support and are essential for all of the activities that you will do with NEO 2. NEO Manager is required to update NEO 2s when new features are available and to configure NEO 2s to address specific learning needs. In addition, NEO Manager allows you to generate reports in KeyWords, the built-in keyboarding program. The Renaissance Wireless Server Utility establishes wireless connectivity, making it possible for students to print wirelessly, take Accelerated Reader quizzes, submit writing assignments, and do other interactive learning tasks using their NEO 2s. In other words, the Renaissance Wireless Server Utility establishes a network for your classroom. Please note that if other teachers in your school use NEO 2s, it s important to give your network a unique name, since your students NEO 2s may pick up multiple signals. We suggest using either your name or your room number. Instructions for how to do this can be found in the appendix under Common Software Tasks Renaissance Wireless Server Utility. NEO Share. NEO Share allows you to wirelessly send assignments from your computer to your students NEO 2s and to retrieve their work. Many teachers use NEO Share to support writing, editing, and revision. Students can engage in individualized and collaborative writing tasks, and you can create assignments and in-class activities. You can also access built-in writing lessons and sample rubrics through NEO Share. 2Know! Toolbar. The 2Know! Toolbar is a software program that facilitates formative assessment and classroom engagement by allowing for immediate, anonymous classroom response. It helps increase instructional interactivity by allowing you to gather data from your students and view or display their responses while you are in the middle of a lesson. AccelTest. AccelTest is a software program that also enables classroom response; however, rather than collecting answers anonymously, AccelTest collects and stores data that is linked to each student. It can be used for all types of assessment, from formative to summative, from homework assignments to quizzes and tests. You can use it to score existing practice or test assignments, design your own practice or test items, use multimedia resources to pose questions, and align assignments with state standards or Common Core State Standards. AccelTest automatically grades assignments and generates reports to monitor student achievement. Optional software includes the following: Renaissance Responder Scoring Software. If you plan to use NEO 2 to submit Accelerated Math answers, you ll need to download the Renaissance Responder scoring software as well. This is done by going to your Renaissance Place Home 19
22 Getting the Most out of NEO 2 page, clicking Check Software Requirements, and then choosing to download Renaissance Responder. This applies only to Renaissance Place customers who have a subscription to Accelerated Math Renaissance Place. NEO 2 for MY Access! If you will use NEO 2 to download MY Access! writing prompts or submit writing to MY Access! for feedback, you ll need to download the NEO 2 for MY Access! plug-in. To do so, go to the Renaissance Learning Download Center (accessible at MY Access! is a third-party technology partner of NEO 2, and you ll need a subscription to use it. SmartApplets SmartApplets (also called applets) are pre-installed programs, or applications, on the NEO 2. You can think of these as similar to apps on your smart phone. Just as you can use apps for different purposes on a smart phone, you can switch back and forth among the applets for different purposes on your NEO 2s throughout the day. For instance, you may want your students to start the day with 10 minutes of keyboarding practice. Then, perhaps you ll switch to word processing tasks or a student will be ready to take an Accelerated Reader quiz. To switch among these different tasks, students choose a different applet. To access the applets, students simply press the applets key on their NEO 2s and choose the desired applet. NEO 2 comes pre-installed with the following applets: Accelerated Reader. If you have a subscription to Accelerated Reader Renaissance Place, your students can use this applet to take Accelerated Reader quizzes with NEO 2. AlphaWord Plus. This applet is used for word processing. Students can use it to do everything from taking notes to writing compositions. Calculator. This applet is used for basic calculator functionality. Control Panel. You can use this applet to configure settings on a single NEO 2. KeyWords. This applet is used to develop keyboarding proficiency. MathFacts in a Flash (offline). This applet is used for practice of math fact fluency when an Internet connection is not available or you do not have a subscription to MathFacts in a Flash Renaissance Place. MathFacts in a Flash RP. If you have a subscription to MathFacts in a Flash Renaissance Place, this applet is used to practice and test for automaticity with math facts. Responder. This applet is used with the 2Know! Toolbar, AccelTest, and several third-party technology and software partners. It is also used to score Accelerated Math assignments if you have a subscription to Accelerated Math Renaissance Place. Beamer. The beaming function allows students to wirelessly send text from one NEO 2 to another using infrared technology. In addition to those listed above, you may also wish to purchase Co:Writer as a separate applet from Don Johnston, Inc., a third-party technology partner. Co:Writer is the word prediction software for NEO 2 that supports developing authors, reluctant writers, and students with unique language learning needs. 20
23 NEO 2 Basics Built-in Instructional Content There is a wealth of built-in instructional content that comes with NEO 2, including writing lessons, keyboarding activities, and other activities ready for you to access and use at any time. Below is a list of this content, what it is for, and where you can find it. Write On! Lessons Write On! is a collection of writing lessons, literacy skills activities, and vocabulary strategies for use in grades 3 through 12. To integrate them into your classroom, you can access, edit, and send Write On! lessons using NEO Share. Each set of lessons comes with an accompanying teacher guide, also accessible through NEO Share. Sample Linked Files Often when assigning a task to students, it helps to include a written document giving project guidelines, instructions, or rubrics to follow. With linked files, you can make documents like these accessible to your students as read-only documents that are attached, or hyperlinked, to the active files in which they are working. There are 22 sample linked files built into NEO Share. Additionally, you can create your own linked files and send them to students NEO 2s with NEO Share. Keyboarding Resources On your computer, you have access to a host of keyboarding resources that are installed when you install NEO Manager. (Find them on your Windows computer here: Start>All Programs> NEO Manager>KeyWords Master Transparencies. On Macintosh computers, open Applications : AlphaSmart : AlphaSmart Manager 2 : KeyWords Extras and double-click KeyWords SmartApplet Master.) These resources include visual posters showing finger zones, posture and wrist placement, as well as additional practice activities and more. If you are a Renaissance Place customer, you also have access to KeyWords reporting and resources through Renaissance Place. Resources at the Renaissance Training Center Over the life of owning a car, you need to take it in for regular oil changes, car washes, and other services. You may consult your owner s manual, talk to a mechanic, or install new features as needed. Similarly, a host of resources are available to help you to maintain and fine-tune your NEO 2 implementation on a regular basis. Your one-stop shop for these resources is the Renaissance Training Center. Teacher Tip The Renaissance Training Center is an online resource center for all Renaissance Learning products. There, you ll find links to all user guides, sample lesson plans, research, and training resources for NEO 2, as well as information about NEO 2 professional-development opportunities including remote and live training, regional symposiums, and on-demand sessions. QuickStart Guides, which are concise, regularly updated stepby-step sets of instructions for all NEO 2 features, are also found here. When new software is updated or features are added, the Renaissance Training Center is the best place to look for the most up-to-date information. We recommend becoming familiar with this site at the beginning of your NEO 2 implementation. You can also create favorites within your account for easy reference. 21

24 Getting the Most out of NEO 2 We encourage you to create a Training Center account, which gives you free access to all resources at the training center 24 hours a day. If you choose to subscribe to lists, this account ensures that you have the latest information from Renaissance Learning. To create your account, go to training and click Create Your Free Account in the upper right corner. Once you are logged in, click the Learn by Product drop-down list and choose NEO 2. Or click Search to enter any keyword or phrase. Decide How to Manage Your NEO 2 Classroom Access the Renaissance Training Center at Once you have familiarized yourself with the components of NEO 2 and the resources available to you, it s time to decide how to manage your NEO 2 classroom. This process involves thoughtful decisions about who will use NEO 2s and when. Specifically, you ll need to choose between two implementation models to use at your school: a one-to-one implementation or a shared implementation. In the one-to-one implementation, each student in your class, grade, or school is assigned to one NEO 2. In this model, you ll need to label NEO 2s, assign them to students, and make sure students understand proper care of NEO 2s. In addition, you ll make decisions about how students will manage NEO 2 each day. In the shared implementation, multiple teachers we recommend no more than two share one set of NEO 2s. In this model, you ll need to carefully consider how NEO 2s will be used and how they will be moved throughout the day. In addition, think about how students writing will be managed. In both implementation models, the key task is to develop a system that helps you take maximum advantage of the NEO 2. One-to-One Implementations In the NEO 2 one-to-one implementation, each student in your class has her own NEO 2. There are several advantages to this implementation. Saving files, for example, is quite easy because only one student s files are on the NEO 2. There is also little need to password-protect files again because only one student s work is on the NEO 2. Here are some ideas to consider in the NEO 2 one-to-one implementation. 22


25 NEO 2 Basics Label Each NEO 2 Some schools use permanent marker, some an etching pen, and others use a bar code to label each NEO 2. We recommend an asset tag or bar code system to inventory each NEO 2 such as those that media center specialists use with library books, electronic resources, and other educational tools. Then students check out their NEO 2s to use for the school year. Even with the bar code, the student will need some way to distinguish her NEO 2 from all other NEO 2s. We suggest using permanent marker to label the back of the NEO 2 with a number, such as 1, 2, 3, 4, etc. (Avoid the front of the NEO 2 because the mark may fade as the NEO 2 is handled.) If your school has multiple carts of NEO 2s, it may help to label the carts A, B, C, and then label NEO 2s A1, A2, A3 and B1, B2, B3, etc. Decide How Students Will Carry Each NEO 2 NEO 2s are designed for the classroom and are remarkably durable. They are built to withstand a drop from the top of an average school desk. They are also tough enough to take a ride in a student s backpack but here s something else to consider. Pens, notebooks, textbooks, extra shoelaces, and who-knows-whatelse are also in that backpack. Pens and spiral notebooks could scratch the NEO 2 screen or find their way under a key and cause it to come loose. If NEO 2 needs to ride along in a backpack, consider some sort of protective sleeve. Here are some ideas: - Look for a backpack with an internal pocket large enough for NEO 2. Grab a NEO 2 and go backpack shopping! - Renaissance Learning sells a NEO backpack with an internal pocket. - Renaissance Learning also sells a streamlined Neoprene sleeve perfect to protect NEO 2 in backpacks, on buses, and in lockers. - NEO 2 fits in a two-gallon plastic zipper food storage bag. Those are easy to find and inexpensive to replace. - NEO 2 also fits in a large, padded mailing envelope. Again, easy to find and inexpensive to replace. - Any kind of cloth tote bag would protect the screen and keys. One private school made cloth NEO 2 totes as a fund-raiser. Above all, students should practice reasonable care with the keyboard and screen, just as they would with any computer technology. Manage Student Writing and Keyboarding Since each NEO 2 is used only by one student, managing work in the word processing and keyboarding programs is fairly straightforward. When students write with AlphaWord Plus, the word processing program, their work is 23
26 Getting the Most out of NEO 2 automatically saved. However, we recommend teaching students to routinely save and close important files. This is a good habit to have when they move to conventional computers later in life. Similarly, students who use the same NEO 2 all year have the convenience of access to KeyWords, the keyboarding program, anytime, anywhere. Simply create a single student account on the NEO 2 and work through the lessons in order. Ask Students to Accept Ownership and Responsibility When a student is offered the privilege of his own NEO 2 to use every day, he should accept ownership and responsibility for that NEO 2. Some teachers have used the following contract with their students. You may want to consider a similar NEO 2 contract for your students. NEO 2 Contract for [enter your name] Date I understand that I may use this NEO 2 to help me learn and do my best work. I promise to take care of this NEO 2, its screen, and its keyboard. I promise that I will: 1. Use a gentle touch when keyboarding. 2. Never use a sharp object, like a pen or a paper clip on the NEO 2 screen. 3. Be careful when I carry my NEO Be careful so that I don t drop, toss, or throw my NEO If I destroy, damage, or lose my NEO 2, I will be responsible to replace it. Student Signature: Parent Signature: Form tags set off the read-only file. They are invisible on NEO 2, so students do not see them. Students can place checks inside the check boxes by pressing the space bar. If you want to send this contract as a linked file so that students actually check off each item on the list, use the following format and send via NEO Share. Note that in the example below, the form tags (<form> and </form>) are what set off the read-only file. Form tags are invisible on NEO 2, so students do not see them. Students can place checks inside the check boxes in this read-only file by pressing the space bar. NEO 2 Contract for: Date: I understand that I may use this NEO 2 to help me learn and do my best work. I promise to take care of this NEO 2, its screen, and its keyboard. <form> I promise that I will: [ ] Use a gentle touch when keyboarding. [ ] Never use a sharp object, like a pen or a paper clip on the NEO 2 screen. [ ] Be careful when I carry my NEO 2. [ ] Be careful so that I don t drop, toss, or throw my NEO 2. [ ] If I destroy, damage, or lose my NEO 2, I will be responsible to replace it. Student Signature: Parent Signature: </form> 24

27 NEO 2 Basics When each student prints his file, the entire file excluding the beginning and ending form tags will print. If you would like to use a more comprehensive contract with your students and their parents, Renaissance Learning has developed an acceptable use policy template, which you can find at the Renaissance Training Center online. Shared Implementations Although the one-to-one implementation is ideal, many schools find that they need to pool resources and share sets of NEO 2s. Sharing NEO 2s isn t difficult, it just takes planning. Based on what we have observed on thousands of campuses, two teachers can easily share a set of NEO 2s. Three teachers can share a set of NEO 2s if all three excel at scheduling and planning. When more than three teachers share a set of NEO 2s, scheduling is difficult and there is rarely enough time for students and their teachers to gain confidence with NEO 2. There are as many sharing scenarios as there are creative educators. Some educators share a mobile lab or classroom set, while others place a set of NEO 2s in each classroom and students within the classroom share them. Regardless of the sharing scenario you adopt, some basic decisions must be made. Develop a Sharing Protocol Teachers who share classroom sets of NEO 2s have found it helpful to develop a sharing protocol. Here are some ideas that teachers have implemented successfully: - If you use the SmartOption Mobile Lab, place a sign-up poster inside the left door of the lab. - Put a sign-up sheet in the media center. 25
28 Getting the Most out of NEO 2 - Set up a system in which teachers can request to check out the NEO 2s for an extended time to work through an integrated unit of study. - Develop a rotating schedule so that teachers know they will have access at the same time each day or for a set number of days each grading period. Label Each NEO 2 In a shared implementation, label each NEO 2 just as you would in a one-to-one implementation. Assign Each NEO 2 Even when NEO 2s are shared, the same student should use the same NEO 2 every day. This promotes ownership and responsibility and helps you manage your implementation. You could number each NEO 2 so that a student knows she will always work with, for instance, NEO 2 #13. Alternatively, you could put a label on the back of each NEO 2 listing each student who will use that NEO 2. If you use the label, consider numbering 1 through 8. Student 1 would complete all of his writing in file space 1. Student 2 would always use file space 2, etc. In the sample label pictured here, Rocky Amici would always use file space 1 for writing, while Rachel Callahan s open files would always be available in file space 6. THIS NEO 2 TO BE USED BY: 1. Rocky Amici 5. Kathleen Burdick 2. Rudy Ball 6. Rachel Callahan 3. Kristie Berwick 7. Michael Hamilton 4. Lauren Bryant 8. Roberto Jackson Decide How to Move NEO 2s If you purchase the SmartOption Mobile Lab, moving NEO 2s from room to room is an easy matter. Simply place them in the lab and roll the lab from one room to the next. If you purchase classroom bundles without the mobile lab, you need to develop a system to move the NEO 2s from room to room. Some teachers use plastic boxes that resemble milk crates. While this is inexpensive and somewhat efficient, please consider wear and tear as NEO 2s are loaded into the crates. The NEO 2s will need some sort of sleeve or way to protect the screen and keyboard as they are moved. In the previous section on carrying NEO 2s from class to class in a one-to-one implementation, several ideas were listed: - Purchase the NEO Neoprene case. - Use a two-gallon plastic food storage zipper bag. - Use a large padded mailing envelope. 26
29 NEO 2 Basics In the shared implementation, you can also consider the following solutions: - Use any kind of slotted storage cart that keeps the NEO 2s from too much rough and tumble as you move to class to class. - Divide the NEO 2s in the lab so that a set number is in each classroom permanently. Manage Student Writing and Keyboarding Work Since students will be sharing NEO 2s, they may want to password-protect their files in AlphaWord Plus, the word processing program. There are also a few other options for saving student work. See Chapter 4 for more detail. In the keyboarding program, students set up a KeyWords account on NEO 2. Each NEO 2 allows for eight KeyWords accounts, so eight different students can share the same NEO 2. Since KeyWords data is stored locally on the NEO 2, it s important that the same student use the same NEO 2 each day. Ask Students to Accept Ownership and Responsibility The rigors of ownership and responsibility are as much at play in the shared implementation as they are in the one-to-one implementation. Even if a student only uses NEO 2 three hours per week, for those three hours, he owns the NEO 2 and is responsible for everything that happens to it. Please refer to the ownership and responsibility discussion presented earlier in this section. Plan to apply it to your shared implementation. Summary NEO 2 Basics Before you begin, take some time to familiarize yourself with NEO 2 components. These include hardware, software, applets, built-in instructional content, and resources. Decide how to manage your NEO 2 classroom. Choose either a one-to-one implementation or a shared implementation. After deciding on the type of implementation, you ll need to assign and label NEO 2s, develop a sharing protocol (if in a shared implementation), decide how NEO 2s will be transported, manage student writing and keyboarding, and ask students to accept ownership and responsibility. 27


30 Getting the Most out of NEO 2 e Keyboarding with NEO 2 In order to tap into the full potential of NEO 2 as a writing tool, students need to develop proficiency in keyboarding. Efficient keyboarding skills offer fluency and automaticity so that students mental energies are focused on developing ideas, organizing, and communicating with their readers. As the gateway skill to writing, keyboarding can be considered as part of a routine language arts curriculum. You can also incorporate keyboarding across the curriculum, in subjects ranging from health and fitness to science and social studies. This chapter first covers several ways to introduce keyboarding informally in your classroom, and then details how to start formal instruction with KeyWords, the built-in, language-based keyboarding instruction program for NEO 2. Then we explain how you can help your students work through the 15 cumulative units in the KeyWords curriculum. Finally, we discuss ways to monitor your students progress as they progress toward keyboarding fluency. Introduce Keyboarding Informally Formal keyboarding instruction is best begun at third grade. However, you can engage students in keyboarding strategies starting in kindergarten, first, or second grade. For instance, you may decide to start by introducing keyboarding informally so students can become exposed to the proper posture, hand positioning, and mechanics of keyboarding. Here are some ways to do so: Introduce hand zones showing that a standard keyboard has a left-hand side and a right-hand side. Tie a string around the keyboard to show the left and right sides of the keyboard. Introduce the space bar showing that it s always pressed with the thumb. Have students practice entering their names using the correct hands. As they gain confidence, ask them to enter their names using the correct fingers. 28
31 Keyboarding with NEO 2 Incorporate Keyboarding Games Another way to engage primary students in keyboarding is through keyboarding games, which motivate students and encourage practice. Below are some ideas that can be used from kindergarten through fourth grade. The Alphabet Song Lead the class in singing the ABC song, one phrase at a time, while students practice typing the letters with the correct hand. They will discover that the letters A, B, C, D, E, F, and G only use the left hand, while the letters H, I, J, K, L, M, N, O, and P only use the right hand. The remaining letters use left and right hands. Left-Hand Challenge After students have had some practice with the alphabet, allow them to practice entering words with only one hand. There are 3,000 English words that can be entered using only the keys on the left side of the keyboard. In the Left-Hand Challenge game, students see how many left-hand words they can enter in two minutes. With older students, make it more interesting by adding a system of points for longer words. In kindergarten and first grade, give students one point for every word. At the end of the activity, each student can wirelessly print his list of words and take it home to read to his parents. Right-Hand Challenge If students are successful with the Left-Hand Challenge, introduce the Right- Hand Challenge next. However, this may be a tougher task. While 3,000 English words can be created using the left side of the keyboard, only 300 words can be created using the right side. Wonder why? You may think it s because of the vowels on the left side of the keyboard, but it s the consonants that make the difference. The left side of the keyboard has the most commonly used consonants. Left-Right Pattern Challenges Once students are comfortable entering letters with the left and right hands, introduce some practice integrating the two sides by following an alternating pattern. For instance, the word fog uses a left-right-left pattern, while the word pep uses a right-left-right pattern. Have students enter as many words as they can using one pattern or the other. If you teach second through fourth grade students, challenge them to create longer words using the same patterns or other patterns you choose, building in a points system if you wish. Cross-Curricular Connections Since keyboarding activities involve working with words, they can be used to reinforce language arts skills, such as practicing rhyming words, synonyms, or antonyms. However, rather than limiting keyboarding activities to an isolated time of the day, incorporate them across the curriculum. For instance, during a lesson on health and fitness, teach the importance of proper posture, hand positions, and frequent breaks to stretch back, neck, arm, hand, and finger muscles. During a science lesson, have students practice entering vocabulary words related to the concepts they are learning. During a spelling lesson, send or display a list of scrambled spelling words and have students unscramble and enter the words using correct finger placement. 29
32 Getting the Most out of NEO 2 Please see the appendix for instruction cards for some of these informal keyboarding activities. You can photocopy them to use as guidelines at keyboarding centers, or adapt them if necessary, depending on the age and grade level of your students. Start Formal Instruction with KeyWords At the third grade, most students are ready for formal keyboarding instruction. As we mentioned at the beginning of the chapter, KeyWords is the built-in keyboarding instruction program for NEO 2. You can access this program by pressing the applets key on any NEO 2 and choosing the KeyWords applet. Since KeyWords lessons are language-based, students will quickly be guided from home-row letter introduction to real words and phrases. This feature distinguishes KeyWords from many other keyboarding programs that are based on 1950s typing instruction. KeyWords reinforces the development of a reading and writing vocabulary, leading students to build language skills as they type. The following screen shots show how lessons progress from words to phrases to sentences as students advance. Example from a beginning lesson: Example from a middle lesson: Example from an advanced lesson: Guiding Principles The KeyWords design is based on research about how people learn to keyboard: Speed and keyboarding fluency increase more readily if simple words are used and repeated. The KeyWords method follows this model of repetition, presenting diverse vocabulary, rhymes, and humor to keep lessons interesting. Students learn patterns of keystrokes more quickly when they aren t interrupted by immediate corrections. The KeyWords error-checking method emphasizes the importance of words and phrases. Speed skills and accuracy are best developed independently. KeyWords provides separate lessons for these skills. You can set proficiency goals and view reports as learners test themselves. Speed increases with practice entering words and phrases instead of random letters. By practicing with words and phrases, new keyboarders learn common letter patterns that are the building blocks for simple and complex words. This promotes the ability to quickly recognize and enter letter combinations that occur frequently. 30

33 Keyboarding with NEO 2 The KeyWords curriculum is built around one teacher-led lesson and 15 student-paced units. Each of the 15 student-paced units follows the same format: students first learn new keys, then develop accuracy and speed through several practice exercises, and finally test for accuracy and speed. (If you are interested in seeing the exact keys introduced in each lesson, the words and word patterns learned, and the passing criteria for testing, see the appendix.) Since keyboarding builds muscle memory, students need to work 10 to 15 minutes every day until they complete the KeyWords curriculum. We estimate that this will take about 12 to 16 weeks. Once they ve worked through all the lessons, students should continue to practice 10 to 15 minutes two to three times per week. KeyWords is designed to be independent at the third grade and beyond. This means that once you have completed the teacher-led lesson and established routines, students work through the curriculum on their own. Some teachers choose to start each day with 10 minutes of keyboarding. Each morning, students power on their NEO 2 and get started right away on KeyWords. Other teachers build in some keyboarding practice throughout the day. For instance, if the whole class is working on an assignment or inclass activity, some students inevitably finish before the others. As each student finishes her work, she gets started on keyboarding. It s amazing how the classroom quiets down as all students eventually end up at their desks, concentrating on their own keyboarding lessons. If your district requires you to collect pre and post data for your KeyWords implementation, you can have your students take a pretest prior to any KeyWords instruction and a posttest after completion of all KeyWords lessons. This allows you to track and measure the effectiveness of KeyWords in your class, school, or district. If you choose not to use the pretest and posttest, you can still track and monitor your students progress throughout the KeyWords curriculum using reports and other options that are discussed later in this chapter. The pretest and posttest do not monitor progress along the way, but instead measure growth that results from a student completing the entire KeyWords curriculum. Built-in Resources The KeyWords program includes a host of resources, including posture and wrist placement pictures, finger zone pictures, additional practice activities, and more. You can use these resources to support and deepen your keyboarding instruction. There are several ways for you to access the KeyWords resources. If you purchased a classroom set of NEO 2s, you received two keyboarding posters. One poster shows finger zones, while the other shows proper posture. Additional resources, including posture and wrist placement pictures, finger 31


34 Getting the Most out of NEO 2 zone pictures, a KeyWords progress report log, and additional practice activities, are installed on your computer when you install NEO Manager. (All of these resources are located in a PDF file called KeyWords SmartApplet Master Transparencies and Handouts. To access from a Windows computer, go to Start, All Programs, open the NEO Manager folder, and choose the file called KeyWords Master Transparencies. On Macintosh computers, open Applications : AlphaSmart : AlphaSmart Manager 2 : KeyWords Extras and double-click KeyWords SmartApplet Master.) The progress report log and finger zones page are also reproduced in the appendix of this guide. Alternatively, if you are a Renaissance Place customer, you can access resources through your Renaissance Place site. These resources include many of the same pieces mentioned above as well as guidelines for getting started, user manuals, and white papers detailing the research behind effective keyboarding instruction. At any time during KeyWords lessons, project the posture, wrist placement, and finger zone pictures to remind students to follow these guidelines. In addition, project the finger placement posters when students are learning specific keys. Finally, the sustained practice pages are perfect for students who have completed the KeyWords curriculum or simply need further practice. Below are some sample pages from these resources. 32
35 Keyboarding with NEO 2 Set-Up Tasks Before starting formal instruction with KeyWords, you ll need to complete a few tasks to set everything up for a successful keyboarding program. 1. Learn the Master Password You will always be able to log into any student s KeyWords account with the master password, which you can learn by calling Technical Support at You can use this to log a student in if he forgets his password. You ll also need the master password to access the Teacher Options menu on an individual NEO 2, which allows you to configure several settings. 2. Configure KeyWords You may wish to configure KeyWords to meet instructional goals and district requirements. For example, you can set the standard to require either one or two spaces following punctuation. You also can change words per minute (WPM) and error rate (ER) goals. If you do change WPM and ER goals, they will remain static and will apply to every KeyWords lesson. On the other hand, built-in goals are dynamic and become more rigorous as students work through the lessons. When deciding whether to set custom WPM and ER goals, keep the following in mind: custom goals may be appropriate if you have a struggling student for whom the built-in goals would be too challenging or a very advanced student for whom the built-in goals would not be challenging enough. For the general population, we recommend leaving the built-in goals. You can also select KeyWords pretest and posttest levels, which can be set at the beginning, intermediate, or advanced typist level. If you don t specify a level, the program will use intermediate as the default. Levels vary by time and length of the test, so they should be determined based on the grade levels of your students. Beginning typist level is recommended for grades 1 and 2; the test takes about one minute to complete. Intermediate typist level is recommended for grades 3 and 4; it takes about two minutes to complete. Advanced typist level is recommended for grades 5 and 6; it takes about four or five minutes to complete. Finally, you can determine whether students should be required to complete the KeyWords lessons in the order they are presented on the NEO 2. Since KeyWords lessons are cumulative, this sequential setting is recommended. Using NEO Manager, you may configure KeyWords settings on each NEO 2 individually or on all NEO 2s at one time through the NEO 2 mobile lab. See the NEO Manager software tasks in the appendix for detailed instructions. (Alternatively, to configure KeyWords settings on a single NEO 2, you can use the Teacher Options menu in the KeyWords applet. To do so, select the KeyWords applet on the NEO 2, choose Teacher Options, enter the master password and select the settings you d like to configure.) 3. Enroll Students You need to enroll each of your students in KeyWords through NEO Manager. As part of this process, you ll create or import a user name and password for each student. Why a student password? Up to eight students may enroll for 33

36 Getting the Most out of NEO 2 KeyWords on a single NEO 2. The password protects students KeyWords data. You can access student user names and passwords through the Student Information Report in NEO Manager or, if you are a Renaissance Place customer, in Renaissance Place. 4. Give the Pretest If Desired If you choose to use the pretest and posttest, you must have students take the pretest before any KeyWords instruction has begun. In fact, if a student has done any work in KeyWords prior to taking the pretest, the results of that pretest will not be valid. (On the other hand, informal instruction and keyboarding games do not impact pretest validity.) See above for help in deciding which level to set for the pretest. Getting Started The first step to beginning KeyWords with your students is to go through the teacher-led lesson. This lesson, called Start Here!, explains appropriate keyboarding habits and introduces students to keyboarding. The lesson includes references to keyboarding posters described earlier. The best way for you to use the Start Here! lesson is with the whole class. As students work through the lesson, emphasize the following: Good posture Correct hand position Frequent stretch breaks Once students complete the Start Here! lesson, they are ready to begin working though the 15 KeyWords units. Since the KeyWords curriculum is cumulative, students should work through the 15 units sequentially. You will need to work through the first unit the ASKL unit with students to make sure they understand the format of the lessons. Once students understand the lesson format, they work through the remaining lessons independently. Here s how each lesson is structured: 1. Learn New Keys Students always begin here. They learn the finger position for the keys introduced in the unit and practice with each new key. While students are learning new keys, KeyWords does not allow mistakes. Students cannot go on until they press the correct key. If after several tries a student still does not press 34
37 Keyboarding with NEO 2 the correct key, KeyWords offers assistance, first by giving onscreen instructions and then by displaying a keyboard image with the correct key blinking. 2. Accuracy and Speed Builders Each KeyWords unit includes six accuracy and speed-builder passages. Students work until they master both the accuracy (measured by their error rate, or ER) and speed (measured by their words per minute, or WPM) goals. Then they are ready to test. Keep in mind that students may not need to work through all six accuracy and speed builders before moving on to an accuracy and speed test. While students are building accuracy and speed, KeyWords does not allow mistakes. Students cannot move forward until they press the correct key. The lessons are purposefully structured this way because it helps reinforce correct practice. Students won t get into the habit of making mistakes and correcting them with the back space key. Instead, the program ensures that they will get better at hitting the correct key stroke. As a result, they develop better, more accurate keyboarding habits. Managing One-to-One and Shared Implementations If you have a one-to-one NEO 2 implementation, students use the same NEO 2 all year. Therefore, they have the convenience of access to KeyWords anytime, anywhere. Simply create a single student account on the NEO 2 and work through the lessons in order. If you have a shared NEO 2 implementation, eight different students can share the same NEO 2 for keyboarding. This is because each student sets up a KeyWords account on NEO 2, and each NEO 2 allows for eight KeyWords accounts. Since KeyWords data is stored locally on the NEO 2, it s important that the same student use the same NEO 2 each day. 3. Accuracy and Speed Test The accuracy and speed test measures errors and WPM. Students should meet both error and WPM goals before moving to the next KeyWords lesson. After Students Have Completed the Curriculum Once a student has completed all KeyWords lessons, you may wish to perform the following two tasks. 1. Collect Posttest Data, If Desired If you have chosen to collect pretest and posttest data, have each student take the posttest after she has completed all of the KeyWords lessons. This allows you to see how much the student has improved after having used KeyWords in its entirety. Some districts require teachers to track of this type of data. 2. Direct Students to Continue Practicing As mentioned earlier, once students complete all KeyWords lessons, they should continue to practice for 10 to 15 minutes, two to three times per week, in order to review and reinforce the skills they have learned. Practice could include going through a whole lesson in its entirety, but typically it is only necessary to work through some of the accuracy and speed builders and then take the accuracy and speed test. Also, students typically don t need to work through each lesson again in sequential order but rather need additional practice in a few specific 35

38 Getting the Most out of NEO 2 areas. Once students have mastered all of the KeyWords lessons, they can go back through and review any lesson in any order. Monitor Progress As your students work their way through the 15 lessons, they can track their own progress using the Progress Report found in the appendix of this guide (also located in the built-in KeyWords resources on your computer). In addition, we recommend that you routinely check KeyWords reports to find out if your students are getting adequate practice with accuracy and speed builders and gaining in accuracy and speed. Progress monitoring allows you to note potential challenges early and intervene appropriately so that all of your students can master keyboarding. One thing to look for when monitoring student progress is whether the student is spending too much time on accuracy and speed builders. There are six accuracy and speed builders in each lesson. Best practices recommend that each student complete just one or two of the six before moving on to the test. If you see that a student is doing too many accuracy and speed builders before testing, make sure he knows how to leave the accuracy and speed builders to take a test. Students need to press the esc key in order to get into a test. On the other hand, one or two accuracy and speed builders may not be enough for all of your students on all of the lessons. Based on performance, some students may need to return to the lesson and continue with the remaining accuracy and speed builders before taking a test. As always, your knowledge and expertise are valuable in helping guide your students through the lessons in the most effective way possible. In addition to KeyWords reports which are described in detail in following section you can gauge student progress easily by browsing the KeyWords applet on each student s NEO 2. Here s how: Monitor Workflow on Students NEO 2s Remember, you can log onto any student s KeyWords account on the NEO 2 with the master password. Once you are logged in, you will be able to view which lesson the student is working on and how much progress she has made so far. A few symbols help you see this information at a glance. The asterisk (*) indicates that the student has completed all the activities in a given area. The plus sign (+) means she s moved on to this area but hasn t completed it. By going into a specific lesson, you can check to see how many accuracy and speed builders a student has completed by looking at how many have an asterisk next to them. This lets you keep track of what students are doing and monitor their progress. What can the teacher learn here? - This student is working on the GO lesson. He has completed at least one but not all accuracy and speed builders, but has not yet taken an accuracy and speed test. 36


39 Keyboarding with NEO 2 What should the teacher check? - Is this student stuck at accuracy and speed builders? One way to check is to select Accuracy and speed builders to see how many the student has completed. Another way is to use KeyWords reports. Generate KeyWords Reports Both teachers and students can generate KeyWords reports. Students generate KeyWords reports on their NEO 2s by using the KeyWords applet, while teachers generate KeyWords reports with NEO Manager. Once the reports are generated, teachers have the option to view reports in a simple text file through NEO Manager or log onto Renaissance Place for detailed reports KeyWords Dashboard Renaissance Place customers can also check the KeyWords Dashboard to see a quick snapshot of student participation, lessons passed, and practices completed. and keyboarding certificates. Please see the NEO Manager Common Software Tasks section in the appendix for instructions on accessing KeyWords reports. When students generate their own reports, they have the option to wirelessly print a report, send one to a computer, or send to an AlphaWord Plus (word processing) file on their NEO 2. (To wirelessly print a report, you must have a Renaissance Receiver connected to your computer.) KeyWords reports outline progress through the lesson and compare the student s actual WPM and ER scores to her WPM and ER goals. This information motivates students and encourages keyboarding efficiency. Using NEO Manager, teachers can generate individual, small group, and whole class KeyWords reports. The information offers a blueprint for each student s keyboarding success. Below are two examples. 37 The KeyWords Group Progress Report allows you to see the whole class at a glance, while the Detailed Student Report gives more detail about each individual student.
40 Getting the Most out of NEO 2 If you are a Renaissance Place customer, you may wish to generate more detailed KeyWords reports and certificates using Renaissance Place. Use the Student Record Report to see how each student is progressing with the lessons. Use the Diagnostic Report to quickly identify which students are having the most trouble and view an overall summary of each student s work. Student Record Report This report allows the teacher to see how each student is progressing with the lessons. 1 of 3 Printed Monday, October 11, :59:06 AM School: Cherry Hill Elementary School Reporting Period: 09/01/ /12/2010 (1st Quarter) Owen has completed six accuracy and speed builders but not taken the test for lesson GO. He may need to be reminded to take the test. Alonzo, Maria ID: MALONZ Grade: 4 Lesson Pre I ASKL DJF TH GO Babcock, Owen ID: OBABCO Grade: 4 Lesson Pre I ASKL DJF TH GO Lesson Passed a - Yes Yes Yes Yes Lesson Passed a - Yes Yes Yes - Class: Keyboarding 4C Teacher: Lane, Evelyn Goal WPM / Errorr - 8 / / / / 10 Class: Keyboarding 4C Teacher: Lane, Evelyn Goal WPM / Errorr - 8 / / / 12 - Actual WPM / Error 11 / / / / 9 26 / 8 Actual WPM / Error 8 / / / / 10 - Accuracy & Speed Builders Completed - 1, 2, 3, 4 1, 2, 3 1, 2 1, 2 Date Last Submitted 09/03/10 09/10/10 09/17/10 09/24/10 10/01/10 Accuracy & Speed Builders Date Last Completed Submitted - 09/03/10 1, 2, 3 09/10/10 1, 2, 3 09/17/10 1, 2, 3, 4 09/24/10 1, 2, 3, 4, 5, 6 10/01/10 Baker, Grace ID: GBAKER Grade: 4 Lesson Pre I ASKL DJF TH GO Lesson Passed a - Yes Yes Yes No Class: Keyboarding 4C Teacher: Lane, Evelyn Goal WPM / Errorr - 8 / / / / 10 Actual WPM / Error 5 / 14 8 / / / / 13 Accuracy & Speed Builders Completed - 1, 2, 3 1, 2, 3 1, 2 - Date Last Submitted 09/03/10 09/10/10 09/17/10 09/24/10 10/01/10 Chin, Melissa ID: MCHIN Grade: 4 Lesson Pre I ASKL DJF TH GO Lesson Passed a - Yes Yes Yes Yes Class: Keyboarding 4C Teacher: Lane, Evelyn Goal WPM / Errorr - 8 / / / / 10 Actual WPM / Error 10 / / / / / 10 Accuracy & Speed Builders Completed - 1, 2, 3 1, 2, 3 1, 2, 3 1, 2 Date Last Submitted 09/03/10 09/10/10 09/17/10 09/24/10 10/01/10 a Lesson Passed: Met WPM/Errorr criteria. Grace did not pass the test for lesson GO, but she has not completed any accuracy and speed builders for that lesson. She may need to be reminded to complete at least one or two before taking a test. 38
41 Keyboarding with NEO 2 School: Cherry Hill Elementary School Report Options Group By: Class Diagnostic Report Printed Tuesday, October 12, :56:32 AM Use this report to quickly 1 of 1 identify which students are having the most trouble. Reporting Period: 09/01/ /12/2010 (1st Quarter) The goals are automatically set in KeyWords, but teachers have the option to adjust the goals. Class: Keyboarding 4C Teacher: Lane, Evelyn Student Alonzo, Maria Babcock, Owen Baker, Grace Chin, Melissa Gomez, Mario Habib, Sarah O Brien, Katie Rowland, Amber Rudzinski, Andy Stevens, Simon Thompson, Erin Wolfe, Sophie Average Diagnostic Code Summary Number of Students Diagnostic Codes A, B % of Students Class Summary Goal Number of Lessons to Passs 8 Students Total 12 Students At/Above Goal 0 Lessons Tested Completed Passed / Total % / Taken % 4 / / / / / / / / / / / / / / / / / / / / 2 50< 4 / / / / / / 4 92 Diagnostic Code A B C Lesson GO TH GO GO GO EI GO QU GO DJF GO GO Last Lesson Completed Goal WPM / Error 14 / / / / / / / / / / / / 10 Actual WPM / Error Description Less than 60% of lessonss passed Completed lesson errors exceeded goall by more than 30% Current WPM is 30% lower than goal Date Last Submitted 26 / 8 10/01/ / 10 10/01/ / 13 10/01/ / 10 10/01/ / 7 10/01/ / 9 10/01/ / 7 10/01/ /01/ / 9 10/01/ / 16< 10/01/ / 6 10/01/ / 8 10/01/ / 9 a Values which produce a diagnostic code are highlighted with the trouble value. <Trouble value a Calculated using only the scores of those students who have completed the lastt lesson. Does not include Pre-Test or Post-Test scores. By looking at these reports, you can monitor the pace at which the students are working, monitor their accuracy rates, and see if they are skipping accuracy and speed builders and going straight to tests. In addition, if you are participating in a district initiative that requires pretest and posttest data, you can monitor the effectiveness of KeyWords by students or by class average. 39
42 Getting the Most out of NEO 2 Assess Keyboarding Skills In addition to the reports discussed above, here are some suggested activities to add informal assessment to your keyboarding program. You may wish to use these activities in the third and fourth grades, after students have begun formal instruction with KeyWords. Monitor Technique with Duck, Duck, Goose When you monitor technique, watch for healthy posture, correct finger position, and frequent stretch breaks. You can make written or verbal observations, use a checklist, or put students in charge with a new twist on the children s game Duck, Duck, Goose. 1. Tell students you will walk around the room as they keyboard, and let them know what behaviors you hope to see. 2. Tell students that when you find someone with excellent technique you will tap him or her on the shoulder. 3. That student will take over your role walking around the room looking for the elements of good technique. Stress Precision with an Accuracy Challenge This challenge involves practicing spelling words while improving keyboarding. Tell students to enter each word as slowly as needed to enter each one accurately. Each student works with a partner. At the same time, the partners enter spelling words as accurately as they can on their NEO 2s. Students press enter after each word so that they create a list of words. Students are not allowed to use the back space, spell check, or clear file keys during this part of the challenge. When both students have entered all spelling words, each one beams his list to the other. (See Chapter 4 for a more complete description of beaming.) They check each other s spelling list for accuracy. Add one point for each error. The student with the lowest score wins. Practice Speed Announce a speed day apart from KeyWords. Use the NEO 2 built-in typing timer. The typing timer is separate from KeyWords. It reports only keyboarding speed. It does not report errors. As a result, do not use this as a complete progress measure; however, students can benefit from an occasional focus on speed. To use the typing timer, project a sentence for all students to type. You can use any sentence or brief passage (keep it very brief) just make it the same for all. Then instruct students to do the following: - Power on NEO 2 and open a clean file space. - Press cmd-find to open the typing timer. - Start typing to start the timer. - Press caps lock to stop the timer. - You will see your WPM. - Press enter if you want to try again. - Press esc to exit and to view what was typed. 40
43 Keyboarding with NEO 2 Technique Checklist You may want to encourage good technique with a checklist, such as the one below. (This checklist is also included as a reproducible form in the appendix.) Attitude/Technique Never Sometimes Always Comments Sits straight in chair Feet flat on the floor Arms relaxed, elbows at sides Fingers slightly curved, tips resting lightly on keys Wrists lifted off the keyboard Begins and ends all keystrokes at home row Presses each key with correct finger Presses space bar with thumbs Uses right hand little finger for enter key Another way of using this checklist is to send it to students NEO 2s as a linked file for self and peer assessment. Enter the checklist exactly as it appears below and send it to students NEO 2s via NEO Share. (See Chapter 4 for more information on using NEO Share and linked files.) Keyboarding Checklist for : <form> [ ] I sit straight in my chair. [ ] My feet are on the floor. [ ] I keep my elbows at my sides. [ ] I use good hand and finger position [ ] When my fingers are not pressing a key, they are on the home row. [ ] I use the correct finger to press each letter and number. [ ] I press the space bar with my right or left thumb. [ ] I press the enter key with my right, little finger. </form> Summary Keyboarding with NEO 2 Introduce keyboarding informally starting in kindergarten, first, or second grades. Expose students to proper hand zones, posture, and keyboarding games. Start formal instruction with KeyWords beginning in third grade. KeyWords lessons help students develop vocabulary and language skills. Access built-in KeyWords resources on your computer, including posture and wrist placement pictures, additional practice activities, and more. Set-up tasks include configuring KeyWords, enrolling students, and giving the pretest if desired. The 15 KeyWords lessons are cumulative. Each one includes a segment on learning new keys, practice with accuracy and speed builders, and an accuracy and speed test. After students complete all KeyWords lessons, collect posttest data, if desired, and direct students to continue practicing. Monitor progress on students NEO 2s and with KeyWords reports. Have students monitor their own progress to motivate practice and make success visible. Assess keyboarding skills with several informal activities as well. 41

44 r Developing Writers with NEO 2 Think for a moment about what writing instruction is usually like without access to word processors. Even if you are implementing research-based instructional practices, students are limited to writing on paper, waiting their turn at the computer lab, or bringing in a finished assignment printed from a home computer, if they have access to one. If you wish to workshop writing, incorporate interactive exercises, or facilitate peer collaboration in class, these things must generally be done with paper and pencil or multiple photocopies. The process can be slow, cumbersome, and limited in its effectiveness. Now picture your class with NEO 2s. Having one-to-one student access to these word processors can transform the way you teach writing. Instead of being limited by lack of technology, you can wirelessly send and receive assignments, capture text and share it instantly, and distribute built-in rubrics and writing activities with ease. All of your students will be able to compose electronic text in class every day. They can electronically edit and revise their work, fix their spelling, strengthen word choice, and correct their punctuation. They can also send text back and forth to each other, work collaboratively, and submit assignments wirelessly to you. You can capture what your students have written immediately after they ve written it and add your own comments before sending the work back to your students. You can even critique or workshop your students writing in individual, small-group, or whole-class settings without much logistical preparation of materials. If you use other multimedia technologies in your class, such as an interactive whiteboard or online materials, you can use the NEO 2 as a way to connect your students to the content in these resources. Students can access the text files you choose, when you choose to make them available. Because you retain control of what they access and when, NEO 2s can help focus your students The Many Uses of NEO 2 for Writing The uses of NEO 2 for writing are as varied as the students who use them. In the primary grades, students can practice the alphabet and simple word families, while in the upper grades, they can compose and revise essays and incorporate more complex vocabulary. In English language arts, students can compose poetry, prose, personal narratives, and responses to literature. In science and math, they can use NEO 2 for lab reports, math think-alouds, and note-taking. Adapt what you read in this chapter to suit your particular instructional needs. 42

45 Developing Writers with NEO 2 energies on creating quality written content before sending their text to a computer to incorporate graphics, audio, or other effects. A vast array of Internet and multimedia tools are still at your fingertips, yet you choose how to integrate them. Word Processing In this chapter, we explain how to use the NEO 2 as a word processor, how its features and software allow you and your students to interact, and how to use NEO 2 with instructional content you ve already created or compiled. We also introduce you to several types of built-in instructional content that comes with the NEO 2. Then, we look at a few classroom scenarios to help you envision how you might utilize these tools in your own classes. As you begin to think about your own implementation, keep in mind that NEO 2 is designed for writing across all grade levels and content areas. The ideas in this chapter are merely intended as a starting place. NEO 2 was born to write. Through its built-in word processor, AlphaWord Plus, students can easily enter text and save it to a file. They can also run spell check; use the thesaurus; and cut, copy, and paste text for easy revisions. The visual below identifies some of the keys you ll use for the most common word processing functions. Screen displays two to six lines of text file 1 file 8 move among active text files send transfers files function keys print, find, etc. cmd commands the wireless functions delete erases esc goes back ctrl controls keyboard commands arrow keys move the cursor 43
46 Getting the Most out of NEO 2 To use the word processor on the NEO 2, simply power on, open a clean file space, and write. If the NEO 2 is already on and working in another applet, merely press the applets key and choose AlphaWord Plus. Alternatively, you can access the word processor by turning the NEO 2 off and back on again. There are eight file spaces on each NEO 2, as shown by the keys at the top of the keyboard labeled file 1 through file 8. This means that students can have eight AlphaWord Plus files active at one time. To move among active files, students press the desired file space key. While students write, their work is automatically saved. If they should power off NEO 2, their work will be available when they power NEO 2 on again. However, it s a good idea to get students into the habit of routinely saving and closing important files. When students are finished with a file, they have two choices: Clear the file space, which erases all the text. Save the file with a file name. (Students can have up to 90 files saved on one NEO 2.) If a student is finished with an assignment and does not plan to keep it, he can simply press the clear-file key to erase all the text and clear the file space to make it available for another AlphaWord Plus file. If the student needs to close a file but wants to come back to it at another time, he should press ctrl-s to save it and then press the clear-file key to close it. If a student has saved a file but then realizes he doesn t need to keep it, he can delete the file by pressing ctrl-d. When saving a file, students need to give it a file name. We recommend that you establish a naming convention for your students so that they can easily find and retrieve their saved work and so that file names are consistent. In addition, the file-saving routine is especially important in shared implementations in which you and another teacher might be sharing one set of NEO 2s. In this case, we recommend that you teach your students to save their work at the end of every day or class period. In case students in the two classes have similar names or assignments, make sure your students can distinguish which work is theirs. Managing One-to-One and Shared Implementations If you have a one-to-one NEO 2 implementation, each NEO 2 is used only by one student. Therefore, there is little need to password-protect AlphaWord Plus files. Students press ctrl-s to save all their files on their NEO 2s and press clear file to close a file. When a student is ready to open an AlphaWord Plus file, she presses ctrl-o to see an alphabetical list of all files. If you have a shared NEO 2 implementation, your students will be sharing NEO 2s. In this case, they may want to password-protect their files. (See the appendix for instructions.) Additionally, students could print, then delete, their files at the end of each class session. Or you may want to collect files via NEO Share and save them on the computer s hard drive or a school network. In both one-to-one and shared implementations, there are also a few other options. Students with Google Docs accounts can press cmd-send (if within range of the Renaissance Receiver) to store files at their Google Docs account. Press cmd-o to download the file. And students with MY Access! accounts can press cmd-send (if within range of the Renaissance Receiver) to submit their writing to MY Access! Press cmd-o to download the file. 44
47 Developing Writers with NEO 2 Spell Check AlphaWord Plus includes a full-featured spell check. To run spell check, students press the spell-check key, located in the top row of the keyboard. The spell check offers suggestions for how to spell the selected word. Students can then choose one of the suggested words, ignore the misspelled word, edit the misspelled word, see the word in context, or add the word to the dictionary. Depending on the age and experience of your students, you may need to give them guidance about how and when to use spell check. Teach them to look at the suggestions below the misspelled word first. If they don t find the intended word there, encourage them to look at the word in context. This can often help students correct their own mistakes and typos. If they are still not sure how to spell the word, encourage them to get help from a peer or dictionary. After consulting a reliable source, they can use the edit feature to edit the misspelled word themselves. Thesaurus The NEO 2 s word processor also includes a thesaurus. The thesaurus can be a useful tool when you want students to vary their word choice or use more complex vocabulary. The thesaurus can also help students if they are struggling to grasp the meaning of a word in a passage of text they ve downloaded from you. Often, seeing a synonym of an unfamiliar word helps students better understand the meaning. To run the thesaurus, students press ctrl-t. Cut, Copy, and Paste AlphaWord Plus allows for editing and revising with cut, copy, and paste commands. You use the same keyboard commands you use with any word processor to cut or copy text and paste it in a new location. Hold the shift key and press an arrow key to highlight the text, then press ctrl-x to cut or ctrl-c to copy. Once you ve moved the cursor to the new location, press ctrl-v to paste. For a more complete list of AlphaWord Plus keyboard commands, see the appendix. Collaborating and Communicating: NEO 2 Connectivity After familiarizing yourself with the NEO 2 s word processing functions, you ll be ready to facilitate interactive lessons and begin distributing and collecting assignments electronically. To do these things, there are three options: performing a USB send, beaming, and using a software program called NEO Share. USB Send If you would like a student to send text from his NEO 2 to your computer, simply connect the NEO 2 to your computer using the USB cable. Make sure you have your cursor blinking in the active open window where you d like to receive the text. The NEO 2 will send text to any program on your computer that accepts text. You might perform a USB send if you are projecting your computer screen for an in-class activity and would like the whole class to see the writing of a particular student or group of students. In addition, if you are using a specific website that allows you to manipulate text (such as one that creates word clouds based on word frequency or one that uses 45

48 Getting the Most out of NEO 2 avatars to verbally present passages of text), USB send is a quick and easy way to transfer the writing from a NEO 2 to your computer. USB send is also useful when you want students to send their work from the NEO 2 to a classroom or lab computer. For example, when assigning her students to do written reports, one teacher has her students do all the drafting, editing, and revising on NEO 2. Then, once the content and structure of the text is complete, each student goes to a computer and sends the text via USB to a Word document. At the computer, students then add formatting and pictures to their text. Beaming Using nothing but the word processor and a few simple key commands, students can send or beam text back and forth wirelessly by physically pointing the front of one NEO 2 at another. This function works through infrared technology, similar to that of a television remote control, by aligning the infrared lens at the front of one NEO 2 with that of another NEO 2. To beam text, the student who will receive the file opens an empty file space and presses ctrl-b. Then the student who is sending the file presses ctrl-send. If the student receiving the file already has a file open that has text in it, she will be asked to choose whether she would like to append the current file or overwrite the current file. Beaming is a good option when you would like your students to work in pairs or sequentially build on each other s work. For instance, in a sentence chain vocabulary activity, each student adds to the work of the previous student and beams it to the next student. Or in a partner activity, pairs of students practice synonyms and antonyms by sending words back and forth to one another. NEO Share The third way to do collaborative and interactive work with NEO 2 is through the software program called NEO Share. This program allows students to wirelessly download assignments from your computer, work on them, and then send them back to you all from their desks. It also enables you as the teacher to send writing assignments to your students, differentiate assignments, and share information from a variety of resources including text that you find online. Since NEO Share is located on your computer, you can pull from any files you can access on your computer: Internet resources, documents on your desktop, even files located on shared drives. In NEO Share, you can collect these files and create favorites for easy access or browse for files while in the middle of a lesson. In addition, as you ll learn later in this chapter, NEO Share comes with built-in lessons and rubrics for you to use if you wish. 46

49 Developing Writers with NEO 2 NEO Share works through a process called radio frequency wireless file transfer. Communicating through the Renaissance Receiver, NEO Share allows text to be shared wirelessly through a classroom network an intranet, if you will. Note that this is entirely separate from your school s wireless Internet connection. You do not need to Name USB Send Beaming NEO Share How It Connects USB cable Infrared lens, requires line-of-sight connectivity Radio frequency, no line-of-sight required, but must be in range What It Connects One NEO 2 to one computer One NEO 2 to one NEO 2 Many NEO 2s to one computer Wireless? Keyboard Commands be connected to the Internet to use NEO Share. You merely need to have a Renaissance Receiver connected to your computer and have NEO Manager and NEO Share software installed. However, you can access content from the Internet if you choose to do so. See the visual below for an illustration of how this classroom network functions. No Yes Yes n/a ctrl-send to send a file ctrl-b to receive a file Students press cmd-send to send a file and cmd-o to download and open a file. Access content from the Internet if you choose to do so. Project this content using a projector or interactive whiteboard if you wish. Drag and drop a writing prompt from your computer, or an article from the Internet, into NEO Share for students to retrieve. Retrieve files students have uploaded into NEO Share to be reviewed and graded. Students wirelessly download files that you have placed into NEO Share. Then they work on the assignment individually or in groups. When they are done, they send files back to NEO Share for you to retrieve. 47

50 Getting the Most out of NEO 2 How NEO Share Works After you install the software on your computer and open NEO Share, a window appears on your desktop. This window is divided into three parts, shown in the visual below. The top part is called the Pickup Zone. This is where you can highlight and drag or copy and paste any text for your students to access. The Pickup Zone is perfect for use in the moment. For instance, say that you are in the middle of a poetry lesson and you wish that you had an example of a haiku you could show your students. You can go out to the Internet or into your files on your computer, find a haiku, and paste it into the Pickup Zone. Immediately, that text is available for your students to receive on their NEO 2s. The Pickup Zone holds this text until you delete it by using the icon at the top right corner or by closing NEO Share. Below the Pickup Zone in the lower left corner you ll find the Files for Pickup window. This area holds files that you put there by browsing through your computer and selecting them. Pickup Zone holds text you highlight/drag or copy/ paste and makes it available for students to retrieve on NEO 2s until you click the delete icon. Files for Pickup holds files you browse to find and keeps them there until you select them and click the delete icon. Files Received holds the files students send until you click the save or delete icon. You can manage which files in Files for Pickup students see on the NEO 2s. Click the wireless icon next to any file to make it available or unavailable. Use this feature to plan your entire lesson or unit and load files onto NEO Share but only use them when you are ready for each one. 48


51 Developing Writers with NEO 2 Files for Pickup also includes a folder icon, which allows you to access and manage Write On! lessons, sample linked files, and favorites, which are files you create and compile. The last part of the NEO Share window is called Files Received. Located in the lower right corner, this area is where students assignments show up when they submit them to you. Files Received then holds students files until you click the save or delete icon. The NEO Share window floats on top of any application on your computer. With a few clicks you can mobilize or minimize NEO Share. For instance, click the triangle at the bottom of the NEO Share window to collapse it into a pill to make it easier to move around your desktop and capture text from Internet resources. Alternatively, you can simply click the minimize icon in the top right corner and NEO Share will minimize. Click the minimize icon to minimize NEO Share. Click the triangle to collapse NEO Share into a pill. The default preference is for the NEO Share window to automatically minimize after 10 seconds of inactivity. If you would rather control when it minimizes, you can change this setting in your preferences. From the Edit menu, select Preferences. Then remove the check mark in the box labeled Automatically minimize NEO Share after 10 seconds of inactivity, or adjust the time. 49
52 Getting the Most out of NEO 2 Many Uses of NEO Share NEO Share enables you to do much more than simply send and receive files wirelessly. It also serves as the portal to valuable instructional content, namely Write On! lessons, sample linked files, and your own favorite folders. These uses are discussed later in this chapter. NEO Share can also be used with other technologies and programs, including NEO 2 assessment and classroom response software (called the 2Know! Toolbar and AccelTest), PowerPoint presentations, web pages, and interactive whiteboards. Examples of these uses can be found in Chapter 5. Finally, in addition to using NEO Share for writing lessons, you can also use it any time you d like to send text to students for classroom management reasons. For instance, as mentioned in Chapter 2, some teachers send students a written contract at the beginning of the school year to ensure that they take good care of their NEO 2s. Use NEO Share to Differentiate When students access NEO Share, they see every available assignment. They must select which assignment to download from among those listed on their NEO 2 screens. If you load multiple assignments and reading passages into the Files for Pickup area, you can differentiate instruction based on level and interest. As mentioned earlier, you control what students see by clicking the wireless icon next to the files you wish to make available. Using Multiple Ways of Connecting Once you ve gotten comfortable with USB send, beaming, and NEO Share, you can use one at a time or combine them in flexible ways. For instance, Gina Fletcher, a fifth-grade teacher in Flower Mound, Texas, uses all three as part of a literature lesson. After her class has read a particular chapter of a book, she asks her students to come up with quality discussion questions. Each student beams his questions to a partner and the partner writes answers. After they ve had some time to work together, she collects a few sample student responses via USB send, removes the students names, and workshops their work with the whole class, demonstrating how to turn an incomplete answer into a thoughtful, wellfleshed-out response. Then she allows students more time to complete their work. When they are finished, students submit their work to her via NEO Share for her to review. She inserts feedback before returning the work to the students. To differentiate based on level, simply edit each version of the assignment or reading passage to meet your students needs. To differentiate assignments and reading passages based on interest, identify key resources that match students interest. For example, when studying ancient Rome, some students may be interested in day-to-day life in Rome, while others want to learn more about the games, and still others wish to learn about political comparisons between ancient Rome and modern governments. Place several resources in the Files for Pickup area and instruct students to download the resources that reflect their interest. Instructional Content and NEO 2 When it comes to the types of instructional content you can use with NEO 2, there are various options. You can use content you ve created or compiled. You can pull from other resources, such as online content. You can access content that is built in to NEO 50

53 Developing Writers with NEO 2 Share, such as Write On! lessons, which are a collection of writing lessons, literacy skills activities, and vocabulary strategies. Or you can access sample linked files scoring rubrics, checklists, and step-by-step guidelines that are read-only files linked to active files in which students write which are also built in to NEO Share. Finally, at our online Renaissance Training Center, you ll find a host of lesson ideas and activities called Teach with It Now, or TWIN Ideas. Use Your Own Content NEO Share makes it easy to access your own content and share it with your students. If you use a Windows computer, simple text is the only type of content that can be shared and accessed with NEO 2s. You ll need to save your files as a plain text or.txt file. (Macintosh users can use.doc,.rtf, and.pdf files as well.) Beyond that, the sky is the limit. To find material you d like to use, open NEO Share and, from Files for Pickup, click the folder icon and browse for files on your computer. As you ll learn in a moment, you can also create favorite folders for easy access to your own content. Pull from Other Resources In addition to files on your computer, you can pull from other resources, including online content, to share with your students through NEO Share. Say you are in the middle of a lesson on the 2010 oil spill in the Gulf of Mexico, and students want to know more. You can go to an educational website and find an article about the cap placed on the oil well, or one about how manta rays will be affected by the oil. Simply highlight the text of the article and drag it into the Pickup Zone window. Your students will instantly be able to capture it on their NEO 2s. Students will not be able to download images on their NEO 2s, but you can project the images for the whole class to see. This enables you to make full use of the Internet in your lessons but control what students access, keeping their focus on the task at hand and avoiding the distractions that can come with unrestricted web browsing. Create Favorite Folders With content you ve created or compiled, you can build in your favorite assignments for greater accessibility on NEO Share. It all starts with a folder. Simply create a folder for a certain topic and put all the assignments related to that topic inside that folder. Save this folder anywhere on your computer or on your network. In NEO Share, select the folder icon in Files for Pickup and choose Manage Favorites. Then drag or browse for the folder. When you click the folder icon in Files for Pickup, you will see a list of your folders. For instance, the screen shots below show the steps one teacher took to create folders for units on ancient Rome, Egypt, and the Titanic. Step 1: Click the folder icon and choose Manage Favorites. 51


54 Getting the Most out of NEO 2 Step 2: Drag the folder into the top box or click Add to browse for your folder. Step 3: Click the folder icon again. You will see a list of favorite folders that have been added. Once you access a favorite folder through Files for Pickup, you can select text files you ve stored in that folder and they will appear in Files for Pickup for your students to download onto their NEO 2s. You can also store image files and web links in your favorite folders and access them during instruction. Rather than appearing in Files for Pickup, the images and websites will simply open on your computer. This is handy if you d like to project images or access websites during a lesson. For instance, in a lesson on the Titanic, you can save an image of the sunken ship in your Titanic favorite folder to easily access and open through NEO Share. Or you can open a website you have saved to refer to or project during instruction. In addition to creating favorite folders, you can also save your favorite websites as quick links in NEO Share. Once you have done this, when you click the folder icon in Files for Pickup, your favorite websites will be listed under My Websites. Software steps for how to create and manage favorite folders and save favorite websites are in the appendix. You can also refer to the classroom scenarios in Chapter 5 to see examples of how teachers might use favorites in NEO Share. 52

55 Developing Writers with NEO 2 Built-in Instructional Content: Write On! Lessons In addition to content you create or compile, NEO Share comes with a wealth of built-in instructional content, called Write On! lessons. Write On! includes three types of lessons: literacy skills activities, vocabulary strategies, and writing lessons. In total, there are: 36 literacy skills activities and a teacher s guide Nine vocabulary strategies and a teacher s guide 387 writing lessons and teacher guides for elementary school, middle school, and high school Write On! Literacy Skills Activities Vocabulary Strategies Writing Lessons If you are new to NEO Share, you may wish to get used to how it works by using your own content before delving into the Write On! lessons. Or, pick and choose a few of the Write On! lessons and gradually incorporate more of them as you become more familiar with everything they include. This section includes an overview and a few tips to get you started. To access Write On! lessons, click the folder icon in the Files for Pickup area of NEO Share and choose Write On! Lessons. You ll find three folders, one for elementary, one for middle school, and one for high school. Inside each of these folders are the three types of lessons: literacy skills activities, vocabulary strategies, and writing lessons. To access the teacher guides (also referred to as teacher s supplements), click the folder icon in the Files for Pickup area of NEO Share and choose Write On! Lessons. Enter an asterisk (*) in File name as shown and click Open. Guides for literacy skills activities and vocabulary strategies will appear as PDF files in the main folder. To find the teacher supplements for the writing lessons, click inside each grade-level folder, choose the Writing Lessons folder, enter an asterisk (*) in File name, click Open, and you ll find a PDF supplement for the lessons at that grade level. 53

 include poetry and building word power, the process of writing, and writing skills.")
56 Getting the Most out of NEO 2 Writing Lessons The writing lessons span grades 3 through 12 and cover everything from writing topic sentences and summarizing to crafting persuasive essays and polishing prose. Each lesson introduces concepts and provides explicit instruction in chunks. As the lesson continues, it includes models of good writing and a host of independent practice activities. At the elementary level (grades 3 through 5), you can choose from a set of lessons about seasons, the process of writing, and writing skills. The middle school lessons (grades 6 through 8) include poetry and building word power, the process of writing, and writing skills. The high school lessons (grades 9 through 12) focus on writing skills, the process of writing, and lifelong skills. To use these lessons, select them, edit them if you desire, and send them to students via NEO Share. We ll take a look at a few of these lessons in the classroom scenarios a little later in this chapter. Below are a few tips for getting the most out of the writing lessons in Write On! - Find what you want in the teacher supplement. The Write On! teacher supplements open with Adobe Reader. Use the Adobe Reader Find function to locate Write On! writing lessons that focus on specific skills. For example, say you need a lesson on simile. Open the Write On! middle school teacher supplement. In the Find area, enter simile and press enter. - Know how to find lessons you search for in the teacher supplement. When you find a lesson in the teacher supplement you d like to use, look at the bottom of the page to see where the lesson can be found in NEO Share. The screen shot below is what you ll see on the bottom of the page in the teacher supplement when you search for a lesson on simile. The notation tells you to look in Chants to Limericks. 54


57 Developing Writers with NEO 2 - Use handouts from teacher supplements. Many of the writing lessons include additional handouts. These handouts are available in the Write On! teacher supplements. - Differentiate with vertically aligned lessons. Many of the Write On! writing lessons are vertically aligned. This means that much of what is covered in the elementary series is addressed at a deeper level in the middle school series. Additional content covered in the middle school series is addressed at a deeper level in the high school series. You may wish to use similar lessons from different grade levels to differentiate instruction. - Present lessons over several class sessions. Each Write On! writing lesson has several parts. The parts are divided by a double line that looks like this: =======. If you want to introduce one part of the lesson at a time, open the lesson, then highlight and drag that one section into the NEO Share Pickup Zone or copy and paste into a new document and load that document into NEO Share. Literacy Skills Activities Accelerated Reader, Renaissance Learning s reading software program, includes more than 800 Literacy Skills Quizzes for well-known literature across the grade levels. Each Literacy Skills Quiz includes an electronic copy of a teacher s guide with varied activities designed to facilitate literacy skills development. Using the information in the teacher s guides, a select set of these literacy skills activities has been formatted to work with NEO 2s through Write On! lessons. Even if you do not use Accelerated Reader, you can still utilize these literacy skills activities because they include some of the most widely read books at each grade level. If your class is reading one of the books for which there are Write On! literacy skills activities, use them to deepen your students understanding of the book and build various literacy skills, such as recognizing setting, understanding theme, comparing/contrasting, and thinking about character. Literacy skills activities may be used with individualized, small-group, or wholeclass instruction. Here s how it works. Following reading, you select the book title and then choose the appropriate literacy skills activities and send them to your students NEO 2s with NEO Share. Students read, write, and respond to the activities 55
58 Getting the Most out of NEO 2 on their NEO 2s. Then they may elect to publish their work by sending to a computer, printing wirelessly from NEO 2, or beaming NEO 2 files to other NEO 2s. Below is a list of the titles for which there are literacy skills activities in NEO Share. The check marks in the grid show the types of activities included. Literacy Skills Activities at a Glance Believability Character Compare/Contrast Dialogue Inference Plot Respond to Literature Setting Theme Tone Vocabulary Elementary Literacy Activities Class Clown Fudge-a-Mania Marvin Redpost: Kidnapped at Birth? The Boxcar Children Middle School Literacy Activities Hatchet Number the Stars The Giver The Lion, the Witch, and the Wardrobe High School Literacy Activities Animal Farm Flowers for Algernon Lord of the Flies The Hobbit 56
59 Developing Writers with NEO 2 Say your fifth-grade class just finished reading Hatchet, the Newberry Honor-winning book about a boy forced to survive in the wilderness after his plane crashes. You can choose to do a literacy skills activity that focuses on believability. Below is what that activity looks like when you access it through NEO Share: Name: < > Class: < > Date: < > Access this activity at: Write On! Lessons Middle School Literacy Skills Activities Hatchet Believability Hatchet Realistic and Believable Situations When Brian realizes he is left alone to land the plane and survive in the wilderness, he often tries to recall what a movie or television character or hero would do in his situation. Generally, though, Brian finds that these images and thoughts aren t of much use to him. Choose an action/adventure movie or television show you have seen. Compare the situations of the characters in the show with the situations that Brian faces. Discuss how these differ. Which is more realistic? < > What could the moviemakers have done that would make the characters situations more realistic or believable? < > If you haven t done so already, name and save this file now. (Press Ctrl-S, type a name for the file, and press Enter.) ==================== end of activity Copyright Renaissance Learning, Inc. 57
60 Getting the Most out of NEO 2 Vocabulary Strategies Vocabulary instruction is at the heart of learning new content. Think back to how you learned vocabulary in school. Did it look something like this? Carbon dioxide: A colorless, odorless gas formed during cell respiration Cell respiration: Glucose: A series of metabolic processes that take place within a cell in which energy is harvested from organic substance glucose and stored as energy carriers Organic substance used in cell respiration Traditional forms of vocabulary instruction focus on learning lists of related words and their definitions in the just in time model. Students typically learn the words just in time for the vocabulary quiz and then promptly forget any of those words that are not used regularly. In contrast, effective vocabulary instruction includes opportunities for students to read, write, speak, and listen to new words. It involves multiple exposures over time. Powerful vocabulary instruction also focuses on concept development, since words are labels for concepts. The nine vocabulary strategy activities for NEO 2 help students gain skills to learn and apply concepts as they learn new words. Each grade span has three types of vocabulary strategy activities, as shown in the chart below: Elementary Middle School High School ABC Graffiti Closed Word Sort Concept of Definition Possible Sentences Concept Circles Four-Part Definition Synonym Cluster Sentence Chains Vocabulary Self-Selection The strategies with modification are effective at most grade levels. We recommend exploring the strategies in all three grade spans and modifying as needed for your students. Whether you are teaching geography, history, or science, simply select three to five terms critical to understanding the content. Then navigate to the Write On! lessons and choose a grade span. Finally, select Vocabulary Strategies, then decide on an appropriate strategy and edit as needed to meet your instructional goals. The chart on the next page identifies the types of vocabulary skills addressed by each of the vocabulary strategies for NEO 2. The column on the left gives the name of the activity, and the check marks in the grid note what kind of an activity it is. Additionally, strategies that require extensive teacher interaction are noted. 58
61 Developing Writers with NEO 2 Vocabulary Strategies at a Glance Develop Concepts Predict and Confirm Create Word Banks Use Analogies Use Reference Tools Teacher Interaction Reference Tools Elementary ABC Graffiti Facilitate Possible Sentences Introduce new words and provide text preview Synonym Cluster Facilitate Middle School Closed Word Sort Monitor independent work Concept Circles Provide reference tools Sentence Chains High School Monitor to keep chains on topic Concept of Definition Provide reference tools Four-Part Definition Provide reference tools Vocabulary Self-Selection Provide reference tools - Dictionary - Glossary - Dictionary - Glossary - Dictionary - Glossary - Dictionary - Glossary - Thesaurus - Encyclopedia - Other research tools - Dictionary - Glossary - Thesaurus - Encyclopedia - Other research tools - Dictionary - Glossary - Thesaurus - Encyclopedia - Other research tools 59
62 Getting the Most out of NEO 2 For instance, if you select the ABC Graffiti activity, you ll see it is built around a lesson on weather terminology. However, you can edit it to work with a lesson on ancient Rome, the Titanic disaster, or any other topic. Here s what the lesson looks like: Name: < > Class: < > Date: < > Access this activity at: Write On! Lessons Elementary Vocabulary Strategies ABC Graffiti ABC Graffiti So you think you know the new word. The ABC Graffiti strategy will challenge you. This strategy helps you focus your thinking about new vocabulary words. It is fun to do, and it is good exercise for your brain. Work with a partner or in a small group. Keep your group small - no more than four. The key word is weather. Beginning with the letter A, enter a related term for weather. Then go to the letters B, C, and so on until you get to Z. Can you enter a term for each letter of the alphabet? Here are three to get you started: WEATHER Atmosphere Blazing heat Cyclone D E F G H I J K L M N O P Q R S T U V W X Y Z Did you make it all the way to Z? If you haven t done so already, name and save this file now. (Press Ctrl-S, type a name for the file, and press Enter.) ==================== end of activity Copyright Renaissance Learning, Inc. 60
63 Developing Writers with NEO 2 In addition, several of the activities can be done collaboratively. For instance, the middle school sentence chains activity features beaming. Here s an excerpt from that lesson: Person #1 completes the sentence below and beams it to person #2. Person #2 writes another sentence that begins with the end of the sentence that #1 wrote, and beams both sentences to #3. Access this activity at: Write On! Lessons Middle School Vocabulary Strategies Sentence Chains Here is an example with the sentence chains strategy that begins with the word nutrition. Nutrition makes me think of eating. Eating makes me think of digestion. Digestion makes me think of getting benefit from food. Getting benefit from food makes me think of.... As you can see, this activity can be done with a partner or in small groups. The exercise is based upon the idea that students learn new words best when they read them, write them, speak them, and listen to them. When students work together and use beaming to facilitate interactivity, they get the chance to do all four. 61

64 Getting the Most out of NEO 2 Editing Write On! Lessons You can edit any of the Write On! lessons to suit your teaching purposes. For instance, many of the writing lessons include a series of activities that build on one another, and therefore are too long to be done all at once. If you would like to just send the first activity in the series to your students, edit the lesson by deleting the activities you are not ready to do yet. You can also modify the content of any of the lessons. For instance, the vocabulary strategies can be used with a wide variety of content words. Simply edit the original lesson to include content words you wish to use. For instructions on how to edit Write On! lessons, see the appendix. Built-in Instructional Content: Linked Files When students are completing an assignment, it is often helpful for them to have stepby-step instructions, a scoring rubric, project guidelines, or relevant reading passages right at their fingertips. With linked files through NEO 2, you can attach a read-only file to the active file in which your students will work. With a simple key command, students can switch back and forth between their work and the read-only file for reference. There are 22 sample linked files built into NEO Share. To access the sample linked files, click the folder icon in the Files for Pickup window of NEO Share and select Sample Linked Files. Below is an example of one linked file about how to write a haiku. Since it includes all of the rules students must follow, it serves as a good reference while completing the assignment. <form> HAIKU [ ] Written about nature. [ ] Three lines. [ ] Five syllables in line one. [ ] Seven syllables in line two. [ ] Five syllables in line three. [ ] Cadence and tone sound musical. </form> Access this activity at: Sample Linked Files Haiku 62
65 Developing Writers with NEO 2 The form tags (<form> and </form>) at the beginning and end of the file are used to delineate where the read-only file begins and ends. They appear in your version of the linked file but not in the student s version. To use this linked file, students access it from the Files for Pickup zone in NEO Share after you have placed it there. (To do so, they open an empty AlphaWord Plus file, press cmd-o, join your network, choose NEO Share, and then access the file.) It will open as a blank active file in which students can write. Then, as they draft, edit, and revise in the active file, they can press ctrl-l at any time to access the linked file for support. The linked file is read-only, yet students can check or uncheck the checkboxes with the space bar and move among them with the tab key. When students are ready to return to their writing, they press ctrl-l again. In other words, ctrl-l lets students toggle between their work and the linked file for reference. You may wish to add a prompt to a sample linked file with simple instructions to your students, such as Your haiku rubric is attached. Press ctrl-l to access. That way, when students download the linked file, they will see the prompt instead of a blank screen. To add a prompt, you ll edit the linked file, adding your prompt before the form tag. This is what students will see when they download a linked file with a prompt you have added. If you don t add a prompt, they ll see a blank screen. This is what students will see after they press ctrl-l. Note that the form tags do not show up on the NEO 2. You can also make any edits to the read-only portion of any sample linked file. The procedure for editing sample linked files is the same as for editing Write On! files. Instructions for how to edit sample linked files are in the appendix. In addition to the sample linked files built into NEO Share, you may also create your own linked files and send them to students through NEO Share. While most linked files include checkboxes, you may choose to omit the checkboxes if you create your own linked files. For details about how to create your own linked files, see the appendix or the QuickStart Guide for Linked Files found at the Renaissance Training Center online. Also, see the appendix for a list of all key commands used with linked files. 63
66 Getting the Most out of NEO 2 Building Integrated Lessons into NEO Share In Chapter 5, you ll learn about two software programs called the 2Know! Toolbar and AccelTest that help increase student engagement, gather formative feedback, and monitor student progress with the NEO 2. Once you ve become comfortable with using NEO Share as a portal for your own content, online resources, Write On! lessons, and linked files, you ll be ready to integrate NEO Share with these two assessment and classroom engagement software programs. The classroom scenarios in Chapter 5 show how you can use NEO Share in conjunction with these programs, along with online content and your interactive whiteboard if you use one, to create integrated units of study that draw upon all of these tools and resources. Sample lessons on the Titanic and ancient Rome, as well as a checklist for creating your own integrated units of study, are included in that chapter. Teach with It Now (TWIN) Lesson Ideas With new technology, some teachers just need to get an idea of how others integrate it successfully. Teach with It Now (TWIN) Ideas, which can be found at the Renaissance Training Center online, offer that glimpse into what can be done with NEO 2. They are a collection of sample integration ideas and resources. TWIN Ideas span the grade levels and subject areas. Some of them give ideas for how to use NEO 2 with NEO Share as well as with the assessment and engagement software introduced in Chapter 5. For instance, the TWIN Idea called ABC and 123 is an interactive lesson intended for primary grades. It uses a colorful slide presentation to provide practice for counting, letter/sound associations, and critical thinking. Another TWIN Idea, the Anticipation Guide Strategy, is aimed at middle and high school students. It teaches pre-reading strategies that can help prime students for a reading passage. Before reading a passage arguing that smokers must quit completely rather than cutting down, students read and respond to several statements about smoking, all of which sound plausible yet half of which are incorrect. Then when they read the passage, they check to see which of their original answers were correct. Other TWIN Ideas deal with using six-trait writing, exploring the five major regions of Africa, finding the area of triangles, and developing comprehension strategies. Many teachers download a TWIN Idea and tweak it to meet their instructional goals. We recommend you do the same. 64
67 Developing Writers with NEO 2 Classroom Scenarios Now that you have learned about the tools at your disposal, let s explore some scenarios that make use of them. All of the strategies in the following scenarios are aligned with instructional practices recommended by research (Graham and Perin, 2007). However, these scenarios are merely suggestions of how you might utilize these tools in your own classroom. Scenario 1: Developing Writing Skills Mr. Jones is working with his middle school students on developing writing skills. One such skill involves learning to combine short, simple sentences into longer, more complex sentences. His students have been working through a series of sentencecombining activities for several weeks. He decides to use one of the Write On! lessons as a culminating activity, giving his students a chance to use what they know about combining sentences to edit or revise. He starts by instructing his students to download the lesson excerpt (below) he has placed in NEO Share. When we first write down our thoughts, we often use short, choppy sentences and there may not be enough thought in one sentence to make it interesting. We can sometimes go back and combine sentences. For example: Access this activity at: Write On! Lessons Middle School Writing Lessons, Writing Skills Sentence Writing Level II Combin Short Sentences The cow ambled slowly. She was headed for the barn. It was milking time. Combined The cow ambled slowly toward the barn at milking time. Combine the short, choppy sentences below into one more interesting sentence. Here are some words that might help you combine sentences: and, but, while, where, when, because, for, which, after, although, as, since, who, that, if 1. The sun is scorching! Sweat is pouring off my brow. 2. You can have the rest of the peanut butter. I m not hungry. 3. Our first president was George Washington. He turned down the offer to become our first king. Kings are found in aristocracies. He believed in democracy. Mr. Jones introduces what they will be doing by going over the introduction and first example with the students. Then he gives his students the chance to work through the three exercises on their own and in small groups. Once they send their sentences to him via NEO Share, he projects a few of them to discuss with the whole class, showing all of the different ways the same sentences could be combined. The next day, Mr. Jones continues with more activities found in the middle school Write On! writing lessons. These lessons involve short reading passages that include a moral. Students engage with the material by talking about what they think the moral of the story is, as well as getting further practice in editing and revising. Here is an excerpt from the lesson he uses. 65
68 Getting the Most out of NEO 2 You who have brothers and sisters know that people don t always want the same things. Don t you feel sorry for the grownups in your life who try to please all of you? This fable is about just such a family predicament. The Father and His Two Daughters A man who had two daughters gave one in marriage to a gardener and the other to a potter. After the weddings, the daughters departed with their husbands to their new homes, and the father was left alone. Access this activity at: Write On! Lessons Middle School Writing Lessons Writing Skills Sentence Combining with a Moral Please The following spring the father went to visit the daughter who married the gardener. How fares it with you, daughter? he asked. Very well, indeed, she replied. We have everything we want. I have only one wish. And that is that we have a heavy shower to water all our growing plants. Later the father visited the daughter who had married the potter. And how is everything with you, daughter? There is not a thing we lack, said she. My only hope is that this fine weather and hot sun may continue so that all our tiles may be baked. Alas, said the father, if you must have fine weather and your sister must have rain, which am I to pray for? The End ==================== Talk about the fable with your writing partners. How would you tell -- in your own words -- what the moral is? Suppose you began it this way: You can t always... How would you finish it? Let each writing partner try. You can t always < >. You can t always < >. You can t always < >. You can t always < >. Name and save this file now. (Press ctrl+s, type a name for the file, and press enter.) ==================== 66
69 Developing Writers with NEO 2 After students are done reading the passage, discussing the moral, and completing the activity with a writing partner, they have the chance to apply what they ve learned about sentence combining. Mr. Jones has his students continue with the lesson below. You ve been using the words who, that, and which in your speech since you were little. But did you know how useful they are when you write sentences? You can combine two related sentences using who, that, or which. For example: Fables are stories. Fables teach a lesson. Might become: Fables are stories that teach a lesson. Here s another example: Aesop was a slave in ancient Greece. Aesop told stories. The stories taught a lesson. That might become: Aesop, who was a slave in ancient Greece, told stories that taught a lesson. Or: Aesop, who told stories that taught a lesson, was a slave in ancient Greece. If you wanted to stress telling the stories, you might want to use the first combination. If you wanted to stress his being a slave, you might choose the second. Do you see why? Talk it over with your writing partners. ==================== Then, the lesson relates what students have learned about sentence combining to the original fable about the father and his two daughters. Students first look at sentences from the story, then practice combining them, and finally make deductions about which words they can use to replace certain types of information. Now, try using who, that, and, or which to combine sentences from the story. Look for the hints in brackets. Sentences from the story A man had two daughters. [who] He gave one in marriage to a gardener. [and] He gave the other in marriage to a potter. Combined sentence: < > ==================== Sentences from the story He visited one daughter. She had married the potter. Combined sentence: 67
70 Getting the Most out of NEO 2 < > ==================== Sentences from the story The second daughter wanted hot weather. [who] She wanted [dry] weather. She wanted the sun to bake her tiles. [because] She was the opposite of her sister. Her sister wanted wet weather. [who] Combined sentence: < > ==================== Maybe you noticed something. Who can replace words like these: the man the daughter the husband she Add another to this list: < > Which and that can replace words like these: the garden the weather the tiles the stories Add another to this list: < > Now you might be able to finish these rules: Who replaces < > words. Which and that replace < > words. If you decided that who is always used to stand for people words, then you were right. 68
71 Developing Writers with NEO 2 Mr. Jones works through a different activity each day over the span of several weeks to reinforce these skills and provide ongoing practice. * * * * Another essential writing skill is summarization, which has been proven to improve writing performance for all students even those who struggle with writing. To develop his students summarization skills, Mr. Jones decides to use NEO Share to do a six-word memoir activity, which he found in the TWIN Ideas at the Renaissance Training Center online. He starts the lesson by introducing the concept of the six-word memoir. Some claim that Ernest Hemingway created the six-word memoir when challenged by his writing colleagues to tell a story in less than 10 words. Hemingway, legend has it, bested them by four words. The result: For sale, baby shoes. Never worn. Like the example above, a powerful six-word memoir should address key ideas and raise questions. For example: Who is selling the shoes? Why are they for sale? Why were they never worn? After discussing these questions with his students, Mr. Jones shares a few other examples of six-word memoirs. He leads a discussion with his students about how challenging it can be to distill a larger concept into such few words. Then he asks his students to download a passage about the history of the Statue of Liberty that he has loaded into NEO Share. The passage, which he found at an educational website, explains that the Statue of Liberty was a gift from France on July 4, 1884, as a monument to American freedom. It also explains where the statue is located, how it came to be there, and describes its physical characteristics. Once his students have read the passage on their NEO 2s, Mr. Jones instructs them to summarize the passage in just six words. Then they send their work to NEO Share. When all students have completed this task, Mr. Jones pulls up several students work on the projector and leads a whole-class discussion on why the students chose the six words they did. One student wrote: Gift from France, American liberty symbol. Another wrote: A birthday gift, 15 stories tall. Still another: Woman with torch in New York. Mr. Jones uses this opportunity to talk about main idea and supporting details, which are key elements of summarization. Beyond this initial lesson, Mr. Jones revisits the six-word memoir activity often across the content areas to give his students further practice summarizing concisely. In English language arts, for instance, he asks his students to describe a character in the book they are reading in just six words. He also asks them to summarize what happened in the latest chapter in just six words. He even gives the students the opportunity to craft sixword memoirs to describe specific aspects of their own lives. 69
72 Getting the Most out of NEO 2 Scenario 2: Writing in the Content Areas Writing in the content areas can range from writing to learn the content material to learning to write in content-specific genres. Teachers of math, science, and other content areas can use the NEO 2 to include both approaches in their instruction. Ms. Salazar is a high school biology teacher. One of her goals is to integrate more writing into her science classes. By its nature, science requires lots of writing, from hypotheses and procedures to data analysis and reports of findings. Inspired by a TWIN Idea called Integrating NEO 2 in Math and Science, she decides to give her students the opportunity to use NEO 2s to write in the science lab and to take notes while in the field. For instance, before a field trip to the local natural history museum, students use NEO 2s to write predictions and questions about what they will see. While at the museum, they enter observations about several of the exhibits. When they return to school, they reflect on which of their predictions turned out to be correct and why. They also fill in the answers to their initial questions. NEO 2s also work well for lab reports. Ms. Salazar creates a new linked file that tells her students the precise format they should use for their lab reports. The rubric leads students through each step of their experiment: introduction, hypothesis, methodology, results, analysis, and conclusions. Before she finalizes the linked file, Ms. Salazar involves her students in helping to create the criteria in each category. She asks her students to brainstorm what types of information should be included in the introduction, the hypothesis, the methodology, and so on. Once the rubric is completed, having the linked file attached to their own work gives the students clear guidance and serves as a reference as they progress through each stage. In addition, as a regular part of her lessons, Ms. Salazar uses the Four-Part Definition vocabulary strategy from the Write On! lessons. In this activity, students are asked to take a word, for example photosynthesis, and come up with a four-part definition. The four parts are: 1. A list of related words and phrases 2. The top three related words and phrases 3. A comparison 4. A sketch Below is an excerpt from the lesson that her students downloaded on their NEO 2s via NEO Share: Part 1. Working alone or with a partner, brainstorm as many related words and phrases as you can for photosynthesis. < > Access this activity at: Write On! Lessons High School Vocabulary Strategies Four-Part Definition Part 2. Now, copy and paste your three best related words or phrases. < > Part 3. Enter a comparison using this template: Photosynthesis and < > are both alike because they both < > and < >. Part 4. Print your file and illustrate your comparison. 70
73 Developing Writers with NEO 2 This activity helps her students understand and explain the concept of photosynthesis rather than just being told what it is or being asked to read about it. The strategy engages them, requires them to process the information, and helps them learn to relate it to concepts they already know. Scenario 3: Process Writing The process writing approach teaches students that creating a piece of quality writing doesn t happen all at once, but rather develops over several stages. Students brainstorm, generate ideas, organize, draft, edit, revise, and finally publish. At each stage, students must think about their audience and purpose for writing and how to tailor their message accordingly. Mrs. Parker, who teaches writing with an emphasis on the process, has designed a unit for her students based on movie reviews. First, her students will look at samples of movie reviews and think about the audience and purpose behind this type of writing. Then, they will craft their own movie reviews. This assignment helps students develop summarization and word choice skills. They also get the opportunity to work collaboratively during the peer review stage. As part of the pre-writing stage, Mrs. Parker leads a whole-group discussion about online movie reviews. Using NEO Share, she places several sample movie reviews that she found online into the Pickup Zone for her students to download. After reading the reviews, the class as a whole comes up with a list of the characteristics of a good movie review, with a focus on summarization and vivid word choice. Mrs. Parker then posts this list and sends it to students NEO 2s. Next, Mrs. Parker wants students to engage with the types of vocabulary commonly used in movie reviews. To do so, she breaks students into small groups and asks them to brainstorm words appropriate for a movie review, such as: Blockbuster Edge-of-your-seat Hilarious Romantic 71

74 Getting the Most out of NEO 2 One leader of each group collects the words and beams them to other groups. Finally, student groups send their word banks to Mrs. Parker s computer through NEO Share. She sends this file to a spreadsheet application to sort the words alphabetically. She projects the list for reference and makes it available to students via NEO Share. Before beginning to write their first drafts, students take some time to reflect on the movie they have chosen to review. They make prewriting notes, first brainstorming and then organizing their ideas. Then, during the drafting stage, students open up a new file on NEO 2 and write their first drafts, incorporating words from the word bank as appropriate. During the editing and revising stage, students work with partners or in small groups. They beam their first drafts to peers for help with the review and revision process. Peer editors review the beamed file to make sure it includes a good summary of the movie and vivid word choice. They also recommend words that could be replaced using the thesaurus. The peer editors also work through a rubric Mrs. Parker sends as a linked file, checking off whether the review has a good introduction, a thorough summary, and engaging word choice. After students have exchanged feedback, each one revises his work. Finally, the students reach the publishing stage. Mrs. Parker collects all of the reviews by having her students send them to her via NEO Share. She also asks for a few volunteers to have their reviews projected and read by the whole class. Summary Developing Writers with NEO 2 The NEO 2 can be used as a word processor. It includes a spell check, thesaurus, and commands for cut, copy, and paste. You can work with multiple open files or save files on each NEO 2. Use NEO 2 to collaborate and communicate through its three ways of connecting: USB send, beaming, and NEO Share. NEO Share allows you to send and retrieve writing assignments, activities, and reading passages wirelessly to and from your students. You can use various types of instructional content with NEO 2. These include accessing your own content, pulling from other resources, creating favorite folders, using built-in Write On! lessons and linked files, and building integrated lessons into NEO Share. Various lesson ideas can also be found at the Renaissance Training Center online. Use the classroom scenarios in this chapter to spark your own ideas about how to use NEO 2 for writing instruction. 72


75 t Assessment and Classroom Engagement Imagine that you are in the middle of a lesson. You pause and ask a question to see if students are following along. What happens? Do just three or four students raise their hands? Is it the same three or four students every time? These responses give you a little bit of information about what your class is thinking. But is it enough? In many classrooms, perfectly well intentioned teachers only see the tip of the iceberg in terms of what their students are thinking. Yet there s a massive amount of ice still below the surface. It s often not until students turn in an assignment or take a quiz that teachers learn about misunderstandings or gaps in their students knowledge. And it may be too late at that point to modify instruction to address those needs. Now imagine that you could see the entire iceberg while you were teaching. How would that change your classroom? You could gather information strategically and adjust your teaching accordingly. This process, called formative assessment, has the power to change your classroom into a more dynamic, responsive, interactive place (Black and Wiliam, 1998). Using NEO 2, you can see the entire iceberg: you can engage all students every time you ask a question, and you can easily collect assessment data as you teach. This technology doesn t replace your expertise as a teacher. It s still up to you to design quality questions and use them at opportune points in your teaching. And you decide how to adapt instruction based on what you find out. NEO 2 merely makes the process of gathering information more efficient and effective. Even students who are shy or reluctant to show their confusion in front of other students can safely participate and stay engaged. While formative assessment explores students understanding while it s still developing, summative assessment is about measuring results, enabling you to provide students with a rank, grade, or other score. Summative assessment is important in its own way, helping ensure that your students are meeting state standards requirements and giving students valuable information about where they need to improve. You can use NEO 2 to gather and electronically score both formative and summative assessments. Two key software programs, called the 2Know! Toolbar and AccelTest, enable you to use the NEO 2 for assessment and classroom engagement. This chapter explains how to incorporate these resources effectively into your teaching. We also look at how you can use NEO Share which was introduced in Chapter 4 for formative assessment 73


76 Getting the Most out of NEO 2 and classroom engagement. When you are comfortable with all of these programs, you can combine them together within the same lesson to make the most out of these teaching tools. To get started, you ll need the following hardware resources: your computer, NEO 2s, the Renaissance Receiver and USB cable, and any other technology you d like to incorporate, such as a projector, interactive whiteboard, or document camera. You ll be able to use the software programs with verbal questions, textbook material, online resources, PowerPoint presentations, and written assignments. Ask the questions Questions can be projected, printed, displayed on PowerPoint slides, asked verbally, or shown from the Internet. Plan your lesson and questions The Formative Assessment Cycle Gather information from students Use the 2Know! Toolbar or AccelTest software. For minute-by-minute, day-by-day assessment Modify instruction as needed Interpret data Use toolbar data or AccelTest results and reports. The teacher plays a crucial role in the continuous cycle of formative assessment: planning quality questions, interpreting the information collected, and using that information to modify instruction. NEO 2 helps make the data collection process easy, immediate, and reliable. 74


77 Assessment and Classroom Engagement Using the 2Know! Toolbar for Formative Assessment and Classroom Engagement Mrs. Rosario stands at the front of the classroom. Her fifth-grade students sit with their NEO 2s at their desks. As part of a math lesson, Mrs. Rosario is going over division word problems taken from a textbook. She uses a projector and document camera to project each problem onto the whiteboard behind her. The current problem reads: For the annual bake sale, your class baked a total of 90 brownies. You decide to sell the brownies in packages of 4. Each package will be tied with a ribbon. How many ribbons will you need? a. 360 b. 23 c. 22 d. 4 e. 94 Mrs. Rosario reads the question aloud and asks her students to work the problem and choose the correct answer. She has already given some instruction about how to approach problems like this, but she wants to see what they ve learned so far. Pulling up the 2Know! Toolbar on her computer screen, she clicks on the multiple choice option, labeled ABC. Then she instructs her students to enter their responses on the NEO 2. When she can see that most of her students have responded, she clicks Graph. She can see that most of her students 22 of them to be exact have chosen C, which is the correct response. She switches the projector from document camera view to computer screen projection so her students can see the graph. To identify which answer is correct, she selects C on the graph, causing the bar for answer C to turn green. Now Mrs. Rosario has valuable information. She can see that about two-thirds of her students got the answer right, which means that about one-third of her students still may be confused. Based on how they answered, she knows a little bit about the kinds of misconceptions they might or might not have. If all the wrong answers were clustered together with choice A, meaning the students multiplied the two numbers in the problem rather than using division, she would know that she needed to review how to determine which operation to use. In this case, since only one student chose answer A, this helps her to know how to model the solving of this problem. 75

78 Getting the Most out of NEO 2 She picks up a dry erase marker and walks through the calculations involved in solving the problem on the board. She uses the think-aloud method, explaining her reasoning aloud as she completes each step. First, she divides the 90 brownies into groups of 4. Since 90 divided by 4 is 22.5, the class can make 22 packages of brownies. Because there is a remainder, she knows there will still be some brownies left over, but not enough to make another package. Therefore, the number of ribbons needed is 22, or answer choice C. Using the 2Know! Toolbar this way allows Mrs. Rosario to gauge how many of her students are following along as she goes through each problem. Since this is near the beginning of the division word problems unit, she s not too concerned that some of her students got the problem wrong or didn t answer. She plans to do several more problems of this type using the toolbar in a similar way. If several students continue to struggle, she knows she ll need to find out who they are and do some additional instruction with them. No Document Camera? No Problem! You can use an interactive whiteboard or document camera to project problems like Mrs. Rosario does. However, the strategy in this scenario is just as effective with students reading the problem from their textbook. How It Works Working with the 2Know! Toolbar is easy. Once you have installed the software on your computer, simply open the 2Know! Toolbar and it appears on your desktop. Make sure your Renaissance Receiver is connected, and then have your students choose the Responder applet on their NEO 2s and join your network. Now you are ready to begin. When you decide to ask a question, choose one of the question format options by clicking T/F for true/false, ABC for multiple choice, 123 for numeric response, Short Answer for short answer, or Pulse for a quick yes/no poll. Then ask a question and wait for students to enter responses. Click Graph to see a graph of student responses. You can either view the data yourself or project it for the whole class to see. (If you don t want Take the Pulse of the Class The pulse option on the 2Know! Toolbar is designed for quick classroom polls. Students can either press Y for yes or N for no, and their responses show up as either green or red. This allows you to quickly see how everyone feels about a given topic. Gina Fletcher, a fifth-grade teacher in Flower Mound, Texas, uses the pulse feature during classroom debates. For instance, during a social studies lesson on the Revolutionary War, the class was discussing the events leading up to the colonists decision to go to war. One student wondered aloud who was right during this conflict: the colonists or the British. In response to this question, Ms. Fletcher decided on the spot to have a debate. She used the toolbar to take a pulse vote at the beginning of the debate and left it projected for the class to see. At that point, there were just a few students who sided with the British. Then she asked those who had sided with the British to try to convince the other side to change their vote, and vice versa. Students could change their votes at any time and see the results on the toolbar graph. The students got very involved in the discussion, and at the end the vote was almost evenly split. 76
 Use this process at all stages of the instructional cycle to pique interest, activate prior knowledge, and determine the next steps in your teaching.")
79 Assessment and Classroom Engagement your students to be influenced by each other, wait until everyone has responded before projecting the graph.) Use this process at all stages of the instructional cycle to pique interest, activate prior knowledge, and determine the next steps in your teaching. All information collected by the toolbar by design is anonymous. You will know what percentage of your students entered a particular answer, but you will not know which student entered each answer. Remember, this is an instructional advantage with the toolbar. The companion software, AccelTest, does record responses. You will learn later in this chapter when it is appropriate to switch applications. Since the toolbar does not store data, it truly lives in the moment. You ask a question, view responses, and then ask another question. Once you view responses and move on to the next question, all data from your previous question is gone. Don t worry. This is by design as well. The toolbar informs instruction. If your students struggle with a concept, you have all the information you need to know. Adjust your instruction and the students interaction right away. The 2Know! Toolbar floats on top of any application. This means that you can project a spreadsheet application, float the toolbar on top of it, and ask questions about the data on the spreadsheet using the toolbar. You can float the toolbar on top of any application on your computer including no application by simply floating it on top of your desktop. You create all content for the 2Know! Toolbar. This includes: Verbal questions you ask Images you show Multimedia presentations you display Websites you visit Videos you show 2Know! Toolbar floating on an Excel spreadsheet You are in charge of the toolbar. This means you can use it without restraint. There is no need to pause instruction while you launch additional software and navigate to find a question or resource. Gather Information Strategically The 2Know! Toolbar makes it easy for you to increase interactivity throughout your instruction, yet it s important to be strategic about how you gather information. This means asking the right questions at the right time so you are tapping into what students know and what they need to know all while keeping them engaged. Below are some guidelines to follow. Gauge Prior Knowledge with Range-Finding Questions Brain-based instruction stresses the power of prior knowledge, or schema. What this means is that the brain seeks to connect new information with previously 77
80 Getting the Most out of NEO 2 gained understandings. Learning, in part, is the interaction between short-term memory, which works with new information, and long-term memory, which is your storehouse of previously gained understandings (Willingham, 2009). The best way to gauge prior knowledge is to use range-finding questions (Leahy et al., 2005). A range-finding question is designed to identify the span or range of knowledge among a group of students. The 2Know! Toolbar is ideal for range-finding questions. At the beginning of a unit, you can use data from these questions to gauge students prior knowledge. For example, as you open a unit on the American Civil War, connect the Renaissance Receiver and launch the 2Know! Toolbar. Choose numeric response, and ask students, In what year did the American Civil War begin? When all students have responded, click Graph. If students responses are reasonable somewhere around 1861 begin the unit. If students responses indicate some confusion, such as 1776 or 1918, use some schema-building activities, such as designing a basic time line, reading letters from soldiers, or other activities. Check for Understanding with Hinge-Point Questions Once your lesson is underway, use hinge-point questions at key points during the instruction to check for understanding (Leahy et al., 2005). If students understand, the hinge swings the instructional door open to the next phase of teaching and learning. If students do not understand specific concepts, the hinge keeps the instructional door right where it is so you can intervene and engage in corrective instruction. Say your class is well into the unit on the Civil War and has learned about some of the major factors leading up to the conflict. At this point, perhaps you want to check their understanding of the abolition movement or the economic and social differences between the North and the South before moving on to the issue of states versus federal rights. To do so, pause and ask a few multiple-choice or true/false questions before moving ahead. The 2Know! Toolbar gives you instant feedback about these hinge-point questions. Click Graph and you know whether your class is ready to move on. If some students answer correctly but a good portion of the class still hasn t mastered the concept, you may wish to include peer instruction, or a convince your neighbors approach at these pivotal points. Eric Mazur (1997) set forth a research-based approach to asking questions to inform instruction and the use of peer instruction. As you analyze the 2Know! Toolbar graph, consider these guidelines: a. If 80 percent or more of the students answer correctly, identify the correct response. b. If 50 percent to 80 percent of the students answer correctly, allow time for peer instruction. Then ask again. c. If fewer than 50 percent answer correctly, begin corrective instruction. d. To check the effectiveness of your corrective instruction, ask additional questions. 78

81 Assessment and Classroom Engagement Have Students Make Predictions Asking your students to make predictions about what will happen next is an effective instructional strategy for ensuring that they stay actively engaged in the material. Use NEO 2 and the 2Know! Toolbar to gather your students predictions across all content areas. For example: In science, have students predict the outcome as you conduct experiments. In English language arts, pause during read-alouds to predict ahead. In math, ask students to estimate or ball-park the answer. After they make a prediction, students have a stake in finding out how the science experiment, book chapter, or math problem will turn out. They are more likely to want to stay tuned to see if their predictions pan out and, therefore, are more engaged. In addition, the process of collecting students predictions can also help you gauge how well they grasp the material up to that point. If you are going over a math word problem and half the class wrongly predicts that the answer will be in the hundreds rather than the thousands, you know that there might be a fundamental misunderstanding of the concepts involved. This helps guide your instruction right in the middle of a lesson. Engage Students with Other Resources and Technologies Because the toolbar floats, you can run it on top of any application including websites and online videos. When working with video, pause to ask questions at key points. Click Graph and discuss answers. Clarify misconceptions and return to the video. OPTIONS Check for Understanding at the End of the Day During the course of a lesson, you often cover a lot of material, yet there are a few main points it s essential that your students take away at the end. When concluding a lesson, use the toolbar as a quick check to make sure students have retained key facts or concepts. For instance, when working with vocabulary in a language arts class, quiz students on the vocabulary words you know to be most difficult as a way to reinforce them. In a history lesson, ask students to recall important dates. When used this way, the toolbar is just one more tool to bring closure to a segment while helping focus students attention on the most important points you ve covered. 79


82 Getting the Most out of NEO 2 Fifth-grade teacher Ms. Fletcher uses the 2Know! Toolbar to reinforce important concepts and main ideas in literature. For instance, her class is reading Hatchet, which is divided into chapters that are numbered instead of named. After reading each chapter, she has the students get into small groups and come up with a suggestion for what to name the chapter. Then she projects the choices. For instance, after reading Chapter 10, in which the main character is so hungry that he eats some raw turtle eggs he finds on the beach, students come up with the following suggestions: A. Yummy B. Turtle Eggs C. I Want More D. Finding Turtle Eggs E. The Eggs Then students vote with their NEO 2s on what they think the best chapter name would be. This activity keeps them engaged and reinforces the main themes of each chapter. Customize Your Options There are several options to customize the toolbar according to your preferences. For instance, you can assign one NEO 2 to use as a teacher responder. This allows you to navigate the toolbar NEO 2 as teacher responder even when you re away from your computer. If you d like to walk around the room or stand at the front or back of the room while teaching, using a NEO 2 as a teacher responder gives you the mobility you need. To assign a teacher responder, click Options on the toolbar. You can also change the theme of the 2Know! Toolbar, which means you can make it smaller or larger, choose graphite or silver for the background color, and choose whether to include the short answer capability or not. Silver background with short answer Graphite background with no short answer See the appendix for complete instructions for this and all other 2Know! Toolbar tasks. 80
83 Assessment and Classroom Engagement Using AccelTest for Formative and Summative Assessment Once you have learned how to use the 2Know! Toolbar to assess and engage the class as a whole, you may be wondering how you can gather information in such a way that allows you to track, record, and score individual student responses. AccelTest does just that. AccelTest facilitates classroom response while giving you access to specific student data. Since AccelTest collects and saves this data, you can generate a host of reports to guide instruction and promote student achievement. AccelTest also makes it possible for you to automate assessment scoring and export results to an electronic gradebook. As a result, you can use it for both formative and summative assessment. How It Works You can use AccelTest to create, assign, and score many different types of assignments. AccelTest also calculates overall student grades, which are based on the dates you set for the school year and on the grading scale you have chosen. AccelTest is a stand-alone application storing data on your computer s hard drive. The software features two basic types of interactions: teacher-paced sessions and studentpaced sessions. (A session is the time that students using NEO 2 take to complete AccelTest assignments.) As the names suggest, a teacher-paced session is one in which the teacher controls when questions are asked and answered, while a student-paced session involves students entering answers at their own pace. Both teacher- and student-paced sessions offer a variety of ways to monitor student success. You can create score keys to use with existing assignments for instance, quizzes from textbooks or those you have already created or compiled. You can design and create custom assignments to assess students knowledge base. You can also use AccelTest during instruction to track students responses to verbal questions. Later in this chapter, we ll discuss these options in more detail and look at some examples. Once you are comfortable with these uses of the software and are ready to do more, you can explore more advanced features. For example, you can use the built-in content available in the AccelTest libraries. See the appendix for more information. AccelTest also makes it easy for you to differentiate instruction. When you add AccelTest assignments to the electronic gradebook, you can add multiple versions of the same assignment and assign each one to specific students. Although all versions of the assignment will be available during the same session, each student sees only the version assigned to him or her. Another feature of AccelTest is that it allows you to import state standards including Common Core State Standards and align AccelTest items to those standards. Using AccelTest with state standards alignment means that you have an effective solution to track student progress toward standards mastery. See the appendix for step-by-step instructions to align AccelTest items to state standards. 81

84 Getting the Most out of NEO 2 Set-up Tasks Before you use AccelTest with NEO 2, there are some set-up functions to complete: Set up the school year Select your preferences Set up your classes, add your students, and enroll them into your classes See the appendix for step-by-step instructions for these set-up tasks. AccelTest Database When you install AccelTest, a database is installed on your computer. The classes you create and the lists of students you enroll into each of those classes are stored in this database. Likewise, each assignment you create, including questions and answers, is stored in this database. As assignments are scored, all student data including assignment grades and reports are added to the database. By default, this database is saved on your computer s hard drive, but you can go to the Preferences menu to move the database to a network drive. Types of Assignments AccelTest provides flexibility so that you can use it across the curriculum and with any content. Assignment questions can be in a variety of formats, including multiple-choice, matching, ranking, true/false, yes/no, essay, short answer, or numeric response. The types of assignments you can use with AccelTest are as follows. Score Existing Assignments To use AccelTest to score assignments you already have, such as end-of-chapter quizzes, state assessment practice questions, or other existing tests, you create a score key for the existing assignments. The assignments aren t in the AccelTest software only the score key is. An AccelTest score key is one of the student-paced interactions, which means students read questions from the existing content and answer them at their own pace using their NEO 2s. The assignments are then scored automatically by the software. This is a simple way to automate scoring for tests that already exist. See the appendix for step-by-step instructions to create AccelTest score keys. Create, Assign, and Score Assignments This option lets you display questions and answer choices on the NEO 2s. To create assignments in AccelTest, you write your own questions and include answers. The students see the questions on the NEO 2s and answer at their own pace. The assignments are then scored automatically by the software. As mentioned earlier, when you create an assignment, you are building a database on your computer. When a student enters an answer on his NEO 2, AccelTest instantly compares that answer with the answer to that item in the database on your computer. An exact match is counted as a correct answer. 82
85 Assessment and Classroom Engagement See the appendix for step-by-step instructions to create an AccelTest assignment. Use Teacher-Paced Sessions for In-Class Assignments AccelTest teacher-paced sessions put you in control of the pace of the assignment and are typically used for in-class assignments. Students log on as usual, but cannot see or respond to a question until you take action. The simplest way to use this type of session is to ask verbal questions. All you do is ask questions; you don t even need to have anything projected. This is ideal for giving spelling tests, reviewing vocabulary, or asking questions that occur to you on the spot. Since you are verbally asking the questions, you control the pace. You can also ask verbal questions in conjunction with printed assignments, such as going over homework in class. Another way to use teacher-paced sessions is to ask questions on a PowerPoint slide and have students respond. Again, you control the pace, since you control the pace of the PowerPoint presentation. (This option is available for Windows computers only.) Once you are comfortable with these kinds of teacher-paced sessions, you may wish to explore other options. The first of these options is to create a projection assignment within AccelTest, which includes tools for incorporating graphs, equations, and images into your assignments. The second option is to ask questions from an existing assignment using a previously created AccelTest. No matter which type of teacher-paced session you use, keep in mind that each session can be graded or ungraded. If you chose to score the assignments, the software will score them automatically, and the scores will appear in your electronic gradebook after the session is complete. During the session, you can see which students have responded to each question and how many have answered the questions correctly. This allows you the flexibility to use AccelTest for formative or summative assessment purposes. See the appendix for step-bystep instructions to create an AccelTest teacher-paced session. A Classroom Example Donna Freedman, a fifth-grade teacher in California, uses AccelTest about three times a week to ask verbal questions in a wide range of subjects including vocabulary, social studies, science, and math. The students enter their answers on the NEO 2, and she can check to see if they understand the material. One way she uses verbal questions is to check math homework. Students come to class with their homework completed on paper with their work shown. Miss Freedman goes through each question one by one, asking the questions verbally, and directing students to enter their homework answer with their NEO 2s. Then she projects or displays the correct answer. If students see that they got the question wrong on their homework, they correct it, showing their rework. As Miss Freedman goes through the homework, she can see on the AccelTest session graph on her computer which students are getting each question right or wrong. If she sees a lot of red Xs, indicating that a lot of students got the problem wrong, she knows that she needs to review or reteach that particular concept, principle, or procedure. On the other hand, if only two students get a question wrong, 83
86 Getting the Most out of NEO 2 she can plan to work with them separately. After going through all of the homework, she collects their papers to check that they have shown their work. Used in this way, AccelTest helps guide her instruction and allows her to review right away before going on to a new lesson. Another way Miss Freedman uses AccelTest is to administer the multiple-choice math test at the end of each chapter. She creates a score key within AccelTest, and the students score this test on their NEO 2s. She makes sure, though, that they do all of their work on paper and finish all the questions before they power up their NEO 2s for scoring, because she doesn t want them to guess. Then, after the test is done, she asks them to make corrections for the questions they got wrong. She staples their work with a letter to the parents once these corrections have been made. Review Student Data You ll want to review student data as part of formative and summative assessment. AccelTest offers three ways to review student data: 1. View data in the Gradebook. AccelTest posts students grades in the Gradebook. Here, you can see individual scores as well as the mean or median score for all students. (You can toggle between mean and median by clicking on the word Mean at the bottom of the Gradebook.) 2. View data graphically. AccelTest uses a simple bar graph to display results. 3. View or print reports. AccelTest reports offer detailed information about each assignment. Here are just a few of the kinds of reports you can view and print: Assignment Analysis offers statistical data as well as item-by-item analysis. Assignment Results generates student-by-student reports with score and student answers. This report can also show corrected answers with the student answers, if you set the preference to do so. Student Record lists all assignments and grades for each student. Group Report lists all students and grades. Standards Report shows state standards mastery. Score keys and AccelTest assignments must be aligned to state standards in order to view this data. See the appendix for step-by-step instructions to review data with AccelTest reports. Integrating NEO Share for Assessment and Engagement In addition to the 2Know! Toolbar and AccelTest, you can also use NEO Share as a formative assessment tool to gather student responses during a lesson. As you learned in Chapter 4, NEO Share is a software program that allows wireless file transfer of text from NEO 2s to your computer. It can be used to make instruction interactive and keep students engaged as well. For example, after a lesson, ask students to summarize what they learned that day or ask them to come up with one question they still have about the material. Collect responses via NEO Share and choose a few of them to spark discussion. Or have students work in small groups and send one response per group. 84

87 Assessment and Classroom Engagement Once you become comfortable using the 2Know! Toolbar, AccelTest, and NEO Share, you can design lessons that integrate all three of these software programs. Below are two examples of lessons that do just that. Scenario 1: What Caused the Titanic to Sink? Ms. Ling has prepared a lesson on the Titanic disaster using the NEO 2 with her interactive whiteboard and various Internet resources. She has also created a favorite folder in NEO Share with all of her materials for easy access. Warm-Up Activity To introduce the subject, Ms. Ling powers on her interactive whiteboard and accesses a quiz available online from the interactive whiteboard vendor. The quiz is a slide presentation with images of the Titanic along with multiple-choice questions asking about when the disaster occurred, where the ship was built, how many people were on board, and how many lifeboats were on board. Ms. Ling uses the 2Know! Toolbar to gauge how much her students know about this maritime disaster. Students enter responses via their NEO 2s and immediately see the graph with results. After collecting student responses wirelessly, Ms. Ling is now ready to give some background about the topic, confident that she is tailoring the lesson to how familiar her students already are with the material. Main Activity Next, Ms. Ling introduces an activity in which students work in groups to either defend or prosecute a different person or group of people for the disaster. For instance, one group of students is assigned the shipbuilders, another the ship s architect, another the ship s captain, and another the captain of the neighboring ship that failed to come to the Titanic s rescue. Each group downloads onto their NEO 2s a different passage explaining what researchers know about the alleged culpability of each person or group of people. (Ms. Ling found these passages at an educational website focusing on historical topics and loaded each passage into her favorites folder in NEO Share.) Students work in their groups to discuss whether they will defend or prosecute the assigned parties. Then they work together to draft a summary of their arguments on their NEO 2s. One student in each group volunteers to be the recorder so there is only one final copy of their argument. When the groups are ready to present their arguments, Ms. Ling allows the students to create an online avatar to deliver their message if they wish. For this, she uses a USB cable to send the text from one student s NEO 2 directly to her computer, where she has accessed a multimedia website that allows users 85
88 Getting the Most out of NEO 2 to create avatars to verbally present written messages. If groups choose not to create an avatar, they can deliver their arguments verbally themselves or send their written arguments via NEO Share to be projected on the whiteboard and read by the whole class. After each group presents, Ms. Ling asks the class to vote via the 2Know! Toolbar s pulse feature on how persuasive their argument was. The voting is also projected on the whiteboard. Wrap-Up Activities Now that the class has learned about the Titanic disaster, Ms. Ling uses AccelTest to give a quiz to wrap up and review what they have learned. She uses some of the same questions from the warm-up activity and includes a few new ones about the alleged responsible parties involved. Since AccelTest collects and scores data linked to each student, Ms. Ling can see how much each student learned by viewing how well each did on the end-of-lesson quiz. Finally, she links this historical disaster to a present-day issue. She found a news article explaining that a newly discovered bacteria is eating the wreck of the ship at the bottom of the Atlantic Ocean. At this rate, if something is not done to preserve the wreck, it will be completely gone in 20 years. She sends the text of this article to her students through NEO Share. After students read the article, she explains that there is a debate about whether items from the wreck should be brought to the surface to be saved and restored. Some argue that since the wreck is the site of a mass grave, it should be left untouched, while others argue for the importance of saving what can be salvaged before it s too late. Using the pulse feature of the 2Know! Toolbar, she takes a class vote and then asks the students to debate the issue. She lists the pro and con arguments on the whiteboard. As a closing exercise, Ms. Ling asks each student to choose a position on the debate, write a paragraph arguing his position, and send it to her via NEO Share. Scenario 2: Ancient Rome across the Curriculum Mr. Romero has planned a sixth-grade social studies unit on ancient Rome. He designed the unit to make many connections across the curriculum. He also used the favorites folder in NEO Share to collect the materials for easy access during class. Warm-Up Activity To introduce the topic and spark his students curiosity, Mr. Romero begins with the 2Know! Toolbar and some simple questions projected on PowerPoint slides: - True/False Romulus and Remus founded Rome. - Short Answer Romulus and Remus were sons of the Roman god. 86

89 Assessment and Classroom Engagement - Multiple Choice - Multiple Choice - Short Answer The ancient Roman Baths can be compared to today s: A. Shopping malls B. Fitness clubs C. Resorts D. Water parks Rhea Silvia was: A. The river that runs through Rome B. Romulus and Remus mother C. The courtyard outside the largest Roman bath D. The lone senator who opposed the assassination of Julius Caesar When a gladiator fell in the Coliseum, the crowd would signal the emperor with either a thumbsup or thumbsdown signal. The emperor would consider the crowd s choice and then decide. Which signal spared the gladiator s life? Enter either up or down. Mr. Romero projects the graph for each question, letting students see how others answered. But he doesn t reveal the correct answers just yet. Now the students are primed for a reading passage, which Mr. Romero sends via NEO Share. The passage is from an educational website, and it includes answers to the above questions. It explains the story of how Rome was founded, describes how the baths were a social and commercial gathering place, and explains the thumbsdown gesture was a signal to lay down the weapon and let the gladiator live. After his students read the passage, Mr. Romero leads a discussion of these points, asking students to find the correct answers within the reading passage. Cross-Curricular Activities The topic of ancient Rome can be approached through the lens of English language arts, science, mathematics, and many other disciplines. Here are a few of the activities Mr. Romero includes: - English Language Arts Mr. Romero uses NEO Share to send the following idioms to his students: Rome wasn t built in a day. When in Rome, do as the Romans do. All roads lead to Rome. Fiddle while Rome burns. 87
90 Getting the Most out of NEO 2 Working in groups, students research the origin of each idiom and explain what each one means. Then Mr. Romero challenges the groups to see who can use the idioms in an authentic situation. For example, when one student says, I wonder when we ll finish this project, another answers, Take your time and do your best. Rome wasn t built in a day. Next, Mr. Romero asks students to list other idioms and research their meanings. Then they create a database of idioms citing which ones are historical, such as the Roman idioms, or which ones refer to natural events such as once in a blue moon. - Science In this lesson, students research the formula used to make roads in ancient Rome. Then they compare that process with concrete production today, making a note of any differences. Using the 2Know! Toolbar, Mr. Romero asks his students to make predictions before beginning the research. He uses the pulse feature of the toolbar to ask the following questions: 1. Do you think that the processes used today are identical to the processes used in ancient Rome? 2. Do you think that most ingredients used today are the same as the ingredients used in ancient Rome? Then he leads a short discussion about why his students answered the way they did and what kinds of similarities or differences they expect to see. By the time they finish their research, the students are surprised to discover there are few differences between the ancient process and that of today. - Mathematics Next, students work on developing simple equations using only Roman numerals, and beam them to other students to complete. This lesson reinforces place value by giving students a chance to work with Roman numerals, which do not use place value. IX x IX = LXXXI [9 x 9 = 81] LXIII L = XIII [63 50 = 13] C / XXV = IV [100 / 25 = 4] 88

91 Assessment and Classroom Engagement - Vocabulary Using NEO Share, Mr. Romero searched for an appropriate vocabulary strategy from the Write On! series. He decides to adapt and use the ABC Graffiti strategy, in which students keep an ongoing record of key terms and phrases related to ancient Rome. Wrap-up Activity To monitor his students progress, Mr. Romero creates his own AccelTest assignment. He includes questions about all of the various things they ve learned about ancient Rome. He also aligns AccelTest items to his state s standards when possible. How to Design Integrated Units of Study Use the checklist below as a framework for designing your own integrated units of study. 1. Find your passion. Review your curriculum. Select a unit of study that fuels your passion to learn and has the potential to meet the instructional goals for the unit. Your students will imitate your passion. Curiosity is the first step to learning. 2. Collect your resources. Begin with resources on hand. Review vocabulary strategies in the Write On! lessons to develop vocabulary concepts introduced in textbooks. Review AccelTest libraries for built-in content to support your integrated unit of study. Locate resources included with your interactive whiteboard, if applicable. Access online content. Build favorite folders in NEO Share. 3. Design your unit s structure. Decide on the order in which to present information and do activities. Design the flow of the lessons. 4. Gauge prior knowledge. Use the 2Know! Toolbar to gauge students prior knowledge. Use data to move forward with the unit or take time to build schema. 5. Build cross-curricular interactions. Browse Write On! to find appropriate resources for your integrated unit of study. Remember to use the Find feature in the Write On! teacher supplements to support your search for resources. Build in multiple ways to write across the curriculum. Browse the Teach with It Now (TWIN) ideas at the Renaissance Training Center. Explore TWIN-Discussion Web Strategy, TWIN-Guided Reading Procedure, and others for writing across the curriculum ideas. Use AR BookFinder to build a classroom library for your unit. 6. Engage learners. Use the 2Know! Toolbar during instruction to engage all learners and gauge developing understandings. Use NEO Share during instruction to collect students ideas and writing. 7. Monitor individual progress. Use AccelTest to monitor students progress throughout the unit. Use AccelTest teacher-paced sessions for review. Use AccelTest assignments aligned to state standards to measure progress. 89
92 Getting the Most out of NEO 2 Other Assessment Tools Accelerated Reader, Accelerated Math, and MathFacts in a Flash with NEO 2s are powerful ways of gathering formative assessment data as well. Whether in reading or in math, this data helps both you and your students gauge their learning through immediate feedback. Read more about how to use NEO 2 with these programs in the next chapter. Summary Assessment and Classroom Engagement The 2Know! Toolbar is an anonymous, in-the-moment classroom response software program. Use it with NEO 2 for formative assessment and classroom engagement. - Gather information strategically by asking questions to gauge prior knowledge, check for understanding, have students make predictions, engage students with other resources and technology, and check for understanding at the end of the day. - You can customize your options, including using one NEO 2 as a teacher responder for greater mobility around the classroom. AccelTest is a software program that can be used for both formative and summative assessment. It gathers student data, saves it in a database, and automatically scores assignments. - Set-up tasks for AccelTest include creating classes, adding students, and enrolling them into your classes. - There are many types of assignments you can use with AccelTest. For example, you can score existing assignments, create new ones, ask verbal questions, and use it with PowerPoint presentations. - AccelTest offers several ways to review student data. You can use NEO Share with the 2Know! Toolbar and AccelTest to create integrated units of study. Several classroom scenarios illustrate how. Other Renaissance Learning software programs offer further options for formative assessment. 90

93 y Using NEO 2 with Renaissance Learning Reading and Math Programs If you are a Renaissance Place customer, your students can use NEO 2 to take Accelerated Reader quizzes, score Accelerated Math assignments, or develop computational fluency with MathFacts in a Flash. By providing an alternative means to submit student data, NEO 2 helps support best practices and increases access to these programs. In addition, regardless of whether you are a Renaissance Place customer, MathFacts in a Flash Offline on NEO 2 supplements and extends opportunities for students to practice math facts anywhere, anytime. In this chapter, you ll learn about the steps you need to take to connect the NEO 2s to your Renaissance Place programs and how NEO 2 works with each of them. Finally, we conclude with some tips to keep in mind as you plan how to use these programs within your classroom. Along with the advice given in this chapter, best practices for Accelerated Reader, Accelerated Math, and MathFacts in a Flash remain the cornerstone of an effective implementation. For more detailed information about these best practices, visit the Renaissance Training Center online and search by product, or refer to the teacher s guide for that specific product: Getting Results with Accelerated Reader, Getting Results with Accelerated Math, or Getting Results with MathFacts in a Flash. Throughout this chapter, we provide brief product overviews of each of the programs for your reference. Set up for Renaissance Place Connectivity NEO 2 communicates with Renaissance Place through the Renaissance Receiver, which is connected to your computer. Before you begin, you need to configure the Renaissance Wireless Server Utility, if you haven t already done so. See the appendix for step-by-step instructions. You also need to have Internet access on your computer so that data can be sent to Renaissance Place. 91
94 Getting the Most out of NEO 2 Accelerated Reader Accelerated Reader fosters reading growth by facilitating individualized practice. Students select books appropriate to their interests and reading level. After finishing a book, they take an Accelerated Reader quiz. NEO 2 makes it possible for students to take quizzes quickly, thus ensuring quiz scores reflect comprehension rather than memory. (For more information about Accelerated Reader, see the Product Overview on page 94.) To take Accelerated Reader quizzes on the NEO 2, students use the Accelerated Reader applet, log in with their Accelerated Reader user name and password, search for a quiz by quiz number, and take the quiz. Just like a quiz on a computer, a quiz on the NEO 2 includes questions and four answer choices that show up on the NEO 2 screen. NEO 2 allows students to scroll down to view all the answer choices. To answer the questions, students select A, B, C, or D. Upon completing the quiz, a TOPS Report is sent wirelessly to the printer via the Renaissance Receiver, providing immediate feedback on how the student did. Students can take quizzes on both computers and their NEO 2s because results are combined into one database. For a reproducible poster with simple instructions on how to quiz with NEO 2, see the appendix. While students are quizzing, your computer must access the Internet; however, you do not need to launch any software or connect to your Renaissance Place website. You may continue to work on other applications on your computer while students take Accelerated Reader quizzes on NEO 2. Finding Quizzes by Number We recommend that, when taking an AR quiz on the NEO 2, students search by quiz number to guarantee that they take the quiz designed for each book. This number should be easy to find because books must be labeled with difficulty, point value, and quiz number. (If for some reason the quiz number is not on the label, you and your students can use AR BookFinder at arbookfind.com to search for that information.) Students should also keep track of their daily reading progress with a Student Reading Log. These logs can be printed from the Accelerated Reader software in Renaissance Place (located in the Resources section, under Forms and Charts). After students select their books, they fill out their logs and start reading. When they are finished reading, they have the information they need to take the quiz. 92
95 Using NEO 2 with Renaissance Learning Reading and Math Programs Students can take three types of AR quizzes on NEO 2: Reading Practice Quizzes, Vocabulary Practice Quizzes, and Other Reading Quizzes. (Literacy Skills Quizzes are not available to take with the NEO 2 Accelerated Reader applet. However, a select set of literacy skills activities have been formatted to work with NEO 2s through Write On! lessons. See Chapter 4 for more information.) Quizzes can be taken on books read to, read with, or read independently by students. Make sure students read and quiz in the same way. For example, if a book is read to students, the quiz must be read to them as well. In primary-grade classrooms, you may want to enlist parent volunteers or upper-grade students to read books and quizzes to students. Recorded Voice Quizzes, which feature a recorded narrator who reads quiz questions and answer choices as they appear onscreen, are available for certain quizzes on the computer but not with NEO 2s. Instead, have the volunteer or older student help emergent readers take AR quizzes on NEO 2 by reading the quiz questions and answer choices aloud and helping students enter responses. To help you monitor the reading practice of Spanish-speaking students, Accelerated Reader quizzes are also available for more than 8,000 best-selling books published in Spanish. If a student reads a book in English, she takes the English-language quiz. If she reads it in Spanish, she takes the Spanish-language quiz. Spanish quizzes are available on the NEO 2 just as they are on the computer, and the process for taking the quiz is the same as for an English quiz. Students simply enter the quiz number and begin the quiz. Since NEO 2s are portable, it s a good idea to think about the ways they may change how and when students quiz. Will your students take AR quizzes directly from their desks? Or will you have several NEO 2s set up at an AR center where students can take quizzes without any distractions? In either case, make sure you follow the best practice of checking in with students before and after they take an AR quiz. This ensures that you know who is ready to quiz and allows you to monitor results. It may help to implement a procedure or routine to ensure that students meet with you at these critical points. 93
96 Getting the Most out of NEO 2 Product Overview: Accelerated Reader The Purpose of Accelerated Reader: Powerful Practice Reading is a skill and, as with every skill, it requires not just instruction but practice. Reading practice serves a number of purposes. It enables students to apply the skills and strategies that you teach. It gives you opportunities to check student learning and identify weaknesses. And it draws students into the world of real reading a world in which people learn from and enjoy books. Practice does not automatically lead to growth, however. To be effective, practice must have certain attributes: it must be at the right level of difficulty, cover a sufficient amount of time, be guided by the instructor, and be enjoyable enough to sustain. The purpose of Accelerated Reader is to enable powerful practice. It does this by - providing data that helps you monitor and personalize reading practice. - encouraging substantial amounts of practice, according to guidelines based on research findings. - making practice fun for students by facilitating successful encounters with text. How Accelerated Reader Works Accelerated Reader is a software program that enables differentiated, data-driven reading practice. It includes more than 140,000 quizzes that accurately assess reading comprehension. At the heart of Accelerated Reader are a few basic steps: 1. Students read a book. Teachers schedule time for daily reading practice, additional to their instructional reading period. During this time, students select and read library books that match their individual ability levels and interests. 2. Students take a quiz. When a student finishes a book, he or she takes an AR Reading Practice Quiz on the NEO 2 or computer. This quiz assesses general comprehension of the book just read. 3. Teachers get immediate feedback. Accelerated Reader scores the quiz, keeps track of the results, and generates reports. Teachers use this data to monitor each student s practice, guide students to appropriate books, and target instruction. Types of Quizzes Accelerated Reader includes the following types of quizzes. - Reading Practice Quizzes assess basic comprehension on books students select for reading practice. These quizzes consist of five, 10, or 20 multiple-choice questions, depending on the length and complexity of the book. This is the most common type of AR quiz. - Vocabulary Practice Quizzes test student knowledge of key vocabulary words in books students choose for independent reading. - Other Reading Quizzes check comprehension of reading the teacher assigns in specific textbook series. - Literacy Skills Quizzes assess student proficiency with higher-level reading skills. All of the above quiz types can be done on a NEO 2 or computer except for Literacy Skills Quizzes, which can only be done on a computer. 94
97 Using NEO 2 with Renaissance Learning Reading and Math Programs Accelerated Math Accelerated Math distributes personalized practice assignments based on student performance, scores student work automatically, and provides results immediately. For more information about Accelerated Math, see the Product Overview on page 96. Before you begin, make sure you ve installed the Renaissance Responder scoring software from your Renaissance Place site. (See the appendix for step-by-step instructions.) To use NEO 2s with Accelerated Math, select objectives and print assignments as usual. Open the Renaissance Responder scoring software on your computer. Distribute assignments and allow time for students to complete their work. Students work through problems on paper and then use NEO 2 to score their assignments. NEO 2 is used as an input device with Accelerated Math. When students are ready to score their work, they select the Responder applet, connect to your network, enter the form number from the assignment, input their answers, and submit them. The TOPS Report and next assignment (if there is one) print automatically to your default printer if these options are enabled. Accelerated Math Works Differently If you use the NEO 2s for both Accelerated Math and Accelerated Reader, you may notice that scoring Accelerated Math assignments works a little differently than taking Accelerated Reader quizzes. When your students use NEO 2s for Accelerated Reader, they choose an applet dedicated to Accelerated Reader. However, when using NEO 2s for Accelerated Math, there is no applet dedicated to Accelerated Math. Instead, students use the Responder applet to score Accelerated Math assignments. Another key difference is what the teacher does. To score Accelerated Math assignments, you must have the Renaissance Responder scoring software open and running on your computer. In contrast, you do not need to have any software running on your computer to use Accelerated Reader on NEO 2. Be sure to consider classroom management procedures when using NEO 2s with Accelerated Math. Will one NEO 2 sit on each student s desk? Or will you have a designated location, such as a scoring center, with several NEO 2s available? Make sure to establish a clear classroom routine for scoring, which may include having students check in with you before scoring (to see that they ve shown their work) and after scoring (so you know how to help with the next step). 95
98 Getting the Most out of NEO 2 Product Overview: Accelerated Math How Accelerated Math Works Accelerated Math software personalizes student math practice and helps teachers generate assignments, monitor progress, and motivate students to succeed. Teachers use progressmonitoring information provided by Accelerated Math to do what they do best provide individualized, differentiated instruction to each student. Content Accelerated Math organizes its content into libraries of objectives, and each objective describes a specific mathematical task. Accelerated Math s Second-Edition Libraries include Early Numeracy, grades 1 through 8, Algebra 1, Geometry, and Financial Literacy and incorporate identification of core objectives, learning progressions, and prerequisite skills to help teachers plan and remediate instruction. (If you are an Accelerated Math Enterprise customer, you also have access to libraries for Algebra 2, Pre-Calculus, Calculus, Basic Math, and Probability & Statistics.) The libraries are based, in part, on National Mathematics Advisory Panel (NMAP) recommendations, National Council of Teachers of Mathematics (NCTM) Curriculum Focal Points, analysis of U.S. state and international standards, experienced Accelerated Math teacher feedback, student achievement data, and consultation with recognized mathematicians. Assignment Types Accelerated Math has four assignment types: - Diagnostic tests include any objectives specified by the teacher. Teachers can use diagnostic tests to place incoming students, find critical skill gaps, and allow students to master objectives directly when they demonstrate previous knowledge of them. - Practices include objectives assigned by the teacher, objectives that are ready to work (via the student not meeting success on another assignment type), or objectives that are ready to be reviewed. Practices are designed to give students an opportunity to practice or review math concepts that have been previously taught or mastered. - Regular tests include objectives that a student has practiced successfully, and allow the student to demonstrate mastery of those objectives. - Exercises include any objectives specified by the teacher, can have identical or individual problems (if printed for more than one student for the same objectives), and are designed to provide more practice on specific objectives after corrective instruction. Accelerated Math assignments are individually generated and printed for each student. After students work assignments on paper, they submit their responses using a NEO 2 (or other scoring device, such as a Renaissance Responder or AccelScan scanner). The software automatically scores the assignment and provides immediate feedback via informative reports for teacher and student. If scoring a practice assignment, the software will automatically generate and print a next practice assignment for the student, based on student performance and objectives available for practice. How Students Master Objectives Students follow various pathways for mastering objectives while using Accelerated Math. Upon completion of assignments, students continue on a path based on whether they were successful or not with the objectives on the assignments. If a student is repeatedly unsuccessful with an objective, the teacher receives a notification to intervene (both on reports printed from the program and in the software s Assignment Book). Following teacher intervention, the student makes another attempt to master, or practice and then master, the objective. Once an objective is mastered, it appears as a review objective on practice assignments after two weeks. If the student is unsuccessful with an objective upon review, its status changes to intervene and the student works with the objective again. If successful upon review, the objective becomes reviewed and the student doesn t receive any more work on it. 96
99 Using NEO 2 with Renaissance Learning Reading and Math Programs MathFacts in a Flash (Renaissance Place and Offline) MathFacts in a Flash helps students develop math fact fluency and automaticity. When students have command of their math facts, they are free to focus on higher-level problem-solving skills. For more information, see the Product Overview on page 98. There are two MathFacts in a Flash applets on the NEO 2: MathFacts in a Flash RP, and MathFacts in a Flash (offline). The MathFacts in a Flash RP applet connects to Renaissance Place and functions the same as if a student were using a classroom computer. The MathFacts in a Flash (offline) applet is not connected to Renaissance Place. Instead, it is intended to provide students with additional practice on math facts anytime, anywhere. Both the Renaissance Place and offline versions on NEO 2 support best practices because they allow students to practice for 10 to 15 minutes daily without having to wait for computer access. 97
100 Getting the Most out of NEO 2 Product Overview: MathFacts in a Flash How MathFacts in a Flash (Renaissance Place) Works MathFacts in a Flash provides students at all levels with personalized practice of addition, subtraction, multiplication, and division facts, as well as other math skills, including finding squares, working with fractions and decimals, and converting between fractions, decimals, and percentages. Timed tests at appropriate skill levels accurately measure students practice and mastery, with feedback provided both onscreen and via a variety of detailed reports. Feedback motivates students and helps teachers inform instruction and monitor student progress throughout the year. Students can work in the program either in English or Spanish. MathFacts in a Flash supports sufficient and appropriate practice by doing the following: - Providing targeted/personalized practice on math facts - Giving immediate feedback - Enabling customizable time goals for test sessions By providing the means for effective practice targeted, timed, and with immediate feedback MathFacts in a Flash can help students develop the automaticity with math facts that will form the foundation for success throughout their mathematics careers. MathFacts in a Flash also provides the means to assess for this automaticity and track the results. In general, implementing MathFacts in a Flash involves a few basic steps. 1. Teachers instruct. If students attempt to memorize facts too early, without adequate concept development, they may become frustrated, discouraged, and disenchanted with the process. To avoid this, teachers guide concept development so students know the meaning of facts before attempting to memorize them. For example, students should understand that 3 4 means three groups of four or before committing its product of 12 to memory. 2. Students take a baseline test. Students complete a 40-item timed test on the NEO 2, Renaissance Responder, or computer for each new math level. Immediate onscreen feedback provides time and accuracy data and shows any missed facts. If students answer all 40 items correctly within the time limit, they automatically move on to the next level. This allows every student to work at an individualized level and pace. 3. Students practice. Students can practice before taking a baseline test if they practice outside of the software via MathFacts in a Flash Offline on NEO 2 (or Renaissance Responders), Renaissance Home Connect, or MathFacts in a Flash worksheets and flash cards. (They must use the software at least once at school before they can practice in Renaissance Home Connect.) The practice sessions include a minimum of 20 items, and provide immediate corrective feedback to students. If practicing in the software, students also receive a printed TOPS Report that lists fraction and percent correct along with the specific items missed. 4. Students take timed tests to demonstrate mastery. Once students have successfully practiced a level, they take a timed test on a NEO 2, Renaissance Responder, or school computer to demonstrate mastery. To master a level, they must correctly answer, by default, 40 problems in two minutes or less. This rate of response helps students move away from using strategies for figuring out or deriving answers and into automaticity. At the end of the test, students get onscreen corrective feedback showing the problems they missed, the correct answers, and the time it took to complete the test. If students master a level, they can attempt a lower time goal on the same level or move on to the next one. 5. Teachers monitor progress. Both the Assignment Book in the software and certain key reports help teachers monitor progress of MathFacts in a Flash practice. Students can also monitor their own progress by recording time and accuracy data for each level, as well as tracking their total number of mastered levels. 98
101 Using NEO 2 with Renaissance Learning Reading and Math Programs MathFacts in a Flash Renaissance Place To use MathFacts in a Flash Renaissance Place on the NEO 2, follow best practices as usual, assigning levels, setting preferences, and monitoring practice. You also need to have the Renaissance Receiver connected to your computer. That s really all you do. Once the Renaissance Wireless Network is configured, it runs in the background as long as your computer is powered on and has access to the Internet. Your students use the program on their NEO 2s by selecting the MathFacts in a Flash RP applet, logging in with their MathFacts in a Flash user name and password, and entering their answers into the NEO 2. Data is sent to Renaissance Place in real time as students work. Students input their answers either by pressing arrow keys or typing the correct answer, based on teacher preference. By default, students press the arrow keys to move the cursor to the correct answer and then press the enter key. You may change the question type from multiple choice to free response at your Renaissance Place site. MathFacts in a Flash Offline MathFacts in a Flash Offline on NEO 2 is like having access to electronic math flash cards. It provides anytime, anywhere practice and testing so that students develop computational fluency and automaticity. This means they can work at home, on the bus, in the library anywhere their NEO 2 can go. Students have access to all MathFacts in a Flash levels. The offline version is not intended as a replacement for MathFacts in a Flash Renaissance Place; instead, think of it as a supplement to the Renaissance Place version. Having multiple ways to practice math facts helps students work toward automaticity. Struggling students especially can benefit from the opportunity to do a trial run with a test on a given level before testing for mastery in Renaissance Place. You do not have to be a Renaissance Place customer to use the offline applet. Students can use MathFacts in a Flash Offline even if their school or district does not subscribe to Renaissance Place. However, keep in mind that with MathFacts in a Flash Offline, neither practice nor tests count toward mastery. It s purely intended as a practice tool, much like flash cards or worksheets. 99
102 Getting the Most out of NEO 2 If it s important to you to track the practice that students do with MathFacts in a Flash Offline, have students fill out a tracking sheet as they work. (One example, called the MathFacts in a Flash All-Level Mastery Tracker, can be found as a reproducible form in the appendix of Getting Results with MathFacts in a Flash, available as a free download at the Renaissance Training Center online.) There is also a way to send unmanaged practice data from the offline version to Renaissance Place. (See the NEO 2 Quick Guide, available at the Renaissance Training Center, for instructions.) Keep in mind, though, that this data represents limited information, so if you need to track a full and complete set of data, we recommend using Math Facts in a Flash Renaissance Place instead. Getting Results with MathFacts in a Flash HELP STUDENTS DEVELOP AUTOMATICITY WITH MATH FACTS How It Works Students do not log into MathFacts in a Flash Offline. They just pick up a NEO 2, choose the MathFacts in a Flash (offline) applet, and start practicing, either working in a practice or a test at any of the levels. Practices allow students to practice their facts, and tests allow them to test their developing math fluency. In MathFacts in a Flash Offline, the only answer input format is pressing arrow keys. While students practice, MathFacts in a Flash Offline catches errors immediately and provides instant feedback on each item. If a student chooses an incorrect response during a practice, a large X appears over the incorrect answer and a box appears around the correct response. Then the program gives the student another chance to choose the correct response before moving on to the next question. When students test for automaticity, they do not get feedback until the end. They work under a time limit in which the goal is to recall 40 math facts within two minutes with 100 percent accuracy. You may wish to set up a learning center in your classroom with manipulatives for numeracy development and one or more NEO 2s for practice on automatic recall of math facts. Since students do not log into MathFacts in a Flash Offline, they can practice on any NEO 2. One school takes advantage of the time before school for additional practice on math facts. A number of students routinely arrive at school early and wait in the library or cafeteria for the school day to begin. Because NEO 2s are available, students can utilize this valuable time for electronic math fact practice. 100
103 Using NEO 2 with Renaissance Learning Reading and Math Programs Teacher Tips If you use learning centers in your classroom, NEO 2s are a great tool to help facilitate multiple activities going on at the same time. For instance, you could have a reading center where students read books and take Accelerated Reader quizzes. At a math center, students could work through and score Accelerated Math assignments. At yet another center, students could practice math facts with MathFacts in a Flash Offline and even test for mastery with MathFacts in a Flash Renaissance Place. You may wish to include additional centers that focus on writing, small-group instruction, keyboarding, or other activities. The NEO 2 is ideal for such centers and can be used with the various other programs described in this guide. There are a few logistical details to keep in mind as you plan how these learning centers will work. It is only possible to use one of the following three software programs at a time: 2Know! Toolbar, AccelTest, and Renaissance Responder scoring software (used to score Accelerated Math assignments). If you have one of these three programs running, students will use the Responder applet to interact with the program. That means that you cannot have other students using the Responder applet to interact with either of the other two programs at the same time. However, you can have students taking Accelerated Reader quizzes, printing wirelessly, beaming, keyboarding, using NEO Share, or working on MathFacts in a Flash (Offline or Renaissance Place) at the same time. The following table details what you can do in your classroom at the same time: Choose one of the following: (These use the Responder applet) 2Know! Toolbar AccelTest Renaissance Responder scoring software (used to score Accelerated Math) And any or all of the following: (These do not use the Responder applet) Accelerated Reader MathFacts in a Flash Wireless printing NEO Share KeyWords The visual on the next page illustrates one possible scenario. 101
104 Getting the Most out of NEO 2 Writing or vocabulary partner activity involving beaming Wireless Printing KeyWords Center Teacher doing corrective/small group instruction with 2Know! Toolbar or AccelTest, or students working in Accelerated Math Teacher Interactive Whiteboard Teacher s Desk Accelerated Reader Center Comfortable chairs provide a place for reading. NEO 2 quizzing stations include dividers for privacy. MathFacts in a Flash Center This illustration shows some of the activities that might be underway at the same time. 102
105 Using NEO 2 with Renaissance Learning Reading and Math Programs Summary Using NEO 2 with Renaissance Learning Reading and Math Programs If you are a Renaissance Place customer, your students can use NEO 2 to take Accelerated Reader quizzes, score Accelerated Math assignments, and practice and test for mastery in MathFacts in a Flash. Regardless of whether you are a Renaissance Place customer, your students can use the MathFacts in a Flash (offline) applet on NEO 2 for anytime, anywhere practice on automaticity with math facts. To set up for Renaissance Place connectivity, connect the Renaissance Receiver to a computer with Internet access and configure your Renaissance Wireless Server Utility. To take Accelerated Reader quizzes on NEO 2, students use the Accelerated Reader applet, log in, and search by quiz number. To score Accelerated Math assignments with NEO 2, have the Renaissance Responder scoring software open and running on your computer. Students use the Responder applet and enter the form number from the assignment. To work in MathFacts in a Flash Renaissance Place on NEO 2, students use the MathFacts in a Flash RP applet, log in, and data is sent to Renaissance Place in real time. MathFacts in a Flash Offline on NEO 2 is like having access to electronic flashcards. Using the MathFacts in a Flash (offline) applet, students can practice math facts at any time. They do not log in to the software. You can use NEO 2s for various purposes at learning centers in your classroom. However, keep in mind that some functions cannot be done at the same time. 103
106 u Third-Party Software and Technology Partners As we ve seen in previous chapters, the NEO 2 can function as a hub, connecting many other technologies in the classroom. To extend this capacity even further, Renaissance Learning has partnered with a number of third-party companies, including Google Docs, Vantage Learning, Study Island, Ignite! Learning, and Don Johnston, Inc. These partnerships bring even more quality content and tools to the NEO 2, giving you acrossthe-curriculum support in instruction, practice, and assessment. Using NEO 2s with third-party technology partners has many of the same advantages as with other applications. For instance, when you integrate online resources into your teaching using NEO Share or the 2Know! Toolbar, NEO 2s allow you to retain control over what your students access and when. This enables you to bring in the power of the Internet while keeping your students focused on the task at hand. Similarly, using the NEO 2 as a hub for third-party software and technology partner content has the advantage of exposing students to powerful tools without the distractions they might find on a computer. It also makes it possible for students to use the programs without having to wait their turn at a classroom computer or computer lab. In this chapter, you ll learn about how to use NEO 2 with third-party software and technology partners. NEO 2 interfaces with most partners in one of two ways: through wireless file transfer or through the Responder applet. This chapter offers some stepby-step instruction for both types of partners, including a couple of examples of each kind. We also look at one exception to these two categories, word prediction software Co:Writer by Don Johnston, Inc., which works through its own applet that is available for separate purchase. The information in this chapter is just a starting place. Some third-party technology partners require a subscription or additional set-up tasks. Please check renlearn.com/neo/neo2/partners.aspx for the most up-to-date information, including links to each of the partners own websites, where you can learn more about the individual programs. Wireless File Transfer Partners With wireless file transfer partners, students send and receive documents wirelessly to and from the third-party program. The main key commands they ll use to do this are cmd-o to download and open a file and cmd-send to send a file. The NEO 2 sends documents wirelessly through the Renaissance Receiver connected to your computer. Partners of this type include Google Docs and MY Access! by Vantage Learning. NEO 2 and Google Docs Google Docs is a document, spreadsheet, and presentation program. It allows online word processing, online document storage, easy creation and distribution of writing assignments, online collaboration, and publishing to a website or blog. Students can 104
107 Third-Party Software and Technology Partners send documents back and forth wirelessly between NEO 2 and the Google Docs website. They can also save their NEO 2 work and continue working on it from a different NEO 2 or any other web-enabled computer. This encourages collaboration and increases writing practice, while avoiding computer lab bottlenecks. As the teacher, you can use Google Docs to distribute writing assignments to students. Here s how it works: You log onto your Google Docs account and prepare writing prompts and other assignments for students to download. Make sure you have your Renaissance Receiver connected to your computer. Then your students power on NEO 2 and open a clean file space. They press cmd-o to download a file, join your network, and select Google Docs. They enter your Google Docs log-in information. When they are ready to upload writing, they press cmd-send. It s up to each school or district to decide how to set up Google Docs accounts. Some schools allow students to set up individual Google Docs accounts, while others create one account per classroom or teacher. Please note that NEO 2 works only with the word processing application at Google Docs. NEO 2 does not interface with Google Docs spreadsheet and multimedia applications. To learn more about Google Docs, see NEO 2 and MY Access! MY Access! is an online writing assessment program offered by Vantage Learning. If your school has a license to use MY Access!, students can use NEO 2s to submit writing assignments wirelessly for immediate scoring and feedback. (For more information about MY Access!, visit the Vantage Learning website at Before using the program, you ll need to download the NEO 2 for MY Access! plug-in available at (Instructions are in the appendix.) Once installed, the plug-in runs in your computer s background. There s no need to launch any software when students download prompts and submit their writing. To use the program, continue to log onto your MY Access! account to assign prompts, monitor progress, and access reports. Students use NEO 2 to download prompts, write, edit, and submit assignments. Just like with Google Docs, they power on the NEO 2, open a file space, press cmd-o, and join your network. Then they select MY Access! and enter the user name and password. If more than one prompt is assigned, students press the down arrow key to highlight a prompt and press enter. The prompt is downloaded as a linked file, so students press ctrl-l to read the prompt and ctrl-l again to return to the active word processing file and begin writing. (See Chapter 4 for more information about using linked files.) When ready to submit their writing, students press cmd-send. MY Access! reviews the writing and returns feedback. The feedback is designed to give students a quick look at their strengths and areas for growth. This feedback is displayed until a student presses enter. Typically, students review their feedback and press enter to delete it. Remember, this same feedback, with additional editing tools, is available to students when they log on to their MY Access! accounts in the campus computer lab. 105
108 Getting the Most out of NEO 2 Responder Partners As mentioned above, responder partners work with the NEO 2 through the Responder applet. Our responder partners include Study Island, Ignite! Learning, Edugames, and many more. (Again, you can find an up-to-date listing of all partners at renlearn.com/neo/neo2/partners.aspx.) Below we discuss Study Island and Ignite! Learning. NEO 2 and Study Island Study Island is a widely used educational service that provides web-based tools for standards instruction, practice, and assessment. Its online state standards-based learning programs are available both in traditional assessment and interactive game format. You can use NEO 2 with Study Island to gauge prior knowledge at the beginning of a lesson, check for understanding during the lesson, and assess progress at the end of a lesson. (Your school must have a subscription to Study Island; to learn more about this program, please visit There are two ways to use Study Island: Use teacher-led sessions with NEO 2 to engage your students in small-group or whole-class sessions, or use student-paced sessions to allow each student to work at his or her own pace. To use a teacher-led session, project Study Island from your computer and direct students to respond via NEO 2s, using the Responder applet. (You need to have your Renaissance Receiver connected to your computer so students NEO 2s can communicate through it.) To use a student-paced session, print the assignment, distribute it to students, and allow time for them to submit answers. For step-by-step instructions on teacher-led and student-paced sessions, see the QuickStart Guide for Study Island, available for download at the Renaissance Training Center. Most responder partners require some setup so that the partner s software has a way to recognize each NEO 2. With Study Island, you use a Detect Pad ID tool. Check with your software partner to learn how to set up for use with NEO 2. NEO 2 and Ignite! Learning NEO 2 works with Ignite! Torch, a plug and play device that provides access to Ignite! Learning s interactive digital content for middle school students. These materials include more than 3,000 multimedia activities, including music video, animation, and interactive pieces covering math, science, and social studies. More than 18,000 formative assessment items are built into the content, and the materials are designed to current state, local, subject, and grade-level priorities. For more information, see www. ignitelearning.com or The NEO 2 has been fully integrated into the Ignite! Learning software. To use, plug the Torch (a piece of hardware supplied by Ignite! Learning) into your computer s USB drive, open the software, and then instruct your students to join your session. Students power on their NEO 2s, choose the Responder applet, join your session, and get started. You show the multimedia presentation via a projector or interactive whiteboard and students enter their responses to the questions and quizzes via the NEO 2 using the Responder applet. 106


109 Third-Party Software and Technology Partners Co:Writer Applet Co:Writer is a powerful word-prediction software program that helps students with special needs write complete, grammatically correct sentences. The software does this by analyzing sentences, words, and patterns to offer students contextually relevant word choices that are correct in both English grammar and syntax. Because it provides fast access to words and phrases, it helps boost writing confidence and frees students to focus on the content of their writing. To learn more about Co:Writer, including research and case studies showing when to use it with students, see Unlike the other third-party technology partners discussed in this chapter, Co:Writer has its own applet, which is available for separate purchase. If you decide to purchase Co:Writer when purchasing a new NEO 2, the applet comes pre-installed on the NEO 2. If you already own a NEO 2 and decide that you d like to use Co:Writer with it, you can purchase a CD from Don Johnston, Inc. to install the program. (To purchase this CD and for installation instructions, visit Students use Co:Writer with AlphaWord Plus, the NEO 2 word processor. As they type, they see word prediction screens offering a list of suggested words. They can choose from one of the options given or, if the desired word is not listed, continue to enter letters. As the student begins writing a sentence, Co:Writer suggests words that might come next. When students enter a punctuation mark or press the enter key, their writing is copied into an AlphaWord Plus file. They will see an arrow (>) in the lower right corner of the screen. This means Co:Writer is active. To go back to the Co:Writer screen, press any key. Students work in AlphaWord Plus (above) and consult Co:Writer (below) when needed. The arrow at the bottom of the AlphaWord Plus screen indicates that Co:Writer is active. 107
110 Getting the Most out of NEO 2 If students want to write on their own, they simply press the tab key. The arrow at the bottom of the screen becomes an asterisk (*) instead. When they are ready for Co:Writer assistance, they press the tab key again. The asterisk at the bottom of the screen indicates that Co:Writer is not currently active. There are a number of options that allow you to customize Co:Writer for your students needs: You can change the number of guesses from six word choices to one, two, three, four, or five. If you use a word that Co:Writer does not know, such as a name, Co:Writer learns the word and adds it to a collected words dictionary. You can turn off this function or edit this list of collected words. You can view any topic dictionaries you have uploaded. You can use grammar in predicting ahead. You can turn off predicting ahead. These options can be accessed by pressing the home key on the NEO 2 from the Co:Writer word prediction screen. To learn more, visit the Renaissance Training Center online, where you can download QuickStart Guides for Co:Writer on various topics. Summary Third-Party Software and Technology Partners A complete, up-to-date list of NEO 2 third-party software and technology partners can be found at Most third-party technology partners work with NEO 2 in one of two ways: through wireless file transfer or through the Responder applet. With wireless file transfer partners, which include Google Docs and MY Access!, students send and receive documents wirelessly to and from the third-party program. They use key commands to do so. With responder partners, which include Study Island and Ignite! Learning, the NEO 2 functions as a responder. Students use the Responder applet. Word prediction software Co:Writer by Don Johnston, Inc. works through its own applet. Students use it with AlphaWord Plus, the NEO 2 word processor. 108
111 i Supporting All Learners The NEO 2 is built to help you support all learners, and it includes many features to assist students with special needs. The challenges students may face range from motor control issues to visual challenges that require larger text onscreen. In addition, you may teach students with unique learning needs, including English language learners who could benefit from a bilingual lookup feature. You may teach very young learners who are still learning proper keyboarding techniques and have difficulty targeting the right keys. Or you may simply wish to differentiate instruction based on whether a student is struggling with a particular topic or skill. The NEO 2 has many computer accessibility features and software options to assist with all of these situations. Additionally, as mentioned in the last chapter, NEO 2 works with industry leading wordprediction software Co:Writer, by Don Johnston, Inc. This third-party technology partner program helps all students construct complete, grammatically correct sentences, so they can focus instead on the content of what they are writing. Another option you might find helpful is NEO Text2Speech, a simple-to-use add-on device which allows students to listen to text at any speed. Visual Needs In this chapter, you ll learn ways to use NEO 2 to support learners with unique visual, physical, or learning needs. Both Co:Writer and Text2Speech can be purchased separately, while all other features described in this chapter are included with NEO 2 and its accompanying software. Unique Visual Needs Physical Needs Learning Needs To assist students with visual challenges, you can use simple keyboard commands or use the Control Panel applet to configure NEO 2 for optimum use. Change the AlphaWord Plus display font size. For better readability, some students need to use a larger font on the NEO 2 screen, while others benefit from seeing more of their text at one time. There are six different font size options, ranging from two lines of text per screen to six lines of text per screen. Changing the font size in AlphaWord Plus does not affect how big the text will be when it is sent to a printer or computer; it uses the default font you ve chosen in your computer program. Adjust the screen contrast. This setting allows you to darken or lighten the screen for better readability for students with visual challenges. See the appendix for step-by-step instructions. 109
112 Getting the Most out of NEO 2 Unique Physical Needs Dysgraphia is a neurological disorder in which students struggle to write legibly with paper and pencil. They may write inappropriately sized and spaced letters and have trouble incorporating punctuation and correct spelling into their work. However, when such students use the NEO 2, these problems often disappear. They are able to select the letters they want on the keyboard and have them appear on the screen. Keyboarding rather than writing by hand can free such students to focus on the content of their writing. Dysgraphia is just one example of the unique physical challenges facing students. Other students might have unsteady hands or difficulty in key targeting. Or perhaps you are working with very young users who need additional assistance physically using the keyboard. In these instances, you may wish to apply certain NEO 2 accessibility features. These features include auto repeat, sticky keys, slow keys, and multiple keyboard layouts. Each accessibility feature is described below. Auto Repeat If a student presses and holds the S key while Auto Repeat is on, the S repeats continuously until the student moves her hand. With Auto Repeat off, when a student presses and holds the S key, she will only see a single S appear on the screen. This accessibility feature applies to all keys, including the backspace and delete keys. You can disable the Auto Repeat feature to support students with reflex control challenges. Sticky Keys Typically, a student will press and hold a shift key while pressing a letter key to enter a capital letter. This can be challenging for students with unique physical needs. With Sticky Keys on, students press keyboard commands consecutively rather than simultaneously. In other words, a student presses the shift key, releases, and then presses the J key to enter a capital J. Slow Keys This setting is recommended only for those students with severe motor control issues. The Slow Keys setting allows the user to set a delay time between keystrokes. For example, if Slow Keys is on and the delay time is set at 2 seconds, NEO freezes for 2 seconds following each keystroke. To enter the word the, a student presses the T key and NEO immediately freezes. After 2 seconds, the T character appears on the screen and then the user can press the H key. This feature can help students with unsteady hands or difficulty in key targeting. Multiple Keyboard Layouts NEO 2 s keyboard default layout is QWERTY. For students who need an ergonomic keyboard, the Dvorak simplified keyboard layout is an option. In addition, students with purposeful movement of only one hand can configure NEO with either a right- or left-hand-only keyboard layout. When you change the keyboard layout, you should purchase a keyboard skin that correctly identifies new keyboard arrangement, or place stickers on the keyboard. To use these accessibility features, you can configure each NEO 2 with keyboard commands, through the Control Panel applet, or with NEO Manager. See the appendix for step-by-step instructions. 110
113 Supporting All Learners Unique Learning Needs Since NEO 2 provides one-to-one computing access, it is an ideal tool for individualizing instruction and differentiating assignments to meet the needs of all students. In addition, certain students have unique learning needs: they may be English language learners, struggling writers, or simply need more assistance. Many of the programs that are covered in prior chapters of this guide have features to help meet these learning challenges. Linked Files Linked files allow you to include written guidelines or rubrics with your assignments. Students access linked files as read-only documents that are attached, or hyperlinked, to the active AlphaWord Plus files in which they write. They can switch back and forth between their own work and the linked file for guidance or additional support. You can use linked files with all students, but students with unique learning needs may especially benefit from having access to step-by-step instructions and helpful hints as they work. There are 22 sample linked files built into NEO Share, or you can create your own. To learn more about linked files, see Chapter 4. NEO Share NEO Share is a software program that facilitates wireless transfer of writing assignments between you and your students. When using NEO Share, you can send different versions of assignments and resources to different students depending on their needs and interests. This enables you to differentiate instruction and assist students with unique learning challenges. See Chapter 4 for details. 2Know! Toolbar The 2Know! Toolbar is a classroom response program that facilitates formative assessment and instructional interactivity. You can use it to ask questions and instantly graph students responses as you teach. Since it collects and displays responses anonymously, the toolbar provides an avenue of engagement for students who historically have been reluctant to participate. To support all learners, we recommend projecting the graph, identifying the correct answer, and asking students to reenter. This seemingly simple learning interaction provides critical practice for students who struggle. See Chapter 5 for more details. AccelTest AccelTest is a software program used for formative and summative assessment and for the electronic scoring of student work. This program is not anonymous but rather collects data linked to each specific student. If you d like to differentiate instruction, AccelTest makes it easy to distribute different versions of assignments to different students. Simply add several versions of the same assignment into the AccelTest Gradebook and assign each version of the assignment to specific students. Although all versions of the assignment will be available during the same session, each student sees only the version assigned to him. See Chapter 5 to learn more. 111

114 Getting the Most out of NEO 2 Resources for Spanish Speakers The overwhelming majority of English language learners in K-12 schools are native Spanish speakers. NEO 2 includes several resources to help address the needs of this population: - Accelerated Reader Spanish Quizzes. As mentioned in Chapter 6, Spanish-language Accelerated Reader quizzes are offered for many book titles in Spanish. If you are a Renaissance Place customer, your students can take these Spanish quizzes on the NEO 2 just as they can on a computer. - MathFacts in a Flash in Spanish. If you are a Renaissance Place customer, students can now use their NEO 2s to develop automaticity with math facts in Spanish using the MathFacts in a Flash RP applet. - Thesaurus Spanish to English. In AlphaWord Plus, the NEO 2 word processing program, you can replace the default thesaurus with one that enables users to type Spanish words and find their English equivalents. To install the Thesaurus Spanish to English, use NEO Manager (see the appendix for instructions). Then when students are writing, they press ctrl-t to open the thesaurus, type the Spanish word they want to look up, and find a list of English equivalents. This feature can be helpful for English language learners who occasionally need to look up the English equivalent of a Spanish word as they are writing. - SpellCheck Spanish. If a student will use AlphaWord Plus to write in Spanish, you can change the spell-check function to Spanish. Once this setting is changed, the spell check flags all English words as misspelled, so we recommend activating this feature only if a student will be writing in Spanish. To install the SpellCheck Spanish, use NEO Manager (see the appendix for instructions). Purchased Resources to Support All Learners In addition to the built-in features of NEO 2, there are also several purchasable solutions available to help you support students learning needs. These include NEO Text2Speech and Co:Writer. NEO Text2Speech NEO Text2Speech by Renaissance Learning allows NEO 2 users to hear their writing read aloud. This supports developing writers, students with unique visual needs, and students who are learning English. To use, connect headphones or speakers to the Text2Speech device, a small piece of hardware. Then align the infrared lens on the NEO 2 with the Text2Speech device and use simple key commands to hear the text read aloud. See the appendix for step-by-step instructions on using Text2Speech. 112
115 Supporting All Learners Co:Writer by Don Johnston, Inc. Co:Writer word prediction software supports students with language differences and writing challenges. Co:Writer predicts words based on English grammar and syntax. Additionally, Co:Writer is customizable as it learns how students write and even collects unique words, such as names of people and locations. Co:Writer is one of several third-party software and technology partners of NEO 2. To learn more about Co:Writer, see Chapter 7 or visit Summary Supporting All Learners The NEO 2 has many computer accessibility features and software options to help you support all learners. For students with unique visual needs, you can change the AlphaWord Plus display font size or adjust the screen contrast. For students with unique physical needs, you can use NEO 2 accessibility features such as auto repeat, sticky keys, slow keys, and multiple keyboard layouts. Students with unique learning needs include English language learners, struggling writers, or those who simply need more assistance. Many of the programs covered in prior chapters of this guide have features to support these learners and differentiate instruction. The NEO Text2Speech device converts typed text into synthesized speech for students with special needs and struggling writers. Co:Writer word prediction software supports students with language differences and writing challenges. 113

116 o Maintenance and Troubleshooting NEO 2s are easy to use and maintain, and rarely need technical attention. Yet there are some simple steps you can take to ensure that you get the best and longest use from them. In the unlikely event a NEO 2 or Renaissance Receiver freezes or fails to perform as expected, you may wish to perform some basic troubleshooting procedures, outlined below. We also encourage you to call Technical Services at for assistance. Our technical support team tracks all customer issues and uses this information to update and improve NEO 2 functionality, so your call is important. You can also access the Knowledge Base, an online search engine for detailed, step-by-step solutions to common questions, at techkb. Use the information in this chapter as well as the free technical support from Renaissance Learning for a trouble-free, powerfully effective NEO 2 implementation. Routine Maintenance With some common sense routine maintenance procedures in place, your NEO 2 implementation can be worry free. Batteries NEO 2s run on three AA batteries. Expected battery life is approximately 700 hours, or one school year. (Some schools have reported one-and-a-half to two years of use.) To preserve battery life, NEO 2 will shut off if left unused for four minutes. It s a good idea to make a plan at the beginning of the year to change batteries when needed. Live Chat If you are a Renaissance Place customer, you can also use the live-chat online dialog box to interact with a technical support representative. To access live chat, click the Live Chat Support link or icon in the upper right corner of your Renaissance Place Home page. Storage On those rare occasions when the NEO 2s are not in use, they should be stored in the mobile lab or in another suitable container. Remember to store NEO 2s away from sharp objects that might scratch the screen. Cleaning Wipe NEO 2s with a soft, dry cloth to clean. You may also use commercially available computer cleaning wipes to clean the NEO 2 surface. 114
117 Maintenance and Troubleshooting Keep Hardware and Software up to Date Renaissance Learning routinely releases updates for NEO 2 and its accompanying software. Check regularly for updates to NEO Manager, NEO Share, 2Know! Toolbar and AccelTest software. These updates include new software features and even more ways to integrate NEO 2 across the curriculum. Since NEO 2 was launched in 2007, free updates have included the following: Accelerated Reader quizzing Accelerated Math scoring functionality MathFacts in a Flash Offline Short answer functionality with the 2Know! Toolbar Wireless file transfer Spanish spell check Wireless functionality with a host of software and technology partners such as Google Docs, Study Island, MY Access! and Ignite! Learning Each update has increased NEO 2 functionality without adding to cost. Software updates are downloadable for installation. AccelTest is designed to automatically search for software updates. You can configure this feature. To do so, launch AccelTest and go to the Preferences menu. Hardware updates are pushed to the NEO 2s through NEO Manager. To push the updates, simply reset and update the NEO 2s. (See the appendix for step-by-step instructions.) Resetting a NEO 2 will erase all student data. For assistance in updating without losing data, call Renaissance Learning Technical Services at The SmartOption Mobile Lab The SmartOption Mobile Lab is used to reset a classroom set of NEO 2s and configure settings. It has a power strip built in that provides power to the AlphaHub, which is a piece of hardware that lets you simultaneously connect to up to 30 NEO 2s. Plug the SmartOption Mobile Lab directly into a wall power outlet. Plugging into another power strip (outside of the SmartOption Mobile lab) is not recommended. You can, however, drop a power supply from a printer or computer through the opening at the top of the SmartOption Mobile Lab and connect to the power strip built into the lab. If the AlphaHub will not power on, check the on/off switch on the AlphaHub. If the AlphaHub will still not power on, check the on/off switch on the built in power strip. If both switches are powered on, and the AlphaHub will still not power on, follow these steps: 1. Remove the plate from the back of the SmartOption Mobile Lab. 2. Check the power cord to the AlphaHub. 115
118 Getting the Most out of NEO 2 Troubleshooting NEO 2s are durable and seldom require troubleshooting. On the rare occasion that a NEO 2 does not perform as expected, the easiest troubleshooting procedure is to power off and power on again. Additional troubleshooting ideas are described below. NEO 2 is Frozen Rarely, a NEO 2 will get stuck in a memory loop and appear to freeze. To solve this, power NEO 2 off and on again. If NEO 2 still appears stuck, power off and on again. If, after the third power off and on, NEO 2 still does not respond, connect it to your computer and launch NEO Manager. Select the Get/Print AlphaWord Files tab and see if there is a file full of spaces or meaningless characters. If there is such a file, delete it. Then unplug the NEO 2 from NEO Manager and see if it powers up successfully. If none of these steps works, connect the NEO 2 to your computer, launch NEO Manager, and reset your NEO 2. Instructions are in the appendix. A NEO 2 Key Cap Fell Off The NEO 2 keyboard is durable; however, a student may dislodge a key cap. Search the Renaissance Learning Knowledge Base for Article to download a detailed step-by-step guide to replace the key cap. Also, keep a sharp eye on that student. It takes quite a bit of force to loosen a NEO 2 key cap. NEO 2 Can t Find the Teacher s Network When students report that NEO 2 cannot find your network, go to square one. Is the Renaissance Receiver connected to your computer? Is your computer powered on? Is the light on the Renaissance Receiver green? If the answer to either of the first two questions is No, then the troubleshooting procedure is simple. If the answer to the third question is No, then you need to apply more advanced troubleshooting. To troubleshoot when the light on the Renaissance Receiver is not green, try these steps. 1. First, try another USB cable. USB cables are remarkably durable, but some can get damaged. This happens so rarely that teachers forget to consider this possibility. If a new cable gives you a green light, you are back in business. 2. If switching the cable doesn t do the trick, then switch to another USB port on your computer. Wait a minute to see if the light turns green. If not, launch the Renaissance Wireless Server Utility to see if the server is running. 3. If you have a green light, but students still cannot join your network, there could be memory issues at play. NEO 2 has a great memory. If a student has been in Mr. Jones class and working wirelessly in Mr. Jones network, NEO 2 will continue to search for Mr. Jones network even when the student moves to another classroom. If this is the case, power NEO 2 116
119 Maintenance and Troubleshooting off. Then power it back on again. This will force NEO 2 to search for a new network. Additionally, NEO 2 will find all networks within range generally 150 feet. If a student selects the wrong network, NEO 2 will send his data to the selected network. If this is the case, power NEO 2 off. Then power it back on again. Select the correct network, and you re back in business. 4. Finally, check for interference. NEO 2 uses Radio Frequency (RF) wireless communication, and there are some interference issues common to all RF networks. For example, microwave towers (cell phone towers) near the classroom will cause some interference. Simply move the Renaissance Receiver away from the wall closest to the microwave tower. Also, the Renaissance Receiver should be visible to the entire classroom and not behind any objects blocking it from view. NEO 2 Files Will Not Print Wirelessly If NEO 2 files will not print wirelessly, check all the pieces in the wireless printing chain. Is the Renaissance Receiver connected? Did the student join the correct network? Did you select a default printer on the computer where the Renaissance Receiver is connected? Is the printer powered on? Is the printer communicating with your computer? Chances are you will find the culprit somewhere in this chain. Electrostatic Discharge If you power on a NEO 2 and the screen displays a checkerboard design, static electricity has built up inside your NEO 2. As frightening as that sounds, the recovery procedure is very simple. Set the NEO 2 aside. In 24 hours or less the static electricity will discharge, and NEO 2 is ready to go. (Sometimes the checkerboard effect goes away in a matter of a few minutes, but it can take up to 24 hours for the effect to go away.) 117
120
121 Appendix Glossary... A2 Software Installation Instructions... A7 NEO Manager (and Renaissance Wireless Server Utility)... A7 NEO Share... A9 2Know! Toolbar... A10 AccelTest... A11 NEO 2 for MY Access!.... A12 Renaissance Responder Scoring Software.... A13 Common Software Tasks... A14 Renaissance Wireless Server Utility... A14 NEO Manager Common Software Tasks.... A15 NEO Manager Advanced Software Tasks.... A18 NEO Share... A20 2Know! Toolbar... A25 AccelTest Common Software Tasks... A27 AccelTest Advanced Software Tasks... A35 Renaissance Responder Scoring Software.... A40 KeyWords.... A41 Linked Files... A42 Write On! Lessons... A43 Text2Speech... A44 AlphaWord Plus... A45 Keyboard Commands... A45 AlphaWord Plus Common Keyboard Commands... A45 Linked Files Keyboard Commands... A46 AlphaWord Plus Passwords.... A47 AlphaWord Plus Accessibility Features... A48 Accelerated Reader on NEO 2 Reproducible Form... A50 Keyboarding Resources and Reproducible Forms... A51 Keyboarding Activities.... A51 Technique Checklist.... A53 Progress Report.... A54 Finger Zones... A55 Lessons in KeyWords... A56 References... A61 Index.... A62 A1
122 Glossary Use this glossary as a quick reference for the various terms introduced throughout this guide. 2Know! Toolbar: A software application that installs on your computer and allows for anonymous in-class response, helping increase opportunities for formative assessment and classroom engagement. Users can respond to true or false, numeric, multiple choice, short answer, or pulse questions (yes/no). Accelerated Math: A software program that personalizes student math practice and helps teachers generate assignments, monitor progress, and motivate students to succeed. If you have a subscription to Accelerated Math Renaissance Place, your students can score Accelerated Math assignments on NEO 2. Accelerated Reader: A software program that enables differentiated data-driven reading practice. It includes more than 140,000 quizzes that accurately assess students reading comprehension. If you have a subscription to Accelerated Reader Renaissance Place, your students can take Accelerated Reader quizzes on NEO 2. Accelerated Reader applet: An applet that allows you to complete English or Spanish Reading Practice Quizzes, Vocabulary Practice Quizzes, and Other Reading Quizzes on NEO 2. If you would like to use this applet, you must have a subscription to Accelerated Reader Renaissance Place, install NEO Manager on your computer, enter in your Renaissance Place server address in the Renaissance Wireless Server Utility on your computer, and connect a Renaissance Receiver to your computer. AccelTest: A software application that installs on your computer and allows you to create your own quizzes, tests, and assignments on any subject, score assignments quickly, and have the scores entered in an electronic gradebook. AccelTest can help you manage all of your existing assignments, quizzes, and tests. Students can take tests and complete assignments in AccelTest using their NEO 2s. AlphaHub: A piece of hardware that lets you simultaneously configure and manage up to 30 NEO 2s through the SmartOption Mobile Lab. If you ve purchased rechargeable NEO 2s, the AlphaHub also lets you recharge the NEO 2s. If your NEO 2s are not rechargeable, the AlphaHub has no effect on battery life. A2
123 Glossary AlphaWord Plus applet: An applet that allows you to do word processing on your NEO 2. This is the applet that opens by default when you first turn on your NEO 2. You also use AlphaWord to enable and use a text-to-speech device. In addition, AlphaWord is the applet you use to activate wireless file transfer to NEO Share, Google Docs, or MY Access! Applet: A software application designed specifically for installation and use on NEO 2s. Also referred to as a SmartApplet. Beamer applet: An applet that uses infrared technology to send data from one NEO 2 to another without using a cable. Calculator: An applet that allows you to do mathematical calculations on your NEO 2. Control Panel: An applet that allows you to change settings for the NEO 2 and for some applets. Co:Writer applet: A word prediction program based on English grammar and syntax that supports developing authors, reluctant writers, and students with unique language learning needs. Co:Writer also works with the text-to-speech feature on NEO 2. Created by Don Johnston Software, Inc., Co:Writer is a paid applet and is not available for free download. Google Docs: A third-party software partner program that allows online word processing, online document storage, easy creation and distribution of writing assignments, online collaboration, and easy publishing to a website or blog. Students can send documents back and forth wirelessly between NEO 2 and the Google Docs website using wireless file transfer. Ignite! Learning: A third-party software partner program that features multimedia activities, including music video, animation, and interactive pieces covering math, science, and social studies. NEO 2 works as a responder with Ignite! Torch, a plug and play device that provides access to Ignite! Learning s content. KeyWords applet: An applet that allows you to learn and practice keyboarding through its full keyboarding curriculum. The distinguishing feature of KeyWords is that it is language-based. This means that students develop language skills, such as vocabulary, sight words, and simple sentence structure while learning to keyboard. Data from KeyWords can be synchronized into Renaissance Place through the NEO Manager software. KeyWords Renaissance Place: A program on the Renaissance Place platform for running reports of KeyWords data. The data first gets synchronized with NEO Manager software into KeyWords Renaissance Place from the NEO 2s. A3
124 Getting the Most out of NEO 2 Linked File: A read-only file that is attached or linked to an AlphaWord Plus file. Teachers use linked files to attach writing rubrics, step-by-step guides, and additional reading information to any assignment. There are 22 sample linked files built into NEO Share; however, teachers may also create their own linked files to send through NEO Share. MathFacts in a Flash: A software program that provides students at all levels with personalized practice of addition, subtraction, multiplication, and division facts, as well as other math skills, including finding squares and converting between fractions, decimals, and percentages. Timed tests measure students practice and mastery, with feedback provided both onscreen and via a variety of detailed reports. If you have a subscription to MathFacts in a Flash Renaissance Place, your students can use the MathFacts in a Flash RP applet on NEO 2. MathFacts in a Flash RP applet: An applet that allows you to practice and test for mastery in MathFacts in a Flash on NEO 2. To use this applet, you must subscribe to MathFacts in a Flash Renaissance Place, install NEO Manager on your computer, enter in your Renaissance Place server address in the Renaissance Wireless Server Utility on your computer, and connect a Renaissance Receiver to your computer. MathFacts in a Flash (offline) applet: An applet that provides anytime, anywhere practice and testing on math facts so that students develop computational fluency and automaticity. On NEO 2, students have access to all MathFacts in a Flash levels. You do not have to be a Renaissance Place customer to use the offline applet. However, since the offline applet is intended as a practice tool, neither practice nor tests count toward mastery. MY Access!: A third-party software partner program featuring online writing assessment offered by Vantage Learning. If your school has a license to use MY Access!, students can use NEO 2s to submit writing assignments wirelessly (through wireless file transfer) for immediate scoring and feedback. NEO Manager: A software application you install on your computer that allows you to manage up to 30 NEO 2s via an AlphaHub connection or one NEO 2 via a direct USB connection. NEO Manager is used to send or remove applets, reset or update NEO 2s, configure settings, and retrieve KeyWords data. NEO Share: A software application that installs on your computer that allows you to send and receive text files wirelessly between NEO 2 and the computer. Through NEO Share, you can also use Write On! lessons and sample linked files and build favorite folders to easily access your instructional resources. To use NEO Share, you must install it on your computer and connect a Renaissance Receiver to your computer. A4
125 Glossary Renaissance Place: A web-based platform that provides access to a variety of subscription-based Renaissance Learning software programs, including Accelerated Reader, Accelerated Math, and MathFacts in a Flash. If you have a subscription to one or more of these Renaissance Place programs, your students can interact with them using NEO 2. In addition, you can access reports and resources and activate schools for KeyWords. Renaissance Receiver: A piece of hardware that connects to a computer via a USB cable. The Renaissance Receiver sends and receives information from the computer s Renaissance Wireless Server Utility to a NEO 2 using wireless radio frequency technology. It does not require batteries and receives its power from the computer. Renaissance Training Center: An online library and resource center aimed at helping customers implement Renaissance Learning products with fidelity. Located at this site includes links to user manuals, training resources, live and e-learning professional development opportunities, research, quick start guides, lesson plan ideas, and much more. Users can create a free account that enables them to access resources, save favorites, and receive information on new features and updates. Renaissance Wireless Server Utility: A software application that installs on your computer when you install any of the following: NEO Manager, 2Know! Toolbar, NEO Share, AccelTest, Renaissance Responder scoring software for Accelerated Math, or NEO 2 for MY Access! The Wireless Server must be started and running on a computer that has a Renaissance Receiver connected in order to use the wireless radio frequency technology of the NEO 2. Responder applet: An applet that allows you to use NEO 2 as a responder. It can be used to complete AccelTest assignments or score Accelerated Math Renaissance Place assignments. Students can also use it to respond to the 2Know! Toolbar and to several third-party software programs. SmartApplet: A software application designed specifically for installation and use on NEO 2s. Also referred to as an applet. SmartOption Mobile Lab: A cart which provides an all-in-one solution for transforming a classroom into a fully functional computer lab. Each mobile lab includes the NEO Manager software and the AlphaHub, which give you the ability to conveniently configure and manage 30 NEO 2s. Study Island: A third-party software partner program that provides web-based tools for standards instruction, practice, and assessment. If you have a subscription to Study Island, students can use NEO 2 as a responder to interact with the content. A5
126 Getting the Most out of NEO 2 Text2Speech: An assistive technology solution that converts typed text into synthesized speech for special needs students and struggling writers. The NEO Text2Speech device is a piece of hardware that works in conjunction with the Text-to-Speech feature in the AlphaWord Plus applet, Co:Writer applet, spell check, thesaurus, and Write On! lessons. The device converts any text written on the NEO 2 into spoken words. It comes with two AA batteries and a set of headphones. Topic Dictionary: A list of content-specific words in Co:Writer. When you install Co:Writer, you automatically install the Main Dictionary. You may install up to five additional Topic Dictionaries. Installing a Topic Dictionary does not delete or alter the Main Dictionary. You can download a host of Topic Dictionaries from Don Johnston s website ( and load them on your NEO 2s. Wireless File Transfer: A feature of the AlphaWord Plus applet that allows NEO 2 users to exchange files among NEO 2 and one or all of the following applications: NEO Share, Google Docs, or MY Access! In order to use this feature, you must have a Renaissance Receiver connected to a computer. If you wish to use Wireless File Transfer with Google Docs or MY Access!, you must create an account at the Google Docs website or have a paid subscription to the MY Access! software, respectively, and your computer must have Internet access. You do not need Internet access to use NEO Share. Write On! lessons: A collection of writing lessons, literacy skills activities, and vocabulary strategies for use in elementary, middle, and high school. The lessons are built into the NEO Share software and are sent to students through NEO Share. There are a total of 387 complete writing lessons, which include individual writing tasks and prompts, editing and revising activities, and models of good writing. A6
127 Software Installation Instructions Install NEO Manager first. Then install all other software. If you need assistance with any software downloads or installs, contact Renaissance Learning at NEO Manager (and Renaissance Wireless Server Utility) NEO Manager is required to update NEO 2s when new features are available and configure NEO 2s to address specific learning needs. The Renaissance Wireless Server Utility, which installs at the same time, is required to establish wireless connectivity. You download and install NEO Manager from the Renaissance Learning website or using the CD that shipped with your NEO 2. Downloading from Renaissance Learning is preferred because it guarantees that you install the latest version. Option 1: Download from Renaissance Learning (Recommended) 1. Go to and click the link to the Download Center. 2. Click the link to NEO Product Downloads and select NEO Manager for Mac or PC. 3. If you choose to Open, the software will open online and install automatically. 4. If you chose Save (recommended), a zipped file will download with the NEO Manager installers. Double-click to unzip the zipped file and gain access to the installers. 5. For Windows computers: Double-click Setup to install. (For Macintosh computers: Double-click NEO Manager Installer.app to install.) 6. When installation is complete, connect a single NEO 2 to your computer and allow the hardware wizard to run. 7. If using the SmartOption Mobile Lab, connect the lab to your computer and allow the hardware wizard to run. 8. Connect the Renaissance Receiver and allow the hardware wizard to run. 9. Restart your computer. Option 2: NEO Manager CD 1. Insert CD and select NEO Manager Setup. 2. Allow the installation wizard to run. 3. When installation is complete, connect a single NEO 2 to your computer and allow the hardware wizard to run. 4. If using the SmartOption Mobile Lab, connect the lab to your computer and allow the hardware wizard to run. 5. Connect the Renaissance Receiver and allow the hardware wizard to run. 6. Restart your computer. A7
128 Getting the Most out of NEO 2 NOTE: Configure Your Wireless Network The Renaissance Wireless Server Utility installs at the same time as you install NEO Manager. Once it is installed, you will need to configure the network, giving it a unique name so your students connect to your specific network. For instructions on how to do so, see the Common Software Tasks Renaissance Wireless Server Utility section later in this appendix. A8
129 Software Installation Instructions NEO Share Use NEO Share to send text from any resource, including online resources, send Write On! lessons and writing rubrics, retrieve students writing, and interface with interactive white boards. NEO Share software is available as a free download from Renaissance Learning and on the NEO Manager CD. Downloading from Renaissance Learning is preferred because it guarantees that you install the latest version of NEO Share. Option 1: Download from Renaissance Learning (Recommended) 1. Go to and click the link to the Download Center. 2. Click the link to NEO Product Downloads, and select NEO Share for Mac or PC. 3. If you choose to Open, the software will open online and install automatically. 4. If you chose Save (recommended), a zipped file will download with the NEO Share installer. 5. Double-click to unzip the zipped file and gain access to the installers. 6. For Windows computers: Double-click Setup to install. (For Macintosh computers: Double-click NEO Share Installer.app to install.) Option 2: NEO Manager CD 1. Insert the NEO Manager CD. 2. Select Setup. 3. Allow the installation wizard to run. A9
130 Getting the Most out of NEO 2 2Know! Toolbar The 2Know! Toolbar works with NEO 2 wirelessly to provide instructional interactivity. 2Know! Toolbar software is available as a free download from Renaissance Learning. It is also available on the 2Know! CD that ships with NEO 2 SmartOption Mobile Labs and Classroom Bundles. Downloading from Renaissance Learning is preferred because it guarantees that you install the latest version. Option 1: Download from Renaissance Learning (Recommended) 1. Go to and click the link to the Download Center. 2. Click the link to NEO Product Downloads. 3. Select 2Know! Toolbar. 4. Choose your platform. 5. Click 2Know! Toolbar. (If you see Update, go ahead and download. The update is a full copy.) 6. Click Download Now. 7. You have two options. If you choose Run, the software will open online and install automatically. 8. If you chose Save (recommended), the 2Know! Toolbar installer will download. 9. For Windows computers: Double-click the installer icon and allow the installation wizard to run. (For Macintosh computers: Double-click 2Know! Toolbar Installer. app to install.) Option 2: 2Know! Toolbar CD 1. Insert the 2Know! Toolbar CD. 2. Select Setup. 3. Allow the installation wizard to run. A10
131 Software Installation Instructions AccelTest The AccelTest CD ships with your NEO 2 SmartOption Mobile Lab or Classroom Bundle. You may install from the CD or download the software from Renaissance Learning (recommended). Note: You will need your AccelTest serial number to download software. This serial number is included with your AccelTest documentation. Also, you can call Renaissance Learning at if you do not have access to your serial number and documentation. Option 1: Download from Renaissance Learning (Recommended) 1. Go to and click the link to the Download Center. 2. Click the link to NEO Product Downloads. 3. Select AccelTest. 4. Choose your platform, and click AccelTest. (If you see Update, go ahead and download. The update is a full copy.) 5. Enter your AccelTest serial number and click Submit. 6. You have two options. If you choose Run, the software will open online and install automatically. If you chose Save (recommended), AccelTest installer will download. 7. For Windows computers: Double-click the installer icon and allow the installation wizard to run. (For Macintosh computers: Double-click AccelTest Installer.app to install.) 8. When the installation is complete, launch AccelTest. 9. You will be asked about a location for the AccelTest database. Select the default location, which is on your computer s hard drive. If you need to use another location, select it at this time. 10. You will also be asked to enter your AccelTest serial number. 11. Finally, you will see a dialog box instructing you to set up the school year. Refer to your AccelTest documentation to set up the school year, or refer to the AccelTest Common Software Tasks section later in this appendix. Option 2: AccelTest CD 1. Insert the AccelTest CD. 2. Select Setup. 3. Allow the installation wizard to run. 4. When installation is complete, launch AccelTest. 5. You will be asked about a location for the AccelTest database. Select the default location, which is on your computer s hard drive. If you need to use another location, select it at this time. 6. You will also be asked to enter your AccelTest serial number. 7. Finally, you will see a dialog box instructing you to set up the school year. Refer to your AccelTest documentation to set up the school year, or refer to the AccelTest Common Software Tasks section later in this appendix. A11
132 Getting the Most out of NEO 2 NEO 2 for MY Access! This plug-in is required if students use NEO 2 with MY Access! Download it from the Renaissance Learning website. 1. Go to and click the link to the Download Center. 2. Click NEO Product Downloads. 3. Select NEO 2 for MY Access! for Mac or PC. 4. If you choose to Open, the software will open online and install automatically. 5. If you chose Save (recommended), a zipped file will download with the NEO 2 for MY Access! installer. Double-click to unzip the zipped file and gain access to the installers. 6. For Windows computers: Double-click Setup to install. (For Macintosh computers: Double-click NEO 2 for MY Access Installer.app to install.) A12
133 Software Installation Instructions Renaissance Responder Scoring Software This software is required if students use NEO 2 to submit answers to Accelerated Math assignments. Download this software from your Renaissance Place site. 1. Go to your Renaissance Place site. 2. Do not log in. 3. From the Welcome page, click Check Software Requirements. 4. Scroll down and select Renaissance Responder for your platform. 5. You have two options. If you choose Run, the software will open online and install automatically. 6. If you chose Save (recommended), the Renaissance Responder installer will download. 7. For Windows computers: Double-click the installer icon and allow the installation wizard to run. (For Macintosh computers: Double-click the Renaissance Responder Installer.app to install.) A13
134 Getting the Most out of NEO 2 Common Software Tasks Renaissance Wireless Server Utility The Renaissance Wireless Server Utility runs in the background and provides the gateway for radio frequency wireless communication. You do not need to install it separately because it installs automatically when you install NEO Manager. However, you do need to configure the Renaissance Wireless Server Utility on your computer. This allows you to name your network so that your students know which network to connect to with their NEO 2s. Configure the Renaissance Wireless Server Utility 1. Launch the Renaissance Wireless Server Utility. Windows users: Go to your Start menu and look in All Programs. Macintosh users: Go to your Applications Folder on your computer s hard drive. 2. Enter the Administrator PIN, which is Click the Server Settings tab. 4. In the box labeled Network Name, enter a name for your network. Do this by changing the default network name from Renaissance Receiver to the network name you would like your students to see on their NEO 2s. We recommend using your name (i.e. Mrs. Brown) or room number. 5. Click Update Network Settings. 6. Click OK. Renaissance Place subscribers complete the following steps: 1. Click Renaissance Place Settings. 2. Enter your Renaissance Place server address. (Hint: Launch your Internet browser and go to your Renaissance Place site. Copy and paste the URL from your Internet browser.) 3. Click Verify to make sure the Renaissance Wireless Server Utility can find your Renaissance Place site. 4. Once verified, click OK. 5. Close the Renaissance Wireless Server Utility. A14
135 Common Software Tasks NEO Manager Common Software Tasks NEO Manager is the backbone of your NEO 2 implementation, your means to maintain NEO 2s, support all learners, and update new resources. Launch NEO Manager Connect a single NEO 2 to your computer with the USB cable or connect a classroom set of NEO 2s to the hub in the SmartOption Mobile Lab and connect the lab to your computer with the USB cable from the top of the lab. Once connected: 1. Launch NEO Manager and allow a minute or two for NEO Manager to find all NEO 2s. 2. Click the + sign in the lower left corner of NEO Manager to see how many NEO 2s are connected. You navigate NEO Manager via its tabs and menus. Configure NEO 2 Settings The NEO Manager Settings functionality is critical to your NEO 2 implementation. Through this tab, you can manage AlphaWord Plus files, control access to SmartApplets, and configure KeyWords. Take some time to learn how to configure NEO 2s with NEO Manager. It will pay off in big ways. 1. Click the Settings tab. 2. Select System settings to change the master password, select the keyboard layout, and configure accessibility features. (Call Technical Support at for the default master password, or change it in these System settings.) 3. Settings related to transfer speed and printer selection can be ignored if you use wireless printing. 4. Select AlphaWord Plus settings to enable password protection recommended in the shared implementation. 5. Select KeyWords settings to select pretest and posttest levels, customize WPM and error rate goals, and require or disable sequential lessons. You can also configure KeyWords to allow one space or two between sentences. Take time to explore all your KeyWords settings. 6. Select Control Panel settings to disable the Control Panel. This prevents students who may learn the master password from changing the NEO 2 configuration. You can always access the Control Panel with the master password. (See Step 2 above for how to find or change the master password.) 7. Continue with each SmartApplet until you have configured your NEO 2s for optimum use in your classroom. 8. When all Settings are selected, click Send List, and click Send. Do not interrupt this process. Review the NEO Manager Send List A send list is a collection of SmartApplets and settings you send from your computer to your students NEO 2s. You should review your send list before you press Send. Once NEO Manager begins sending the send list to the NEO 2s, you must not interrupt the process. You can work on other applications while NEO Manager runs in the background. Just remember: never interrupt a send list. To review your send list: 1. Click the Send List tab. A15
136 Getting the Most out of NEO 2 2. Review the information in the Send List Display area. 3. If you want to send to all NEO 2s, click Send. 4. If you want to select specific NEO 2s to receive the files and settings you are sending, click Select Devices. Select the NEO 2s. Click OK. Click Send. Teacher Tip Never interrupt the process while NEO Manager is sending a send list to connected NEO 2s. Doing so may corrupt the operating system and require you to send the NEO 2 in for repair. Access Help NEO Manager includes built-in Help resources and a quick link to the Renaissance Training Center. To access Help: 1. From the Help menu, select NEO Manager Help. 2. If you want to go to the Renaissance Training Center, click the link at the top for online training and resources. Configure AlphaWord Plus Below are two features you may wish to change in AlphaWord Plus for Spanish-speaking students: - Install the Thesaurus Spanish to English or SpellCheck Spanish 1. Click the File menu and choose New Send List. 2. Click the SmartApplets tab. 3. Click Thesaurus Spanish to English (or SpellCheck Spanish), then click Add. 4. Click the Send List tab and click Send. - Remove the Thesaurus Spanish to English or SpellCheck Spanish 1. Click the File menu and choose New Send List. 2. Click the SmartApplets tab. 3. Click Thesaurus Large USA (or SpellCheck Large USA), then click Add. 4. Click the Send List tab and click Send. Generate KeyWords Reports You can generate KeyWords reports in two ways. Option 1 is to generate limited KeyWords reports in NEO Manager. Option 2 is to synch KeyWords data with Renaissance Place (if you are a Renaissance Place customer). After you have synched the data, you can log into your Renaissance Place site, click Reports under KeyWords, and run reports. Option 1: Generate Limited KeyWords Reports in NEO Manager 1. Open NEO Manager. 2. Click the KeyWords tab. 3. Select one or more students. 4. Click Reports to generate reports with KeyWords. 5. Select Student Detail to see all KeyWords activity. 6. Select Student Progress to see only the most recent activity. 7. Select Student Information, then enter the master password to see student user names and passwords. A16
137 Common Software Tasks Option 2: Synch KeyWords data with Renaissance Place 1. Open NEO Manager. 2. Click the KeyWords tab. 3. Click Synch with RP to send KeyWords data to Renaissance Place. 4. Enter your Renaissance Place URL, user name and password. A17
138 Getting the Most out of NEO 2 NEO Manager Advanced Software Tasks Teachers also use NEO Manager to keep their NEO 2 implementation running smoothly and to update NEO 2s with new software and features. Save a Send List Imagine this scenario: It is the week before school starts. You connect all your students NEO 2s to the SmartOption Mobile Lab, connect the lab to your computer and launch NEO Manager. You click the Settings tab and configure each SmartApplet to work exactly as you want it to work. It took you some time, but it was worth it to get the NEO 2s ready for school. You send the settings to the NEO 2s and they are ready to go on the first day of school. In less than three weeks, you get a new student with a new NEO 2. You sigh because you have to recreate that send list with all your settings and send it again. It will take you approximately 30 minutes that you don t have. Now imagine the scenario if you were able to save your beginning-of-the-year send list. It is ready anytime you need to use it. Imagine no more, because you can save your NEO Manager send lists. Here s how: 1. Create your send list. 2. From the NEO Manager File menu, select Save Send List. 3. NEO Manager will automatically save it in the NEO Manager folder on your computer s hard drive. 4. The next time you need to use that same send list, go to the File menu and select Open Send List. Select your saved send list, and you are back in business. Send a User Dictionary When students press spell check on their NEO 2s, one option for an unrecognized word is to add that word to the user dictionary on that particular NEO 2. This is especially helpful with unusually spelled names. Once the name is added to the user dictionary, NEO 2 will recognize it as a known word, and if a student misspells it in the future, the NEO 2 spell check will display the correct spelling. When you create integrated units of study, particularly in science and social studies, there may be a host of words that the NEO 2 spell check will not recognize. You can create a user dictionary on your computer and send it to your students NEO 2s. 1. Create a list of the words you want added to the user dictionary. Separate each word with a return, like this: Kiowa Tawakoni Tonkawa Coahuilteco Karankawa 2. Save the file as a.txt file. 3. Connect a single NEO 2 to your computer or connect all NEO 2s to the SmartOption Mobile Lab and connect the lab to your computer. 4. Launch NEO Manager. 5. From the File menu, select Send User Dictionary. 6. Navigate to your word list and click Open. Remember, your list must be a.txt file. 7. Press the Send List tab. 8. Press Send. A18
139 Common Software Tasks Reset NEO 2s Resetting a NEO 2 returns that NEO 2 to its factory-default settings. To reset NEO 2s: 1. Connect a single NEO 2 to your computer with the USB cable or connect a classroom set of NEO 2s to the SmartOption Mobile Lab and connect the lab to your computer with the USB cable on top of the lab. 2. Launch NEO Manager. 3. From the NEO Manager Setup menu, select Reset All NEO Devices. 4. NEO Manager warns you that resetting NEO 2s will erase all settings, files, and KeyWords data. Click Yes to proceed. 5. Allow two minutes to reset a single NEO 2 and one hour to reset a classroom set. Update NEO 2s The reset procedure listed above is also used to update NEO 2s when new software and features are available. The process erases all data and installs the new updates that have been released by Renaissance Learning. At the end of one school year or at the beginning of the following school year, updating your NEO 2s makes them ready for use with a new group of students and allows you to take advantage of the latest functionality. You use NEO Manager to push the updates to your NEO 2s. Most updates require you to first download and install a new version of NEO Manager before resetting the NEO 2s. To update NEO 2s: 1. Go to and click the link to the Download Center. 2. From the Download Center, click NEO Product Downloads. 3. From the NEO Product Download page, download and install NEO Manager. 4. Follow the directions above to reset NEO 2s. Reset and Restore NEO 2s Because resetting NEO 2s erases all settings, files, and KeyWords data, we recommend waiting until the end of one school year or beginning of the following school year to perform this procedure. However, if there s a new feature you d like to take advantage of right away, you can perform a Reset and Restore Procedure. To do so, please call for assistance. A19
140 Getting the Most out of NEO 2 NEO Share Use NEO Share to send text from any resource, including online resources; send Write On! lessons and linked files; retrieve students writing; and interface with interactive whiteboards. NEO Share Basics You work with three NEO Share zones or areas: Pickup Zone, Files for Pickup, and Files Received. NEO Share floats on your computer s desktop or on top of any open application. Click and drag the NEO Share bar to move it. Click the triangle at the bottom of the NEO Share window to collapse it into a pill to make it easier to move around your desktop. Or click the minimize icon in the upper right corner to minimize NEO Share. Pickup Zone Use the Pickup Zone to quickly access and send text to your students. To use the Pickup Zone: 1. Highlight and drag (or copy and paste) any text including text from online resources into the Pickup Zone. 2. Text in the Pickup Zone stays until you click the delete icon or close NEO Share. 3. The Pickup Zone displays a count of how many students downloaded the text. Files for Pickup Browse to find assignments on your computer to put in the Files for Pickup area. To use the Files for Pickup area: 1. Click the folder icon and click Browse to browse for resources on your computer. You can search for text (.txt) files or, if you are a Mac user, you can also search for.doc or.docx files. 2. Click the name of the file and click Open to load the file into NEO Share. 3. Load as many files as you wish. If you are not ready for students to download a particular file, click the wireless icon to the right of the file to make it unavailable. (The wireless icon will disappear.) Files with wireless icons will be listed on students NEO 2s, while files with no wireless icon will not be listed on students NEO 2s. 4. To remove a file from Files for Pickup, check the file and click the delete icon. 5. You can also manage favorites by clicking the folder icon and choosing Manage Favorites. For more detail, see Add and Manage Favorites, below. Files Received When students upload their AlphaWord Plus files, NEO Share displays them in Files Received. To manage student work in Files Received, do any of the following: 1. Double-click to view any student s file. 2. If appropriate, enter comments on the student s file. Save and close it. Then click and drag it to Files for Pickup so the student can download the file and read your comments. 3. If you wish, click and drag any student s file to an open application such as a spreadsheet application or interactive whiteboard text box. 4. Check the file and click the save icon to save students writing to your computer or to a network drive. 5. Check the file and click the delete icon to delete students files. A20
141 Common Software Tasks Add and Manage Favorites With NEO Share, you can build in your favorite assignments and thematic units for greater accessibility. It all starts with a folder. Follow these steps: 1. Create a folder for your assignments or thematic unit. You can save this folder anywhere on your computer or on your network. 2. You can put any type of file into your thematic unit folder URLs, pdf files,.doc files,.txt files, images, and PowerPoint presentations. You will be able to access and open any file in your thematic unit folder through NEO Share s Manage Favorites window. 3. For the files that you would like to be able to place in the Files for Pickup window, you will need to save them in this folder as a Plain Text or.txt file (for Windows users). If you are prompted to Allow Character Substitution, click Yes to allow it. (If you don t allow character substitution, NEO Share doesn t know how to read quotation marks and replaces them with question marks. Therefore, don t neglect this important step.) If you use a Macintosh computer, you can use.doc files. 4. From Files for Pickup, click the folder icon and select Manage Favorites. 5. When the Manage Favorites window opens, drag the folder into the top box or click Add to navigate to your folder. 6. Click OK. Work with Favorites Access your favorites through NEO Share while you are teaching. 1. Click the folder icon in Files for Pickup to see a list of your folders. 2. Select a folder to see a list of all text files and URLs. 3. To access all files, enter an asterisk (*) in File name and press enter. 4. Click a file, or press the Ctrl key while you click more than one file, and then click Open. 5. Your selected.txt files (Windows and Macintosh users) or.doc files (Macintosh users only) will be available in Files for Pickup. 6. If you click one of the other types of files, NEO Share will open it. For instance, if you click one of the URLs, NEO Share will open the URL in your web browser. You can highlight and drag text from the website to the Pickup Zone. Save Favorite Web Links You can also save your favorite websites as quick links in NEO Share. 1. Open your browser and go to a website. 2. Open NEO Share, and click the folder icon in Files for Pickup. 3. Click Manage Favorites. 4. Drag the URL from your browser into the Manage Favorites window. 5. Name the favorite, and click Add. Then click OK. 6. The next time you click the folder icon in Files for Pickup, your website will be listed under My Websites. 7. Click the link and NEO Share will open your browser and go to the site. Remove Favorites 1. To remove a favorite folder or website, click the folder icon in Files for Pickup, and then select Manage Favorites. 2. Check the box next to the folder or website. Then click Remove. A21
142 Getting the Most out of NEO 2 Access Write On! Lessons The Write On! lessons include 36 literacy skills activities, nine vocabulary strategies, 387 writing lessons, and teacher guides. To access lessons: 1. From the Files for Pickup area, click the folder icon and select Write On! Lessons. 2. Select the grade span, lesson type, and lesson. If you want to select more than one lesson, hold the Ctrl key as you click each one. Then click Open. 3. To facilitate differentiation or hide files you are not ready for students to use yet, click the wireless icon next to any file to make it unavailable for pickup. 4. Click the wireless icon again to make the file available. Access Write On! Lesson Teacher Guides The Write On! lessons come with teacher guides (also referred to as supplements). 1. From the Files for Pickup area, click the folder icon and select Write On! Lessons. 2. To access teacher guides for literacy skills activities and vocabulary strategies, enter an asterisk (*) in File name, and press enter. Then double-click a guide. 3. If you want to see the teacher guides for writing lessons, open a Writing Lessons folder; then enter an asterisk (*) in File name and press enter. Edit Write On! Lessons You can edit Write On! lessons to suit your teaching purposes. 1. If you want to edit an activity, double-click the title from the Files for Pickup area. 2. Edit the activity. 3. When you close it, you will be prompted to give your edited version a new name. 4. The original activity will not change and will remain available under its original name for further editing. 5. Click the folder icon, click Write On! Lessons, and browse to your edited activity. Click on the name of your edited activity to select it. It will now appear in the Files for Pickup area. 6. Check the original activity in the Files for Pickup area and click the delete icon to remove it. 7. This will remove the original from NEO Share, but will not delete the original from your computer. You can go back and access the original content, repeating the steps above to edit it again. How Students Download Write On! Lessons Students power on NEO 2, open a clean file space, and press cmd-o to download a file. They choose to join or stay connected to your network and select NEO Share. If multiple files are available, students must select one file to download. Upload Students Write On! Lesson Files When your students complete the work in their Write On! lessons, they can upload their files to your computer. Connect the Renaissance Receiver to your computer. Then instruct students to: 1. Power on NEO 2 and open the file with their Write On! lesson. 2. Press the cmd-send key and join your network. 3. Select NEO Share, enter a name for the file and press enter. A22
143 Common Software Tasks Access Sample Linked Files Linked files allow you to attach a read-only writing rubric (or other content) to any file. Through NEO Share, you can access built-in sample linked files. 1. From the Files for Pickup area, click the folder icon and select Sample Linked Files. 2. Select a linked file, and then click Open. 3. If you want to select more than one sample linked file, hold the Ctrl key as you click each one, and then click Open. 4. You can manage students access to linked files. Click the wireless icon next to any file to make it accessible or inaccessible. 5. Instruct your students to power on NEO 2 and open a clean file space. 6. Ask them to press cmd-o, join your network, and download the linked file. 7. If you have added a prompt in your linked file, students will see the prompt. (See Edit Linked Files below for instructions about adding a prompt.) If you have not added a prompt, students will see a blank active file. Instruct them to press ctrl-l to open the read-only file. 8. Students press ctrl-l again to return to the active file. Edit Linked Files You may wish to edit linked files to add a prompt or change the wording to suit your needs. 1. Double-click the title from Files for Pickup. 2. Edit the linked file. If you want to include a prompt with your linked file, enter the prompt before the beginning form tag. 3. When you close your edited linked file, you will be prompted to give it a new name. 4. The original activity will not change and will remain available under its original name for further editing. 5. Then check the original linked file in Files for Pickup and click the delete icon to remove it. 6. This will remove the original from NEO Share, but will not delete the original from your computer. 7. Click the folder icon to browse to your edited linked file. Create Your Own Linked Files If you already have access to a writing rubric or have information you want to share with your students in a read-only format, you can create your own linked file. You use either the Pickup Zone or Files for Pickup for your linked files. Both are described below. Option 1: Use the Pickup Zone If you want to create and send a linked file quickly but do not want to save it for future use go to the Pickup Zone and follow these steps: 1. Connect the Renaissance Receiver to your computer and launch NEO Share. 2. Create your linked file in the Pickup Zone. 3. You will use beginning and ending html form tags. The form tags will not show on the students NEO 2s. - Enter <form> and then press enter to begin. - Enter </form> to end. A23
144 Getting the Most out of NEO 2 - If you want to include a prompt with your linked file, enter the prompt before the beginning form tag. - If you want to send reading passages, enter or copy/paste the text between the two form tags. Don t worry if your text is longer than the NEO Share Pickup Zone. NEO Share will display a scroll bar so you can navigate your text. - If you want to use checkboxes, use the [ ] keys on your computer. 4. Instruct your students to power on NEO 2 and open a clean file space. 5. Ask them to press cmd-o, join your network, and download the linked file. Option 2: Use Files for Pickup If you want to create linked files that you plan to use over and over, you may want to build them into NEO Share. It all starts with a folder. Follow these steps: 1. Create a folder for your linked files. You can save this folder anywhere on your computer or on your network. 2. Next, create your linked file in a blank Word or text file on your computer. You will use beginning and ending html form tags. The form tags will not show on the students NEO 2s. - Enter <form> and then press enter to begin. - Enter </form> to end. - If you want to include a prompt with your linked file, enter the prompt before the beginning form tag. - If you want to send reading passages, enter or copy/paste the text between the two form tags. - If you want to use checkboxes, use the [ ] keys on your computer. 3. If you use a Windows computer, you must save your linked file in your folder as a Plain Text, or.txt, file. (If you are prompted to Allow Character Substitution, click Yes to allow it.) If you use a Macintosh computer, you can use.doc files. 4. From Files for Pickup, click the folder icon and select Manage Favorites. 5. When the Manage Favorites window opens, you can: - Drag your folder into the Manager Favorites window, - Enter the path to your folder, or - Click Add and navigate to your folder. 6. To access your linked files, click the folder icon and select your linked files folder. A24
145 Common Software Tasks 2Know! Toolbar The 2Know! Toolbar with NEO 2 allows you to increase classroom engagement and anonymously gather formative assessment data while you teach. You can use the toolbar with verbal questions or float it over any open application on your computer, such as your Internet browser, a multimedia presentation, or spreadsheet application, just to name a few. To use the 2Know! Toolbar: Select Your Theme You control the look and functionality of the 2Know! Toolbar by selecting among several themes. To select a theme: 1. Connect the Renaissance Receiver to your computer with the USB cable. 2. Launch the 2Know! Toolbar. 3. Click the Options button and select Themes. 4. Select Graphite or Silver color options, Large or Small size, and with or without Short Answer functionality. 5. When you select your theme, click OK. The 2Know! Toolbar will open with your selected theme each time you launch it. Ask Questions 1. Ask students to turn on their NEO 2s, select the Responder applet, and join your network. The number in the middle of the toolbar shows how many students have joined. 2. Ask a question. You can ask the following types of questions: - T/F true/false - ABC multiple choice numeric response (numbers only, no letters or math symbols) - Short Answer (if available in the theme) short answer response (will accept text, math symbols, and numbers) - Pulse yes/green, no/red (use with polling data, students can enter Y for yes, N for no, T for true, or F for false) 3. Click the corresponding question type on the toolbar. Stop will appear in place of the question type. 4. Allow time for students to respond. Watch the toolbar to see the percentage of students who have responded. 5. Students can change and resubmit answers until you click Stop. You do not have to click Stop to show the Graph (see below). Work with the Data 1. Once students answer, click Graph to view student results. If you wish to stop accepting answers, click Stop. However, you do not have to click Stop before opening the Graph. Discuss results. To reinforce the correct answer, click the radio button next to the answer. The bar next to that answer will turn green. 2. Click Reset to clear the answers and ask another question of the same type. 3. Click Close to return to the toolbar. A25
146 Getting the Most out of NEO 2 Assign a NEO 2 to be a Teacher Responder You can assign a single NEO 2 to act as a teacher responder. The teacher responder allows you to move around the classroom while you operate the 2Know! Toolbar with one NEO 2 rather than with your computer. 1. Connect the Renaissance Receiver to your computer with the USB cable. 2. Launch the 2Know! Toolbar. 3. Click the Options button and select Teacher Responder. 4. Click Assign. You will see a PIN. 5. Power on a NEO 2, press applets, select Responder and join the network. 6. Enter the PIN that the toolbar displayed. 7. Click Close on the 2Know! Toolbar after the ID is shown. You will not need to reference this ID. 8. You can now control the toolbar with the designated NEO 2. Follow the onscreen prompts on NEO 2 to operate the 2Know! Toolbar. Unassign a NEO 2 as a Teacher Responder Once you have assigned a NEO 2 as a teacher responder, it will act as a teacher responder each time you use it with the 2Know! Toolbar. If you would like that NEO 2 to stop functioning as a teacher responder, you must unassign it. To do so: 1. Follow steps 1 3 above. 2. Click Unassign. 3. Click Close. A26
147 Common Software Tasks AccelTest Common Software Tasks Set Up AccelTest There are several steps to set up AccelTest and personalize it for your classroom. Launch AccelTest and enter the password admin. Set up the School Year The first time you launch AccelTest, the School Year Wizard opens. (Note: Next year, when you want to change the date, go to the Preferences menu and select School Year.) 1. Click the calendar icon and select start and end dates. 2. Click Next and select number of terms. Unless you plan to use AccelTest as your electronic gradebook, keep it simple select 1 term. 3. Click Next to review the information 4. Click Done to exit the wizard. Select Your Subject Preferences Optional AccelTest has several built-in subjects, including English, geography, grammar, history, and math. You can edit this list. For example, if you only teach one of those subjects, you may wish to delete the others. If you want to edit the AccelTest built-in subjects, follow the steps below. If not, move to the next heading (Set up Your Classes and Students). 1. From the Preferences menu, select Subjects. 2. Click Add, Edit, or Delete to customize subjects. 3. Click OK when finished. Set up Your Classes and Students You must set up your classes, add students, and enroll them in your classes to use AccelTest. You have three options to complete this task: - Set up Your Classes, Add Students, and Enroll - Import Your Students from a File - Import Your Students from Renaissance Place Review all options and select the one that works best for you. - Option 1: Set up Your Classes, Add Students, and Enroll With this option, you enter all information yourself. Add Your Class 1. Click the Classes tab. 2. Click Add Class. 3. Name your class and click OK. Add Your Students 1. Click the Add Student button. 2. Enter student information and click OK. 3. Follow the prompts to add more students, and click Done when finished. Although the ID number is auto-generated, you may change it. AccelTest recognizes only numeric ID numbers. Enroll Your Students 1. Click the Enroll Students button. 2. Enter a check in the box next to each student s name, or click Select All. 3. Click OK to enroll. A27

148 Getting the Most out of NEO 2 - Option 2: Import Your Students from a File This option works well if you have a master list of all your students. If you use an electronic gradebook, you can download your class list from your gradebook. Add Your Class 1. Click the Classes tab and click Add Class. 2. Name your class and click OK. Import Your Students 1. Save your student list as a Comma Separated Value (CSV) file. This can be done with a spreadsheet saved as a CSV file or a text file. Headings must use this format: 2. From the Classes menu, select Import from File. 3. When the Import Students Wizard opens, select Import from a Comma Separated Value (CSV) formatted file, and click Next. 4. Select your file and click Next. 5. Select students to enroll and click Next. You may select your class or create a new class. 6. Click Next. - Option 3: Import Your Students from Renaissance Place This option works if you are a Renaissance Place subscriber. 1. From the Classes menu, select Import from Renaissance Place. 2. When the Renaissance Place Import Wizard opens, enter your Renaissance Place server address. 3. Enter your user name and password. 4. Select your campus and click Next. 5. Select your class and click Next. 6. Review the summary and click Next. 7. Click Done when students have been imported. A28

149 Common Software Tasks Create a Score Key for Existing Assignments An AccelTest score key is one of the student-paced interactions. You create an AccelTest score key to use with existing content, such as end-of-chapter quizzes, state assessment practice questions, or spelling tests. Students read questions from the existing content and answer them at their own pace using their NEO 2s. Create Your Score Key Launch AccelTest and log in. The default password is admin. 1. Go to the Assignments tab and click New Assignment. 2. Enter a title, and select a subject from the drop-down list. 3. Select Score Key for the assignment type and NEO 2 Only for the scoring device. 4. Click OK. Add Items and Point Values 1. Find each Item Type that matches your test such as Multiple Choice, True/False, Short Answer, etc. 2. Enter the number of each item type. 3. Enter a Points Per Item value for each item type. 4. Click Add. Enter Answers 1. Enter answers. 2. Click the Add Items button to add more item types. 3. When finished, click Done. 4. Then click Save. If you want to reorder items, click the item type (MC, TF, SA, etc.) and: Press ctrl and to move up. Press ctrl and = to move down. Add Your Score Key to the AccelTest Gradebook When you are ready to assign the score key to your students, you must add your score key to the AccelTest Gradebook to assign it to students. 1. Click the Gradebook tab and click Add. 2. Select Score Key and click Next. 3. Select class from the drop-down list. 4. Choose your score key and click Next. 5. Select your assignment and click Next. 6. Enter details for your assignment: - Which term? - Will this be given in class? - Is this an exam or extra credit? - Will students see feedback on their NEO 2s? 7. Click Next. 8. Enter Start/Due Dates and click Next. 9. Assign to All students in the class or Select specific students and click Next. 10. Review the Summary and click Done. A29
150 Getting the Most out of NEO 2 Start Your Score Key Session 1. Connect the Renaissance Receiver to your computer and launch AccelTest. 2. From the Responder menu, select Start a Student Paced Session. 3. Instruct students to power on NEO 2, press applets, select Responder, join your network, enter their AccelTest ID numbers, and enter answers. Create a New Assignment In AccelTest, you can create assignments for many different instructional purposes, such as quizzes, tests, study guides, or text organizers. To create a new assignment: 1. Click the Assignments tab. 2. Click New Assignment. 3. Enter a title and select the subject. 4. Select NEO 2 Only as the assignment option and select NEO 2 Only as the scoring option. Click OK. Add Items and Point Values 1. Select item types such as True/False, Multiple Choice, etc. 2. Enter the number of each item type. 3. Enter a Points Per Item value for each item type. 4. Click Add. Enter Questions and Answers 1. Enter the question. 2. Enter the correct answer. 3. Click OK. 4. When finished, click Done and Save your assignment. Helpful Hints for Multiple Choice Items - Customize the number of answer choices. - To save time, always enter the correct answer in Choice A and then shuffle choices by choosing All in the Shuffle drop-down list in the upper right corner. When AccelTest sends the assignment to the NEO 2s, it will automatically shuffle the answer choices. Helpful Hints for Short Answer Items - Ask very specific questions students answers must exactly match your answer. - List all acceptable forms of the answer, and separate each one with a return. - Choose whether or not to make answers Case Sensitive. Helpful Hints to Reorder Items - Click Add Item to add a new item. - Double-click an item, or click an item, and then click Edit Item to make changes. - Press ctrl and -, or select Move Up from the Assignments menu, to move an item up. - Press ctrl and =, or select Move Down from the Assignments menu, to move an item down. - Click Preview to see how each item looks on NEO 2. (Use arrows to scroll through the questions.) A30
151 Common Software Tasks Add Your Assignment to the AccelTest Gradebook When you are ready to assign the assignment to your students, you must add your assignment to the AccelTest Gradebook to assign it to students. 1. Click the Gradebook tab and click Add. 2. Select AccelTest and click Next. 3. Choose your assignment and click Next. 4. Enter details and click Next. - Which term? - Will this be given in class? - Is this an exam or extra credit? - Will students see feedback on their NEO 2s? 5. Enter Start/Due Dates and click Next. 6. Assign to All students in the class or Select specific students and click Next. 7. Review the Summary and click Done. Start the Session 1. Connect the Renaissance Receiver to your computer and launch AccelTest. 2. From the Responder menu, select Start a Student Paced Session. 3. Instruct students to power on NEO 2, press applets, select Responder, join your network, enter their AccelTest ID numbers, and enter answers. Use a Teacher-Paced Session AccelTest teacher-paced sessions put you in control of the pace of the assignment. Students log on as usual, but cannot see or respond to a question until you take action. There are four types of teacher-paced sessions: Ask verbal questions use for spelling tests, vocabulary review and on-the-fly questions Show PowerPoint slides use with PowerPoint presentations (Windows only) Show questions using a projection monitor use with graphs and images Ask questions from an existing assignment use with previously created AccelTests Step-by-step instructions for the first two types of teacher-paced sessions are outlined below. Instructions for the last two types can be found in the AccelTest Advanced Software Tasks section. Ask Verbal Questions To start a teacher-paced session in which you will ask verbal questions: 1. Connect the Renaissance Receiver to your computer. 2. Launch AccelTest and enter the password, admin. 3. From the Responder menu, select Start Teacher Paced Session. 4. Select Ask Verbal Questions and click Next. 5. Click Ask Verbal Questions again and click Next. 6. Decide whether this assignment will be scored and select Yes or No. 7. For Responder Type, check NEO 2 Only. 8. Enter all details for your assignment, including adding a name for your assignment and determining a point value for each item. Click Next and Done. A31


152 Getting the Most out of NEO 2 9. Click a question type, such as Multiple Choice, True/False, Yes/No, Numeric, or Short Answer. 10. Instruct students to power on NEO 2, press applets, select Responder, join your network, enter their AccelTest ID numbers, press enter, then enter their answers, and press enter again. 11. Click Stop Accepting Responses. 12. Select the correct answer. 13. Click Set Answer. 14. Repeat for additional questions. 15. When finished, click Done and Save. 16. If you opted for the session to be graded, students grades are automatically entered into the AccelTest Gradebook. Show PowerPoint Slides This type of teacher-paced session is only available on Windows computers. As the name of the session suggests, teachers ask questions about existing PowerPoint presentations. To use this type of teacher-paced session: 1. Connect the Renaissance Receiver to your computer. 2. Launch AccelTest and enter the password, admin. 3. From the Responder menu, select Start Teacher Paced Session. 4. Select Show PowerPoint Slides and click Next. 5. Click Select, and navigate to your PowerPoint presentation. 6. Click Next. 7. Select Ask verbal questions so that you can ask questions during the PowerPoint presentation. 8. Enter assignment details. Click Next. Review the Summary and click Done. 9. When your PowerPoint presentation opens, select a question type. 10. Instruct students to power on NEO 2, press applets, select Responder, join your network, enter their AccelTest ID numbers, press enter on their NEO 2s, then enter their answers, and press enter again. 11. When all have answered, click Stop Accepting Responses. 12. Identify the correct answer. 13. Click Set Answer. 14. If you want to show a graph that displays percentages of correct answers, click the graph icon. Click Done to close the graph. 15. Click Next Slide and repeat steps 9 14 for your remaining slides and questions. A32
153 Common Software Tasks 16. When finished with the lesson, click Done to close the PowerPoint and Yes to end the session. 17. If you opted to have the assignment graded, all students grades are automatically entered into the AccelTest Gradebook. Show Questions Using a Projection Monitor Select this teacher-paced session type if you have an existing projected assignment with graphics, equations, or other images. See AccelTest Advanced Software Tasks, later in this appendix, to learn about projected assignments. Ask Questions From an Existing Assignment Select this teacher-paced session type to review content and promote collaboration. This type of session uses AccelTest assignments you created previously. See AccelTest Advanced Software Tasks, later in this appendix, to learn about asking questions from an existing assignment. Review AccelTest Student Data With AccelTest, teachers review student data via the Gradebook, the Sessions tab, or AccelTest Reports. Option 1: Review Data in the AccelTest Gradebook 1. Click the Gradebook tab. 2. Review individual grades and scores. 3. Review class mean. Click Mean to toggle between mean and median. Option 2: Review Data in the Sessions Tab 1. Click the Sessions tab. 2. Double-click a session to review. 3. Review bar graph to see percentages of correct answers for question Click Next to see percentages for question Click Previous to go back. 6. If you want to group students by correct or incorrect responses, click State. 7. If you want to project the graph to students, slide the shade to hide student names. 8. Click Done. Option 3: Review Data with AccelTest Reports 1. Click the Gradebook tab. 2. Select an assignment by clicking on its header. 3. From the Reports menu, select a report. The most common AccelTest reports include: - Assignment Analysis offers statistical data as well as item-byitem analysis. - Assignment Results generates student-by-student reports with scores and student answers. If you want this report to show corrected answers with the student answers, go to the Preferences menu, select Reports, and select Assignment Results. Check Show Correct Answers. A33
154 Getting the Most out of NEO 2 - Student Record lists all assignments and grades for each student. - Group Assignment lists all students and grades. - Student Standards Report shows state standards mastery. Score keys and assignments must be aligned to state standards. A34
155 Common Software Tasks AccelTest Advanced Software Tasks As your AccelTest skill set grows, so will your NEO 2 integration. The following sets of instructions detail advanced AccelTest tasks, which include, but are not limited to: Align AccelTest items to State Standards Use AccelTest Libraries Export an AccelTest Assignment Import an AccelTest Assignment Align AccelTest Items to State Standards or Common Core State Standards You can align each item as you create your assignment. You can align items on existing assignments as long as you have not already administered the assignment to students. You must download and install your state s standards before you can align items. To do so: 1. Launch AccelTest and enter the password, which is admin. 2. From the Preferences menu, select Libraries/Standards. 3. Click the Standards tab. 4. Click Add. 5. Select Install standards from Renaissance Learning web site. 6. If you would like to install Common Core State Standards, select NGA Center- CCSSO. 7. If you would not like to install Common Core State Standards, select your state. 8. Click Next. 9. Select all of the standards or just the ones you want. 10. Click Install. Now that your standards are installed, you can align items on your AccelTest assignments. 1. As you create your items, or as you open an existing assignment, click the Align button. 2. Click the Standards tab. 3. Click the + sign to open the standards. Select your state, subject area, and grade level. 4. Select a standard. 5. Click Add. 6. Repeat steps 4 5 to add other standards to the same item. 7. Click OK. Access Standards Reports When your AccelTest assignments are aligned, you have access to additional reporting options including: Assignment Standards Report lists all standards used in a particular assignment. Class Standards Report lists standards that have been aligned to AccelTest items, and notes classroom performance. Student Standards Report lists each student, all standards that have been aligned to AccelTest items, and student performance. To view the Assignment Standards Report: 1. Click the Assignments tab, and select an aligned assignment. 2. From the Reports menu, select Assignment Standards. 3. Select Preview or Print. (You can also print from the Preview window.) A35
 To view the Student Standards Report: 1. Click the Gradebook tab, and select a student or set of students. 2.")
156 Getting the Most out of NEO 2 To view the Class Standards Report: 1. Click the Gradebook tab, and select an assignment that has been aligned. 2. From the Reports menu, select Class Standards. 3. Select Preview or Print. (You can also print from the Preview window.) To view the Student Standards Report: 1. Click the Gradebook tab, and select a student or set of students. 2. From the Reports menu, select Student Standards. 3. Select Preview or Print. (You can also print from the Preview window.) Use AccelTest Libraries AccelTest ships with a host of built-in questions. You access these questions via AccelTest Libraries. To use the AccelTest Libraries: 1. Launch AccelTest and enter the password, which is admin. 2. From the Assignments tab, click New Assignment. 3. Name the assignment. 4. Select NEO 2 Only for the assignment type (on the left), and select NEO 2 Only for the type of scoring (on the right). 5. Click OK. 6. When the Add Items wizard opens, click the Library tab. 7. Select your grade level and content area. (Click the + sign to expand the items.) You can view questions in the window. 8. Select questions and click Add. 9. Hold the Ctrl key and click to select multiple items and click Add. 10. Click Done and Save. Teacher-Paced Assignment: Show Questions Using a Projection Monitor To engage students in this type of teacher-paced session, first create your assignment: 1. Launch AccelTest and enter the password, admin. 2. From the Assignments tab, click New Assignment. 3. Complete assignment details. Select Projected and NEO 2 Only as shown. 4. Enter number of questions for each question type and point value for each question. 5. Enter question stem, answer choice(s), and identify correct answer. 6. As you edit the question, position your cursor where you want to place a graphic. 7. Click the Graphic button. 8. Navigate to the saved graphic on your computer, and click Open. 9. The graphic will appear within the question stem. If you chose to delete a graphic, click the graphic and press the delete key on your computer. 10. When you complete the assignment, click Done, and Save, to save your assignment and add it to the assignments listed in the Assignment tab. A36

157 Common Software Tasks To administer your assignment: 1. Connect the Renaissance Receiver to your computer. 2. Launch AccelTest and enter the password, admin. 3. From the Responder menu, select Start Teacher Paced Session. 4. Select Show questions using a projection monitor and click Next. 5. Select your existing projected assignment. 6. Complete all assignment details. Click Next. 7. Review the Summary. Click Done. 8. When the session starts, click Send Question. 9. Instruct students to power on NEO 2, press applets, select Responder, choose your network, and enter their AccelTest ID numbers. 10. Instruct students to press enter on their NEO 2s, enter their answers, and press enter again. 11. When all students respond, click Stop Accepting Responses. 12. Click Send Question. 13. Instruct students to press enter on their NEO 2s, enter their answers, and press enter again. 14. Repeat steps to ask more questions. 15. When you are finished with all of the questions, click Done. 16. If you opted to have the assignment graded, all students grades are automatically entered into the AccelTest Gradebook. A37
158 Getting the Most out of NEO 2 Teacher-Paced Assignment: Ask Questions from an Existing Assignment Select this teacher-paced session type to review content and promote collaboration. This type of session uses AccelTest assignments you created previously. Why would you want to use an AccelTest assignment which is typically administered as a student-paced session as a teacher-paced session? Here are three reasons: Review the content in the AccelTest assignment and allow for discussion on each item. Review test-taking strategies. Work in collaborative groups. To use a teacher-paced session with an existing assignment: 1. Connect the Renaissance Receiver to your computer. 2. Launch AccelTest and enter the password, admin. 3. From the Responder menu, select Start Teacher Paced Session. 4. Select Ask questions from an existing assignment and click Next. 5. Select your existing assignment. Click Next. 6. Complete all assignment details. Click Next. 7. Review the Summary and click Done. 8. When the session starts, click Send Question. 9. Instruct students to power on NEO 2, press applets, select Responder, choose your network, and enter their AccelTest ID numbers. 10. Instruct students to press enter on their NEO 2s, enter their answers, and press enter again. 11. When all students respond, click Stop Accepting Responses. 12. Click Send Question. 13. Instruct students to press enter on their NEO 2s, enter their answers, and press enter again. 14. Repeat steps to ask more questions. 15. When you are finished with all of the questions, click Done. 16. If you opted to have the assignment graded, all students grades are automatically entered into the AccelTest Gradebook. A38
159 Common Software Tasks Export an AccelTest Assignment Teachers may share AccelTest assignments. When you export your AccelTest assignment, everything exports, including any state standards alignments, images or equations. To export an assignment: 1. Click the Assignments tab. 2. Click once to select an assignment. 3. From the Assignments menu, select Export. 4. Select a location to export the assignment to, and click OK. Import an AccelTest Assignment 1. From the Assignments menu, select Import. 2. Navigate to the exported assignment and click OK. 3. When the assignment opens, review it, make any changes, and click Done. 4. Click Save. A39
160 Getting the Most out of NEO 2 Renaissance Responder Scoring Software You will use the Renaissance Responder scoring software when students submit answers to Accelerated Math Assignments. Download and Install the Renaissance Responder Scoring Software 1. Go to your Renaissance Place site, but do not log in. 2. Click Check Software Requirements. 3. Select Renaissance Responder. 4. Download and install. Configure the Renaissance Responder Scoring Software 1. Connect the Renaissance Receiver to your computer. 2. Launch Renaissance Responder scoring software. 3. When prompted, enter your Renaissance Place URL, user name, and password. Score Accelerated Math Assignments with NEO 2 1. Continue to follow all Accelerated Math best practices. 2. Connect the Renaissance Receiver to your computer. 3. Launch Renaissance Responder scoring software. 4. Log in with your Renaissance Place user name and password. 5. Instruct each student to power on his or her NEO 2, press applets, and select Responder. 6. Instruct each student to join your network, enter the Form Number from his Accelerated Math assignment, and enter answers. A40
161 Common Software Tasks KeyWords To configure KeyWords options and access KeyWords reports, see the NEO Manager Common Software Tasks section earlier in this appendix. A41
162 Getting the Most out of NEO 2 Linked Files To access, edit, and work with sample linked files and to create your own linked files, see the Common Software Tasks NEO Share section earlier in this appendix. A42
163 Common Software Tasks Write On! Lessons To access, edit, and work with Write On! lessons, see the Common Software Tasks NEO Share section earlier in this appendix. A43
164 Getting the Most out of NEO 2 Text2Speech Text2Speech by Renaissance Learning allows NEO 2 users to hear their writing read. To use, follow these steps: 1. Connect headphones or speakers to the Text2Speech device. 2. Turn the Text2Speech device on using the button on the side of the device. 3. Align the NEO 2 infrared lens with the Text2Speech device. 4. Press ctrl-j to enable Text2Speech and customize for optimum use. Then press esc. 5. Enter text. Text2Speech will read your text. 6. Press ctrl-a to highlight all text, and press ctrl-m to hear text read again. 7. If you notice your editing keys are not working, they ve been disabled while your text is waiting to be read. Press esc to enable or see Step 5 to hear text read. A44
165 AlphaWord Plus Keyboard Commands NEO 2 uses standard computer keyboard commands to cut, copy, paste, save, and open files. Other commands allow students to enter symbols and international characters. The most commonly used keyboard commands are printed on the back of each NEO 2. Press ctrl-h and select Features to view more commands through the help menu. A comprehensive list of all commands is included in the NEO User Manual, which is available as a free download at the Renaissance Training Center. AlphaWord Plus Common Keyboard Commands How Do I Move the cursor Change font size Clear a file space Keyboard Command ctrl option cmd F clear file Special Notes Press any arrow key to move the cursor. Press an arrow key to move to the desired font size. Then press enter. Pressing clear file is like closing a window on your computer. If you save your file with a file name, clear file closes your file. If you do not save your file with a file name, clear file clears or erases your file. Save a file ctrl S After you save a file with a file name, press clear file to close your file. Open a file ctrl O Closed files are listed in alphabetical order. Press the down arrow key to move to your file, and then press enter. Delete a file ctrl D Use the arrow keys to move to the file, and press enter. Then press the Y key to permanently delete the file. Highlight text shift-arrow key Press and hold the shift key while you press an arrow key to highlight text. Copy text ctrl C Highlight text first, and then copy. Cut text ctrl X Highlight text first, and then cut. Paste text ctrl V Use the arrow keys to move to the desired location or press a file space key to move to a new file space and press ctrl-v. Count words ctrl W Displays word count, paragraphs, and page usage. Use the thesaurus Beam a file Work with NEO Share ctrl T ctrl-send ctrl-b cmd-send cmd-o Move the cursor inside the word you want to look up and press ctrl-t. Press enter, and select a category to narrow the search. Then press enter. Use the arrow keys to select a synonym or press A to search for antonyms and press enter. Press enter again to replace the word in your file. The sender presses ctrl-send, while the receiver presses ctrl-b. Be sure to point the NEO 2s at each other while sending or receiving a file. To send the current file to NEO Share, press cmd-send. To download and open a file from NEO Share, press cmd-o. Find a file ctrl F See all your saved files and the first lines of text. Access help ctrl H See all keyboard commands and learn more about features, navigating, and other topics. A45
166 Getting the Most out of NEO 2 Linked Files Keyboard Commands If you want to do this... Do this... Remember... Access the linked file Go back to your writing Press ctrl-l Press ctrl-l Enter a check mark Press the space bar Pressing X also works, but we recommend teaching students to use the space bar, so they understand that the rest of their keyboard is not enabled with read-only files. Erase a check mark Go to the next check box Go back to the previous check box Move around in the text in the read-only file Reset or erase all the check marks in the check boxes Press the space bar Press the tab key Press shift-tab Press an arrow key Press clear file The linked file loops. This means that when you get to the last check box and press the tab key, it will take you back to the first check box. Delete the linked file Press ctrl-d The only way to delete a linked file is to delete both pieces the active file and the read-only file. Beam the linked file Edit the text in the active file Edit the text in the readonly file Press ctrl-b to receive Press ctrl-send to send Edit as you would in any word processing file Not possible The active file and the linked file will beam together. Students cannot make any changes to a readonly file on the NEO 2. (Teachers can edit linked files before they send them to students.) A46
167 AlphaWord Plus AlphaWord Plus Passwords As you read in Chapter 2, you may want students to password protect their AlphaWord Plus files particularly in a shared implementation. If you enable password protection, your students can set a password for each of the AlphaWord Plus files. If you teach your students to save their files before adding the password, they can use the same password such as their student ID number for each of their AlphaWord Plus files. Enable Password Protection You enable password protection with a keyboard command on each NEO 2 or enable password protection on all NEO 2s with NEO Manager. Option 1: NEO Manager 1. Connect NEO 2s to the SmartOption Mobile Lab and connect the lab to your computer. 2. Launch NEO Manager. 3. Click Settings. 4. Check AlphaWord Plus Settings. 5. Check Passwords Enabled. 6. Click Yes. 7. Click the Send List tab. 8. Click Send. The default AlphaWord Plus file password is write. Option 2: Individual NEO 2 1. Press ctrl-option-cmd-p. 2. Enter the master password. (Call Technical Support at for the master password.) 3. Press any key. Setting Passwords When you first enable password protection for AlphaWord Plus files, all files have the same default password write. Students follow these steps to set unique passwords on their AlphaWord Plus files: 1. Open a file. 2. Enter the default password write. 3. Press option-cmd-p. 4. Enter the current password write. 5. Press tab and enter a new password. 6. Press tab and enter the new password again to confirm. 7. Enter text, edit, revise, save, print, and beam as usual. A47
168 Getting the Most out of NEO 2 AlphaWord Plus Accessibility Features In Chapter 8, you read about NEO 2 built-in features to support students with visual, physical, and learning needs. You can enable or disable most accessibility features using keyboard commands or through the Control Panel applet. You may also use the Settings tab in NEO Manager. Adjust Screen Contrast Use the Control Panel to adjust the contrast. 1. Power on NEO Press the applets key. 3. Select Control Panel. 4. Select Set Screen Contrast. 5. Use the up/down arrow keys to adjust contrast. 6. Press enter. Adjust AlphaWord Plus Font Size Adjust the display font size with simple keyboard commands. 1. Power on NEO Press ctrl-option-cmd-f. 3. Use the up/down arrow keys to select an appropriate font size. 4. Press enter. Set Default Font Size for AlphaWord Plus Use the Control Panel to select a default display font size. 1. Power on NEO Press the applets key. 3. Select Control Panel. 4. Select Change Default AlphaWord Font. 5. Select appropriate font size. (You will see a + sign in front of the current font size.) 6. Press enter. Turn Auto Repeat Off Use the Settings tab in NEO Manager, or, on the NEO 2: 1. Press option-cmd-k. 2. Press 1 to turn Auto Repeat off. 3. Press esc to exit. Turn Sticky Keys On Use the Settings tab in NEO Manager, or, on the NEO 2: 1. Press option-cmd-k. 2. Press 2 to turn Sticky Keys on. 3. Press esc to exit. Turn Slow Keys On Use the Settings tab in NEO Manager, or, on the NEO 2: 1. Press the applets key. 2. Select Control Panel. 3. Select Change keyboard settings. 4. Select Change slow keys setting. 5. Set the delay time in seconds. 6. Press esc to exit. A48
169 AlphaWord Plus Change the Keyboard Layout Use the Settings tab in NEO Manager, open the Control Panel on the NEO 2, or: 1. Press option-cmd-l. 2. Enter 1, 2, 3, or 4 to select a keyboard layout. 3. Press esc to exit. View the Current Keyboard Layout 1. Press the applets key. 2. Select Control Panel. 3. Select View keyboard layout. Return to the QWERTY Keyboard Use the Settings tab in NEO Manager, or, on the NEO 2: 1. Press the applets key. 2. Select Control Panel. 3. Select Change keyboard settings. 4. Select Change keyboard layout. 5. Select the QWERTY layout. 6. Press esc. A49

170 Accelerated Reader on NEO 2 Taking AR quizzes on NEO 2 is as easy as 1-2-3! 1. Press the applets key. 2. Choose Accelerated Reader. 3. Read the question, enter your answer. Question Answer choices If you see a scroll bar, use the up and down arrow keys to see more words. Reproducible Forms 2011 Renaissance Learning, Inc. A50


171 Keyboarding Resources and Reproducible Forms Keyboarding Activities The following activities provide for fun, engaging keyboarding practice. Photocopy them to use as guidelines at keyboarding centers. Adapt them if necessary, depending on the age and grade level of your students. Reproducible Forms 2011 Renaissance Learning, Inc. Reproducible Forms 2011 Renaissance Learning, Inc. A51


172 Reproducible Forms 2011 Renaissance Learning, Inc. Reproducible Forms 2011 Renaissance Learning, Inc. A52
173 Technique Checklist Attitude/Technique Never Sometimes Always Comments Sits straight in chair Feet flat on the floor Arms relaxed, elbows at sides Fingers slightly curved, tips resting lightly on keys Wrists lifted off the keyboard Begins and ends all keystrokes at home row Presses each key with correct finger Presses space bar with thumbs Uses right hand little finger for enter key Reproducible Forms 2011 Renaissance Learning, Inc. A53

174 A54 Reproducible Forms 2011 Renaissance Learning, Inc.

175 Finger Zones Reproducible Forms 2011 Renaissance Learning, Inc. A55


176 Lessons in KeyWords The following tables list the lessons provided in KeyWords. Each table shows the keys introduced in the lesson, the words and word patterns learned, and the passing criteria for testing (based on the default goals). A56
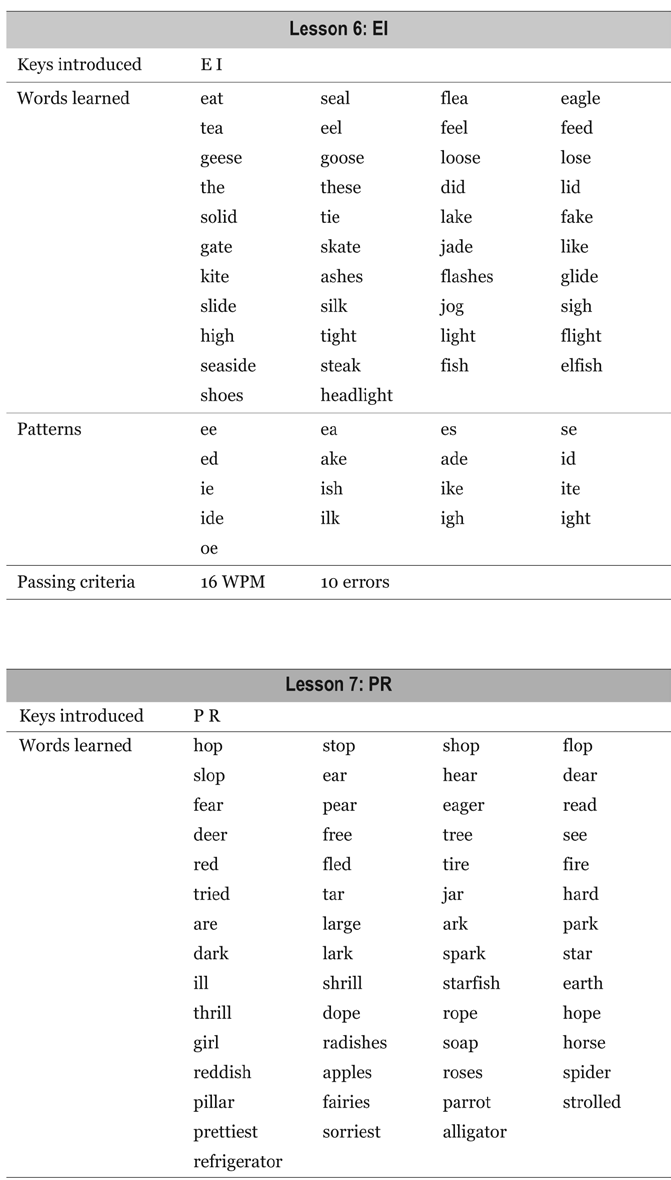
177 A57

178 A58

179 A59

180 A60
Contact Information. Copyright Notice. Asia/Pacific, Canada, and Latin America. Europe, Middle East, and Africa
 Contact Information United States Renaissance Learning PO Box 8036 Wisconsin Rapids, WI 54495-8036 Technical questions or problems: Telephone: (800) 338-4204 Email: support@renlearn.com Website: www.renlearn.com/support
Contact Information. Copyright Notice. Asia/Pacific, Canada, and Latin America. Europe, Middle East, and Africa. Technical questions or problems:
 Contact Information United States Renaissance Learning PO Box 8036 Wisconsin Rapids, WI 54495-8036 Technical questions or problems: Telephone: (800) 338-4204 Email: support@renlearn.com Website: www.renlearn.com/support
Accelerated Math Software Manual
 Renaissance Learning PO Box 8036 Wisconsin Rapids, WI 54495-8036 Telephone: (800) 338-4204 (715) 424-3636 Outside the US: 1.715.424.3636 Fax: (715) 424-4242 Email (general questions): answers@renaissance.com
Renaissance Place TM Software Manual
 Renaissance Place TM Renaissance Learning P.O. Box 8036 Wisconsin Rapids, WI 54495-8036 Telephone: (800) 338-4204 (715) 424-3636 Outside the US: 1.715.424.3636 Fax: (715) 424-4242 Email (general questions):
Using the Accelerated Math Live Online Student Program A SUPPLEMENT TO GETTING RESULTS WITH ACCELERATED MATH LIVE
 Using the Accelerated Math Live Online Student Program A SUPPLEMENT TO GETTING RESULTS WITH ACCELERATED MATH LIVE Using the Accelerated Math Live Online Student Program A Supplement to Getting Results
Reading Management Software. Software Manual. Motivate Your Students to Read More and Better Books!
 Reading Management Software Software Manual Motivate Your Students to Read More and Better Books! Renaissance Learning P. O. Box 8036 Wisconsin Rapids, WI 54495-8036 Phone: (866) 846-7323* Fax: (715) 424-4242
Accelerated Reader Software Manual
 Renaissance Learning PO Box 8036 Wisconsin Rapids, WI 54495-8036 Telephone: (800) 338-4204 (715) 424-3636 Outside the US: 1.715.424.3636 Fax: (715) 424-4242 Email (general questions): answers@renaissance.com
Software Manual. Learn how to: Reading Management Software
 Reading Management Software Learn how to: Manage Reading Practice, Recorded Voice, Vocabulary Practice, Literacy Skills, and Other Reading Quizzes Set Reading Practice Goals and Reader Certifi cations
Getting Results with Accelerated Math Live EASILY MANAGE DAILY MATH PRACTICE FOR ALL STUDENTS
 Getting Results with Accelerated Math Live EASILY MANAGE DAILY MATH PRACTICE FOR ALL STUDENTS Getting Results with Accelerated Math Live All logos, designs, and brand names for Renaissance Learning s
The Notebook Software Activity Guide
 The Notebook Software Activity Guide The Notebook software activity guide is intended to act as a reference of the best practices for creating and presenting lesson activities using Notebook software.
Using. An excerpt from Smart Technology's getting started manual explaining the basics of the SmartBoard and how to use it.
 Using An excerpt from Smart Technology's getting started manual explaining the basics of the SmartBoard and how to use it. Quick Reference Hardware Basics for Front Projection SMART Board Interactive Whiteboards
CORE PROGRESS FOR MATH LEARN MORE
 CORE PROGRESS FOR MATH LEARN MORE About Core Progress Math The National Math Panel recommends that mathematics courses provide a focused, coherent progression of mathematics learning, with an emphasis
Software Manual. Learn how to: Reading Management Software
 Reading Management Software Software Manual Learn how to: Install and manage Reading Practice, Recorded Voice, Vocabulary Practice, Literacy Skills, and Other Reading Quizzes Set Reading Practice goals
Punctuality The child must be responsible for collecting his laptop promptly and arriving in the classroom on time for each lesson.
 LAPTOP POLICY Priory Preparatory School is committed to providing best access to the curriculum for all its pupils. The use of laptops has been shown to be beneficial for children with specific learning
SMART Board Training Packet. Notebook Software 10.0
 SMART Board Training Packet Notebook Software 10.0 Chris de Treville Chris.deTreville@avispl.com 6301 Benjamin Road Suite 101 Tampa, FL 33634 p: 813.884.7168 f: 813.882.9508 SMART Board Welcome Center
BRING YOUR OWN DEVICE (BYOD) STUDENT & PARENT GUIDELINES. Version 5
 STUDENT & PARENT GUIDELINES. Version 5") BRING YOUR OWN DEVICE (BYOD) STUDENT & PARENT GUIDELINES Version 5 08/25/2015 Table of Contents BYOD Program Overview... 3 What is BYOD?... 3 BYOD Rationale... 3 Overview of BYOD Program... 3 Objective
BRING YOUR OWN DEVICE (BYOD) STUDENT & PARENT GUIDELINES Version 5 08/25/2015 Table of Contents BYOD Program Overview... 3 What is BYOD?... 3 BYOD Rationale... 3 Overview of BYOD Program... 3 Objective
The Comprehensive, Yet Concise Guide to Credit Card Processing
 The Comprehensive, Yet Concise Guide to Credit Card Processing Written by David Rodwell CreditCardProcessing.net Terms of Use This ebook was created to provide educational information regarding payment
Welcome to SMART Notebook TM 11 collaborative learning software
 Welcome to SMART Notebook TM 11 collaborative learning software SMART Notebook Software Tutorial Review features and get started quickly To access this tutorial later, go to: 1 What s new in SMART Notebook
Software Manual RENAISSANCE PLACE REAL TIME
 RENAISSANCE PLACE REAL TIME Renaissance Learning PO Box 8036 Wisconsin Rapids, WI 54495-8036 Toll-Free Phone Number: (800) 338-4204 (715) 424-3636 Outside the US: 1.715.424.3636 Fax: (715) 424-4242 Email
Vodafone Email Plus. User Guide for Windows Mobile
 Vodafone Email Plus User Guide for Windows Mobile 1 Table of Contents 1 INTRODUCTION... 4 2 INSTALLING VODAFONE EMAIL PLUS... 4 2.1 SETUP BY USING THE VODAFONE EMAIL PLUS ICON...5 2.2 SETUP BY DOWNLOADING
STAR. Early Literacy Teacher s Guide
 STAR Early Literacy Teacher s Guide STAR Early Literacy Teacher s Guide The STAR products logo, STAR Early Literacy, STAR Reading, Accelerated Reader, Power Lessons, Renaissance Learning, Renaissance
Parent s Guide to. Accelerated Reader QUESTIONS AND ANSWERS. www.renaissance.com
 Parent s Guide to Accelerated Reader QUESTIONS AND ANSWERS www.renaissance.com Your child will be participating in the Accelerated Reader (AR ) program. This guide is designed to answer your questions
Writing Software List. Cursors Biggy cursor go to google, type in Biggy Cursor
 Writing Software List Cursors Biggy cursor go to google, type in Biggy Cursor CloseView is a screen magnification program for the Macintosh computer. It can magnify a section to make it more easily visible.
MathXL Getting Started Guide for Instructors
 MathXL Getting Started Guide for Instructors Copyright Notice Copyright 2013 by Pearson Education. All rights reserved. No part of the contents of this book may be reproduced or transmitted in any form
BRING YOUR OWN DEVICE (BYOD) STUDENT & PARENT GUIDELINES Version 4.3.14 04/03/2014
 STUDENT & PARENT GUIDELINES Version 4.3.14 04/03/2014") BRING YOUR OWN DEVICE (BYOD) STUDENT & PARENT GUIDELINES Version 4.3.14 04/03/2014 Table of Contents BYOD Program Overview... 3 What is BYOD?... 3 BYOD Rationale... 3 Overview of BYOD Program... 3 Objective
BRING YOUR OWN DEVICE (BYOD) STUDENT & PARENT GUIDELINES Version 4.3.14 04/03/2014 Table of Contents BYOD Program Overview... 3 What is BYOD?... 3 BYOD Rationale... 3 Overview of BYOD Program... 3 Objective
Literacy. Work Stations. Source: Diller, D.(2003) Literacy Work Stations, Making Centers Work
 Literacy Work Stations, Making Centers Work") Literacy Work Stations Source: Diller, D.(2003) Literacy Work Stations, Making Centers Work Kyrene Reading Instruction Focus: Improve student achievement through implementation of curriculum and adopted
Literacy Work Stations Source: Diller, D.(2003) Literacy Work Stations, Making Centers Work Kyrene Reading Instruction Focus: Improve student achievement through implementation of curriculum and adopted
SMART NOTEBOOK 10. Instructional Technology Enhancing ACHievement
 SMART NOTEBOOK 10 Instructional Technology Enhancing ACHievement TABLE OF CONTENTS SMART Notebook 10 Themes... 3 Page Groups... 4 Magic Pen... 5 Shape Pen... 6 Tables... 7 Object Animation... 8 Aligning
CHROMEBOOK TIPS & TRICKS
 CHROMEBOOK TIPS & TRICKS NILES ELEMENTARY DIST. 71 0 Table of Contents Getting Started with your Chromebook... 3 Ready When You Are!... 3 Getting To Know The Keyboard... 3 The Search Key and Caps Lock
Digital Curriculum Instructional Delivery
 This resource sponsored by Intel Education A planning resource for personalizing learning Digital Curriculum Instructional Delivery toolkits With game-based learning, online lessons, virtual simulations
1:1 LAPTOP PROGRAM FAQS
 1:1 LAPTOP PROGRAM FAQS Accessories Batteries Breakage, Theft or Loss Costs Distribution File Access and Storage Internet Access Loaner Laptops Logging in Ownership Personal Use Philosophy of Program Printing
H-ITT CRS V2 Quick Start Guide. Install the software and test the hardware
 H-ITT CRS V2 Quick Start Guide Revision E Congratulations on acquiring what may come to be one of the most important technology tools in your classroom! The H-ITT Classroom Response System is quite easy
SMART Board User Guide for Mac
 SMART Board User Guide for Mac What is it? SMART Board is an interactive whiteboard available in an increasing number of classrooms at the University of Tennessee. While your laptop image is projected
SMART Board Interactive Whiteboard Setup with USB Cable
 SMART Board Interactive Whiteboard Setup with USB Cable The instructions below are for the SMART Board interactive whiteboard 500 series and apply to both desktop and laptop computers. Ready Light USB
DIGITAL LEARNING ENVIRONMENT NETBOOK PROGRAM. Frequently Asked Questions
 DIGITAL LEARNING ENVIRONMENT NETBOOK PROGRAM Frequently Asked Questions This set of questions and answers is designed to provide parents and students with answers to commonly asked questions about the
Teacher Interview 7377 Introduction to Technology in Schools, Fall, 2008 Connie Capaldo, Katherine Flanagan, and David Littrell
 Teacher Interview 7377 Introduction to Technology in Schools, Fall, 2008 Connie Capaldo, Katherine Flanagan, and David Littrell What are the different types of technology you use in your classroom? Why
A Barcode Primer for Manufacturers Dr. Peter Green BellHawk Systems Corporation
 A Barcode Primer for Manufacturers Dr. Peter Green BellHawk Systems Corporation Introduction This document is an introduction to the principles and practice of barcode scanning as it relates to a manufacturing
Putting It All Together
 15 Putting It All Together Now that we ve taken a look at all the tools available in Moodle, I want to take a step back and look at the big picture. Moodle has a lot of nifty capabilities, but they are
VIRTUAL DESKTOP COMPANION SOFTWARE FOR MAC
 VIRTUAL DESKTOP COMPANION SOFTWARE FOR MAC USER MANUAL 25206A ABOUT THIS MANUAL Thank you for getting the Boogie Board Sync 9.7 LCD ewriter. This manual will help you with the Sync Virtual Desktop Companion
MacBook and OS X Basics
 1 MacBook and OS X Basics Users will learn basic care, features, icons, and gestures for the MacBook Air. Modified March 10, 2014 TRAINING DISTRIBUTION AND BASICS (ITC) Info and Care 11 MacBook Air Model
Microsoft Office Access 2007 which I refer to as Access throughout this book
 Chapter 1 Getting Started with Access In This Chapter What is a database? Opening Access Checking out the Access interface Exploring Office Online Finding help on Access topics Microsoft Office Access
SMART Board Training Outline Trainer: Basel Badran
 Sharjah Higher Colleges of Technology SMART Board Training Outline Trainer: Basel Badran What is a SMART Board? o Concept & Technology SMART Board Components: o Smart Tools Start Center Recorder Keyboard
Getting Started. Getting Started with Time Warner Cable Business Class. Voice Manager. A Guide for Administrators and Users
 Getting Started Getting Started with Time Warner Cable Business Class Voice Manager A Guide for Administrators and Users Table of Contents Table of Contents... 2 How to Use This Guide... 3 Administrators...
Dell Connected Learning for Schools. Transforming Education for the Digital Age
 Dell Connected Learning for Schools Transforming Education for the Digital Age This document was created to provide Dell s point of view for primary and secondary schools and contains the following sections:
SMART Board User Guide for PC
 SMART Board User Guide for PC What is it? The SMART Board is an interactive whiteboard available in an increasing number of classrooms at the University of Tennessee. While your laptop image is projected
Hypercosm. Studio. www.hypercosm.com
 Hypercosm Studio www.hypercosm.com Hypercosm Studio Guide 3 Revision: November 2005 Copyright 2005 Hypercosm LLC All rights reserved. Hypercosm, OMAR, Hypercosm 3D Player, and Hypercosm Studio are trademarks
Internet and Computing Core Certification Guide Module A Computing Fundamentals
 Lesson 4: Using Input/Output Devices input/output devices common input devices common output devices specialized devices how a device connects what a port is what a device driver is What are Input/Output
1 to 1 Laptop Programs Brisbane Catholic Education
 1 to 1 Laptop Programs Brisbane Catholic Education Introduction What is a one to one program? A 1 to 1 laptop program provides every student and teacher access to his or her own laptop computer in a wireless
COMPUTER APPLICATIONS TECHNOLOGY TEACHER GUIDE
 COMPUTER APPLICATIONS TECHNOLOGY TEACHER GUIDE Welcome to the Mindset Computer Applications Technology teaching and learning resources! In partnership with Coza Cares Foundation, Mindset Learn, a division
Ansur Test Executive. Users Manual
 Ansur Test Executive Users Manual April 2008 2008 Fluke Corporation, All rights reserved. All product names are trademarks of their respective companies Table of Contents 1 Introducing Ansur... 4 1.1 About
Jump right in. SMART Board software
 Jump right in. SMART Board software Meet the heart of the SMART Board interactive whiteboard Ever wonder what makes SMART Board interactive whiteboards so powerful? SMART Board software the real genius
GOALS: The goal for this session is: OBJECTIVES: By the end of the lesson participants should be able to: MATERIALS: Instructor ACTVITIES: EVALUATION:
 GOALS: The goal for this session is: Learn how to connect and use the SMART Board for effective instruction Ability to annotate and save work using Microsoft Office and SMART Notebook Software OBJECTIVES:
itunes U Course Guidelines
 itunes U Course Guidelines Contents What s New in itunes U 1 Overview 2 Getting Started 3 Course Settings 4 Editing and Organizing Content 6 Adding Posts, Assignments, and Materials 7 Managing Enrollment
Accelerated Reader TM Software Manual
 Accelerated Reader TM United Kingdom Renaissance Learning UK Ltd 32 Harbour Exchange Square London E14 9GE United Kingdom Tel: +44 (0)20 7184 4000 Fax: +44(0) 02 7538 2625 Email: support@renlearn.co.uk
Hi! Let s get started.
 Hi! Let s get started. What s in the box Roku 2 player Roku 2 enhanced remote Headphones 2 x AA batteries for remote A/V cable (RCA) Power adapter Get to know your Roku 2 A Front view B E C Back view
Frog VLE Update. Latest Features and Enhancements. September 2014
 1 Frog VLE Update Latest Features and Enhancements September 2014 2 Frog VLE Update: September 2014 Contents New Features Overview... 1 Enhancements Overview... 2 New Features... 3 Site Backgrounds...
Windows BitLocker Drive Encryption Step-by-Step Guide
 Windows BitLocker Drive Encryption Step-by-Step Guide Microsoft Corporation Published: September 2006 Abstract Microsoft Windows BitLocker Drive Encryption is a new hardware-enhanced feature in the Microsoft
NetSupport School: Classroom Management
 NetSupport School: Classroom Management NetSupport School is a class leading training software solution, providing Teachers with the ability to instruct, monitor and interact with their Students either
LogMeIn Hamachi. Getting Started Guide
 LogMeIn Hamachi Getting Started Guide Contents What Is LogMeIn Hamachi?...3 Who Should Use LogMeIn Hamachi?...3 The LogMeIn Hamachi Client...4 About the Relationship Between the Client and Your LogMeIn
EDD- 7914 Curriculum Teaching and Technology by Joyce Matthews Marcus Matthews France Alcena
 EDD- 7914 Curriculum Teaching and Technology by Joyce Matthews Marcus Matthews France Alcena Assignment 1: Online Technology for Student Engagement: Kahoot Instructor: Dr. Shirley Walrod Nova Southeastern
professional development Training Guide
 professional development Training Guide u Webinar and training Information u Guided Tour u How To Tips Welcome! Your school now has unlimited access to the award-winning Britannica Online School Edition.
Hi! Let s get started.
 Hi! Let s get started. What s in the box Roku player Remote control with in-ear headphone jack 2 x AA Alkaline batteries In-ear headphones Power adapter Get to know your Roku B A Front view C D E Back
Wiley PLUS Student User Guide
 Wiley PLUS Student User Guide Table Of Contents egrade Plus... 1 egrade Plus Help... 1 Getting Additional Help and Technical Support... 1 System Requirements... 2 Getting Started... 5 Logging in and Registering
Karen Fuson, Pam Richards, and Robyn Seifert
 The Math Expressions Mastery Learning Loop Keeping All Students on the Grade-Level Learning Path by Giving More Time and Support to In-Class Periodic Interventions and Out-of-Class Tier 2 & Tier 3 Follow
Parent FAQ s. 1:1 Laptop Program. Introduction. 1-to-1 devices and student learning. Will students use computers too much for schoolwork?
 Introduction What is a one-to-one program? One-to-one learning provides every student and teacher access to his or her own laptop computer in a wireless environment allowing students to learn at their
ELL Considerations for Common Core-Aligned Tasks in English Language Arts
 ELL Considerations for Common Core-Aligned Tasks in English Language Arts A substantial body of research clearly indicates that utilizing specific instructional modifications as well as targeted pedagogical
SMART Vantage. Installation guide
 SMART Vantage Installation guide Product registration If you register your SMART product, we ll notify you of new features and software upgrades. Register online at smarttech.com/registration. Keep the
Good Share Client User Guide for ios Devices
 Good Share Client User Guide for ios Devices Product Version: 3.1.3 Doc Rev 3.1 Last Updated: 24-Feb-15 Good Share TM Table of Contents Introducing Good Share 1 Installing the Good Share App 1 Getting
Representing Data Using Frequency Graphs
 Lesson 25 Mathematics Assessment Project Formative Assessment Lesson Materials Representing Data Using Graphs MARS Shell Center University of Nottingham & UC Berkeley Alpha Version If you encounter errors
The Edmodo Quick Start Guide
 The Edmodo Quick Start Guide Hunted & Gathered by Tony P. Thompson Table of Contents First Thing First: Get a District or School Domain... 2 The Deal About Edmodo... 2 New Teacher Sign Up... 3 Create a
The Best Ideas for Managing and Evaluating the Interactive Student Notebook. Presented by TCI. www.teachtci.com (800) 497-6138
 497-6138") The Best Ideas for Managing and Evaluating the Interactive Student Notebook Presented by TCI www.teachtci.com (800) 497-6138 P A R T Using the Interactive Student Notebook 3 125 Using the Interactive Student
The Best Ideas for Managing and Evaluating the Interactive Student Notebook Presented by TCI www.teachtci.com (800) 497-6138 P A R T Using the Interactive Student Notebook 3 125 Using the Interactive Student
For further support information, refer to the Help Resources appendix. To comment on the documentation, send an email to support@tk20.com.
 Technical Support and Product Information tk20.com Tk20 Corporate Headquarters 10801 MoPac Expressway, Suite 740, Austin, Texas 78759 USA Tel: 512-401-2000 For further support information, refer to the
So you want to create an Email a Friend action
 So you want to create an Email a Friend action This help file will take you through all the steps on how to create a simple and effective email a friend action. It doesn t cover the advanced features;
Trademark Notice. Copyright Notice
 User s Guide Trademark Notice LinQ, SMART Board, Sympodium, Notebook, Bridgit, smarttech and the SMART logo are trademarks or registered trademarks of SMART Technologies Inc. in the U.S. and/or other countries.
What s New in SMART Board Software 9.0 for Windows Operating Systems
 What s New in SMART Board Software 9.0 for Windows Operating Systems If you ve used SMART Board software before, you ll notice many changes in version 9.0. In this document, we ll introduce version 9.0
LEARN... Ways to support active learning outside the classroom. How to get more out of your investment in educational technology and content.
 Destiny can help districts make sure every student in every school has the right tools in the right place at the right time to learn the way that fits them best supporting teachers and librarians in their
LabSim. Anytime, anywhere learning. self-paced learning. www.gtslearning.com
 Anytime, anywhere learning www.gtslearning.com Love learning... LabSim from gtslearning offers the very best blend of learning tools, developed specifically to get students through their certification
Conference Management Software Solution http://www.conference-tracker.com/
 Engineerica Systems, Inc. P.O. Box 677096 Orlando, FL 32867-7096 Conference Management Software Solution http://www.conference-tracker.com/ Operator Quick Start Manual Revision 1.0.2 March 13, 2013 2002-2013
10 Reasons TO TRY QUICKBOOKS POINT OF SALE
 10 Reasons TO TRY QUICKBOOKS POINT OF SALE 10 Reasons TO TRY QUICKBOOKS POINT OF SALE 1. Ring up sales quickly and accurately.............3 2. Works seamlessly with your QuickBooks financial software*..................4
Online International Business Certificate Programs
 Online International Business Certificate Programs User s Guide for Students Copyright 2007, Bisk Education, Inc., and Thunderbird School of Global Management. All rights reserved. i Table of Contents
OBJECTIVES. The BIG Idea. How do I register for the ACT? What do I need to know for the test day? ACT Registration
 ACT Registration 3 Taking Tests The BIG Idea How do I register for the ACT? What do I need to know for the test day? AGENDA Approx. 45 minutes I. Warm Up: ACTing Ahead (5 minutes) II. ACT Registration
SMART Software for Mobile Devices Sales brief
 SMART Software for Mobile Devices Sales brief For reseller use only This brief provides a summary of the information and tools available to assist in you in your conversations with education customers
CTL Online Workshop Program Referral Resource Sheet
 ACADEMIC POLICIES THAT CAN AFFECT YOU AS A UMUC FACULTY MEMBER Familiarizes faculty with UMUC Academic Policies and their effect on faculty responsibilities and expectations for students Intended for all
Change your perspective of work
 Change your perspective of work with the addition of multiple monitors Multiple monitors in the workplace In many professions, using more than one monitor from a single machine is not a new thing. Many
Backing up your digital image collection provides it with essential protection.
 Backing up your digital image collection provides it with essential protection. In this chapter, you ll learn more about your options for creating a reliable backup of your entire digital image library.
Learning Goals & Success Criteria
 Learning Goals & Success Criteria Assessment for Learning Video Series VIEWING GUIDE A resource to support the implementation of GROWING SUCCESS: Assessment, Evaluation, and Reporting in Ontario Schools.
Information Systems Services Enterprise Vault
 Information Systems Services Enterprise Vault Email Archiving ENTERPRISE VAULT EMAIL ARCHIVING This document has been created in conjunction with Watsonia Publishing Ltd. and ISS Training Unit, Leeds University.........................................
Choose your blend. Case stories from real classrooms that show how to succeed with blended learning WHAT IS BLENDED LEARNING?
 Choose your blend Case stories from real classrooms that show how to succeed with blended learning WHAT IS BLENDED LEARNING? 1 What is blended learning? Blended learning is the mix of the online and physical
Outcomes of Preservice Teacher s Technology Use
 Outcomes of Preservice Teacher s Technology Use William F. Morrison, Assistant Professor, Bowling Green State University Tara L. Jeffs, Assistant Professor, East Carolina University Abstract: At a time
Scholastic READ 180 Next Generation
 Scholastic READ 180 Next Generation READ 180 Next Generation is a comprehensive system of curriculum, assessment, human capital development, and family engagement tools that empower everyone to contribute
Microsoft Outlook Quick Reference Sheet
 Microsoft Outlook is an incredibly powerful e-mail and personal information management application. Its features and capabilities are extensive. Refer to this handout whenever you require quick reminders
Foundation Paper Supporting Special Education Students with READ 180
 Foundation Paper Supporting Special Education Students with READ 180 READ 180 is a scientifically research-based, intensive reading intervention program with a proven track record of delivering measurable
Networking. General networking. Networking overview. Common home network configurations. Wired network example. Wireless network examples
 Networking General networking Networking overview A network is a collection of devices such as computers, printers, Ethernet hubs, wireless access points, and routers connected together for communication
Simple Computer Backup
 Title: Simple Computer Backup (Win 7 and 8) Author: Nancy DeMarte Date Created: 11/10/13 Date(s) Revised: 1/20/15 Simple Computer Backup This tutorial includes these methods of backing up your PC files:
I m Miss Smith, and I teach English and German. Today I ll show you how I use NetSupport School to plan, prepare and conduct my classes.
 1 I m Miss Smith, and I teach English and German. Today I ll show you how I use NetSupport School to plan, prepare and conduct my classes. Before I take my first class, I ll guide you through the basics
FORMATIVE ASSESSMENT STRATEGIES, DEFINITIONS, EXAMPLES
 FORMATIVE ASSESSMENT STRATEGIES, DEFINITIONS, EXAMPLES 1 Minute Essay Give students an open-ended question and one to three minutes to write their answers. Good questions: What is the most important thing
Software User's Guide
 BROTHER QL-500/550/650TD/1050/1050N Software User's Guide QL-500 QL-650TD QL-550 QL-1050/1050N 1 Contents Contents....................................................................................2................................................................................4
Thanks to official SAT practice tools.
 Aaron s ready. Tara s ready. Karina s ready. Thanks to official SAT practice tools. Preparation leads to performance. When students prepare for the SAT with official SAT practice tools from the maker of
Contents. Section A Networking Basics... 1. 1 Learning the Basics... 3. Section B Wired Ethernet Networking... 17
 Contents Section A Networking Basics...................................... 1 1 Learning the Basics............................................. 3 Selecting a network connection........................................
Connect and Project: Using a Video Projector in the Classroom
 Connect and Project: Using a Video Projector in the Classroom Apple and Dell Laptops User Guide Training Module Version Date: 7/2008 1 Connect and Project: Using a Video Projector in the Classroom Video
Visit salonbooker.com or Call 1.866.966.9798
 Visit salonbooker.com or Call 1.866.966.9798 What s the Top 5 all about? Welcome curious salon owners and managers! Our years of experience and passion for the beauty industry have left us knowledgeable,