Welcome to the ClimeMET CM9088 Wireless Desktop Weather Station.
|
|
|
- Flora Bridges
- 8 years ago
- Views:
Transcription
1
2 Welcome to the ClimeMET CM9088 Wireless Desktop Weather Station. Congratulations on the purchase of your new desktop weather station, the latest in home weather technology from ClimeMET Welcome to the ClimeMET CM9088 Desktop Weather Station. This system can be set up to measure the indoor & outdoor temperature and humidity, pressure, sunrise & sunset times and more at your location. You ll be able to go back and view maximum and minimum historical records, while you can also set various alarms to let you know if and when certain conditions are met. The CM9088 is packed with numerous features that will enable you to bring the joy of the great outdoors into your home, so please make sure to begin by reading through this manual in order to get the most out of your new weather station. Thank you for choosing ClimeMET. This manual should be kept in a safe place for future reference as it contains important notes on the setup and operation of your weather station. This handbook may contain mistakes and printing errors. The information in this handbook is regularly checked and corrections made in the next issue. We accept no liability for technical mistakes or printing errors, or their consequences. All trademarks and patents are acknowledged. 01

3 Contents 1. What s in the Box?... Page 3 2. Features... Page 4 3. Setup Guide... Page Battery Installation... Pages 5 & Sensor Installation... Pages 6 & 7 4. Display Console... Pages 7 & Weather Forecasting... Page Weather Tendency Indicator... Page Examples of Changing Weather Icons... Page Storm Warning Indicator... Page 9 5. Program Mode... Page Quick Display Mode... Page Setting Mode... Pages Setting Calibrated Humidity... Page Setting Barometric Pressure... Page Alarm Mode... Pages Sunrise and Sunset... Page Minimum/Maximum Mode... Page Support... Pages 20 & Product Specification... Page 22 02

4 1. What s in the Box? > Weather Console > Remote Sensor with Mounting Bracket > Instruction Manual You May Also Need: > Three AA batteries for the weather console > Two AAA batteries for the outdoor sensor > Phillips Screwdriver for mounting your outdoor sensor Please help in the preservation of the environment and return used batteries to an authorized depot. All rights reserved. This handbook must not be reproduced in any form, even in excerpts, or duplicated or processed using electronic, mechanical or chemical procedures without written permission of the publisher. 03

5 2. Features 1) Wireless Outdoor and Indoor Temperature ( F or C) 2) Wireless Outdoor and Indoor Humidity (%RH) 3) Records Min and Max Temperature 4) Records Min and Max Humidity 5) Barometric Pressure 24-hour History Graph (inhg or hpa) 6) Weather Tendency Arrow 7) Forecast Icons Based on Changing Barometric Pressure 8) DCF-1 Radio Controlled Time and Date with Manual Setting 9) Automatic Updates for Daylight Saving Time Based on Germany DST System 10) Synchronized Instant Reception 11) 12 or 24-hour Time Display 12) Time Alarm with Snooze 13) Perpetual Calendar 14) LED Backlight 15) Wall Hanging or Free Standing 16) Low Battery Indicator 17) Sunrise Time 18) Sunset Time 19) Moon Phase 04
 Time Alarm with Snooze 13) Perpetual Calendar 14) LED Backlight 15) Wall Hanging or Free Standing 16) Low Battery Indicator 17) Sunrise Time 18) Sunset Time")
6 3. Setup Guide 3.1 Battery Installation: Note: To avoid operating problems, please take note of battery polarity before/when inserting any Alkaline Batteries (permanent damaged could be introduced by inserting the battery in wrong direction). Use good quality Alkaline Batteries and avoid rechargeable batteries. 1) Insert two AAA batteries into the remote sensor. 2) Insert three AA batteries into the weather station straight afterward. 3) Within 3 minutes (but probably sooner) the outdoor temperature should be received by the weather station. Do not press any keys before the outdoor sensor data is received. 4) Once the outdoor connection has been established, mount the units ensuring that the receiver can still pick up the signal from the transmitter. Position the remote sensor at the desired location indoors/outdoors and it will transmit the temperature from its location. Every time the remote sensor is powered up (for example after a change of batteries) a random security code is transmitted that must be synchronized with the base station to receive weather data. Therefore, if the batteries from the remote sensor were changed, then the display console must also be powered up again to re-learn the transmitter so it can receive data. The most effective way to do this is to remove all batteries from both parts, wait one minute with both units unpowered, then re-insert all batteries again within a 30-second time period. When the display console is powered up, a short beep will sound and all LCD segments will light-up for 3 seconds before it enters learning-mode in order to identify the remote sensors security code. Following this period, the base station will then start the DCF radio controlled time reception. The console will commence Radio-Controlled Clock reception period and no weather data will be received during this period of time. If the RCC signal can t be found within 1 minute, the search process will be cancelled and will automatically re-attempt every two hours until the signal is successfully received. The regular radio-frequency link will be resumed once the RCC reception routine has been completed. 05
 Insert three AA batteries into the weather station straight afterward. 3) Within 3 minutes (but probably sooner) the outdoor temperature should be received by the weather station.")
7 3.1 Battery Installation Continued: Note: Please make sure not to press any keys during the initial learning-period if a key is pressed before the station receives the temperature signal, you will need to follow the battery installation procedure again. Please wait 10 seconds before re-inserting the batteries in order to ensure both the transmitter and receiver have been allowed to completely reset. Note for Radio Controlled Time: The time and date display is based on the signal provided by the highly accurate government operated atomic clock based in Frankfurt, Germany. The display console will continue to scan for the radio controlled time signal each day, even if the time has been set manually. If this reception has been unsuccessful, the radio controlled time icon will not appear but reception will still be attempted continually. If reception has been successful, the received time and date will overwrite the manually-set time and date. If after setting the time manually it appears to then jump forward, it is possible that the unit has received the radio-controlled time and overwritten the manual time setting. If this happens, please check the Time Zone setting, as you may need to adjust this to compensate for international time difference. To do this, press and hold the SET key until the time changes to a flashing single digit (this will display 0 by default). Then, press either the + or MIN/MAX key to change the time zone setting up and down accordingly. Note: When batteries require replacement for the display console the low battery indicator will light up on the LCD. 3.2 Sensor Installation: 1) Display Console Using the foldable legs at the back of the unit, the base station can be placed onto any flat surface. It can also be wall mounted at the desired position by using the hanging holes also found at the back of the unit. It s important to check that the radio signal can be received successfully before permanently mounting either of the units. 06

8 3.2 Sensor Installation Continued: 2) Remote sensor Note: To achieve a true temperature reading, please try to avoid mounting the remote sensor in direct sunlight. The outer casing of the sensor could potentially heat up and then take time to cool again, resulting in false temperature readings. We recommend that you install the remote sensor on an outside North-facing wall. Remember that some obstacles such as thick walls, concrete and large metal objects can reduce the transmission range. To wall mount, use 3 screws to fix the wall bracket to the desired wall and then simply plug the remote sensor into the bracket. 4. Display Console The following illustration shows the full segments of the LCD for descriptive purposes only it will not appear like this during normal operation. 07

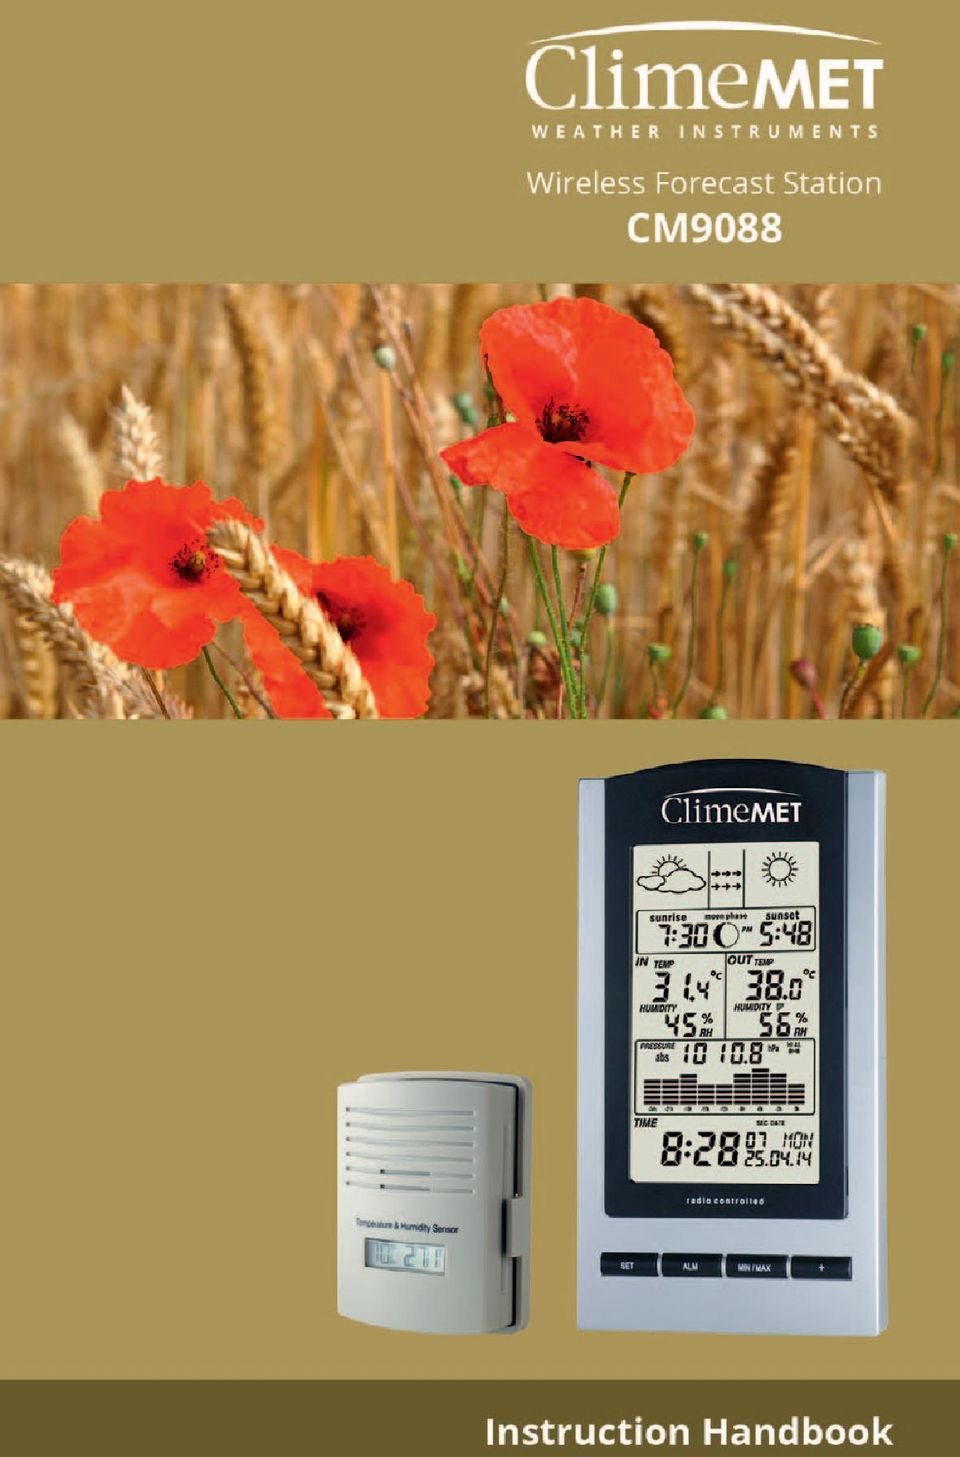
9 4. Display Console Continued 1. Weather forecast icon 2. low battery indicator 3. MIN/MAX information 4. Sunrise time 5. Moon phase indicator 6. Sunset time 7. Indoor temperature low / high alarm 8. Indoor temperature display 9. Temperature display unit 10. Indoor humidity display 11. Indoor temperature and humidity alarm on indicator 12. Indoor humidity low / high alarm 13. Dew point temperature display 14. Outdoor temperature low/high alarm 15. Outdoor temperature and humidity alarm on indicator 16. Temperature display unit 17. Outdoor temperature display 18. Outdoor humidity display 19. Outdoor humidity low/high alarm 20. Absolute or relative air pressure selection 21. Barometer air pressure 22. Pressure with 24 hour history graph 23. Pressure high alarm 24. Pressure alarm on indicator 25. Pressure low alarm 26. Pressure display unit (inhg or hpa) 27. DCF, WWVB indicator 28. Radio Controlled Time icon 29. Time 30. Second 31. Day of week/ time zone 32. Alarm on indicator 33. Date (Y / M / D) 08

10 4.1 Weather Forecasting: The four weather icons Sunny, Partly Cloudy, Cloudy and Rainy are used for weather forecasting. There are also two weather tendency indicators to show the air pressure tendency between the displayed weather icons. The weather forecasting is calculated from the changing air pressure. 4.2 Weather Tendency Indicator: The weather tendency indicator arrow is located between the weather icons to show the air pressure tendency and to provide a forecast of the upcoming weather. The rightward arrow means that the air pressure is increasing and weather is expected to generally become better. The leftward arrow means that the air pressure is decreasing and the weather is expected to become worse. The weather forecast icon is in accordance with the calculation between the current relative-pressure and the on-going pressure change over the last six hours. If a change is occurring, the weather tendency indicator (animated arrows) will be flashing for three hours indicating that a change in the weather is underway. If weather conditions have then become stable and no new weather change conditions are met, the arrows will be fixed. 4.3 Examples of Changing Weather Icons: 4.4 Storm Warning Indicator: The storm threshold can be set to suit the user s requirement for storm forecasting, from a sensitivity of between 3-9hPa (default 2hPa). Areas that experience frequent changes in air pressure generally require a higher setting compared to an area where the air pressure is calmer. For example, if 4hPa is selected there must be a fall or rise in air pressure of at least 4hPa before the weather station will register this as a change in weather. 09

11 5. Program Mode The display console uses five keys for operation: SET, ALARM, MIN/MAX, + and SNOOZE/LIGHT. There are also four program modes available: Quick Display Mode, Setting Mode, Alarm Mode and Min/Max Mode. The selected program mode can be exited at any time by either pressing the SNOOZE/LIGHT key, or simply pressing no keys and waiting for the 10-second time-out to take effect. 5.1 Quick Display Mode: While in Normal Mode, press the SET key to enter the Quick Display Mode, you then have the following options: 1) Switch between Outdoor Temperature/Dew point (pressing the MIN/MAX key or + key shifts the display between outdoor temperature and dew point). Press the SET key again to switch to the pressure setting: 2) Switch between Absolute pressure / Relative pressure (pressing the MIN/MAX key of the + key shifts display between the absolute pressure and relative pressure). Press the SET key to accept the change and toggle between these settings then either press SNOOZE/LIGHT or wait 10 seconds to exit this program mode. 5.2 Setting Mode: - Hold the SET key for 3 seconds while in normal mode to enter Setting Mode - Press the SET key to scroll through the following in sequence: 1) DST (Daylight Savings Time) on/off. The DST (ON or OFF) setting will begin flashing. Press the + key to toggle between DST ON and DST OFF. 2) Time Zone Setting. Press the SET key again to adjust the Time Zone (TZ) setting. Press the + key or MIN/MAX key to adjust the time zone from -12 to 12, based on the number of hours from Coordinated Universal Time, or Greenwich Mean Time (GMT). 10
 Switch between Outdoor Temperature/Dew point (pressing the")
12 5.2 Setting Mode Continued: The following table provides times zones throughout the world. Locations in the eastern hemisphere are positive, and locations in the western hemisphere are negative. Hours from GMT Time Zone Cities -12 IDLW: International Date Line West NT: Nome Nome, AK -10 AHST: Alaska-Hawaii Standard Honolulu, HI CAT: Central Alaska HST: Hawaii Standard -9 YST: Yukon Standard Yukon Territory -8 PST: Pacific Standard Los Angeles, CA, USA -7 MST: Mountain Standard Denver, CO, USA -6 CST: Central Standard Chicago, IL, USA -5 EST: Eastern Standard New York, NY, USA -4 AST: Atlantic Standard Caracas São Paulo, Brazil -2 AT: Azores Azores, Cape Verde Islands -1 WAT: West Africa GMT: Greenwich Mean London, England WET: Western European 1 CET: Central European Paris, France 2 EET: Eastern European Athens, Greece 3 BT: Baghdad Moscow, Russia Abu Dhabi, UAE Tashkent Astana Bangkok 8 CCT: China Coast Bejing 9 JST: Japan Standard Tokyo 10 GST: Guam Standard Sydney Magadan 12 IDLE: International Date Line East Wellington, New Zealand NZST: New Zealand Standard 11

13 5.2 Setting Mode Continued: 3) 12/24 hour format. Press the SET key again to adjust the 12/24 hour format setting. Press the + key to change between 12 hour and 24 hour format. 4) Latitude Location. Press the SET key again to adjust the Northern and Southern Hemisphere settings. The icon LA (latitude) will appear in the Time and Date field. Press the + key to change between NTH (northern hemisphere) and STH (southern hemisphere). Next, press the ALARM key to adjust the latitude whole number. Press the + key or MIN/MAX key to adjust the latitude whole number up or down. Press the ALARM key again to adjust the latitude decimal number. Press the + key or MIN/MAX key to adjust the latitude decimal number up or down. Note: To determine your latitude and longitude, we recommend visiting: and enter your street address. 5) Longitude Location. Press the SET key again to adjust the Eastern and Western Hemisphere settings. The icon LO (longitude) will appear in the Time and Date field. Press the + key to change between EST (eastern hemisphere) and WST (western hemisphere). Next, press the ALARM key to adjust the longitude whole number x 100. Press the + key or MIN/MAX key to adjust the longitude whole number x 100 up or down. Press the ALARM key again to adjust the longitude decimal number. Press the + key or MIN/MAX key to adjust the longitude decimal number up or down 6) Manual time setting (hours/minutes). Press the SET key again to set the hour. Press the + key or MIN/MAX key to adjust the hour up or down. Press the SET key again to set the minute. Press the + key or MIN/MAX key to adjust the minute. 12

14 5.2 Setting Mode Continued: 7) Calendar setting (year /month /date). Press the SET key again to set the calendar year. Press the + key or MIN/MAX key to adjust the calendar year. Press the SET key again to set the calendar month. Press the + key or MIN/MAX key to adjust the calendar month. Press the SET key again to set the calendar day. Press the + key or MIN/MAX key to adjust the calendar day (note that the display format is Month/Day/Year). 8) Temperature display unit degree Celsius or Fahrenheit. Press the SET key again to toggle the temperature units from Celsius to Fahrenheit. 9) Indoor Temperature Calibration (default is measured indoor temperature). Press the SET key to adjust the indoor temperature. Press the + key or MIN/MAX key to adjust the temperature up or down in 0.1 degc (0.18 degf) increments. To view the uncalibrated value, press the ALARM key while the temperature is flashing. 10) Indoor humidity calibration. Press the SET key to adjust the indoor humidity. Press the + key or MIN/MAX key to adjust the humidity up or down in 1% increments. Please see Setting Calibrated Humidity notes below for further information. 11) Outdoor Temperature Calibration (default is measured outdoor temperature). Press the SET key to adjust the outdoor temperature. Press the + key or MIN/MAX key to adjust the temperature up or down in 0.1 degc (0.18 degf) increments. To view the uncalibrated value, press the ALARM key while the temperature is flashing. 12) Outdoor humidity calibration. Press the SET key to adjust the outdoor humidity. Press the + key or MIN/MAX key to adjust the humidity up or down in 1% increments. Please see Setting Calibrated Humidity notes below for further information. To view the uncalibrated value, press the ALARM key while the humidity is flashing. 13) Air pressure display units in hpa or inhg. Press the SET key again to toggle the pressure units between hpa or inhg. 13
 Indoor Temperature Calibration (default is measured indoor temperature).")
15 5.2 Setting Mode Continued: 14) Relative pressure setting from 700hPa 1100hPa (default hPa). Press the SET key to adjust the relative barometric pressure. Press the + key or MIN/MAX key to adjust the relative barometric pressure up or down. Please see Setting Barometric Pressure notes below for further information. 15) Pressure threshold setting (default 2hPa). Press the SET key again to adjust the pressure threshold setting. Press the + key or MIN/MAX key to adjust the pressure threshold up or down. 16) Storm threshold setting (default 4hPa).Press the SET key again to adjust the storm threshold setting. Press the + key or MIN/MAX key to adjust the storm threshold up or down. Note: Please set the units firstly before change units value. When changing the unit setting, the value will convert accordingly but may cause resolution loss due to the internal calculation-algorithm. 5.3 Setting Calibrated Humidity: The display console allows you to calibrate both the indoor and outdoor humidity. Humidity is a difficult parameter to measure accurately and drifts over time - the calibration feature allows you to compensate for this. To calibrate humidity, you will need an accurate source, such as a sling psychrometer or whirling hygrometer. To calibrate indoor humidity - In the Setup Mode with the indoor humidity flashing, press the + key or the MIN/MAX key to increase or decrease the humidity setting (in increments of 1%) to match the known humidity source. To return the indoor humidity to the measured value, press and hold the SET key for 3 seconds and the humidity will return to the uncalibrated value. To calibrate outdoor humidity - In the Setup Mode with the outdoor humidity flashing, press the + key or MIN/MAX key to increase or decrease the humidity setting (in increments of 1%) to match the known humidity source. To return the outdoor humidity to the measured value, press and hold the SET key for 3 seconds and the humidity will return to the uncalibrated value. Note: The remote thermo-hygrometer will always display the measured humidity level and not the calibrated humidity level. Only the console will show this calibrated value. Note: The dew point calculation is based on the calibrated humidity level. 14
 Storm threshold setting (default 4hPa).Press the SET key again to adjust the storm threshold setting. Press the + key or MIN/MAX key to adjust the storm threshold up or down.")
16 5.4 Setting Barometric Pressure: The display console displays two different pressures: absolute (measured) and relative (corrected to height above sea-level). To compare pressure conditions from one location to another, meteorologists correct pressure to sea-level conditions. Because the air pressure decreases as you rise in altitude, the sea-level corrected pressure is generally higher than your measured pressure. Therefore your absolute pressure may read inhg (969 mb) at an altitude of 1000 feet (305 m), but the relative pressure is inhg (1016 mb). The standard sea-level pressure is in Hg (1013 mb). This is the average sea-level pressure around the world. Relative pressure measurements greater than inhg (1013 mb) are considered high pressure and relative pressure measurements less than inhg are considered low pressure. To determine the relative pressure for your location, locate an official reporting station near you (the internet is the best source for real time barometer conditions, such as weather.com or wunderground.com), and set your weather station to match the official reporting station. To change this, while the relative pressure is flashing press the + key or MIN/MAX key to increase or decrease the relative pressure setting to match the official reporting station. 5.5 Alarm Mode: - While in Normal Mode press the ALARM key to enter the High Alarm Mode - Press the ALARM key again to enter Low Alarm mode After the initial pressing of the ALARM key the display will be refreshed to show current high and low alarm value. The alarm value will be displayed only for those already activated - all non-activated values will display --- instead. 15
 at an altitude of 1000 feet (305 m), but the relative pressure is 30.00 inhg (1016 mb). The standard sea-level pressure is 29.92 in Hg (1013 mb).")
17 5.5 Alarm Mode Continued: - While In the High Alarm Mode, press the SET key to scroll through the following alarm modes: 1. Time alarm (hour/minute) 2. Indoor humidity/high alarm 3. Indoor temperature high alarm 4. Outdoor humidity high alarm 5. Outdoor temperature and dew point high alarm 6. Pressure high alarm - In the Low Alarm mode press the SET key to scroll through the following alarm modes: 1. Time alarm (hour/minute) 2. Indoor humidity low alarm 3. Indoor temperature low alarm 4. Outdoor humidity low alarm 5. Outdoor temperature and dew point low alarm 6. Pressure low alarm - When the desired alarm mode is selected, press the + key or MIN/MAX key change or toggle the alarm value. Holding the + key or MIN/MAX key for 3 seconds will change the figure in larger amounts. Press the ALARM key to then choose if the alarm is on or off (if the alarm is enabled, the speaker icon on the LCD will be displayed to indicate this). Press the SET key to confirm the setting and continue pressing the SET key to toggle through the remaining alarm modes until it returns to the normal display mode. - Remember - you can press SNOOZE/LIGHT key or leave the keys alone for 10 seconds at any time and the alarm mode will return to Normal Mode. Cancelling the Temperature Alarms a. When an alarm condition has been met, that particular alarm will sound and flash for 120 seconds. At this point, simply press any key to mute the alarm. If the alarm condition is activated again within 10 minutes, the alarm will not sound again but will continue to flash until weather conditions have stabilized. This feature will prevent repeated alarms sounding for the same value being triggered in a short period of time. b. The alarm will then reactivate automatically once the value has fallen below the set limit or if a new value is entered instead. 16

18 5.5 Alarm Mode Continued: The Outdoor Weather Alarm When an outdoor weather alarm has been triggered it will flash on the LCD display. The primary outdoor alarm icon and high/low alarm icon will also flash accordingly. For example, in the outdoor temperature display mode when then dew point high alarm is triggered, the DEW POINT icon will flash along with the outdoor & high alarm icons, confirming that the current alarm is relating to high dew point. 5.6 Moon Phase: The following moon phases are displayed based on the calendar date. 17

19 5.7 Sunrise and Sunset: To determine your longitude and latitude,we recommend the following website: Reference Figure 5 below: 1. Enter your address and select the search button 2. The latitude (first number) and longitude (second number) are returned. In this example: Latitude= Longitude= The table below of defines the hemisphere based on the positive or negative sign: Positive Positive Negative Latitude Northern Southern Longitude Eastern Western 3. In this example, the location entered into the display is as below: Latitude = North Longitude = West after rounding to two signification digits. Record your longitude and latitude here for future reference: Latitude: Longitude:

20 5.8 Minimum/Maximum Mode: - While in Normal Mode, press the MIN/MAX key to enter the maximum mode. The MAX logo and the general Max record will then be displayed. - Press the MIN/MAX key again to enter the minimum mode. The MIN icon and minimum record will now be displayed instead. - Press the MIN/MAX key once again to return to Normal Mode. In the Maximum reading mode, press the + key to display the following maximum values along with the time and date at which these values were recorded: 1. Indoor humidity 2. Indoor temperature 3. Outdoor humidity 4. Outdoor temperature 5. Dewpoint 6. Pressure In the Minimum reading Mode, press the + key to display the following minimum values together with the time and date at which these values were recorded: 1. Indoor humidity 2. Indoor temperature 3. Outdoor humidity 4. Outdoor temperature 5. Dewpoint 6. Pressure - While in the Minimum or Maximum mode, press the SET key for 2 seconds and the Minimum or Maximum record that is showing will be reset to the current reading. - Press the SNOOZE/LIGHT key or wait 10 seconds and the Min/Max mode will return to Normal Mode. 19

21 6. Support Problem Cause Remedy My stations clock is an hour fast. Your time zone is set to default. TO SET THE TIME ZONE You will need to set the time zone. 1) Press and hold the SET button for at least 10 seconds. 2) The time zone will be the first option. 3) When it is flashing 0, press the MIN/MAX button until it shows -1. 4) Leave your station for the changes to be set. My sensor is not transmitting to the console. There are a few causes: Too much distance between the two parts. Interference from other sources (wireless radio, speaker etc.). Loss of signal. Reduce the distance. Find a different location for the sensor or console away from units with the same frequency. Reset the whole unit. TO RESET THE WHOLE STATION 1) Place the console and sensor next to each other and take all batteries out of both parts. 2) Leave the console overnight powered down without batteries. 3) In the morning reinsert the batteries into the sensor first then straight away place the batteries into the console. 4) Wait a few minutes; you should then see the readings show on both the console and sensor. EVERY TIME THE SENSOR IS POWERED UP A RANDOM SECURITY CODE IS TRANSMITTED AND THIS CODE MUST SYNCRONIZE WITH THE CONSOLE TO RECEIVE WEATHER DATA. 20
22 Support Continued Problem Cause Remedy My weather tendency is not showing any change or is changing too often. The number in which your barometric pressure threshold is set to is too low or too high. You will need to set the barometric pressure threshold. I cannot reset my Minimum and Maximum values. TO CHANGE THE BAROMETRIC PRESSURE THRESHOLD 1) Press and hold the Set button for at least 10 seconds. 2) Press the Set button to scroll through the options until the relative pressure setting display changes to a single number. 3) The pressure threshold is defaulted to 2hPa. Check that this is what is displayed the range is 2-4hPa. The lower the number, the less it will take to detect a change in pressure. The higher the number, the more pressure will need to change to alter the weather tendency. 4) Use Min/Max and the + buttons to change the barometric threshold. You will need to use these following steps. TO CHANGE THE BAROMETRIC PRESSURE THRESHOLD 1) Press the Min/Max button - once for Maximum values and twice for Minimum. The values will then start to flash. 2) Press the + button to scroll through the values. 3) Press and hold the Set button for the value you want to reset. 4) Repeat steps 2 & 3 for all values you want to reset. 5) Leave your station and it will return to normal mode. 21
23 7. Product Specification Outdoor data Transmission distance in open field Frequency Temperature range Resolution Measuring range rel. humidity Humidity accuracy Measuring interval thermo-hygro sensor Water proof level 100 meters max 433MHz -40 C to +65 C (show OFL if outside range) 0.1 C 20%~95% +/-5% under 0-45 C 48 sec IPX3 Indoor data Pressure / temperature 48 sec Indoor temperature range 0 C to +60 C Resolution 0.1 C Measuring range rel. humidity 1% ~ 99% Resolution 1% Measuring range air pressure 700hPa 1100hPa Resolution/Accuracy 0.1hPa/1.5hPa Alarm duration 120 sec Power consumption Base station Remote sensor Battery life 3XAA 3 x AA 1.5V LR6 Alkaline batteries 2xAAA 2 x AAA 1.5V LR03 Alkaline batteries Minimum 12 months for base Minimum 24months for remote sensor 22
24