ACTi NVR User s Manual. Version /1/24
|
|
|
- Scarlett Manning
- 8 years ago
- Views:
Transcription

1 ACTi NVR User s Manual Version /1/24

2 Table of Contents 1 Overview 9 ACTi NVR Architecture... 9 ACTi NVR Server... 9 ACTi NVR Workstation NVR Web Client System Requirements Operating System and Browsers Supported Editions Explained Keyboard Shortcuts Installing 15 Backup SQL IIS Server Ports and Firewalls Disabling UAC in Windows Vista and Windows NVR Main Program Restore old setting to NVR Database License How does registration work Online Registration Offline Registration (Through ACTi website) Verify your license NVR Quick Start 26 Logging In Finding Cameras on the Network Find cameras with IP Utility Adding cameras to NVR System Adding cameras Automatically via Active Setup Adding cameras Manually Add or configure cameras via Copy setting

3 Configuring Access Rights Defining Camera Groups Setup Camera Group Basic Info 33 Setup which groups does each camera belong 33 Defining User Roles Defining Users View Live Video Display selected Camera Recording and snapshots View recorded video Export Video as Evidence NVR Operation Explained 39 Camera Setup Camera Add New Camera 39 Auto Scan 40 Manual 41 Detail Description Setting 44 Frame Rate Setting Dual Stream enabled 45 Frame Rate Setting Single Stream with constant frame rate 46 Frame Rate Setting Single Stream with constant and variable frame rate46 Advanced Setting 47 Delete Camera 50 Copy Settings 52 Record Path Schedule Special Day 56 Motion PTZ PTZ Preset Preset Tour Event Manager Event List 67 Actions 69 Mail Notification Setup 71 System Setup

4 Camera Groups User Roles Users Storage Joystick View Layouts View Tours Language Services License How does registration work 86 Online Registration 86 Offline Registration (Through ACTi Website) 87 Verify Your License 89 System Map Setup E-Map Setup Add Map 94 Edit Map 94 Add Cameras Add Map Link 97 Map Tour 98 Active Monitor Overview Active Monitor Toolbar Camera Panel Event Panel PTZ Panel Adding cameras into preview windows Personal profile Layout Manager System Monitor Active Player Overview Active Player Toolbar Video Search Video Search Result Play Archive from Search Page

5 Snapshot Search Snapshot Preview Playback Control Panel Export Active Player - Export Time Based Search Bar Channel Layout Synchronous Playback Open file/drag-drop channel Finding your time and Synchronize Sync Main and Sync Follower Sync Playback Active Map Map Overview Mini Preview Web Client Introduction Connecting to NVR as a Web Client Web Client Restrictions ACTi Utility Suite IP Utility Media converter Backup Wizard Streaming Explorer Archive Player

6 Figure List Fig. 1 System Requirements Fig. 2 List of Supported Operating Systems Fig. 3 Keyboard Shortcut List Fig. 4 License Requirements for each version Fig. 5 Online Registration Fig. 6 Offline Registration Fig. 7 Verifying License Registration Info Fig. 8 Login Screen (NVR Workstation) Fig. 9 IP Utility Fig. 10 Add New Cameras - Auto Fig. 11 Auto Search Camera List Fig. 12 Add New Cameras Manual Fig. 13 Camera Setup - Add New Camera Fig. 14 Camera Setup Auto Scan - Auto Search Result List Fig. 15 Camera Setup - Manual Fig. 16 Camera Setup Manual - Basic Settings Fig. 17 Camera Setup Manual - Get Device Setting completed Fig. 18 Camera Setup - Detail Description Setting Tab Fig. 19 Camera Setup Frame Rate Setting Stream 1 only Fig. 20 Camera Setup - Frame Rate Setting Fig. 21 Camera Setup Advanced Setting - Video Quality Fig. 22 Camera Setup Advanced Setting Video Adjustment Fig. 23 Camera Setup Advanced Setting Connection Port Fig. 24 Camera Setup - Delete Camera Fig. 25 Camera Setup - Copy Setting Fig. 26 Camera Setup - Record Path Fig. 27 Camera Setup - Schedule Weekly View Fig. 28 Camera Setup Schedule Copy Setting(Weekly) Fig. 29 Camera Setup - Schedule - Special Day Fig. 30 Camera Setup - Schedule - Copy Setting (Special day) Fig. 31 Camera Setup - Motion - Get motion setting Fig. 32 Camera Setup Motion - Motion Setup Fig. 33 Camera Setup - PTZ setup Fig. 34 Camera Setup - PTZ preset Fig. 35 Camera Setup - Preset Tour

7 Fig. 36 Camera Setup Event Manager - Setup Fig. 37 Camera Setup Event Manager Copy Setting Fig. 38 Camera Setup Event Manager - PIR Fig. 39 Event Manager Setup Action Tab Fig. 40 Event Manager Setup - Notification via Fig. 41 System Setup - Camera Groups Fig. 42 System Setup - User Roles Fig. 43 System Setup - Users Fig. 44 System Setup - Storage Management Fig. 45 System Setup - Joystick Fig. 46 System Setup - Joystick - Dropdown features menu Fig. 47 View Layouts Fig. 48 System Setup - View Tours Fig. 49 System Setup - Language Fig. 50 System Setup - Language - Language List to Insert Fig. 51 System Setup Language - Language List Fig. 52 System Setup - Service Fig. 53 System Setup - License - License Requirements Fig. 54 System Setup - License - Online Registration Fig. 55 System Setup - License - Offline Registration Fig. 56 System Setup - License - Verifying Registration Info Fig. 57 System Setup - System - System Property Fig. 58 Decode I Setting Fig. 59 System Setup - System - System Setting Fig. 60 System Setup - System - System FTP Setting System Fig. 61 System Setup - System - License Information Fig. 62 System Setup - System - Available Disk Drive Capacity Fig. 63 System Setup - System - Workstation Setting Fig. 64 System Setup - System - Camera Model Update Fig. 65 Map Setup - Map Manager (Before adding any map) Fig. 66 Map Setup - Adding Map Image File Fig. 67 Map Setup - Selecting Map Fig. 68 Map Setup - Adding Cameras to Map Fig. 69 Map Setup - Arranging Cameras Fig. 70 Map Setup - Selecting Map Fig. 71 Map Setup - Selecting Map to add into Map Tour Fig. 72 Map Setup - Changing sequence in Map Tour Fig. 73 Active Monitor

8 Fig. 74 Active Monitor - Side panels Fig. 75 Active Monitor - Active Monitor Toolbar Fig. 76 Active Monitor - Camera Panel Fig. 77 Active Monitor - Camera Panel - Sorting the Camera Tree Fig. 78 Active Monitor - Camera Panel - Popup Info Panel Fig. 79 Active Monitor - Event Panel - Camera Panel Fig. 80 Active Monitor - Event Panel - Event Preview window Fig. 81 Active Monitor - Event Panel -Event Playback window Fig. 82 Active Monitor - Event Panel - Event Popup Mini-Preview. 105 Fig. 83 Active Monitor - PTZ Panel Fig. 84 Active Monitor - PTZ Panel - Mouse PTZ Fig. 85 Active Monitor - Playback window Fig. 86 Active Monitor - Personal Profile Fig. 87 Active Monitor - Change Password Fig. 88 Active Monitor - System Monitor Fig. 89 Active Monitor - System Monitor Select Type of Log Fig. 90 Active Monitor - System Monitor - Export Fig. 91 Active Player - Overview Fig. 92 Active Player - Video Search Fig. 93 Active Player Video Search result Fig. 94 Active Player Play Archive from Search Page Fig. 95 Active Player Snapshot Search Fig. 96 Snapshot Preview Fig. 97 Finding Sync Main start point Fig. 98 Sync Main and Sync Follower Fig. 99 Active Map - Active Map Overview Fig. 100 Active Map - Mini Preview Window Fig. 101 Web Client Login Screen Fig. 102 Web Client Basic Mode Fig. 103 Web Client Advanced Mode

9 Overview ACTi NVR Architecture ACTi NVR is a windows-based program that provides full functionality IP-based network video surveillance. It consists of several modules, such as: ACTi NVR Server, ACTi NVR Workstation, ACTi Web Client and ACTi Utility Suite. ACTi NVR Server NVR Server includes several Win32 services. These programs start automatically when the computer boots up and operate in the background, without requiring login by Administrator. The server configurations are done by NVR Workstation or NVR Web Clients. The services are: Active Event Manager Event Manager handles events and responses, and executes all rule-based reactions. Active Schedule Service Schedule service provides recording and scheduling management. Active Service Manager This program monitors the other software service modules. If the other services are down, it will automatically restart them. Active Streaming Service Streaming engine handles connection to ACTi IP devices and provides video stream to multiple clients. Active Message Engine Message engine maintains proper background communication between the various win32 services. 9

10 ACTi NVR Workstation NVR 2.3 (V2.3.01) User s Manual NVR Workstation includes a set of programs that provide interface between users and the NVR server. NVR Workstation may be installed on the same PC as the NVR server, or they may be installed separately and connect to NVR Server via network. For NVR Professional, workstation and server are bundled together and must be on the same PC. They are: Active Setup This module includes both Camera Setup and System Setup. Users can add and setup cameras and devices, configure system parameters and e-maps here. Active Monitor In this module you can see live view from cameras and devices, perform PTZ operations with mouse or Joystick, view system log, receive alert on the Event panel, setup view layouts or survey with pre-defined multi-layout tour. Active Player You may find and playback existing recordings in this module. Up to 4 channels may be played back synchronously. Snapshots or excerpted video segments can be taken from playback files. Recorded files can also be exported to AVI format here. Active Map You can see camera deployment on maps here. Live video feed may also be displayed right on the e-maps. Cycling map tour views are also defined here. NVR Web Client NVR Web Client is the web version of interface to access NVR. You do not have to install any program to use Web Client, just Open IE 7 or IE 8 and type in the server web address/port to login. Almost all of NVR workstation s functions can be accessed on Web Client, except a few minor restrictions. 10

11 System Requirements The performance of NVR is largely determined by the hardware PC capability. The table below provides basic guideline for selecting proper hardware. The minimum required hardware will provide acceptable performance for systems that use mostly MPEG4 streams. Surveillance systems that use primarily H.264 streams should satisfy Recommended PC Spec for good performance. PC Server PC with Local Client Server PC without Local Client Specifications 1-16 Channels Channels 1-64 Channels CPU Intel Core 2 Duo Intel Core i7-920 Intel Core 2 Duo 2.4 GHz 32-bit 2.66 GHz 32-bit 2.67 GHz 64-bit Memory 4GB 6GB 4GB Network Gigabit Ethernet Gigabit Ethernet Gigabit Ethernet Hard Drive 2 GB for NVR 2 GB for NVR 2 GB for NVR Sever/ Space Server/ Workstation Server/ Workstation Workstation PC Remote Client PC Specifications 1-16 Channels Channels CPU Intel Core 2 Duo 2.66 GHz 32-bit Intel Core i GHz 64-bit Memory 4GB 6GB Network Gigabit Ethernet Gigabit Ethernet Hard Drive Space 1 GB for NVR Workstation 1 GB for NVR Workstation Fig. 1 System Requirements NOTE: * These specifications are based on following camera settings: Single stream mode: 1280x1024, 3Mbps, 18fps, MPEG-4 Dual stream mode: 1280x1024, 3Mbps, 18fps, H.264 (recording) 640x480, Quality: 100, 18fps, MJPEG (live view) For more details about system requirements, please refer to Project Planner on 11

12 NOTE: Live view for multiple channels require good hardware for smooth performance. If your live view performance is not satisfactory, please reduce the number of channels viewed at the same time, and use Layout Tour to scan through all the channels instead. NOTE: When CPU power is not enough to provide smooth live view, NVR will decode only one frame per second to save computing power. This is done to ensure that recording is always properly processed. In extreme cases, like when viewing 64 Megapixel H.264 video streams at the same time, PC will be overloaded and NVR will stop operation. This is a common limitation imposed upon all Windows based video management programs. Enhancement for this limitation will be available in the next version of NVR. NOTE: PC Spec requirements are the same for 32-bit and 64-bit systems. 12

13 Operating System and Browsers Supported NVR works with windows-based PCs for both 32 bit and 64 bit systems. The versions supported are listed as below. NVR requires Internet Explorer 7 or 8 to work. Internet Explorer 6 and below are no longer supported. For 64 bit systems, 32 bit IE is required. OS Version 32 bit 64 bit Ultimate sp1 Y Y Windows Vista Enterprise sp1 Y Y Business sp1 Y Y Windows Server 2003 Standard sp2 Y Y Enterprise sp2 Y Y Windows XP Professional sp3 Y N/A Windows Server 2008 Standard Y Y Enterprise Y Y Windows 7 Professional Y Y Fig. 2 List of Supported Operating Systems Editions Explained ACTi NVR comes in two versions, Enterprise and Professional. Professional Version provides full functionality on a single PC. You record and access the videos on the same computer. Enterprise Version provides remote access from another PC. User may connect to Server by either Workstation or Web Client. Recording is done on the server. Enterprise version is divided into Server and Workstation. Remote users do not need to install NVR Server. Function Overview Version NVR Professional NVR Enterprise Single Package Server Workstation Web Client Live View Y Y Y Record Y Y Playback Y Y Y Setup Y Y Y* Remote Access Y Y * Some functions cannot be setup through web client and must be configured via workstation. 13

14 Keyboard Shortcuts NVR provides many keyboard shortcuts to save your time. Here s a list of the available hotkeys. Keyboard Shortcut F5 Ctrl+F6 Ctrl+F7 Ctrl+F8 Ctrl+F9 Ctrl+F10 Ctrl+F11 Ctrl+F12 ESC Description Refresh. This will restart the application session, and starts from login page. Toggle Video display stretch Create snapshot Toggle start / stop tour. Show / hide camera tree panel Cancel auto-login mode during login Show / hide title bar Toggle full-screen mode Cancel full-screen mode; return to normal mode. This function is only valid in full-screen mode Fig. 3 Keyboard Shortcut List 14

15 Installing If you are using ACTi NVR CD-ROM, just follow the auto run sequence. If you downloaded NVR from our website, please run the installer.exe file included. Users that start from auto run will see the first three screens described below. Users that install directly from the installer files will proceed directly to installation. If you are using the enterprise version, please first install windows IIS server (Refer to the How to Setup IIS Server document. After you have IIS setup then you should install NVR Server, and lastly workstation. For remote user you may only install workstation as long as you can connect to the server. Before actual installation, you will be asked to register online. Registering provides many benefits, including online customer help desk, e-newsletter and free software downloads. You may choose to Skip and proceed to NVR installation. The next screen will show the Installer. Choose the software you wish to install on this PC. Please refer to the previous section if you do not know what version to install. (If you downloaded ACTi NVR from the website, you may have a single software package, without multiple choices. In this case just click install.) Note: Be sure to have at least one NVR Server in your system to record video. If you are installing Enterprise Server, you must also install NVR workstation in the same machine to access server settings. 15


16 For installing Workstation, just follow the on screen instructions. For installing NVR Enterprise Server or NVR Professional, please see sample screen from NVR Enterprise Server setup, and follow below steps: 16

17 Backup If you are doing a fresh install, you may ignore this section. If you are upgrading from a previous version of NVR or otherwise doing a re-install, then it would be best to backup existing settings before installing. Please note that NVR 2.3 has a slightly change database structure. You must use the latest version of Backup Wizard that comes with the NVR 2.3 for backup and restore. During NVR 2.3 installation, the existing database will be converted to the new format, and your existing data will still be accessible by the upgraded version. Click Step 1: Backup Database to launch Backup Wizard. Select the version of NVR installed on the current PC. Use the closest one if you do not find an exact match. Enter the correct NVR IP address, NVR Admin account and password. Then choose the destination folder for backup files (Default folder is C:\backup). For detailed instructions, please see Backup Wizard User s Manual. SQL NVR 2.3 requires SQL database engine to work. The NVR installer will automatically install Microsoft SQL 2005 Express SP3 on your PC. Please follow all on-screen instructions. If you have already installed Microsoft SQL 2005, please be sure to upgrade it to SP3. During NVR installation, NVR will need to log in to Database Server. Please provide your own password for Login ID sa, instead of the default password for fresh SQL installs. IIS Server NVR 2.3 requires Microsoft IIS server to operate. You need to install and configure IIS before installing or upgrading your NVR. If you are using Windows 7 / Windows Vista / Windows Server 2008, IIS installation will be automatically covered by the install shield. For other Operating systems, Please refer to the document How to Setup IIS Server for detailed instructions. Please note that 64-bit systems are configured slightly different from 32-bit systems. 17

18 Ports and Firewalls Several ports are needed to transmit data for NVR. Please properly configure the firewalls on the Server PC, Workstation PC and the routers in between. Blockage in any point of the way will prevent NVR from functioning properly. Port Name & Number Workstation Web Client Local Remote Local Remote HTTP Port (Default 80) No Need Required Required Required Control Port 6001 No Need Required Required Required Streaming Port 6002 No Need Required Required Required Message Port 8001 No Need Required Required Required If you encounter any connection issue, please make sure that you have enabled these ports to pass through. Even if your firewall is turned off. Occasionally, you may need to allow unlimited access through firewall for NVR core services. This is required if you use RTP protocol for communication. You can go to Control Panel -> Windows Firewall -> Allowed Programs to add the following two programs to the allowed list: C:\Program Files\NVR\ActiveStreamEngine\ActiveStreamingService.exe C:\Program Files\NVR\ActiveScheduleService\ActiveScheduleService.exe Sample screenshots from Windows 7 are shown below. The steps are similar in other versions of windows OS 18


19 Step 1: Control Panel -> Windows Firewall -> Allow a program through Windows Firewall Step 2: Allow another program Step 3: Browse to the target program. In this sample Active Streaming Service is shown. 19


20 Add this into the list of allowed programs. Step 4: Streaming Service is added to the allowed programs list. Do the same for Active Scheduling service. 20


21 Disabling UAC in Windows Vista and Windows 7 UAC (User Access Control) is a security setting that restricts access in Microsoft Windows Vista. You must disable UAC before installing NVR in Windows Vista and Windows 7. You may disable UAC through Windows control panel, or through the TweakUAC tool that comes with NVR. TweakUAC will launch automatically during install if you still have UAC on. Choose Turn UAC off now., then restart the computer before continuing installation. You may choose to turn UAC back on with TweakUAC after NVR has been fully installed. NVR Main Program After you completed setting up SQL server, disabling UAC for Vista / Win7 and setting up IIS server, you can proceed to install NVR. Please follow the on-screen instructions. For NVR Server, the recommended path is C:\Program Files\NVR. You can change the destination folder path if you really need to. NVR will need to log into the SQL server during installation. If you are doing a fresh install, just use the default account / password. If you have your own sa password, use this instead of the default password. If you forgot the password for sa account, please select Windows Authentication instead. When you use Windows Authentication, just use your windows login account / password. Please see following image. 21

22 After installing NVR Server or workstation, system will ask you to reboot your PC. Please reboot for proper operation afterwards. Restore old setting to NVR Database If you have backed up your old database before installing the new NVR SP3 and somehow require restoring it, please use the latest version of Backup Wizard to restore and recover old settings. You can find Backup Wizard in NVR Workstation, or the Utility folder in original install files. Please refer to Backup Wizard User s Manual for detailed instructions. License ACTi NVR software has 16 channel / 32 channel / 48 channel / 64 channel packages. For NVR Enterprise it is free for up to 16 channels. For more than 16 channels, you have to purchase a license key. Please contact our sales representatives for Enterprise Version 32/48/64 channel license keys. Professional version is free for up to 64 Channels. 22
23 Version NVR Professional NVR Enterprise Channels Single Package Server Workstation 16 Free Free 32 / 48 / 64 License Required Free Fig. 4 License Requirements for each version How does registration work During registration, your license key is matched against the MAC address on the Network Interface Card (NIC) on your computer. This MAC address is used as the Machine Key. This matching record will be stored on the ACTi web server. If your computer has more than one network card, only the network card with the smallest MAC address will be used. If your Server PC has multiple network cards, you will need to disable the extra network cards which you do not intend to register. Please refer to the support document How to Disable and Enable Multiple Network Cards on ACTi Knowledge base website for more information. Online Registration This is the recommended and easiest way to register NVR on your PC. You will need to have internet connection to register this way. Please log into NVR with Active Setup, Click on the Setup System symbol and then click on the license tab. (See following image) Fig. 5 Online Registration Click the Online Registration on the horizontal menu under the tabs. Make sure your computer is connected to internet and enter the License Key. Click Apply to connect to Registration Center. Your License Key and MAC address (NVR automatically reads the Network card with the smallest MAC Address number on your PC) will be recorded. 23
24 Offline Registration (Through ACTi website) If your PC cannot connect to the internet (e.g. in a restricted military base), then you should register offline. You may obtain an activation key from ACTi website with another PC that has internet connection, and activate your NVR license on the server PC off-line. 1. Please go to our website: (See following image) 2. Enter your license key and MAC address (you need to record the MAC address you re your server PC beforehand) 3. Make sure the MAC address shown is correct. 4. Click Apply to generate your Activation Key. Fig. 6 Offline Registration 5. Copy the complete Activation Key and transfer it to the NVR server PC. (By pasting into a text file and copying it via USB disk, for example). 6. Paste the key in Active Setup -> System Setup -> License -> Offline Registration 7. Click Apply to finish registration 24
25 Verify your license Once you ve successfully registered your NVR, you will receive a notification message as shown here. You may check your current NVR license from Active Setup -> System Setup -> System tab Fig. 7 Verifying License Registration Info If you encounter any error message, please report on our Customer Help Desk: 25

26 NVR Quick Start This section will demonstrate the fundamentals of how to setup your security surveillance system with ACTi NVR. We will guide you through the basic steps required to setup your surveillance system. This section will only explain the necessary part of the User Interface, and will not detail every function. For a complete list of functions please see the User Interface Explained section. Logging In The default login User Account and Passwords are: Admin/ You can use either workstation or web client to access NVR. We will describe how to use Workstation at this moment. Web client access will be covered in later sections. 1. Click on one of the four NVR Workstation icons on your desktop, or go to Start -> Program Files -> NVR Workstation and select one of them. We ll use Active Setup for now, as we re just starting to configure the system. 2. The login screen will be displayed as below Fig. 8 Login Screen (NVR Workstation) 26
27 3. For the Server IP address, you need to add the port number after the IP address. If your workstation and server are located on the same computer, you may either use or the actual network address of your Network card. The port to use is the HTTP port. If your HTTP port used is the default port 80, you can just enter the IP address and omit the port number. If you are logging in to NVR server from a workstation located on a separate PC, please make sure the IP and the HTTP port are correct, and that the router or firewall allows traffic at this port. 4. Preview Mode: There are two different levels of complexities in the live preview available. For NVR Workstation, you will always use the Advanced mode that comes with the full features. For NVR Web Client, you may also choose to login with the basic preview mode. 5. If you Check the Checkbox for HTTPS support, you will log into NVR with HTTPS protocol. 6. You may choose to check the box Auto login with this account. NVR will then remember the settings you used to login this time, and automatically login in future startups, saving you valuable time. Please note that if your workstation will be accessed by more than one individual, then you may not want everyone to be able to auto-login with the default account. In this case you should use the Save as Default as described below. If you decide to cancel auto-login in the future, you may press Ctrl-F10 during login process. The NVR will still start automatically that time. But when you login again, it will again require you to type in your information manually. 7. Selecting Save as Default will store the parameters you used this time for Language, server IP, Port, User Name, application and Preview mode for future use. The next time you login, everything except the password will be filled in automatically. This is useful if there is a main user for this PC, but others may also gain access to this PC. In such cases you do not want to breach security protocols by automatically logging in without verifying if the user has permission to use this account. This method provides convenience with proper security safeguard 27

28 Finding Cameras on the Network There are two ways to find cameras on the network. One is via the separate IP utility, one is through NVR itself. IP Utility is useful in that it allows you to perform multiple camera upgrading and setting, but cameras are only added to NVR system via the workstation program Active Setup. Find cameras with IP Utility Before using NVR to view cameras, you may use IP Utility to find and access IP devices (download the latest version here). IP Utility will scan your network and display a list of ACTi Cameras. From the list you may check the IP address of each camera, access them through web configurators, or perform firmware upgrade to many cameras at the same time. A few tips on using IP Utility: Fig. 9 IP Utility After a short initial search, IP Utility will display devices it has found in a table. The IP address of each will be shown. If the IP is displayed as a hyperlink, then it is in the same subnet as your computer, and you can click the link to access the device via IE. Clicking on the title sorts the whole list by that column. Click again to sort in reverse order. You may enter the Account and Password for each camera at the space provided to the right. This will enable you to perform advanced functions, like backup/ restore configurations, save / reboot and batch firmware or profile upgrades. 28

29 Adding cameras to NVR System Adding cameras Automatically via Active Setup 1. Login to Active Setup 2. As your system is currently empty and there are no cameras in the NVR camera tree, you will see the Camera Setup section and Add New Camera displayed prominently. You may add cameras manually or automatically. Assuming your cameras are in the Local Area Network, and not over the internet, we will start with Auto. If your cameras are located over the internet or in other LANs, please use manual. For now, select Auto and click Next Step Fig. 10 Add New Cameras - Auto 3. A message will appear when searching for devices. Once the search is complete a list of available devices will be shown. You may click on the title header to sort by that column. Click again to sort in the reverse order Fig. 11 Auto Search Camera List 29

30 4. Click on the row of the camera you wish to add to the system. That row will be highlighted. A drop-down list will appear in the Camera ID column of the current highlighted row. Click on it to expand and select the available channel no. Repeat this step until you ve added all devices you wish to include in the NVR system. 5. Click Add New Camera to add selected devices into NVR system. The devices will be added to your camera tree according to the Camera ID. you ve assigned. You may add further cameras by going to Active Setup -> Camera Setup -> Camera -> New. Adding cameras Manually If your camera is not within the same LAN segment (i.e. over the internet), it will not be searchable by NVR. In this case you need to add it manually. 1. To add a camera manually, go to Active Setup -> Camera Setup -> Camera -> New -> Manual 2. The camera setting page will appear as below. The most important settings are the Protocol, Camera IP, HTTP Port, username and Password. These five fields are required for NVR to communicate with the device. Click Get Device Setting and NVR will automatically contact the device, to fill in the other fields. NOTE: If any one of the five fields is incorrect, you will not be able to connect with the device. When you have any device connection problem, please check these settings. Fig. 12 Add New Cameras Manual 30


31 3. Once NVR finds the device, it will open the Advanced setting Tab. Click live view below the view window to see real-time video from the camera so that you may verify this is the device you intended to add. 4. Click open the expand arrows on the right of Media Source information tab, and you will see that the Detail Description Setting fields have been automatically filled up by NVR. 5. Click Apply to save settings to NVR and finish manually adding this camera. 31

32 Add or configure cameras via Copy setting A third way is to utilize the Copy Setting function to add device to the NVR. 1. Go to Active Setup -> Camera Setup -> Camera. You must first select one camera from the camera tree to copy settings from. 2. Click Copy Settings, and the copy setting screen will appear as below. 3. You may select the types of settings you wish to copy from the item list below. You need to select at least one type of settings to proceed. The Camera Data Target may be a new device, or it may be an existing camera. If you select Add New Device, then a new camera will be created. If you select a particular existing camera, then the settings in NVR for that camera will be overwritten. 32

33 Configuring Access Rights In NVR, the access rights are managed by a combination of Camera Groups and User Roles. User Roles define what functions are allowed for each user. Camera Groups define to what cameras the user may apply these functions upon. This means that different users may be able to use the same set of functions on different groups of cameras. An example will be the guards located at building one and building two of a business complex. They will belong to the same user role, but have access to different camera groups. Both will be allowed to see live view, perform PTZ operations, take snapshots and export evidence. But they may perform these functions only to the cameras in the building they are responsible for. They will not be able to change the camera or system settings, which are reserved for the system administrators. Defining Camera Groups Setup Camera Group Basic Info 1. Please go to Active Setup -> System Setup -> Camera Groups 2. Type in the Group name and the Group Description. The Group name is mandatory, while the description may be omitted. 3. Click Apply to save the currently typed group name/description as a new camera group. Camera groups already in the system will be displayed below in the camera groups table. Setup which groups does each camera belong Each Camera may belong to multiple groups. This is configured in Active Setup -> Camera Setup -> Camera -> Detailed description setting -> Camera Groups. 33

34 Select the Camera Groups for each camera to belong to. Click Apply to save settings. Every camera that has not been specially reassigned will automatically belong to the section named No Group. This means that No Group will contain all devices unless the administrator has unchecked the check box from specific cameras. Defining User Roles 1. Please go to Active Setup -> System Setup -> User Roles 34

35 2. There are four pre-defined roles. There may be more than one user in a given user role. Administrator is the role that controls the whole system. Setups are only allowed for the administrator. Standard User can operate the view and see the playbacks. Supervisor can do what Standard User can do, plus export evidence and take snapshots. Guest users can only see the live view. 3. If you have other combinations of allowed functions in mind, then you may create a new User Role by typing the Role Name, Role Description and selecting the intended functions in the list below. You need to first check the boxes to the left to enable the module, then select the detail operations allowed for this role. Then click Apply to add this role to the User Role list. Defining Users You may add users to NVR system by going to Active Setup -> System Setup -> Users You may configure the User Account, User name, password, Address, User Role and Descriptions here. The camera groups available to this user are also selected here. 35
36 View Live Video Now that you ve added your devices to NVR, you should go to Active monitor to test the connection. Display selected Camera 1. Start Active Monitor and login. 2. The interface is shown as below. To the top left is the camera tree. Above the video display windows are the layout selection tab. 3. There are two ways to see live view from your camera. You may click and drag the appropriate camera from the camera tree to the view window, or select the view window then double click on the camera you wish to add. 4. You may arrange the channels by clicking and dragging them to different view windows. 36


37 Recording and snapshots There are three ways to record video. Before recording video, please go to System Setup -> Storage to configure your disks. To record by schedule, you should go to Camera Setup -> Schedule For continuous recording, first click on radio Schedule then click and drag over the scheduler to setup. For Event only recording (Triggered by motion detection / Digital inputs/ PIR), click on Event with Streaming and setup the time segments. Each segment represents 20 minutes. Time segments left blank will not be recorded. If you wish to record a give channel while viewing live video, first select the channel to record by clicking on the view window. Then just click on the record icon to start manual recording. By default, manual recording will continue automatically for 5 minutes then stop. 37
38 To take snapshots, you should click the snapshot button instead. View recorded video To view recorded video, you may either use the Active Player, or the Utility program Archive Player. Use Active player when you wish to search for some specific event but do not know the exact original recording file. Use archive player when you have already located the file and wish to perform further processing. Export Video as Evidence To export video as evidence, you should first locate the file via Active Player. If the format you need is AVI or RAW, you may export directly from Active Player. If you need JPEG files, you may also use Media Converter to convert part of the video into JPG images. 38

39 NVR Operation Explained Camera Setup Camera Cameras are the fundamental building blocks of surveillance systems. This section describes how to: 1. Add or delete camera/ video server to NVR system 2. Sort through the various methods of connection to your camera/ video server. 3. Fine tune device through the Advanced Setting tab. 4. Configure camera groups, frame rates and other settings. 5. Save setup time by copying settings across cameras. Each camera is configured separately. You should first select a camera to access its settings. Add New Camera There are two ways to add devices into the system, auto or manual. Use auto search if your cameras are located in the same subnet as your NVR server. If your cameras / video servers are located outside of local subnet or if you are unable to find it via auto search, then please use connect to it by Manual Add. You need to know the IP address of the device to add it manually. If you are just starting to use NVR and have no camera in your system, you will see the Add New Camera screen automatically when you use active setup. If you already have devices in your NVR system, then click New under the Camera tab to add new camera. Fig. 13 Camera Setup - Add New Camera 39

40 Auto Scan Select Auto and click Next Step to start auto scan. NVR will take a short while to look for devices on your network. Only devices on the same subnet can be found. A list of available cameras and video servers will be displayed once the search is complete. Fig. 14 Camera Setup Auto Scan - Auto Search Result List 1. Add New Camera: After you ve selected all the devices you wish to add to NVR and which channel ID should they be assigned to, click here to add the selected devices into NVR database. 2. Cancel: Click this button to abort adding devices and return to the Add New Camera screen. 3. List of Cameras/Video servers: Here is a list of devices found over the network. You may click on the row of the device you wish to add, and User can see the list of all the IP cameras / video servers found. You may click the column heading to sort by each column. 4. LAN/WAN IP Address: Most devices have a single IP address. Some devices provide two IP addresses identified as LAN or WAN. Please click on the radio button to select the IP address you want to connect to. In most cases this would be the WAN address. 5. Camera ID: When you select the row of the device you wish to add, a drop-down list will appear to the right in the Camera ID section. Select an unused camera ID to refer to this device in NVR. The column Channel No is used for multiple channel Video Servers. One video server may connect to many analog cameras, and they are identified by the Channel No. You may add each Channel No. as a separate Channel in NVR. 40

41 Manual Select Manual and click Next Step in the Add New Camera screen to proceed. Fig. 15 Camera Setup - Manual Please fill up the Basic Setting of the camera. Then Click 17. Get Device Setting to read the other settings from your device. Fig. 16 Camera Setup Manual - Basic Settings 1. Web Configurator: Click this button to open web configurator of the camera/video server. Some detailed settings are available only through the web configurator and not through NVR. 41
42 2. Apply: After finishing all the setting, click this button to add camera/video server to NVR 3. Cancel: Click this button to cancel adding camera/video server 4. Camera ID: Select the new camera ID to assign to the camera. 5. Protocol: Select a streaming protocol to connect the camera with. You may choose between TCP, RTP or HTTP. 6. Camera IP: Enter the camera s IP address or host name 7. Http Port: Enter the HTTP port for IP cameras/ video servers. Most cameras use the default port number of User Name: Enter the user name to login the camera. 9. Password: Enter the password to login the camera. 10. Connection Type: This is the method of connection between NVR and the camera / video server. I. Get Video from Device: The video stream will be sent directly from the camera / video server. If you use this method, each user will establish a separate connection to the device. Please be careful not to overload the camera with too many viewers at the same time. II. Get Video from NVR: When you use this method, options 11~15 will show up. This allows you to get video stream by logging to another NVR system. Then user has to fill up all these fields to access the assigned NVR. Please make sure you have the proper access rights on the target NVR. You should also verify the port settings and the firewall forwarding configurations on all the routers between your current NVR PC and the target NVR PC. III. Get Video from Current NVR: The video stream will be sent from the current NVR you are logged in. This is the recommended method unless your installation requires many NVR servers. 11. NVR IP: Enter NVR server IP address. 12. NVR User Name: Enter the user name to login to the target NVR Server 13. NVR Password: Enter the password to login to the target NVR Server 14. NVR Streaming Port: Enter the streaming port for the target NVR Server 15. NVR Control Port: Enter the control port for the target NVR Server 16. Reset: Reset all the fields to default value 17. Get Device Setting: Get Setting information from device After you have filled in the basic setting and completed getting device settings, your screen will be similar to the figure below. You can click section and the Advanced Setting section. to open/close Media Source Information 42

43 Fig. 17 Camera Setup Manual - Get Device Setting completed Click the apply button to add device to NVR system. We will explain the other sections below 43

44 Detail Description Setting Fig. 18 Camera Setup - Detail Description Setting Tab 1. Camera Name: Enter the name of the camera. This name should be descriptive so that you know where the camera is located. 2. Camera Model: Select the device type of the IP cameras / video servers. If the setting here does not the device, you may not be able to use the full function properly. In most cases this is automatically filled in when you perform Get Device Setting and you don t need to worry about it. 3. Production ID: This is a more detailed parameter on what product series does the camera belong to. In most cases you will not need to edit it. 4. Connection Timeout: Enter the amount of time without response for NVR to consider the device to be disconnected (in seconds). We recommend you to set different values for different types of connection. The default setting is 5 seconds. For devices located over the internet, you may wish to increase this value to allow for occasional internet lags. 5. OSD Position: for devices with OSD (On Screen Display), this determines where to show them. In most cases you do not need to edit this value. 6. Camera Groups: Select the camera groups for this device to belong to. One camera may belong to many camera groups at the same time. 44

45 Frame Rate Setting Dual Stream enabled By using different streams for recording and live view, you may use different values so that the live view stream is smaller in size with lesser frame rate to save decoding CPU power and bandwidth. Meanwhile the recording stream can be larger and have more FPS so that if you have clear images when you need to retrieve evidence. For devices with dual stream functionality, use the following steps to access settings in both streams. 1. Add camera into NVR 2. Go to Web Configurator via NVR UI or by directly typing in the ip address. 3. Go to setup -> Video & Audio -> Video -> compression -> Stream 2 enabled (Check) 4. In NVR Camera Setup, get device setting. 5. Configurations for both streams will appear in advanced section. Edit and apply to camera from here. 6. You may now select which stream to do live / record with. 45

46 Frame Rate Setting Single Stream with constant frame rate For Dual stream devices with only stream one enabled, the frame rate will be selected in the video quality section in Advanced setting, after Get Device Setting. Fig. 19 Camera Setup Frame Rate Setting Stream 1 only Frame Rate Setting Single Stream with constant and variable frame rate For devices without dual streaming and variable frame rate option, you may check the Use FPS setting button to enable alternative frame reading from NVR side. Fig. 20 Camera Setup - Frame Rate Setting IMPORTANT: It is highly recommended that users use Get Device Setting before making configuration changes, and use Apply after the changes are made. This way the status of IP Camera can be synchronized to the NVR Server. 46
47 Advanced Setting Fig. 21 Camera Setup Advanced Setting - Video Quality There are several tabs available under advanced setting. Please always use Get Device Setting before reviewing this section so that the information represented is up to date. Some settings may not be edited through NVR and will need to be changed through the web configurator. Video quality tab: 1. Video Encoder: Show the codec of camera/video server 2. Stream Mode: Show whether the streaming mode is single or dual. 3. FPS: User can see the FPS (Frames Per Second) on this IP camera here. To modify it, select the new one and click the Apply button. 4. Resolution: User can see the Resolution on this IP camera here. To modify it, enter desired resolution and click the Apply button. 5. Bitrate Mode: Select Bitrate Mode of camera/video server 6. Maximum Bitrate: Select the maximum bitrate of camera/video server 7. Bit Rate: User can see the target Bit Rate on this IP camera. To modify it, enter the new one and click the Apply button 47
48 Fig. 22 Camera Setup Advanced Setting Video Adjustment Video Adjustment tab: 1. Brightness: Adjust the brightness value either by clicking on the bar or selecting from the drop down list. 2. Saturation: Adjust the Saturation value either by clicking on the bar or selecting from the drop down list. 3. Contrast: Adjust the Contrast value either by clicking on the bar or selecting from the drop down list. NOTE: Some devices do not allow setting for some of these values. 48
49 Fig. 23 Camera Setup Advanced Setting Connection Port Connection Port tab: Settings in this section are read-only. To modify them, please use the web configurator to access camera firmware directly over Internet Explorer. 1. Register Port: User can see the current register port on this IP camera here. 2. Control Port: User can see the current control port on this IP camera here. 3. Streaming Port: User can see the current Streaming port on this IP camera here. 4. Multicast Port: User can see the current multicast port on this IP camera here. 49

50 Delete Camera This section describes how to delete a camera. There are several options when deleting a camera/video server. You may select a single camera first and click the Delete button to decide what settings to delete. If user wants to delete all cameras and video servers, click the Delete All button. Fig. 24 Camera Setup - Delete Camera 1. Delete a single Camera/video server: Click this button to remove this device from NVR. 2. Delete All: Click this button to delete all of the cameras and video servers in the camera list NOTE: Please be very careful when you select this option. This delete is irreversible. We recommend you to backup your data with backup wizard before using the Delete All option. Even if you have kept a backup with the backup wizard, it will only save your camera settings, and will not retain your video recordings if they are also deleted. After you clicked the Delete button, you will see three options with different settings to delete. Please select one method to delete. 50

51 After user click Delete All button, the three options will also show up. Please select one method to delete. Deleting cameras will also remove them from Layouts and View Tours, but will not remove the maps or the camera groups they are involved in. 51

52 Copy Settings When setting a large number of devices, many settings will be the same across cameras, and it is sometimes tiresome to repeat everything again and again. You can use the Copy Setting function to save the hassle of needless repetition. Fig. 25 Camera Setup - Copy Setting 1. Apply: Click this button after you have selected the types of info to copy. 2. Cancel: Click this button to cancel copy settings 3. Camera Data Target: Select one camera/video server to copy data to. If you select Add New Device, a new device will appear with the same settings as your current camera. You may wish to modify the settings from there. 4. Items: Check the settings that you want to copy. Some detailed settings require you to first select Camera model to be able to include them in copy settings. 52

53 Record Path This section describes how to configure video recording for each camera. Fig. 26 Camera Setup - Record Path 1. Apply: Click this button to save the settings after you ve done configuration. 2. Recording path: This is the path where all recordings for this channel are stored. This is read-only and cannot be edited. This can only be modified in Setup System -> Storage management. 3. File Type: This shows the file type for recordings. Currently only.raw format is allowed. 4. Snapshot File Type: Please select the file type for snapshots. You may choose between.jpg file and.bmp file. 5. Frequency of flush record file: This is the length of each video recording segment. Shorter segments create more files, and may overload Microsoft SQL server in extreme cases. Please set this to at least 10 minutes unless there is special requirement. Recommended value is 30 minutes per video segment. 6. Pre-event recording buffer: NVR keeps a short cache of video received from devices. If an event is triggered, NVR will automatically store the pre-event buffer along with the recording of the event itself. E.g. Digital input is triggered when the gate is forced open. A recording of the five seconds before the door is forced will be added to the video record. 7. Post-event recording buffer: This determines how long after the event is triggered should be included in the event recording file. NOTE: You should only use recording by event scheduling if activity is NOT frequent and spaced far apart enough for significant storage space savings. If you expect to encounter frequent short triggers, you should use scheduled recording to keep track of the whole time period. An example would be the entry of a retail shop during business hours. 53

54 Schedule This section describes how to configure the recording schedule for the IP camera / video server. There are two ways to setup recording schedule: 1. Weekly Schedule: This marks the weekday and time to record and will be repeated every week. 2. Special day: This marks special record schedules for individual days. On such days the Special day schedule will override the Weekly Schedule. When you select the Schedule Section, you will see the weekly schedule view. The schedule is broken down in 20 minute segments. Fig. 27 Camera Setup - Schedule Weekly View To change the assigned record method for each time segment, click the radio button, then click and drag across the schedule to change the color. 1. View By Camera: Click this button to configure recording schedule of this camera 2. Delete: Click this button to remove all weekly schedules of this camera. Please note that you still need to click Apply to confirm editing. Special day schedules are not affected. 3. Apply: Click this button to save the settings. 4. Schedule: The camera will record continuously during your designated period. 5. Event with Streaming: NVR will keep receiving video from cameras, but will not record unless events are triggered. This method saves the storage space and keeps only the relevant video. 6. Delete: The camera will not perform any recording during the selected time period. After configuring the recording schedule, if you need to copy the schedule to other cameras, 54

55 you can click Copy Camera Setting button to replicate the schedule across many devices. Fig. 28 Camera Setup Schedule Copy Setting(Weekly) 1. Copy Camera Setting: Click this button to copy setting from this device to others. Please note that if you selected Copy Camera setting during Weekly Schedule, only the weekly schedule will be copied. The special day settings of the target cameras will not be changed. 2. Apply: Once you completed the choices, click apply to save settings to target cameras. 3. Camera: Check the Cameras to copy schedule to. You may also click the checkbox in front of Camera to select all devices. 4. Schedule: You may adjust your schedule before copying to devices. Note: After you modify the recording schedule and click Apply, it would only save to the assigned cameras but not to the original camera. 55

56 Special Day Sometimes you need to override the weekly schedule during special days. This is where you should go for such settings. Fig. 29 Camera Setup - Schedule - Special Day To change the assigned record method for each time segment, click the radio button, then click and drag across the schedule to change the color. 1. Special Day: Click this button to establish schedule for special days. This schedule will override weekly schedule settings. 2. Delete: Click this button to remove all special schedules of this camera. Please note that you still need to click Apply to confirm editing. Weekly schedules are not affected. 3. Apply: Click this button to save the settings. 4. Schedule Calendar: Select the day to edit with the calendar here. 5. Schedule: The camera will record continuously during your designated period. 6. Event with Streaming: NVR will keep receiving video from cameras, but will not record unless events are triggered. This method saves the storage space and keeps only the relevant video. 7. Delete: The camera will not perform any recording during the selected time period. 8. Schedule table on Special Day: After you ve selected the day to edit, this is where you 56

57 edit schedule for that day. 9. Special Day List: A list of all special day schedules are shown here. You may perform Copy camera setting in the same way as the weekly schedule. Only the special day schedules will be copied if you select copy camera setting here. Please see the sample screenshot below. Fig. 30 Camera Setup - Schedule - Copy Setting (Special day) 57
58 Motion This section describes how to setup motion detection for this camera with NVR. Before configuring motion detection, first make sure you can connect properly to the IP camera / video server and get device settings. This section covers both video motion detection and PIR (Passive Infrared) motion sensors. PIR is available only for some models. Fig. 31 Camera Setup - Motion - Get motion setting 1. Get Motion Setting: Click this button to connect to retrieve motion detection setting from the device and see live view. The parameters of each motion region from the device will be displayed to the right. In this stage red motion region borders will show up if you have previously configured motion detection in NVR and applied it to both device and NVR. You can check if the current setting detects video motion satisfactorily. If you wish to modify the motion detection settings, click Motion Setup 2. Motion Setup: After you retrieved motion setting from device, click this button to start setting up motion detection or PIR motion sensor. The previously grayed out check boxes for each region will be enabled now. In this stage you may configure the size and location of each individual region. Please see screenshot on the next page. 58
 detection 1. Get Motion Setting: Click this button to connect to retrieve motion detection setting from the device and see live view. 2.")
59 Fig. 32 Camera Setup Motion - Motion Setup After you click the Motion Setup button, the Apply button will show up and replace Motion Setup. Then you can start to configure motion (and PIR) detection 1. Get Motion Setting: Click this button to connect to retrieve motion detection setting from the device and see live view. 2. Apply button: Click this button to save the settings to camera and NVR 3. Show Motion Region in Active-Monitor: When this checkbox is checked, a red rectangle representing the motion region will in Active-Monitor during live view if there is motion activity. Please note that if the motion detection region was configured only in camera and not through NVR, the live view camera title bar will turn red, but the motion region rectangle will not show up in Active Monitor live view. Whether PIR motion sensor activity will show red borders around the live view window is also controlled here. 4. Set: After checking/unchecking Show Motion Region in Active-Monitor, click Set button to save the setting. This setting applies to all cameras, regardless of which camera you enabled it from. 5. Enable / Disable Motion Detection: Click this button to enable / disable this motion 59
60 detection area. The motion detection region setup rectangle will show up when this is enabled. 6. Sensitivity: Enter the sensitivity level of this motion detection region. Higher sensitivity levels are more easily triggered, but may give more false alarms. Sensitivity may range from Name: Enter the name of this motion detection region. This is the name that will be shown in Event manager and the Active Monitor event panel when motion activity is detected. 8. Timer: The interval before the next motion detection can be triggered again. The range of available value is seconds. 9. Description: Enter more detailed description of this motion detection area. Both the name and the description will be shown in the event manager. 10. Enable/Disable PIR Event: Click this button to enable / disable PIR detection.(available only to certain models) 11. Motion Region: Click and Drag to setup the location and size of the target motion region in view window After you ve completed setup, please click Apply to save into to camera and NVR. This process may take a short while. If you have pressed Get motion setting and leave the page without applying, the system will provide a warning message to urge you to save all changes. If you have changed the motion detection settings via the web configurator, please remember to come back to NVR and press Get device settings, then click apply to save to NVR. This is to ensure that the settings in NVR are always in sync with the device. * For ACTi TCM/TCD model devices, motion detection is available when codec is either H.264 or MPEG4. MJPEG does not support motion detection. 60

61 PTZ This section describes how to set the PTZ (Pan/Tilt/Zoom) parameters for this camera. IP PTZ cameras may be controlled directly. Or you may use a video server to either connect to an analog PTZ camera or an analog PTZ camera plus a PTZ platform. You need to complete setup in this section to enable PTZ Preset and Preset Tour sections. If the parameters here are incorrect, the device will not respond properly to your PTZ commands. Fig. 33 Camera Setup - PTZ setup 1. Apply button: Click this button after you finish setup to save the settings 2. Enable/Disable PTZ: Click this to enable or disable the PTZ function of this device. 3. Vendor: Select the vendor of the PTZ device/ speed dome you wish to control. You may select the device type directly if it is listed here. 4. Protocol: Select the protocol of the PTZ device/ speed dome. 5. PTZ File: If the protocol for your PTZ device is not within the previous list, you can import a new protocol file to control the PTZ device / speed dome. Commands in PTZ file will override the protocol previously selected. For details about the protocol file format, please contact our technical support. PTZ file setup is not available for Web Clients. 6. Address ID: Enter the address ID of the PTZ device / speed dome. 7. Parity: Enter the parity of the PTZ device / speed dome. 8. User Command List: If your speed dome or PTZ device has a special function not supported in the standard protocol. Ex: Activate the wiper to clean the window of the PTZ. User can manually input the command to activate the wiper for later selection in PTZ controls. 61
62 9. Baud Rate: Enter the baud rate of the PTZ device/ speed dome. This option appears only for certain models. 10. Absolute Position: Check this box to enable PTZ by absolute positioning. This option appears only for certain devices 62
63 PTZ Preset This section describes how to setup PTZ preset points, auto scan and the OSD (On Screen Display) settings of the camera. Some devices may not support all functions listed here. Fig. 34 Camera Setup - PTZ preset 1. Live View: Click this button to see live view from camera 2. Close: Click this button to stop previewing current camera in live preview window 3. Apply: Click this button after you ve completed setup to save the settings 4. Image Preview: You can see the camera preview here 5. OSD setting Control Panel: For devices that provide On Screen Display control (OSD), you may open control panel and configure the camera via OSD here. 6. PTZ Operation Control Panel: You may control camera movement in this panel. Please note that if the device does not support zoom, then the zoom in / zoom out buttons will not show up. 7. Auto Scan Panel: You may setup Auto scan parameters in this panel. For some devices, you can only start or stop the auto scan. The camera will automatically scan between the 63
64 left extreme and the right extreme position.. For some devices, you can set the borders for the auto scan to repeat between. The Auto Scan panel for such devices will look like below. 8. Preset Points Setup Panel: Here you may perform setups and operations about PTZ preset points. : To setup a PTZ Preset point, move the camera to your desired view angle (including pan, tilt and zoom) via the PTZ control panel. After you re satisfied with the view, please enter a name for the Preset point and click this button to save the settings. : Click this button to delete this Preset point from both NVR and Device : Click this button to go to the preset point NVR supports up to 32 Preset Points. Some devices may not support that many Preset Points. NOTE: After you finish setting or deleting preset points, please click Apply to ensure the changes are properly saved. 64

65 Preset Tour Preset Tour is a preconfigured PTZ sequence that directs the camera to cycle through multiple preset PTZ views, including where to look and how long to look at each location. You may configure the preset points to go to in the previous PTZ Preset section. Make sure you configure PTZ and PTZ Preset sections correctly before setting up Preset Tours. Fig. 35 Camera Setup - Preset Tour 1. New Tour: Click this button to create a new tour. Enter the Tour Name and Description, then click apply to add a new tour to the tour list. 2. Delete Tour: Click this button to delete the currently selected tour from the tour list. 3. Add Preset Point: Click this button to add preset point to the current tour. After you click this button, you will enter the subsection showing the available preset points. 65
66 You may click the checkbox in front of each preset point to select it. When you ve selected all the presets points you wish to add, click Add to add them to the preset point list. Click Return to return to preset tour page without making any changes. 4. Delete Preset Point: Click this button to delete preset points of a tour. 5. Apply: Click this button to save all current settings. If you are editing an existing tour, you may change the tour name, description and preset setting. If you just clicked New tour, then pressing apply will add the new tour to the tour list. Be sure to click Apply after you finished setup, before configuring something else. 6. Tour ID: Each preset tour has a unique preset tour ID stored in the system. The ID column is entered automatically by the system 7. Tour Name: Enter the name of this preset tour 8. Description: Enter the description of this preset tour 9. Preset Points Sequence Control Panel: You may rearrange the preset point sequence here. First click on the row of the preset point you wish to move, then click the buttons to move to top, move up, move down or move to bottom of list. 10. Preset ID list: All the preset points included in this tour are listed here. Click on the appropriate row to edit that preset point. You may setup how long will the PTZ camera stay at each point by selecting from the drop down Dwell time list. Default dwell time is 30 seconds. You may change the value here, but do not use dwell time smaller than 15 seconds unless absolutely necessary. 11. Tour ID list: All tours currently configured are listed here. You may select each tour to edit the details. 66

67 Event Manager Event Manager describes how NVR responds to events from devices. You may configure the event types and the responses to these events. An example would be for NVR to record video when motion detection from camera is triggered, and send to alert the supervisor. Event List Event list panel gives an overview on event setup for this device. The Event type column is the original trigger from the device. The Name is shown on the Event panel so that you may easily decide what exactly happened. Fig. 36 Camera Setup Event Manager - Setup 1. Delete: Click this button to delete all the settings on the event. Settings on other events are not influenced. (e.g. only settings for MD1 are removed, while settings on MD2 and DI 1 are kept) 2. Apply: Click this button to save settings to NVR and device 3. Event type: User can see the list of event type here and select the event user wants to trigger to modify it. The Action and Mail checkboxes indicate if there is any response currently configured for this type of event. 4. Enable Action: After selecting an event, first user has to enable the function by checking it and then select which action to take upon event. 5. Enable Notification: If you wish to send notification, you need to first enable it by checking the checkbox. 67

68 6. Copy Settings: Once you completed setup for a camera which you d like to apply to other cameras, click here. A dialog window will pop up as below. Select the target cameras to apply settings to. You may click on the dropdown list to select all cameras or a single device to copy to. Fig. 37 Camera Setup Event Manager Copy Setting Note: When cameras have PIR, an additional event type PIR will show up. User can take it as one of the events and set actions for it. Fig. 38 Camera Setup Event Manager - PIR 68

69 Actions This section lets you select which action to take upon event. Fig. 39 Event Manager Setup Action Tab 1. Action: Check this box to enable the following responses. Existing settings are still kept if you disable action responses by clearing the checkbox. The settings will be grayed out as a result. 2. Snapshot: Click to enable / disable Snapshot when this event occurs 3. Trigger DO1: Click to enable / disable DO1 when this event occurs. You may also setup the duration for DO1 to be triggered. 4. Trigger DO2: Click to enable / disable DO2 when this event occurs. You may also setup the duration for DO2 to be triggered. 69
70 5. Beep: Click to setup NVR to beep upon event. User can also select how many times does it beep and the duration of each beep. 6. Play Audio File: Click to setup NVR to play your desired audio file for a number of repetitions. User can enter the path of the audio file to be played. Please note that you may either beep or play audio file, but cannot do both at the same time. NOTE: Play Audio File function only works on NVR Workstation, not on Web Client. 7. Don t beep: Click to disable beep function of NVR. 8. Activate Hot-Spot Window: Click to display video from the camera on Hot-Spot window upon event. (The upper left main preview window). You may also select the duration for the video to display on the Hot-spot window. 9. Activate Pop-Up Window: Click to display video form the camera on the event pop-up window upon trigger. You may also select the duration for video to be displayed in the Pop up window. Please note that you may activate either the Hot Spot window or the Pop-up window, but not both at the same time. 10. None: Click here to disable both Pop-up and Hot-Spot windows. 11. Enable PTZ Command: Upon event, NVR can move specific camera to specific PTZ presets. Check this box to enable this function. 12. Camera Channel and Preset number: Select which camera to move and which PTZ preset to go to. Please note that you need to configure PTZ presets for that camera first. 13. Upload Snapshot File to FTP Site: Click to enable NVR to upload FTP to a FTP site upon this event. You need to configure FTP settings in System Setup -> System for this to function correctly. Please also make sure the FTP server setting is correct and the folder access rights are properly configured. 14. Enable Execute Command and enter its File Path: Click to enable NVR to execute a certain command upon this event. This is a very power function. User can use it to integrate NVR s event handling with other programs. User can enter the path of the command to be executed upon event. 70

71 Mail Notification Setup This section lets you setup the notification. Fig. 40 Event Manager Setup - Notification via 1. Notification via Check this box to enable notification upon event. 2. Mail to: Click to select which users of NVR to send notification to upon this event. All these accounts are from the NVR user list. 3. Mail Subject: Click to select the Mail subject to use. To avoid accidentally blocking the message, you may wish to include special words, and use the words to do white listing on your mail sever. 4. Mail Message: Write the message body of your here. NOTE: Only Alphabets, numbers, dash and underscore are allowed in Mail Subject / Message. Special characters are not allowed. 5. Attach Snapshot File: Click to select whether to include Snapshot in upon event. Attach Snapshot File option can only be enabled when Snapshot is enabled in the Action tab. NOTE: Event responses will only be triggered when the trigger time falls within either the Scheduled Recording or the Event with Streaming Recording period. There must be video stream from device when the event happens for event responses to work. 71

72 System Setup Camera Groups Camera Group is an important layer of Camera management for NVR. User Permissions, View Layouts and e-maps are all based upon camera groups. Designing proper data groups in advance is very important. One camera can belong to multiple groups at the same time, and there s no limit to number of camera groups. Here s how to setup Camera Groups. Fig. 41 System Setup - Camera Groups 1. Group Name: Enter the user group name for a new camera group or to modify existing camera group. 2. Group Description: Enter the description of this camera group. 3. Group List: User can see all the groups already created here. 4. Apply button: When you first enter the Camera group screen, you are by default in a ready to add new group mode. You can just enter a group name and click Apply to add a new camera group. You may also select a group from the list of existing camera groups below and edit the group. Always click Apply before leaving to preserve changes you ve made. IMPORTANT: Please do not delete default Camera Group. Default Camera Group is No Group. 72

73 User Roles Fig. 42 System Setup - User Roles 1. Role Name: Enter the role name for a new user role. 2. Role Description: Enter the description of this user role. 3. Permission Selection Panel: Select the range of permission for each user role here. 4. User Role List: You can see all the existing roles and their permission settings here. 5. Apply: When you first enter the User Role screen, you are by default in a ready to add new User Role mode. You can just enter a Role name and click Apply to add a new User Role. You may also select a group from the list of existing user roles below and edit the role permissions. Always click Apply before leaving to preserve changes you ve made. NOTE: Please do not change default User Roles. Default User Roles are: Administrator, Guest, Standard User and Guard. 73

74 Users Fig. 43 System Setup - Users 1. User Account: Enter the user account for a new user or modify an existing user. This user account will be used for this user to login the NVR system. 2. User Name: Enter the user name of this account. This name is a reference data for this account and will NOT be used for user to login NVR in the future. 3. Password: Enter the password for this user account to login to NVR system. 4. Address: Enter the address for this user. This may be used for administrative purposes. Please note that when is sent from event manager, the s are sent to the stored here for the user account. 5. User Role: Select the user role for this user. 6. User Description: Enter the description for this user. 7. Default Layout: Select the layout to see upon login here. 8. Camera Group Permission: You may assign which camera groups are available to this user. The user will not be able to see cameras outside for their permission. 9. User List: User can see all the info on existing users here. 10. Apply: When you first enter the Users screen, you are by default in a ready to add new User mode. You can add new user by clicking Apply after filling in the required fields. You may also select a user from the list of existing users and edit the roles and permissions. Always click Apply before leaving to preserve changes you ve made. NOTE: Please assign the correct Camera Groups to the user account created. 74

75 Storage This section describes how to manage storage space in NVR. Please note that this section only deals with the overall storage rules, and not storage of individual channels. Please note that as NVR continuously writes and deletes file from the disk drive, using a removable disk may risk losing recording when device is removed while being accessed. Fig. 44 System Setup - Storage Management 1. Apply: Click this after you ve completed setup to save modified settings. 2. Recording Path: This is the folder path where the recordings from NVR will be stored. This section will be inserted between the drive letter and the Channel number subfolders 3. Manual Record Duration: During manual recording in Active Monitor, this is the duration when recording will automatically end if not stopped by user. If the user forgets to end the manual recording, this prevents the recording from taking up unnecessary space. 4. Recording Delete Rule: There are two ways to delete recordings. The first one is to decide a number of days of videos to keep, and delete recording files older than this. The second option is to keep recording until the disk is almost full, and then delete the earliest 75
76 recording files. NVR will always delete old files when available space is lower than reserve space. Select the checkbox for Keep Days to add an additional space management mechanism. When both are active, NVR will start to clear old files when any of the criterion is reached. 5. Snapshot delete rule: This field defines how long will snapshots be kept on the disk drive. Set the number of days to keep snapshots here. 6. Cleanup Space (GB): This is only used when recording delete rule is Reserve Space. Once free space on the drive is lower than reserve space, the system will delete the earliest recordings. This is the amount of space to clean out each time. Setting cleanup space too small will result in over frequent deletes. 7. Selected Drive: Here you can see the storage space information for your disk drives. 8. Shift drive up / down: If you have multiple drives in your system, this changes the priority in which they are used. 9. New / Delete: These two buttons control whether a drive is added to the system. To add new disk to be used for NVR storage, select a disk below and click New. To remove a drive from use, select a disk above and click delete. Please note that removing a disk will remove database logs of all recordings from that disk. The files will still remain in the disk, but will no longer be searchable and will not be automatically deleted by NVR upon low disk space. 10. Available Disk Drives: These are the drives detected by NVR, but not yet included for video storage use. Note: When deleting storage drive from system, NVR will delete all recorded logs on this disk. 76

77 Joystick Fig. 45 System Setup - Joystick 1. Select joystick of IP Desktop: NVR supports two joystick providers, IP desktop/logitech. Please select the correct model. 2. Select joystick of Logitech: NVR supports two joystick providers, IP desktop/logitech. Please select the correct model. 3. Apply: Confirm the settings after you ve configured the joystick.. 4. Joystick Picture: When any joystick is selected, user can see a representative picture of the joystick here. 5. Button setups: You may configure the joystick buttons to perform specific actions. Please the dropdown list in the next page for details. Other joysticks are also supported, but they may not offer 3-dimentional operation. The user may need to define zoom in and zoom out with specific buttons. USB joystick shown here may be obtained from or other online distributors. Note: Joystick Setup is available only through workstation and not available through web client. 77

78 Fig. 46 System Setup - Joystick - Dropdown features menu 78

79 View Layouts This section describes how to setup view layouts. View layouts are predefined arrangements of cameras in a single screen. Each screen may contain multiple cameras, and the location of each camera in each layout can be configured. Fig. 47 View Layouts 1. New button: Click this button to create a new view layout. When you enter the View Layout screen, it is by default in the New mode. Select the camera group, choose a layout style, provide a name to the layout and assign at least one camera to the view before clicking Apply to add a new layout. 2. Delete Button: If you have selected one layout from the list below, this button will appear. You can click this to delete the layout from list. 3. Camera Groups: Select the camera group you wish to view from the drop down list. Only cameras in the camera group can be assigned to the windows in the view layout. 4. Name: Enter the name for a new layout list or to modify an existing view layout. 5. Layout Style: Select the number of channels to see in this view layout. 6. Description: Enter descriptions for this view layout here. 7. Layout Setting: Pick the cameras to view in each window for this view layout. Only 79
80 cameras in the selected camera group are available. You may assign the same camera to more than one window. Please note that if you assign one camera to more than one window, the streaming load will be increased. 8. View Layout List: User can see the existing view layout list here. Click on the row of the target layout to edit. 9. Apply Button: Click button to confirm and save the settings. If the View Layout screen is in the New mode, clicking Apply will add a new layout. 80

81 View Tours This section describes how to setup View Tours (Layout tours). View Tours are a predefined sequence of view layouts that will be displayed in the Active Monitor. It is useful when you need to monitor a large number of channels and also want enough detail in each view. Make sure you configure View Layouts correctly before setting up View Tours. Fig. 48 System Setup - View Tours 1. New Tour: Click this button to create a new layout tour. Enter the Tour Name and Description, and then click Apply to add a new layout tour to the tour list. 2. Delete Tour: Click this button to delete the currently selected tour from the tour list. 3. Add Layout: Click this button to add layout to the current layout tour. After you click the button, you will enter the subsection showing the available layouts. Check the checkboxes in front of each layout to select it. When you ve selected all the layouts you wish to add, click Add to add them to the layout tour. Click Return to return to View Layout tour page without making any changes. 81
82 4. Delete Layout: Click this button to delete layouts from a layout tour. 5. Tour Information: Each layout tour has a unique view layout ID stored in the system. The column ID is assigned automatically by the system. Each tour also has a tour name and description. 6. Layouts in This Tour: All the layouts included in this tour are listed here. Click on the appropriate row to edit that layout. 7. Layout Tour Sequence Control panel: You may rearrange the layout sequence here. First click on the row of the Layout Tour you wish to move, then click the buttons to move to top, move up, move down or move to bottom of list. 8. Dwell Time: You may setup how long should Active Monitor stay in each layout by selecting from the drop down Dwell time list. Default dwell time is 30 seconds. You may change the value here, but do not use dwell time smaller than 15 seconds unless absolutely necessary. 9. Tour List: All layout tours currently configured are listed here. You may select each tour to edit the details. 10. Apply: Click this button to save all current settings. If you are editing an existing tour, you may change the tour name, description and Layout Tour setting. If you just clicked New tour, then pressing apply will add the new tour to the tour list. Be sure to click Apply after you finished setup, before configuring something else. Note: If you remove a camera that is part of a layout, the window for that removed camera will display a black video when viewed. 82

83 Language This section describes how to translate and modify the embedded texts through the language section of NVR. Fig. 49 System Setup - Language 1. Settings button: Select the language you wish to use in from the full list You may translate the list once you opened it. Fig. 50 System Setup - Language - Language List to Insert Fig. 51 System Setup Language - Language List 2. Reset button: Restore the fields back to default settings. 3. Export button: Export current language to an XML file for editing. Click here and a select path and filename to export. This is available only to workstation, not to Web Client. 83
84 4. Import button: Select a translated XML file to import. You may update support for new languages or change the more up to date translated version for your language this way. 5. Apply button: Confirm and save current settings. 6. Language: Show the keyword list of the selected language to edit. 84

85 Services This section describes how to start / stop the various NVR component services. Occasionally, some minor errors in NVR operation can be easily fixed by stopping and restarting individual services. For security reasons, this section is only available to workstation running on the same PC as the NVR server. You cannot access this through web Client. Fig. 52 System Setup - Service 1. Refresh: Click to refresh the status of all services. 2. ActiveEventManager.EXE: Event Manager handles events and responses, and executes all rule-based reactions. 3. ActiveScheduleService.EXE: Schedule service provides recording and scheduling management. 4. ActiveServiceManager.EXE: This program monitors the other software service modules. If the other services are down, it will automatically restart them. 5. ActiveStreamingService.EXE: Streaming engine handles connection to ACTi IP devices and provides video stream to multiple clients. 6. ActiveMessageEngine.Exe: Message engine maintains proper background communication between the various win32 services. 7. Service Status: Current status of each service is shown here. They may be either Running, Pending, Stop Running, stopping and stop. 8. Service Action Start Service button: Start Service 9. Service Action Stop Service button: Stop Service 85

86 License ACTi NVR software has 16 channel / 32 channel / 48 channel / 64 channel packages and is free for 16 channels. For more than 16 channels, you have to purchase a license key. Please contact our sales representatives for 32/48/64 channel license keys. Version NVR Professional NVR Enterprise Channels Single Package Server Workstation 16 Free Free 32 / 48 / 64 License Required Free Fig. 53 System Setup - License - License Requirements How does registration work During registration, your license key is matched against the MAC address on the Network Interface Card (NIC) on your computer. This MAC address is used as the Machine Key. This matching record will be stored on the ACTi web server. If your computer has more than one network card, only the network card with the smallest MAC address will be used. If your Server PC has multiple network cards, you will need to disable the extra network cards which you do not intend to register. Please refer to the support document How to Disable and Enable Multiple Network Cards on ACTi Knowledge base website for more information. Online Registration This is the recommended and easiest way to register NVR on your PC. You will need to have internet connection to register this way. Please log into NVR with Active Setup, Click on the Setup System symbol and then click on the license tab. (See following image) Fig. 54 System Setup - License - Online Registration 86
87 Click the Online Registration on the horizontal menu under the tabs. Make sure your computer is connected to internet and enter the License Key. Click Apply to connect to Registration Center. Your License Key and MAC address (NVR automatically reads the Network card with the smallest MAC Address number on your PC) will be recorded. Offline Registration (Through ACTi Website) If your PC cannot connect to the internet (e.g. in a restricted military base), then you should register offline. You may obtain an activation key from ACTi website with another PC that has internet connection, and activate your NVR license on the server PC off-line. 1. Please go to our website: (See following image) 2. Enter your license key and MAC address (you need to record the MAC address you re your server PC beforehand) 3. Make sure the MAC address shown is correct. 4. Click Apply to generate your Activation Key Fig. 55 System Setup - License - Offline Registration 5. Copy the complete Activation Key and transfer it to the NVR server PC. (By pasting into a text file and copying it via USB disk, for example). 6. Paste the key in Active Setup -> System Setup -> License -> Offline Registration 7. Click Apply to finish registration 87
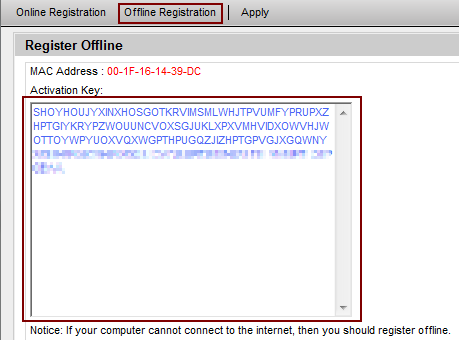
88 88
89 Verify Your License Once you ve successfully registered your NVR, you will receive a notification message as shown here. You may check your current NVR license from Active Setup -> System Setup -> System tab Fig. 56 System Setup - License - Verifying Registration Info If you encounter any error message, please report on our Customer Help Desk: 89
: The number of days to keep event logs for. The default is 45 days. Event logs older than this date will be deleted. 2.")
90 System This section describes how to setup system-wide basic parameters. Fig. 57 System Setup - System - System Property System Property: NVR system setup 1. Keep Event Log for (day): The number of days to keep event logs for. The default is 45 days. Event logs older than this date will be deleted. 2. Keep Recording Log for (day): The number of days to keep recording logs for. The default is 45 days. Recording logs older than this date will be deleted. 3. Keep System Log for (day): The number of days to keep system logs for. The default is 180 days. System logs older than this date will be deleted. 4. NVR Streaming Port: NVR Streaming Port. Default NVR Control Port: NVR Control Port. Default Message Engine Port Number: NVR Message Engine Port. Default OSD [FPS]: Select this checkbox to display real time Frames Per Second info for each channel on Active Monitor preview windows. 8. OSD [Camera Name]: Check this box to show camera names on the preview window in Active Monitor. The location of the OSD text is defined in Camera Setup -> Camera -> Media Source Information -> OSD Position 9. Popup Message when event trigger: A warning message will popup in Active Monitor when an event is trigged. A sample message is shown below. 10. Event status on Camera Tree: Check this box to enable cameras with recently triggered events to highlight and flash on the Camera Tree. 11. Apply: Confirm and save the settings in System. 90
91 Fig. 58 Decode I Setting This section controls the maximum number of videos to display before NVR starts to skip frames in video. Skipping frames protect your PC from overloading. This sacrifices live view smoothness to ensure that your computer will have enough resources to properly record all video feeds. There are two ways to do this, both are defaulted as enabled: 1. Lower display frame rate when CPU usage is above a certain percentage. 2. Lower display frame rate when displaying layout of more than a number of channels. Please be sure that you enable at least one of the protection mechanisms here. This protection will work only for MPEG4 and H.264 codecs, not for MJPEG. Fig. 59 System Setup - System - System Setting System Setting: User can set an account for NVR to send notification when events are triggered. 1. SMTP Server: Enter the SMTP server address to send SMTP Port: You may configure the SMTP port here. Default is SMTP authentication: Enable this checkbox if the SMTP server requires authentication. 4. Sender Address: Enter the address to send from. 5. SMTP User Name: Enter a SMTP user account. 6. Sender Name: Enter a name for NVR to send from. 7. SMTP password: Enter a password to login SMTP server with. Fig. 60 System Setup - System - System FTP Setting System 91
92 FTP Setting Section: This section includes a FTP account for NVR to send notification when events are triggered. 1. FTP Server: Enter a FTP server address for NVR to upload data. 2. User Name: Enter the FTP user name to login FTP server with. 3. Port: Enter the port number to upload files to FTP. 4. Password: Enter the password for NVR FTP account 5. Upload Folder: Enter the FTP folder path to upload files onto. Fig. 61 System Setup - System - License Information License Information: You may review the software license information here, including shipping date and Channel Number. Fig. 62 System Setup - System - Available Disk Drive Capacity This is the list of detected disks on this PC. Fig. 63 System Setup - System - Workstation Setting Default Export path: You may select the default export path for the data to export to. This is only available on the workstation interface and not available for web client. Fig. 64 System Setup - System - Camera Model Update Camera Model Update: You may update supported device list to NVR by uploading a new 92

93 Camera Model file. Click the text field to select file to import. This is only available on the workstation interface and not available for web client. Map Setup E-Map Setup The purpose of the E-map system is to help the guard have better overview of the physical locations of all the cameras in the monitored area. The E-map system may contain one or several images (jpeg or gif) of the territory map, floor plan, etc which can be filled with the icons of the cameras together with small live preview windows for each camera on the map. Each image in the E-map system will be linked to a certain camera group you can pick the cameras only from that camera group to fill the image with camera icons. It is possible to define convenient hyperlinks that help you switch between the maps with a single click. In order to set up the E-map system, you have to use the Workstation that is located in the same PC with the NVR server. Before you proceed with creating the maps, please make sure you have already created the necessary camera groups and added the cameras into those groups. Once the E-map is properly setup, you may access it from other PCs by either workstation or web client. To start with E-map setup, go to Active Setup -> Setup Map -> Map Manager -> Add Map. Fig. 65 Map Setup - Map Manager (Before adding any map) Before you add any map in the system, the Map Name dropdown list will be empty. Click Add Map to select the camera group you wish to monitor and the map image file you wish to show. 93

94 Tips to setup: Before you start, make sure you have your camera groups configured correctly. Please also add the cameras to their proper camera groups. Prepare the map images so that each camera group is shown in full on a single map. Add Map Once you have clicked [Add Map], you will see the list of camera groups. Fig. 66 Map Setup - Adding Map Image File 1. Pick a camera group, for example Floors by clicking the radio button. 2. Click on the map image file field to the right to select the map you need. Before you change, it will show initialmap.jpg. 3. A browse window will pop up for you to select the map image on your local hard drive. 4. Once the needed map image has been selected, press the [Add] button. The Map Information page will appear together with the map image you had just chosen. Only alphabets, numbers, dashes, underscores or spaces can be used in file name. You can press [Cancel] button to stop adding new maps. Edit Map Fig. 67 Map Setup - Selecting Map 94


95 You may select one of the maps you have already added to the system and edit settings in this screen. You may add cameras and arrange their icons / mini previews on the map here. The drop down list will show the maps you ve already added by the camera group name. Pick the map you want to add cameras to, and press [Add Camera]. The description for the camera group will also show to the right in Map Description. Note: [Add Camera] button will only appear after you have added at least one camera into the camera group that you are using for current map. Add Cameras Fig. 68 Map Setup - Adding Cameras to Map Check the cameras that you want to add to the given map and press [Add]. Alternatively, you may cancel the adding process by pressing [Cancel] button. 95
96 Fig. 69 Map Setup - Arranging Cameras After adding the cameras, you will be redirected back to the Map Information screen where the newly added cameras are placed over the map image. Note that each camera on the map appears twice one as a camera icon to be positioned on the map and another one with the small preview window to be placed anywhere you like. We recommended you to put it as close as possible to the camera icon so it is clear to the user which preview represents which camera. You may also want to leave a little space to the right of cameras so that the popup camera information window does not interfere with the live image in Active Map. You can drag and drop the cameras around the map to position them. The currently selected camera will be highlighted with a green border. You may also move the live preview windows by the same means. Note that there is no actual live preview during Setup stage. You will be able to see live preview later on when you start using the ActiveMap. By checking the checkbox [Display Camera ID on emap Viewer], the camera icons shown on the Active Map with live previews will contain the camera IDs for better recognition It is also possible to add the viewing direction arrows for each camera icon on the map. In the camera information section, click on the drop down list under [Direction] and choose one of the 8 possible directions: [Upper left], [Up], [Upper right], [Right], [Lower right], [Down], [Lower left], [Left]. As soon as you select any of the directions, the arrows indicating view angle will appear beside the camera icon. Press [Apply] to save the changes when finished with all the icons. The live preview images can be resized by pressing [Resize] available [Small], [Medium] and [Large]. The default size is [Small]. button. There are three sizes On the Camera Information section you can also find Camera ID and Camera Name. These items are not editable under E-map system. You have to go to the Camera Setup page to edit the name and ID if necessary. If you want to replace the existing map image, just click on the file name and the file browsing window will pop up. You can delete the camera from the map by pressing [Delete Camera] button if necessary. Please note that it will not delete the camera from the NVR system, but only from the current E-map. 96
![You can delete the map by pressing [Delete Map] button if necessary.](/docs-images/22/1469980/images/97-0.png "Add Map Link If you want to have convenient hyperlinks to switch between the current map and other maps with a single click, then you have to add Map Link.")
97 You can delete the map by pressing [Delete Map] button if necessary. Add Map Link If you want to have convenient hyperlinks to switch between the current map and other maps with a single click, then you have to add Map Link. Press [Add MapLink] button and check the map you want to link to. NOTE: [Add MapLink] button will only appear after you ve created more than one map. Fig. 70 Map Setup - Selecting Map Check the maps you want to create links for, and press [Add]. Only maps you ve already added to the e-map system will be shown here. Camera groups that are not represented by maps will not be available for selection. An icon representing map link will appear on the map information page once you ve added the MapLink. Occasionally the MapLink icon may appear outside the actual map image. In that case, please use scroll down to find the map link icon and drag it to your desired location. Press [Apply] to save the changes. You can delete the Map Links by pressing [Delete MapLink] button if necessary. The typical situation where the map link is needed is when there is one map for the large area (for example a school s campus) and several other maps containing floor plans of each building in the area. Map link can also be used when the area is too big so that it has to be divided into several smaller maps. 97

98 Map Tour If there are two or more maps in the system, and you would like to switch between them regularly, then you can setup an automated Map Tour. You can decide which maps should be included to the tour and for how many seconds will each map be displayed before switching to the next one. Open Map Tour tab and press [Add]. Fig. 71 Map Setup - Selecting Map to add into Map Tour Put the checks into checkboxes for the maps you want to be added to the tour. Dwell time indicates how long the screen will display this given map before switching to the next. Once you have added the maps you wish into the Map Tour, you can re-arrange the order of maps by using the following arrow keys on the right side of the window: You may also select each row and redefine the dwell time. Fig. 72 Map Setup - Changing sequence in Map Tour You can run the Tour later on ActiveMap by pressing the following [Patrol] button: Once you have added the maps to the Map Tour, the option of deleting the maps from the Tour will appear the [Delete] button. Click [Delete] to remove one or more maps from the Tour. 98
99 Active Monitor Active Monitor is the interface where you see the live views from your cameras. It is where most of the security professionals access the surveillance system. Aside from keeping an eye on the video, you may also cycle through View layouts, drag and drop various cameras to the screen, review a log of events, take snapshots, control PTZ cameras, start or stop recording on a given channel, trigger Digital output and broadcast or talk to specific cameras. First we provide an overview of the UI elements, and then we describe the functions in each section. Overview Fig. 73 Active Monitor 1. About Us: Click on the logo to bring up the About Us dialog box which contains software version, system information, technical support, knowledge base and other details about the software. 2. Active Monitor Toolbar: Contains buttons to operate in Active Monitor application 3. Personal Profile: Click on this to bring up Personal Profile settings; you may change the password for the current user. 99

100 4. PTZ/Event Layout Control: Click on the buttons to hide or show the sections of side panel devoted to these functions. The figure below shows the different configurations available when either PTZ or Event panel is hidden from view. Hiding sections you do not use will provide more space for the camera tree. Fig. 74 Active Monitor - Side panels 5. Camera Panel: The Camera tree is displayed here.. 6. Event Panel: Displays a real time log of events from devices, including motion detection, Digital input, PIR, Video loss/recovery and Network Loss/recovery events. You may click on each item to see further details. 7. PTZ Panel: PTZ operations are controlled here. 8. Layout Manager: Controls the various window layouts 9. Video Window: Each video window displays live view from one device. The round dot on the top right of video window is grey when not connected to device, yellow when connected without video, green when receiving video and flashing yellow when cannot be displayed due to lack of memory. 10. Change Layout: You may select a layout from this dropdown list to change the view. The layouts here need to be setup first in the View Layouts section in System Setup. 100
101 Active Monitor Toolbar Fig. 75 Active Monitor - Active Monitor Toolbar 1. Active Monitor: Click to go to Active Monitor. As you are already in Active monitor, this will not change your current view. 2. Active Player: Click to go to Active Player to search and playback video recordings. 3. Active Map: Click to go to Active Map and view video overlaid upon physical map. 4. Active Setup: Click to go to Active Setup and configure the Camera, system or E-Map settings. 5. Full Screen: Click to bring the video into full-screen mode. To return, press ESC. 6. Snapshot: Takes a single screenshot at maximum resolution for the selected video window. The screenshot is saved as a JPG or BMP file in the Recording Path for that particular channel, as defined in the Recording section of Camera Setup. Please refer to the Recording section for details. The snapshots will be stored on your workstation local machine, and cannot be searched by NVR Server. 7. Manual Record: Click to record the current selected channel immediately. The recording will be stored on NVR server PC and can be searched by NVR Server. A red indicator will show on the top right of video channels currently being recorded. 8. Disconnect This Camera: Click to stop video streaming for the selected channel. 9. Disconnect All Cameras: Click to stop video streaming for all channels. 10. Trigger DO: Click to trigger DO (Digital Output) of the selected channel. 11. System Monitor: Click to bring up system log. 12. Talk: Click and hold to talk to the selected video device; release mouse to end transmission. Depending upon how your device is set up, you may be able to only hear, only speak, or talk in both directions. 13. Broadcast: Pressing this icon enables broadcasting to all video devices that appear in this layout. What you speak will be heard over all cannels in current layout, but you cannot hear from them. 14. Volume Control: Turn audio signal on/off and adjust the volume. New channels are set to Mute On as default (No Sound). 101

102 Camera Panel Fig. 76 Active Monitor - Camera Panel 1. Refresh: Refresh the camera list. You should refresh when you have made some changes to camera parameters in Camera Setup. 2. Sort By: You may sort the camera list in different ways. Select the criterion to sort by from the drop down list. Fig. 77 Active Monitor - Camera Panel - Sorting the Camera Tree 3. Camera Tree: List of cameras added into NVR. Note that there is an icon to the left of each camera in the list. Clicking the icon displays a popup info panel with basic information about the camera as shown in the figure below. If Event on Camera Tree is enabled in System setup, then cameras with current events will highlight and flash. 102

103 Fig. 78 Active Monitor - Camera Panel - Popup Info Panel Event Panel Fig. 79 Active Monitor - Event Panel - Camera Panel Events are special conditions that require attention, either from device or from the system. Event Panel keeps a real time log of recent events. The most recent events are listed at the top of the scroll-down list. Each entry describes the Channel ID, the Camera Name, the type of event and the time. You may click on the Clear button to clear the log entries in the event list. By the side of each entry there are two clickable icons, and. Clicking the icon will pop up a mini preview window which shows the live view of the channel in this event. Clicking the icon will pop up a mini playback window which shows the recording for this particular event. The mini-preview window and the playback window are shown in the following two figures. 103
104 Fig. 80 Active Monitor - Event Panel - Event Preview window Fig. 81 Active Monitor - Event Panel -Event Playback window 104
105 If you have configured a Pop-up window in the Event Manager Section for this camera, a window will pop up when the event is triggered. If more events are triggered before the first one times out, a logs show the events at the side of the pop-up window. You may click upon each event in the window to switch between them. Shown below is the popup window for multiple events. Fig. 82 Active Monitor - Event Panel - Event Popup Mini-Preview 1. Mini Preview window: This window will automatically popup if configured to do so in event manager. 2. List of triggered event: Each entry records the camera name, event type and dwell time. 3. Live preview: Here is the actual preview window of the channels with recent events. NOTE: For PTZ cameras, you may also use mouse for PTZ controls in pop-up preview window. 105
106 PTZ Panel Fig. 83 Active Monitor - PTZ Panel 1. OSD: Click here to open On Screen Display for PTZ devices that use OSD menus. 2. Digital Zoom: Enable the Digital Zoom function for this device. You may zoom in, zoom out and perform digital pan/tilt with this channel. You must zoom in first with Digital zoom to perform digital PTZ. 3. Mouse PTZ: Enable PTZ control by mouse on the preview screen. Available only for PTZ cameras. When you perform Mouse PTZ, your cursor icon will change with your position in view. Depending upon its position on screen, the PTZ camera will Pan/Tilt with different speed or zoom in/out. The below overlay image shows some of the possible cursor images. Fig. 84 Active Monitor - PTZ Panel - Mouse PTZ 106
107 4. Tour: Select PTZ Preset Tour from this drop down list. You can setup the Preset tour for each camera in Camera Setup. 5. Control Pad: Click on this wheel to control PTZ movements. 6. Zoom In/Out: If the camera has controllable zoom, this will zoom the lens in or out. 7. Focus In/Out: If the camera has controllable focus, this will shift the focus of the camera. Please note that if you use manual controlled focus, then auto-focus has to be disabled on the camera side via web configurator. Otherwise the camera will return to the auto-focus value once you finished the focus command. 8. Iris In/Out: If the camera has controllable iris, this will modify Iris level. 9. Pan: Set the Pan speed of the control pad. 10. Tilt: Set the Tilt speed of the control pad. 11. Goto: Go to a preset point. Just select the target from the drop down list. You must first setup the preset point through NVR to use this. 12. Action: If you have special PTZ commands entered here, you may select from the drop down list to issue that particular command. 107

108 Adding cameras into preview windows Fig. 85 Active Monitor - Playback window Users can add cameras into the preview window by simply dragging the camera from camera tree and drop it onto the preferred window. A red border will show on the window where preview will be displayed. You may also first click on the preferred preview window then double click on the camera you wish to display there. 108
109 Personal profile Fig. 86 Active Monitor - Personal Profile Fig. 87 Active Monitor - Change Password Users may change their password in the Active Monitor by clicking the personal profile at the top-left corner of the Active Monitor; a window will pop upon click with slots for password confirmation and change. Layout Manager Layout manager is a toolbar where you can quickly switch between frequently used layouts. 1. Patrol: Click here to select the view layout tour to use. You may click Cancel to close the patrol dialog window. Click Patrol again to stop layout tour window view 3. 4 window view 4. 9 window view window view window view window view window view 109
110 9. 64 window view window view window view window view 13. This is the subsection where you select the stream or channel ID to display on the current preview window. If you are using a Dual-stream device, you may setup two different streams in Camera Setup. By default NVR will accept live view only on media 1, while recording can be done with either Media 1 or 2. In active Monitor, channels with dual streams will by default preview in media 1. You may temporarily change the displayed video stream to media 2 by clicking on 2 here. This does not affect the recording, and the live view will still use media 1 when you next refresh this layout. This way you may verify that media 2 is acceptable to your recording needs, but do not need to keep decoding a larger video stream in live view. 110

111 System Monitor You may review, search and export system logs from System Monitor. Fig. 88 Active Monitor - System Monitor 1. Type of log: Select the type of log you wish to display Fig. 89 Active Monitor - System Monitor Select Type of Log 2. Date & Time: Enter the start and end time filter to limit your search results. 3. Camera ID: Enter a specific Camera ID here if you wish to limit the search to a particular camera. 4. Search Button: Press the button to search the logs according to the filter. 5. Export Button: Export the logs into XLS file. Pressing the button will pop up a window for you to confirm the path and name of the export file. This function is only available through workstation, not Web Client. Fig. 90 Active Monitor - System Monitor - Export 111
112 6. Navigation buttons: Click here to move through the pages of records 7. Displaying Data: Here you can see the record numbers being displayed. 8. Records: Display the search result according to the search filters. The results may contain different fields depending upon the type of log filter. 112
113 Active Player Active Player is the NVR module that processes recorded clips. You may search, playback and export video through Active Player. You may search by time period, by snapshot, by time bar and by event. Playback may include up to 4 channels synchronized playback or up to 36 individual clips. Video clips may also be exported in either RAW or AVI formats. Overview Fig. 91 Active Player - Overview 1. About Us: Click on the logo to bring up the About Us dialog box which contains software version, system information, technical support, knowledge base and other details about the software. 2. Active Player Toolbar: Contains buttons to operate in Active Player application 3. Personal Profile: Click on this to bring up Personal Profile settings; you may change the password for the current user. 4. Layout Manager: Control various window layouts and 4-channel synchronized playback. 5. Camera Panel: The Camera tree is displayed here. 6. Open/Digital Zoom / Export: Open local file to playback. Once file is open, you may perform digital zoom or export to local PC. Digital zoom is performed in the same way as in Active Monitor. 113
114 7. Clip Information: Displays start, end and current date and time of the archive. 8. Playback Panel: Playback operations are performed here. 9. Video Window: Active window that plays recorded archive. 10. Quick Search Bar: Quick search with channel, date, time, event criteria. 11. Archive Time Bar: Displays time segments with recordings in the time bar. Each type of recording is represented in a different color. Active Player Toolbar 1. Active Monitor: Click to go to Active Monitor. As you are already in Active monitor, this will not change your current view. 2. Active Player: Click to go to Active Player to search and playback video recordings. 3. Active Map: Click to go to Active Map and view video overlaid upon physical map. 4. Active Setup: Click to go to Active Setup and configure the Camera, system or E-Map settings. 5. Full Screen: Click to go to full-screen mode. The entire video layout will be enlarged together, not just video in the window. (CTRL-F12) To return, press ESC. 6. Snapshot: Takes a single screenshot at maximum resolution for the selected video window. (CTRL-F7) The screenshot is saved in JPG format. It will be saved in the Recording Path for that particular channel, as defined in the Recording section of Camera Setup. Please refer to the Recording section for details. The snapshots will be stored on your workstation local machine, and cannot be searched by NVR Server. 7. Disconnect This Camera: Click to stop video playback for the selected channel. 8. Disconnect All Cameras: Click to stop video playback for all channels. 9. Video Search: Click to search video recording files. 10. Snapshot Search: Click this button to search and browse snapshots taken by the system, and bring up related archive playback. 11. Volume Control: Turn audio signal on/off and adjust the volume. New channels are set to Mute On as default (No Sound). 114
115 Video Search Fig. 92 Active Player - Video Search 1. Video Search: Click to show the Video Search screen as shown above. 2. Record Type: Select the types of recordings to include in search. You may select between Schedule / DI / Motion and PIR / Manual. 3. Camera: Select the cameras to include in search. Beside each camera there is an icon, you may click on it to see camera information tab. 4. Time Period: Mark the Start and end date/time for this search. Video that began before the starting time will be included unless Include video that began before this time period is unchecked. 5. Search: Click to search video archives according to the filter above 6. Return Button: Click to return to main page 115

116 Video Search Result Fig. 93 Active Player Video Search result 1. Camera Name: Display the camera name that matches the search criteria 2. Recording Type: Displays the recording type. This value can be Schedule, Manual or event. 3. File Location: Displays physical file location in NVR Server. 4. Start Time / End Time: Displays start / end date/time of the video clip 5. End Time: Displays end date/time of the video clip 6. Page Indicator: User may go to different pages of the search result here. 7. Download: Download video file to your local drive. 8. Return: Click to return to search page 116

117 Play Archive from Search Page NVR 2.3 (V2.3.01) User s Manual Fig. 94 Active Player Play Archive from Search Page After clicking the link from the search page, user can see the file information on the screen first, and playback will begin when the file is ready. 117

118 Snapshot Search Fig. 95 Active Player Snapshot Search 1. Snapshot Search: Click on Snapshot Search button to start search 2. Event Type: Displays the recording type. This value can be Schedule, Manual or event. 3. Camera: Select the cameras to include in search. Beside each camera there is an icon, you may click on it to see camera information tab. 4. Time Period: Mark the Start and end date/time for this snapshot search. 5. Search: Click to search snapshot archives according to the filter above 6. Return Button: Click to return to main page 118
119 Snapshot Preview Fig. 96 Snapshot Preview 1. Thumbnail List: You may see the thumbnail image of the snapshots from the search results. In each thumbnail the type of event is listed at the top left. Beside the event type there is a small Play icon. You may click on the Play icon or double click on the thumbnail to playback that video. The video playback will start from the time of snapshot. The time of snapshot within that video is shown below the thumbnail. 2. Snapshot View: When you click on one thumbnail, a preview image the original snapshot will be displayed below in the Snapshot view area. You may see the physical file location below the snapshot, and click the link to the right to download snapshot file. 119

120 Playback Control Panel NVR 2.3 (V2.3.01) User s Manual 1. Start Time: Displays video clip start time 2. Current Time: Displays the date / time of the current video playback. 3. End Time: Displays end time of the video clip 4. Playback scroll bar: Shows the time bar of current video clip. Click and drag to change video segment to view. 5. Previous recording: Click this button to go to the recording file before the current one. 6. Play backward: Click this button to play backward. 7. Local Record: Click this button to record from the playback file. Click again to stop recording. This file is located in local PC, and cannot be search from NVR. When local record is in effect, the playback speed is automatically locked into 1x normal. Click on the Local Record button again to finish local record. This is a useful way to retrieve a segment out of a long video archive clip. The save path will be displayed at the bottom. 8. Stop: Click this button to stop playback. 9. Pause: Click this button to pause playback. 10. Play: Click this button to play forward. 11. Next recording: Click this button to go to the recording file after the current one. 12. Speed bar: This bar shows how fast this recording is being played. User can click the button on this bar to change playback speed. F to the left means frame-by frame. 120

121 Export Active Player - Export Select a video window with a clip already playing, then click on the Export button in the main screen to export video. You may specify the following info: 1. File type of the Export file 2. Export destination path 3. Name of the Export file 4. Start Exporting 5. Cancel Export NOTE: You may export video only from Workstation, not from Web Client. The original file must be located on the same PC as the workstation. If you are connecting to the server from a remote workstation, then you may open the files from Server, but will not be able to export them. If there are local recording files on the remote workstation PC, then the remote workstation user can export from these files, but not from files on NVR Server. NOTE: To play the exported.avi file, you must have FFDShow or DivX codec installed in your computer. They can be found over the internet at the following sites:
122 Time Based Search Bar NVR 2.3 (V2.3.01) User s Manual 1. Camera ID: Shows the camera currently being displayed. To select the camera, click the camera name on the device tree. 2. Search time: Select the time for time bar starting point 3. Search event: Choose the types of recordings to include in the search 4. View-by-hour button: Change the scale of the time bar to one hour. 5. View-by-day button: Change the scale of the time bar to 24 hours. 6. Search button: Search for video with the above filter and display below. 7. Time bar: The video clips found by the above filter will be displayed here. You can see the time and type of recording available at a glance. 8. Show previous section: Go to the previous section. If the time scale is hour, the time bar will go back one hour. If it is day, it will go back by one day. 9. Show next section: Go to the next section. If the time scale is hour, the time bar will go forward one hour. If it is day, it will go forward one day. 10. File Information: Shows the recorded, date and time of the recording file. Note: The time displayed is based upon device time, not NVR PC time. 122
123 Channel Layout 1. 1-Window View: Shows a single channel; video is not expanded if maximum resolution of the source video is reached Window View: Shows a maximum of 2x2 video channels at one time Window View: Shows a maximum of 3x3 video channels at one time Window View: Shows a maximum of 4x4 video channels at one time Window View: Shows a maximum of 5x5 video channels at one time Window View: Shows a maximum of 6x6 video channels at one time Window View: Shows one video channel with a larger view, and 5 others at a lower resolution Window View: Shows one video channel with a larger view, and 7 others at a lower resolution Window View: Shows two video channels with a larger view, and 8 others at a lower resolution. 10. Synchronous Button: 4-channel synchronized playback. NOTE: The Synchronous Button will be enabled only when there are files being played back. 123

124 Synchronous Playback 4-channel synchronous playback function allows user to review what happened at a give time from four different cameras. Synchronized playback works by first finding the time you wish to investigate from a Sync Main channel. Then you may add up to three other reference channels that will synchronize with the Sync Main channel. These other channels are called Sync Follower. Open file/drag-drop channel There are three ways to start a sync playback, first you need to define a sync main for other channels to sync with. 1. Drag: You may drag a channel into one of the 4-window view 2. Open: You can open a file from archive to sync with 3. Search: Your selected search result will be the main file to sync from. Note: You may sync to a maximum of 4-channels at one time. 124
125 Finding your time and Synchronize NVR 2.3 (V2.3.01) User s Manual Fig. 97 Finding Sync Main start point Here are the steps to prepare for synchronized playback. 1. Choose Video Screen: Open a recording in the view window to use as Sync Main. 2. Playback Time: Find the time you want to sync/view from Playback Control Panel 3. Time Bar: Or find the time you want to sync/view from Time Based Search Bar 4. Synchronize Button: Then click on the synchronize button to confirm the current channel as Sync Main. 125

126 Sync Main and Sync Follower NVR 2.3 (V2.3.01) User s Manual Fig. 98 Sync Main and Sync Follower 1. Sync Main: This is the Main channel/file that the other channels would synchronize to. 2. Sync Follower 1: Drag/add the channel you want to synchronize with Sync Main here. 3. Sync Follower 2: Drag/add the channel you want to synchronize with Sync Main here. 4. Sync Follower 3: Drag/add the channel you want to synchronize with Sync Main here. If the channel you drag into Sync Follower view windows does not have recording at the time selected, then it will show as Sync Fail. You will need to find another channel with recording at the same time to do Sync Playback. Note: You may only have one channel acting as Sync Main. Once a channel is defined as Sync Main, you need to first click Cancel below to exit Sync Playback mode before disconnecting the Sync Main channel. 126
127 Sync Playback 1. Play: Click this button to play forward. 2. Pause: Click this button to pause playback. 3. Stop: Click this button to stop playback. 4. Play backward: Click this button to play backward. 5. Cancel: Cancel sync playback. 6. Synchronization Button: Start or Stop sync playback. 7. Disconnect all Channels: disconnect all channels and cancel sync playback. 8. Disconnect Channel: You may disconnect all sync followers except sync main. Note: Under Sync Playback mode you may not use Search and Snapshot view button. While Sync Playback (Play/Pause) you may drag/add more channels to empty ones or replace original ones. 127
128 Active Map Active Map viewer shows live video overlaid upon area maps. It can help you get a much better visualization of your surveillance system. You can also navigate between several maps or cycle through maps on a preset tour. This section describes how to operate the e-map system via Active Map. Before using Active Map, please be sure to setup your Camera Groups and e-map properly. Map Overview The Active map screen is divided in two parts. To the left is the camera tree sorted by Camera Groups. To the right is the map view area. Fig. 99 Active Map - Active Map Overview 1. Camera Tree: The cameras are shown in camera groups here. Select each camera group to show the map linked to that particular group. 2. Camera: Icons representing each camera is shown here on the map. Arrows indicating the direction they point to may also be shown if it is configured in the map setup section. Double click on camera icon to show mini-preview. 3. Live View Window: These windows display the live view from cameras. If an event is currently active, the bar at the top will turn red. Related event symbol will appear beside it, and red rectangle will appear for Motion Detection or PIR events. 4. Camera Info: if your mouse hovers over the camera, then a popup text box will show up 128
129 with information on this camera. 5. Event rectangle: If an event is currently being triggered for a certain camera, it will be highlighted on the map with a red square. 6. Event Symbol: When event is happening to a certain camera, small symbols of the event type will show beside the camera and the camera live view. This allows the user to identify what happened to the camera swiftly. 7. Full Screen: Click here for full screen mode. To return, pres Esc. 8. Map Tour: Click here to start the predefined Map tour. Please go to Map Setup section for details. 9. Live View Start / Stop: Click here to toggle live view from all cameras. Mini Preview To get a more detailed view on a certain camera, there are two ways to bring up the mini preview window. 1. Double-clicking on camera icon, or 2. Double-clicking on the live preview window Fig. 100 Active Map - Mini Preview Window 1. Mini-Preview Window: Mini-preview window displays with larger display window. 2. Audio Control: User may turn on/off audio transmissions here. NOTE: You may also control PTZ cameras via on-screen mouse PTZ. 129

130 Web Client Introduction NVR Web Client is an alternative to NVR Workstation. It provides access to NVR through Internet Explorer 7 or 8. The layouts and functions are almost the same as NVR workstation with a few restrictions. User will only need to install a small ActiveX control add-on to IE without requiring any desktop application. Connecting to NVR as a Web Client 1. Open your Internet Explorer Browser (Only IE 7 and 8 are supported. Firefox / Safari / Chrome or other browsers may not access NVR web client.) 2. In the address bar, type in the web address of the NVR server. If the HTTP port it uses is the default 80 then you do not need to add any port number. If the HTTP port it uses has been changed, please add a colon and the port number after the IP address. Sample Scenarios: (Local host, used when running web client on the NVR Server PC.) (Local host, HTTP Port changed to 3456) (Connecting to NVR server from another PC over LAN) (Connecting to NVR server from another PC over LAN, HTTP Port changed to 3456) 3. If you are logging in for the first time, a warning bar will appear in the page. Click to install the ActiveX control and run the add-on to access NVR. This installation is secure, and you will only need to install once for each PC. 130

131 4. The Web Client login screen is shown below. Fig. 101 Web Client Login Screen There are two important differences between the login screen of Web Client and Workstation. Firstly the Server IP Address/port is not editable as you have already decided how to access your server when you typed in the address bar. Secondly the Preview mode now has two options, Basic and Advanced. Advanced mode is almost the same as NVR workstation. Basic mode is used when you want to restrict access or for simple observers. 131
132 5. Once you ve logged into Web Client, it looks exactly like the NVR workstation. The default login connects you to the Active Monitor If you do not have access right to Active Monitor, it will connect you to modules where your account has permission to. Fig. 102 Web Client Basic Mode Fig. 103 Web Client Advanced Mode 132
133 Web Client Restrictions NVR 2.3 (V2.3.01) User s Manual Below is a List of functions available to Workstation and not to Web Client 1. In Setup Camera -> Event Action -> Beep and play audio file, Play audio file is not available to Web Client. 2. In Setup System -> PTZ setup, you may not use PTZ file function from Web Client. 3. In Setup System -> System, Camera Model Update is not available to Web Client. 4. In Setup System, Joystick setting is not available to Web Client. 5. In Setup System -> System, Default Export Path is not available to Web Client 6. You may not export files from Web Client, including Language files, Raw/AVI files and system logs. 7. You may not setup emap from web client 133

134 ACTi Utility Suite Aside from NVR, we also provide a set of utilities to help round out the features. Here is a brief introduction to the utility programs. For details, please go to the respective user s manual. IP Utility IP Utility helps you find cameras over LAN network, and allows for multiple camera firmware upgrades at the same time. You may also backup and restore device settings through IP Utility. Often it is faster to use IP utility to check if your device is properly running then go through NVR. Media converter Media converter helps you process your recorded files into your desired format. You may convert between RAW / AVI / MP4 / JPG formats. You may also trim a section out of the original video for your convenience Backup Wizard Backup Wizard provides a convenient way to safeguard your NVR settings. In case of any troubleshooting needs, you may also provide a backup file for easier troubleshooting. Streaming Explorer Streaming explorer is a handy little tool to control camera directly. It is especially useful when testing PTZ or OSD functions, as it does not include bulky setup steps, but goes directly to camera control. Archive Player Archive Player allows you to view recorded video in detail. When you need to present evidence to Law Enforcement authorities, sometimes they do not have proper software to view.raw or.avi files. This is a little program to pack along with the recording of the suspect so that they can work with you and enhance security. 134
ACTi NVR User s Manual. Version 2.3.04 2011/12/27
 ACTi NVR User s Manual Version 2.3.04 2011/12/27 Table of Contents 1 Overview 6 ACTi NVR Architecture... 6 ACTi NVR Server... 6 ACTi NVR Workstation... 7 NVR Web Client... 7 Hardware System Requirements...
ACTi NVR User s Manual. Version 2.3.05 2012/10/12
 ACTi NVR User s Manual Version 2.3.05 2012/10/12 Table of Contents 1 Overview 6 ACTi NVR Architecture... 6 ACTi NVR Server... 6 ACTi NVR Workstation... 7 NVR Web Client... 7 Hardware System Requirements...
ACTi Central Management System
 ACTi Central Management System User s Manual Version 1.1.05.06 2012/10/12 Table of Contents 1 Overview 5 Software Architecture... 5 2 Installation 6 Requirements... 6 Operating System... 6 Hardware System
Server Application. ACTi NVR v2.2. Quick Installation Guide
 Server Application ACTi NVR v2.2 Quick Installation Guide ACTi APP-2000 This document is copyrighted, 2003-2008 by ACTi Corporation. All rights are reserved. ACTi Corporation reserves the right to make
LOREX CLIENT Remote Software 4.0
 LOREX CLIENT Remote Software 4.0 Instruction Manual English Version 2.0 MODEL: L20WD800 Series www.lorexcctv.com Copyright 2008 LOREX Technology Inc. Table of Contents Table of Contents Software Installation...
ivms-4200 Client Software Quick Start Guide V1.02
 ivms-4200 Client Software Quick Start Guide V1.02 Contents 1 Description... 2 1.1 Running Environment... 2 1.2 Surveillance System Architecture with an Performance of ivms-4200... 3 2 Starting ivms-4200...
How To Set Up Flir Cloud Client For Pc Or Mac Or Mac (For Pc Or Ipad) On A Pc Or Pc Or Mouse (For Mac) On An Iphone Or Ipa) On Pc Or Tv (For Ipa
 On A Pc Or Pc Or Mouse (For Mac) On An Iphone Or Ipa) On Pc Or Tv (For Ipa") Instruction Manual FLIR Cloud Services Client Instruction Manual FLIR Cloud Services Client #LX400018; r. 2.0/14567/14568; en-us iii Table of contents 1 Setting up FLIR Cloud Client for PC or Mac...1
Instruction Manual FLIR Cloud Services Client Instruction Manual FLIR Cloud Services Client #LX400018; r. 2.0/14567/14568; en-us iii Table of contents 1 Setting up FLIR Cloud Client for PC or Mac...1
NVR 3.0 System Administrator s Manual
 NVR 3.0 System Administrator s Manual For Version 3.0.08 2013/12/20 About This Manual Target Audience This manual is intended for System Administrators who are responsible for installing and setting up
Server Application. ACTi NVR v2.1. User s Manual
 Server Application ACTi NVR v2.1 User s Manual ACTi APP-2000 This document is copyrighted, 2003-2008 by ACTi Corporation. All rights are reserved. ACTi Corporation reserves the right to make improvements
NVR 3.0. System Administrator s Manual. For V3.0.02 Version 2013/03/21
 NVR 3.0 System Administrator s Manual For V3.0.02 Version 2013/03/21 About This Manual Target Audience This manual is intended for System Administrators who are responsible for installing and setting up
NVMS-1200. User Manual
 NVMS-1200 User Manual Contents 1 Software Introduction... 1 1.1 Summary... 1 1.2 Install and Uninstall... 1 1.2.1 Install the Software... 1 2 Login Software... 3 2.1 Login... 3 2.2 Control Panel Instruction...
Central Management Software CV3-M1024
 Table of Contents Chapter 1. User Interface Overview...5 Chapter 2. Installation...6 2.1 Beginning Installation...6 2.2 Starting the CMS software...10 2.3 Starting it from the Start menu...10 2.4 Starting
NVMS - 1000 USER MANUAL. Version 2.1.0
 NVMS - 1000 USER MANUAL Version 2.1.0 Contents 1 Software Introduction... 1 1.1 Summary... 1 1.2 Operation Environment... 1 1.3 Install and Uninstall... 2 1.3.1 Install the Software... 2 1.3.2 Uninstall
ACS CLIENT SOFTWARE USER MANUAL
 ACS CLIENT SOFTWARE USER MANUAL 1 ACS USER GUIDE 1.1 System Requirement Recommended System Requirement OS CPU VGA RAM HDD WindowXP, Vista Pentium 4, 2Ghz 1024*768, 64MB 24bit color graphic card 1GB 20MB
Central Management System (CMS) USER MANUAL
 USER MANUAL") Central Management System (CMS) USER MANUAL LEGAL INFORMATION Reproduction, transfer, distribution or storage of part or all of the contents in this document in any form without the prior written permission
Central Management System (CMS) USER MANUAL LEGAL INFORMATION Reproduction, transfer, distribution or storage of part or all of the contents in this document in any form without the prior written permission
KViewCenter Software User Manual 2012 / 04 / 20 Version 2.2.1.0
 KViewCenter Software User Manual 2012 / 04 / 20 Version 2.2.1.0 Table of Contents Chapter 1. KViewCenter Interface... 5 1.1. Log in.... 5 1.2. Log out... 5 1.3. Control Panel... 6 1.4. Control Panel (Preview
Multi-Site 4200. Remote Viewing Software. User Guide
 Multi-Site 4200 Remote Viewing Software User Guide Document 800-12064V1 Rev A 09/2012 User Guide Revisions Issue Date Revisions A 07/2012 New document. V1 Rev A 09/2012 Updated the description of the
Manual Client Management Software HDR50-CMS
 Manual Client Management Software HDR50-CMS HDR50-CMS (Client Management Software) A-1. Install HDR50-CMS for Windows PC HDR50-CMS is a program for communication between DVR and PC to control signal and
PowerVideo Plus. EverFocus Central Management Software. for Networked Video Devices Management. User s Manual
 EverFocus Central Management Software for Networked Video Devices Management User s Manual Copyright EverFocus Electronics Corp. Release Date: January, 2013 Copyright 2012 EverFocus Electronics Corp. All
ReadyNAS Surveillance
 ReadyNAS Surveillance Add-on Manual Firmware: RAIDiator 4.2.17 or later 350 East Plumeria Drive San Jose, CA 95134 USA May 2012 202-11009-01 2012 NETGEAR, Inc. All rights reserved No part of this publication
Professional Surveillance System User s Manual
 Professional Surveillance System User s Manual \ 1 Content Welcome...4 1 Feature...5 2 Installation...6 2.1 Environment...6 2.2 Installation...6 2.3 Un-installation...8 3 Main Window...9 3.1 Interface...9
AXIS Camera Station Quick Installation Guide
 AXIS Camera Station Quick Installation Guide Copyright Axis Communications AB April 2005 Rev. 3.5 Part Number 23997 1 Table of Contents Regulatory Information.................................. 3 AXIS Camera
1. Central Monitoring System Software
 1. Central Monitoring System Software 1-1. General information CMS program is an application with which users not only watch and control remote DVRs, but also receive video/audio data or alarm signals
InventoryControl for use with QuoteWerks Quick Start Guide
 InventoryControl for use with QuoteWerks Quick Start Guide Copyright 2013 Wasp Barcode Technologies 1400 10 th St. Plano, TX 75074 All Rights Reserved STATEMENTS IN THIS DOCUMENT REGARDING THIRD PARTY
ImagineWorldClient Client Management Software. User s Manual. (Revision-2)
") ImagineWorldClient Client Management Software User s Manual (Revision-2) (888) 379-2666 US Toll Free (905) 336-9665 Phone (905) 336-9662 Fax www.videotransmitters.com 1 Contents 1. CMS SOFTWARE FEATURES...4
ImagineWorldClient Client Management Software User s Manual (Revision-2) (888) 379-2666 US Toll Free (905) 336-9665 Phone (905) 336-9662 Fax www.videotransmitters.com 1 Contents 1. CMS SOFTWARE FEATURES...4
ACTi NVR Config Converter User s Manual. Version 1.0.0.17 2012/06/07
 ACTi NVR Config Converter User s Manual Version 1.0.0.17 2012/06/07 Legal Notice Disclaimer The information contained in this document is intended for general information purposes. ACTi Corporation shall
Central Management System
 Central Management System Software Installation Guide Ver. 1.5.0.101115.001 ... ii System Introduction... 3 Client/Server Architecture...3 System Requirements... 4 System Setup...4 Multiple Monitor Configuration...5
Camera Control for Windows
 Camera Control for Windows 1910011253 REV1.0.0 Contents Chapter 1 Introduction... 1 1.1 Overview... 1 1.2 System Requirement... 1 Chapter 2 Software Installation... 2 Chapter 3 Quick Start... 5 3.1 Create
Appendix A. CMS(Client Management Software)
") Appendix A. CMS(Client Management Software) A-1. Install CMS for Windows PC CMS is a program for communication between DVR and PC to control signal and video. Insert the enclosed CD, and go to CD-ROM Drive
Appendix A. CMS(Client Management Software) A-1. Install CMS for Windows PC CMS is a program for communication between DVR and PC to control signal and video. Insert the enclosed CD, and go to CD-ROM Drive
MJPEG Camera Client User Manual
 MJPEG Camera Client User Manual CONTENTS User Manual 1 WELCOME... 3 1.1Features... 3 1.2Installation Requirements... 3 1.3 Software Installation... 3 2 Software Operation... 5 2.1 Tab bar... 6 2.2 Device
1. Central Monitoring System Software
 1. Central Monitoring System Software 1-1. General information CMS program is an application with which users not only watch and control remote DVRs, but also receive video/audio data or alarm signals
PC-ZViewer User Manual
 PC-ZViewer User Manual For further help, please visit www.zmodo.com Contents Preface... 3 Statement... 3 Intended Reader... 3 Terms in this Manual... 3 Software Introduction... 3 Operating Environment...
Access to remote DVR from IE USER S MANUAL CONTENT
 Access to remote DVR from IE CONTENT... 2 Preface... 2 1. Introduction... 2 2. System requirement and executing environment... 2 2.1. Supported operating System:... 2 2.2. Hardware requirement (recommend):...
Preface Version 1.0 (1808. rev. 2)
") A brand that is integrated into Samsung s network products, stands for a convenient world (Polis) made safe (Polis) through Samsung s superior network performance (Internet protocol). With products, clear
A brand that is integrated into Samsung s network products, stands for a convenient world (Polis) made safe (Polis) through Samsung s superior network performance (Internet protocol). With products, clear
Remote Client Program... 3. Web Client... 39
 Remote Client / Web Client USER MANUAL T Series Digital Video Recorder Remote Client Program... 3 Remote Client Program Installation... 4 Remote Client... 6 Main Window... 6 Site Registration... 7 Group
ivms-4000 (V2.03.07) Client Software User Manual
 Client Software User Manual") ivms-4000 (V2.03.07) Client Software User Manual Table of Contents User Manual... 2 Table of Contents... 1 Chapter 1 Welcome to ivms-4000 (V2.03.04.07)... 4 1.1 Overview... 4 1.2 Computer Disposition Request...
ivms-4000 (V2.03.07) Client Software User Manual Table of Contents User Manual... 2 Table of Contents... 1 Chapter 1 Welcome to ivms-4000 (V2.03.04.07)... 4 1.1 Overview... 4 1.2 Computer Disposition Request...
ENR-2000 Series. User s Manual. For V4.00.02 Firmware 2014/01/29
 ENR-2000 Series User s Manual For V4.00.02 Firmware 2014/01/29 Legal Notice Disclaimer The information contained in this document is intended for general information purposes. ACTi Corporation shall not
CMS-DH CENTRAL MANAGEMENT SOFTWARE
 CMS-DH CENTRAL MANAGEMENT SOFTWARE CMS-DH is a central management software that allows you to view and manage up to 300 DH200 series DVRs. System Requirements Your system must meet the system requirements
Manager Express Release 3.0 Software User Manual Jan 2012
 Manager Express Release 3.0 Software User Manual Jan 2012 0 Contents 1. Overview... 1 1.1. What s new... 1 1.2. Conventions... 1 1.3. Content management Overview... 2 2. Installation... 2 2.1. Minimum
User s Manual of DVR DVS Remote Client Software V 4.0.1
 User s Manual of DVR DVS Remote Client Software V 4.0.1 Index Version description...4 1 Introduction...8 2 Software Install, Uninstall and use...9 2.1 Install remote client software ver4.0.1...9 2.2 Uninstall
Quick-Start Guide. Remote Surveillance & Playback SUPER DVR MONITORING SOFTWARE. For use on Q-See s QSDT series of PC Securitiy Surveillance Cards
 Quick-Start Guide SUPER DVR MONITORING SOFTWARE Remote Surveillance & Playback For use on Q-See s QSDT series of PC Securitiy Surveillance Cards 2 CONFIGURING ROUTER FOR REMOTE ACCESS REMOTE SURVEILLANCE
ivms-5200 Professional Web Manager User Manual
 ivms-5200 Professional Web Manager User Manual UD.6L0202D1651A01 Hikvision ivms-5200 Professional Web Manager User Manual This manual, as well as the software described in it, is furnished under license
DIGICLIENT 8.0 Remote Agent Software
 DIGICLIENT 8.0 Remote Agent Software MODEL: D17800 Series Instruction Manual English Version 1.0 Copyright 2007 Digimerge Technologies Inc Table of Contents Table of Contents About the DigiClient 8.0...
CDVS-7000 Series Remote Software Users Guide
 CDVS-7000 Series Remote Software Users Guide Crest Electronics, Inc. Version 12.1005 Remote Surveillance Program The remote surveillance program enables users of the Crest 7000 series DVRs to connect remotely
LOREX CLIENT 2.2 Integrated Remote Agent Software
 LOREX CLIENT 2.2 Integrated Remote Agent Software Instruction Manual English Version 1.0 MODEL: L15LD420 / L17LD420 Series Copyright 2008 LOREX Technology Inc. www.lorexcctv.com Table of Contents Table
TVI End User Guide. Version: Summer 2009 Release
 TVI End User Guide Version: Summer 2009 Release Table of Contents Control Center for Windows...2 TVI Control Center for Windows XP/Vista...2 Features...2 System Requirements...3 Installing Control Center...3
VMS A1 Client Software. User Manual (V2.0)
") VMS A1 Client Software User Manual (V2.0) Contents Chapter 1 Overview...4 1.1 Description...4 1.2 Running Environment...4 1.3 Function Modules...5 Chapter 2 Live View...7 2.1 User Registration and Login...7
VMS A1 Client Software User Manual (V2.0) Contents Chapter 1 Overview...4 1.1 Description...4 1.2 Running Environment...4 1.3 Function Modules...5 Chapter 2 Live View...7 2.1 User Registration and Login...7
How to Use Motion Detection in ACTi Cameras
 ACTi Knowledge Base Category: Installation & Configuration Note Sub-category: Application Model: All Firmware: N/A Software: N/A Author: Ando.Meritee Published: 2010/11/19 Reviewed: 2011/03/02 How to Use
User Manual V1.0. Remote Software
 User Manual V1.0 Notice: The information in this manual was current when published. The manufacturer reserves the right to revise and improve its products. All specifications are therefore subject to change
IDIS Solution Suite. Backup Service. Software Manual. Powered by
 Solution Suite Software Manual Backup Service Powered by Before reading this manual This Operation Manual provides instructions for using Solution Suite, a network integration solution enabling remote
Quick Start Guide NVR DS-7104NI-SL/W NVR. www.hikvision.com. First Choice For Security Professionals
 Quick Start Guide NVR DS-7104NI-SL/W NVR NOTE: For more detailed information, refer to the User s Manual on the CD-ROM. You must use your PC or MAC to access the files. www.hikvision.com Quick Start 1.
IDIS Solution Suite. Backup Service. Software Manual. Powered by
 Solution Suite Software Manual Backup Service Powered by Before reading this manual This Operation Manual provides instructions for using Solution Suite, a network integration solution enabling remote
i -CEN S USER S Manual 2007. 08. 13.
 i -CEN S i -CEN'S USER S Manual 2007. 08. 13. i -CEN S Table of Contents Overview of i-cen S software... 4 1 Introduction of i-cen S... 4 2 Key Features... 5 3 Key Benefits... 5 4 System Specification...
1. Central Monitoring System Software
 1. Central Monitoring System Software 1-1. General information CMS program is an application with which users not only watch and control remote DVRs, but also receive video/audio data or alarm signals
Table of Contents. Chapter 5 Backed-up Video Playback & Exportation... 29 5.1 Playing back Backed-up Video... 29 5.2 Exporting Backed-up Video...
 inex Backup Table of Contents Chapter 1 Introduction... 1 1.1 System Diagram... 2 Backup Service Registered on Administration Service... 2 Backup Service Registered on Federation Service... 3 Chapter 2
Networking Best Practices Guide. Version 6.5
 Networking Best Practices Guide Version 6.5 Summer 2010 Copyright: 2010, CCH, a Wolters Kluwer business. All rights reserved. Material in this publication may not be reproduced or transmitted in any form
ivms-4200 Client Software User Manual Version 1.02
 ivms-4200 Client Software User Manual Version 1.02 Contents Chapter 1. Overview... 3 1.1 Description... 3 1.2 Running Environment... 3 Chapter 2. Starting ivms-4200... 4 2.1 User Registration... 4 2.2
DVR4C Remote Viewer Operation Manual Table of Contents EN 3 1. OVERVIEW...5 1.1 MINIMUM PC REQUIREMENTS...5 2. INSTALLING THE PROGRAM...
 DVR4x4RemoteViewer.book Page 3 Tuesday, February 15, 2005 9:19 AM DVR4C Remote Viewer Operation Manual Table of Contents EN 3 1. OVERVIEW...5 1.1 MINIMUM PC REQUIREMENTS...5 2. INSTALLING THE PROGRAM...5
NetClient software user manual
 NetClient software user manual 1-1. General information Net Client is an application which provides users not only viewing and controling remote DVRs, but also receiving realtime event data or alarm signals
Allworx OfficeSafe Operations Guide Release 6.0
 Allworx OfficeSafe Operations Guide Release 6.0 No part of this publication may be reproduced, stored in a retrieval system, or transmitted, in any form or by any means, electronic, mechanical, photocopy,
Stand Alone Type. Digital Video Recorder USER S MANUAL. (Real time recording 8 & 16 CH DVR) Revision Date : 2010. 6. 30.
 Revision Date : 2010. 6. 30.") Stand Alone Type Digital Video Recorder USER S MANUAL (Real time recording 8 & 16 CH DVR) Revision Date : 2010. 6. 30. INDEX 1. Front Panel - - - - - - - - - - - - - - - - - - - - - - - - - - - - - - -
Stand Alone Type Digital Video Recorder USER S MANUAL (Real time recording 8 & 16 CH DVR) Revision Date : 2010. 6. 30. INDEX 1. Front Panel - - - - - - - - - - - - - - - - - - - - - - - - - - - - - - -
ACTi Streaming Explorer User s Manual Ver 2.1.09
 ACTi Streaming Explorer User s Manual Ver 2.1.09 2011/06/24 Overview Streaming Explorer is a Web tool used to manage devices remotely. The Functions provided include Connection, PTZ, DI/DO, Motion, Camera
Surveillance Manager REV: 1.0.0 1910010755
 Surveillance Manager REV: 1.0.0 1910010755 Contents Chapter 1 System Requirement... 1 Chapter 2 Installation... 2 2.1 Before Installing the Software...2 2.2 Starting the Installation...2 Chapter 3 Quick
CMS Basic User s Manual
 CMS Basic User s Manual Central Management Solution For Multi-sites Applications V1.0.0 2 CMS Basic User s Manual Table of Contents User Interface Overview... 4 CMS UI Overview... 4 Installation... 6 Begin
SMS (Server Management Software) Digital Video Recorder. User s Manual
 Digital Video Recorder. User s Manual") SMS (Server Management Software) Digital Video Recorder User s Manual 1 Table of Contents Chapter 1 Overview.....03 1.1 In This Manual..03 1.2 Overview 03 1.3 SMS Features...03 1.4 Product Information..03
SMS (Server Management Software) Digital Video Recorder User s Manual 1 Table of Contents Chapter 1 Overview.....03 1.1 In This Manual..03 1.2 Overview 03 1.3 SMS Features...03 1.4 Product Information..03
V.I.P. Kit. Video Insight Pilot Kit. (Video Insight Pilot Kit).
.") V.I.P. Kit (Video Insight Pilot Kit). Video Insight Pilot Kit Please follow these instructions and everything should go very smoothly. Before you begin, you will need to establish (or obtain from your
V.I.P. Kit (Video Insight Pilot Kit). Video Insight Pilot Kit Please follow these instructions and everything should go very smoothly. Before you begin, you will need to establish (or obtain from your
A quick user guide for your LX Apollo DVR
 A quick user guide for your LX Apollo DVR The LX Apollo series of DVR s is designed specially for the security and surveillance field and is an outstanding digital surveillance product. It has an embedded
Central Management System
 Central Management System NCS System Installation User Manual Ver. 1.6.0.110630.001 Table of Contents Table of Contents Table of Contents... ii Part 1: NCS Overview... 4 System Introduction... 5 Client/Server
Quick Start Guide. GV-Redundant Server GV-Failover Server. 1 Introduction. Packing List
 1 Introduction Quick Start Guide GV-Redundant Server GV-Failover Server Welcome to the GV-Redundant Server / Failover Server Quick Start Guide. In the following sections, you will be guided through the
Easy Data Centralization with Webster. User Guide
 Easy Data Centralization with Webster User Guide CONTENTS 3-4 1 Introducing Webster Webster - An Introduction 5-14 2 Installing & Configuring Webster Installing the System Configuring Webster 15-18 3 Managing
Point of Sale 2015 Enterprise. Installation Guide
 Point of Sale 2015 Enterprise Installation Guide Contents About this guide 3 System Requirements - Microsoft SQL Server 2008 R2 Express 3 System Requirements - POS Enterprise 2015 (Administrator) 3 System
DVS Net (Integration)
") DVS Net (Integration) Installation and User s Guide Ver 11.10.x Digital Video Security System Digital Video Recorder www.tuniss.com PLEASE CALL TUNISS COMPUTER AT: 650-401-6138 FOR ANY QUASTIONS REGARDING
DVS Net (Integration) Installation and User s Guide Ver 11.10.x Digital Video Security System Digital Video Recorder www.tuniss.com PLEASE CALL TUNISS COMPUTER AT: 650-401-6138 FOR ANY QUASTIONS REGARDING
Configuration Manager 1.6
 Configuration Manager 1.6 en Manual Configuration Manager 1.6 Table of Contents en 1 Table of Contents 1 Introduction 3 1.1 About this manual 3 1.2 Conventions in this manual 3 1.3 System requirements
GUARD1 PLUS SE Administrator's Manual
 GUARD1 PLUS SE Administrator's Manual Version 4.4 30700 Bainbridge Road Solon, Ohio 44139 Phone 216-595-0890 Fax 216-595-0991 info@guard1.com www.guard1.com i 2010 TimeKeeping Systems, Inc. GUARD1 PLUS
Pharos Control User Guide
 Outdoor Wireless Solution Pharos Control User Guide REV1.0.0 1910011083 Contents Contents... I Chapter 1 Quick Start Guide... 1 1.1 Introduction... 1 1.2 Installation... 1 1.3 Before Login... 8 Chapter
Table of Contents. Introduction...9. Installation...17. Program Tour...31. The Program Components...10 Main Program Features...11
 2011 AdRem Software, Inc. This document is written by AdRem Software and represents the views and opinions of AdRem Software regarding its content, as of the date the document was issued. The information
ivms 4000(V2.0) User Manual
 User Manual") ivms 4000(V2.0) User Manual Table of Contents Chapter 1 Welcome to ivms 4000 (V2.0)...4 1.1 Overview...4 1.2 Computer Disposition Request...4 1.3 Convention...4 Chapter 2 Install & Uninstall...5 2.1 Install
ivms 4000(V2.0) User Manual Table of Contents Chapter 1 Welcome to ivms 4000 (V2.0)...4 1.1 Overview...4 1.2 Computer Disposition Request...4 1.3 Convention...4 Chapter 2 Install & Uninstall...5 2.1 Install
Gigabyte Management Console User s Guide (For ASPEED AST 2400 Chipset)
") Gigabyte Management Console User s Guide (For ASPEED AST 2400 Chipset) Version: 1.4 Table of Contents Using Your Gigabyte Management Console... 3 Gigabyte Management Console Key Features and Functions...
Gigabyte Management Console User s Guide (For ASPEED AST 2400 Chipset) Version: 1.4 Table of Contents Using Your Gigabyte Management Console... 3 Gigabyte Management Console Key Features and Functions...
IP Camera Centralization Management. Client Application. (IPCMonitor) Feb, 2013 Version 1.9. User Manual
 Feb, 2013 Version 1.9. User Manual") IP Camera Centralization Management Client Application (IPCMonitor) Feb, 2013 Version 1.9 User Manual INDEX 1 Introduction...3 2 Computer Requirement...3 3 Installation...4 4 Devices list...4 4.1 Adding
IP Camera Centralization Management Client Application (IPCMonitor) Feb, 2013 Version 1.9 User Manual INDEX 1 Introduction...3 2 Computer Requirement...3 3 Installation...4 4 Devices list...4 4.1 Adding
Table of Contents. Chapter 1 Introduction... 1 1.1 Features... 1 1.2 System Diagram... 2
 inex Basic Table of Contents Chapter 1 Introduction... 1 1.1 Features... 1 1.2 System Diagram... 2 Chapter 2 Installation... 3 2.1 Product Information... 3 2.2 Installation... 3 2.3 Uninstall... 5 Chapter
SeeTec ExpansionPackage
 SeeTec ExpansionPackage Contents Contents 1 SeeTec WebClient...1 1.1 System requirements... 2 1.1.1 Server requirements for Apache HTTP Server, SeeTec TranscodingEngine (STE) and SeeTec ApplicationGateway
Video Storage Server User s Manual
 Video Storage Server User s Manual Version 3.2 Table of Contents 1. Overview...2 1.1 System Requirement...3 2. Software Installation...4 3. Software Upgrade...6 3.1 Automatic Software Upgrade...6 3.2 Manual
SMS (Server Management Software) Digital Video Recorder. User s Manual
 Digital Video Recorder. User s Manual") SMS (Server Management Software) Digital Video Recorder User s Manual Contents 1 - Introduction 2 1.1 About this manual 2 1.2 Configuration 2 1.3 SMS Functions 2 1.4 Product Information 2 1.5 System Requirements
SMS (Server Management Software) Digital Video Recorder User s Manual Contents 1 - Introduction 2 1.1 About this manual 2 1.2 Configuration 2 1.3 SMS Functions 2 1.4 Product Information 2 1.5 System Requirements
026-1010 Rev 7 06-OCT-2011. Site Manager Installation Guide
 026-1010 Rev 7 06-OCT-2011 Site Manager Installation Guide Retail Solutions 3240 Town Point Drive NW, Suite 100 Kennesaw, GA 30144, USA Phone: 770-425-2724 Fax: 770-425-9319 Table of Contents 1 SERVER
Central Management System
 Central Management System NCS System Installation User Manual Ver. 1.7.0.130326.001 Table of Contents Table of Contents Table of Contents... ii Part 1: NCS Overview... 4 System Introduction... 5 Client/Server
Network Camera. User s Guide Software Version 1.3 Before operating the unit, please read this manual thoroughly and retain it for future reference.
 4-194-204-14 (1) Network Camera User s Guide Software Version 1.3 Before operating the unit, please read this manual thoroughly and retain it for future reference. SNC-CH110/CH210 SNC-DH110/DH110T/DH210/DH210T
Network Video Recorder. Operation Manual
 Network Video Recorder Operation Manual Content 1 Product Description... 1 1.1 Product Overview... 1 1.2 Specification... 1 2 Product Structure Introduction... 2 2.1 Back Interface... 2 2.2 Front Panel...
A&H Software House Inc. Web: www.luxriot.com Email: sales@luxriot.com. Luxriot
 A&H Software House Inc. Web: www.luxriot.com Email: sales@luxriot.com Luxriot Luxriot Product Features Luxriot is equipped with Unique, Advanced and Industry Standard Surveillance Features: Luxriot is
PLEASE NOTE: The client data used in these manuals is purely fictional.
 Welcome! CAREWare Quick Start guides will walk you through the basics of setting up, managing and using the main CAREWare functions. It is intended for non-technical users who just need to get basic information
Desktop Surveillance Help
 Desktop Surveillance Help Table of Contents About... 9 What s New... 10 System Requirements... 11 Updating from Desktop Surveillance 2.6 to Desktop Surveillance 3.2... 13 Program Structure... 14 Getting
ivms-4200 Client Software Quick Start Guide
 ivms-4200 Client Software Quick Start Guide UD.6L0202B1538A01 Thank you for purchasing our product. If there is any question or request, please do not hesitate to contact the dealer. This manual applies
Advanced Event Viewer Manual
 Advanced Event Viewer Manual Document version: 2.2944.01 Download Advanced Event Viewer at: http://www.advancedeventviewer.com Page 1 Introduction Advanced Event Viewer is an award winning application
CamGuard Security System CamGuard Security System Manual
 CamGuard Security System Manual JMC Electron Co.,LTD Brief Introduction... 3 Features... 3 System Requirements... 3 Configuration... 4 Add Camera... 4 Device Options... 4 About Alarm... 5 Alarm Actions...
Chapter 4 Control Center
 Chapter 4 Control Center Control Center is a central monitoring station solution (CMS) that provides the CMS operator with these major features: Access to client DVRs (See Remote DVR) Access to remote
Digital Sentry DS ControlPoint
 O P E R A T I O N Digital Sentry DS ControlPoint C3674M-I (5/11) 2 C3674M-I (5/11) C3674M-I (5/11) 3 Contents Description...........................................................................................................
AXIS Camera Station User s Manual
 AXIS Camera Station User s Manual AXIS Camera Station User s Manual 1 Regulatory Information About This Document This manual is intended for administrators and operators of AXIS Camera Station and is applicable
How To Use The Workstation Program On A Pc Or Mac Or Macbook Or Macintosh (Aero) With A Computer Or Ipa (A2) With An Ipa Or Ipad (A3) With The Powerpoint 2.
 With A Computer Or Ipa (A2) With An Ipa Or Ipad (A3) With The Powerpoint 2.") Mirasys NVR 6.1 User s Guide CONTENTS Contents... 2 Before you start... 3 Introduction... 6 Logging in... 9 User interface... 13 Navigator... 16 Cameras... 25 Video outputs... 41 Digital outputs... 46
Mirasys NVR 6.1 User s Guide CONTENTS Contents... 2 Before you start... 3 Introduction... 6 Logging in... 9 User interface... 13 Navigator... 16 Cameras... 25 Video outputs... 41 Digital outputs... 46
Monitor Wall 4.0. Installation and Operating Manual
 Monitor Wall 4.0 en Installation and Operating Manual Monitor Wall 4.0 Table of Contents en 3 Table of Contents 1 Introduction 4 1.1 About this Manual 4 1.2 Conventions in this Manual 4 1.3 Minimum Installation
RASplus (Remote Administration System)
") RASplus (Remote Administration System) Digital Video Recorder Software User Guide Document 900.0857 Rev 1.01 Revisions Issue Date Revisions 1.00 New document. 1.01 Minor changes. Rev 1.01 ii Document 900.0857
RASplus (Remote Administration System) Digital Video Recorder Software User Guide Document 900.0857 Rev 1.01 Revisions Issue Date Revisions 1.00 New document. 1.01 Minor changes. Rev 1.01 ii Document 900.0857
How To Use Vs.Org Video Storage Server (Vs)
") Video Storage Server VSS User s Manual Version 3.10.0 Table of Contents 1. Overview... 3 1.1 Recommended Operation System... 4 2. Software Installation... 5 3. Software Upgrade... 7 3.1 Automatic Software
Video Storage Server VSS User s Manual Version 3.10.0 Table of Contents 1. Overview... 3 1.1 Recommended Operation System... 4 2. Software Installation... 5 3. Software Upgrade... 7 3.1 Automatic Software