Mobility Tool+ Guide for Beneficiaries of the Erasmus+ programme
|
|
|
- Daniella Parker
- 8 years ago
- Views:
Transcription

1 EUROPEAN COMMISSION DIRECTORATE-GENERAL FOR EDUCATION AND CULTURE Education and vocational training; Coordination of Erasmus+ Coordination of National Agencies Erasmus+ Mobility Tool+ Guide for Beneficiaries of the Erasmus+ programme Release date: 28 November 2014 Mobility Tool+ v. 1.3 Document version: 1.0

2 This page is intentionally left blank

3 Table of Contents 1. GENERAL INTRODUCTION Description Mobility Tool+ users ACCESS TO THE APPLICATION What is the URL address of Mobility Tool+ website? How do I login to Mobility Tool+? How to change language of user interface? PROJECT How to view project details? User interface overview Changes to project details Manual changes Automatic changes ORGANISATIONS How to display list of organisations? How to add new organisation? How to edit organisation details? How to export list of organisations? How to remove organisation? CONTACTS Who are organisation contact persons? How to display contact persons? How to add organisation contact person? How to edit contact person details? How to remove organisation contact person? How to enable or disable access to Mobility Tool+ website for other users? MOBILITIES How to display list of mobilities? How to add new mobility? How to change mobility details? How to delete mobility or mobilities? Online Linguistic Support Import and export of mobility data Data export Data import and update Text and spreadsheet editors PARTICIPANT REPORTS... 60

4 7.1. How to request participant reports? How to check participant report status? How to see results of participant report? BUDGET What are the elements of project budget on the "Budget" page? How to check project budget? How to change project budget? REPORTS How can I submit my final report to National Agency? What happens after I submit my final report? How can I edit my project after final report submission? SUPPORT AND TROUBLESHOOTING National Agency Helpdesk contact Troubleshooting of the most common issues National characters are replaced with question marks during the import process CSV files exported by Mobility Tool+ are not opened correctly by Microsoft Excel Mobility Tool+ website is not displayed correctly in Microsoft Internet Explorer... 74

5 Acknowledgements For security and privacy reasons some names and addresses used in application screenshots presented in this document have been greyed out or blurred. The agency acronyms visible in the screenshots are used for information and demonstration purposes only. All screenshots have been taken from a test version of Mobility Tool+. Data presented in the screenshots is not a real data. Project numbers are only for demonstration purposes only. Organisation contact information that can be found on some screenshots in this document represents publicly available data of organisations. This document describes functionality of Mobility Tool+ version specified on the title page of the manual. Document history Version Date Description Mobility Tool+ version Modified pages /11/2014 Initial version 1.3 all

6 This page is intentionally left blank

7 Mobility Tool+ Guide for Beneficiaries of the Erasmus+ programme 1. GENERAL INTRODUCTION 1.1. Description Mobility Tool+ is a web platform tool for collaboration, management and reporting for mobility projects under the Lifelong Learning Programme (LLP) and under the Erasmus+ Programme of the European Commission. It is developed by the European Commission to be used by the beneficiaries of Erasmus+ Projects managed by Erasmus+ National Agencies. The users of Mobility Tool+ will find in the tool some of the information of the projects they manage (included in the Delegation Agreement signed with their National Agency) and are able to encode the remaining information. They can identify participants; mobilities, outputs, etc. and complete and update budget information. The tool can also generate participant reports and beneficiary reports, both based on the mobility data introduced by the Mobility Tool+ users. The elements of the projects managed in Mobility Tool+ presents the diagram below. Mobility Tool+ supports the following Erasmus+ actions and action types: (1) Key Action 1 (KA1): KA101 - School education staff mobility 7

8 Mobility Tool+ Guide for Beneficiaries of the Erasmus+ programme KA102 Vocational Education and Training (VET) learner and staff mobility KA103 Higher education student and staff mobility KA104 - Adult education staff mobility KA105 Youth mobility (2) Key Action 2: KA200 - Strategic partnerships addressing more than one field KA201 Strategic partnerships for school education KA202 Strategic partnerships for vocational education and training KA203 Strategic partnerships for higher education KA204 Strategic partnerships for adult education KA205 - Strategic partnerships for youth (3) Key Action 3: KA347 Dialogue between young people and policy makers 1.2. Mobility Tool+ users The users of Mobility Tool+ are: Beneficiary organisations the main users of the tool, responsible for entering mobility and participant details via the graphical user interface or via the import process and for entering budget information. They can also consult the participant report data. National Agencies the users of the National Agencies monitor the project information and validate the information entered by the Beneficiaries The European Commission Directorate for Education and Culture (DG EAC) the system owner and the central administrator of the tool Participants indirect Mobility Tool+ users interacting with the tool via participant reports 8

9 2. ACCESS TO THE APPLICATION 2.1. What is the URL address of Mobility Tool+ website? Mobility Tool can be accessed using the following URL address: How do I login to Mobility Tool+? In order to login to Mobility Tool+ you need to have 1) an ECAS (European Commission Authentication Service) account and 2) be registered in Mobility Tool+. For the first point please refer to the ECAS User Manual document for more information on registration and how to obtain a login name and password. For the second point, if you are the contact person of the beneficiary organisation of an awarded project, your address was provided within your project application and you will be registered automatically. If you are not sure whether or not your address was provided in the project details or you are not sure which of your addresses were provided please consult your submitted application PDF form or contact your National Agency for support. You are always redirected to ECAS login page for authentication when you enter Mobility Tool+. If you have never used ECAS system before, the authentication system will welcome you with a screen similar to the one presented below. On this page, please select External Partners, Researchers, Citizens, unless you work for any organisation or agency listed on that page, i.e. European Central Bank, European Institute for Gender Equality, Eurojust, etc. Commission européenne/europese Commissie, 1049 Bruxelles/Brussel, BELGIQUE/BELGIË - Tel

10 ECAS will remember the choice of your organisation in your browser and will use the selection in future logins. The ECAS login page that you will normally see is shown below. 10


11 The most important fields are: "Is the selected domain correct?" should be always set to "External". If it is set otherwise, please use "Change it" link and select "Neither an institution nor a European body". "Username or e mail address" both username and address can be used for login. Since usernames are generated automatically by ECAS during the registration, we suggest using address as an easier alternative. "Password" as defined during the registration process 2.3. How to change language of user interface? The Mobility Tool website can be translated to many languages. Languages available to you can be seen on the upper right corner drop down list. The list of available languages is using the following naming convention: "FR1 English (EN)", where FR1 is the National Agency code, in this case French agency Agence Europe Education Formation France, and English (EN) is the language available for that agency. English is by default available to all Agencies. Some Agencies offer more 11


12 than one language beside English, i.e. French for French speaking countries, Spanish for Spain, Polish for Poland, etc. There are default languages for Agencies. For example, French agency will only have French language listed while other Agencies may have more languages available. If your language is not present on the list, please contact your National Agency. 12

13 3. PROJECT 3.1. How to view project details? Login to Mobility Tool+ using your ECAS username (or address) and password. After login you will see Mobility Tool+ page similar to the one presented below. This is your Mobility Tool+ homepage. Click the project's grant agreement number or national ID to see your project details. Please note you may have projects from Lifelong Learning Programme as well as from Erasmus+ Programme. Make sure you select the right project to manage. 13


14 After selecting the project, your screen will present some information about the project. 14


15 3.2. User interface overview The graphical user interface of Mobility Tool+ project view contains a few elements that are important to recognize and remember. The three most important elements of the page are selected on the following screenshot. Area indicated with number 1 contains a menu with 7 elements: Home and Project List redirects to the main page of the tool that shows the list of projects Organisations shows a list of organisations taking part in the project, including the beneficiary, sending, receiving or other type of organisations Contacts shows a list of contacts for organisations Mobilities shows a list of mobilities with participant details Budget shows a project s budget summary Reports provides facility for final report to National Agency This manual will describe each section of the tool in greater details in the following chapters. 15

16 The second area of the page indicated with number 2 provides information about the Programme, Call, Round and some key data of the project itself, about the National Agency granting the project and about the beneficiary organisation. The third area selected on the screenshot presents information about the creation of the project in Mobility Tool+, last update and person (or system) that updated the project last Changes to project details Manual changes In Mobility Tool+ you can change organisations, organisation contact persons, mobilities, participants or budget information. All other project information, i.e. the project title, the National Agency project ID, the project activity periods cannot be changed in the tool. To request changes to these project details, please contact the National Agency Automatic changes "Approved Budget (by National Agency)" details displayed in "Budget" section of Mobility Tool+ are updated automatically by the National Agency. This can be a result of an amendment or other changes to the project. The approved section of the budget is presented on the screenshot below. 16


17 More information about the budget and budget management can be found in the following chapters. 17


18 4. ORGANISATIONS The "Organisations" page displays a list of organisations that were in the initial grant application form. Depending on the action, the list may contain just one organisation the beneficiary; in other cases, the list of organisations can contain several entries. All other participating organisations that were not part of the initial application form need to be created manually in the Mobility Tool+ for projects under KA How to display list of organisations? Login to Mobility Tool+ and open your project details. Click the "Organisations" button in the menu as shown on the screen shot below. From the contextual menu, select "List Organisations". A list of organisations will appear in a table, as shown below. 18

.")
19 Organisations can be beneficiary organisation, sending and receiving or other type of organisations. Please note the beneficiary organisation will be marked with a tick in "Beneficiary" column of the table (marked in red in the screenshot below). The list of organisations allows quick filtering and searching within the list. Organisations can be filtered by PIC, organisation ID, legal name, department, country or city. The organisation list page offers additional functionality. You can find the actions oriented with the partner list in the list top menu on the website. Below is an explanation of each button and associated action. Icon/button Description "Select all" selects all or deselects all element in the list "Add New" adds new element to the list "Delete" removes selected element from the list "Export Excel/CSV" exports list to a CSV/Excel file. Please note that only elements that are visible in the list will be exported to CSV file. That means if the list is filtered, only the result of the filtering will be seen in CSV file. 19

20 Icon/button Description "Print" print the list. Please note that only elements that are visible in the list will be printed. That means if the list is filtered, only the result of the filtering will be seen on the printout. "Add/Remove Columns" adds/removes displayed columns of the list. These changes will not be saved when browsing to another section of the tool. General search field can be used for searching for any value from the list. The list will dynamically adjust to results of the search. "Reset Filters" clears the search results (similar to deleting the content of the previously described search field) How to add new organisation? Login to Mobility Tool+ and open your project details. Select Organisations from the top menu, a choose "Create a new Organisation". A partner details form will appear. Depending on the action type of the project, you may be required to put a PIC number of the organisation you wish to add. In special cases you may override the PIC requirement by selecting "Non-PIC Organisation". In either way, organisation ID will be prefilled with a unique identifier of an organisation in the project in Mobility Tool+. You may change the value to other, more suitable if you like (for higher education institutions having an Erasmus Code, it is recommended to enter the Erasmus Code as Organisation ID). The only requirement is that the organisation ID must be unique in the project. A comment field is also available for any additional notes or remarks concerning the organisation. 20
. 4.2.")

21 Note: Partner details can be changed at any time during the project lifetime. Organisations with PIC number If organisation has a PIC, enter the PIC number in the designated field and click "Check PIC" button. Data of the organisation will be imported from the Beneficiary Register database, including organisation name, type, address or Erasmus Code (if applicable). You may add acronym, department or specify if organisation has less than 250 employees by entering the data manually. 21
22 In case the organisation is already in the project, error message "This PIC is not unique in this project" will appear. In case an organisation cannot be found by the PIC number, please contact your National Agency for support. Organisations without a PIC number In case the organisation you wish to add does not have a PIC code, you need to tick "Non-PIC Organisation" in the form. In this case all fields marked with the red asterisk need to be filled in or selected. 22
23 4.3. How to edit organisation details? Login to Mobility Tool+ and open your project details. Click "Organisations" in the top menu and select "List Organisations". Click the pencil icon next to the partner you want to edit, as shown on the screenshot. An organisation details will be displayed. Click "Edit" on top of the screen to edit the organisation. 23

24 Change the details and click the "Save" button. A confirmation message will be displayed. Only a few fields of the organisation profile are effectively editable. Most of them are taken from the data entered by the organisation in Participant Portal when obtaining the PIC number. If there is a need to change any of these, it has to be done in the Participant Portal first and once done there you can force the update of the information in Mobility Tool+ by clicking in "Check PIC" button. Depending of the type of the organisation and/or the Action Type, the field "Erasmus Code" will appear in the organisation form. This field is linked to the ECHE (Erasmus Charter for Higher Education) and can be used to search an organisation in the ECHE 24

25 database among those Higher Education institutions who have received a Charter for Erasmus+ Programme. The beneficiary organisation details should not be changed by the beneficiary organisation, only by the National Agency. If for any reason the Beneficiary Organisation details need to be changed, please contact your National Agency. Once the data is changed by the National Agency, please reflect these changes in the project in Mobility Tool How to export list of organisations? The list of organisations can be exported to a CSV file. The exported list will contain exactly the same fields shown on the Organisations page. Login to Mobility Tool+, open your project and click "Organisations" button in the top menu. Click the Excel local computer. icon in the partner list menu. Save the exported file on your 4.5. How to remove organisation? Login to Mobility Tool+ and open your project details. Click "Organisations" in the top menu and select "List Organisations". 25
26 Mark the selection box next to the partner you want to remove. Please note that it is not possible to remove your own beneficiary organisation from the list. Sending and receiving organisations that are already part of entered mobilities in the project cannot be deleted either. Click the "Delete" icon. The selected organisation will be deleted. 26

27 5. CONTACTS 5.1. Who are organisation contact persons? The organisations taking part in the project may have one or more contact persons for the project. By default only the contact person of the beneficiary organisation and legal representative are granted access to Mobility Tool+. However, these users can grant access to the project information in Mobility Tool+ to additional contact persons of her/his own organisation only, being aware that they will be able to edit and change the information of the project How to display contact persons? Login to Mobility Tool+ and open your project details. Click "Contacts" from the top menu. Then select "List Contacts" from the contextual menu. A table with contacts of all organisations will be displayed. The table shows contact persons' last names, first names, department, position, telephone number, , PIC of the organisation, legal name of the organisation, flag whether the organisation is a beneficiary or not, flag if the contact is organisation's legal representative, flag is the contact is organisation's preferred contact and flag if the contact has access to the project. 27
28 The list can be sorted and filtered. The description of the sorting and filtering options is described in chapter How to add organisation contact person? The contact persons can be added on page "Contact" in Mobility Tool+ page. Login to Mobility Tool+ and open your project details. Click "Contacts" from the top menu. Then select "Create a new Contact" from the contextual menu. A new contact person form will be displayed. All fields marked with red asterisk must be filled in. There must be a minimum one preferred contact person within each organisation. First contact person is automatically elected as a preferred one. In case of the beneficiary organisation, the preferred contact or contacts will receive notifications from the Mobility Tool+ for project updates, for example. In case of address details, selecting "Same as Organisation" will prefill the fields with data from organisation details. The address details can be modified after being prefilled with organisation address details. 28
![When the organisation chosen from "Organisation" drop-down list is the beneficiary organisation (marked with [(Beneficiary)] in the drop-down list), an additional option is displayed on the bottom of](/docs-images/28/12829404/images/29-0.png "the screen \"Access to Project\". This option allows beneficiary contacts to access the Mobility Tool+ project page and manage the project details.")
29 When the organisation chosen from "Organisation" drop-down list is the beneficiary organisation (marked with [(Beneficiary)] in the drop-down list), an additional option is displayed on the bottom of the screen "Access to Project". This option allows beneficiary contacts to access the Mobility Tool+ project page and manage the project details. The beneficiary contact persons must have ECAS account as detailed in chapter "How do I login to Mobility Tool+?" of this guide. 29

30 Please note that every page with contact details has a section called "History Information" showing who created the contact and when. Also, this section displays who was the last person editing the contact details and when did this take place. The section is displayed on the right hand side of the contact person details, as indicated on the screenshot below How to edit contact person details? Login to Mobility Tool+ and open your project details. Click "Contacts" from the top menu. Select "List Contacts" from the contextual menu. Click the pencil icon next to the details of the person you wish to edit. Page with the contact details will be displayed. Click "Edit". 30

31 Edit form page will be displayed. Change the data and click "Save" button on the bottom of the page to save the details How to remove organisation contact person? Login to Mobility Tool+ and open your project details. Click "Contacts" from the top menu. Select "List Contacts" from the contextual menu. Tick a box next to a contact person you wish to remove. Click the "Delete" icon contact person will be removed.. The Please note you cannot remove yourself How to enable or disable access to Mobility Tool+ website for other users? Please note that only the contact person(s) from the beneficiary organisations can have access to projects in Mobility Tool+. 31
32 In order to enable or disable access to the page, please login to Mobility Tool+ and open your project details. Click "Contacts" from the top menu. Select "List Contacts" from the contextual menu. Click the pencil icon next to the details of the person you wish to grant or to revoke access for. The location of the icon is indicated on the following screenshot. Page with the contact details will be displayed. Click "Edit". Edit form page will be displayed. Check the bottom of the screen for "Access to Project" option. By ticking the box for "Access to Project" you give the contact person access to the project in Mobility Tool+. Similarly, by de-selecting this option you revoke the contact person access to the tool. 32
33 In order to access the Mobility Tool+ page, the beneficiary contact persons must have ECAS account as detailed in chapter "How do I login to Mobility Tool+?" of this guide. An automated message will be sent to the contact person address. There, a short instruction is provided on how to access the tool. Also, links to ECAS registration page are provided. An example of the message can be found below. The values between < and > are automatically filled in by the Mobility Tool+. Please note this message may be sent in English and any other language supported by the Mobility Tool+. In case translations are available, the will contain all translations, starting with English version. From: replies-will-be-discarded@ec.europa.eu Subject: Mobility Tool - Access granted Dear <first name of the contact person>, You have been granted access to the Mobility Tool by <first name and last name of the person granting access> You have access to the following project: EC Project Number: <European Commission grant agreement number> National Project Number: <national grant agreement number> Project Title: <project title> Mobility Tool is the system for the management of mobility projects that received an EU grant under the Lifelong Learning and Erasmus+ programmes. The Tool is developed by the European Commission for you, as beneficiaries of these projects. In the Mobility Tool you will be able to provide all the information on your projects, identify participants and mobilities, complete and update budget information, generate and follow-up participant reports and generate and submit your own report(s) to your National Agency. To access the project, please follow the steps below. - Go to Mobility Tool website at 33
34 - If you haven't register yet, please click "Not registered yet" and set up your account. During the registration process please use the address that this message was sent to. - If you already have an ECAS account associated with this address, please use it to log in Please contact your National Agency if you need further information or support. <name of the National Agency> <support of the National Agency> This is a system generated message. Please do not reply. 34

35 6. MOBILITIES Mobility can be defined as a set of elementary data identifying a participant of Erasmus+ project, his or her details, source and destination countries, durations and corresponding financial information and other additional information. "Mobilities" is the most important part of the tool. There you will be able to record all mobilities being funded by your project in a single place. You will be able to do it on the Mobility Tool+ web interface, entering one mobility after another, or via import. More details will be explained in the following chapters How to display list of mobilities? Login to Mobility Tool+ and open your project details. Click "Mobilities" from the top menu. Select "List Mobilities" from the contextual menu. If you only opened the Mobility Tool+ and your project for the first time, most likely you will see an empty page informing you that there are "no matching records found". If there are mobilities in the project, you will see their details, such as first and last name of the participants, their addresses, activity types of the mobilities, mobility IDs, start and end dates, flag for eligible mobility, status of the participant report, when the participant report was requested and when it was received. These columns are displayed by default. You can modify what columns should be displayed by using the "Add/Remove Columns" button. More details on how to use the options in the table can be found in chapter 4.1 "How to display list of organisations?". An example of list of mobilities with 2 entries is shown in the screenshot below. 35

36 6.2. How to add new mobility? Login to Mobility Tool+ and open your project details. Click "Mobilities" from the top menu. Select "List Mobilities" from the contextual menu. Click the button to add new entry. A new page with new mobility form will appear similar to one presented in the screenshot below. Depending on the type of activity and on the action type of your project you may see different fields in this screen and you may observe different behaviour in the calculation and in the validation of the information. However, the main fields, marked with the red asterisk must be provided. The mobility page can be split into 3 sections. Screenshots and description for each of these 3 sections can be found below. 1. general information about the mobility This section contains details of the participant's mobility, the mobility action type, participant's sending and receiving countries and locations. There you will also find fields for participants , gender, date of birth, nationality, field of education, and flag for special needs. The section includes a comment field useful for providing any extra information concerning location of the sending or receiving organisations. 36

37 2. budget This section includes some important financial information about the mobility. There you define a distance band between the two locations indicated in the first section of the screen and start and end date of the mobility. Together with sending, receiving countries and activity type the calculation of a grant for the participant will be possible. 37

38 3. certification and language section In this section, which may differ according to the action and activity type, you can specify any certifications that the participant might have received or will receive from organisations involved in the mobility. Please note that the list of organisations is taken from the "Organisations" page of the Mobility Tool+. Also in this section, the main instruction or working language of the mobility can be selected. On top of that up to 3 other languages of the mobility can be entered. You can save new mobility details using the "Save" button on the bottom of the screen. Mandatory fields The minimum set of fields consist of activity type, participant first name, participant last name, participant , participant gender, participant date of birth, nationality, mobility ID, sending organisation, receiving organisation, sending country, receiving country, sending city, receiving city, start date, end date and main instruction/work language. For specific activity types, additional fields are mandatory (e.g., the total number of teaching hours for teaching periods in higher education institutions abroad). Sending and receiving organisations The sending and receiving organisation drop-down list are pre-filled with the list of organisations in the "Organisations" tab. If you are missing some organisations from either of these two drop-down lists, please enter them first on the "Organisations" page. 38

39 Sending and receiving cities The sending and receiving cities are pre-filled based on the cities of the sending and receiving organisations. These fields can be changed. Distance band Based on the locations indicated in sending and receiving city, correct distance band should be used. European Commission has provided a sample distance calculator that should be used for measuring distance between two places. The distance calculator is available at the location provided below. Calculating mobility budget For correct budget calculation, fields such as activity type, sending and destination country, mobility start and end date must be filled in and correct distance band must be selected. With this data provided, please click "Calculate" button indicated in the screenshot below. 39

40 The "Calculate" function will fill in the duration fields and all fields related to grants that have been defined on European or national level. After the calculation, almost all fields in this budget section of the mobility form become locked. If you wish to edit the values or add additional travel days or days for courses, you may tick the "Edit" field located nearby the "Calculate" button. The "Edit" option will re-enable previously locked fields for your corrections. Errors in budget calculations In specific cases, you may see an error message after pressing the "Calculate" button. For example, the system may inform you that: Given the parameters you have entered it is not possible to perform a rate calculation for Individual Support. Please contact your National Agency for further information on the correct set of parameters The request is invalid. The specified duration is 61 days but it must be at most 60 days. In this case, the user has chosen wrong duration of the mobility for the specified activity type. Correcting the duration and pressing the "Calculate" button again fixes the issue. For specific activity types, the exact monthly grant rate or other rates have to be entered 40

41 if the beneficiary has been given a range for setting itself the rate. If the rate is outside the authorised range, an error message will be displayed indicating the allowed range How to change mobility details? Login to Mobility Tool+ and open your project details. Click "Mobilities" from the top menu. Select "List Mobilities" from the contextual menu. Click on the pencil icon next to the mobility you need to edit. A page with the details of the mobility will open. There you will see the details in readonly mode. To edit, click the pencil icon again. A mobility edit form will open. This is the form that is used to create a new mobility and already described in the previous chapter. Edit the data and click "Save" on the bottom of the form to save your changes How to delete mobility or mobilities? Login to Mobility Tool+ and open your project details. Click "Mobilities" from the top menu. Select "List Mobilities" from the contextual menu. 41
42 To delete, you can select one or many mobilities by ticking the box in the first column and choose the red button. A confirmation of the desired action will be displayed. By choosing OK, the selected mobilities will be deleted. Please note that deleting mobilities also deletes any participant reports that the participants might have already submitted. If the participant has already taken an online linguistic assessment test, the mobility should not be deleted Online Linguistic Support In specific actions, such as Higher Education (KA103) for student action types (SMS and SMP) or long-term activities in Youth projects (KA105) for European Voluntary Service Programme and Partner Countries when the main instruction or working language of the mobility is German (DE), English (EN), Spanish (ES), French (FR), Italian (IT) or Dutch (NL), additional two options become available: Online Linguistic Assessment 42
43 Online Language Course These two are used to indicate participants that should take the language assessment and may also take the language course using the online tool. More information on how to use Online Linguistic Support can be found at the location below: Import and export of mobility data In this chapter you will find details regarding import and export of the mobility data. The mobility data contains the details of all mobilities, the participants, the sending and receiving partner organisations and the corresponding grants. Organisational support grants related to the project are not included in the import/export of the data and should be managed in the way presented in the chapter describing the budget details in this manual. The main purpose of data import is to enable beneficiaries of big projects to enter large amount of data into the Mobility Tool+ in a more efficient manner than manually through the interface. The data import/export feature is available from the "Mobilities" menu, as presented on the screenshot. Next paragraphs will cover the data export and import in detail. A document containing "Mobility Tool+ Data Dictionary" can be downloaded from the "Import Export" page. This document contains all codes that need to be used in the import/export process. Please make yourself familiar the "Mobility Tool+ Data Dictionary" before importing data into the tool Data export The export function can be found under the "Mobilities" menu by clicking the "Import Export" option. The data export part of the Import Export page is highlighted on the screenshot below. 43
 file format.")
44 Please notice that depending on the action type of the projects, names of the links may be different. Please note that organisation contact details are not exported in the export data. Only the basic organisational information is used in the import/export process. When exported, data from Mobility Tool+ projects is saved in CSV (Comma Separated Values) file format. Semicolon (;) is used as a default field separator. The file is exported in UTF 8 character encoding standard. The exported file may be used for data import under the condition that all mandatory fields are provided. More information on this topic can be found in the chapter describing the import process. If there are partners in the mobility projects that do not have any mobilities associated, these partner details will not be used in the import/export process. Please notice that exporting data from Mobility Tool+ may take some time and it may result in a large file. If the export data is displayed incorrectly after opening the file in Microsoft Excel, please refer to the troubleshooting section of this document for more information Data import and update General description Mobility Tool+ allows importing partner organisations, participant and mobility data in one go. The import process uses CSV (Comma Separated Values) file as a data protocol. This file format is similar to the format used by Microsoft Excel it contains rows and 44
45 columns, but it does not preserve any formatting (i.e. bold, italics), filtering or functions (i.e. sums), as Microsoft Excel file would normally do. The mobility data can be imported at any time of the project lifecycle. During the import new data entries may be created as well as updated. It is not possible to delete any organisations or mobilities already existing in the tool using the data import process. All deletions must be done manually by the user through the graphical user interface (GUI). General rules for data import into Mobility Tool+ In order to import data into Mobility Tool+ two conditions must be met imported file must have a proper structure and imported data must meet required conditions. In particular, the organisation ID and mobility ID should always be provided BEFORE the function of data export and import is used. If the partner organisation or the mobility cannot be identified in the system by the organisation ID or mobility ID respectively, a new set of data is created. If the partner organisation or mobility can be found in the system by their organisation ID or mobility ID respectively and the imported data contains some changes to the organisation or mobility details, the set of existing data will be updated. If the partner organisation or mobility can be found in the system by their organisation ID or mobility ID respectively and the imported data doesn t contain changes to neither the organisation nor the mobility, no data is changed. The import file is processed line by line, meaning that if the same mobility (ID) with the same organisation (ID) will appear twice in the file, only the latest entry for this mobility and the organisation will be saved in Mobility Tool+. It is important to mention that while it is not possible to delete data from Mobility Tool+ using the import functionality, it is possible to duplicate the existing information. More details on this topic can be found in the next paragraphs. Please notice that data import is a heavy resource consuming process and depending on a size of the imported file it may take some time to complete. 45

46 Backup of data It is suggested that before every import of the data, users download and save the existing data into CSV files one file for the staff and one for the students. A complete set of backup may save time and may help with any issues with the data entered into the tool by mistake. The export function can be found under the "Mobilities" menu by clicking the "Import Export" option. The data import section of the Import Export page is highlighted on the screenshot below. Every import process always generates a system response in either successful or unsuccessful cases. Result of the import can be found on the list of import attempts. Each of the unsuccessful import generates a log file where import errors are indicated. A failed import process may be signalled by the following system message. 46
47 Important! Please note that unless all data in the imported file is correct, Mobility Tool+ will not import anything. This can be described as All or None approach to the import process. It is important to mention that if a data field for a particular mobility (single line in imported file) already has a value in the tool and the import file doesn't contain data for this field, the result of the import will be to remove the existing data in this particular field of the mobility. Data file template file structure The best way to ensure the correct file structure of the imported file is to use a template from Mobility Tool+. The template can be obtained by making an export of the data. The result of exporting data from an empty project will be a file containing headers for the fields, but no actual data. The file is organised in the way that all header fields are located in the first row of the file, the second row contains field requirements (described below) and data rows start from the third row. A single row equals to one mobility participant, mobility details, partner organisation details, grant, etc. A single row is an equivalent to providing data for a single mobility in the new mobility form. Please note that even if you use only one sending or receiving partner organisation, you need to enter the partner organisation details as many times as mobilities your project contains, paying attention that the same organisation ID is used throughout. There are no fields for the organisation contact person and contact person details in the import/export file. As it was mentioned previously, there are three types of fields in the template file mandatory fields that need to contain data (marked by a star * in the template file), code fields (marked as DICT) and optional open text fields (that may be empty). The specifics of each field are described in the second row of the template file. Note: The list of codes used in the code fields marked with DICT in the template file can be found in the document Mobility Tool+ Data Dictionary available from the 47
48 Import/Export page. Please pay special attention to the list of codes, as they will be used extensively during the data import process. Mobility Tool+ import function uses the national characters in UTF 8 character format. Therefore it is important to ensure that the data file used for import is encoded using the correct character set. The CSV file template can use one of the three accepted formats of data: Field_1 ; Field_2 ; ; Field_n Field_1 ; Field_2 ; ; Field_n Field_1 ; Field_2 containing a double quote ; ; Field_n Decimal and thousands separator The export as well as the import CSV files use dot as a symbol to separate the integer part from the fractional part of a number. The system doesn't use any symbol for the thousands separator. The correct format of a number consisting an integer and fractional part is Examples of data import file The examples presented in this chapter are general examples for all types of import files. The table below depicts some fields of the template import data file that contains information about three mobilities. Please note the second row of the file containing specification of each field * being a mandatory field, DICT being a code field. For the purpose of the demonstration, other fields (columns) have been removed (marked with the ellipsis). Project ID Mobility ID Participant First Name Participant Last Name Participant Year of Birth Participant Gender * * * * * *, DICT BE01 KA BE01 KA BE01 KA FirstName LastName 01/01/1980 M 0002 Jane Jones 01/01/1995 F 0003 FirstName LastName 01/01/1980 M 48
49 During the import of the data, the first two rows field headers and field specification must be preserved in the file. Deleting the first two rows from the template will render the import process invalid. It is also important not to change the order of the columns (fields). Any change in the fields/columns order will render the import process invalid as well. In the following example 8 participants from the same sending organisation (Organisation ID BEN) will be sent to 8 different hosting organisations (Organisation ID HOST01 to HOST08). Please notice different mobility ID s and participant names. Project ID Mobility ID... Participant First Name... Sending Organisation ID... Receiving Organisation ID... * *... *... *... * BE01 KA BE01 KA BE01 KA BE01 KA BE01 KA BE01 KA BE01 KA BE01 KA ID FirstName1... BEN... HOST01... ID FirstName2... BEN... HOST02... ID FirstName3... BEN... HOST03... ID FirstName4... BEN... HOST04... ID FirstName5... BEN... HOST05... ID FirstName6... BEN... HOST06... ID FirstName7... BEN... HOST07... ID FirstName8... BEN... HOST08... The next example will create 3 different mobilities from the same sending partner organisation to three different hosting partners for the same participant. Please note that this import will result in a list of mobilities containing details of the same person 3 times, although going to three different receiving partners. Please notice different mobility ID s. Project ID Mobility ID... Participant First Name Participant Last Name... Sending Organisation ID... Receiving Organisation ID... * *... * *... *... *... 49
50 Project ID Mobility ID... Participant First Name Participant Last Name... Sending Organisation ID... Receiving Organisation ID BE01 KA BE01 KA BE01 KA ID FirstName1 LastName1... BEN... HOST01... ID FirstName1 LastName1... BEN... HOST02... ID FirstName1 LastName1... BEN... HOST03... The following example highlights the importance of careful row by row data entry. During the import process Mobility Tool+ sees each row as a consecutive data entry. Therefore if the row 20 contains some modifications of the partner data that has already been defined in the row 6 of the same imported data file, the tool will take the data from row 20 as the most current one and will update the partner data as a result. This can be illustrated by the next example of the import data file. Project ID... Sending Organisation ID Sending Organisation Legal Name... Sending Organisation Erasmus Code Sending Organisation Postal Code... *... * *... * * BE01 KA BEN Beneficiary Organisation... NL AMS01 BE BE01 KA BEN Beneficiary Organisation... B BRU01 BE Please notice the different address of the beneficiary organisation in the last row as compared with the first row of the data. Being the last entry in the imported data file, Sending Organisation Erasmus Code will contain value B BRU01, not NL AMS01 as used in the previous line. 50
51 The following example illustrates the similar behaviour. Project ID... Sending Organisation ID Sending Organisation Legal Name... Sending Organisation Erasmus Code Sending Organisation Postal Code... *... * *... * * BE01 KA BEN Beneficiary Organisation... NL AMS01 BE BE01 KA BE01 KA BEN Beneficiary Organisation... BEN Beneficiary Organisation... B BRU01 BE NL AMS01 BE Please notice that in the last example the beneficiary organisation data will change twice during the import process. Once the Sending Organisation Erasmus Code will be changed from NL AMS01 to BE BRU01 and then, at the very last row, the address will be changed back to its original value of NL AMS01. More scenarios are illustrated in the following chapters. ID fields The data template files contain 5 ID fields. They play a very important role in the data import process. The table below presents all the ID fields with their characteristics. Please note that the beneficiary ID should always be provided BEFORE the import/export of data is used. Field name Mandatory? Description Project ID Yes Grant agreement number also called project number, i.e BE01 KA In the same project this field must always contain the same value. Participant ID No Unique identifier for a participant of the mobility. It can be a national ID (recommended identifier), student ID or any other ID that identifies one 51
52 participant from another. Uniqueness of the value of this field will not be checked during the import. Mobility ID Yes Any unique identification of a particular mobility, i.e. 0001, MOB01, NL GB John Sending Organisation ID Yes Unique alphanumeric string identifying the sending organisation in the mobility. It is recommended using the Erasmus code (e.g., A WIEN01) in the case of the partner organisation being a higher education institution holding a valid Erasmus Charter for Higher Education ECHE (for manual data entry in Mobility Tool+, the change has to be done in the "Organisations" menu). Receiving Organisation ID Yes Unique alphanumeric string identifying the receiving organisation in the mobility. It is recommended using the Erasmus code in the case of the partner organisation being a higher education institution holding a valid Erasmus Charter for Higher Education ECHE (for manual data entry in Mobility Tool+, the change has to be done in the "Organisations" menu). Sending and Receiving Organisation IDs The list of Organisation IDs (either sending or receiving) that already exist in the tool can be found on the "Organisations" page described in the other chapter of this manual. The list of organisations may include a single organisation, i.e. the beneficiary organisation, or may include sending and receiving organisations. It is suggested that the list of partner organisations is exported and the codes of the partners are used in the mobilities template file for the import process. However, there the list of partner organisations cannot be imported the same way the mobilities are. We recommend using the Erasmus Code (e.g., A WIEN01) as an organisation ID where the Erasmus Code is applicable, i.e. for higher education institutions holding an ECHE. Data import scenarios Let s analyse few scenarios that illustrate in details the logic behind the ID fields and how the system interprets their use. 52
53 The following scenarios describe some data import use cases you may come across in the daily management of your mobilities. Some of them lead to unwanted results. Please read this chapter carefully as it may save you a lot of time and help you avoiding stressful situations. Scenario 1 data import to an empty project sending organisation different than the beneficiary organisation This example illustrates a situation, where a sending organisation is different than the beneficiary organisation. Let s assume you just received the invitation from Mobility Tool+ to work with your project. You login to ECAS with your username or address and password. The website doesn t contain any information about project mobilities. You may or may not already have some partners defined in the project. You go to Mobility Tool+ website, "Mobilities", choose Import Export option, then "Export" to download the exported data. The files are almost empty they contain only two rows the field names and their specification the files do not contain any mobility or partner data. You open the file in a program of your choice (please read remarks regarding software at the end of this chapter) and fill in all required fields, taking into consideration the list of codes from the "Mobility Tool+ Data Dictionary" file, format of the fields (please pay special attention to the date format) and ID codes described earlier. You save the file in CSV format and import the file via the website. The result of the successful data import is the following: Minimum two new partners are created with the organisation IDs and partner organisation details specified in the import file (sending and receiving partner). Minimum one mobility is created. 53

54 Scenario 2 data import to an empty project beneficiary organisation as the sending partner Let s assume you just received the invitation from Mobility Tool+ to work with your project. You log in to ECAS with your username or address and password. The website doesn t contain any information about mobilities. You may or may not already have some partner organisations in the project and you want to make sure your beneficiary organisation is used to create mobilities during the import process. You go to "Organisations" page to display the list of organisations in your project. You click the pencil icon to edit your organisation and enter a value for Organisation ID field if the Organisation ID field is blank, as presented in the screenshot below. For the purpose of a demonstration, value BEN is used in the Organisation ID field. The same partner data can be obtained by exporting partner details. Next, click "Mobilities", choose Import Export option and download the file template (click "Export" link). The file is almost empty contains only two lines the field names and their specification it does not contain any project data. You open the file in an editor of your choice (please read remarks regarding software at the end of this chapter) and fill in all required fields, taking into consideration the list of codes from the "Mobility Tool+ Data Dictionary" and format of the fields (please pay special attention to the date format) and ID codes described earlier. In sending organisation part of the template file you use data of your own organisation, making sure that Sending organisation ID contains value BEN. 54
55 The result of the successful import is following: Minimum one new organisation is created with the organisation ID and organisation details specified in the import file (receiving organisation). Minimum one mobility is created Notice that in this case, your beneficiary organisation (organisation ID BEN) was used as the sending organisation. You may also notice that unless you entered your organisation details in the import file exactly as they were on the website, the organisation data is updated. Please refer to the next scenario for more details on how to update data using the import process. Scenario 3 data import to a project with mobilities adding new and updating existing information entered via graphical user Let s assume that you already worked with your project and added some data using the website. You have added some organisation with their respective organisation IDs and created some mobilities with mobility IDs. You decided to work with the data outside of the tool using external editing software. You click "Mobilities", choose Import Export option and download the project data. You open the file in the text editor or a spreadsheet editor of your choice and notice that both the organisation and the mobilities have IDs. You decide to update some information about the participants and add more mobilities. You add mobility and organisation IDs in the respective columns you reuse the organisation IDs as you have the same sending partner for all your mobilities. Finally, you import the data. The result is following: You login to the tool and notice that organisation information remained unchanged as you didn t change any partner data in the import file You notice that the list of mobilities is longer than previously there are new mobilities that you defined in the import file. 55

56 Highlights from the described scenarios To update organisation information use the same organisation ID in the import file as the organisation ID you find in the organisation details on the Mobility Tool+ website. Similarly, to update mobility information use the same mobility ID in the import file as the mobility ID you find on the "Mobilities" page. Error handling Every failed import process generates a message on the website and a log file for details. The log file can be downloaded by clicking on the link in the error message on the website. As it was already mentioned earlier, unless all the data in the imported file is in the correct format, nothing will be stored in Mobility Tool+ ( All or None approach). The error log file has almost exactly the same structure as the imported file it contains field headers and their specifics (whether the field is mandatory or a code must be used) with an additional field at the beginning of the file Line Number (please notice the line number is different than the Excel's row number). The other difference is that instead of data it contains descriptions of errors from the import process. Each error is linked to a specific field in a specific row of the imported file. Using the row number and the error in the specified field it is easy to locate the problematic entry in the imported data file. Please notice that columns in the error log are shifted left by 1 columns comparing with the import data file. A sample of the error file is presented on the screenshot below. In order to fix problems in the import process, all fields marked in the error log must be corrected. 56
57 The most important rules for successful data import The following is a non exhaustive list of example requirements for successful data import: The file must use the standard template. For the best results, always export the existing data first (or an empty file if none exists), enter and/or update the data in this file and then re-import it The file must be in the CSV format and encoded in UTF-8 please read the next chapter for more information about text editors Project agreement number must be the same as the active project on the website. Import of data for multiple projects at once is not possible in Mobility Tool+ Organisation ID and Mobility ID must be always provided In order to avoid duplicated mobilities the mobility ID should be unique in the imported file All mandatory fields must be provided All fields must have a correct format All codes must be correctly used (please refer to the "Mobility Tool+ Data Dictionary" document). The mobility end date must be later than the start date Text and spreadsheet editors There are many examples of text or spreadsheet editors available on the market. This paragraph will not extensively cover any particular example of software but will provide few use cases for Microsoft Excel We will focus on the most typical examples of issues that might affect data import process into Mobility Tool+. When in doubt you can always check your imported or exported data in some simple text editors that support clear text format and UTF-8 encoding, i.e. Notepad++. UTF 8 As mentioned already in this chapter, Mobility Tool+ import process respects national characters in the import data file. The requirement is that the data file must be in UTF 8 encoding standard. Otherwise, some national characters may be displayed incorrectly on the website and in the export files. Note: 57
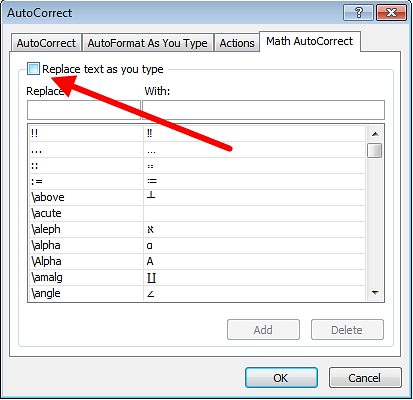
58 Microsoft Excel 2010 does not save CSV files in UTF 8 encoding by default. More information on Microsoft Excel and saving CSV files in UTF-8 encoding can be found in chapter Saving CSV file format from Excel 2010 Microsoft Excel 2010 is capable of opening and saving files in CSV format. However, whilst opening the file is rather straightforward (see troubleshooting section if your Excel doesn t respect CSV field separators used by Mobility Tool), saving files in CSV format may require little bit more attention. Here are the steps to ensure that the data is saved in a proper format. 1. When you finish file editing in Excel, select menu File and click Save & Send. 2. Click Change File Type, select CSV (Comma delimited) (*.csv) and click Save As button. 3. Select file name and make sure Save as type list have CSV (Comma delimited) (*.csv) option selected. Click Save button to confirm. 4. Excel will display a compatibility warning. Click Yes button to save. Long numerical values Some spreadsheet editors may shorten your long numerical values, for example a phone number to a format of 3.12E+12. Pay special attention to the long data entries because unless the type is changed to text, the imported data will contain 3.12E+12 in the phone number field and the import process will fail due to unexpected value (E). Auto completion during writing Some software offers auto completion during text editing which may create some problems. Automatically corrected by Microsoft Excel values may not be accepted during the data import. In Excel, the auto completion can be disabled in menu File, then Options, Proofing, AutoCorrect Options button, Math AutoCorrect tab, deselect Replace text as you type. 58
59 59

60 7. PARTICIPANT REPORTS Participant reports provide information about the Erasmus+ projects participants' experience. Each participant receives an invite to fill in the participant report at the end of their mobility period. The message sent to the address indicated in the details of the participant's mobility includes a link to a website. The link starts with the following web address: The participant report has a form of a web-based questionnaire with different types of questions single choice, multiple choices, and matrix-type of questions. The reporting is handled by EUSurvey tool, developed and managed by the European Commission How to request participant reports? Mobility Tool+ sends out requests for participant reporting automatically after the end of the mobility period, as indicated in the "End date" field of the mobility details. When the report is in status "REQUESTED", the report can be re-requested. To re-send the report request, login to Mobility Tool+ and open your project details. Click "Mobilities" from the top menu. Select "List Mobilities" from the contextual menu. Edit the mobility details and click button "Re-Send" in the "Participant Report" section, as presented in the screenshot below. When the mobility period is not over or when the participant report is already in status "SUBMITTED" re-sending participant report is not available How to check participant report status? The status of the report is displayed on the page "Mobilities". There are 3 types of status in the system: NONE no invite for a report has been sent yet 60

61 REQUESTED invitation to fill in the report has been sent out to the participant SUBMITTED the participant has submitted his/her report The statuses of mobilities are changed automatically, depending on the system and participant actions. To see status of the participant reports in your project, login to Mobility Tool+ and open your project details. Click "Mobilities" from the top menu. Select "List Mobilities" from the contextual menu. The status of the participant reports will be displayed in the "Report status" column How to see results of participant report? Login to Mobility Tool+ and open your project details. Click "Mobilities" from the top menu. Select "List Mobilities" from the contextual menu. Edit the mobility for which you'd like to see the participant report. Click "Download PDF" link in the "Participants Reports" section to download a PDF version of the participant report results. This method can be used for checking individual participant reports. Alternatively, you can export all participant reports in CSV file. Go to the "Mobilities" page and click "Export Participant Report". This way, a ZIP file with all participant reports grouped by activity type will be generated. The CSV files can be opened with programs such as Microsoft Excel. 61
62 8. BUDGET Budget section of Mobility Tool+ provides a summary of the financial details of mobilities and other financial elements of the project. This section should be regularly checked for overview of the project finances What are the elements of project budget on the "Budget" page? The "Budget" displays two sources of information project budget as granted by the National Agency and project budget as a summary of project activities. This distinction is clearly visible on the "Budget" page the columns of budget approved and current budget are clearly marked on the page. For easier budget management, a third column "% Current / Approved budget" provides the current level of budget consumption. If there are changes in the project budget following an amendment of the initial agreement between the beneficiary organisation and the National Agency, those changes should be reflected in the first column How to check project budget? Login to Mobility Tool+. Click "Budget" in the top menu. A budget page will be displayed. 62

63 Depending on action type of your projects you may see different fields. Fields which are marked in grey contain summary details taken from all mobilities in the project. Fields which are not greyed out are available for editing. An example of such field may be "Organisational Support", for example How to change project budget? Login to Mobility Tool+. Click "Budget" in the top menu. A budget page will be displayed. Edit fields which are editable they are normally not greyed out on the page. Once you make a change, a button that was previously called "Nothing to change" on the top of the page changes into "Save". 63

64 Click the "Save" button to preserve your changes. 64

65 9. REPORTS The last section of the Mobility Tool+ provides you a reporting functionality as beneficiary. This section can be used to submit interim and final beneficiary reports to your National Agency. Please note that the participant reports are covered in section "Mobilities" of this guide. The final report will contain a summary of all the activities of your project, the project budget and some additional information. Most of the content of the report will be prefilled with the data you have entered in Mobility Tool+. Additionally, you will be asked series of questions concerning the implementation of your project. Depending on the action type of your project, the form of the final report can be a PDF form or a website form How can I submit my final report to National Agency? Login to Mobility Tool+. Click "Reports" in the top menu. In case your project was realised in the area of Youth (action code KA105), you will see a page similar to the one below. To generate your report, click "Generate Beneficiary Report". If you project have some issues, a message may be displayed to inform you about detected problems. You will be asked to choose a language of the report. 65

66 Click "Yes" to continue. The processing of your request will go through 3 stages of generating the file and submitting the report. Please wait until a report PDF file is generated. Click "Download Beneficiary Report" to download the final report PDF file. The PDF file will have relevant sections pre-filled with project and mobility data. The report must be completed and submitted using the "Submit" button in the PDF file. During this time a warning message "Beneficiary Report in progress - please do not update data unless agreed with your National Agency" will be displayed on all pages of your project. 66
67 9.2. What happens after I submit my final report? After submission of the final report your access to your project in Mobility Tool+ will be restricted. You will be able to read data, but not to change it. You will be able to download participant reports, for example. A warning similar to the one below will be displayed on all pages of your project How can I edit my project after final report submission? National Agency may restore your access to the project if the final report is found to be unsatisfactory or your project requires further changes. In either way you will receive a notification from the National Agency. 67
68 10. SUPPORT AND TROUBLESHOOTING National Agency Helpdesk contact All questions or issues with Mobility Tool+ should be reported to your National Agency helpdesk. The contact details are published on the Mobility Tool+ "Home" page of your project Troubleshooting of the most common issues National characters are replaced with question marks during the import process Some national characters may not be correctly displayed after a CSV file is saved in Microsoft Excel and imported into the tool. The problem lays in the way all versions of Microsoft Excel on Microsoft Windows and Apple OS X encode the national characters in UTF-8 format. In particular, the national characters encoding is not preserved when a CSV file is saved. The problem has been officially confirmed by Microsoft support. It's important to highlight this is not a problem of data, process or algorithms used by Mobility Tool+. The problem is affecting 13 of the 27 different alphabets used by National Agencies and participant of the Erasmus+ programme. The affected alphabets are Greek, Bulgarian, Croatian, Czech, Hungarian, Latvian, Lithuanian, Maltese, Polish, Romanian, Slovak, Slovene, and Turkish. For some of these alphabets none of the national characters are saved properly, for some others only partially. Many solutions have been tested to prevent this issue from happening. 3 office suits have been confirmed not exhibiting this problem. Two of the suits are open source and freely available on the Internet, the 3 rd is a proprietary software package: Microsoft Windows: LibreOffice (Calc), Apache OpenOffice (Calc) Linux: LibreOffice (Calc), Apache OpenOffice (Calc) Apple OS X: LibreOffice (Calc), Apache OpenOffice (Calc) and iworks (Numbers) The list is not exhaustive and if you already have a solution in place that works for you, you may ignore this message. There are also other solutions in place, such as Notepad++ or custom-made applications that may work with the national characters correctly but may not be as straightforward in use as the spreadsheet editors. 68

69 CSV files exported by Mobility Tool+ are not opened correctly by Microsoft Excel Mobility Tool+ offers two options for data export Excel and CSV. It may happen that when you choose to download and open CSV, Excel might not recognize the field separator and will display a whole length of each line in just one cell, as shown on the screenshot below. This may happen due to regional settings of your computer. There are two solutions of this problem. The first describes a change of system settings of your operating system. The other uses the text import functionality within Microsoft Excel. Regional settings The solution presented below applies to Microsoft Windows 7, however previous versions of the Windows operating system may have similar steps. Please be aware that such change may affect all applications installed on your computer. In order to fix the problem, please go to Control Panel, then Region and Language and click "Additional Settings" button on the bottom of the window. 69

70 There you'll find "List separator" option, which most likely will be set to comma (,). Please change this option to semi colon (;), save the settings, close Excel and open the data again. The issue should be resolved. Use of Excel data import functionality The CSV data can be imported into Microsoft Excel without changing the regional settings. For this purpose text import function can be used in the application. Please note that the steps presented below may differ between different versions of Microsoft Excel 70
 Select the CSV file you wish to edit in Excel. The import process will continue with \"Text Import Wizard\".")
71 and Office suits running on different operating systems (Microsoft Windows or Apple OS X). (1) Open Microsoft Excel with a blank spreadsheet. (2) Go to Data tab and click "From Text". Window "Import Text File" will appear. (3) Select the CSV file you wish to edit in Excel. The import process will continue with "Text Import Wizard". (4) Select "Delimited", as presented on the screenshot. Leave all other options as they are (start import at row 1, file origin: "65001: Unicode (UTF-8)"). Click "Next" button. (5) Un-tick the default "Tab" and tick "Semicolon". You will notice that data preview will change accordingly. Click "Next" button. 71
 While holding Shift key on your keyboard, click on the last column of the data preview.")
72 (6) In the next window, move the horizontal scrolling to the end of the right side of the data preview. (7) While holding Shift key on your keyboard, click on the last column of the data preview. You will notice the data preview table will turn black. 72
 Click \"Finish\".")
73 (8) Select "Text" option in the column data format pane, as presented on the screenshot below. You will notice the headings of the columns in data preview will change from "General" to "Text". (9) Click "Finish". The wizard will ask you where the imported data should be placed. Click button "OK". 73

74 Your data from the CSV file exported from Mobility Tool+ will be presented in columns Mobility Tool+ website is not displayed correctly in Microsoft Internet Explorer It has been reported that the Compatibility View function of Microsoft Internet Explorer may cause some display issues on the Mobility Tool+ website. If you experience any issues displaying the websites on Microsoft Internet Explorer, please turn off the Compatibility View by going to Tools, and then click on Compatibility View to deselect it. More information on compatibility view can be found at the page below. 9/features/compatibility-view 74
Mobility Tool+ Guide for Beneficiaries of the Erasmus+ programme
 EUROPEAN COMMISSION DIRECTORATE-GENERAL FOR EDUCATION AND CULTURE Education and vocational training; Coordination of Erasmus+ Coordination of National Agencies Erasmus+ Mobility Tool+ Guide for Beneficiaries
Mobility Tool Guide for Beneficiaries of the Erasmus programme
 EUROPEAN COMMISSION Directorate General for Education and Culture Lifelong Learning: policies and programme Coordination of the "Lifelong learning" programme Mobility Tool Guide for Beneficiaries of the
Mobility Tool Guide for Beneficiaries of Leonardo da Vinci programme
 EUROPEAN COMMISSION Directorate-General for Education and Culture Lifelong Learning: policies and programme Coordination of the "Lifelong learning" programme Mobility Tool Guide for Beneficiaries of Leonardo
Mobility Tool Guide for Beneficiaries
 EUROPEAN COMMISSION Directorate-General for Education and Culture Lifelong Learning: policies and programme Coordination of the "Lifelong learning" programme Mobility Tool Guide for Beneficiaries Version:
Mobility Tool Guide for Beneficiaries
 EUROPEAN COMMISSION Directorate-General for Education and Culture Lifelong Learning: policies and programme Coordination of the "Lifelong learning" programme Mobility Tool Guide for Beneficiaries Version:
Erasmus Charter for Higher Education
 Erasmus Charter for Higher Education How to complete and submit an application for accreditation Version 1 2 March 2015 TABLE OF CONTENTS Technical requirements... 3 Overview of the application process...
EUROPEAN COMMISSION Directorate-General for Education and Culture
 EUROPEAN COMMISSION Directorate-General for Education and Culture Lifelong Learning: policies and programme Coordination of the "Lifelong learning" programme ECAS User Manual The European Commission Authentication
Volunteering Database User Guide
 Volunteering Database User Guide v1.1 10/2014 Contents Page 1. Contents 2. Introduction 3. Getting ready to use the Volunteering Database 4. Registering for an ECAS account 8. Logging in to the Volunteering
Vodafone Bulk Text. User Guide. Copyright Notice. Copyright Phonovation Ltd
 Vodafone Bulk Text User Guide Copyright Notice Copyright Phonovation Ltd Important Notice: The Information contained in this document is subject to change without notice and should not be construed as
Introduction to Client Online. Factoring Guide
 Introduction to Client Online Factoring Guide Contents Introduction 3 Preparing for Go live 3 If you have any questions 4 Logging In 5 Welcome Screen 6 Navigation 7 Navigation continued 8 Viewing Your
Erasmus+ Support: Licence Management System for Beneficiaries User Guide 4.0
 Erasmus+ Support: Licence Management System for Beneficiaries User Guide 4.0 Date 1/06/2015 Version 4.0 Author Service Provider Public Beneficiary Institutions/Organisations Page 1 Table of Contents Introduction...
Erasmus+ Support: Licence Management System for Beneficiaries User Guide 6.0
 Erasmus+ Support: Licence Management System for Beneficiaries User Guide 6.0 Date 1/09/2015 Version 6.0 Author Service Provider Public Beneficiary Institutions/Organisations Page 1 Table of Contents Introduction...
emobile Bulk Text User Guide Copyright Notice Copyright Phonovation Ltd
 emobile Bulk Text User Guide Copyright Notice Copyright Phonovation Ltd Important Notice: The Information contained in this document is subject to change without notice and should not be construed as a
Erasmus+ Linguistic Support: Licence Management System for Beneficiaries User Guide 2.0. Date 29/12/2014. Service Provider
 Erasmus+ Linguistic Support: Licence Management System for Beneficiaries User Guide 2.0 Date 29/12/2014 Version 2.0 Draft Author Service Provider Revised by Under revision process Approved by Public Beneficiary
Council of Ontario Universities. COFO Online Reporting System. User Manual
 Council of Ontario Universities COFO Online Reporting System User Manual Updated September 2014 Page 1 Updated September 2014 Page 2 Table of Contents 1. Security... 5 Security Roles Defined in the Application...
System requirements 2. Overview 3. My profile 5. System settings 6. Student access 10. Setting up 11. Creating classes 11
 Table of contents Login page System requirements 2 Landing page Overview 3 Adjusting My profile and System settings My profile 5 System settings 6 Student access 10 Management Setting up 11 Creating classes
User's Guide of the Unique Registration Facility (URF) and Participant Portal for Education, Audio-visual, Culture, Citizenship and Volunteering
 and Participant Portal for Education, Audio-visual, Culture, Citizenship and Volunteering") Page 1 12/12/2013 blanc User's Guide of the Unique Registration Facility (URF) and Participant Portal for Education, Audio-visual, Culture, Citizenship and Volunteering 2013/12/11 (URF/PP version 1.1)
Page 1 12/12/2013 blanc User's Guide of the Unique Registration Facility (URF) and Participant Portal for Education, Audio-visual, Culture, Citizenship and Volunteering 2013/12/11 (URF/PP version 1.1)
Washington Access to Instruction and Measurement (WA-AIM) Engrade Users Guide
 Engrade Users Guide") Washington Access to Instruction and Measurement (WA-AIM) Engrade Users Guide Copyright 2015 by OSPI, Data Recognition Corporation, and McGraw-Hill LLC. All rights reserved. Developed and published under
Washington Access to Instruction and Measurement (WA-AIM) Engrade Users Guide Copyright 2015 by OSPI, Data Recognition Corporation, and McGraw-Hill LLC. All rights reserved. Developed and published under
Web Mail Classic Web Mail
 April 14 Web Mail Classic Web Mail Version 2.2 Table of Contents 1 Technical Requirements... 4 2 Accessing your Web Mail... 4 3 Web Mail Features... 5 3.1 Home... 5 3.1.1 Mailbox Summary... 5 3.1.2 Announcements...
Payco, Inc. Evolution and Employee Portal. Payco Services, Inc.., 2013. 1 Home
 Payco, Inc. Evolution and Employee Portal Payco Services, Inc.., 2013 1 Table of Contents Payco Services, Inc.., 2013 Table of Contents Installing Evolution... 4 Commonly Used Buttons... 5 Employee Information...
User's Guide of the Unique Registration Facility (URF) and Participant Portal for Education, Audio-visual, Culture, Citizenship and Volunteering
 and Participant Portal for Education, Audio-visual, Culture, Citizenship and Volunteering") Page 1 11/12/2013 blanc User's Guide of the Unique Registration Facility (URF) and Participant Portal for Education, Audio-visual, Culture, Citizenship and Volunteering 2013/12/11 (URF/PP version 1.1)
Page 1 11/12/2013 blanc User's Guide of the Unique Registration Facility (URF) and Participant Portal for Education, Audio-visual, Culture, Citizenship and Volunteering 2013/12/11 (URF/PP version 1.1)
OPTAC Fleet Viewer. Instruction Manual
 OPTAC Fleet Viewer Instruction Manual Stoneridge Limited Claverhouse Industrial Park Dundee DD4 9UB Help-line Telephone Number: 0870 887 9256 E-Mail: optac@stoneridge.com Document version 4.0 Part Number:
How to Add Users 1. 2.
 Administrator Guide Contents How to Add Users... 2 How to Delete a User... 9 How to Create Sub-groups... 12 How to Edit the Email Sent Out to New Users... 14 How to Edit and Add a Logo to Your Group's
Netigate User Guide. Setup... 2. Introduction... 5. Questions... 6. Text box... 7. Text area... 9. Radio buttons...10. Radio buttons Weighted...
 Netigate User Guide Setup... 2 Introduction... 5 Questions... 6 Text box... 7 Text area... 9 Radio buttons...10 Radio buttons Weighted...12 Check box...13 Drop-down...15 Matrix...17 Matrix Weighted...18
User's Guide of the Unique Registration Facility (URF) and Participant Portal for Education, Audio-visual, Culture, Citizenship and Volunteering
 and Participant Portal for Education, Audio-visual, Culture, Citizenship and Volunteering") User's Guide of the Unique Registration Facility (URF) and Participant Portal for Education, Audio-visual, Culture, Citizenship and Volunteering 2015/07/16 (URF/PP version 3.2) Table of Contents Document
User's Guide of the Unique Registration Facility (URF) and Participant Portal for Education, Audio-visual, Culture, Citizenship and Volunteering 2015/07/16 (URF/PP version 3.2) Table of Contents Document
MEDIAplus administration interface
 MEDIAplus administration interface 1. MEDIAplus administration interface... 5 2. Basics of MEDIAplus administration... 8 2.1. Domains and administrators... 8 2.2. Programmes, modules and topics... 10 2.3.
MailEnable Web Mail End User Manual V 2.x
 MailEnable Web Mail End User Manual V 2.x MailEnable Messaging Services for Microsoft Windows NT/2000/2003 MailEnable Pty. Ltd. 486 Neerim Road Murrumbeena VIC 3163 Australia t: +61 3 9569 0772 f: +61
Interreg Europe Online application system USER MANUAL
 European Union European Regional Development Fund Sharing solutions for better regional policies Interreg Europe Online application system USER MANUAL 01 June 2015 v. 01/06/2015 Login: Login information
HertSFX. User Guide V2.04. Hertfordshire s Secure File Exchange Portal. (Jan 2014) HertSFX User Guide V2.04 Jan 2014 Page 1 of 17
 HertSFX User Guide V2.04 Jan 2014 Page 1 of 17") Hertfordshire s Secure File Exchange Portal User Guide V2.04 (Jan 2014) HertSFX User Guide V2.04 Jan 2014 Page 1 of 17 CONTENTS 1. About HertSFX... 3 2. HertSFX Limitations... 3 3. Getting Started... 3
Hertfordshire s Secure File Exchange Portal User Guide V2.04 (Jan 2014) HertSFX User Guide V2.04 Jan 2014 Page 1 of 17 CONTENTS 1. About HertSFX... 3 2. HertSFX Limitations... 3 3. Getting Started... 3
Table of Contents 1. Contents...1
 Table of Contents 1. Contents...1 1.1 Introduction/Getting Started...1 1.1.1 Creating an Account...1 1.1.2 Logging In...2 1.1.3 Forgotten Password...2 1.1.4 Creating a New Project...3 1.2 My Projects...3
System Administrator Training Guide. Reliance Communications, Inc. 603 Mission Street Santa Cruz, CA 95060 888-527-5225 www.schoolmessenger.
 System Administrator Training Guide Reliance Communications, Inc. 603 Mission Street Santa Cruz, CA 95060 888-527-5225 www.schoolmessenger.com Contents Contents... 2 Before You Begin... 4 Overview... 4
Supply Chain Finance WinFinance
 Supply Chain Finance WinFinance Customer User Guide Westpac Banking Corporation 2009 This document is copyright protected. Apart from any fair dealing for the purpose of private study, research criticism
Table of Contents INTRODUCTION... 2 HOME PAGE... 3. Announcements... 7 Personalize & Change Password... 8 Reminders... 9 SERVICE CATALOG...
 Table of Contents INTRODUCTION... 2 HOME PAGE... 3 Announcements... 7 Personalize & Change Password... 8 Reminders... 9 SERVICE CATALOG... 11 Raising a Service Request... 12 Edit the Service Request...
Ministry of Education User Guide for the School Facilities Inventory System Application
 Ministry of Education User Guide for the School Facilities Inventory System Application Version 3.0 November 2009 Table of Contents Purpose of this Guide... 1 Overview... 2 Connecting to the SFIS Application...
WatchDox Administrator's Guide. Application Version 3.7.5
 Application Version 3.7.5 Confidentiality This document contains confidential material that is proprietary WatchDox. The information and ideas herein may not be disclosed to any unauthorized individuals
ERASMUS+ Technical guidelines for completing application e-forms. For actions managed by National Agencies
 ERASMUS+ Technical guidelines for completing application e-forms For actions managed by National Agencies Version 2 of 09/03/2015 Table of Contents Introduction...4 Preparation...4 Electronic forms catalogue...
Proposal Submission User Guide. How to create, complete and submit an Application eform
 Proposal Submission How to create, complete and submit an Application eform Version 1 14 February 2014 TABLE OF CONTENTS Technical requirements... 3 Overview of the process... 5 A. Creation of a new application
Florida Department of Environmental Protection Office of Technology and Information Services
 Florida Department of Environmental Protection Office of Technology and Information Services Industrial and Domestic Wastewater EzDMR (Discharge Monitoring Reporting) External User s Guide Prepared by:
REGISTER OF COMPANIES, ENTERPRISES AND BUSINESS
 RWANDA BUSINESS REGISTRY PROJECT REGISTER OF COMPANIES, ENTERPRISES AND BUSINESS NAMES USER MANUAL Online user Version: 1.0 March 9 th 2010 NORWAY REGISTERS DEVELOPMENT AS TABLE OF CONTENTS 1 INTRODUCTION...
domovea remote access tebis
 domovea remote access tebis SUMMARY SUMMARY Page 1. INTRODUCTION... 2 1.1 PURPOSE OF THE DOCUMENT... 2 1.2 PRELIMINARIES... 2 2.... 3 2.1 CONNECTING TO THE DOMOVEA.COM PORTAL... 3 2.2 CREATING A PERSONAL
Intellect Platform - The Workflow Engine Basic HelpDesk Troubleticket System - A102
 Intellect Platform - The Workflow Engine Basic HelpDesk Troubleticket System - A102 Interneer, Inc. Updated on 2/22/2012 Created by Erika Keresztyen Fahey 2 Workflow - A102 - Basic HelpDesk Ticketing System
Barclaycard Spend Management Training Guide. December 2010
 Barclaycard Spend Management Training Guide December 2010 About this Guide The following slides are intended to assist with cardholder and manager (approver) Barclaycard Spend Management training. The
Employer Portal User Guide Last Updated: October 2015
 Employer Portal User Guide Last Updated: October 2015 San Francisco City Option PO Box 194367 San Francisco, CA 94119-4367 Phone: 1(415) 615-4492 Fax: 1(415) 615-4392 Email: employerservices@sfcityoption.org
EASA Airworthiness Directives publishing tool 2008 EASA
 EASA Airworthiness Directives publishing tool 2 EASA Airworthiness Directives publishing tool Table of Contents 3 Part I Introduction 1 Welcome... 3 NEW: Safety... Information Bulletin NEW: Foreign...
DIRECT ADMISSIONS SYSTEM
 1/24/2013 UNIVERSITY OF GLASGOW DIRECT ADMISSIONS SYSTEM Postgraduate Taught Application User Guide Online Application Guide Table of Contents Introduction... 1 Technical support... 1 1. Creating your
REACH-IT Industry User Manual
 REACH-IT Industry User Manual Part 03 - Login and message box 2 REACH-IT Industry User Manual Version 2.1 Version Changes 2.1 April 2014 Updates related to REACH-IT 2.7 regarding the Terms and Conditions,
SerialMailer Manual. For SerialMailer 7.2. Copyright 2010-2011 Falko Axmann. All rights reserved.
 1 SerialMailer Manual For SerialMailer 7.2 Copyright 2010-2011 Falko Axmann. All rights reserved. 2 Contents 1 Getting Started 4 1.1 Configuring SerialMailer 4 1.2 Your First Serial Mail 7 1.2.1 Database
BEST / Act 230 Funding
 BEST / Act 230 Funding GRANTIUM APPLICATION INSTRUCTIONS FOR FY 16 (2015 2016 Academic Year) Table of Contents Logging into Grantium and Changing Your Password... 3 Forgot Your Password?... 4 How to Get
Charter Business Phone. Online Control Panel Getting Started Guide. Document Version 1.0
 Charter Business Phone Online Control Panel Getting Started Guide Document Version 1.0 Table of Contents 1 About This Guide...4 2 Overview...5 2.1 Online Control Panel and Call Manager... 5 3 Manual and
UNIVERSITY OF CALGARY Information Technologies WEBFORMS DRUPAL 7 WEB CONTENT MANAGEMENT
 UNIVERSITY OF CALGARY Information Technologies WEBFORMS DRUPAL 7 WEB CONTENT MANAGEMENT Table of Contents Creating a Webform First Steps... 1 Form Components... 2 Component Types.......4 Conditionals...
Chapter 15: Forms. User Guide. 1 P a g e
 User Guide Chapter 15 Forms Engine 1 P a g e Table of Contents Introduction... 3 Form Building Basics... 4 1) About Form Templates... 4 2) About Form Instances... 4 Key Information... 4 Accessing the Form
**Web mail users: Web mail provides you with the ability to access your email via a browser using a "Hotmail-like" or "Outlook 2003 like" interface.
 Welcome to NetWest s new and improved email services; where we give you the power to manage your email. Please take a moment to read the following information about the new services available to you. NetWest
NAB Trade Finance Online Customer User Guide
 NAB Trade Finance Online Customer User Guide Contents Introduction Scope... 2 How to Use This Guide... 2 Users of NAB Trade Finance Online... 3 Resources... 3 Your Profile... 4 Introduction... 4 Roles...
Proposal Submission User Guide. How to create, complete and submit an Application eform
 Proposal Submission How to create, complete and submit an Application eform Version 1 21 November 2013 TABLE OF CONTENTS Technical requirements... 3 Overview of the process... 5 A. Creation of a new application
PDC Helpdesk User Guide
 PDC Helpdesk User Guide PDC Helpdesk Prolog Development Center A / S Page 1 of 17 Contents 1 Introduction... 3 2 Using the browser or e-mails... 3 3 Login PDC Helpdesk... 3 4 Overview page for Issues...
OPTAC Fleet Viewer. Instruction Manual
 OPTAC Fleet Viewer Instruction Manual Stoneridge Limited Claverhouse Industrial Park Dundee DD4 9UB Help-line Telephone Number: 0870 887 9256 E-Mail: optac@stoneridge.com Document version 3.0 Part Number:
Cre-X-Mice Database. User guide
 Cre-X-Mice Database User guide Table of Contents Table of Figure... ii Introduction... 1 Searching the Database... 1 Quick Search Mode... 1 Advanced Search... 1 Viewing Search Results... 2 Registration...
A guide to bulk deposit submissions
 A guide to bulk deposit submissions What is a bulk deposit submission? The Bulk Deposit Submission process is used for agents/landlords who have a large amount of deposits to submit at the same time, reducing
HE Gateway User guide for colleges and universities
 HE Gateway User guide for colleges and universities HE Gateway 1 Student Loans Company Ltd Contents Section 1 Definitions & Related Documents...3 Definitions... 3 Related Documents... 3 Section 2 Purpose
Managing users. Account sources. Chapter 1
 Chapter 1 Managing users The Users page in Cloud Manager lists all of the user accounts in the Centrify identity platform. This includes all of the users you create in the Centrify for Mobile user service
User Manual for National Transplant Procurement Management (NTPM) TOP team user Web Application
 TOP team user Web Application") User Manual for National Transplant Procurement Management (NTPM) TOP team user Web Application Tel: 03-2694 2704/2705, 03-2615 6576 E-mail:ntpm@moh.gov.my Website: https://www.macr.org.my/entpm/ Table
User Manual for National Transplant Procurement Management (NTPM) TOP team user Web Application Tel: 03-2694 2704/2705, 03-2615 6576 E-mail:ntpm@moh.gov.my Website: https://www.macr.org.my/entpm/ Table
AT&T Business Messaging Account Management
 AT&T Business Messaging Account Management Admin User Guide December 2015 1 Copyright 2015 AT&T Intellectual Property. All rights reserved. AT&T, the AT&T logo and all other AT&T marks contained herein
Barracuda Spam Firewall User s Guide
 Barracuda Spam Firewall User s Guide 1 Copyright Copyright 2005, Barracuda Networks www.barracudanetworks.com v3.2.22 All rights reserved. Use of this product and this manual is subject to license. Information
Table of Contents INTRODUCTION...2 HOME PAGE...3. Announcements... 6 Personalize... 7 Reminders... 9 Recent Items... 11 SERVICE CATALOG...
 Table of Contents INTRODUCTION...2 HOME PAGE...3 Announcements... 6 Personalize... 7 Reminders... 9 Recent Items... 11 SERVICE CATALOG...12 REQUEST...14 Request List View... 15 Creating a New Incident...
School account creation guide
 School account creation guide Contents Your welcome email Page 2 The CSV file Page 3 Uploading the CSV and creating the accounts Page 5 Retrieving staff usernames and passwords Page 8 Retrieving student
Student Employment Website Employer User Guide Updated July 17, 2015
 EMPLOYER USER GUIDE Getting Started... 2 Request Log-In Permission... 3 Log In... 4 My Control Panel... 5 Post a New Job... 7 Review Student Applications... 11 Contact Applicants... 13 Hire a Student...
COLLABORATION NAVIGATING CMiC
 Reference Guide covers the following items: How to login Launching applications and their typical action buttons Querying & filtering log views Export log views to Excel User Profile Update info / Change
I. Simplifying Payment Processing. II. Authorizing Your Transactions Correctly page 6
 Welcome to PaySimple! Congratulations on choosing PaySimple for all your payment processing needs! You will quickly notice that billing and collections is transformed into an effortless process. With PaySimple,
Web Portal User Guide. Version 6.0
 Web Portal User Guide Version 6.0 2013 Pitney Bowes Software Inc. All rights reserved. This document may contain confidential and proprietary information belonging to Pitney Bowes Inc. and/or its subsidiaries
Creating Online Surveys with Qualtrics Survey Tool
 Creating Online Surveys with Qualtrics Survey Tool Copyright 2015, Faculty and Staff Training, West Chester University. A member of the Pennsylvania State System of Higher Education. No portion of this
Upgrade of Business Systems Data Warehouse Reporting
 Upgrade of Business Systems Data Warehouse Reporting The Business Systems Data Warehouse Reporting System was upgraded to a new version of Business Objects the weekend of December 12 th. The current system
eproc strategic procurement Supplier - Quick Reference Guide Version 3.0
 eproc strategic procurement Supplier - Quick Reference Guide Version 3.0 1 Overview of eproc 2 How to register in eproc 3 First Connection 4 How to perform the main activities 5 Contact and Help 2 1 Overview
EMAIL MAKER FOR VTIGER CRM
 EMAIL MAKER FOR VTIGER CRM Introduction The Email Maker is extension tool designed for the vtiger CRM. Using EMAIL Maker you can create email templates with predefined information and send them from all
INTEGRATING MICROSOFT DYNAMICS CRM WITH SIMEGO DS3
 INTEGRATING MICROSOFT DYNAMICS CRM WITH SIMEGO DS3 Often the most compelling way to introduce yourself to a software product is to try deliver value as soon as possible. Simego DS3 is designed to get you
SAP BusinessObjects Financial Consolidation Web User Guide
 SAP BusinessObjects Financial Consolidation Document Version: 10.0 Support Package 18 2016-02-19 SAP BusinessObjects Financial Consolidation Web User Guide Content 1 General user functions....12 1.1 To
How To Manage Your Quarantine Email On A Blackberry.Com
 Barracuda Spam Firewall User s Guide 1 Copyright Copyright 2005, Barracuda Networks www.barracudanetworks.com v3.2.22 All rights reserved. Use of this product and this manual is subject to license. Information
How To Get A Strategic Partnership For Schools
 Key Action 2 (KA2) Guide for Applicants Strategic Partnerships for Schools (partnerships composed of only school) Deadline 12:00 AM (CET) on Wednesday 30 April 2014 Version 1: Published 28 March 2014 by
BlackBerry Internet Service. Version: 4.5.1. Administration Guide
 BlackBerry Internet Service Version: 4.5.1 Administration Guide Published: 2014-01-22 SWD-20140122155744258 Contents 1 Getting started...6 Administrative feature availability... 6 Availability of features
Novell ZENworks Asset Management 7.5
 Novell ZENworks Asset Management 7.5 w w w. n o v e l l. c o m October 2006 USING THE WEB CONSOLE Table Of Contents Getting Started with ZENworks Asset Management Web Console... 1 How to Get Started...
How to Order and Install Odette Certificates. Odette CA Help File and User Manual
 How to Order and Install Odette Certificates Odette CA Help File and User Manual 1 Release date 20.07.2015 Contents Preparation for Ordering an Odette Certificate... 3 Step 1: Prepare the information you
Refer to the Integration Guides for the Connect solution and the Web Service API for integration instructions and issues.
 Contents 1 Introduction 4 2 Processing Transactions 5 2.1 Transaction Terminology 5 2.2 Using Your Web Browser as a Virtual Point of Sale Machine 6 2.2.1 Processing Sale transactions 6 2.2.2 Selecting
GlobalSign Enterprise PKI Support. GlobalSign Enterprise Solution EPKI Administrator Guide v2.4
 GlobalSignEnterprisePKISupport GlobalSignEnterpriseSolutionEPKIAdministratorGuidev2.4 1 TABLE OF CONTENTS GETTING STARTED... 3 ESTABLISHING EPKI SERVICE... 3 EPKI ADMINISTRATOR/USER CERTIFICATE... 4 ESTABLISHING
Microsoft Online Learning Administrator guide v1.0
 Microsoft Online Learning Administrator guide v1.0 This guide provides an overview of the administrative functions of the Microsoft Online Learning Portal for Administrators. IMPORTANT NOTE: Please do
ithenticate User Manual
 ithenticate User Manual Version: 2.0.2 Updated March 16, 2012 Contents Introduction 4 New Users 4 Logging In 4 Resetting Your Password 5 Changing Your Password or Username 6 The ithenticate Account Homepage
NHSP:Online. Uploading Agency Rates. NHSP:Online. Agency Rates Admin V2.2 Issued December 2012 Page 1 of 31
 Uploading Agency Rates Page 1 of 31 Contents Page 1.0 Getting Started...3 2.0 Notifications...6 3.0 Downloading a Blank Template...7 4.0 Filling out your rates template...8 5.0 Uploading your completed
How to Order and Install Odette Certificates. Odette CA Help File and User Manual
 How to Order and Install Odette Certificates Odette CA Help File and User Manual 1 Release date 24.02.2014 Contents Preparation for Ordering an Odette Certificate... 3 Step 1: Prepare the information you
Transaction Inquiries
 Transaction Inquiries Publisher guide 3/26/2014 A guide to Tradedoubler s Transaction Inquiries system for publishers Contents 1. Introduction... 3 2. How it works... 3 3. Accessing the interface... 3
The Power Loader GUI
 The Power Loader GUI (212) 405.1010 info@1010data.com Follow: @1010data www.1010data.com The Power Loader GUI Contents 2 Contents Pre-Load To-Do List... 3 Login to Power Loader... 4 Upload Data Files to
How to Order and Install Odette Certificates. Odette CA Help File and User Manual
 How to Order and Install Odette Certificates Odette CA Help File and User Manual 1 Release date 28.07.2014 Contents Preparation for Ordering an Odette Certificate... 3 Step 1: Prepare the information you
ithenticate User Manual
 ithenticate User Manual Updated November 20, 2009 Contents Introduction 4 New Users 4 Logging In 4 Resetting Your Password 5 Changing Your Password or Username 6 The ithenticate Account Homepage 7 Main
Recruiter s Resource Guide
 Recruiter s Resource Guide First Edition 1.29.2015 Contents Section One Recruiting... 3 Accessing Team Georgia Careers... 4 My Setup Preferences... 5 Creating a Requisition... 6 Approving a Requisition...
User Guide for Online Permit Application & Emission Statement Submittals Using RADIUS 4.0
 User Guide for Online Permit Application & Emission Statement Submittals Using RADIUS 4.0 New Jersey Department of Environmental Protection Air Quality Permitting Program last updated: November 2012 Table
PCORI Online User Manual: Submitting a Letter of Intent
 PCORI Online User Manual: Submitting a Letter of Intent Revised 7/10/2015 Table of Contents 1. About PCORI Online... 3 2. Register... 4 3. Create an Account... 5 4. Start Your LOI... 6 5. Pre Screen Questionnaire...
TriCore Secure Web Email Gateway User Guide 1
 TriCore Secure Web Email Gateway User Guide This document provides information about TriCore Secure Web Email Gateway. This document is for users who are authorized to send and receive encrypted email
DIY Email Manager User Guide. http://www.diy-email-manager.com
 User Guide http://www.diy-email-manager.com Contents Introduction... 3 Help Guides and Tutorials... 4 Sending your first email campaign... 4 Adding a Subscription Form to Your Web Site... 14 Collecting
Email. Using Outlook Live
 Using Outlook Live Contents What is Email?... 4 Using Email... 4 Email Address... 4 Password... 4 The Windows Live Hotmail Welcome Screen... 6 Inbox... 7 The Mail Inbox Toolbar... 8 Sending Mail... 9 Attaching
Federal Program Office (FPO) User Manual
 User Manual") Federal Program Office (FPO) User Manual System Navigation NOAA Grants Online Program Management Office August 2015 Table of Contents Overview... 5 Accessing Grants Online... 5 Grants Online Navigation
Federal Program Office (FPO) User Manual System Navigation NOAA Grants Online Program Management Office August 2015 Table of Contents Overview... 5 Accessing Grants Online... 5 Grants Online Navigation
EMC Documentum Webtop
 EMC Documentum Webtop Version 6.5 User Guide P/N 300 007 239 A01 EMC Corporation Corporate Headquarters: Hopkinton, MA 01748 9103 1 508 435 1000 www.emc.com Copyright 1994 2008 EMC Corporation. All rights
ez Service Portal User Guide version 2.5.1
 ez Service Portal User Guide version 2.5.1 Revised June 18th 2015 1 Table of contents Introduction... 3 Conventions... 3 Contacting ez... 3 Copyright and trademarks... 3 Portal access... 4 Service Portal
Daily Traffic Control Log
 Daily Traffic Control Log User Instructions Name: FAP&A940/3.1 Property of Ford Motor Company GIS: 37.01 S+3T Proprietary Table of Contents Page IntrodUCTIon 3 SELECTING A LANGUAGE 4 1. RegisterING a DealershIP