DECT Gigaset N510 IP PRO
|
|
|
- Edith Nicholson
- 8 years ago
- Views:
Transcription

1 DECT Gigaset N510 IP PRO SUMMARY Summary System Features of the DECT Gigaset N510 IP Pro... 2 Base Station Gigaset N510 IP Pro... 2 Environmental Requirements... 3 The base should be placed in closed, dry rooms with a temperature range of +5 C and +45 C. Protect from moisture, dust, corrosive liquids and vapours Structural Requirements... 3 Acronyms Installing the Gigaset N510 IP Pro Configuration of the Gigaset N510 IP Pro... 8 How to Access the WEB administrator page... 9 Assign a Static IP to the Base User Configuration Codec Settings Assigning Lines for the User VoIP Configuration System Management Configure System Timings Select Country Start Registration for DECT Telephones Restart & Reset Save and Reset Updating Firmware Synchronisation of the Dect Gigaset


2 6. Create a User on the VOIspeed PBX SYSTEM FEATURES OF THE DECT GIGASET N510 IP PRO Maximum number of base stations that you can install 1 Maximum number of simultaneous conversations 4 Maximum number of user registrations 6 Maximum cover range of the Base Station Approx.300m Cover range for the Base Station for typical installations/ offices Approx 50m BASE STATION GIGASET N510 IP PRO The Base Station is positioned in the area where calls are made, and via its internal radio antenna manages up to 4 voice channels (simultaneous calls). The Base Statition can be powered via PoE (802.3af) and therefore via a PoE switch (maximum power of 4.0W). The base station coverage varies between 50m (in a closed space) and 300 meters in an open space. The coverage decreases according to the obstacles encountered by the radio waves (eg. Cement walls, scaffolding etc). The range is reduced by about 50% when the Eco Mode is active. Never place close to other electrical devices to avoid mutual interference. 2

3 ENVIRONMENTAL REQUIREMENTS The base should be placed in closed, dry rooms with a temperature range of +5 C and +45 C. Protect from moisture, dust, corrosive liquids and vapours. STRUCTURAL REQUIREMENTS The following are tips on how to position the radio unit (ie. the base station): For larger rooms, you should install the radio unit horizontally, towards the centre of the room by placing it under the ceiling. To cover the corridors we suggest that you place the unit vertically pointing the LED of the radio unit to the hallway, or vertically at the intersection of several corridors so that the signal follows the line of the corridor. You should place it at half-height between floor and ceiling. If there is a large object in the way, try to place the unit on top of it yet some way away from the ceiling. Mounting the unit vertically on a wall, the radio coverage front (side the LED is positioned) will be double compared to the rear. The attenuation is greater with an exterior wall. Please don t install the station close to large metal objects. If the building has reinforced concrete walls, the attenuation will be very high. 3

4 ACRONYMS AC Nr. ARI Db DECT DHCP DNS e.i.r.p. GAP IP IPEI LAN LED MAC MTU MWI NIC NTP PBX PoE PP RSSI RTP SIP TFTP UDP VoIP WLAN WRFP Authorisation Code Access Rights Identity Serial number of the KWS6000 found under the base or printed on the base box. Decibel Digital Enhanced Cordless Telecommunications Dynamic Host Configuration Protocol Domain Name System Equivalent Isotropic Radiated Power Generic Access Profile Internet Protocol International Portable Equipment Identity Telephone serial number Local area Network Light Emitting Diode Media Access Control Hardware address of the device connected to the network Maximum Transmission Unit Message Waiting Indication Network Interface Card Network Time Protocol Private Branch exchange Power over Ethernet Portable Parts Portable telephones Received Signal Strength Indicator Real-time Transport Protocol Session Initiated Protocol Trivial File Transfer Protocol User Datagram Protocol Voice Over IP Wireless Local Area Network Wireless Radio Fixed Part Repeater Wireless 4

5 2. INSTALLING THE GIGASET N510 IP PRO Functions of the button on the base - the led indicates the operating status of the unit The back view: Gigaset N510 IP Pro from the front Registration/ paging button Gigaset N510 IP Pro from the back Functions of the registration/ paging button on the base: Lights up LAN connection active (phone is connected to router) 5

 cable ( Cat 5 with 2 RJ45 modular jacks) for connecting the base to a router/ switch (LAN/ Internet) 4.")
6 Flashes Press briefly Press and hold Data transfer to LAN connection Launch paging (hanset search) Set base to registration mode Checking the package contents 1. One base, Gigaset N510 IP Pro 2. One power adapter for connecting the base to the mains power supply 3. One Ethernet (LAN) cable ( Cat 5 with 2 RJ45 modular jacks) for connecting the base to a router/ switch (LAN/ Internet) 4. One CD Note: the device colour may differ from the one shown here. 6
 cable ( Cat 5 with 2 RJ45 modular jacks) for connecting the base to a router/ switch (LAN/")

7 Setting up the base The following diagram is an overview of tall the connections for your base. The individual connections are described in detail below. In order to make calls over VoIP you must connect the base to the Internet and register at least one handset to the base. Follow the steps in the order given below: Follow the steps in the order given below: 1. Connect the power cable to the base. 2. Connect the base to the mains power supply. 3. Connect the base to the router/ switch to access the Internet and configure the base via the Web configurator (Internet connection via router and moden or via router with integrated modem). 4. Connect the PC to the router. NB. The Gigaset N510 IP PRO is supplied with sufficeint power via PoE (Power over Ethernet) if the device is connected to an Ethernet switch with PoE functionality (PoE class IEEE802.3af). In this case it is not necessary to tconneccdt the device to the mains power supply and steps 1 and 2 should be omitted. 7
. 4.")
8 3. CONFIGURATION OF THE GIGASET N510 IP PRO Configuration Manual This section provides information on how to configure the base via the Web Adminsitrator page. NB. The base is preconfigured with dynamic IP (DHCP) 8


9 HOW TO ACCESS THE WEB ADMINISTRATOR PAGE Configuration Manual The web interface page can be accessed using any standard browser on your PC that uses the same base network. 1. Open the web browser 2. In the address space write: and press return. Note: You can find your base IP address on the DHCP server (if it is there) or using a software which scans the network which starting from the MAC address substitutes it with the base IP address (for example, NetScan). 1. You can select your language for the web interface 2. In the PIN field insert the system PIN (default 0000) 3. Click on OK 9
. 1. You can select your language for the web interface 2.")
10 ASSIGN A STATIC IP TO THE BASE The base can be used with either a dynamic IP address (where you have a DHCP server) or with a static IP address. To use it with a dynamic IP address you only need to select Automatic from the drop down menu IP Address, after this it will be described as a static IP setting.. 10


11 Network configuration On the page Configuration Network IP Configuration you can define your IP address, subnet, gateway and DNS. 1. Click on Configuration then on Network and finally on IP Configuration 2. Chose Static from the drop down menu matching the first IP Address 3. In the field IP address insert the IP that will be assigned to the base 4. Fill in the remaining fields with information of the network that will be used for the base 5. Click on OK to save the configuration. 11

12 USER CONFIGURATION In the section Configuration Telephone Connections you can insert up to 6 DECT users. To add a user you only need to click on Modify for the connection that you intend to create and then click on Show advanced settings and complete all the fields as shown in the figures and then table below: 12


13 13 Configuration Manual

14 Connection name or number Name authentication Password authentication Username Name shown Domain Server Registration Refresh time Outbound server address Insert an identifying name for the user that you are creating User name for the user (identical to that on VOIspeed) Password for the user (identical to that on VOIspeed) Username (identical to that on VOIspeed) Insert an identifying name for the user that you are creating Company domain (configured in the section Company PBX) IP server of the VOIspeed PBX 60 seconds IP address of the VOIspeed PBX Leave blank any additional fields that have not been listed in this table 14
 IP server of the VOIspeed PBX 60 seconds IP address of the VOIspeed PBX Leave blank any additional fields that have not been listed in this")
15 CODEC SETTINGS For each user listed in the DECT Base Station you can chose the codec that will be used and its priority. To do this you need to access the section Configuration Telephone Audio and click on Show advanced settings. For this to work correctly on the DECT system with VOIspeed 6 you need to leave between the Codecs selected only the G711 and the G729 (optional) putting the G711 codec in first position as shown in the figure below: For this to work correctly on the DECT system with VOIspeed 6 you need to leave between the Codecs selected only the G711 and the G729 (optional) putting the G711 codec in first position as shown in the figure below: 15

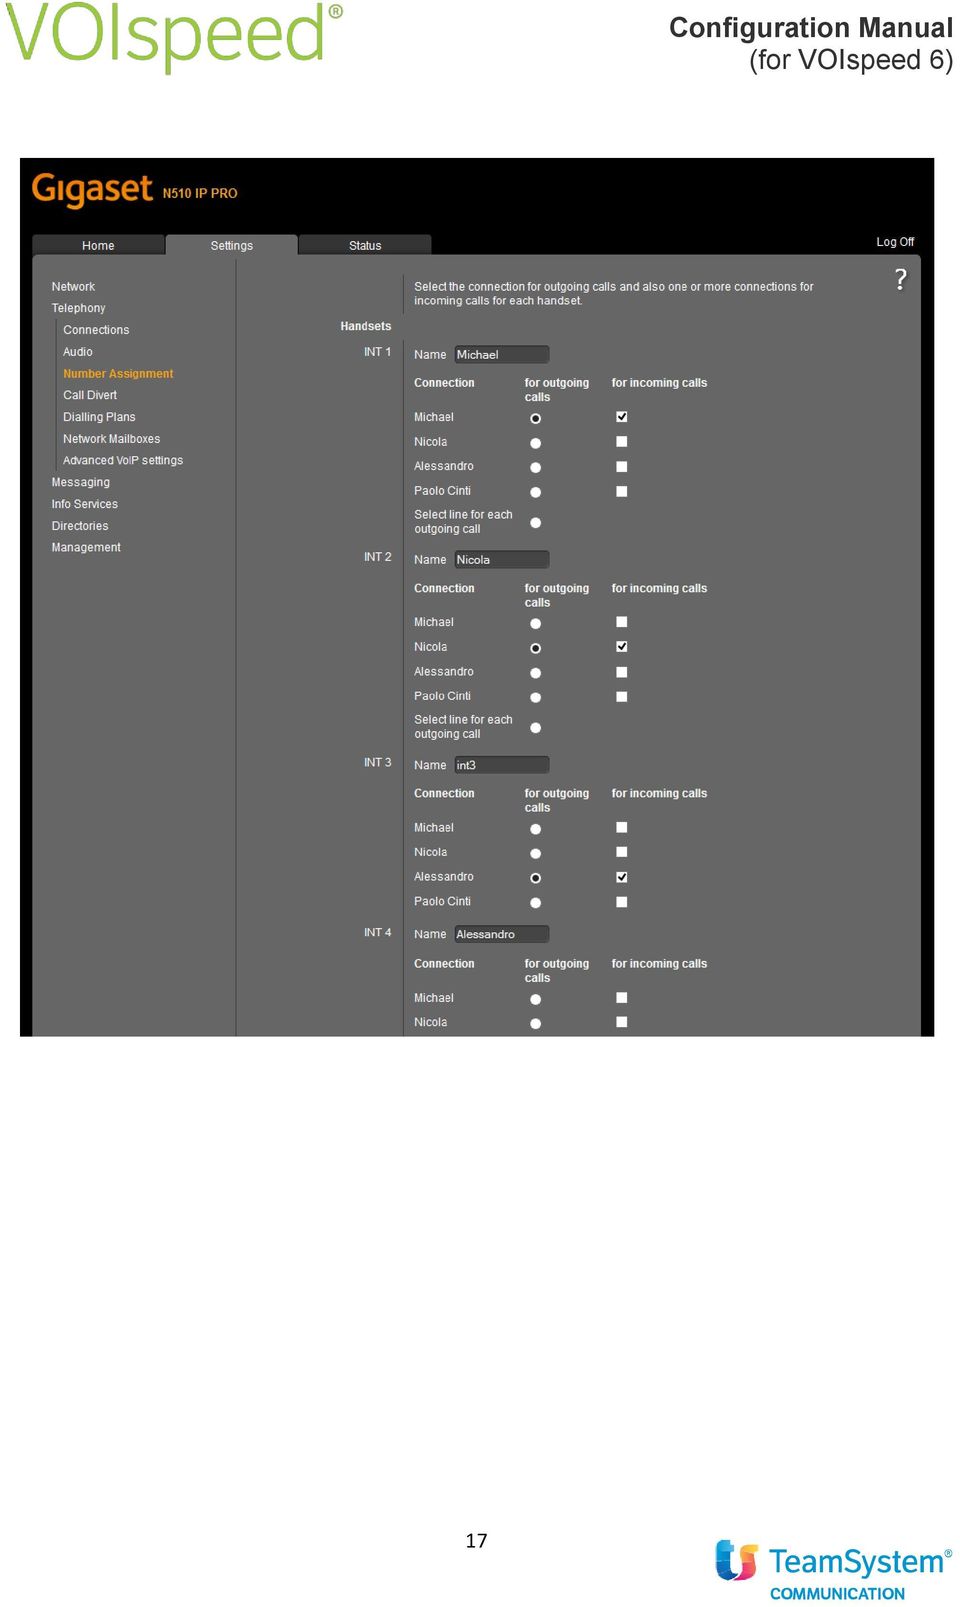
16 ASSIGNING LINES FOR THE USER The configuration of this section is very important, as if not correctly configured could prevent the receiving and sending of calls between the DECT users. Each telephone (identified on the extension line) should have selected its corresponding user (shown in the connection column) for both incoming and outgoing calls. The correct configuration is shown in the table below: 16
 for both incoming and outgoing calls.")
17 17 Configuration Manual

18 VOIP CONFIGURATION In the section Configuration Telephone Advanced VoIP settings you can configure how to manage the transfer of calls, music on hold and the RTP ports via which the audio packets will be sent. For the correct configuration with VOIspeed 6, please follow the settings highlighted in the image below: Press the R key to transfer the call Forward the call by hanging up Select No Select Yes RTP port Insert Music on hold Select No 18

19 4. SYSTEM MANAGEMENT Under the section Configuration Management it is possible to manage the system and: - Configure the system timetable - Select the country in which you find yourself (useful for the Country Code and ring tone), - Start the registration of DECT telephones on the DECT base station. - Restart the base or reset factory settings - Make a backup of the settings or restore - Update the Firmware (via the Gigaset server) CONFIGURE SYSTEM TIMINGS Enter in the section Configuration Management Date and Hour to configure the time adding a STNP server or, in the event in which the base does not have internet access, specify manually the date and time. It is also possible to enable the automatic updating of daylight saving time. The configurations shown below are useful for the automatic update of the date and time and daylight saving time via the SNTP server (NB. the Base station must have internet access) If there is no internet access, you only need to select No in the section Automatic update of the system time and insert the date and time manually. 19

20 SELECT COUNTRY Enter in the section Configuration Management Local settings to configure the Country in which the Base Station is working to work out automatically the international prefix to associate the International calls, and the corresponding ring tone. As shown in the example below, if the base is in the UK, select UK from the drop down menu of Country options and Ringtone map. 20


21 START REGISTRATION FOR DECT TELEPHONES Configuration Manual By clicking on Start Registration from the beginning of the automatic telephone registration: the base will send a registration request signal to DECT telephones covered by the base. To finish the registration correctly, after having clicked on the Start registration button, you need to register the telephone too (see section Gigaset telephone registration point 1). Note: In case you need to start the registration from the telephone, follow the procedure described in the chapter Gigaset telephone registration and not the procedure described in this section (Start registration of DECT telephones). 21
22 RESTART & RESET In the section Configurations Management Restart and Reset you can restart the base (soft reboot) or restore its factory settings (pressing OK next to Start Reset ). 22
23 SAVE AND RESET You can back up the complete configuration of the BASE Station to use to restore these settings. This can be undertaken from the section Configuration Management Save and Restore.. 23
24 UPDATING FIRMWARE It is possible to update firmare directly from the web interface of the Base Station. To do this, access the section Configuration Management Updating firmware and click on Update firmware : the system will check the presence of a new version and, if it is there, will start the update for the base. N. B. The latest firmware tested and certified is the Please do not update different firmware and firmware not specifically supported by the base. 24
25 5. SYNCHRONISATION OF THE DECT GIGASET On the base it is possible to register up to six portable handsets. The manual registration of the portable handsets should be followed on portable handset (1) and on the base (2). Once the registration is complete the portable handset goes to stand-by and on the display shows the internal number of the portable handset in relation to the base (e.g. Ext 1). 1. On the portable handset If the portable handset has been registered correctly, you will see Registration successful. If unsuccessful you will see, Registration failed and will need to repeat all the steps listed above (including the start of the registration of the Base Station). 2. On the base station Within 60 seconds, press (for around 3 seconds) the button Registration/ Paging. The Base station assigns the portable handset the lowest extension number available (numbers from 1-6). The internal number is displayed on the handset, for example Ext 2. 25
26 This means that the portable handset has been assigned extension 2 (useful when identifying the telephone during configuration of Connexions, Codec, and assigning lines). 3. Creation of the User on the Phone System This section contains information regarding the creation of a user on the phone system. The example below is using VOIspeed CREATE A USER ON THE VOISPEED PBX Go to the VOIspeed web administrator and then Configuration Users. 1. Click on Configuration and then on Users 2. Click on New User (+symbol) 3. Fill in the fields Name, Surname and with information of the user in question 4. Complete the fields Extension and Username with the extension number of the user 5. Insert the password in the Password field 26
27 NB. The information for the user registration should be the same as that used for the same user in relation to the BASE Station N510 IP PRO. 27
D-LINK DPH-140S SIP PHONE INSTALLATION GUIDE
 pag.1 D-LINK DPH-140S SIP PHONE INSTALLATION GUIDE pag.2 SUMMARY SKYPHO VOIP SERVICE...3 DPH-140S PACKAGE CONTENT...3 DEVICE PHYSICAL CONNECTION...4 ACCESS TO THE DEVICE...6 Accesso to the IP Phone when
P-2302HWUDL-P1. Quick Start Guide. 802.11g Wireless VoIP Station Gateway. with Built-in DECT Base Station
 P-2302HWUDL-P1 802.11g Wireless VoIP Station Gateway with Built-in DECT Base Station Quick Start Guide Version 3.60 Edition 1 3/2007 Overview The P-2302HWUDL-P1 model is a router with IEEE 802.11g wireless
Polycom KIRK Wireless Server 6000. Installation and Configuration Guide. 14168000 Version 3.0
 Polycom KIRK Wireless Server 6000 Installation and Configuration Guide 14168000 Version 3.0 KIRK Wireless Server 6000 Installation and Configuration Guide Copyright Polycom, Inc. All Rights Reserved Catalog
Mediatrix Gateway 440x Series Quick Configuration Guide
 Mediatrix Gateway 440x Series Quick Configuration Guide All BRI Mediatrix gateways are pre-configured on ETH1 port with DHCP and ETH2 port with static IP 192.168.0.10. All PRI Mediatrix gateways are pre-configured
SOYO G668 VOIP IP PHONE USER MANUAL
 SOYO G668 VOIP IP PHONE USER MANUAL Inglos Networks Industrial Global Solutions Teléfono: +1 (585) 217-9864, Fax: + 1 (585) 872-9627, Email: jmesen@inglos.com Table of Content SAFETY INFORMATION... 1 INTRODUCTION...
Broadband Phone Gateway BPG510 Technical Users Guide
 Broadband Phone Gateway BPG510 Technical Users Guide (Firmware version 0.14.1 and later) Revision 1.0 2006, 8x8 Inc. Table of Contents About your Broadband Phone Gateway (BPG510)... 4 Opening the BPG510's
Wireless VoIP Phone User s Manual
 Wireless VoIP Phone User s Manual Table of Contents Chapter 1 Overview of the WiFi phone... 5 1.1 Front Panel and Keypad...5 1.2 Removing and Installing the Battery...7 1.3 Charging the WIFI PHONE...8
User Manual 821121-ATA-PAK
 User Manual 821121-ATA-PAK IMPORTANT SAFETY INSTRUCTIONS When using your telephone equipment, basic safety precautions should always be followed to reduce the risk of fire, electric shock and injury to
GW400 VoIP Gateway. User s Guide
 GW400 VoIP Gateway User s Guide P/N: 956YD30001 Copyright 2006. All Rights Reserved. Document Version: 1.0 All trademarks and trade names are the properties of their respective owners. i Table of Contents
Phone Adapter. with 2 Ports for Voice-over-IP. Installation and Troubleshooting Guide. Model No. PAP2 Ver. 2. Voice
 Phone Adapter with 2 Ports for Voice-over-IP Voice Installation and Troubleshooting Guide Model No. PAP2 Ver. 2 Copyright and Trademarks Specifications are subject to change without notice. Linksys is
DVG-2101SP VoIP Telephone Adapter
 This product can be set up using any current web browser, i.e., Internet Explorer 6 or Netscape Navigator 6.2.3. DVG-2101SP VoIP Telephone Adapter Before You Begin 1. If you purchased this VoIP Telephone
Quick Start Guide. Cisco SPA232D Mobility Enhanced ATA
 Quick Start Guide Cisco SPA232D Mobility Enhanced ATA Package Contents Analog Telephone Adapter Ethernet Cable Phone Cable Power Adapter Quick Start Guide Product CD-ROM Welcome Thank you for choosing
DPH-140S SIP Phone Quick User Guide
 DPH-140S SIP Phone Quick User Guide Version 1.0 TABLE OF CONTENTS 1.0 INTRODUCTION... 1 2.0 PACKAGE CONTENT... 1 3.0 LIST OF FIGURES... 2 4.0 SUMMARY OF KEY FUNCTIONS... 3 5.0 CONNECTING THE IP PHONE...
CyberData VoIP V2 Speaker with VoIP Clock Kit Configuration Guide for OmniPCX Enterprise
 CyberData VoIP V2 Speaker with VoIP Clock Kit Configuration Guide for OmniPCX Enterprise CyberData Corporation 2555 Garden Road Monterey, CA 93940 T:831-373-2601 F: 831-373-4193 www.cyberdata.net 2 Introduction
P160S SIP Phone Quick User Guide
 P160S SIP Phone Quick User Guide Version 2.2 TABLE OF CONTENTS 1.0 INTRODUCTION... 1 2.0 PACKAGE CONTENT... 1 3.0 LIST OF FIGURES... 2 4.0 SUMMARY OF KEY FUNCTIONS... 3 5.0 CONNECTING THE IP PHONE... 4
How To Program A Talkswitch Phone On A Cell Phone On An Ip Phone On Your Ip Phone (For A Sim Sim) On A Pc Or Ip Phone For A Sim Phone On Iphone Or Ipro (For An Ipro) On
 On A Pc Or Ip Phone For A Sim Phone On Iphone Or Ipro (For An Ipro) On") TALKSWITCH DOCUMENTATION ADDING IP PHONES TO TALKSWITCH RELEASE 6.50 CT.TS005.008104 ANSWERS WITH INTELLIGENCE COPYRIGHT INFORMATION Copyright 2011 Fortinet, Inc. All rights reserved. Fortinet, FortiGate,
TALKSWITCH DOCUMENTATION ADDING IP PHONES TO TALKSWITCH RELEASE 6.50 CT.TS005.008104 ANSWERS WITH INTELLIGENCE COPYRIGHT INFORMATION Copyright 2011 Fortinet, Inc. All rights reserved. Fortinet, FortiGate,
V101 SIP VoIP Telephone Adaptor User Manual V1.1m
 V101 SIP VoIP Telephone Adaptor User Manual V1.1m Quick Guide Step 1: Broadband (ADSL/Cable Modem) Connections for V101 A. Connect V101 LAN port to ADSL NAT Router as the following connection. B. Connect
NetComm V90 VoIP Phone Quick Start Guide Draft Release 0.1
 NetComm V90 VoIP Phone Quick Start Guide Draft Release 0.1 Copyright NetComm Ltd Overview NetComm V90 SIP VoIP Phone User Guide Table of Contents Overview... 3 V90 VoIP Phone Specification...4 Shipping
Opera 240 System DECT Integration. with Gigaset N720 IP PRO Base Station. and Gigaset N720 DM PRO Manager. Installation and User Guide
 Opera 240 System DECT Integration with Gigaset N720 IP PRO Base Station and Gigaset N720 DM PRO Manager Installation and User Guide Contents 1 Introduction... 3 2 To set up the Opera 240 System and the
How to add a SIP server How to register a handset
 How to add a SIP server How to register a handset Contents Contents... 1 Hardware required equipment... 2 Software required equipment... 3 Add server... 3 Register handset to base... 7 1 of 12 Hardware
Chapter 6 Using Network Monitoring Tools
 Chapter 6 Using Network Monitoring Tools This chapter describes how to use the maintenance features of your Wireless-G Router Model WGR614v9. You can access these features by selecting the items under
PLANET is a registered trademark of PLANET Technology Corp. All other trademarks belong to their respective owners.
 Trademarks Copyright PLANET Technology Corp. 2004 Contents subject to revise without prior notice. PLANET is a registered trademark of PLANET Technology Corp. All other trademarks belong to their respective
Note: these functions are available if service provider supports them.
 Key Feature New Feature Remote Maintenance: phone can be diagnosed and configured by remote. Zero Config: automated provisioning and software upgrading even through firewall/nat. Centralized Management:
KE1020A INSTALL GUIDE
 KE1020A INSTALL GUIDE Table of Contents 1 Check for Required Items...2 2 Installation Steps...2 2.1 Installation View... 2 2.2 Connection Chart to Determine Cable Types... 2 3 Ready to Use...3 3.1 Changing
Cisco SPA302D Mobility Enhanced Cordless Handset
 USER GUIDE Cisco SPA30D Mobility Enhanced Cordless Handset Contents Chapter 1: Getting Started 1 Overview 1 Understanding Your Cisco SPA30D Cisco SPA30D Display Screen 4 Turning the Handset On and Off
NF1Adv VOIP Setup Guide (for Generic VoIP Setup)
") NF1Adv VOIP Setup Guide (for Generic VoIP Setup) Configuring your NF1Adv for VOIP Service The following steps will take you through the process of setting up your VOIP connection. Step 1: Checking Computer
NF1Adv VOIP Setup Guide (for Generic VoIP Setup) Configuring your NF1Adv for VOIP Service The following steps will take you through the process of setting up your VOIP connection. Step 1: Checking Computer
Mediatrix 4404 Step by Step Configuration Guide June 22, 2011
 Mediatrix 4404 Step by Step Configuration Guide June 22, 2011 Proprietary 2011 Media5 Corporation Table of Contents First Steps... 3 Identifying your MAC Address... 3 Identifying your Dynamic IP Address...
SIP Proxy Server. Administrator Installation and Configuration Guide. V2.31b. 09SIPXM.SY2.31b.EN3
 SIP Proxy Server Administrator Installation and Configuration Guide V2.31b 09SIPXM.SY2.31b.EN3 DSG, DSG logo, InterPBX, InterServer, Blaze Series, VG5000, VG7000, IP590, IP580, IP500, IP510, InterConsole,
Chapter 6 Using Network Monitoring Tools
 Chapter 6 Using Network Monitoring Tools This chapter describes how to use the maintenance features of your RangeMax Wireless-N Gigabit Router WNR3500. You can access these features by selecting the items
Quick Installation Guide
 0, Total 18 Quick Installation Guide Sep, 2013 1, Total 18 Thank you for purchasing Enterprise High Gain Outdoor CPE. This manual will instruct you how to configure and manage this CPE, enable you to use
Wireless VoIP Phone. Table of Contents. User s Manual
 Wireless VoIP Phone User s Manual Table of Contents Chapter 1 Overview the WiFi Phone... 6 1.1 Front Panel and Keypad... 6 1.2 Removing and Installing the Battery... 8 1.4 Powering the WiFi Phone On and
NF1Adv VOIP Setup Guide (for Pennytel)
") NF1Adv VOIP Setup Guide (for Pennytel) Configuring your NF1Adv for VOIP Service The following steps will take you through the process of setting up your VOIP connection. Step 1: Checking Computer Network
NF1Adv VOIP Setup Guide (for Pennytel) Configuring your NF1Adv for VOIP Service The following steps will take you through the process of setting up your VOIP connection. Step 1: Checking Computer Network
Welcome. Unleash Your Phone
 User Manual Welcome Unleash Your Phone For assistance with installation or troubleshooting common problems, please refer to this User Manual or Quick Installation Guide. Please visit www.vonage.com/vta
6.40A AudioCodes Mediant 800 MSBG
 AudioCodes Mediant 800 MSBG Page 1 of 66 6.40A AudioCodes Mediant 800 MSBG 1. Important Notes Check the SIP 3 rd Party Validation Website for current validation status. The SIP 3 rd party Validation Website
The Gigaset SX762 WLAN dsl... 7
 First steps Contents Contents The Gigaset SX762 WLAN dsl.................. 7 Do your part for the environment (ECO)................................. 8 Local area networks with Gigaset products..................................
How to Configure the Toshiba Strata CIX for use with Integra Telecom SIP Solutions
 How to Configure the Toshiba Strata CIX for use with Integra Telecom SIP Solutions Overview: This document provides a reference for configuration of the Toshiba Strata CIX IP PBX to connect to Integra
10/2011 - English Edition 1. Quick Start Guide. NWA1100N-CE CloudEnabled Business N Wireless Access Point
 10/2011 - English Edition 1 Quick Start Guide NWA1100N-CE CloudEnabled Business N Wireless Access Point Package Contents - 1 x ZyXEL NWA1100N-CE Access Point - 2 x Detachable Antennas - 1 x Power Adapter
Chapter 1 Installing the Gateway
 Chapter 1 Installing the Gateway This chapter describes how to set up the wireless voice gateway on your Local Area Network (LAN), connect to the Internet, and perform basic configuration. For information
Applies to: F1PG200ENau Belkin Analogue Telephone Adapter (ATA) Firmware release notes
 Firmware release notes") Applies to: F1PG200ENau Belkin Analogue Telephone Adapter (ATA) Firmware release notes 1. Voice over IP registration indicator and error codes 2. Error 482 loop detected fixed. This error is caused if
Applies to: F1PG200ENau Belkin Analogue Telephone Adapter (ATA) Firmware release notes 1. Voice over IP registration indicator and error codes 2. Error 482 loop detected fixed. This error is caused if
VoIP Router TA G81022MS User Guide
 VoIP Router TA G81022MS User Guide V. 1.0 TABLE OF CONTENTS TABLE OF CONTENTS...2 1.0 INTRODUCTION...1 2.0 PACKAGE CONTENT...1 3.0 SUMMARY OF LED & CONNECTOR DESCRIPTION...2 3.1 THE FRONT LEDS...2 3.2
Installation and setup guide V 1.0
 V o I P G S M G A T E BlueGate SIP 1 Installation and setup guide V 1.0 1. General description 1.1 Technical parametres Dimensions 100 x 130 x 37 mm Weight 850 g Operating position various Operating condition
How To Set Up A Gxp280 Ip Phone On A Cell Phone On Your Computer Or Ip Phone (Siphone) On A Sim Sim Sim Or Ipro (Cell Phone) On Your Ipro Or Ipo (Cellphone) On
 On A Sim Sim Sim Or Ipro (Cell Phone) On Your Ipro Or Ipo (Cellphone) On") GXP280 Small Business IP Phone Quick Installation Guide Part Number: 9620001302A Document Version Number: 1.0 1 GXP280 IP Phone Quick Installation Guide WARNING: Please DO NOT power cycle the GXP280 when
GXP280 Small Business IP Phone Quick Installation Guide Part Number: 9620001302A Document Version Number: 1.0 1 GXP280 IP Phone Quick Installation Guide WARNING: Please DO NOT power cycle the GXP280 when
VOICE OVER IP USER S MANUAL
 VOICE OVER IP USER S MANUAL Your User Name: Your Password: Your Prefix No.: Your H323 ID: Your Extension No.: PI Gatekeeper IP Address: 4.38.32.22 i. INDEX i. INDEX..............................................................
How To Check If Your Router Is Working Properly On A Nr854T Router (Wnr854) On A Pc Or Mac) On Your Computer Or Ipad (Netbook) On An Ipad Or Ipa (Networking
 On A Pc Or Mac) On Your Computer Or Ipad (Netbook) On An Ipad Or Ipa (Networking") Chapter 7 Using Network Monitoring Tools This chapter describes how to use the maintenance features of your RangeMax NEXT Wireless Router WNR854T. These features can be found by clicking on the Maintenance
Chapter 7 Using Network Monitoring Tools This chapter describes how to use the maintenance features of your RangeMax NEXT Wireless Router WNR854T. These features can be found by clicking on the Maintenance
Konftel/ RTX SIP DECT Solution Wireless SIP Conference Phone Installation Guide
 Bundle Part#: KF300WX-VoIP (1) RTX SIP DECT Base (1) Konftel 300Wx Conference Phone More Information: 800-238-0787 sales@fontel.com Konftel/ RTX SIP DECT Solution Wireless SIP Conference Phone Installation
WLAN Outdoor CPE For 2.4G. Quick Installation Guide
 WLAN Outdoor CPE For 2.4G Quick Installation Guide Part I: External Installation Direction A. Check the parts in your box CPE SET 1 DC 12V/1.5A Power Adapter 1 PoE DC Injector 1 Hose Clamps 2 Manual &
CPEi 800/825 Series. User Manual. * Please see the Introduction Section
 CPEi 800/825 Series User Manual * Please see the Introduction Section Contents Introduction...iii Chapter 1: CPEi 800/825 User Guide Overview... 1-1 Powerful Features in a Single Unit... 1-2 Front of the
PA168X SIP Phone Http Setup Guide
 PA168X SIP Phone Http Setup Guide Configured by WEB... 2 Network Setting:... 3 Audio settings:... 5 Dial Plan settings:... 7 SIP Protocol Setting:... 10 Other settings:... 15 When PA168X SIP phone is properly
UIP1868P User Interface Guide
 UIP1868P User Interface Guide (Firmware version 0.13.4 and later) V1.1 Monday, July 8, 2005 Table of Contents Opening the UIP1868P's Configuration Utility... 3 Connecting to Your Broadband Modem... 4 Setting
Turn on all of your network devices and then check to see if the LEDs on the Access Point display normally as the diagram below describes.
 Connect to the Access Point with the Ethernet cable or via wireless. The default SSID of the Access Point is TP-LINK_ XXXXXX. The XXXXXX is the last 6 characters of the Access Point s MAC address. Plug
Connecting the DG-102S VoIP Gateway to your network
 Contents of Package: DG-102S VoIP Station Gateway Power adapter CD-ROM, including User s Manual Quick Install Guide Requirements: RS-232 Console Cable Two RJ-45 CAT-5 Straight-Through Cables For more information
VOIP-211RS/210RS/220RS/440S. SIP VoIP Router. User s Guide
 VOIP-211RS/210RS/220RS/440S SIP VoIP Router User s Guide Trademarks Contents are subject to revise without prior notice. All trademarks belong to their respective owners. FCC Warning This equipment has
Configuration Guide for connecting the Eircom Advantage 4800/1500/1200 PBXs to the Eircom SIP Voice platform.
 Configuration Guide for connecting the Eircom Advantage 4800/1500/1200 PBXs to the Eircom SIP Voice platform. 1 Contents Introduction.... 3 Installing the Applications Module... 4 Ordering a Licence for
GXP-2020 6-line SIP Enterprise Phone Quick Installation Guide
 1 GXP-2020 6-line SIP Enterprise Phone Quick Installation Guide WARNING: Please DO NOT power cycle the GXP-2020 when LED lights are flashing during system boot up or firmware upgrade. You may corrupt firmware
Link Link sys E3000 sys RE1000
 User Guide High Performance Extender Wireless-N Router Linksys Linksys RE1000 E3000Wireless-N Table of Contents Contents Chapter 1: Product Overview 1 Front 1 Top 1 Bottom 1 Back 2 Chapter 2: Advanced
Front LEDs... 2 Rear Ports... 3 BASIC INSTALLATION... 4 Connecting Your Router... 5 Network Configuration... 6
 0 P a g e Table of contents Front LEDs... 2 Rear Ports... 3 BASIC INSTALLATION... 4 Connecting Your Router... 5 Network Configuration... 6 Gateway Configuration... 11 Accessing your gateway... 11 Displaying
Voice Gateway with Router
 Voice User Guide Model No. SPA3102 Copyright and Trademarks Specifications are subject to change without notice. Linksys is a registered trademark or trademark of Cisco Systems, Inc. and/or its affiliates
Quick Start Guide. RV 120W Wireless-N VPN Firewall. Cisco Small Business
 Quick Start Guide Cisco Small Business RV 120W Wireless-N VPN Firewall Package Contents Wireless-N VPN Firewall Ethernet Cable Power Adapter Quick Start Guide Documentation and Software on CD-ROM Welcome
How To Set Up A 9339 Voip Phone For The First Time
 Interquartz 9339HS VoIP Phone Quick Start User Guide Rev 3a 1/16 9339HS VoIP Phone Quick Start Up Guide The 9339HS VoIP (Voice over Internet Protocol) Phone provides a cost-saving solution for small business/home
BiPAC 7404V series. VoIP/(802.11g) ADSL2+ (VPN) Firewall Router. Quick Start Guide
 ADSL2+ (VPN) Firewall Router. Quick Start Guide") BiPAC 7404V series VoIP/(802.11g) ADSL2+ (VPN) Firewall Router Quick Start Guide VoIP/(802.11g) ADSL2+ (VPN) Firewall Router For more detailed instructions on configuring and using the Billion VoIP/(802.11g)
BiPAC 7404V series VoIP/(802.11g) ADSL2+ (VPN) Firewall Router Quick Start Guide VoIP/(802.11g) ADSL2+ (VPN) Firewall Router For more detailed instructions on configuring and using the Billion VoIP/(802.11g)
Assign a static IP address 192.168.1.100 for your computer. Please refer to the T3 in Troubleshooting guide if you need assistance.
 Assign a static IP address 192.168.1.100 for your computer. Please refer to the T3 in Troubleshooting guide if you need assistance. Connect to the Access Point with the Ethernet cable or via wireless.the
Home Wi-Fi Gateway Instructions
 Home Wi-Fi Gateway Instructions 1. Connect the gateway. Use the coaxial cable provided by BendBroadband to connect the cable port (A) to your cable outlet. 2. Connect your computer to the cable modem gateway
How to configure Linksys SPA 941 942 for VOIP Connections
 How to configure Linksys SPA 941 942 for VOIP Connections Congratulations. Welcome to VOIP Connections family. 1.) Connect the phone properly. Make sure the phone is connected securely to your router or
Chapter 1 Configuring Basic Connectivity
 Chapter 1 Configuring Basic Connectivity This chapter describes the settings for your Internet connection and your wireless local area network (LAN) connection. When you perform the initial configuration
Quick Start Guide v1.0
 Quick Start Guide v1.0 Table of contents : 01. Quick Start Guide...03 O2. Configuring your VoIPOffice appliance...14 03. Adding a VoIPtalk trunk...21 04. Configuring UADs for use with VoIPOffice...25 05.
How To Check If Your Router Is Working Properly
 Chapter 6 Using Network Monitoring Tools This chapter describes how to use the maintenance features of your RangeMax Dual Band Wireless-N Router WNDR3300. You can access these features by selecting the
Quick set-up instructions for. The Avois AV-3500 IP Phone
 Solwise Ltd. Quick set-up instructions for The Avois AV-3500 IP Phone www.solwiseforum.co.uk The Solwise Forum is designed to be the first port-of-call for technical support and sales advice for the whole
3.5 EXTERNAL NETWORK HDD. User s Manual
 3.5 EXTERNAL NETWORK HDD User s Manual Table of Content Before You Use Key Features H/W Installation Illustration of Product LED Definition NETWORK HDD Assembly Setup the Network HDD Home Disk Utility
VOI-7000 VOI-7100 SIP IP Telephone
 VOI-7000 VOI-7100 SIP IP Telephone User Manual 1 Ver 2.01-0609 Table of Contents 1. INTRODUCTIONS... 1 1.1. FEATURES... 1 1.2. PACKING CONTENTS... 2 1.3. LCD DISPLAY AND KEYPADS... 2 2. INSTALLATIONS &
IP PBX. SD Card Slot. FXO Ports. PBX WAN port. FXO Ports LED, RED means online
 1 IP PBX SD Card Slot FXO Ports PBX LAN port PBX WAN port FXO Ports LED, RED means online 2 Connect the IP PBX to Your LAN Internet PSTN Router Ethernet Switch FXO Ports 3 Access the PBX s WEB GUI The
Hands-on MESH Network Exercise Workbook
 Hands-on MESH Network Exercise Workbook Santa Clara County RACES Date: 18 March 2015 Version: 1.0 scco_wifi_intro_exonly_v150318.docx 1 Table of Contents HANDS ON! Exercise #1: Looking at your Network
NeoGate TA Series Quick Installation Guide
 NeoGate TA Series Quick Installation Guide Version: V1.1 Yeastar Technology Co., Ltd. Date: November 18, 2014 http://www.yeastar.com 1/15 Contents NeoGate TA Series Quick Installation Guide 1. Preparation
How To Set Up A Computer With A Network Connection On A Cdrom 2.5 (For A Pc) Or Ipad (For Mac) On A Pc Or Mac Or Ipa (For Pc) On An Ipad Or Ipro (
 Or Ipad (For Mac) On A Pc Or Mac Or Ipa (For Pc) On An Ipad Or Ipro (") Connect the supplied power-adapter to the power inlet port and connect it to a wall outlet. Then, the router automatically enters the self-test phase. During self-test phase, RNX-EasyN400 s Power LED will
Connect the supplied power-adapter to the power inlet port and connect it to a wall outlet. Then, the router automatically enters the self-test phase. During self-test phase, RNX-EasyN400 s Power LED will
1 Serial RS232 to Ethernet Adapter Installation Guide
 Installation Guide 10/100 Mbps LED (amber color ) Link/Activity LED (green color ) 1. Introduction Thank you for purchasing this 1-port RS232 to Ethernet Adapter (hereinafter referred to as Adapter ).
How To Use A Modem On A Pc Or Mac Or Ipad (For A Laptop)
") CLEAR MODEM with Wi-Fi USER GUIDE GET TO KNOW YOUR CLEAR MODEM WITH WI-FI 3 WHAT S IN THE BOX? 3 INFORMATIVE LED INDICATORS 3 USE WITH CARE 3 SET UP THE MODEM 4 PLACE THE MODEM ON A FLAT, STABLE SURFACE
CLEAR MODEM with Wi-Fi USER GUIDE GET TO KNOW YOUR CLEAR MODEM WITH WI-FI 3 WHAT S IN THE BOX? 3 INFORMATIVE LED INDICATORS 3 USE WITH CARE 3 SET UP THE MODEM 4 PLACE THE MODEM ON A FLAT, STABLE SURFACE
NF3ADV VoIP Setup Guide (for TPG)
") NF3ADV VoIP Setup Guide (for TPG) Configuring your NF3ADV for TPG VoIP The following steps will take you through the process of setting up your VoIP connection. This guide assumes that the NF3ADV already
NF3ADV VoIP Setup Guide (for TPG) Configuring your NF3ADV for TPG VoIP The following steps will take you through the process of setting up your VoIP connection. This guide assumes that the NF3ADV already
2 Setting Up the Hardware for a Wired Ethernet Network... 13. 3 Setting Up the Software for an Ethernet Network... 21
 Contents 1 Networking Basics............................................... 1 Selecting a network connection........................................ 2 Wired Ethernet network...........................................
VP301 SIP. VoIP Phone. User Manual. V1.1p
 VP301 SIP VoIP Phone User Manual V1.1p Quick Guide Step 1: Broadband (ADSL/Cable Modem) Connections for VP301 A. Connect VP301 RJ45 WAN port to ADSL NAT Router as the following connection. B. Connect VP301
NetLINE Wireless Broadband Gateway
 NetLINE Setup Guide Farallon s NetLINE connects to your cable/dsl modem, allowing computers on your local wired and wireless networks to share a single broadband connection to the Internet. This Setup
3CX PBX v12.5. SIP Trunking using the Optimum Business Sip Trunk Adaptor and the 3CX PBX v12.5
 SIP Trunking using the Optimum Business Sip Trunk Adaptor and the 3CX PBX v12.5 Table of Contents 1. Overview 3 2. Prerequisites 3 3. PBX Configuration 3 4. Creating Extensions 4 5. VoIP Provider Setup
Setup Reference guide
 Setup Reference guide for KX-NS1000 to E1 PRI/R2 Gateway interconnection Panasonic PBX (KX-NS1000 series), Media5 Digital Gateway 3631(Mediatrix 3000 series) Revision 0.2(PSNJ) October.14, 2012 Attention:
VoIP Telephone Adapter User s Manual
 VoIP Telephone Adapter User s Manual Last Update: 2008/10/10 1 Introduction...3 1.1 Product Overview (Single Phone Port Model)...3 1.2 Product Overview (Dual Phone Port Model)...4 2 IVR Interface for TA...6
Quick Start Guide. Cisco SPA100 Series Analog Telephone Adapters. SPA112 Two Port Phone Adapter SPA122 ATA with Router
 Quick Start Guide Cisco SPA100 Series Analog Telephone Adapters SPA112 Two Port Phone Adapter SPA122 ATA with Router Package Contents Analog Telephone Adapter Ethernet Cable Power Adapter Quick Start Guide
Voice Over Internet Protocol (VoIP) Configuration
 Configuration") (VoIP) Configuration ENGINEERING REPORT No: 02-003 Introduction This report describes interfacing the IPCS VoIP Gateway Model EGW-902 to an ESTeem Model 192E Wireless Ethernet radio modem in a demonstration
(VoIP) Configuration ENGINEERING REPORT No: 02-003 Introduction This report describes interfacing the IPCS VoIP Gateway Model EGW-902 to an ESTeem Model 192E Wireless Ethernet radio modem in a demonstration
MyPBX U100 & U200 Installation Guide
 MyPBX U100 & U200 Installation Guide Version: V1.0 Yeastar Technology Co., Ltd Date: 25 th February, 2013 http://www.yeastar.com 1/14 Contents MyPBX U100 & U200 Installation Guide 1. PREPARATION BEFORE
Assign a static IP address 192.168.1.100 for your computer. Please refer to the T3 in Troubleshooting guide if you need assistance.
 Note The product model shown in this QIG is TL-WA701ND, as an example. Assign a static IP address 192.168.1.100 for your computer. Please refer to the T3 in Troubleshooting guide if you need assistance.
Linksys Gateway SPA2100-SU Manual
 Linksys Gateway SPA2100-SU Manual Manuel de l'utilisateur Table of Contents Looking for Basic Setup Instructions?... 3 Most Recent Version of this Manual... 3 Advanced Setup Instructions... 4 Wiring Your
THINKTEL COMMUNICATIONS CUDATEL PHONE SYSTEM 270. High Availability and SIP-TRUNK Configuration
 THINKTEL COMMUNICATIONS CUDATEL PHONE SYSTEM 270 High Availability and TABL E OF CO NTENTS 1.1 CONFIGURING TELEPHONE SERVICE PROVIDER (THINKTEL)... 3 1.2 OUTBOUND CALL ROUTING... 5 1.3 INBOUND CALL FROM
Link Gate SIP. (Firmware version 1.20)
") Link Gate SIP (Firmware version 1.20) User guide v1.0 1 Content 2 1. Technical parameters - Dimensions 133 x 233 x 60 mm - Weight 850 g - Operating position various - Operating condition temperature: +5
Link Gate SIP (Firmware version 1.20) User guide v1.0 1 Content 2 1. Technical parameters - Dimensions 133 x 233 x 60 mm - Weight 850 g - Operating position various - Operating condition temperature: +5
IP Telephony. User Guide. System SPA9000. Model No. Voice
 IP Telephony System User Guide Voice Model No. SPA9000 Copyright and Trademarks Specifications are subject to change without notice. Linksys is a registered trademark or trademark of Cisco Systems, Inc.
ICE 008 IP PBX. 1. Product Information. 1.1. New Mini PBX. 1.2. Features 1.2.1. System Features
 1. Product Information 1.1. New Mini PBX ICE 008 IP PBX ICE008 is new generation office communication equipment that delivers traditional PBX (private branch exchange) functions and more with advanced
Linksys WAP300N. User Guide
 User Guide Contents Contents Overview Package contents 1 Back view 1 Bottom view 2 How to expand your home network 3 What is a network? 3 How to expand your home network 3 Where to find more help 3 Operating
UBIQUITI BRIDGE CONFIGURATION PROCEDURE (PowerStation & NanoStation Units ONLY)
") UBIQUITI BRIDGE CONFIGURATION PROCEDURE (PowerStation & NanoStation Units ONLY) Hardware Installation 1. Initial placement for programming and configuration purposes should be performed in an indoor environment.
UBIQUITI BRIDGE CONFIGURATION PROCEDURE (PowerStation & NanoStation Units ONLY) Hardware Installation 1. Initial placement for programming and configuration purposes should be performed in an indoor environment.
Quick & Easy Set-Up of Packet8 Internet Phone Service
 For the Way You Live & Work Quick & Easy Set-Up of Packet8 Internet Phone Service Welcome to Packet8 Internet Phone Service. Soon, you ll be able to make all your calls over the Internet and save a bundle
IP101 VoIP Phone. User Manual
 IP101 VoIP Phone User Manual 1 Introduction...3 1.1 Hardware Overview...3 1.2 Software Overview...4 2 Setup the IP Phone system by using keypad...4 2.1 Keypad Description...4 2.2 Keypad Function and Setting
Quick Start Guide. WRV210 Wireless-G VPN Router with RangeBooster. Cisco Small Business
 Quick Start Guide Cisco Small Business WRV210 Wireless-G VPN Router with RangeBooster Package Contents WRV210 Router Ethernet Cable Power Adapter Product CD-ROM Quick Start Guide Welcome Thank you for
Configuring the CyberData VoIP 4-Port Zone Controller with Audio Out
 NetVanta Unified Communications Technical Note Configuring the CyberData VoIP 4-Port Zone Controller with Audio Out Introduction The CyberData Voice over Internet Protocol (VoIP) zone controller enables
Contents. Section A Networking Basics... 1. 1 Learning the Basics... 3. Section B Wired Ethernet Networking... 17
 Contents Section A Networking Basics...................................... 1 1 Learning the Basics............................................. 3 Selecting a network connection........................................
WLAN600 Wireless IP Phone Administrator s Guide
 WLAN600 Wireless IP Phone Administrator s Guide Trademark Acknowledgement All brand names are trademarks or registered trademarks of their respective companies. Disclaimer This document is supplied by