How to configure VPN function on TP-LINK Routers
|
|
|
- Annabella Watson
- 8 years ago
- Views:
Transcription
1 How to configure VPN function on TP-LINK Routers 1. VPN Overview How to configure LAN-to-LAN IPsec VPN on TP-LINK Router How to configure GreenBow IPsec VPN Client with a TP-LINK VPN Router How to configure Shrew Soft VPN IPsec Client with TP-LINK Router How to configure LAN-to-LAN L2TP/PPTP VPN on TP-LINK Router How to configure a PPTP Server on TP-LINK Router How to configure a L2TP Server on TP-LINK Router

2 1. VPN Overview VPN (Virtual Private Network) is a private network established via the public network, generally via the Internet. However, the private network is a logical network without any physical network lines, so it is called Virtual Private Network. With the wide application of the Internet, more and more data are needed to be shared through the Internet. Connecting the local network to the Internet directly, though can allow the data exchange, will cause the private data to be exposed to all the users on the Internet. The VPN (Virtual Private Network) technology is developed and used to establish the private network through the public network, which can guarantee a secured data exchange. VPN adopts the tunneling technology to establish a private connection between two endpoints. It is a connection secured by encrypting the data and using point-to-point authentication. As the packets are encapsulated and de-encapsulated in the Router, the tunneling topology implemented by encapsulating packets is transparent to users. The tunneling protocols supported by TP-LINK Routers are as below: Product Model TL-ER6120 TL-ER6020 TL-ER604W TL-R600VPN Tunneling Protocol IPsec PPTP L2TP IPsec PPTP L2TP IPsec PPTP L2TP IPsec PPTP 2

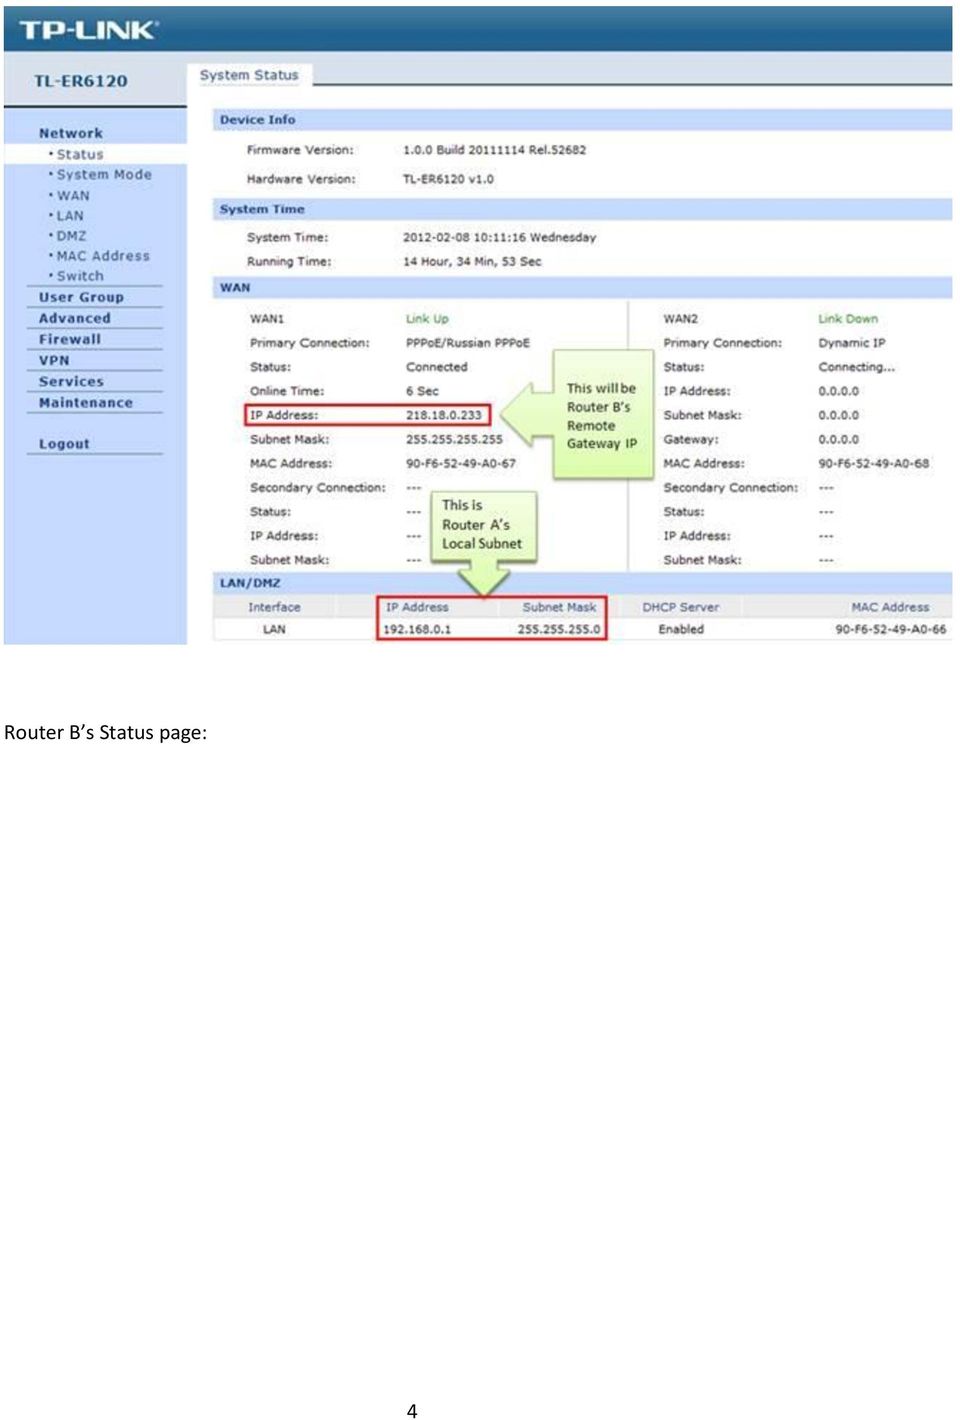
3 2. How to configure LAN-to-LAN IPsec VPN on TP-LINK Router Suitable for: TL-ER6120, TL-ER6020, TL-ER604W, TL-R600VPN To setup an IPsec VPN tunnel on TP-LINK routers you need to perform the following steps: A. Connecting the devices together B. Verify the settings needed for IPsec VPN on router C. Configuring IPsec VPN settings on TL-ER6120 (Router A) D. Configuring IPsec VPN settings on TL-R600VPN (Router B) E. Checking IPsec SA NOTE: We use TL-ER6120 and TL-R600VPN in this example, the way to configure IPsec VPN on TL-ER6020/TL-ER604W is the same as that on TL-ER6120. A. Connecting the devices together Before setup a VPN tunnel, you need to ensure that the two routers are connected to the Internet. After ensuring that there is an active Internet connection on each router, you need to verify the VPN settings of the two routers, please follow the instruction below. B. Verify the settings needed for IPsec VPN on router To verify the settings needed on the two routers, please login the router s management webpage. Router A s Status page: 3

4 Router B s Status page: 4
5 C. Configuring IPsec VPN settings on TL-ER6120 (Router A) Step 1 : On the management webpage, click on VPN then IKE Proposal. Under IKE Proposal, enter Proposal Name whatever you like, select Authentication, Encryption and DH Group, we use MD5,3DES, DH2 in this example. Step 2 : Click on Add. 5

6 Step 3 : Click on IKE Policy, enter Policy Name whatever you like, select Exchange Mode, in this example we use Main, select IP Address as ID Type. Step 4 : Under IKE Proposal 1, we use test1 in this example. Enter Pre-shared Key and SA Lifetime you want, DPD is disabled. Step 5 : Click on Add. Step 6 : Click on IPsec on the left menu, then IPsec Proposal. Select Security Protocol, ESP Authentication and ESP Encryption you want to enable on VPN tunnel. Here we use ESP, MD5 and 3DES for example. 6

7 Step 7 : Click on Add. Step 8 : Click on IPsec Policy, enter Policy Name whatever you like, the Mode should be LANto-LAN. Enter Local Subnet and Remote Subnet. Step 9 : Select WAN you use and type in Remote Gateway. In this example, the Remote Gateway is Router B s WAN IP address, Step 10 : Look for Policy Mode and select IKE. Step 11 : Under IKE Policy, we select test1 which is used. Step 12 : Under IPsec Proposal, we use ipsec1 in this example. 7

8 Step 13 : Look for PFS, we set NONE here, under SA Lifetime, enter or the period you want. Step 14 : Look for Status then select Activate Step 15 : Click on Add. Step 16 : Select Enable then click on Save. 8

9 D. Configuring IPsec VPN settings on TL-R600VPN (Router B) Step 1 : Go to IPsec VPN -> IKE, click on Add New Step 2 : Enter Policy Name whatever you like, here we use test2. Exchange Mode, select Main. Step 3 : Authentication Algorithm and Encryption Algorithm are the same with Router A, we use MD5 and 3DES in this example. 9

10 Step 4 : DH Group, select DH2, the same with Router A. Step 5 : Enter Pre-share Key and SA Lifetime, make sure that they are the same with Router A. Step 6 : Click on Save. Step 7 : Click on IPsec on left side, click on Add New. Step 8 : Enter Policy Name, we use ipsec2 in this example. Step 9 : Enter Local Subnet and Remote Subnet, and then enter Remote Gateway, it s Router A s WAN IP address,

11 Step 10 : Look for Exchange mode, please select IKE, and Security Protocol, we use ESP here. Step 11 : Authentication Algorithm and Encryption Algorithm are the same with Router A, we use MD5 and 3DES in this example. Step 12 : IKE Security Policy, we use test2 in this example. Step 13 : Look for PFS, we set NONE here, under Lifetime, enter or the period you want. Step 14 : Look for Status then select Enable. Step 15 : Click on Save. Step 16 : Enable IPsec and then click on Save. E. Checking IPsec SA Router A: Router B: 11

12 12

13 3. How to configure GreenBow IPsec VPN Client with a TP-LINK VPN Router Suitable for: TL-ER6120, TL-ER6020, TL-ER604W GreenBow IPsec VPN Client is an IPsec VPN client software developed by TheGreenBow company. It can be downloaded from download page for TL-ER6120 ( or official website of TheGreenBow ( services.html ). To setup an IPsec VPN tunnel between the GreenBow IPsec VPN Client and the TP-LINK VPN Router you need to perform the following steps: A. Make sure PCs of two sides can access to Internet B. Configuring the TP-LINK VPN Router C. Configuring the GreenBow VPN Client A. Make sure PCs of two sides can access to Internet Before setup a VPN tunnel, you need to ensure that PCs of two sides are connected to the Internet. After ensuring that there is an active Internet connection on each side, you need to verify the VPN settings of the two sides, please follow the instruction below. B. Configuring the TP-LINK VPN Router Step 1: Access the router s management webpage, verify the settings needed on the router. 13

14 Step 2: On the management webpage, click on VPN then IKE Proposal. Under IKE Proposal, enter Proposal Name whatever you like, select Authentication, Encryption and DH Group, we use MD5, 3DES, DH2 in this example. Step 3: Click on IKE Policy, enter Policy Name whatever you like, select Exchange Mode, in this example we use Main, select FQDN as ID Type and enter Local ID and Remote ID whatever you like, here we enter 1234 for Local ID and 4321 for Remote ID. 14

15 NOTE: No matter on Main mode or Aggressive mode, once the client PC is behind a NAT device, we have to select FQDN as ID Type and the NAT device must support VPN passthrough, otherwise the VPN tunnel can t be established. Step 4: Under IKE Proposal 1, we select 1 in this example. Enter Pre-shared Key and SA Lifetime you want, DPD is disabled. Step 5: Click on IPsec on the left menu, then IPsec Proposal. Select Security Protocol, ESP Authentication and ESP Encryption you want to enable on VPN tunnel. Here we use ESP, MD5 and 3DES for example. 15

16 Step 6: Click on IPsec Policy, enter Policy Name whatever you like, the Mode should be Client-to- LAN. Enter Local Subnet and select WAN port. Step 7: Look for Policy Mode and select IKE. Under IKE Policy, we select 123 which is used. Under IPsec Proposal, we use 123 in this example. 16

17 Step 8: Look for PFS, we set NONE here, under SA Lifetime, enter or the period you want. Look for Status then select Activate. Step 9: Enable IPsec and then click on Save. C. Configuring the GreenBow VPN Client Step 1: Right click on VPN Configuration and click on New Phrase 1. Step 2: 17

18 Under Remote Gateway, enter the router s WAN IP address, the Pre-shared Key should be the same with router s, it is on IKE section, the Encryption, Authentication and Key Group are the same with router s, we use 3DES, MD5and DH2 here. Step 3: Go to Advanced tab, select DNS as Type of ID, and then enter 4321 for Local ID and 1234 for Remote ID. 18

19 Step 4: Right click on Phase 1, add a new phrase 2. 19

20 Step 5: Enter remote LAN address and Subnet mask, in the example, the IP address is , Subnet mask is Encryption and Authentication are the same with routers; we use 3DES and MD5 here. The Mode should be Tunnel. 20

21 Step 6: Click Save and Apply and then right click on Phrase 2(Tunnel), click on Open Tunnel. 21
22 Step 7: If the client connect to the VPN Server successfully, you can see IPsec SA on the list. 22
23 4. How to configure Shrew Soft VPN IPsec Client with TP-LINK Router Suitable for: TL-ER6120, TL-ER6020, TL-ER604W Shrew Soft VPN IPsec Client is an VPN Client software developed by Shrew Soft Inc. It can be downloaded from official website of Shrew Soft ( To set up an IPsec VPN tunnel, you need to perform the following steps: A. Make sure PCs of two sides can access to Internet B. Configuring IPsec VPN settings on TL-ER6120 C. Configuring the Shrew VPN Client A. Make sure PCs of two sides can access to Internet Before setup a VPN tunnel, you need to ensure that PCs of two sides are connected to the Internet. After ensuring that there is an active Internet connection on each side, you need to verify the VPN settings of the two sides, please follow the instruction below. B. Configuring IPsec VPN settings on TL-ER6120 Step 1: Access the router s management webpage; verify the settings needed on the router. 23
24 Step 2: On the management webpage, click on VPN then IKE Proposal. Under IKE Proposal, enter Proposal Name whatever you like, select Authentication, Encryption and DH Group, we use MD5, 3EDS, DH2 in this example. Click on Add. Step 3: Click on IKE Policy, enter Policy Name whatever you like, we select Aggressive for Exchange Mode, select FQDN as ID Type and enter Local ID whatever you like, here we enter 123 for Local ID and 321 for Remote ID. 24
25 NOTE: No matter on Main mode or Aggressive mode, once the client PC is behind a NAT device, we have to select FQDN as ID Type and the NAT device must support VPN passthrough, otherwise the VPN tunnel can t be established. Step 4: Under IKE Proposal 1, we select test in this example. Enter Pre-shared Key and SA Lifetime you want, DPD is disabled. Click on Add. Step 5: Click on IPsec on the left menu, then IPsec Proposal. Select Security Protocol, ESP Authentication and ESP Encryption you want to enable on VPN tunnel. Here we use ESP, MD5 and 3DES for example. Click on Add. 25
26 Step 6: Click on IPsec Policy, enter Policy Name whatever you like, the Mode should be Client-to-LAN. Enter Local Subnet and select WAN port. 26
27 Step 7: Look for Policy Mode and select IKE. Under IKE Policy, we select ike which is used. Under IPsec Proposal, we use test in this example. Step 8: Look for PFS, we set NONE here, under SA Lifetime, enter or the period you want. Look for Status then select Activate. Step 9: Enable IPsec and then click on Add. C. Configuring the Shrew VPN Client Step 1: Click on Add. Under Host Name or IP Address, enter the TL-ER6120 s WAN IP address, select disable for Auto Configuration. Under Address Method, we select Using an existing adapter and current address. Step 2: Click on Name Resolution on the top menu, don t tick the Enable WINS and Enable DNS. 27
28 Step 3: Click on Authentication on the top menu, select Mutual PSK as Authentication. Under Identification Type, select Fully Qualified Domain Name and enter 321 for FQDN String. Step 4: Click on Remote Identity, select Fully Qualified Domain Name as Identification Type and enter 123 for FQDN String. 28
29 Step 5: Click on Credentials, the Pre Shared Key, should be the same as the Pre-shared Key on the TL-ER6120, it s
30 Step 6: Click on Phase 1, under the Proposal Parameters, the Exchange Type, DH Exchange, Cipher Algorithm, and Hash Algorithm are the same with TL-ER6120 s, we use aggressive, group 2, 3des, md5 here. Step 7: Click on Phase 2, under the Proposal Parameters, the Transform Algorithm, HMAC Algorithm are the same with TL-ER6120 s we use esp-3des, md5 here. PFS Exchange and Compress Algorithm are disabled. 30
31 Step 8: Click on Policy, don t tick Obtain Topology Automatically or Tunnel All. Then click on Add. Step 9: Select Include as Type, enter the TL-ER6120 s LAN Subnet Address and Subnet Mask, it s , Then click on OK and Save. 31
32 Step 10: Click on Connect. Step 11: Click on Connect. Step 12: After Shrew Soft VPN show tunnel enabled as the followings, you need ping TL- ER6120 LAN IP. 32

33 Step 13: If client connect to the VPN Server successfully, you can see IPsec SA on the list. 33
34 5. How to configure LAN-to-LAN L2TP/PPTP VPN on TP-LINK Router Suitable for: TL-ER6120, TL-ER6020, TL-ER604W LAN-to-LAN L2TP/PPTP VPN connection is established between two VPN routers. To configure LAN-to-LAN L2TP/PPTP VPN on TL-LINK Routers, please follow the instructions below: A. Connecting the devices together B. Verify the settings needed for L2TP/PPTP VPN on Router C. Configuring a L2TP/PPTP Server on TP-LINK router(router A) D. Configuring a L2TP/PPTP Client on TP-LINK router(router B) NOTE: We give the guide to configure LAN-to-LAN PPTP VPN in this example, the way to configure LAN-to-LAN L2TP VPN is similar. If the TP-LINK Router configured as PPTP Server is behind a NAT device, Virtual Server or DMZ should be configured on the NAT device, otherwise the VPN tunnel can t be established. A. Connecting the devices together Before setup a VPN tunnel, you need to ensure that the two routers are connected to the Internet. After ensuring that there is an active Internet connection on each router, you need to verify the VPN settings of the two routers, please follow the instruction below. B. Verify the settings needed for PPTP VPN on Router Router A s Status Page: 34
35 Router B s Status Page: 35
 The IP addresses in the IP Address Pool can only be in the same subnet with the VPN router s LAN port in the latest firmware, and in the earlier version")
36 C. Configuring a PPTP Server on TP-LINK router Step 1 : Access Router A s management page, click on VPN->L2TP/PPTP->IP Address Pool, enter Pool Name and IP Address Range, and then click on Add. Enter pool name Click on Add NOTE: 1) The IP addresses in the IP Address Pool can only be in the same subnet with the VPN router s LAN port in the latest firmware, and in the earlier version firmware, IP Address pool must be in the different subnet with the VPN router s LAN IP address range. 2) If the IP addresses in the IP Address Pool is in the same subnet with the VPN router s LAN port, the remote VPN clients can directly access the Internet. It s recommended that the IP address range in the IP Address Pool do not overlap with the one in the local DHCP IP address pool. If not in the same subnet, it must configure an extra multi-nets NAT entry. Only in this way, the remote VPN clients can access the Internet via the VPN router in the headquarters. The following contents will respectively introduce the two situations. In the Same Subnet 1) Configure the IP Address Pool of access router A as step 1. 2) Keep using the default gateway on remote network on clients, as the steps in the following picture. 36
37 In the Different Subnet 1) Configure the IP Address Pool of access router A as step 1. Enter pool name Click on Add 2) Choose the menu Advanced NAT Multi-Nets NAT to enter the Subnet/Mask and select the Status Activate. 37
38 Enter subnet and mask Click on Add 3) Keep using the default gateway on remote network on clients. Step 2 : Go to L2TP/PPTP Tunnel, look for protocol, select PPTP; the Mode should be Server. DNS setting is not necessary, it can be kept as default Click on Save Enter Account Name and Password Click on Add Select LAN-to-LAN Enter Router B s local subnet Step 3 : Enter Account Name and Password whatever you like, here we use pptp as account name, password is pptp. Step 4 : Under Tunnel, select LAN-to-LAN. Step 5 : Under IP Address Pool, select VPN we have added before. 38
39 Step 6 : Under Remote Subnet, enter Router B s local subnet, we enter /24 in this example. Step 7 : Look for Status, select Active. Step 8 : Click on Add and then click on Save. Note: 1) If the IP addresses in the IP Address Pool is not in the same subnet with the Router A s LAN port, the IP address Pool here should choose PPTP2_Dialup_User. 2) In the latest firmware of TP-LINK router, the Enable VPN-to-Internet button is removed and the VPN feature is enabled by default. 3) DNS setting is not necessary and it can be kept as default. The default IP is , which means the LAN IP of the router is used as the DNS server address. Or you can enter the well-known DNS server. D. Configuring a PPTP client on TP-LINK Router Step 1 : Access Router B s management page, go to L2TP/PPTP Tunnel, look for protocol, select PPTP; the Mode should beclient. Step 2 : Enter pptp as Account Name and pptp as Password. Click on Save Enter Account Name and Password Click on Add Enter Router A s IP Enter Router A s local subnet Step 3 : Under Server IP, enter Router A s IP address, which is
40 Step 4 : Under Remote Subnet, enter Router B s local subnet, we enter /24 in this example. Step 5 : Look for Status, select Active. Step 6 : Click on Add and then click on Save. Step 7: If the PPTP tunnel is established successfully, you can check it on List of Tunnel. Also, PC within the local subnet of Router B, can ping Router A s LAN IP ( ). 40
41 6. How to configure a PPTP Server on TP-LINK Router Suitable for: TL-ER6120, TL-ER6020, TL-ER604W PPTP (Point to Point Tunneling Protocol) Server is used to create a VPN connection for remote clients. To configure PPTP Server on TP-LINK router, please follow the instructions below: A. Make sure PCs of two sides can access to Internet B. Configuring a PPTP Server on TP-LINK router C. Configuring PPTP client on remote PC (Windows 7) NOTE: If the TP-LINK Router is behind a NAT device, Virtual Server or DMZ should be configured on the NAT device, otherwise the VPN tunnel can t be established. A. Make sure PCs of two sides can access to Internet Before setup a VPN tunnel, you need to ensure that PCs of two sides are connected to the Internet. After ensuring that there is an active Internet connection on each side, you need to verify the VPN settings of the two sides, please follow the instruction below. B. Configuring a PPTP Server on TP-LINK router Step 1: Access the router s management webpage, verify the settings needed on the router. 41
42 Step 2: Click on VPN->L2TP/PPTP->IP Address Pool, enter Pool Name and IP Address Range, and then click on Add. NOTE: 1) The IP addresses in the IP Address Pool can only be in the same subnet with the VPN router s LAN port in the latest firmware, and in the earlier version firmware, IP Address pool must be in the different subnet with the VPN router s LAN IP address range. 42
43 2) If the IP addresses in the IP Address Pool is in the same subnet with the VPN router s LAN port, the remote VPN clients can directly access the Internet. It s recommended that the IP address range in the IP Address Pool do not overlap with the one in the local DHCP IP address pool. If not in the same subnet, it must configure an extra multi-nets NAT entry. Only in this way, the remote VPN clients can access the Internet via the VPN router in the headquarters. The following contents will respectively introduce the two situations. In the Same Subnet 1) Configure the IP Address Pool of access router A as step 2. 2) Keep using the default gateway on remote network on clients, as the steps in the following picture. In the Different Subnet 1) Configure the IP Address Pool of access router A as step 1. Enter pool name 43
44 Click on Add 2) Choose the menu Advanced NAT Multi-Nets NAT to enter the Subnet/Mask and select the Status Activate. Enter subnet and mask Click on Add 3) Keep using the default gateway on remote network on clients. Step 3: Look for protocol, select PPTP; the Mode should be Server. 44
45 DNS setting is not necessary, it can be kept as default Click on Save Enter Account Name and Password Click on Add Step 4: Enter Account Name and Password whatever you like, here we use client as account name, password is Step 5: Under Tunnel, select Client-to-LAN. Step 6: The tunnel supports up to 10 connections, we enter 5 in this example. Step 7: Under IP Address Pool, select group we have added before. Step 8: Look for Status, select Active. 45
46 Step 9: Click on Add and then click on Save. Note: 1) If the IP addresses in the IP Address Pool is not in the same subnet with the VPN router s LAN port, the IP address Pool here should choose PPTP2_Dialup_User. 2) In the latest firmware of TP-LINK router, the Enable VPN-to-Internet button is removed and the VPN feature is enabled by default. 3) DNS setting is not necessary and it can be kept as default. The default IP is , which means the LAN IP of the router is used as the DNS server address. Or you can enter the well-known DNS server. C. Configuring PPTP client on remote PC (Windows 7) NOTE: For remote PC to connect to PPTP server, it can use Windows built-in PPTP software or Third-party PPTP software. Step 1: Click on Start->Control Panel->Network and Internet->Network and Sharing Center. Step 2: Click on Set up a new connection or network. 46
47 Step 3: Choose Connect to a workplace, and then click on Next. 47
48 Step 4: Select Use my Internet connection (VPN) Step 5: Under Internet address field, enter router s WAN IP address, and then click on Next. 48
49 Step 6: Enter User name and Password, and then click on Create. 49
50 Step 7: The VPN connection is created and ready to use, click on Close. Step 8: Go to Network and Sharing Center and click on Change adapter settings on the left menu. Step 9: Right Click on VPN Connection and select Connect. 50
51 Step 10: Enter User name and Password and then click on Connect. Step 11: 51
52 If the PPTP tunnel is established successfully, you can check it on List of Tunnel. 52

53 7. How to configure a L2TP Server on TP-LINK Router Suitable for: TL-ER6120, TL-ER6020, TL-ER604W L2TP (Layer 2 Tunneling Protocol) Server is used to create a VPN connection for remote clients. To configure L2TP Server on TP-LINK router, please follow the instructions below: A. Make sure PCs of two sides can access to Internet B. Configuring a L2TP Server on TP-LINK router C. Configuring L2TP client on remote PC (Windows 7) NOTE: If the TP-LINK Router is behind a NAT device, Virtual Server or DMZ should be configured on the NAT device, otherwise the VPN tunnel can t be established. A. Make sure PCs of two sides can access to Internet Before setup a VPN tunnel, you need to ensure that PCs of two sides are connected to the Internet. After ensuring that there is an active Internet connection on each side, you need to verify the VPN settings of the two sides, please follow the instruction below. B. Configuring a L2TP Server on TP-LINK router Step 1: Access the router s management web page; verify the settings needed on the router. 53
54 Step 2: Click on VPN->L2TP/PPTP->IP Address Pool, enter Pool Name and IP Address Range, and then click on Add. NOTE: 1) The IP addresses in the IP Address Pool can only be in the same subnet with the VPN router s LAN port in the latest firmware, and in the earlier version firmware, IP Address pool must be in the different subnet with the VPN router s LAN IP address range. 2) If the IP addresses in the IP Address Pool is in the same subnet with the VPN router s LAN port, the remote VPN clients can directly access the Internet. It s recommended that the IP address range in the IP Address Pool do not overlap with the one in the local DHCP IP address pool. If not in the same subnet, it must configure an extra multi-nets NAT entry. 54

 Keep using the default gateway on remote network on clients, as the steps in the following picture.")
55 Only in this way, the remote VPN clients can access the Internet via the VPN router in the headquarters. The following contents will respectively introduce the two situations. In the Same Subnet 1) Configure the IP Address Pool of access router A as step 2. 2) Keep using the default gateway on remote network on clients, as the steps in the following picture. In the Different Subnet 1) Configure the IP Address Pool of access router A as step 1. Enter pool name Click on Add 2) Choose the menu Advanced NAT Multi-Nets NAT to enter the Subnet/Mask and select the Status Activate. 55
56 Enter subnet and mask Click on Add 3) Keep using the default gateway on remote network on clients. Step 3: Look for protocol, select L2TP; the Mode should be Server. DNS setting is not necessary, it can be kept as default Click on Save Enter Account Name and Password Click on Add Step 4: Enter Account Name and Password whatever you like, here we use tplinktest as account name, password is
57 Step 5: Under Tunnel, select Client-to-LAN. Step 6: The tunnel supports up to 10 connections, we enter 10 in this example. Step 7: Under Encryption, select Enable, and then enter 5678 as Pre-shared Key. Step 8: Under IP Address Pool, select test1 we have added before. Step 9: Look for Status, select Active. Step 10: Click on Add. Note: 1) If the IP addresses in the IP Address Pool is not in the same subnet with the VPN router s LAN port, the IP address Pool here should choose PPTP2_Dialup_User. 2) In the latest firmware of TP-LINK router, the Enable VPN-to-Internet button is removed and the VPN feature is enabled by default. 3) DNS setting is not necessary and it can be kept as default. The default IP is , which means the LAN IP of the router is used as the DNS server address. Or you can enter the well-known DNS server. Step 11: As we enabled Encryption, we need to go to VPN->IPsec, enable IPsec and then click on Save. 57
58 C. Configuring L2TP client on remote PC (Windows 7) NOTE: For remote PC to connect to L2TP server, it can use Windows built-in L2TP software or Third-party L2TP software. Step 1: Click on Start->Control Panel->Network and Internet->Network and Sharing Center. Step 2: Click on Set up a new connection or network. 58
59 Step 3: Choose Connect to a workplace, and then click on Next. Step 4: Select Use my Internet connection (VPN) 59
60 Step 5: Under Internet address field, enter router s WAN IP address, and then click on Next. 60
61 Step 6: Enter User name and Password, and then click on Create. Step 7: The VPN connection is created and ready to use, click on Close. 61

.")
62 Step 8: Go to Network and Sharing Center and click on Change adapter settings on the left menu. Step 9: Right Click on VPN Connection and select Properties. On the Security tab, Select Layer 2 Tunneling Protocol with IPsec (L2TP/IPsec), under Data encryption, select Require encryption (disconnect if server declines). 62
63 Step 10: Click on Advanced settings, pick Use preshared key for authentication, and then enter the key, here is

64 Step 11: Double click on VPN Connection, enter User name and Password and then click on Connect. 64
How to configure VPN function on TP-LINK Routers
 How to configure VPN function on TP-LINK Routers 1. VPN Overview... 2 2. How to configure LAN-to-LAN IPsec VPN on TP-LINK Router... 3 3. How to configure GreenBow IPsec VPN Client with a TP-LINK VPN Router...
Configuring TheGreenBow VPN Client with a TP-LINK VPN Router
 Configuring TheGreenBow VPN Client with a TP-LINK VPN Router This chapter describes how to configure TheGreenBow VPN Client with a TP-LINK router. This chapter includes the following sections: Example
Use Shrew Soft VPN Client to connect with IPSec VPN Server on RV130 and RV130W
 Article ID: 5037 Use Shrew Soft VPN Client to connect with IPSec VPN Server on RV130 and RV130W Objective IPSec VPN (Virtual Private Network) enables you to securely obtain remote resources by establishing
Using Opensource VPN Clients with Firetunnel
 This document describes how to use VPN Clients. Since the number of VPN Tunnels using PPTP is limited to 4, this is your way to connect up to 10 parallel tunnels using VPN/IPSEC technology. The method
IPsec VPN Application Guide REV: 1.0.0 1910010876
 IPsec VPN Application Guide REV: 1.0.0 1910010876 CONTENTS Chapter 1. Overview... 1 Chapter 2. Before Configuration... 2 Chapter 3. Configuration... 5 3.1 Configure IPsec VPN on TL-WR842ND (Router A)...
OvisLink 8000VPN VPN Guide WL/IP-8000VPN. Version 0.6
 WL/IP-8000VPN VPN Setup Guide Version 0.6 Document Revision Version Date Note 0.1 11/10/2005 First version with four VPN examples 0.2 11/15/2005 1. Added example 5: dynamic VPN using TheGreenBow VPN client
VPN. VPN For BIPAC 741/743GE
 VPN For BIPAC 741/743GE August, 2003 1 The router supports VPN to establish secure, end-to-end private network connections over a public networking infrastructure. There are two types of VPN connections,
Configuring IPSec VPN Tunnel between NetScreen Remote Client and RN300
 Configuring IPSec VPN Tunnel between NetScreen Remote Client and RN300 This example explains how to configure pre-shared key based simple IPSec tunnel between NetScreen Remote Client and RN300 VPN Gateway.
VPN Wizard Default Settings and General Information
 1. ProSecure UTM Quick Start Guide This quick start guide describes how to use the IPSec VPN Wizard to configure IPSec VPN tunnels on the ProSecure Unified Threat Management (UTM) Appliance. The IP security
IPSec Pass through via Gateway to Gateway VPN Connection
 IPSec Pass through via Gateway to Gateway VPN Connection 1. Connection 2 In the diagram depicted below, the left side router represents the SME200/SME100/SME50 in HQ and right side represents the PC installed
How To Set Up A Vpn Tunnel Between Winxp And Zwall On A Pc 2 And Winxp On A Windows Xp 2 On A Microsoft Gbk2 (Windows) On A Macbook 2 (Windows 2) On An Ip
 On A Macbook 2 (Windows 2) On An Ip") WINXP VPN to ZyWALL Tunneling 1. Setup WINXP VPN 2. Setup ZyWALL VPN This page guides us to setup a VPN connection between the WINXP VPN software and ZyWALL router. There will be several devices we need
WINXP VPN to ZyWALL Tunneling 1. Setup WINXP VPN 2. Setup ZyWALL VPN This page guides us to setup a VPN connection between the WINXP VPN software and ZyWALL router. There will be several devices we need
How To Configure An Ipsec Tunnel On A Network With A Network Gateways (Dfl-800) On A Pnet 2.5V2.5 (Dlf-600) On An Ipse 2.0.5 Vpn
 On A Pnet 2.5V2.5 (Dlf-600) On An Ipse 2.0.5 Vpn") - Network topology WAN IP: 9.68.0.3/4 DFL-800 LAN IP: 9.68.3./4 WAN Static IP: 9.68.0.4/4 Remote LAN Internal LAN IP: 9.68.3.0/4 DFL-600 LAN IP: 9.68../4 PC IP: 9.68.3.00/4 Internal LAN IP: 9.68..0/4 PC
- Network topology WAN IP: 9.68.0.3/4 DFL-800 LAN IP: 9.68.3./4 WAN Static IP: 9.68.0.4/4 Remote LAN Internal LAN IP: 9.68.3.0/4 DFL-600 LAN IP: 9.68../4 PC IP: 9.68.3.00/4 Internal LAN IP: 9.68..0/4 PC
Virtual Private Network and Remote Access Setup
 CHAPTER 10 Virtual Private Network and Remote Access Setup 10.1 Introduction A Virtual Private Network (VPN) is the extension of a private network that encompasses links across shared or public networks
Configure IPSec VPN Tunnels With the Wizard
 Configure IPSec VPN Tunnels With the Wizard This quick start guide provides basic configuration information about setting up IPSec VPN tunnels by using the VPN Wizard on the ProSafe Wireless-N 8-Port Gigabit
ISG50 Application Note Version 1.0 June, 2011
 ISG50 Application Note Version 1.0 June, 2011 Scenario 1 - ISG50 is placed behind an existing ZyWALL 1.1 Application Scenario For companies with existing network infrastructures and demanding VoIP requirements,
Chapter 5 Virtual Private Networking Using IPsec
 Chapter 5 Virtual Private Networking Using IPsec This chapter describes how to use the IPsec virtual private networking (VPN) features of the ProSafe Dual WAN Gigabit Firewall with SSL & IPsec VPN to provide
VPN Configuration of ProSafe VPN Lite software and NETGEAR ProSafe Router:
 Page 1 of 8 VPN Configuration of ProSafe VPN Lite software and NETGEAR ProSafe Router: This document will guide you on how to create IKE and auto-vpn policies for your ProSafe NETGEAR Router, as well as
Planet CS-1000. TheGreenBow IPSec VPN Client. Configuration Guide. http://www.thegreenbow.com support@thegreenbow.com
 TheGreenBow IPSec VPN Client Configuration Guide Planet CS-1000 WebSite: Contact: http://www.thegreenbow.com support@thegreenbow.com IPSec VPN Router Configuration Property of TheGreenBow Sistech SA -
V310 Support Note Version 1.0 November, 2011
 1 V310 Support Note Version 1.0 November, 2011 2 Index How to Register V310 to Your SIP server... 3 Register Your V310 through Auto-Provision... 4 Phone Book and Firmware Upgrade... 5 Auto Upgrade... 6
Chapter 6 Virtual Private Networking
 Chapter 6 Virtual Private Networking This chapter describes how to use the virtual private networking (VPN) features of the FVX538 VPN firewall. VPN tunnels provide secure, encrypted communications between
I. What is VPN? II. Types of VPN connection. There are two types of VPN connection:
 Table of Content I. What is VPN?... 2 II. Types of VPN connection... 2 III. Types of VPN Protocol... 3 IV. Remote Access VPN configuration... 4 a. PPTP protocol configuration... 4 Network Topology... 4
Netgear ProSafe VPN firewall (FVS318 or FVM318) to Cisco PIX firewall
 to Cisco PIX firewall") Netgear ProSafe VPN firewall (FVS318 or FVM318) to Cisco PIX firewall This document is a step-by-step instruction for setting up VPN between Netgear ProSafe VPN firewall (FVS318 or FVM318) and Cisco PIX
Netgear ProSafe VPN firewall (FVS318 or FVM318) to Cisco PIX firewall This document is a step-by-step instruction for setting up VPN between Netgear ProSafe VPN firewall (FVS318 or FVM318) and Cisco PIX
Windows XP VPN Client Example
 Windows XP VPN Client Example Technote LCTN0007 Proxicast, LLC 312 Sunnyfield Drive Suite 200 Glenshaw, PA 15116 1-877-77PROXI 1-877-777-7694 1-412-213-2477 Fax: 1-412-492-9386 E-Mail: support@proxicast.com
Create a VPN on your ipad, iphone or ipod Touch and SonicWALL NSA UTM firewall - Part 1: SonicWALL NSA Appliance
 Create a VPN on your ipad, iphone or ipod Touch and SonicWALL NSA UTM firewall - Part 1: SonicWALL NSA Appliance This article will easily explain how to configure your Apple ipad, iphone or ipod Touch
Cisco RV 120W Wireless-N VPN Firewall
 TheGreenBow IPSec VPN Client Configuration Guide Cisco RV 120W Wireless-N VPN Firewall WebSite: Contact: http://www.thegreenbow.com support@thegreenbow.com IPSec VPN Router Configuration Property of TheGreenBow
VPN L2TP Application. Installation Guide
 VPN L2TP Application Installation Guide 1 Configuring a Remote Access L2TP VPN Dial-in Connection A remote worker establishes a L2TP VPN connection with the head office using Microsoft's VPN Adapter (included
IP Office Technical Tip
 IP Office Technical Tip Tip no: 186 Release Date: August 14, 2007 Region: GLOBAL Configuring a VPN Remote IP Phone with an Adtran Netvanta 3305 VPN Router The following document assumes that the user/installer
Establishing a VPN tunnel to CNet CWR-854 VPN router using WinXP IPSec client
 Establishing a VPN tunnel to CNet CWR-854 VPN router using WinXP IPSec client Generally speaking, remote users need to use a VPN client software for establishing a VPN connection to their home/work router
How To Industrial Networking
 How To Industrial Networking Prepared by: Matt Crites Product: Date: April 2014 Any RAM or SN 6xxx series router Legacy firmware 3.14/4.14 or lower Subject: This document provides a step by step procedure
Configure VPN between ProSafe VPN Client Software and FVG318
 Configure VPN between ProSafe VPN Client Software and FVG318 The following configuration is tested with: NETGEAR FVG318 with firmware version 1.0.41 NETGEAR ProSafe VPN Client Software version 10.5.1 Configure
Chapter 4 Virtual Private Networking
 Chapter 4 Virtual Private Networking This chapter describes how to use the virtual private networking (VPN) features of the FVL328 Firewall. VPN tunnels provide secure, encrypted communications between
ZyXEL ZyWALL P1 firmware V3.64
 TheGreenBow IPSec VPN Client Configuration Guide ZyXEL ZyWALL P1 firmware V3.64 WebSite: Contact: http://www.thegreenbow.com support@thegreenbow.com IPSec VPN Router Configuration Property of TheGreenBow
Virtual Private Network and Remote Access
 Virtual Private Network and Remote Access Introduction A virtual private network (VPN) is the extension of a private network that encompasses links across shared or public networks like the Internet. A
Shrew Soft VPN Client Configuration for GTA Firewalls
 Shrew Soft VPN Client Configuration for GTA Firewalls ShrewVPN201003-01 Global Technology Associates 3505 Lake Lynda Drive Suite 109 Orlando, FL 32817 Tel: +1.407.380.0220 Fax. +1.407.380.6080 Email: info@gta.com
axsguard Gatekeeper IPsec XAUTH How To v1.6
 axsguard Gatekeeper IPsec XAUTH How To v1.6 Legal Notice VASCO Products VASCO data Security, Inc. and/or VASCO data Security International GmbH are referred to in this document as 'VASCO'. VASCO Products
Gateway to Gateway VPN Connection
 Gateway to Gateway VPN Connection 1. Connection Scenario 4 In the diagram depicted below, the left side router represents the SME200/SME100/SME50 in HQ and right side router represents the SME200/SME100/SME50
LAN-Cell to Cisco Tunneling
 LAN-Cell to Cisco Tunneling Page 1 of 13 LAN-Cell to Cisco Tunneling This Tech Note guides you through setting up a VPN connection between a LAN-Cell and a Cisco router. As the figure below shows, the
Configure an IPSec Tunnel between a Firebox Vclass & a Check Point FireWall-1
 Configure an IPSec Tunnel between a Firebox Vclass & a Check Point FireWall-1 This document describes how to configure an IPSec tunnel between a WatchGuard Firebox Vclass appliance (Vcontroller version
Configuration Guide. How to set up the IPSec site-to-site Tunnel between the D-Link DSR Router and the Cisco Firewall. Overview
 Configuration Guide How to set up the IPSec site-to-site Tunnel between the D-Link DSR Router and the Cisco Firewall Overview This document describes how to implement IPSec with pre-shared secrets establishing
Chapter 8 Virtual Private Networking
 Chapter 8 Virtual Private Networking This chapter describes how to use the virtual private networking (VPN) features of the FWG114P v2 Wireless Firewall/Print Server. VPN tunnels provide secure, encrypted
Watchguard Firebox X Edge e-series
 TheGreenBow IPSec VPN Client Configuration Guide Watchguard Firebox X Edge e-series WebSite: Contact: http://www.thegreenbow.com support@thegreenbow.com Configuration Guide written by: Writer: Anastassios
Fireware How To VPN. Introduction. Is there anything I need to know before I start? Configuring a BOVPN Gateway
 Fireware How To VPN How do I set up a manual branch office VPN tunnel? Introduction You use Branch Office VPN (BOVPN) with manual IPSec to make encrypted tunnels between a Firebox and a second IPSec-compliant
TheGreenBow IPsec VPN Client. Configuration Guide Cisco RV325 v1. Website: www.thegreenbow.com Contact: support@thegreenbow.com
 TheGreenBow IPsec VPN Client Configuration Guide Cisco RV325 v1 Website: www.thegreenbow.com Contact: support@thegreenbow.com Table of Contents 1 Introduction... 3 1.1 Goal of this document... 3 1.2 VPN
DFL-210/260, DFL-800/860, DFL-1600/2500 How to setup IPSec VPN connection
 DFL-210/260, DFL-800/860, DFL-1600/2500 How to setup IPSec VPN connection This setup example uses the following network settings: In our example the IPSec VPN tunnel is established between two LANs: 192.168.0.x
How to setup PPTP VPN connection with DI-804HV or DI-808HV using Windows PPTP client
 How to setup PPTP VPN connection with DI-804HV or DI-808HV using Windows PPTP client Make sure your DI-804HV or DI-808HV is running firmware ver.1.40 August 12 or later. You can check firmware version
Cisco SA 500 Series Security Appliance
 TheGreenBow IPSec VPN Client Configuration Guide Cisco SA 500 Series Security Appliance This guide applies to the following models: Cisco SA 520 Cisco SA 520W Cisco SA 540 WebSite: Contact: http://www.thegreenbow.de
ZyWALL 5. Internet Security Appliance. Quick Start Guide Version 3.62 (XD.0) May 2004
 May 2004") ZyWALL 5 Internet Security Appliance Quick Start Guide Version 3.62 (XD.0) May 2004 Introducing the ZyWALL The ZyWALL 5 is the ideal secure gateway for all data passing between the Internet and the LAN.
ZyWALL 5 Internet Security Appliance Quick Start Guide Version 3.62 (XD.0) May 2004 Introducing the ZyWALL The ZyWALL 5 is the ideal secure gateway for all data passing between the Internet and the LAN.
UTM - VPN: Configuring a Site to Site VPN Policy using Main Mode (Static IP address on both sites) i...
 i...") Page 1 of 10 Question/Topic UTM - VPN: Configuring a Site to Site VPN Policy using Main Mode (Static IP address on both sites) in SonicOS Enhanced Answer/Article Article Applies To: SonicWALL Security
Page 1 of 10 Question/Topic UTM - VPN: Configuring a Site to Site VPN Policy using Main Mode (Static IP address on both sites) in SonicOS Enhanced Answer/Article Article Applies To: SonicWALL Security
IP Office Technical Tip
 IP Office Technical Tip Tip no: 190 Release Date: September 27, 2007 Region: GLOBAL Configuring a VPN Remote IP Phone with a Sonicwall Tz170 Standard / Enhanced VPN Router The following document assumes
Chapter 6 Basic Virtual Private Networking
 Chapter 6 Basic Virtual Private Networking This chapter describes how to use the virtual private networking (VPN) features of the FVG318 wireless VPN firewall. VPN communications paths are called tunnels.
Configuration Guide. How to establish IPsec VPN Tunnel between D-Link DSR Router and iphone ios. Overview
 Configuration Guide How to establish IPsec VPN Tunnel between D-Link DSR Router and iphone ios Overview The iphone is a line of smartphones designed and marketed by Apple Inc. It runs Apple s IOS mobile
Astaro Security Gateway V8. Remote Access via L2TP over IPSec Configuring ASG and Client
 Astaro Security Gateway V8 Remote Access via L2TP over IPSec Configuring ASG and Client 1. Introduction This guide contains complementary information on the Administration Guide and the Online Help. If
Configuring GTA Firewalls for Remote Access
 GB-OS Version 5.4 Configuring GTA Firewalls for Remote Access IPSec Mobile Client, PPTP and L2TP RA201010-01 Global Technology Associates 3505 Lake Lynda Drive Suite 109 Orlando, FL 32817 Tel: +1.407.380.0220
Netopia 3346. TheGreenBow IPSec VPN Client. Configuration Guide. http://www.thegreenbow.com. support@thegreenbow.com
 TheGreenBow IPSec VPN Client Configuration Guide Netopia 3346 WebSite: Contact: http://www.thegreenbow.com support@thegreenbow.com IPSec VPN Router Configuration Property of TheGreenBow Sistech SA - Sistech
VPN Consortium Scenario 1: Gateway-to-Gateway with Preshared Secrets
 VPN Consortium Scenario 1: Gateway-to-Gateway with Preshared Secrets The following is a typical gateway-to-gateway VPN that uses a preshared secret for authentication. Figure 4-5: VPN Consortium Scenario
Juniper NetScreen 5GT
 TheGreenBow IPSec VPN Client Configuration Guide Juniper NetScreen 5GT WebSite: Contact: http://www.thegreenbow.com support@thegreenbow.com Configuration Guide written by: Writer: Connected Team Company:
Linksys RV042. TheGreenBow IPSec VPN Client. Configuration Guide. http://www.thegreenbow.com support@thegreenbow.com
 TheGreenBow IPSec VPN Client Configuration Guide Linksys RV042 WebSite: Contact: http://www.thegreenbow.com support@thegreenbow.com Configuration Guide written by: Writer: TheGreenBow Support Team Company:
VPN Consortium Scenario 1: Gateway-to-Gateway with Preshared Secrets
 VPN Consortium Scenario 1: Gateway-to-Gateway with Preshared Secrets The following is a typical gateway-to-gateway VPN that uses a preshared secret for authentication. Figure 4-5: VPN Consortium Scenario
VPN PPTP Application. Installation Guide
 VPN PPTP Application Installation Guide 1 Configuring a Remote Access PPTP VPN Dial-in Connection A remote worker establishes a PPTP VPN connection with the head office using Microsoft's VPN Adapter (included
Micronet SP881. TheGreenBow IPSec VPN Client Configuration Guide. http://www.thegreenbow.com support@thegreenbow.com
 TheGreenBow IPSec VPN Client Configuration Guide Micronet SP881 WebSite: Contact: http://www.thegreenbow.com support@thegreenbow.com IPSec VPN Router Configuration Property of TheGreenBow Sistech SA -
Ingate Firewall. TheGreenBow IPSec VPN Client Configuration Guide. http://www.thegreenbow.com support@thegreenbow.com
 TheGreenBow IPSec VPN Client Configuration Guide Ingate Firewall WebSite: Contact: http://www.thegreenbow.com support@thegreenbow.com IPSec VPN Router Configuration Property of TheGreenBow Sistech SA -
IPsec VPN Security between Aruba Remote Access Points and Mobility Controllers
 IPsec VPN Security between Aruba Remote Access Points and Mobility Controllers Application Note Revision 1.0 10 February 2011 Copyright 2011. Aruba Networks, Inc. All rights reserved. IPsec VPN Security
Viewing VPN Status, page 335. Configuring a Site-to-Site VPN, page 340. Configuring IPsec Remote Access, page 355
 VPN This chapter describes how to configure Virtual Private Networks (VPNs) that allow other sites and remote workers to access your network resources. It includes the following sections: About VPNs, page
CREATING AN IKE IPSEC TUNNEL BETWEEN AN INTERNET SECURITY ROUTER AND A WINDOWS 2000/XP PC
 CREATING AN IKE IPSEC TUNNEL BETWEEN AN INTERNET SECURITY ROUTER AND A WINDOWS 2000/XP PC 1 Introduction Release date: 11/12/2003 This application note details the steps for creating an IKE IPSec VPN tunnel
Dial-Up VPN auf eine Juniper
 Dial-Up VPN auf eine Juniper Gateway Konfiguration Phase 1 Konfiguration Create a user that is used to define the phase1 id parameters. Navigate to the following screen using the tree pane on the left
This topic discusses Cisco Easy VPN, its two components, and its modes of operation. Cisco VPN Client > 3.x
 Configuring Remote-Access VPNs via ASDM Created by Bob Eckhoff This white paper discusses the Cisco Easy Virtual Private Network (VPN) components, modes of operation, and how it works. This document also
Apliware firewall. TheGreenBow IPSec VPN Client. Configuration Guide. http://www.thegreenbow.com support@thegreenbow.com
 TheGreenBow IPSec VPN Client Configuration Guide Apliware firewall WebSite: Contact: http://www.thegreenbow.com support@thegreenbow.com Table of contents 1 Introduction... 0 1.1 Goal of this document...
Lab 4.4.8a Configure a Cisco GRE over IPSec Tunnel using SDM
 Lab 4.4.8a Configure a Cisco GRE over IPSec Tunnel using SDM Objective Scenario Topology In this lab, the students will complete the following tasks: Prepare to configure Virtual Private Network (VPN)
7. Configuring IPSec VPNs
 7. This guide describes how to use the Unified Threat Management appliance (UTM) IPSec VPN Wizard to configure the IP security (IPSec) virtual private networking (VPN) feature. This feature provides secure,
How To Establish IPSec VPN connection between Cyberoam and Mikrotik router
 How To Establish IPSec VPN connection between Cyberoam and Mikrotik router Applicable Version: 10.00 onwards Scenario Establish IPSec VPN connection between Cyberoam and Mikrotik router using Preshared
Configuring IPsec VPN with a FortiGate and a Cisco ASA
 Configuring IPsec VPN with a FortiGate and a Cisco ASA The following recipe describes how to configure a site-to-site IPsec VPN tunnel. In this example, one site is behind a FortiGate and another site
How to Setup PPTP VPN Between a Windows PPTP Client and the DIR-130.
 Note: DIR-130 FW: 1.21 How to Setup PPTP VPN Between a Windows PPTP Client and the DIR-130. This setup example uses the following network settings: D-Link Technical Support PPTP VPN Between Windows PPTP
Configuring the OfficeConnect Secure Gateway for a remote L2TP over IPSec connection
 Creating L2TP over IPSec VPNs between the OfficeConnect Cable/DSL Secure Gateway and the Microsoft VPN Client 1.0 Introduction The OfficeConnect Cable/DSL Secure Gateway supports IPSec, PPTP and L2TP over
Creating a Gateway to Client VPN between Sidewinder G2 and a Mac OS X Client
 A P P L I C A T I O N N O T E Creating a Gateway to Client VPN between Sidewinder G2 and a Mac OS X Client This application note describes how to set up a VPN connection between a Mac client and a Sidewinder
Setting up D-Link VPN Client to VPN Routers
 Setting up D-Link VPN Client to VPN Routers Office Unit: DI-804HV (firmware 1.41) LAN IP: 192.168.100.22 Subnet Mask: 255.255.255.0 WAN IP: 202.129.109.82 Subnet Mask: 255.255.255.224 Default Gateway:
DI-804HV with Windows 2000/XP IPsec VPN Client Configuration Guide
 DI-804HV with Windows 2000/XP IPsec VPN Client Configuration Guide This guide will show how to configure a Windows 2000/XP machine to make an IPsec VPN Tunnel connection to a DI-804HV. Below is the example
VPN Quick Configuration Guide. Astaro Security Gateway V8
 VPN Quick Configuration Guide Astaro Security Gateway V8 2010 equinux AG and equinux USA, Inc. All rights reserved. Under copyright law, this configuration guide may not be copied, in whole or in part,
Chapter 9 Monitoring System Performance
 Chapter 9 Monitoring System Performance This chapter describes the full set of system monitoring features of your ProSafe Dual WAN Gigabit Firewall with SSL & IPsec VPN. You can be alerted to important
Configuring a VPN for Dynamic IP Address Connections
 Configuring a VPN for Dynamic IP Address Connections Summary A Virtual Private Network (VPN) is a virtual private network that interconnects remote (and often geographically separate) networks through
How To Configure A Kiwi Ip Address On A Gbk (Networking) To Be A Static Ip Address (Network) On A Ip Address From A Ipad (Netware) On An Ipad Or Ipad 2 (
 To Be A Static Ip Address (Network) On A Ip Address From A Ipad (Netware) On An Ipad Or Ipad 2 (") UAG715 Support Note Revision 1.00 August, 2012 Written by CSO Scenario 1 - Trunk Interface (Dual WAN) Application Scenario The Internet has become an integral part of our lives; therefore, a smooth Internet
UAG715 Support Note Revision 1.00 August, 2012 Written by CSO Scenario 1 - Trunk Interface (Dual WAN) Application Scenario The Internet has become an integral part of our lives; therefore, a smooth Internet
Connecting Remote Offices by Setting Up VPN Tunnels
 Connecting Remote Offices by Setting Up VPN Tunnels Cisco RV0xx Series Routers Overview As your business expands to additional sites, you need to ensure that all employees have access to the network resources
How To Configure Apple ipad for Cyberoam L2TP
 How To Configure Apple ipad for Cyberoam L2TP VPN Connection Applicable to Version: 10.00 (All builds) Layer 2 Tunneling Protocol (L2TP) can be used to create VPN tunnel over public networks such as the
If you have questions or find errors in the guide, please, contact us under the following e-mail address:
 1. Introduction... 2 2. Remote Access via PPTP... 2 2.1. Configuration of the Astaro Security Gateway... 3 2.2. Configuration of the Remote Client...10 2.2.1. Astaro User Portal: Getting Configuration
Appendix A: Configuring Firewalls for a VPN Server Running Windows Server 2003
 http://technet.microsoft.com/en-us/library/cc757501(ws.10).aspx Appendix A: Configuring Firewalls for a VPN Server Running Windows Server 2003 Updated: October 7, 2005 Applies To: Windows Server 2003 with
Enable VPN PPTP Server Function
 How to use VPN PPTP Server/Client on TW- EAV510/EAV510 AC Note: Please make sure that both LAN side networks are in different subnet. Enable VPN PPTP Server Function Go to Advanced Setup - > VPN - > PPTP
TheGreenBow VPN Client. User Guide
 TheGreenBow VPN Client User Guide Property of TheGreenBow 2015 Table of Contents 1 Presentation... 4 1.1 The universal VPN Client... 4 1.2 Full compatibility with PKI... 4 1.3 VPN security policies...
Configuring a FortiGate unit as an L2TP/IPsec server
 Configuring a FortiGate unit as an L2TP/IPsec server The FortiGate implementation of L2TP enables a remote dialup client to establish an L2TP/IPsec tunnel with the FortiGate unit directly. Creating an
Using a VPN with CentraLine AX Systems
 Using a VPN with CentraLine AX Systems User Guide TABLE OF CONTENTS Introduction 2 What Is a VPN? 2 Why Use a VPN? 2 How Can I Set Up a VPN? 2 Important 2 Network Diagrams 2 Network Set-Up with a VPN 2
Creating a VPN Using Windows 2003 Server and XP Professional
 Creating a VPN Using Windows 2003 Server and XP Professional Recommended Instructor Preparation for Learning Activity Instructor Notes: There are two main types of VPNs: User-to-Network This type of VPN
VPN Configuration of ProSafe Client and Netgear ProSafe Router:
 VPN Configuration of ProSafe Client and Netgear ProSafe Router: This document will guide you on how to create IKE and auto-vpn policies for your ProSafe Netgear Router, as well as how to configure the
Using a VPN with Niagara Systems. v0.3 6, July 2013
 v0.3 6, July 2013 What is a VPN? Virtual Private Network or VPN is a mechanism to extend a private network across a public network such as the Internet. A VPN creates a point to point connection or tunnel
IPSec XAUTH How To. Version 8.0.0
 IPSec XAUTH How To Version 8.0.0 Table of Contents 1. Introduction... 1 1.1. 1.2. 1.3. 1.4. About this Document... Examples used in this Guide... Documentation and Training... About the AXS GUARD... 1.4.1.
Sophos UTM. Remote Access via PPTP. Configuring UTM and Client
 Sophos UTM Remote Access via PPTP Configuring UTM and Client Product version: 9.000 Document date: Friday, January 11, 2013 The specifications and information in this document are subject to change without
Version : 2.0 Date : 2006/6/12
 Version : 2.0 Date : 2006/6/12 i Table of Contents Chapter 1. High Availability Function... 1 1.1 Introduction... 1 1.2 Examples and Web Configurations... 2 Chapter 2. VPN Function... 4 2.1 VPN Dial-in
Protecting the Home Network (Firewall)
") Protecting the Home Network (Firewall) Basic Tab Setup Tab DHCP Tab Advanced Tab Options Tab Port Forwarding Tab Port Triggers Tab DMZ Host Tab Firewall Tab Event Log Tab Status Tab Software Tab Connection
Protecting the Home Network (Firewall) Basic Tab Setup Tab DHCP Tab Advanced Tab Options Tab Port Forwarding Tab Port Triggers Tab DMZ Host Tab Firewall Tab Event Log Tab Status Tab Software Tab Connection
Setting up VPN connection: DI-824VUP+ with Windows PPTP client
 Setting up VPN connection: DI-824VUP+ with Windows PPTP client DI-824VUP+ (firmware 1.03 or higher) LAN IP: 192.168.0.1 Subnet Mask: 255.255.255.0 WAN IP: 203.111.91.1 Subnet Mask: 255.255.255.252 Default
This is a guide on how to create an IPsec VPN tunnel from a local client running Shrew Soft VPN Client to an Opengear device.
 IPsec VPN Guide Opengear to Shrew Soft VPN Client This is a guide on how to create an IPsec VPN tunnel from a local client running Shrew Soft VPN Client to an Opengear device. In this document: 1. Network
SSL... 2 2.1. 3 2.2. 2.2.1. 2.2.2. SSL VPN
 1. Introduction... 2 2. Remote Access via SSL... 2 2.1. Configuration of the Astaro Security Gateway... 3 2.2. Configuration of the Remote Client...10 2.2.1. Astaro User Portal: Getting Software and Certificates...10
VPN Configuration Guide. ZyWALL USG Series / ZyWALL 1050
 VPN Configuration Guide ZyWALL USG Series / ZyWALL 1050 2011 equinux AG and equinux USA, Inc. All rights reserved. Under copyright law, this configuration guide may not be copied, in whole or in part,
VPN Configuration Guide. Juniper Networks NetScreen / SSG / ISG Series
 VPN Configuration Guide Juniper Networks NetScreen / SSG / ISG Series equinux AG and equinux USA, Inc. 2009 equinux USA, Inc. All rights reserved. Under the copyright laws, this manual may not be copied,