Integrating IP Office
|
|
|
- Diana Jefferson
- 8 years ago
- Views:
Transcription
1 NetVanta Unified Communications Technical Note Integrating IP Office 1 UC Server Overview The NetVanta Unified Communications Server works with an integrated messaging client, Microsoft Exchange, Lotus Notes and other IMAP-compliant systems to provide users with a single storage and access point for voice, fax, and / or messages. The UC server provides full fax server capabilities, including managing incoming and outgoing faxes. Users can retrieve and manage messages either over the telephone or directly from the desktop. The UC server is designed to allow users to access Personal Assistant and Personal Business Assistant mode. Clients will be able to route specific callers to one-time messages and to filter calls to their extensions by activating call transfer, active message delivery, and pager notification based on Caller ID, Outlook Contact or Contact Group, and/or Time of Day. In addition to unified communications features, the products provide seamless Active Directory (AD) integration for user management. The product users can be linked to AD users via the product administration user interface or via an MMC snap-in visible in the AD user dialog. User details like first/last/display name and state (enabled/disabled) are synchronized automatically with AD on a continual basis, and the plug-in also provides mechanisms for modifying product-specific details like extensions and message store. AD linked users are automatically authenticated when they log into the Server using the Client. The UC server can also act as a centralized voic system within a networked IP Office environment. Remote IP Office installations can have calls redirected to a central IP Office location where the message store and voic system are centralized. 1.1 Integration Overview The UC server interacts with IP Office via Analog integration (Tip and Ring) for the media and TAPI 3 rd party control for the control. The analog integration provides media for both voice and fax messages. The UC server can also interact with IP Office via TAPI/WAVE integration (for call control and media) IP Office Analog Integration The 2-wire analog single-line circuits are connected to Intel Dialogic D/4PCIUF, D/120JCT-LS, D/41JCT-LS or VFX/PCI cards in the product server. Each Dialogic port simulates 2-wire analog lines. The caller information and call reason information is conveyed to the product through Avaya IP Office s 3 rd party TAPI implementation (CTI Link Pro). The server then answers and plays the appropriate greeting. Message-Waiting indication is set and cancelled using the TAPI interface. 1

2 NOTE: If fax is not required, the product can also integrate with TAPI Wave IP Office TAPI CTI Link Overview Avaya IP Office s CTI Link Pro is used to gather caller and called telephone number information as well as call reason information. The call reason gives the product the ability to determine how it answers. For example, whether it acts as an Automated Attendant, prompts for a mailbox password or prompt the callers to leave a message in a mailbox. A CTI Link Pro license MUST be installed on each IP Office that is integrated with the product. In addition, if TAPI/Wave is required then a Wave User license must be installed and configured. 1.2 System Requirements The following table describes the minimum requirements for the different integration types of UC server. UC Server Hardware Requirements Dialogic Cards Platform Requirements Corporate Office (Main) Remote Office TAPI Analog (1) TAPI/Wave (1) Remote Agent D/4PCIUF, D/4JCT-LS, VFX/PCI, D/120JCT-LS P4 3.0 GHz 1 GB RAM UC Server Software Requirements 80GB Hard Drive None Required P4 3.0 GHz 1 GB RAM 80GB Hard Drive None Required P3 600 MHz 512 MB RAM 20GB Hard Drive Operating System UC Server Release Windows XP, 2003* Server UC Server Release 3.0 or higher Dialogic Software Intel Dialogic 6.0 SU22 or higher IP Office User CD Software CTI Link Pro IP Office PBX Software Requirements Windows XP, 2003* Server UC Server Release or higher None Required CTI Link Pro Wave Driver Windows 2000, Windows XP, Vista, 2003 Server UC Server Release or higher None Required CTI Link Pro Wave (Optional) IP Office Software Release** IP Office Release 2.1 or higher IP Office Release 2.1 or higher CTI Link Pro License Yes Yes Yes IP Office Release 3.2(17) or higher 2

3 Corporate Office (Main) Remote Office UC Server Hardware Requirements TAPI Analog (1) TAPI/Wave (1) Remote Agent Wave Users Licenses No Yes, (available in 4 port increments) Optional (2) IP Office PBX Hardware Requirements Analog Station Ports Yes No Optional (2) Digital Station Ports No No Optional (2) (also incl. telephone) * Both Dialogic and Avaya TAPI-WAV software do not currently support Microsoft Windows Server 2008, SBS 2008, and EBS ** See Appendix A - Recommended IP Office and UC Server Version Pairings Based on Integration Type for more information about which version of IP Office to use with your version of the UC Server. 1 The UC server can use a mixture of TAPI/Analog and TAPI/Wave ports to satisfy customer requirements. 2 The remote IP Office integration requires in service devices. Choose one of: Analog station ports TAPI/Wave ports (Requires Wave User license) Digital Station Ports (With telephone plugged in so that it is in service on IP Office You must also assign at least one extension of the above types into the remote IP Office hunt group. ADTRAN recommends a minimum of two ports be assigned to this redirection hunt group to ensure that there is at least one idle port available at all times. Depending on system configuration, additional ports may be required. The number of ports is based on the number of simultaneous calls that are expected to route to voic from the remote site within the busiest 2-second interval. PBX Limitations and Considerations License Key server must be installed, configured and available. If a centralized UC server is required, IP Office must be networked together using IP or PRI trunks (using Small Community Networking) with unique dialing extension number on each IP Office. See sections 8 and 9 for more information Remote Access Considerations for WAVE Audio Devices CAUTION: Mapping remote computer sound to local computer when using Windows Remote Desktop may cause WAVE audio devices to stop working. 3

4 Ensure that the remote audio mapping is disabled for a client computer that wishes to manage the UC server using a Windows Remote Desktop connection if you are integrating with IP Office using TAPI/Wave. To configure Remote Desktop connections to leave sound at remote computer 1. Launch remote desktop connection using Start > All Programs > Accessories > Remote Desktop Connection. 2. Click Options. 3. Select the Local Resources tab. 4. Change the Remote computer sound configuration is set to Leave at remote computer. 2 Workarounds for Known Integration Issues 2.1 One-way audio issues for incoming PRI calls Applies to IP Office version(s): 3.2(54) only Integration type: Analog, TAPI-WAVE Description: There is a condition where no audio can be heard on a PRI call on when the previous incoming PRI call was transferred through a UC server auto-attendant. Investigation into the issue revealed that if the server answers the PRI call too quickly then the IP Office PBX does not relay audio properly which results in silence on the external call. If the server answers the call more slowly after it is presented then the audio is relayed correctly. Resolution: A configuration file has been provided to include an option for this particular case (see below). The option allows adjustment for the amount of time (in seconds) between when the server is notified about a new incoming call and when it answers that call. Modification of this option will require a server restart. The steps to modify this option are described below. Note: This work-around was first applied to NetVanta UC Server version and the configuration option was located in the following file:.\adtran\netvanta CallAttendant Office Server\Data\System\TAPI2.cfg This file has since been deprecated. Therefore, if you have upgraded to UC Server version 4.2 or later than the change must be propagated as per the instructions below. 1. Edit the IP Office configuration file:.\adtran\netvanta UC Server\Data\System\Pbxs\ xml NOTE: If you have more than one PBX configured in the UC server then contact ADTRAN Technical Support. 4
: 3.")
5 2. The DELAY_BEFORE_ANSWER value must be changed from 0 (default value) to at least 2 seconds. This means that the Server will wait 2 seconds before picking up every incoming call. See below for an example of how the change can be applied to the configuration file. <?xml version="1.0" encoding="utf-8"?> <AVAYA_IP_OFFICE_PBX version=" "> <REMOTE_AGENTS/> <REMOTE_CALL_CACHE> <EXPIRY>3</EXPIRY> </REMOTE_CALL_CACHE> <TAPI_OPTIONS> <DISCONNECT_DEFERAL_TIME>0</DISCONNECT_DEFERAL_TIME> <DELAY_BEFORE_ANSWER>2</DELAY_BEFORE_ANSWER> </TAPI_OPTIONS> <BLIND_TRANSFER_OPTIONS> <STYLE>consult</STYLE> <PRE_DIAL_DELAY>2</PRE_DIAL_DELAY> </BLIND_TRANSFER_OPTIONS> </AVAYA_IP_OFFICE_PBX> 3. Restart the UC server s Application Server service. 2.2 Shortcode "D" does not send first DTMF tone Applies to IP Office version(s): All versions; fixed in 4.1(15). Integration type: Analog, TAPI-WAVE Avaya bug #: MRDB Description: If an IP Office shortcode contains a D character, then the first character after the "D" character is not sent to the answering device. This only affects shortcodes that redirect calls to the UC server application server (voic ) port (i.e., shortcodes that allow direct transfer to voic ). For example, let s say your shortcode is configured as follows: Short code: #xxx Telephone number: 500D#N Feature: DialExtn (where 500 is the UC server voic hunt group pilot number) If a user dials #203 (where is a user s extension) then the first DTMF digit will be ignored. The result is that the UC server receives the digits "203 instead of #203. Workaround: This issue can be circumvented by adding an extra # after the D character in the shortcode s Telephone number field. In keeping with the above example, the working shortcode would be configured as follows: Short code: #xxx Telephone number: 500D##N number) Feature: DialExtn (where 500 is the UC server voic hunt group pilot 5

 and higher Integration type: TAPI-WAVE only Avaya bug #: MRDB00060958 Description: IP Office stops acknowledging DTMF key presses over an analog trunk after it receives a linegeneratetone TAPI")
6 2.3 IP Office stops acknowledging DTMF tones Applies to IP Office version(s): 4.0(7) and higher Integration type: TAPI-WAVE only Avaya bug #: MRDB Description: IP Office stops acknowledging DTMF key presses over an analog trunk after it receives a linegeneratetone TAPI message. This standard TAPI message is called by the UC server when it requires an audible beep be played for the caller, such as before a voice recording is to begin. After this beep occurs, IP Office stops recognizing DTMF keys pressed by the caller. The likelihood of encountering this issue is small since callers typically hang up after leaving a voice message. Workaround: This issue can be circumvented for PBA users (see below) but cannot be circumvented for PA users. This is because the beep is automatically generated after a user s greeting is played to the caller to indicate that the voice message recording is about to begin. For PBA users: Replace every instance of the Voic element with two elements: Play Announcement and Take Message. For Play Announcement, select Greetings > [Called Extension], and uncheck the Beep before recording checkbox for Take Message. You can optionally put an additional Play Announcement element after the first one to play a beep announcement (thus emulating the regular system beep ). 2.4 Blind transfers to DND extensions can cause IP Office to Restart Applies to IP Office version(s): 4.1(9) up to (but not including) 4.2(17) Integration type: Analog Avaya bug #: Description: If a call from an auto attendant service transfers a caller to an extension that is DND, then IP Office can restart if the majority of the voic ports are busy with other calls. Resolution: Upgrade to IP Office version 4.2(17). Workaround: If upgrading to 4.2(17) is not currently viable, then this issue can also be circumvented by changing the method that the UC server uses to transfer calls from blind to consultative. NOTE: In NetVanta UC Server version the configuration option was located in the following file:.\adtran\netvanta CallAttendant Office Server\Data\System\TAPI2.cfg This file has since been deprecated. Therefore, if you have upgraded to UC Server version 4.2 or later than the change must be propagated as per the instructions below. 6

7 1. Edit the IP Office configuration file:.\adtran\netvanta UC Server\Data\System\Pbxs\ xml Note: If you have more than one PBX configured in the UC server then contact ADTRAN Technical Support. 2. The STYLE value must be changed from blind (default value) to consult. 3. The PRE_DIAL_DELAY value must be changed from 0 (default value) to at least 2 seconds. This means that the Server will wait 2 seconds after putting the caller on hold before initiating the transfer. The following is an example of how the change can be applied to the configuration file: <?xml version="1.0" encoding="utf-8"?> <AVAYA_IP_OFFICE_PBX version=" "> <BLIND_TRANSFER_OPTIONS> <STYLE>consult</STYLE> <PRE_DIAL_DELAY>2</PRE_DIAL_DELAY> <POST_DIAL_DELAY></POST_DIAL_DELAY> </BLIND_TRANSFER_OPTIONS> </AVAYA_IP_OFFICE_PBX> 4. Restart the UC server s Application Server service. 3 Supported Features The following features are supported with this integration: Call coverage to personal greeting Busy Ring-no-answer Unconditional Automated Attendant Inbound and outbound fax server Return-to-operator / Find me Follow me Personal greeting of original-called party on double-call forward using call coverage Direct Call Message Waiting Caller ID Direct transfer to voic Centralized voic and application services 7

8 4 Programming IP Office Programming on the IP Office is done using the IP Office Manager application. In a centralized voic scenario, the following instructions apply for both the central IP Office and remote IP Office configurations; they are configured identically. The only difference is whether the ports that are mentioned terminate calls or simply redirect calls. Note: For more details, refer to the Avaya IP Office Communications System Programming Manual. 4.1 Assigning and Configuring UC Server Ports The following are instructions about how to program the analog ports on the IP Office system for integration with the ports on the UC server. Login to the IP Office Manager PC and go to Start > Programs > IP Office > Manager to launch the Manager application. Log in to the Manager application with the Administrator s username and password. 1. In the Manager window that appears, select File > Open to search for the IP Office system in the network. 2. Log in to the IP Office system using the appropriate password to receive its configuration Port Programming with Analog Media The UC server connects to the IP Office via Analog Extensions. The tables below show the programming required for the ports used to physically connect the UC server to the IP Office. The table headings correspond to the different configuration options in IP Office Manager. If a property/value is not specified, leave it as the default value. For each extension corresponding to a UC server voic port, configure the following attributes (the sections in which these configurations are performed are indicated in bold above each table): Extension Tab Attribute Value Extn Extension ID Base Extension Caller Display Type (Automatically configured by the system) {Assign a unique extension number for each VM port} Off Analogue Equipment Classification IVR Port Flash hook pulse width Min: 20, Max: 500 Message Waiting Lamp Indication Type Hook Persistency None 100mx 8

9 Note: To ensure that the voic extension is listed through TAPI, disable the Ex Directory check box. This is the default. User Tab Attribute Value User Name Password Confirm password Full name Extension Ex Directory {Assign the name of Voic port} Leave Blank (default) Leave Blank (default) Full name of the voic port {Assign to be the same as the Base Extension number defined in the previous Extension table} Ensure that the Ex Directory is Disabled Voic [All settings and values] Blank and unchecked DND Telephone Number (list) Blank ShortCodes Codes (list) Blank Source Numbers Source Numbers (list) Blank Telephony Call Settings [All settings and values] Supervisor Settings Cannot be intruded [All other settings and values] Default values Enabled (checked) Default values Multiline Options [All settings and values] Default values Port Programming with Wave Media The following are instructions about how to configure the TAPI/Wave users on the IP Office system. Configure using this method if you plan to integrate with TAPI/Wave. Consult Installing and Configuring TAPI-WAVE for details on how to install Avaya s Wave audio driver on the UC server. The table below show the programming required for the UC server TAPI/Wave devices. NOTE: IP Office differentiates a TAPI/Wave user from a regular user by the inclusion of the prefix TAPI: as part of the Name field. 9
![voicemail port {Assign to be the same as the Base Extension number defined in the previous Extension table} Ensure that the Ex Directory is Disabled Voicemail [All settings and values] Blank and](/docs-images/45/9243159/images/page_9.jpg "unchecked DND Telephone Number (list) Blank ShortCodes Codes (list) Blank Source Numbers Source Numbers (list) Blank Telephony Call Settings [All settings and values] Supervisor Settings Cannot be")
10 NOTE: On IP Office release 3.1 and below, when you create an extension with no physical hardware a prompt will ask you if you want to Add a VoIP Extension. For a TAPI/Wave port select No. NOTE: To ensure that the voic extension is listed by browsing the TAPI devices, disable the Ex Directory check box. This is the default. NOTE: There is no physical extension corresponding to a TAPI/Wave user, so no configuration in the Extension section is required. For each extension corresponding to a UC server voic port, configure the following attributes (the sections in which these configurations are performed are indicated in bold above each table): User Tab Attribute Value User Name TAPI:{Unique Extension Number} e.g. TAPI: 600 Password Confirm password Full name Extension Ex Directory Leave Blank (default) Leave Blank (default) Full name of the voic port {Assign a unique extension number} Ensure that the Ex Directory is Disabled Voic [All settings and values] Blank and unchecked DND Telephone Number (list) Blank ShortCodes Codes (list) Blank Source Numbers Source Numbers (list) Blank Telephony Call Settings [All settings and values] Supervisor Settings Cannot be intruded [All other settings and values] Default values Enabled (checked) Default values Multiline Options [All settings and values] Default values 10
:")
11 4.2 Assigning UC Server Ports as Members of a Voic Hunt Group Use the following to configure the UC server ports as a member of a voic hunt group Hunt Group Here you will assign the user extensions (created to represent the UC server voic ports) to a hunt group. When calls are redirected to voic , the system will hunt through each of the extension in this hunt group until a free port is available. Hunt Group Tab Attribute Value Hunt Group Name Extension Ring Mode No Answer time (secs) Overflow time (secs) Voic Answer time (secs) Extension list Overflow Group list {Name of voic Hunt Group} {Unique extension number} Sequential (default) Off 45 (default) {Add the voic port extension numbers see Assigning and Configuring UC Server Ports} Blank (default) [All other tabs] [Default values] 4.3 UC Server as the ONLY System Defined Voic Use the following instructions to configure the UC server as the only system-defined voic . 11
 Off 45 (default) {Add the voicemail port extension numbers see 4.")
12 4.3.1 System Configuration The UC server must be defined as the default voic system for IP Office. Under System, select the IP Office unit. Tab Attribute Value Voic Voic Type Voic Destination Voic IP Address [All other values] Group Voic {Using the drop-down list, select the UC server voic Hunt Group created in Hunt Group} Not enabled (blank) [Default values] [All other tabs] [Default values] End User Configuration Use the Voic tab under each individual User s configuration to enable users for the UC server voic support. Tab Attribute Value Voic Voic On Voic Help Voic Ringback Voic Reading Voic Code Confirm Voic Code Voic Reception /Breakout (DTMF- 0) Breakout (DTMF-2) Breakout (DTMF-3) Checked Unchecked (Default) Unchecked (Default) Unchecked (Default) Blank (Default) Blank (Default) Blank (Default) Blank (Default) Blank (Default) Blank (Default) [All other tabs] [Can be set as required by each user] 4.4 UC Server in Parallel with Voic Lite/Pro The UC server can also be used when Voic Lite/Pro is installed and configured in a customer s environment. This may be necessary when some users use Voic Lite/Pro or some features on 12
![in 4.2.1 - Hunt Group} Not enabled (blank) [Default values] [All other tabs] [Default values] 4.3.](/docs-images/45/9243159/images/page_12.jpg "2 End User Configuration Use the Voicemail tab under each individual User s configuration to enable users for the UC server voicemail support.")
13 Voic Lite/Pro (for example, Call Recording) are required, while the UC server is used as the VM system System Configuration Follow the instructions described in the Voic Lite/Pro installation manual to configure the Voic Lite/Pro users. Use the Voic Tab under System Configuration to define Voic Pro as the default voic system for IP Office. Tab Attribute Value Voic Voic Type Voic Destination Voic IP Address Voic Password Confirm Password Voic Lite/Pro Blank Either broadcast address or specific address for Voic Lite/Pro. As defined by Voic Lite/Pro As defined by Voic Lite/Pro End User Configuration User programming Use the Forwarding Tab to define users of the UC server by setting the individual user s Call forward on busy and no answer destinations to the voic Hunt Group. Tab Attribute Value Forwarding Forward Unconditional Forward Number Forward On Busy Forward On No Answer Forward Number Enable if all calls are to be forwarded to the UC server. {UC server Hunt Group as defined in Assigning UC Server Ports as Members of a Voic Hunt Group } Enable Enable { UC server Hunt Group as defined in 4.2- Assigning UC Server Ports as Members of a Voic Hunt Group } 4.5 Configuring IP Office for Direct Answer by UC Server The UC server can answer calls directly and play defined greetings/announcements, or route the calls to the defined destinations. Applications that can benefit from this ability are company auto-attendants and DID Fax Services. 13

14 4.5.1 Auto Attendant To have the UC server answer Trunks/Lines directly as an auto-attendant, do the following on the IP Office. 1. Create a Hunt Group that will terminate the incoming trunks: Tab Attribute Value Hunt Group Name Extension Hunt type Overflow time (secs) No Answer Time (secs) Voic Answer Time (secs) Extension List Overflow Group list {Name of trunk group} {Unique extension number} Linear Blank (Default) Blank (Default) 45 (Default) (Empty) {UC Server Voic Hunt Group name} [All other tabs] [Default values] 2. Set up the Line Configuration as follows: Tab Attribute Value Line Settings Incoming Group ID Note: All other parameters are not required. 3. Set up the Incoming Call Route for the Lines as follows: Tab Attribute Value Standard Line Group Id Group ID in step #2 (Ensure your incoming lines are assigned to a defined Group ID. This will be used in the Incoming call route configuration.) Incoming Number Destination NOTE: All other parameters are not required. Incoming number to be answered by Auto Attendant. Set the destination as the Hunt Group created in Step #1 above 14
![List Overflow Group list {Name of trunk group} {Unique extension number} Linear Blank (Default) Blank (Default) 45 (Default) (Empty) {UC Server Voicemail Hunt Group name} [All other tabs] [Default](/docs-images/45/9243159/images/page_14.jpg "values] 2. Set up the Line Configuration as follows: Tab Attribute Value Line Settings Incoming Group ID Note: All other parameters are not required. 3.")
15 4.5.2 DID fax services To have users receive faxes directly to their UC server mailboxes via separate DID fax numbers, do the following: 1. Create a User for the each DID fax numbers and use the Voic tab under that user to enable voic for that number. Set this user s properties as shown in End User Configuration. 2. Set up the Line Configuration as follows: Tab Attribute Value Line Settings Incoming Group ID Note: All other parameters are not required. (Ensure the incoming number is assigned to a defined Group ID. This will be used in the Incoming call route configuration) 3. Set up the Incoming Call Route for the Lines as follows: Tab Attribute Value Standard Line Group Id Group ID in step #2 Incoming Number Destination Note: All other parameters are not required. Incoming number to be answered by the Fax service. Set the destination to be the DID fax user created in Step #1 above 4.6 IP Office Short Codes for Direct Transfer to Voic To directly transfer a user to a voic box without ringing the user s telephone, a short code can be created on IP Office to facilitate direct transfers into voic . Create a short code as follows: Short Code: #xxx Telephone Number: <Pilot Number>D#N Feature: DialExtn Where the <Pilot Number> is the hunt group extension number that contains the UC server ports connected to IP Office. To use direct transfer to voic , a user can simply place a caller on consultation hold, dial #<Extension number of voic >. When the call is answered by the UC server, release the call. 15
 3.")
16 5 Installing and Configuring CTI Link 5.1 Overview The UC server needs Avaya s TAPI Service Provider (CTI Link) in order to operate. Avaya IP Office s CTI Link Pro is used to gather caller and called telephone number information as well as call reason information. The call reason gives the UC server the ability to determine how it answers. For example, the call reason indicates whether the server should act as an automated attendant, prompt for a mailbox password, or prompt callers to leave a message in a mailbox. The following are required for the UC server to answer calls properly: A valid CTI Link Pro license installed on the IP Office Key Server The TAPI2 Service Provider (from the IP Office User CD) installed on the UC server machine 5.2 Licensing the CTI TAPI Link Pro on the IP Office You are required to license the TAPI driver to ensure correct operation in third-party mode. To install the TAPI license 1. Run the IP Office Manager. This can be installed from the IP Office Admin CD. 2. Load the configuration file for your IP Office. 3. Select License on the tree in the left hand window. 4. Right-click in the right hand window and select New. 5. Type the 32-character license key. The IP Office Manager indicates whether the license is valid or not. Note: You might have to restart the IP Office to verify that the license shows as valid. 5.3 Installing and ConfiguringTAPI2 Service Provider Avaya s TAPI2 Service Provider is installed from the IP Office User CD. Perform the following steps: To install the TAPI2 Service Provider 1. Insert the IP Office User CD (self installing). The Workstation Installation Wizard - Welcome screen is displayed. 2. Click Next, select your IP Office Unit, and then click Next. 3. Enter both your User Name (or select from existing) and User Password. Click Next. The Choose Destination screen is displayed. 4. Accept the default location or click Browse and select your own destination folder. Click Next. 5. On the Select Components screen, enable the TAPI box. Disable all other boxes, and then click Next. 16

17 6. When the Select Program Folder screen is displayed, either accept the default or enter a new folder name and click Next. 7. A progress bar is displayed and on completion the Install Shield Wizard Complete screen is displayed. 8. Click OK and then click Finish to exit from install routine. 9. Reboot the UC server. To configure the TAPI Service Providers on a Windows 2000 or Windows XP Platform 1. After the system reboots, log in to the system again as administrator and go to Start > Settings > Control Panel. 2. In the Control Panel window that appears, double-click Phone and Modem Options. 3. On the Advanced tab of the Phone and Modem Options window, double-click Avaya IP Office TAPI2 Service Provider. 4. In the Avaya TAPI2 configuration window, set Switch IP Address to the IP Address of the IP Office System, enable the Third Party button, set Switch Password to the IP Office System password (i.e. the password used to login to the IP Office Manager application), and click OK. 5. Reboot the UC server computer. 6 Installing and Configuring TAPI-WAVE 6.1 Overview The UC server has the ability to stream media with IP Office in a purely digital format. This can eliminate (or complement) the traditional analog media integration with IP Office using Dialogic cards. The following are required for the UC server to use the TAPI-WAVE integration: The CTI License and TAPI2 Service Provider must be installed and configured (see Installing and Configuring CTI Link). TAPI2 Service Provider must be configured to allow for WAV users. 17


18 A valid Wave User license installed on the IP Office Key Server The TAPI-WAVE audio driver is installed on the UC server machine 6.2 ConfiguringTAPI2 Service Provider The TAPI2 Service Provider configuration is exactly the same as outlined in 5.3 Installing and ConfiguringTAPI2 Service Provider, with one additional step: 1. In Installing and ConfiguringTAPI2 Service Provider, after performing step 3 (and before clicking OK to close the dialog box) check the WAV Users check box. 2. Click OK and reboot the UC server. 6.3 Licensing the Wave User on the IP Office You are required to license the TAPI-WAVE audio driver to ensure correct operation in third-party mode. To install the Wave User license 1. Run the IP Office Manager. This can be installed from the IP Office Admin CD. 2. Load the configuration file for your IP Office. 3. Select License on the tree in the left hand window. 4. Right-click in the right hand window and select New. 5. Type the 32-character license key. The IP Office Manager indicates whether the license is valid or not. Note: You might have to restart the IP Office to verify that the license shows as valid. 18

19 6.4 Installing and Configuring TAPI-WAVE Audio Driver Installing the TAPI-WAVE Audio Driver The TAPI-WAVE driver is a 32-bit WAVE driver, and therefore only works on Windows Server 2003 and Windows XP. It is not plug-and-play so you must install it manually. It is included on the UC server installation CD. Windows XP and Windows Server 2003 Perform the following on the UC server machine: 1. Insert the UC server installation CD. 2. From the Control Panel, select Add Hardware. You will have to wait for your PC to do a search for new Devices which takes about 30 seconds. 3. Select Yes, I have already connected the hardware. 4. Select Add a new hardware device. 5. Select Install the hardware that I manually select from a list (Advanced). 6. Select Sound, video and game controllers. 7. Press the Have Disk button. 8. Navigate to the Redistrib\AvayaIPOfficeWaveDriver directory on the installation media (either CD or download). Select the oemsetup.inf file. Once the wave driver is installed, you must ensure that it is only used by TAPI. Otherwise, the system uses the driver inappropriately, which causes problems. From the Control Panel, select Sounds and Audio Devices. Ensure that no preferred devices use the WIDWOD32 driver. You also need to prevent its use explicitly by performing the following: 1. From the Control Panel, open Sounds and Audio Devices. 2. Select the Hardware tab. 3. From the list, select Avaya IP bit WIDWODDriver and click the Properties button. 4. Click the Properties tab. 5. Expand the Audio Devices list item, select Avaya IP400 WIDWOD driver, and click the Properties button. 6. Enable the box labeled Do not map through this device. 19
. 6.")
20 7 Configuring UC Server for Direct Answering The UC server can be configured to answer calls directly and play a defined greeting/announcement or route them to the defined destinations. Applications that can benefit from this ability are auto-attendants and DID fax services. 7.1 Company Auto Attendants To have the UC server answer trunks/lines directly as an auto-attendant, you must first create an attendant service and link it to an attendant identity (aka extension) or DID number. To create an Attendant Service 1. Launch UC Client and log in as admin (or using an authentication with administrative privileges). 2. Select the Services tab. 3. Right-click in the content view and select New > Service. 4. Type an appropriate name for the attendant service. For Example: Main Auto Attendant 5. Double-click the new service that you created in step 3. This launches the Service Editor. Build the attendant service as per instructions in the Server Administration Guide. To create an Attendant Identity 1. Launch UC Client and log in as admin (or using an authentication with administrative privileges). 2. Locate the Identities view from the Administration tab. 3. Create a new dialed number/ DID trunk by right-clicking in the Identities contents view (right hand pane) and select New Identity. 4. For the Select Identity Type page: a. For communication system, select Avaya IP Office. b. For user profile, select Admin. Note: Auto Attendants are typically associated with the Admin user profile unless you want specific service execution based on a user s profile and/or mailbox. c. For class of identity, select Attendant service. 20
. 2. Select the Services tab. 3.")
21 5. On the Attendant Identity page: a. For Name, type a name for the auto-attendant (e.g. Main Auto Attendant). b. For Address, type the extension of the Hunt Group created in Auto Attendant. c. For Behavior, select the service that you created in section Company Auto Attendants. NOTE: If the associated user for this new identity is in Personal Assistant mode then no service selection is possible. The behavior section instead presents two options: Voic and Receive Fax behavior. 6. Click Next, and then Finish on the following page. 21

22 7.2 DID Fax Services Implementing DID fax services for the UC server can be accomplished in one of two ways: 1. Assign a fax number when creating a new user with the New User Wizard. OR 2. Create an identity that represents the destination for the DID Fax number that is configured to receive a fax. The following sections describe both methods in detail Assigning a DID Fax Number Using the New User Wizard In the Phone number information section of the User Information page (third page in the wizard), the bottom of the page allows you to specify a fax number. In the diagram below, a user named Tim Miller is being created, with a regular identity (extension number) at 203, and a fax number at identity Follow through the rest of the wizard and specify details pertaining to the user you are creating. Once the wizard is complete, Tim Miller has two identities: a regular telephone extension, and a DID fax number that can immediately start to receive faxes Creating an identity to receive a fax In this section you will create a new identity which, when dialed, will automatically receive a fax. 1. Launch UC Client and log in as admin (or using an authentication with administrative privileges). 2. Under Administration, select Identities. 3. Create a new dialed number/ DID trunk by right-clicking in the Identities contents view (right hand pane) and select New Identity. 4. On the Select Identity Type page: 22
 For Address, enter the extension of the DID fax user created in section 4.5.")
23 For Communication System, select Avaya IP Office For user profile, select the user to associate with the new identity For class of identity, select User 5. On the Configure User Identity page: For Name, give an appropriate name for the identity (e.g. Tim s Fax Identity) For Address, enter the extension of the DID fax user created in section DID fax services. For Behavior, select Receive Fax 6. Click Next and then click Finish. 23
24 8 Centralized Voic for IP Office Versions Pre-4.2 This chapter provides instructions for configuring the UC server as a centralized voic solution for IP Office units running versions up to 4.1. In this configuration, each IP Office unit in the solution must be running versions up to 4.1. Note: If you are running IP Office version 4.2 (inclusive) or higher, please see 9 Centralized Voic for IP Office Versions 4.2 (and Higher). 8.1 Overview If your company requires that the UC server operates as the voic service for a main office and one or more remote IP Office sites (up to 16 sites total), then this section describes how to configure both the IP Office PBX and the UC server to work in this environment. 8.2 Network Topology Below is a diagram that depicts the typical UC server centralized voic scenario: Remote Office Corporate (Main) Office IP Office (remote) Hunt Group IP Office (main) T1/VPN link RemoteVM1-port1 RemoteVM1-port2 RemoteVM1-port3 Remote Agent Main Hunt Group MainVM-port1 MainVM-port2 MainVM-port3 Calls redirected to main hunt group Ancillary Hunt Group MainVM-port1 MainVM-port2 MainVM-port3 UC Server T1/VPN link IP Office (remote) Hunt Group RemoteVM2-port1 RemoteVM2-port2 RemoteVM2-port3 Remote Agent The UC server can serve as a centralized voic service in a distributed IP Office environment with the help of a Remote Agent application. This application is installed on a machine at each remote IP Office site requiring centralized voic capability, and the Remote Agent is configured remotely by 24
25 the UC server. The Remote Agent is responsible for redirecting incoming voic calls to the UC server at the corporate IP Office site and for toggling message waiting lights on telephones at the remote IP Office sites. The Remote Agent operates as follows: 1. Listens for calls forwarded to the remote site s voic hunt-group extensions via TAPI messages 2. Once a call is forwarded to one of these extensions, the Remote Agent then does two things: Sends the call party information along with a unique call identifier to the UC server running at the corporate site via TCP/IP Redirects the call to the corporate site IP Office at a special voic hunt-group 3. The corporate site IP Office then redirects the call to the UC server, which then handles the call as if it were placed to an extension at the corporate office site. 8.3 Small Community Networking Small Community Networking (SCN) aka Voice Networking is the only supported networked IP Office configuration for this solution. Consult your IP Office administration manuals for instructions on how to configure this correctly. 8.4 Configuration Procedure Overview The following is an overview of a typical configuration procedure for a centralized voic solution: Configure corporate IP Office Configure main voic hunt group containing extensions that correspond to the UC server voic ports Configure ancillary voic hunt group(s) for calls redirected from remote IP Office sites containing extension(s) that correspond to the UC server voic ports Configure the UC server Remote Agent and remote IP Office Install Remote Agent application and configure firewall Configure the remote IP Office with a voic hunt group containing extensions to be monitored by the Remote Agent Configure the UC server Configure the UC server to become aware of the each of the Remote Agents and the extensions they are monitoring 8.5 Configuring the Corporate IP Office The configuration of the corporate IP Office is almost the same as if you were integrating the UC server with IP Office for a single site (that is, as if there were no remote office locations). This means that the IP Office must be configured with a main voic hunt group that contains extensions that correspond to 25
26 the UC server voic ports (see 4.1 -Assigning and Configuring UC Server Ports for details). The difference between a single-site IP Office configuration and a multi-site centralized voic solution is the configuration of ancillary voic hunt group(s) for calls redirected from the remote IP Office sites Ancillary Voic Hunt Group(s) The additional configuration step for the corporate IP Office is the creation of other voic hunt groups that are used for calls redirected from the remote IP Office sites. The recommended (basic) configuration is to use a single voic hunt group for all calls redirected from all remote IP Office sites. An optional (advanced) configuration is to use different voic hunt groups for different remote IP Office sites. NOTE: Calls from a remote IP Office site should only be redirected to the ancillary voic hunt group(s) at the corporate IP Office. Basic Configuration Create a voic hunt group by following the instructions in Hunt Group. The extension list for this new voic hunt group contains exactly the same extensions as the corporate IP Office The UC server voic hunt group (that is, contains all UC server ports as extension members). All remote IP Office sites will have calls redirected to this ancillary voic hunt group. For example, in a 4-port UC server analog integration: Main UC server voic hunt group (For calls originating from the corporate IP Office) Name: UCServerHuntGroup Extension: 400 Members: 100, 101, 102, 103 Ancillary UC server voic hunt group (For all calls originating at all remote IP Office sites) Name: UCServerAncillaryHuntGroup Extension: 500 Members: 100, 101, 102, 103 Advanced Configuration If desired, different remote IP Office sites can have their calls redirected to different voic hunt groups at the corporate IP Office, which in turn can have different UC server port extension members. The number of UC server port extensions for each voic hunt group depends on the requirements for the individual remote IP Office sites. For example, one remote IP Office site requires more bandwidth than all other remote sites because it has more employees, and hence more extensions and more call traffic. In this case, you might want to dedicate more UC server port extensions for this large remote site. To accomplish this, you create two ancillary voic hunt groups: one ancillary hunt group for the large remote IP Office site with many UC server port extensions, and another ancillary voic hunt group that serves the rest of the remote IP Offices with a subset of or the remaining UC server port extensions. For example, in an 8-port UC server analog integration: 26
27 Main UC server voic hunt group (For calls originating from the corporate IP Office) Name: UCServerHuntGroup Extension: 400 Members: 100, 101, 102, 103 Ancillary UC server voic hunt group 1 (For call originating at the large remote IP Office site) Name: UCServerAncillaryHuntGroup1 Extension: 500 Members: 104, 105, 106, Configuring a Remote IP Office Agent Installation Ancillary UC server voic hunt group 2 (For all calls originating at the remaining remote IP Office sites) Name: UCServerAncillaryHuntGroup2 Extension: 600 Members: 104, 105 Each remote office site requires an installation of the Remote Agent on a machine in the LAN. Limitations and Restrictions The computer that hosts the Remote Agent must have a static IP address. The UC server (corporate/main site) and the remote IP Office sites must be connected via a VPN or T1/FR. Each IP Office location must include a CTI Link Pro license. Pre-Agent Installation Prior to installing the Remote Agent, the host computer must have Avaya s TAPI driver installed. The driver must be configured to point to the remote IP Office unit you must therefore know in advance the IP address for the remote IP Office unit. See 5 Installing and Configuring CTI Link for instructions about configuring the TAPI driver; disregard any literal references to the UC server (that is, skip step #5). Installing the Agent 1. Run the Remote Agent installer application located on the installation CD. 2. When prompted, choose an installation directory. 3. When prompted, choose a password that the UC server will use to authenticate with the Remote Agent. 27
28 4. When prompted, choose a TCP port to communicate with the UC server. NOTE: Be sure that the chosen TCP port is not being used by another application Firewall Configuration After the Remote Agent application is installed, you must ensure that the UC server can communicate with the Remote Agent using the chosen port. If the built-in Windows Firewall is enabled, it must be configured for proper UC Server operation. Failure to configure the Windows Firewall correctly will likely prevent calls from being redirected to the central IP Office voic hunt group. To verify your Windows Firewall settings (for Windows XP and Vista): 1. Click Start > Control Panel. 2. Double-click Windows Firewall. The following dialog appears: 3. Verify that the General tab has one of the following options selected: a) OR [Windows XP] The Windows Firewall is On; and Don t allow exceptions is disabled [Windows Vista] The Windows Firewall is On; and no exceptions exist in the Exceptions tab b) The Windows Firewall is Off. 28
29 4. If condition 3(a) is satisfied then a new exception must be added in order to allow traffic to the Remote Agent port: a) Click the Exceptions tab, and click Add Port. b) Give the port exception a name like UC Server Remote Agent (the name is arbitrary and is for your reference). c) Enter the port number that was entered during the Remote Agent installation and the same value used when configuring the Remote Agent parameters in the administration user interface. d) Select TCP, and then click OK Remote IP Office Configuration When installing and configuring the remote IP Office, follow the same steps as the installation of the corporate IP Office. Note: The instructions defined in Configuring IP Office for Direct Answer by UC Server can be used to create auto-attendants and DID fax services for the remote IP Office sites. The remote IP Office unit requires the following to enable centralized voic capability: CTI Link license Unique dialing plan and display names Voic hunt-group, Modified Default No Answer Time Short code for redirecting calls CTI Link License Each remote IP Office must have a valid and correctly configured CTI Link Pro license (see Licensing the CTI TAPI Link Pro on the IP Office). Unique dialing plan and display names To ensure that the UC server can correctly identify the associated mailbox for each forwarded call and that proper message waiting light toggling takes place, all extensions in the corporate and remote offices must be unique. In other words, once an extension number is used at any site (either at the corporate or a remote office) it must not be used again anywhere else. As mentioned earlier, when calls are redirected by the Remote Agent at the remote office, the Remote Agent first sends the call-party information along with a unique identifier. This unique identifier is derived from the user name associated with the extension (as defined in the IP Office Manager application). The display names for each user extension must therefore be unique (for the first 12 characters) to ensure that messages are deposited in the correct mailbox and for message-waiting light toggling to operate correctly. 29
30 Remote UC Server Voic Hunt Group The remote IP Office must have its own voic hunt group where unanswered calls at the remote site are forwarded. This hunt group consists of special extensions that are monitored by the Remote Agent. These extensions must be real extensions and must be able to receive incoming calls, but must not be in use. When calls are forwarded to this voic hunt group the Remote Agent intercepts the calls and redirects them to the corporate site ancillary The UC server voic hunt group (not the corporate site main UC server voic hunt group; see Ancillary Voic Hunt Group(s) for clarification) to ensure proper port provisioning. The extensions must be one of the following types: TAPI/Wave Analog Digital This requires a TAPI/Wave license for the remote IP Office and that TAPI/Wave is correctly configured on the Remote Agent host machine. A physical analog telephone need not be plugged into the corresponding port. A physical digital telephone must be plugged into the corresponding digital port. Keep the following items in mind when creating this hunt group: The extensions in this remote site voic hunt group are not the same extensions as those in the main site UC server voic hunt group. Like all other extensions at all sites, the remote site voic hunt group must have a unique extension number. If the UC server is the only system defined voic (that is, Group Voic ) at the remote site, follow the instructions in UC Server as the ONLY System Defined Voic and use the extensions described above. o Note: The Default No Answer Time value (under the System Telephony tab) must be less than the corresponding setting at the corporate IP Office site. For example: - Corporate site IP Office Default No Answer Time : 20 seconds - Remote site IP Office Default No Answer Time : 15 seconds Example: If the UC server is used with Voic Pro at the remote site, then follow instructions in UC Server in Parallel with Voic and use the extensions described above. Remote UC server voic hunt group Name: UCServerRemoteHuntGroup Extension: 600 Members: 397, 398,
31 Shorter No-Answer Time The remote site IP Office unit must be configured with a shorter default no-answer time value (compared to the main site IP Office). This is to ensure that the main site IP Office doesn t pull back the call before the Remote Agent can properly redirect it. This value must be at least 3 seconds lower than the corresponding main site IP Office value. The default no-answer time value can be configured using the IP Office Manager, in the System category under the Telephony tab. Short code A short code for the remote IP Office can be used to create transparent dialing plans across all IP Office sites, and can also be used to redirect calls to the ancillary voic hunt group at the corporate IP Office site. Using the figures in the example in Ancillary Voic Hunt Group(s), we have two hunt groups at the corporate site: Main UC server voic hunt group (For calls originating from the corporate IP Office) Name: UCServerHuntGroup Extension: 400 Members: 100, 101, 102, 103 Ancillary UC server voic hunt group (For all calls originating at all remote IP Office sites) Name: UCServerAncillaryHuntGroup Extension: 500 Members: 100, 101, 102, 103 We will create a short code that, when dialed, will redirect calls to the corporate site IP Office. Let s suppose that the IP Trunk (line) connecting the corporate and remote IP Office units has an outgoing group ID of 71. Let s create a short code so that when a 6 followed by any number of digits is dialed, the digits (proceeding 6) will be passed through to the corporate site IP Office. In this case the following short code parameters would be used: This is a generic configuration for routing calls from the remote to the corporate site. We can also use this shortcode for configuring the Remote Agents to redirect calls to the ancillary The UC server voic hunt group (see Ancillary Voic Hunt Group(s) for details on how this shortcode is used). 8.7 Configuring the UC Server The remaining Remote Agent configuration is performed through the UC Client administration user interface To create the Remote Agent 1. Launch UC Client and log in as admin (or using an authentication with administrative privileges). 31
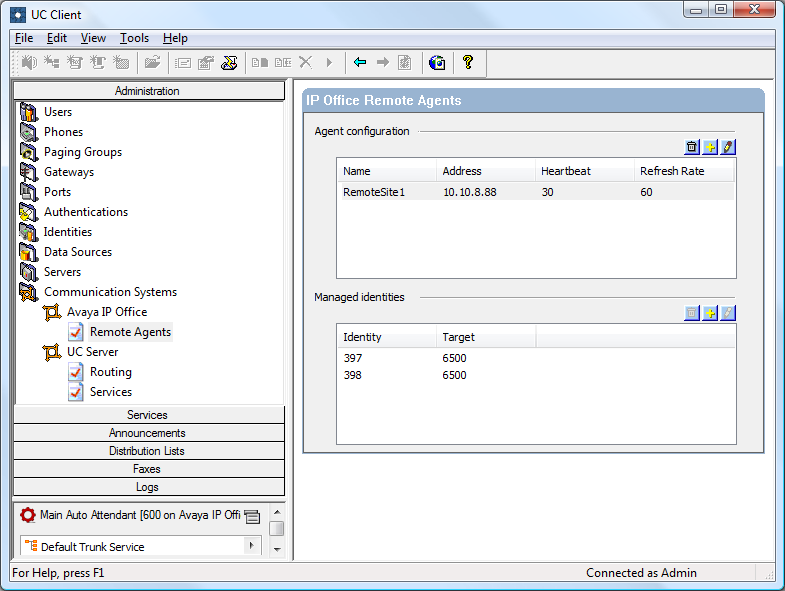
32 2. Locate the Communication Systems view from the Administration tab. If you cannot see any items under Communication Systems, then double-click Communication Systems. Select Remote Agents under the Avaya IP Office item (see the image below). 3. Create a Remote Agent for the remote IP Office location that is to use the UC server as the centralized voic by clicking the yellow plus-sign button above the Remote Agent list. This opens a dialog that allows you to specify details about a remote IP Office: Unique Name: Give the Remote Agent an appropriate display name. Network address: Specify the IP address for the Remote Agent machine. Password: Enter the password to connect to the Remote Agent. This password must be the same as the value provided during the Remote Agent installation (see section Agent Installation). Heartbeat: enter a value (in seconds) to specify the time period which the UC server will verify that communication with this Remote Agent is possible. Default value is 30 seconds. Refresh: enter a value (in seconds) to specify the time period which the UC server will check for changes in the list of extensions on this remote site (so MWI can be set correctly). Default value is 60 seconds. 4. Click OK to save the changes. 32

33 5. Repeat Steps 1-4 for every remote IP Office site that will have (or has) a Remote Agent installed. NOTE: If the Remote Agent is not installed prior to this configuration, you receive a warning dialog indicating that the UC server was unable to connect to the Remote Agent. The UC server continues to attempt to connect to the Remote Agent until a connection can be made Configure the Identities to Monitor For each Remote Agent you need to specify the identities (aka extensions) to monitor that are part of the remote IP Office s voic hunt group. 1. Select the newly created Remote Agent in the list. 2. Click the yellow plus-sign button above the managed identities list. The following dialog appears: 3. For Identity, enter the extension number to monitor at the remote IP office site. The extension number will be one of the extensions present in the remote site UC server voic hunt group. See 4 - Programming IP Office for more information. 4. Enter the target ancillary UC server voic hunt group number. This is the number you would dial from the remote site to reach the ancillary UC server voic hunt group at the corporate IP Office site (see the example below that puts it all together. 5. Click OK. 6. Repeat Steps 1-5 for every extension to monitor at the remote IP Office site. In the image below there is one remote IP Office site configured. The name of the machine where the Remote Agent is installed is called RemoteSite1. As in the previous example, the remote IP Office site has three extensions in the remote UC server voic hunt group: 397, and 398. These extensions are those that are being monitored by the Remote Agent. The target number has been defined as This is because the short code to reach the corporate IP Office site from this remote site is 6N, and 500 is the ancillary UC server voic hunt group extension number. This means when calls arrive at 397, or 398, the call will be redirected to the corporate IP Office site at extension
34 34
35 8.8 Centralized Voic Worksheet Corporate IP Office UC Server VM Ports Remote IP Office Site 1 Name Extension Remote UC Server VM Hunt Group Name: Extension: Members: Main UC Server VM Hunt Group Name: Extension: Members: Remote IP Office Site 2 Remote UC Server VM Hunt Group Name: Extension: Members: Ancillary UC Server VM Hunt Group Name: Extension: 35
36 Members: Remote IP Office Site 3 Remote UC Server VM Hunt Group Name: Extension: Members: 9 Centralized Voic for IP Office Versions 4.2 (and Higher) This chapter provides instructions for configuring the UC server as a centralized voic solution for IP Office units running firmware versions 4.2 and higher. In this configuration, each IP Office unit in the solution must be running version 4.2 or higher. Note: If you are running IP Office version pre-4.2 (non inclusive), please see 8 - Centralized Voic for IP Office Versions Pre Overview If your company requires that the UC server operates as the voic service for a main office and one or more remote IP Office sites (up to 16 sites total), then this section describes how to configure both the IP Office PBX and the UC server to work in this environment. 9.2 Network Topology Below is a diagram that depicts the typical UC server centralized voic scenario: 36
37 Remote Offices Corporate (Main) Office IP Office (remote) IP Office (main) T1/VPN link Remote Agent Main Hunt Group CAO-main1 CAO-main2... CAO-mainX Calls redirected to main hunt group T1/VPN link IP Office (remote) UC Server Remote Agent The UC server can serve as a centralized voic service in a distributed IP Office environment with the help of a Remote Agent application. This application is installed on a machine at each remote IP Office site requiring centralized voic capability. The Remote Agent is responsible for toggling message waiting lights on telephones at the remote IP Office sites. 9.3 Small Community Networking Small Community Networking (SCN) aka Voice Networking is the only supported networked IP Office configuration for this solution. Consult your IP Office administration manuals for instructions on how to configure this correctly. 9.4 Configuration Procedure Overview The following is an overview of a typical configuration procedure for a centralized voic solution: Configure corporate IP Office Configure main voic hunt group containing extensions that correspond to the UC server voic ports Install and configure UC server remote agent Install Remote Agent application and configure firewall 37
38 Configure Remote IP Office(s) Apply configuration changes to the remote IP Office(s) to support centralized voic Configure the UC server Add remote agents and configure remote manage mailbox service 9.5 Configuring the Corporate IP Office The configuration of the corporate IP Office is the same as if you were integrating the UC server with IP Office for a single site (that is, as if there were no remote office locations). This means that the IP Office must be configured with a main voic hunt group that contains extensions that correspond to the UC server voic ports (see Assigning and Configuring UC Server Ports for details). 9.6 Configuring the Remote IP Office(s) Agent Installation Each remote office site requires an installation of the Remote Agent on a machine in the LAN. Limitations and Restrictions The computer that hosts the Remote Agent must have a static IP address. The UC server (corporate/main site) and the remote IP Office sites must be connected via a VPN or T1/FR. Each IP Office location must include a CTI Link Pro license. Pre-Agent Installation Prior to installing the Remote Agent, the host computer must have Avaya s TAPI driver installed. The driver must be configured to point to the remote IP Office unit you must therefore know in advance the IP address for the remote IP Office unit. See 5 Installing and Configuring CTI Link for instructions about configuring the TAPI driver; disregard any literal references to UC server (that is, skip step #5). Installing the Remote Agent 1. Run the Remote Agent installer application located on the installation CD. 2. When prompted, choose an installation directory. 3. When prompted, choose a password that the UC server will use to authenticate with the Remote Agent. 4. When prompted, choose a TCP port to communicate with the UC server. Ensure that the chosen TCP port is not being used by another application. 38
39 9.6.2 Firewall Configuration After the Remote Agent application is installed, you must ensure that the UC server can communicate with the Remote Agent using the chosen port. If the built-in Windows Firewall is enabled, it must be configured for proper UC server operation. Failure to configure the Windows Firewall correctly will likely prevent calls from being redirected to the central IP Office voic hunt group. To verify your Windows Firewall settings (Windows XP and Vista): 1. Click Start > Control Panel. 2. Double-click Windows Firewall. The following dialog appears: 4. Verify that the General tab has one of the following options selected: a) OR [Windows XP] The Windows Firewall is On; and Don t allow exceptions is disabled [Windows Vista] The Windows Firewall is On; and no exceptions exist in the Exceptions tab b) The Windows Firewall is Off. 5. If condition 3(a) is satisfied then a new exception must be added in order to allow traffic to the Remote Agent port: e) Click the Exceptions tab, and click Add Port. f) Give the port exception a name like UC Server Remote Agent (the name is arbitrary and is for your reference). 39
40 g) Enter the port number that was entered during the Remote Agent installation and the same value used when configuring the Remote Agent parameters in the administration user interface. h) Select TCP, and then click OK Remote IP Office Configuration The remote IP Office unit requires the following to enable centralized voic capability: Valid CTI Link license Unique dialing plan and display names System voic set to Centralized Voic Short code for redirecting voic calls to the corporate IP Office site (optional) Incoming Call Route to ensure that PSTN calls at the remote site are redirected to a UC server auto attendant. CTI Link License Each remote IP Office must have a valid and correctly configured CTI Link Pro license (see Licensing the CTI TAPI Link Pro on the IP Office). Unique dialing plan and display names To ensure that the UC server can correctly identify the associated mailbox for each forwarded call and that proper message waiting light toggling takes place, all extensions in the corporate and remote offices must be unique. In other words, once an extension number is used at any site (either at the corporate or a remote office) it must not be used again anywhere else. As mentioned earlier, when calls are redirected by the Remote Agent at the remote office, the Remote Agent first sends the call-party information along with a unique identifier. This unique identifier is derived from the user name associated with the extension (as defined in the IP Office Manager application). The display names for each user extension must therefore be unique (for the first 12 characters) to ensure that messages are deposited in the correct mailbox and for message-waiting light toggling to operate correctly. System Voic The remote site IP Office must have its System Voic Type set to Centralized Voic . The Voic Destination must correspond to the group Id for the IP Line connecting the remote site IP Office to the corporate IP Office. In the following example, the IP Line (connecting this remote site IP Office and the corporate IP Office) has a Line Group Id of

41 Short code (for voic access) A short code at the remote IP Office can be used to simulate the main site voic pilot number so that all users at all sites can use the same number to access their voic mailbox using the telephone. This voic pilot number corresponds to the number assigned to the main voic hunt group number at the corporate site. In the following example image, the corporate IP Office voic hunt group number is 500, and the IP Line (connecting this remote site IP Office and the corporate IP Office) has a Line Group Id of 72. This short code will allow users at this remote site to dial 500 to access their voic mailbox. Incoming Call Route (for common auto-attendants) If the remote site IP Office has PSTN connectivity, and if you expect that external call traffic arriving at the remote site IP Office will be answered by the same auto-attendant running at the corporate site IP Office, then you will need to configure an incoming call route to do so. In the following example, external calls arrive at the remote site IP Office via an analog trunk with Line Group Id 0, and are routed to the corporate site IP Office s main auto attendant hunt group at 600 via the IP Line with Group Id 72: Standard Tab 41
. 2. Locate the Communication Systems view from the Administration tab.")
42 Destinations Tab 9.7 Configuring the UC Server The remaining Remote Agent configuration is performed through the UC Client administration user interface Remote Agent Configuration 1. Launch UC Client and log in as admin (or using an authentication with administrative privileges). 2. Locate the Communication Systems view from the Administration tab. If you cannot see any items under Communication Systems, then double-click Communication Systems. Select Remote Agents under the Avaya IP Office item (see the image below). 42

43 3. Create a Remote Agent for the remote IP Office location that is to use the UC server as the centralized voic by clicking the yellow plus-sign button above the Remote Agent list. This opens a dialog that allows you to specify details about a remote IP Office. Unique Name: Give the Remote Agent an appropriate display name. Network address: Specify the IP address for the Remote Agent machine. Password: Enter the password to connect to the Remote Agent. This password must be the same as the value provided during the Remote Agent installation (see section Agent Installation). Remote Agent is possible. The default value is 30 seconds. Heartbeat: Enter a value (in seconds) to specify the time period which the UC server will verify that communication with this Refresh: Enter a value (in seconds) to specify the time period which the UC server will check for changes in the list of extensions on this remote site (so MWI can be set correctly). The default value is 60 seconds. 4. Click OK to save the changes. 5. Repeat Steps 1-4 for every remote IP Office site that will have (or has) a Remote Agent installed. Note: If the Remote Agent is not installed prior to this configuration, you receive a warning dialog indicating that the UC server was unable to connect to the Remote Agent. The UC server continues to attempt to connect to the Remote Agent until a connection can be made. Note: in these versions of IP Office, it is not necessary to add any Managed Identities Remote Voic Service An attendant identity with a specific service must be created in order to field voic calls from remote locations. This service is pre-built and is located in the accompanying zip file entitled TN012 IP Office Integration.zip. The service must be copied to the UC server program directory and associated with an identity. To import the service 1. Open the accompanying zip file entitled TN012 IP Office Integration.zip, and extract the only file Manage_Mailbox.srv to the following location:.\program Files\ADTRAN\NetVanta UC Server\Data\Users\ \Services To create the attendant identity 1. Launch UC Client and log in as admin (or using an authentication with administrative privileges). 43

44 2. Under Administration, select Identities. 3. Right-click under the existing identities and select New Identity. 4. For the Select Identity Type page: a. For Communication System, select Avaya IP Office b. For user profile, select Admin c. For class of identity, select Attendant service 5. For the Configure Attendant Identity page: a. For Name, type Manage Mailbox b. For Address, enter the IP Office voic hunt group number. In the previous example, this was 500. c. For Run Service, click the value selector button, and select Services > Manage_Mailbox 44

45 6. Finish the Wizard. 10 Upgrading IP Office Considerations When upgrading IP Office there are some considerations that must be taken into account. Please read the following sections carefully before upgrading IP Office Upgrading the IP Office Units Before you upgrade the IP Office units, make sure that the version you wish to upgrade is supported with the version of UC server that you are running. This information can be found in Appendix A - Recommended IP Office and UC Server Version Pairings Based on Integration Type Upgrading Additional Components Avaya updates other IP Office components from time to time that are not part of the Admin CD installation. These components include (but are not necessarily limited to) the TAPI driver and the TAPI- WAVE driver. In order to ensure that these components are kept up to date with the Admin CD installation and IP Office binary version it is imperative that you also upgrade the TAPI components. The TAPI components should be upgraded after IP Office has been upgraded Upgrading the TAPI Driver Follow the instructions outlined in Installing and ConfiguringTAPI2 Service Provider Upgrading the TAPI-WAVE Driver This step is only required if you re using TAPI-WAVE ports. To upgrade the TAPI-WAVE driver, follow the instructions outlined in Installing and Configuring TAPI-WAVE Audio Driver. 45
Application Notes for DuVoice with Avaya IP Office 8.1 Issue 1.1
 Avaya Solution & Interoperability Test Lab Application Notes for DuVoice with Avaya IP Office 8.1 Issue 1.1 Abstract These Application Notes describe the configuration steps required for the DuVoice hospitality
Avaya IP Office Platform Web Self Administration
 Avaya IP Office Platform Web Self Administration Release 9.1 Issue 01.02 August 2015 Contents Chapter 1: Avaya IP Office Platform Web Self Administration... 3 Logging in to Web Self Administration... 3
FortiVoice. Version 7.00 Start Guide
 FortiVoice Version 7.00 Start Guide FortiVoice Version 7.00 Start Guide Revision 2 18 October 2011 Copyright 2011 Fortinet, Inc. All rights reserved. Contents and terms are subject to change by Fortinet
How To Test Fcs Winexpress On An Ipo On A Pc Or Mac Xp (Windows) On A Microsoft V3.3.5 (Windows Xp) On An Iphone Or Ipo (Windows V3) On Pc
 On A Microsoft V3.3.5 (Windows Xp) On An Iphone Or Ipo (Windows V3) On Pc") Avaya Solution & Interoperability Test Lab Application Notes for FCS WinExpress 2.0 with Avaya IP Office 6.1 Issue 1.1 Abstract These Application Notes describe the configuration steps required for FCS
Avaya Solution & Interoperability Test Lab Application Notes for FCS WinExpress 2.0 with Avaya IP Office 6.1 Issue 1.1 Abstract These Application Notes describe the configuration steps required for FCS
NetVanta Unified Communications Server. Administrator Guide. Version 5.2
 NetVanta Unified Communications NetVanta Unified Communications Server Administrator Guide Version 5.2 619500001-1B September 2012 UCS Administrator Guide Trademarks Any brand names and product names included
Load Bulletin ADP, Inc. Dealer Services 1950 Hassell Road Hoffman Estates, IL 60169-6308
 Load Bulletin ADP, Inc. Dealer Services 1950 Hassell Road Hoffman Estates, IL 60169-6308 Make sure the media label contains this number: NP-ASP-AE1.0 ADP Network Phone ASP Assistant Enterprise Loading
Jenne TTS. IP Office. Scrapbook. Of Job Aids
 Jenne TTS IP Office Scrapbook Of Job Aids Table of Contents Page Topic 3 1 - Basic IP Office Punch list 4 2 - Most wanted Short Codes 7 3 - IP Office upgrade procedure 8 4 - Small community Networking
Magaya Software Installation Guide
 Magaya Software Installation Guide MAGAYA SOFTWARE INSTALLATION GUIDE INTRODUCTION Introduction This installation guide explains the system requirements for installing any Magaya software, the steps to
Empowered by Innovation. Setting Up and Using Fax Mail. P/N 1770087 July 2006 Printed in U.S.A.
 Empowered by Innovation Setting Up and Using Fax Mail P/N 1770087 July 2006 Printed in U.S.A. This manual has been developed by NEC Unified Solutions, Inc. It is intended for the use of its customers and
Using Avaya Flare Experience for Windows
 Using Avaya Flare Experience for Windows Release 9.0 Issue 02.01 September 2013 Contents Chapter 1: About Flare Experience... 5 About Flare Experience... 5 Main window... 6 Button descriptions... 10 Chapter
IP Office Phone Manager Users Guide
 IP Office Phone Manager Users Guide 40DHB0002USAR Issue 6 (03/04/2002) Contents Getting Started... 3 Introduction... 3 Getting Started... 4 Phone Manager... 5 Main Window... 5 Call Status... 6 Call History...
Application Notes for MultiTech FaxFinder FFx40 Software version 1.1.8 with Avaya IP Office 8.0 Issue 1.0
 Avaya Solution & Interoperability Test Lab Application Notes for MultiTech FaxFinder FFx40 Software version 1.1.8 with Avaya IP Office 8.0 Issue 1.0 Abstract These Application Notes describe the configuration
Personal Call Manager User Guide. BCM Business Communications Manager
 Personal Call Manager User Guide BCM Business Communications Manager Document Status: Standard Document Version: 04.01 Document Number: NN40010-104 Date: August 2008 Copyright Nortel Networks 2005 2008
Allworx OfficeSafe Operations Guide Release 6.0
 Allworx OfficeSafe Operations Guide Release 6.0 No part of this publication may be reproduced, stored in a retrieval system, or transmitted, in any form or by any means, electronic, mechanical, photocopy,
NetVanta Unified Communications. NetVanta Unified Communications Server. Configuration Guide
 NetVanta Unified Communications NetVanta Unified Communications Server Configuration Guide 619500001-29A October 2009 Trademarks Unified Communications Server Trademarks Any brand names and product names
Application Notes for DuVoice with Avaya IP Office 9.0 Issue 1.0
 Avaya Solution & Interoperability Test Lab Application Notes for DuVoice with Avaya IP Office 9.0 Issue 1.0 Abstract These Application Notes describe the configuration steps required for the DuVoice hospitality
IP Office Voicemail. 40DHB0002USAV Issue 4 (12/10/2001)
") IP Office Voicemail 40DHB0002USAV Issue 4 (12/10/2001) Contents Page ii Voicemail... 3 Introduction to Voicemail... 3 Voicemail Pro... 3 Installation... 4 Voicemail Server Installation Requirements...
IP Office Voicemail 40DHB0002USAV Issue 4 (12/10/2001) Contents Page ii Voicemail... 3 Introduction to Voicemail... 3 Voicemail Pro... 3 Installation... 4 Voicemail Server Installation Requirements...
Application Notes for Microsoft Office Communicator Clients with Avaya Communication Manager Phones - Issue 1.1
 Avaya Solution & Interoperability Test Lab Application Notes for Microsoft Office Communicator Clients with Avaya Communication Manager Phones - Issue 1.1 Abstract These Application Notes describe the
exchange Call Center Quick Installation Guide
 3Com exchange Call Center Quick Installation Guide Version 4.33 http://www.3com.com Part Number: 900-0150-01 Rev AA Published May 2004 3Com Corporation, 350 Campus Drive, Marlborough, MA 01752-3064 Copyright
Application Notes for DuVoice Emergency Alert System with Avaya IP Office 9.0 Issue 1.0
 Avaya Solution & Interoperability Test Lab Application Notes for DuVoice Emergency Alert System with Avaya IP Office 9.0 Issue 1.0 Abstract These Application Notes describe the configuration steps required
How to Configure the Cisco UC500 for use with Integra Telecom SIP Solutions
 How to Configure the Cisco UC500 for use with Integra Telecom SIP Solutions Overview: This document provides a reference for configuration of the Cisco UC500 IP PBX to connect to Integra Telecom SIP Trunks.
FortiVoice. Version 7.00 User Guide
 FortiVoice Version 7.00 User Guide FortiVoice Version 7.00 User Guide Revision 2 28 October 2011 Copyright 2011 Fortinet, Inc. All rights reserved. Contents and terms are subject to change by Fortinet
Table of Contents GETTING STARTED... 3. Enter Password Dialog...3 Using Online Help...3 System Configuration Menu...4
 Table of Contents DV2000 Configuration - Service Release 3.0 GETTING STARTED... 3 Enter Password Dialog...3 Using Online Help...3 System Configuration Menu...4 SYSTEM CONFIGURATION OVERVIEW... 5 Using
Using Avaya Aura Messaging
 Using Avaya Aura Messaging Release 6.3.2 Issue 1 December 2014 Contents Chapter 1: Getting Started... 4 Messaging overview... 4 Prerequisites... 4 Accessing your mailbox from any phone... 4 Accessing the
Configuring CyberData VoIP Ceiling Speakers
 NetVanta Unified Communications Technical Note Configuring CyberData VoIP Ceiling Speakers Introduction The CyberData Voice over IP (VoIP) ceiling speaker connects to existing local area networks (LANs)
IP Office 3.2 Phone Manager User Guide
 IP Office 3.2 Phone Manager User Guide 15-600988 Issue 14b (14 th June 2006) 2006 Avaya Inc. All Rights Reserved. Introduction Notice While reasonable efforts were made to ensure that the information in
Enghouse Interactive. Vision 80/20 Avaya IP Office. Installation manual - Avaya IP Office. Version 3.0
 Enghouse Interactive Installation manual - Avaya IP Office Vision 80/20 Avaya IP Office Version 3.0 All material is copyright protected and belongs to Visionutveckling. The material may not be sold, distributed
Cloud Voice Service Cloud Communicator User Guide. (Version 1.0)
") Cloud Voice Service Cloud Communicator User Guide (Version 1.0) Table of Content 1.0 Cloud Communicator Installation Guide... 3 1.1 Install Cisco AnyConnect VPN...3 1.2 Install Cisco IP Communicator...5
Cloud Voice Service Cloud Communicator User Guide (Version 1.0) Table of Content 1.0 Cloud Communicator Installation Guide... 3 1.1 Install Cisco AnyConnect VPN...3 1.2 Install Cisco IP Communicator...5
IP Office - Job Aid Voicemail Pro Example Exercises
 IP Office - Job Aid Voicemail Pro Example Exercises 048 Issue 2 (21st January 2003) Contents Voicemail Pro Example Exercises... 3 Introduction... 3 1. System Setup... 4 2. Creating a New Module...6 3.
Wave IP 2.0 SP1. Wave ViewPoint User Guide
 Wave IP 2.0 SP1 Wave ViewPoint User Guide 2011 by Vertical Communications, Inc. All rights reserved. Vertical Communications and the Vertical Communications logo and combinations thereof and Vertical ViewPoint
RiOffice Users Manual
 RiOffice Users Manual Rio Networks 9/23/2009 Contents Available Services... 4 Core PBX Features... 4 Voicemail Features... 4 Call Center Features... 4 Call Features... 4 Using Your Phone... 5 Phone Layout...
Back Office Recorder 4iP Installation Guide Intelligent Recording Limited
 Back Office Recorder 4iP Installation Guide Intelligent Recording Limited Downloads Available at www.usbcallrecord.com UK Office +44 (0) 1909 512148 US Office +1 949.587.1226 Copyright Intelligent Recording
IP PBX. SD Card Slot. FXO Ports. PBX WAN port. FXO Ports LED, RED means online
 1 IP PBX SD Card Slot FXO Ports PBX LAN port PBX WAN port FXO Ports LED, RED means online 2 Connect the IP PBX to Your LAN Internet PSTN Router Ethernet Switch FXO Ports 3 Access the PBX s WEB GUI The
UX Mail Fax Features. Empowered by Innovation. P/N 0913251 Rev 1, September 15, 2008 Printed in U.S.A. V4.21
 Empowered by Innovation UX Mail Fax Features P/N 0913251 Rev 1, September 15, 2008 Printed in U.S.A. V4.21 For additional resources, visit UX5000 on the web at http://www.necux5000.com. This manual has
1 VoIP/PBX Axxess Server
 - 1 1 VoIP/PBX Axxess Server The Axxess Server supports comprehensive Voice Over Internet Protocol network services, which are based on the Open Source Asterisk VoIP software. The Axxess Server VoIP telephony
BillQuick Agent 2010 Getting Started Guide
 Time Billing and Project Management Software Built With Your Industry Knowledge BillQuick Agent 2010 Getting Started Guide BQE Software, Inc. 2601 Airport Drive Suite 380 Torrance CA 90505 Support: (310)
Business Solutions. Page 1
 2012 C Page 1 Contents Getting Started emerge Dashboard Login... 3 Main Profile Screen... 5 Group Services... 5 Auto Attendant Overview... 7 Modifying Auto Attendant Settings... 7 Auto Attendant Modify
Corporate Telephony Toolbar User Guide
 Corporate Telephony Toolbar User Guide 1 Table of Contents 1 Introduction...6 1.1 About Corporate Telephony Toolbar... 6 1.2 About This Guide... 6 1.3 Accessing The Toolbar... 6 1.4 First Time Login...
Positron G-320 Business Phone System Setup Guide
 Positron G-320 Business Phone System Setup Guide 5101 Buchan Street, Suite 200 Montreal, Quebec H4P 2R9 Phone: (514)-345-2220 Support: (514)-664-4719 July 2011 Steps Once your Positron G-320 unit hardware
Hosted VoIP Phone System. Desktop Toolbar User Guide
 Hosted VoIP Phone System Desktop Toolbar User Guide Contents 1 Introduction... 3 1.1 System Requirements... 3 2 Installing the Telesystem Hosted VoIP Toolbar... 4 3 Accessing the Hosted VoIP Toolbar...
Application Notes for Configuring Broadvox SIP Trunking with Avaya IP Office - Issue 1.0
 Avaya Solution & Interoperability Test Lab Application Notes for Configuring Broadvox SIP Trunking with Avaya IP Office - Issue 1.0 Abstract These Application Notes describe the procedures for configuring
To ensure you successfully install Timico VoIP for Business you must follow the steps in sequence:
 To ensure you successfully install Timico VoIP for Business you must follow the steps in sequence: Firewall Settings - you may need to check with your technical department Step 1 Install Hardware Step
CPEi 800/825 Series. User Manual. * Please see the Introduction Section
 CPEi 800/825 Series User Manual * Please see the Introduction Section Contents Introduction...iii Chapter 1: CPEi 800/825 User Guide Overview... 1-1 Powerful Features in a Single Unit... 1-2 Front of the
Virtual Office Account Manager Phone System Setup Guide. 8x8 Virtual Office Phone System Setup Guide
 8x8 Virtual Office Version 1.1, October 2011 Contents Introduction...3 System Requirements...4 Supported Operating Systems....4 Required Plug-ins....4 Supported Browsers....4 Required Firewall Ports...4
Quick Installation and Configuration Guide OX10
 Quick Installation and Configuration Guide OX10 Hybrid Office Business Telephone System with Built-In Analog Phone Ports, CO Line Ports and SIP Adaptors Table of Contents 1. INTRODUCTION... 3 2. GETTING
Voice Mail. Objectives. When you finish this module, you will be able to:
 Voice Mail 23 Objectives When you finish this module, you will be able to: Verify that the Embedded Voice Mail (EVM) application can record and play messages. Check the EVM health. Maintain the EVM system.
Central Management System
 Central Management System Software Installation Guide Ver. 1.5.0.101115.001 ... ii System Introduction... 3 Client/Server Architecture...3 System Requirements... 4 System Setup...4 Multiple Monitor Configuration...5
Zed One Hosted VoIP Telephony User Guide. A document to provide end user guidance on enterprise-class Hosted VoIP Telephony solution.
 Zed One Hosted VoIP Telephony User Guide A document to provide end user guidance on enterprise-class Hosted VoIP Telephony solution. Contents Unity Desktop Client Quick Start User Guide... 3 Broadworks
026-1010 Rev 7 06-OCT-2011. Site Manager Installation Guide
 026-1010 Rev 7 06-OCT-2011 Site Manager Installation Guide Retail Solutions 3240 Town Point Drive NW, Suite 100 Kennesaw, GA 30144, USA Phone: 770-425-2724 Fax: 770-425-9319 Table of Contents 1 SERVER
Application Notes for BT Wholesale/HIPCOM SIP Trunk Service and Avaya IP Office 8.0 Issue 1.0
 Avaya Solution & Interoperability Test Lab Application Notes for BT Wholesale/HIPCOM SIP Trunk Service and Avaya IP Office 8.0 Issue 1.0 Abstract These Application Notes describe the procedures for configuring
User Manual. 3CX VOIP client / Soft phone Version 6.0
 User Manual 3CX VOIP client / Soft phone Version 6.0 Copyright 2006-2008, 3CX ltd. http:// E-mail: info@3cx.com Information in this document is subject to change without notice. Companies names and data
Application Notes for Configuring Cablevision Optimum Voice SIP Trunking with Avaya IP Office - Issue 1.1
 Avaya Solution & Interoperability Test Lab Application Notes for Configuring Cablevision Optimum Voice SIP Trunking with Avaya IP Office - Issue 1.1 Abstract These Application Notes describe the procedures
Quick Start Guide v1.0
 Quick Start Guide v1.0 Table of contents : 01. Quick Start Guide...03 O2. Configuring your VoIPOffice appliance...14 03. Adding a VoIPtalk trunk...21 04. Configuring UADs for use with VoIPOffice...25 05.
Digital Voice Services Residential User Guide
 Digital Voice Services Residential User Guide 2 P a g e * Feature Access Codes *11 Broadworks Anywhere (pulling call to alternate phone) *62 Access Voicemail *72 Call Forwarding Always Activation *73 Call
Intel Unite Solution. Standalone User Guide
 Intel Unite Solution Standalone User Guide Legal Disclaimers & Copyrights All information provided here is subject to change without notice. Contact your Intel representative to obtain the latest Intel
FedEx Ship Manager Software. Installation Guide
 FedEx Ship Manager Software Installation Guide Before you start Check here to see that your PC has what it needs to run FedEx Ship Manager Software: Minimum System and Hardware Requirements Intel Pentium
Esi-Mail. Setup and User s Guide. Visit http://www.esiusers.com for up-to-date help. 0450-0479 Rev. A
 Esi-Mail Setup and User s Guide 0450-0479 Rev. A Visit http://www.esiusers.com for up-to-date help. Table of contents Introduction... 1 About this guide... 1 System requirements... 2 ESI hardware requirements...
Business Communications Solutions 9910 Irvine Center Drive Irvine, CA 92618 www.bcsconsultants.com [ m ] 949.333.1000 [ f ] 949.333.
![Business Communications Solutions 9910 Irvine Center Drive Irvine, CA 92618 www.bcsconsultants.com [ m ] 949.333.1000 [ f ] 949.333.](/thumbs/28/12943220.jpg "Business Communications Solutions 9910 Irvine Center Drive Irvine, CA 92618 www.bcsconsultants.com [ m ] 949.333.1000 [ f ] 949.333.") VERTICAL VIEWPOINT 2.0 USER GUIDE Business Communications Solutions 9910 Irvine Center Drive Irvine, CA 92618 www.bcsconsultants.com [ m ] 949.333.1000 [ f ] 949.333.1001 TABLE OF CONTENTS Logging on to
VERTICAL VIEWPOINT 2.0 USER GUIDE Business Communications Solutions 9910 Irvine Center Drive Irvine, CA 92618 www.bcsconsultants.com [ m ] 949.333.1000 [ f ] 949.333.1001 TABLE OF CONTENTS Logging on to
MS Live Communication Server managed by TELUS. Getting Started Guide. v. 1.0
 MS Live Communication Server managed by TELUS Getting Started Guide v. 1.0 Table of Contents Getting Connected...1 Managing Contacts...2 Searching for a Contact...2 Adding a Contact to Your Contacts List...2
Allworx Installation Course
 VPN Hello and welcome. In the VPN section we will cover the steps for enabling the VPN feature on the Allworx server and how to set up a VPN connection to the Allworx System from your PC. Page 1 VPN The
User Manual. Onsight Management Suite Version 5.1. Another Innovation by Librestream
 User Manual Onsight Management Suite Version 5.1 Another Innovation by Librestream Doc #: 400075-06 May 2012 Information in this document is subject to change without notice. Reproduction in any manner
PrettyMay Call Center for Skype
 PrettyMay Call Center for Skype User Guide Released 4i Copyright 2005-2010 PrettyMay Team. All Rights Reserved www.prettymay.net 1 Contents Preface... 4 How to use this guide... 5 Finding Out What s New...
Personal USB VoIP Gateway User s Guide
 Personal USB VoIP Gateway User s Guide Contents Contents... 2 Welcome... 3 Package Contents...4 Requirements... 5 USB Gateway Installation... 6 Enabling USB GATEWAY... 18 USB GATEWAY States... 20 USB Gateway
Centrepoint Technologies. Phone System Solutions for: Smart homes Home businesses Small offices Branch/Remote offices DESKTOP PHONE SYSTEM.
 Centrepoint Technologies DESKTOP PHONE SYSTEM Phone System Solutions for: Smart homes Home businesses Small offices Branch/Remote offices User Guide Table of Contents 1.0 Installing TalkSwitch 1.1 What's
Digital telephony. Softphone Getting Started Guide. Business Edition TEL-GDA-AFF-002-0902
 Digital telephony Business Edition Softphone Getting Started Guide TEL-GDA-AFF-002-0902 Contents ABOUT THIS GUIDE 3 911 EMERGENCY SERVICES 3 DOWNLOADING THE SOFTWARE 3 CONFIGURING THE SOFTWARE 5 INITIALIZING
Application Notes for Configuring Intelepeer SIP Trunking with Avaya IP Office 7.0 - Issue 1.0
 Avaya Solution & Interoperability Test Lab Application Notes for Configuring Intelepeer SIP Trunking with Avaya IP Office 7.0 - Issue 1.0 Abstract These Application Notes describe the procedures for configuring
Integrating the Avaya Definity G3 Analog PBX
 NetVanta Unified Communications Technical Note Integrating the Avaya Definity G3 Analog PBX Introduction With in-band integration, one pathway between the private branch exchange (PBX) and the UC server
IP Office Conferencing Center Installation
 Conferencing Center Installation - Issue 03a - (13 June 2009) 2009 AVAYA All Rights Reserved. Notice While reasonable efforts were made to ensure that the information in this document was complete and
3CX PBX v12.5. SIP Trunking using the Optimum Business Sip Trunk Adaptor and the 3CX PBX v12.5
 SIP Trunking using the Optimum Business Sip Trunk Adaptor and the 3CX PBX v12.5 Table of Contents 1. Overview 3 2. Prerequisites 3 3. PBX Configuration 3 4. Creating Extensions 4 5. VoIP Provider Setup
How To Use Allworx On A Pc Or Mac Or Ipod Or Ipo Or Ipode Or Ipro Or Iporode Or Mac (For A Mac) Or Ipore Or Ipos Or Ipob Or Ipocode (
 Or Ipore Or Ipos Or Ipob Or Ipocode (") Allworx User s Guide (Release 7.2.3.x) No part of this publication may be reproduced, stored in a retrieval system, or transmitted, in any form or by any means, electronic, mechanical, photocopy, recording,
Allworx User s Guide (Release 7.2.3.x) No part of this publication may be reproduced, stored in a retrieval system, or transmitted, in any form or by any means, electronic, mechanical, photocopy, recording,
UM8000 MAIL USER GUIDE
 UM8000 MAIL USER GUIDE INT-2076 (UNIV) Issue 1.0 INTRODUCTION Welcome to UM8000 Mail User Guide. The UM8000 Mail is a simple yet powerful voice messaging system that can greet your callers and record your
Hardware Overview. Ooma Linx devices These are installed around the office and are used to connect phones and other devices to your Ooma Office system
 Quick Start Guide Introduction Installation Overview Setting up the Ooma Office system in your business is easy. You should have your first extensions up and running in about 20 minutes. Ooma Office blends
Integrating Skype for SIP with UC500
 Integrating Skype for SIP with UC500 Version 1.1 2008 Cisco Systems, Inc. All rights reserved. 1 TABLE OF CONTENTS 1 OVERVIEW... 3 1.1 INTRODUCTION... 3 1.2 SCOPE... 3 1.3 REVISION CONTROL... 3 1.4 RESTRICTIONS...
IP Office Conferencing Center 3.0 Installation and Administration Manual
 IP Office Conferencing Center 3.0 Installation and Administration Manual 40DHB0002UKEN Issue 2 (24 th January 2005) Table Of Contents Conferencing Center... 1 Overview... 1 Key Features... 1 Access Levels...
COMPLEX SYSTEMS ONE SOLUTION
 Communications Products, Inc. United States Coast Guard Avaya IP Office Training DAY 1 LESSONS 1, 2 & 3 COMPLEX SYSTEMS ONE SOLUTION Lesson 1 Introduction & Familiarization to IP Office Lesson Objective:
<Insert Picture Here> Contact Center Anywhere: Interaction Manager (IM) Overview
 Overview") Contact Center Anywhere: Interaction Manager (IM) Overview What is Interaction Manager? Interaction Manager is the software that each call center agent uses to take and place customer
Contact Center Anywhere: Interaction Manager (IM) Overview What is Interaction Manager? Interaction Manager is the software that each call center agent uses to take and place customer
Frontier Tandem. Administrator User Guide. Version 2.4 January 28, 2013
 Frontier Tandem Administrator User Guide Version 2.4 January 28, 2013 About This Document 1 Version 7.3 Jan 28, 2013 Frontier Tandem Administrator Guide CONFIDENTIAL About This Document The Frontier Small
Programming the Lines and Features of the Sets
 Programming the Lines and Features of the Sets 11 Objectives When you finish this module, you will: Recognize a prime line and how it is used. Understand the differences between a single line and multicall
Digital Telephone User Guide
 Digital Telephone User Guide 1 Proud to provide Conway s Electric, Water, Cable, Internet and Telephone services. Welcome to Conway Corporation Digital Telephone Service We take pride in providing superior
Application Notes for Avaya IP Office 7.0 Integration with Skype Connect R2.0 Issue 1.0
 Avaya Solution & Interoperability Test Lab Application Notes for Avaya IP Office 7.0 Integration with Skype Connect R2.0 Issue 1.0 Abstract These Application Notes describe the steps to configure an Avaya
CTI Installation Manual Version 1.0
 CTI Installation Manual Version 1.0 Document History June 2012 Initial Release Table of Contents General Description... 4 1 st Party CTI... 5 Requirements... 5 Configuring the SL Series PBX... 6 Installing
Network Scanner Tool R3.1. User s Guide Version 3.0.04
 Network Scanner Tool R3.1 User s Guide Version 3.0.04 Copyright 2000-2004 by Sharp Corporation. All rights reserved. Reproduction, adaptation or translation without prior written permission is prohibited,
Installation Instruction STATISTICA Enterprise Small Business
 Installation Instruction STATISTICA Enterprise Small Business Notes: ❶ The installation of STATISTICA Enterprise Small Business entails two parts: a) a server installation, and b) workstation installations
InventoryControl for use with QuoteWerks Quick Start Guide
 InventoryControl for use with QuoteWerks Quick Start Guide Copyright 2013 Wasp Barcode Technologies 1400 10 th St. Plano, TX 75074 All Rights Reserved STATEMENTS IN THIS DOCUMENT REGARDING THIRD PARTY
DPH-50U VoIP USB Phone Adapter Quick User Guide
 DPH-50U VoIP USB Phone Adapter Quick User Guide Version 1.0 TABLE OF CONTENTS 1. INTRODUCTION...3 2. PACKAGE CONTENTS...4 3. REQUIREMENTS...5 4. DPH-50U INSTALLATION...6 5. ENABLING DPH-50U...16 6. DPH-50U
61200796L1-31B February 2008. NetVanta 7100 Administrator s Guide
 61200796L1-31B February 2008 NetVanta 7100 Administrator s Guide NetVanta 7100 Administrator s Guide Conventions Notes provide additional useful information. Cautions signify information that could prevent
Configuring the CyberData VoIP 4-Port Zone Controller with Audio Out
 NetVanta Unified Communications Technical Note Configuring the CyberData VoIP 4-Port Zone Controller with Audio Out Introduction The CyberData Voice over Internet Protocol (VoIP) zone controller enables
This Deployment Guide is intended for administrators in charge of planning, implementing and
 YOUR AUTOMATED EMPLOYEE Foxtrot Deployment Guide Enterprise Edition Introduction This Deployment Guide is intended for administrators in charge of planning, implementing and maintaining the deployment
Diamond II v2.3 Service Pack 4 Installation Manual
 Diamond II v2.3 Service Pack 4 Installation Manual P/N 460987001B ISS 26APR11 Copyright Disclaimer Trademarks and patents Intended use Software license agreement FCC compliance Certification and compliance
OpenScape Business V1R3
 OpenScape Business V1R3 How To Configure OpenScape Business X model for use with OpenScape Contact Center Version 1.1 Table of Contents 1. Connecting OSCC to an OpenScape Business V1R3 3 2. Configuring
CUCM 9.x Configuration Manual for Arc Premium
 CUCM 9.x Configuration Manual for Arc Premium Version 6.0.0 2003-2013 Arc Solutions (International) Ltd. All rights reserved No part of this documentation may be reproduced in any form or by any means
Configuring NET SatisFAXtion with Avaya IP Office
 Configuring NET SatisFAXtion with Avaya IP Office Documentation provided by Kristian Guntzelman - G&C Interconnects - 3-15-2010 Summary: This document will provide an example of how to connect the FaxBack
Receptionist Small Business
 Receptionist Small Business Administrator Guide Revision 1.0 GCI Ltd Global House 2 Crofton Close Lincoln Lincolnshire LN3 4NT www.gcicom.net Copyright GCI 2012 GCI Receptionist Small Business - Administrator
WhatsUp Gold v16.3 Installation and Configuration Guide
 WhatsUp Gold v16.3 Installation and Configuration Guide Contents Installing and Configuring WhatsUp Gold using WhatsUp Setup Installation Overview... 1 Overview... 1 Security considerations... 2 Standard
Hosted IP-PBX Phone System
 Administrator Guide Hosted IP-PBX Phone System Business Voice Systems Metro Connection Services Commercial DirecTV Managed Services Data Center Business Voice Systems Metro Broadband Services Data Center
Premium Digital Voice Solution. User Guide
 Premium Digital Voice Solution User Guide Table of Contents How to Log into Account Portal & Changing your Password 1 How to Download Toolbar 2 Utilizing Voice Mail 3 Feature Guide & How to Configure
MaxACD for Lync Release 6.5.8. Deployment Guide
 MaxACD for Lync Release 6.5.8 Deployment Guide August 2013 Contents Introduction... 3 Operational Notes... 3 Requirements... 6 Server Requirements... 6 MaxAgent Requirements... 6 VRM (Voice Recording Manager)
Verizon Collaboration Plug-In for Microsoft Outlook User Guide
 Verizon Collaboration Plug-In for Microsoft Outlook User Guide Version 4.11 Last Updated: July 2011 2011 Verizon. All Rights Reserved. The Verizon and Verizon Business names and logos and all other names,
Digital Voice Services User Guide
 Digital Voice Services User Guide 2 P a g e * Feature Access Codes *11 Broadworks Anywhere (pulling call to alternate phone) *62 Access Voicemail *72 Call Forwarding Always Activation *73 Call Forwarding
Installation Instruction STATISTICA Enterprise Server
 Installation Instruction STATISTICA Enterprise Server Notes: ❶ The installation of STATISTICA Enterprise Server entails two parts: a) a server installation, and b) workstation installations on each of