Before operating this system
|
|
|
- Philip Robinson
- 8 years ago
- Views:
Transcription
1

2

3

4 Before operating this system Malfunctions that occur during the normal use of the system will be repaired by Sony in accordance with the conditions defined in the limited warranty for this system. However, Sony will not be liable for any consequences arising from a failure to play caused by a damaged or malfunctioning system. Music discs encoded with copyright protection technologies This product is designed to playback discs that conform to the Compact Disc (CD) standard. Recently, various music discs encoded with copyright protection technologies are marketed by some record companies. Please be aware that among those discs, there are some that do not conform to the CD standard and may not be playable by this product. Note on DualDiscs A DualDisc is a two sided disc product which mates DVD recorded material on one side with digital audio material on the other side. However, since the audio material side does not conform to the Compact Disc (CD) standard, playback on this product is not guaranteed. 4 GB

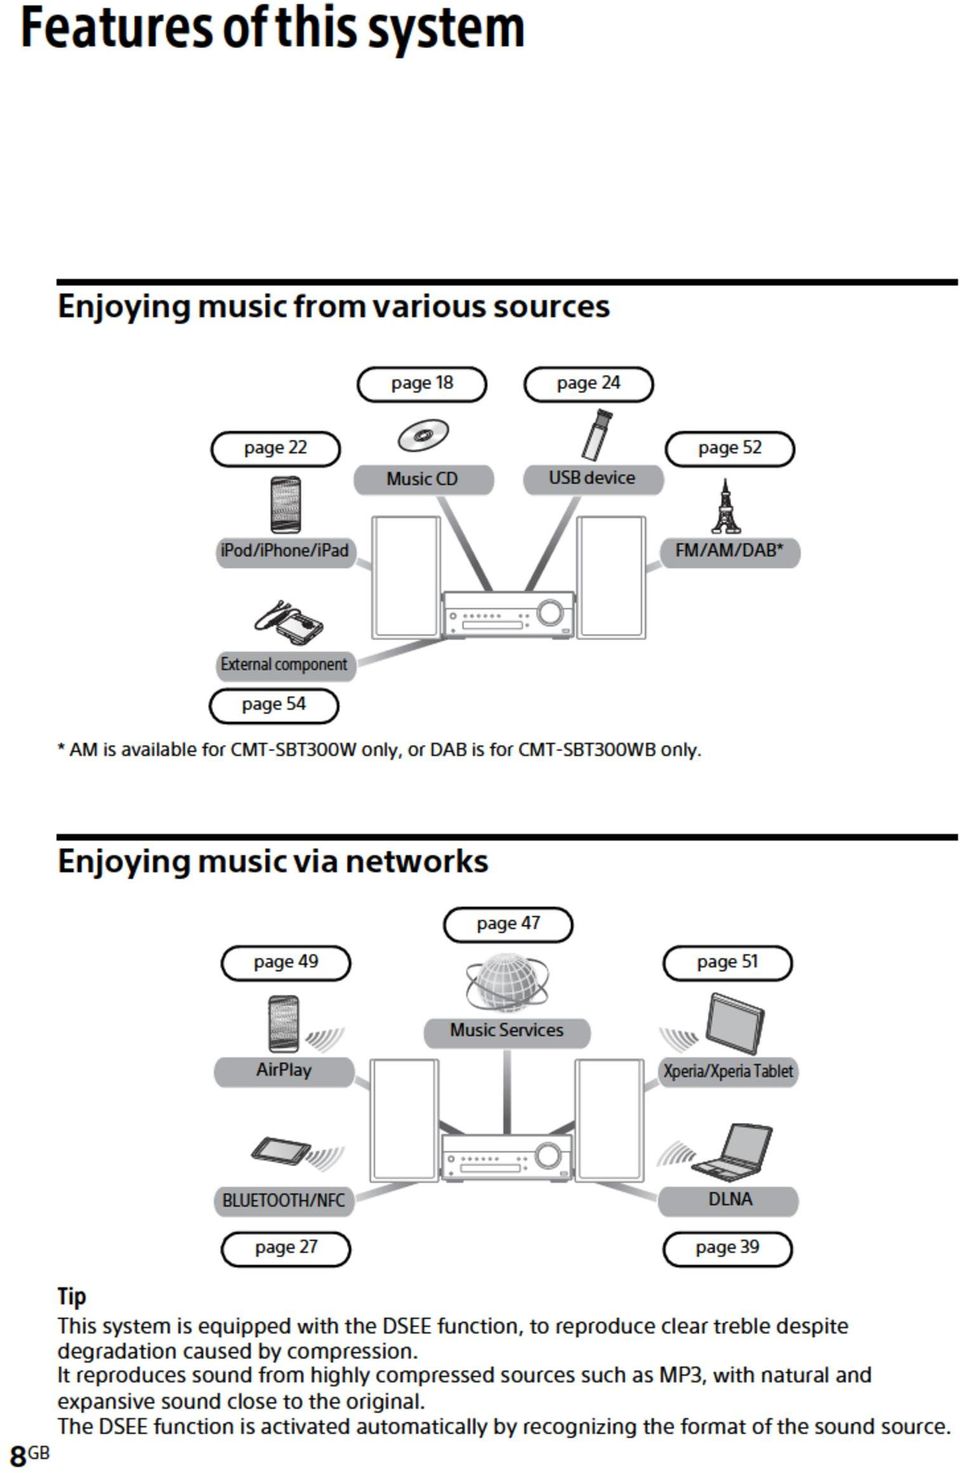
5 Table of Contents Before operating this system... 4 Features of this system... 8 Enjoying music from various sources... 8 Enjoying music via networks... 8 Getting started Location and Function of Controls... 9 Unit (Front)... 9 Remote...10 Connections Connecting the antennas, speakers and power cord Connecting the ipod/iphone/ipad or USB device Preparing a wireless LAN antenna...14 Attaching speaker pads Inserting the batteries...16 Setting the clock Operations Playing a CD-DA/MP3 disc...18 Creating your own program (Program Play) Playing an ipod/iphone/ipad...22 Compatible ipod/iphone/ipad models...22 Charging an ipod/iphone/ipad...23 Playing a file on a USB device Charging a USB device...25 Preparing for a BLUETOOTH connection...27 Pairing the system with a BLUETOOTH device Connecting by one-touch action (NFC) Listening to music through a BLUETOOTH connection GB
... 20 Playing an ipod/iphone/ipad...22 Compatible ipod/iphone/ipad models...22 Charging an ipod/iphone/ipad.")
6 Network connections How to connect your network Setting up for a wireless network Option 1: Method for using an application for smartphones or Tablets (Android device/iphone/ipod touch/ipad) Option 2: Manual setting method using an Access Point Scan (for PC/Mac) Option 3: Method for using a WPS push button at the access point supporting WPS Setting up wired networks Option 4: DHCP method Listening to audio content using DLNA (Digital Living Network Alliance) Listening to audio content on a computer with Windows Listening to audio content on a computer with Windows Listening to audio content on a computer with Windows Vista/ Windows XP Using Internet music streaming (Music Services) Preparing your mobile device for the controller Enjoying Internet music streaming Using AirPlay Using WALKMAN application on an Xperia/Xperia Tablet...51 Additional information Listening to the radio Tuning in a radio station Presetting radio stations Running the DAB Automatic Scan manually (CMT-SBT300WB only) Using optional audio components Setting the Automatic Standby function Setting the BLUETOOTH/Network Standby mode Updating the software Adjusting the sound Changing the display Using the timers...60 Setting the Sleep Timer...60 Setting the Play Timer GB
... 39 Listening to audio content on a computer with Windows 8... 39 Listening to audio content on a computer with Windows 7.")
7 Troubleshooting Troubleshooting Messages...67 Precautions/Specifications Precautions BLUETOOTH wireless technology Specifications GB

8
9
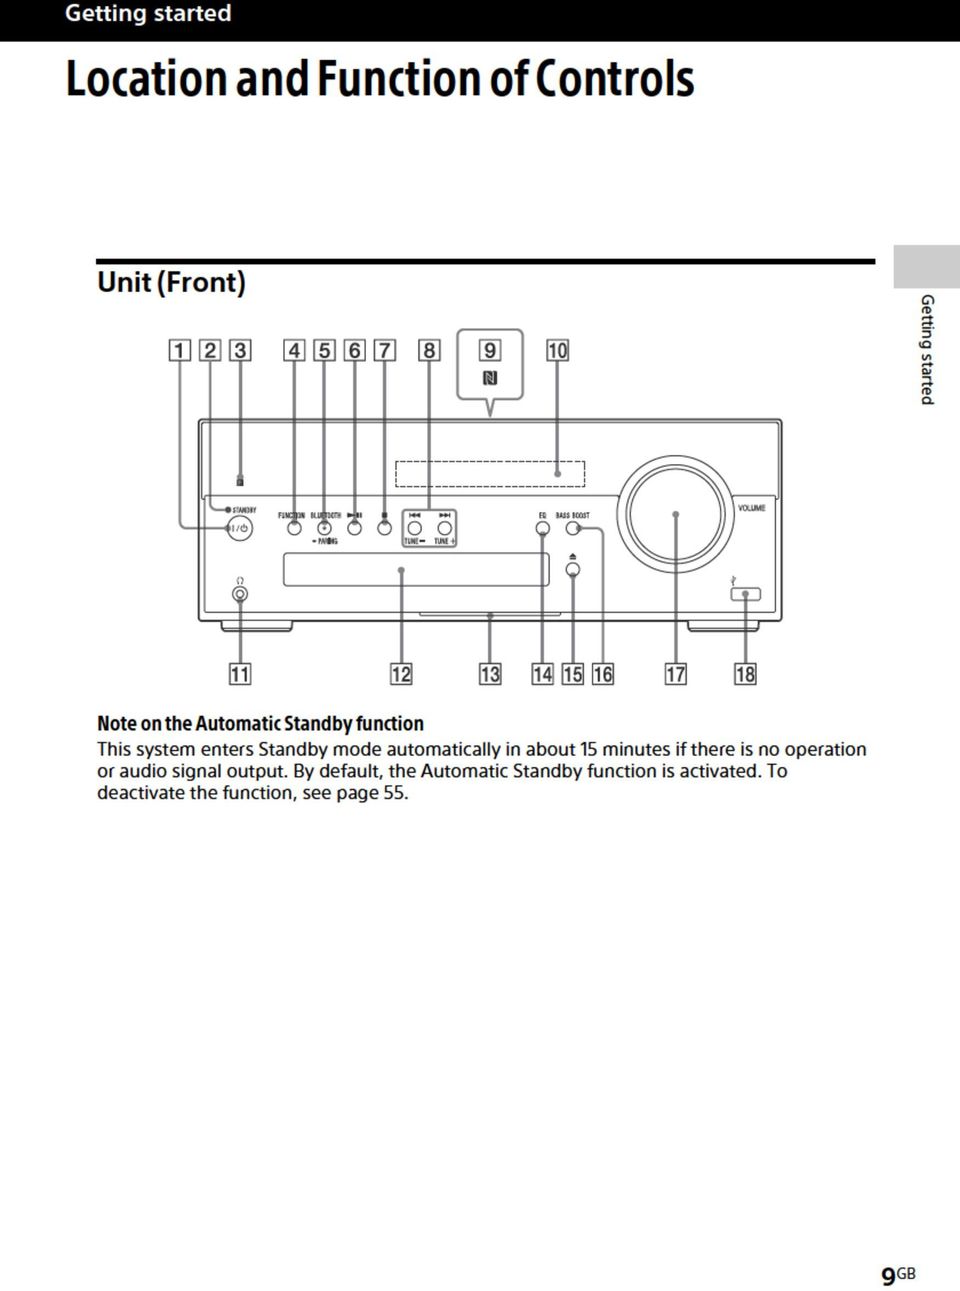
10 Remote This manual mainly explains operations using the remote, but the same operations can also be performed using the buttons on the unit having the same or similar names. / (power) button Use to turn the power on or off. STANDBY indicator Lights when the power is turned off. The indicator flashes when the unit detects abnormality. See If the STANDBY indicator flashes (page 62). Remote sensor FUNCTION button(s) Unit: FUNCTION button Each time you press the button, the function is switched to CD, USB, BLUETOOTH, DAB*, TUNER FM, TUNER AM* and AUDIO IN. * AM is available for CMT-SBT300W only, or DAB is for CMT-SBT300WB only. Remote: CD, USB, BLUETOOTH, TUNER and AUDIO IN FUNCTION buttons Press the corresponding function button you want to activate. BLUETOOTH button/indicator Use to connect/disconnect with a BLUETOOTH device or to perform pairing operation (page 28, 29, 32). The center lamp indicates the connection status of BLUETOOTH. For details, see About the BLUETOOTH indicator (page 27). (play/pause) button Use to start or pause playback of a CD- DA or MP3 disc, or a file on the connected ipod/iphone/ipad, USB device or BLUETOOTH device. (stop) button Use to stop playback of a CD-DA or MP3 disc, or a file on the connected ipod/ iphone/ipad, USB device or BLUETOOTH device. Radio presetting/music operation buttons Unit: TUNE +/ and / buttons TUNE +/ buttons Use to tune in a desired radio station or to select a preset number of the registered radio station. / buttons Use to cue the beginning of a track or file. While holding down the button, you can fast-forward or fast-rewind the track or file. Remote: TUNE +/, / and / buttons TUNE +/ buttons Use to tune in a desired radio station or to select a preset number of the radio station tuned in. / buttons Use to cue the beginning of a track or file. / buttons Use to fast-rewind or fast-forward a track or file. N-Mark Place a smartphone equipped with the NFC function close to this mark to perform BLUETOOTH registration, connection or disconnection by onetouch action. For this operation, a setting is required beforehand (page 30). Display window Displays the setting information of the unit. 10 GB
 Unit: FUNCTION button Each time you press the button, the function is switched to CD, USB, BLUETOOTH, DAB*, TUNER FM, TUNER AM* and AUDIO IN.")
11 (headphone) jack Use to connect headphones. Disc tray Use to load a CD-DA or MP3 disc (page 18). Effect indicator Informs the operating status of this system. EQ button Use to select bass or treble for sound adjustment (page 58). (open/close) button Use to open/close the disc tray (page 18). BASS BOOST button Use to turn on or off the bass boost (page 58). Volume dial/button Unit: VOLUME dial Use to adjust the volume turning left or right. Remote: VOLUME +/ button Use to adjust the volume pressing the + or button. USB port Use to connect an ipod/iphone/ipad. For details, see Connecting the ipod/ iphone/ipad or USB device (page 13). TIMER MENU button Use to set the clock or Play Timer (page 17, 61). SLEEP button Use to set the sleep timer (page 60). TUNING MODE button Use to select the tuning mode. Each time you press the button, the mode changes to AUTO, PRESET or MANUAL (page 52). FM MODE button Use to select FM stereo or monaural reception (page 52). TUNER MEMORY button Use to preset radio stations (page 53). Operation buttons / / / buttons Use to select an item or change the setting. +/ buttons Use to select a folder (album) on an MP3 disc or USB device. RETURN button Use to return to the previous status. REPEAT button Use to select repeat play (page 19, 24). PLAY MODE button Use to select the play mode (page 19, 20, 21, 25). DISPLAY button Use to change information displayed in the display window (page 17, 32, 59). BASS +/ buttons Use to control the bass sound (page 58). TREBLE +/ buttons Use to control the treble sound (page 58). CLEAR button Use to delete a programmed track or folder (page 21). (effect indicator) button Use to turn on/off the effect indicator. (enter) button Use to enter a selected item or setting. OPTIONS button Use to display an option menu. Press / to select the next option menu. DEL LINK: For deleting the BLUETOOTH pairing information (page 29). BT/NW STBY: For setting BLUETOOTH/ Network Standby mode (page 56). AUTO STBY: For setting Automatic Standby mode (page 55). BT AAC: For receiving data in AAC codec format from a BLUETOOTH device (page 27). WPS: For connecting to a network using a WPS-compliant network device (page 37). NW RESET: For initializing the network connection (page 35, 50). UPDATE: For updating software (page 57). The available menus may differ depending on the function in use. Getting started 11 GB
. TIMER MENU button Use to set the clock or Play Timer (page 17, 61).")
12 Connections Connecting the antennas, speakers and power cord Rear of the speaker red Power input (AC IN) After all equipments are connected, connect the power cord to the wall outlet. Speakers (left/right) connectors Firmly connect the right speaker cord to R, and the left speaker cord to L. AUDIO IN (external input) jack Connect optional external equipment with an audio connecting cable (not supplied). 12 GB LAN connector Connect a network cable (not supplied). Antennas FM lead antenna (supplied) (CMT-SBT300W only) AM loop antenna (supplied) (CMT-SBT300W only) DAB/FM lead antenna (supplied) (CMT-SBT300WB only)
.")
13 To receive radio broadcasts, connect antennas. Find a location and an orientation that provide good reception, and then fix the antennas to a stable surface (window, wall, etc.). Keep the antennas away from the unit, power cord and other AV components to avoid picking noise. Secure the end of the FM lead antenna with adhesive tape. To prepare the AM loop antenna Rewind an antenna cord wound around the antenna and raise the antenna stand. Stand the antenna and secure it to the slit until it clicks. Getting started Connecting the ipod/iphone/ipad or USB device Connect an ipod/iphone/ipad or USB device to the USB port. For connecting an ipod/iphone/ipad* to the USB port, use a USB cable supplied with your ipod/iphone/ipad. * For the ipod/iphone/ipad you can use with this system, see Compatible ipod/iphone/ipad models (page 22). 13 GB

14 Preparing a wireless LAN antenna When making a wireless connection, set the wireless antenna on the back of the unit in the upright position. Note on the wireless LAN signal strength indicator lights up in the display when the system is turned on and the wireless LAN connection to the access point is established.* Check the reception status of the wireless LAN signal and install the system where the received signal is strong. The more segments there are, the stronger the signal. * is also displayed for a network (LAN) cable connection. 14 GB

15 Attaching speaker pads Attach the supplied speaker pads to the bottom of the speakers to prevent slipping. Getting started 15 GB

16 Inserting the batteries Insert two supplied R6 (size AA) batteries, side first, matching the polarities shown below. Notes With normal use, the batteries should last for about 6 months. Do not mix an old battery with a new one or mix different types of batteries. If you do not use the remote for a long period of time, remove the batteries to avoid damage from battery leakage and corrosion. 16 GB

17 Setting the clock Set the clock using the buttons on the remote. Note The clock settings are reset when you disconnect the power cord or if a power failure occurs. To display the clock when the system is off Press DISPLAY repeatedly to display the clock. The clock is displayed for about 8 seconds. If the system is in BLUETOOTH/Network Standby mode, the clock does not appear by pressing DISPLAY. Getting started 1 Press / (power) to turn on the system Press TIMER MENU to select the clock set mode. If PLAY SET flashes, press / repeatedly to select CLOCK, and then press (enter). Press / repeatedly to set the hour, then press (enter). Use the same procedure to set the minutes. 17 GB
.")
18 Operations Playing a CD-DA/MP3 disc Label side (printed side) (open/close) 4 Press the (open/close) button to close the disc tray. 1 Press CD FUNCTION. Press FUNCTION on the unit repeatedly until CD appears in the display. 5 Press (play/pause) button. Playback starts. 18 GB 2 3 Press the (open/close) button to open the disc tray. Load a disc with the label side facing up. When NO DISC appears in the display No disc is set in the disc tray or a disc that cannot be played on this system is set. See Precautions (page 69) and set a playable disc. Notes If you cannot remove a disc and LOCKED appears in the display, contact your nearest Sony dealer. Do not load a disc with non-standard shapes (e.g., heart, square, star). Doing this may cause irreparable damage to the system. Do not use a disc with tape, stickers or paste on it as this may cause malfunction. When you remove a disc, do not touch the surface of the disc.
 and set a playable disc. Notes If you cannot remove a disc and LOCKED appears in the display, contact your nearest Sony dealer.")
19 Other operations To Pause playback Do the following: Stop playback Press. Select a track or file Find a point in a track or file Select Repeat Play Select a folder on an MP3 disc Remove a disc Press. To resume play, press the button again. Press /. To change the play mode Press PLAY MODE repeatedly while the player is stopped. You can select Normal Play mode (no indication or FLDR * appears), Shuffle Play mode ( SHUF or FLDR SHUF * appears), or Program Play mode ( PGM appears). Play mode Hold down / (or / on the unit) during playback, and release the button at the desired point. Press REPEAT repeatedly until (all tracks or files) or 1 (single track or file) appears. Press +/ repeatedly. Press on the unit. * When FLDR or FLDR SHUF appears, all the files in the selected folder on the MP3 disc will be played. When playing a CD-DA disc, the system performs the same operation as Normal Play (no indication) or Shuffle Play SHUF. When PUSH STOP appears You cannot change the play mode during playback. Stop playback then change the play mode. Note on the play mode If the power cord is disconnected when the system is on, the play mode returns to Normal Play. Notes on Repeat Play indicates that all tracks or files will be repeated until you stop playback. 1 indicates that a single track or file will be repeated until you stop playback. If the power cord is disconnected when the system is on, Repeat Play is cancelled. Notes on Shuffle Play mode When Shuffle Play mode is set to SHUF, the system shuffle-plays all tracks or files on the disc. When Shuffle Play mode is set to FLDR SHUF, the system shuffleplays all tracks or files in the selected folder. When you turn off the system, the selected Shuffle Play mode ( SHUF or FLDR SHUF ) is cleared and the play mode returns to Normal Play mode (no indication or FLDR ). Notes on playing MP3 discs Do not save unnecessary folders or files on a disc that has MP3 files. Folders that have no MP3 files are not recognized on the system. The system can only play MP3 files that have a file extension of.mp3. Even when file name has the.mp3 file extension, if it is not an audio MP3 file, playing this file may generate a loud noise, which could cause damage of the system. The maximum number of MP3 folders and files compatible with this system is: 999* folders (including the root folder) 999 files 250 files in a single folder 8 folder levels (in the tree structure of files) Compatibility with all MP3 encoding/ writing software, CD-R/RW drive and recording media cannot be guaranteed. Incompatible MP3 discs may produce noise or interrupted audio or may not play at all. * This includes folders that have no MP3 or other files. The number of folders that the system can recognize may be less than actual number of folders, depending on the folder structure. Operations 19 GB
 during playback, and release the button at the desired point. Press REPEAT repeatedly until (all tracks or files) or 1 (single track or file) appears.")
20 Creating your own program (Program Play) Program the selected tracks or files using the buttons on the remote. 4 Select the desired track or file number. Press / repeatedly until the desired track or file number appears. Selected track or file number Total playing time of the selected track or file 5 Press appears when the total playing time exceeds 100 minutes for a CD-DA or when you program MP3 files. 1 Press CD FUNCTION. Press FUNCTION on the unit repeatedly until CD appears in the display. 2 Press PLAY MODE repeatedly until PGM appears to select the Program Play mode while the player is stopped. 6 Repeat steps 3 through 5 to program additional tracks or files. Up to 25 tracks or files can be programmed. If STEP FULL appears You attempt to program 26 tracks or files. Delete a programmed track or file and program the new track or file again. See To delete the program (page 21). 3 Select a folder (MP3 disc only). Press +/ repeatedly to select the desired folder. Press if you want to program all files in the folder. 20 GB

21 7 Press. Your program of tracks or files starts playback. The programmed files or tracks remain available until you remove the disc from the disc tray or unplug the power cord. To play the same program again, press. To cancel Program Play Press PLAY MODE repeatedly until PGM disappears while the player is stopped. To delete the program Press CLEAR while the play is stopped. Each time you press the button, the last programmed track or file will be deleted. When all the programmed tracks or files are deleted, NO STEP appears. Notes If the disc is ejected after programming, all the programmed tracks or files are deleted. If the power cord is disconnected when the system is on, the programmed tracks or files are deleted. Operations 21 GB
22 Playing an ipod/iphone/ipad 22 GB You can play an ipod/iphone/ipad by connecting it to the system. You can operate your ipod/iphone/ipad using the buttons on this system. Compatible ipod/iphone/ ipad models The ipod/iphone/ipad models that can be used with this system are as follows: Compatible model USB connection AirPlay connection ipod touch (5th generation) ipod touch (4th generation) ipod touch (3rd generation) ipod nano (7th generation) ipod nano (6th generation) ipod nano (5th generation) ipod nano (4th generation) ipod classic iphone 5 iphone 4S iphone 4 iphone 3GS ipad (4th generation) ipad mini ipad (3rd generation) ipad 2 ipad as of April, 2013 Made for ipod, Made for iphone, and Made for ipad mean that an electronic accessory has been designed to connect specifically to ipod, iphone, or ipad, respectively, and has been certified by the developer to meet Apple performance standards. Apple is not responsible for the operation of this device or its compliance with safety and regulatory standards. Please note that the use of this accessory with ipod, iphone, or ipad may affect wireless performance. 1 Press USB FUNCTION. Press FUNCTION on the unit repeatedly until USB appears in the display. 2 Connect the USB cable supplied with the ipod/iphone/ipad to the USB port on the unit.
23 3 Connect the USB cable supplied with the ipod/iphone/ipad to the ipod/iphone/ipad. The function indicator in the display changes from USB to ipod. Charging an ipod/iphone/ ipad Charging begins automatically when you connect an ipod/iphone/ipad to this system and the system is turned on. 4 When ipod appears in the display, press to start playback. Other operations You can perform the following operations using the buttons on the remote or unit of the system. 1 Turn the power of the system on. Press / (power) to turn on the system. 2 Connect the ipod/iphone/ipad to the USB port on the unit. For details on connection, see page 13. Operations To Do the following: Pause playback Press or. To resume play, press the button again. Stop playback Press. Select a track or chapter of audiobook/ podcast Find a point in a track or chapter of audiobook/ podcast Press /. Hold down / ( / on the unit) during playback, and release the button at the desired point. Notes The performance of the system may vary depending on the specifications of your ipod/ iphone/ipad. Do not carry the system with an ipod/iphone/ ipad connected to the system. Doing so may cause a malfunction. To adjust the volume level, use VOLUME +/ on the remote or VOLUME dial on the unit. To use an ipod/iphone/ipad, refer to the user s guide of your ipod/iphone/ipad. Sony cannot accept responsibility in the event that data recorded to ipod/iphone/ipad is lost or damaged when using an ipod/iphone/ipad with this system. Charging the ipod/iphone/ipad begins. For details, refer to the user s guide of your ipod/iphone/ipad. To stop charging the ipod/iphone/ipad Press / to turn off the system, and then disconnect the ipod/iphone/ipad. Notes on charging You cannot charge an ipod/iphone/ipad when the system is off. If the system enters Standby mode during charging of an ipod/iphone/ipad, the charging stops in progress. Before charging, turn off the Automatic Standby function. For details, see Setting the Automatic Standby function (page 55). To see whether charging is operating or not, check the battery icon on the ipod/iphone/ipad display. 23 GB
24 Playing a file on a USB device You can play audio files stored on a USB device on this system by connecting a USB memory or USB device to the system. The audio format that can be played back on this system is MP3/WMA*/AAC*. Check the websites below for the information about compatible USB devices. For customers in Europe: For customers in other countries/regions: * Files with DRM (Digital Rights Management) copyright protection or files downloaded from an online music store cannot be played on this system. If you try to play one of these files, the system plays the next unprotected audio file. 2 3 Connect the USB device directly or via the USB cable supplied with the USB device to the USB port on the unit. Press to start playback. Other operations You can perform the following operations using the buttons on the remote or unit of the system. To Do the following: Pause playback Stop playback Select a folder Press. To resume play, press the button again. Press. To resume play, press * 1. To cancel resume play, press again* 2. Press +/ repeatedly. Select a file Press /. Find a point in a file Hold down / ( / on the unit) during playback, and release the button at the desired point. 1 Press USB FUNCTION. Press FUNCTION on the unit repeatedly until USB appears in the display. Select Repeat Play Press REPEAT repeatedly until (all audio files) or 1 (single audio file) appears. *1 When playing a VBR MP3/WMA file, the system may resume playback from a different point. *2 When resume play is canceled, the display returns to the number of folders. 24 GB
25 To change the play mode Press PLAY MODE repeatedly while the player is stopped. You can select Normal Play mode (no indication or FLDR appears* 1 ), or Shuffle Play mode ( SHUF or FLDR SHUF appears* 2 ). *1 When no indication is selected, the system plays all files on the USB device. When FLDR is selected, the system plays all files in the selected folder on the USB device. *2 When SHUF is selected, the system shuffleplays all audio files on the USB device. When FLDR SHUF is selected, the system shuffleplays all audio files in the selected folder. Note on the play mode If the power cord is disconnected when the system is on, the play mode returns to Normal Play. Notes on Repeat Play indicates that all files will be repeated until you stop playback. 1 indicates that a single file will be repeated until you stop playback. If the power cord is disconnected when the system is on, Repeat Play is cancelled. Note on Shuffle Play mode When you turn off the system, the selected Shuffle Play mode ( SHUF or FLDR SHUF ) is cleared and the play mode returns to Normal Play mode (no indication or FLDR ). Notes The playback order for the system may differ from the playback order of the connected digital music player. Be sure to turn off the system before removing the USB device. Removing the USB device while the system is turned on may corrupt the data on the USB device. When USB cable connection is necessary, connect the USB cable supplied with the USB device to be connected. For details on connection, refer to the operation manual supplied with the USB device to be connected. It may take time before READING appears after connecting, depending on the type of USB device connected. Do not connect the USB device through a USB hub. When the USB device is connected, the system reads all the files on the USB device. If there are many folders or files on the USB device, it may take a long time to finish reading the USB device. With some connected USB devices, it may take a long time to transmit signals from the system or to finish reading the USB device. Compatibility with all encoding/writing software cannot be guaranteed. If audio files on the USB device were originally encoded with incompatible software, those files may produce noise or may malfunction. The maximum number of folders and files on the USB device compatible with this system is: 1,000* folders (including the root folder) 3,000 files 250 files in a single folder 8 folder levels (in the tree structure of files) * This includes folders that have no playable audio files and empty folders. The number of folders that the system can recognize may be less than actual number of folders, depending on the folder structure. The system does not necessarily support all the functions provided in a connected USB device. Folders that have no audio files are not recognized. The audio formats that you can listen to with this system are as follows: MP3: file extension.mp3 WMA: file extension.wma AAC: file extension.m4a,.mp4 or.3gp Note that even when file name has the correct file extension, if the actual file differs, the system may produce noise or may malfunction. Charging a USB device Charging begins automatically when you connect a USB device to this system and the system is turned on. 1 Turn the power of the system on. Press / (power) to turn on the system. 2 Connect a USB device to the USB port on the unit. For details on connection, see page 13. To stop charging the USB device Press / to turn off the system, and then disconnect the USB cable. Operations 25 GB
26 26 GB Notes on charging You cannot charge the USB device when the system is off. Some USB devices may not be charged owing to their characteristics. If the system enters Standby mode during charging of a USB device, the charging stops in progress. Before charging, turn off the Automatic Standby function. For details, see Setting the Automatic Standby function (page 55).
27 Preparing for a BLUETOOTH connection You can listen to music from your ipod/ iphone/ipad or BLUETOOTH device over a wireless connection. Before using the BLUETOOTH function, perform pairing to register your BLUETOOTH device. The system supports registration and connection of the BLUETOOTH device and NFC, which enables data communication by just touching a specified location. For details on NFC, see Connecting by onetouch action (NFC) (page 29). What is pairing? The BLUETOOTH devices to be connected must be registered with each other beforehand. Pairing is an operation of registering two devices. Once a pairing operation is performed, it does not have to be performed again. In the following cases, however, a pairing operation must be performed again: Pairing information was erased when the BLUETOOTH device was repaired. You attempt to pair the system with more than 10 BLUETOOTH devices. This system can pair with up to 9 BLUETOOTH devices. If you pair another BLUETOOTH device after pairing with 9 devices was performed, pairing information of the device that was connected with the system first is overwritten with that of the new device. Pairing registration information of this system is erased from the connected device. If you initialize the system or erase the pairing history with the system, all the pairing information will be erased. About the BLUETOOTH indicator The BLUETOOTH indicator in the center of the BLUETOOTH button allows checking of the BLUETOOTH status. System status The system is in BLUETOOTH Standby (when the system is on) During BLUETOOTH pairing The system is attempting to connect with a BLUETOOTH device The system has established connection with a BLUETOOTH device Indicator color Blue Blue Blue Blue Indicator status Flashes slowly. Flashes quickly. Flashes. Lit. This system supports BLUETOOTH A2DP (Advanced Audio Distribution Profile) and AVRCP (Audio Video Remote Control Profile). For details, see BLUETOOTH wireless technology (page 71). Notes For details on operations of the BLUETOOTH device to be connected, refer to the operation manual supplied with your BLUETOOTH device. The BLUETOOTH device to be connected must support A2DP (Advanced Audio Distribution Profile). Enabling reception of AAC codec You can receive data in AAC codec format from a BLUETOOTH device. To enable reception, set up using the option menu. 1 Press OPTIONS to display the setting menu. 2 Press / repeatedly to select BT AAC then press. 3 Press / repeatedly to select ON or OFF, then press. Operations 27 GB
28 ON: to receive in AAC codec format OFF: to receive in SBC codec format Notes If you initiate setup during BLUETOOTH connection, the connection is cut. When using an Apple product, update it to the latest software version. For details on updating, refer to the operation manual supplied with your Apple product. If sound is interrupted during reception in AAC codec format, set the BT AAC menu to OFF. 1 Place the BLUETOOTH device to be connected within 1 meter from the system. Pairing the system with a BLUETOOTH device Connection example 2 Press BLUETOOTH FUNCTION. Press FUNCTION on the unit repeatedly until BT AUDIO appears in the display. The BLUETOOTH indicator flashes slowly in blue. If the system has been automatically connected with the BLUETOOTH device in the past, press BLUETOOTH on the unit to cancel the connection so that BT AUDIO appears in the display. BLUETOOTH device such as a WALKMAN * * Check if your WALKMAN is a BLUETOOTH device or not, referring to the operation manual supplied with your WALKMAN. 3 Press and hold BLUETOOTH on the unit for 2 seconds or longer. The BLUETOOTH indicator flashes quickly in blue and PAIRING flashes in the display. The system is in Pairing mode. 4 Perform the pairing operation on the BLUETOOTH device and search for this system with the BLUETOOTH device. When searching has finished, a list of the devices found may appear on the BLUETOOTH device display. This system appears as SONY:CMT- SBT300W (Bluetooth) or SONY:CMT- SBT300WB (Bluetooth). If it does not appear, perform the procedure from step 1 again. 28 GB
29 5 6 When establishing connection with this system, select the audio profile (A2DP, AVRCP) on the BLUETOOTH device. If the BLUETOOTH device does not support AVRCP (Audio Video Remote Control Profile), you cannot perform playback or stop playback with the system. For details on operations of the BLUETOOTH device to be connected, refer to the operation manual supplied with your BLUETOOTH device. Select SONY:CMT-SBT300W (Bluetooth) or SONY:CMT- SBT300WB (Bluetooth) in the display of the BLUETOOTH device. If prompted to enter a passkey on the BLUETOOTH device, enter Operate the BLUETOOTH device and perform BLUETOOTH connection. When pairing is completed and connection with the BLUETOOTH device is established correctly, the display changes to BT AUDIO from PAIRING and the BLUETOOTH indicator flashes slowly in blue. Depending on the type of BLUETOOTH device, connection may start automatically after pairing is completed. Notes Passkey may be called Passcode, PIN code, PIN number or Password, etc. The pairing standby status of the system is cancelled after about 5 minutes. If pairing is not successful, perform the procedure from step 1 again. If you want to pair with several BLUETOOTH devices, perform the procedure from step 1 to 6 individually for each BLUETOOTH device. Tip You can perform a pairing operation or attempt to make a BLUETOOTH connection with another BLUETOOTH device while the BLUETOOTH connection is established with one BLUETOOTH device. The currently established BLUETOOTH connection is cancelled when BLUETOOTH connection with another device is successfully established. To erase the pairing registration information 1 Press BLUETOOTH FUNCTION. Press FUNCTION on the unit repeatedly until BT AUDIO appears in the display. When the system is connected with a BLUETOOTH device, the device name set for the connected BLUETOOTH device appears in the display of the system. Press BLUETOOTH on the unit to cancel the connection with that BLUETOOTH device so that BT AUDIO appears in the display. 2 Press OPTIONS to display the setting menu. 3 Press / repeatedly to select DEL LINK, then press. 4 Press / repeatedly to select OK, then press. COMPLETE appears in the display and all the pairing information is erased. Note If you have erased the pairing information, you cannot make a BLUETOOTH connection unless pairing is performed again. To connect with a BLUETOOTH device again, you must enter the passkey on the BLUETOOTH device. Connecting by one-touch action (NFC) NFC is a technology for short-range wireless communication between various devices such as a mobile phone and IC tag. NFC enables data communication by just touching your device to a specified location. Compatible smartphones are those equipped with the NFC function (compatible operating system: Android version or later with the exception of Android 3.x). Check the website below for information on compatible devices. For customers in Europe: For customers in other countries/regions: Preparation on your smartphone (Android) An NFC-compliant application must be installed on your smartphone. If not Operations 29 GB
30 installed, you can download NFC Easy Connect from Google Play. In some countries and regions, NFCcompliant application may not be downloaded. For some smartphones, this function may be available without downloading NFC Easy Connect. In this case, the operation and specifications of the smartphone may be different from the description in this manual. For details, refer to the user s guide supplied with your smartphone. 1 Install the application. If you access using 2D Code Read the following 2D Code to access. 2 Set your smartphone to enable the NFC function. For details, refer to the user s guide supplied with your smartphone. About the NFC Easy Connect application This is a free application especially used for Android. Search the internet for detailed information on NFC Easy Connect and download the application. In some countries and regions, NFC-compliant application may not be downloaded. Making a connection with your smartphone by one-touch action Just touch your smartphone to the system. The system is turned on automatically, and pairing and BLUETOOTH connection are established. 1 Start the NFC Easy Connect application on your smartphone. Check that the application display appears. 2 Touch your smartphone to the unit. Touch the smartphone to the N-Mark on the unit and maintain contact until the smartphone vibrates. Complete the connection with your smartphone, following the instructions on the screen. Refer to the user s guide of your smartphone for the part of your smartphone used as touch contact. To disconnect by one-touch action To disconnect the established connection, touch your smartphone to the N-Mark on the unit. To switch a connected device by one-touch action When you touch an NFC-compliant smartphone to the unit while another BLUETOOTH device is connected with this system, the BLUETOOTH device is disconnected and the system is connected with the smartphone. If you touch the smartphone connected with this system to another NFC-compliant BLUETOOTH headset or speaker, the smartphone is disconnected from the system and connected with the touched BLUETOOTH device. 30 GB
31 Listening to music through a BLUETOOTH connection You can operate a BLUETOOTH device that is paired with the system and play music through the BLUETOOTH connection. You can adjust the volume of the system and perform play/stop operations using the connected BLUETOOTH device. For details on the operations, refer to the operation manual supplied with your BLUETOOTH device. Confirm the following before playing music: The BLUETOOTH function of the BLUETOOTH device is enabled. Pairing with the system has been completed. 2 Establish BLUETOOTH connection with the BLUETOOTH device. Once connection is established, CONNECT appears in the display then the name set on the connected BLUETOOTH device appears. If the BLUETOOTH device has been connected with this system in the past, it may be connected automatically with no user operation required. For details on operations of the BLUETOOTH device, refer to the operation manual supplied with your BLUETOOTH device. Operations 3 Press to start playback. Depending on the BLUETOOTH device, you may have to start up a music player on the BLUETOOTH device beforehand. Depending on the BLUETOOTH device, you may have to press twice. 4 Press VOLUME +/ to adjust the volume. Turn the VOLUME dial on the unit left or right to adjust the volume. If the volume cannot be changed, adjust it on your BLUETOOTH device. 1 Press BLUETOOTH FUNCTION. The BLUETOOTH indicator flashes slowly in blue. Press FUNCTION on the unit repeatedly until BT AUDIO appears in the display. 31 GB
32 Other operations You can perform the following operations using the buttons on the remote or unit of the system. To Pause playback Do the following: Press *. Stop playback Press. Select a folder Press +/. Select a file Press /. Find a point in a file Hold down / (or / on the unit) during playback and release the button at the desired point. * Depending on the BLUETOOTH device, you may have to press twice. Note The operations described in this manual may not be available for certain BLUETOOTH devices. In addition, the actual operations may differ depending on the connected BLUETOOTH device. To check the address of a connected BLUETOOTH device Press DISPLAY while the name set on the connected BLUETOOTH device is shown in the display. The BLUETOOTH device address appears in two installments in the display for 8 seconds. To cancel the connection with the BLUETOOTH device Press BLUETOOTH on the unit. DISCONNECT appears in the display. Depending on the BLUETOOTH device, the connection may be cancelled automatically when you stop playback. 32 GB
33 Network connections How to connect your network Set up the network after checking your network environment. Refer to the following descriptions. Setting up for a wireless network Select the suitable method and start to make the network settings. Do not connect any network (LAN) cable to the system. Option 1: Method for using an application for smartphones or Tablets (Android device/iphone/ipod touch/ipad) (page 34) Option 2: Manual setting method using an Access Point Scan (for PC/Mac) (page 35) Option 3: Method for using a WPS push button at the access point supporting WPS (page 37) Network connections Setting Up for a Wired Network Option 4: DHCP method (page 38) Tip For connecting the fixed IP address and setting of the proxy server, use the screen in step 8 of Option 2: Manual setting method using an Access Point Scan (for PC/Mac) (page 35). 33 GB
34 Setting up for a wireless network Note When setting up a wireless network, SSID (Wireless Network Name) and Security Key (WEP or WPA key) may be required. Security key (or network key) is an encryption key used to limit the devices with which communication can occur. It is used to provide higher security for devices communicating via a wireless LAN router/access point. Option 1: Method for using an application for smartphones or Tablets (Android device/iphone/ ipod touch/ipad) Notes Before starting this procedure, be aware that your Wi-Fi network will not be protected until the setting is complete. After the setting is complete, your Wi-Fi network will be protected again when you set wireless LAN security. The following procedure must be completed within 30 minutes. If you cannot complete it, turn off the system and start over from step 1. If a trouble occurs during network setup, start over from step 1. 1 Have the wireless network name (SSID) and Security Key of the wireless LAN router/access point to be used available for reference. SSID (Wireless Network Name) Security Key (WEP or WPA key) Download the NS Setup application. You can download the free application from Google Play for Android devices or App Store for iphone/ipod touch/ ipad. If you access using 2D Code Read the following 2D Code to access. Android ios You can search the application easily if you type NS Setup into the search screen. Press / (power) to turn on the system. Press OPTIONS to display the setting menu. 34 GB For the SSID and Security Key, refer to the operating instructions of the wireless LAN router/access point.
35 5 6 Press / repeatedly to select NW RESET, then press. When OK appears in the display, press. The system is automatically turned off. Press / (power) to turn on the system. When flashes in the display, perform the following operation. When setting up with an iphone/ipod touch/ipad From the Home screen, go to [Settings] - [Wi-Fi] and select Sony_Wireless_Audio_Setup. If Sony_Wireless_Audio_Setup does not appear, wait until flashes in the display, then perform searching again. Option 2: Manual setting method using an Access Point Scan (for PC/Mac) Note Be aware that your Wi-Fi network will not be protected until the setting is complete. After the setting is complete, your Wi-Fi network will be protected again when you set a wireless LAN security. 1 Have the wireless network name (SSID) and Security Key of the wireless LAN router/access point to be used available for reference. SSID (Wireless Network Name) Security Key (WEP or WPA key) Network connections 7 Launch the NS Setup application. For the SSID and Security Key, refer to the operating instructions of the wireless LAN router/access point. 8 Perform setup, following the onscreen instructions. When setup is completed, press the Play test sound button to confirm operation of the system by playing the test sound. Notes If Sony_Wireless_Audio_Setup does not appear, repeat steps 4 and after. Do not connect the network (LAN) cable Press OPTIONS to display the setting menu. Press / repeatedly to select NW RESET, then press. The system is automatically turned off. Press / (power) to turn on the system. 5 Connect the unit and a Mac or PC. For Mac OS X Turn on Mac. Select the icon on the top of the screen. Select [Sony_Wireless_Audio_Setup] from the network list. 35 GB
36 For Windows 8 (Windows UI) Turn on PC. Move the mouse pointer to the topright (or bottom-right) corner on the Start screen to display the charms, and select [Settings]. With a touch panel, display the charms by swiping from the right end of the Start screen, and select [Settings]. For PC Start the browser and input either of the following URLs into the browser s address bar. 7 Select the desired language when the [Language Setup] screen appears. Select or tap the or icon. Select [Sony_Wireless_Audio_Setup] from the network list. For Windows 7/Windows 8 Turn on PC. Click or tap the desktop on the Start screen. Select the or icon on the bottom of the screen. Select [Sony_Wireless_Audio_Setup] from the network list. For Windows Vista Turn on PC. Click the icon on the bottom of the screen. Select [Connect to a network]. Select [Sony_Wireless_Audio_Setup] from the network list. 8 Select [Network Settings] from the menu. Network Settings 6 Access the [Sony Network Device Setting] screen. For Mac Start Safari and select [Bonjour] under ([Bookmarks]), then select [SONY:CMT-SBT300W(B) XXXXXX]. 36 GB
37 9 Select the SSID of the wireless LAN router/access point, then input the Security Key (if applicable). 2 3 Press OPTIONS to display the setting menu. Press / repeatedly to select WPS, then press. OK appears in the display. To cancel the setting, press / to select CANCEL, then press. SSID 4 Press. WPS flashes Select [Apply]. Select [OK] in the displayed window. The system restarts automatically. 5 Hold down the WPS button on the access point for more than 3 seconds. Network connections 12 Connect the Mac or PC to the wireless LAN router/access point to be used. Note This procedure needs to be completed within 30 minutes. If you cannot complete, start over from step 3. Option 3: Method for using a WPS push button at the access point supporting WPS 6 WPS button* * The position and the shape of the WPS button are different depending on the model of the access point. CONNECT lights up after WPS flashes for several tens of seconds in the display window of the system. Make sure that lights up after a connection has been made. Tip Refer to the operating instructions of your wireless LAN router/access point for details on the WPS button. 1 Check whether the network (LAN) cable (not supplied) is disconnected. Disconnect the network (LAN) cable while the power cord is disconnected if the network (LAN) cable is connected. 37 GB
38 Setting up wired networks Option 4: DHCP method Usually, the DHCP setting is set to ON when you connect your computer to the network. Try the following method if you are using a wired network. Set the DHCP setting of your computer to ON in advance. 1 Check whether your computer and router are turned on. 2 3 Connect the system and the router using a network (LAN) cable (not supplied). Connect the router and your computer using a second network (LAN) cable (not supplied) or a wireless LAN connection. Network (LAN) cable (not supplied) or a wireless LAN connection Network (LAN) cable (not supplied) 4 Turn the system on. lights up in the display when the connection is made. 38 GB
39 Listening to audio content using DLNA (Digital Living Network Alliance) You can play back audio content on DLNAcompliant servers such as your computer, or network recorder, etc., on this system by controlling the server using Network Audio Remote application*. A DLNA-compliant controller device (a remote control device, etc.) is needed for the operation. You can use Windows 7/Windows 8 as both server and controller. If you access using 2D Code Read the following 2D Code to access. Android ios Device with Network Audio Remote* or DLNA controller Server Control Access Deliver Network controlled player (this system) * Network Audio Remote is application for ios and Android. Sony provides the Network Audio Remote application for free. (Digital Rights Management) copyright protection cannot be played on this system. * The system can play AAC files with the extension of.m4a,.mp4, or.3gp only. Notes Generally, it may take a while to recognize each DLNA-compliant device currently used when you enjoy audio content via a home network. This system cannot play back files in WMA format with DRM copyright protection. If a WMA file cannot be played back on this system, check the property of that file on your computer, and see whether the file is DRM-copyrighted. Open a folder or a volume where the WMA file is stored, and right-click the file to display the [Property] window. When there is the [Licence] tab, the file is DRM-copyrighted and cannot be played back on this system. You may not be able to play back some content with DLNA CERTIFIED products. Tip The network function is available by playing back audio content on a DLNA -compliant server or controller device, although you cannot select it using the function button(s) on the unit of this system. Listening to audio content on a computer with Windows 8 Windows 8 supports DLNA1.5. Windows 8 can be used as both server and controller. You can listen to audio content on the server easily using the [Play To] function of Windows 8. Network connections You can search for application easily if you type Network Audio Remote on the search screen. Control & Deliver The system can play audio content stored on the server in MP3, Linear PCM, WMA and AAC* formats. Audio content with DRM DLNA controller/server (Windows 8-based computer) Network controlled player (this system) 39 GB
40 Note The items displayed on the computer may be different from the ones shown in this section, depending on the version of the operating system or the computer environment. For details, refer to the help of your computer. Setting up a computer with Windows 8 1 Move the mouse pointer to the top-right (or bottom-right) corner on the Start screen to display the charms, and select [Settings]. With a touch panel, display the charms by swiping from the right end of the start screen, then select [Settings]. 4 Select [Yes, turn on sharing and connect to devices]. 2 3 Select the or icon. Right-click the name of the connected network or press and hold it, and select [Turn sharing on or off]. Listening to audio content stored on a computer with Windows 8 Using Music of Windows 8 (Windows UI) 1 Select [Music] on the Start screen. 40 GB
41 2 3 Select the desired audio content and play it back. Move the mouse pointer to the top-right (or bottom-right) corner on the Start screen to display the charms, and select [Devices]. With a touch panel, display the charms by swiping from the right end of the start screen, and select [Devices]. Using Windows Media Player 1 Right-click on the Start screen. With a touch panel, swipe the Start screen from the bottom to top, and select [All apps] at the bottom right on the screen. 2 Select [Windows Media Player]. Network connections 4 Select [SONY:CMT-SBT300W(B) XXXXXX]. The system enters the network function mode and the selected audio content is played back. 3 Right-click the desired audio content or press and hold it. 41 GB
42 4 Select [Play To] from the menu. 5 The device list appears. Select [SONY:CMT-SBT300W(B) XXXXXX]. 2 Select [Windows Media Player]. The system enters the network function mode and the selected audio content is played back. Setting up the DLNA controller for using this PC 3 Click or tap [Stream], and select [More streaming options]. 1 Right-click on the Start screen. With a touch panel, swipe the Start screen from the bottom to top, and select [All apps] at the bottom-right on the screen. 4 Check if all the devices are allowed. 42 GB
43 Setting up a computer with Windows 7 1 Go to [Start] - [Control Panel] and select [View network status and tasks] under [Network and Internet]. The [Network and Sharing Center] screen appears. 5 If not, select [Allow All], and open the [Allow All Media Devices] screen. Select [Allow all the PCs and Media Devices]. Select [OK] to close the screen. The setting is now completed. You can listen to music stored in you PC using the DLNA controller. 2 Tip If the desired item does not appear in the display, try to change the display type of the Control Panel. Select [Public network] under [View your active networks]. If the display shows other than [Public network], go to step 5. Network connections Listening to audio content on a computer with Windows 7 Windows 7 supports DLNA1.5. Windows 7 can be used as both server and controller. You can listen to audio content on the server easily using the [Play To] function of Windows 7. DLNA controller/server (Windows 7-based computer) Control & Deliver Network controlled player (this system) Note The items displayed on the computer may be different from the ones shown in this section, depending on the version of the operating system or the computer environment. For details, refer to the help of your computer. 3 4 The [Set Network Location] screen appears. Select [Home network] or [Work network] according to the environment in which the system is used. Follow the instructions that appear on the display according to the environment in which the system is used. When the change is completed, confirm that the item under [View your active networks] has been changed to 43 GB
Enjoy Music over Your Wi-Fi Network
 Personal Audio System Enjoy Music over Your Wi-Fi Network Read this document first. Enjoy Music over Your Wi-Fi Network GB SRS-X7 This manual introduces how to play music connecting this unit to your Wi-Fi
Quick Connection and Setup Guide
 3-300-262-13(1) Read this first Quick Connection and Setup Guide Quick start guide to main features GB HDD Network Audio System NAS-SC55PKE 2008 Sony Corporation Printed in Malaysia Table of Contents Checking
Parrot Zikmu by Starck. User guide
 Parrot Zikmu by Starck User guide Contents Getting started... 4 Installation... 4 Installation... 4 Maintenance and precautions... 5 Commands... 5 Turning the speakers on / off... 5 Selecting an audio
Introduction. Overview. Contents. Linksys AC1200 Max Wi-Fi Range Extender. Front
 User Guide RE6500 Linksys AC1200 Max Wi-Fi Range Extender Introduction This User Guide can help you connect the extender to your network and solve common setup issues. You can find more help from our award-winning,
SPH-DA120. English. Operation Manual. Smartphone Receiver
 Operation Manual Smartphone Receiver SPH-DA120 Notice to all users: This software requires that the product is properly connected to your vehicle s parking brake and depending on your vehicle, additional
Quick Start. Nighthawk X8 AC5300 Tri-Band WiFi Router Model R8500. Package Contents. NETGEAR, Inc. 350 East Plumeria Drive San Jose, CA 95134 USA
 Support Thank you for purchasing this NETGEAR product. You can visit www.netgear.com/support to register your product, get help, access the latest downloads and user manuals, and join our community. We
System requirements for computers connected to the HDD AUDIO PLAYER [5] What you need to do before starting to use the HDD AUDIO PLAYER [11]
![System requirements for computers connected to the HDD AUDIO PLAYER [5] What you need to do before starting to use the HDD AUDIO PLAYER [11]](/thumbs/37/17792174.jpg "System requirements for computers connected to the HDD AUDIO PLAYER [5] What you need to do before starting to use the HDD AUDIO PLAYER [11]") HDD AUDIO PLAYER HAP-Z1ES About the HDD AUDIO PLAYER Features of the HDD AUDIO PLAYER [1] Playable audio file formats [2] How to make and enter selections [3] How to input characters [4] System requirements
HDD AUDIO PLAYER HAP-Z1ES About the HDD AUDIO PLAYER Features of the HDD AUDIO PLAYER [1] Playable audio file formats [2] How to make and enter selections [3] How to input characters [4] System requirements
DSB-100 Portable Premium Bluetooth Speaker Owner s Manual
 . DSB-100 Portable Premium Bluetooth Speaker Owner s Manual You can print more than one page of a PDF onto a single sheet of paper. 1 Index Preparation Unpacking 3 Overview 4 Sound Quality 4 Design 4 Operation
M-CR610. CD Receiver. Owner s Manual. Appendix. Contents. You can print more than one page of a PDF onto a single sheet of paper.
 CD Receiver M-CR610 You can print more than one page of a PDF onto a single sheet of paper. Owner s Manual Front panel Rear panel Remote Contents Accessories 5 Inserting the batteries 6 Operating range
UK - USER MANUAL. Contents
 1 UK - USER MANUAL Contents Internet Radio Quickstart Guide 7 What you need before you can use your Internet radio 7 Controls 8 Connections 9 Steps for connecting your radio to your wireless network 10
WFR-28D / WFR-28. GB Revision 2
 WFR-28D / WFR-28 Revision 2 Contents Introduction... 2-6 Before you can use this product... 2-3 Controls and connections... 4-5 Navigation controls... 6 Network configuration... 7-5 Connecting your radio
Networking. General networking. Networking overview. Common home network configurations. Wired network example. Wireless network examples
 Networking General networking Networking overview A network is a collection of devices such as computers, printers, Ethernet hubs, wireless access points, and routers connected together for communication
NETGEAR genie Apps. User Manual. 350 East Plumeria Drive San Jose, CA 95134 USA. August 2012 202-10933-04 v1.0
 User Manual 350 East Plumeria Drive San Jose, CA 95134 USA August 2012 202-10933-04 v1.0 Support Thank you for choosing NETGEAR. To register your product, get the latest product updates, get support online,
Mobility with Eye-Fi Scanning Guide
 Mobility with Eye-Fi Scanning Guide Scan and Transfer Images Wirelessly with Eye-Fi This document is to be used in addition to the scanner s user guide located on the installation disc. The instructions
Using the Wireless Music Bridge
 Using the Wireless Music Bridge Stream music to a room in the home from your mobile devices Now you can control and stream music from your handheld Apple * ipod, ipod touch, iphone, ipad ; Bluetooth ;
DATA PROJECTOR XJ-A147/XJ-A247/XJ-A257 XJ-M146/XJ-M156 XJ-M246/XJ-M256. XJ-A Series. XJ-M Series. Network Function Guide
 DATA PROJECTOR EN XJ-A Series XJ-A147/XJ-A247/XJ-A257 XJ-M Series XJ-M146/XJ-M156 XJ-M246/XJ-M256 Network Function Guide In this manual, XJ-A Series and XJ-M Series refer only to the specific models listed
Thank you for purchasing the Mobile WiFi. This Mobile WiFi brings you a high speed wireless network connection.
 Thank you for purchasing the Mobile WiFi. This Mobile WiFi brings you a high speed wireless network connection. This document will help you understand your Mobile WiFi so you can start using it right away.
THE NEW GENERATION IN TECHNOLOGY. NI-3103A Alarm Clock w/fm Radio ipod & iphone Docking. Operating Instructions
 THE NEW GENERATION IN TECHNOLOGY NI-3103A Alarm Clock w/fm Radio ipod & iphone Docking Operating Instructions Table of Contents Important Safeguards... 3 Parts... 6 Controls... 6 To Set Up... 7 ipod/iphone
Home Wi-Fi Gateway Instructions
 Home Wi-Fi Gateway Instructions 1. Connect the gateway. Use the coaxial cable provided by BendBroadband to connect the cable port (A) to your cable outlet. 2. Connect your computer to the cable modem gateway
FEATURE GUIDE AeroSphère / Small / Large / Base
 FEATURE GUIDE AeroSphère / Small / Large / Base Content: Wi-Fi Setup - advanced topics WPS - advanced topics Wi-Fi Setup with the AeroSphère Network Setup webpage Troubleshooting & FAQ Version v0.52 WI-FI
HANTZ + PARTNER The Upgrade Company! www.hantz.com
 Quick Start Guide X3000 HD Network Media Player X3000 HD NETWORK MEDIA PLAYER POWER HANTZ + PARTNER The Upgrade Company! www.hantz.com A Get to know your HELIOS X3000 Thank you for purchasing the HELIOS
Windows 10.1 Tablet (UB-15MS10 and UB-15MS10SA) FAQ December 2014
 FAQ December 2014") Windows 10.1 Tablet (UB-15MS10 and UB-15MS10SA) FAQ December 2014 Navigation... 2 Question 1: What are charms used for?... 2 Question 2: How do I navigate while using a mouse or trackpad?... 3 Question
Windows 10.1 Tablet (UB-15MS10 and UB-15MS10SA) FAQ December 2014 Navigation... 2 Question 1: What are charms used for?... 2 Question 2: How do I navigate while using a mouse or trackpad?... 3 Question
HP Advanced Wireless Docking Station. User Guide
 HP Advanced Wireless Docking Station User Guide Copyright 2014, 2015 Hewlett-Packard Development Company, L.P. Intel is a trademark of Intel Corporation in the U.S. and other countries. Windows and Windows
DIGA Player Instruction manual for ios device
 DIGA Player Instruction manual for ios device Index 1.Activate Remote Recording function on DIGA 2.Let s use DIGA Player 2.1. How to use Remote Recording Service 2.1.1. Make your account (User registration)
2006 Sony Corporation Printed in Malaysia 2-678-175-13 (1) Quick Start Guide NW-E002F / E003F / E005F / E002 / E003 / E005
 Quick Start Guide NW-E002F / E003F / E005F / E002 / E003 / E005") 2006 Sony Corporation Printed in Malaysia 2-678-175-13 (1) Quick Start Guide NW-E002F / E003F / E005F / E002 / E003 / E005 Table of Contents Owner s Record The model and serial numbers are located on the
2006 Sony Corporation Printed in Malaysia 2-678-175-13 (1) Quick Start Guide NW-E002F / E003F / E005F / E002 / E003 / E005 Table of Contents Owner s Record The model and serial numbers are located on the
Audio Amplifier. User Manual
 Audio Amplifier User Manual Contents Contents 1 Thank You for your Purchase. 1 Introduction 2 A100 Capabilities 2 What s in the box? 2 AirPlay Compatibility 2 USB Compatibility 2 The A100 3 Remote 3 Getting
ShareLink 200 Setup Guide
 ShareLink 00 Setup Guide This guide provides instructions for installing and connecting the Extron ShareLink 00. The ShareLink USB 00 Wireless Collaboration Gateway allows anyone to present content from
Figure 1 Sample WiseLink screens, showing MP3 music files (left) and photos (right) available as shared files from your networked PC or media server
 and photos (right) available as shared files from your networked PC or media server") SAMSUNG S GUIDE TO DLNA Welcome to the era of 21 st -century television! Samsung s added a new level of functionality to its HDTVs with DLNA CERTIFIED connectivity. Now, your compatible Samsung HDTV can
SAMSUNG S GUIDE TO DLNA Welcome to the era of 21 st -century television! Samsung s added a new level of functionality to its HDTVs with DLNA CERTIFIED connectivity. Now, your compatible Samsung HDTV can
BLU Vivo 4.3 User Manual
 BLU Vivo 4.3 User Manual 1 Table of Contents Phone Safety Information... 3 Appearance and Key Functions... 4 Installation and Charging... 5 Phone Operation... 7 Communication... 10 Camera... 11 Gallery...
Nighthawk AC1900 WiF Range Extender
 Nighthawk AC1900 WiF Range Extender Model EX7000 User Manual December 2014 202-11469-01 350 East Plumeria Drive San Jose, CA 95134 USA Nighthawk AC1900 WiF Range Extender Support Thank you for selecting
Point of View SmartTV-500 Center - Android 4.2. General notices for use...2 Disclaimer...2 Box Contents...2
 Point of View SmartTV-500 Center - Android 4.2 English Table of Contents General notices for use...2 Disclaimer...2 Box Contents...2 1.0 Product basics...3 1.1 Buttons and connections... 3 1.2 Connecting
User Guide Vodafone Mobile Wi-Fi R206-Z. Designed by Vodafone
 User Guide Vodafone Mobile Wi-Fi R206-Z Designed by Vodafone Welcome to the world of mobile communications 1 Welcome 2 Device overview 3 Getting started: Step 1 4 Getting started: Step 2 5 Mobile Wi-Fi
Support Package Contents AC1600 WiFi VDSL/ADSL Ethernet cable Trademarks Modem Router Compliance Phone cable Modem router
 Support Thank you for purchasing this NETGEAR product. After installing your device, locate the serial number on the label of your product and use it to register your product at https://my.netgear.com.
Welcome. You re watching Apple TV. This guide contains all the information you need to get from setup to your sofa.
 Welcome. You re watching Apple TV. This guide contains all the information you need to get from setup to your sofa. Contents Chapter 1: Connect. 7 What s in the box 8 Apple TV at a glance 10 What you
Smart Music Control Application CONTENTS. Smart Music Control Application. User Guide CONTENTS 1 GETTING STARTED 1 MEDIA PLAYER MODE 1
 Smart Music Control Application JVC KENWOOD Corporation Smart Music Control Application User Guide CONTENTS CONTENTS 1 GETTING STARTED 1 How to Install Smart Music Control App 1 Preparing the Music Player
User Manual I1010Q16DCZ
 User Manual I1010Q16DCZ Explanation, Note and Warning *Explanation: important information, which can help you better use your tablet PC. *Note: indicates that not observing the content may result in hardware
STEREO WIRELESS BLUETOOTH HEADPHONES
 STEREO WIRELESS BLUETOOTH HEADPHONES model: AF52 USER MANUAL part of the series TABLE OF CONTTS Product Overview Charging Powering On and Off Pairing with Bluetooth Devices iphone, ipad, and ipod touch
DAB / FM and WiFi Internet Radio with Music Player and Last.fm Please read this manual before use
 Enjoy Listening ROBERTS DAB / FM and WiFi Internet Radio with Music Player and Last.fm Please read this manual before use Contents Introduction... 2-9 istream internet radio features... 2 Before you can
SwannEye HD Security Camera Wi-Fi Connections Quick Setup Guide. Welcome! Lets get started.
 EN SwannEye HD Security Camera Wi-Fi Connections Quick Setup Guide Welcome! Lets get started. 1 1 Introduction 1 2 3 4 Congratulations on your purchase of this SwannEye HD Wi-Fi Security Camera from Swann!
Internet and Email Help. Table of Contents:
 Internet and Email Help The following tips are provided to assist you in troubleshooting and managing your Plex Internet and email services. For additional issues or concerns, you may also call our Product
Premium Design Phone with Smartphone Connect
 Smartphone Connect App Guide Premium Design Phone with Smartphone Connect Model No. KX-PRW130 Thank you for purchasing a Panasonic product. This document explains how to use the Smartphone Connect app.
USING YOUR DMX PROFUSION
 Set Up Guide USING YOUR DMX PROFUSION io FOR 1 Connect 2 Set Up 3 Listen SIMPLE PERSONALIZED UNLIMITED ECONOMICAL LICENSED Welcome Thank you for choosing DMX to provide your Pandora listening experience
PERSONAL AUDIO SYSTEM
 4-449-198-14(1) PERSONAL AUDIO SYSTEM Operating Instructions Getting Started Basic Operations Bluetooth Tuner Sound Adjustment Other Operations Additional Information FST-GTK37iP/GTK17iP RDH-GTK37iP/GTK17iP
WiFi DSL Modem Router
 Support Thank you for purchasing this NETGEAR product. After installing your device, locate the serial number on the label of your product and use it to register your product at https://my.netgear.com.
Quick Start. is a trademark of ETSI.
 TM Quick Start is a trademark of ETSI. Thank you for purchasing the Mobile WiFi. This Mobile WiFi brings you a high speed wireless network connection. This document will help you understand your Mobile
EasyMP Multi PC Projection Operation Guide
 EasyMP Multi PC Projection Operation Guide Contents Introduction to EasyMP Multi PC Projection... 7 EasyMP Multi PC Projection Features... 7 Connection to Various Devices... 7 Four-Panel Display... 8
GETTING TO KNOW YOUR TELSTRA PRE-PAID 3G WI-FI
 GETTING TO KNOW YOUR TELSTRA PRE-PAID 3G WI-FI LET S GET THIS SHOW ON THE ROAD You must be excited about your brand new Telstra Pre-Paid 3G Wi-Fi. This guide will help you get connected as quickly and
Aura. Wireless Speaker System Owner s Manual
 Wireless Speaker System Owner s Manual Table of Contents Introduction 3 Included IteMS 3 Controls and ConnectionS 3 Harman Kardon Aura Front Panel ControlS 3 Harman Kardon Aura Rear Panel ControlS 4 ConnectionS
COPY EOS 70D (W) Wi-Fi Function Instruction Manual INSTRUCTION MANUAL
 Wi-Fi Function Instruction Manual INSTRUCTION MANUAL") EOS 70D (W) Wi-Fi Function Instruction Manual E INSTRUCTION MANUAL What You Can Do Using the Wireless LAN Functions This camera s wireless LAN functions let you perform a range of tasks wirelessly, from
EOS 70D (W) Wi-Fi Function Instruction Manual E INSTRUCTION MANUAL What You Can Do Using the Wireless LAN Functions This camera s wireless LAN functions let you perform a range of tasks wirelessly, from
Configuring the wireless security of your Linksys Wireless-N router through the web-based setup page
 Contents Configuring the wireless security of your Linksys Wireless-N router through the web-based setup page.. 2 Checking the Linksys router s wireless settings through the web-based setup page and adding
IMPORTANT SAFETY INSTRUCTIONS. When using this electronic device, basic precautions should always be taken, including the following:
 IMPORTANT SAFETY INSTRUCTIONS When using this electronic device, basic precautions should always be taken, including the following: 1. Read all instructions before using the product. 2. Do not use this
SL-D930. Stunning Sound from Compact Body A Retro-cool 2.1ch Bluetooth Speaker with CD/Radio. Main Features
 SL-D930 Stunning Sound from Compact Body A Retro-cool 2.1ch Bluetooth Speaker with CD/Radio Main Features >Wireless connection from Smartphones, Tablets, and Laptops via Bluetooth >2.1ch Speaker System
Quick Reference for:
 Quick Reference for: Optimum Online Boost Plus Optimum Link SM Optimum app Advanced Wireless Router Por español, vea al revérso Version 1.0 9815001CAP0311COL Table of Contents Optimum Online Boost Plus...................
User Guide Vodafone Mobile Wi-Fi R206-Z. Designed by Vodafone
 User Guide Vodafone Mobile Wi-Fi R206-Z Designed by Vodafone Welcome to the world of mobile communications 1 Welcome 2 Device overview 3 Getting started: Step 1 4 Getting started: Step 2 5 Mobile Wi-Fi
Contents: Thank You for your Purchase FOR FURTHER INFORMATION ON MONITOR AUDIO PLEASE GO TO WWW.MONITORAUDIO.COM
 User Manual Contents: Contents: 1 Thank You for your Purchase 1 Introduction 2 S200 Capabilities 2 What s in the box 2 AirPlay Compatibility 2 USB Compatibility 2 The S200 3 Getting Ready to Free Your
User Guide. E-Series Routers
 User Guide E-Series Routers Table of Contents Table of Contents Product overview E900/E1200/E1500/E2500/E3200 1 Back view 1 Bottom view 1 E4200 2 Top view 2 Back view 2 Setting Up Your E-Series Router
Lenovo Miix 2 8. User Guide. Read the safety notices and important tips in the included manuals before using your computer.
 Lenovo Miix 2 8 User Guide Read the safety notices and important tips in the included manuals before using your computer. Notes Before using the product, be sure to read Lenovo Safety and General Information
Canvio Home FAQ. is designed to be very easy to install and use to back up, share, and remotely access the files from your computers.
 What is a Canvio Home device? Canvio Home is a Network-Attached Storage device that is designed to be very easy to install and use to back up, share, and remotely access the files from your computers.
Targus Bluetooth Keyboard for Tablets
 1 BLUETOOTH KEYBOARD for Tablets 410-2153-001B / AKB33US 1 YEAR LIMITED WARRANTY: We pride ourselves on the quality of our products. For complete warranty details and a list of our worldwide offices, please
AC1200 WiFi Range Extender
 Model EX6200 User Manual February 2014 202-11298-01 350 East Plumeria Drive San Jose, CA 95134 USA Support Thank you for selecting NETGEAR products. After installing your device, locate the serial number
Technical Support. Package Contents. CENTRIA WNDR4700/WNDR4720 Installation Guide
 Technical Support After installing your device, locate the serial number on the label of your product and use it to register your product at https://my.netgear.com. You must register your product before
Thank you for choosing HUAWEI Mobile WiFi
 Thank you for choosing HUAWEI Mobile WiFi Supported functions and actual appearance depend on the specific models you purchased. The illustrations are provided for your reference only. For details about
User Manual. BluLink. Wireless Cell Phone and Music Adapter. www.pilot-usa.com www.pilotblulink.com
 User Manual BluLink Wireless Cell Phone and Music Adapter www.pilot-usa.com www.pilotblulink.com Thank you for purchasing BluLink At Pilot Communications USA we have been instrumental in bringing cutting
CONTENTS PAGE. c) Our Recommended Settings... 14. d) Overview...7. i. Check Out and Download a book... 27
 Our Recommended Settings... 14. d) Overview...7. i. Check Out and Download a book... 27") USER GUIDE CONTENTS PAGE Top Tip: Hold down the Ctrl key on your keyboard and using your mouse click on the heading below to be taken to the page Introduction... 3 1. How to create a new account... 3 2.
USER GUIDE CONTENTS PAGE Top Tip: Hold down the Ctrl key on your keyboard and using your mouse click on the heading below to be taken to the page Introduction... 3 1. How to create a new account... 3 2.
Wi-Fi Direct Guide. Version 0 ENG
 Wi-Fi Direct Guide Version 0 ENG Applicable models This User s Guide applies to the following models. HL-5470DW(T)/6180DW(T)/MFC-8710DW/8910DW/8950DW(T) Definitions of notes We use the following icons
Safety and General Information
 User Guide Safety and General Information Please read the following information before using this product Users are not permitted to make changes or modify the product and the accessories in any way. Do
EOS 750D (W) Wi-Fi/NFC Function Instruction Manual ENGLISH INSTRUCTION MANUAL
 Wi-Fi/NFC Function Instruction Manual ENGLISH INSTRUCTION MANUAL") EOS 750D (W) Wi-Fi/NFC Function Instruction Manual ENGLISH INSTRUCTION MANUAL Introduction What You Can Do Using the Wireless LAN Functions This camera s wireless LAN functions let you perform a range
EOS 750D (W) Wi-Fi/NFC Function Instruction Manual ENGLISH INSTRUCTION MANUAL Introduction What You Can Do Using the Wireless LAN Functions This camera s wireless LAN functions let you perform a range
Thank you for purchasing the Mobile WiFi. This Mobile WiFi brings you a high speed wireless network connection.
 Quick Start Thank you for purchasing the Mobile WiFi. This Mobile WiFi brings you a high speed wireless network connection. This document will help you understand your Mobile WiFi so you can start using
HP MediaSmart Server Software Upgrade from v.1 to v.3
 HP MediaSmart Server Software Upgrade from v.1 to v.3 Table of Contents Upgrade Your Server Software to HP MediaSmart Server v.3 2 Before You Begin 3 What's New... 3 Features That Will Change... 4 Prepare
Fibe Internet Connection Hub Reference Guide
 Fibe Internet Connection Hub Reference Guide FibeInternet_ConnectionHub_ReferenceGuide_Eng_V7 1 Bell Internet Service Agreement Use of the Bell Internet service is subject to the terms and conditions of
Connecting your Blu-ray Disc / DVD Player to your Wi-Fi Network
 4-151-271-11(1) Connecting your Blu-ray Disc / DVD Player to your Wi-Fi Network 2009 Sony Corporation Welcome This guide illustrates how to connect the player to your Wi-Fi network (wireless network).
N600 WiFi USB Adapter
 Model WNDA3100v3 User Manual December 2014 202-11470-01 350 East Plumeria Drive San Jose, CA 95134 USA Support Thank you for selecting NETGEAR products. After installing your device, locate the serial
USER GUIDE AC2400. DUAL BAND GIGABIT Wi Fi ROUTER. Model# E8350
 USER GUIDE AC2400 DUAL BAND GIGABIT Wi Fi ROUTER Model# E8350 Table of Contents Product overview E8350..................................... 1 Setting Up Your E-Series Router Where to find more help.........................
Amcrest 960H DVR Quick Start Guide
 Amcrest 960H DVR Quick Start Guide Welcome Thank you for purchasing our Amcrest 960H DVR! This quick start guide will help you become familiar with our DVR in a very short time. Before installation and
Register your radio at iradio.gracedigitalaudio.com for additional features.
 USER GUIDE GDI-IR1000 Register your radio at iradio.gracedigitalaudio.com for additional features. Grace Wireless Internet Radio 1 Table Of Contents Safety Warnings... 4 Internet Radio Quickstart Guide...
genie app and genie mobile app
 genie app and genie mobile app User Manual 350 East Plumeria Drive San Jose, CA 95134 USA June 2012 202-10933-02 v1.0 2012 NETGEAR, Inc. All rights reserved No part of this publication may be reproduced,
Bank. Wireless Portable Hard Drive. User s Manual
 Bank Wireless Portable Hard Drive User s Manual REGULATORY AND SAFETY INFORMATION FCC Compliance and Advisory Statement This device complies with Part 15 of the FCC rules. Operation is subject to the following
Thank you for purchasing the Mobile WiFi. This Mobile WiFi brings you a high speed wireless network connection.
 Quick Start Thank you for purchasing the Mobile WiFi. This Mobile WiFi brings you a high speed wireless network connection. This document will help you understand your Mobile WiFi so you can start using
A quick Guide to your Super Hub 2ac
 A quick Guide to your Super Hub 2ac HELLO. W el c o m e t o t h i s h a n d y g u i d e t o y o u r n ew v i r g i n m e d i a b u s i n e s s b r o a d b a n d. What s inside Getting to know your Super
Android Dongle. User Manual TL869
 Android Dongle User Manual TL869 2 User Manual Android TV Dongle Before using the product, please read this manual thoroughly. The specifications and software in this manual are subject to change without
Controls. LCD Display. Tuning Up Time Set and Station Scan
 PR-D8 GB Revision 3 1 1 2 4 5 7 9 10 12 14 16 18 20 22 24 25 26 27 29 31 33 35 36 37 38 Controls Stereo Built-in Microphone (Left Channel) LCD Display Stereo Built-in Microphone (Right channel) Power/Auto
BlackBerry Desktop Software User Guide
 BlackBerry Desktop Software User Guide Version: 2.4 SWD-1905381-0426093716-001 Contents Basics... 3 About the BlackBerry Desktop Software... 3 Set up your smartphone with the BlackBerry Desktop Software...
USER GUIDE AC2600 MU-MIMO GIGABIT ROUTER. Model# EA8500
 USER GUIDE AC2600 MU-MIMO GIGABIT ROUTER Model# EA8500 Table of Contents Product overview EA8500.....................................1 Setting Up Your Router Where to find more help.........................
Controls. Opening the cover
 BTS-102 GB 2013 CSR plc and its group companies. The aptx mark and the aptx logo are trademarks of CSR plc or one of its group companies and may be registered in one or more jurisdictions. The Bluetooth
Thank you for choosing HUAWEI E5331 Mobile Wi-Fi
 Thank you for choosing HUAWEI E5331 Mobile Wi-Fi This guide briefly describes the functions of the E5331 Mobile Wi-Fi. Copyright Huawei Technologies Co., Ltd. 2012. All rights reserved. THIS DOCUMENT IS
Thank you for purchasing the Mobile WiFi. This Mobile WiFi brings you a high speed wireless network connection.
 Quick Start Thank you for purchasing the Mobile WiFi. This Mobile WiFi brings you a high speed wireless network connection. This document will help you understand your Mobile WiFi so you can start using
DATA PROJECTOR XJ-A146/XJ-A246/XJ-A256
 DATA PROJECTOR XJ-A146/XJ-A246/XJ-A256 E Data Projector Wireless Function Guide Be sure to read the precautions in the Setup Guide that comes with the Data Projector. Be sure to keep all user documentation
Allows you to play & control music and video content stored on your iphone, and charge it while it s docked
 CMT-MX700NI Sony CMT-MX700Ni Music System and Wi-Fi Internet Radio Get everything you need to enjoy your music with this compact, user-friendly micro shelf system with built-in Wi-Fi. Stream internet music,
Troubleshooting Guide
 Troubleshooting Guide Before you start troubleshooting: Power down the Tooway modem for 60 seconds. Connect a computer directly (via Ethernet cable) to the Tooway modem Power the Tooway modem and wait
Nokia. udirect 2 Bluetooth pairing guide. Pairing and connecting udirect 2 with your Nokia cellular phone
 Nokia with your Nokia cellular phone Charge and turn on both cellular phone and udirect 2. Turning on Nokia Bluetooth Find the connectivity settings of your phone. With most Nokia models the following
Welcome to life on. Get started with this easy Self-Installation Guide.
 Welcome to life on Get started with this easy Self-Installation Guide. Welcome to a network that s light years ahead. Welcome to life on FiOS. Congratulations on choosing Verizon FiOS! You re just a few
User Manual 9.7 Tablet Android 4.0
 User Manual 9.7 Tablet Android 4.0 1 Welcome...3 Important Notices...3 Keys and Functions...4 I. Getting Started...5 1.1 Turn on/off...5 1.1.1 Turn on...5 1.1.2 Turn off...5 1.2 Lock/unlock the screen
Thank you for purchasing the Mobile Wi-Fi. This Mobile Wi-Fi brings you a high speed wireless network connection.
 Thank you for purchasing the Mobile Wi-Fi. This Mobile Wi-Fi brings you a high speed wireless network connection. This document will help you understand your Mobile Wi-Fi so you can start using it right
CMP30. User Manual. www.audac.eu
 CMP30 User Manual www.audac.eu 2 Index Introduction 4 Precautions 5 Safety requirements 5 Caution servicing 5 EC Declaration of Conformity 5 Waste of Electrical and Electronic Equipment (WEEE) 6 Caution
Network Installation Guide. WorkForce 600 Series Artisan 700 Series Artisan 800 Series
 Network Installation Guide WorkForce 600 Series Artisan 700 Series Artisan 800 Series Before You Begin Make sure you installed ink cartridges and loaded paper as described on the Start Here poster. Then
Hi, let s get started. Sound Rise Wireless Speaker & Alarm Clock
 Hi, let s get started. Sound Rise Wireless Speaker & Alarm Clock Welcome to your new Sound Rise! We created Sound Rise for music lovers like you. Start the day with your favorite tunes, rock out while
Get to Know Your Device 4G LTE BROADBAND ROUTER WITH VOICE
 Get to Know Your Device 4G LTE BROADBAND ROUTER WITH VOICE FRONT VIEW The Verizon 4G LTE Broadband Router with Voice is a wireless device that delivers Internet connectivity and telephone service. You
Thank you for purchasing the Huawei E5332 Mobile WiFi. This quick start guide will help you to get started right away.
 Thank you for purchasing the Huawei E5332 Mobile WiFi. This quick start guide will help you to get started right away. You can connect your Huawei E5332 to the internet through any WiFi enabled device
Step By Step Guide To Setting Up Your System
 www.kenwood-electronics.co.uk/vw Kenwood Navigation Systems DNX525DAB Keep up-to-date with the latest software by registering today. Registrate your system on Kenwood s website to receive notifications
Downloadable ebooks and Audiobooks at McKinney Public Library
 Downloadable ebooks and Audiobooks at McKinney Public Library Contents 1. How to Borrow a Title 2. EPUB ebooks: Using Adobe Digital Editions 3. EPUB ebooks: Using the OverDrive App (includes Kindle Fire)