OpenStack Beginner s Guide (for Ubuntu - Precise)
|
|
|
- Daisy Stafford
- 8 years ago
- Views:
Transcription
1

2

3 OpenStack Beginner s Guide (for Ubuntu - Precise) v3.0, 7 May 2012 Atul Jha Johnson D Kiran Murari Murthy Raju Vivek Cherian Yogesh Girikumar

4 OpenStack Beginner s Guide (for Ubuntu - Precise) v3.0, 7 May 2012 Ubuntu, the Ubuntu Logo and Canonical are registered trademarks of Canonical. Read Canonical s trademark policy here. CSS, CSS Corp., and the CSS Corp logos are registered trademarks of CSS Corp. Pvt. Ltd All other trademarks mentioned in the book belong to their respective owners. This book is aimed at making it easy/simple for a beginner to build and maintain a private cloud using OpenStack. This book will be updated periodically based on the suggestions, ideas, corrections, etc., from readers. Mail Feedback to: css.ossbooks@csscorp.com Please report bugs in the content of this book at : and we will try to fix them as early as possible and incorporate them in to the next version of the book. Released under Creative Commons - Attribution-NonCommercial-ShareAlike 3.0 Unported license. A brief description of the license A more detailed license text CC $ BY NC SA

5 Preface Introduction We released the OpenStack Beginner s Guide - Diablo version a few months earlier and it was met with very positive response from users looking to set up a private cloud using OpenStack. OpenStack has since become a lot more stable and robust. There are some significant additions to the component family that comprises a typical OpenStack cloud setup. We are excited to give you the next version of the guide which aims to help users get started with OpenStack Essex on Ubuntu LTS (Precise Pangolin). In this book, we have included (along with several new content) sections that deal with the OpenStack identity service and the new OpenStack web interface. Target Audience Our aim has been to provide a guide for a beginners who are new to OpenStack. Good familiarity with virtualization is assumed, as troubleshooting OpenStack related problems requires a good knowledge of virtualization. Similarly, familiarity with Cloud Computing concepts and terminology will be of help. Prior exposure to AWS API and/or tools is not mandatory, though such exposure will accelerate learning greatly. Acknowledgement Most of the content has been borrowed from web resources like manuals, documentation, white papers etc. from OpenStack and Canonical; numerous posts on forums; discussions on the OpenStack IRC Channel and many articles on the web including those of our colleagues at CSS Corp. We would like to thank the authors of all these resources. License Attribution-Noncommercial-Share Alike 3.0 Unported. For the full version of the license text, please refer to and http: //creativecommons.org/licenses/by-nc-sa/3.0 for a shorter description.
 sections that deal with the OpenStack identity service and the new OpenStack web interface.")
6 vi Preface Feedback We would really appreciate your feedback. We will enhance the book on an ongoing basis based on your feedback. Please mail your feedback to OpenStack Beginner s Guide: Ubuntu Precise Edition

7 OpenStack Compute Starter Guide 1 Contents 1 Introduction to OpenStack and Its Components Cloud Computing OpenStack Open Stack Compute Infrastructure (Nova) Functions and Features: Components of OpenStack Compute API Server (nova-api) Message Queue (Rabbit MQ Server) Compute Worker (nova-compute) Network Controller (nova-network) Volume Workers (nova-volume) Scheduler (nova-scheduler) OpenStack Imaging Service (Glance) Functions and Features Components of Glance OpenStack Storage Infrastructure (Swift) Functions and Features Components of Swift Swift Proxy Server Swift Object Server Swift Container server Swift Account Server The Ring OpenStack Identity Service (Keystone) Components of Identity Service Openstack Administrative Web-Interface (Horizon)
.......................... 9 1.2.1.2.5 Volume Workers (nova-volume)............................ 10 1.2.1.2.6 Scheduler (nova-scheduler).")
8 2 Installation and Configuration Introduction Server Base OS Network Configuration NTP Server Databases MySQL Creating Databases Keystone Creating Tenants Creating Users Creating Roles Listing Tenants, Users and Roles Adding Roles to Users in Tenants Creating Services Creating Endpoints Glance Glance Configuration Nova Nova Configuration OpenStack Dashboard Swift Swift Installation Swift Storage Backends Partition as a storage device Loopback File as a storage device Using the backend Configure Rsync Configure Swift Components Configure Swift Proxy Server Configure Swift Account Server Configure Swift Container Server Configure Swift Object Server Configure Swift Rings Starting Swift services Testing Swift Server BaseOS

9 OpenStack Compute Starter Guide Network Configuration NTP Client Nova Components (nova-compute alone) Client BaseOS Networking Configuration NTP Client Client Tools OpenStack Dashboard Image Management Introduction Creating a Linux Image OS Installation Ubuntu Fedora OpenSUSE Debian CentOS 6 and RHEL Uploading the Linux image Creating a Windows Image OS Installation Uploading the Windows image Instance Management Introduction Openstack Command Line Tools Creation of Key Pairs Launch and manage instances OpenStack Dashboard (Horizon) Login User Overview Instances Services Flavors Images Projects Users Users

10 5.3 Project Overview Instances & Volumes Instances - VNC Console Images & Snapshots Access & Security Containers & Objects Storage Management Nova-volume Interacting with Storage Controller Swift Network Management Introduction Security Security Overview OpenStack Commands Nova Commands Glance Commands Swift Commands Keystone Commands

11 OpenStack Compute Starter Guide 5 List of Tables This is a tutorial style beginner s guide for OpenStack on Ubuntu 12.04, Precise Pangolin. The aim is to help the reader in setting up a minimal installation of OpenStack.

12

13 OpenStack Compute Starter Guide 7 Chapter 1 Introduction to OpenStack and Its Components 1.1 Cloud Computing Cloud computing is a computing model, where resources such as computing power, storage, network and software are abstracted and provided as services on the Internet in a remotely accessible fashion. Billing models for these services are generally similar to the ones adopted for public utilities. On-demand availability, ease of provisioning, dynamic and virtually infinite scalability are some of the key attributes of cloud computing. An infrastructure setup using the cloud computing model is generally referred to as the "cloud". The following are the broad categories of services available on the cloud: Infrastructure as a Service (IaaS) Platform as a Service (PaaS) Software as a Service (SaaS) 1.2 OpenStack OpenStack is a collection of open source software projects that enterprises/service providers can use to setup and run their cloud compute and storage infrastructure. Rackspace and NASA are the key initial contributors to the stack. Rackspace contributed their "Cloud Files" platform (code) to power the Object Storage part of the OpenStack, while NASA contributed their "Nebula" platform (code) to power the Compute part. OpenStack consortium has managed to have more than 150 members including Canonical, Dell, Citrix etc. There are 5 main service families under OpenStack Nova - Compute Service Swift - Storage Service Glance - Imaging Service Keystone - Identity Service Horizon - UI Service

 Nova is the Computing Fabric controller for the OpenStack Cloud.")
14 The below diagram shows a simple representation of interaction between keystone and dashboard with the remaining OpenStack components Open Stack Compute Infrastructure (Nova) Nova is the Computing Fabric controller for the OpenStack Cloud. All activities needed to support the life cycle of instances within the OpenStack cloud are handled by Nova. This makes Nova a Management Platform that manages compute resources, networking, authorization, and scalability needs of the OpenStack cloud. But, Nova does not provide any virtualization capabilities by itself; instead, it uses libvirt API to interact with supported hypervisors. Nova exposes all its capabilities through a web services API that is compatible with the EC2 API of Amazon Web Services.

15 OpenStack Compute Starter Guide Functions and Features: Instance life cycle management Management of compute resources Networking and Authorization REST-based API Asynchronous eventually consistent communication Hypervisor agnostic : support for Xen, XenServer/XCP, KVM, UML, VMware vsphere and Hyper-V Components of OpenStack Compute Nova Cloud Fabric is composed of the following major components: API Server (nova-api) Message Queue (rabbit-mq server) Compute Workers (nova-compute) Network Controller (nova-network) Volume Worker (nova-volume) Scheduler (nova-scheduler) API Server (nova-api) The API Server provides an interface for the outside world to interact with the cloud infrastructure. API server is the only component that the outside world uses to manage the infrastructure. The management is done through web services calls using EC2 API. The API Server then, in turn, communicates with the relevant components of the cloud infrastructure through the Message Queue. As an alternative to EC2 API, OpenStack also provides a native API called "OpenStack API" Message Queue (Rabbit MQ Server) OpenStack communicates among themselves using the message queue via AMQP(Advanced Message Queue Protocol). Nova uses asynchronous calls for request response, with a call-back that gets triggered once a response is received. Since asynchronous communication is used, none of the user actions get stuck for long in a waiting state. This is effective since many actions expected by the API calls such as launching an instance or uploading an image are time consuming Compute Worker (nova-compute) Compute workers deal with instance management life cycle. They receive the requests for instance life cycle management via the Message Queue and carry out operations. There are several compute workers in a typical production cloud deployment. An instance is deployed on any of the available compute worker based on the scheduling algorithm used Network Controller (nova-network) The Network Controller deals with the network configuration of host machines. It does operations like allocating IP addresses, configuring VLANs for projects, implementing security groups and configuring networks for compute nodes.
 Message Queue (rabbit-mq server) Compute Workers (nova-compute) Network")
16 Volume Workers (nova-volume) Volume workers are used for management of LVM-based instance volumes. Volume Workers perform volume related functions such as creation, deletion, attaching a volume to an instance, and detaching a volume from an instance. Volumes provide a way of providing persistent storage for the instances, as the root partition is non-persistent and any changes made to it are lost when an instance is terminated. When a volume is detached from an instance or when an instance, to which the volume is attached, is terminated, it retains the data that was stored on it. This data can be accessed by re-attaching the volume to the same instance or by attaching it to other instances. Critical data in an instance must always be written to a volume, so that it can be accessed later. This typically applies to the storage needs of database servers etc Scheduler (nova-scheduler) The scheduler maps the nova-api calls to the appropriate OpenStack components. It runs as a daemon named nova-schedule and picks up a compute server from a pool of available resources depending on the scheduling algorithm in place. A scheduler can base its decisions on various factors such as load, memory, physical distance of the availability zone, CPU architecture, etc. The nova scheduler implements a pluggable architecture. Currently the nova-scheduler implements a few basic scheduling algorithms: chance: In this method, a compute host is chosen randomly across availability zones. availability zone: Similar to chance, but the compute host is chosen randomly from within a specified availability zone. simple: In this method, hosts whose load is least are chosen to run the instance. The load information may be fetched from a load balancer OpenStack Imaging Service (Glance) OpenStack Imaging Service is a lookup and retrieval system for virtual machine images. It can be configured to use any one of the following storage backends: Local filesystem (default) OpenStack Object Store to store images S3 storage directly S3 storage with Object Store as the intermediate for S3 access. HTTP (read-only) Functions and Features Provides imaging service Components of Glance Glance-control Glance-registry OpenStack Storage Infrastructure (Swift) Swift provides a distributed, eventually consistent virtual object store for OpenStack. It is analogous to Amazon Web Services - Simple Storage Service (S3). Swift is capable of storing billions of objects distributed across nodes. Swift has built-in redundancy and failover management and is capable of archiving and media streaming. It is extremely scalable in terms of both size (several petabytes) and capacity (number of objects).

17 OpenStack Compute Starter Guide Functions and Features Storage of large number of objects Storage of large sized objects Data Redundancy Archival capabilities - Work with large datasets Data container for virtual machines and cloud apps Media Streaming capabilities Secure storage of objects Backup and archival Extreme scalability Components of Swift Swift Account Swift Container Swift Object Swift Proxy The RING Swift Proxy Server The consumers interact with the Swift setup through the proxy server using the Swift API. The proxy server acts as a gatekeeper and recieves requests from the world. It looks up the location of the appropriate entities and routes the requests to them. The proxy server also handles failures of entities by rerouting requests to failover entities (handoff entities) Swift Object Server The Object server is a blob store. It s responsibility is to handle storage, retrieval and deletion of objects stored in the local storage. Objects are typically binary files stored in the filesystem with metadata contained as extended file attributes (xattr). Note: xattr is supported in several filesystems such as ext3, ext4, XFS, Btrfs, JFS and ReiserFS in Linux. But it is known to work best under XFS, JFS, ReiserFS, Reiser4, and ZFS. XFS is considered to be the best option Swift Container server The container server lists the objects in a container. The lists are stored as SQLite files. The container server also tracks the statistics like the number of objects contained and the storage size occupied by a container Swift Account Server The account server lists containers the same way a container server lists objects.


18 The Ring The ring contains information about the physical location of the objects stored inside Swift. It is a virtual representation of mapping of names of entities to their real physical location. It is analogous to an indexing service that various processes use to lookup and locate the real physical location of entities within the cluster. Entities like Accounts, Containers, Objects have their own seperate rings OpenStack Identity Service (Keystone) Keystone provides identity and access policy services for all components in the OpenStack family. It implements it s own REST based API (Identity API). It provides authentication and authorization for all components of OpenStack including (but not limited to) Swift, Glance, Nova. Authentication verifies that a request actually comes from who it says it does. Authorization is verifying whether the authenticated user has access to the services he/she is requesting for. Keystone provides two ways of authentication. One is username/password based and the other is token based. Apart from that, keystone provides the following services: Token Service (that carries authorization information about an authenticated user) Catalog Service (that contains a list of available services at the users disposal) Policy Service (that let s keystone manage access to specific services by specific users or groups) Components of Identity Service Endpoints - Every OpenStack service (Nova, Swift, Glance) runs on a dedicated port and on a dedicated URL(host), we call them endpoints. Regions - A region defines a dedicated physical location inside a data centre. In a typical cloud setup, most if not all services are distributed across data centers/servers which are also called regions User - A keystone authenticated user. Services - Each component that is being connected to or being administered via keystone can be called a service. For example, we can call Glance a keystone service.

19 OpenStack Compute Starter Guide 13 Role - In order to maintain restrictions as to what a particular user can do inside cloud infrastructure it is important to have a role associated. Tenant - A tenant is a project with all the service endpoint and a role associated to user who is member of that particular tenant Openstack Administrative Web-Interface (Horizon) Horizon the web based dashboard can be used to manage /administer OpenStack services. It can be used to manage instances and images, create keypairs, attach volumes to instances, manipulate Swift containers etc. Apart from this, dashboard even gives the user access to instance console and can connect to an instance through VNC. Overall, Horizon features the following: Instance Management - Create or terminate instance, view console logs and connect through VNC, Attaching volumes, etc. Access and Security Management - Create security groups, manage keypairs, assign floating IPs, etc. Flavor Management - Manage different flavors or instance virtual hardware templates. Image Management - Edit or delete images. View service catalog. Manage users, quotas and usage for projects. User Management - Create user, etc. Volume Management - Creating Volumes and snapshots. Object Store Manipulation - Create, delete containers and objects. Downloading environment variables for a project.

20


21 OpenStack Compute Starter Guide 15 Chapter 2 Installation and Configuration 2.1 Introduction The following section describes how to set up a minimal cloud infrastructure based on OpenStack using 3 machines. These machines are referred to in this and subsequent chapters as Server1, Server2 and Client1. Server1 runs all the components of Nova, Glance, Swift, Keystone and Horizon (OpenStack Dashboard). Server2 runs only nova-compute. Since OpenStack components follow a shared-nothing policy, each component or any group of components can be installed on any server. Client1 is not a required component. In our sample setup, it is used for bundling images, as a client to the web interface and to run OpenStack commands to manage the infrastructure. Having this client ensures that you do not need to meddle with the servers for tasks such as bundling. Also, bundling of desktop Systems including Windows will require a GUI and it is better to have a dedicated machine for this purpose. We would recommend this machine to be VT-Enabled so that KVM can be run which allows launching of VMs during image creation for bundling. The installation steps use certain specifics such as host names/ip addresses etc. Modify them to suit your environment before using them. The following table summarizes these specifics. 2.2 Server1 As shown in the figure above, Server1 contains all nova- services including nova-compute, nova-api, nova-volume, nova-network, Glance, Swift, Keystone and Horizon. It contains two network interface cards (NICs).
22 2.2.1 Base OS Install 64 bit version of Ubuntu server keeping the following configurations in mind. Create the first user with the name localadmin. Installation lets you setup the IP address for the first interface i.e. eth0. Set the IP address details. During installation select only Openssh-server in the packages menu. We will also be running nova-volume on this server and it is ideal to have a dedicated partition for the use of nova-volume. So, ensure that you choose manual partitioning scheme while installing Ubuntu Server and create a dedicated partition with adequate amount of space for this purpose. We have referred to this partition in the rest of the chapter as /dev/sda6. You can substitute the correct device name of this dedicated partition based on your local setup while following the instructions. Also ensure that the partition type is set as Linux LVM (8e) using fdisk either during install or immediately after installation is over. If you also plan to use a dedicated partition as Swift backend, create another partition for this purpose and follow the instructions in "Swift Installation" section below. Update the machine using the following commands. sudo apt-get update sudo apt-get upgrade Install bridge-utils: sudo apt-get install bridge-utils Network Configuration Edit the /etc/network/interfaces file so as to looks like this: auto lo iface lo inet loopback auto eth0 iface eth0 inet static address netmask broadcast gateway dns-nameservers auto eth1 iface eth1 inet static address netmask network broadcast Restart the network now sudo /etc/init.d/networking restart NTP Server Install NTP package. This server shall act as the NTP server for the nodes. The time on all components of OpenStack will have to be in sync. We can run NTP server on server1 and have other servers/nodes sync to it.
23 OpenStack Compute Starter Guide 17 sudo apt-get install ntp Open the file /etc/ntp.conf and add the following lines to make sure that the time on the server stays in sync with an external server. If the Internet connectivity is down, the NTP server uses its own hardware clock as the fallback. server ntp.ubuntu.com server fudge stratum 10 Restart the NTP server sudo service ntp restart Ensure that, IP addresses of the servers are resolvable by the DNS. If not, include the hostnames in /etc/hosts file Databases You can use MySQL, PostgreSQL or SQLite for Nova and Glance. Depending upon your choice of database, you will need to install the necessary packages and configure the database server MySQL Install mysql-server and python-mysqldb package sudo apt-get install mysql-server python-mysqldb Create the root password for mysql. The password used in this guide is "mygreatsecret" Change the bind address from to in /etc/mysql/my.cnf. It should be identical to this: bind-address = Restart MySQL server to ensure that it starts listening on all interfaces. sudo restart mysql Creating Databases Create MySQL databases to be used with nova, glance and keystone. Create a database named nova. sudo mysql -uroot -pmygreatsecret -e CREATE DATABASE nova; Create a user named novadbadmin. sudo mysql -uroot -pmygreatsecret -e CREATE USER novadbadmin; Grant all privileges for novadbadmin on the database "nova". sudo mysql -uroot -pmygreatsecret -e "GRANT ALL PRIVILEGES ON nova.* TO % ;" Create a password for the user "novadbadmin". sudo mysql -uroot -pmygreatsecret -e "SET PASSWORD FOR % = PASSWORD( novasecret );"
24 Create a database named glance. sudo mysql -uroot -pmygreatsecret -e CREATE DATABASE glance; Create a user named glancedbadmin. sudo mysql -uroot -pmygreatsecret -e CREATE USER glancedbadmin; Grant all privileges for glancedbadmin on the database "glance". sudo mysql -uroot -pmygreatsecret -e "GRANT ALL PRIVILEGES ON glance.* TO % ;" Create a password for the user "glancedbadmin". sudo mysql -uroot -pmygreatsecret -e "SET PASSWORD FOR % = PASSWORD( glancesecret );" Create a database named keystone. sudo mysql -uroot -pmygreatsecret -e CREATE DATABASE keystone; Create a user named keystonedbadmin. sudo mysql -uroot -pmygreatsecret -e CREATE USER keystonedbadmin; Grant all privileges for keystonedbadmin on the database "keystone". sudo mysql -uroot -pmygreatsecret -e "GRANT ALL PRIVILEGES ON keystone.* TO % ;" Create a password for the user "keystonedbadmin". sudo mysql -uroot -pmygreatsecret -e "SET PASSWORD FOR % = PASSWORD( keystonesecret );" Keystone Keystone is the identity service used by OpenStack. Install Keystone using the following command. sudo apt-get install keystone python-keystone python-keystoneclient Open /etc/keystone/keystone.conf and change the line admin_token = ADMIN so that it looks like the following: admin_token = admin (We have used admin as the token in this book.) Since MySQL database is used to store keystone configuration, replace the following line in /etc/keystone/keystone.conf connection = sqlite:////var/lib/keystone/keystone.db with connection = mysql://keystonedbadmin:keystonesecret@ /keystone
25 OpenStack Compute Starter Guide 19 Restart Keystone: sudo service keystone restart Run the following command to synchronise the database: sudo keystone-manage db_sync Export environment variables which are required while working with OpenStack. export SERVICE_ENDPOINT=" export SERVICE_TOKEN=admin You can also add these variables to ~/.bashrc, so that you need not have to export them everytime Creating Tenants Create the tenants by executing the following commands. In this case, we are creating two tenants - admin and service. keystone tenant-create --name admin keystone tenant-create --name service Creating Users Create the users by executing the following commands. In this case, we are creating four users - admin, nova, glance and swift keystone user-create --name admin --pass admin -- admin@foobar.com keystone user-create --name nova --pass nova -- nova@foobar.com keystone user-create --name glance --pass glance -- glance@foobar.com keystone user-create --name swift --pass swift -- swift@foobar.com Creating Roles Create the roles by executing the following commands. In this case, we are creating two roles - admin and Member. keystone role-create --name admin keystone role-create --name Member Listing Tenants, Users and Roles The tenants, users and roles that have been created above can be listed by following commands: List Tenants: keystone tenant-list id name enabled f95ae9617cd496888bc412efdceabfd admin True c c6959ee35970cf3199 service True List Users:
26 keystone user-list id enabled name b986cca67e242f38cd6aa4bdec587ca True swift 518b51ea133c4facadae42c328d6b77b True glance b3de3aeec2544f0f90b9cbfe8b8b7acd True admin ce8cd56ca8824f5d845ba6ed015e9494 True nova List Roles: keystone role-list id name bbe305ad d4281aaaebb700 admin d983800dd6d54ee3a1b1eb9f2ae3291f Member Please note that the values of the id column, would be required later when we associate a role to a user in a particular tenant Adding Roles to Users in Tenants Now we add roles to the users that have been created. A role to a specific user in a specific tenant can be assigned with the following command: keystone user-role-add --user $USER_ID --role $ROLE_ID --tenant_id $TENANT_ID The required id can be obtained from the commands - keystone user-list, keystone tenant-list, keystone role-list. To add a role of admin to the user admin of the tenant admin. keystone user-role-add --user b3de3aeec2544f0f90b9cbfe8b8b7acd --role 2 bbe305ad d4281aaaebb700 --tenant_id 7f95ae9617cd496888bc412efdceabfd The following commands will add a role of admin to the users nova, glance and swift of the tenant service. keystone user-role-add --user ce8cd56ca8824f5d845ba6ed015e role 2 bbe305ad d4281aaaebb700 --tenant_id c c6959ee35970cf3199 keystone user-role-add --user 518b51ea133c4facadae42c328d6b77b --role 2 bbe305ad d4281aaaebb700 --tenant_id c c6959ee35970cf3199 keystone user-role-add --user 1b986cca67e242f38cd6aa4bdec587ca --role 2 bbe305ad d4281aaaebb700 --tenant_id c c6959ee35970cf3199 The Member role is used by Horizon and Swift. So add the Member role accordingly. keystone user-role-add --user b3de3aeec2544f0f90b9cbfe8b8b7acd --role d983800dd6d54ee3a1b1eb9f2ae3291f --tenant_id 7f95ae9617cd496888bc412efdceabfd Replace the id appropriately as listed by keystone user-list, keystone role-list, keystone tenant-list Creating Services Now we need to create the required services which the users can authenticate with. nova-compute, nova-volume, glance, swift, keystone and ec2 are some of the services that we create. keystone service-create --name service_name --type service_type --description Description of the service
27 OpenStack Compute Starter Guide 21 keystone service-create --name nova --type compute --description OpenStack Compute Service keystone service-create --name volume --type volume --description OpenStack Volume Service keystone service-create --name glance --type image --description OpenStack Image Service keystone service-create --name swift --type object-store --description OpenStack Storage Service keystone service-create --name keystone --type identity --description OpenStack Identity Service keystone service-create --name ec2 --type ec2 --description EC2 Service Each of the services that have been created above will be identified with a unique id which can be obtained from the following command: keystone service-list id name type description e93ee6c70f8468c88a5cb1b106753f3 nova compute OpenStack Compute Service 28fd92ffe a3e04e059d875 ec2 ec2 EC2 Service 7d4ec192dfa f0f4c47415c7a7 keystone identity OpenStack Identity Service 96f35e1112b143e59d5cd5d0e6a8b22d swift object-store OpenStack Storage Service f38f4564ff7b4e43a52b2f5c1b75e5fa volume volume OpenStack Volume Service fbafab6edcab467bb734380ce6be3561 glance image OpenStack Image Service The id will be used in defining the endpoint for that service Creating Endpoints Create endpoints for each of the services that have been created above. keystone endpoint-create --region region_name --service_id service_id --publicurl public_url --adminurl admin_url --internalurl internal_url For creating an endpoint for nova-compute, execute the following command: keystone endpoint-create --region myregion --service_id 1e93ee6c70f8468c88a5cb1b106753f3 -- publicurl --adminurl v2/$(tenant_id)s --internalurl For creating an endpoint for nova-volume, execute the following command: keystone endpoint-create --region myregion --service_id f38f4564ff7b4e43a52b2f5c1b75e5fa -- publicurl --adminurl v1/$(tenant_id)s --internalurl For creating an endpoint for glance, execute the following command: keystone endpoint-create --region myregion --service_id fbafab6edcab467bb734380ce6be publicurl --adminurl -- internalurl For creating an endpoint for swift, execute the following command: keystone endpoint-create --region myregion --service_id 96f35e1112b143e59d5cd5d0e6a8b22d -- publicurl --adminurl http :// :8080/v1 --internalurl For creating an endpoint for keystone, execute the following command:
28 keystone endpoint-create --region myregion --service_id 7d4ec192dfa f0f4c47415c7a7 -- publicurl --adminurl -- internalurl For creating an endpoint for ec2, execute the following command: keystone endpoint-create --region myregion --service_id 28fd92ffe a3e04e059d publicurl --adminurl services/admin --internalurl Glance Install glance using the following command: sudo apt-get install glance glance-api glance-client glance-common glance-registry python- glance Glance Configuration Glance uses SQLite by default. MySQL and PostgreSQL can also be configured to work with Glance. Open /etc/glance/glance-api-paste.ini and at the end of the file, edit the following lines: admin_tenant_name = %SERVICE_TENANT_NAME% admin_user = %SERVICE_USER% admin_password = %SERVICE_PASSWORD% These values have to be modified as per the configurations made earlier. The admin_tenant_name will be service, admin_user will be glance and admin_password is glance. After editing, the lines should be as follows: admin_tenant_name = service admin_user = glance admin_password = glance Now open /etc/glance/glance-registry-paste.ini and make similar changes at the end of the file. Open the file /etc/glance/glance-registry.conf and edit the line which contains the option "sql_connection =" to this: sql_connection = mysql://glancedbadmin:glancesecret@ /glance In order to tell glance to use keystone for authentication, add the following lines at the end of the file. [paste_deploy] flavor = keystone Open /etc/glance/glance-api.conf and add the following lines at the end of the document. [paste_deploy] flavor = keystone Create glance schema in the MySQL database.: sudo glance-manage version_control 0 sudo glance-manage db_sync Restart glance-api and glance-registry after making the above changes.
29 OpenStack Compute Starter Guide 23 sudo restart glance-api sudo restart glance-registry Export the following environment variables. export SERVICE_TOKEN=admin export OS_TENANT_NAME=admin export OS_USERNAME=admin export OS_PASSWORD=admin export OS_AUTH_URL=" export SERVICE_ENDPOINT= Alternatively, you can add these variables to ~/.bashrc. To test if glance is setup correectly execute the following command. glance index The above command will not return any output. The output of the last command executed can be known from its return code - echo $?. If the return code is zero, then glance is setup properly and connects with Keystone. With glance configured properly and using keystone as the authentication mechanism, now we can upload images to glance. This has been explained in detail in "Image Management" chapter Nova Install nova using the following commands: sudo apt-get install nova-api nova-cert nova-compute nova-compute-kvm nova-doc nova-network nova-objectstore nova-scheduler nova-volume rabbitmq-server novnc nova-consoleauth Nova Configuration Edit the /etc/nova/nova.conf file to look like this. --dhcpbridge_flagfile=/etc/nova/nova.conf --dhcpbridge=/usr/bin/nova-dhcpbridge --logdir=/var/log/nova --state_path=/var/lib/nova --lock_path=/run/lock/nova --allow_admin_api=true --use_deprecated_auth=false --auth_strategy=keystone --scheduler_driver=nova.scheduler.simple.simplescheduler --s3_host= ec2_host= rabbit_host= cc_host= nova_url= --routing_source_ip= glance_api_servers= : image_service=nova.image.glance.glanceimageservice --iscsi_ip_prefix= sql_connection=mysql://novadbadmin:novasecret@ /nova --ec2_url= --keystone_ec2_url= --api_paste_config=/etc/nova/api-paste.ini --libvirt_type=kvm
30 --libvirt_use_virtio_for_bridges=true --start_guests_on_host_boot=true --resume_guests_state_on_host_boot=true # vnc specific configuration --novnc_enabled=true --novncproxy_base_url= --vncserver_proxyclient_address= vncserver_listen= # network specific settings --network_manager=nova.network.manager.flatdhcpmanager --public_interface=eth0 --flat_interface=eth1 --flat_network_bridge=br100 --fixed_range= /27 --floating_range= /27 --network_size=32 --flat_network_dhcp_start= flat_injected=false --force_dhcp_release --iscsi_helper=tgtadm --connection_type=libvirt --root_helper=sudo nova-rootwrap --verbose Create a Physical Volume. sudo pvcreate /dev/sda6 Create a Volume Group named nova-volumes. sudo vgcreate nova-volumes /dev/sda6 Change the ownership of the /etc/nova folder and permissions for /etc/nova/nova.conf: sudo chown -R nova:nova /etc/nova sudo chmod 644 /etc/nova/nova.conf Open /etc/nova/api-paste.ini and at the end of the file, edit the following lines: admin_tenant_name = %SERVICE_TENANT_NAME% admin_user = %SERVICE_USER% admin_password = %SERVICE_PASSWORD% These values have to be modified conforming to configurations made earlier. The admin_tenant_name will be service, admin_user will be nova and admin_password is nova. After editing, the lines should be as follows: admin_tenant_name = service admin_user = nova admin_password = nova Create nova schema in the MySQL database. sudo nova-manage db sync Provide a range of IPs to be associated to the instances. nova-manage network create private --fixed_range_v4= /27 --num_networks=1 -- bridge=br100 --bridge_interface=eth1 --network_size=32 Export the following environment variables.
31 OpenStack Compute Starter Guide 25 export OS_TENANT_NAME=admin export OS_USERNAME=admin export OS_PASSWORD=admin export OS_AUTH_URL=" Restart nova services. sudo restart libvirt-bin; sudo restart nova-network; sudo restart nova-compute; sudo restart nova-api; sudo restart nova-objectstore; sudo restart nova-scheduler; sudo restart nova-volume; sudo restart nova-consoleauth; To test if nova is setup correctly run the following command. sudo nova-manage service list Binary Host Zone Status State Updated_At nova-network server1 nova enabled :-) :58:43 nova-scheduler server1 nova enabled :-) :58:44 nova-volume server1 nova enabled :-) :58:44 nova-compute server1 nova enabled :-) :58:45 nova-cert server1 nova enabled :-) :58:43 If the output is similar to the above with all components happy, your setup is ready to be used OpenStack Dashboard Install OpenStack Dashboard by executing the following command: sudo apt-get install openstack-dashboard Restart apache with the following command: service apache2 restart Open a browser and enter IP address of the server1. You should see the OpenStack Dashboard login prompt. Login with username admin and password admin. From the dashboard, you can create keypairs, create/edit security groups, raise new instances, attach volumes etc. which are explained in "OpenStack Dashboard" chapter Swift Swift Installation The primary components are the proxy, account, container and object servers. sudo apt-get install swift swift-proxy swift-account swift-container swift-object Other components that might be xfsprogs (for dealing with XFS filesystem), python.pastedeploy (for keystone access), curl (to test swift). sudo apt-get install xfsprogs curl python-pastedeploy Swift Storage Backends There are two methods one can try to create/prepare the storage backend. One is to use an existing partition/volume as the storage device. The other is to create a loopback file and use it as the storage device. Use the appropriate method as per your setup.
32 Partition as a storage device If you had set aside a partition for Swift during the installation of the OS, you can use it directly. If you have an unused/unpartitioned physical partition (e.g. /dev/sdb3), you have to format it to xfs filesystem using parted or fdisk and use it as the backend. You need to specify the mount point in /etc/fstab. CAUTION: Replace /dev/sdb to your appropriate device. I m assuming that there is an unused/ un-formatted partition section in /dev/sdb sudo fdisk /dev/sdb Type n for new partition Type e for extended partion Choose appropriate partition number ( or go with the default ) Choose first and last sectors to set the hard disk size (or go with defaults) Note that 83 is the partition type number for Linux Type w to write changes to the disk This would have created a partition (something like /dev/sdb3) that we can now format to XFS filesystem. Do sudo fdisk -l in the terminal to view and verify the partion table. Find the partition Make sure that the one that you want to use is listed there. This would work only if you have xfsprogs installed. sudo mkfs.xfs -i size=1024 /dev/sdb3 sudo tune2fs -l /dev/sdb3 grep -i inode Create a directory /mnt/swift_backend that can be used as a mount point to the partion tha we created. sudo mkdir /mnt/swift_backend Now edit /etc/fstab and append the following line to mount the partition automatically everytime the system restarts. /dev/sdb3 /mnt/swift_backend xfs noatime,nodiratime,nobarrier,logbufs= Loopback File as a storage device We create a zero filled file for use as a loopback device for the Swift storage backend. Here we use the disk copy command to create a file named swift-disk and allocate a million 1KiB blocks ( MiB) to it. So we have a loopback disk of approximately 1GiB. We can increase this size by modifying the seek value. The disk is then formated to XFS filesystem. The file command can be used to verify if it worked. sudo dd if=/dev/zero of=/srv/swift-disk bs=1024 count=0 seek= sudo mkfs.xfs -i size=1024 /srv/swift-disk file /srv/swift-disk swift-disk1: SGI XFS filesystem data (blksz 4096, inosz 1024, v2 dirs) Create a directory /mnt/swift_backend that can be used as a mount point to the partion tha we created. sudo mkdir /mnt/swift_backend Make it mount on boot by appending this to /etc/fstab. /srv/swift-disk /mnt/swift_backend xfs loop,noatime,nodiratime,nobarrier,logbufs=8 0 0
33 OpenStack Compute Starter Guide Using the backend Now before mounting the backend that will be used, create some nodes to be used as storage devices and set ownership to swift user and group. sudo mount /mnt/swift_backend pushd /mnt/swift_backend sudo mkdir node1 node2 node3 node4 popd sudo chown swift.swift /mnt/swift_backend/* for i in {1..4}; do sudo ln -s /mnt/swift_backend/node$i /srv/node$i; done; sudo mkdir -p /etc/swift/account-server /etc/swift/container-server /etc/swift/object- server /srv/node1/device /srv/node2/device /srv/node3/device /srv/node4/device sudo mkdir /run/swift sudo chown -L -R swift.swift /etc/swift /srv/node[1-4]/ /run/swift Append the following lines in /etc/rc.local just before "exit 0";. This will be run everytime the system starts. mkdir /run/swift chown swift.swift /run/swift Configure Rsync Rsync is responsible for maintaining object replicas. It is used by various swift services to maintain consistency of objects and perform updation operations. It is configured for all the storage nodes. Set RSYNC_ENABLE=true in /etc/default/rsync. Modify /etc/rsyncd.conf as follows: # General stuff uid = swift gid = swift log file = /var/log/rsyncd.log pid file = /run/rsyncd.pid address = # Account Server replication settings [account6012] max connections = 25 path = /srv/node1/ read only = false lock file = /run/lock/account6012.lock [account6022] max connections = 25 path = /srv/node2/ read only = false lock file = /run/lock/account6022.lock [account6032] max connections = 25 path = /srv/node3/ read only = false lock file = /run/lock/account6032.lock
34 [account6042] max connections = 25 path = /srv/node4/ read only = false lock file = /run/lock/account6042.lock # Container server replication settings [container6011] max connections = 25 path = /srv/node1/ read only = false lock file = /run/lock/container6011.lock [container6021] max connections = 25 path = /srv/node2/ read only = false lock file = /run/lock/container6021.lock [container6031] max connections = 25 path = /srv/node3/ read only = false lock file = /run/lock/container6031.lock [container6041] max connections = 25 path = /srv/node4/ read only = false lock file = /run/lock/container6041.lock # Object Server replication settings [object6010] max connections = 25 path = /srv/node1/ read only = false lock file = /run/lock/object6010.lock [object6020] max connections = 25 path = /srv/node2/ read only = false lock file = /run/lock/object6020.lock [object6030] max connections = 25 path = /srv/node3/ read only = false lock file = /run/lock/object6030.lock [object6040] max connections = 25 path = /srv/node4/ read only = false lock file = /run/lock/object6040.lock Restart rsync. sudo service rsync restart
35 OpenStack Compute Starter Guide Configure Swift Components General server configuration options can be found in If the swift-doc package is installed it can also be viewed in the /usr/share/doc/swift-doc/html directory. Python uses paste.deploy to manage configuration. Default configuration options are set in the [DEFAULT] section, and any options specified there can be overridden in any of the other sections BUT ONLY BY USING THE SYNTAX set option_name = value. Here is a sample paste.deploy configuration for reference: [DEFAULT] name1 = globalvalue name2 = globalvalue name3 = globalvalue set name4 = globalvalue [pipeline:main] pipeline = myapp [app:myapp] use = egg:mypkg#myapp name2 = localvalue set name3 = localvalue set name5 = localvalue name6 = localvalue Create and edit /etc/swift/swift.conf and add the following lines to it: [swift-hash] # random unique string that can never change (DO NOT LOSE). I m using 03c9f48da # od -t x8 -N 8 -A n < /dev/random # The above command can be used to generate random a string. swift_hash_path_suffix = 03c9f48da You will need the random string when you add more nodes to the setup. So never lose the string. You can generate a random string by running the following command: od -t x8 -N 8 -A n < /dev/random Configure Swift Proxy Server Proxy server acts as the gatekeeper to swift. It takes the responsibility of authenticating the user. Authentication verifies that a request actually comes from who it says it does. Authorization verifies the who has access to the resource(s) the request wants. Authorization is done by identity services like keystone. Create and edit /etc/swift/proxy-server.conf and add the following lines. [DEFAULT] bind_port = 8080 user = swift swift_dir = /etc/swift [pipeline:main] # Order of execution of modules defined below pipeline = catch_errors healthcheck cache authtoken keystone proxy-server [app:proxy-server] use = egg:swift#proxy allow_account_management = true account_autocreate = true set log_name = swift-proxy set log_facility = LOG_LOCAL0 set log_level = INFO
36 set access_log_name = swift-proxy set access_log_facility = SYSLOG set access_log_level = INFO set log_headers = True account_autocreate = True [filter:healthcheck] use = egg:swift#healthcheck [filter:catch_errors] use = egg:swift#catch_errors [filter:cache] use = egg:swift#memcache set log_name = cache [filter:authtoken] paste.filter_factory = keystone.middleware.auth_token:filter_factory auth_protocol = http auth_host = auth_port = auth_token = admin service_protocol = http service_host = service_port = 5000 admin_token = admin admin_tenant_name = service admin_user = swift admin_password = swift delay_auth_decision = 0 [filter:keystone] paste.filter_factory = keystone.middleware.swift_auth:filter_factory operator_roles = admin, swiftoperator is_admin = true Note: You can find sample configuration files at the "etc" directory in the source. Some documentation can be found under "/usr/share/doc/swift-doc/html" if you had installed the swift-doc package using apt-get Configure Swift Account Server The default swift account server configuration is /etc/swift/account-server.conf. [DEFAULT] bind_ip = workers = 2 [pipeline:main] pipeline = account-server [app:account-server] use = egg:swift#account [account-replicator] [account-auditor] [account-reaper] Account server configuration files are also looked up under /etc/swift/account-server.conf. Here we can create several account server configuration files each of which would correspond to a device under /srv. The files can be named 1.conf, 2.conf and so
37 OpenStack Compute Starter Guide 31 on. Here are the contents of /etc/swift/account-server/1.conf: [DEFAULT] devices = /srv/node1 mount_check = false bind_port = 6012 user = swift log_facility = LOG_LOCAL2 [pipeline:main] pipeline = account-server [app:account-server] use = egg:swift#account [account-replicator] vm_test_mode = no [account-auditor] [account-reaper] For the other devices, (/srv/node2, /srv/node3, /srv/node4), we create 2.conf, 3.conf and 4.conf. So we make three more copies of 1.conf and set unique bind ports for the rest of the nodes (6022, 6032 and 6042) and different local log values (LOG_LOCAL3, LOG_LOCAL4, LOG_LOCAL5). sudo cp /etc/swift/account-server/1.conf /etc/swift/account-server/2.conf sudo cp /etc/swift/account-server/1.conf /etc/swift/account-server/3.conf sudo cp /etc/swift/account-server/1.conf /etc/swift/account-server/4.conf sudo sed -i s/6012/6022/g;s/local2/local3/g;s/node1/node2/g /etc/swift/account-server/2. conf sudo sed -i s/6012/6032/g;s/local2/local4/g;s/node1/node3/g /etc/swift/account-server/3. conf sudo sed -i s/6012/6042/g;s/local2/local5/g;s/node1/node4/g /etc/swift/account-server/4. conf Configure Swift Container Server The default swift container server configuration is /etc/swift/container-server.conf. [DEFAULT] bind_ip = workers = 2 [pipeline:main] pipeline = container-server [app:container-server] use = egg:swift#container [container-replicator] [container-updater] [container-auditor] [container-sync] Container server configuration files are also looked up under /etc/swift/container-server.conf. Here we can create several container server configuration files each of which would correspond to a device under /srv. The files can be named 1.conf, 2.conf and so on. Here are the contents of /etc/swift/container-server/1.conf:
38 [DEFAULT] devices = /srv/node1 mount_check = false bind_port = 6011 user = swift log_facility = LOG_LOCAL2 [pipeline:main] pipeline = container-server [app:container-server] use = egg:swift#container [container-replicator] vm_test_mode = no [container-updater] [container-auditor] [container-sync] For the other devices, (/srv/node2, /srv/node3, /srv/node4), we create 2.conf, 3.conf and 4.conf. So we make three more copies of 1.conf and set unique bind ports for the rest of the nodes (6021, 6031 and 6041) and different local log values (LOG_LOCAL3, LOG_LOCAL4, LOG_LOCAL5) Configure Swift Object Server The default swift object server configuration is /etc/swift/object-server.conf. [DEFAULT] bind_ip = workers = 2 [pipeline:main] pipeline = object-server [app:object-server] use = egg:swift#object [object-replicator] [object-updater] [object-auditor] Object server configuration files are also looked up under /etc/swift/object-server.conf. Here we can create several object server configuration files each of which would correspond to a device under /srv. The files can be named 1.conf, 2.conf and so on. Here are the contents of /etc/swift/object-server/1.conf: [DEFAULT] devices = /srv/node1 mount_check = false bind_port = 6010 user = swift log_facility = LOG_LOCAL2 [pipeline:main] pipeline = object-server
39 OpenStack Compute Starter Guide 33 [app:object-server] use = egg:swift#object [object-replicator] vm_test_mode = no [object-updater] [object-auditor] For the other devices, (/srv/node2, /srv/node3, /srv/node4), we create 2.conf, 3.conf and 4.conf. So we make three more copies of 1.conf and set unique bind ports for the rest of the nodes (6020, 6030 and 6040) and different local log values (LOG_LOCAL3, LOG_LOCAL4, LOG_LOCAL5) Configure Swift Rings Ring is an important component of swift. It maintains the information about the physical location of objects, their replicas and devices. We now create the ring builder files corresponding to object service, container service and account service. NOTE: We need to be in the /etc/swift directory when executing the following commands. pushd /etc/swift sudo swift-ring-builder object.builder create sudo swift-ring-builder container.builder create sudo swift-ring-builder account.builder create The numbers indicate the desired number of partitions, replicas and the time in hours to restrict moving a partition more than once. See the man page for swift-ring-builder for more information. Now we add zones and balance the rings. The syntax is as follows: swift-ring-builder <builder_file> add <zone>-<ip_address>:<port>/<device> <weight> Execute the following commands to add the zones and rebalance the ring. sudo swift-ring-builder object.builder add z :6010/device 1 sudo swift-ring-builder object.builder add z :6020/device 1 sudo swift-ring-builder object.builder add z :6030/device 1 sudo swift-ring-builder object.builder add z :6040/device 1 sudo swift-ring-builder object.builder rebalance sudo swift-ring-builder container.builder add z :6011/device 1 sudo swift-ring-builder container.builder add z :6021/device 1 sudo swift-ring-builder container.builder add z :6031/device 1 sudo swift-ring-builder container.builder add z :6041/device 1 sudo swift-ring-builder container.builder rebalance sudo swift-ring-builder account.builder add z :6012/device 1 sudo swift-ring-builder account.builder add z :6022/device 1 sudo swift-ring-builder account.builder add z :6032/device 1 sudo swift-ring-builder account.builder add z :6042/device 1 sudo swift-ring-builder account.builder rebalance Starting Swift services To start swift and the REST API, run the following commands. sudo swift-init main start sudo swift-init rest start
40 Testing Swift Swift can be tested using the swift command or the dashboard web interface (Horizon). Firstly, make sure that the ownership for /etc/swift directory is set to swift.swift. sudo chown -R swift.swift /etc/swift Then run the following command and verify if you get the appropriate account information. The number of containers and objects stored within are displayed as well. swift -v -V 2.0 -A -U service:swift -K swift stat StorageURL: Auth Token: ba9df200a92d4a5088dcd6b7dcc19c0d Account: AUTH_c c6959ee35970cf3199 Containers: 1 Objects: 1 Bytes: 77 Accept-Ranges: bytes X-Trans-Id: tx11c64e218f984749bc3ec37ea46280ee Server2 This server runs only nova-compute service BaseOS Install 64 bit version of Ubuntu server Network Configuration Install bridge-utils: sudo apt-get install bridge-utils Edit the /etc/network/interfaces file so as to looks like this: auto lo iface lo inet loopback auto eth0 iface eth0 inet static address netmask broadcast gateway dns-nameservers auto eth1 iface eth1 inet static address netmask network broadcast Restart the network. sudo /etc/init.d/networking restart
41 OpenStack Compute Starter Guide NTP Client Install NTP package. sudo apt-get install ntp Open the file /etc/ntp.conf and add the following line to sync to server1. server Restart NTP service to make the changes effective sudo service ntp restart Nova Components (nova-compute alone) Install the nova-components and dependencies. sudo apt-get install nova-compute Edit the /etc/nova/nova.conf file to look like this. This file is identical to the configuration file (/etc/nova/nova.conf) of Server1 --dhcpbridge_flagfile=/etc/nova/nova.conf --dhcpbridge=/usr/bin/nova-dhcpbridge --logdir=/var/log/nova --state_path=/var/lib/nova --lock_path=/run/lock/nova --allow_admin_api=true --use_deprecated_auth=false --auth_strategy=keystone --scheduler_driver=nova.scheduler.simple.simplescheduler --s3_host= ec2_host= rabbit_host= cc_host= nova_url= --routing_source_ip= glance_api_servers= : image_service=nova.image.glance.glanceimageservice --iscsi_ip_prefix= ec2_url= --keystone_ec2_url= --api_paste_config=/etc/nova/api-paste.ini --libvirt_type=kvm --libvirt_use_virtio_for_bridges=true --start_guests_on_host_boot=true --resume_guests_state_on_host_boot=true # vnc specific configuration --novnc_enabled=true --novncproxy_base_url= --vncserver_proxyclient_address= vncserver_listen= # network specific settings --network_manager=nova.network.manager.flatdhcpmanager --public_interface=eth0 --flat_interface=eth1 --flat_network_bridge=br100 --fixed_range= /27 --floating_range= /27
42 --network_size=32 --flat_network_dhcp_start= flat_injected=false --force_dhcp_release --iscsi_helper=tgtadm --connection_type=libvirt --root_helper=sudo nova-rootwrap --verbose Restart nova-compute on Server2. sudo service restart nova-compute Check if the second compute node (Server2) is detected by running: sudo nova-manage service list If you see an output similar to the following, it means that the set up is ready to be used. sudo nova-manage service list Binary Host Zone Status State Updated_At nova-network server1 nova enabled :-) :58:43 nova-scheduler server1 nova enabled :-) :58:44 nova-volume server1 nova enabled :-) :58:44 nova-compute server1 nova enabled :-) :58:45 nova-cert server1 nova enabled :-) :58:43 nova-compute server2 nova enabled :-) :22: Client BaseOS Install 64-bit version of Ubuntu Desktop Networking Configuration Edit the /etc/network/interfaces file so as to looks like this: auto lo iface lo inet loopback auto eth0 iface eth0 inet static address netmask broadcast gateway dns-nameservers NTP Client Install NTP package. sudo apt-get install -y ntp Open the file /etc/ntp.conf and add the following line to sync to server1. server
43 OpenStack Compute Starter Guide 37 Restart NTP service to make the changes effective sudo service ntp restart Client Tools As mentioned above, this is a desktop installation of Ubuntu to be used for tasks such as bundling of images. It will also be used for managing the cloud infrastructure using nova, glance and swift commandline tools. Install the required command line tools with the following command: sudo apt-get install python-novaclient glance-client swift Install qemu-kvm sudo apt-get install qemu-kvm Export the following environment variables or add them to your ~/.bashrc. export SERVICE_TOKEN=admin export OS_TENANT_NAME=admin export OS_USERNAME=admin export OS_PASSWORD=admin export OS_AUTH_URL=" export SERVICE_ENDPOINT= Execute nova and glance commands to check the connectivity to OpenStack setup. nova list ID Name Status Networks ee9230-6bb5-4eca-8808-e6b4e myinstance ACTIVE private= c939cb2c-e662-46e5-bc cf9 myinstance1 ACTIVE private= glance index ID Name Disk Container Size Format Format b9f8e1-cde8-40e7-93e3-0866becfb9d4 windows qcow2 ovf f147e c-47e2-9caa-a5a21470cc4e debian qcow2 ovf f3a8e689-02ed-460f-a587-dc f opensuse qcow2 ovf aa362fd9-7c28-480b-845c-85a5c38ccd86 centoscli qcow2 ovf f0ec2b-26dd-4644-adcc-2ce047e281c5 ubuntuimage qcow2 ovf OpenStack Dashboard Start a browser and type the ip address of Server1 i.e, You should see the dashboard login screen. Login with the credentials username - admin and password - admin to manage the OpenStack setup.
44
45 OpenStack Compute Starter Guide 39 Chapter 3 Image Management 3.1 Introduction There are several pre-built images for OpenStack available from various sources. You can download such images and use them to get familiar with OpenStack. For any production deployment, you may like to have the ability to bundle custom images, with a custom set of applications or configuration. This chapter will guide you through the process of creating Linux images of popular distributions from scratch. We have also covered an approach to bundling Windows images. There are some minor differences in the way you would bundle a Linux image, based on the distribution. Ubuntu makes it very easy by providing cloud-init package, which can be used to take care of the instance configuration at the time of launch. cloud-init handles importing ssh keys for password-less login, setting host name etc. The instance acquires the instance specific configuration from Nova-compute by connecting to a meta data interface running on While creating the image of a distro that does not have cloud-init or an equivalent package, you may need to take care of importing the keys etc. by running a set of commands at boot time from rc.local. The process used for creating the Linux images of different distributions is largely the same with a few minor differences, which is explained below. In all the cases, the documentation below assumes that you have a working KVM installation to use for creating the images. We are using the machine called client1 as explained in the chapter on "Installation and Configuration" for this purpose. The approach explained below will generate disk images that represent a disk without any partitions. 3.2 Creating a Linux Image The first step would be to create an image on Client1. This will represent the main HDD of the virtual machine, so make sure to give it as much space as you will need. kvm-img create -f qcow2 server.img 5G OS Installation Download the iso file of the Linux distribution you want to install in the image. For Ubuntu, you can download the iso from using wget or with the help of a browser Boot a KVM instance with the OS installer ISO in the virtual CD-ROM. This will start the installation process. The command below also sets up a VNC display at port 0
46 sudo kvm -m 256 -cdrom ubuntu server-amd64.iso -drive file=server.img,if=virtio,index =0 -boot d -net nic -net user -nographic ~-vnc :0 Connect to the VM through VNC (use display number :0) and finish the installation. For Example, where is the IP address of client1: vncviewer :0 During creation of Linux images, create a single ext4 partition mounted on a swap partition. After finishing the installation, relaunch the VM by executing the following command. sudo kvm -m 256 -drive file=server.img,if=virtio,index=0 -boot c -net nic -net user - nographic -vnc :0 At this point, you can add all the packages you want to have installed, update the installation, add users and make any configuration changes you want in your image Ubuntu sudo apt-get update sudo apt-get upgrade sudo apt-get install openssh-server cloud-init Remove the network persistence rules from /etc/udev/rules.d as their presence will result in the network interface in the instance coming up as an interface other than eth0. sudo rm -rf /etc/udev/rules.d/70-persistent-net.rules Fedora yum update yum install openssh-server chkconfig sshd on Edit the file /etc/sysconfig/network-scripts/ifcfg-eth0 to look like this DEVICE="eth0" BOOTPROTO=dhcp NM_CONTROLLED="yes" ONBOOT="yes" Remove the network persistence rules from /etc/udev/rules.d as their presence will result in the network interface in the instance coming up as an interface other than eth0. sudo rm -rf /etc/udev/rules.d/70-persistent-net.rules Shutdown the virtual machine. Since, Fedora does not ship with cloud-init or an equivalent, you will need to take a few steps to have the instance fetch the meta data like ssh keys etc. Edit the /etc/rc.local file and add the following lines before the line "touch /var/lock/subsys/local"
47 OpenStack Compute Starter Guide 41 depmod -a modprobe acpiphp # simple attempt to get the user ssh key using the meta-data service mkdir -p /root/.ssh echo >> /root/.ssh/authorized_keys curl -m 10 -s grep ssh- rsa >> /root/.ssh/authorized_keys echo "AUTHORIZED_KEYS:" echo "************************" cat /root/.ssh/authorized_keys echo "************************" OpenSUSE Select ssh server, curl and other packages needed. Install ssh server. zypper install openssh Install curl. zypper install curl For ssh key injection into the instance use the following steps: Create a file /etc/init.d/sshkey and add the following lines echo >> /root/.ssh/authorized_keys curl -m 10 -s grep ssh -rsa >> /root/.ssh/authorized_keys echo "AUTHORIZED_KEYS:" echo "************************" cat /root/.ssh/authorized_keys echo "************************" Change the permissions for the file. chmod 755 /etc/init.d/sshkey Configure the service to start automatically while booting. chkconfig sshkey on Configure the firewall (not iptables) using the following command and allow ssh service yast2 Also remove the network persistence rules from /etc/udev/rules.d as their presence will result in the network interface in the instance coming up as an interface other than eth0. rm -rf /etc/udev/rules.d/70-persistent-net.rules Debian Select SSH server, Curl and other packages needed. Do the necessary changes needed for the image. For key injection add the following lines in the file /etc/rc.local.
48 echo >> /root/.ssh/authorized_keys curl -m 10 -s grep ssh -rsa >> /root/.ssh/authorized_keys echo "AUTHORIZED_KEYS:" echo "************************" cat /root/.ssh/authorized_keys echo "************************" Also remove the network persistence rules from /etc/udev/rules.d as their presence will result in the network interface in the instance coming up as an interface other than eth0. rm -rf /etc/udev/rules.d/70-persistent-net.rules CentOS 6 and RHEL 6 Select SSH server, Curl and other packages needed. Do the necessary changes needed for the image. For key injection add the following lines in the file /etc/rc.local. echo >> /root/.ssh/authorized_keys curl -m 10 -s grep ssh -rsa >> /root/.ssh/authorized_keys echo "AUTHORIZED_KEYS:" echo "************************" cat /root/.ssh/authorized_keys echo "************************" Edit the file /etc/sysconfig/network-scripts/ifcfg-eth0 to look like this DEVICE="eth0" BOOTPROTO=dhcp NM_CONTROLLED="yes" ONBOOT="yes" Remove the network persistence rules from /etc/udev/rules.d as their presence will result in the network interface in the instance coming up as an interface other than eth0. rm -rf /etc/udev/rules.d/70-persistent-net.rules Uploading the Linux image Upload the image glance add name="<image name>" is_public=true container_format=ovf disk_format=qcow2 < < filename>.img 3.3 Creating a Windows Image The first step would be to create an image on Client1, this will represent the main HDD of the virtual machine, so make sure to give it as much space as you will need. kvm-img create -f qcow2 windowsserver.img 20G
49 OpenStack Compute Starter Guide OS Installation OpenStack presents the disk using a virtio interface while launching the instance. Hence the OS needs to have drivers for virtio. By default, the Windows Server 2008 ISO does not have the drivers for virtio. Download the iso image containing virtio drivers from the following location and attach it during the installation Start the installation by executing: sudo kvm -m cdrom windows2008.iso -drive file=windowsserver1.img,if=virtio -boot d - drive file=virtio-win iso,index=3,media=cdrom -device virtio-net-pci -net nic - net user -nographic -vnc :5 When the installation prompts you to choose a hard disk device you won t see any devices available. Click on "Load drivers" at the bottom left and load the drivers by browsing the secondary CDROM in which the virtio driver disk is loaded After the installation is over, boot into it once and install any additional applications you need to install and make any configuration changes you need to make. Also ensure that RDP is enabled as that would be the only way you can connect to a running instance of Windows. Windows firewall needs to be configured to allow incoming ICMP and RDP connections Uploading the Windows image Shut-down the VM and upload the image to OpenStack glance add name="windows" is_public=true container_format=ovf disk_format=qcow2 < windowsserver.img
50

51 OpenStack Compute Starter Guide 45 Chapter 4 Instance Management 4.1 Introduction An instance is a virtual machine provisioned by OpenStack on one of the nova-compute servers. When you launch an instance, a series of actions is triggered on various components of the OpenStack. During the life cycles of an instance, it moves through various stages as shown in the diagram below: The following interfaces can be used for managing instances in nova. Nova commands Custom applications developed using Nova APIs
52 Custom applications developed using EC2 APIs 4.2 Openstack Command Line Tools Nova has a bunch of command line tools to manage the OpenStack setup. These commands help you manage images, instances, storage, networking etc. A few commands related to managing the instances are given below Creation of Key Pairs OpenStack services are authenticated and authorized against keystone identity server. Keystone provides a token and a service catolog containing information about the endpoints of services to which a user is authorized. Each user has a token and service catalog created for them. This can be downloaded from the OpenStack Dashboard. You will also need to generate a keypair consisting of private key/public key to be able to launch instances on OpenStack. These keys are injected into the instances to make password-less SSH access to the instance. This depends on the way the necessary tools are bundled into the images. Please refer to the chapter on "Image Management" for more details. Keypairs can also be generated using the following commands. ssh-keygen cd.ssh nova keypair-add --pub_key id_rsa.pub mykey This creates a new keypair called mykey. The private key id_rsa is saved locally in ~/.ssh which can be used to connect to an instance launched using mykey as the keypair. You can see the available keypairs with nova keypair-list command. nova keypair-list Name Fingerprint mykey b0:18:32:fa:4e:d4:3c:1b:c4:6c:dd:cb:53:29:13:82 mykey2 b0:18:32:fa:4e:d4:3c:1b:c4:6c:dd:cb:53:29:13: Also while executing ssh-keygen you can specify a custom location and custom file names for the keypairs that you want to create. To delete an existing keypair: nova keypair-delete mykey Launch and manage instances There are several commands that help in managing the instances. Here are a few examples: $ nova boot --flavor 1 --image 9bab7ce d37-831f-c18fbc5cb543 --key_name mykey myinstance Property Value OS-DCF:diskConfig MANUAL OS-EXT-SRV-ATTR:host None OS-EXT-SRV-ATTR:hypervisor_hostname None OS-EXT-SRV-ATTR:instance_name instance OS-EXT-STS:power_state 0 OS-EXT-STS:task_state scheduling OS-EXT-STS:vm_state building accessipv4
53 OpenStack Compute Starter Guide 47 accessipv6 adminpass FaUPM6EEBT8F config_drive created T19:29:59Z flavor m1.tiny hostid id 25ee9230-6bb5-4eca-8808-e6b4e image ubuntu key_name mykey metadata {} name myinstance progress 0 status BUILD tenant_id 24da687e5d bd5e93d06cb89 updated T19:29:59Z user_id 2b64e5ed949145ce92e1fb fe $ nova list ID Name Status Networks ee9230-6bb5-4eca-8808-e6b4e myinstance ACTIVE private= c939cb2c-e662-46e5-bc cf9 myinstance1 ACTIVE private= $ nova reboot 25ee9230-6bb5-4eca-8808-e6b4e $ nova list ID Name Status Networks ee9230-6bb5-4eca-8808-e6b4e myinstance REBOOT private= c939cb2c-e662-46e5-bc cf9 myinstance1 ACTIVE private= $ nova delete 25ee9230-6bb5-4eca-8808-e6b4e $ nova list ID Name Status Networks c939cb2c-e662-46e5-bc cf9 myinstance1 ACTIVE private= $ nova console-log myinstance For passwordless ssh access to the instance: ssh -i <private_key> username@<ip_address> VM type has implications for harddisk size, amount of RAM and number of CPUs allocated to the instance. Check the VM types available. nova flavor-list New flavours can be created with the command. sudo nova-manage flavor create <args> [options] A flavour can be deleted with the command. sudo nova-manage flavor delete <args> [options]
54
55 OpenStack Compute Starter Guide 49 Chapter 5 OpenStack Dashboard (Horizon) Using the OpenStack Dashboard, one can manage various OpenStack services. It may be used to manage instances and images, create keypairs, attach volumes to instances, manipulate Swift containers etc. The OpenStack Dashboard is accessible via Login Login to the dashboard with username "admin" and password "admin".
56 5.2 User Overview After logging, depending on the access privileges, the user is allowed access to specific projects. The below is an overview page for a project belonging to the admin user. One can view and download some basic usage metric reports here Instances The page lists currently running instances belonging to the user admin. From this page, one can terminate, pause, reboot any running instances, connect to vnc console of the instance etc.
57 OpenStack Compute Starter Guide Services The list of services defiend can be viewed on this page.
58 5.2.3 Flavors This page lists the currently available flavors that can be used to launch an instance. One can also create custom flavors on this page.

59 OpenStack Compute Starter Guide Images This page lists the available images for the admin user. One can also delete any images, if they are not required.

60 5.2.5 Projects This page lists the available projects (tenants) that have been created. One can also create new projects, assign users to the projects etc.
61 OpenStack Compute Starter Guide Users This page lists the users that have been created. One can also create new users, disable/delete existing users.
62 5.2.7 Users This page lists the quota of resources allocated to a user; number of CPUs, amount of RAM, diskspace, max. number of instances that can be raised etc.
63 OpenStack Compute Starter Guide Project Overview This page shows an overview of the project admin. One can view and download some basic usage metric reports here.
64 5.3.1 Instances & Volumes This page lists all the instances belonging to various users of the project, instance properties etc. It also list all the volumes that have been created and their status; whether available or attached to any running instances. One can also create new volumes and attach them to the instances on this page.

65 OpenStack Compute Starter Guide Instances - VNC Console For a running instance, one can connect to the instance console via VNC.

66
67 OpenStack Compute Starter Guide Images & Snapshots This page lists the custom images that have been uploaded. One can edit the image properties, delete and launch new instances of the images. This page also lists the snapshots taken from instances and volumes.

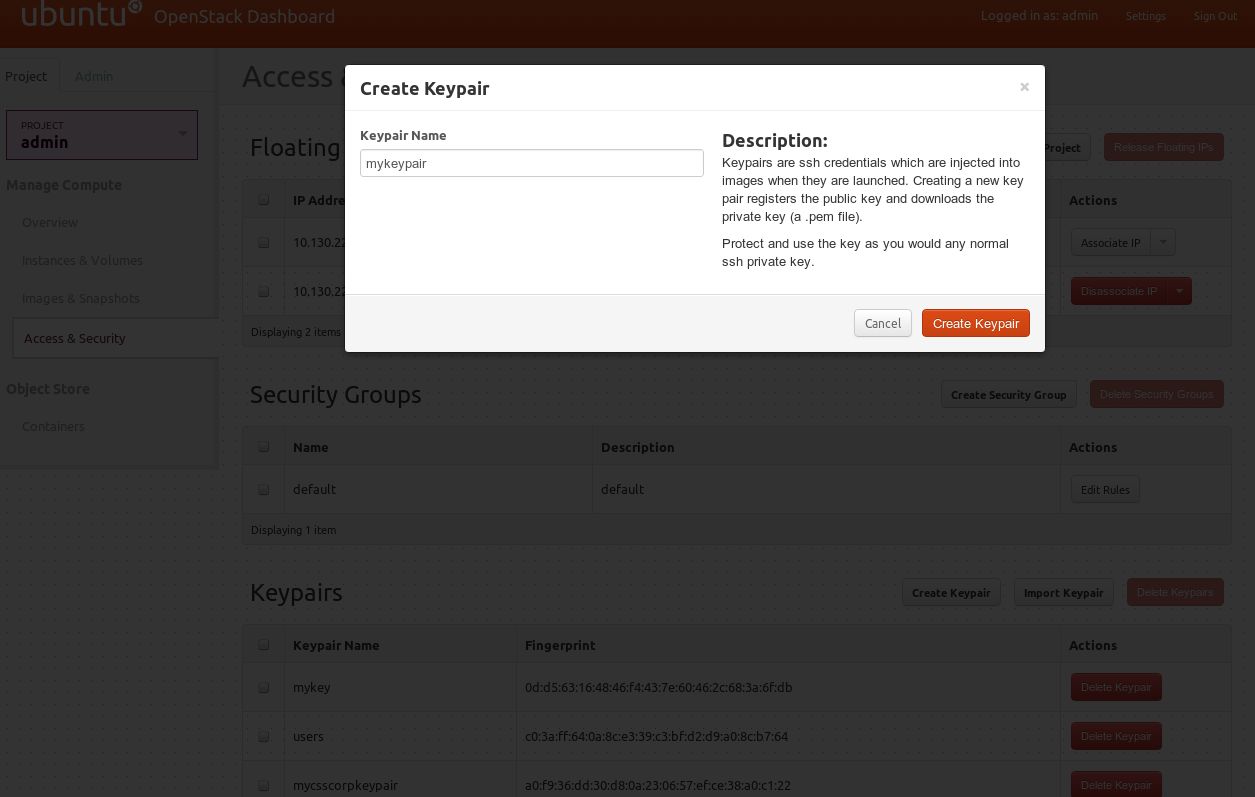
68 5.3.4 Access & Security On this page, one can allocate and release floating ip addresses, associate and dissociate them to instances. New security groups can be created and one can modify the rules belonging to each security group.

69 OpenStack Compute Starter Guide 63
70

71 OpenStack Compute Starter Guide Containers & Objects On this page, one can create/delete containers, lists objects, upload/download objects and delete objects.
Introduction to Openstack, an Open Cloud Computing Platform. Libre Software Meeting
 Introduction to Openstack, an Open Cloud Computing Platform Libre Software Meeting 10 July 2012 David Butler BBC Research & Development david.butler@rd.bbc.co.uk Introduction: Libre Software Meeting 2012
Keywords OpenStack, private cloud, infrastructure, AWS, IaaS
 Volume 3, Issue 10, October 2013 ISSN: 2277 128X International Journal of Advanced Research in Computer Science and Software Engineering Research Paper Available online at: www.ijarcsse.com Deployment
LABS Agenda University of Luxembourg, FSTC, 6 rue Richard Coudenhove-Kalergi
 Cloud computing enables the delivery of computing resources as a service, rather than a single bundled product. Amongst the many options for running a cloud infrastructure, the open source solution, OpenStack,
Configuring Keystone in OpenStack (Essex)
") WHITE PAPER Configuring Keystone in OpenStack (Essex) Joshua Tobin April 2012 Copyright Canonical 2012 www.canonical.com Executive introduction Keystone is an identity service written in Python that provides
WHITE PAPER Configuring Keystone in OpenStack (Essex) Joshua Tobin April 2012 Copyright Canonical 2012 www.canonical.com Executive introduction Keystone is an identity service written in Python that provides
1 Keystone OpenStack Identity Service
 1 Keystone OpenStack Identity Service In this chapter, we will cover: Creating a sandbox environment using VirtualBox and Vagrant Configuring the Ubuntu Cloud Archive Installing OpenStack Identity Service
OpenStack Introduction. November 4, 2015
 OpenStack Introduction November 4, 2015 Application Platforms Undergoing A Major Shift What is OpenStack Open Source Cloud Software Launched by NASA and Rackspace in 2010 Massively scalable Managed by
Mirantis www.mirantis.com/training
 TM Mirantis www.mirantis.com/training Goals Understand OpenStack purpose and use cases Understand OpenStack ecosystem o history o projects Understand OpenStack architecture o logical architecture o components
Cloud on TEIN Part I: OpenStack Cloud Deployment. Vasinee Siripoonya Electronic Government Agency of Thailand Kasidit Chanchio Thammasat University
 Cloud on TEIN Part I: OpenStack Cloud Deployment Vasinee Siripoonya Electronic Government Agency of Thailand Kasidit Chanchio Thammasat University Outline Objectives Part I: OpenStack Overview How OpenStack
OpenStack Ecosystem and Xen Cloud Platform
 OpenStack Ecosystem and Xen Cloud Platform Amit Naik Prasad Nirantar BMC Software 1 Agenda Introduction Rise of OpenStack OpenStack Details and Ecosystem OpenStack and Xen Cloud Platform - Demo Conclusion
Prepared for: How to Become Cloud Backup Provider
 Prepared for: How to Become Cloud Backup Provider Contents Abstract... 3 Introduction... 3 Purpose... 3 Architecture... 4 Result... 4 Requirements... 4 OS... 5 Networking... 5 Database... 5 Permissions...
Cloud Computing #8 - Datacenter OS. Johan Eker
 Cloud Computing #8 - Datacenter OS Johan Eker Outline What is a Datacenter OS? OpenStack Kubernetes Resource Management What is an OS? What is an OS? Manage hardware resources such as CPU, RAM, disk, I/O,
Privileged Cloud Storage By MaaS JuJu
 Privileged Cloud Storage By MaaS JuJu Sarita Shankar Pol 1, S. V. Gumaste 2 1 Computer Engineering, Sharadchandra College of Engineering, Otur (Pune), India 2 Professor, Computer Engineering, Sharadchandra
การใช งานและต ดต งระบบ OpenStack ซอฟต แวร สาหร บบร หารจ ดการ Cloud Computing เบ องต น
 การใช งานและต ดต งระบบ OpenStack ซอฟต แวร สาหร บบร หารจ ดการ Cloud Computing เบ องต น Kasidit Chanchio kasidit@cs.tu.ac.th Thammasat University Vasinee Siripoonya Electronic Government Agency of Thailand
Building a Cloud Computing Platform based on Open Source Software. 10. 18. 2011. Donghoon Kim ( donghoon.kim@kt.com ) Yoonbum Huh ( huhbum@kt.
 Yoonbum Huh ( huhbum@kt.") Building a Cloud Computing Platform based on Open Source Software 10. 18. 2011. Donghoon Kim ( donghoon.kim@kt.com ) Yoonbum Huh ( huhbum@kt.com) Topics I.Open Source SW and Cloud Computing II. About OpenStack
Building a Cloud Computing Platform based on Open Source Software 10. 18. 2011. Donghoon Kim ( donghoon.kim@kt.com ) Yoonbum Huh ( huhbum@kt.com) Topics I.Open Source SW and Cloud Computing II. About OpenStack
Moving SNE to the Cloud
 UNIVERSITY OF AMSTERDAM Moving SNE to the Cloud RP1 Report Sudesh Jethoe 30-12-2011 *[27] Summary: In this research the OpenStack framework is used to build a private, public and hybrid cloud for the System
Ubuntu Cloud Infrastructure - Jumpstart Deployment Customer - Date
 Ubuntu Cloud Infrastructure - Jumpstart Deployment Customer - Date Participants Consultant Name, Canonical Cloud Consultant,name.lastname@canonical.com Cloud Architect Name, Canonical Cloud Architect,
Guide to the LBaaS plugin ver. 1.0.2 for Fuel
 Guide to the LBaaS plugin ver. 1.0.2 for Fuel Load Balancing plugin for Fuel LBaaS (Load Balancing as a Service) is currently an advanced service of Neutron that provides load balancing for Neutron multi
Cloud Platform Comparison: CloudStack, Eucalyptus, vcloud Director and OpenStack
 Cloud Platform Comparison: CloudStack, Eucalyptus, vcloud Director and OpenStack This vendor-independent research contains a product-by-product comparison of the most popular cloud platforms (along with
SUSE Cloud 2.0. Pete Chadwick. Douglas Jarvis. Senior Product Manager pchadwick@suse.com. Product Marketing Manager djarvis@suse.
 SUSE Cloud 2.0 Pete Chadwick Douglas Jarvis Senior Product Manager pchadwick@suse.com Product Marketing Manager djarvis@suse.com SUSE Cloud SUSE Cloud is an open source software solution based on OpenStack
Install Your Own OpenStack Cloud Essex Edition
 Install Your Own OpenStack Cloud Essex Edition Eric Dodémont (dodeeric) eric.dodemont@skynet.be Version: 1.03 16 May 2012 License: Install Your Own OpenStack Cloud Essex Edition by Eric Dodémont is licensed
Implementation of Database as a Service in a Private Cloud using EUCALYPTUS
 Volume 2, No. 02, April 2013 ISSN 2278-1080 The International Journal of Computer Science & Applications (TIJCSA) RESEARCH PAPER Available Online at http://www.journalofcomputerscience.com/ Implementation
Create a virtual machine at your assigned virtual server. Use the following specs
 CIS Networking Installing Ubuntu Server on Windows hyper-v Much of this information was stolen from http://www.isummation.com/blog/installing-ubuntu-server-1104-64bit-on-hyper-v/ Create a virtual machine
OpenStack Installation Guide for Red Hat Enterprise Linux, CentOS, and Fedora
 docs.openstack.org OpenStack Installation Guide for Red Hat Enterprise Linux, CentOS, and Fedora (2013-06-11) Copyright 2012, 2013 OpenStack Foundation All rights reserved. The OpenStack system has several
rackspace.com/cloud/private
 rackspace.com/cloud/private Rackspace Private Cloud Installation (2014-11-21) Copyright 2014 Rackspace All rights reserved. This documentation is intended for users who want to install Rackspace Private
How To Install Openstack On Ubuntu 14.04 (Amd64)
") Getting Started with HP Helion OpenStack Using the Virtual Cloud Installation Method 1 What is OpenStack Cloud Software? A series of interrelated projects that control pools of compute, storage, and networking
Getting Started with HP Helion OpenStack Using the Virtual Cloud Installation Method 1 What is OpenStack Cloud Software? A series of interrelated projects that control pools of compute, storage, and networking
Release Notes for Fuel and Fuel Web Version 3.0.1
 Release Notes for Fuel and Fuel Web Version 3.0.1 June 21, 2013 1 Mirantis, Inc. is releasing version 3.0.1 of the Fuel Library and Fuel Web products. This is a cumulative maintenance release to the previously
Murano User Guide. v0.2. Publication date 2013-09-09. Abstract. This document is intended for individuals who wish to use Murano Product.
 Murano User Guide Murano User Guide v0.2 Publication date 2013-09-09 Abstract This document is intended for individuals who wish to use Murano Product. Table of Contents 1. How can I use Murano Service?...
Syncplicity On-Premise Storage Connector
 Syncplicity On-Premise Storage Connector Implementation Guide Abstract This document explains how to install and configure the Syncplicity On-Premise Storage Connector. In addition, it also describes how
Private Cloud in Educational Institutions: An Implementation using UEC
 Private Cloud in Educational Institutions: An Implementation using UEC D. Sudha Devi L.Yamuna Devi K.Thilagavathy,Ph.D P.Aruna N.Priya S. Vasantha,Ph.D ABSTRACT Cloud Computing, the emerging technology,
OpenStack Compute Administration Manual
 OpenStack Compute (02/03/11) Copyright 2010, 2011 OpenStack LLC All rights reserved. OpenStack Compute offers open source software for cloud administration and management for any organization. This manual
Snakes on a cloud. A presentation of the OpenStack project. Thierry Carrez Release Manager, OpenStack
 Snakes on a cloud A presentation of the OpenStack project Thierry Carrez Release Manager, OpenStack Cloud? Buzzword End-user services Software as a Service (SaaS) End-user services Online storage / streaming
OnCommand Performance Manager 1.1
 OnCommand Performance Manager 1.1 Installation and Setup Guide For Red Hat Enterprise Linux NetApp, Inc. 495 East Java Drive Sunnyvale, CA 94089 U.S. Telephone: +1 (408) 822-6000 Fax: +1 (408) 822-4501
Installation Runbook for Avni Software Defined Cloud
 Installation Runbook for Avni Software Defined Cloud Application Version 2.5 MOS Version 6.1 OpenStack Version Application Type Juno Hybrid Cloud Management System Content Document History 1 Introduction
vrealize Operations Management Pack for OpenStack
 vrealize Operations Management Pack for This document supports the version of each product listed and supports all subsequent versions until the document is replaced by a new edition. To check for more
Cloud.com CloudStack Community Edition 2.1 Beta Installation Guide
 Cloud.com CloudStack Community Edition 2.1 Beta Installation Guide July 2010 1 Specifications are subject to change without notice. The Cloud.com logo, Cloud.com, Hypervisor Attached Storage, HAS, Hypervisor
SOA Software API Gateway Appliance 7.1.x Administration Guide
 SOA Software API Gateway Appliance 7.1.x Administration Guide Trademarks SOA Software and the SOA Software logo are either trademarks or registered trademarks of SOA Software, Inc. Other product names,
w w w. u l t i m u m t e c h n o l o g i e s. c o m Infrastructure-as-a-Service on the OpenStack platform
 w w w. u l t i m u m t e c h n o l o g i e s. c o m Infrastructure-as-a-Service on the OpenStack platform http://www.ulticloud.com http://www.openstack.org Introduction to OpenStack 1. What OpenStack is
Deploying RDO on Red Hat Enterprise Linux. Dan Radez Sr. Software Engineer, RED HAT
 Deploying RDO on Red Hat Enterprise Linux Dan Radez Sr. Software Engineer, RED HAT What is OpenStack Cloud/Virtualization Platform Designed for standard hardware OpenSource Overview PackStack: Installation
Comparing Ganeti to other Private Cloud Platforms. Lance Albertson Director lance@osuosl.org @ramereth
 Comparing Ganeti to other Private Cloud Platforms Lance Albertson Director lance@osuosl.org @ramereth About me OSU Open Source Lab Server hosting for Open Source Projects Open Source development projects
CloudCIX Bootcamp. The essential IaaS getting started guide. http://www.cix.ie
 The essential IaaS getting started guide. http://www.cix.ie Revision Date: 17 th August 2015 Contents Acronyms... 2 Table of Figures... 3 1 Welcome... 4 2 Architecture... 5 3 Getting Started... 6 3.1 Login
An Introduction to OpenStack and its use of KVM. Daniel P. Berrangé <berrange@redhat.com>
 An Introduction to OpenStack and its use of KVM Daniel P. Berrangé About me Contributor to multiple virt projects Libvirt Developer / Architect 8 years OpenStack contributor 1 year
Introduction to OpenStack
 Introduction to OpenStack Carlo Vallati PostDoc Reseracher Dpt. Information Engineering University of Pisa carlo.vallati@iet.unipi.it Cloud Computing - Definition Cloud Computing is a term coined to refer
Desktop virtualization using SaaS Architecture
 Desktop virtualization using SaaS Architecture Pranit U. Patil, Pranav S. Ambavkar, Dr.B.B.Meshram, Prof. Varshapriya VJTI, Matunga, Mumbai, India. pranit_patil@aol.in Abstract - Desktop virtualization
Comparing Open Source Private Cloud (IaaS) Platforms
 Platforms") Comparing Open Source Private Cloud (IaaS) Platforms Lance Albertson OSU Open Source Lab Associate Director of Operations lance@osuosl.org / @ramereth About me OSU Open Source Lab Server hosting for Open
Comparing Open Source Private Cloud (IaaS) Platforms Lance Albertson OSU Open Source Lab Associate Director of Operations lance@osuosl.org / @ramereth About me OSU Open Source Lab Server hosting for Open
SI455 Advanced Computer Networking. Lab2: Adding DNS and Email Servers (v1.0) Due 6 Feb by start of class
 Due 6 Feb by start of class") SI455 Advanced Computer Networking Lab2: Adding DNS and Email Servers (v1.0) Due 6 Feb by start of class WHAT TO HAND IN: 1. Completed checklist from the last page of this document 2. 2-4 page write-up
SI455 Advanced Computer Networking Lab2: Adding DNS and Email Servers (v1.0) Due 6 Feb by start of class WHAT TO HAND IN: 1. Completed checklist from the last page of this document 2. 2-4 page write-up
NOC PS manual. Copyright Maxnet 2009 2015 All rights reserved. Page 1/45 NOC-PS Manuel EN version 1.3
 NOC PS manual Copyright Maxnet 2009 2015 All rights reserved Page 1/45 Table of contents Installation...3 System requirements...3 Network setup...5 Installation under Vmware Vsphere...8 Installation under
SUSE Manager in the Public Cloud. SUSE Manager Server in the Public Cloud
 SUSE Manager in the Public Cloud SUSE Manager Server in the Public Cloud Contents 1 Instance Requirements... 2 2 Setup... 3 3 Registration of Cloned Systems... 6 SUSE Manager delivers best-in-class Linux
2) Xen Hypervisor 3) UEC
 Xen Hypervisor 3) UEC") 5. Implementation Implementation of the trust model requires first preparing a test bed. It is a cloud computing environment that is required as the first step towards the implementation. Various tools
5. Implementation Implementation of the trust model requires first preparing a test bed. It is a cloud computing environment that is required as the first step towards the implementation. Various tools
Postgres on OpenStack
 Postgres on OpenStack Dave Page 18/9/2014 2014 EnterpriseDB Corporation. All rights reserved. 1 Introduction PostgreSQL: Core team member pgadmin lead developer Web/sysadmin teams PGCAC/PGEU board member
A technical whitepaper describing steps to setup a Private Cloud using the Eucalyptus Private Cloud Software and Xen hypervisor.
 A technical whitepaper describing steps to setup a Private Cloud using the Eucalyptus Private Cloud Software and Xen hypervisor. Vivek Juneja Cloud Computing COE Torry Harris Business Solutions INDIA Contents
Using SUSE Cloud to Orchestrate Multiple Hypervisors and Storage at ADP
 Using SUSE Cloud to Orchestrate Multiple Hypervisors and Storage at ADP Agenda ADP Cloud Vision and Requirements Introduction to SUSE Cloud Overview Whats New VMWare intergration HyperV intergration ADP
Today. 1. Private Clouds. Private Cloud toolkits. Private Clouds and OpenStack Introduction
 Today Private Clouds and OpenStack Introduction 1. Private Clouds 2. Introduction to OpenStack What is OpenStack? Architecture and Main components Demo: basic commands Luis Tomás Department of Computing
SWIFT. Page:1. Openstack Swift. Object Store Cloud built from the grounds up. David Hadas Swift ATC. HRL davidh@il.ibm.com 2012 IBM Corporation
 Page:1 Openstack Swift Object Store Cloud built from the grounds up David Hadas Swift ATC HRL davidh@il.ibm.com Page:2 Object Store Cloud Services Expectations: PUT/GET/DELETE Huge Capacity (Scale) Always
Openstack. Cloud computing with Openstack. Saverio Proto saverio.proto@switch.ch
 Openstack Cloud computing with Openstack Saverio Proto saverio.proto@switch.ch Lugano, 23/03/2016 Agenda SWITCH role in Openstack and Cloud Computing What is Virtualization? Why is Cloud computing more
VMware Identity Manager Connector Installation and Configuration
 VMware Identity Manager Connector Installation and Configuration VMware Identity Manager This document supports the version of each product listed and supports all subsequent versions until the document
GRAVITYZONE HERE. Deployment Guide VLE Environment
 GRAVITYZONE HERE Deployment Guide VLE Environment LEGAL NOTICE All rights reserved. No part of this document may be reproduced or transmitted in any form or by any means, electronic or mechanical, including
SYNNEFO: A COMPLETE CLOUD PLATFORM OVER GOOGLE GANETI WITH OPENSTACK APIs VANGELIS KOUKIS, TECH LEAD, SYNNEFO
 SYNNEFO: A COMPLETE CLOUD PLATFORM OVER GOOGLE GANETI WITH OPENSTACK APIs VANGELIS KOUKIS, TECH LEAD, SYNNEFO 1 Synnefo cloud platform An all-in-one cloud solution Written from scratch in Python Manages
Summarized OpenStack Install Guide
 Summarized OpenStack Install Guide Telmo Silva Morais Student of Doctoral Program of Informatics Engineering Computer Systems Security Faculty of Engineering, University of Porto Porto, Portugal telmo.morais@gmail.com
An Efficient Failover Enabling Mechanism in OpenStack
 An Efficient Failover Enabling Mechanism in OpenStack S. Ramakrishnan M.Tech Cloud Computing Department of Information Technology SRM University, SRM Nagar, Kattankulathur, Tamil Nadu, India, 603203 Abstract:
CERN Cloud Infrastructure. Cloud Networking
 CERN Cloud Infrastructure Cloud Networking Contents Physical datacenter topology Cloud Networking - Use cases - Current implementation (Nova network) - Migration to Neutron 7/16/2015 2 Physical network
Cloud on TIEN Part I: OpenStack Cloud Deployment. Vasinee Siripoonya Electronic Government Agency of Thailand Kasidit Chanchio Thammasat
 Cloud on TIEN Part I: OpenStack Cloud Deployment Vasinee Siripoonya Electronic Government Agency of Thailand Kasidit Chanchio Thammasat Outline Part I: OpenStack Overview How OpenStack components work
RealPresence Platform Director
 RealPresence CloudAXIS Suite Administrators Guide Software 1.3.1 GETTING STARTED GUIDE Software 2.0 June 2015 3725-66012-001B RealPresence Platform Director Polycom, Inc. 1 RealPresence Platform Director
Getting Started with OpenStack and VMware vsphere TECHNICAL MARKETING DOCUMENTATION V 0.1/DECEMBER 2013
 Getting Started with OpenStack and VMware vsphere TECHNICAL MARKETING DOCUMENTATION V 0.1/DECEMBER 2013 Table of Contents Introduction.... 3 1.1 VMware vsphere.... 3 1.2 OpenStack.... 3 1.3 Using OpenStack
SUSE Cloud. www.suse.com. OpenStack End User Guide. February 20, 2015
 SUSE Cloud 5 www.suse.com February 20, 2015 OpenStack End User Guide OpenStack End User Guide Abstract OpenStack is an open-source cloud computing platform for public and private clouds. A series of interrelated
Mobile Cloud Computing T-110.5121 Open Source IaaS
 Mobile Cloud Computing T-110.5121 Open Source IaaS Tommi Mäkelä, Otaniemi Evolution Mainframe Centralized computation and storage, thin clients Dedicated hardware, software, experienced staff High capital
Acronis Storage Gateway
 Acronis Storage Gateway DEPLOYMENT GUIDE Revision: 12/30/2015 Table of contents 1 Introducing Acronis Storage Gateway...3 1.1 Supported storage backends... 3 1.2 Architecture and network diagram... 4 1.3
Installing and Using the vnios Trial
 Installing and Using the vnios Trial The vnios Trial is a software package designed for efficient evaluation of the Infoblox vnios appliance platform. Providing the complete suite of DNS, DHCP and IPAM
insync Installation Guide
 insync Installation Guide 5.2 Private Cloud Druva Software June 21, 13 Copyright 2007-2013 Druva Inc. All Rights Reserved. Table of Contents Deploying insync Private Cloud... 4 Installing insync Private
Quick Start Guide for Parallels Virtuozzo
 PROPALMS VDI Version 2.1 Quick Start Guide for Parallels Virtuozzo Rev. 1.1 Published: JULY-2011 1999-2011 Propalms Ltd. All rights reserved. The information contained in this document represents the current
Nessus or Metasploit: Security Assessment of OpenStack Cloud
 Nessus or Metasploit: Security Assessment of OpenStack Cloud Aleksandar Donevski, Sasko Ristov and Marjan Gusev Ss. Cyril and Methodius University, Faculty of Information Sciences and Computer Engineering,
THE EUCALYPTUS OPEN-SOURCE PRIVATE CLOUD
 THE EUCALYPTUS OPEN-SOURCE PRIVATE CLOUD By Yohan Wadia ucalyptus is a Linux-based opensource software architecture that implements efficiencyenhancing private and hybrid clouds within an enterprise s
OpenStack Tutorial. IEEE CloudCom 2010. Bret Piatt Community Stacker Twitter: @bpiatt
 OpenStack Tutorial IEEE CloudCom 2010 Bret Piatt Community Stacker Twitter: @bpiatt Application Platforms Undergoing A Major Shift 70 s 80 s 90 s-2000 s 2010-beyond Mainframe Era Client Server Era Cloud
Virtual Appliance Setup Guide
 Virtual Appliance Setup Guide 2015 Bomgar Corporation. All rights reserved worldwide. BOMGAR and the BOMGAR logo are trademarks of Bomgar Corporation; other trademarks shown are the property of their respective
Deploying a Virtual Machine (Instance) using a Template via CloudStack UI in v4.5.x (procedure valid until Oct 2015)
 using a Template via CloudStack UI in v4.5.x (procedure valid until Oct 2015)") Deploying a Virtual Machine (Instance) using a Template via CloudStack UI in v4.5.x (procedure valid until Oct 2015) Access CloudStack web interface via: Internal access links: http://cloudstack.doc.ic.ac.uk
Deploying a Virtual Machine (Instance) using a Template via CloudStack UI in v4.5.x (procedure valid until Oct 2015) Access CloudStack web interface via: Internal access links: http://cloudstack.doc.ic.ac.uk
OpenStack Towards a fully open cloud. Thierry Carrez Release Manager, OpenStack
 OpenStack Towards a fully open cloud Thierry Carrez Release Manager, OpenStack Cloud? Why we need open source IaaS A cloud building block Emergence of a standard Eliminate cloud vendor lock-in Enable federation
CloudPortal Business Manager 2.2 POC Cookbook
 CloudPortal Business Manager 2.2 POC Cookbook February 9, 2014 Contents 1 Overview... 3 2 Prepare CloudPlatform to Be Used with CloudPortal Business Manager... 4 2.1 Assumptions... 4 2.2 Steps to configure
Research of Enterprise Private Cloud Computing Platform Based on OpenStack. Abstract
 , pp.171-180 http://dx.doi.org/10.14257/ijgdc.2014.7.5.16 Research of Enterprise Private Cloud Computing Platform Based on OpenStack Jiang Yunxia, Zhao Bowen, Wang Shuqi and Sun Dongnan School of Automation,
Interworks. Interworks Cloud Platform Installation Guide
 Interworks Interworks Cloud Platform Installation Guide Published: March, 2014 This document contains information proprietary to Interworks and its receipt or possession does not convey any rights to reproduce,
Installing and Scaling out Ubuntu Enterprise Cloud in Virtual Environment
 Installing and Scaling out Ubuntu Enterprise Cloud in Virtual Environment Supplement to Guidelines for Building a Private Cloud Infrastructure Zoran Pantić and Muhammad Ali Babar Tech Report TR-2012-154
Migration of virtual machine to cloud using Openstack Python API Clients
 Migration of virtual machine to cloud using Openstack Python API Clients Jyoti Joshi 1, Manasi Thakur 2, Saurabh Mhatre 3, Pradnya Usatkar 4, Afrin Parmar 5 1 Assistant Professor Computer, R.A.I.T., University
Partek Flow Installation Guide
 Partek Flow Installation Guide Partek Flow is a web based application for genomic data analysis and visualization, which can be installed on a desktop computer, compute cluster or cloud. Users can access
Ubuntu OpenStack on VMware vsphere: A reference architecture for deploying OpenStack while limiting changes to existing infrastructure
 TECHNICAL WHITE PAPER Ubuntu OpenStack on VMware vsphere: A reference architecture for deploying OpenStack while limiting changes to existing infrastructure A collaboration between Canonical and VMware
Building a Penetration Testing Virtual Computer Laboratory
 Building a Penetration Testing Virtual Computer Laboratory User Guide 1 A. Table of Contents Collaborative Virtual Computer Laboratory A. Table of Contents... 2 B. Introduction... 3 C. Configure Host Network
http://www.trendmicro.com/download
 Trend Micro Incorporated reserves the right to make changes to this document and to the products described herein without notice. Before installing and using the software, please review the readme files,
Building a Private Cloud Cloud Infrastructure Using Opensource
 Cloud Infrastructure Using Opensource with Ubuntu Server 10.04 Enterprise Cloud (Eucalyptus) OSCON (Note: Special thanks to Jim Beasley, my lead Cloud Ninja, for putting this document together!) Introduction
RingStor User Manual. Version 2.1 Last Update on September 17th, 2015. RingStor, Inc. 197 Route 18 South, Ste 3000 East Brunswick, NJ 08816.
 RingStor User Manual Version 2.1 Last Update on September 17th, 2015 RingStor, Inc. 197 Route 18 South, Ste 3000 East Brunswick, NJ 08816 Page 1 Table of Contents 1 Overview... 5 1.1 RingStor Data Protection...
From Zero to OpenStack
 Richard Hartmann, RichiH@{freenode,OFTC,IRCnet}, rh@globalways.net August 20, 2011 Outline 1 Quick intro 2 Current situation 3 What is OpenStack? 4 OpenStack: Swift 5 Conclusion Outline 1 Quick intro 2
Quick Start Guide for VMware and Windows 7
 PROPALMS VDI Version 2.1 Quick Start Guide for VMware and Windows 7 Rev. 1.1 Published: JULY-2011 1999-2011 Propalms Ltd. All rights reserved. The information contained in this document represents the
Virtualization & Cloud Computing (2W-VnCC)
") Virtualization & Cloud Computing (2W-VnCC) DETAILS OF THE SYLLABUS: Basics of Networking Types of Networking Networking Tools Basics of IP Addressing Subnet Mask & Subnetting MAC Address Ports : Physical
Virtualization & Cloud Computing (2W-VnCC) DETAILS OF THE SYLLABUS: Basics of Networking Types of Networking Networking Tools Basics of IP Addressing Subnet Mask & Subnetting MAC Address Ports : Physical
VMware Integrated OpenStack Administrator Guide
 VMware Integrated OpenStack Administrator Guide VMware Integrated OpenStack 1.0.0 This document supports the version of each product listed and supports all subsequent versions until the document is replaced
VMware Identity Manager Administration
 VMware Identity Manager Administration VMware Identity Manager 2.4 This document supports the version of each product listed and supports all subsequent versions until the document is replaced by a new
Installing and Configuring vcloud Connector
 Installing and Configuring vcloud Connector vcloud Connector 2.7.0 This document supports the version of each product listed and supports all subsequent versions until the document is replaced by a new
Automated Configuration of Open Stack Instances at Boot Time
 Automated Configuration of Open Stack Instances at Boot Time N Praveen 1, Dr. M.N.Jayaram 2 Post Graduate Student 1, Associate Professor 2, EC Department, SJCE, Mysuru, India Abstract: Cloud Computing
Moving Drupal to the Cloud: A step-by-step guide and reference document for hosting a Drupal web site on Amazon Web Services
 Moving Drupal to the Cloud: A step-by-step guide and reference document for hosting a Drupal web site on Amazon Web Services MCN 2009: Cloud Computing Primer Workshop Charles Moad
PARALLELS SERVER BARE METAL 5.0 README
 PARALLELS SERVER BARE METAL 5.0 README 1999-2011 Parallels Holdings, Ltd. and its affiliates. All rights reserved. This document provides the first-priority information on the Parallels Server Bare Metal
CloudPlatform (powered by Apache CloudStack) Version 4.2 Administrator's Guide
 Version 4.2 Administrator's Guide") CloudPlatform (powered by Apache CloudStack) Version 4.2 Administrator's Guide Revised September 7, 2013 10:50 pm Pacific Citrix CloudPlatform CloudPlatform (powered by Apache CloudStack) Version 4.2 Administrator's
CloudPlatform (powered by Apache CloudStack) Version 4.2 Administrator's Guide Revised September 7, 2013 10:50 pm Pacific Citrix CloudPlatform CloudPlatform (powered by Apache CloudStack) Version 4.2 Administrator's
VMware Identity Manager Administration
 VMware Identity Manager Administration VMware Identity Manager 2.6 This document supports the version of each product listed and supports all subsequent versions until the document is replaced by a new
RSA Security Analytics Virtual Appliance Setup Guide
 RSA Security Analytics Virtual Appliance Setup Guide Copyright 2010-2015 RSA, the Security Division of EMC. All rights reserved. Trademarks RSA, the RSA Logo and EMC are either registered trademarks or