3D Lift Plan Manual Rev. 4 10/21/09
|
|
|
- Reynard Cunningham
- 8 years ago
- Views:
Transcription
1 3D Lift Plan Manual Rev. 4 10/21/09 1

2 Index Introduction Page 3 About 3DLiftPlan Page 4 Current Features and Benefits Page 5 Minimum Requirements Page 6 Creating an Account Page 7 My Account Page Page 8 Getting Started Page 9 Installing the Flux Player and Flux Player Controls Page 10 Adding Cranes Page Editing Account Information Page 13 Corporate Account Page Setting Preferences Page 18 Managing, Opening, Creating Lift Plans Page 19 Lift Plan Settings Page Page 20 Quick Lift Setup Page Crane Search Setup Page Crane Search Page 26 Crane Search Results Page 27 Advanced Lift Setup Load Type, and Load Details Page Rigging Type and Rigging Details Page Jobsite Obstructions Page o Box Page 42 o Cylinder Page 43 o Sphere Page 44 o Construction Building Page 45 o Rope Page 46 o Text Page 47 o 3D Object Obstruction Page 48 Choose Crane Page 49 Lift Simulation Page 50 Dimensions Page Load Chart Page 55 Printing Page Page 56 3D Lift Plan Publisher Page 57 2

3 Printing Lift Plans to Paper or for ing to a Customer Page 58 Critical Lift Plan Worksheet Page 59 Tower Crane Planning Page 60 Ground Bearing Pressure Page 61 Crane Setup Page 62 CAD Export Page Multi-Crane Lift Page Share Feature Page Snapshot Feature Page Manual Lift Video Page Technical Support & FAQ s Information Page 79 Upcoming Features Page 80 Introduction Welcome to 3DLiftPlan.com and thank you for using our product. 3Dliftplan.com is the only lift planning application that uses the newest true 3d technology. This is not a CAD based program, so there is no need to buy an expensive additional program to use it, nor the expensive training or wasted time trying to draw objects. We have easy tools to draw many objects for your jobsite. You can use a combination of them to create detailed drawings or just keep it simple with our pre loaded objects. This comprehensive manual is designed to help you use our site, to better understand how to navigate the site and produce high quality and professional lift plan. The manual will be updated often as we develop and implement new features; I hope you find it useful, and complete. Please let us know if there is any thing that requires more explanation or clarification. Thanks for using 3dliftplan.com! 3

4 Frequently Asked Questions About 3DLiftPlan.com Why 3D Lift Plan? 3D Lift Plan's step-by-step design allows you to create detailed, accurate lift plans in minutes. With state-of-the-art 3D graphics and a powerful crane selection algorithm, 3D Lift Plan is the easiest to use and most powerful lift planning application available. Why online lift planning? It is easily accessible from any location. Program features, load charts, and crane graphics are all updated on our server, so there is no need for you to install updates. How much does it cost? All Link-Belt cranes are provided by Link-Belt at no charge. Other cranes can be purchased online from one week to one year at a time. Create an account to see the prices of the cranes in your fleet. Can I use my entire fleet in 3D Lift Plan? Yes, you can use as many or as few cranes as you wish. We have over 500 cranes to choose from. If we don't have one of your cranes in our database, we can add it at no additional charge. View the complete list of cranes available on 3D Lift Plan. Do I need to know CAD? No, 3D Lift Plan does not use any CAD-based program. Do I need any special training to use 3D Lift Plan? No, you just need to know how to browse the internet and perform basic windows operations. We can provide training if you feel it would increase productivity for you or your company. Does 3D Lift Plan work with metric units? Yes, you can choose to work in US or Metric units. What does my computer require? Pentium III-class 600 MHz processor Hardware-accelerated 3D graphics card with at least 32MB of video memory DirectX version 9 (or newer) An X3D browser plugin. We recommend the Flux Player. Internet Explorer v6 (or newer) What is the relationship between 3D Lift Plan and Link-Belt? Link-Belt sponsors all of their cranes in 3D Lift Plan at no charge to the customer. 4

5 Current Features of 3DLiftPlan.com Features and Benefits of 3D Lift Plan Convenient Runs online in your web browser, accessible from any location. Cranes can be added in seconds. You don't need to wait days or weeks for an installation for all your pc's. You will always have the latest version, no need for you to install updates. Safe and secure storage of lift plans on the 3D Lift Plan server. Easy-to-Use Doesn't require CAD or any other expensive program to run. User-friendly, step-by-step design makes 3D Lift Plan easy enough for a novice to use. Easy to move back and forth through the program to make changes. Affordable Link-Belt cranes are provided by Link-Belt at no charge. Purchase other cranes for as little as one week, paying for just the time you need. 3D Graphics Highly-accurate graphics are in true 3D, allowing you to view the lift plan from any angle. Easy to create detailed 3D jobsites and rigging designs. Change ground and skyline colors. Lift Simulation Performs a simulation of your lift while monitoring the crane's capacity. Allows you to view the load chart to see the capacity at various distances. Crane Selection Searches your entire fleet of cranes in seconds. Displays the most economical crane configurations that can handle your lift at the top of the results list, allowing you to save time sifting through long lists of possible choices. Accounts for any obstruction in your jobsite whether it's to the side, front, rear, or above the crane. Provides several filter options so you can search only the cranes and configurations you choose. Print Detailed Lift Plans Print your lift plan from any viewpoint. Quickly add notes to the printout. Show your logo on the printout. 5

6 Minimum Requirements Pentium III-class 600 MHz processor Hardware-accelerated 3D graphics card with at least 32MB of video memory DirectX version 9 (or newer) Flux Player Browser Plug in Internet Explorer v6 (or newer) 6
 Flux Player Browser Plug in Internet Explorer")
7 Creating an Account Click the Button Create a New Account Select a Username, password and fill in all of your contact information. Make sure you read all of the Website Application User Agreement, check the box that your agree to the terms and click the submit button. 7

8 My Account Page Use these links to add and edit your cranes in your account. Use these links to set preferences, change your password or edit your account information Read the latest up to date news about 3dliftplan. Create, Open and Delete Lift Plans. 8

9 Getting Started Getting Started This page will walk you through the basic steps required to create a lift plan. You can return to this page at any time by clicking the "Getting Started" link on your account page or under the "Support" menu option. Step 1 - Create an account On the home page, click the "Create a new account" button and fill out the form that appears on the screen. Be sure to write down your password and keep it in a safe place. Your username and password are required every time you log on to 3D Lift Plan. You will access the features of 3D Lift Plan from the "My Account" page, which you can reach by clicking the "My Account" link at the top of the page. Step 2 - Install the Flux Player The Flux Player by Media Machines is a free browser plugin that displays the 3D images. Click here to install the Flux Player Note to Windows 98/Me Users: The Flux Player uses the Microsoft XML libraries (MSXML) to load XML-encoded X3D files. These libraries may not be installed on your system. Click here to download MSXML. If you have any problems installing the Flux Player or viewing 3D Images on the website, please visit this page: Troubleshooting (3D Images) Step 3 - Add cranes to your account From the "My Account" page, select "Add Cranes". Select all of your Link-Belt cranes in the list, then press "Add to Shopping Cart". Note: All Link-Belt cranes are free of charge. Then select all of your other cranes in the same manner, changing the "Crane Make" to see a list of other manufacturer's cranes. Once you have added all of your cranes to the shopping cart, press "Purchase Cranes". Step 4 - Create a new Lift Plan From the "My Account" page, enter a name for your new lift plan and press "Create New Lift Plan". This name will help you identify your lift plan if you want to make any changes to it after you close it. Your lift plan will automatically be saved every time you navigate to a different page of the website, so there is no need to manually save a file. When you want to load a lift plan later, you can find it in the "Load a Lift Plan" table at the bottom of the "My Account" page. Step 5 - Design your Lift Plan 3D Lift Plan will guide you through the steps required to design your lift plan, just follow the instructions at the top of each page. Generally, you will fill out the information on each page and press the "Next" button to go to the next step. The navigation bar on the left side of the page allows you to go back to any step to make changes. Please note, if you make changes to the load or jobsite you will need to perform the Crane Search again to account for the changes you made. Further Assistance If you need further assistance, please press the "Support" button at the top of the page. 9

10 Installing and Using the Flux Player Install the Flux Player The Flux Player by Media Machines is a free browser plugin that displays the 3D images. Click here to install the Flux Player Note to Windows 98/Me Users: The Flux Player uses the Microsoft XML libraries (MSXML) to load XML-encoded X3D files. These libraries may not be installed on your system. Click here to download MSXML. If you have any problems installing the Flux Player or viewing 3D Images on the website, please visit this page: Troubleshooting (3D Images) Left click on the Explore button to activate this control. Put mouse pointer in the picture and hold your left mouse key down while moving your mouse. This will allow you fly around the jobsite. Hold down your right mouse key while moving your mouse around to pan around your jobsite, holding down your shift key at the same time will pan faster. You can also use your arrow keys. Left click on the Examine button to activate this control. Put mouse pointer in the picture and hold your left mouse key down while moving your mouse. This will allow you to see the jobsite in 3D at any angle. Hold down your right mouse key while moving your mouse around to pan around your jobsite. You can use the center wheel on your mouse to zoom in and out. Use the level button to straighten your jobsite and move it to the upright position. Left click inside the viewpoint box to view and select all the default points of view. Or you can left click on the arrows on either side to change to each viewpoint. 10
 Left click on the Explore button to activate this control.")
11 Adding Cranes We offer cranes from many different manufactures. Simply pick the manufacture from the drop down list and see all the cranes we have available for each one. You will also notice a tier number next to each model. These tier numbers help you determine the cost to use the model on 3dliftplan.com. For example, the Terex-Demag AC25 is a Tier 3 crane. If you look at the table to the left you will see Tier 3. You can purchase the use of the AC25 for 7 days to 365 days. If we want to use the AC25 for 30 days the price would be $25. 11

12 Click the purchase button to advance to the credit card entry form. If you would rather we send you an invoice for payment by check just call us or us with your order number. 12

13 Edit Account Information Update all of your account information at any time. Simply click on the Edit Account Information link from the My Account page. 13

14 Upgrade to a Corporate Account Upgrade to a corporate account to access features like: Tandem Lifts, Advanced Rigging, Copy Lift Plans, Change Crane Colors, Snapshot and Share Feature. With a corporate account you can also share cranes, 3D objects, and lift plans between co-workers. Click this link to upgrade to a corporate account 14

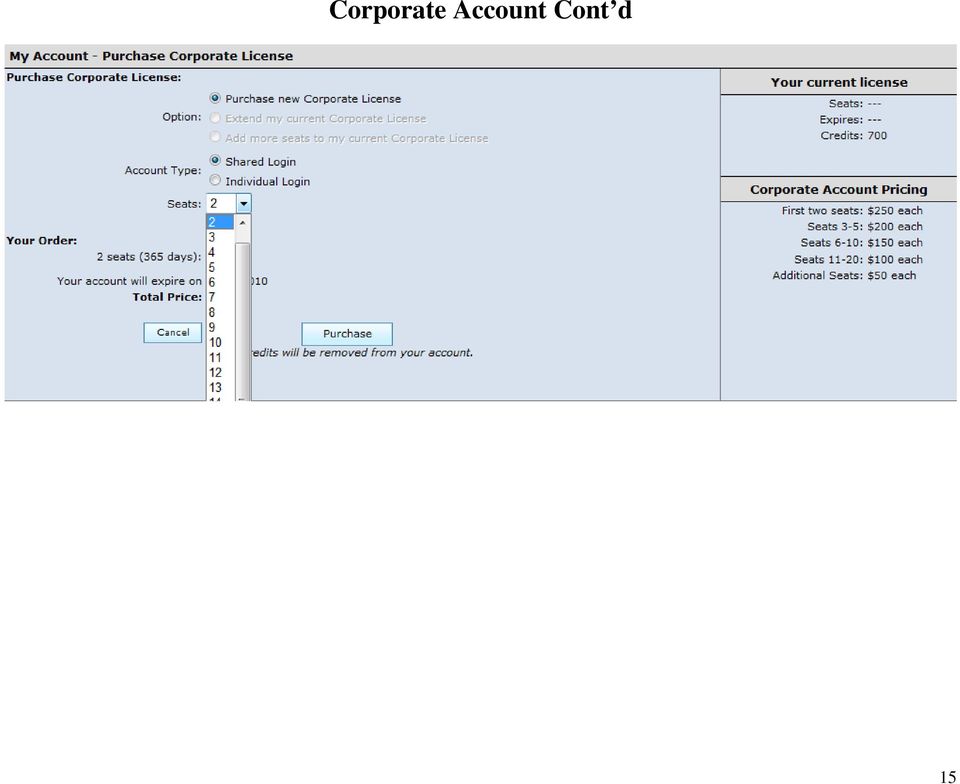
15 Corporate Account Cont d 15
16 Corporate Account Cont d To allow user access to your corporate account have them create their own individual account and tell you their registered username so you can add it to this list. When you are done typing in their username click the "Update" button. 16

17 Corporate Account Cont d User accounts will enter the corporate account name here, then click submit. 17

18 Setting Preferences Set all of the preferences you want to default to when using 3dliftplan.com. Select whether you want to work in metric or U.S. units. Select the default color and texture for the sky and ground color in your lift plans. Select whether you want to show the grid and xyz axis and what view you want for the default. Select the size of you want the flux player window to be. Specify the default clearances you want for running crane selection. For boom clearance you might want to make it a lower number like 2 so you will get more results when running crane selection. 18

19 Managing, Opening and Creating Lift Plans Create a new lift plan by simply typing in a name and left clicking the Create New Lift Plan button Open an existing lift plan by left clicking the Open next to the lift plan you want to open. To delete a lift plan, left click on the Delete button next to the lift plan you want to delete. 19

20 Lift Plan Settings Page Put a Description in for your Lift Plan Give your Lift Plan a name Choose between US or Metric units Enter a Customer name Copy an Existing Lift Plan Choose the Ground color for your plan Choose the Sky color for your plan Choose the default viewing position for the images as the appear on each screen Choose whether you want to see the sky and ground textured Once you have selected your crane you can return here to change the color of your crane. Some cranes cannot be changed. Choose the Advanced Lift Setup to add rigging and create an advanced jobsite. Use the Quick Lift Setup, answer a few questions then find the let 3dliftplan s crane selection find the best crane fast. Choose whether you want to see the XYZ axes markers and the grid For Instructions on the Advanced Lift Setup go to page 28 20

21 Quick Lift Setup Step 1 Answer a few simple questions about your lift to determine which crane you need for the job. 21
22 Quick Lift Setup Step 2 Add a front obstruction, and give it dimensions. Enter your load distance (distance from front edge of building to center of load), and enter your minimum setup distance (distance from center pin of crane to front edge of load.) You can also enter multiple heights and depths for your front obstruction. You can also enter obstructions in behind you or to the right or left of you. For the rear building how much room do you have between the 2 buildings? For the buildings to the left and right assume that your crane is going to be centered on the front obstruction. How far over to the left or right do you want the edge of the obstruction to start? 22
23 Starting point for placement of center pin Ending point for placement of center pin Crane Search Setup Page Controls to place the load on the jobsite, X is the position lengthwise on the jobsite. By choosing 5 the load will be placed starting at 5 from 0 on the X axis. Set Z to the location from side to side, and Y for the height you want to lift it. Location of center pin from side to side The red area represents the area in which the crane will be placed. Controls to set the clearance of the crane components to all your jobsite obstructions, for example if you had a power line you would want to set your boom clearance to 10 to make sure that when the program performs crane selection it choose a crane and configuration that is at least 10 away from the power line. White Line Represents the location you want to place the center pin. 23
24 After creating your jobsite with the Quick Lift Setup feature or by manually adding jobsite obstructions, you can search your entire fleet of cranes to determine which ones can perform the lift. Crane Search Setup The Crane Search Setup page lets you set the position of the load at a critical point in the lift, and lets you set a range of possible locations for the crane. Load Location X and Z represent the center point of the load, relative to the jobsite origin. Load Location Y is the distance from the ground to the bottom of the load. The Clearances box allows you to set minimum clearance requirements for various parts of the crane. A Carrier Clearance of 5 ft will ensure that the carrier of the crane is at least 5 ft away from all jobsite obstructions. A 5 ft Boom Clearance will keep the boom at least 5 ft away from all jobsite obstructions. Setting the Rigging Clearance to 5 ft will keep the Load and Rigging components at least 5 ft away from the boom or jib. Setup Distance is the distance from the jobsite origin to the center pin of the crane. As an example, if you set the Minimum Setup Distance to 20 ft, the crane center pin will be positioned at least 20 ft from the primary obstruction. 24
25 The 3D image helps represent the Crane Search parameters. The white line represents the range of the crane center pin location. The red area represents the allowable area for the crane carrier. In other words, the crane center pin will be placed somewhere on the white line, and the entire carrier of the crane will be placed inside the red area. When you have set all the Crane Search Setup values, click Next to choose which cranes to search. Search Cranes The Search Cranes page lets you choose which cranes to search. You can also use the filters to narrow down which cranes and charts to search. In the Search Options box, there are two options to choose from... 1) "Find best result for each crane" - This option will find the optimal configuration for each crane, which typically means the least amount of counterweight and shortest possible boom and jib. 2) "Find multiple results for each crane" - Select this option if you would like to see multiple configurations for each crane. When you are done selecting which cranes to search, click Next to perform the search. Results The results page lists all the cranes that can perform the lift. Information about the load chart and crane configuration are provided in the table. Click the "Use This Chart" button next to the chart you would like to use. The crane will be automatically set up and you will be sent to the Lift Simulation page. If you don't see any results, go back through the Search Setup steps to try to broaden your search. Try searching more cranes, selecting fewer filters, decreasing clearance requirements, and increasing the range of possible setup distances. 25
26 Search Crane Page Select the cranes you would like to run crane selection on. Select whether you would like to include or exclude different charts Select the minimum percentage of chart you want to use. Select whether you want to find the best result for each crane that can perform the lift or find multiple results from each crane. 26
27 Search Result Page If you don t find a crane below or crane selection did not find any cranes left click on the back button and select different cranes, change clearances or change the location you selected for the center pin. If at any point you want to go back and make changes to your load, obstructions, or search setup simply click on the link you want. Left click on the button next to the crane you want to use. ****If you have not added cranes to your account there will be no cranes listed. Please make sure you return to the My Account page and open the Add Cranes link**** 27
28 Advanced Lift Setup Load Type Page Select the Load Type you want to use. You can select the 3D object to access all our custom objects like wind turbines, trees, beams and more. Once you left click on a load you will be taken to the next page where you can enter all the dimension information for the load. 28
29 Load Dimensions Page Enter the weight of your load Enter the Dimensions for the load Select the color you want the load to be Rotate the load under the hook or angle your load. Then select whether you want the boom to stay at that angle when you swing the boom. Select whether you want the load to rotate with the boom while you are swinging the boom. Or uncheck to keep load at the angle of the building you are setting it on. 29
30 Rigging Type Page Choose the rigging configuration that best represents your rigging setup. 30
31 Rigging Offset Page Introduction By default, the load is centered directly below the hook. If you want to offset the load, you will need to modify the Rigging Offset values on the Rigging Properties page. Rigging Offset The easiest way to offset the load is to choose a point from the "Set to" drop down box, such as "Top Right", "Top Back", or "Bottom Center". This will automatically position the load so the hook is directly above the point you choose. If you select a "Top" point, the pick points will be level with the top of the load. If you select a "Bottom" point, the pick points will be level with the bottom of the load. To offset the load to a different point, you will need to modify the X, Y, and Z values in the Rigging Offset box. To move the load forward or backward, modify the X value. A positive X value will move the load forward. A negative X value will move the load backward. 31
32 To move the pick points down to the side or bottom of the load, modify the Rigging Offset Y value. If you change the load angle or rotation (on the Load Details page), the coordinate axes also rotate. For instance, if you rotate the load 90 degrees, changing the Rigging Offset X value will now move the load left and right instead of forward and back. If you change the Load Angle to 90 degrees, the X-axis will be oriented vertically, so adjusting the Rigging Offset X value will move the pick points up and down. Load Rotation and Rigging Rotation When you change the Load Rotation (on the Load Details page), the rigging also rotates with the load. To rotate the rigging objects without rotating the load, you should change the Rotation value on the Rigging Details page. 32
33 Load Rotation Rigging Rotation 33
34 Select how many parts of line you need. When you select 1 you will have a headache ball. When you select multiple parts of line you will get a hook block and the total parts of line you selected. Use our sling calculator to determine the length of your slings, the leg height or the angle of your slings. 3D Lift Plan will also calculate the sling tension. Enter in the weight of the rigging you are using. Rigging Details Page 4 Leg Bridle Setup Offset your rigging on the load. Refer to the previous page for instructions. Enter the length of the slings you want to use and the distance between where you are planning on attaching your rigging to the load. You will notice the load that you selected and sized on the previous pages. 34
35 Spreader Bar Rigging Details Enter the dimensions for the spreader bar you are using. Then select the distance you need between where your slings attach to the upper and lower part of your spreader bar. 35
36 Advanced Rigging Feature Select what rigging you want to work with. Hook- You can enter in the weight and capacity of your hoist line, hook and block. You can put rigging under your hook one at a time. Slings- You can enter size of wire rope, capacity and weight. Y can add rigging to each end of the slings you have. If you have 2 slings it will add 2 rigging items at a time when you select to add them. 4 slings will add 4 rigging items at a time to either the upper or lower end of the slings. Spreader Bar- You can enter weight, dimensions and capacity of your spreader bar. Load- will add rigging items to the load. 36
37 I have selected to add rigging to the upper part of my upper slings. You can select to add a shackle, pick between Crosby or Columbus McKinnon or customize your own. As you select the model and size of the shackle you will notice that 3D Lift Plan has added 2 shackles to the upper part of your slings. You will notice as you add rigging that all the information is added to the above info box, and the weights of all the rigging is added to the load weight. 37
38 Advanced Rigging Cont d You will notice that you have 2 places you can select rigging, above and below. On the previous page rigging was added to the upper part of the sling and the rigging that was selected was above the Sling. To add rigging to the lower part of the sling add rigging below the Sling section. 38
39 Adding Obstructions 3D Lift Plan Coordinate System The 3D Lift Plan Coordinate System is oriented as shown in the image below. X and Z values represent a location on the ground. Y values represent a vertical distance above the ground. Grid lines are drawn every 10 ft or 10m if you are using metric units. Adding an object to the Jobsite You build and edit your jobsite from the Jobsite Obstructions page, which can be reached by clicking the "Obstructions" link on the left-side menu when you are creating a lift plan. To add a new object to the jobsite, press the "Add New Object" button. A simple box will be created. If this is the first object you are adding to the jobsite, the front edge of the box will be placed at the jobsite origin. In 3D Lift Plan, the Length of an object always corresponds to it's size in the X-direction. The Width always cooresponds to the Z-dimension. 39
40 To change the dimensions of the object, edit the "Length", "Width", and "Height" values in the Object Properties box, then press the "Update" button. To change the location of the object, edit the "Center X", "Center Z", and "Bottom" values. For instance, to position the default box so the front edge is 20 ft from the jobsite origin, set "Center X" to 25 ft, accounting for the 10 ft length of the object. Note: When only one object exists on the jobsite, the program will keep it's front edge at the jobsite origin by default. To move the object in the x-direction you will need to uncheck the "Keep object edge at origin" checkbox. Selecting a 3D Object You can change the shape of the object in the "Shape" dropdown list. You can choose from the pre-defined objects like Box, Cylinder, and Text, or you can select "3D Object" to display one of many detailed custom 3D objects that are included with 3D Lift Plan. After selecting "3D Object" from the list, you will be transferred to the 3D Object Selection page. Choose one of the Categories on the left, then select which object you want to use. Some objects are free to use, but some require purchase. 40
41 41
42 To place objects on the jobsite use the controls in the center column. Center X is the placement on the jobsite lengthwise. If you building is 10 long and you want your building to start at 0 then the number you put in Center X is 5. You will use positive and negative numbers to move the objects into place. To place an object like a power line you will want to put the height in the Bottom cell. So if you want a power line to start at 100 in the air, put 100 in the Bottom cell. Box Object Choose Object to Edit Name Object Controls to place the object on the jobsite Controls to change dimension of each object Choose Object Shape and color Add New Object Starting point at white dot 42
43 Cylinder Object Enter the dimensions of the Cylinder, and location you want to place it on the jobsite. 43
44 Sphere Object Enter the diameter of the sphere, and the location. 44
45 Construction Building Object Enter the dimensions of the building, how many floors the building has, and where you want it on the jobsite. 45
46 Rope Object X1 represents the starting point in the x direction of your rope; X2 represents the ending point of your rope in the x direction. Same applies with the Y1 and Y2, Z1 and Z2. The sag represents how far down you want the rope to sag in the middle. 46
47 Adding Text to your Jobsite Enter the X, Y, Z coordinates for where you would like to place the text on the jobsite. Select Text from the Shape dropdown box. Type in the text you would like to appear, Enter the Font Size. 47
48 3D Objects Obstruction Select the category of the object you want to add. Some categories also have a sub category. You will need credits in your account to purchase some of the objects. Some objects are free. To purchase credits you can return to the My Account Page and purchase credits. 48
49 Choose Crane Page You can also select the exact crane you would like to use for the job. Choose the manufacture, and model you would like to use. You can also select the exact configuration you want to use. Select any of the links above to make changes to your load, jobsite or choose cranes from your list of cranes or from the crane search results. Find the list of configurations and select the one you would like to use. 49
50 Select any of the links above to make changes to your load, jobsite or choose cranes from your list of cranes or from the crane search results. You can also select to add Dimensions to your jobsite or view the load chart. Lift Simulation Page Click the button next to boom length for intermediate boom lengths. Click the button next to boom angle to lay the boom and jib down flat to determine the setup area needed Position your crane by entering your center pin location. You can also change the height of your crane to put it on top of a mat or up a hill. Use these controls to change the location of the crane on the jobsite, change carrier, swing angle and hook height. Change the boom length, boom angle, jib length and offset or set your lift radius. To print your lift plan left click on the Print button Change the Load Location, or change the angle or rotation of the load Monitor the radius, tip height and chart capacity as you simulate he lift. Add additional cranes to the website by clicking on Add Crane link. 50
51 Dimensions Page Select which dimensions you want to show on your lift plan. If you want to place an arc in the air to show where tower cranes may intersect, simply enter the height you want the arc to be. Use the dropdown box to select the Obstruction you want to turn dimensions on for. Place a check in box next to the dimension you want to show for the Load and Obstructions. Click the Add New Dimension link to use our custom dimension feature. Click one of these links to turn on any of these dimensions. 51
52 Custom Dimension Feature With the custom dimension feature you can draw a dimension from any 2 points on the jobsite. You can use the coordinate system to select 2 points on the grid. Or you can select any point or edge on the crane, load or any obstruction. Use the dropdown list to determine the starting and ending point. Click the link Add New Dimension Select the direction your dimension will run. XYZ Distance- Diagonal dimension that measures distances between 2 points that 1 point is higher than the other and at an angle, not straight up and down. XZ Distance- Diagonal dimension that is at the same height but is at an angle X Distance- A dimension that runs straight in the X direction Z Distance- A dimension that runs straight in the Z direction Flipped distances flip the text in the opposite direction 52
53 Custom Dimension Feature Cont d If we want to measure the distance between the right front outrigger and the tree I will first select an XZ distance because the dimension will run in both the X and Z direction. Next select your starting point for the dimension. Point #1- Select the crane from the dropdown list then select the Rear Right Outrigger. This will be the starting point for the dimension. Point #2- Select Tree then Center. This will draw a diagonal dimension between the Front Outrigger and the Center of the Tree. 53
54 54
55 Load Chart Page View the Load Chart for the configuration you are using. You can enter in for a stowed jib deduction, wind, etc. 55
56 Printing Click on this link to launch the 3D Lift Plan Publisher to print out your plan. You can also print out our critical lift worksheet. ***If this is the first time you have tried to print, you might have to install the.net framework. You will see a grey box in this area that will tell you. Installing the.net framework takes some time to install. Most computers already have this installed from the manufacture.*** 56
57 Select the layout format and resolution you want for your lift plan. You can select up to 4 images on the plan. 3D Lift Plan Publisher Enter a title, description and customer name for your lift plan. Add your company logo by clicking on the Browse for Image button and point to the file you want to use. Click the Select 3D Position button to select the angle you want to print at. Select the Print or Preview button to print out your plan. Add general notes to your lift plan; enter ground bearing pressure info, or anything you want to show on your plan. Select the 3D view you want to use in your lift plan using the flux controls located on the grey bar at the bottom of the image. Select whether you want to print a rigging plan or a lift plan. 57
58 Printing Lift Plans to Paper or for ing to a Customer To print your lift plans on paper simply select the printer you want to use. To lift plans to your customers you will need a program like Adobe Acrobat Professional, PDF Printfactory, Snagit, etc. Simply select the program from your list of printers (like Adobe PDF below) and name and save the pdf. 58
59 Critical Lift Plan Worksheet 59
60 Tower Crane Planning Choose the tower crane you want through the choose crane page. Then configure your tower crane using our Edit Tower feature. 60
61 Ground Bearing Pressure ***We are working on adding as many cranes we can find information on for ground bearing pressure. If we don t have your crane please let us know. ***** If we have ground bearing pressure information you will notice on the lift simulation page under results a link for Ground Bearing Pressure. Click on that link to access the ground bearing pressure. You will notice the information for the configuration and load you have selected. 61
62 Crane Setup Put a check mark in the box and click update. 3D Lift Plan will draw your boom and jib flat on the ground to calculate the area you need to setup the crane. 62
63 CAD Export Click on the Export Link to export your lift plan to load into AutoCAD. 63
64 CAD Export Cont d Click the link to Download Lift Plan. You will be asked how and where you want to save the file. Depending on the program you are loading the program into you may need to use a program like AccuTrans 3D to convert the exported file into the format your CAD program needs. 64
65 Configure the Cranes Multi-Crane Lift Set up the primary crane just like you would for any other lift. First, create the load and set up the rigging. Then build the jobsite, choose the crane configuration, and position the crane where you want it on the jobsite from the Lift Simulation page. You should also set the load angle and rotation so the load is in the correct position for the beginning of the lift. Next, click the "Add Crane" button in the top-right corner of the screen. Select and configure the secondary crane and choose the load chart you want to use. From the Lift Simulation page, position the crane where you want it on the jobsite. If you would like to modify the rigging configuration for the secondary crane, click the "Rigging Type" link from the menu on the left. Don't worry about connecting the secondary crane to the load yet. That will be done in the next step. At this point your lift plan should show the primary crane holding the load in it's initial position, and a secondary crane sitting nearby. My sample lift plan looks like this... Set up the Multi-Crane Lift Click the "Multi-Crane" link from the menu on the left. Choose your primary crane from the "Primary Crane" dropdown list: If you haven't done so already, position the pick points of the primary crane using the "Set pick point" list box or by manually setting the X, Y, and Z points. Now set the Lift Mode of the secondary crane by selecting one from the "Lift Mode" list box. Then position the pick points of the secondary crane using the "Set pick point" list box or by manually setting the X, Y, and Z points. 65
66 Lift Modes Tandem - Boom The secondary crane will hoist up or down to keep the load at it's current angle. If the primary crane travels or booms up or down, the secondary crane will boom up or down to follow the load. The secondary crane carrier will not move. Tandem - Travel The secondary crane will hoist up or down to keep the load at it's current angle. If the primary crane travels or booms up or down, the secondary crane will travel to follow the load. Trail - Boom The secondary crane will keep it's hook at the same height, tilting the load. If the primary crane travels or booms up or down, the secondary crane will boom up or down to follow the load. The secondary crane carrier will not move. Trail - Travel The secondary crane will keep it's hook at the same height, tilting the load. If the primary crane travels or booms up or down, the secondary crane will travel to follow the load. 66
67 Simulate the lift When you are done setting the Lift Mode and pick points for all cranes, click the "Lift Simulation" link from the menu on the left. Before simulating the lift, make sure the primary crane is selected in the multi-crane selection box at the top-right of the screen. Now when you move the primary crane, the secondary crane will automatically adjust to follow the load. 3D Lift Plan will calculate the load on each crane throughout the lift and display it on the Lift Simulation page. You can position your mouse cursor over the Capacity field to see the current lift radius for any crane involved in the lift. To reposition the secondary crane, select the crane in the multi-crane selection box at the top-right of the screen, then modify the Center Pin coordinates. Because the secondary crane is set up to automatically adjust to the primary crane, you will not be able to modify some values for the secondary crane. Setting up the load and pick points tends to be the trickiest part of multi-crane lifts, so I thought some examples would be helpful... Box Load The first sample is a long box object. This example will apply to box, lattice, and custom 3D load objects. Our primary crane's pick points are 10' from the center of the load, so we set Rigging Offset to 10' on the Rigging Details page... 67
68 After adding the second crane, we position it in front of the primary crane by setting Center Pin X to 50' on the Lift Simulation page. To lift over the rear end of the crane, set the Carrier Angle to 180 degrees. Then, on the Multi-Crane page, we select the primary crane and set the secondary crane lift mode as described above. Then set the secondary crane Pick Point X to 10' and your lift will look like this... Box Load positioned sideways In 3D Lift Plan, all multi-crane lifts need to occur along the length of the load. In order to set up a lift where the cranes are set up next to each other, you will need to rotate the 90 degrees on the Load Details or Lift Simulation page. 68
69 Cylindrical Load When lifting a cylindrical load, you will often need to set the Load Angle to 90 degrees to lay it sideways. This rotates the load's coordinate system so the X dimension moves pick points up and down, and the Y dimension moves the pick points towards and away from the crane. Some examples are shown here... When setting up the secondary crane, you will typically need to set the Pick Point Y value to a negative number to move the pick points down towards the bottom end of the load... 69
70 70
71 Share Feature Send customers an electronic 3D version of the lift plan so they can look at the lift plan at any angle using the flux player controls. 71
72 Share Feature Cont d 72
73 Snapshot Feature Configure your crane to the location radius and load location you would like using the Lift Simulation controls. Type a Name for Snapshot (like Set Point). Click Save Snapshot button Re-Configure the crane for the next moment you would like to save in the lift. 73
74 Snapshot Feature Cont d You can edit the name of the snapshot or delete them by clicking on the Snapshots link. From the dropdown menu you will see the different snapshots you saved. When you select one the crane will be setup to the configuration you saved. 74
75 Manual Lift Video To create a video you will need a couple other programs. Movie making software and a screen capture program. We use Windows Movie Maker software and Snagit screen capture software. Steps to make a movie using Snagit and Windows Movie Maker: 1. Use the Snapshot feature to configure the crane throughout the lift you want to make the movie of. 2. Use Snagit to take screen captures of the images and save them into a folder. Make sure you name them in a series so you know where each image fits in the video. 3. Open Windows Movie Maker and drag each image into the slide show. Save your screen captures from Snagit as BMP or JPEG. Make sure to save them in a series like snapshot 1, snapshot 2, snapshot 3 etc or something similar. Click the button Save As 75
76 Manual Lift Video Cont d Click the link to import Pictures Find the file you saved all your images from Snagit to. Select all of the images and click the Import button 76
77 Manual Lift Video Cont d Hold your left mouse button down on each picture and drag them into the video clip below Hold your mouse over the end of each image and hold you left mouse key down and drag to the time that you want each slide to play. 77
78 Manual Lift Video Cont d You can add text to your video by clicking on Titles and Credits link. Select whether you want a title page at the beginning of your movie, place text over an image, add a page with text during the movie or add a credits page at the end of the movie. When you are done with making the video click the link to publish the video, usually you would use This Computer link. Give it a name and save it. That s all there is to it. 78
79 Technical Support FAQ s and Information Q. I can t see any images of the crane or jobsite A. Make sure you have the minimum requirements (refer to page 6), make sure you have installed the flux player correctly, allow ActiveX controls to run (you will see a yellow bar at the top of your screen), make sure you are using internet explorer. Q. When I run crane selection no cranes are found to do the lift. A. Make sure you have added cranes to your account (refer to page ) If that is not the issue, go to the Search Setup page and make sure you have the information filled out correctly (refer to page 29.) Q. I can t get the printing program to open. A. Double check to see if there is a yellow bar towards the top of the screen that asks you to install and ActiveX control. Make sure the security settings on your computer are not set higher than medium high. Make sure you are using Internet Explorer. If you are still having issues with printing contact us at support@3dliftplan.com. 79
80 Upcoming Features Tower Crane Erection/ Dismantle Wizard Collision Detection Additional Rigging Types Ground Bearing Pressures under Your Timber Mats Multiple Load Pickup and Drop Off Parts of Line Calculator Lift Video Project Management 80
81 Thank you for using 3D Lift Plan. If you have any comments or suggestions or you need help at any time please feel free to contact us by phone at (904) or by at 81
TABLE OF CONTENTS. INTRODUCTION... 5 Advance Concrete... 5 Where to find information?... 6 INSTALLATION... 7 STARTING ADVANCE CONCRETE...
 Starting Guide TABLE OF CONTENTS INTRODUCTION... 5 Advance Concrete... 5 Where to find information?... 6 INSTALLATION... 7 STARTING ADVANCE CONCRETE... 7 ADVANCE CONCRETE USER INTERFACE... 7 Other important
SketchUp Instructions
 SketchUp Instructions Every architect needs to know how to use SketchUp! SketchUp is free from Google just Google it and download to your computer. You can do just about anything with it, but it is especially
CREATING A 3D VISUALISATION OF YOUR PLANS IN PLANSXPRESS AND CORTONA VRML CLIENT
 CREATING A 3D VISUALISATION OF YOUR PLANS IN PLANSXPRESS AND CORTONA VRML CLIENT 20-25 Minutes This topic is for users of PlansXpress Total Toolkit Edition. To upgrade to PlansXpress Total Toolkit, call
Software for Producing Rack Layouts and Purchase Orders
 1 Software for Producing Rack Layouts and Purchase Orders Welcome to RackTools: software that makes it simple and quick to specify Middle Atlantic Products. RackTools has been designed with one purpose
Guide To Creating Academic Posters Using Microsoft PowerPoint 2010
 Guide To Creating Academic Posters Using Microsoft PowerPoint 2010 INFORMATION SERVICES Version 3.0 July 2011 Table of Contents Section 1 - Introduction... 1 Section 2 - Initial Preparation... 2 2.1 Overall
Generative Drafting. Page 1 1997 2001 DASSAULT SYSTEMES. IBM Product Lifecycle Management Solutions / Dassault Systemes
 Generative Drafting Page 1 Tutorial Objectives Description This Tutorial is an introduction to Generative Drafting. Message To show how CATIA V5 allows the user to automatically generate associative drafting
DESIGN A WEB SITE USING PUBLISHER Before you begin, plan your Web site
 Page 1 of 22 DESIGN A WEB SITE USING PUBLISHER Before you begin, plan your Web site Before you create your Web site, ask yourself these questions: What do I want the site to do? Whom do I want to visit
SpaceClaim Introduction Training Session. A SpaceClaim Support Document
 SpaceClaim Introduction Training Session A SpaceClaim Support Document In this class we will walk through the basic tools used to create and modify models in SpaceClaim. Introduction We will focus on:
Section #13 Pictorial Table Of Contents. The Caster. Top & Bottom Shelves. Pages 617-623 Page 624 Page 625 Pages 626-628 Pages 629-633
 AQX Introduction Section # Pictorial Table Of Contents Completed Shop Cart Step-by-Step Tutorial The Caster The Leg Fractional The Lower Cross Member Machining w/ Access Holes AutoQuoterX Page 610 Page
Getting Started with Vision 6
 Getting Started with Vision 6 Version 6.9 Notice Copyright 1981-2009 Netop Business Solutions A/S. All Rights Reserved. Portions used under license from third parties. Please send any comments to: Netop
Autodesk Fusion 360 Badge Guide: Design an F1 in Schools Trophy
 Autodesk Fusion 360 Badge Guide: Design an F1 in Schools Trophy Abstract: Gain basic understanding of creating 3D models in Fusion 360 by designing an F1 in Schools trophy. This badge may be claimed by
VantagePoint PC Application Software USER MANUAL
 VantagePoint PC Application Software USER MANUAL 605-0183-004 A Overview Magellan VantagePoint software allows you to view, edit and store color maps on a personal computer, with zoom and pan functions
SMART Board Tips & Tricks (version 9.0) Getting Started. SMART Tools vs. SMART Notebook software
 Getting Started. SMART Tools vs. SMART Notebook software") SMART Board Tips & Tricks (version 9.0) Getting Started SMART Tools vs. SMART Notebook software Click the SMART Board icon (in the system tray at the bottom right of your screen) to access the SMART Board
SMART Board Tips & Tricks (version 9.0) Getting Started SMART Tools vs. SMART Notebook software Click the SMART Board icon (in the system tray at the bottom right of your screen) to access the SMART Board
Layout Tutorial. Getting Started
 Getting Started Layout Tutorial This tutorial will explain how create a layout template, send views to a layout page, then save the document in PDF format. In this tutorial you will learn about: Creating
Welcome to PowerClaim Net Services!
 Welcome to PowerClaim Net Services! PowerClaim Net Services provides a convenient means to manage your claims over the internet and provides detailed reporting services. You can access PowerClaim Net Services
Appspace 5.X Reference Guide (Digital Signage) Updated on February 9, 2015
 Updated on February 9, 2015") Appspace 5.X Reference Guide (Digital Signage) Updated on February 9, 2015 1 TABLE OF CONTENTS 2 What is Appspace For Digital Signage... 4 3 Access Appspace... 4 4 Best Practices and Notes... 4 5 Appspace
Appspace 5.X Reference Guide (Digital Signage) Updated on February 9, 2015 1 TABLE OF CONTENTS 2 What is Appspace For Digital Signage... 4 3 Access Appspace... 4 4 Best Practices and Notes... 4 5 Appspace
WebSphere Business Monitor V7.0 Business space dashboards
 Copyright IBM Corporation 2010 All rights reserved IBM WEBSPHERE BUSINESS MONITOR 7.0 LAB EXERCISE WebSphere Business Monitor V7.0 What this exercise is about... 2 Lab requirements... 2 What you should
Basic 2D Design Be sure you have the latest information!
 Basic 2D Design mastercam x getting started tutorials Basic 2D Design December 2011 Be sure you have the latest information! Information might have been changed or added since this document was published.
Ortelia Space Builder User Manual
 Ortelia Space Builder User Manual http://ortelia.com 1 Table of Contents Introducing Ortelia Space Builder... 2 System Requirements... 3 1. Operating system:... 3 2. Hardware:... 3 Minimum Graphics card
Intellect Platform - Tables and Templates Basic Document Management System - A101
 Intellect Platform - Tables and Templates Basic Document Management System - A101 Interneer, Inc. 4/12/2010 Created by Erika Keresztyen 2 Tables and Templates - A101 - Basic Document Management System
WebSphere Business Monitor V6.2 Business space dashboards
 Copyright IBM Corporation 2009 All rights reserved IBM WEBSPHERE BUSINESS MONITOR 6.2 LAB EXERCISE WebSphere Business Monitor V6.2 What this exercise is about... 2 Lab requirements... 2 What you should
The Dashboard. Change ActivInspire's Look And Feel. ActivInspire Primary. ActivInspire Studio. <- Primary. Studio -> page 1
 page 1 The Dashboard When ActivInspire opens, you are immediately greeted with the Dashboard. The Dashboard contains shortcuts to flipcharts and time-saving tools. The Dashboard remains open until it is
What s New V 11. Preferences: Parameters: Layout/ Modifications: Reverse mouse scroll wheel zoom direction
 What s New V 11 Preferences: Reverse mouse scroll wheel zoom direction Assign mouse scroll wheel Middle Button as Fine tune Pricing Method (Manufacturing/Design) Display- Display Long Name Parameters:
SMART Ink 1.5. Windows operating systems. Scan the following QR code to view the SMART Ink Help on your smart phone or other mobile device.
 SMART Ink 1.5 Windows operating systems User s guide Scan the following QR code to view the SMART Ink Help on your smart phone or other mobile device. Trademark notice SMART Ink, SMART Notebook, SMART
Sweet Home 3D user's guide
 1 de 14 08/01/2013 13:08 Features Download Online Gallery Blog Documentation FAQ User's guide Video tutorial Developer's guides History Reviews Support 3D models Textures Translations Forum Report a bug
Creating a Poster in PowerPoint 2010. A. Set Up Your Poster
 View the Best Practices in Poster Design located at http://www.emich.edu/training/poster before you begin creating a poster. Then in PowerPoint: (A) set up the poster size and orientation, (B) add and
Instructions for Creating a Poster for Arts and Humanities Research Day Using PowerPoint
 Instructions for Creating a Poster for Arts and Humanities Research Day Using PowerPoint While it is, of course, possible to create a Research Day poster using a graphics editing programme such as Adobe
Ansur Test Executive. Users Manual
 Ansur Test Executive Users Manual April 2008 2008 Fluke Corporation, All rights reserved. All product names are trademarks of their respective companies Table of Contents 1 Introducing Ansur... 4 1.1 About
Adobe Dreamweaver CC 14 Tutorial
 Adobe Dreamweaver CC 14 Tutorial GETTING STARTED This tutorial focuses on the basic steps involved in creating an attractive, functional website. In using this tutorial you will learn to design a site
Finance Reporting. Millennium FAST. User Guide Version 4.0. Memorial University of Newfoundland. September 2013
 Millennium FAST Finance Reporting Memorial University of Newfoundland September 2013 User Guide Version 4.0 FAST Finance User Guide Page i Contents Introducing FAST Finance Reporting 4.0... 2 What is FAST
Creating a Poster Presentation using PowerPoint
 Creating a Poster Presentation using PowerPoint Course Description: This course is designed to assist you in creating eye-catching effective posters for presentation of research findings at scientific
StrikeRisk v6.0 IEC/EN 62305-2 Risk Management Software Getting Started
 StrikeRisk v6.0 IEC/EN 62305-2 Risk Management Software Getting Started Contents StrikeRisk v6.0 Introduction 1/1 1 Installing StrikeRisk System requirements Installing StrikeRisk Installation troubleshooting
JOOMLA 2.5 MANUAL WEBSITEDESIGN.CO.ZA
 JOOMLA 2.5 MANUAL WEBSITEDESIGN.CO.ZA All information presented in the document has been acquired from http://docs.joomla.org to assist you with your website 1 JOOMLA 2.5 MANUAL WEBSITEDESIGN.CO.ZA BACK
KB COPY CENTRE. RM 2300 JCMB The King s Buildings West Mains Road Edinburgh EH9 3JZ. Telephone: 0131 6505001
 KB COPY CENTRE RM 2300 JCMB The King s Buildings West Mains Road Edinburgh EH9 3JZ Telephone: 0131 6505001 Email: kbcopy@ed.ac.uk martin.byrne@ed.ac.uk colin.doherty@ed.ac.uk Step 1. Set up page orientation
Document Manager 2.0. User Guide
 Document Manager 2.0 User Guide Document Manager 2.0 Introduction Document Manager 2.0 is the Web to Print ordering application for OfficeMax ImPress. Many features and functionality are available to you
Virtual Exhibit 5.0 requires that you have PastPerfect version 5.0 or higher with the MultiMedia and Virtual Exhibit Upgrades.
 28 VIRTUAL EXHIBIT Virtual Exhibit (VE) is the instant Web exhibit creation tool for PastPerfect Museum Software. Virtual Exhibit converts selected collection records and images from PastPerfect to HTML
Hypercosm. Studio. www.hypercosm.com
 Hypercosm Studio www.hypercosm.com Hypercosm Studio Guide 3 Revision: November 2005 Copyright 2005 Hypercosm LLC All rights reserved. Hypercosm, OMAR, Hypercosm 3D Player, and Hypercosm Studio are trademarks
Appointment Scheduler
 EZClaim Appointment Scheduler User Guide Last Update: 11/19/2008 Copyright 2008 EZClaim This page intentionally left blank Contents Contents... iii Getting Started... 5 System Requirements... 5 Installing
Interactive Voting System. www.ivsystem.nl. IVS-Basic IVS-Professional 4.4
 Interactive Voting System www.ivsystem.nl IVS-Basic IVS-Professional 4.4 Manual IVS-Basic 4.4 IVS-Professional 4.4 1213 Interactive Voting System The Interactive Voting System (IVS ) is an interactive
User Guide. A guide to online services available through Sircon for Education Providers. DOC CX 08/13/10 02/02 v5
 User Guide A guide to online services available through Sircon for Education Providers DOC CX 08/13/10 02/02 v5 Contents Contents Contents... 2 Introduction... 4 About this Guide... 4 Getting Started...
Introduction to Windows 8
 Introduction to Windows 8 Windows 8 is a completely redesigned operating system developed from the ground up with touchscreen use in mind as well as near instant-on capabilities that enable a Windows 8
Document Services Online Customer Guide
 Document Services Online Customer Guide Logging in... 3 Registering an Account... 3 Navigating DSO... 4 Basic Orders... 5 Getting Started... 5 Attaching Files & Print Options... 7 Advanced Print Options
Custom Reporting System User Guide
 Citibank Custom Reporting System User Guide April 2012 Version 8.1.1 Transaction Services Citibank Custom Reporting System User Guide Table of Contents Table of Contents User Guide Overview...2 Subscribe
Reporting Tips and Tricks
 Chapter 16 Reporting Tips and Tricks Intuit Statement Writer New for 2009! Company Snapshot New for 2009! Using the Report Center Reporting Preferences Modifying Reports Report Groups Memorized Reports
Adding Animation With Cinema 4D XL
 Step-by-Step Adding Animation With Cinema 4D XL This Step-by-Step Card covers the basics of using the animation features of Cinema 4D XL. Note: Before you start this Step-by-Step Card, you need to have
House Design Tutorial
 Chapter 2: House Design Tutorial This House Design Tutorial shows you how to get started on a design project. The tutorials that follow continue with the same plan. When we are finished, we will have created
Quick Start Guide. Microinvest Warehouse Pro Light Restaurant
 Quick Start Guide Warehouse Pro Light Restaurant 2013 I. Application Installation During the initial installation of the product, the application gets to know the computer system, on which it shall work
Introduction to Microsoft Word 2008
 1. Launch Microsoft Word icon in Applications > Microsoft Office 2008 (or on the Dock). 2. When the Project Gallery opens, view some of the available Word templates by clicking to expand the Groups, and
Introduction to Autodesk Inventor for F1 in Schools
 Introduction to Autodesk Inventor for F1 in Schools F1 in Schools Race Car In this course you will be introduced to Autodesk Inventor, which is the centerpiece of Autodesk s digital prototyping strategy
Book Builder Training Materials Using Book Builder September 2014
 Book Builder Training Materials Using Book Builder September 2014 Prepared by WDI, Inc. Table of Contents Introduction --------------------------------------------------------------------------------------------------------------------
The main imovie window is divided into six major parts.
 The main imovie window is divided into six major parts. 1. Project Drag clips to the project area to create a timeline 2. Preview Window Displays a preview of your video 3. Toolbar Contains a variety of
User Guide Version 5.1
 User Guide Version 5.1 Copyright 2010 Pearson Education, Inc. or its affiliate(s). All rights reserved. No part of this publication may be reproduced or transmitted in any form or by any means, electronic
Ingeniux 8 CMS Web Management System ICIT Technology Training and Advancement (training@uww.edu)
") Ingeniux 8 CMS Web Management System ICIT Technology Training and Advancement (training@uww.edu) Updated on 10/17/2014 Table of Contents About... 4 Who Can Use It... 4 Log into Ingeniux... 4 Using Ingeniux
Ingeniux 8 CMS Web Management System ICIT Technology Training and Advancement (training@uww.edu) Updated on 10/17/2014 Table of Contents About... 4 Who Can Use It... 4 Log into Ingeniux... 4 Using Ingeniux
Rick and Tim s Thirty Dirty Tricks for Acrobat 8
 Rick and Tim s Thirty Dirty Tricks for Acrobat 8 PREFERENCES 1) Copy Encircled Text into Sticky Notes If you frequently use sticky notes to indicate major re-writes to text, this tip may save you some
Embroidery Fonts Plus ( EFP ) Tutorial Guide Version 1.0505
 Tutorial Guide Version 1.0505") Embroidery Fonts Plus ( EFP ) Tutorial Guide Version 1.0505 1 Contents Chapter 1 System Requirements.................. 3 Chapter 2 Quick Start Installation.................. 4 System Requirements................
Embroidery Fonts Plus ( EFP ) Tutorial Guide Version 1.0505 1 Contents Chapter 1 System Requirements.................. 3 Chapter 2 Quick Start Installation.................. 4 System Requirements................
Banner Document Management Suite (BDMS) Web Access Help
 Web Access Help") May 10 th, 2011 Banner Document Management Suite (BDMS) Web Access Help Division of Information Technology AppXtender Web Access Help: For questions regarding AppXtender Web Access, please contact the
May 10 th, 2011 Banner Document Management Suite (BDMS) Web Access Help Division of Information Technology AppXtender Web Access Help: For questions regarding AppXtender Web Access, please contact the
Creating Drawings in Pro/ENGINEER
 6 Creating Drawings in Pro/ENGINEER This chapter shows you how to bring the cell phone models and the assembly you ve created into the Pro/ENGINEER Drawing mode to create a drawing. A mechanical drawing
Central Management Software CV3-M1024
 Table of Contents Chapter 1. User Interface Overview...5 Chapter 2. Installation...6 2.1 Beginning Installation...6 2.2 Starting the CMS software...10 2.3 Starting it from the Start menu...10 2.4 Starting
Software Application Tutorial
 Software Application Tutorial Copyright 2005, Software Application Training Unit, West Chester University. No Portion of this document may be reproduced without the written permission of the authors. For
TABLE OF CONTENTS SURUDESIGNER YEARBOOK TUTORIAL. IMPORTANT: How to search this Tutorial for the exact topic you need.
 SURUDESIGNER YEARBOOK TUTORIAL TABLE OF CONTENTS INTRODUCTION Download, Layout, Getting Started... p. 1-5 COVER/FRONT PAGE Text, Text Editing, Adding Images, Background... p. 6-11 CLASS PAGE Layout, Photo
GpsGate VehicleTracker
 GpsGate VehicleTracker Application Manual Version: 2.0 Rev: 01 Table of Contents 1 Introduction...3 2 System Requirements...4 3 Device Management...4 3.1 Device Mapper...4 3.2 Channel Mapper...6 4 Account
Intro to Excel spreadsheets
 Intro to Excel spreadsheets What are the objectives of this document? The objectives of document are: 1. Familiarize you with what a spreadsheet is, how it works, and what its capabilities are; 2. Using
Personal Portfolios on Blackboard
 Personal Portfolios on Blackboard This handout has four parts: 1. Creating Personal Portfolios p. 2-11 2. Creating Personal Artifacts p. 12-17 3. Sharing Personal Portfolios p. 18-22 4. Downloading Personal
Creating Interactive PDF Forms
 Creating Interactive PDF Forms Using Adobe Acrobat X Pro Information Technology Services Outreach and Distance Learning Technologies Copyright 2012 KSU Department of Information Technology Services This
800-02577-TC 3/10 Rev. A
 800-02577-TC 3/10 Rev. A Total Connect Online Help Guide TRADEMARKS Honeywell is a registered trademark of Honeywell International Inc. Windows and Windows Vista are trademarks, or registered trademarks
Invoice Quotation and Purchase Orders Maker
 Invoice Quotation and Purchase Orders Maker Professional Edition Version 2.0.0.0 Help File By: Khaled Aljundi Software developer 1 P a g e Table of Contents 1.0 License Agreement... 3 2.0 About This Software...
Quick Start Tutorial Imperial version
 Quick Start Tutorial Imperial version 1996-2006 Cadsoft Corporation. No part of this guide or the accompanying software may be reproduced or transmitted, electronically or mechanically, without written
Making Your Computer Work for You Tips for Windows 7, Laptops, Internet Explorer, MS Office and Adobe Acrobat
 Making Your Computer Work for You Tips for Windows 7, Laptops, Internet Explorer, MS Office and Adobe Acrobat By Drew Kottke Bureau of Technical Services Division of Transportation Systems Development
InfoView User s Guide. BusinessObjects Enterprise XI Release 2
 BusinessObjects Enterprise XI Release 2 InfoView User s Guide BusinessObjects Enterprise XI Release 2 Patents Trademarks Copyright Third-party contributors Business Objects owns the following U.S. patents,
If you know exactly how you want your business forms to look and don t mind detail
 Advanced Form Customization APPENDIX E If you know exactly how you want your business forms to look and don t mind detail work, you can customize QuickBooks forms however you want. With QuickBooks Layout
Advanced Presentation Features and Animation
 There are three features that you should remember as you work within PowerPoint 2007: the Microsoft Office Button, the Quick Access Toolbar, and the Ribbon. The function of these features will be more
Create a Simple Website. Intel Easy Steps 1 2012 Intel Corporation All rights reserved.
 Create a Simple Website Intel Easy Steps 1 2012 Intel Corporation Website Creating a Simple Website As more and more people are using the Internet to get information, it has become very important for businesses
GP REPORTS VIEWER USER GUIDE
 GP Reports Viewer Dynamics GP Reporting Made Easy GP REPORTS VIEWER USER GUIDE For Dynamics GP Version 2015 (Build 5) Dynamics GP Version 2013 (Build 14) Dynamics GP Version 2010 (Build 65) Last updated
Using Microsoft Picture Manager
 Using Microsoft Picture Manager Storing Your Photos It is suggested that a county store all photos for use in the County CMS program in the same folder for easy access. For the County CMS Web Project it
Website Editor User Guide
 CONTENTS Minimum System Requirements... 3 Design Your Website... 3 Choosing your Theme... 4 Choosing your Header Style... 4-5 Website Content Editor... 6 Text Editor Toolbar features... 6 Main Menu Items...
FEDEX DESKTOP CUSTOMER TOOLS USER GUIDE
 FEDEX DESKTOP CUSTOMER TOOLS USER GUIDE Revision No. 2.1 Last Revised August 2, 2011 Copyright 2011, FedEx. All rights reserved. No portion of this document may be copied, displayed, reproduced or used
How To Set Up A Xerox Econcierge Powered By Xerx Account
 Xerox econcierge Account Setup Guide Xerox econcierge Account Setup Guide The free Xerox econcierge service provides the quickest, easiest way for your customers to order printer supplies for all their
Understand the Sketcher workbench of CATIA V5.
 Chapter 1 Drawing Sketches in Learning Objectives the Sketcher Workbench-I After completing this chapter you will be able to: Understand the Sketcher workbench of CATIA V5. Start a new file in the Part
KViewCenter Software User Manual 2012 / 04 / 20 Version 2.2.1.0
 KViewCenter Software User Manual 2012 / 04 / 20 Version 2.2.1.0 Table of Contents Chapter 1. KViewCenter Interface... 5 1.1. Log in.... 5 1.2. Log out... 5 1.3. Control Panel... 6 1.4. Control Panel (Preview
Handout: Word 2010 Tips and Shortcuts
 Word 2010: Tips and Shortcuts Table of Contents EXPORT A CUSTOMIZED QUICK ACCESS TOOLBAR... 2 IMPORT A CUSTOMIZED QUICK ACCESS TOOLBAR... 2 USE THE FORMAT PAINTER... 3 REPEAT THE LAST ACTION... 3 SHOW
You can make your own layout / theme for your PowerPoint project.
 About the PowerPoint Intermediate Workshop The purpose of the PowerPoint Intermediate workshop is to inform users more about the design aspect of making presentations. We will build on the skills learned
How To Use Senior Systems Cloud Services
 Senior Systems Cloud Services In this guide... Senior Systems Cloud Services 1 Cloud Services User Guide 2 Working In Your Cloud Environment 3 Cloud Profile Management Tool 6 How To Save Files 8 How To
Business Objects InfoView Quick-start Guide
 Business Objects InfoView Quick-start Guide Last Modified: 10/28/2015 The latest PDF version of this document can be found at: http://www.calpolycorporation.com/docs/finance/boeinfoviewquickstart.pdf What
Cypress Connexion HELP Guide www.cypressconnexion.com
 Welcome to Cypress Connexion your one-stop-shop for accessing and managing your Cypress Communications account online, at your convenience. The following guide will provide you with helpful information
Data-Tracker PLUS and Data-Viewer PLUS Software User s Guide
 Data-Tracker PLUS and Data-Viewer PLUS Software User s Guide Version 1.1 Data-Tracker PLUS and Data-Viewer PLUS User s Guide Overview Data-Tracker PLUS is a software program designed and developed to interface
Backing up IMail Server using Altaro Backup FS
 Backing up IMail Server using Altaro Backup FS Purpose The purpose of this document is to provide guidelines and procedures for backing up IMail server system data and user data in case of a hardware or
Fireworks CS4 Tutorial Part 1: Intro
 Fireworks CS4 Tutorial Part 1: Intro This Adobe Fireworks CS4 Tutorial will help you familiarize yourself with this image editing software and help you create a layout for a website. Fireworks CS4 is the
ACS CLIENT SOFTWARE USER MANUAL
 ACS CLIENT SOFTWARE USER MANUAL 1 ACS USER GUIDE 1.1 System Requirement Recommended System Requirement OS CPU VGA RAM HDD WindowXP, Vista Pentium 4, 2Ghz 1024*768, 64MB 24bit color graphic card 1GB 20MB
User manual Version: 1.3 Publication: March 2008
 User manual Version: 1.3 Publication: March 2008 This manual is property of Thinking Minds Building Bytes SL. It s strictly prohibited its reproduction. 2008 Thinking Minds Building Bytes S.L. INDEX 1.
Shopping Cart Manual. Written by Shawn Xavier Mendoza
 Shopping Cart Manual Written by Shawn Xavier Mendoza Table of Contents 1 Disclaimer This manual assumes that you are using Wix.com for website creation, and so this method may not work for all other online
Chapter 15 Using Forms in Writer
 Writer Guide Chapter 15 Using Forms in Writer OpenOffice.org Copyright This document is Copyright 2005 2006 by its contributors as listed in the section titled Authors. You can distribute it and/or modify
MathXL Getting Started Guide for Instructors
 MathXL Getting Started Guide for Instructors Copyright Notice Copyright 2013 by Pearson Education. All rights reserved. No part of the contents of this book may be reproduced or transmitted in any form
Password Memory 6 User s Guide
 C O D E : A E R O T E C H N O L O G I E S Password Memory 6 User s Guide 2007-2015 by code:aero technologies Phone: +1 (321) 285.7447 E-mail: info@codeaero.com Table of Contents Password Memory 6... 1
HeinOnline User s Guide
 HeinOnline User s Guide Navigating the Interface www.heinonline.org HeinOnline is a product of William S. Hein & Co., Inc. For more information, please contact us at: 716-882-2600 Toll Free: 800-828-7571
Microsoft PowerPoint 2008
 Microsoft PowerPoint 2008 Starting PowerPoint... 2 Creating Slides in Your Presentation... 3 Beginning with the Title Slide... 3 Inserting a New Slide... 3 Slide Layouts... 3 Adding an Image to a Slide...
Avigilon Control Center Web Client User Guide
 Avigilon Control Center Web Client User Guide Version: 4.12 Enterprise OLH-WEBCLIENT-E-E-Rev2 Copyright 2013 Avigilon. All rights reserved. The information presented is subject to change without notice.
TelNet Digital Fax. Reference Guide..
 TelNet Digital Fax. Reference Guide.. LOGIN to the TelNet Digital Fax Web Portal 1) Set your Internet browser to https://fax.telnetww.com 2) Input your assigned Digital Fax username (typically your email
Getting Started Guide. Getting Started With Quick Shopping Cart. Setting up and configuring your online storefront.
 Getting Started Guide Getting Started With Quick Shopping Cart Setting up and configuring your online storefront. Getting Started with Quick Shopping Cart Version 1.2 (12.17.08) Copyright 2007. All rights
Microsoft Power Point 2007: The Basics
 Creating a presentation in Microsoft PowerPoint involves starting with a basic design; adding new slides and content, choosing layouts; modifying slide design; and creating effects such as animated slide
Microsoft Access 2010 handout
 Microsoft Access 2010 handout Access 2010 is a relational database program you can use to create and manage large quantities of data. You can use Access to manage anything from a home inventory to a giant