STORAGE SYSTEM DATALOGGER DATABASE
|
|
|
- Mercy Johnston
- 8 years ago
- Views:
Transcription
1 STORAGE SYSTEM DATALOGGER DATABASE Database based storage system for data acquisition systems, dataloggers and transmitters Instruction Manual

2 Introduction This storage system is database based system for data collection from data acquisition systems, dataloggers and transmitters. It offers: - loading the database with data downloaded from data acquisition systems or dataloggers - online data collection from ethernet transmitters into the database - backing up the database - viewing data from the database in tabular and chart format - print and PDF output as tables and charts as well - output table data to CSV (MS Excel compatible format) - viewing data from different devices at a time and their comparing on one chart - viewing online values from ethernet transmitters Attention: Primary data source of measured values from data acquisition systems and dataloggers are downloaded files. Never delete original *.msx, *.mss and *.msb files! System brief scheme: 2
3 Content Introduction... 2 Content Preparation of storage system Installation of MySQL database server Using program Database Administration Utility Installation of program Database Administration Utility Using Database Administration Utility for creation database on database server Functions of program Database Administration Utility User administration SOAP Server Device properties Backing up and restoring Upgrading Database log Deleting data Using program Database Viewer Installation of Database Viewer Database connection parameters settings Viewing history data from database How to choose channels whose data are to be viewed Choosing of interval Displayed data Viewing online data Presets of selected channels Viewer settings Using storage system with dataloggers Database connection parameters settings in program for dataloggers Storing data from dataloggers into database Viewing data from database in program for dataloggers Using storage system with data acquisition systems Database connection parameters settings in program for data acquisition systems Storing data from data acquisition systems into database Viewing data from database in program for acquisition systems Using storage system with transmitters Preparing SOAP Server (data entry from transmitters) Transmitter settings Viewing data from database Appendixes Allowing TCP port on windows firewall Allowing TCP port on Windows XP firewall Allowing TCP port on Windows 7 (or Vista) firewall Entering database connection parameters
4 1 Preparation of storage system The database (the data store, place where all records are being saved) is the base of the storage system. It is necessary to install database server and create the database of storage system on it. 1.1 Installation of MySQL database server Storage system is able to work with MySQL database server of version 5.0. Supported versions are from to !!! Storage system will not work with MySQL 5.1, 5.5 or 5.6!!! Installation instructions assume that MySQL server will be installed under operation system Windows XP, Vista, 7 or Server 2003/2008 and that there is not installed any instance of MySQL server on the computer yet. If there is already installed an instance of MySQL 5.0, you can skip this chapter and use that server. You will need to know the password for database administrator account (username: root). Step by step instructions how to install MySQL server: 1) Download the installer of MySQL 5.0 Community server from: 2) Lunch downloaded installer mysql-essential win32.msi. 4
 Confirm installation by the button install on the following page. The installation process will take a time now.")
5 3) Skip the first welcome page by button Next to the page Setup type. Choose Typical type of installation and continue by the button Next. 4) Confirm installation by the button install on the following page. The installation process will take a time now. Confirm continuation of the installation several times by Next button until you get to the page Wizard completed. 5) Check if the choice Configure the MySQL Server now is selected and continue by the button Finish. 5
 Leave everything without changes on the following page and continue by the button Next. 8) Create new password for system administrator account (its username will be root) and enter it here.")
6 6) Use button Next to skip welcome page of configuration wizard, then choose Standard Configuration and continue by the button Next. 7) Leave everything without changes on the following page and continue by the button Next. 8) Create new password for system administrator account (its username will be root) and enter it here. Enable the access from other computers in the network for this account as well. Make a note of the password because you will need it later! Then click the button 6

7 Next. 9) Run the configuration process by the button Execute. MySQL server installation is finished at the moment but there is still one step left: You have to allow TCP/IP port 3306 on the firewall to be able to connect to the database server from other computers in the network. Allow port 3306 MySQL standard port on the firewall. How to do it you can read in chapter 7.1 Allowing TCP port on windows firewall. Also remember, that there can be other firewalls running on your computer and also some anti-virus programs contains firewalls. 7
8 2 Using program Database Administration Utility The program Database Administration Utility is the utility for managing the storage system. Primarily, you will use it for creation of the database on the MySQL database server. Then you will have to use it for administrating user accounts. Not the least function of Database Administration Utility is configuring and controlling the SOAP server which serves as online collector of measured values from transmitters. You can read about all Database Administration Utility functions in chapter 2.3 Functions of program Database Administration Utility 2.1 Installation of program Database Administration Utility Installation is simple with help of the installer. It is strictly recommended to install the Database Administration Utility on the same computer where you have installed MySQL database server. Lunch the installer and proceed through the installation. 2.2 Using Database Administration Utility for creation database on database server Creating the database on database server is the primary function of the Database Administration Utility. Find the program icon and run it. Login dialog will be displayed at first. Enter database connection parameters (more info in chapter 7.2 Entering database connection parameters), but don t choose the database at this moment. Enter root as the username and as the password enter the password that you entered during MySQL installation. 8

9 At this moment you can use button Test to verify if you have entered correct database connection parameters. If parameters are OK, then message Database name is not entered will be displayed. Otherwise the program will inform you that it is unable to log in the server. If parameters are OK, create some database name and enter it into the field Database. Use characters a..z, 0..9 only and instead of character space use character underline _. Remember, number can not be the first character (valid examples: test_01, storage_system, ) Click on the button Create database to execute creation process of the database. After successful creation of the database following message will be displayed: Creation of the database is finished now. 2.3 Functions of program Database Administration Utility In the previous chapter, we have used the program Database Administration Utility for creating new database only. Now and also at any time later you can reenter database connection parameters, choose already created database from Database list and press the OK button to get to the database administration. How to enter database connection parameters is explained in chapter 7.2 Entering database connection parameters. 9

10 It will allow you to: administrate users for database configure and control SOAP server set device properties i.e. renaming. execute the backup and eventually upgrade the database view database log delete data There are basic information about database at the top of the manager form: name, version and eventually there can be some message (e.g. that the database should be upgraded to newer version). Tabs with manager functions are under these basic information: User administration You ll find this function on User Administration tab of the manager. This administration has two lists: User accounts (marked with number 1 on the picture below) and Users with access to actual database (marked with number 2 on the picture below). 10
.")
11 User accounts list displays all user accounts on the database server. Below are buttons for creating new user, deleting existing user and changing the password for existing user. Be careful especially when deleting user or changing password that you have selected known user program allows deleting and changing password for all users on server (except root user). The list Users with access to actual database displays users who can view or insert data into actual database. Next to the User column are columns reader and writer. If the user have in reader columns tick and don t have tick in writer column then this user has rights for viewing the database only. If the user have tick in both reader and writer column then he has rights for viewing and also for inserting data to the database. You can add read-only or read/write access rights to any existing user in User accounts list by buttons between this list: first select user in User accounts list and then click the button. You can also deny access rights for user who already have some rights to the database: first select the user in Users with access to actual database list and then click on the Deny access from user button. If some user in Users with access to actual database list has gray tick in last global 11

12 column then this user has access rights globally. It means that the user has global rights for all databases on the server (e.g. user root will be the one for sure, because root user has all rights to all databases, because it is system administrator). If another user than root is in the list with global tick, then the only way to deny the access to the database for him, is to completely delete him from the database server by the button Delete selected user account. Remember, you must be sure that this user is not used in another project on SQL server! SOAP Server This function serves for configuring and controlling the SOAP server. SOAP server acts as online collector of measured data from transmitters, so you will only need to use this when you are using storage system with transmitters Attention! To be able to configure and control the SOAP Server service you have to run Database administrator utility with administrator privileges. You can check if SOAP server is running or stopped on the top of the page. There are configuration parameters below and then buttons for controlling the SOAP server. At the bottom is the list of events. This list can prompt you to solve problems. Use the button Reconfigure for the server configuration. Configuration wizard will be executed where you will be asked for entering listening TCP port, database account and and processing thread count. 12
13 Port 80 is recommended as listening TCP port, but you have to be sure, that there is no other application using this port on the computer. Especially HTTP server like Apache or IIS use this port (port 80 is standard for HTTP). Finally remember to allow entered port on firewall! As database account you have to use account with read/write privileges (explained in chapter User administration). Leave the value 8 in Processing thread count. Increasing this value leads to increasing the SOAP server performance, but it is the question of tuning SQL server. Buttons Start, Stop allows you to control the SOAP server. When you start the service you should check the SOAP server diagnostic by clicking on the button Diagnostic Device properties This tool primarily allows you to rename devices. You can give user-friendly name to any device in the database. This name will be displayed everywhere in Database Viewer where device serial number was displayed before. Another function is enabling / disabling devices for viewing. For example, when you cancel monitoring from some device and you don t want to see this device and its values in Database Viewer, then switch off Enabled for viewing checkbox. The setting How to recognize online acquisition fault applies only to transmitters and online monitoring via SOAP Server. This sample frequency delay is here due to used SOAP protocol, which rely on HTTP and TCP/IP protocol. If you monitor from transmitters via internet then samples from transmitters will probably never come exactly on time. For example when some transmitter has sending interval 10 seconds and this settings is set to 2 drop-outs by default then samples which came in times: 12:00:00; 12:00:10; 12:00:20 are considered to be correct logging. But when samples came in times: 12:00:00; 12:00:14; 12:00:50 then interrupted logging will be recognized between 2 nd and 3 rd sample. In most cases default settings is acceptable and don t need to be changed. You can get useful information about sensor location in the network from Last sample obtained from IP. 13
. It is recommend to run the backup when no user is using the database.")
14 2.3.4 Backing up and restoring You ll find this function on Backup tab of the manager: Use the button Backup to backup the database. Backing up process can takes a few minutes (it depends on how much data are in the database and on hardware). It is recommend to run the backup when no user is using the database. The button Restore can be used to restore the database. Keep in mind that this will overwrite existing database completely, so be careful! Also, all users must be disconnected from the database. If you re not sure that there is no user using the database then you, for 14

15 example, can run the manager on the machine with database server and disconnect the machine from the network or something similar: disallowing database port on firewall, disabling TCP/IP communication on MySQL server, etc. The best way how to restore the database is not to overwrite existing, full of data, database but to create new one (described in chapter 2.2 Using Database Administration Utility for creation database on database server) and restore from backup into this data empty database Upgrading You ll find this function on Upgrading tab of the manager. When you get newer version of program manager it is possible that this newer version of program supports newer version of the database. In this case the manager will inform you in the Notice label that the database is of an older version and that the database should be upgraded. If this happens then you ll find the button Upgrade database to the latest version on Upgrading tab enabled. It is strictly recommended to backup the database before executing upgrade process! More info about backing up is in chapter Backing up and restoring. Another think you have to figure out before upgrading is that after the upgrade the database will be of an newer version and other programs which currently uses the database (Database Viewer, Program for Data Acquisition Systems, Program for Dataloggers, PHP SOAP Service for data acquisition from transmitters) will not be able to connect to this newer database. Hence you will have to reinstall all programs to their newer version, so get all installers before running upgrade or don t run the upgrade at all Database log It is viewer of the storage system log table. Errors during inserting data into the database are logged here especially. If any problem occurs then information from this table should help us to solve it. Also, there is the button Export all log. If you would be solving some problem with our 15

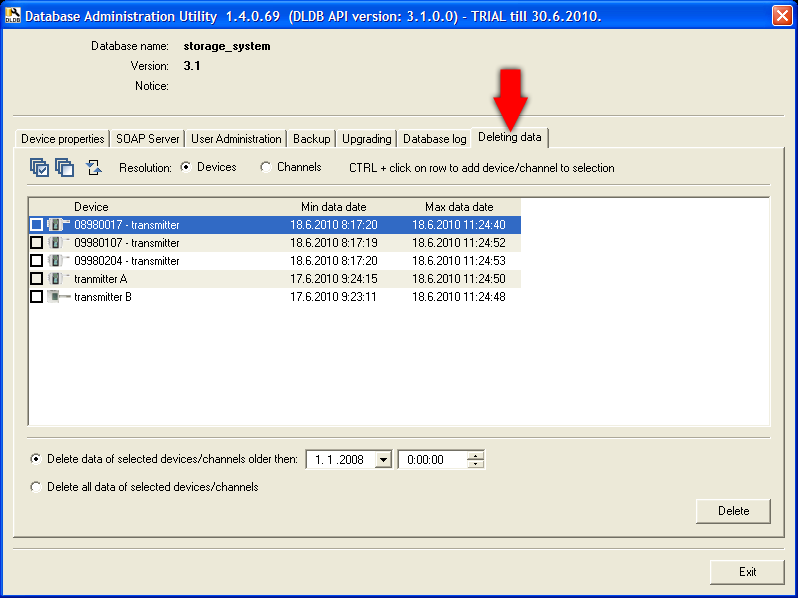
16 support, you probably will be demanded to generate the log by this button and send it to us Deleting data This tool allows you to delete data from the database. Be careful when using this tool, because changes done by it are inreversible! You can switch between two kinds of resolution: - resolution on devices allows you to delete data from selected devices (i.e. when you choose delete all, then whole device will be deleted from the database) - resolution on channels allows you to delete data only from selected channels (i.e. when you choose one channel and delete all, then only that channel will be deleted from the database. To select the row use CTRL + Click on the row. Under the grid there you can choose if you want to delete all data or only values older then entered date-time. Finally use button delete to proceed deletion. 16
17 17
18 3 Using program Database Viewer The program Database Viewer serves for viewing data from the database. You can view records from the database as tables and charts. You can print and export to PDF as tables and charts. Also, you can export table data to CSV (useful for processing in MS Excel). Great deal of this storage system is that you can view records of any channel and any device, which are stored in the database, all at once and compare it on one chart. When using the storage system with transmitters then Database Viewer offers online visualization of actual values and alarms. 3.1 Installation of Database Viewer You can install Database Viewer on whatever computer in local network where is the computer with database server or directly on the computer with database server. To install it, run Database Viewer installer on the computer where you want it to be installed. 3.2 Database connection parameters settings You have to set database connection parameters before using Database Viewer. This settings are located in program Menu Program Connection Settings. How to enter connection parameters is described in chapter 7.2 Entering database connection parameters. You can use the user with read-only access to the database. 3.3 Viewing history data from database This chapter describes how to view history data from database. You have to do four simple steps to obtain requested history data view from the database: 1) Switch to the tab History data from database 2) Choose channels whose records you want to view 3) Choose interval time boundaries, data will be displayed within them 4) Click on the button View history data from database data will be displayed as table 18

19 3.3.1 How to choose channels whose data are to be viewed Tree view, which is marked by number 1 on previous picture, provides it. The tree of devices and their channels, which are in the database, is displayed here after launching the viewer or clicking on the button Refresh. Any channel can be added into channels which are to be viewed by enabling the field next to the channel: analog channel binary channel alarm channel Clicking on field at device level selects / unselects all channels of the device: datalogger device acquisition system device transmitter device P85xx ethernet thermometers transmitter device Txxxx series (Temperature, Relative Humidity, Pressure) transmitter device Hxxxx series (Temperature, Relative Humidity, Pressure + Relay output and Binary input) Choosing of interval This provides area for interval selection, which is marked by number 2 on the picture above. Use this to set time boundaries of data to be viewed. You have two options how to 19

20 choose the interval: by entering one date-time and selecting length of the interval. In addition, it is possible to choose whether requested interval shall start from or end to the selected date. By entering two date-times as from to boundaries You can use additional buttons to set a date-time to the first or the last sample date-time of data from selected channels in Tree view. Finally, clicking on the button View history data from database will launch the process of mining data from the database. This can take a short time or several minutes. It depends on the amount of data which was selected (too many channels, too wide interval). This also depends on hardware equipment. The program executes counting of selected data before execution of mining data from the database. There are preset amount boundaries, when the program warns and stops data mining process. This is useful in case of MySQL server, because MySQL server doesn t support interruption of running SQL statement Displayed data This is labeled by number 3 on the picture above. You can view data in table format here. Data are sorted chronologically from the oldest to the newest samples within selected interval. First column of every view displays date-time of samples. The other columns displays data of selected channels. There can be displayed red/yellow square next to the analog or binary value, which informs that high/low alarm was on. If alarm channel of any device is displayed then you can see that there aren t its values in every sample. It is because there are displayed only changes of alarms. For example, you can see alarm channel of Hxxxx transmitter on the picture below. There is only one sample in alarm channel when alarm of Temperature channel arose. Alarm channel shows states of all alarms in device at the sample date and time. If monitoring is interrupted (i.e. transmitter is disconnected from the network and then connected back again) then whole row of starting sample (first sent sample after transmitter reconnection) is marked by red color. See example on the picture below. 20

21 To print with preview, print or export viewed data to the PDF, CSV use these buttons: To switch from table view to chart view use button also print, viewed data as graphical visualization in curves:. You will be able to view, and 3.4 Viewing online data Database Viewer has very useful tool Online Data Monitor. It allows you to watch actually measured values and alarms states from devices witch sends its data online. These devices are P85xx, Txxxx and Hxxxx ethernet transmitters or RS232/RS485 transmitters networked via GSM modem. Lets call them Online devices. 21

22 Click on the tab Online data to switch to this tool. If any Online device ever sent measured data to the storage system, then there will be its last values visible. Every row in the table represents last value from one channel of the device. For example you can see values from channels of sensors named 21 and 28 on the picture above. Note: When program is switched to Online data, then area for interval selection is hidden, because it has no use in this mode. Columns of the Online data table have following meanings: - Columns! informs about any warning. Type of the warning is written in column Warning message. For example it can be that the data aren t fresh (it means that it s too long from the time when the device lastly send values), or that the channel is in alarm state. - Column Fresh displays green tick if the value is fresh. Otherwise whole row is grayed. - Columns Device and Channels display device serial number or renamed name (devices can be renamed, see Device properties) and channel type. - Column Value displays lastly measured analog value or state of binary channel. - Column Alarms informs about alarm on the channel. If red rectangle higher in the cell is displayed then channel is in high alarm state. If yellow rectangle lower in the cell is displayed then channel is in low alarm state. - Column Date of sample informs about time and date when the sample was measured. Additionally next column Sample age shows elapsed time since date of sample to last online table refresh. Note: Online table refreshes every 5 seconds. If too many rows are in the table then you can use filtering. Select channels which you want to watch from Tree view and switch filter button from to. For example, there is online table filtered on temperature channels of both devices on the picture bellow. 22
 - Use to see")
23 You can also see online chart of selected channels. This chart will be changing online as new values will income to the system. First choose chart history length, then click Online chart button: - Use to see online chart of selected channel / channels (to select more channels use CTRL + Click on the row in grid) - Use to see online chart for all channels in the grid Presets of selected channels This tool allows you to save current selection of channels and reuse it later. Click on the button to save current selection. You will be asked for entering selection name. You re also able to export/import presets to/from file. This can be useful when you want to move presets to another Database Viewer on another computer. Use button to open export/import manager. 23
.")
24 3.4.2 Viewer settings You ll find it in Menu Options Viewer settings. Primarily, you can adjust time shift settings here. This setting applies only to data from devices which haven t got time generator (acquisition from these devices is online and the SOAP service assigns the time to each incoming sample). These devices are Txxxx, Hxxxx and P85xx transmitters. The program automatically shifts the time to current locale but you can adjust it to manual shift towards UTC time. 24

25 4 Using storage system with dataloggers The program for dataloggers provides both: data insertion to the database and viewing the data. The first what is needed is to set database connection parameters. 4.1 Database connection parameters settings in program for dataloggers This settings is located in program options Menu File Options on page Datalogger database. How to enter parameters is explained in chapter 7.2 Entering database connection parameters. 4.2 Storing data from dataloggers into database You can store currently opened data in the program for dataloggers into the database by clicking on the command in menu: Menu File Add current file to database. There are 25

26 opened data in the program when they are downloaded from the device or after opening them from *.mss file. Second option is mass storing of data into the database from *.mss files in directory. This tool is located in: Menu File Fill database from directory. Drop down choosing dialog Folder and choose the directory where *.mss files, from which you want to store data into the database, are placed. There is info window under choosing parameters where you can see how many files has program found. You can also enable the choice Include subfolders - then *.mss files will be searched in subdirectories of selected directory too. If you enable the choice Unprocessed files only then only files, which weren't processed yet, will be included into the storing process. When any file is stored into the database then its filename with full path is stored into the database as the source. Therefore the system is able to detect if data from the file were stored into the database or not. It is not needed to enable this choice system is able to detect duplicate records and forbids insertion of duplicate records into the database. It means that if any record exists in the database (record is identified by device, channel and time) then no new record with the same identification will be inserted. By clicking on the button Store data storing process is executed. Above the info window you can see information about how many files are already processed, how many files processing failed and how many files left. There are detailed information about processing of one file in the info window. 26
27 Storing process can be interrupted by clicking on the button Interrupt. After clicking on this button processing of current file will be finished and then storing process will stop. 4.3 Viewing data from database in program for dataloggers Database Viewer is located in Menu Show Database viewer. More info how to use the Database Viewer is explained in chapter 3.3 Viewing history data from database. 27

28 5 Using storage system with data acquisition systems Working with storage system in the program for data acquisition system is similar as in the program for dataloggers. Program also provides both functions: data insertion and data viewing. Also, the first thing to do is to set database connection parameters. 5.1 Database connection parameters settings in program for data acquisition systems These settings are located in program options Menu File Options on page Datalogger database. How to enter parameters is explained in chapter 7.2 Entering database connection parameters. 28
29 There is additional settings Automatic export located under the Connection parameters settings. If the Automatic export is enabled then downloaded data will be stored into the database after downloading them from the device ( ). 5.2 Storing data from data acquisition systems into database Storing data into the database is absolutely the same as in the program for dataloggers with only one exception: data files of acquisition systems has this format: *.msx. To understand this topic please read chapter 4.2 Storing data from dataloggers into database. 5.3 Viewing data from database in program for acquisition systems Database Viewer is located in Menu Show Database viewer. You can also use icon in toolbar. More info how to use the Database Viewer is explained in chapter 3.3 Viewing history data from database. 29
30 6 Using storage system with transmitters Storage system also supports transmitters with ethernet output. The advantage is that data acquisition from transmitters is online and automatic. This means that you don t need to download data from the device manually like in case of dataloggers. Ethernet transmitters periodically sends measured values to the database via SOAP protocol. Hence, there have to be SOAP Server running, which captures messages sent from transmitters and stores them to the database. 6.1 Preparing SOAP Server (data entry from transmitters) The SOAP server was placed on the computer during installation of the Database administration utility. It is only needed to configure and start it. Attention! To be able to configure and control the SOAP Server service you have to run Database administrator utility with administrator privileges. Step by step instructions how to configure and start SOAP server: 1) Connect to your database with program Database Administration Utility and switch to the tab SOAP Server. 30

31 Press the button Reconfigure to run configuration wizard 2) On the first page of the wizard enter listening TCP port. 80 is recommended value, but you have to be sure, that there is no other application using this port on the computer. Especially HTTP server like Apache or IIS uses port 80 because 80 is standard for HTTP. If this is the case then another recommended port is Finally click the Next button. Program will check if the port is occupied and if so, program will ask you for reentering the port. 3) On next page you have to enter database user account. This account must have read/write access to the database. About database user accounts you can read in chapter User administration. Finally click the Next button. 4) On last page leave the value 8 for Processing thread count. Increasing this value leads to increasing the SOAP server performance, but it is the question of tuning SQL server. Finally click the Finish button 5) Configuration wizard is finished and the SOAP server is configured at this moment. Now, you have to allow listening TCP port on the firewall. Allow port 80 HTTP standard port on the firewall (or 8080 if you used this one). How to do it you can read in chapter 7.1 Allowing TCP port on windows firewall. Also remember, that there can be other firewalls running on your computer and also some anti-virus programs contains firewalls. 6) Since you have the port allowed, go back to the Database administration utility and press the button Start to start the SOAP server. 31

32 7) Wait until the Service status is Service is running. You can see new message in Service event log: Service: Serice started Click the button Diagnostic to verify if the SOAP server is well running and well configured. Diagnostic page will be opened in the default web browser. Before it, you will see the dialog with HTTP addresses, which tells you how to get to the diagnostic page if the browser doesn t open automatically. Seconds The second HTTP address guides you to open diagnostic page on remote computer. Go to some another computer in the network and open second HTTP address in browser on that computer. This will verify, that SOAP server is accessible and not blocked by firewall. If the SOAP server is well configured, then there are no warnings highlighted with red color on the diagnostic page and the diagnostic page should look like this one: 32
 If diagnostic page opened on local and also on remote computer doesn")
33 If i.e. you have configured the SOAP server with incorrect database user account, then the diagnostic page will inform you about this: 8) If diagnostic page opened on local and also on remote computer doesn t show any warnings, than you have successfully prepared the SOAP server. At this moment, you only have to configure your transmitters to send its measured values to this service. You will do this with the program Tsensor configuration program for transmitters and transducers. There is Example of SOAP settings on the diagnostic page: 33
34 You should enter all parameters as in this example. Only setting of Sending interval is up to you, but we alert you, that entering short interval will lead to rapid growing of the database. Please use short intervals (10 s) only when tuning data acquistion. But when you are sure that acquisition works well, reconfigure all devices settings and set sending interval minimally on 60 seconds. But recommended are values longer than 300 seconds (5 minutes). 6.2 Transmitter settings Now, when the SOAP server is ready, the last step to do is to set transmitters to send measured values to the SOAP service. You have to use configuration program for transmitters Tsensor. Establish the connection with the ethernet transmitter and choose the tab Communication Setup I. There is SOAP settings of the transmitter: 34
 Then click the button Get IP from host name it will automatically fill the field IP address.")
35 As Target web page enter the text composed of SOAP server IP address and string /soap : (do not enter string its already predefined) Then click the button Get IP from host name it will automatically fill the field IP address. As the source port enter 0 and as the destination port enter listening TCP port of the SOAP server (if you went in accordance with this manual then it is 80). Finally, choose sending interval. You can enter minimally 10 seconds, but we alert you, that entering short interval will lead to rapid growing of the database. Please use short intervals (10 s) only when tuning data acquistion. But when you are sure that acquisition works well, reconfigure all devices settings and set sending interval minimally on 60 seconds. But recommended sending interval value is longer than 300 seconds (5 minutes). The good help, how to set SOAP settings, is on the SOAP server diagnostic page. There is Example of SOAP settings with real values (IP and port of the SOAP server) displayed: You should enter all parameters as in this example. Only setting of Sending interval is up to you 35
36 This is everything you have to set up in the transmitter. Click the button Save changes. From this moment the transmitter will start sending SOAP messages to SOAP service. If you entered short interval, e.g. 10 seconds, then it can take up to half of minute until the first value will be sent. 6.3 Viewing data from database For viewing the database use standalone program Database Viewer. All information about this program are in chapter 3 Using program Database Viewer. 36
.")

37 7 Appendixes 7.1 Allowing TCP port on windows firewall Following subchapters guides you how to allow TCP port on Windows firewall. First chapter explains it for Windows XP. Following chapter explains it for Windows 7 (or Vista). Attention: Not only Windows firewall can be running on the computer. Also, for example some antivirus programs includes own firewalls. If this is the case then allowing port on this firewall or disabling whole firewall is needed too Allowing TCP port on Windows XP firewall 1) Run applet Windows firewall in Control panel: 37

38 2) Switch to the page Exceptions and click on the button Add port. 3) Enter exception name (it s up to you what name you think up) into the field Name. Then enter the port number which is to be allowed into the field Port number. Finally, left the choice TCP selected. Examples of standard port which you may need to allow: Name: MySQL Port number: 3306 Name: HTTP Port number: 80 4) Confirm by the button OK and exit the applet Windows firewall by the button OK again. 38
")

39 7.1.2 Allowing TCP port on Windows 7 (or Vista) firewall 1) Run applet Windows Firewall in Control Panel: 39
 Left-click on Inboud Rules and choose New Rule")
40 2) Choose advanced settings in Windows Firewall: 3) Left-click on Inboud Rules and choose New Rule 40

41 4) Choose Port as the type of rule on the first page of New Inbound Rule Wizard. Then click the button Next. 5) Left the choice TCP selected. Enter the port number which is to be allowed into the field Specific local ports. Examples of standard port which you may need to allow: Name: MySQL Port number: 3306 Name: HTTP Port number: 80 41
 into the field Name. 42")
42 6) Skip following two pages without changes with the button Next until you get to the page Name. Enter exception name (it s up to you what name you think up) into the field Name. 42

43 Finally click the button Finish. 7.2 Entering database connection parameters Every program which works with storage system needs to have entered database connection parameters to establish connection with the database server. Programs have the same interface for entering these parameters. How to use it is explained once at this chapter for all programs: To establish connection with database server these parameters have to be entered: 43
 IP address 12")
44 Server type: Choose MySQL Server from dropdown list. Server name: As server name enter IP address of the computer where the MySQL server was installed. If the database server is installed on actual computer you can enter (and is recommended to enter) IP address IP address can be found out by executing command ipconfig in the command line: Port number: MySQL uses TCP port 3306 by default. So left 3306 here. User name: When you are logging in Database Administration Utility program, you have to use system administrator account, so enter the text root. Root is the username of system administrator account and its password you have entered during MySQL installation. When you enter parameters in the other programs, enter the username of read-only or read/write user account. How to create these accounts is explained in chapter User administration. It is sufficient to use read-only user in Database Viewer program, but you have to use read/write user in the other applications. For example, if you use read-only user in program for dataloggers, then data insertion will be disallowed. Password: Enter the password for the user. Database: Drop down the list and choose the database. Also, you can type in the database name. Typing in the database will be usefull when creating new database. Whenever you want, you can use button test to verify entered parameters. Program will try to connect, verify rights and check the database. Then it will show test result, for example that: 44
45 parameters are ok and entered database is accessible for reading and writing the server is unreachable (probably there is not any MySQL server running on computer identified by Server name) the program cannot log in with entered user name and password the database doesn t exits etc. 45
Comet Database. Database system for all COMET devices. Instruction Manual
 Comet Database Database system for all COMET devices Instruction Manual Introduction This database system is designed for collection and storage of data from COMET devices. It allows: - Loading the database
Comet Database Database system for COMET devices
 Cometsystem s. r. o. Comet Database Database system for COMET devices Instruction manual Start here: Preparation Comet Database system Introduction This database system is designed for collection and storage
Monitoring Network DMN
 Monitoring Network DMN User Manual Table of contents Table of contents... 2 1. Product features and capabilities... 3 2. System requirements... 5 3. Getting started with the software... 5 3-1 Installation...
NETWORK PRINT MONITOR User Guide
 NETWORK PRINT MONITOR User Guide Legal Notes Unauthorized reproduction of all or part of this guide is prohibited. The information in this guide is subject to change without notice. We cannot be held liable
Install MS SQL Server 2012 Express Edition
 Install MS SQL Server 2012 Express Edition Sohodox now works with SQL Server Express Edition. Earlier versions of Sohodox created and used a MS Access based database for storing indexing data and other
User Manual. Onsight Management Suite Version 5.1. Another Innovation by Librestream
 User Manual Onsight Management Suite Version 5.1 Another Innovation by Librestream Doc #: 400075-06 May 2012 Information in this document is subject to change without notice. Reproduction in any manner
SA-9600 Surface Area Software Manual
 SA-9600 Surface Area Software Manual Version 4.0 Introduction The operation and data Presentation of the SA-9600 Surface Area analyzer is performed using a Microsoft Windows based software package. The
Ekran System Help File
 Ekran System Help File Table of Contents About... 9 What s New... 10 System Requirements... 11 Updating Ekran to version 4.1... 13 Program Structure... 14 Getting Started... 15 Deployment Process... 15
User Guide. Version 3.2. Copyright 2002-2009 Snow Software AB. All rights reserved.
 Version 3.2 User Guide Copyright 2002-2009 Snow Software AB. All rights reserved. This manual and computer program is protected by copyright law and international treaties. Unauthorized reproduction or
GP REPORTS VIEWER USER GUIDE
 GP Reports Viewer Dynamics GP Reporting Made Easy GP REPORTS VIEWER USER GUIDE For Dynamics GP Version 2015 (Build 5) Dynamics GP Version 2013 (Build 14) Dynamics GP Version 2010 (Build 65) Last updated
Decision Support AITS University Administration. Web Intelligence Rich Client 4.1 User Guide
 Decision Support AITS University Administration Web Intelligence Rich Client 4.1 User Guide 2 P age Web Intelligence 4.1 User Guide Web Intelligence 4.1 User Guide Contents Getting Started in Web Intelligence
Manual Password Depot Server 8
 Manual Password Depot Server 8 Table of Contents Introduction 4 Installation and running 6 Installation as Windows service or as Windows application... 6 Control Panel... 6 Control Panel 8 Control Panel...
Desktop Surveillance Help
 Desktop Surveillance Help Table of Contents About... 9 What s New... 10 System Requirements... 11 Updating from Desktop Surveillance 2.6 to Desktop Surveillance 3.2... 13 Program Structure... 14 Getting
Vodafone PC SMS 2010. (Software version 4.7.1) User Manual
 User Manual") Vodafone PC SMS 2010 (Software version 4.7.1) User Manual July 19, 2010 Table of contents 1. Introduction...4 1.1 System Requirements... 4 1.2 Reply-to-Inbox... 4 1.3 What s new?... 4 2. Installation...6
Vodafone PC SMS 2010 (Software version 4.7.1) User Manual July 19, 2010 Table of contents 1. Introduction...4 1.1 System Requirements... 4 1.2 Reply-to-Inbox... 4 1.3 What s new?... 4 2. Installation...6
NovaBACKUP. Storage Server. NovaStor / May 2011
 NovaBACKUP Storage Server NovaStor / May 2011 2011 NovaStor, all rights reserved. All trademarks are the property of their respective owners. Features and specifications are subject to change without notice.
A-AUTO 50 for Windows Setup Guide
 A-AUTO 50 for Windows Setup Guide 1st Edition 1 A-AUTO is a registered trade mark of UNIRITA Inc. "This product includes software developed by the Apache Software Foundation (http://www.apache.org/)."
Advanced Event Viewer Manual
 Advanced Event Viewer Manual Document version: 2.2944.01 Download Advanced Event Viewer at: http://www.advancedeventviewer.com Page 1 Introduction Advanced Event Viewer is an award winning application
Point of Sale 2015 Enterprise. Installation Guide
 Point of Sale 2015 Enterprise Installation Guide Contents About this guide 3 System Requirements - Microsoft SQL Server 2008 R2 Express 3 System Requirements - POS Enterprise 2015 (Administrator) 3 System
Spector 360 Deployment Guide. Version 7
 Spector 360 Deployment Guide Version 7 December 11, 2009 Table of Contents Deployment Guide...1 Spector 360 DeploymentGuide... 1 Installing Spector 360... 3 Installing Spector 360 Servers (Details)...
Velocity Web Services Client 1.0 Installation Guide and Release Notes
 Velocity Web Services Client 1.0 Installation Guide and Release Notes Copyright 2014-2015, Identiv. Last updated June 24, 2015. Overview This document provides the only information about version 1.0 of
SOS SO S O n O lin n e lin e Bac Ba kup cku ck p u USER MANUAL
 SOS Online Backup USER MANUAL HOW TO INSTALL THE SOFTWARE 1. Download the software from the website: http://www.sosonlinebackup.com/download_the_software.htm 2. Click Run to install when promoted, or alternatively,
DiskPulse DISK CHANGE MONITOR
 DiskPulse DISK CHANGE MONITOR User Manual Version 7.9 Oct 2015 www.diskpulse.com info@flexense.com 1 1 DiskPulse Overview...3 2 DiskPulse Product Versions...5 3 Using Desktop Product Version...6 3.1 Product
SourceAnywhere Service Configurator can be launched from Start -> All Programs -> Dynamsoft SourceAnywhere Server.
 Contents For Administrators... 3 Set up SourceAnywhere... 3 SourceAnywhere Service Configurator... 3 Start Service... 3 IP & Port... 3 SQL Connection... 4 SourceAnywhere Server Manager... 4 Add User...
Seagate Manager. User Guide. For Use With Your FreeAgent TM Drive. Seagate Manager User Guide for Use With Your FreeAgent Drive 1
 Seagate Manager User Guide For Use With Your FreeAgent TM Drive Seagate Manager User Guide for Use With Your FreeAgent Drive 1 Seagate Manager User Guide for Use With Your FreeAgent Drive Revision 1 2008
Network Probe User Guide
 Network Probe User Guide Network Probe User Guide Table of Contents 1. Introduction...1 2. Installation...2 Windows installation...2 Linux installation...3 Mac installation...4 License key...5 Deployment...5
How To Create An Easybelle History Database On A Microsoft Powerbook 2.5.2 (Windows)
") Introduction EASYLABEL 6 has several new features for saving the history of label formats. This history can include information about when label formats were edited and printed. In order to save this history,
Introduction EASYLABEL 6 has several new features for saving the history of label formats. This history can include information about when label formats were edited and printed. In order to save this history,
Step-by-Step Setup Guide Wireless File Transmitter FTP Mode
 EOS Step-by-Step Setup Guide Wireless File Transmitter FTP Mode Ad Hoc Setup Windows XP 2012 Canon U.S.A., Inc. All Rights Reserved. Reproduction in whole or in part without permission is prohibited. 1
PowerLogic ION Enterprise 5.6
 PowerLogic ION Enterprise 5.6 Power Management Software User Guide April 2007 Notices This section describes the symbols used in this guide. Danger This alerts you to things that may cause serious injury
NVMS-1200. User Manual
 NVMS-1200 User Manual Contents 1 Software Introduction... 1 1.1 Summary... 1 1.2 Install and Uninstall... 1 1.2.1 Install the Software... 1 2 Login Software... 3 2.1 Login... 3 2.2 Control Panel Instruction...
Charter Business Desktop Security Administrator's Guide
 Charter Business Desktop Security Administrator's Guide Table of Contents Chapter 1: Introduction... 4 Chapter 2: Getting Started... 5 Creating a new user... 6 Recovering and changing your password...
Allworx OfficeSafe Operations Guide Release 6.0
 Allworx OfficeSafe Operations Guide Release 6.0 No part of this publication may be reproduced, stored in a retrieval system, or transmitted, in any form or by any means, electronic, mechanical, photocopy,
Spector 360 Deployment Guide. Version 7.3 January 3, 2012
 Spector 360 Deployment Guide Version 7.3 January 3, 2012 Table of Contents Deploy to All Computers... 48 Step 1: Deploy the Servers... 5 Recorder Requirements... 52 Requirements... 5 Control Center Server
Easy Data Centralization with Webster. User Guide
 Easy Data Centralization with Webster User Guide CONTENTS 3-4 1 Introducing Webster Webster - An Introduction 5-14 2 Installing & Configuring Webster Installing the System Configuring Webster 15-18 3 Managing
MobileStatus Server Installation and Configuration Guide
 MobileStatus Server Installation and Configuration Guide Guide to installing and configuring the MobileStatus Server for Ventelo Mobilstatus Version 1.2 June 2010 www.blueposition.com All company names,
Legal Notes. Regarding Trademarks. 2012 KYOCERA Document Solutions Inc.
 Legal Notes Unauthorized reproduction of all or part of this guide is prohibited. The information in this guide is subject to change without notice. We cannot be held liable for any problems arising from
Enterprise Remote Control 5.6 Manual
 Enterprise Remote Control 5.6 Manual Solutions for Network Administrators Copyright 2015, IntelliAdmin, LLC Revision 3/26/2015 http://www.intelliadmin.com Page 1 Table of Contents What is Enterprise Remote
Dial-up Installation for CWOPA Users (Windows Operating System)
") Dial-up Installation for CWOPA Users (Windows Operating System) 1 Table of Contents Download and Install Digital Certificates... 3 Internet Explorer 8/9 Certificate Installation.3 Windows XP Instructions
Dial-up Installation for CWOPA Users (Windows Operating System) 1 Table of Contents Download and Install Digital Certificates... 3 Internet Explorer 8/9 Certificate Installation.3 Windows XP Instructions
PART 1 CONFIGURATION 1.1 Installing Dashboard Software Dashboardxxx.exe Administration Rights Prerequisite Wizard
 Omega Dashboard 1 PART 1 CONFIGURATION 1.1 Installing Dashboard Software Find the Dashboardxxx.exe in the accompanying CD or on the web. Double click that to install it. The setup process is typical to
Password Memory 6 User s Guide
 C O D E : A E R O T E C H N O L O G I E S Password Memory 6 User s Guide 2007-2015 by code:aero technologies Phone: +1 (321) 285.7447 E-mail: info@codeaero.com Table of Contents Password Memory 6... 1
FAQ. How does the new Big Bend Backup (powered by Keepit) work?
 work?") FAQ How does the new Big Bend Backup (powered by Keepit) work? Once you establish which of the folders on your hard drive you ll be backing up, you ll log into myaccount.bigbend.net and from your control
FAQ How does the new Big Bend Backup (powered by Keepit) work? Once you establish which of the folders on your hard drive you ll be backing up, you ll log into myaccount.bigbend.net and from your control
TechComplete Test Productivity Pack (TPP) Backup Process and Data Restoration
 Backup Process and Data Restoration") Introduction The TPP backup feature backs up all TPP data folders on to a storage device which can be used to recover data in case of problems with the TPP server. TPP data folders include TPP server data,
Introduction The TPP backup feature backs up all TPP data folders on to a storage device which can be used to recover data in case of problems with the TPP server. TPP data folders include TPP server data,
How To Install An Aneka Cloud On A Windows 7 Computer (For Free)
") MANJRASOFT PTY LTD Aneka 3.0 Manjrasoft 5/13/2013 This document describes in detail the steps involved in installing and configuring an Aneka Cloud. It covers the prerequisites for the installation, the
MANJRASOFT PTY LTD Aneka 3.0 Manjrasoft 5/13/2013 This document describes in detail the steps involved in installing and configuring an Aneka Cloud. It covers the prerequisites for the installation, the
SysPatrol - Server Security Monitor
 SysPatrol Server Security Monitor User Manual Version 2.2 Sep 2013 www.flexense.com www.syspatrol.com 1 Product Overview SysPatrol is a server security monitoring solution allowing one to monitor one or
Attix5 Pro Server Edition
 Attix5 Pro Server Edition V7.0.2 User Manual for Mac OS X Your guide to protecting data with Attix5 Pro Server Edition. Copyright notice and proprietary information All rights reserved. Attix5, 2013 Trademarks
Table of Contents. Welcome... 2. Login... 3. Password Assistance... 4. Self Registration... 5. Secure Mail... 7. Compose... 8. Drafts...
 Table of Contents Welcome... 2 Login... 3 Password Assistance... 4 Self Registration... 5 Secure Mail... 7 Compose... 8 Drafts... 10 Outbox... 11 Sent Items... 12 View Package Details... 12 File Manager...
WhatsUp Gold v16.2 Database Migration and Management Guide
 WhatsUp Gold v16.2 Database Migration and Management Guide Contents CHAPTER 1 How to use this guide CHAPTER 2 Migrating the WhatsUp Gold Microsoft SQL Server 2008 R2 Express Edition database to Microsoft
GE Healthcare Life Sciences UNICORN 5.31. Administration and Technical Manual
 GE Healthcare Life Sciences UNICORN 5.31 Administration and Technical Manual Table of Contents Table of Contents 1 Network setup... 1.1 Network terms and concepts... 1.2 Network environment... 1.3 UNICORN
Contents Overview... 5 Configuring Project Management Bridge after Installation... 9 The Project Management Bridge Menu... 14
 Portfolio Management Bridge for Microsoft Office Project Server User's Guide June 2015 Contents Overview... 5 Basic Principles and Concepts... 5 Managing Workflow... 7 Top-Down Management... 7 Project-Based
CompleteView Admin Console Users Guide. Version 3.0.0 Revised: 02/15/2008
 CompleteView Admin Console Users Guide Version 3.0.0 Revised: 02/15/2008 Table Of Contents Configuration... 3 Starting the Admin Console... 3 Adding a Server... 4 Monitoring Server Status... 6 Menus...
How to Program a Commander or Scout to Connect to Pilot Software
 How to Program a Commander or Scout to Connect to Pilot Software Commander and Scout are monitoring and control products that can transfer physical environmental conditions and alarm sensor electrical
TANDBERG MANAGEMENT SUITE 10.0
 TANDBERG MANAGEMENT SUITE 10.0 Installation Manual Getting Started D12786 Rev.16 This document is not to be reproduced in whole or in part without permission in writing from: Contents INTRODUCTION 3 REQUIREMENTS
a) Network connection problems (check these for existing installations)
 Network connection problems (check these for existing installations)") How do I resolve issues with a Client not connecting to the Best Practice server instance? This FAQ is intended to answer common questions about resolving issues with a Best Practice client not connecting
How do I resolve issues with a Client not connecting to the Best Practice server instance? This FAQ is intended to answer common questions about resolving issues with a Best Practice client not connecting
TROUBLESHOOTING INFORMATION
 TROUBLESHOOTING INFORMATION VinNOW Support does not support Microsoft products to include SQL Server,.NET Framework, and also cannot assist with Windows User issues, Network or VPN issues. If installing
NovaBACKUP. User Manual. NovaStor / November 2011
 NovaBACKUP User Manual NovaStor / November 2011 2011 NovaStor, all rights reserved. All trademarks are the property of their respective owners. Features and specifications are subject to change without
Connecting to a Soundweb TM. London Network
 This guide will step you through the process of configuring your laptop and HiQnet TM London Architect TM to communicate with a network of Soundweb London devices. 1 Install London Architect Install the
Introweb Remote Backup Client for Mac OS X User Manual. Version 3.20
 Introweb Remote Backup Client for Mac OS X User Manual Version 3.20 1. Contents 1. Contents...2 2. Product Information...4 3. Benefits...4 4. Features...5 5. System Requirements...6 6. Setup...7 6.1. Setup
IXP120 Alarm Monitor Utility
 IXP120 Alarm Monitor Utility SOFTWARE MANUAL Scope of Document This document provides a brief overview of the Alarm Monitor Utility and its interaction with the IXP120 Software. Document Conventions We
How To Use Senior Systems Cloud Services
 Senior Systems Cloud Services In this guide... Senior Systems Cloud Services 1 Cloud Services User Guide 2 Working In Your Cloud Environment 3 Cloud Profile Management Tool 6 How To Save Files 8 How To
Net Protector Admin Console
 Net Protector Admin Console USER MANUAL www.indiaantivirus.com -1. Introduction Admin Console is a Centralized Anti-Virus Control and Management. It helps the administrators of small and large office networks
WhatsUp Gold v16.1 Database Migration and Management Guide Learn how to migrate a WhatsUp Gold database from Microsoft SQL Server 2008 R2 Express
 WhatsUp Gold v16.1 Database Migration and Management Guide Learn how to migrate a WhatsUp Gold database from Microsoft SQL Server 2008 R2 Express Edition to Microsoft SQL Server 2005, 2008, or 2008 R2
Liebert Nform Infrastructure Monitoring Software. User Manual - Version 4
 Liebert Nform Infrastructure Monitoring Software User Manual - Version 4 TABLE OF CONTENTS 1.0 ABOUT LIEBERT NFORM................................................1 1.1 How Do You Contact Emerson Network
Networking Best Practices Guide. Version 6.5
 Networking Best Practices Guide Version 6.5 Summer 2010 Copyright: 2010, CCH, a Wolters Kluwer business. All rights reserved. Material in this publication may not be reproduced or transmitted in any form
ChromQuest 5.0 Chromatography Data System
 ChromQuest 5.0 Chromatography Data System Administrator Guide CHROM-97251 Revision A March 2008 2008 Thermo Fisher Scientific Inc. All rights reserved. Surveyor is a registered trademark of Thermo Fisher
JUL / 07 VERSION 3.2
 JUL / 07 VERSION 3.2 ASETVI EWME smar www.smar.com Specifications and information are subject to change without notice. Up-to-date address information is available on our website. web: www.smar.com/contactus.asp
FileMaker Server 14. FileMaker Server Help
 FileMaker Server 14 FileMaker Server Help 2007 2015 FileMaker, Inc. All Rights Reserved. FileMaker, Inc. 5201 Patrick Henry Drive Santa Clara, California 95054 FileMaker and FileMaker Go are trademarks
File Management Utility User Guide
 File Management Utility User Guide Legal Notes Unauthorized reproduction of all or part of this guide is prohibited. The information in this guide is subject to change without notice. We cannot be held
GUARD1 PLUS SE Administrator's Manual
 GUARD1 PLUS SE Administrator's Manual Version 4.4 30700 Bainbridge Road Solon, Ohio 44139 Phone 216-595-0890 Fax 216-595-0991 info@guard1.com www.guard1.com i 2010 TimeKeeping Systems, Inc. GUARD1 PLUS
AVG 8.5 Anti-Virus Network Edition
 AVG 8.5 Anti-Virus Network Edition User Manual Document revision 85.2 (23. 4. 2009) Copyright AVG Technologies CZ, s.r.o. All rights reserved. All other trademarks are the property of their respective
Networking. General networking. Networking overview. Common home network configurations. Wired network example. Wireless network examples
 Networking General networking Networking overview A network is a collection of devices such as computers, printers, Ethernet hubs, wireless access points, and routers connected together for communication
Global Image Management System For epad-vision. User Manual Version 1.10
 Global Image Management System For epad-vision User Manual Version 1.10 May 27, 2015 Global Image Management System www.epadlink.com 1 Contents 1. Introduction 3 2. Initial Setup Requirements 3 3. GIMS-Server
Novell ZENworks Asset Management 7.5
 Novell ZENworks Asset Management 7.5 w w w. n o v e l l. c o m October 2006 USING THE WEB CONSOLE Table Of Contents Getting Started with ZENworks Asset Management Web Console... 1 How to Get Started...
Ethernet Radio Configuration Guide
 Ethernet Radio Configuration Guide for Gateway, Endpoint, and Repeater Radio Units April 20, 2015 Customer Service 1-866-294-5847 Baseline Inc. www.baselinesystems.com Phone 208-323-1634 FAX 208-323-1834
Ajera 7 Installation Guide
 Ajera 7 Installation Guide Ajera 7 Installation Guide NOTICE This documentation and the Axium software programs may only be used in accordance with the accompanying Axium Software License and Services
Gigabyte Content Management System Console User s Guide. Version: 0.1
 Gigabyte Content Management System Console User s Guide Version: 0.1 Table of Contents Using Your Gigabyte Content Management System Console... 2 Gigabyte Content Management System Key Features and Functions...
Kaseya 2. Quick Start Guide. for Network Monitor 4.1
 Kaseya 2 Syslog Monitor Quick Start Guide for Network Monitor 4.1 June 5, 2012 About Kaseya Kaseya is a global provider of IT automation software for IT Solution Providers and Public and Private Sector
QIAsymphony Management Console User Manual
 April 2012 QIAsymphony Management Console User Manual For use with software version 4.0 Sample & Assay Technologies Trademarks QIAGEN, QIAsymphony, Rotor-Gene (QIAGEN Group). InstallShield (Informer Technologies,
Results CRM 2012 User Manual
 Results CRM 2012 User Manual A Guide to Using Results CRM Standard, Results CRM Plus, & Results CRM Business Suite Table of Contents Installation Instructions... 1 Single User & Evaluation Installation
StruxureWare Power Monitoring 7.0.1
 StruxureWare Power Monitoring 7.0.1 Installation Guide 7EN02-0308-01 07/2012 Contents Safety information 5 Introduction 7 Summary of topics in this guide 7 Supported operating systems and SQL Server editions
This document details the following four steps in setting up a Web Server (aka Internet Information Services -IIS) on Windows XP:
 on Windows XP:") Wazza s QuickStart: Setting up a Web Server (IIS) Windows XP This document details the following four steps in setting up a Web Server (aka Internet Information Services -IIS) on Windows XP: Configuring
Wazza s QuickStart: Setting up a Web Server (IIS) Windows XP This document details the following four steps in setting up a Web Server (aka Internet Information Services -IIS) on Windows XP: Configuring
Note: With v3.2, the DocuSign Fetch application was renamed DocuSign Retrieve.
 Quick Start Guide DocuSign Retrieve 3.2.2 Published April 2015 Overview DocuSign Retrieve is a windows-based tool that "retrieves" envelopes, documents, and data from DocuSign for use in external systems.
Table of Contents. Introduction...9. Installation...17. Program Tour...31. The Program Components...10 Main Program Features...11
 2011 AdRem Software, Inc. This document is written by AdRem Software and represents the views and opinions of AdRem Software regarding its content, as of the date the document was issued. The information
Installation and Operation Manual Portable Device Manager, Windows version
 Installation and Operation Manual version version About this document This document is intended as a guide for installation, maintenance and troubleshooting of Portable Device Manager (PDM) and is relevant
Installing S500 Power Monitor Software and LabVIEW Run-time Engine
 EigenLight S500 Power Monitor Software Manual Software Installation... 1 Installing S500 Power Monitor Software and LabVIEW Run-time Engine... 1 Install Drivers for Windows XP... 4 Install VISA run-time...
safend a w a v e s y s t e m s c o m p a n y
 safend a w a v e s y s t e m s c o m p a n y SAFEND Data Protection Suite Installation Guide Version 3.4.5 Important Notice This guide is delivered subject to the following conditions and restrictions:
Network DK2 DESkey Installation Guide
 VenturiOne Getting Started Network DK2 DESkey Installation Guide PD-056-306 DESkey Network Server Manual Applied Cytometry CONTENTS 1 DK2 Network Server Overview... 2 2 DK2 Network Server Installation...
How To Install Amyshelf On Windows 2000 Or Later
 Contents I Table of Contents Part I Document Overview 2 Part II Document Details 3 Part III Setup 4 1 Download & Installation... 4 2 Configure MySQL... Server 6 Windows XP... Firewall Settings 13 3 Additional
System Administration Training Guide. S100 Installation and Site Management
 System Administration Training Guide S100 Installation and Site Management Table of contents System Requirements for Acumatica ERP 4.2... 5 Learning Objects:... 5 Web Browser... 5 Server Software... 5
Administrator Manual
 . Self-evaluation Platform (SEP) on Information Technology in Education (ITEd) for School Administrator Manual Mar 2006 [Version 3.0] Copyright 2005 Education and Manpower Bureau Page 1 Table of Contents
PigCHAMP Knowledge Software. Enterprise Edition Installation Guide
 PigCHAMP Knowledge Software Enterprise Edition Installation Guide Enterprise Edition Installation Guide MARCH 2012 EDITION PigCHAMP Knowledge Software 1531 Airport Rd Suite 101 Ames, IA 50010 Phone (515)
Colligo Email Manager 6.0. Offline Mode - User Guide
 6.0 Offline Mode - User Guide Contents Colligo Email Manager 1 Key Features 1 Benefits 1 Installing and Activating Colligo Email Manager 2 Checking for Updates 3 Updating Your License Key 3 Managing SharePoint
Hosting Users Guide 2011
 Hosting Users Guide 2011 eofficemgr technology support for small business Celebrating a decade of providing innovative cloud computing services to small business. Table of Contents Overview... 3 Configure
Server & Workstation Installation of Client Profiles for Windows
 C ase Manag e m e n t by C l i e n t P rofiles Server & Workstation Installation of Client Profiles for Windows T E C H N O L O G Y F O R T H E B U S I N E S S O F L A W General Notes to Prepare for Installing
User Guide Online Backup
 User Guide Online Backup Table of contents Table of contents... 1 Introduction... 2 Adding the Online Backup Service to your Account... 2 Getting Started with the Online Backup Software... 4 Downloading
Operation Error Management
 S&C IntelliTeam CNMS Communication Network Management System Operation Error Management Table of Contents Section Page Section Page Overview.... 2 Error Management Alarms... 4 Viewing Alarms.... 5 Editing
IEI emerge and Milestone Systems Network Video Recorder. Setup and Integration Guide. Milestone Version 6.5 and emerge Version 3.
 IEI emerge and Milestone Systems Network Video Recorder Setup and Integration Guide Milestone Version 6.5 and emerge Version 3.2 and above CONTENTS Requirements for Milestone NVR/IEI emerge Integration...
Immotec Systems, Inc. SQL Server 2005 Installation Document
 SQL Server Installation Guide 1. From the Visor 360 installation CD\USB Key, open the Access folder and install the Access Database Engine. 2. Open Visor 360 V2.0 folder and double click on Setup. Visor
Online Backup Client User Manual
 For Mac OS X Software version 4.1.7 Version 2.2 Disclaimer This document is compiled with the greatest possible care. However, errors might have been introduced caused by human mistakes or by other means.
NovaBACKUP Storage Server User Manual NovaStor / April 2013
 NovaBACKUP Storage Server User Manual NovaStor / April 2013 2013 NovaStor, all rights reserved. All trademarks are the property of their respective owners. Features and specifications are subject to change
Reporting for Contact Center Setup and Operations Guide. BCM Contact Center
 Reporting for Contact Center Setup and Operations Guide BCM Contact Center Document Number: NN40040-302 Document Status: Standard Document Version: 04.00 Part Code: N0060637 Date: June 2006 Copyright 2005
Wakanda Studio Features
 Wakanda Studio Features Discover the many features in Wakanda Studio. The main features each have their own chapters and other features are documented elsewhere: Wakanda Server Administration Data Browser