Ricoh Product Line Segment 2 thru 6
|
|
|
- Dinah Robbins
- 7 years ago
- Views:
Transcription


1 Ricoh Product Line Segment 2 thru 6 MP C2000, MP2550, MP3300, MP4000/5000, MP C5000/6000, MP7000/8000, MP6001/7001, MP8001/9001, MP906EX

 Enter any finishing options Enter desired number of copies Press [Sample Copy] copier will print")
![one completed set and prompt you [Suspend] to cancel job or change settings [Continue] if job is correct to complete remaining copy sets Or press](/docs-images/62/46885197/images/2-4.jpg "START to skip [Sample Copy] Adjust paper guides Note: When copying from the glass and requesting multiple copies, press the # key after feeding your")
2 Copying Documents Remove paperclips, staples or other loose objects before placing originals in feeder. Be sure to straighten bent or curled edges If using the Glass Platen, Lift the lid and place documents face down on the glass at the position of arrow regardless of size Select any additional copy settings Place Originals in the document Feeder Press original document type, i.e. Text, Text/Photo, Photo, etc. Press [sort] to collate document (if not highlighted) Enter any finishing options Enter desired number of copies Press [Sample Copy] copier will print one completed set and prompt you [Suspend] to cancel job or change settings [Continue] if job is correct to complete remaining copy sets Or press START to skip [Sample Copy] Adjust paper guides Note: When copying from the glass and requesting multiple copies, press the # key after feeding your last original to release the additional copies
![Using Batch Mode Use [Batch] when the number of pages being fed in the document feeder exceeds the feeder capacity, or you need to feed documents from the feeder and off the platen glass or you need](/docs-images/62/46885197/images/3-0.jpg "to feed pages from different sources but want to keep the page order and output multiple complete copies. 2. Select [Batch], and then press [OK]. 3.")

3 Using Batch Mode Use [Batch] when the number of pages being fed in the document feeder exceeds the feeder capacity, or you need to feed documents from the feeder and off the platen glass or you need to feed pages from different sources but want to keep the page order and output multiple complete copies. 2. Select [Batch], and then press [OK]. 3. Enter your job settings including the desired number of copies. 4. Place the first part of the originals in the feeder (or on the glass) press (Start) key 5. After those originals have been scanned, placed the next batch, pressing start each time a new page or pages is added and continue until all the pages for your job is complete. 6. Press the [#] key to release the complete job. Note: If copies are not stapled, the machine will deliver the first copies as they are scanned and will release the additional copies after the # key have been selected. You cannot switch between 1 sided and 2 sided documents when using this mode.
![Sort/Stack & Rotate Sort Output SORT Rotate/Sort the machine assembles copies as sets in sequential order. Use [Sort] when placing multiple page document to maintain page order - Same as [Collate].](/docs-images/62/46885197/images/4-0.jpg "When a finisher is installed with the device the machine will output the document in the Sort/Shift Sort order, separating the first set from the next set.")

4 Sort/Stack & Rotate Sort Output SORT Rotate/Sort the machine assembles copies as sets in sequential order. Use [Sort] when placing multiple page document to maintain page order - Same as [Collate]. When a finisher is installed with the device the machine will output the document in the Sort/Shift Sort order, separating the first set from the next set. STACK groups together copies of each page in a multi-page original. Use Stack when setting multiple pages in the document feeder and requiring the same copy number count per page to be stacked. ROTATE SORT Use Rotate Sort when your machine does not have a finisher to keep jobs separated. To use this option you must have one paper tray loaded with 8.5x11 paper in landscape orientation and the other tray loaded with 11x8.5 portrait and select this option from the finishing mode or from the short cut menu on copier screen.

 Double Staple Top")

5 1. Place Documents in the document Feeder 2. On bottom of touch screen - select the staple position that match you job output. Select Top Left (straight) Stapling Documents Top Left Slant Bottom Left (for landscape documents fed through feeder in portrait orientation Double Staple Left (portrait Orientation) Double Staple Top (landscape orientation) Booklet stapling (for booklet folded at center stapling) 3. Press OK 4. Press Start 2. Select desired staple position 3. Press [OK] Note: The number of pages and stapling positions will vary by machine depending on the model and type of finisher installed 4. Place documents in feeder 5. Press [START]


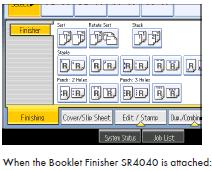
6 2 & 3 Hole Punch


7 Duplex Copying (2 Sided Output) Place Originals in Feeder Landscape orientation or Portrait orientation Select or Select You can select these options from the main copier panel Press OK Enter desired options Select copy count Press START


8 Dup./Combine/Series Full menu for short cuts on panel Duplex 1 sided+2 Sided 2 Sided+ 2 Sided Combine Combine multiple pages on single pages with options for 2 sided or single sided output and options of placing 2, 4, 8 or pages on a single page. Users can choose different size pager for output. Series output documents from 2 Sided to 1 Sided Copy 2 face forwarding pages of a book to 2 single pages. Book Create a magazine output (use booklet for 4 page output) use Magazine for 5 or more pages. When the booklet finisher is installed, Users can choose to have the job stapled and folded. Use to copy 2 face forwarding pages of a book as a duplex output. Default Screen Settings

9 Combine Pages Use this option to combine multiple single pages or 2 sided pages for multiple pages copied on each side of a page. Originals can be copied in portrait or landscape orientation. Some of these options are available from the main copier panel. You cannot use the Bypass tray with this option.

![Outputs 2 single pages for the right and left pages Press [OK] OR Press the [BOOK ]button Book](/docs-images/62/46885197/images/10-1.jpg "2-Sided Select [BOOK TO 2 SIDED] Copies the left and right pages and place front and back to a")
10 Book Copying Place open Book on Glass Platen Press [Dup./Combine/Series ]button Book 1-Sided Select [SERIES] button Press [Book - 1 sided] for single pages Outputs 2 single pages for the right and left pages Press [OK] OR Press the [BOOK ]button Book 2-Sided Select [BOOK TO 2 SIDED] Copies the left and right pages and place front and back to a single page Press [OK] Enter desired sets Press [Start]


11 Reduction/Enlargement Select the option that matches your output Place originals, Press START

![Press [Horizontal) Enter the desired ratio with the number keys, and then press [ ]. Press [Vertical].](/docs-images/62/46885197/images/12-2.jpg "Enter the desired ratio with the number keys, and then press [ ]. Press [OK] twice.")
12 Directional Size Magnification% Use this feature to enlarge a document by placing percentage proportions in the horizontal and vertical fields. Place document on platen glass Press [Reduce/Enlarge] Press [Direct. Mag. %]. Press [Horizontal) Enter the desired ratio with the number keys, and then press [ ]. Press [Vertical]. Enter the desired ratio with the number keys, and then press [ ]. Press [OK] twice. Place the originals, and then press the [Start] key.
13 Create Margin Reduces the image to 93% of its original size and places the reduced image at the center By combining it with the Reduce / Enlarge functions, you can further increase a margin. Great for creating copy edge for stapling or hole punching. 1. Press [Create Margin]. 2. Select the reproduction ratio, if necessary. 3. Press START


14 Erase Center/Border This option erases the Center and/or all four sides of a document page or pages. Center/Border applies to books, but use same width or elect to clear out single or multiple edges together.


15 Page Numbering Page Number Format Number Page Position Starting Page, Starting Number and Ending number, Allows users to keep track of documents being copied for projects, etc. Users can choose numbering Sequence and position of placement of numbers. Place Documents in Feeder Press Edit /Stamp Select Stamp Select Page Numbering Press Change>Select Page Numbering Format>OK Press Change (opposite side) Select Page Number Placement>OK Touch First Printing Page >indicate page to start number sequence Touch Last Number>Enter information Touch First Printing Number >enter information Touch Total Pages >enter information Select any other finishing options including the desired number of copies Press SAMPLE COPY

![Press [Double Copies]. Press [OK]. Select the paper size.](/docs-images/62/46885197/images/16-1.jpg "Original Feed Copy Output orientation Enter desired number of copies")
16 Double Copies Place Original in Document or lift the lid and place face down on Glass Platen Press [Edit / Stamp]. Press [Edit Image]. Press [Double Copies]. Press [OK]. Select the paper size. Original Feed Copy Output orientation Enter desired number of copies Press [Start]

17 Document Centering You can make copies with the image moved to the center of the copy paper. Place the document Select the paper size. Press [Edit / Stamp]. Press [Edit Image]. Press [Centering]. Press [OK]. Press [Start]. Note: You cannot use the bypass tray with this function.


18 To set the Bypass tray as the cover paper source:- Press "User Tools" Select "System Settings" Select the "Paper Size" Settings" tab Select "Bypass" Select "Display" Select "Cover" Select "Mode Selected" Select "OK" Press "User Tools" again to exit Adding Covers To change between 1 and 2 sided covers:- Press "User Tools" Select "Copy Features" Select "Page Format" Select "Cover Mode" Select 1 or 2 sided covers Select "OK" Press "User Tools" to exit On the main screen:- Select "Cover/Slip sheet" Select "Front Cover" Select "Blank" or "Copy" Press "OK" Set the paper for the cover sheet on the bypass tray For 2 sided covers select "Duplex" Set the originals on the document feeder Select any additional options Enter desired number of copies Press Sample Copy Press Continue if sample set is correct.

![Copy Blank Press [Cover/Slip Sheet]. Press [Designate / Chapter].](/docs-images/62/46885197/images/19-1.jpg "Select [Designate: Copy] to copy designated page on the designated number page or Press [Designate: Blank].")

19 Designate Use this function to have certain pages of your original copied onto designation sheets or to insert a designation sheet for each page specified. Before using this option you must set up the paper trays under paper tray settings. Copy Blank Press [Cover/Slip Sheet]. Press [Designate / Chapter]. Select [Designate: Copy] to copy designated page on the designated number page or Press [Designate: Blank]. Not to copy anything on the specified page. Press the key to select the chapter number. Enter the page number of the first chapter using the numbers key, and then press the [#] key. You can continue to specify additional page location numbers, up the 20 locations may be selected. After making all settings, press [OK] twice. Press [Start] or [Sample Copy].

20 Sample Copy Use this option to check the copy settings before making a long copy run. Place originals Select any other necessary functions for copy job Enter number of desired copies Instead of [START] press [Sample Copy] key -One set is delivered as a sample If Sample Copy is acceptable, press [Continue] -The number of copies made is the number of copies requested minus the proof copy. Screen settings will change and display continue or Suspend. If you press [Suspend] after checking the results, return to step 1 to adjust the copy settings as necessary. -Depending on the combination of functions, you may not be able to change some settings. You can press [Sample Copy] again or press [Start] to output the job Note: This feature can only be used when [sort] is selected. This feature is not available from the [Simplified screen].


21 Using the By-pass Tray On copier panel press the # key Press Paper Size Place copy paper in tray Adjust tray paper guides to fit paper size Press Paper Type, Select Paper option, Press OK Press OK Place originals, enter desired number of copies, press START, Press Clear Modes

22 Job Preset New Job


23 Simplified Display Pressing the Simplified Display button will cause letters and keys to be displayed at a larger size, making operations easier. To access the [Simplified Display] Press the Simplified Display on the Main Screen Display s the basic copier functions Finishing options may be added to this screen for ease of use. Not all functions are available with this screen. Key color is only available in simplified display mode.
24 Accessing Document Server From Copy Panel Select Document Server Option Used for storing documents for easy access, confidential printing etc.
 -Electronic Distribution -HIPPA Compliancy -Label Printing -Cost")
25 Document Server Usage Documents may be scanned or Printed to Document Server for: -Confidential Printing -Print and Hold -Sample Printing -Forms printing -File Merge (different types) -Electronic Distribution -HIPPA Compliancy -Label Printing -Cost Savings


26 List view Document Server Displays Preview document Search by user name Details Preview File Management Delete File Print Specified Page Edit user & file Info Search by file name To Printing Screen Print one or multiple pages of a stored document Displays scan options Displays printing options of a stored file


27 Storing an Original Keyboard appears, type your document name If a password is required, enter a numerical value. System will prompt you to re-enter password, then press OK Place your document > Select any additional options > press [Start]

![Screen]. 2.](/docs-images/62/46885197/images/28-2.jpg "Select the document Name you want to")

28 Printing a Stored Document 4. To make changes Press the [To Printing Screen]. 2. Select the document Name you want to Print. [More than one job may be selected to print] 3. Press [Start] Press [Start] Files may be deleted after printing


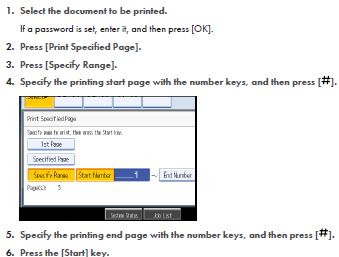
29 Printing a Specified Page or Page Range

30 Deleting a Stored File System will prompt you, Are you sure you want to delete file,
31 Ricoh Control Panel Clears screen to default settings 8.5 Full Color W-VGA Screen Hard function keys have Red/Yellow status LEDs Ready Not Ready
32 Fax Display Panel Add additional numbers to a memory transmission. Touch tabs to switch between transmission modes. Store fax document into the document server. Edit memory transmission settings and display information on communications. Preview fax before sending. Set scan settings and feed types. Select file type PDF or TIFF Program new number into a stored one touch button. Switches between memory and immediate transmission modes. You can only specify one address in immediate transmission mode. Allows you to send a file stored in the document server. Stored one touch fax numbers. Numbers can be added as groups or individually. Select for transmission and reception status of sent files. To Fax A Document Place Document in Feeder or on Glass Enter Fax Number using Key Pad or Select from Programmed List Press Start
![1. Press [Fax] or [Facsimile] Faxing from Copier 3.](/docs-images/62/46885197/images/33-2.jpg "Select Fax number from the shortcut menu or using the numeric key pad enter the recipients fax number as you would at a regular fax machine 2.")
33 1. Press [Fax] or [Facsimile] Faxing from Copier 3. Select Fax number from the shortcut menu or using the numeric key pad enter the recipients fax number as you would at a regular fax machine 2. Place Originals in feeder or on glass 4. Optional settings may be selected 5. Press [Start]
![1. Press [Fax] or [Facsimile] Storing a Fax Number 4. Use Keypad to enter company name 5.](/docs-images/62/46885197/images/34-0.jpg "Press [OK] 2. Press [Prog.")
![Dest] You can also program and change your fax numbers by doing the following: 1.](/docs-images/62/46885197/images/34-1.jpg "Press [User tools] 2. Systems Settings 3. Administrator Tools 4. Address book Mgmt. 5.")
![Press [New Program] 6.](/docs-images/62/46885197/images/34-3.jpg "At [Names] prompt, press [Change] enter Person or Company Name, press [OK] 8. Press [Fax No.] 9.")
34 1. Press [Fax] or [Facsimile] Storing a Fax Number 4. Use Keypad to enter company name 5. Press [OK] 2. Press [Prog. Dest] You can also program and change your fax numbers by doing the following: 1. Press [User tools] 2. Systems Settings 3. Administrator Tools 4. Address book Mgmt. 5. Press [New Program] 6. At [Names] prompt, press [Change] enter Person or Company Name, press [OK] 8. Press [Fax No.] 9. Enter Fax# 10. Press [OK] To add additional numbers, repeat steps 5 thru Press [Fax Dest.] 7. Use keypad to enter [Fax# ] 3. At [Names] press [Change] Press [OK]


35 Changing or Deleting a Fax Destination
![Faxing From Desktop 1. Open the document you wish to fax 2. Select [File], then [Print] 3.](/docs-images/62/46885197/images/36-1.jpg "In the [Name] list, click the LAN-Fax M8 driver 4. Press [OK] or [Print]. 5.")
![At [Fax Number] type the Recipient's Fax# just as if you were manually dialing the number at a Fax Machine or select from](/docs-images/62/46885197/images/36-2.jpg "[Address Book], if the number is already pre-programmed in address book. 6.")
36 Faxing From Desktop 1. Open the document you wish to fax 2. Select [File], then [Print] 3. In the [Name] list, click the LAN-Fax M8 driver 4. Press [OK] or [Print]. 5. At [Fax Number] type the Recipient's Fax# just as if you were manually dialing the number at a Fax Machine or select from [Address Book], if the number is already pre-programmed in address book. 6. Press [Set as Destination] to confirm Recipient's destination. You can select more than one destination to send same fax. 7. Press [Send]
37 8. Check the box marked [Attach a Cover Sheet] 9. Click on [Cover Sheet] You can edit the cover page with your Company Name, Phone, Fax and information and save contents. Faxing From Desktop Cont. You can add a fax cover to your document with notes etc., 10. Press [Send]
38 Printing From Desktop

39 !. How to Print Documents from your PC Basic Printing 4. In the [Name] list, click the Ricoh Copier/printer you want to use 2. Open the document you wish to print 5. Enter desired number of copies. 3. Press File>Print>OK 6. Press [OK]
40 Printing [Duplexed] 2-sided Documents 1. Open the document you wish to print 2. Press File>Print>OK 4. Click the [Setup] tab, click your preferred two-sided printing method in the [Duplex] list, and then click [OK]. 3. In the [Name] list, click the Ricoh Copier/printer you want to use then press [Properties] 5. Before printing ensure that the orientation you select for printing matches the orientation of the paper in your device. Press [OK] >OK
41 Stapling Printing Documents 1. Open the document you wish to print 4. Click the [Setup] tab, click your preferred two-sided printing method in the [Duplex] list, and then click [OK]. 2. Press [File]>[Print]>[OK] 5. Before printing ensure that the orientation you select for Stapling matches the orientation of the paper in your device. Press [OK] >OK 3. In the [Name] list, click the Ricoh Copier/printer you want to use then press [Properties]


42 Printing Options You can send documents to the copier to be held for later pick-up, confidential printing, for sample printing or to the document server for reprinting. See next page for options break-out of these features.


43 Printer Properties Job Type Locked Print: Temporarily holds print jobs in the memory until a valid password is entered at the control panel. Files are automatically deleted from the system HDD after printing. Hold Print: Temporarily holds multiple print files in the memory until selected. Does not require the user to enter a password. Sample Print: Outputs the first set of a multiple-set print job so that output settings can be checked for accuracy prior to printing the entire job. Stored Print/Store and Print: Identical in functionality to Hold Print, except files are not immediately deleted after printing. Store and Print enables users to print files immediately while simultaneously storing data. 4-8 digit password is optional. Document Server: Sends files directly to the document server for storage and printing at a later date.

44 Accessing Confidential Documents Press Printer to access the list of stored files from your computer as listed on right:-

![desktop that were sent via confidential [locked print] or other option from desktop.](/docs-images/62/46885197/images/45-1.jpg "Highlight file and select print.")
![Press [Printer] Press [Print Jobs] Select your job and follow the next steps or](/docs-images/62/46885197/images/45-2.jpg "press [Start] to output your document.")
45 Printer must be online to be able to submit work via desktop Main Display Printer Display Panel Print Jobs List Use the Printer button to access print jobs from the desktop that were sent via confidential [locked print] or other option from desktop. Highlight file and select print. Press [Printer] Press [Print Jobs] Select your job and follow the next steps or press [Start] to output your document. If you submitted your print job via the locked Print feature, you will now be prompted for your password.
46 Scanning Documents From Copier Panel, Select Scanner Place the documents to be scanned in the Document Feeder or on the Platen Glass and Select the appropriate options for your Documents where necessary. (Note: Screenshots are provided for reference purposes only. Your display may vary depending on your operating system and device.)
47 Scanner Display Panel Check file status. Select tabs to switch between and folder scan destinations. Set resolution, scan size & scan type. Preview scan before sending. For manual entry One or two sided original. Program destinations into one touch buttons. Groups and individual addresses can be programmed. Set file types between multi and single page PDF, TIFF and JPEG* Select file stored in the document server. Add message. Add security features to document i.e. encryption & signature. Set up notification when your is opened. * JPEG scanning in single page mode only. Add subject heading. Set sender from list of registered users. (Note: Screenshots are provided for reference purposes only. Your display may vary depending on your operating system and device.)
![Basic Scanning 1. At copier Screen Press [Scanner] 2. Select [E-mail] or [Folder] Tab 3. Select destination [email address or folder location 4.](/docs-images/62/46885197/images/48-0.jpg "Place Originals in Feeder or on Glass 5. Press [Start] (Note: Screenshots are provided for reference purposes only.")
48 Basic Scanning 1. At copier Screen Press [Scanner] 2. Select [ ] or [Folder] Tab 3. Select destination [ address or folder location 4. Place Originals in Feeder or on Glass 5. Press [Start] (Note: Screenshots are provided for reference purposes only. Your display may vary depending on your operating system and device.)
![Scanning Options must be selected before pressing the [START] button!](/docs-images/62/46885197/images/49-1.jpg "Preview scan before sending.")

49 Scanning Options must be selected before pressing the [START] button! Preview scan before sending. Drop Out Color From Documents Select Document Types Check file status. (Note: Screenshots are provided for reference purposes only. Your display may vary depending on your operating system and device.)

50 Viewing the Job at your Desktop (Note: Screenshots are provided for reference purposes only. Your display may vary depending on your operating system and device.)
www.ricoh-usa.com Ricoh Product Line Segment 2 thru 6 MP/5000/5001, MP C5000/C6000/C6501, MP7000/8000, MP6001/7001, MP8001/9001, MP907EX
 www.ricoh-usa.com Ricoh Product Line Segment 2 thru 6 MP/5000/5001, MP C5000/C6000/C6501, MP7000/8000, MP6001/7001, MP8001/9001, MP907EX Understanding Your Ricoh Control Panel To access system administrator
RICOH. Quick User Guide For Copying, Printing E-mailing and Faxing
 RICOH Quick User Guide For Copying, Printing E-mailing and Faxing 1 Index Chapter 1: Chapter 2: Navigating the Ricoh Operation Panel Chapter 3: Making a Copy Chapter 4: Sending a Fax Enter a Fax Number
Quick Reference Guide. copy. locked print. fax. scan-to-email
 Quick Reference Guide copy locked print fax scan-to-email Copy Basic Copy Procedure 3 Place original(s) face up in the Auto Document Feeder, or face down on the Platen Glass.. Select the [Copy] function
Quick Reference. Store this guide next to the machine for future reference. ENG
 Quick Reference Store this guide next to the machine for future reference. ENG Contents * Screen shots used in this manual may differ from the ones you actually see. Things You Can Do with This Device...........................................................................................................
 - - - - - - 601/751 Print To access the print driver in most programs: 1. File Print 2. From the dropdown box next to Name, select the Bizhub 601/751 Printer 3. Click the Properties or Preferences button
MFD User Guide. Ver 1.3
 MFD User Guide Ver 1.3 CONTENTS CONTROL PANEL Page 4 An overview of the function buttons. MFD BASICS Page 5 Explains some of the most commonly used buttons. COPIER Double-sided Page 7 Make 2-sided copies
DIGITAL MULTIFUNCTIONAL SYSTEM
 MODEL: MX-M283N MX-M363N MX-M453N MX-M503N DIGITAL MULTIFUNCTIONAL SYSTEM Quick Start Guide Before using the machine Functions of the machine and procedures for placing originals and loading paper. Copying
CONTENT. 1 Normal Printing. 2 Secure Printing. 3 Faxing from PC. 4 Setting Mailbox. 5 Scanning documents into mailbox. 6 Retrieve Scanned Image
 CONTENT 1 Normal Printing 2 Secure Printing 3 Faxing from PC 4 Setting Mailbox 5 Scanning documents into mailbox 6 Retrieve Scanned Image 7 Scanning Documents to Ifax 8 Setting Of Speed Dial Via Internet
Faxing. Fax Overview
 Fax Overview Faxing is an optional printer feature providing several methods for faxing an original document. Embedded Fax: Document is scanned and sent directly to a fax machine. Server Fax: Document
Xerox ColorQube 9201/9202/9203 Quick Use Guide
 Xerox ColorQube 9201/9202/9203 2009 Xerox Corporation. All Rights Reserved. Unpublished rights reserved under the copyright laws of the United States. Contents of this publication may not be reproduced
Xerox WorkCentre 6655 Color Multifunction Printer Control Panel
 Control Panel Available services can vary on your printer setup. For details about services and settings, see the User Guide. 3 4 5 Touch screen Menus 6 6 Alphanumeric keypad 7 Job controls 7 Services
FAQ: How to copy? Step-by-Step-Instructions for advanced Functions. 1. Preview: Checking the preview image before copying.
 FAQ: How to copy? Step-by-Step-Instructions: Advanced Functions 1 FAQ: How to copy? Step-by-Step-Instructions for advanced Functions. 1. Preview: Checking the preview image before copying... 3 2. Copy
CANON USER GUIDE. 1. How to register and print with your LSE ID Card 2. Changing print settings 3. Scan to email 4. How to copy
 CANON USER GUIDE 1. How to register and print with your LSE ID Card 2. Changing print settings 3. Scan to email 4. How to copy 1 How to register and print with your LSE ID Card 1 Getting Started: 2 To
Plain-paper digital Fax/Copier/Printer/Scanner Scanner and Fax Guide
 Plain-paper digital Fax/Copier/Printer/Scanner Scanner and Fax Guide Please read this guide before operating this machine. After you finish reading this guide, keep it handy for easy reference. Chapter
Quick Reference. Store this guide next to the machine for future reference. ENG
 Quick Reference Store this guide next to the machine for future reference. ENG Contents * Screen shots used in this manual may differ from the ones you actually see. Things You Can Do With This Device.....................................................................................................
Legal Notes. Regarding Trademarks. Model supported by the KX printer driver. 2010 KYOCERA MITA Corporation
 Legal Notes Unauthorized reproduction of all or part of this guide is prohibited. The information in this guide is subject to change for improvement without notice. We cannot be held liable for any problems
Operating Instructions
 Operating Instructions (For Facsimile and Internet Fax) Digital Color Imaging Systems Model No. DP-C406 / C306 / C266 Before operating this machine, please carefully read this manual, and keep this documentation
Ricoh Copier Scan to File Instructions
 Overview Ricoh Copier Scan to File Instructions Your new Ricoh copier provides scanning functions to: Scan documents up to 11 by 17 Convert them to Adobe Acrobat PDF file or TIFF file format and then either:
Photocopying and scanning
 Photocopying and scanning Logging in at the copier Scan your card using the Barcode Scanner at the copier Press in the PIN field Enter your PIN, and then press OK. 1 Photocopying 1. Position your document
X644e, X646e. User s Guide. www.lexmark.com. January 2006
 X644e, X646e User s Guide January 2006 www.lexmark.com Lexmark and Lexmark with diamond design are trademarks of Lexmark International, Inc., registered in the United States and/or other countries. 2006
User Guide. Printing, Copying and Scanning
 User Guide Printing, Copying and Scanning A few important things to know ( for successful printing, copying and scanning) 1. You will need sufficient credit on your printing account to release your printing.
ADMINISTRATOR SETTINGS GUIDE PURPOSE OF THE ADMINISTRATOR SETTINGS ADMINISTRATOR SETTINGS LIST USING THE ADMINISTRATOR SETTINGS
 ADMINISTRATOR SETTINGS GUIDE DIGITAL MULTIFUNCTIONAL SYSTEM This manual explains settings for use by the administrator of the machine. PURPOSE OF THE ADMINISTRATOR SETTINGS ADMINISTRATOR SETTINGS LIST
Printing - User Guide
 Printing - User Guide ir Version 1 July 2005 http://www.canon.co.uk www.canon.co.uk Page 1 Contents Key Contacts...3 Introduction...4 INFORMATION TO CHECK BEFORE PRINTING...5 PRINTER DRIVER TRAINING NOTES...6
Interactive Whiteboard Functionality Overview... 4. Choosing Pen Style... 5. Erasing / Modifying Writing... 6. Undo / Redo... 6. Email...
 Quick Start Guide 1 Stand-alone Usage Interactive Whiteboard Functionality Overview... 4 Choosing Pen Style... 5 Erasing / Modifying Writing... 6 Undo / Redo... 6 Email... 7 Import / Open file... 7 Saving
Integrated Cloud Environment Scan to Oracle Cloud User s Guide
 Integrated Cloud Environment Scan to Oracle Cloud User s Guide 2012-2015 Ricoh Americas Corporation It is the reader's responsibility when discussing the information contained this document to maintain
Overview. Quick User Guide. Copy. ApeosPort-IV C5570/4470/3370/2270 DocuCentre-IV C5570/4470/3370/2270. Fax. Scan. Print. Job Status.
 Quick User Guide ApeosPort-IV C5570/4470/3370/2270 DocuCentre-IV C5570/4470/3370/2270 Setup Job Status Print Overview Copy Scan Fax This User Guide is printed on FUJI XEROX Office Color Capable Products.
A How To Guide for irc 1028 Printer
 A How To Guide for irc 1028 Printer 1. How to Login & Pull Print 2. How to copy 3. How to change your print job settings (PC) 4. How to scan and send to your email 5. How to delete your print job in the
Operation Guide <Functions Edition> Click on the button to jump to the desired section.
 Operation Guide Click on the button to jump to the desired section. Using the Scanner Function Sending Scanned Image Data to Your Computer Sending Scanned Image Data by Email Using
UniFLOW Print and Copy Instructions for Students
 UniFLOW Print and Copy Instructions for Students Getting Started, Setting up your PIN Page 2 Purchasing Credits for printing and Photocopying Page 4 How to use the MFD Page 8 Photocopying Page 10 Printing
From a school district computer, using Internet Explorer, type copycenter into the address bar.
 How to Create a Remote Print account From a school district computer, using Internet Explorer, type copycenter into the address bar. From home, using a computer connected to the Internet, type http://www.scps.info
Scan to PC. Create a scan profile... 2. Custom Scan to PC settings... 7. Make copies. Send faxes
 1 Create a scan profile.................... 2 Use ScanBack utility...................... 2 Use the MarkNet web pages................ 4 Custom settings............. 7 Create a scan profile 2 A scan profile
d-color MF 2 Code: 57
 d-color MF 2 d-color MF2 2/d-COLOR MF 2 d-color MF452/d-COLOR MF552 Code: 57 PUBLICATION ISSUED BY: Olivetti S.p.A. Gruppo Telecom Italia Via Jervis, 77-10015 Ivrea (ITALY) www.olivetti.com Copyright 2012,
OPERATION MANUAL. (for image send) LASER PRINTER
 LASER PRINTER") OPERATION MANUAL (for image send) LASER PRINTER INTRODUCTION This manual explains the scanner function, the Internet fax function, and the metadata send function of the machine. To use these functions,
OPERATION MANUAL (for image send) LASER PRINTER INTRODUCTION This manual explains the scanner function, the Internet fax function, and the metadata send function of the machine. To use these functions,
Introduction. KIC Help Desk Guide Page 1
 Introduction Knowledge Imaging Center (KIC) kiosks are public self-serve scanning/copying systems for students, faculty, researchers, administrators and the general public. KIC systems make it fast and
Sending Fax Documents from Computers
 6. LAN-Fax Features Sending Fax Documents from Computers The optional printer/scanner unit is required. Using computers connected to the machine through parallel ports, IEEE 1394 (IP Over 1394) ports,
Phaser 3635MFP Quick Use Guide
 Phaser 3635MFP Quick Use Guide Version 3.2 25.01.08 Quick Use Guide Phaser 3635MFP Xerox Phaser 3635MFP Quick Use Guide Thank you for choosing the Phaser 3635MFP. If you work through the procedures in
Introduction. KIC Help Desk Guide v. 2.7
 Introduction Knowledge Imaging Center (KIC) kiosks are public self-serve scanning/copying systems for students, faculty, researchers, administrators and the general public. KIC systems make it fast and
Creating a Poster in PowerPoint 2010. A. Set Up Your Poster
 View the Best Practices in Poster Design located at http://www.emich.edu/training/poster before you begin creating a poster. Then in PowerPoint: (A) set up the poster size and orientation, (B) add and
Understanding the home screen
 Quick Reference Learning about the printer Using the printer control panel 1 2 3 4 5 6 Understanding the home screen When the printer is turned on, the display shows a basic screen, referred to as the
Understanding the home screen
 Quick Reference Learning about the printer Using the printer control panel 1 2 3 4 5 6 Understanding the home screen When the printer is turned on, the display shows a basic screen, referred to as the
How To Use A Powerpoint 3D Printer On A Pc Or Mac Or Mac (For Pc Or Ipad) On A Mac Or Ipod (For Mac) On An Ipod Or Ipo (For Ipo) On Pc Or Pc
 On A Mac Or Ipod (For Mac) On An Ipod Or Ipo (For Ipo) On Pc Or Pc") Xerox ColorQube 90 / 90 / 90 Control Panel Available services can vary on your printer setup. For details about services and settings, see the User Guide.? Menus GHI PRS 7 * ABC JKL TUV 8 0 DEF MNO 6 WXY
Xerox ColorQube 90 / 90 / 90 Control Panel Available services can vary on your printer setup. For details about services and settings, see the User Guide.? Menus GHI PRS 7 * ABC JKL TUV 8 0 DEF MNO 6 WXY
Version 1.0 09/10. Xerox ColorQube 9301/9302/9303 Administration and Accounting
 Version 1.0 09/10 Xerox ColorQube 9301/9302/9303 2010 Xerox Corporation. All Rights Reserved. Unpublished rights reserved under the copyright laws of the United States. Contents of this publication may
V1.0 April 2010. Xerox WorkCentre 3550 User Guide
 V1.0 April 2010 Xerox WorkCentre 3550 2010 Xerox Corporation. All Rights Reserved. Unpublished rights reserved under the copyright laws of the United States. Contents of this publication may not be reproduced
Snap 9 Professional s Scanning Module
 Miami s Quick Start Guide for Using Snap 9 Professional s Scanning Module to Create a Scannable Paper Survey Miami s Survey Solutions Snap 9 Professional Scanning Module Overview The Snap Scanning Module
PostScript User Guide 604P17454_EN
 CopyCentre C118 WorkCentre M118/M118i PostScript User Guide 604P17454_EN Prepared by: The Document Company Xerox GKLS European Operations Bessemer Road Welwyn Garden City Hertfordshire AL7 1HE ENGLAND
Xerox WorkCentre 7800 Series Control Panel
 Control Panel Available services can vary on your printer setup. For details about services and settings, see the User Guide. ABC DEF Menus GHI PQRS 7 JKL TUV 8 MNO 6 WXYZ 9 7 Job controls 0 # C Touch
Advanced User s Guide
 Advanced User s Guide MFC-J6920DW MFC-J6925DW Version A UK/IRE/GEN User's Guides and where do I find them? Which Guide? What's in it? Where is it? Product Safety Guide Quick Setup Guide Basic User s Guide
Océ 31x5E. Print jobs and job management
 Océ 31x5E Print jobs and job management Océ-Technologies B.V. Trademarks All trademarks mentioned in this manual are the exclusive property of the respective parties and are hereby acknowledged by Océ-Technologies
Xerox DocuPrint P12 Print Driver User Guide
 Xerox DocuPrint P12 Print Driver User Guide Xerox Corporation 800 Phillips Road Webster, New York 14580 1998 Xerox Corporation. Xerox, The Document Company, the stylized X, and the identifying product
Learning about your All-In-One on page 9. Information about the printer parts and software. How to use your All-In-One in a network environment.
 X6100 Series User s Guide for Windows Learning about your All-In-One on page 9 Information about the printer parts and software. Networking on page 75 How to use your All-In-One in a network environment.
Setting up Scan to Email
 Setting up Scan to Email Basic information provided from the end user or the customer s IT staff: Static IP for the copier Subnet Mask (use IPCONFIG Command if not provided) Gateway (use IPCONFIG Command
BDMS Banner Document Management Suite DRAFT User Instructions Page 1 of 19
 DRAFT Page 1 of 19 INTRODUCTION BDMS is an imaging and electronic document management system for clients who use Banner products. It is designed to meet the imaging and document management requirements
Scanner Reference. Operating Instructions
 Operating Instructions Scanner Reference 1 2 3 4 5 6 7 Sending Scan Files by E-mail Sending Scan Files by Scan to Folder Storing Files Using the Scanner Function Delivering Scan Files Scanning Originals
Scanning. WorkCentre C2424 Copier-Printer
 Scanning This chapter includes: "Basic Scanning" on page 4-2 "Installing the Scan Driver" on page 4-4 "Adjusting Scanning Options" on page 4-5 "Retrieving Images" on page 4-11 "Managing Files and Controlling
Printer / Scanner Reference
 Operating Instructions Printer / Scanner Reference 1 2 3 4 5 6 Getting Started Installing the Software Using the Printer Function Using the TWAIN Scanner Function Troubleshooting Appendix Read this manual
HP LaserJet P2050 Series Printer Print tasks
 Cancel a print job Stop the current print job from the control panel Press the Cancel button on the control panel. OK Stop the current print job from the software program When you send the print job, a
HP Color LaserJet CM6030 and CM6040 MFP Series Use output finishers
 Print to the optional -bin stapler/stacker. If you have the optional stapler/stacker the following options are available: Job offset: Each copy of a job is shifted to one side in the output bin in order
Integrated Cloud Environment Google Drive User s Guide
 Integrated Cloud Environment Google Drive User s Guide 2012-2015 Ricoh Americas Corporation It is the reader's responsibility when discussing the information contained this document to maintain a level
Integrated Cloud Environment Box User s Guide
 Integrated Cloud Environment Box User s Guide 2012-2015 Ricoh Americas Corporation It is the reader's responsibility when discussing the information contained this document to maintain a level of confidentiality
ADVANCED USER S GUIDE
 ADVANCED USER S GUIDE MFC-J6910DW Version 0 UK/IRE/GEN User's Guides and where do I find it? Which manual? What's in it? Where is it? Safety and Legal Quick Setup Guide Basic User's Guide Advanced User's
Scanned image. If multiple scanner installed in the computer then click here to select desired scanner. Select Resolution, Color, and Scan Type.
 Objectives & Goals Scanning & Document Management Opening & Understanding Multi Scan/Select Scanning & Drag/Drop Documents Set Document Details Set Reminders, Actions and Links Create New Document From
Frequently Asked Questions
 Frequently sked Questions Store this guide next to the machine for future reference. ENG Contents * Screen shots used in this manual may differ from the ones you actually see. Copy Functions Q1 I want
Advanced User s Guide
 Advanced User s Guide FAX-2840 FAX-2845 FAX-2940 Not all models are available in all countries. Version 0 UK/IRE User s Guides and where do I find them? Which Guide? What s in it? Where is it? Product
User Support Manual KIDS IEP AND DATA MANAGEMENT SOFTWARE PROGRAM. Customized Relational Technology, Inc.
 Customized Relational Technology, Inc. 17726-J Oak Park Ave., Tinley Park, IL 60477 Phone: (708) 532-7022 Fax: (708) 532-7028 Toll Free: (866) 640-KIDS (5437) Email: support@iep-crt.com User Support Manual
AR-NB2 A NETWORK EXPANSION KIT. OPERATION MANUAL (for network scanner) SCANNER FUNCTION 17 USING THE NETWORK
 SCANNER FUNCTION 17 USING THE NETWORK") MODEL AR-NB A NETWORK EXPANSION KIT OPERATION MANUAL (for network scanner) Page INTRODUCTION BEFORE USING THE NETWORK SCANNER FUNCTION USING THE NETWORK SCANNER FUNCTION 7 TROUBLESHOOTING SHARPDESK CD-ROM
MODEL AR-NB A NETWORK EXPANSION KIT OPERATION MANUAL (for network scanner) Page INTRODUCTION BEFORE USING THE NETWORK SCANNER FUNCTION USING THE NETWORK SCANNER FUNCTION 7 TROUBLESHOOTING SHARPDESK CD-ROM
Merging Labels, Letters, and Envelopes Word 2013
 Merging Labels, Letters, and Envelopes Word 2013 Merging... 1 Types of Merges... 1 The Merging Process... 2 Labels - A Page of the Same... 2 Labels - A Blank Page... 3 Creating Custom Labels... 3 Merged
Legal Notes. Regarding Trademarks. 2013 KYOCERA Document Solutions Inc.
 Legal Notes Unauthorized reproduction of all or part of this guide is prohibited. The information in this guide is subject to change without notice. We cannot be held liable for any problems arising from
August 2010 05-0805-000. Xerox DocuMate 3920. User s Guide
 August 2010 05-0805-000 Design 2010 Xerox Corporation. All rights reserved. XEROX, XEROX and Design and DocuMate are trademarks of Xerox Corporation in the United States and/or other countries. Content
MULTIFUNCTIONAL DIGITAL SYSTEMS. Scanning Guide
 MULTIFUNCTIONAL DIGITAL SYSTEMS Scanning Guide 2009 KYOCERA MITA Corporation All rights reserved Preface Thank you for purchasing Multifunctional Digital Color Systems. This manual provides instructions
MULTIFUNCTIONAL DIGITAL COLOR SYSTEMS. Printing Guide
 MULTIFUNCTIONAL DIGITAL COLOR SYSTEMS Printing Guide 009 KYOCERA MITA Corporation All rights reserved. Preface Thank you for purchasing Multifunctional Digital Color Systems. Also this guide describes
MULTIFUNCTIONAL DIGITAL SYSTEMS. Network Fax Guide
 MULTIFUNCTIONAL DIGITAL SYSTEMS Network Fax Guide 2009 KYOCERA MITA Corporation All rights reserved Preface Thank you for purchasing Multifunctional Digital Color Systems. This manual explains the instructions
Scan to PC Desktop: Image Retriever 5.2 for Xerox WorkCentre C2424
 Scan to PC Desktop: Image Retriever 5.2 for Xerox WorkCentre C2424 Scan to PC Desktop includes Image Retriever, which is designed to monitor a specified folder on a networked file server or local drive
User s Guide [Network Scan/Fax/Network Fax Operations]
![User s Guide [Network Scan/Fax/Network Fax Operations]](/thumbs/27/11353988.jpg "User s Guide [Network Scan/Fax/Network Fax Operations]") User s Guide [Network Scan/Fax/Network Fax Operations] Table of contents 1 Introduction 1.1 Welcome... 1-2 1.1.1 User's guides... 1-2 1.1.2 User's Guide... 1-3 1.2 Conventions used in this manual... 1-4
User s Guide [Network Scan/Fax/Network Fax Operations] Table of contents 1 Introduction 1.1 Welcome... 1-2 1.1.1 User's guides... 1-2 1.1.2 User's Guide... 1-3 1.2 Conventions used in this manual... 1-4
17 April 2014. Remote Scan
 17 April 2014 Remote Scan 2014 Electronics For Imaging. The information in this publication is covered under Legal Notices for this product. Contents 3 Contents...5 Accessing...5 Mailboxes...5 Connecting
MULTIFUNCTIONAL DIGITAL SYSTEMS. Scanning Guide
 MULTIFUNCTIONAL DIGITAL SYSTEMS Scanning Guide 2011 TOSHIBA TEC CORPORATION All rights reserved Under the copyright laws, this manual cannot be reproduced in any form without prior written permission of
Microsoft Word 2010 Prepared by Computing Services at the Eastman School of Music July 2010
 Microsoft Word 2010 Prepared by Computing Services at the Eastman School of Music July 2010 Contents Microsoft Office Interface... 4 File Ribbon Tab... 5 Microsoft Office Quick Access Toolbar... 6 Appearance
What You Can Do with Canon Mobile Scanning for Business
 What You Can Do with Canon Mobile Scanning for Business You can scan, manage documents, and print from an iphone or ipad using a Canon multifunction device on a network. New Functions in This Version Support
This guide describes the action to take when a paper jam or other problem occurs.
 This guide describes the action to take when a paper jam or other problem occurs. Applicable Printer models 9050/9050R 7050/7050R/7010/7010R 3050/3050R/3010/3010R CAUTION After reading this guide, keep
Advanced User s Guide
 Advanced User s Guide MFC-8950DW MFC-8950DWT Not all models are available in all countries. Version 0 USA/CAN User's Guides and where do I find them? Which Guide? What's in it? Where is it? Product Safety
ADVANCED USER S GUIDE
 ADVANCED USER S GUIDE MFC-9970CDW Version A USA/CAN User's Guides and where do I find it? Which manual? What's in it? Where is it? Safety and Legal Quick Setup Guide Basic User's Guide Advanced User's
KIP 3000 Series MULTIFUNCTION SIMPLICITY
 KIP 3000 Series MULTIFUNCTION SIMPLICITY KIP 3000 SERIES SYSTEMS The KIP 3000 is a highly hl advanced d wide format digital copy system that provides the ability to easily add network printing and scan-to-file
Customer Release Notes for Xerox Integrated Fiery Color Server for the Xerox Color C75 Press, version 1.0
 Customer Release Notes for Xerox Integrated Fiery Color Server for the Xerox Color C75 Press, version 1.0 This document contains important information about this release. Be sure to provide this information
WorkCentre 5632/5638/5645/5655/5665/5675/5687. Quick Use Guide MAXIMISE YOUR PRODUCTIVITY...
 WorkCentre 563/5638/5645/5655/5665/5675/5687 Quick Use Guide 604P90C MAXIMISE YOUR PRODUCTIVITY......by taking advantage of all the capabilities of your device. An Interactive User Guide CD is supplied
2016 Xerox ConnectKey Technology-enabled MFPs Comparison White Paper
 06 Xerox ConnectKey Technology-enabled MFPs Comparison White Paper Executive Summary The information in this document is intended to provide a summary, or where appropriate to avoid duplication, a reference
BookMaker. User Guide Windows & Mac OSX. Devalipi Software www.devalipi.com. The Easiest Professional Digital Book Printing Tool
 1.1 BookMaker User Guide Windows & Mac OSX The Easiest Professional Digital Book Printing Tool Devalipi Software www.devalipi.com Features 2up Book printing made easy! Creates Book PDF directly from one
Communicate: In Print
 Communicate: In Print A simple guide Work areas Communicate: In Print has two different modes in which to edit your documents: Create and Adjust modes. These are easily interchangeable and the toolbars
Troubleshooting. Operating Instructions
 Operating Instructions Troubleshooting 1 2 3 4 5 6 7 8 When the Machine Does Not Operate As Wanted Troubleshooting When Using the Copy Function Troubleshooting When Using the Facsimile Function Troubleshooting
Configure a scanning device Install ImageNow If you are using Kofax/VRS, install the Kofax application as an administrator. the following procedure.
 Setting Up the ImageNow Scanner and ImageNow Printer To perform these procedures, you must be a manager or local admin in ImageNow. To create a scanning profile, the user logged in to the local machine
Integrated Cloud Environment OneDrive User s Guide
 Integrated Cloud Environment OneDrive User s Guide 2012-2015 Ricoh Americas Corporation It is the reader's responsibility when discussing the information contained this document to maintain a level of
Network FAX Driver. Operation Guide
 Network FAX Driver Operation Guide About this Operation Guide This Operation Guide explains the settings for the Network FAX driver as well as the procedures that are required in order to use the Network
PRINTER / PC-FAX USER S GUIDE. Intelli FAX-2820 Intelli FAX-2920
 PRINTER / PC-FAX USER S GUIDE Intelli FAX-2820 Intelli FAX-2920 Table of Contents 1 Using the machine as a printer Using the Brother printer driver...1-1 How to print your document...1-1 Printing from
Mobile Print/Scan Guide for Brother iprint&scan
 Mobile Print/Scan Guide for Brother iprint&scan Version G ENG Definitions of notes We use the following icon throughout this user s guide: Notes tell you how you should respond to a situation that may
State of Ohio DMS Solution for Personnel Records Training
 State of Ohio DMS Solution for Personnel Records Training 1 Contents LOGGING IN AND THE BASICS... 3 LOGGING INTO THE DMS... 3 NAVIGATING THE UNITY CLIENT... 4 CREATING PERSONAL PAGES... 6 ADDING WEB LINKS
Xerox 700 Digital Color Press with Integrated Fiery Color Server. Utilities
 Xerox 700 Digital Color Press with Integrated Fiery Color Server Utilities 2008 Electronics for Imaging, Inc. The information in this publication is covered under Legal Notices for this product. 45072726
DDST Unit Type A / Type B. Printer / Scanner Reference. Operating Instructions
 DDST Unit Type A / Type B Operating Instructions Printer / Scanner Reference 1 2 3 4 5 6 Getting Started Installing the Software Using the Printer Function Using the TWAIN Scanner Function Troubleshooting
What You Can Do with Canon Mobile Scanning for Business
 What You Can Do with Canon Mobile Scanning for Business You can scan, manage documents, and print from an iphone or ipad using a Canon multifunction device on a network. Scan Receive data scanned on a
UNIVERSITY INFORMATION TECHNOLOGY SERVICES IT TRAINING. OnBase Training Guide. Document Prepare and Scan
 UNIVERSITY INFORMATION TECHNOLOGY SERVICES IT TRAINING OnBase Training Guide Document Prepare and Scan About IT Training The University Information Technology Services (UITS) IT Training program at Indiana
Version 6.x Generic. KYOCERA KX DRIVER 6.x USER GUIDE
 Version 6.x Generic KYOCERA KX DRIVER 6.x USER GUIDE Legal Notes Unauthorized reproduction of all or part of this guide is prohibited. The information in this guide is subject to change without notice.
LABELS ANYWHERE FAQ. A: The system requires you to download ActiveX component the first time you attempt to print labels.
 Active X LABELS ANYWHERE FAQ Q: Do I have to download anything special to print labels? A: The system requires you to download ActiveX component the first time you attempt to print labels. Q: What is ActiveX?
Sage Abra SQL HRMS Reports. User Guide
 Sage Abra SQL HRMS Reports User Guide 2010 Sage Software, Inc. All rights reserved. Sage, the Sage logos, and the Sage product and service names mentioned herein are registered trademarks or trademarks