lindab we simplify construction Table of contents
|
|
|
- Matthew Woods
- 7 years ago
- Views:
Transcription


1
2 Table of contents 1. General information Features Definitions Toolbars Tools Working method Exterior wall scenario Interior wall scenario LindabRevitTools (68)
3 1. General information Platforms LindabRevitTools 2016 is designed for Autodesk Revit Architecture 2016 and Autodesk Revit Structure Editions The extension is available in two editions; Standard and Professional. The Standard Edition is optimized for architects. It contains tools for defining, selecting, creating, converting and tagging Lindab walls. It also contains tools for work sharing and wall section schedules. The Professional Edition is optimized for engineers, estimators, contractors and builders. It contains tools for framing, material lists and wall sheets. The tools available in the Standard Edition are also available in the Professional Edition. The extension is designed in two editions for ease of use purposes. The toolbar and some of the dialogs will look different dependent on the edition used. Licensing The following license options are applicable: Single-User license, Internet based This license type is given to members of Lindab s Information Gateway. If you are not a member, apply for membership at Company license, Internet based This license type is created upon request for large scale user scenarios. Contact Lindab on lindabrevittools@lindab.com for more information. Both license options are free of charge but the usage of the extension should comply with the extension EULA (End-User License Agreement) given during the installation. LindabRevitTools (68)


4 Display language The extension is available in two display languages; Swedish and English. The display language is chosen according to the settings made in the Regional and Language Options in the Windows Control Panel. 2. Features Work sharing The extension is designed to support sharing of families, wall definitions and wall layer definitions. The location of these folders is given to a set of pre-defined project parameters. If a server or another shared location is used, multiple users can work with the same content in the same project. Clearance for walls This feature makes it possible to design walls in its full sizes which speeds up the design process considerably. The clearance values are first considered when the framing or specification tools are used. The clearance values can be assigned in general for different wall types (exterior, interior, bearing, nonbearing) or wall for wall using an override option. The clearance feature is mostly used for infill wall projects. LindabRevitTools (68)


5 Clearance for windows, doors and gates The clearance values for windows, doors and gates are handled using family type parameters. The most time saving solution is to use clearance values for walls and openings simultaneously. Definitions for walls and wall layers Wall and wall layer definitions are managed using graphical interfaces which are easy and clear to work with. Each definition can be stored in different libraries to increase control and reusability. Definitions can be created as user specific or company/project specific depending on working method and project type. The extension comes with a predefined library but new libraries/definitions can be added when needed. Wall types The extension offers three alternatives for creating wall types in projects. The first alternative is to create a wall type from a selected wall definition. This option is suitable when starting from scratch. The second alternative is appropriate when the project is designed with generic wall types, which are to be changed into Lindab wall types. There is a special converter tool available for this alternative which simplifies the work. The terms of contract for each project are usually the governing factor here. The third alternative is to create the wall types manually but it is a much more time consuming operation. The third alternative is the only option for exterior walls. LindabRevitTools (68)

6 Wall identification and tags Wall identification and tags are assigned with a special tool. One or multiple walls can be handled simultaneously. The wall tag family can be changed to comply with company or project guidelines. Framing Light gauge steel framing has never been easier. The customized framing tools for exterior and interior walls are interactive and show the framing in detail. The framing tools analyze the wall geometry together with the matching wall definition resulting in a default wall design. Lintels, strip steel reinforcements etc. can be added in the tool if needed before finalizing the wall design. The finalized wall design tool data is stored if changes need to be done later on. LindabRevitTools (68)


7 Wall joints Both the framing and the specification tools analyze the wall joints and the appropriate solution is given in the output results. Outer joints, inner joints and T-joints are handled automatically no matter if the joining walls are perpendicular or non-perpendicular to each other. The only exception to this automatic handling is exterior walls with cross laid layers; they must be perpendicular to each other. LindabRevitTools (68)
8 Wall section schedule The wall section schedule for Lindab interior wall types are generated automatically when needed. Both the predefined and user defined wall types are included in the print-out. Exterior wall type sections must be created manually. Material list The material lists for light gauge steel profiles and wall layer materials are created easily with the specification tools available. Steel profiles are shown with their exact length, amount, weight etc. Wall layer materials are shown with their gross and net area. The material list is shown in a grid where it can be filtered and grouped according to user requirements. The filtering and grouping possibilities are dependent on the identification parameters given for each wall in the project. If the walls are well specified, the filtering and grouping options increase and vice versa. The material list can be exported to excel when customized and ready. LindabRevitTools (68)


9 LindabRevitTools (68) lindab we simplify construction

10 Wall sheets The wall sheets are generated automatically and can be configured to comply with company and project guidelines. A special title block can be used, view templates can be assigned and sheets can be created as seen from the exterior or interior face. The sheets and their views are given the same identification parameters as the walls which gives alternatives for browser organization. LindabRevitTools (68)
11 3. Definitions These expressions are used frequently in the manual and their explanations are: Lindab wall elements A Lindab wall element is an exterior or interior light gauge steel frame created by the Exterior Wall or Interior Wall framing tool. The reference wall for the element can be both a Lindab wall and a wall. Lindab wall A Lindab wall is any exterior or interior wall that has a matching wall definition. Wall A wall is any exterior or interior wall that hasn t a matching wall definition. LindabRevitTools (68)


12 4. Toolbars Standard edition toolbar Professional edition toolbar LindabRevitTools (68)
13 5. Tools Ordinary tools Account This tool is used for configuring the account information. Activate This tool is used for activating the extension. Edit Wall This tool is used for specifying wall parameters for identification. A wall tag is created simultaneously if desired. Element Specification This tool is used for calculating the material list for light gauge steel profiles. The tool calculates the material list for Lindab wall elements. Exterior Wall This tool is used for light gauge steel framing of exterior walls. The tool is interactive and shows the framing in detail before it is created in the project. Exterior Wall Configurator This tool starts the Exterior Wall Configurator in which you can add, remove and edit exterior wall libraries and definitions. The efficiency in a project increases considerably when wall definitions is used. Find Wall This tool is used for finding and selecting walls with given wall id parameters. Interior Wall This tool is used for light gauge steel framing of interior walls. The tool is interactive and shows the framing in detail before it is created in the project. LindabRevitTools (68)
14 Interior Wall Configurator This tool starts the Interior Wall Configurator in which you can add, remove and edit interior wall libraries and definitions. The efficiency in a project increases considerably when wall definitions is used. Material Specification This tool is used for calculating the material list for wall layers. The tool calculates the material list for Lindab walls. Project Parameters This tool is used for specifying Lindab project parameters. This tool starts a new LindabRevitTools project and specifies the parameters that are used throughout the design. Quick Specification This tool is used for creating a quick specification of a single Lindab wall. The wall parameters for identification, the material list for light gauge steel profiles and the material list for wall layers are included. Support This tool shows the contact information for support. Use this contact information for all support issues and requests. Wall Converter This tool is used for converting generic interior wall types to Lindab interior wall types by matching performance. Wall Creator This tool is used for creating Lindab interior wall types from Lindab interior wall definitions. A matching wall section detail is created simultaneously if desired. Wall Layer Configurator This tool starts the Wall Layer Configurator in which you can add, remove and edit wall layer definitions. Wall layer definitions are used in the Interior wall configurator when creating new definitions. Wall Section Schedule LindabRevitTools (68)
15 This tool is used for creating wall section schedules for Lindab interior wall types. Wall Specification This tool is used for calculating the material list for light gauge steel profiles. The tool calculates the material list for Lindab interior walls. Wall Sheets This tool is used for creating wall sheets for Lindab wall elements. Quick Tools Set ID Parameters This tool is used for assigning ElementID parameters for all Lindab walls in one operation. The ElementID s are created on the form wall type name digit number. Ex. V Update Navisworks Parameters This tool is used for updating the parameters that can be read by the LindabNavisworksTools plugin inside Navisworks Simulate or Navisworks Manage. The wall parameters for identification, the material list for light gauge steel profiles and the material list for wall layers are included in export. Update Opening Parameters This tool is used for updating the ID parameters of windows, doors and gates used in Lindab walls. The tools simply copy the ID parameter values from the Lindab wall to the openings. Window, door and generic model families are handled. Update WallHeightID Parameters This tool is used for updating the WallHeightID parameters of Lindab walls. The tool calculates the wall height and writes the value to the parameter. The parameter value can then be used in user specific tags etc. LindabRevitTools (68)
16 Analyze Unhandled Elements This tool is used for analyzing walls that couldn t be handled when the Wall Specification or Material Specification tool was executed. The tool lists each and one of the unhandled walls and the reason why they couldn t be handled. Each wall can then be selected in the model so that the problem can be solved. All unhandled walls should be stepped through before proceeding with orders. Analyze Wall Elevations This tool is used for analyzing wall elevations of unhandled walls. Some walls can indicate an elevation problem even if there isn t any. Analyze Wall Joints This tool is used for analyzing wall joints of unhandled walls. Some walls can indicate a joint problem even if there isn t any. Find Element This tool is used for finding a specific element with the given UniqueID. The element doesn t have to be a wall; it can be any type of element. Show UniqueID This tool is used for showing the UniqueID of an element. LindabRevitTools (68)
17 6. Working method The LindabRevitTools extension contains a wide range of tools that can be used in different order and for different purposes. The options are many and there is no real right or wrong. However, there are limitations in the handling of exterior and interior walls and they don t give the same opportunities for output. To reflect the differences in exterior and interior wall handling, two scenarios will be described in detail. Exterior wall scenario Interior wall scenario A normal project will most likely be designed using both the exterior and interior scenario and perhaps not all of their steps. Choose the parts applicable to the task. LindabRevitTools (68)

18 7. Exterior wall scenario LindabRevitTools (68)
19 Specify Project Parameters The first thing to accomplish in a LindabRevitTools project is to specify the project parameters. These parameters are used throughout the project and can be changed during the design process if needed. There is a special tool in the toolbar for this which is called Project Parameters. It opens the project parameters dialog were all parameters can be specified. The parameters in the dialog are shared parameters which are loaded into and stored specifically for the project. The majority of the parameters is invisible and can be changed in the project parameters dialog only. The project parameters dialog will always be the starting point in a new LindabRevitTools project, no matter what tool that is executed first. Identification: The identification section contains four parameters that are used when the identification tool (Edit Wall) is executed on a single wall. The identification values are then shown as default in the Edit Wall dialog. If multiple walls are selected, they are not used. LindabRevitTools (68)
20 Identification tag: The Create Tags parameter specifies whether identification family tags should be added to walls or not. If it is selected, it is possible to choose which identification parameters to use as the tag identification string. Usually more identification parameters are assigned walls compared to the ones shown in the tags. Tags are added to walls when the Edit Wall tool is executed. If any of the Show...InTag parameters are changed during the design process all existing tags will update accordingly. If the Create Tags is selected/deselected during the design process, existing tags will not be added or removed. Folder and file location: It is possible to assign a folder location for family overrides. The extension will first look in the overrides folder for the family and if it isn t found there, it will look for it in the standard folder for families. Nonstandard locations for wall definition libraries and wall layer definitions can be assigned and used throughout the project. New library/definition files can be created by copying a template file or a current user file to a new location. These options are useful when running work sharing projects. Sill height tolerance: This parameter sets a tolerance value used when analyzing window and door geometry in walls. If the sill height measure of the opening is smaller or equal to the sill height tolerance measure, the sill height measure will be treated as 0. Joints, corner stud: Corner stud profiles (HR/HRT) can be used instead of standard studs if this parameter is selected. Two parameters can be set for different joint types; Exterior wall to Interior wall and Interior wall to Interior wall. LindabRevitTools (68)
21 T-joints, extra stud: An extra stud in a T-joint can improve the stability considerably. Two parameters can be set for different joint types; Exterior wall to Interior wall and Interior wall to Interior wall. Simplification: A simplified algorithm can replace the standard algorithm when the material list for light gauge steel profiles is calculated through the Wall Specification function. The simplified algorithm always calculates with full length runners and studs no matter what openings that interfere with them. The material list will be simplified but the waist will increase. Two parameters can be set; bearing interior wall and non-bearing interior wall. This setting can also be done on wall type level and wall instance level since a project specific setting can be to general. Wall clearance: Clearances values can speed up the design process considerably. This means in general that walls can be designed in one size but handled in another. A wall can start from the edge of the column and end at another. It can start from the top of a floor and finish at the bottom of the next one. LindabRevitTools (68)
22 When the framing or the material list tools are executed, the wall clearance values will be subtracted from the designed wall size to give the actual wall size. The wall clearance override parameter could be useful when working with the Exterior Wall framing tool. If walls need different clearance values, the Wall clearance override parameter should be selected. It will force an override dialog to pop up just before the framing dialog opens. The values can then be changed (from default) before the geometry is analyzed. View template: A wall sheet consists of four different views that can be customized with the use of pre-defined view templates. The view template to use for elevation, vertical section, horizontal section and specification can be assigned here. LindabRevitTools (68)
23 View type: Elevation, vertical section and horizontal section views are created as detail views. The specification view is created as a drafting view. It is possible to change these view types using parameters. The section mark graphics can be customized and it can enable new grouping possibilities in the browser tree etc. View port: When a view is placed on a sheet, the view is viewed through a view port. A view port usually shows the view name and the view scale as text with an extension line. If this standard appearance should be changed, the view port settings are the one to use. Prefix: The names of the views/sheets are exactly according the identification parameters given (wall identification string). To avoid a naming conflict, a unique prefix for each view must be used. A prefix for the sheet can be used, but it is not needed since there will only be one sheet created for each wall. View direction: A sheet can be created as seen from the exterior or interior face. The exterior face is set as default. Title block: The title block to use when creating wall sheets is assigned here. The preferred scale or start scale is also set here. The wall sheet generator will try to insert the content (four views) with a given scale on the sheet. If the views are too big, the generator will increase the scale by a factor of two and try again. It will continue until the views fit inside the title block. A wide range of wall element sizes can support the use of different title blocks in one project. The title block parameter can be changed whenever. It is possible to generate one wall sheet, change settings and generate another and so on. Title blocks used in this extension must follow certain rules in order to work properly. First of all, four parameters must be inserted into the title block family. LindabRevitTools (68)
24 These parameters are: o LRT_TB_X o LRT_TB_Y o LRT_TB_Width o LRT_TB_Height (Type-Length) (Type-Length) (Type-Length) (Type-Length) They should give the distance from the bottom left corner of the title block to the bottom left corner of the free area. They should also give the width and height of the free area. There are also 7 other shared parameters that can be assigned automatically if inserted into the title block family. They are however optional. These parameters are: o LRT_S_ProjectID o LRT_S_BuildingID o LRT_S_ZoneID o LRT_S_ModuleID o LRT_S_ElementTypeID o LRT_S_ElementID o LRT_S_Scale LindabRevitTools (68)

25 The shared parameters file including these parameters is the LRT_SharedParameters.txt which can be found in the LindabRevitTools 2016 installation directory. The path to the shared parameters folder is usually: C:\Program Files\Lindab\LindabRevitTools 2016\SharedParameters\ but it can be different depending on Windows version and language. The parameters are found under the parameter group LRT_Sheets. Create Exterior Wall Definition Exterior wall definitions can be created and organized into libraries to increase control and reusability. The Exterior Wall Configurator tool is found in the ribbon toolbar and opens the configurator dialog that is used for adding, deleting and editing wall definitions and libraries. The libraries/definitions are stored as an xml-file and are connected to the wall types in Revit by the wall type definition name. Wall definitions used in the right way will speed up the light gauge steel framing considerably. The following icons are used in the tree view: Exterior wall definition Exterior wall definition connected to a wall type in the model If a wall definition is connected to a wall type in the model, the name of the wall type will be shown in the end of the description string. Create Exterior Wall Type Exterior wall types are created manually. Simply select an exterior wall type in Revit and make a copy of it using the duplicate option. There are three important parts to consider when creating the exterior wall type: LindabRevitTools (68)


26 Parameters: The type parameter Function should be set to Exterior. Connecting wall type to wall definition: The wall type is connected to the wall definition by the shared parameter LRT_WT_Wall Type. The parameter is automatically loaded and connected to all walls (type parameter) when the Project Parameters tool is executed. The wall type parameter should have the exact same name as the wall definition created for it. Structure and Materials: All materials that are assigned to the wall layer collection must be written on the form thickness + space + material name. The string will be the material name shown in the material list for wall layers. Wall layers that aren t of interest in the material list should be given a material name that ends with the characters LRT_NI. Materials ending with these characters will not be included in the material list. An air gap layer is a good example of this. LindabRevitTools (68)


27 The layer collection for an exterior wall type should contain one structure layer and one structure layer only. The thickness of the layer should match the main frame dimension. Create Exterior Wall When the wall type is created and connected to the wall definition, the wall design can start. These parts should be considered during the design: o Only walls with one top edge will work in the extension. The edge can be both horizontal and sloped. o Instance parameter Top Constraint should be given with a level, not Unconnected. o Instance parameter Structural Usage should be set to either Bearing or Non-bearing, depending on purpose of use. o Instance parameters LRT_W_NoLayerWrappingLeft and LRT_W_NoLayerWrappingRight can be used to control the wrapping behavior in the ends, if they are different. Specify Exterior Wall Identification The wall identification parameters are assigned using the Edit Wall tool. The tool can be executed when one or multiple walls are selected at the same time. If the tool is executed first, one wall can be selected. If one wall is selected, the dialog looks like this: LindabRevitTools (68)

28 If multiple walls are selected, it looks a bit different: When the Save and Close button is clicked, the identification tag will be created if the Create Tags parameter is selected in the Project Parameters dialog. The identification string presented in the tag depends on the parameter settings in the Project Parameters dialog. The identification tag family consists of a label and a 3D model text. When the identification string is changed using the Wall ID tool, the label and 3D model text is updated accordingly. The 3D model text will only show the identification string. The label however, will show the identification string and a user defined string if given. The user defined string should be assigned to the instance parameter ElementText in the tag. It will then show the user string after the identification string. The identification tag has a type parameter called 3D Text Visibility that controls whether the 3D model text should be visible or not. Create Exterior Wall Framing The light gauge steel framing module for exterior wall is detailed and full of opportunities. When the Exterior Wall tool is executed and a wall is LindabRevitTools (68)
29 selected, the framing tool analyzes the wall geometry together with the matching wall definition. That work result in a default wall design. Lintels, strip steel reinforcements etc. can be added in the tool if needed before finalizing the wall design. The finalized wall design tool data is kept in memory if changes need to be done later on. When a matching wall definition is found, its name can be seen in the bottom right corner of the framing dialog. If there isn t any match, the Template text will be shown instead. Lintels, strip steel reinforcements etc. are added to the wall design manually. Select that start and end circle in the wall layout by right clicking on them. When the circles are selected, click the appropriate button to insert the requested profile. To finalize the wall, select the checkbox on the Export button and click Export. If the Export button is red instead of green, it is an indication that there are conflicts in the stud arrangement. The location of the conflicts can be seen LindabRevitTools (68)


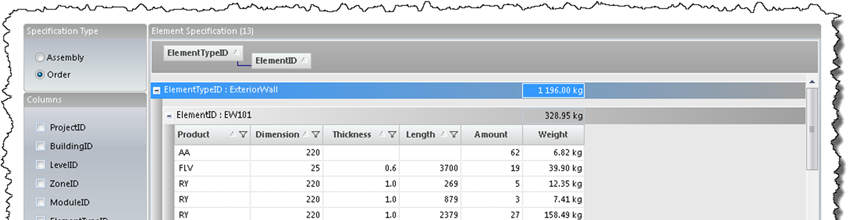
30 in the top view, also shown in red color. Use the Move studs slide bar to find a solution. If a solution is difficult to find, it is possible to click twice on the Export button to finalize the wall design. The first click will make the button green and the second will execute the export. Create Element Specification The material list for light gauge steel profiles is generated automatically when the Element Specification tool is executed. All Lindab exterior wall elements are handled by this tool. Before exporting the material list to excel, there are three options to consider: Specification Type: The specification type can be either Assembly or Order. The Assembly option gives the exact lengths and amounts for the grouping option selected. It generally means that the material list can include lengths or amounts of products that cannot be ordered that way. Fasteners and rollbased products are examples of products that are affected by this option. The Order option gives a material list ready for ordering. LindabRevitTools (68)


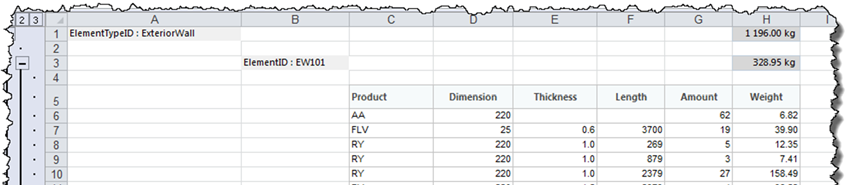
31 Columns: The columns list to be exported to excel can be customized. Some columns are static and some can be added if needed. Parameter filters can be added to all visible columns. When a filter is added to a column, it shouldn t be hidden in the columns list afterwards since it will lose its filter criteria. The workaround for this is to add the filter criteria and then add the corresponding Groupings column afterwards. The column will be hidden in the columns list but shown in the groupings column list. The filter criteria will be active. Groupings: The material list can be grouped according to different column values. One or more columns can be used as group by columns at the same time. When the material list is exported to excel, the assigned group by columns will set the appearance of the pivot table created. When the requested filters and groupings have been added to the grid, the export button will transfer the customized data to Excel. A file location is set before the file is saved and opened. LindabRevitTools (68)


32 Create Wall Sheets The wall sheets are generated automatically when the Wall Sheets tool is executed. All Lindab exterior wall elements are handled by this tool. LindabRevitTools (68)

33 The wall sheets dialog will specify all Lindab wall elements in the model. It will show its Element name (Identification string) and if there is an existing wall sheet created already. The blue icon to the right indicates and existing sheet. Use the Create sheet column or the quick tools in the bottom left corner to select which walls to create sheets for. The majority of the settings for the wall sheet generator are set in the Project Parameters dialog. Those are default settings but nothing says that they cannot be changed during the wall sheet generation process. It is possible to generate a couple of sheets, go back to the Project Parameters dialog and change some settings, and return to the Wall Sheets dialog and generate some more. LindabRevitTools (68)
34 In previous versions of LindabRevitTools, filters were needed in order to exclude unwanted profiles (from nearby walls) in the views. In this version, the filters are both created and applied automatically. To view the applied filter: o Select the view. o Select the Edit button for Visibility/Graphics Overrides. o Select the tab Filters. LindabRevitTools (68)

35 Repeat the procedure for all views. LindabRevitTools (68)


36 Create Material Specification The material list for wall layers is generated automatically when the Material Specification tool is executed. All Lindab exterior walls are handled by this tool. Before exporting the material list to excel, there are three options which are similar to the ones available in the Element Specification tool. The only difference is that the Specification Type always is set to Assembly. Quantities of wall layer materials are shown as gross and net area. LindabRevitTools (68)


37 LindabRevitTools (68) lindab we simplify construction

38 8. Interior wall scenario LindabRevitTools (68)


39 Specify Project Parameters The first thing to accomplish in a LindabRevitTools project is to specify the project parameters. These parameters are used throughout the project and can be changed during the design process if needed. There is a special tool in the toolbar for this which is called Project Parameters. It opens the project parameters dialog were all parameters can be specified. The parameters in the dialog are shared parameters which are loaded into and stored specifically for the project. The majority of the parameters is invisible and can be changed in the project parameters dialog only. The project parameters dialog will always be the starting point in a new LindabRevitTools project, no matter what tool that is executed first. Identification: The identification section contains four parameters that are used when the identification tool (Edit Wall) is executed on a single wall. The identification values are then shown as default in the Edit Wall dialog. If multiple walls are selected, they are not used. LindabRevitTools (68)
40 Identification tag: The Create Tags parameter specifies whether identification family tags should be added to walls or not. If it is selected, it is possible to choose which identification parameters to use as the tag identification string. Usually more identification parameters are assigned walls compared to the ones shown in the tags. Tags are added to walls when the Wall ID tool is executed. If any of the Show...InTag parameters are changed during the design process all existing tags will update accordingly. If the Create Tags is selected/deselected during the design process, existing tags will not be added or removed. Folder and file location: It is possible to assign a folder location for family overrides. The extension will first look in the overrides folder for the family and if it isn t found there, it will look for it in the standard folder for families. Nonstandard locations for wall definition libraries and wall layer definitions can be assigned and used throughout the project. New library/definition files can be created by copying a template file or a current user file to a new location. These options are useful when running work sharing projects. Sill height tolerance: This parameter sets a tolerance value used when analyzing window and door geometry in walls. If the sill height measure of the opening is smaller or equal to the sill height tolerance measure, the sill height measure will be treated as 0. Joints, corner stud: Corner stud profiles (HR/HRT) can be used instead of standard studs if this parameter is selected. Two parameters can be set for different joint types; Exterior wall to Interior wall and Interior wall to Interior wall. LindabRevitTools (68)


41 T-joints, extra stud: An extra stud in a T-joint can improve the stability considerably. Two parameters can be set for different joint types; Exterior wall to Interior wall and Interior wall to Interior wall. Simplification: A simplified algorithm can replace the standard algorithm when the material list for light gauge steel profiles is calculated through the Wall Specification function. The simplified algorithm always calculates with full length runners and studs no matter what openings that interfere with them. The material list will be simplified but the waist will increase. Two parameters can be set; bearing interior wall and non-bearing interior wall. This setting can also be done on wall type level and wall instance level since a project specific setting can be to general. Wall clearance: Clearances values can speed up the design process considerably. This means in general that walls can be designed in one size but handled in another. A wall can start from the edge of the column and end at another. It can start from the top of a floor and finish at the bottom of the next one. LindabRevitTools (68)


42 When the framing or the material list tools are executed, the wall clearance values will be subtracted from the designed wall size to give the actual wall size. The wall clearance override parameter could be useful when working with the Exterior Wall framing tool. If walls need different clearance values, the Wall clearance override parameter should be selected. It will force an override dialog to pop up just before the framing dialog opens. The values can then be changed (from default) before the geometry is analyzed. LindabRevitTools (68)
43 View template: A wall sheet consists of four different views that can be customized with the use of pre-defined view templates. The view template to use for elevation, vertical section, horizontal section and specification can be assigned here. View type: Elevation, vertical section and horizontal section views are created as detail views. The specification view is created as a drafting view. It is possible to change these view types using parameters. The section mark graphics can be customized and it can enable new grouping possibilities in the browser tree etc. View port: When a view is placed on a sheet, the view is viewed through a view port. A view port usually shows the view name and the view scale as text with an extension line. If this standard appearance should be changed, the view port settings are the one to use. Prefix: The names of the views/sheets are exactly according the identification parameters given (wall identification string). To avoid a naming conflict, a unique prefix for each view must be used. A prefix for the sheet can be used, but it is not needed since there will only be one sheet created for each wall. View direction: A sheet can be created as seen from the exterior or interior face. The exterior face is set as default. Title block: The title block to use when creating wall sheets is assigned here. The preferred scale or start scale is also set here. The wall sheet generator will try to insert the content (four views) with a given scale on the sheet. If the views are too big, the generator will increase the scale by a factor of two and try again. It will continue until the views fit inside the title block. A wide range of wall element sizes can support the use of different title blocks in one project. The title block parameter can be changed whenever. It is possible to generate one wall sheet, change settings and generate another and so on. LindabRevitTools (68)
44 Title blocks used in this extension must follow certain rules in order to work properly. First of all, four parameters must be inserted into the title block family. These parameters are: o LRT_TB_X o LRT_TB_Y o LRT_TB_Width o LRT_TB_Height (Type-Length) (Type-Length) (Type-Length) (Type-Length) They should give the distance from the bottom left corner of the title block to the bottom left corner of the free area. They should also give the width and height of the free area. There are also 7 other shared parameters that can be assigned automatically if inserted into the title block family. They are however optional. These parameters are: o LRT_S_ProjectID o LRT_S_BuildingID o LRT_S_ZoneID o LRT_S_ModuleID o LRT_S_ElementTypeID o LRT_S_ElementID LindabRevitTools (68)


45 o LRT_S_Scale The shared parameters file including these parameters is the LRT_SharedParameters.txt which can be found in the LindabRevitTools 2016 installation directory. The path to the shared parameters folder is usually: C:\Program Files\Lindab\LindabRevitTools 2016\SharedParameters\ but it can be different depending on Windows version and language. The parameters are found under the parameter group LRT_Sheets. Create Wall Layer Definition Interior wall layer definitions can be created and stored in a library to increase control and reusability. The Wall Layer Configurator is found in the ribbon toolbar and opens the configurator dialog that is used for adding, deleting and editing wall layer definitions. The definitions are stored as an xml-file and are used when adding customized Interior wall definitions. The customized interior wall definitions can contain wall layers that are different from standard plasterboards. Examples can be plywood, OSB, fire board etc. Wall layer: The wall layer name is the material name that will be presented in the material list for wall layers. The wall layer name will always be represented by a Revit material (with the exact same name) which is assigned to the specific layer in the wall type structure. LindabRevitTools (68)
46 The name must be written on the form thickness + space + material name. Thickness: The thickness should be the exact layer thickness. Template material: The template material should be a Revit material that is available in the project file. If it isn t available when needed, a default material will be used instead. When a new wall layer material is created, the template material is duplicated and renamed to the wall layer name. This feature gives an opportunity to control the appearance of different wall layers in the project. Fill pattern family: The fill pattern family should be a family that is available in the project file or in the LindabRevitTools 2016/Families/DetailComponent folder. If it isn t available when needed, the area that should be filled by the family will be left empty. When a new wall section detail is created in the wall section schedule, every wall layer is represented by a fill pattern family. The fill pattern family is a simple family that contains a resizable filled region. To create a new customized fill pattern family, copy an existing and edit the hatch pattern to fit the needs. Fill pattern families have names like DetailComponent_Lindab_Gypsum.rfa. LindabRevitTools (68)


47 Create Interior Wall Definition Interior wall definitions can be created and organized into libraries to increase control and reusability. The Interior Wall Configurator tool is found in the ribbon toolbar and opens the configurator dialog that is used for adding, deleting and editing wall definitions and libraries. The libraries/definitions are stored as an xml-file and are connected to the wall types in Revit by the wall type definition name. The following icons are used in the tree view: Interior wall definition Interior wall definition connected to a wall type in the model Interior wall definition connected to a wall type in the model that has an incorrect layer structure If a wall definition is connected to a wall type in the model, the name of the wall type will be shown in the end of the description string. Clicking the blue arrow will expand the dialog and show options for acoustics, fire classification, insulation, wall layer overrides etc. The button next to the Layers drop down list will open the Wall layer overrides dialog. This is used when other wall layers are used then standard plasterboards. Wall definitions used in the right way will speed up the light gauge steel framing considerably and make the Wall Specification tool possible to use for Lindab interior walls. Create Interior Wall Type LindabRevitTools (68)

48 The Create Interior Wall Type and the Create Interior Wall chapters represent a sub part in the scenario diagram. This sub part is suitable when designing from scratch. Interior wall types can be created in two ways. The first and easiest way is to use the Wall Creator tool. The tool opens the wall creator dialog that is used for creating wall types and wall section details. The grid presents all interior wall definitions available in the interior wall libraries file used in the project. An interior wall type is created by selecting a wall type definition followed by a click on the Create button. The sub dialog for the wall creator opens in which a new wall type name and description can be entered. Here it is possible to select weather the wall type and/or the wall section detail should be created or not. If the wall section detail is selected, it will also be possible to select if identical layers should be grouped and which detail length to use. New wall type name: This will be the name of the wall type. Wall type: This is the referenced interior wall definition. Description: This text describes the usage of the wall type. Create wall type: Indicates if a wall type will be created or not. Create wall section detail: Indicates if a wall section detail will be created or not. LindabRevitTools (68)


49 Group identical layers: Indicates if identical layers should be written as one or not. Detail length: 900 mm or 1200 mm. When the selections are made and the Create button is clicked, the selected content is created. The operation can be repeated as many times as needed. If the task is to find the most suitable wall, column filters can be a valuable assistance. Every column header shows a filter button which makes it possible to add performance filters to narrow down the search. Multiple filters can be added in the same time. The second way is to create interior wall types manually. Simply select an interior wall type in Revit and make a copy of it using the duplicate option. There are three important parts to consider when creating the interior wall type: Parameters: The type parameter Function should be set to Interior. Connecting wall type to wall definition: The wall type is connected to the wall definition by the shared parameter LRT_WT_Wall Type. The parameter is automatically loaded and LindabRevitTools (68)


50 connected to all walls (type parameter) when the Project Parameters tool is executed. The wall type parameter should have the exact same name as the wall definition created for it. Structure and Materials: All materials that are assigned to the wall layer collection must be written on the form thickness + space + material name. The string will be the material name shown in the material list for wall layers. Wall layers that aren t of interest in the material list should be given a material name that ends with the characters LRT_NI. Materials ending with these characters will not be included in the material list. A stud layer without insulation is a good example of this. The layer collection for an interior wall type should contain one or two structure layers depending on if it is a single or double frame wall. The thickness of the layer should match the main frame dimension. Additionally, there are two wall type parameters available that are named LRT_WT_Group and LRT_WT_Index. Those parameters are of interest no matter what method that is used to create the interior wall types. It is possible to group wall section details according to the LRT_WT_Group LindabRevitTools (68)

51 parameter and to sort them according to the LRT_WT_Index parameter. A correct set up can improve the wall section schedule print out. Create Interior Wall When the wall type is created and connected to the wall definition, the wall design can start. These parts should be considered during the design: o Only walls with one top edge will work in the extension. The edge can be both horizontal and sloped. o Instance parameter Top Constraint should be given with a level, not Unconnected. o Instance parameter Structural Usage should be set to either Bearing or Non-bearing, depending on purpose of use. o Instance parameters LRT_W_NoLayerWrappingLeft and LRT_W_NoLayerWrappingRight can be used to control the wrapping behavior in the ends, if they are different. Convert Generic Interior Wall The Convert Generic Interior Wall chapter represents a sub part in the scenario diagram. This sub part is suitable when the project is designed with generic wall types, which are to be changed into Lindab wall types. The Wall Converter tool is available for this project scenario. This tool opens the wall converter dialog that is used for the exchange work. The grid in the top shows the existing interior walls in the project. The walls are grouped depending on Usage, Wall type name and Wall height. The icon to the left can be used to show the wall type parameters and their values. This function is valuable when matching performance later on. Acoustic and fire performance values are usually stored in wall type parameters. LindabRevitTools (68)

52 The empty fields are wall type, new wall type name and description which are exactly the same as the ones used when creating new wall types using the Wall Creator tool. New wall type name: This will be the name of the wall type. Wall type: This is the referenced interior wall definition. Description: This text describes the usage of the wall type. The grid in the bottom shows all interior wall definitions available in the interior wall libraries file used in the project. The content and appearance of the grid is similar to the one that is used in the Wall Creator tool. LindabRevitTools (68)
53 The process of converting a generic interior wall to a Lindab interior wall can be divided into six different steps: o Select the row in the top grid that contains the post to convert. o Double click on the post in the bottom grid that contains the wall definition that should replace the post in the top grid. It is possible to select the appropriate wall definition directly using the drop down list in the wall type column of the top grid. Filters can be used in the bottom grid to find the most suitable wall. o Enter the New wall type name text. o Enter the Description text. This is optional. o Press the ENTER key. o Click the Convert button. These steps are valid if the new wall type doesn t exist in the project file. The extension will first create the new wall type and then change all walls of that wall type to the new wall type. However, it is also possible to use this dialog to change amongst existing wall types in a project. Select an existing wall type in the project directly from the new wall type name column and press ENTER. It can also be done manually but it is easier to change wall type directly in the dialog. The grouping of the walls in the top grid is valuable and cannot be achieved using the Select All Instances etc. Repeat this procedure for each wall or enter all the information at the same time and convert all of them at the same time. Converted walls are shown in top grid with an icon in the most right column. Specify Interior Wall Identification The wall identification parameters are assigned using the Edit Wall tool. The tool can be executed when one or multiple walls are selected at the same time. If the tool is executed first, one wall can be selected. LindabRevitTools (68)
54 If one wall is selected, the dialog looks like this: If multiple walls are selected, it looks a bit different: When the Save and Close button is clicked, the identification tag will be created if the Create Tags parameter is selected in the Project Parameters dialog. The identification string presented in the tag depends on the parameter settings in the Project Parameters dialog. LindabRevitTools (68)


55 The identification tag family consists of a label and a 3D model text. When the identification string is changed using the Wall ID tool, the label and 3D model text is updated accordingly. The 3D model text will only show the identification string. The label however, will show the identification string and a user defined string if given. The user defined string should be assigned to the instance parameter ElementText in the tag. It will then show the user string after the identification string. The identification tag has a type parameter called 3D Text Visibility that controls whether the 3D model text should be visible or not. Create Interior Wall Framing The light gauge steel framing module for interior wall is detailed and full of opportunities. When the Interior Wall tool is executed and a wall is selected, the framing tool analyzes the wall geometry together with the matching wall definition. That work result in a default wall design. Lintels, strip steel reinforcements etc. can be added in the tool if needed before finalizing the wall design. The finalized wall design tool data is kept in memory if changes need to be done later on. When a matching wall definition is found, its name can be seen in the middle of the dialog. If there isn t any match, the Template text will be shown instead. LindabRevitTools (68)
56 Lintels, strip steel reinforcements etc. are added to the wall design manually. Select that start and end circle in the wall layout by right clicking on them. When the circles are selected, click the appropriate button to insert the requested profile. To finalize the wall, select the checkbox on the Export button and click Export. If the Export button is red instead of green, it is an indication that there are conflicts in the stud arrangement. The location of the conflicts can be seen in the top view, also shown in red color. Use the Move studs slide bar to find a solution. If a solution is difficult to find, it is possible to click twice on the Export button to finalize the wall design. The first click will make the button green and the second will execute the export. LindabRevitTools (68)

57 Create Element Specification The material list for light gauge steel profiles is generated automatically when the Element Specification tool is executed. All Lindab interior wall elements are handled by this tool. Before exporting the material list to excel, there are three options to consider: Specification Type: The specification type can be either Assembly or Order. The Assembly option gives the exact lengths and amounts for the grouping option selected. It generally means that the material list can include lengths or amounts of products that cannot be ordered that way. Fasteners and rollbased products are examples of products that are affected by this option. The Order option gives a material list ready for ordering. Columns: The columns list to be exported to excel can be customized. Some columns are static and some can be added if needed. Parameter filters can be added to all visible columns. When a filter is added to a column, it shouldn t be hidden in the columns list afterwards since it will lose its filter criteria. The workaround for this is to add the filter criteria and then add the LindabRevitTools (68)

58 corresponding Groupings column afterwards. The column will be hidden in the columns list but shown in the groupings column list. The filter criteria will be active. Groupings: The material list can be grouped according to different column values. One or more columns can be used as group by columns at the same time. When the material list is exported to excel, the assigned group by columns will set the appearance of the pivot table created. When the requested filters and groupings have been added to the grid, the export button will transfer the customized data to Excel. A file location is set before the file is saved and opened. LindabRevitTools (68)


59 Create Wall Sheets The wall sheets are generated automatically when the Wall Sheets tool is executed. All Lindab interior wall elements are handled by this tool. LindabRevitTools (68)
60 The wall sheets dialog will specify all Lindab wall elements in the model. It will show its Element name (Identification string) and if there is an existing wall sheet created already. The blue icon to the right indicates and existing sheet. Use the Create sheet column or the quick tools in the bottom left corner to select which walls to create sheets for. The majority of the settings for the wall sheet generator are set in the Project Parameters dialog. Those are default settings but nothing says that they cannot be changed during the wall sheet generation process. It is possible to generate a couple of sheets, go back to the Project Parameters dialog and change some settings, and return to the Wall Sheets dialog and generate some more. In previous versions of LindabRevitTools, filters were needed in order to exclude unwanted profiles (from nearby walls) in the views. In this version, the filters are both created and applied automatically. To view the applied filter: o Select the view. o Select the Edit button for Visibility/Graphics Overrides. o Select the tab Filters. LindabRevitTools (68)

61 Repeat the procedure for all views. LindabRevitTools (68)


62 Create Material Specification The material list for wall layers is generated automatically when the Material Specification tool is executed. All Lindab interior walls are handled by this tool. Before exporting the material list to excel, there are three options which are similar to the ones available in the Element Specification tool. The only difference is that the Specification Type always is set to Assembly. Quantities of wall layer materials are shown as gross and net area. LindabRevitTools (68)


63 Create Wall Section Schedule The wall section schedule is generated automatically when the Wall Section Schedule tool is executed. All Lindab interior walls used in the project are handled by this tool. Before generating the wall section schedule, there are some options to consider: Drafting view name: LindabRevitTools (68)
64 The drafting view name is the name of the wall section schedule in the project. Columns and Rows: Use the Columns and Rows drop down list to arrange the wall section details. Distance between columns and rows: These textboxes controls the distance between each column and row in the wall section schedule. The default values can be changed to make the schedule more or less compact. Layout: Arrange wall section details in Columns or Rows. Detail Length: 900 mm or 1200 mm. Group schedule: Details with the same group parameter value (LRT_WT_Group) will be arranged in the same Column or Row. Group identical layers: Wall layers with identical name (that comes after each other) can be grouped and presented like amount + x + wall layer. Ex. 2 x 13 Plasterboard. By default, all wall section details are pre-selected for the print-out. By changing the values in the Create column, details can be removed from the print-out. LindabRevitTools (68)

65 Create Wall Specification The material list for light gauge steel profiles is generated automatically when the Wall Specification tool is executed. All Lindab interior walls are handled by this tool. When a Lindab interior wall is used as a reference for the Interior Wall framing tool, and the Lindab interior wall element is created, it will no longer be handled by the Wall Specification tool. The Element Specification tool will handle it instead. This means that as soon as a Lindab interior wall is framed up using the Interior Wall framing tool, the Element Specification tool is the one to use. This is possible due to the connection between a Lindab wall element and its referenced Lindab wall. Each Lindab wall element is always connected to one Lindab wall and they work together as one. Before exporting the material list to excel, there are three options to consider: Specification Type: The specification type can be either Assembly or Order. The Assembly option gives the exact lengths and amounts for the grouping option selected. It generally means that the material list can include lengths or amounts of products that cannot be ordered that way. Fasteners and roll- LindabRevitTools (68)

66 based products are examples of products that are affected by this option. The Order option gives a material list ready for ordering. Columns: The columns list to be exported to excel can be customized. Some columns are static and some can be added if needed. Parameter filters can be added to all visible columns. When a filter is added to a column, it shouldn t be hidden in the columns list afterwards since it will lose its filter criteria. The workaround for this is to add the filter criteria and then add the corresponding Groupings column afterwards. The column will be hidden in the columns list but shown in the groupings column list. The filter criteria will be active. Groupings: The material list can be grouped according to different column values. One or more columns can be used as group by columns at the same time. When the material list is exported to excel, the assigned group by columns will set the appearance of the pivot table created. When the requested filters and groupings have been added to the grid, the export button will transfer the customized data to Excel. A file location is set before the file is saved and opened. LindabRevitTools (68)


67 LindabRevitTools (68) lindab we simplify construction
")
68 lindab we simplify construction LindabRevitTools (68)
Collaborating Across Disciplines with Revit Architecture, MEP, and Structure
 Collaborating Across Disciplines with Revit Architecture, MEP, and Structure David Cohn AB104-3 Are you ready to take the next step and use building information modeling to share data across the entire
TABLE OF CONTENTS. INTRODUCTION... 5 Advance Concrete... 5 Where to find information?... 6 INSTALLATION... 7 STARTING ADVANCE CONCRETE...
 Starting Guide TABLE OF CONTENTS INTRODUCTION... 5 Advance Concrete... 5 Where to find information?... 6 INSTALLATION... 7 STARTING ADVANCE CONCRETE... 7 ADVANCE CONCRETE USER INTERFACE... 7 Other important
AutoCAD Architecture 2012 UK Content Tools
 AutoCAD Architecture 2012 UK Content Tools Contents Contents... 1 Installation... 2 Loading the utilities... 2 Utilities Overview... 3 Menu and Toolbar... 3 Content Generation... 3 Content Publishing...
Multi-user Collaboration with Revit Worksets
 Autodesk Revit White Paper Multi-user Collaboration with Revit Worksets Starting Your First Multi-user Project On many building projects, designers work in teams with each assigned a specific functional
Multi-user Collaboration with Autodesk Revit Worksharing
 AUTODESK REVIT WHITE PAPER Multi-user Collaboration with Autodesk Revit Worksharing Contents Contents... 1 Autodesk Revit Worksharing... 2 Starting Your First Multi-user Project... 2 Autodesk Revit Worksets...
Merging Labels, Letters, and Envelopes Word 2013
 Merging Labels, Letters, and Envelopes Word 2013 Merging... 1 Types of Merges... 1 The Merging Process... 2 Labels - A Page of the Same... 2 Labels - A Blank Page... 3 Creating Custom Labels... 3 Merged
Microsoft Access 2010 Overview of Basics
 Opening Screen Access 2010 launches with a window allowing you to: create a new database from a template; create a new template from scratch; or open an existing database. Open existing Templates Create
Create a Poster Using Publisher
 Contents 1. Introduction 1. Starting Publisher 2. Create a Poster Template 5. Aligning your images and text 7. Apply a background 12. Add text to your poster 14. Add pictures to your poster 17. Add graphs
Microsoft Access 2010 handout
 Microsoft Access 2010 handout Access 2010 is a relational database program you can use to create and manage large quantities of data. You can use Access to manage anything from a home inventory to a giant
Chapter 23: Drafting in Worksheet View
 Chapter 23: Drafting in Worksheet View Worksheet View is a powerful, 2D production drafting module. Here you can find all of the drawing and editing tools needed to create fast, accurate, detailed working
How to Make the Most of Excel Spreadsheets
 How to Make the Most of Excel Spreadsheets Analyzing data is often easier when it s in an Excel spreadsheet rather than a PDF for example, you can filter to view just a particular grade, sort to view which
ADMINISTRATORS GUIDE EPISUITE 6
 ADMINISTRATORS GUIDE EPISUITE 6 A quick tutorial on how to set up and implement Episuite Software created by IDentiphoto Specialists in IDentification 1810 Joseph Lloyd Pkwy. Willoughby, OH 44094 Phone:
In this session, we will explain some of the basics of word processing. 1. Start Microsoft Word 11. Edit the Document cut & move
 WORD PROCESSING In this session, we will explain some of the basics of word processing. The following are the outlines: 1. Start Microsoft Word 11. Edit the Document cut & move 2. Describe the Word Screen
Microsoft Word 2010 Prepared by Computing Services at the Eastman School of Music July 2010
 Microsoft Word 2010 Prepared by Computing Services at the Eastman School of Music July 2010 Contents Microsoft Office Interface... 4 File Ribbon Tab... 5 Microsoft Office Quick Access Toolbar... 6 Appearance
Vodafone PC SMS 2010. (Software version 4.7.1) User Manual
 User Manual") Vodafone PC SMS 2010 (Software version 4.7.1) User Manual July 19, 2010 Table of contents 1. Introduction...4 1.1 System Requirements... 4 1.2 Reply-to-Inbox... 4 1.3 What s new?... 4 2. Installation...6
Vodafone PC SMS 2010 (Software version 4.7.1) User Manual July 19, 2010 Table of contents 1. Introduction...4 1.1 System Requirements... 4 1.2 Reply-to-Inbox... 4 1.3 What s new?... 4 2. Installation...6
This Skill Builder demonstrates how to define and place sketched symbols in drawings.
 Sketched Symbols This Skill Builder demonstrates how to define and place sketched symbols in drawings. A sketched symbol is a user-defined symbol. You create sketched symbols in the sketch environment
Handout: Word 2010 Tips and Shortcuts
 Word 2010: Tips and Shortcuts Table of Contents EXPORT A CUSTOMIZED QUICK ACCESS TOOLBAR... 2 IMPORT A CUSTOMIZED QUICK ACCESS TOOLBAR... 2 USE THE FORMAT PAINTER... 3 REPEAT THE LAST ACTION... 3 SHOW
Blackbaud StudentInformationSystem. Reports Guide for Admissions Office
 Blackbaud StudentInformationSystem Reports Guide for Admissions Office 102811 2011 Blackbaud, Inc. This publication, or any part thereof, may not be reproduced or transmitted in any form or by any means,
WebFOCUS BI Portal: S.I.M.P.L.E. as can be
 WebFOCUS BI Portal: S.I.M.P.L.E. as can be Author: Matthew Lerner Company: Information Builders Presentation Abstract: This hands-on session will introduce attendees to the new WebFOCUS BI Portal. We will
Publisher 2010 Cheat Sheet
 April 20, 2012 Publisher 2010 Cheat Sheet Toolbar customize click on arrow and then check the ones you want a shortcut for File Tab (has new, open save, print, and shows recent documents, and has choices
Use this translator to save ArchiCAD layouts/views in DXF/DWG format if you plan to continue
 Tip Sheet ArchiCAD 11 Mark Horrocks Graphisoft New Zealand May 2007 DWG Translator In Architectural practice you often send and receive content from co-working Structural, Mechanical or Electrical Engineers.
edgebooks Quick Start Guide 4
 edgebooks Quick Start Guide 4 memories made easy SECTION 1: Installing FotoFusion Please follow the steps in this section to install FotoFusion to your computer. 1. Please close all open applications prior
UOFL SHAREPOINT ADMINISTRATORS GUIDE
 UOFL SHAREPOINT ADMINISTRATORS GUIDE WOW What Power! Learn how to administer a SharePoint site. [Type text] SharePoint Administrator Training Table of Contents Basics... 3 Definitions... 3 The Ribbon...
Digital Marketing EasyEditor Guide Dynamic
 Surveys ipad Segmentation Reporting Email Sign up Email marketing that works for you Landing Pages Results Digital Marketing EasyEditor Guide Dynamic Questionnaires QR Codes SMS 43 North View, Westbury
CREATING A 3D VISUALISATION OF YOUR PLANS IN PLANSXPRESS AND CORTONA VRML CLIENT
 CREATING A 3D VISUALISATION OF YOUR PLANS IN PLANSXPRESS AND CORTONA VRML CLIENT 20-25 Minutes This topic is for users of PlansXpress Total Toolkit Edition. To upgrade to PlansXpress Total Toolkit, call
Microsoft Access 2010 Part 1: Introduction to Access
 CALIFORNIA STATE UNIVERSITY, LOS ANGELES INFORMATION TECHNOLOGY SERVICES Microsoft Access 2010 Part 1: Introduction to Access Fall 2014, Version 1.2 Table of Contents Introduction...3 Starting Access...3
TurboNest. What s New. Version 11.0. Released April 2014. Copyright 2014 Hypertherm, Inc. All rights reserved.
 TurboNest Version 11.0 2015 What s New Released April 2014 What s New in TurboNest 2015 (v11.0) 1 New Features and Enhancements The following enhancements are available in the TurboNest 11.0 release: Ribbon
Working with sections in Word
 Working with sections in Word Have you have ever wanted to create a Microsoft Word document with some pages numbered in Roman numerals and the rest in Arabic, or include a landscape page to accommodate
Education Solutions Development, Inc. APECS Navigation: Business Systems Getting Started Reference Guide
 Education Solutions Development, Inc. APECS Navigation: Business Systems Getting Started Reference Guide March 2013 Education Solutions Development, Inc. What s Inside The information in this reference
Layout Tutorial. Chapter 10: Getting Started
 Chapter 10: Layout Tutorial In this tutorial we will create a layout template, send a few views to a layout page, then save this document in PDF format. In this tutorial you will learn about: Creating
FirstClass FAQ's An item is missing from my FirstClass desktop
 FirstClass FAQ's An item is missing from my FirstClass desktop Deleted item: If you put a item on your desktop, you can delete it. To determine what kind of item (conference-original, conference-alias,
Hypercosm. Studio. www.hypercosm.com
 Hypercosm Studio www.hypercosm.com Hypercosm Studio Guide 3 Revision: November 2005 Copyright 2005 Hypercosm LLC All rights reserved. Hypercosm, OMAR, Hypercosm 3D Player, and Hypercosm Studio are trademarks
Appointment Scheduler
 EZClaim Appointment Scheduler User Guide Last Update: 11/19/2008 Copyright 2008 EZClaim This page intentionally left blank Contents Contents... iii Getting Started... 5 System Requirements... 5 Installing
ORACLE BUSINESS INTELLIGENCE WORKSHOP
 ORACLE BUSINESS INTELLIGENCE WORKSHOP Creating Interactive Dashboards and Using Oracle Business Intelligence Answers Purpose This tutorial shows you how to build, format, and customize Oracle Business
Online Sharing User Manual
 Online Sharing User Manual June 13, 2007 If discrepancies between this document and Online Sharing are discovered, please contact backupfeedback@verizon.net. Copyrights and Proprietary Notices The information
How To Create A Powerpoint Intelligence Report In A Pivot Table In A Powerpoints.Com
 Sage 500 ERP Intelligence Reporting Getting Started Guide 27.11.2012 Table of Contents 1.0 Getting started 3 2.0 Managing your reports 10 3.0 Defining report properties 18 4.0 Creating a simple PivotTable
CATIA Basic Concepts TABLE OF CONTENTS
 TABLE OF CONTENTS Introduction...1 Manual Format...2 Log on/off procedures for Windows...3 To log on...3 To logoff...7 Assembly Design Screen...8 Part Design Screen...9 Pull-down Menus...10 Start...10
Excel 2007: Basics Learning Guide
 Excel 2007: Basics Learning Guide Exploring Excel At first glance, the new Excel 2007 interface may seem a bit unsettling, with fat bands called Ribbons replacing cascading text menus and task bars. This
Data Visualization. Prepared by Francisco Olivera, Ph.D., Srikanth Koka Department of Civil Engineering Texas A&M University February 2004
 Data Visualization Prepared by Francisco Olivera, Ph.D., Srikanth Koka Department of Civil Engineering Texas A&M University February 2004 Contents Brief Overview of ArcMap Goals of the Exercise Computer
Frog VLE Update. Latest Features and Enhancements. September 2014
 1 Frog VLE Update Latest Features and Enhancements September 2014 2 Frog VLE Update: September 2014 Contents New Features Overview... 1 Enhancements Overview... 2 New Features... 3 Site Backgrounds...
Custom Reporting System User Guide
 Citibank Custom Reporting System User Guide April 2012 Version 8.1.1 Transaction Services Citibank Custom Reporting System User Guide Table of Contents Table of Contents User Guide Overview...2 Subscribe
Asset Track Getting Started Guide. An Introduction to Asset Track
 Asset Track Getting Started Guide An Introduction to Asset Track Contents Introducing Asset Track... 3 Overview... 3 A Quick Start... 6 Quick Start Option 1... 6 Getting to Configuration... 7 Changing
HOW TO LINK AND PRESENT A 4D MODEL USING NAVISWORKS. Timo Hartmann t.hartmann@ctw.utwente.nl
 Technical Paper #1 HOW TO LINK AND PRESENT A 4D MODEL USING NAVISWORKS Timo Hartmann t.hartmann@ctw.utwente.nl COPYRIGHT 2009 VISICO Center, University of Twente visico@utwente.nl How to link and present
If you know exactly how you want your business forms to look and don t mind
 appendix e Advanced Form Customization If you know exactly how you want your business forms to look and don t mind detail work, you can configure QuickBooks forms however you want. With QuickBooks Layout
DocumentsCorePack for MS CRM 2011 Implementation Guide
 DocumentsCorePack for MS CRM 2011 Implementation Guide Version 5.0 Implementation Guide (How to install/uninstall) The content of this document is subject to change without notice. Microsoft and Microsoft
Advanced Excel 10/20/2011 1
 Advanced Excel Data Validation Excel has a feature called Data Validation, which will allow you to control what kind of information is typed into cells. 1. Select the cell(s) you wish to control. 2. Click
Logi Ad Hoc Reporting System Administration Guide
 Logi Ad Hoc Reporting System Administration Guide Version 11.2 Last Updated: March 2014 Page 2 Table of Contents INTRODUCTION... 4 Target Audience... 4 Application Architecture... 5 Document Overview...
Umbraco v4 Editors Manual
 Umbraco v4 Editors Manual Produced by the Umbraco Community Umbraco // The Friendly CMS Contents 1 Introduction... 3 2 Getting Started with Umbraco... 4 2.1 Logging On... 4 2.2 The Edit Mode Interface...
Excel -- Creating Charts
 Excel -- Creating Charts The saying goes, A picture is worth a thousand words, and so true. Professional looking charts give visual enhancement to your statistics, fiscal reports or presentation. Excel
Rebar for Revit. User s manual. Version 2014.3.1. www.nois.no post@nois.no
 User s manual Version 2014.3.1 www.nois.no post@nois.no User s manual Rebar 2 Norconsult Informasjonssystemer AS Content 1 INTRODUCTION...5 1.1 Installation...5 1.2 Preparing a model for ISY CAD Rebar...5
MICROSOFT ACCESS 2003 TUTORIAL
 MICROSOFT ACCESS 2003 TUTORIAL M I C R O S O F T A C C E S S 2 0 0 3 Microsoft Access is powerful software designed for PC. It allows you to create and manage databases. A database is an organized body
Making Visio Diagrams Come Alive with Data
 Making Visio Diagrams Come Alive with Data An Information Commons Workshop Making Visio Diagrams Come Alive with Data Page Workshop Why Add Data to A Diagram? Here are comparisons of a flow chart with
Using Microsoft Word. Working With Objects
 Using Microsoft Word Many Word documents will require elements that were created in programs other than Word, such as the picture to the right. Nontext elements in a document are referred to as Objects
Session 25 Revit MEP Tips and Tricks
 Session 25 Revit MEP Tips and Tricks Page 1 of 17 Sometimes it's the little things which make all the difference. I thought I would share some nifty tricks that can help make Revit MEP go down a little
Build Your First Web-based Report Using the SAS 9.2 Business Intelligence Clients
 Technical Paper Build Your First Web-based Report Using the SAS 9.2 Business Intelligence Clients A practical introduction to SAS Information Map Studio and SAS Web Report Studio for new and experienced
CREATING EXCEL PIVOT TABLES AND PIVOT CHARTS FOR LIBRARY QUESTIONNAIRE RESULTS
 CREATING EXCEL PIVOT TABLES AND PIVOT CHARTS FOR LIBRARY QUESTIONNAIRE RESULTS An Excel Pivot Table is an interactive table that summarizes large amounts of data. It allows the user to view and manipulate
MICROSOFT OFFICE ACCESS 2007 - NEW FEATURES
 MICROSOFT OFFICE 2007 MICROSOFT OFFICE ACCESS 2007 - NEW FEATURES Exploring Access Creating and Working with Tables Finding and Filtering Data Working with Queries and Recordsets Working with Forms Working
EPM Performance Suite Profitability Administration & Security Guide
 BusinessObjects XI R2 11.20 EPM Performance Suite Profitability Administration & Security Guide BusinessObjects XI R2 11.20 Windows Patents Trademarks Copyright Third-party Contributors Business Objects
Welcome to the topic on Master Data and Documents.
 Welcome to the topic on Master Data and Documents. In this topic, we will look at master data in SAP Business One. After this session you will be able to view a customer record to explain the concept of
House Design Tutorial
 Chapter 2: House Design Tutorial This House Design Tutorial shows you how to get started on a design project. The tutorials that follow continue with the same plan. When we are finished, we will have created
Adobe Dreamweaver CC 14 Tutorial
 Adobe Dreamweaver CC 14 Tutorial GETTING STARTED This tutorial focuses on the basic steps involved in creating an attractive, functional website. In using this tutorial you will learn to design a site
Creating Drawings in Pro/ENGINEER
 6 Creating Drawings in Pro/ENGINEER This chapter shows you how to bring the cell phone models and the assembly you ve created into the Pro/ENGINEER Drawing mode to create a drawing. A mechanical drawing
BulkSMS Text Messenger Product Manual
 BulkSMS Text Messenger Product Manual 1. Installing the software 1.1. Download the BulkSMS Text Messenger Go to www.bulksms.com and choose your country. process. Click on products on the top menu and select
TheFinancialEdge. Reports Guide for Accounts Receivable
 TheFinancialEdge Reports Guide for Accounts Receivable 041813 2013 Blackbaud, Inc. This publication, or any part thereof, may not be reproduced or transmitted in any form or by any means, electronic, or
How to create PDF maps, pdf layer maps and pdf maps with attributes using ArcGIS. Lynne W Fielding, GISP Town of Westwood
 How to create PDF maps, pdf layer maps and pdf maps with attributes using ArcGIS Lynne W Fielding, GISP Town of Westwood PDF maps are a very handy way to share your information with the public as well
Intellect Platform - Tables and Templates Basic Document Management System - A101
 Intellect Platform - Tables and Templates Basic Document Management System - A101 Interneer, Inc. 4/12/2010 Created by Erika Keresztyen 2 Tables and Templates - A101 - Basic Document Management System
User Manual Microsoft Dynamics AX Add-on LabAX Label Printing
 User Manual Microsoft Dynamics AX Add-on LabAX Label Printing Version 1.7 Last Update: 17.04.2011 User Manual Microsoft Dynamics AX Add-on LabAX Label Printing Page 2 / 23 Contents 1 Introduction... 3
Window Glass Design 5 According to ASTM E 1300
 A User s Guide to: Window Glass Design 5 According to ASTM E 1300 A product of: 1 Table of Contents Table of Contents List of Figures Chapter 1: Window Glass Design 5 1.1 Introduction 1.2 Features ii iv
How To Create A View Frame In 3D
 12/4/2008-10:00 am - 11:30 am Room:Palazzo O-P (5th) The Secrets of Cutting Plan and Profile Sheets in AutoCAD Civil 3D Michelle Rasmussen - Application Engineer, IMAGINiT Technologies CV304-1P In this
Tips and Tricks SAGE ACCPAC INTELLIGENCE
 Tips and Tricks SAGE ACCPAC INTELLIGENCE 1 Table of Contents Auto e-mailing reports... 4 Automatically Running Macros... 7 Creating new Macros from Excel... 8 Compact Metadata Functionality... 9 Copying,
DataPA OpenAnalytics End User Training
 DataPA OpenAnalytics End User Training DataPA End User Training Lesson 1 Course Overview DataPA Chapter 1 Course Overview Introduction This course covers the skills required to use DataPA OpenAnalytics
Ad Hoc Reporting. Usage and Customization
 Usage and Customization 1 Content... 2 2 Terms and Definitions... 3 2.1 Ad Hoc Layout... 3 2.2 Ad Hoc Report... 3 2.3 Dataview... 3 2.4 Page... 3 3 Configuration... 4 3.1 Layout and Dataview location...
About XML in InDesign
 1 Adobe InDesign 2.0 Extensible Markup Language (XML) is a text file format that lets you reuse content text, table data, and graphics in a variety of applications and media. One advantage of using XML
Sage Accountants Business Cloud EasyEditor Quick Start Guide
 Sage Accountants Business Cloud EasyEditor Quick Start Guide VERSION 1.0 September 2013 Contents Introduction 3 Overview of the interface 4 Working with elements 6 Adding and moving elements 7 Resizing
Anoto pendocuments. User s Guide
 Anoto pendocuments User s Guide Copyright 1997 2009 Anoto AB. All rights reserved. Anoto, Magic Box and the Anoto logotype are trademarks owned by Anoto AB. All other trademarks are the property of their
Creating tables of contents and figures in Word 2013
 Creating tables of contents and figures in Word 2013 Information Services Creating tables of contents and figures in Word 2013 This note shows you how to create a table of contents or a table of figures
MAS 500 Intelligence Tips and Tricks Booklet Vol. 1
 MAS 500 Intelligence Tips and Tricks Booklet Vol. 1 1 Contents Accessing the Sage MAS Intelligence Reports... 3 Copying, Pasting and Renaming Reports... 4 To create a new report from an existing report...
Kitchen and Bath Design Tutorial
 Adding Cabinets Chapter 5: Kitchen and Bath Design Tutorial This tutorial continues where the Materials Tutorial left off. You should save this tutorial using a new name to archive your previous work.
CONVERSION GUIDE Financial Statement Files from CSA to Accounting CS
 CONVERSION GUIDE Financial Statement Files from CSA to Accounting CS Introduction and conversion program overview... 1 Conversion considerations and recommendations... 1 Conversion procedures... 2 Data
Kentico CMS 7.0 User s Guide. User s Guide. Kentico CMS 7.0. 1 www.kentico.com
 User s Guide Kentico CMS 7.0 1 www.kentico.com Table of Contents Introduction... 4 Kentico CMS overview... 4 Signing in... 4 User interface overview... 6 Managing my profile... 8 Changing my e-mail and
Working with Tables: How to use tables in OpenOffice.org Writer
 Working with Tables: How to use tables in OpenOffice.org Writer Title: Working with Tables: How to use tables in OpenOffice.org Writer Version: 1.0 First edition: January 2005 First English edition: January
JOOMLA 2.5 MANUAL WEBSITEDESIGN.CO.ZA
 JOOMLA 2.5 MANUAL WEBSITEDESIGN.CO.ZA All information presented in the document has been acquired from http://docs.joomla.org to assist you with your website 1 JOOMLA 2.5 MANUAL WEBSITEDESIGN.CO.ZA BACK
Ohio University Computer Services Center August, 2002 Crystal Reports Introduction Quick Reference Guide
 Open Crystal Reports From the Windows Start menu choose Programs and then Crystal Reports. Creating a Blank Report Ohio University Computer Services Center August, 2002 Crystal Reports Introduction Quick
CATIA Tubing and Piping TABLE OF CONTENTS
 TABLE OF CONTENTS Introduction...1 Manual Format...2 Tubing and Piping design...3 Log on/off procedures for Windows...4 To log on...4 To logoff...8 Pull-down Menus...9 Edit...9 Insert...12 Tools...13 Analyze...16
84 part video tutorial training course. The course is 100% free with no catches or exclusions. You don
 Please Note: If you're new to Revit, you may be interested in my " Beginner's Guide to Revit Architecture " 84 part video tutorial training course. The course is 100% free with no catches or exclusions.
Microsoft Office 2010: Introductory Q&As PowerPoint Chapter 1
 Microsoft Office 2010: Introductory Q&As PowerPoint Chapter 1 Are the themes displayed in a specific order? (PPT 6) Yes. They are arranged in alphabetical order running from left to right. If you point
Kitchen and Bath Design Tutorial
 Adding Cabinets Kitchen and Bath Design Tutorial This tutorial continues where the Interior Design Tutorial left off. You should save this tutorial using a new name to archive your previous work. The tools
MadCap Software. Import Guide. Flare 11
 MadCap Software Import Guide Flare 11 Copyright 2015 MadCap Software. All rights reserved. Information in this document is subject to change without notice. The software described in this document is furnished
Getting Started Guide
 3D Architect Home Designer Getting Started Guide Produced and published in the UK by Eleco Software Limited 2014 Eleco plc. All rights reserved. The software and hardware names and labels used in this
ICP Data Entry Module Training document. HHC Data Entry Module Training Document
 HHC Data Entry Module Training Document Contents 1. Introduction... 4 1.1 About this Guide... 4 1.2 Scope... 4 2. Step for testing HHC Data Entry Module.. Error! Bookmark not defined. STEP 1 : ICP HHC
1.5 MONITOR. Schools Accountancy Team INTRODUCTION
 1.5 MONITOR Schools Accountancy Team INTRODUCTION The Monitor software allows an extract showing the current financial position taken from FMS at any time that the user requires. This extract can be saved
Content Author's Reference and Cookbook
 Sitecore CMS 6.5 Content Author's Reference and Cookbook Rev. 110621 Sitecore CMS 6.5 Content Author's Reference and Cookbook A Conceptual Overview and Practical Guide to Using Sitecore Table of Contents
digital project V1,R4 Quick Start
 digital project V1,R4 Quick Start Quick Starting Your Knowledge in Digital Project V1,R4 Nuri Miller May 2009 Copyright 2009 Gehry Technologies, Inc. Table of Contents Introduction...vi Creating a Part...2
Manual English KOI Desktop App 2.0.x
 Manual English KOI Desktop App 2.0.x KOI Kommunikation, Organisation, Information Comm-Unity EDV GmbH 2010 Contents Introduction... 3 Information on how to use the documentation... 3 System requirements:...
Application Developer Guide
 IBM Maximo Asset Management 7.1 IBM Tivoli Asset Management for IT 7.1 IBM Tivoli Change and Configuration Management Database 7.1.1 IBM Tivoli Service Request Manager 7.1 Application Developer Guide Note
kalmstrom.com Business Solutions
 HelpDesk OSP User Manual Content 1 INTRODUCTION... 3 2 REQUIREMENTS... 4 3 THE SHAREPOINT SITE... 4 4 THE HELPDESK OSP TICKET... 5 5 INSTALLATION OF HELPDESK OSP... 7 5.1 INTRODUCTION... 7 5.2 PROCESS...
Microsoft Publisher 2010 What s New!
 Microsoft Publisher 2010 What s New! INTRODUCTION Microsoft Publisher 2010 is a desktop publishing program used to create professional looking publications and communication materials for print. A new
for Sage 100 ERP Business Insights Overview Document
 for Sage 100 ERP Business Insights Document 2012 Sage Software, Inc. All rights reserved. Sage Software, Sage Software logos, and the Sage Software product and service names mentioned herein are registered
SECTION 5: Finalizing Your Workbook
 SECTION 5: Finalizing Your Workbook In this section you will learn how to: Protect a workbook Protect a sheet Protect Excel files Unlock cells Use the document inspector Use the compatibility checker Mark
3. Add and delete a cover page...7 Add a cover page... 7 Delete a cover page... 7
 Microsoft Word: Advanced Features for Publication, Collaboration, and Instruction For your MAC (Word 2011) Presented by: Karen Gray (kagray@vt.edu) Word Help: http://mac2.microsoft.com/help/office/14/en-