NTS-4000-S GPS NTP Time Server For Accurate Time. Reference Manual
|
|
|
- John Patterson
- 7 years ago
- Views:
Transcription
1 NTS-4000-S GPS NTP Time Server For Accurate Time Reference Manual 1
2 Index Index 2 Introduction 3 Features 3 Package Contents 4 GPS Receiver Enclosed in an IP65 Weather Proof Box 4 Wiring requirements for NTS Hardware Installation 7 Wire Length 8 Frequently Asked Questions 9-10 Server Location 11 Connect to Network 11 Install the Antenna 11 Connecting Server to Antenna 11 Configuration 12 Configuring the Server 13 Install Windows Based Configuration Program 14 Network Configuration 18 Time Server Configuration Options 20 Search 21 Broadcast Search 21 Search by IP 21 Debug 21 Upgrade Firmware 21 Client Configuration 22 Timesync 22 K9 23 Windows XP 23 Linux/Unix 23 Time Server Fundamentals 24 2
, or radio-based broadcasts from Cumbria in the UK (MSF), Frankfurt in Europe (DCF77), and Fort Collins, Colorado in the US")
3 Introduction The NTS-4000 timeserver provides the correct time to computers on a local area network (LAN). Correct time is derived from either Global Positioning Satellites (GPS), or radio-based broadcasts from Cumbria in the UK (MSF), Frankfurt in Europe (DCF77), and Fort Collins, Colorado in the US (WWVB). Once installed on a computer network the NTS-4000 provides a server for the Network Time Protocol (NTP). Each PC on the network can retrieve the time from the server using a NTP client. The NTS Time Server provides a bridge between Ethernet wired LANs and GPS and radio based time sources. Features Hardware clock support Interfaces directly to 10/100Mbps IEEE Ethernet networks Firmware is stored in flash memory and can be upgraded Windows based configuration program Power and network activity LED indicators Optional dual external antennas supporting diversity NTS 4000-S 3


4 Installation Package Contents Before installing the unit, first locate the following parts: NTS-4000 Time Server GPS Antenna unit and power supply IEC Power Cables and power connector Time Server unit NTS 4000-S Separate power supply There is a junction box on the rear of the unit (In the MSF unit the junction box uses four-core cable, in the GPS version, six-core cable is used). The unit is powered by an IEC cable, its operating voltages are between 100v and 240v (0.8amp). GPS Receiver Enclosed in an IP65 Weather Proof Box The cable used for the antenna is six-core unscreened alarm cable; this can be purchased from Galleon Systems or from a local electrical retailer. 4

5 Wiring Requirement for the NTS

6 6
7 Hardware Installation The following diagram summarises the hardware configuration. GPS Clock Installation 7


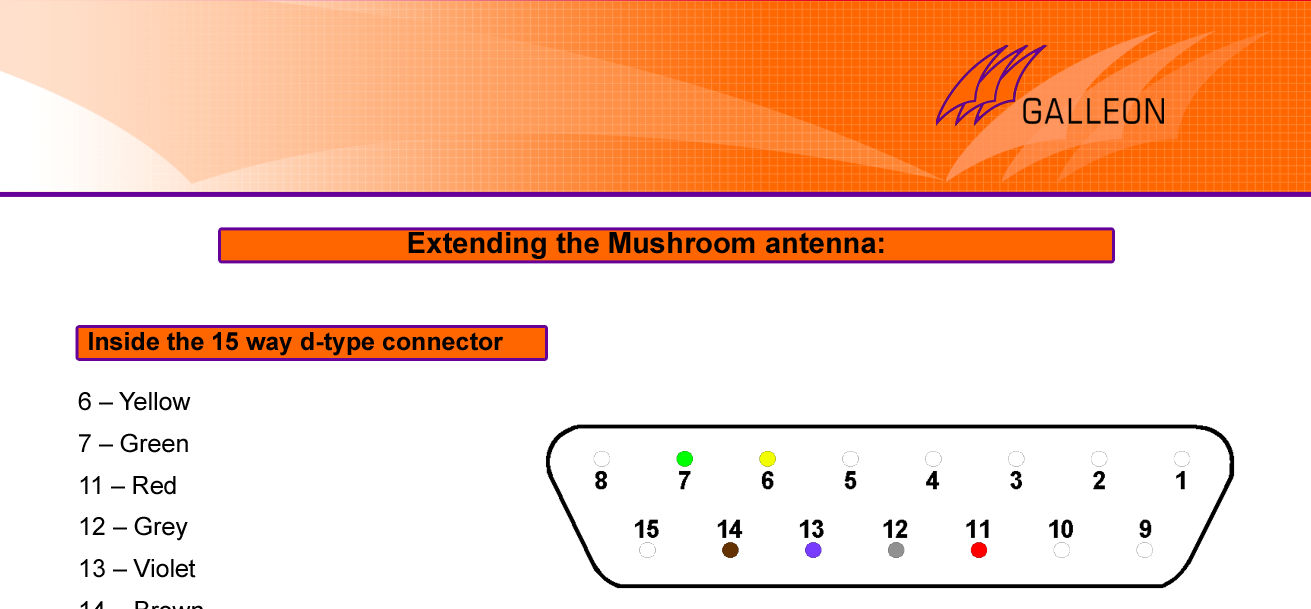
8 Wire Length When cutting the wires to set up the 15 way D-type connector we advise you not to cut the wires too far back as this can cause a possible shortening to the system or the antenna. See below for a picture guide on how much we recommend you cut off: 8


9 Frequently Asked Questions Q: What do the three LED s on the front of the display mean? A: The A LED represents that there is power going to the Unit, the B LED is the GPS Signal and the C is the MSF/WWVB/DCF Signal Either of these or both if you have a Dual unit will be flashing showing you that the unit is picking up the signal from the respective antenna Q: How do you use the software to program the unit? A: After installing the software on you PC double click on the config software program the program will load up and identify the unit connected double click on the unit and will bring up a Configuration pop up box which will show you the IP address, netmask, gateway and IP mode this IP mode can be changed from DHCP to Static IP. Click on ok and the unit is now programmed. Q: How do you use the software to debug the unit? A: The software has on the top section a debug button this will pop out a window like cmd prompt window this will then start showing data from the unit and you can read any error messages that are coming from the Unit, we also recommend that you check all cabling to the unit as this might also be a cause to errors in the unit 9
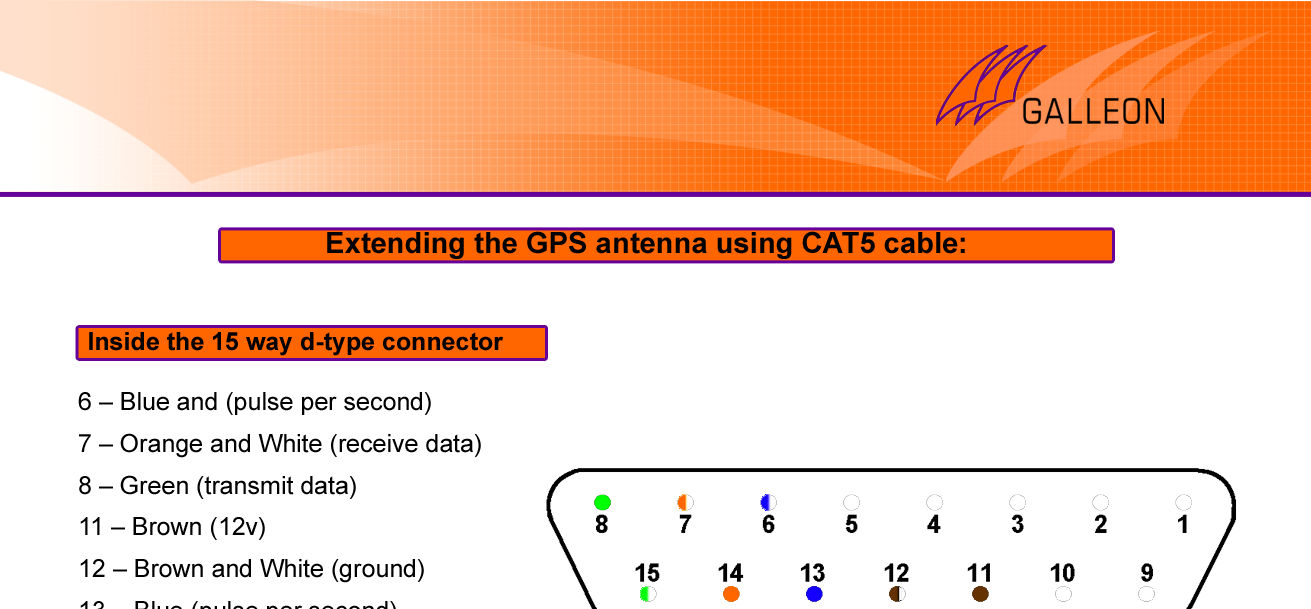
10 Q: The GPS unit cannot pick up the signal - what can be done to improve this? A: The ideal location for the GPS antenna is the roof of the building as the Antenna needs to get the best possible chance to receive the signal from the satellites Q: Can the cabling for the antenna be taken across the existing CAT5 cabling structure in our building? A: Yes, the GPS antenna can be taken across CAT5 / UTP cabling however the cabling must be point to point and cannot pass through routers, hubs or switches. Q: What type of cable should I use for extending the GPS antenna to 1000 metres? A: The GPS antenna uses standard unscreened four-core cable; in most cases this is adequate however in some cases screen cable may be required. Note: The cabling is referred to as six-core alarm cable 10
11 Server Location Choose a suitable location for the NTS-4000; please bear in mind you will need to run a cable from this location preferably to the roof of the building or to a window. Connect to Network Connect the NTS-4000 to the network using a standard RJ45 cable. Install antenna Locate a mains power supply on the roof of the building or a mains power supply that can be accessed from the roof. Choose an area to mount the GPS antenna; the ideal place would be the roof of the Building. Things to avoid are air conditioning units and power distribution units, as these will cause electrical interference. Connecting the server to the antenna The cable should be run from the rack mount enclosure to the selected mounting position Hint: It is a good idea to leave some slack cable in case you need to move the unit later. Note: The maximum cable length is 1000 metres (1 KM). 11
12 Display and system start-up Configuration First power the GPS antenna then power up the NTS The LCD display should show the following information: Current time (when synchronised) IP address of the Ethernet port The synchronisation state of the system When the system starts, it will initially display a message: GPS xxxxxx, Radio Pulse x, IP xxx.xxx.xxx.xxx Unsynchronised This indicates that the system is searching for an initial timestamp from the antenna. Once this is achieved, the system sets its internal clock using the accurate time data. After power is applied, the server should be able to provide correct time within a few minutes of the correct clock operation. The delay is due to the NTS-4000 locating and synchronising to the time signal. Note: The display will show GPS xxxxx and Radio Pulse xxx whether one or both types of antenna are connected. The GPS message will show whether GPS data is received and if a fix has been achieved. The Radio clock messages shows if pulses are being receive, typically this value should change once every second, if the value changes intermittently or not at all, the radio antenna may need to be repositioned. Once synchronised the display should change to: Synchronised to xxx, IP xxx.xxx.xxx.xxx yyyy/mm/dd hh:mm:ss Once synchronised the system can tolerate the loss of signal for 30 minutes before it becomes unsynchronized, once synchronised and calibrated (approximately 30 minutes after the first time the NTS-4000 was synchronised after it was switched on) the system can tolerate the loss of signal for 14 days before it becomes unsynchronised. 12
13 Configuring the Server Once the hardware has been installed, follow these steps to configure the server for use: Install the Windows configuration program Configure the network Configure the NTP options Note: The time displayed is UTC. It may not match your wall clock depending on what time zone you are in and whether daylight savings/summer time is in effect. This does not affect whether the correct time is shown on client PCs. Clients use the time in UTC from the server plus information about their local time zone to calculate the correct local time. Note: The time displayed is accurate to the nearest second, updated once a second. This means that the display may appear to be up to a ½ second off from other time sources. The display does not reflect the underlying system s ability to provide the correct time to millisecond accuracy. 13
 on a suitable Windows PC - all recent versions of Windows are supported.. ` Press Next Press Next 14")
14 Install Windows based Configuration program Now you need to install and run the Windows based configuration program to set up the network connection, you will then be able to configure NTP clients to use the NTS Run the setup program (called ConfigVxx.exe where xx is the version number) on a suitable Windows PC - all recent versions of Windows are supported.. ` Press Next Press Next 14

15 Select where you would like the program installed Select the program group 15


16 Press Install Press Finish and the configuration program will be started, it will immediately search the network for NTS-4000 Devices. 16


17 Note: You may get a warning from your PC if you have a firewall enabled. e.g. The Configuration program must be unblocked to allow it to work correctly. All the NTS-4000 Devices found are shown along with their current IP address (if any), hardware MAC address and software version number. Select the device you are configuring then press Configuration. 17

18 Network Configuration The first configuration step is to set up the network so other devices can use the NTS The display always shows the currently active IP address for the network connection. Hint: The NTS-4000 must be configured with a valid IP address before the NTP options can be set. First, determine whether you are going to use DHCP (automatic network configuration) or a static address. DHCP is short for Dynamic Host Configuration Protocol, a protocol for assigning dynamic IP addresses to devices on a network. With dynamic addressing, a device can have a different IP address every time it connects to the network. To switch DHCP on to determine network settings automatically Select change Ethernet setting Select IP Mode DHCP This is the easiest way to set up the server initially; however, it is recommended that a static address be assigned to the server, if possible, to fix the address permanently. With automatically assigned addresses using DHCP it is possible that the address could change, possibly requiring client reconfiguration. 18

19 To assign static settings to the network first determine the following: Gateway Subnet mask IP address the server should use These should be available from your network administrator. To switch DHCP off Select change Ethernet setting Select IP Mode Static IP The Gateway, Subnet mask and IP address should be replaced by values for your network. Hint: Once the NTS-4000 is correctly configured, the Windows Configuration program is no longer required for normal operation. 19

20 Time Server Configuration Options To set the timeserver options for the NTS-4000, select the device as before, then press Options. The current status is shown along with the options to send broadcasts and/or syslog messages. Broadcasts are a way of sending a single timestamp to many computers at the same time. Multicasts are similar but may span more than one subnet if the network is set to do so. If the value of the broadcast frequency is set to 0, none are sent. The K9 client uses broadcasts so broadcasts should be switched on when it is used. Broadcasts cover the local subnet but go no further. Up to 10 broadcast addresses may be set. Press the default broadcast and/or default multicast buttons to set the most commonly used addresses. Other subnets may be sent broadcasts (called directed broadcasts). Eg: one could send a broadcast to subnet x using an address of The syslog server is where system status messages are sent using the syslog protocol. If this is set to no syslog messages are ever sent. 20

21 Search The search options are used to find NTS-4000 Devices on the network. Broadcast Search Broadcast search sends a message to all devices on the local subnet. Any that reply are listed. This is done by default when the configuration program starts. Search by IP If you know the address of the NTS-4000 you can search for it directly using this option. It allows access to NTS-4000 Devices beyond the local subnet. Debug Selecting debug will start a telnet session with the NTS-4000 Showing information that may be useful to engineers to resolve problems. 21


22 Upgrade Firmware Upgrade allows the NTS-4000 Software to be upgraded to add new features and/or fix problems. Select the device to be upgraded and press the upgrade button or select Upgrade->firmware. Now select the new firmware file supplied by Galleon Systems and press Open. After approximately 1 minute, the following message should be displayed: The NTS-4000 should restart automatically. Client Configuration The following clients are supported. Others clients that use SNTP or NTP should work too. Add a server of type SNTP/NTP Timesync Enter the address of the NTS

23 K9 For K9 to set the time the NTS-4000 must be set to send broadcasts. This is off by default. On the option page, select a non-zero broadcast frequency. Windows XP Windows XP may be configured to use an NTP time source such as the NTS In the Date and Time control panel select the Internet Time tab and enter the NTS-4000 as the server. Linux/Unix Place an entry in the Linux/Unix machine s ntp.conf file for the NTS Eg server Where the IP address should be that of the NTS This assumes that NTP is already set up on the machine. 23
24 Time Server Fundamentals The NTS-4000 provides a network-based timeserver using the NTP protocol - it may be assigned fixed or dynamic network addresses using DHCP. The Network Time Protocol (NTP) is used to synchronise the time of a computer client or server to another server or reference time source - such as a radio or GPS satellite receiver. It provides accuracies typically within a few milliseconds on LANs and up to a few tens of milliseconds on WANs relative to Coordinated Universal Time (UTC). GPS is a system of satellites, computers, and receivers that is able to determine the Latitude and longitude of a receiver on Earth by calculating the time difference of signals from different satellites to reach the receiver. These signals are generated by an atomic clock and are used by a GPS timeserver to receive the time. UTC (Universal Time Coordinated or Temps Universel Coordonné) is an official standard for the current time. UTC evolved from the former GMT (Greenwich Mean Time), GMT had been adopted as the world's standard time but one of the reasons it has been replaced as official standard time was the fact that it was based on the mean solar time. Newer methods of time measurement showed that the mean solar time varied a lot by itself as the Earth s rotation is varied. The following list will explain the main components of UTC: Universal means that the time can be used everywhere in the world, meaning that it is independent from time zones (i.e. it is not local time). To convert UTC to local time, one would have to add or subtract the local time zone.. Coordinated means that several institutions contribute their estimate of the current time, and UTC is built by combining these estimates - all contributions to UTC are made by atomic clocks. 24
TS-300-MSF TS-300 INSTALLATION AND CONFIGURATION MANUAL
 TS-300 INSTALLATION AND CONFIGURATION MANUAL CONTENTS Contents... 2 Introduction... 3 Features... 3 What should be shipped... 4 Standard Parts... 4 Optional Parts... 4 Technical Specification... 5 System
Quick Setup Guide High Power Wireless Ethernet Converter WLI-TX4-G54HP
 Quick Setup Guide High Power Wireless Ethernet Converter WLI-TX4-G54HP This guide is intended to help you quickly and easily install your High Power Wireless Ethernet Converter. For more setup and configuration
SNMP Web Management. User s Manual For SNMP Web Card/Box
 SNMP Web Management User s Manual For SNMP Web Card/Box Management Software for Off-Grid Inverter Version: 1.2 Table of Contents 1. Overview... 1 1.1 Introduction... 1 1.2 Features... 1 1.3 Overlook...
DSL Installation Guide
 DSL Installation Guide Thank you for choosing Integra Telecom s DSL service! Introduction This guide will walk you through the DSL installation process and will help you configure a computer to access
UBIQUITI BRIDGE CONFIGURATION PROCEDURE (PowerStation & NanoStation Units ONLY)
") UBIQUITI BRIDGE CONFIGURATION PROCEDURE (PowerStation & NanoStation Units ONLY) Hardware Installation 1. Initial placement for programming and configuration purposes should be performed in an indoor environment.
UBIQUITI BRIDGE CONFIGURATION PROCEDURE (PowerStation & NanoStation Units ONLY) Hardware Installation 1. Initial placement for programming and configuration purposes should be performed in an indoor environment.
1 PC to WX64 direction connection with crossover cable or hub/switch
 1 PC to WX64 direction connection with crossover cable or hub/switch If a network is not available, or if it is desired to keep the WX64 and PC(s) completely separated from other computers, a simple network
Assign a static IP address 192.168.1.100 for your computer. Please refer to the T3 in Troubleshooting guide if you need assistance.
 Assign a static IP address 192.168.1.100 for your computer. Please refer to the T3 in Troubleshooting guide if you need assistance. Connect to the Access Point with the Ethernet cable or via wireless.the
ASUS WL-5XX Series Wireless Router Internet Configuration. User s Guide
 ASUS WL-5XX Series Wireless Router Internet Configuration User s Guide Contents Chapter 1 Introduction:...1 Chapter 2 Connecting the wireless router...1 Chapter 3 Getting to know your Internet connection
Turn on all of your network devices and then check to see if the LEDs on the Access Point display normally as the diagram below describes.
 Connect to the Access Point with the Ethernet cable or via wireless. The default SSID of the Access Point is TP-LINK_ XXXXXX. The XXXXXX is the last 6 characters of the Access Point s MAC address. Plug
Assign a static IP address (192.168.1.100) for your computer. Please refer to T3 in Troubleshooting guide on page 10 if you need assistance.
 for your computer. Please refer to T3 in Troubleshooting guide on page 10 if you need assistance.") Assign a static IP address (192.168.1.100) for your computer. Please refer to T3 in Troubleshooting guide on page 10 if you need assistance. You may need to write down the original settings as a backup.
Assign a static IP address (192.168.1.100) for your computer. Please refer to T3 in Troubleshooting guide on page 10 if you need assistance. You may need to write down the original settings as a backup.
USER GUIDE. Ethernet Configuration Guide (Lantronix) P/N: 2900-300321 Rev 6
 P/N: 2900-300321 Rev 6") KRAMER ELECTRONICS LTD. USER GUIDE Ethernet Configuration Guide (Lantronix) P/N: 2900-300321 Rev 6 Contents 1 Connecting to the Kramer Device via the Ethernet Port 1 1.1 Connecting the Ethernet Port Directly
KRAMER ELECTRONICS LTD. USER GUIDE Ethernet Configuration Guide (Lantronix) P/N: 2900-300321 Rev 6 Contents 1 Connecting to the Kramer Device via the Ethernet Port 1 1.1 Connecting the Ethernet Port Directly
NXT Controller Manual IP Assignment in WAN Environments Application Note
 It is difficult to perform NXT controller IP address assignment and auto-configuration when controllers are on different subnets from the local PC (the PC from which the Doors.NET client is run). This
3.5 EXTERNAL NETWORK HDD. User s Manual
 3.5 EXTERNAL NETWORK HDD User s Manual Table of Content Before You Use Key Features H/W Installation Illustration of Product LED Definition NETWORK HDD Assembly Setup the Network HDD Home Disk Utility
Assign a static IP address 192.168.1.100 for your computer. Please refer to the T3 in Troubleshooting guide if you need assistance.
 Note The product model shown in this QIG is TL-WA701ND, as an example. Assign a static IP address 192.168.1.100 for your computer. Please refer to the T3 in Troubleshooting guide if you need assistance.
Check Your Package Contents. CD-ROM containing Manual and Warranty
 This product can be set up using any current web browser, i.e., Internet Explorer 6 or Netscape Navigator 6.2.3. DVA-G3340S Wireless VoIP Router Before You Begin If you purchased this Router to share your
BROADBAND INTERNET ROUTER USER S MANUAL. Version 1.0. - Page 1 of 13 -
 Version 1.0 - Page 1 of 13 - 10/100M Broadband Router GETTING TO KNOW 2 3 4 1 5 7 6 - Page 2 of 13 - LED Indicator S/N Indicator Function 1 Power LED (Green) LED lights up steadily indicate that the power
GPS NTP Time Server for Intranet Networks DIN RAIL Version
 GPS NTP Time Server for Intranet Networks DIN RAIL Version Description: GPS NTP time server is very simple low cost solution for Ethernet / Intranet time synchronization. Each computer or devices with
Linksys Gateway SPA2100-SU Manual
 Linksys Gateway SPA2100-SU Manual Manuel de l'utilisateur Table of Contents Looking for Basic Setup Instructions?... 3 Most Recent Version of this Manual... 3 Advanced Setup Instructions... 4 Wiring Your
BiPAC 7404V series. VoIP/(802.11g) ADSL2+ (VPN) Firewall Router. Quick Start Guide
 ADSL2+ (VPN) Firewall Router. Quick Start Guide") BiPAC 7404V series VoIP/(802.11g) ADSL2+ (VPN) Firewall Router Quick Start Guide VoIP/(802.11g) ADSL2+ (VPN) Firewall Router For more detailed instructions on configuring and using the Billion VoIP/(802.11g)
BiPAC 7404V series VoIP/(802.11g) ADSL2+ (VPN) Firewall Router Quick Start Guide VoIP/(802.11g) ADSL2+ (VPN) Firewall Router For more detailed instructions on configuring and using the Billion VoIP/(802.11g)
Chapter 10 Troubleshooting
 Chapter 10 Troubleshooting This chapter provides troubleshooting tips and information for your ProSafe Dual WAN Gigabit Firewall with SSL & IPsec VPN. After each problem description, instructions are provided
Using a simple crossover RJ45 cable, you can directly connect your Dexter to any computer.
 Dexter is a network device using the Ethernet protocol to connect and communicate with other devices on the network: Computers, routers, DHCP servers. Thus you have to setup your Dexter and your network
Preparing the Computers for TCP/IP Networking
 Configuration Preparing the Computers for TCP/IP Networking Configuring Windows 98, and ME for TCP/IP Networking Verifying TCP/IP Properties Configuring Windows 2000 or XP for IP Networking Install or
1. Hardware Installation
 4 Port 10/100M Internet Broadband Router with USB Printer server Quick Installation Guide #4824904AXZZ0 1. Hardware Installation A. System Requirement Before you getting started, make sure that you meet
Broadband Router ESG-103. User s Guide
 Broadband Router ESG-103 User s Guide FCC Warning This equipment has been tested and found to comply with the limits for Class A & Class B digital device, pursuant to Part 15 of the FCC rules. These limits
HomePlug Turbo Powerline Ethernet Bridge. User Manual
 HomePlug Turbo Powerline Ethernet Bridge User Manual Copyright The contents of this publication may not be reproduced in any part of as a whole, stored, transcribed in an information retrieval system,
Networking Guide Redwood Manager 3.0 August 2013
 Networking Guide Redwood Manager 3.0 August 2013 Table of Contents 1 Introduction... 3 1.1 IP Addresses... 3 1.1.1 Static vs. DHCP... 3 1.2 Required Ports... 4 2 Adding the Redwood Engine to the Network...
ACU-1000 Manual Addendum Replacement of CPM-2 with CPM-4
 ACU-1000 Manual Addendum Replacement of CPM-2 with CPM-4 1 PURPOSE:... 1 2 CPM-4/CPM-2 COMPATIBILITY... 2 2.1 NETWORK CABLES... 2 2.2 FACTORY DEFAULT SETTINGS... 2 2.3 CHANGING THE RS-232 SERIAL PORT BAUD
IS SERIES. QuikStart Programming Guide. IP Network Direct System. Programming Videos
 0215 IS SERIES IP Network Direct System QuikStart Programming Guide 1 4 GHI 2 ABC 5 JKL 3 DEF 6 MNO PRIVACY TRANSFER LIST SETTING 7 PQRS 8 TUV 9 WXYZ ZOOM 0 # WIDE Programming Videos ATTENTION: This is
Manual. IP Sensor and Watchdog IPSW2210. I P S W 2 2 1 0 M a n u a l P a g e 1. Relay Output. Power input. 12VDC adapter LED Indicators. 2 Dry.
 IP Sensor and Watchdog IPSW2210 Manual Relay Output Power input 12VDC adapter LED Indicators 1 wire 2 Dry Output Green : Power Yellow: Link temperature & humidity contact inputs LED indicator sensor input
ProSAFE 8-Port and 16-Port Gigabit Click Switch
 ProSAFE 8-Port and 16-Port Gigabit Click Switch Model GSS108E and GSS116E User Manual March 2015 202-11520-01 350 East Plumeria Drive San Jose, CA 95134 USA Support Thank you for selecting NETGEAR products.
Chapter 3 Management. Remote Management
 Chapter 3 Management This chapter describes how to use the management features of your ProSafe 802.11a/g Dual Band Wireless Access Point WAG102. To access these features, connect to the WAG102 as described
NETVIGATOR Wireless Modem Setup Guide. (TG789Pvn)
") NETVIGATOR Wireless Modem Setup Guide (TG789Pvn) Configure the NETVIGATOR Wireless Modem Make sure that system meets the following requirement prior to NETVIGATOR Wireless Modem usage: - Subscribers who
NETVIGATOR Wireless Modem Setup Guide (TG789Pvn) Configure the NETVIGATOR Wireless Modem Make sure that system meets the following requirement prior to NETVIGATOR Wireless Modem usage: - Subscribers who
Krontek. KT2000 GPS SNTP Timeserver
 Krontek KT2000 GPS SNTP Timeserver GPS Network Timeserver - 1 - Rev 1.3b 17-Jul-2008 Table of contents Communicating with the Controller... 3 Introduction... 4 Main Menu... 4 1 - Set device Address, Mask,
Secure Ethernet Gateway SEG-1 and SEG-M for IEI Access Systems Installation Manual
 Secure Ethernet Gateway SEG-1 and SEG-M for IEI Access Systems Installation Manual Section 1: Introduction SECURITY WARNING: New SEG's shipped after April 2008 will have Telnet setup option enabled by
Gigabit Content Security Router CS-5800
 Gigabit Content Security Router CS-5800 Quick Installation Guide Table of Contents 1. Package Contents... 3 2. Hardware Installation... 4 2.1 Safety Instruction... 4 2.2 Front panel... 4 2.3 LED & Button
DIR-100. Before You Begin. Check Your Package Contents. Triple Play Router
 This product can be set up using a current web browser. DIR-100 Triple Play Router Before You Begin Make sure you have all the necessary information and equipment on hand before beginning the installation.
Chapter 6 Using Network Monitoring Tools
 Chapter 6 Using Network Monitoring Tools This chapter describes how to use the maintenance features of your Wireless-G Router Model WGR614v9. You can access these features by selecting the items under
PLANET is a registered trademark of PLANET Technology Corp. All other trademarks belong to their respective owners.
 Trademarks Copyright PLANET Technology Corp. 2004 Contents subject to revise without prior notice. PLANET is a registered trademark of PLANET Technology Corp. All other trademarks belong to their respective
Please use only wired network connections to configure the router.
 Note Please use only wired network connections to configure the router. Connect the WAN port on your Router to the Modem s LAN port with an Ethernet cable. Note If connecting the TL-WR543G to the WISP
2 Setting Up the Hardware for a Wired Ethernet Network... 13. 3 Setting Up the Software for an Ethernet Network... 21
 Contents 1 Networking Basics............................................... 1 Selecting a network connection........................................ 2 Wired Ethernet network...........................................
Multi-Homing Dual WAN Firewall Router
 Multi-Homing Dual WAN Firewall Router Quick Installation Guide M73-APO09-400 Multi-Homing Dual WAN Firewall Router Overview The Multi-Homing Dual WAN Firewall Router provides three 10/100Mbit Ethernet
Contents. Section A Networking Basics... 1. 1 Learning the Basics... 3. Section B Wired Ethernet Networking... 17
 Contents Section A Networking Basics...................................... 1 1 Learning the Basics............................................. 3 Selecting a network connection........................................
www.css-timemachines.com Precision Clocks When you absolutely can't afford a time shift Installation and Operation Manual
 www.css-timemachines.com Precision Clocks When you absolutely can't afford a time shift Installation and Operation Manual Table of Contents 1. Introduction...1 2. Initial Setup...2 2.1 PoE...2 2.2 Network...2
1.0 Basic Principles of TCP/IP Network Communications
 Section 1 Basic Principles of TCP/IP Network Communications Section 2 Introduction to Doors NetXtreme Section 3 Common Connection Issues Section 4 Common Causes Section 5 Tools Section 6 Contact Keri Systems
FWS WiTDM Series KWA-O8800-I User Manual
 FWS WiTDM Series KWA-O8800-I User Manual Date: 2009 / 04 / 23 Version: 1.0 1 Copyright This user s manual and the software described in it are copyrighted with all rights reserved. No part of this publication
801.11n Wireless Broadband Router
 801.11n Wireless Broadband Router WNRT-626 Quick Installation Guide Table of Contents Hardware Installation... 4 Web Configuration... 6 Further Configuration... 8 Thank you for purchasing PLANET 801.11n
802.11n Wireless Broadband Router WNRT-625
 802.11n Wireless Broadband Router WNRT-625 Quick Installation Guide Table of Contents Introduction... 3 Package Content... 4 Hardware Installation... 5 Web Configuration... 8 Further Configuration...11
Easy Setup Guide for the Sony Network Camera
 -878-191-11 (1) Easy Setup Guide for the Sony Network Camera For setup, a computer running the Microsoft Windows Operating System is required. For monitoring camera images, Microsoft Internet Explorer
Chapter 4 Management. Viewing the Activity Log
 Chapter 4 Management This chapter describes how to use the management features of your NETGEAR WG102 ProSafe 802.11g Wireless Access Point. To get to these features, connect to the WG102 as described in
WIRELESS INTERNET TROUBLESHOOTING GUIDE. 320.834.5151 888.236.3574 www.gctel.com. Help Desk 320.834.5155
 WIRELESS INTERNET TROUBLESHOOTING GUIDE 320.834.5151 888.236.3574 www.gctel.com Help Desk 320.834.5155 Table of Contents Check Physical Connection Connection Diagram - Page 1 Power Inserter - Page 2 Identify
Chapter 1 Installing the Gateway
 Chapter 1 Installing the Gateway This chapter describes how to set up the wireless voice gateway on your Local Area Network (LAN), connect to the Internet, and perform basic configuration. For information
Zebra Ethernet. Frequently Asked Questions
 Zebra Ethernet Frequently Asked Questions Zebra Technologies Corporation Card Imaging Division 1001 Flynn Road Camarillo, CA 93012 USA Phone: (805) 579-1800 Fax: (805) 579-1808 www.cards.zebra.com 2004
Application Note Configuring the UGate 3000 for use with ClipMail Pro and ClipExpress
 Application Note Configuring the UGate 3000 for use with Introduction This Application Note guides the ClipMail user through the UGate gateway configuration process by using a simple dial up connection
Packet Tracer 3 Lab VLSM 2 Solution
 Packet Tracer 3 Lab VLSM 2 Solution Objective Create a simulated network topology using Packet Tracer Design an IP addressing scheme using a Class B subnetwork address and VLSM Apply IP addresses to the
EnGenius ERB9250 300M Range Extender. Quick Start Guide
 EnGenius ERB9250 300M Range Extender Quick Start Guide Package Contents One ERB9250 300M Range Extender One 12V/1A power adapter Two 2dBi 2.4GHz SMA antennas One Ethernet cable One CD-ROM with user s manual
User Manual Network Interface
 User Manual Network Interface Rev. 1.00 SRP-350plusll SRP-352plusll http://www.bixolon.com Table of Contents 1. Manual Information...3 2. Specifications...3 2-1 Hardware version...3 2-2 Configuration Tool...3
Self Help Guide IMPORTANT! F5D7330 - Setting Up An Ad Hoc Connection. Please read the following carefully;
 IMPORTANT! This Guide refers to the following Products: F5D7330 - Setting Up An Ad Hoc Connection Please read the following carefully; Synopsis: This guide is designed to assist in you in forming an ad
How To Set Up A Computer With A Network Connection On A Cdrom 2.5 (For A Pc) Or Ipad (For Mac) On A Pc Or Mac Or Ipa (For Pc) On An Ipad Or Ipro (
 Or Ipad (For Mac) On A Pc Or Mac Or Ipa (For Pc) On An Ipad Or Ipro (") Connect the supplied power-adapter to the power inlet port and connect it to a wall outlet. Then, the router automatically enters the self-test phase. During self-test phase, RNX-EasyN400 s Power LED will
Connect the supplied power-adapter to the power inlet port and connect it to a wall outlet. Then, the router automatically enters the self-test phase. During self-test phase, RNX-EasyN400 s Power LED will
WEB CONFIGURATION. Configuring and monitoring your VIP-101T from web browser. PLANET VIP-101T Web Configuration Guide
 WEB CONFIGURATION Configuring and monitoring your VIP-101T from web browser The VIP-101T integrates a web-based graphical user interface that can cover most configurations and machine status monitoring.
PC/POLL SYSTEMS Version 7 Polling SPS2000 Cash Register TCP/IP Communications
 PC/POLL SYSTEMS Version 7 Polling SPS2000 Cash Register TCP/IP Communications PC/POLL SYSTEMS supports native TCP/IP polling for the SPS2000 cash register. It is recommended users have the register updated
Chapter 6 Using Network Monitoring Tools
 Chapter 6 Using Network Monitoring Tools This chapter describes how to use the maintenance features of your RangeMax Wireless-N Gigabit Router WNR3500. You can access these features by selecting the items
Installation. The product model shown in this QIG is TD-W8961ND, as an example.
 Installation The product model shown in this QIG is TD-W8961ND, as an example. Please use only wired network connections to configure the router. Power down all your network devices, including your computer(s)
Cisco - Configure the 1721 Router for VLANs Using a Switch Module (WIC-4ESW)
") Page 1 of 20 Configure the 1721 Router for VLANs Using a Switch Module (WIC-4ESW) Document ID: 50036 Contents Introduction Prerequisites Requirements Components Used Network Diagram The Role of Switched
Page 1 of 20 Configure the 1721 Router for VLANs Using a Switch Module (WIC-4ESW) Document ID: 50036 Contents Introduction Prerequisites Requirements Components Used Network Diagram The Role of Switched
Wireless LAN 802.11g USB Adapter
 Wireless LAN 802.11g USB Adapter User s Guide Version 1.0 User s Guide 0 Copyright statement No part of this publication may be reproduced, stored in a retrieval system, or transmitted in any form or by
IX Support Tool Setting Manual
 IX System IP network-compatible intercom IX Support Tool Setting Manual Software version 2.0.0.0 or later Before configuring and using the system, read Setting Manual and Operation Manual (PDF) carefully.
How To Check If Your Router Is Working Properly
 Chapter 6 Using Network Monitoring Tools This chapter describes how to use the maintenance features of your RangeMax Dual Band Wireless-N Router WNDR3300. You can access these features by selecting the
Firewall VPN Router. Quick Installation Guide M73-APO09-380
 Firewall VPN Router Quick Installation Guide M73-APO09-380 Firewall VPN Router Overview The Firewall VPN Router provides three 10/100Mbit Ethernet network interface ports which are the Internal/LAN, External/WAN,
The following sections describe the Gateway configuration pages in the SBG1000 Setup Program.
 Configuration Gateway > WAN Page Gateway: LAN nat config Page Gateway: LAN dhcp server config Page Gateway LOG Page Preparing the Network Preparing the Computers for TCP/IP Networking Configuring TCP/IP
N300 WiFi Range Extender WN2000RPT User Manual
 N300 WiFi Range Extender WN2000RPT User Manual December 2013 202-11333-01 350 East Plumeria Drive San Jose, CA 95134 USA Support Thank you for selecting NETGEAR products. After installing your device,
TR-7W Configuration Guide. Before You Start
 TR-7W Configuration Guide Before You Start Take a few moments before you start to make the following simple checks. A few moments spent before you start installing your system can save a lot of time later
SYNCHRONIZE DIGITAL CLOCK SYSTEM NETWORK DIGITAL CLOCK VER 1.0 DYNATEK
 SYNCHRONIZE DIGITAL CLOCK SYSTEM NETWORK DIGITAL CLOCK MODEL NO :NET-CLK VER 1.0 DYNATEK 125, Diamond Indl. Est., Near Dahisar Check Naka, Dahisar - (E),Mumbai - 400068 Email: dynatek@vsnl.com Web: www.dynatekindia.com
Quick Installation Guide. Overview. GULFSIP ATA-G1S Quick Installation Guide
 Quick Installation Guide Overview This quick installation guide describes the objectives; organization and basic installation of the GULFSIP ATA-G1S VoIP Phone Adapter ( ATA in the following term). The
NeoGate TA Series Installation Guide
 NeoGate TA Series Installation Guide Version 1.2 Date: April 1, 2015 Yeastar Information Technology Co. Ltd Contents 1. Preparation before Installation... 3 2. Hardware Specifications... 5 2.1 Overview...
H0/H2/H4 -ECOM100 DHCP & HTML Configuration. H0/H2/H4--ECOM100 DHCP Disabling DHCP and Assigning a Static IP Address Using HTML Configuration
 H0/H2/H4 -ECOM100 DHCP & HTML 6 H0/H2/H4--ECOM100 DHCP Disabling DHCP and Assigning a Static IP Address Using HTML 6-2 H0/H2/H4 -ECOM100 DHCP DHCP Issues The H0/H2/H4--ECOM100 is configured at the factory
CMP-102U. Quick Installation Guide
 CMP-102U Quick Installation Guide V1.0 http://www.cnet.com.tw 1 CMP-102U Supports One High-speed USB2.0 Port MFP Server Supports 10/100Mbps Fast Ethernet Network Quick Installation Guide 1 Package Contents:
SOYO G668 VOIP IP PHONE USER MANUAL
 SOYO G668 VOIP IP PHONE USER MANUAL Inglos Networks Industrial Global Solutions Teléfono: +1 (585) 217-9864, Fax: + 1 (585) 872-9627, Email: jmesen@inglos.com Table of Content SAFETY INFORMATION... 1 INTRODUCTION...
Ethernet. Customer Provided Equipment Configuring the Ethernet port.
 Installing the RDSP-3000A-NIST Master Clock. Ethernet Connect the RJ-45 connector to a TCP/IP network. Equipment The following equipment comes with the clock system: RDSP-3000A-NIST Master Clock Module.
Talk2M Free+ Remote-Access Connectivity Solution for ewon COSY 131 3G devices. Getting Started Guide
 Talk2M Free+ Remote-Access Connectivity Solution for ewon COSY 131 3G devices Getting Started Guide Page 1 of 32 mac-solutions.net ABBMA: v1 JAN 2015 INTRODUCTION... 3 1. HARDWARE AND SOFTWARE REQUIREMENTS...
Enabling Internet Connection Sharing on Windows 2000 15. Enabling ICS On Windows XP As The Host 4 Enabling ICS On Windows XP As The Client 11
 Sharing an Internet Connection with SatDirect Plus Table of Contents Contents Section 1: Section 2: Section 3: Introduction... 1 Physical Setup......2 Enabling Internet Connection Sharing on Windows XP
SNMP Web card. User s Manual. Management Software for Uninterruptible Power Supply Systems
 SNMP Web card User s Manual Management Software for Uninterruptible Power Supply Systems Table of Contents 1. Overview... 3 1.1 Introduction... 3 1.2 Features... 3 1.3 Overlook... 3 1.4 Installation and
BASLER ACE QUICK INSTALLATION GUIDE
 BASLER ACE QUICK INSTALLATION GUIDE Rev. 01 Quick installation Guide V1 1 Introduction The installation procedures in this guide assume that you want to get your camera operational and begin capturing
BiPAC 7800NL. Wireless-N ADSL2+ Firewall Router. Quick Start Guide
 BiPAC 7800NL Wireless-N ADSL2+ Firewall Router Quick Start Guide BiPAC 7800NL Wireless-N ADSL2+ Firewall Router Billion BiPAC 7800NL Wireless-N ADSL2+ Firewall Router PLEASE READ THE QUICK START GUIDE
enervista UR Setup Software Quick Connect Instructions:
 enervista UR Setup Software Quick Connect Instructions: The user can connect to the UR relay via front serial port or rear Ethernet port using the Quick Connect feature of enervista UR Setup software.
WLAN Outdoor CPE For 2.4G. Quick Installation Guide
 WLAN Outdoor CPE For 2.4G Quick Installation Guide Part I: External Installation Direction A. Check the parts in your box CPE SET 1 DC 12V/1.5A Power Adapter 1 PoE DC Injector 1 Hose Clamps 2 Manual &
GS510TP and GS110T Gigabit Smart Switches
 GS510TP and GS110T Gigabit Smart Switches Software Administration Manual 350 East Plumeria Drive San Jose, CA 95134 USA December 2011 202-10883-01 v1.0 2011 NETGEAR, Inc. All rights reserved No part of
Setting up VPN Access for Remote Diagnostics Support
 Setting up VPN Access for Remote Diagnostics Support D. R. Joseph, Inc. supports both dial-up and Internet access for remote support of 3GIBC1 and LF-Sizer control systems. This document describes how
PLANET is a registered trademark of PLANET Technology Corp. All other trademarks belong to their respective owners.
 Trademarks Copyright PLANET Technology Corp. 2004 Contents subject to revise without prior notice. PLANET is a registered trademark of PLANET Technology Corp. All other trademarks belong to their respective
Talk2M Free+ Remote-Access Connectivity Solution for ewon COSY devices. Getting Started Guide
 Talk2M Free+ Remote-Access Connectivity Solution for ewon COSY devices Getting Started Guide Page 1 of 36 mac-solutions.co.uk DSH : v3 OCT 2014 INTRODUCTION... 3 HARDWARE AND SOFTWARE REQUIREMENTS... 5
BEC 6200WZL. 4G/LTE Cellular Broadband Router. Quick Start Guide
 BEC 6200WZL 4G/LTE Cellular Broadband Router Quick Start Guide 1 BEC 6200WZL 4G/LTE Cellular Broadband Router PLEASE READ THE QUICK START GUIDE AND FOLLOW THE STEPS CAREFULLY. THIS QUICK START GUIDE WILL
Router Setup Manual. NETGEAR, Inc. 4500 Great America Parkway Santa Clara, CA 95054 USA 208-10060-01 2006-03-17
 NETGEAR, Inc. 4500 Great America Parkway Santa Clara, CA 95054 USA 208-10060-01 2006-03-17 2006 by NETGEAR, Inc. All rights reserved. Trademarks NETGEAR is a trademark of Netgear, Inc. Microsoft, Windows,
SATO Network Interface Card Configuration Instructions
 SATO Network Interface Card Configuration Instructions Table of Contents 1. Reset of wired/wireless interface card... 3 2. Installing the All-In-One Utility (recommended)... 4 3. Configuring wired/wireless
Keri USB-A Connection and Configuration
 Step 1 - Connect the KPC-1 cable to the K-USB. NOTE: The form of the USB converter may vary, so the unit you receive may not be identical to the one displayed here. Step 2 Plug the USB Connector of the
Computer Networks I Laboratory Exercise 1
 Computer Networks I Laboratory Exercise 1 The lab is divided into two parts where the first part is a basic PC network TCP/IP configuration and connection to the Internet. The second part is building a
Internet Telephony PBX system IPX-1980
 Internet Telephony PBX system IPX-1980 Quick Installation Guide Table of Contents 1. Package Contents... 3 2. Hardware Installation... 4 2.1 Safety Instruction... 4 2.2 Front panel... 4 2.3 LED & Button
Quick Installation Guide DAP-1360. Wireless N 300 Access Point & Router
 DAP-1360 Wireless N 300 Access Point & Router BEFORE YOU BEGIN Delivery Package Access point DAP-1360 Power adapter DC 12V Ethernet cable (CAT 5E) (brochure). If any of the items are missing, please contact
TCP/IP MODULE CA-ETHR-A INSTALLATION MANUAL
 TCP/IP MODULE CA-ETHR-A INSTALLATION MANUAL w w w. c d v g r o u p. c o m CA-ETHR-A: TCP/IP Module Installation Manual Page Table of Contents Introduction...5 Hardware Components... 6 Technical Specifications...
Steps for Basic Configuration
 1. This guide describes how to use the Unified Threat Management appliance (UTM) Basic Setup Wizard to configure the UTM for connection to your network. It also describes how to register the UTM with NETGEAR.
AN140011 - ISP router - Ruckus R300 Access Point
 Application Note:- To introduce a Ruckus R300 Access Point router to function with an ISP (Internet Service Provider) router which is providing broadband internet access and Wi-Fi. The Ruckus R300 Access
Configuring an A Series LED Sign Controller for your Network
 Configuring an A Series LED Sign Controller for your Network A Series LED displays from Optec support both serial and 10BaseT Ethernet communication. Serial communication via RS232 or RS485 is independent
DVG-2101SP VoIP Telephone Adapter
 This product can be set up using any current web browser, i.e., Internet Explorer 6 or Netscape Navigator 6.2.3. DVG-2101SP VoIP Telephone Adapter Before You Begin 1. If you purchased this VoIP Telephone