RICOH Stereo Camera Software R-Stereo-GigE-Player
|
|
|
- Steven May
- 7 years ago
- Views:
Transcription
1 RICOH Stereo Camera Software R-Stereo-GigE-Player User's Guide RICOH Industrial Solutions Inc. 1/25
2 Contents 1. FUNCTION OVERVIEW STARTUP PROCEDURE OPERATING PROCEDURES Menu Bar File Menu Opening an Image Buffer Saving Image Buffer under a Different Name Exporting the Mesh View Menu Image 1/Image Operation Panel Device Menu Camera Mask IP Settings in Non-volatile Memory Trigger Settings Device Information Projector Connection Disconnecting Brightness Reset Alarm Help Menu Log Version Information Operation Panel Connection Acquisition Mode Operation Settings Manual Exposure Adjustment Automatic Exposure Adjustment Gamma Settings Distance Settings Projector Status Bar Execution Result Frame Rate IP ADDRESS SETTINGS OF PC /25
3 1. Function Overview The main functions of the R-Stereo-GigE-Player software are as follows. Image display: Continuously capture and display intensity and depth images. Conversion to 3D point cloud: Convert the depth image to a 3D point cloud. Exposure time adjustment: Adjust the exposure time (shutter speed) of the camera. Projector control: Turn the projector on/off and control the brightness of the projector. Trigger settings: Configure trigger settings for IO with external hardware, e.g. use an external trigger source or output a strobe signal. Imaging mode: Choose the camera imaging mode from default mode or several High Dynamic Range (HDR) modes. Gamma settings: Adjust the gamma transformation of the camera s brightness image. Measurement range settings: Adjust the distance range for which the depth image is output. 3/25

4 2. Startup Procedure 2.1 First, check that the power cable and LAN cable are connected to the camera. 2.2 Select "Start" - "All Programs" - "R-Stereo-GigE-Package X.X.X.XX" - "R-Stereo-GigE-Player" to launch R-Stereo- GigE-Player. 2.3 The operation window and image display windows of R-Stereo-GigE-Player appear. Operation window Image display window (master camera) Image display window (slave camera) 4/25

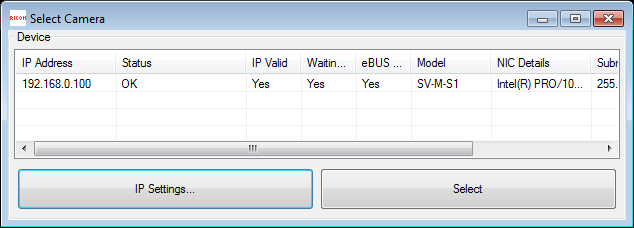
5 2.4 Click the Select button to display the Select Device dialog box, click the camera to use, and click the IP Settings button. 2.5 The IP Settings dialog box appears. The initial IP address and subnet mask of the camera are as shown below. Change the IP address and subnet mask settings of the camera to match the IP address of your PC environment (for the setting procedure, refer to section 4). When configuring the settings, set an IP address that will not duplicate that of a camera or PC within the same network. Initial IP address of camera: Initial subnet mask of camera: After configuring the settings, click the Apply button. 2.6 When the status changes to OK, the IP settings are complete. Click the Select button to close the dialog box. 5/25
6 6/25

7 2.7 Click the Connect button. 2.8 If the Disconnect button becomes available, the connection is successful. To disconnect from the camera, click the Disconnect button. 7/25
8 8/25

9 3. Operating Procedures This section describes how to use the operation window and image display windows. Menu bar Refer to section 3.1 Operation panel Connection Refer to section Acquisition mode Refer to section Operation Refer to section Settings Refer to section Projector Refer to section Status bar Refer to section Menu Bar File Menu Refer to section Refer to section Refer to section /25
 Specify the ***.rimgbuf file that was saved to an arbitrary folder in advance and then click the Open button. d) The image is displayed in the image display windows. 3.1.")
10 Opening an Image Buffer Display an image in the image display window. a) Click the Disconnect button to disconnect the PC and camera. b) Select "Open Image Buffer" to open a dialog box. c) Specify the ***.rimgbuf file that was saved to an arbitrary folder in advance and then click the Open button. d) The image is displayed in the image display windows Saving Image Buffer under a Different Name Save captured image to an image buffer file on the PC. a) Click the Start Capture button to capture an image to the PC. b) Select "Save Image Buffer As" to open a dialog box. c) Specify the save destination and file name and then click the Save button to save a ***.rimgbuf format file. 10/25
11 Exporting the Mesh Save the 3D point cloud data (***.ply format file). a) Click the Connect button to connect to the camera. b) Select "Intensity + Depth" or "Depth" for the capture mode. c) Click the Start Capture button to obtain images. d) Click the Stop Capture button to stop obtaining images. e) Select "Export Mesh" to open a dialog box. f) Specify the save destination and file name and then click the Save button to save a ***.ply format file. Only the region that is selected by the mask is included in the point cloud. You can check the 3D point cloud using suitable viewer software for ply format files. 11/25

12 3.1.2 View Menu Refer to section Image 1/Image 2 The windows of image 1 and image 2 are displayed when R-Stereo-GigE-Player is started. To display them again after they have been closed, select these menu items. The displayed image is switched depending on the pixel type. (Refer to the following table.) Pixel type Image 1 Image 2 Intensity Pair Base camera intensity Slave camera intensity Intensity + Depth Base camera intensity Base camera depth Depth Base camera depth No data Operation Panel Refer to section Status bar Refer to section /25


13 Operation Panel Zoom In/Zoom Out Adjust the magnification of the displayed image. Adjust the magnification by entering a value in the text box or dragging the slide bar Image Size Adjustment Click the Fit button to automatically adjust the image size to fit the image display window size Save Image Save the image. Enter the folder and file name and press the Save button to save the image Display Color Adjust display color details. Refer to section Refer to section Range Select Range to display the Range settings dialog. 13/25
 to 255 (bright). For depth images, the valid range depends on the camera settings and specifies the distance in millimeters. 3.1.2.1.1.4.")

14 In Auto mode, the display color range is automatically adjusted to the range of valid values. In Manual mode, the display color range may be adjusted manually. For intensity images, the valid value range is from 0 (dark) to 255 (bright). For depth images, the valid range depends on the camera settings and specifies the distance in millimeters Black->White ComboBox You can select the image display color from the following four types. The relationship between the display color and the intensity image and depth image is as follows. Display color Image value Depth Intensity Black white White black Blue red Red blue Small large Near far Dark light Status Bar The X and Y coordinates and pixel value are displayed in the status bar when you move the mouse pointer over the displayed image. For intensity images, the pixel value is its intensity value. For depth images, the three-dimensional XYZ coordinates in millimeters are displayed. 14/25

15 3.1.3 Device Menu Camera Refer to section Refer to section Refer to section Refer to section Mask The mask specifies a region in the base camera image. Automatic exposure adjustment and mesh export functions only use the region that is specified by the mask. For details on automatic exposure adjustment, refer to section a) Select " Mask" to open the dialog for mask editing. For details on how to use the image display window, refer to section The bright area is the mask area. The mask area is initially set to the entire image area. b) Edit the mask. By holding down mouse buttons while dragging the mouse, you can edit the mask. Right mouse button: Add area to the mask Middle mouse button: Remove area from the mask 15/25
, fill the mask (mask entire image) and select the mask brush size from the operation panel. 3.1.")

16 The following shows an example of the center of the image area set as the mask. You can clear the mask (unmask entire image), fill the mask (mask entire image) and select the mask brush size from the operation panel IP Settings in Non-volatile Memory Save the IP settings of the camera. Set an IP address and subnet mask for "New settings" that match your PC environment and then click the "Apply" button. The IP address and subnet mask settings are saved to the non-volatile memory of the camera. They are reflected after the camera is restarted. Note: Please be careful because the camera may become inaccessible from the PC if invalid IP settings are configured. 16/25
 specifies the maximum time from pressing the Start Capture button to image retrieval.")
17 Trigger Settings Shows the dialog for the camera s trigger settings. In External Trigger mode, the Time Out [milli sec] (below Image Retrieval ) specifies the maximum time from pressing the Start Capture button to image retrieval. If the external trigger signal is not input to the camera and no image is received by the PC within this time, a timeout will occur. For details about the trigger settings, please refer to the stereo camera s external hardware trigger user s guide Device Information Display the firmware version and license information of the camera. 17/25


18 Projector Refer to section Refer to section Refer to section Refer to section Check that the following items have been performed in advance. Power of the lighting has been turned on. PC mode has been selected with the Mode button. The lighting and PC have been connected with a USB-serial adapter cable. The driver for the USB-serial adapter cable has been installed on the PC. Power switch Mode button Serial port Power Section of Lighting 18/25


19 Connection Select "Connect" to open the Serial Port setting dialog box. Select the serial port with the cable connected and then click the OK button. If the ON and OFF buttons become available, the connection is successful Disconnecting Select the Disconnect button to disconnect the projector and PC. If the ON and OFF buttons become unavailable, the disconnection is successful. 19/25

20 Brightness Select "Brightness" to display the slide bar for adjusting the brightness of the lighting. Adjust the brightness appropriately to suit the capture environment Reset Alarm If the projector becomes abnormally hot, an alarm sounds. To stop the alarm, select "Reset Alarm." Help Menu Refer to section Refer to section Log Select "Log" to display the log information Version Information Select "About R-Stereo-GigE-Player" to display the version information of the software. 20/25
21 3.2 Operation Panel Connection For details, refer to "2. Startup Procedure." Acquisition Mode Change the imaging mode to suit the images you wish to obtain. Depending on the stereo camera model and its firmware, some modes may not be available. Image Acquisition Mode Free run Software trigger External trigger Functionality This mode obtains images constantly from the camera after capturing is started. This mode obtains images from the camera only when the Start Capture button is clicked. The application will start to wait for image retrieval when Start Capture button is clicked. The image is displayed after retrieval. If no image is retrieved during the time out set in the trigger settings, the application stops waiting for image retrieval. Pixel Type Intensity Intensity + Depth Depth Functionality This mode obtains base and slave camera intensity images from the camera. This mode obtains base camera intensity and depth images from the camera. This mode obtains only depth images from the camera. The speed for transferring data between the camera and PC can be increased. Imaging Mode Functionality Mode00 Imaging Mode 00: This is the default imaging mode. Mode01 Imaging Mode 01: Enhances contrast in dark areas and reduces contrast in bright areas. Mode02 Imaging Mode 02: High Dynamic Range (narrow) mode; covers a wider dynamic range than Mode00 Mode03 Imaging Mode 03: High Dynamic Range (middle) mode; covers a wider dynamic range than Mode02. Mode04 Imaging Mode 04: High Dynamic Range (wide) mode; covers a wider dynamic range than Mode Operation Click the Start Capture button to start obtaining images from the camera. Click the Stop Capture button to stop obtaining images from the camera. The Stop Capture button is not available in the software trigger mode. 21/25

22 3.2.4 Settings Manual Exposure Adjustment Set the exposure time (shutter speed) of the camera manually. The exposure time can be adjusted by entering a value in the text box or dragging the slide bar Automatic Exposure Adjustment The exposure time of the camera can be set automatically so that the most stable depth of the capture target is obtained. The exposure time is set according to the mask. (For details on the mask, refer to section ) Click the Adjust button. The Adjusting Exposure... window appears and then disappears when adjustment is complete Gamma Settings Adjusting gamma alters the intensity image brightness, and depending on the imaging conditions, may improve the depth image quality. The default gamma value is 1.0; the image gets brighter for higher values. Note that for cameras with old firmware, this functionality is disabled Distance Settings Set the start distance of the stereo camera depth measurement range. The end distance of the measurement range is then automatically adjusted internally. The new distance range is displayed in the status bar. Please note that values different from the default value may reduce measurement accuracy. Also note that for cameras with old firmware, this functionality is disabled Projector While there is a connection to the projector, click the ON button to turn on the projector light. Click the OFF button to turn off the projector light. If you wish to adjust the brightness of the projector, refer to section Status Bar Execution Result The result of executing "Connect," "Start Capture," or other operations is displayed at the left side of the status bar. If the operation ends successfully, "OK" is displayed. If an error occurs, the details of the error are displayed Frame Rate The numbers of frames drawn and received per second are displayed on the right side of the status bar. 22/25


23 4 IP Address Settings of PC Select "Start" - "Control Panel" - "Network and Internet" - "View network status and tasks" - "Change adapter settings" to display the network connections. Right-click the network adapter that will connect to the camera and then select "Properties." The properties dialog box for the network adapter that will connect to the camera appears. Select "Internet Protocol Version 4 (TCP/IPv4)" and then click the Properties button. 23/25

24 If both TCP/IPv6 and TCP/IPv4 are displayed, select TCP/IPv4.) Set the IP address and subnet mask in the properties dialog box for the network adapter that will connect to the camera. Here we show an example of changing the address of the PC to Select "Use the following IP address" and set the IP address and subnet mask. Set the IP address to Set the subnet mask to In this example, the first three parts of the IP address of the camera to be connected need to match the first three parts of the IP address of the PC. If the subnet mask is set to , the first two parts of the IP address of the camera to be connected need to match the first two parts of the IP address of the network interface card. Set an IP address that will not duplicate that of a camera or PC within the same network. After setting the IP address and subnet mask of the PC, click the OK button to close the Internet protocol properties dialog box. 24/25
25 Revision History Rev. Date Changes Note 1.00 March 24, 2015 Newly issued 1.01 March 27, 2015 Updated Updated description on connection procedure June 16, 2015 Updated Updated projector description December 24, 2015 Updated Updated descriptions of acquisition mode, trigger settings, gamma, start distance, and display color. RICOH Industrial Solutions Inc. 25/25
BASLER ACE QUICK INSTALLATION GUIDE
 BASLER ACE QUICK INSTALLATION GUIDE Rev. 01 Quick installation Guide V1 1 Introduction The installation procedures in this guide assume that you want to get your camera operational and begin capturing
ebus Player Quick Start Guide
 ebus Player Quick Start Guide This guide provides you with the information you need to efficiently set up and start using the ebus Player software application to control your GigE Vision or USB3 Vision
32 Transferring Projects and Data
 32 Transferring Projects and Data This Chapter explains how to transfer GP-Pro EX project files to the GP and how to transfer the project files stored on the GP to your PC. Please start by reading 32.1
Interactive Whiteboard Functionality Overview... 4. Choosing Pen Style... 5. Erasing / Modifying Writing... 6. Undo / Redo... 6. Email...
 Quick Start Guide 1 Stand-alone Usage Interactive Whiteboard Functionality Overview... 4 Choosing Pen Style... 5 Erasing / Modifying Writing... 6 Undo / Redo... 6 Email... 7 Import / Open file... 7 Saving
Windows XP Home Edition / Windows XP Professional
 Windows XP Home Edition / Windows XP Professional COOLPIX5000/995/885/775 This manual is for those users of the COOLPIX5000/995/885/ 775 who are running Nikon View 4 (Version4.3.1) under Windows XP Home
Interfacing Basler GigE Cameras With Cognex VisionPro 7.2
 www.baslerweb.com Interfacing Basler GigE Cameras With Cognex VisionPro 7.2 This Application Note explains how to interface a Basler camera with GigE interface with the Cognex VisionPro 7.2 software package
OPERATION MANUAL. MV-410RGB Layout Editor. Version 2.1- higher
 OPERATION MANUAL MV-410RGB Layout Editor Version 2.1- higher Table of Contents 1. Setup... 1 1-1. Overview... 1 1-2. System Requirements... 1 1-3. Operation Flow... 1 1-4. Installing MV-410RGB Layout
SMART Board Software for Macintosh FAQ
 SMART Board Software for Macintosh FAQ NOTE: The following FAQs relate to the latest SMART Board Software for Macintosh release and apply only to Macintosh computers. SMART Board Software for Macintosh
SMS (Server Management Software) Digital Video Recorder. User s Manual
 Digital Video Recorder. User s Manual") SMS (Server Management Software) Digital Video Recorder User s Manual Contents 1 - Introduction 2 1.1 About this manual 2 1.2 Configuration 2 1.3 SMS Functions 2 1.4 Product Information 2 1.5 System Requirements
SMS (Server Management Software) Digital Video Recorder User s Manual Contents 1 - Introduction 2 1.1 About this manual 2 1.2 Configuration 2 1.3 SMS Functions 2 1.4 Product Information 2 1.5 System Requirements
Connecting Your Camera under Windows XP
 Running Nikon View 4 under Windows XP (Home Edition/Professional) Installing Nikon View 4 Step 2 For information on installing Nikon View 4, see the Nikon View 4 Installation Click System to open the System
Procedure for updating Firmware of EZ4 W or ICC50 W
 Procedure for updating Firmware of EZ4 W or ICC50 W 1. Download the Firmware file for your camera to your PC 2. Download the Leica Camera Configuration program to your PC 3. Install Leica Camera Configuration
HOW-TO-GUIDE. Installer Service Tool: Downloading Data and Event Logs for the Eltek Theia
 HOW-TO-GUIDE Installer Service Tool: Downloading Data and Event Logs for the Eltek Theia READ FIRST: In order to run the Installer Service Tool you first need a software license key. These are issued to
How To Use An Easymp Network Projection Software On A Projector On A Computer Or Computer
 EasyMP Network Projection Operation Guide Contents 2 Before Use Functions of EasyMP Network Projection....................... 5 Sharing the Projector....................................................
User Guide for Windows 10
 User Guide for Windows 10 System requirements E10684 First Edition July 2015 To facilitate a smoother transition from your previous operating system, read the system requirements below before upgrading
Ethernet Interface Manual Thermal / Label Printer. Rev. 1.01 Metapace T-1. Metapace T-2 Metapace L-1 Metapace L-2
 Ethernet Interface Manual Thermal / Label Printer Rev. 1.01 Metapace T-1 Metapace T-2 Metapace L-1 Metapace L-2 Table of contents 1. Interface setting Guiding...3 2. Manual Information...4 3. Interface
EasyMP Network Projection Operation Guide
 EasyMP Network Projection Operation Guide Contents 2 Before Use Functions of EasyMP Network Projection... 5 Sharing the Projector... 5 Various Screen Transfer Functions... 5 Installing the Software...
Access to remote DVR from IE USER S MANUAL CONTENT
 Access to remote DVR from IE CONTENT... 2 Preface... 2 1. Introduction... 2 2. System requirement and executing environment... 2 2.1. Supported operating System:... 2 2.2. Hardware requirement (recommend):...
1. Central Monitoring System Software
 1. Central Monitoring System Software 1-1. General information CMS program is an application with which users not only watch and control remote DVRs, but also receive video/audio data or alarm signals
PRINTER DRIVER GUIDE (KODAK 305 Photo Printer)
") PRINTER DRIVER GUIDE () Microsoft, Windows, Windows XP, Windows Vista and Windows 7 are registered trademarks of Microsoft Corporation in the United States and/or other countries. Adobe, Adobe Photoshop
PRINTER DRIVER GUIDE () Microsoft, Windows, Windows XP, Windows Vista and Windows 7 are registered trademarks of Microsoft Corporation in the United States and/or other countries. Adobe, Adobe Photoshop
How To Use An Easymp Network Projector On A Computer Or Network Projection On A Network Or Network On A Pc Or Mac Or Ipnet On A Laptop Or Ipro Or Ipo On A Powerbook On A Microsoft Computer On A Mini
 EasyMP Network Projection Operation Guide Contents 2 Before Use Functions of EasyMP Network Projection....................... 5 Sharing the Projector....................................................
Software User Guide UG-461
 Software User Guide UG-461 One Technology Way P.O. Box 9106 Norwood, MA 02062-9106, U.S.A. Tel: 781.329.4700 Fax: 781.461.3113 www.analog.com ezlinx icoupler Isolated Interface Development Environment
Configuring Windows 7 64 bit for AutoVISION
 This document will describe how to configure a 64 bit version of Windows 7 Professional, Ultimate or Enterprise to utilize the Windows XP Mode (Virtual PC) capabilities to allow AutoVISION to be used in
1. Central Monitoring System Software
 1. Central Monitoring System Software 1-1. General information CMS program is an application with which users not only watch and control remote DVRs, but also receive video/audio data or alarm signals
Step-by-Step Setup Guide Wireless File Transmitter
 EOS Step-by-Step Setup Guide Wireless File Transmitter EOS UTility Mode Infrastructure or Ad Hoc Networks Windows XP / Windows 7 Professional 2012 Canon U.S.A., Inc. All Rights Reserved. Reproduction in
Quick Start Guide NVR DS-7104NI-SL/W NVR. www.hikvision.com. First Choice For Security Professionals
 Quick Start Guide NVR DS-7104NI-SL/W NVR NOTE: For more detailed information, refer to the User s Manual on the CD-ROM. You must use your PC or MAC to access the files. www.hikvision.com Quick Start 1.
Contents. 1.2 Software Installation... 1
 Software Manual Contents 1 Software Installation... 1 1.1 Overview...1 1.2 Software Installation... 1 2 Introduction To Basic Function...5 2.1 Login System... 5 2.2 CMS Operating Interface...5 2.2.1 Operating
Windows XP Home Edition / Windows XP Professional
 Windows XP Home Edition / Windows XP Professional D1 Series This manual is for those users of D1 Series cameras who are running Nikon View 4 (Version4.3.1) under Windows XP Home Edition / Professional.
MJPEG Camera Client User Manual
 MJPEG Camera Client User Manual CONTENTS User Manual 1 WELCOME... 3 1.1Features... 3 1.2Installation Requirements... 3 1.3 Software Installation... 3 2 Software Operation... 5 2.1 Tab bar... 6 2.2 Device
Professional Surveillance System User s Manual
 Professional Surveillance System User s Manual \ 1 Content Welcome...4 1 Feature...5 2 Installation...6 2.1 Environment...6 2.2 Installation...6 2.3 Un-installation...8 3 Main Window...9 3.1 Interface...9
Standalone recorder instruction
 Standalone recorder instruction 1,Product profile... 2 2. Hardware interface... 2 2.1 2 &4 &8 channel standalone recorder front panel... 2 2.2 8&16 channel standalone recorder device interface... 3 3,
Windows XP Home Edition / Windows XP Professional
 Windows XP Home Edition / Windows XP Professional COOLPIX990/880 This manual is for those users of the COOLPIX 990/880 who are running Nikon View 4 (Version4.3.1) under Windows XP Home Edition / Professional.
NVMS-1200. User Manual
 NVMS-1200 User Manual Contents 1 Software Introduction... 1 1.1 Summary... 1 1.2 Install and Uninstall... 1 1.2.1 Install the Software... 1 2 Login Software... 3 2.1 Login... 3 2.2 Control Panel Instruction...
EasyMP Network Projection Operation Guide
 EasyMP Network Projection Operation Guide Contents 2 About EasyMP Network Projection Functions of EasyMP Network Projection....................... 5 Various Screen Transfer Functions.......................................
DIGICLIENT 8.0 Remote Agent Software
 DIGICLIENT 8.0 Remote Agent Software MODEL: D17800 Series Instruction Manual English Version 1.0 Copyright 2007 Digimerge Technologies Inc Table of Contents Table of Contents About the DigiClient 8.0...
SMART Board Software for Macintosh Computers FAQ
 SMART Board Software for Macintosh Computers FAQ NOTE: The following FAQs relate to the latest SMART Board software release and apply only to Macintosh computers. The latest version of SMART Board software
En Wireless Mobile Utility (Android) User s Manual. D610, D600, D7100, D5300, D5200, D3300, Df 0 2 26
 User s Manual. D610, D600, D7100, D5300, D5200, D3300, Df 0 2 26") 1 En Wireless Mobile Utility (Android) User s Manual Install the Wireless Mobile Utility on your smart device (smartphone or tablet) to download pictures from a camera or take pictures remotely. The Wireless
1 En Wireless Mobile Utility (Android) User s Manual Install the Wireless Mobile Utility on your smart device (smartphone or tablet) to download pictures from a camera or take pictures remotely. The Wireless
EasyMP Multi PC Projection Operation Guide
 EasyMP Multi PC Projection Operation Guide Contents Introduction to EasyMP Multi PC Projection... 7 EasyMP Multi PC Projection Features... 7 Connection to Various Devices... 7 Four-Panel Display... 8
LCD MONITOR TOUCH PANEL DRIVER 2 OPERATION MANUAL. for Mac. Version 1.0 PN-L703A/PN-70TA3/PN-L703B/PN-70TB3/PN-L603A/PN-60TA3/PN-L603B/PN-60TB3
 LCD MONITOR TOUCH PANEL DRIVER 2 OPERATION MANUAL for Mac Version 1.0 Applicable models PN-L703A/PN-70TA3/PN-L703B/PN-70TB3/PN-L603A/PN-60TA3/PN-L603B/PN-60TB3 Contents Introduction...3 System Requirements...3
ImagineWorldClient Client Management Software. User s Manual. (Revision-2)
") ImagineWorldClient Client Management Software User s Manual (Revision-2) (888) 379-2666 US Toll Free (905) 336-9665 Phone (905) 336-9662 Fax www.videotransmitters.com 1 Contents 1. CMS SOFTWARE FEATURES...4
ImagineWorldClient Client Management Software User s Manual (Revision-2) (888) 379-2666 US Toll Free (905) 336-9665 Phone (905) 336-9662 Fax www.videotransmitters.com 1 Contents 1. CMS SOFTWARE FEATURES...4
This section will focus on basic operation of the interface including pan/tilt, video, audio, etc.
 Catalogue Basic Operation... 2 For Internet Explorer... 2 For Other Non-IE Web Browsers... 5 Camera Settings... 6 System... 6 About... 6 PT Setting... 7 Backup and Restore Setup... 8 NTP Setting... 8 System
Remote Monitoring and Control of the R&S FSV with a Web Browser
 Rohde & Schwarz Products: R&S FSV3, R&S FSV7, R&S FSV13, R&S FSV30 Remote Monitoring and Control of the R&S FSV with a Web Browser Application Note This application note describes remote operation or monitoring
Central Management Software CV3-M1024
 Table of Contents Chapter 1. User Interface Overview...5 Chapter 2. Installation...6 2.1 Beginning Installation...6 2.2 Starting the CMS software...10 2.3 Starting it from the Start menu...10 2.4 Starting
C n o t n e t n e t n s
 Preface Thank you for choosing our product, for a better understanding of the product, we recommend you read the instruction and safety information before use. Notice: This user manual is an operation
Quick Start Guide. DVR DS-7200HWI-SH Series DVR. www.hikvision.com. First Choice For Security Professionals
 Quick Start Guide DVR DS-7300HWI-SH Series DVR DS-7200HWI-SH Series DVR NOTE: For more detailed information, refer to the User s Manual on the CD-ROM. You must use your PC or MAC to access the files. www.hikvision.com
R&S AFQ100A, R&S AFQ100B I/Q Modulation Generator Supplement
 I/Q Modulation Generator Supplement The following description relates to the Operating Manuals, version 03 of R&S AFQ100A, and version 01 of R&S AFQ100B. It encloses the following topics: LXI features,
How To Set Up Flir Cloud Client For Pc Or Mac Or Mac (For Pc Or Ipad) On A Pc Or Pc Or Mouse (For Mac) On An Iphone Or Ipa) On Pc Or Tv (For Ipa
 On A Pc Or Pc Or Mouse (For Mac) On An Iphone Or Ipa) On Pc Or Tv (For Ipa") Instruction Manual FLIR Cloud Services Client Instruction Manual FLIR Cloud Services Client #LX400018; r. 2.0/14567/14568; en-us iii Table of contents 1 Setting up FLIR Cloud Client for PC or Mac...1
Instruction Manual FLIR Cloud Services Client Instruction Manual FLIR Cloud Services Client #LX400018; r. 2.0/14567/14568; en-us iii Table of contents 1 Setting up FLIR Cloud Client for PC or Mac...1
How To Install A Scanner On A Computer With A Microsoft Scanner On Itunes Vista 2 (Windows) (Windows 2000) (Powerbook) (Macintosh) (Apple) (X86) (Ms7000) (Netbook
 (Windows 2000) (Powerbook) (Macintosh) (Apple) (X86) (Ms7000) (Netbook") MS6000 MKII / MS7000 MKII User s Guide Scanner Driver Software Ver.3.00 Scanner Driver (32bit) Ver.2.26 Scanner Driver (64bit) Ver.3.16 Contents 1 Getting Ready 1-1 1-1 Overview 1-1 1-2 System Requirements
MS6000 MKII / MS7000 MKII User s Guide Scanner Driver Software Ver.3.00 Scanner Driver (32bit) Ver.2.26 Scanner Driver (64bit) Ver.3.16 Contents 1 Getting Ready 1-1 1-1 Overview 1-1 1-2 System Requirements
AXIS Camera Station Quick Installation Guide
 AXIS Camera Station Quick Installation Guide Copyright Axis Communications AB April 2005 Rev. 3.5 Part Number 23997 1 Table of Contents Regulatory Information.................................. 3 AXIS Camera
1 ImageBrowser Software User Guide
 1 ImageBrowser Software User Guide Table of Contents (1/2) Chapter 1 Try It! ImageBrowser Chapter 2 What is ImageBrowser? Chapter 3 Starting ImageBrowser... 4 Downloading Images to Your Computer... 9 Printing
Remote Monitoring and Control of the R&S FSL with a Web Browser
 Rohde & Schwarz Products: R&S FSL3, R&S FSL6, R&S FSL18 Remote Monitoring and Control of the R&S FSL with a Web Browser Application Note This application notes describes remote operation or monitoring
Kramer Electronics, Ltd. Site-CTRL and Web Access Online User Guide (Documentation Revision 2)
") Kramer Electronics, Ltd. Site-CTRL and Web Access Online User Guide (Documentation Revision 2) Software Version 1.9. 2902 To check that you have the latest version, go to the DOWNLOADS section of our Web
Kramer Electronics, Ltd. Site-CTRL and Web Access Online User Guide (Documentation Revision 2) Software Version 1.9. 2902 To check that you have the latest version, go to the DOWNLOADS section of our Web
Mobile Video Analysis Software User Guide. Version 2.0.8
 User Guide Version 2.0.8 Content 1. Introduction......1 1.1 Software Overview... 1 1.2 Documentation Overview... 1 1.3 Application Range... 1 1.4 System Requirements... 1 2. Getting Started... 3 2.1 Main
EASE Scan Tool Customers. SECTION I - Installation
 Please Install Your EASE Scan Tool DVD Before Installing Any Other Software That Came With Your Package. SECTION I - Installation ATTENTION: Do NOT connect an EASE Vehicle Interface Device to your Computer
Using Web Services for scanning on your network (Windows Vista SP2 or greater, Windows 7 and Windows 8)
") Using Web Services for scanning on your network (Windows Vista SP2 or greater, Windows 7 and Windows 8) The Web Services protocol allows Windows Vista (SP2 or greater), Windows 7 and Windows 8 users to
Using Web Services for scanning on your network (Windows Vista SP2 or greater, Windows 7 and Windows 8) The Web Services protocol allows Windows Vista (SP2 or greater), Windows 7 and Windows 8 users to
LOREX CLIENT Remote Software 4.0
 LOREX CLIENT Remote Software 4.0 Instruction Manual English Version 2.0 MODEL: L20WD800 Series www.lorexcctv.com Copyright 2008 LOREX Technology Inc. Table of Contents Table of Contents Software Installation...
Using These Manuals. How to Use the. Software User Guide. Display examples: 1. Understanding How to Use Your Camera.
 Software User Guide For the safe use of your camera, be sure to read the Safety Precautions thoroughly before use. Types of software installed on your computer varies depending on the method of installation
To perform Ethernet setup and communication verification, first perform RS232 setup and communication verification:
 PURPOSE Verify that communication is established for the following products programming option (488.2 compliant, SCPI only): DCS - M9C & DCS M130, DLM M9E & DLM-M9G & DLM M130, DHP - M9D, P series, SG,
Chapter 1 Downloading Images to Your Computer (Windows)
") Software User Guide For the safe use of your camera, be sure to read the Safety Precautions thoroughly before use. Types of software installed on your computer varies depending on the method of installation
Software User Guide For the safe use of your camera, be sure to read the Safety Precautions thoroughly before use. Types of software installed on your computer varies depending on the method of installation
3.5 EXTERNAL NETWORK HDD. User s Manual
 3.5 EXTERNAL NETWORK HDD User s Manual Table of Content Before You Use Key Features H/W Installation Illustration of Product LED Definition NETWORK HDD Assembly Setup the Network HDD Home Disk Utility
WAVES. MultiRack SETUP GUIDE V9.80
 WAVES MultiRack SETUP GUIDE V9.80 1 Table of Contents 1. Overview... 3 2. Basic Requirements... 3 3. Software... 4 4. Required Waves Licenses... 4 5. Installing MultiRack... 5 6. MultiRack Native... 6
SoundLAB Software Download Software from the Bogen website: www.bogen.com/software
 SPLM DIGITAL SOUND PRESSURE LEVEL METER SoundLAB Software INSTALLATION & INSTRUCTION MANUAL Download Software from the Bogen website: www.bogen.com/software Specifications are subject to change without
Easy Setup Guide for the Sony Network Camera
 -878-191-11 (1) Easy Setup Guide for the Sony Network Camera For setup, a computer running the Microsoft Windows Operating System is required. For monitoring camera images, Microsoft Internet Explorer
Features Reference. About Unified Communication System. Before Using This Machine. Starting a Meeting. What You Can Do During the Meeting
 Features Reference About Unified Communication System Before Using This Machine Starting a Meeting What You Can Do During the Meeting Leaving a Meeting Managing Address Book Changing Network Configuration
R&S AFQ100A, R&S AFQ100B I/Q Modulation Generator Supplement
 I/Q Modulation Generator Supplement The following description relates to the Operating Manuals, version 03 of R&S AFQ100A, and version 01 of R&S AFQ100B. It encloses the following topics: LXI features,
ivms-4200 Client Software Quick Start Guide V1.02
 ivms-4200 Client Software Quick Start Guide V1.02 Contents 1 Description... 2 1.1 Running Environment... 2 1.2 Surveillance System Architecture with an Performance of ivms-4200... 3 2 Starting ivms-4200...
Quick Start Guide. Hybrid DVR DS-9000 Series Hybrid DVR DS-7600 Series Hybrid DVR. NVR DS-9600 Series NVR
 Quick Start Guide Hybrid DVR DS-9000 Series Hybrid DVR DS-7600 Series Hybrid DVR NVR DS-9600 Series NVR Analog DVR DS-9100 Series DS-8100 Series DS-7300 Series DS-7200 Series NOTE: For more detailed information,
1. Central Monitoring System Software
 1. Central Monitoring System Software 1-1. General information CMS program is an application with which users not only watch and control remote DVRs, but also receive video/audio data or alarm signals
Chapter7 Setting the Receiving PC for Direct Upload. Setting the Receiving PC for Direct Upload... 148 For Windows... 148 For Macintosh...
 Chapter7 Setting the Receiving PC for Direct Upload Setting the Receiving PC for Direct Upload... 148 For Windows... 148 For Macintosh... 153 Setting the Receiving PC for Direct Upload This section explains
Scan to PC Desktop: Image Retriever 5.2 for Xerox WorkCentre C2424
 Scan to PC Desktop: Image Retriever 5.2 for Xerox WorkCentre C2424 Scan to PC Desktop includes Image Retriever, which is designed to monitor a specified folder on a networked file server or local drive
UPS Monitoring and Management Software
 UPS Monitoring and Management Software LEN.MAN.SOF.141 Rev.1.00/2008 User s Guide: Easy-Mon X 1. Configuration Before Easy-Mon X software can display the electrical data of LEONICS UPS, user has to configure
i -CEN S USER S Manual 2007. 08. 13.
 i -CEN S i -CEN'S USER S Manual 2007. 08. 13. i -CEN S Table of Contents Overview of i-cen S software... 4 1 Introduction of i-cen S... 4 2 Key Features... 5 3 Key Benefits... 5 4 System Specification...
User Manual. IP Camera Recorder. www.allthings.com.au
 User Manual IP Camera Recorder I. Preface IP Camera Recorder is a 36 Channel Camera recording software which supports IP Camera, and Camera Server. Users use this software to monitor real-time Camera,
DSG SoftPhone & USB Phone Series User Guide
 DSG SoftPhone & USB Phone Series User Guide Table of Contents Overview Before You Start Installation Step 1. Installing DSG SoftPhone Step 2. Installing USB Phone Step 3. System Check First Time Use Step
WAMLocal. Wireless Asset Monitoring - Local Food Safety Software. Software Installation and User Guide BA/WAM-L-F
 Wireless Asset Monitoring - Local Food Safety Software BA/WAM-L-F Software Installation and User Guide System Overview The BAPI Wireless Asset Monitoring Local (WAM Local) Software receives temperature
Yamaha Audio Network Monitor User Guide
 Yamaha Audio Network Monitor User Guide Note The software and this document are the exclusive copyrights of Yamaha Corporation. Copying or modifying the software or reproduction of this document, by any
EPSON Scan Server & EPSON TWAIN Pro Network
 EPSON Scan Server & EPSON TWAIN Pro Network EPSON Scan Server & EPSON TWAIN Pro Network SCANNER UTILITY PROGRAMS All rights reserved. No part of this publication may be reproduced, stored in a retrieval
User Manual V1.0. Remote Software
 User Manual V1.0 Notice: The information in this manual was current when published. The manufacturer reserves the right to revise and improve its products. All specifications are therefore subject to change
Operating Manual for the Player
 Operating Manual for the Player \ 1 Contents 1 FOREWORD... 4 1.1 General Introduction...4 1.2 Supported File Formats...4 2 INSTALLATION... 5 3 PLAYER TOOLBAR NAVIGATION... 6 4 FILE OPERATION... 7 4.1 Play
User Manual of Web Client
 User Manual of Web Client 1 Index Chapter 1 Software Installation... 3 Chapter 2 Begin to Use... 5 2.1 Login and Exit... 5 2.2 Preview Interface Instruction... 6 2.3 Preview Image... 7 Chapter 3 Playback...
JVC Monitor Calibration 2 User's Guide
 JVC Monitor Calibration 2 User's Guide Table of Contents 1. What is JVC Monitor Calibration 2? 2. System Requirement 3. Installation (JVC Monitor Calibration 2) 4. Uninstall 5. Installation (EyeOne Display
Movie Cube. User s Guide to Wireless Function
 Movie Cube User s Guide to Wireless Function Table of Contents 1. WLAN USB Adapter Connection...3 2. Wireless Setup...4 2.1 Infrastructure (AP)...5 2.2 Peer to Peer (Ad Hoc)...7 2.3 Settings for PC...8
Additional Requirements for ARES-G2 / RSA-G2. One Ethernet 10 Base T/100 Base TX network card required for communication with the instrument.
 TA Instruments TRIOS Software Installation Instructions Installation Requirements Your TRIOS Instrument Control software includes all the components necessary to install or update the TRIOS software, as
Installation Steps Follow these steps to install the network camera on your local network (LAN):
:") 1. Description The Network Camera supports the network service for a sensor image with progressive scan, which can be monitored on a real-time screen regardless of distances and locations. By using its
1. Description The Network Camera supports the network service for a sensor image with progressive scan, which can be monitored on a real-time screen regardless of distances and locations. By using its
EasyMP Network Projection Operation Guide
 EasyMP Network Projection Operation Guide Contents 2 About EasyMP Network Projection Functions of EasyMP Network Projection....................... 5 Various Screen Transfer Functions.......................................
The service note describes the basic steps to install a ip camera for the DVR670
 Tech note Description Adding IP camera to DVR670 General The service note describes the basic steps to install a ip camera for the DVR670 Steps involved: 1) Configuration Manager application 2) Camera
Cognex Vision Software
 COGNEX Cognex Vision Software GigE Vision Cameras User s Guide December 2011 Cognex Software and GigE Vision Cameras Cognex VisionPro and CVL software provide support for acquiring, processing, and displaying
BioStar Config Guide V1.0
 BioStar Config Guide V1.0 Suprema Inc. 16F Parkview Tower 6 Jeongja, Bundang Seongnam 463-863 Korea www.supremainc.com Last edited: 27 December 2011 This document is copyright 27 December 2011 by Suprema
Configuring the WT-4 for ftp (Ad-hoc Mode)
") En Configuring the WT-4 for ftp (Ad-hoc Mode) Mac OS X Introduction This document provides basic instructions on configuring the WT-4 wireless transmitter and a Mac OS X (10.5.2) ftp server for transmission
En Configuring the WT-4 for ftp (Ad-hoc Mode) Mac OS X Introduction This document provides basic instructions on configuring the WT-4 wireless transmitter and a Mac OS X (10.5.2) ftp server for transmission
MF Driver Installation Guide
 English MF Driver Installation Guide User Software CD-ROM.................................................................. 1 About the Drivers and Software..................................................................
Ultra Thin Client TC-401 TC-402. Users s Guide
 Ultra Thin Client TC-401 TC-402 Users s Guide CONTENT 1. OVERVIEW... 3 1.1 HARDWARE SPECIFICATION... 3 1.2 SOFTWARE OVERVIEW... 4 1.3 HARDWARE OVERVIEW...5 1.4 NETWORK CONNECTION... 7 2. INSTALLING THE
Software version 1.1 Document version 1.0
 Software version 1.1 Document version 1.0 1 RDNET PROTOCOL OVERVIEW... 2 1.1 Network description... 2 1.2 Connection topology... 2 2 SOFTWARE BASIC OPERATIONS... 3 2.1 Main View elements... 3 2.2 Scanning
Configuring the WT-4 for ftp (Infrastructure Mode)
") Introduction En Configuring the WT-4 for ftp (Infrastructure Mode) This document provides basic instructions on configuring the WT-4 wireless transmitter and a ftp server for transmission over an infrastructure
Introduction En Configuring the WT-4 for ftp (Infrastructure Mode) This document provides basic instructions on configuring the WT-4 wireless transmitter and a ftp server for transmission over an infrastructure
USER S MANUAL. AXIS Mobile Monitor
 USER S MANUAL AXIS Mobile Monitor AXIS Mobile Monitor Overview Main window Main menu Find Devices Find Devices menu Monitor window Monitor menu Sequence window Sequence menu How to Use AXIS Mobile Monitor
Keep it Simple Timing
 Keep it Simple Timing Support... 1 Introduction... 2 Turn On and Go... 3 Start Clock for Orienteering... 3 Pre Start Clock for Orienteering... 3 Real Time / Finish Clock... 3 Timer Clock... 4 Configuring
NETWORK PRINT MONITOR User Guide
 NETWORK PRINT MONITOR User Guide Legal Notes Unauthorized reproduction of all or part of this guide is prohibited. The information in this guide is subject to change without notice. We cannot be held liable
1 ImageBrowser Software Guide
 1 ImageBrowser Software Guide Table of Contents (1/2) Chapter 1 Try It! ImageBrowser Starting ImageBrowser -------------------------------------------------- 4 Importing Images to Your Computer ---------------------------------
GeoVision Setup. Once all the settings for Windows are completed and you have all the hard drives setup you can install GeoVision.
 GeoVision Setup Once all the settings for Windows are completed and you have all the hard drives setup you can install GeoVision. Start in order beginning with the drivers. When you install the drivers
genie app and genie mobile app
 genie app and genie mobile app User Manual 350 East Plumeria Drive San Jose, CA 95134 USA June 2012 202-10933-02 v1.0 2012 NETGEAR, Inc. All rights reserved No part of this publication may be reproduced,
DOMUSBOX. User guide. Index
 DOMUSBOX User guide Index Introduction... 2 1. Installing SEAV DOMUS... 4 1.1 Activating DomusBox... 4 1.2Drawing the environments in DomusWeb... 5 1.3Connecting DomusBox to the devices...9 1.4Configuration
Quick Installation Guide DAP-1360. Wireless N 300 Access Point & Router
 DAP-1360 Wireless N 300 Access Point & Router BEFORE YOU BEGIN Delivery Package Access point DAP-1360 Power adapter DC 12V Ethernet cable (CAT 5E) (brochure). If any of the items are missing, please contact