LCD Controllers Offer:
|
|
|
- Jeffery Williamson
- 7 years ago
- Views:
Transcription

1 The LCD Controllers

2 LCD CONTROLLERS AF1000 LCD CONTROLLER EMULATOR LCD CONTROLLER CYBERLIGHT LCD CONTROLLER TECHNOBEAM LCD CONTROLLER INTELLABEAM LCD CONTROLLER STUDIO COLOR LCD CONTROLLER

3 LCD Controllers Offer: Product-specific programming control Ability to create complex lighting scenes and sequences Playback of cues with the touch of a button Storage and Transfer of shows using a removable memory card or by serial communication
 RAM Card Backup 12 Submasters 8 User-Programmable Macros Audio Input Jack Analog Input Connectors Midi In and Thru Ports Master/Slave")
4 Overview of LCD Controllers 9 memories (6 Memories for EMULATOR LCD CONTROLLER) 99 Pages in each memory Up to 1023 Possible Presets Create Static Scenes (Pages) Create Sequences (Pages that Loop) RAM Card Backup 12 Submasters 8 User-Programmable Macros Audio Input Jack Analog Input Connectors Midi In and Thru Ports Master/Slave Capabilities

5 Agenda Front & Rear Panel Programming Quick Start Advanced Features Additional Programming Features Menu Features Remote Access Control
6 Hands On Exercise Power up the Controller The STANDBY LED will be on; this is the DEFAULT mode upon startup of Controller Toggle the Standby Key OFF DO NOT touch JOYSTICK upon powering up controller due to initialization procedure
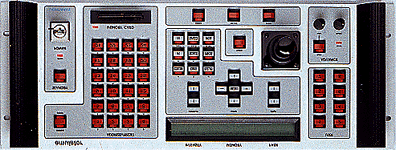
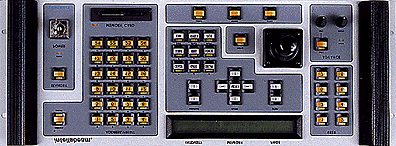
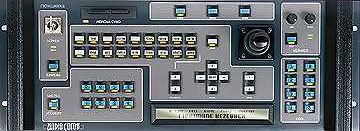
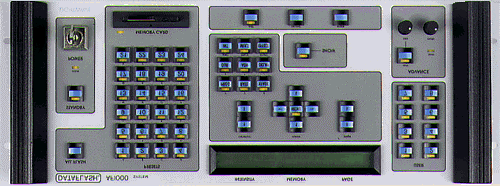
7 LCD Controller Hardware Front Panel Overview
8 LCD Controller Front Panel Power Keyswitch Slave Mode Indicator LED Standby Key Address/Preset Select Key Address/Preset Keypad LCD Window Construct (Up/Down) Keys Construct Keys LCD Power Keyswitch
9 LCD Controller Front Panel Menu Key Cursor Up/Down Left/Right Arrow Keys Page Up/Down Arrow Keys Joystick Erase Key Record Key Select Key Home Key
10 LCD Controller Front Panel Auto Advance Key Rate Knob Audio Level Indicator LED Audio Knob User Keys
11 LCD Controller Hardware Rear Panel Overview
12 LCD Controller Rear Panel Data Link Out Personality DIP Switches RS232 Serial Port Midi IN & OUT Ports Master/Slave Jacks
13 Data Link Out 3 PIN XLR Pin 1=Shield Pin 2=Negative Pin 3=Positive Daisy Chain all units

14 Personality DIP Switches A side is reserved for future use B side defines controller's mode of operation Personality B DIP Switch Settings 1-ON=SLAVE MODE 2-NOT USED 3-ON=PRESET ACCESS 4-NOT USED 5-ON=BINARY ACCESS 6-ON=INDEPENDENT 7-NOT USED 8-NOT USED

15 RS 232 Port LWB Backup Program Backup data to a computer LCC software hookup to a MAC, PC
16 MIDI IN & OUT Ports Controller supports MIDI SHOW CONTROL GO COMMANDS Also supports MIDI System Exclusive Backup MIDI CUE numbers are one-for one with the Controller's PRESET numbers Controller only accepts whole CUE numbers MIDI OUT is switchable between OUT & THRU; OUT is DEFAULT. When RS 232 PORT is active, MIDI OUT functions as MIDI THRU.
17 Master/Slave Ports 1/4 Stereo Jack Link up to 32 SLAVES to one MASTER without using DATA Distributor Assign Personality B DIP Switch 1 to either "ON" or "OFF" according to your configuration
18 Analog Input Connectors 8-PIN DIN connector Enables remote recall of Memory PAGES or PRESETS using an analog control device Dimmer Console TD12
19 Remote Enable Enable/Disable STANDBY mode from a remote location 1/8" Mini Phone Jack
20 Stereo Audio Input 1/4" Stereo Audio Input Jack
21 Fuse 5 mm x 20 mm, 1.5 amp slow blow fuse
22 Voltage Select 115 volts AC 230 volts AC
23 LCD CONTROLLER Programming Quick Start Topics: Pages Address Address Mode Memories Preset Mode Presets
24 Frequently Used Terms Fixture The Automated lighting device controlled by an LCD Controller Constructs Features of the Fixtures: Gobo, Color, Dim, Gate and Position are examples of Constructs Parameters Values for the Constructs
25 The Page What is a Page? Pages are the building blocks of SCENES A Page is one static look specifying CONSTRUCTS for one or more Fixtures The LCD Controller has 891 programmable Pages (Cyberlight, Studio Color, Technobeam, AF1000, Intellabeam)

26 Address Mode/IMP Mode To program a PAGE, you must be in ADDRESS MODE Toggle the ADDRESS/PRESET key until the ADDRESS LED is on: In ADDRESS MODE you may select an ADDRESS or several ADDRESSES to be edited on the PAGE Address Mode is also known as IMP Mode Intensity, Memory, and Page Information is displayed in the LCD Window

27 What is an Address? An ADDRESS is a unique number that you assign to each fixture connected to the controller The number of Addresses an LCD Controller can control is unique to the specific type of fixture you are controlling Fixture Addresses are assigned via DIP Switches or Menus on the Fixtures
28 Selecting an Address To select an Address to edit: Press the SELECT Key (located near bottom center of Controller) Press the Address Number Key of the Fixture to be edited The SELECT and Address Number Keys selected will flash simultaneously To select a block of Fixtures, use RANGE SELECT Simultaneously press both the highest and lowest numbered address keys of the desired range NOTE: Pressing SELECT again will abort this action

29 Editing a Page Adjusting Constructs To edit an Address once selected, press the desired Construct Key of the Construct you want to change; Construct Keys are located near the Address Keys and are labeled GOBO, COLOR, DIM, etc. NOTE: GATE is defaulted to CLOSED. You must open the gate in order to see the output of the lamp Use the CONSTRUCT UP/DOWN Arrow Keys to change the value of the active Construct
30 Recording a Page Make all desired value changes to all Constructs for the selected Fixture Press RECORD (located on bottom center of controller) when the value changes are completed for that Fixture NOTE: You must press RECORD after each Fixture is finished; otherwise, when a second Fixture is selected, it will automatically accept all Construct Values of the first Fixture. Select the next Address on the Page and continue to adjust Constructs. When finished, press RECORD
31 Programming a Page Review To record a PAGE using the 4-STEP 4 method: From ADDRESS MODE: 1. Press SELECT 2. Select ADDRESS(ES) 3. EDIT CONSTRUCTS 4. Press RECORD You can ABORT at any time before pressing RECORD by pressing the SELECT key again
32 Hands On Exercise Building a Page Program Page 1: Cyberlight in Gobo 2, RGB Yellow, MSpeed 93 with XFade of 1.0 sec
33 Changing Pages To change to another PAGE, press the PAGE UP/DOWN Arrow keys to select the desired PAGE number NOTE: PAGES loop around after 99 back to 1 and from 1 to 99 without having to scroll through all PAGES in between Press and HOLD the PAGE UP/DOWN Arrow key to quickly scroll through the 99 PAGES
34 Hands On Exercise Building a Page Program Page 2 Cyberlight in Gobo 2, RGB Cyan, Mspeed 93 with XFade of 1.0 sec. Move image to different position in room.

35 Pages and Memories The LCD Controller s data storage is sub-divided into 9 sections. Each one of these sections is called a MEMORY Each MEMORY contains 99 PAGES Press the CURSOR UP/DOWN Arrow Key (located above and below the MENU Key) to select a different MEMORY
36 LCD Controller Hierarchy LCD Controller Internal Memory Memory 1 Pages Memory 2 Pages Memory 4 Pages Memory 5 Pages Memory 6 Pages Memory 7 Pages Memory 8 Pages Memory 9 Pages 1-991
37 Hands On Exercise Building Pages in Different Memories Program Page 1 in Memories using a different Color and Gobo Combination on each Page for the Cyberlight. Set Mspeed to 95 and XFade for 1.2 sec on each Page
38 Loops Recording a Loop A LOOP is a SEQUENCE or SERIES of programmed PAGES that runs continuously in a loop when played back To record a Loop, first program each PAGE separately
39 Hands On Exercise Building a Loop Program Memory 1 Pages using Cyberlight. On each Page chose the same Color and Gobo combination, and set MSpeed to be 94.
40 Creating a Loop Every LOOP must be bracketed with a NON- INITIALIZED PAGE before the first recorded PAGE and after the last recorded PAGE of the sequence To record a NON-INITIALIZED PAGE (NIP): Press SELECT, ERASE, ERASE It is not necessary to record an NIP before Page 1 or after Page 99 NOTE: all Pages of a Loop must be in the same Memory and in sequential order
41 Hands On Exercise NIP Program an NIP on Memory 1 Pages 4 & 9

42 Playing Back a Loop Go to any recorded Page between the first and last NIP Press AUTO Key Advances PAGES automatically at rate set by RATE KNOB Adjust the RATE KNOB Delay time programmed into the PAGE is added to the rate set by RATE KNOB Programmed DELAY times are completed before PAGE advancement regardless of the RATE KNOB setting
43 Hands On Exercise Running a Loop Playback the Loop recorded on Memory 1 Pages 4-84

44 Recording a Preset From ADDRESS Mode, select the PAGE or PAGES to be recorded as a PRESET using PAGE UP/DOWN Arrow keys and Press the Auto Knob NOTE: SEQUENCES MUST BE RUNNING TO BE RECORDED CORRECTLY Toggle to PRESET mode Press SELECT SELECT the PRESET NUMBER KEY where you want to record Press RECORD
45 Hands On Exercise Recording a Preset Record the the Loop recorded on Memory 1 Pages 4-84 onto Preset #1 Record Memory 3 Page 1 onto Preset #2
46 Preset Playback Toggle ADDRESS/PRESET mode key to PRESET mode Press the PRESET number key of your choice The preset plays back automatically, including the RATE knob setting (Loop) There are multiple BANKS of Presets While in Preset Mode, use the Menu Cursor Left/Right Keys to navigate the Banks of Presets Total number of Presets=1023
47 Hands On Exercise Banks of Presets Record Memory 4 Page 1 into Bank 2 Preset # 1
48 Advanced Programming Features Position Memories Page Copy Block Copy Address Parameter Copy MSpeed for Color and Gobo Erasing a Page (Blackout Page)
49 Position Memory Allows a PAGE to reference another PAGE for PAN and TILT Position information 99 PAGES of Memory 9 are designated as reference pages or POSITION MEMORIES (also called PRESET FOCUSES) Assign these positions to a selected address by pressing the POS key, then selecting a position number using the CONSTRUCT Up/Down Arrow Keys
50 Hands On Exercise Position Memory 9 Record A Position on Memory 9 Pages 1-41 Re-record Memory 1 Pages and change the POS values on each Page to use Positions 1-41
51 Position Memory 9 If a Position is changed on a reference PAGE in Memory 9, all PAGES referring to that Position will automatically update * It is recommended to build all Pages using Positions from Memory 9; this reduces the amount of time necessary in updating all Pages if a Position is changed
52 Hands On Exercise Updating Positions in Memory 9 Record a different Position for the Cyberlight on Memory 9 Pages 1-41 Playback the Preset stored in Bank 1 Preset 1 to see the same Loop but with new Positions
53 Copying Features Entire PAGE to another PAGE in any memory PAGE COPY Block of PAGES to another block of PAGES in any memory BLOCK COPY Copy parameters of one ADDRESS to another ADDRESS(ES) PARAMETER COPY
54 Page Copy From ADDRESS Mode, choose PAGE to be copied Press SELECT Use PAGE UP/DOWN keys to select destination PAGE Press RECORD NOTES: Use PAGE COPY to quickly get all Construct information for all Fixtures from one PAGE to another You may also use PAGE COPY to copy a PAGE from one MEMORY to another
55 Hands On Exercise Page Copy Using Page Copy, copy Memory 2 Page 1 to Memory 2 Page 3 Change the Gobo on Memory 2 Page 3 and record
56 Block Copy From ADDRESS mode, choose any PAGE within the group of pages to be copied Press SELECT Press the AUTO key 3 times Use PAGE UP/DOWN arrow keys to select Destination Page Press RECORD
57 Hands On Exercise Block Copy Block Copy Memory 1 Pages to Memory 1 Pages Change the Color on the Cyberlight on the newly copied Pages Record an NIP on Memory 1 Page 14 Record this new Loop to Bank 1 Preset 3
58 Reverse Block Copy Copies the series of Pages in reverse order so that the first Page being copied becomes the last Page after copied To execute the Reverse Block Copy, use the same steps to do a Block Copy and then: After selecting the destination Page, press the CONSTRUCT UP/DOWN arrow keys to toggle between COPY and COPY REVERSE Press Record to finish
59 Hands On Exercise Reverse Block Copy Reverse Block Copy Memory 1 Pages to Memory 2 Pages 5-85 Record NIPs on Memory 2 Pages 4 & 9 Record this new Loop on Bank 1 Preset 4
60 Address Parameter Copy 1 Copy Parameters from One Address to Another Address on the SAME PAGE Press SELECT Select source ADDRESS Select Construct Parameters to be copied(press the corresponding CONSTRUCT keys) Select destination ADDRESS(ES) Press RECORD
61 Hands On Exercise Address Parameter Copy on Same Page Using Address Parameter Copy, copy Cyberlight Constructs of Address 1 to Address 2
62 Address Parameter Copy 2 Copy Selected Addresses from One Page to Another Page Select source ADDRESSES to be copied Press the PAGE UP/DOWN keys and select the destination PAGE Press RECORD This applies ONLY when the controller is set for "SHARE ALL CONSTRUCTS UNTIL SELECTED" from the EDIT/COPY menu item
63 Hands On Exercise Address Parameter Copy of Same Address to Different Page Copy all Cyberlight Constructs for Address #2 of Memory 1 Page 1 to Memory 1 Page 15 Record this new Page to Preset 2 in Bank 2
64 Address Parameter Copy 3 Forced Parameter Copy Copy selected Constructs of one Address from one PAGE to Another PAGE: POSITION COPY PRESS AND HOLD SELECT KEY Select source ADDRESS Select CONSTRUCTS to be copied PAGE UP/DOWN to select the destination PAGE Press RECORD
65 Hands On Exercise Forced Parameter Copy Copy only Gate & Color information for Cyberlight Address #1 on Memory 1 Page 6 to Memory 1 Page 16 Record this new Page to Preset 3 in Bank 2
66 MSPEED MSpeed is changing from one Color or Gobo on the wheel to another Color or Gobo on the wheel at the same rate of change as the speed of the mirror movement Changing from one wheel position to a different wheel position has two options FAST CHANGE MSPEED CHANGE Access Mspeed for Color and Gobo through the Menu by pressing the Construct Key and then pressing the Cursor Right Key to Mspeed option
67 Hands On Exercise Using MSpeed 1. Record Memory 3 Page 2 Cyberlight Color 1 Gobo 2 Mspeed Page Copy up to Page 3 3. Change the Cyberlight to Color 2 and assign MSpeed to the Color Wheel Record both Pages to Presets 5 & 6 in Bank 1 Playback each Preset and examine the MSpeed change
68 Erasing a Page Creating a Blackout Page Resets all parameters for all addresses on a PAGE to default values Press SELECT Press ERASE Press RECORD
69 Hands On Exercise Erasing a Page Erase Memory 1 Pages 1&2
70 Additional Features of the LCD Controller Home a Fixture Viewing an Address Address Lockout Master/Slave Capabilities Grand Master Instant Blackout Audio Playback Effects (User Keys) Macros
71 Home Key Press the HOME key and the Address of the Fixture you want to reset Pressing HOME a second time will turn off the flashing LED and allow playback of Pages or Presets to continue while the selected Fixture resets
72 Viewing an Address on a Page To instantly see the Construct Parameters of an Address while in Address mode, press and hold the Address key. All Parameters will be displayed in the LCD window CAUTION! Holding the Address Key in for 15 seconds will result in ADDRESS LOCKOUT,, and signal will be shut off to the fixture
73 Address Lockout Temporarily shuts off signal to that Address being locked out Press and Hold in the Address Key for 15 seconds to Lockout and Unlock the Address Turning off the Controller unlocks all Addresses

74 MASTER/SLAVE Using Master/Slave increases the number of individual Addresses that can be controlled Slave Mode Requires Personality B DIP Switch #1 ON SLAVE Mode Indicator LED will be on Slaved controllers only allow programming features PLAYBACK features are DISABLED Master Controller controls PAGE AND PRESET to be played back
75 Grand Master Function In either Address or Preset Mode, the intensity of the output can be adjusted USE CONSTRUCT UP/DOWN ARROW KEYS TO ADJUST SETTING
76 Standby Provides an instant blackout feature Closes GATES of all Fixtures Page advancement is halted All other functions are available
77 Audio Input Playback The LCD Controller can receive an external stereo source to control playback of recorded Pages Audio input playback affects how recorded Pages play back regardless of whether those Pages are part of a Loop or not To use the Audio effects: Plug a stereo source into the Stereo Audio Input connector on the Rear Panel Select a Recorded Page or Pages Select a User Key effect

78 Audio Level Indicator LED & Audio Knob LED displays the strength of the AUDIO INPUT SIGNAL Knob adjusts the controller's sensitivity to the AUDIO INPUT SIGNAL Signal is necessary to use the controller's built in AUDIO ADVANCE Functions and EFFECTS Functions
79 User Keys Pre-Programmed Programmed Audio Effects and Page Advancement Effects USER 1 Random Advance Key (use with Auto Advance Key and/or All-Mem Playback) USER 3 Audio Advance With Beat USER 5 Audio Halt With Beat USER 2 Color Modulate USER 4 Gobo Modulate USER 6 Dim Modulate
80 Macros Series of keystrokes stored onto a single button Playback of button activates the MACRO stored within MACROS are stored on the USER KEYS of the LCD Controller
81 Macros/USER Key Programming Three States of the USER Keys PLAYBACK USER KEY EDIT USER KEY ABORT USER KEY Playback a recorded USER Key by pressing the USER Key once (Press it again to STOP PLAYBACK of Audio Effect) To enter the EDIT menu, press and HOLD the USER Key in; RELEASE when EDIT is displayed in the LCD window ABORT PLAYBACK and EDIT by holding the USER Key in until ABORT is displayed
82 Recording a USER KEY Press and HOLD User Key to be recorded until EDIT USER KEY is displayed Press CURSOR RIGHT key 2 times to RECORD Press CURSOR DOWN key to start recording EXECUTE keystrokes to be recorded as the MACRO Press CURSOR RIGHT Key 2 times to STOP RECORD Press CURSOR DOWN Key to stop recording
83 Hands On Exercise Macros Make a Macro for executing a Page Copy
84 LCD Controller Menu Features
85 LCD Controller Menu Features Menu Mode Menu provides options for you to define the characteristics of the controller Menu also provides some shortcut methods for some controller functions ITEMS INCLUDE: HELP BACKUP SUBMASTERS SETUP FUNCTION
86 Menu Mode Press MENU Key to display SUBMENU items Use Cursor Left/Right keys to select the submenu items Selected item will be displayed in all CAPITAL letters
87 HELP Displays information about each of the SUBMENU items
88 Backup Backup Options include: OS to RAMCard Transfer LCD Controller Operating System to another controller Save to RAMCard Save the LCD Controller's internal RAM to a removable Memory Card Load from RAMCard Load the internal RAM from a Memory Card PCMCIA CARD Removable device that allows you to backup or store the controller's internal memory Each card holds one LCD Controller show
89 Updating Operating Systems Software Allows the O/S from one LCD Controller to be easily copied to another LCD Controller To execute an O/S Update, Turn OFF the controller Insert Memory Card with newer O/S version Turn Power ON Press ERASE key to install O/S when prompted Press ERASE again to continue Follow instructions displayed in LCD window
90 Saving to a RAMCard Press MENU Press CURSOR RIGHT arrow key to BACKUP submenu Press CURSOR DOWN key to view selections With MEM->CARD displayed in ALL CAPITALS, Press RECORD two times to save to RAMCard NOTE: Always Lock the RAMCard after backing up the Controller s Memory
91 Loading from a RAMCard Press MENU Press CURSOR RIGHT arrow key to BACKUP submenu Press CURSOR DOWN to view selections Press CURSOR RIGHT arrow key to CARD->MEM Press ERASE two times to load from RAMCard
92 Hands On Exercise Backing up the Controller Backup the Memory of the Controller to a RAMCard
93 Submasters External Control board that lets you remotely adjust constructs in real time DIM, COLOR, & GOBO can be controlled 12 SUBMASTERS can be assigned Submaster control overrides the controller programming 2 modes: PROPORTIONAL LEVEL: Submaster value is multiplied by the programmed fixture value REMOTE LEVEL: Device with the higher level has control: "HTP"
94 Setup Set Device ID for Show Control operation Lock out Memories to prevent inadvertent editing Configure controller to use RS232 or MIDI port Configure the COPY Command Parameters Erase all of Controller's Memories Erase USER Keys (Restores to Pre-Programmed Programmed Audio Effects)
95 Edit/Copy Command SHARE ALL UNTIL SELECTED Copies all Constructs until specific Constructs are selected This is the Controller s Default setting DON T SHARE ALL UNTIL SELECTED Only copies specified Constructs
96 Erasing the Controller s Memory Erase either Entire Memory User Key Memory only
97 Hands On Exercises Erasing the Controller s Memory Erase the Memory of the Controller Load your show from RAMCard back into the Controller
98 Function Provides access to the six pre-programmed programmed USER key functions when Macros are stored on the keys
99 Automatic All-Memory Playback* Automatically sequences through all 99 PAGES in all 9 MEMORIES From ADDRESS Mode, Press CURSOR UP/DOWN arrow keys until "1-all" or "9-all" is displayed Press AUTO Button Adjust RATE knob To Stop the sequence, press AUTO again and select Memory 1-91 *Use this in conjunction with the Random Audio advance function

100 LCD Controller Remote Access Control
101 Remote Access Control Method of using a remote control device like a dimmer console or TD 12 to remotely access the LCD Controller's Memory 12 Channels are required on the remote device Connect the remote device using the ANALOG INPUT CONNECTORS on rear panel NOTE: Flashing STANDBY KEY LED indicates the controller is being controlled through the ANALOG INPUTS (when analog input is present)
102 Three Methods of Remote Access Control Page Access 12 Level Preset Access Binary Preset Access
103 Page Access Mode Personality B DIP Switches 3 & 5 "OFF" Allows you to remotely call up Pages from within the Memory that you first select on the Controller's front panel You can not remotely select Memories
104 Page Access Mode cont. Channels correspond to PAGES Any simultaneous combination of 2 channels calls up the corresponding PAGE number ( i.e.. "3" and "7"= "37") Channel 10 is also a tens-times times multiplier ("4" and "10"= "40") Channel 11 is also a number doubler ( "5" and "11"="55") Channel 12 is also a number inverter ("6"& "5" & "12"="65 )
105 Hands On Exercise Page Access Playback Pages 34, 40, 55, and 82 in Memory 1
106 12 Level Preset Access Mode Personality B DIP Switch "3"=ON, "5"=OFF Each Channel activates a different level of Presets Presets are called up from Controller's Front Panel
107 Recording Presets in 12 Level First Method Access Mode Activate the Channel corresponding to the level you want Select the Page or Pages to be recorded as a Preset Press SELECT Select the Preset number key to be recorded Press RECORD
108 Recording Presets in 12 Level Second Method Access Mode Choose Page to be recorded Press SELECT Activate a channel on the remote device corresponding to the level you want Select a Preset number key on controller's front panel Press RECORD
109 Playback Presets in 12 Level Access Activate Channel on Remote device Press Preset number on front panel of LCD Controller
110 Hands On Exercise 12 Level Preset Access Program a Preset on Level 2 Preset 1 Program a Preset on Level 10 Preset 5 Playback each Preset
111 Binary Preset Access Mode Expands controller's number of Presets to 1023 Personality B DIP Switches "3" and "5"=ON To record a Binary Preset: Toggle to Preset Mode Select Page or Pages that you want to record as a Preset Press SELECT Key Activate any binary combination of channels Select the lighted Preset number key on the LCD Controller Press RECORD
112 Playing back a Binary Preset Activate the Binary channel combination for the desired PRESET on the remote control device Sit back and watch!
113 Hands On Exercise Binary Preset Access Program Preset # 658

114 High End Systems Further Information Sources Show Technology magazine Status Cue User s Group Seminars Programming Technical
115
User manual DMX CONTROL 512. Table of contents
 User manual DMX CONTROL 512 Table of contents 1. SAFETY INSTRUCTIONS... 4 2. OPERATING DETERMINATIONS... 4 3.OVERVIEW... 6 3.1.REAR PANEL CONNECTIONS... 6 3.2.FRONT PANEL... 6 4.MENU... 6 4.1.CHOOSE FIXTURES...
OVERVIEW Playbacks: Shortcuts: Memories: Data Entry Wheels: Touchpad: Master and Blackout:
 OVERVIEW The MIDIcon is a USB MIDI control panel designed to work alongside the Elation lighting software packages. The Midicon is USB powered and uses the USB class drivers so that no driver needs to
JESTER OPERATING MANUAL
 JESTER OPERATING MANUAL If a portable or temporary three phase mains supply is used to power this desk, we recommend that the desk mains plug is removed before connecting or disconnecting the supply. Serious
SCD Server. SCD Server Pro
 SCD Server SCD Server Pro SCD Server & SCD Server Pro 9850-000387-01 - Page 1 of 8 SCD Server and SCD Server Pro The SCD Server is a 2U high DMX generator, running the ZerOS Operating System and emulating
LIGHTCOMMANDER II 24/6
 LIGHTCOMMANDER II 24/6 LIGHTCOMMANDER II 48/6 User s Manual Version 2.X July 1996 Table of Contents 0. Introduction... 4 0.1 How to use your Operator s Manual... 4 0.2 Specifications and Installation...
LIGHTCOMMANDER II 24/6 LIGHTCOMMANDER II 48/6. User s Manual
 LIGHTCOMMANDER II 24/6 LIGHTCOMMANDER II 48/6 User s Manual Version 2.59 August 2007 Table of Contents 0. Introduction... 4 0.1 How to use your Operator s Manual... 4 0.2 Specifications and Installation...
ILLUSION 500 OPERATING MANUAL
 ILLUSION 500 OPERATING MANUAL ILLUSION 500 OPERATING MANUAL If a portable or temporary three phase mains supply is used to power this desk, we recommend that the desk mains plug is removed before connecting
AC612 XUB/XUF/DIN sidekick too
 AC612 XUB/XUF/DIN sidekick too 512 channel houselight / architectural controller and universal wing Users Manual for Software version 2.05 Including Editor Software AC 612 XU and sidekick too The AC612
Troubleshooting Tips Lifestyle SA-2 & SA-3 Amplifier. Troubleshooting Tips
 Troubleshooting Tips Lifestyle SA-2 & SA-3 Amplifier Refer to the Lifestyle SA-2 & SA-3 Amplifier service manuals, part number 271720 for schematics, PCB layouts and parts lists. Preventative Repair Measures
3NNet KVM CP-104S /OSD / 19 KVM CP-108S / OSD / 19 KVM CP-116S / OSD / 19
 3NNet USERS MANUAL KVM CP-104S /OSD / 19 KVM CP-108S / OSD / 19 KVM CP-116S / OSD / 19 RACK MOUNTABLE 4 / 8 / 16 PORT PS2 KVM SWITCH Rev 1.1 TABLE OF CONTENTS INTRODUCTION.. 3 FEATURES... 3 PACKAGE CONTENTS........
DVB-T 730. User s Manual
 EPG Program Reservation There are 10 program timers to bring up reminder for a reserved program. 20 seconds before the start of the reserved program, a pop-up window will remind viewer. If no further instruction,
Table of Contents. expression. Lighting control system Version 2.0
 Table of Contents expression Lighting control system Version 2.0 i User manual March 1991 Copyright Electronic Theatre Controls 1991 ii Expression 2.0 Limited warranty Electronic Theatre Controls (ETC)
DAB1001. Wireless Digital Radio Interface. Installation & User Guide
 DAB1001 Wireless Digital Radio Interface Installation & User Guide Contents Contents... 2 Introduction... 3 Contents of Package... 4 Installation... 5 Product Overview... 5 Installation Procedure... 5
Mbox Basics Guide. Version 6.7 for LE Systems on Windows XP or Mac OS X. Digidesign
 Mbox Basics Guide Version 6.7 for LE Systems on Windows XP or Mac OS X Digidesign 2001 Junipero Serra Boulevard Daly City, CA 94014-3886 USA tel: 650 731 6300 fax: 650 731 6399 Technical Support (USA)
TG24 / 48 LIGHTING CONTROLLER
 TG24 / 48 LIGHTING CONTROLLER USER MANUAL ( Version: 2.0 ) Net.DO LIGHTING CONTROL EQUIPMENT CO.,LTD Contents 1 Summary... 2 1.1 Function... 2 1.2 Specification parameter... 3 2 Installation... 3 2.1 Safety
Quick user guide for the Vista Quantum 960H range of DVRs, models included
 Quantum 960H DVR range Quick User guide Quick user guide for the Vista Quantum 960H range of DVRs, models included QX960H08-xxx QX960H16-xxx QP960H04-xxx QP960H08-xxx QP960H16-xxx Full manual found on
CONTROL SWITCHER User s Manual (Preliminary)
") CONTROL SWITCHER User s Manual (Preliminary) www.voodoolab.com Copyright 2010 by Digital Music Corporation. This publication is protected by copyright and all rights are reserved. Voodoo Lab, Control Switcher,
CONTROL SWITCHER User s Manual (Preliminary) www.voodoolab.com Copyright 2010 by Digital Music Corporation. This publication is protected by copyright and all rights are reserved. Voodoo Lab, Control Switcher,
MLA...3 KEYBOARD FUNCTIONS...5 UP AND RUNNING...10 DISPLAY FORMATS...10 CLEARING THE EDITOR...10 release 11 release a spot from a memory...
 MLA...3 KEYBOARD FUNCTIONS...5 UP AND RUNNING...10 DISPLAY FORMATS...10 CLEARING THE EDITOR...10 release 11 release a spot from a memory...11 release a spot from the editor...11 release specific parameters...11
MANUAL PC1000R INFO@APART-AUDIO.COM
 MANUAL PC1000R INFO@APART-AUDIO.COM Features The APart PC1000R is a professional multisource CD/USB/SD card music player, equipped with balanced and unbalanced analog outputs, coaxial and optical digital
PART 1 PRODUCT (GENERAL)...1.
...1.") 11 T ABLE OF CONTENTS PART 1 PRODUCT (GENERAL)...1. 1.1--PRODUCT INTRODUCTION...1. 1.2--PRODUCT FEATURES...1. 1.3--TECHNICAL SPECIFICATIONS...2. 1.4--PHOTOMETRIC DATA...3. 1.5--SAFETY WARNING...4. PART
11 T ABLE OF CONTENTS PART 1 PRODUCT (GENERAL)...1. 1.1--PRODUCT INTRODUCTION...1. 1.2--PRODUCT FEATURES...1. 1.3--TECHNICAL SPECIFICATIONS...2. 1.4--PHOTOMETRIC DATA...3. 1.5--SAFETY WARNING...4. PART
LEN s.r.l. Via S. Andrea di Rovereto 33 c.s. 16043 CHIAVARI (GE) Tel. +39 0185 318444 - Fax +39 0185 472835 mailto: len@len.it url: http//www.len.
 Tel. +39 0185 318444 - Fax +39 0185 472835 mailto: len@len.it url: http//www.len.") MA511 General Index 1 INTRODUCTION... 3 1.1 HARDWARE FEATURES:... 4 2 INTERFACE... 5 2.1 KEYBOARD... 6 2.2 POWER ON... 7 2.3 POWER OFF... 7 2.4 DETECTOR CONNECTION... 7 2.5 DETECTOR SUBSTITUTION...7 3
MA511 General Index 1 INTRODUCTION... 3 1.1 HARDWARE FEATURES:... 4 2 INTERFACE... 5 2.1 KEYBOARD... 6 2.2 POWER ON... 7 2.3 POWER OFF... 7 2.4 DETECTOR CONNECTION... 7 2.5 DETECTOR SUBSTITUTION...7 3
USER MANUAL. Issue 3 - December 2003. Manual Stock No. 73-700 - 00 Software Version 3.0 Zero 88 Lighting Ltd. 2003
 USER MANUAL USER MANUAL If a portable or temporary three phase mains supply is used to power this desk, we recommend that the power supply is unplugged from the mains supply before connecting or disconnecting
INSTRUCTION MANUAL. Installing the Software NO. XX134-24-00. NOTES Refer to XX134 REV. 510 SEC. 3
 INSTRUCTION MANUAL NOTES Refer to XX134 NO. XX134-24-00 REV. 510 Vicon Direct Control Software It is possible to control the SurveyorVFT or Surveyor -Mini camera dome from a PC using the Direct Control
EZ DUPE DVD/CD Duplicator
 EZ DUPE DVD/CD Duplicator User s Manual Version 3.0 0 TABLE OF CONTENTS Introduction 2 Setup 11 LCD Front Panel Overview 2 o Auto Start Time 11 Menu Overview 3-5 o Display Mode 12 Functions 6 o Button
Elation Professional Los Angeles, Ca 90058 www.elationlighting.com
 USER MANUAL Version 03-05 Rev 3.0 Elation Professional Los Angeles, Ca 90058 www.elationlighting.com Sections: Table of Contents 1 : General Introduction..... 3 2 : Safety Information & Maintenance......
USER'S MANUAL. Elation Professional R 4295 Charter Street Los Angeles CA. 90058 www.elationlighting.com
 1 3 5 7 9 11 SCENE SETTER 1 CH Dimmer Console FOG MACHINE REC STEP DIMMER SPEED TIME FADE TIME PRESET A Heating Ready DOWN UP DELETE INSERT EDIT BEAT REV CHASE REV REV ONE % OR -55 ALL REV DARK MODE SELECT
PART 1 PRODUCT (GENERAL)...1.
...1.") TABLE OF CONTENTS PART 1 PRODUCT (GENERAL)...1. 1.1--PRODUCT INTRODUCTION...1. 1.2--PRODUCT FEATURES...1. 1.3--TECHNICAL SPECIFICATIONS...2. 1.4--PHOTOMETRIC DATA...3. 1.5--SAFETY WARNING...4. PART 2 INSTALLATION...5.
TABLE OF CONTENTS PART 1 PRODUCT (GENERAL)...1. 1.1--PRODUCT INTRODUCTION...1. 1.2--PRODUCT FEATURES...1. 1.3--TECHNICAL SPECIFICATIONS...2. 1.4--PHOTOMETRIC DATA...3. 1.5--SAFETY WARNING...4. PART 2 INSTALLATION...5.
GSM Autodialer Professional GJD700 Speech & Text Autodialer
 Text Edit message GSM Autodialer Professional GJD700 Speech & Text Autodialer Introduction The GSM Autodialer Professional works in conjunction with standard alarm systems and makes use of your preferred
Mini Amp Gizmo. User s Manual. RJM Music Technology, Inc.
 Mini Amp Gizmo User s Manual RJM Music Technology, Inc. Mini Amp Gizmo User s Manual Version 1.1 March 15, 2012 RJM Music Technology, Inc. 2525 Pioneer Ave #1 Vista, CA 92081 E-mail: support@rjmmusic.com
Kiva Technology User s Manual
 2009 Kiva Technology User s Manual For Support Contact Call Center (816) 235-2000: Monday Friday 7:00 am 7:00 pm ILE Support E-Mail: ILESupport@UMKC.EDU URL: http://www.umkc.edu/is/cts/ilesupport/ctssupporttext.asp
lighting control software
 lighting control software 2 HANDS ON code: C24102 HandsOn transforms a simple computer into a sophisticated DMX lighting control desk Clay Paky presents HandsOn: an innovative software lighting control
Soundcraft Signature MTK Recording Guide
 Soundcraft Signature MTK Recording Guide S O U N D C R A F T S I G N AT U R E M T K R E C O R D I N G G U I D E 2 Table of Contents USB Overview... 04 Installing the Drivers (PC Only)... 04 Finding the
50W/100W LED Zoom User Manual
 50W/100W LED Zoom User Manual Code: ELUM042-50W - (5600K) Code: ELUM042A - 100W - (5600K) Code: ELUM042D - 100W - (3200K) 1 2 FUSE F2A~250V Overview: You should find inside the Elemen8 carton the following
Lighting Control Console User Manual
 Lighting Control Console User Manual Version 2.1.0 Copyright 2013 Electronic Theatre Controls, Inc. All Rights reserved. Product information and specifications subject to change. Part Number:4330M1210-2.1.0
ChamSys. MagicQ Software Quick Start Manual. 1 of 44
 ChamSys Manual 1 of 44 Quick Start Guide to MagicQ Software Introduction This document is intended to enable you to get up and running with MagicQ Software under Window, Linux or Mac OSX. It is designed
MIDI USER INSTRUCTIONS. Elation Professional 4295 Charter Street Los Angeles Ca. 90058 www.elationlighting.com TABLE OF CONTENTS FLOW CHART...
 TABLE OF CTENTS FLOW CHART...1 CTROLS & FUNCTIS...2 REAR CTROLS...4 DMX-512 ADDRESSING...4 PROGRAMMING SCENES...8 PROGRAMMING SCENES REVIEW:...9 SCENE COPY:...10 SCENE EDITING:...10 DELETE SCENE :...10
DiGiCo SD Series V726+ Appendix
 DiGiCo SD Series V726+ Appendix Issue A - May 2015 - Software Version 726+ 1-1 1-2 Contents DiGiCo SD Series V726+ Appendix 1.1 New Features...4 1.1.1 Overview......4 1.1.2 Merge Input......4 1.1.3 Ident
Setting Up the ZigBee Ethernet Gateway
 Setting Up the ZigBee Ethernet Gateway MAN-01-00030-1.4 This manual describes how to install and set up ZigBee communication between a SolarEdge device (Inverters or Safety and Monitoring Interface) and
1. Introduction... 3. 2.Fixture exterior view... 3. 3. Connecting the Robe Universal Interface... 4. 3.1 Software update of the fixture...
 1 Table of contests 1. Introduction... 3 2.Fixture exterior view... 3 3. Connecting the Robe Universal Interface... 4 3.1 Software update of the fixture... 4 3.2 Connecting a DMX console to the Media Fusion...
In-Car Digital Radio Adaptor User Guide
 S1000-DAB In-Car Digital Radio Adaptor User Guide Table of Content INTRODUCTION... 1 CONTENTS OF PACKAGE... 2 INSTALLATION...3 OVERVIEW OF CONTROLS AND CONNECTORS... 5 STARTING UP THE SYSTEM... 7 USING
(2012 10 24) manual_tocomsat duo LITE.indd 20-1 2012-10-24 7:44:57
 manual_tocomsat duo LITE.indd 20-1 2012-10-24 7:44:57") (2012 10 24) manual_tocomsat duo LITE.indd 20-1 2012-10-24 7:44:57 TABLE OF CONTENTS Table of Contents Table of Contents Safety Warning General Information Package Contents & Features Front Panel Rear
(2012 10 24) manual_tocomsat duo LITE.indd 20-1 2012-10-24 7:44:57 TABLE OF CONTENTS Table of Contents Table of Contents Safety Warning General Information Package Contents & Features Front Panel Rear
DP-DMX20L 4 CHANNEL DMX DIMMER PACK MODE MENU DISPLAY. OUTPUT: 10A/CH, TOTAL 20A Max. DMX CHANNEL RECEIVE TOTAL DMX CHANNEL DIMMER / SWITCH
 DP-DMX0L OUTPUT: 0A/CH, TOTAL 0A Max. CHANNEL DMX DIMMER PACK DISPLAY RECEIVE DMX CHANNEL TOTAL DMX CHANNEL DIMMER / SWITCH 8888 CHASE PROGRAM CHASE CHASE SPEED CHASE DIMMER MODE MENU Elation Professional
Forte GETTING STARTED GUIDE. Specifications. It s the sound.
 Forte GETTING STARTED GUIDE This guide will help you hook up the Forte to your sound system and MIDI system, give you a quick overview, and show you how to start playing music with the Forte. A full manual
The Foundation User Manual LED Battery Slim Par Fixture (RGBA, DMX 7Ch/4CH)
") The Foundation User Manual LED Battery Slim Par Fixture (RGBA, DMX 7Ch/4CH) Page 1 I. Security: 1. Make sure the user voltage cannot higher or lower than the regulating voltage. 2. Please use proper and
The Foundation User Manual LED Battery Slim Par Fixture (RGBA, DMX 7Ch/4CH) Page 1 I. Security: 1. Make sure the user voltage cannot higher or lower than the regulating voltage. 2. Please use proper and
STAGE SETTER-8. User Instructions. Elation Professional
 STAGE SETTER-8 User Instructions Elation Professional A Division of the American DJ Group of Companies 4295 Charter Street Los Angeles, CA 90058 USA Tel: 323-582-2650 Fax: 323-582-2610 Web: www.elationlighting.com
Mini Effect Gizmo. User s Manual. RJM Music Technology, Inc.
 Mini Effect Gizmo User s Manual RJM Music Technology, Inc. Mini Effect Gizmo User s Manual Version 1.3 September 26, 2013 RJM Music Technology, Inc. 2525 Pioneer Ave #1 Vista, CA 92081 E-mail: support@rjmmusic.com
The RIDZ 8x2 Audio Switcher
 The RIDZ 8x2 Audio Switcher Engineering Manual Support Number 800-765-2930 International 712-852-2813 Table of Contents General Information for the RIDZ (8 x 2) Switcher..... 3 Input 9 on the RIDZ Switcher....6
MAC Viper Series Firmware v.2.0.0 Upload Instructions
 MAC Viper Series Firmware v.2.0.0 Upload Instructions This guide explains how to update your MAC Viper Series with firmware version 2.0.0. Important A USB flash drive is required for this update. Once
SwitchView 1000 Switch. Installer/User Guide
 SwitchView 1000 Switch Installer/User Guide SwitchView 1000 Switch Installer/User Guide Avocent, the Avocent logo, The Power of Being There and SwitchView are registered trademarks of Avocent Corporation.
DMX protocol. Robin MMX Blade - DMX protocol, version 1.1
 protocol Mode/channel Robin MMX Blade - protocol, version 1.1 1 1 1 Pan 0-255 Pan movement by 540 proportional 2 2 * Pan Fine 0-255 Fine control of pan movement proportional 3 3 2 Tilt 0-255 Tilt movement
Wireless VoIP Phone User s Manual
 Wireless VoIP Phone User s Manual Table of Contents Chapter 1 Overview of the WiFi phone... 5 1.1 Front Panel and Keypad...5 1.2 Removing and Installing the Battery...7 1.3 Charging the WIFI PHONE...8
CONSOLES R E G I A 2 0 4 8 S E R I E S LIGHTING
 L I G H T I N G C O N S O L E S REGIA 2048 SERIES R E G I A 2 0 4 8 S E R I E S REGIA 2048 is a new series of hi-tech lighting consoles designed and manufactured for a wide range of professional applications.
Showmaster 48 ORDERCODE 50356
 Showmaster 48 ORDERCODE 50356 Congratulations! You have bought a great, innovative product from Showtec. The Showtec Showmaster 48 brings excitement to any venue. Whether you want simple plug-&-play action
ACU-1000 Manual Addendum Replacement of CPM-2 with CPM-4
 ACU-1000 Manual Addendum Replacement of CPM-2 with CPM-4 1 PURPOSE:... 1 2 CPM-4/CPM-2 COMPATIBILITY... 2 2.1 NETWORK CABLES... 2 2.2 FACTORY DEFAULT SETTINGS... 2 2.3 CHANGING THE RS-232 SERIAL PORT BAUD
MANUAL ENGLISH. Ordercode: 50701. Highlite International B.V. Vestastraat 2 6468 EX Kerkrade the Netherlands
 MANUAL ENGLISH SM-16/2 V1 Highlite International B.V. Vestastraat 2 6468 EX Kerkrade the Netherlands Table of contents Warning... 2 Unpacking Instructions... 2 Safety Instructions... 2 Operating Determinations...
Elation Professional Los Angeles, Ca 90058 www.elationlighting.com Table of Contents
 USER MANUAL Version 3.0 24-004-1262 Elation Professional Los Angeles, Ca 90058 www.elationlighting.com Table of Contents Sections: Table of Contents 1 : General Introduction..... 3 2 : Safety Information
REC FIM LOCKPICK INSTALLATION OPTIONS
 REC FIM LOCKPICK INSTALLATION OPTIONS TM PLUG INTO RADIO PLUG WHITE CONNECTOR INTO RADIO PLUG AND PLAY RADIO CONNECTORS UNPLUG ORIGINAL RADIO GRAY CONNECTOR THEN PLUG IN HERE AFTERMARKET FRONT CAMERA VIDEO
User's Guide. Integrating Sound Level Datalogger. Model 407780. Introduction
 User's Guide 99 Washington Street Melrose, MA 02176 Phone 781-665-1400 Toll Free 1-800-517-8431 Visit us at www.testequipmentdepot.com Back to the Extech 407780 Product Page Integrating Sound Level Datalogger
User Manual. Humidity-Temperature Chart Recorder. Model RH520
 User Manual Humidity-Temperature Chart Recorder Model RH520 Introduction Congratulations on your purchase of the Extech RH520 Temperature + Humidity Chart Recorder. The RH520 measures and displays Temperature,
CM HOST CM CardTransporter Fuel Communication and Management Software 10.10.06 Software version up to 3.1
 CM HOST CM CardTransporter Fuel Communication and Management Software 10.10.06 Software version up to 3.1 CM Host Manual For CardMaster Fuel Control www.cardlockvending.com customers call 888-487-5040
DVR-4TL/8TL/16TL Setup Guide
 Package Content DVR-4TL/8TL/16TL Setup Guide Inspect the DVR s packaging. Make sure that the DVR-4TL/8TL/16TL is packed properly. Remove all items from the box and make sure it contains the following items.
computer (please download the software from the official website if there is no CD available).
.") KAMKBMXBRNA Keyboard Software Function Description System Requirements: 1. Windows XP / Windows Vista / Windows 7 / Windows 8 Operation System 2. Free USB 2.0 Port 3. CD-ROM Driver 4. 50 Mb available memory
KAMKBMXBRNA Keyboard Software Function Description System Requirements: 1. Windows XP / Windows Vista / Windows 7 / Windows 8 Operation System 2. Free USB 2.0 Port 3. CD-ROM Driver 4. 50 Mb available memory
1.General Introduction...3 1.1 Thank you for Purchasing Trio-1248...3 1.2 Customer Service...3 2. General Information...4 2.1 Safety...4 2.
 Trio-1248 Rev. 4/10 TABLE OF CONTENTS 1.General Introduction...3 1.1 Thank you for Purchasing Trio-1248...3 1.2 Customer Service...3 2. General Information...4 2.1 Safety...4 2.2 Compliance...4 2.3 Abbreviations...4
FAQs. XAP Frequently Asked Questions. Software/Configuration
 XAP Frequently Asked Questions ~ Software/Configuration ~ Echo Cancellation ~ Audio Performance ~ Expansion Bus ~ Firmware ~ Installation ~ Presets ~ Telephone Hybrid Software/Configuration What is the
DVB-T2 DIGITAL TV BOX
 DVB-T2 DIGITAL TV BOX QUALITY OF DIGITAL TELEVISION MT4159 User Manual EN 2 Index Index...2 Introduction...3 Front panel...3 Rear panel...3 Remote control...4 Hardware configuration...5 Connecting tuner
IX Support Tool Setting Manual
 IX System IP network-compatible intercom IX Support Tool Setting Manual Software version 2.0.0.0 or later Before configuring and using the system, read Setting Manual and Operation Manual (PDF) carefully.
GV-Keyboard. User's Manual V2.0
 GV-Keyboard User's Manual V2.0 Before attempting to connect or operate this product, please read these instructions carefully and save this manual for future use. 2007 GeoVision, Inc. All rights reserved.
NC-12 Modbus Application
 NC-12 Modbus Application NC-12 1 Table of Contents 1 Table of Contents... 2 2 Glossary... 3 SCADA...3 3 NC-12 Modbus in general... 3 4 Entire system... 4 4.1 PFC to PC connection alternatives...4 4.1.1
Contents of the Guide
 BeoCenter 1 Guide Contents of the Guide 3 The following is an index to the contents of the separate Reference book with page references: How to set up BeoCenter 1, 4 Connect your TV cables, 5 Connect
Installation and Introduction to Programming. LightJockey Version 2.3 for Windows 95/98/Me/2000/XP
 Installation and Introduction to Programming LightJockey Version 2.3 for Windows 95/98/Me/2000/XP 1998-2002 Martin Professional A/S, Denmark. All rights reserved. No part of this manual may be reproduced,
Release Notes. R&S ZVH4/ZVH8 Cable and Antenna Analyzer
 Release Notes Revision: 01 R&S ZVH4/ZVH8 Cable and Antenna Analyzer Firmware Release V1.50 These Release Notes describe the following models and options of the R&S Cable and Antenna Analyzer: R&S Cable
Sharing Software. Chapter 14
 Chapter 14 14 Sharing Software Sharing a tool, like a software application, works differently from sharing a document or presentation. When you share software during a meeting, a sharing window opens automatically
Getting to Know Xsight... 3. Home Screen and Everyday Use... 9. Settings... 11. PC Setup... 17. 2 www.oneforall.com
 User Manual English English Getting to Know Xsight........................................ 3 Unpacking and Setting Up Xsight............................................................. 3 Using Xsight
Multi-Range Programmable DC Power Supplies 9115 Series
 Data Sheet Multi-Range Programmable DC Power Supplies 1200 W / 3000 W Multi-Range DC Power Supplies Features & Benefits Any model can replace several supplies on your bench or in your rack. Unlike conventional
SMC 3000 Series Master Clock Programming Manual (V3) Table of Contents. Getting Started.. Page 2. Setting the Time of Day...
 Table of Contents. Getting Started.. Page 2. Setting the Time of Day...") User Password (default is 1111) GETTING STARTED Getting Started.. Page 2 SETTING THE TIME Setting the Time of Day... Page 3 SETTING THE DATE Setting the Date. Page 4 EVENTS Programming Events..... Pages
User Password (default is 1111) GETTING STARTED Getting Started.. Page 2 SETTING THE TIME Setting the Time of Day... Page 3 SETTING THE DATE Setting the Date. Page 4 EVENTS Programming Events..... Pages
Tiger Touch. Operator s Manual. Version 3.0
 Tiger Touch Operator s Manual Version 3.0 Useful Avolites phone numbers:- Avolites England Sales and service* (+44) (0) 20 8965 8522 Service out of hours* (+44) (0) 831 17 8888 Fax (+44) (0) 20 8965 0290
Wireless VoIP Phone. Table of Contents. User s Manual
 Wireless VoIP Phone User s Manual Table of Contents Chapter 1 Overview the WiFi Phone... 6 1.1 Front Panel and Keypad... 6 1.2 Removing and Installing the Battery... 8 1.4 Powering the WiFi Phone On and
Stand Alone Type. Digital Video Recorder USER S MANUAL. (Real time recording 8 & 16 CH DVR) Revision Date : 2010. 6. 30.
 Revision Date : 2010. 6. 30.") Stand Alone Type Digital Video Recorder USER S MANUAL (Real time recording 8 & 16 CH DVR) Revision Date : 2010. 6. 30. INDEX 1. Front Panel - - - - - - - - - - - - - - - - - - - - - - - - - - - - - - -
Stand Alone Type Digital Video Recorder USER S MANUAL (Real time recording 8 & 16 CH DVR) Revision Date : 2010. 6. 30. INDEX 1. Front Panel - - - - - - - - - - - - - - - - - - - - - - - - - - - - - - -
Lenovo Miix 2 8. User Guide. Read the safety notices and important tips in the included manuals before using your computer.
 Lenovo Miix 2 8 User Guide Read the safety notices and important tips in the included manuals before using your computer. Notes Before using the product, be sure to read Lenovo Safety and General Information
dmxlan software Version 3.1.x by ELC lighting
 dmxlan software Version 3.1.x by ELC lighting The dmxlan system is built-up from DMX/Ethernet nodes / DMX/ethernet recorders and intelligent network switches. All of these units can be configured using
CALL MANAGER INSTALLATION
 CALL MANAGER INSTALLATION and OPERATION INSTRUCTIONS JULY 17, 2006 Page 1 TABLE OF CONTENTS INTRODUCTION Use of this manual ----------------------------------------------------------------- 2 Product Overview
DPC-536 Programming and Debug Guide
 DPC-536 Programming and Debug Guide CONTENTS 1. Introduction ------------------------------------------------------------------------------- 2 2. System Password and Master Card -----------------------------------------------------
Animated Lighting Software Overview
 Animated Lighting Software Revision 1.0 August 29, 2003 Table of Contents SOFTWARE OVERVIEW 1) Dasher Pro and Animation Director overviews 2) Installing the software 3) Help 4) Configuring the software
Applied Electronics. Commercial Dimming System UPDATE NOTICE
 REV. A Applied Electronics Commercial Dimming System UPDATE NOTICE This notice is to inform the end user of an additional feature added to this DP12/2400 dimming unit. This unit has been outfitted with
CX Series. Video Recording Server. Quick Start Guide CX784 / CX788 / CX7816. Version 1.05.00
 CX Series Video Recording Server CX784 / CX788 / CX7816 Quick Start Guide Version 1.05.00 Contents 1.Introduction...1 1.1.Packages Contents...1 1.2.Hardware Features...2 1.3.Functional Features...4 1.4.Hard
Getting Started with a blank desk...3. Understanding the Rear Panel and Top Connectors...3. Understanding the Front Panel...5
 2nd Edition Table of contents Getting Started with a blank desk...3 Understanding the Rear Panel and Top Connectors...3 Understanding the Front Panel...5 Controlling Channel Faders...6 Changing INPUT PATCH...7
Pace plc. DC60Xu HD HD DTA. Monday, June 25, 2012. Private & Confidential
 Pace plc DC60Xu HD HD DTA Monday, June 25, 2012 DC60Xu HD DTA 3 DC60Xu HD DTA Overview High Definition adapter for encrypted services Simple channel up/down via RCU Channel 3/4 RF output MPEG 4 and MPEG
Legal Notices. Guide Part Number 9329-65008-00 REV A 2/10
 Legal Notices This guide is copyrighted 2010 by Avid Technology, Inc., with all rights reserved. Under copyright laws, this guide may not be duplicated in whole or in part without the written consent of
Lynx Touch L5100 Technical Training. Z-Wave Setup
 Lynx Touch L5100 Technical Training Z-Wave Setup L5100-Z-wave Combines Home Automation and Security Controls up to: - 40 Devices (Lights, switches and lamp modules) - 3 Thermostats - 4 Door Locks Rules
Digital Photo Bank / Portable HDD Pan Ocean E350 User Manual
 Digital Photo Bank / Portable HDD Pan Ocean E350 User Manual Installing a hard disk 1. Power off the unit. 2. Remove the bottom cover from the unit by removing four screws. 3. Insert the 2.5 HDD to the
Marantz PMD660 Digital Recorder Guide
 Marantz PMD660 Digital Recorder Guide August 2005 Set Up Inserting a Compact Flash Card The PMD660 records onto CF or Compact Flash Cards. To insert a CF card: 1. Open the CF Card Door on the front side
Dash 8Xe / Dash 8X Data Acquisition Recorder
 75 Dash 8Xe / Dash 8X Data Acquisition Recorder QUICK START GUIDE Supports Recorder System Software Version 2.0 1. INTRODUCTION 2. GETTING STARTED 3. HARDWARE OVERVIEW 4. MENUS & BUTTONS 5. USING THE DASH
Software Sequencing Basics
 October 12, 1998 software sequencing basics Software Sequencing Basics Supplemental Notes Roland gear is often used in conjunction with a variety of software sequencer programs. The purpose of this document
Using AORUS Notebook for the First Time
 V2.0 Congratulations on your purchase of the AORUS Notebook! This Manual will help you to get started with setting up your notebook. For more detailed information, please visit our website at http://www.aorus.com.
/&' 79 7; /% ) &RORU 7HOHYLVLRQ (QJOLVK
 &RORU 7HOHYLVLRQ (QJOLVK") 245U Using the On Screen Displays Many features available on this TV can be accessed via the On Screen Display menu system. Use the remote control as shown below to access and adjust features as desired.
245U Using the On Screen Displays Many features available on this TV can be accessed via the On Screen Display menu system. Use the remote control as shown below to access and adjust features as desired.
STEELSERIES FREE MOBILE WIRELESS CONTROLLER USER GUIDE
 STEELSERIES FREE MOBILE WIRELESS CONTROLLER USER GUIDE INTRODUCTION Thank you for choosing the SteelSeries Free Mobile Controller! This controller is designed by SteelSeries, a dedicated manufacturer of
MIDI INTERFACE Z-7. Operator s Manual. Please, first read this manual carefully!
 MIDI INTERFACE Z-7 Operator s Manual Please, first read this manual carefully! The MIDI INTERFACE enables you to execute MIDI switching operations and save switching patches for amps/devices that are equipped
GETTING STARTED WITH STUDIO ONE ARTIST
 GETTING STARTED WITH STUDIO ONE ARTIST 2009, PreSonus Audio Electronics, Inc. All Rights Reserved. TABLE OF CONTENTS Studio One Artist Features...3 System Requirements...4 Installation and Authorization...5
Tecla for Android. Downloading and Installing the Tecla Access App. Activating and Selecting the Tecla Access Keyboard
 Tecla for Android Downloading and Installing the Tecla Access App Activating and Selecting the Tecla Access Keyboard Connecting the App to the Tecla Shield Connecting Switches Controlling the Android User
Keystation Pro 88 Advanced Guide. Contents: 1 Getting Started. 2 Terminology. 3 Performance Operations of the Keystation Pro 88
 Keystation Pro 88 Advanced Guide Contents: 1 Getting Started 2 Terminology 3 Performance Operations of the Keystation Pro 88 Sending Program Changes During Performance Sending Bank Changes During Performance