BEAR RESISTANT GARBAGE CAN CADDY
|
|
|
- Rebecca Banks
- 7 years ago
- Views:
Transcription
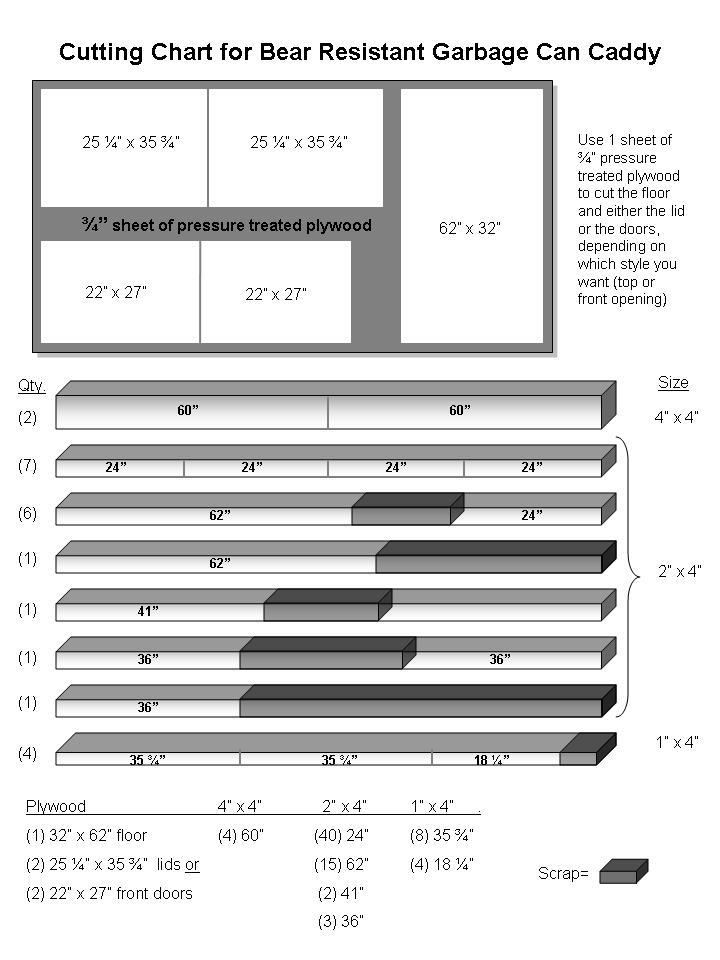
1 BEAR RESISTANT GARBAGE CAN CADDY This bin is heavy-duty and is suitable for areas that will have very frequent and repeated bear visits and raid attempts. It is constructed from pressure-treated lumber for longer-life and lower maintenance; however, it should be cured outdoors at least a month before being stained or painted. Labor time: 4-6 hours, depending on ability and assistance Tools required: Circular saw Post-hole digger Framing square Hand drill Tape measure Approximate materials cost: $158.96
2
3
4 Materials List for Bear Resistant Garbage Bin (Prices are approximate and may vary by location) Pressure-treated lumber 2 x 4 x 8 ft $2.97 $ x 4 x 8 ft $2.39 $ x 4 x 10 ft $8.98 $17.96 ¾ in. exterior plywood $26.99 $26.99 Lumber total $ Galvanized hardware 3 hinges 2 $3.39 $ latches $2.84 $11.36 Handles $1.46 $ deck screws 3 $3.77 $ deck screws 1 $3.77 $3.77 Hardware total $36.14 Total Material Cost $158.96
5 Assembly Instructions for Bear Resistant Garbage Can Caddy These instructions will assist a person with some woodworking experience to construct the caddy with minimal difficulty. Experienced woodworkers may prefer slightly different methods. We encourage people to try modifications and variations and contact us with their results so we can pass them on - there is always room for improvement. The caddy will accommodate two garbage cans up to 36 x 24 x24 in size. Tools required: Saw (circular or table) Electric drill (w/drill bit and driver bit) Tape measure Framing square REMEMBER TO FOLLOW PROPER SAFETY PRECAUTIONS AND WEAR PROTECTION FOR EYES, EARS AND HANDS WHEN USING POWER TOOLS. CONSTRUCTION AND ASSEMBLY Caddy construction is best done on a flat, solid surface like a concrete pad or driveway. If assembling inside a workshop, be sure the door is big enough to get unit when constructed. Two people are recommended during the assembly process (one person can assemble it if experienced, but it is very challenging). Depending on ability and experience, it will take about 4-8 hours to assemble the caddy. The unit will be heavy (150 lbs. or more) and cumbersome when assembled and will take two or three people to move to installation site and install. PRE-CUTTING & PRE-DRILLING Begin by cutting all lumber to lengths specified in cutting chart. Place same-sized pieces together to facilitate finding them later. To prevent splitting of wood and to make driving easier, it is advised that you pre-drill pilot holes (1/16 1/8 ) for deck screws through all 2x4 s listed in these instructions. CADDY ENDS STEP 1: This step may seem a little tedious, but take your time and make sure everything is square or other pieces will not fit right later. Place 2 of the 52 4x4 posts parallel to each other 24 apart to outside edges. Place a 24 2x4 flush with the top of the 52 4x4s, also make sure it is square with the outside edges of both 4x4 posts. (If the edges are not square the other 2x4s will not fit right and your caddy will be uneven, so this is a crucial step.) After checking and rechecking that the 2x4 is square and flush with both 4x4s,
6 attach with 4 (2 on each side) 3 deck screws. Now from the bottom of the attached 2x4, measure down 34 on each 4x4 post and draw a line. This will be the alignment of your lowest 2x4. Align the top of a 24 2x4 with the line that you just drew. Make sure that the 2x4 is flush at the outside edges of the 4x4 post and that it is square along the line on both 4x4 posts. This will ensure that your posts are 24 apart from top to bottom. Now attach the 2x4 to the post in the same manner as you did before. STEP 2: Now that you have a frame for the end of the caddy, take nine more 24 2x4s and evenly space them between the two attached 2x4s. Using a scrap piece of wood about ¼ thick as a spacer, try to space the boards about 1/8-1/4 apart. (The spacing does not have to be exact, but do not exceed ¼ apart or a highly motivated bear can pull apart the boards!) Attach the 2x4s in the same manner as you did the other two, making sure they are flush to the outside edges and are level. Do not attach all the right sides of the 2x4s then go back and attach the left; try to do it one at a time to save from having to go back and reposition the boards. STEP 3: Now go back and repeat steps 1 and 2 to build the other end of the caddy. Make sure all boards are even and flush before attaching them. Take your time and pay attention to make sure each side is flush so that the caddy stands nice and straight. One uneven board will throw the whole caddy off and double your building time. CADDY BACK STEP 4: Place the two caddy end assemblies on edge. Using the same procedure outlined in Step 1, make sure the two end assemblies are square and parallel to each other and 62 to outside edges of attached 2x4s. STEP 5: Place a 62 2x4 across the 4x4s to match up and overlap the outermost 2x4s on the top of the end assembly. Check that the 2x4 is square to the 4x4s and attach with 3 deck screws. Place another 62 2x4 across the 4x4s to match up and overlap the outermost 2x4s on the bottom of the end assembly and check that it is square and attach with deck screws. STEP 6: Attach nine more 62 2x4s across back of caddy to match the 2x4s on the end, and assemble using the same screw pattern. CADDY FRONT STEP 7: Carefully roll the caddy onto its back until the attached 62 2x4s are on the ground. Now place a 62 2x4 along the top of the caddy front so that it is flush with the top of the 4x4s and is square to top 2x4s on the caddy sides. Attach the 2x4 in the same manner as the others. Place a 36 2x4 along one of the 4x4s so that it covers the exposed ends of 2x4s on end assembly. Secure to 4x4 and ends of 2x4s with 3 deck screws. Repeat on other end. Now place another 62 2x4 along the bottom of the front of the caddy. Make sure it is flush with the bottom of the 36 2x4 and also to the outermost edge of the 4x4 post. Attach in the same manner as you did the others.
7 CADDY BACK BRACE STEP 8: Place one of the 41 2x4s on the inside of the 2x4s forming the back of the caddy. It should be centered (about 24 1/4 from each of the side 2x4s). It should be 1 ½ from the top edge of the top 2x4. Secure with 3 deck screws. CADDY FRONT BRACE STEP 9: Place the last 36 2x4 on the floor and then place the last 41 2x4 directly on top of the 36 piece, extending over the ends by 2 on one end and 3 on the other end. Secure the two pieces together with 3 deck screws through the 41 piece. STEP 10: Carefully roll the caddy until the front is on the floor. Place the front brace assembly (with 36 piece down) between the top and bottom 2x4s with the same spacing as discussed in Step 11 and secure with 3 deck screws. CADDY TOP Step 11: Carefully roll the caddy onto its back so the front is facing up. Now place a 62 2x4 flat on top of the rear 4x4 posts. Make sure that it is flush to the rear 62 2x4s and also with the 24 side 2x4 s. Attach the 2x4 to the rear 4x4 posts. If using the lid access option, this is where the hinges of the caddy lids will attach to the base. CADDY FLOOR Bears are capable diggers and adding a bottom to the caddy will help prevent bears from digging under and pulling apart the boards of the walls. Although there are many options for a floor to the caddy; the best two are either a poured concrete floor or a slatted-board floor. If you elect to make a wooden floor, note that if there is any overhang, most bears will be able to pry the caddy open. So make sure that all boards are flush and even along all edges, and take the extra time to trim away any excess wood. Follow the instructions for one of the caddy flooring options, depending on your preference, budget and drainage needs. Option A: CONCRETE FLOOR Step 12a: This style floor is sturdy but permanent, and will not drain water as well as a slatted floor. After the caddy is built and sunk flush to the ground, roughly level out the ground inside and compact along the interior edges with soil. Pour a cement slab using a quickset concrete, creating a floor about 3 thick. (Don t add too much water to the concrete- a thicker mix is less likely to seep out from under your caddy.) Option B: SLATTED FLOOR Step 12b: This style floor drains well, but is more expensive and time consuming to do. With this option, the caddy bottom is made of 2x4 s spaced ½ apart. Place 13 of the 24 2x4s against the outer edge and attach with 2 wood screws along the frame.
8 CADDY ACCESS Depending on your ability, style of trashcan, and waste service handler preference, you make elect to have a top loading or front loading caddy style. Instructions for both types of access are included. Unless it s for a park or public facility that may need both, you will probably only need one of the two options, either the Lid style that opens from the top, OR the Front door style that opens from the front. Option A: LID ACCESS Step 13a: Place two 31 and two 24 1x4s flat on ground to form a rectangle. Place one of the 18x20 pieces of plywood on top of the 1x4s so that edges are flush. Secure 1x4s to plywood with 1 ¼ deck screws screwed through plywood. For extra support now attach a 24 1x4 directly centered to the under side of the lid. Guide lines drawn 3 1/2 from edge of plywood will help guide screw placement. Now attach the 18 ¼ 2x4 that is angle cut to fill the gap between the bottom of the lid and the top of the caddy using 1¼ deck screws. Repeat this step to make the other door. Step 14a: Attach the lids using the heavy duty hinges to the rear 62 2x4. The lids should be elevated by the extra 2x4 in the back and will have a slight slant to allow for rain runoff. Next, attach the chains to the inside of each front corner, and using eye screws and s-hooks, secure the chain inside to the 4x4 post with enough slack for the lid to stand open at about 90 degrees. Step 15a: Install latches and handles on lids. For additional strength substitute 1¼ deck screws for the smaller screws normally provided with hardware whenever possible. Snap hooks or other locking fasteners should be used to secure latches during use. Step 16a: If you have elected to use lids instead of doors, you need to create a front for the caddy. This can be done identically to Steps 4-6 using more 62 2x4s or you can use a 62 x 24 piece of ¾ plywood and trim to the exact dimensions of the caddy front. (Be careful to remove any overhanging edges!) From the outside, frame the plywood with 1x4 s and secure the center with another 1x4 brace. Attach front to 4x4 posts, floor and top frame with 3 deck screws. Option B: FRONT DOOR ACCESS Step 13b: Place the two 35¾ and two 18¼ 1x4s flat on the ground to form a rectangle. Place one of the pieces of plywood on top of the 1x4s so that the edges are flush. Secure 1x4s to plywood with 1¼ deck screws, screwed through plywood. Guidelines drawn 3½ from edge of plywood will help guide screw placement. Repeat this step for the other door. For extra support, attach a single 1x4 centered on the back side of each door. Step 14b: Use small wedges of wood or cardboard to center doors in openings and attach hinges and attach the fixed loop portions of latches to caddy using 1¼ deck screws whenever possible. There should be no more than a 1/8 gap in top and bottom and no more than a ¼ gap on sides of doors.
9 Step 15b: Install latches and handles on doors. For additional strength substitute 1¼ deck screws for the smaller screws normally provided with hardware whenever possible. Snap hooks or other locking fasteners should be used to secure latches during use. Step 16b: If you have elected to use doors instead of lids, you need to create a top for the caddy. Use a 70 x 32 piece of plywood and trim to the exact outer edge dimensions of the caddy top. (Remember- there should be NO overhanging lip for bears to grab!) Secure the plywood with a 24 2x4 in the center as a brace. Screw down to sides and back with 3 deck screws. INSTALLATION, FINISHING & USE Step 17: In dry areas, it can be installed with the floor of the caddy flush to the ground, and in wetter areas it can be installed with the bottom of the caddy 1 or 2 inches above ground level. Prop the caddy up on the legs and dig holes to the desired depth next to each 4x4 post. With at least two people, lower the caddy legs down into the holes. If bear pressure isn t excessive, simply repacking the dirt around legs should be sufficient. If there is heavy bear activity, you may want to add a quick setting concrete in holes to prevent tipping. Step 18: Pressure-treated wood should be allowed to cure for at least 30 days before painting. Afterwards, caddy can be painted, stained or allowed to weather naturally. Regularly wash the caddy and garbage cans with vinegar or bleach to reduce lingering odors and minimize bear attraction.
Total Quantity: IMPORTANT: Plans are to be used with 3 x6 Plexiglass (SKU #298-017).
.") # Materials: Quantity Each: 4x4x8 3 2x4x8 2 2x8x8 1 4x8x3/4 plywood 1 3 x6 corkboard (can be 18 of the 1 x1 pieces) 1 3 x6 plexiglass 1 8 door casing 3 Primer 1 qt. Total Quantity: TIPS FOR SUCCESSFUL
# Materials: Quantity Each: 4x4x8 3 2x4x8 2 2x8x8 1 4x8x3/4 plywood 1 3 x6 corkboard (can be 18 of the 1 x1 pieces) 1 3 x6 plexiglass 1 8 door casing 3 Primer 1 qt. Total Quantity: TIPS FOR SUCCESSFUL
Best Barns USA Assembly Book
 Best Barns USA Assembly Book Revised November 27, 2013 the Easton - R 12'x 20' Manufactured by Reynolds Building Systems, Inc. 205 Arlington Drive Greenville, PA 16125 724-646-3775 This manual is copyrighted.
SUPER SHED. Indoor shelter for your outdoor tools.
 SUPER SHED Indoor shelter for your outdoor tools. Not everyone needs a garden shed. But, if you've no more space on your garage wall for that new leaf rake, if you can't find your potting trowel because
COMPLIMENTARY WOODWORKING PLAN
 COMPLIMENTARY WOODWORKING PLAN Adirondack Chair This downloadable plan is copyrighted. Please do not share or redistribute this plan in any way. It has been created for Wilton Tools, a division of WMH
www.cornholesupplies.com
 www.cornholesupplies.com How To Build Regulation Cornhole Boards Home of the Original Cornhole Bags and Boards Supply List: 1-4' X 8' Piece of Plywood (pre sanded) 4-2" X 4" X 8' Studs (2 by 4s make sure
AMERICAN GOTHIC PLAYHOUSE
 AMERICAN GOTHIC PLAYHOUSE Project Plan #856 Sheet 1 of 5 Pick a spot and get started with the beautiful that your kids will love. The design of the playhouse includes 35 square feet of interior space plus
How to Build a Strawberry Pyramid Watch the how-to video here.
 How to Build a Strawberry Pyramid Watch the how-to video here. This simple, elegant strawberry pyramid can be built by a single person in just one afternoon. Cut the lumber yourself if you have some woodworking
INSTALLATION INSTRUCTIONS for Bifold Doors (JII103)
") Thank you for selecting JELD-WEN products. Attached are JELD-WEN s recommended installation instructions for premium composite, hollow and solid core molded Bifold Doors. Bifolds are designed for fast
Thank you for selecting JELD-WEN products. Attached are JELD-WEN s recommended installation instructions for premium composite, hollow and solid core molded Bifold Doors. Bifolds are designed for fast
Installing Window and Door Mouldings
 Installing Window and Door Mouldings About Window and Door Mouldings The trim around windows and doors greatly influences the look and style of your interior. They also bridge the gaps and cover spaces
DIY CABINET REFACING INSTALLATION GUIDE
 DIY CABINET REFACING INSTALLATION GUIDE CABINET REFACING INSTALLATION Are you ready to reface your outdated cabinets? This guide will show you how to install your new Facelifters Cabinet Refacing Products
Premier & Deluxe 3-Season Room Sliding Glass Door
 DTSSGD-11 Premier & Deluxe 3-Season Room Sliding Glass Door Installation Instructions Screen Door Seal Left Side Track Top Track Assembly Right Side Track Right Side Trim Sliding Glass Door Sliding Screen
2.9 WINDOW & DOOR BUCKS
 2.9 WINDOW & DOOR BUCKS Bucks provide attachment surfaces for windows and doors while holding back concrete from these openings during concrete placement. Mark the center and edges of openings as you place
How to Install UnderDeck The Original.
 How to Install UnderDeck The Original. TOOLS: Chalk Line Caulk Gun Garden hose or water bucket Gloves Hammer or Screw Gun Power Mitre Saw with OSB Blade Pencil Pliers Safety Glasses Straight Edge / Carpenter
Gate Leg Drop Leaf Table Plans
 Preparing the table top blanks: Cut and glue enough 3/4 stock to make three panels 40 long by 24 wide (they will be cut to final size at a later time). While the glue dries we will work on the legs. Preparing
Wood Projects Outdoors. Post Hole Specifications. Deck Span Tables. www.jon Eakes.com
 Wood Projects Outdoors Post Hole Specifications & Deck Span Tables www.jon Eakes.com Building Fences The depth of the fence posts into the ground must be at least one foot below the frost level for your
Owner's Manual & Assembly Instructions
 Owner's Manual & Assembly Instructions PM01 BASE KIT Model No. FDN1014 717090311 CAUTION: SOME PARTS HAVE SHARP EDGES. CARE MUST BE TAKEN WHEN HANDLING THE VARIOUS PIECES TO AVOID A MISHAP. FOR SAFETY
The JIG is UP Or A couple hours up front pays in the long run.
 Ed Simon Page 1 of 5 The JIG is UP Or A couple hours up front pays in the long run. A large part of the fun of beekeeping is the construction and assembly of the equipment. Since it is a hobby, I decided
HfHMD uses LP SmartSide siding and trim.
 HfHMD uses LP SmartSide siding and trim. These products are: More durable than cement fiber board. Much more volunteer-friendly to install. When installed correctly, have a 5/50- year pro-rated warranty.
How to Build a Poker Table
 How to Build a Poker Table www.pokertablematerials.com 10-Person Poker Table- 96 x 48 These are step by step instructions for building a poker table. The table will measure 48" x 96" and have a 4" wide
We urge you to read and follow the attached installation instructions. Failure to do so may void the warranty of this garden window unit.
 Important Information for New Construction Installations Attention Installer! We urge you to read and follow the attached installation instructions. Failure to do so may void the warranty of this garden
Installation Instructions
 READ BEFORE INSTALLING UNIT For Through-the-Wall Air Conditioners To avoid risk of personal injury, property damage, or product damage due to the weight of this device and sharp edges that may be exposed:
Ceiling Mounted Folding Attic Ladders Installation Instructions
 Ceiling Mounted Folding Attic Ladders Installation Instructions WARNING Before you start installing your new Louisville Ceiling Mounted Folding Attic Ladder, you must read and understand the following:
Installing Shutters using Fasteners
 Installing Shutters using Fasteners Electric drill, ¼" drill bit, 3 8" drill bit, hammer, and shutter fasteners. (¼" carbide drill bit is required for stucco, hardboard, fiber cement, brick or masonry.)
March 14, 2007. Installation of Bay, Bow and Garden Windows
 March 14, 2007 Re: Installation of Bay, Bow and Garden Windows Attached are the Atrium Companies, Inc recommendation for the installation of bay, bow and garden windows. These instructions were developed
FRAMED & MOUNTED TILE MURAL
 Page 1 of 5 There is no denying that tile murals have taken the sublimation industry by storm. The unique ability to take a customer s artwork or high resolution photograph, tile it using your software
Building an Off-Center Fixture for Turning Pendants
 Building an Off-Center Fixture for Turning Pendants Turning a pendant off-center with most available metal pendant chucks means that you will have a significant amount of mass off center, which will limit
PANELIZED HOME INSTALLATION GUIDELINE
 PANELIZED HOME INSTALLATION GUIDELINE A typical home package will be constructed of Snap-N-Lock Insulated Panels clad with steel skins. 4" panels will be used for the walls, and 6" panels for the roof.
Free 12 x 8 Shed Plan With Illustrations, Blueprints & Step By Step Details
 Free 12 x 8 Shed Plan With Illustrations, Blueprints & Step By Step Details Brought To You By: MyShedPlans Click Here To Download 12,000 Shed Plans >> 12 x 8 Basic Shed This 8 12-ft. shed features a simple
BUILD A CARPORT. 2 - Planning the carport. 3 - Designing the carport
 BUILD A CARPORT You only need basic DIY and woodworking skills to build a carport. The most important part of the job is setting the supporting posts truly vertical - a job for which another pair of hands
How to Build Your Own CornHole Game
 How to Build Your Own CornHole Game DIMENSIONS Here is a diagram with the basic measurements for the Cornhole board game. SUPPLIES 1/2 thick sheet of plywood one 4 x4 or two 2 x4 s 8 long 2 4 s (4) 4 1/2
DE Frame with C Series Sidelight
 TOOLS REQUIRED Tape measure 6' magnetic level 3' magnetic level Screw gun with clutch adjusted #2 phillips tip #3 phillips tip Screwdriver (used to adjust frame on will using oval slots) Pry Bar Powder
REDI-EXIT COMMERCIAL FIRE DOOR AND EXTERIOR DOOR KITS INSTALLATION GUIDELINES
 REDI-EXIT COMMERCIAL FIRE DOOR AND EXTERIOR DOOR KITS INSTALLATION GUIDELINES Tools Required Tape Measure Hammer Slotted Screw Driver #2 & #3 Philips Screw Driver 3-4 Foot Level 12 Pry Bar Cold Chisel
Easy Six Cube Bookshelf. Copyrighted Material. Page 1
 Compare to: Land of Nod Cube Collection, 6 Cube Bookshelf Skill Level: Beginner Easy Six Cube Bookshelf I love the storage cubes in kids rooms because they give you an opportunity to have your children
Wren Kitchens Installation Tips... 3. Carefully check your kitchen delivery... 4. Measuring out and marking up... 5. Fitting the base cabinets...
 tra 1 Index Wren Kitchens Installation Tips... 3 Carefully check your kitchen delivery... 4 Measuring out and marking up... 5 Fitting the base cabinets... 6 Fitting the corner cabinets... 7 The 972mm or
Sun Windows General Information Sun New Construction Window Installation Instructions
 Sun Windows General Information Section 1 G F H H H A. Apply Weather Resistive Barrier B. Apply Sill Flashing Tape C. Place Waterproof Sill Shims D. Caulk Back of Nail Fin Sides & Top, Set Window, Fasten
Sliding Door Hardware Installation Instructions
 Sliding Door Hardware Installation Instructions Installation Instructions Structural Information For standard systems and most custom single door opening systems. General Overview ff All Krown Lab sliding
The tablesaw may be your shop s most valuable cutting. Crosscut Sleds. Foolproof. Innovative approach guarantees perfect results
 Foolproof Crosscut Sleds Innovative approach guarantees perfect results B Y A L A N T U R N E R The tablesaw may be your shop s most valuable cutting tool, but for precise, repeatable crosscuts it needs
HOW TO INSTALL A BEAUTIFUL NEW KITCHEN
 HOW TO INSTALL A BEAUTIFUL NEW KITCHEN Easy to follow step-by-step kitchen cabinet installation TOOL AND MATERIAL LIST Hammer Pry bar Screwdriver Phillips Flathead Level Tape measure Pencil Straight edge
DECKING INSTALLATION, CARE & MAINTENANCE INSTRUCTIONS. 866.729.2378 MOISTURESHIELD.COM limited lifetime warranty 866.729.2378 WWW.MOISTURESHIELD.
 DECKING INSTALLATION, CARE & MAINTENANCE INSTRUCTIONS 866.729.2378 MOISTURESHIELD.COM limited lifetime warranty Welcome To The Even Greater Outdoors. Congratulations on choosing MoistureShield for your
Sliding Barn Door Hardware Installation Instructions BALDUR and ODEN
 Sliding Barn Door Hardware Installation Instructions BALDUR and ODEN Installation Instructions Structural Information For standard systems and most custom single door opening systems. General Overview
Pole Lathe and Shave Horse Design
 Pole Lathe and Shave Horse Design These pictures and accompanying words are Copyright Michael Hughes February 2002. They are not to be re-produced, in part or whole, without permission from the author.
SAMPLE INSTRUCTIONS. Best Barns USA Assembly Book. the Denver. 12'x 12' or 12'x16' Revised November 29, 2010
 Best Barns USA Assembly Book Revised November 29, 2010 SAMPLE INSTRUCTIONS the Denver 12'x 12' or 12'x16' Manufactured by Reynolds Building Systems, Inc. 205 Arlington Drive Greenville, PA 16125 724-646-3775
Seven. Easy Steps. Your Own Walkway, Without Mortar. or Concrete. to Installing. Driveway and Patio
 Seven Easy Steps to Installing Your Own Walkway, Driveway and Patio Without Mortar or Concrete Brick is one of the world s oldest and most enduring building materials. Those same qualities also make it
Owner's Manual & Assembly Instructions
 Owner's Manual & Assembly Instructions BO01 PATIO COVER/CARPORT Model No. PC1010 Attached 705220511 Missing Parts, Questions on Assembly? Call: 1-800-851-1085 or assist@arrowsheds.com Do not return to
Unlike a porch, which is protected by a roof,
 Rehabbing a Rotted 34 Professional Deck Builder January/February 2013 Porch Stair A template helps to fit the bottom tread neatly around the posts by Emanuel Silva Unlike a porch, which is protected by
HALE PET DOOR INSTALLATION INSTRUCTIONS HALE STANDARD PANEL MODEL
 HALE PET DOOR INSTALLATION INSTRUCTIONS HALE STANDARD PANEL MODEL Please read these instructions carefully and completely before attempting to install Hale Pet Doors; they will guide you through the steps
How to Build an Elevated Square Foot Garden
 How to Build an Elevated Square Foot Garden Thralls, Edmund L., Extension Faculty, Urban Horticulture Fact Sheet Horticulture - 010 Tools: The Institute of Food and Agricultural Sciences (IFAS) is an Equal
How to Install Hardwood Flooring Over a Sub Floor
 How to Install Hardwood Flooring Over a Sub Floor Installation Preparation Instructions Read the entire instructions before starting your project. 1) INSPECT EACH PLANK (see fig. a) Wood is a natural product
BUILDINGA 1/10 SCALE FLATBED TRAILER
 VOLUME 1, ISSUE 1 BUILDINGA 1/10 SCALE FLATBED TRAILER BUILT, DESIGNED & WRITTEN BY NATHAN MYERS MATERIALS: FEATURES: While the design was kept simple to allow anyone to be able to build their own trailer,
Base Cabinet with Self-storing Folding Doors and Floor
 Usable Kitchens When designing a kitchen for use by persons with mobility impairments, especially those who use wheelchairs, careful layout of the kitchen is crucial to maintaining accessibility. People
Making Wooden Hinges
 Making Wooden Hinges By Alex Reid - www.mokkou.jp Materials and tools used - 3.2mm straight router bit - 1/8 round-over router bit - Flush-cut straight bit (with bearing on bottom) - Finger-joint jig -
Herringbone Pattern Flooring
 Herringbone Pattern Flooring If it s not marked NOFMA, it s not certified. Handling, Storage, Installation and Tips Herringbone is generally manufactured from 3/4 x 2 ¼ or ¾ x 1-1/2 standard tongue & groove
DIRECTIONS FOR ASSEMBLING BASE & WALL CABINETS
 DIRECTIONS FOR ASSEMBLING BASE & WALL CABINETS TheRTAStore.com STEP 1: CLEAR A WORK SPACE Place your RTA cabinet panels on a smooth, scratch resistant surface in a large, open area. (Some people like to
CONFER ABOVE GROUND CURVE STEP / ABOVE GROUND CURVE STEP SYSTEM ASSEMBLY AND INSTALLATION MANUAL
 SAVE THESE INSTRUCTIONS DEALER/INSTALLER: GIVE TO HOMEOWNER CONFER ABOVE GROUND CURVE STEP / ABOVE GROUND CURVE STEP SYSTEM ASSEMBLY AND INSTALLATION MANUAL Model CCX-AG Note: 40 lbs. of sand required!
Owner's Manual & Assembly Instructions
 Owner's Manual & Assembly Instructions BL01 PATIO COVER/CARPORT Model No. PC1020 Attached 705120511 Missing Parts, Questions on Assembly? Call: 1-800-851-1085 or assist@arrowsheds.com Do not return to
Protecting Your Home From Hurricane Wind Damage
 T H E W I N D Protecting Your Home From Hurricane Wind Damage During a hurricane, homes may be damaged or destroyed by high winds and high waves. Debris can break windows and doors, allowing high winds
Happily PHOTOGRAPHY BY MICHAEL ANDERSON AND LARRY OKREND
 Ever Happily Rafter 18 HANDY APRIL/MAY 2012 PHOTOGRAPHY BY MICHAEL ANDERSON AND LARRY OKREND An easy-tobuild hip roof makes this gazebo a doable project for any DIYer BY JENNY STANLEY Figuring out precise
KITCHENS. Tip PAGE 1 FITTING YOUR KITCHEN GUIDE. How to mark out a kitchen. Tools required for installing a kitchen STEP ONE STEP TWO STEP THREE
 FITTING YOUR KITCHEN GUIDE How to mark out a kitchen PAGE 1 Before starting on the installation, measure 870mm from the lowest point of the floor and mark a datum line around the room to indicate where
Assembly Instructions Basic Folding-Leg Box Frame Style
 Assembly Instructions Basic Folding-Leg Box Frame Style Basic Folding Leg Cornhole Board Concept 1 2 12 3 1 2 3 15 16 4 1 4 52 9 R1 3 4 6 21 48 12 1 4 Bolt Washer 9 13 16 35 Washer Double Nut CornholePlayers.net
INSTALLATION OF A BAY WINDOW
 INSTALLATION OF A BAY WINDOW Installation of a Bay Window These instructions relate to the replacement of an existing bay window or replacement of a straight window with a new bay window, in an opening
Lightweight, Heavy Duty
 Lightweight, Heavy Duty Trench Covers System Reliability The light weight combined with the tremendous strength of Comcore Trench Covers translates into speed, productivity and increased system reliability.
REDWOOD. Adirondack Chair. Naturally beautiful Easy to use Practical and economical Durable and stable Resistant to decay and insects
 B U I L D I T W I T H REDWOOD Adirondack Chair R E D W O O D Naturally beautiful Easy to use Practical and economical Durable and stable Resistant to decay and insects Adirondack Chair BUILD THE CHAIR
K2 STONE NATURAL VENEER
 INTRODUCTION WHAT IS K2 NATURAL THINSTONE VENEER? Natural K2 Stone veneer is real stone, cut 1 inch thick, making it light enough to be installed as a veneer. Sometimes referred to as thin veneer, thin
Here is your set of Detailed Plans from Copyright 2004 All Rights Reserved
 Here is your set of Detailed Plans from Copyright 2004 All Rights Reserved Materials for the House Here is the list of materials you will need to construct the basic house then to cover it with roofing
Basement Window Installation Guide Hopper and Sliding
 Basement Window Installation Guide Hopper and Sliding americancraftsmanwindows.com Project Requirements: Installation must comply with all applicable building codes. Existing window frame, wall and weatherresistant
LIFE SCIENCE. Hoop House Construction for New Mexico: 12-ft. x 40-ft. Hoop House BRINGING TO YOUR HOME ECONOMICS COLLEGE OF AGRICULTURE AND
 Hoop House Construction for New Mexico: 12-ft. x 40-ft. Hoop House COLLEGE OF AGRICULTURE AND HOME ECONOMICS BRINGING SCIENCE TO YOUR LIFE Hoop House Construction for New Mexico: 12-ft. x 40-ft. Hoop House
Heavy Glass Frameless Shower Door With Return Panel
 202 Anderson Ave., elvue, KS 66407 Phone: 800-669-9867 Fax: 800-393-6699 www.onyxcollection.com Heavy Glass Frameless Shower Door With Return Panel Full Showers with Return ench Seat with Return FRLSDRPL-0116
International Greenhouse Company
 Greenhouse Foundation Design As with any building, a good solid foundation is crucial for the long term durability and functionality of your greenhouse. A weak foundation will cause your greenhouse to
Installation Instructions Double-Hung, Single-Hung, Casement, Awning, Sliding, Picture & Shapes Non-Impact & Impact Resistant Nailing Fin Windows
 Installation Instructions Double-Hung, Single-Hung, Casement, Awning, Sliding, Picture & Shapes Non-Impact & Impact Resistant Nailing Fin Windows americancraftsmanwindows.com Project Requirements: Read
Vinyl Brick Mould Field Installation Instructions All Vinyl and Vinyl Clad Windows
 Vinyl Brick Mould Field Installation Instructions All Vinyl and Vinyl Clad Windows Viewed from the exterior. IMPORTANT: Please read before you begin installation. TABLE OF CONTENTS AND TOOL / MATERIAL
Replacement Window Installation Guide Non-Impact & Impact Resistant Windows without Nailing Fin
 Replacement Window Installation Guide Non-Impact & Impact Resistant Windows without Nailing Fin americancraftsmanwindows.com Project Requirements: Failure to follow these instructions may void product
AZEK Rail Install Guide
 TRIM MOULDING DECK PORCH RAIL PAVERS AZEK Rail Install Guide Installing AZEK Rail with CableRail by Feeney... 1 Installing CableRail by Feeney for AZEK Rail... 7 Installing AZEK Rail Stairs with CableRail
Chelsea Loft Bed WARNING:
 Chelsea Loft Bed WARNING: Failure to follow these warnings and assembly instructions could result in serious injury or death. Read all instructions before assembling bunk bed. KEEP INSTRUCTIONS FOR FUTURE
By SP Partners, LLC. www.rainbowatticstair.com INSTALLATION GUIDE. Prestige
 By SP Partners, LLC www.rainbowatticstair.com INSTALLATION GUIDE Prestige IMPORTANT READ THIS FIRST Inspect stair for any damage prior to installation. Stair is NOT to be installed while home is under
Cedar Cottage Doghouse Plans
 Overlapping cedar shingles add an element of charm to this medium size doghouse. The walls, floor, and trim are constructed of solid cedar, making it naturally weather resistant and provides excellent
Protecting Your Home from Wind Damage
 Protecting Your Home from Wind Damage During severe thunderstorms or hurricanes, homes may be damaged or destroyed by high winds. Debris flying through the air can break windows and doors, allowing high
RadianceRail Installation Guide
 RadianceRail Installation Guide Installing RadianceRail with CableRail by Feeney... 2 Installing CableRail by Feeney for RadianceRail... 7 Installing RadianceRail Stairs with CableRail by Feeney... 10
WHI 90-Minute Rated Veneered Door Frame Installation Instructions
 No. 940-03-10 INSTALLATION INSTRUCTIONS 90 MINUTE RATED VENEERED DOOR FRAME DOOR REQUIREMENTS: Consult the door manufacturer to make sure that the doors are qualified for the hardware to be installed,
ETL listed for installations within 5 ft. (1.5M) of outer edge of water www.srsmith.com 79-15152-00 Rev E2 9.14 Page 1 of 10
 of outer edge of water www.srsmith.com 79-15152-00 Rev E2 9.14 Page 1 of 10") Color Light Streams Large Laminar Installation Manual (CLSLL) Input Power: Total Power: 12V AC 5W 4008814 ETL listed for installations within 5 ft. (1.5M) of outer edge of water 79-15152-00 Rev E2 9.14
Color Light Streams Large Laminar Installation Manual (CLSLL) Input Power: Total Power: 12V AC 5W 4008814 ETL listed for installations within 5 ft. (1.5M) of outer edge of water 79-15152-00 Rev E2 9.14
Chapter 3 Installing Over-the-Post Railing on an L-Shaped Stair
 49 Chapter 3 Installing Over-the-Post Railing on an L-Shaped Stair In this chapter: The Over-the-Post Balustrade System Determining the Rail Centerline Using Rail Bolts Making a Pitch Block Laying Out
These instructions will show you how to install an internal door into a non-loadbearing partition wall. The instructions are split into three parts.
 No 8 in the series of 'How to' brochures produced by PlaceMakers, New Zealand How to Frame and Hang a Door These instructions will show you how to install an internal door into a non-loadbearing partition
Residential Deck Safety, Construction, and Repair
 Juneau Permit Center, 4 th Floor Marine View Center, (907)586-0770 This handout is designed to help you build your deck to comply with the 2006 International Residential Building code as modified by the
STANDARD REQUIREMENTS FOR BONDING OR MECHANICAL ATTACHMENT OF INSULATION PANELS AND MECHANICAL ATTACHMENT OF ANCHOR AND/OR BASE SHEETS TO SUBSTRATES
 ROOFING APPLICATION STANDARD (RAS) No. 117 STANDARD REQUIREMENTS FOR BONDING OR MECHANICAL ATTACHMENT OF INSULATION PANELS AND MECHANICAL ATTACHMENT OF ANCHOR AND/OR BASE SHEETS TO SUBSTRATES Scope 1.1.
FTC 2015-2016 DIY Mountain Build Guide
 FTC 2015-2016 DIY Mountain Build Guide Assembly Instructions Check out the DIY2015-2016 Prints and BoM for individual part details. Release 1.0 9/10/15 Page 1 This guide and Bill of Materials are for constructing
INSTALLATION RECOMMENDATIONS. Outdoor Rubber Tiles
 INSTALLATION RECOMMENDATIONS Outdoor Rubber Tiles Prior to Installation: The Outdoor Rubber Tiles and accessory transition pieces intended for this installation have been shipped to you via a freight carrier
How to secure your property after a disaster
 How to secure your property after a disaster The Red Guide to Recovery HOuse secured properly Board-Up of Windows, Doors and Roof Hole. Lot secured with Perimeter Fencing. Fires, floods, tornadoes, hurricanes,
FLAT ROOF CARPORT RECOMMENDED INSTRUCTION MANUAL
 FLAT ROOF CARPORT RECOMMENDED INSTRUCTION MANUAL Table of Contents Introduction... 2 Components... 3 Step 1 Marking out the Perimeter of the Carport... 3 Step 2a Footing Set-Out for Concrete Block Pad
CHARISMA SHOWER/TUB DOOR INSTALLATION INSTRUCTIONS
 CHARISMA SHOWER/TUB DOOR INSTALLATION INSTRUCTIONS IMPORTANT DreamLine reserves the right to alter, modify or redesign products at any time without prior notice. For the latest up-to-date technical drawings,
3. Choose between an easy table (24 inches wide) and a hard table (20 inches wide).
 and a hard table (20 inches wide).") Ultra Carpetball Plans Version 2.0 The Best (And Only) Free Carpetball Plans On The Web By Matthew Campbell Instructions: 1. Read these instructions all the way through and look at all the diagrams before
Ultra Carpetball Plans Version 2.0 The Best (And Only) Free Carpetball Plans On The Web By Matthew Campbell Instructions: 1. Read these instructions all the way through and look at all the diagrams before
Framing a Crawl-Space Foundation These timesaving tips make short work of setting sills, posts and girders
 Framing a Crawl-Space Foundation These timesaving tips make short work of setting sills, posts and girders by Larry Haun There is no "best" foundation. Depending on what part of the country you live in,
Rating when used as a weight carrying hitch without spring bars:
 BOLT-TOGETHER WEIGHT DISTRIBUTING HITCH SYSTEM Rating when used as a weight distributing hitch with spring bars: Part Number 48051 4805 48053 48054 Max Tongue Weight 550 Ibs. 750 Ibs. 1000 Ibs. 1400 lbs.
The WANZ Guide to Window Installation
 The WANZ Guide to Window Installation as described in E2/AS1 Amendment 5 Ver. 1.1 Page 2 of 74 Contents Overview Page 5 Objective Page 5 Scope Page 5 Opening Preparation Page 7 Step P1 Preliminary Check
Installation Instructions
 Installation Instructions READ BEFORE INSTALLING UNIT For Low Profile Window Air Conditioner INSTALLATION WARNINGS AND CAUTION Carefully read the installation manual before beginning. Follow each step
KITCHEN INSTALLATION GUIDE
 KITCHEN INSTALLATION GUIDE The step-by-step guide to installing your new kitchen right The materials and tools you ll need This brochure is your guide to preparing and installing your new kitchen. Inside
Ladder Shelf Plans Final dimensions: 25 L x 21 W x 72 H
 Ladder Shelf Plans Final dimensions: 25 L x 21 W x 72 H Copyright 2011. MLCS Woodworking. Page 1 Router bits and supplies needed: 3/8 Rabbeting bit (#10691) 1 Bottom Cleaning bit (#7941) Top and Bottom
Trundle Bed Plans (For Use Under Twin or Full-Size Standard Length Beds)
") Bunk Beds Unlimited Trundle Bed Plans (For Use Under Twin or Full-Size Standard Length Beds) On the following pages we have included all of the necessary drawings and requirements for a Modified twin-size
Bunk Beds Unlimited Trundle Bed Plans (For Use Under Twin or Full-Size Standard Length Beds) On the following pages we have included all of the necessary drawings and requirements for a Modified twin-size
Installation Instructions
 READ BEFORE INSTALLING UNIT For Slider Casement Air Conditioners To avoid risk of personal injury, property damage, or product damage due to the weight of this device and sharp edges that may be exposed:
Children s Furniture Projects
 This is an excerpt from the book Children s Furniture Projects by Jeff Miller Copyright 2002 by The Taunton Press www.taunton.com CHILD S ROCKER KIDS ARE ALWAYS IN MOTION. It s not easy to get them even
How to Install GoBoard:
 How to Install GoBoard: A Step-by-Step Guide Durable, Ultra-Lightweight, Waterproof Tile Backer Board Introducing GoBoard Every tiling project requires a durable, waterproof surface under the tile, called
Wine Rack & Glass Storage Bench Chris Gardner
 Wine Rack & Glass Storage Bench Chris Gardner Quantity Length Width Material Part 2 48 16 3/4 birch plywood top, bottom 2 14 16 3/4 birch plywood sides 2 14 13 3/4 birch plywood support dividers 2 3 15