Salter Industries Wood Spiral Stair Installation
|
|
|
- Winifred Boyd
- 7 years ago
- Views:
Transcription
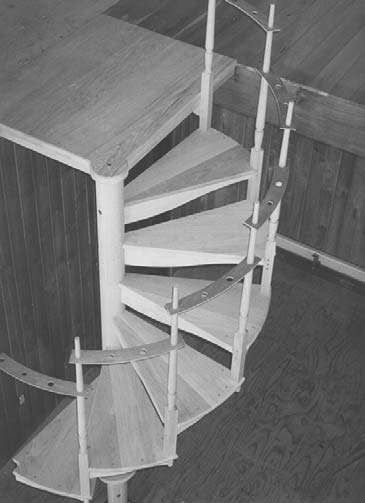
1 Salter Industries Wood Spiral Stair Installation Thank you for choosing Salter Industries as your spiral stair supplier. fter reading the instructions, if you have any questions please call us at WRNING - Oak Handling and Finishing When you receive the stair, it is very important to store the components in a dry and stable environment. o not locate the stair in an area where a gas or propane heater will create excessive heat or an extremely dry environment. Salters cannot guarantee against checking in these conditions. Unfinished treads and handrails on the job site for more than one week absorb moisture from the air. They must be sealed. Plastering, tile work, cement or brickwork introduce enough water into the air for the wood to react unfavorably.. Sand all wood surfaces before applying any stain or polyurethane. Nearly 100% of tread and handrail finishing problems occur because little or no final sanding is done at the job site prior to application of stain or polyurethane. Treads rub together or against surfaces during handling and transportation. This creates shiny spots, which will not absorb finishing material evenly. Wood can absorb moisture, raising the grain and ruining any finish applied without being sanded.. Sand all wood surfaces with 100 to 220 grit.. pply a stain if you want the color of the wood other than a natural finish.. Three coats of sealer must be applied to all surfaces of the wood. Inadequate finishing of all six sides of a tread including the bottom will permit the absorption of moisture. IMPORTNT NOTE: heck with your paint specialty dealer for complete finishing instructions. Things to know before you start. Spiral stairs are assembled from the top down.. ll the treads are the same.. o not walk on the stair until all the treads and balusters are installed.. The stair was built to be installed the way it was ordered. efore you start, review and understand the original layout. The stair is not reversible.

 Group 2. Primary aluster.. enter aluster.. Well Enclosure or Platform aluster.. Newel Post that extends the center column above the platform. Group 3.")

2 Tips: For the top tread assembly. Keep the bolt centered to the hole in the column.. Inspect the seam between the tread and the column.. Measure the riser height between the platform and the tread top. o this at both ends of the tread; they should be the same.. Once again it is extremely important to be certain that the top baluster is plumb prior to making your final connection to the platform. E. ll balusters are connected to the tread with three 3 wood screws. pilot hole will need to be made for each wood screw installed. Group 1. aluster spacing tool.. rilling template.. Steel baluster tips. ( jig ) Group 2. Primary aluster.. enter aluster.. Well Enclosure or Platform aluster.. Newel Post that extends the center column above the platform. Group 3. ombination bolt to connect the platform to the center column.. x 5 bolt to connect the tread to the center column.. 3/8 x 5 lag screw to connect the platform to your top framing.. 3/8 x 2 lag screw to connect the steel base plate to the floor. E. # 12 wood screw to connect the steel base plate to the bottom of the column. F. ombination screw to connect the center balusters to the tread. G. 3 wood screw to connect the baluster to a tread. H. Square drive bit to install 3 wood screws. I. ounter sink & drill bit to make the proper pilot & counter sink for the 3 screws. J. drill bit to drill the holes to install the handrail to the balusters. E F G H I J


 4.")
3 STEP 1. Getting Started 1. Organize the treads, balusters, hardware and other components into matching piles. 2. The primary baluster has a machine screw, which has been factory installed in the bottom of the baluster. () 3. Screw the primary balusters into the corner of each tread. This connection should be hand tight as possible. The baluster should be square to the front and side of the tread. () 4. Repeat this to all the treads. 5. Slide the large hole of the baluster spacing tool over the baluster. () 6. Repeat this to all the treads. () Note: The baluster spacing tool will need to curve the same direction as the stair.

 3.")


4 STEP 2. Prepare the center column and platform 1. Screw the steel base plate to the center column with the two #12 wood screws supplied. () 2. Slide the wood base plate cover over the center column. () 3. Working on the floor, attach the center column to the platform with the combination screw. ( & ) Note: The screw should be left loose enough so that the column can still rotate. 4. Stand the center column and platform up into the desired location and attach the platform with the 3/8 x 5 lag screws. (E) Note: The platform must be level and flush with your finished floor. If the platform is not level in both directions it will affect the plumb of your first baluster. E
 o not cross the threads of the bolt. 3. Tighten the bolt so it is snug not tight. 4.")
 6. Plumb the center column. () 7.")


5 STEP 3. Installing the top tread 1. Lift the tread up to the center column. 2. Line up the bolt and tread. () o not cross the threads of the bolt. 3. Tighten the bolt so it is snug not tight. 4. Inspect the seam between the tread and center column. 5. Rotate the column so the top baluster rests against the platform. () 6. Plumb the center column. () 7. heck that the tread is level in two directions. () 8. heck that the riser height is the same on both sides of the tread. 9. Verify that the baluster is plumb and against the platform. 10. rill one pilot hole and countersink through the baluster and into the center of the platform edge. onnect the top baluster with one 3 wood screw into the platform. () 11. ttach the center column base plate to the floor with the four lag screws supplied. (E) over with wood base plate cover. (F) 12. rill and countersink two additional holes to connect the top baluster to the platform support. (G) 13. Tighten the top column combination screw and drive the three additional wood screws into the top platform. (H) 14. Tighten the center column bolt so it is a solid connection. E F


 8. heck that the riser height is the same on both sides of the tread. () 9.")
 Note: lways loosely tighten the tread bolt, then connect the baluster to the tread and go back and tighten the center column bolt last.")
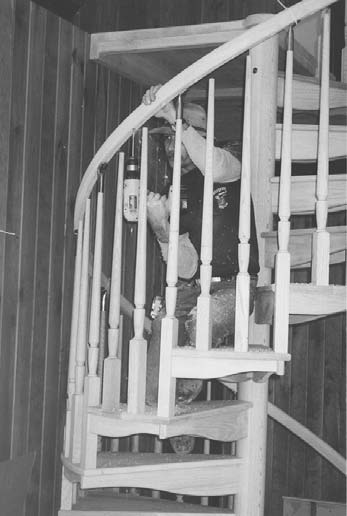
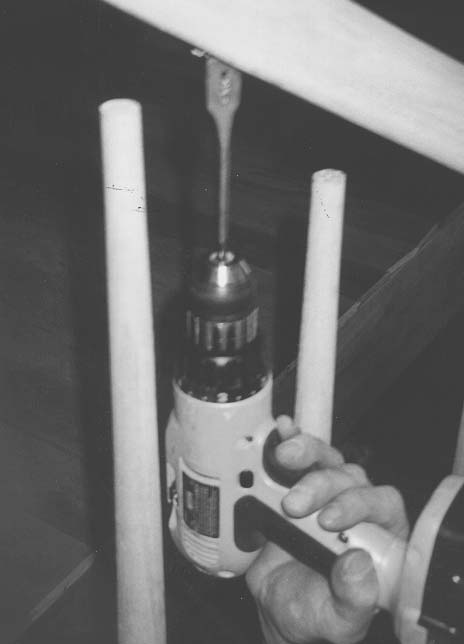
6 G H Note: lways loosely tighten the tread bolt, then connect the baluster to the tread and go back and tighten the center column bolt last. Note: It is extremely important not to cross the threads when you start bolting the tread to the column. STEP 4. Installing the treads 1. Lift the tread up to the center column. 2. Slide the baluster through the spacing tool of the upper tread. () 3. Line up the bolt and tread. o not cross the threads of the bolt. 4. Tighten the bolt so it is snug not tight. 5. Inspect the seam between the tread and center column. 6. Inspect the baluster to see if it is square to the tread above. You may need to rotate the baluster so it will be a tight seam. 7. heck that the tread is level in two directions. () 8. heck that the riser height is the same on both sides of the tread. () 9. Mark your holes, drill and countersink the top hole and drive your first screw. ( & ) Note: lways loosely tighten the tread bolt, then connect the baluster to the tread and go back and tighten the center column bolt last. Note: It is extremely important not to cross the threads when you start bolting the tread to the column. 10. Once again check the tread for level. rill and countersink for the remaining two screws. (E) 11. Tighten the column bolt so it is a solid connection. 12. ontinue this procedure for all the treads. (F & G) E


7 STEP 4. Installing the tread (continued from previous page) E F G


 8.")
8 STEP 5. Installing the bottom baluster 1. Measure from the top of a primary baluster down to the top of the tread. () This dimension will be about Mark a baluster to that length. () 3. Measure from the top of the bottom tread to the top of the finished floor. 4. Subtract the thickness of the bottom baluster bracket. 5. ut the baluster to length. 6. onnect the bottom baluster bracket to the baluster. () 7. onnect the baluster to the tread with one screw. () 8. Plumb the baluster and connect the baluster to the floor with two wood screws. () 9. Install two more wood screws into the tread. ()


9 STEP 6. Installing center balusters 1. You may have 1, 2 or 3 center balusters and each one will be a different length. The balusters have been factory prepared to your specifications. 2. Screw the balusters into the treads hand tight. 3. Keep the baluster spacing tool in place. ()
 3. Place the handrail on top of the steel tips and hold the rail in place with the plastic ties supplied.")
 5. Remove the handrail from the stair. 6.")
10 STEP 7. Installing the handrail 1. The wooden handrail has a rounded side and a flat side. Using a combination square, mark a centerline on the flat side the entire length of the rail. () 2. Place all the steel baluster jigs over the balusters. () 3. Place the handrail on top of the steel tips and hold the rail in place with the plastic ties supplied. The handrail is sent longer then needed, so keep an equal amount of handrail at the top and bottom. Use one tie on every other baluster to hold the rail in place. () 4. Mark the top of the steel baluster tip. Some baluster tips may need to be raised up to the handrail to get an accurate mark. Keep the tip plumb. () 5. Remove the handrail from the stair. 6. Remove all the steel baluster jigs. 7. Remove all the baluster spacing tools. 8. Place steel baluster tips on the primary balusters. (E) 9. Place the handrail back on to the stair with the plastic ties. 10. Keep your marks between the balusters so you can drill the handrail between the balusters. (F & G) 11. rill all the holes about 1 deep. (H) 12. Remove the handrail and jigs. 13. Working from the top down, line up the holes to the balusters and work them into place. (I) 14. With a piece of scrap wood and a hammer you will need to hammer the rail down onto the balusters. 15. Using a brad nailer or trim screws attach the handrail to the baluster. 16. Plumb cut and sand the handrail to its final length.


11 STEP 7. Installing the handrail (continued from previous page) E F G


12 STEP 7. Installing the handrail (continued from previous page) H I J K
Chapter 3 Installing Over-the-Post Railing on an L-Shaped Stair
 49 Chapter 3 Installing Over-the-Post Railing on an L-Shaped Stair In this chapter: The Over-the-Post Balustrade System Determining the Rail Centerline Using Rail Bolts Making a Pitch Block Laying Out
How to Build a Poker Table
 How to Build a Poker Table www.pokertablematerials.com 10-Person Poker Table- 96 x 48 These are step by step instructions for building a poker table. The table will measure 48" x 96" and have a 4" wide
RadianceRail Installation Guide
 RadianceRail Installation Guide Installing RadianceRail with CableRail by Feeney... 2 Installing CableRail by Feeney for RadianceRail... 7 Installing RadianceRail Stairs with CableRail by Feeney... 10
AZEK Rail Install Guide
 TRIM MOULDING DECK PORCH RAIL PAVERS AZEK Rail Install Guide Installing AZEK Rail with CableRail by Feeney... 1 Installing CableRail by Feeney for AZEK Rail... 7 Installing AZEK Rail Stairs with CableRail
Stair Parts Installation. Tricks
 Stair Parts Installation Tips & Tricks Introduction Your DIY staircase guide Welcome to the Stairpart home installation guide. Your stairway is both a functional and focal point in your home, so keeping
DIY CABINET REFACING INSTALLATION GUIDE
 DIY CABINET REFACING INSTALLATION GUIDE CABINET REFACING INSTALLATION Are you ready to reface your outdated cabinets? This guide will show you how to install your new Facelifters Cabinet Refacing Products
www.cornholesupplies.com
 www.cornholesupplies.com How To Build Regulation Cornhole Boards Home of the Original Cornhole Bags and Boards Supply List: 1-4' X 8' Piece of Plywood (pre sanded) 4-2" X 4" X 8' Studs (2 by 4s make sure
Part #20195 WORKBENCH BRACKET SYSTEM INSTRUCTIONS
 Part #20195 WORKNH RKT SYSTM INSTRUTIONS The astwood Workbench rackets are fabricated from 3/16" thick, high strength steel and are designed to be used with wood or steel legs and framing members. Precision
SPIRAL STAIR KIT INSTALLATION MANUAL
 SPIRAL STAIR KIT INSTALLATION MANUAL Effective January 1, 2014 If you have any questions, please call the location that your Stair Kit was purchased from: Broomall, Pennsylvania 1-800-52-7427 Ontario,
HOW TO INSTALL A BEAUTIFUL NEW KITCHEN
 HOW TO INSTALL A BEAUTIFUL NEW KITCHEN Easy to follow step-by-step kitchen cabinet installation TOOL AND MATERIAL LIST Hammer Pry bar Screwdriver Phillips Flathead Level Tape measure Pencil Straight edge
COMPLIMENTARY WOODWORKING PLAN
 COMPLIMENTARY WOODWORKING PLAN Adirondack Chair This downloadable plan is copyrighted. Please do not share or redistribute this plan in any way. It has been created for Wilton Tools, a division of WMH
INSTALLATION INSTRUCTIONS for Bifold Doors (JII103)
") Thank you for selecting JELD-WEN products. Attached are JELD-WEN s recommended installation instructions for premium composite, hollow and solid core molded Bifold Doors. Bifolds are designed for fast
Thank you for selecting JELD-WEN products. Attached are JELD-WEN s recommended installation instructions for premium composite, hollow and solid core molded Bifold Doors. Bifolds are designed for fast
Active and Passive Sash Replacement
 for Andersen Gliding Windows Read all instructions carefully before attempting this procedure. If you have any questions about your ability to complete the procedure, call Andersen at 1-888-888-7020 for
Guidelines for Earthquake Bracing Residential Water Heaters
 Guidelines for Earthquake Bracing Residential Water Heaters Department of General Services Division of the State Architect In accordance with the Health and Safety Code Section 19215, the Division of the
Black Wolf POCKET BILLIARD TABLE INSTALLATION MANUAL. SERVICE DEPARTMENT P.O. BOX 68 BRISTOL, WI 53104
 Black Wolf TM POCKET BILLIARD TABLE INSTALLATION MANUAL www.brunswickbilliards.com SERVICE DEPARTMENT P.O. BOX 68 BRISTOL, WI 53104 51-905710-000 SEPTEMBER 2010 NOTE: Please use the instructions in this
NATURAL RAILING INSTALLATION INSTRUCTIONS
 NTURL RILING INSTLLTION INSTRUCTIONS Manufactured by fiberondecking.com 800.573.8841 FI-0217-PKG 5/14 Natural Railing Installation Instructions Natural Top Rail Profile Required Tools and Supplies: Power
How to Build Your Own CornHole Game
 How to Build Your Own CornHole Game DIMENSIONS Here is a diagram with the basic measurements for the Cornhole board game. SUPPLIES 1/2 thick sheet of plywood one 4 x4 or two 2 x4 s 8 long 2 4 s (4) 4 1/2
Guidelines for Earthquake Bracing of Residential Water Heaters
 Guidelines for Earthquake Bracing of Residential Water Heaters Department of General Services Division of the State Architect 1102 Q Street, Suite 5100 Sacramento, CA 95814 Phone: (916) 324-7099 Fax: (916)
Gate Leg Drop Leaf Table Plans
 Preparing the table top blanks: Cut and glue enough 3/4 stock to make three panels 40 long by 24 wide (they will be cut to final size at a later time). While the glue dries we will work on the legs. Preparing
WHI 90-Minute Rated Veneered Door Frame Installation Instructions
 No. 940-03-10 INSTALLATION INSTRUCTIONS 90 MINUTE RATED VENEERED DOOR FRAME DOOR REQUIREMENTS: Consult the door manufacturer to make sure that the doors are qualified for the hardware to be installed,
Assembly GUIDE. display wine cellar kits. Required. Suggested. Questions? 888.373.6057. or visit wineracksamerica.com
 Page 1 Middle Ladder End Ladder Display Tray Screwless Connector Package Contents * All models follow the same assembly procedure varying only in the number of middle ladders your rack will require. Depending
Best Barns USA Assembly Book
 Best Barns USA Assembly Book Revised November 27, 2013 the Easton - R 12'x 20' Manufactured by Reynolds Building Systems, Inc. 205 Arlington Drive Greenville, PA 16125 724-646-3775 This manual is copyrighted.
MGB Chrome Bumper Conversion
 MGB Chrome Bumper Conversion Installation Instructions For 1974 1/2-1980 MGB This kit requires cutting, welding, and painting. Professional installation recommended. Note: Every MGB body is slightly different
BUILDINGA 1/10 SCALE FLATBED TRAILER
 VOLUME 1, ISSUE 1 BUILDINGA 1/10 SCALE FLATBED TRAILER BUILT, DESIGNED & WRITTEN BY NATHAN MYERS MATERIALS: FEATURES: While the design was kept simple to allow anyone to be able to build their own trailer,
Easy Six Cube Bookshelf. Copyrighted Material. Page 1
 Compare to: Land of Nod Cube Collection, 6 Cube Bookshelf Skill Level: Beginner Easy Six Cube Bookshelf I love the storage cubes in kids rooms because they give you an opportunity to have your children
VERSARAIL ALUMINUM STAIR RAILING INSTALLATION INSTRUCTIONS. Owner's Manual. Version. www.barretteoutdoorliving.com. Models
 Models VERSARAIL ALUMINUM STAIR RAILING 73013153 INSTALLATION INSTRUCTIONS 73013154 73013155 73013156 Owner's Manual Version 1.0 VERSASTAIR_BOM V1 3/2012 www.barretteoutdoorliving.com VERSARAIL ALUMINUM
Premier & Deluxe 3-Season Room Sliding Glass Door
 DTSSGD-11 Premier & Deluxe 3-Season Room Sliding Glass Door Installation Instructions Screen Door Seal Left Side Track Top Track Assembly Right Side Track Right Side Trim Sliding Glass Door Sliding Screen
TREX SELECT RAILING Installation Instructions
 TREX SELECT RAILING NOTE: All Trex Select Railing lengths are manufactured at ON CENTER dimensions (spanning from center of each post): 67-5/8" (76.8 cm) for 6' (.83 m) on center, and 9-5/8" (35.3 cm)
KITCHENS. Tip PAGE 1 FITTING YOUR KITCHEN GUIDE. How to mark out a kitchen. Tools required for installing a kitchen STEP ONE STEP TWO STEP THREE
 FITTING YOUR KITCHEN GUIDE How to mark out a kitchen PAGE 1 Before starting on the installation, measure 870mm from the lowest point of the floor and mark a datum line around the room to indicate where
KITCHEN INSTALLATION GUIDE
 KITCHEN INSTALLATION GUIDE The step-by-step guide to installing your new kitchen right The materials and tools you ll need This brochure is your guide to preparing and installing your new kitchen. Inside
Installing Window and Door Mouldings
 Installing Window and Door Mouldings About Window and Door Mouldings The trim around windows and doors greatly influences the look and style of your interior. They also bridge the gaps and cover spaces
BUILT-IN MICROWAVE OVEN INSTALLATION INSTRUCTIONS
 UILT-IN MIROWVE OVEN INSTLLTION INSTRUTIONS 24" (61.0 cm), 27" (68.6 cm), 30" (76.2 cm) This product is suitable for use above electric or gas built-in ovens, and below non-vented electric or gas cooktops.
Lathe Milling Attachment
 Lathe Milling Attachment By L C. MASON BY CLEVERLY stacking cold-rolled flat stock together, T-slots and slide for this lathe milling attachment are made without costly machinery. In fact, only two tools,
Total Quantity: IMPORTANT: Plans are to be used with 3 x6 Plexiglass (SKU #298-017).
.") # Materials: Quantity Each: 4x4x8 3 2x4x8 2 2x8x8 1 4x8x3/4 plywood 1 3 x6 corkboard (can be 18 of the 1 x1 pieces) 1 3 x6 plexiglass 1 8 door casing 3 Primer 1 qt. Total Quantity: TIPS FOR SUCCESSFUL
# Materials: Quantity Each: 4x4x8 3 2x4x8 2 2x8x8 1 4x8x3/4 plywood 1 3 x6 corkboard (can be 18 of the 1 x1 pieces) 1 3 x6 plexiglass 1 8 door casing 3 Primer 1 qt. Total Quantity: TIPS FOR SUCCESSFUL
Router Table Plans. www.bobsplans.com
 www.bobsplans.com Router Table Plans Increase the capabilities of your router with this weekend project. Features a sliding fence with EZ-Mount clamps. These clamps are simple to make and grip tightly
Installation Instructions READ BEFORE INSTALLING UNIT For SLO3 Air Conditoner (8,000~12,000 BTU)
") RE EFORE INSTLLING UNIT For SLO3 ir onditoner (8,000~2,000 TU) INSTLLTION WRNINGS N UTION arefully read the installation manual before beginning. Follow each step as shown. Observe all local, state, and
RE EFORE INSTLLING UNIT For SLO3 ir onditoner (8,000~2,000 TU) INSTLLTION WRNINGS N UTION arefully read the installation manual before beginning. Follow each step as shown. Observe all local, state, and
Barewood Octagon and Elongated Windows Installation Instructions
 Step-by-step instructions to a beautiful window. Measuring and Installation of your new window from Century Specialty Windows couldn't be easier with our step-by-step instructions. Quality, function and
BUTTERFLY SHOWER DOOR INSTALLATION INSTRUCTIONS
 BUTTERFLY SHOWER DOOR INSTALLATION INSTRUCTIONS IMPORTANT DreamLine reserves the right to alter, modify or redesign products at any time without prior notice. For the latest up-to-date technical drawings,
Ladder Shelf Plans Final dimensions: 25 L x 21 W x 72 H
 Ladder Shelf Plans Final dimensions: 25 L x 21 W x 72 H Copyright 2011. MLCS Woodworking. Page 1 Router bits and supplies needed: 3/8 Rabbeting bit (#10691) 1 Bottom Cleaning bit (#7941) Top and Bottom
AZEK Rail Install Guide
 TRIM MOULDING DECK PORCH RAIL PAVERS AZEK Rail Install Guide Installing AZEK Rail with Glass Infill... 2 Installing AZEk Rail Stairs with Glass Infill... 9 Notes...14 Please read all instructions completely
Stair Layout Guide. Taking You To The Next Level. 1480 E. 6 th Street Sandwich IL 60548. 815-786-7600 www.designedstairs.com
 Stair Layout Guide Taking You To The Next Level 1480 E. 6 th Street Sandwich IL 60548 815-786-7600 www.designedstairs.com The information in this manual will guide you through a simple stair layout. For
QWALL 4 ACRYLIC SHOWER WALL INSTALLATION INSTRUCTIONS
 QWALL 4 ACRYLIC SHOWER WALL INSTALLATION INSTRUCTIONS IMPORTANT DreamLine TM reserves the right to alter, modify or redesign products at any time without prior notice. For the latest up-to-date technical
DIRECTIONS FOR ASSEMBLING BASE & WALL CABINETS
 DIRECTIONS FOR ASSEMBLING BASE & WALL CABINETS TheRTAStore.com STEP 1: CLEAR A WORK SPACE Place your RTA cabinet panels on a smooth, scratch resistant surface in a large, open area. (Some people like to
Sliding Door Hardware Installation Instructions
 Sliding Door Hardware Installation Instructions Installation Instructions Structural Information For standard systems and most custom single door opening systems. General Overview ff All Krown Lab sliding
Balance Beam Plans. Copyright 2007 Ben MacLeod Email: sales@betterplans.net Website: www.betterplans.net
 Balance Beam Plans Copyright 2007 Ben MacLeod Email: sales@betterplans.net Website: www.betterplans.net Balance Beam Plans By Ben MacLeod Copyright 2007 Tools required: -Mitre saw, circular saw, jig saw,
TREX SELECT RAILING. Installation Instructions 1 800 BUY TREX PARTS G * I ** H *
 TREX SELECT RAILING NOTE: All Trex Select Railing lengths are manufactured at ON CENTER dimensions (spanning from center of each post): 67-5/8" (76.8 cm) for 6' (.83 m) on center, and 9-5/8" (35.3 cm)
MODEL# SLA001-3 "SLIDE & LOCK" A-FRAME POOL LADDER
 MODEL# SLA001-3 "SLIDE & LOCK" A-FRAME POOL LADDER IMPORTANT INSTRUCTIONS: : Read all instructions carefully & completely to become familiar with parts, assembly, safety and proper use of this product.
Installation Instructions
 Installation Instructions Issued: March 10, 2004 GeoDeck Deck and Railing System (ICC-ES Legacy Report No. 21 71, former BOCA Report No. 21 71) Design and Installation Manual Congratulations! You have
Sliding Barn Door Hardware Installation Instructions BALDUR and ODEN
 Sliding Barn Door Hardware Installation Instructions BALDUR and ODEN Installation Instructions Structural Information For standard systems and most custom single door opening systems. General Overview
Unlike a porch, which is protected by a roof,
 Rehabbing a Rotted 34 Professional Deck Builder January/February 2013 Porch Stair A template helps to fit the bottom tread neatly around the posts by Emanuel Silva Unlike a porch, which is protected by
Wine Rack & Glass Storage Bench Chris Gardner
 Wine Rack & Glass Storage Bench Chris Gardner Quantity Length Width Material Part 2 48 16 3/4 birch plywood top, bottom 2 14 16 3/4 birch plywood sides 2 14 13 3/4 birch plywood support dividers 2 3 15
FRONT BUMPER INSTALLATION INSTRUCTIONS 2007-2011 DODGE / MERCEDES SPRINTER
 Aluminess Products Inc 9402 Wheatlands Ct. #A Santee, CA 92071 619-449-9930 FRONT BUMPER INSTALLATION INSTRUCTIONS 2007-2011 DODGE / MERCEDES SPRINTER Please read before beginning Stainless steel hardware
Things you need to assemble the tube actuator. Left to right. are small piece of masking tape, super glue,pen knife and small
 Things you need to assemble the tube actuator. Left to right are small piece of masking tape, super glue,pen knife and small crosspoint screwdriver. You will also need a few drops of light oil. Begin by
March 14, 2007. Installation of Bay, Bow and Garden Windows
 March 14, 2007 Re: Installation of Bay, Bow and Garden Windows Attached are the Atrium Companies, Inc recommendation for the installation of bay, bow and garden windows. These instructions were developed
DECKING INSTALLATION, CARE & MAINTENANCE INSTRUCTIONS. 866.729.2378 MOISTURESHIELD.COM limited lifetime warranty 866.729.2378 WWW.MOISTURESHIELD.
 DECKING INSTALLATION, CARE & MAINTENANCE INSTRUCTIONS 866.729.2378 MOISTURESHIELD.COM limited lifetime warranty Welcome To The Even Greater Outdoors. Congratulations on choosing MoistureShield for your
CHARISMA SHOWER/TUB DOOR INSTALLATION INSTRUCTIONS
 CHARISMA SHOWER/TUB DOOR INSTALLATION INSTRUCTIONS IMPORTANT DreamLine reserves the right to alter, modify or redesign products at any time without prior notice. For the latest up-to-date technical drawings,
Modular Locomotive System Instruction Manual for HBK8 George Body Kit
 Modular Locomotive System Instruction Manual for HBK8 George Body Kit Roundhouse Engineering Co. Ltd. Units 6-10 Churchill Business Park. Churchill Road, Wheatley. Doncaster. DN1 2TF. England. Tel. 01302
BUILD A TABLETOP LOOM
 BUILD A TABLETOP LOOM From 1" x 2" stock (actual 3/4" x 1"1/2) cut: 4 pieces 15" long 4 pieces 5"1/2 long Use the above to make 2 frames for the front and back of the loom. From 1" x 4" stock (actual 3/4"
Vinyl Greenhouse Window Page 2 of 6 New Contruction Installation Instructions
 New Construction Installation Instructions EPLACEMENT Installation Instructions Page 2 of 6 New Contruction Installation Instructions 1. Frame rough opening equal to window call out size. ough opening
INSTALLATION INSTRUCTIONS
 Turbo Tube Slide INSTALLATION INSTRUCTIONS C A U T I O N Do not climb on the outside of the slide This slide is designed for home use only, not for Public Playgrounds PlayCore, Inc. 2004 Copyrighted Material.
REDWOOD. Adirondack Chair. Naturally beautiful Easy to use Practical and economical Durable and stable Resistant to decay and insects
 B U I L D I T W I T H REDWOOD Adirondack Chair R E D W O O D Naturally beautiful Easy to use Practical and economical Durable and stable Resistant to decay and insects Adirondack Chair BUILD THE CHAIR
Hive Top Ventilation Shims
 Hive Top Ventilation Shims When preparing your bee hives for the winter, it is very important to provide for ventilation at the top of the hive. Through out the winter, the bees are expelling a lot of
Basement Window Installation Guide Hopper and Sliding
 Basement Window Installation Guide Hopper and Sliding americancraftsmanwindows.com Project Requirements: Installation must comply with all applicable building codes. Existing window frame, wall and weatherresistant
Here is your set of Detailed Plans from Copyright 2004 All Rights Reserved
 Here is your set of Detailed Plans from Copyright 2004 All Rights Reserved Materials for the House Here is the list of materials you will need to construct the basic house then to cover it with roofing
By SP Partners, LLC. www.rainbowatticstair.com INSTALLATION GUIDE. Prestige
 By SP Partners, LLC www.rainbowatticstair.com INSTALLATION GUIDE Prestige IMPORTANT READ THIS FIRST Inspect stair for any damage prior to installation. Stair is NOT to be installed while home is under
Residential Deck Safety, Construction, and Repair
 Juneau Permit Center, 4 th Floor Marine View Center, (907)586-0770 This handout is designed to help you build your deck to comply with the 2006 International Residential Building code as modified by the
INSTALLATION INSTRUCTIONS 24" (61.0 CM) ELECTRIC SINGLE AND DOUBLE BUILT-IN OVEN
 ELECTRIC SINGLE AND DOUBLE BUILT-IN OVEN") INSTLLTION INSTRUTIONS 24" (61.0 M) LTRI SINGL N OUL UILT-IN OVN Table of ontents UILT-IN OVN SFTY... 1 INSTLLTION RQUIRMNTS... 2 Tools and Parts... 2 Location Requirements... 2 lectrical Requirements...
INSTLLTION INSTRUTIONS 24" (61.0 M) LTRI SINGL N OUL UILT-IN OVN Table of ontents UILT-IN OVN SFTY... 1 INSTLLTION RQUIRMNTS... 2 Tools and Parts... 2 Location Requirements... 2 lectrical Requirements...
The JIG is UP Or A couple hours up front pays in the long run.
 Ed Simon Page 1 of 5 The JIG is UP Or A couple hours up front pays in the long run. A large part of the fun of beekeeping is the construction and assembly of the equipment. Since it is a hobby, I decided
WHAT S DIFFERENT. about TimberTech CableRail? Covered under warranty by ONE trusted manufacturer. Saves TIME and EFFORT
 WHAT S DIFFERENT about TimberTech CableRail? Covered under warranty by ONE trusted manufacturer Consumers want project simplicity. Offer them the added luxury by building high-end custom cable railing
39HQ Airovision Air Handling Units
 39HQ Airovision Air Handling Units Mounting instructions CONTENTS 1 - TRANSPORT AND LIFTING INSTRUCTIONS... 3 1.1 - General... 3 1.2 - Transport and storage... 3 1.3 - Roof edge protection during transport
HOW-TO LAY HARDBOARD OR PLYWOOD FLOOR OVERLAY
 HOW-TO HOW-TO LAY HARDBOARD OR PLYWOOD FLOOR OVERLAY Most floor coverings, if laid over uneven wooden floors, will wear unevenly and look unsightly. The answer is to cover the old boards with hardboard
How to Install Hardwood Flooring Over a Sub Floor
 How to Install Hardwood Flooring Over a Sub Floor Installation Preparation Instructions Read the entire instructions before starting your project. 1) INSPECT EACH PLANK (see fig. a) Wood is a natural product
Cedar Cottage Doghouse Plans
 Overlapping cedar shingles add an element of charm to this medium size doghouse. The walls, floor, and trim are constructed of solid cedar, making it naturally weather resistant and provides excellent
INSTRUCTIONS THOROUGHLY BEFORE BEGINNING***************
 Bill of Materials: RAC0012 Green Wing Aerodynamic Skirt Kit Item Part Number Description Quantity 1 RMC0218 Gen 2 Trailer Skirt Roadside 1 2 RMC0219 Gen 2 Trailer Skirt Curbside 1 3 RMC0041 Trailer Skirt
WHAT S DIFFERENT ABOUT OUR CABLERAIL?
 WHAT S DIFFERENT ABOUT OUR CABLERAIL? Manufactured for use with: Covered under warranty by ONE trusted manufacturer Consumers want project simplicity. Offer them the added luxury by building high-end custom
How to build a Pizza Oven in 4 days
 How to build a Pizza Oven in 4 days Preparation day (slab) 1. Foundation 1500 deep x 1300 wide x 75mm deep Required 20 bags cement pre mix. If you already have a concrete base, you save this prep day DAY
2. This is a close up of a typical area where the rocker is rusted out leaving holes under where the rocker moulding would be..
 ROCKER PANELS 55,56,57 CHEVY REPLACEMENT Do not throw away any pieces when you first remove them. There are many supports that are not reproduced and will need to be used again. When disassembling try
CRASH RAIL INSTALLATION HEIGHT
 PLEASE READ PLEASE READ THESE INSTRUCTIONS THOROUGHLY PRIOR TO BEGINNING THE INSTALLATION! THIS INSTRUCTION SHEET IS INTENDED TO PROVIDE A SPECIFIC GUIDE TO FOLLOW FOR THE INSTALLATION OF THIS. CONTAINED
Assembly Instructions Basic Folding-Leg Box Frame Style
 Assembly Instructions Basic Folding-Leg Box Frame Style Basic Folding Leg Cornhole Board Concept 1 2 12 3 1 2 3 15 16 4 1 4 52 9 R1 3 4 6 21 48 12 1 4 Bolt Washer 9 13 16 35 Washer Double Nut CornholePlayers.net
INSTALLATION INSTRUCTIONS for Premium Pocket Windows (JII022) IMPoRtaNt INFoRMatIoN & glossary. safety & HaNdlINg
 IMPoRtaNt INFoRMatIoN & glossary. safety & HaNdlINg") Thank you for selecting JeLd-weN products. Attached are JeLd-weN s recommended installation instructions for pocket (replacement) double-hung, casement, awning, picture or transom windows, designed to
Thank you for selecting JeLd-weN products. Attached are JeLd-weN s recommended installation instructions for pocket (replacement) double-hung, casement, awning, picture or transom windows, designed to
How to re-string & re-cable the Genesis Compound bow. Step by step, picture by picture Right hand models ONLY
 How to re-string & re-cable the Genesis Compound bow. Step by step, picture by picture Right hand models ONLY Introduction and Terminology Inspect all bows prior to use. Once a string or cable has become
How To Replace A Reverse Osmosis Water Tank
 ALL MODELS REVERSE OSMOSIS WITH NONAIRGAP FAUCET 1. Read all instructions carefully before starting installation. 2. Find the cold water line beneath your sink. The cold water is typically on the right.
We urge you to read and follow the attached installation instructions. Failure to do so may void the warranty of this garden window unit.
 Important Information for New Construction Installations Attention Installer! We urge you to read and follow the attached installation instructions. Failure to do so may void the warranty of this garden
FTC 2015-2016 DIY Mountain Build Guide
 FTC 2015-2016 DIY Mountain Build Guide Assembly Instructions Check out the DIY2015-2016 Prints and BoM for individual part details. Release 1.0 9/10/15 Page 1 This guide and Bill of Materials are for constructing
CAST IRON THE BASICS. Heatline - Cast Iron Radiators SMOOTH FLAT FILE TO REMOVE ANY SWARF. ONE TIME. ASSEMBLY. JOINTS SHOULD BE TIGHTENED.
 CAST IRON THE BASICS 1. DO NOT LIFT ON YOUR OWN. 2. ONLY LIFT THE RADIATOR VERTICALLY. 3. DO NOT LIFT MORE THAN 8/10 SECTIONS AT ANY ONE TIME. 4. POSITION THE RADIATOR BEFORE FINAL ASSEMBLY. 5. THIS PRODUCT
SAMPLE INSTRUCTIONS. Best Barns USA Assembly Book. the Denver. 12'x 12' or 12'x16' Revised November 29, 2010
 Best Barns USA Assembly Book Revised November 29, 2010 SAMPLE INSTRUCTIONS the Denver 12'x 12' or 12'x16' Manufactured by Reynolds Building Systems, Inc. 205 Arlington Drive Greenville, PA 16125 724-646-3775
Mobile Home Pre-Inspection Checklist
 Mobile Home Pre-Inspection Checklist TWO (2) STEP INSPECTION PROCESS STEP ONE: CALL FOR THE FIRST INSPECTION WHEN THESE ITEMS ARE COMPLETE. 1. Septic tank installed and plumbing complete. (SEE PLUMBING
INSTRUCTION FOR ASSEMBLY. 150x180 v Traditional sauna cabin
 INSTRUCTION FOR ASSEMBLY 150x180 v Traditional sauna cabin 1. SAUNA PLAN 1800 LIGHT UNDER THE BENCH VENTILATION OUTLET UPPER BENCH 600 1500 LOWER BENCH 400 700 1656 956 HEATER 366 381 690 815 Light switch
Congratulations on your new IKEA Kitchen, and on the money you saved!
 Congratulations on your new IKEA Kitchen, and on the money you saved! INSTALLATION GUIDE FOR YOUR AKURUM KITCHEN Seven steps to a brand new kitchen It s time to discover another major advantage of investing
BLADE REPAIR INSTRUCTION BOOKLET
 BLADE REPAIR INSTRUCTION BOOKLET Contents Section I: Section II: Section III: Section IV: Section V: Section VI: Removing a Blade Refer to this section if you need to remove the blade from an oar shaft.
SHELVES. www.tedswoodworking.com
 SHELVES It's rare that bookshelves look as interesting as the objects you display on them. After all, how much can you decorate the edges of your shelves and sides? This unit is unusual because the shelves
SHOP NOTES METAL SHAPER FOR YOUR SHOP
 SHOP NOTES METAL SHAPER FOR YOUR SHOP A METAL SHAPER is indispensable for certain machining operations where flat surfaces must be produced within very close limits, such as machining flats on castings,
Complete Dovetail Jig Instructions
 Complete Dovetail Jig Instructions 18 15 1 12 13 8 (22818) 19 17 16 4 3 6 14 5 9 9 11 10 2 PARTS LIST - COMPLETE DOVETAIL JIG Introduction Your new dovetail jig will cut Full Through Dovetails and three
Building an Off-Center Fixture for Turning Pendants
 Building an Off-Center Fixture for Turning Pendants Turning a pendant off-center with most available metal pendant chucks means that you will have a significant amount of mass off center, which will limit
1958-64 WINDOW CHANNEL, WEATHERSTRIP & WHISKER STRIP REPLACEMENT FOR 2-DOOR SEDANS
 By Denny Williams Photos by Denny Williams 1958-64 WINDOW CHANNEL, WEATHERSTRIP & WHISKER STRIP REPLACEMENT FOR 2-DOOR SEDANS Denny Williams - Technical Writer Denny is first and foremost a dyed-in-thewool
Solid Wood Worktops Installation and Aftercare Instructions
 Solid Wood Worktops Installation and Aftercare Instructions IMPORTANT NOTE: Please note our worktops have an A and a B side; it is important to identify these prior to making any cuts or other amendments.
9.8.1.1. General (1) This Section applies to the design and construction of interior and exterior stairs, steps, ramps, railings and guards.
 This Section applies to the design and construction of interior and exterior stairs, steps, ramps, railings and guards.") Section 9.8. Stairs, Ramps, Handrails and Guards 9.8.1. Application 9.8.1.1. General (1) This Section applies to the design and construction of interior and exterior stairs, steps, ramps, railings and
Section 9.8. Stairs, Ramps, Handrails and Guards 9.8.1. Application 9.8.1.1. General (1) This Section applies to the design and construction of interior and exterior stairs, steps, ramps, railings and
How To Install Your Frameless Shower Enclosure
 How To Install Your Frameless Shower Enclosure a) Installing Single Frameless Door Side Mounted Wall Hinges b) Installing Frameless Door with In-Line Panel c) Installing Frameless Door Between In-Line
How to Build an Elevated Square Foot Garden
 How to Build an Elevated Square Foot Garden Thralls, Edmund L., Extension Faculty, Urban Horticulture Fact Sheet Horticulture - 010 Tools: The Institute of Food and Agricultural Sciences (IFAS) is an Equal
Children s Furniture Projects
 This is an excerpt from the book Children s Furniture Projects by Jeff Miller Copyright 2002 by The Taunton Press www.taunton.com CHILD S ROCKER KIDS ARE ALWAYS IN MOTION. It s not easy to get them even