MEDICINE CABINET INSTALLATION INSTRUCTIONS
|
|
|
- Dennis Potter
- 7 years ago
- Views:
Transcription

1 MEDICINE CABINET INSTALLATION INSTRUCTIONS Page 1

2 IMPORTANT: Please read all instructions before starting installation. At Flawless we want to insure complete customer satisfaction, therefore we recommend installation by a professional installer. If you have installation questions, please call our customer service representatives at: Toll Free: or Fax: Page 2
3 General Information: Medicine Cabinet Installation Instructions Flawless medicine cabinets are available in a variety of different heights and depths. Medicine cabinets can be surface mounted, recessed, or semi-recessed. You need to determine the installation method, and then follow specific area for your cabinet.if an option is for surface mounting or semi-recessing, then a mirror side kit is needed. Mirror side kit is sold separately. o Recessed or semi-recessed: see page 6 o Surface mount - see page 7 Cabinets must be installed square and plumb to insure that the doors will operate properly. Use a square and level when installing all cabinets. Connecting Cabinets - instructions for connecting cabinets are included in your installation method section Mirror/Shelf Kits - see instructions included with center mirror/shelf kit prior to preforming surface mount instructions Remove cabinet door from box. DO NOT remove protective covering from door until ready for installation on cabinet box. Place to side out of the way so it does not get damaged. DO NOT place unprotected door down on any hard surface, as the mirror will chip. Rough Opening Specifications: Model # Rough Opening Single Cabinet Width X Height x x x x x x x x x Page 3
4 Tools Required Medicine Cabinet Installation Instructions Safety Glasses Measuring Tape Power screw driver or a #2 Phillips head screw driver 8mm masonry drill bit Safety Glasses Level Square Electric Drill 7/32 drill bit Additional Parts List - 30 High Cabinet See back page for other heights *Note: do not remove door from protective packaging until installation of door itself) Cabinet (1) Door* (1) Glass Shelf (3) Mounting Bracket (1) Top Z-Clip (2) Hole Plug (32) Clear Shelf Clip (12) Screw Head Cover Cap (12) Wood Screws (4) #10 x 11 2 Plastic Wall Anchor (4) Cabinet Connector (2) Machine Screw (8) #10-32 x 1/2 Name plate (2) Shelf Clip Stick Tab (12) Page 4
5 Determining Height: 1. Determine the front height of the cabinet model(s): CABINET HEIGHTS: Flat Top = 30 (762 mm) high Arch Top = 34 (863.6 mm) high (rough opening same as Flat Top) Flat Top = 39 3/8 ( mm) high Arch Top = 43 3/8 ( mm) high (rough opening same as Flat Top) 2. Subtract ¾ (19.1 mm) from the height to determine the vertical height of the rough opening. Page 5
6 Recessed or semi-recessed Medicine Cabinet Installation Instructions 5. Make sure hinges are on correct side of opening for left hand or right hand operation. Place cabinet box into rough opening. On fully recessed applications, make sure cabinet flange covers rough opening evenly all around (Fig 4). On semi-recess applications, mirror edges should meet wall surface. (Fig 5). Shim as needed. 6. Insert four (4) #10 x 11 2 wood screws into four locations provided for recessed installation (Fig 6). Be careful not to overtighten. Make sure cabinet is centered in rough opening. Please Note: FOR RECESS MOUNTING CONNECTED CABINETS: It is important that when installing connected cabinet boxes, the doors are adjusted to allow a gap of 1/8 (3.2 mm) between doors. Page 6
7 How to Surface Mount Cabinet If installing in combination with a middle mirror/shelf kit, please see Center Mirror/Shelf Kit Installation Directions that came with your center mirror prior to preforming the steps below 1. Establish precise height and draw a level horizontal line (Fig 7). IMPORTANT: Detect medicine cabinet at precise height. Make sure there is at least 1 of clearance above any obstructions. NOTE: If attaching cabinets, preform Cabinet Connector Installation instructions on page 9 prior to step Establish hole location on mounting bracket and drill 7 32 holes in at least two positions on bracket (Fig 8). When determining position, it is recommended that at least one mounting screw be located in a stud. 3. Place bottom of wall bracket on horizontal line and at correct position left to right and mark holes on wall (Fig 9). Page 7
8 4. Drill 8 mm hole if required for wall anchor and place wall anchor in hole. 5. Mount wall bracket with #10 x wood screws. (Fig 10) 6. Insert surface mount z-clips as shown (Fig 11 & 12). 7. Place cabinet onto wall bracket (Fig 13). Mark hole locations of z-clips (Fig 14). When determining location, it is recommended that at least one z-clip be located at a stud. 8. Detach cabinet and drill 8mm hole if needed for anchor, and place in anchor in hole. 9. Remount cabinet and connect with #10 x wood screws (Fig 15). Be cautious not to damage or scrape the top flange. Page 8
9 10. Using #10-32 x 1/2 machine screws, connect side kit mounting brackets (Fig 16) 11. Please note: Thoroughly clean back of side kit mirror with alcohol pad. 12. Place 2 x 2 foam pads 1 from each end of mirror strip (Fig 16). 13. Remove tape off brackets and place mirrored side kit as shown (Fig 16). Mirror should be even with front of cabinet flange and flush with the top and bottom of the cabinet. Repeat for opposite side. Please Note: FOR SURFACE MOUNTING CONNECTED CABINETS. For combinations of cabinets more than 45 (1143 mm) wide, you must use more than one mounting bar. Page 9
10 Door Installation 1. Remove protective packaging from door being careful not to bump edges of mirror. 2. Line hinges up against hinge mounting plates. Snap into position (Fig 17). Page 10

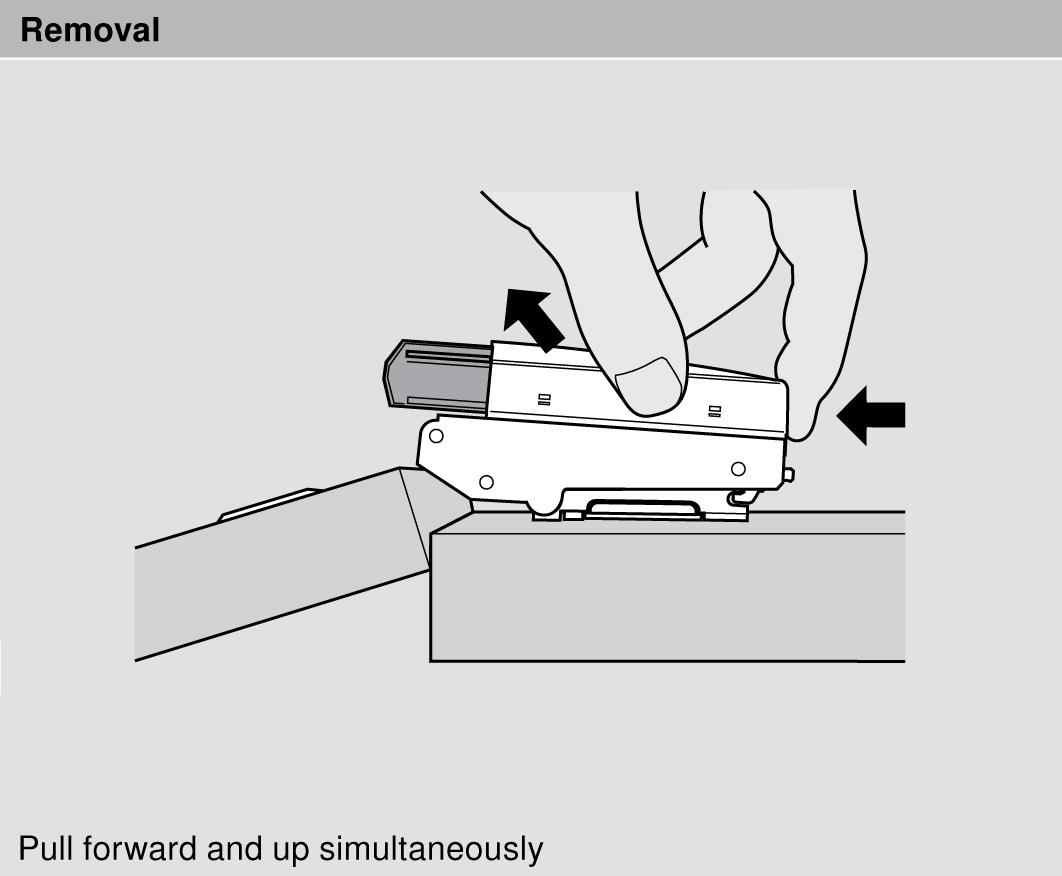
11 Our medicine cabinets are assembled with special hinges from Blumotion. BLUMOTION can now be quickly integrated into cabinets with doors. It will work for almost any application and does not require any change to the hinge assembly. BLUMOTION redefines the term quality of motion. The system is quick and easy to install and once installed, creates a quiet and effortless closing motion. Each time a door is closed consumer will be reminded of the exceptional quality of their cabinets. Hinge Adjustment 1. Door should snap locked when about 1 from being fully closed. Door should be placed even in relation to cabinet. 2. If amendment is needed, detach cover cap and adjust according to Fig 18. Replace cover cap when done. Blum Cover Cap Top to Bottom Front to Back Top to Bottom FIG 18 Left to Right Blumotion Hinges Left to Right Front to Back Quiet closing motion every time due to adaptability The integrated overload safety feature protects the Blumotion hinges from damage thru abuse Blumotion hinges lasts the lifetime of the cabinet ensuring customer satisfaction. Page 11
12 Page 12
13 Additional Item Installation 1. After door and cabinet are installed, install name plates by peeling protective plastic from door and back of nameplate, then placing nameplate in proper location (Fig 19) 2. Decide appropriate location for glass shelves. 3. Place shelf clip stick tab on each clear shelf clip (Fig 21), then peel off tab so only sticker remains on clip. 4. Insert clear shelf clips into appropriate hole locations using 4 clips per shelf 5. Place glass shelf on top of clear shelf clips making sure shelf is against back of cabinet. Press lightly to adhere to shelf clip sticker (Fig 22). 6. Fill left over holes with hole plugs. 7. Cover screw heads with screw head cover caps if required Page 13
14 Cabinet Connector Installation Instructions These Instructions are in Use Only when connecting two or more cabinets. 1. Connect cabinets jointly using cabinet connectors and #10-32 x 1 2 machine connector screws (Fig 23). 2. If connecting more than two cabinets jointly and recessing them, it is suggested that at nearly the center of the conjoined cabinets that you drill a hole (#7) inside the top of the cabinet and secure with wood screw #10 x see Fig 24 & 25 Page 14
15 Parts List for Flawless Medicine Cabinets Parts List - 30 High Cabinets Parts List - 36 High Cabinets Parts List - 40 High Cabinets Cabinet Cabinet Cabinet Door Door Door Glass Shelf 5/16 Thick (2) Glass Shelf 5/16 Thick (3) Glass Shelf 5/16 Thick (4) Mounting Bracket (for surface mount) Mounting Bracket (for surface mount) Mounting Bracket (for surface mount) Surface Mount Top Z-Clip (2) Surface Mount Top Z- Clip (2) Surface Mount Top Z- Clip (2) Hole Plug (32) Hole Plug (38) Hole Plug (44) Clear Shelf Clip (12) Clear Shelf Clip (12) Clear Shelf Clip (16) Screw Head Cover Cap (8) Screw Head Cover Cap (8) Screw Head Cover Cap (8) Wood Screws #10 x (4) Wood Screws #10 x (4) Wood Screws #10 x (4) #10-32x1/2 Machine Connector Screw (8) Shelf Clip Stick Tab (8) #10-32x1/2 Machine Connector Screw (8) Shelf Clip Stick Tab #10-32x1/2 Machine Connector Screw (8) Shelf Clip Stick Tab (16) (12) Cabinet Connector (2) Cabinet Connector (2) Cabinet Connector (2) Plastic Wall Anchor (4) Plastic Wall Anchor (4) Plastic Wall Anchor (4) Name Plate (2) Name Plate (2) Name Plate (2) Page 15
16 Care and Cleaning The cabinet door and interior are constructed of mirrored glass and aluminum. Use only a damp cloth to clean. Ammonia or vinegar based cleaners can damage mirrors. A solution of 50% of water and 50% of isopropyl alcohol is recommended fop mirror cleaning. A very mild detergent may be used to clean the surface. When cleaning, spray the cloth, not the cabinet, mirror, or surround surfaces. Do not use abrasive cleansers on any part of the cabinet. LIMITED ONE YEAR WARRANTY Flawless warrants to purchaser that our Medicine Cabinets are free of defects for a period of one (1) year. We guarantee at its election repair, replace, or make appropriate adjustments to products made by this company shown to have significant defects in material or workmanship which are reported to Flawless in writing within one (1) year from the date of delivery. Flawless is not responsible for labor and other installation costs for the repair or replacement of damaged merchandise, faulty installation. Damage due to abuse, careless handling, changes to the product, color discoloration due to improper care, or accidental damage are not covered by one (1) year Warranty. Permission to return any merchandise under this warranty must be authorized Flawless and returned prepaid by the purchaser. Claims under this warranty should be sent directly to your dealer. Page 16
Destiny Shower Enclosure Installation Instructions
 Destiny Shower Enclosure Installation Instructions IMPORTANT Please read carefully the following instructions before installing your shower enclosure. If you have any questions on this shower enclosure
DE Frame with C Series Sidelight
 TOOLS REQUIRED Tape measure 6' magnetic level 3' magnetic level Screw gun with clutch adjusted #2 phillips tip #3 phillips tip Screwdriver (used to adjust frame on will using oval slots) Pry Bar Powder
KITCHENS. Tip PAGE 1 FITTING YOUR KITCHEN GUIDE. How to mark out a kitchen. Tools required for installing a kitchen STEP ONE STEP TWO STEP THREE
 FITTING YOUR KITCHEN GUIDE How to mark out a kitchen PAGE 1 Before starting on the installation, measure 870mm from the lowest point of the floor and mark a datum line around the room to indicate where
Window Installation Instructions
 Caution The correct installation methods of windows in full frame or insert applications is critical towards achieving the tested performance of the window and longterm enjoyment and energy savings for
K. D. FRAME ASSEMBLY FOR CLOSED STEEL STUD WALLS...Ins 10. FRAME INSTALLATION DETAILS FOR CLOSED STEEL STUD WALLS...Ins 11
 K. D. FRAME ASSEMBLY FOR MASONRY WALLS...........................Ins 2 FRAME INSTALLATION DETAILS FOR MASONRY WALLS......................Ins 3 INSTALLING EXISTING MASONRY WALL ANCHORS IN FRAME..................Ins
Customer Service 800.780.8889 or visit us online at smithnoble.com. Wood Shutters. Step by Step Installation. Troubleshooting Tips
 reflect your style TM Customer Service 800.780.8889 or visit us online at smithnoble.com Wood Shutters Step by Step Installation Troubleshooting Tips Easy Care Instructions STEP 1 Your New Shutter Thank
DIY CABINET REFACING INSTALLATION GUIDE
 DIY CABINET REFACING INSTALLATION GUIDE CABINET REFACING INSTALLATION Are you ready to reface your outdated cabinets? This guide will show you how to install your new Facelifters Cabinet Refacing Products
Speed-Mat Rectangle Cutter
 Speed-Mat Rectangle Cutter 1 Honeycomb baseboard. 2 Left hold down. 14 3 Bottom hold down. 4 4 Left / right rule. 8 5 8 5 Left / right rule pointer. 1 6 Top / bottom rule. 7 Top / bottom rule pointer.
CHARISMA SHOWER/TUB DOOR INSTALLATION INSTRUCTIONS
 CHARISMA SHOWER/TUB DOOR INSTALLATION INSTRUCTIONS IMPORTANT DreamLine reserves the right to alter, modify or redesign products at any time without prior notice. For the latest up-to-date technical drawings,
Acrylic Walls Installation Instructions
 Acrylic Walls Installation Instructions IMPORTANT Please read carefully the following instructions before installing your shower acrylic walls. If you have any questions on this shower acrylic walls installation
CordlessPleated FabricShade including Top-Down/Bottom-Up. owner's handbook
 CordlessPleated FabricShade including Top-Down/Bottom-Up owner's handbook July, 2013 español página 9 2 INSTALLATION INSTRUCTIONS Step 1. Check Package Contents Missing part? Call 1-800-264-1190 Mounting
Basic Spring Motor Roller Shades
 Comprehensive Roller Shade Installation Guide Basic Spring Motor Roller Shades ATTENTION!!! READ CAREFULLY! This shade has a reliable long-lasting Spring Motor. The Spring Motor must have proper tension
BUTTERFLY SHOWER DOOR INSTALLATION INSTRUCTIONS
 BUTTERFLY SHOWER DOOR INSTALLATION INSTRUCTIONS IMPORTANT DreamLine reserves the right to alter, modify or redesign products at any time without prior notice. For the latest up-to-date technical drawings,
1 Door Tall Unit ASSEMBLY GUIDE. Page 1 of 9. WARNING: Contains small parts, keep out of reach of children.
 Page 1 of 9 ASSEMBLY GUIDE 1 Door Tall Unit IMPORTANT Before Commencing Assembly: Read all instructions COMPLETELY Ensure all listed parts are present If any parts are missing from Parts List 1, please
Wren Kitchens Installation Tips... 3. Carefully check your kitchen delivery... 4. Measuring out and marking up... 5. Fitting the base cabinets...
 tra 1 Index Wren Kitchens Installation Tips... 3 Carefully check your kitchen delivery... 4 Measuring out and marking up... 5 Fitting the base cabinets... 6 Fitting the corner cabinets... 7 The 972mm or
All-Season Sunroom Sliding Glass Door Installation Instructions
 ASRESGD-08 All-Season Sunroom Sliding Glass Door Installation Instructions Panel Frame Door Frame Left Side Foam Insulator IE241 H Bar Assembly Door Frame Top Track Panel Frame Door Frame Right Side Stationary
KITCHEN INSTALLATION GUIDE
 KITCHEN INSTALLATION GUIDE The step-by-step guide to installing your new kitchen right The materials and tools you ll need This brochure is your guide to preparing and installing your new kitchen. Inside
Digital Fingerprint safe
 Digital Fingerprint safe Model 96846 Operation Instructions Diagrams within this manual may not be drawn proportionally. Due to continuing improvements, actual product may differ slightly from the product
QWALL 4 ACRYLIC SHOWER WALL INSTALLATION INSTRUCTIONS
 QWALL 4 ACRYLIC SHOWER WALL INSTALLATION INSTRUCTIONS IMPORTANT DreamLine TM reserves the right to alter, modify or redesign products at any time without prior notice. For the latest up-to-date technical
WHI 90-Minute Rated Veneered Door Frame Installation Instructions
 No. 940-03-10 INSTALLATION INSTRUCTIONS 90 MINUTE RATED VENEERED DOOR FRAME DOOR REQUIREMENTS: Consult the door manufacturer to make sure that the doors are qualified for the hardware to be installed,
Installation Instructions Double-Hung, Single-Hung, Casement, Awning, Sliding, Picture & Shapes Non-Impact & Impact Resistant Nailing Fin Windows
 Installation Instructions Double-Hung, Single-Hung, Casement, Awning, Sliding, Picture & Shapes Non-Impact & Impact Resistant Nailing Fin Windows americancraftsmanwindows.com Project Requirements: Read
Premier & Deluxe 3-Season Room Sliding Glass Door
 DTSSGD-11 Premier & Deluxe 3-Season Room Sliding Glass Door Installation Instructions Screen Door Seal Left Side Track Top Track Assembly Right Side Track Right Side Trim Sliding Glass Door Sliding Screen
We urge you to read and follow the attached installation instructions. Failure to do so may void the warranty of this garden window unit.
 Important Information for New Construction Installations Attention Installer! We urge you to read and follow the attached installation instructions. Failure to do so may void the warranty of this garden
Information Technology Solutions
 Information Technology Solutions Aluminum Sliding Door Assembly Instructions Shield Doors & Windows Bi-fold Door Assembly Instructions For Support Please Call 03 8339 2252 Aluminum Sliding Door Assembly
Curved Quadrant Instruction Manual
 Curved Quadrant Instruction Manual Consumer Guarantee - Please make sure the purchaser/end user completes and returns the Guarantee card which is enclosed with this product. Failure to validate the Guarantee
CORNER FRIDGE REFRIGERATION UNIT INSTALLATION AND OPERATION INSTRUCTIONS
 CORNER FRIDGE REFRIGERATION UNIT INSTALLATION AND OPERATION INSTRUCTIONS D E F Y I N G C O N V E N T I O N Congratulations on your new Corner Fridge Your new corner fridge may have different functions
T H A N K Y OU F O R Y OUR P U R C H A S E O F A N E S S E N T I A V A N I T Y, P L E A S E R E A D T H E S E V A N I T Y C A R E A N D I N S T A L L
 T H A N K Y OU F O R Y OUR P U R C H A S E O F A N E S S E N T I A V A N I T Y, P L E A S E R E A D T H E S E V A N I T Y C A R E A N D I N S T A L L AT I O N I N S T R U C T I O N S C A R E F U L LY CAR
Triple Threat 3-in-1 Game Table 3 IN 1 GAME TABLE
 NG0M Triple Threat 3-in- Game Table 3 IN GAME TABLE Thank 3 in Y Game Table Thank you for your purchase of our product. We work around the clock and around the globe to ensure that our products maintain
149mm. Walk-Thru Assembly Gate. MODEL NO: 1161, 1167 Owner s Manual. www.regalo-baby.com
 149mm 210mm Walk-Thru Assembly Gate MODEL NO: 1161, 1167 Owner s Manual READ ALL INSTRUCTIONS BEFORE ASSEMBLY AND USE OF GATE. KEEP INSTRUCTIONS FOR FUTURE USE. www.regalo-baby.com... Regalo International,
Important Information
 Single Door Quadrant Instruction Manual ESQ Important Information Toughened glass is completely safe for use in our shower enclosures and bath screens; providing our products are installed according to
Retail Reception kiosk
 Retail Reception kiosk put 42" corner post in below 66" to allow post to extend above kiosk for raised box sign Mini cantilever option - 24" overhead support leg Mini cantilever option - 24" overhead 66/48E
REDI-EXIT COMMERCIAL FIRE DOOR AND EXTERIOR DOOR KITS INSTALLATION GUIDELINES
 REDI-EXIT COMMERCIAL FIRE DOOR AND EXTERIOR DOOR KITS INSTALLATION GUIDELINES Tools Required Tape Measure Hammer Slotted Screw Driver #2 & #3 Philips Screw Driver 3-4 Foot Level 12 Pry Bar Cold Chisel
Clad Direct Glaze Window Installation Instructions
 Clad Direct Glaze Window Installation Instructions Sill flashing and sealing: 2. An overview of the proper flashing sequence is shown in figure 1. Please read entire installation instructions carefully
Installation Guide for Andersen Architectural Wood Inswing Entry Doors
 Installation Guide for Andersen Architectural Wood Inswing Entry Doors Congratulations! You have just purchased one of the many fine Andersen products. Proper assembly, installation and maintenance are
Important Information for Installer & Homeowner
 Important Information for Installer & Homeowner Homeowner: Please keep this information for your records, do not discard! Installation Instructions for Wood Frame Construction Replacement (See other side
Tools Required: Sawzall, hack saw, or small body saw, drill, ¼ drill bit, ¾ hole saw, tape measure, silicone or epoxy, & 7/16 socket.
 When installing a one-piece window kit, it is best to do it as early as possible in the restoration process. This will allow for minimal repairs if need be. Kit Contents: Glass - 2 pcs Felt channels 2
Beadboard Wall Bookcase
 Beadboard Wall Bookcase Note: The maximum load for each shelf is 30lbs.This hanging system is meant for drywall/wood stud mounting only. If walls are concrete, brick or plaster, please consult your local
Installation Instructions
 Installation Instructions READ BEFORE INSTALLING UNIT For Low Profile Window Air Conditioner INSTALLATION WARNINGS AND CAUTION Carefully read the installation manual before beginning. Follow each step
FL ADJUSTABLE RIDER BACKREST MOUNTING HARDWARE KIT
 -J070 REV. 0-0-0 FL ADJUSTABLE RIDER BACKREST MOUNTING HARDWARE KIT GENERAL Kit Number 9-09A Models For model fitment information, see the P&A Retail Catalog or the Parts and Accessories section of www.harley-davidson.com
Horizontal Mini Blinds Installation Guide
 Horizontal Mini Blinds Installation Guide We make it easy! BTG 468298 EN_ rev0614 For more safety information: 1-866-662-0666 or.www.healthcanada.gc.ca/blindcords Before starting Your new Blinds To Go
INSTALLATION INSTRUCTIONS for Premium Pocket Windows (JII022) IMPoRtaNt INFoRMatIoN & glossary. safety & HaNdlINg
 IMPoRtaNt INFoRMatIoN & glossary. safety & HaNdlINg") Thank you for selecting JeLd-weN products. Attached are JeLd-weN s recommended installation instructions for pocket (replacement) double-hung, casement, awning, picture or transom windows, designed to
Thank you for selecting JeLd-weN products. Attached are JeLd-weN s recommended installation instructions for pocket (replacement) double-hung, casement, awning, picture or transom windows, designed to
Owner s Guide and Installation Manual PELLA EXPRESS INSTALL STORM DOOR MODELS
 1 2 Updated 4/10 35123 Owner s Guide and Installation Manual PELLA EXPRESS INSTALL STORM DOOR MODELS NOTE TO THE INSTALLER: This Owner s Guide and Installation Manual is the property of the homeowner.
Andersen Electric Window Opener for Andersen Awning and Roof Windows
 W A Electric Window Opener Electric Window Opener for Awning and Roof Windows Congratulations! You have just purchased one of the many fine products. For ease of installation and continued enjoyment of
Basement Window Installation Guide Hopper and Sliding
 Basement Window Installation Guide Hopper and Sliding americancraftsmanwindows.com Project Requirements: Installation must comply with all applicable building codes. Existing window frame, wall and weatherresistant
GENUINE PARTS INSTALLATION INSTRUCTIONS
 GENUINE PARTS INSTALLATION INSTRUCTIONS DESCRIPTION: Illuminated Kick Plate APPLICATION: Rogue (2011) PART NUMBER: 999G6 GX010 KIT CONTENTS: Item A B C G H QTY 1 1 1 D 1 E 1 F 3 15 6 Description Kick Plate,
Anthro Tablet Charging Cabinets
 Owner's Manual for Anthro Tablet Charging Cabinets Covers part numbers beginning TAB16 and TAB20. Components at a Glance The open views of the front and side of the cabinet below are for the TAB20 cabinet.
TOLL FREE: (866) 591-7792. E-Mail: techmail@vigoindustries.com. www.vigoindustries.com VANITY SPECIFICATIONS. VANITY COMPONENTS Model VG09042K1
 591-7792. E-Mail: techmail@vigoindustries.com. www.vigoindustries.com VANITY SPECIFICATIONS. VANITY COMPONENTS Model VG09042K1") VANITY SPECIFICATIONS VANITY COMPONENTS Model VG09042K1 MODEL VG09042K1 FEATURES Freestanding cabinet Soft closing sliding cabinet drawer hardware White, single hole ceramic sink Cabinet ships assembled
VANITY SPECIFICATIONS VANITY COMPONENTS Model VG09042K1 MODEL VG09042K1 FEATURES Freestanding cabinet Soft closing sliding cabinet drawer hardware White, single hole ceramic sink Cabinet ships assembled
Tundra Series Windows January 2016
 Tundra Series Windows January 2016 New Construction Installation Instructions Nail Fin, J-Fin and Brickmold Aplications product. ATTENTION! Read and understand all installation instructions before installing
INSTRUCTION BOOK FOR. Dual Monitor Video Conferencing Cart
 INSTRUCTION BOOK FOR Dual Monitor Video Conferencing Cart Procedure 1. Remove contents from cartons and examine for damaged or missing parts. The keys for the cabinet doors are tied to the outside of the
Sealant. 30" Model No. 35020. D: 17-7/8" TO 18-3/8" (454 to 466mm) W: 29-3/4" TO 30-1/4" (756 to 768mm) Under Countertop Installation
 W: 29-3/4 TO 30-1/4 (756 to 768mm) Under Countertop Installation") INSTALLATION INSTRUCTIONS CARE AND MAINTENANCE London Kitchen Sinks 24" Sink model number 35030 30" Sink model number 35020 36" Sink model number 35040 Thank you for selecting Porcher. To ensure this product
INSTALLATION INSTRUCTIONS CARE AND MAINTENANCE London Kitchen Sinks 24" Sink model number 35030 30" Sink model number 35020 36" Sink model number 35040 Thank you for selecting Porcher. To ensure this product
OWNER S MANUAL Table Tennis Table Patent Pending
 OWNER S MANUAL Table Tennis Table Patent Pending Be sure to write your model number and serial number here for future reference. You can find these numbers printed on the bottom of the table. MODEL # T8179
Installation Guide for Andersen Architectural Clad Outswing Commercial Doors
 Installation Guide for Andersen Architectural Clad Outswing Commercial Doors Congratulations! You have just purchased one of the many fine Andersen products. Proper assembly, installation and maintenance
glass & Glazing Products
 glass & Glazing Products WallMaker Create an unlimited variety of bright, beautiful and secure interior environments with the easy-to-install Stylmark WallMaker glass wall system. This versatile system
Replacement Window Installation Guide Non-Impact & Impact Resistant Windows without Nailing Fin
 Replacement Window Installation Guide Non-Impact & Impact Resistant Windows without Nailing Fin americancraftsmanwindows.com Project Requirements: Failure to follow these instructions may void product
INSTRUCTION BOOK FOR. Single Monitor Video Conference Cart
 INSTRUCTION BOOK FOR Single Monitor Video Conference Cart Procedure 1. Remove contents from cartons and examine for damaged or missing parts. The keys for the cabinet doors are tied to the outside of the
Quadrant Shower Enclosure. Telephone 0844 484 7678. Cleaning. All chrome surfaces should be cleaned using a clean damp cloth.
 Cleaning All chrome surfaces should be cleaned using a clean damp cloth. Quadrant Shower Enclosure No abrasive cleaning agents or materials should be used. General glass cleaner can be used for the screen,
IMPORTANT INSTALLATION GUIDE VALENCIA SQUARE CORNER SHOWER READ ALL INSTRUCTIONS CAREFULLY BEFORE STARTING THE INSTALLATION
 INSTALLATION GUIDE VALENCIA SQUARE CORNER SHOWER SEALANT REQUIRED TO COMPLETE THIS INSTALLATION: (Not supplied) Sika Sikasil NG (Arctic White) To seal the WHITE shower door and returns to the shower tray.
ILLUSION FRAMELESS SHOWER ENCLOSURE INSTALLATION INSTRUCTIONS
 PREPARATION Approximate Installation Time: Tools Required for Installation: 60 minutes Hacksaw Electric Drill 3/16 Masonry Bit Pencil/Felt tip pen Safety Glasses Measuring Tape Masking Tape Standard Screw
Sliding Barn Door Hardware Installation Instructions BALDUR and ODEN
 Sliding Barn Door Hardware Installation Instructions BALDUR and ODEN Installation Instructions Structural Information For standard systems and most custom single door opening systems. General Overview
INSTALLATION INSTRUCTIONS for Bifold Doors (JII103)
") Thank you for selecting JELD-WEN products. Attached are JELD-WEN s recommended installation instructions for premium composite, hollow and solid core molded Bifold Doors. Bifolds are designed for fast
Thank you for selecting JELD-WEN products. Attached are JELD-WEN s recommended installation instructions for premium composite, hollow and solid core molded Bifold Doors. Bifolds are designed for fast
Wetroom Panel (Concealed Fix)
") Wetroom Panel (Concealed Fix) Instruction Manual DXFCPCF Important Information Toughened glass is completely safe for use in our shower enclosures and bath screens; providing our products are installed
Wetroom Panel (Concealed Fix) Instruction Manual DXFCPCF Important Information Toughened glass is completely safe for use in our shower enclosures and bath screens; providing our products are installed
HALE PET DOOR INSTALLATION INSTRUCTIONS HALE STANDARD PANEL MODEL
 HALE PET DOOR INSTALLATION INSTRUCTIONS HALE STANDARD PANEL MODEL Please read these instructions carefully and completely before attempting to install Hale Pet Doors; they will guide you through the steps
Installation Instructions For Slider Casement Air Conditioners
 Installation Instructions For Slider Casement Air Conditioners NOTE: These instructions describe installation in a typical wood framed window with a wood SLIDE-BY sash, or installation in a metal CASEMENT
INSTALLATION INSTRUCTIONS for Vinyl Windows without Nailing Fin (JII011) ImPOrTANT INFOrmATION & GlOssAry. rough OPeNINGs
 ImPOrTANT INFOrmATION & GlOssAry. rough OPeNINGs") Thank you for selecting JELD-WEN products. Attached are JELD-WEN s recommended installation instructions for vinyl windows without a nailing fin (including finless, flush fin and flange). Read these instructions
Thank you for selecting JELD-WEN products. Attached are JELD-WEN s recommended installation instructions for vinyl windows without a nailing fin (including finless, flush fin and flange). Read these instructions
majestic install ation guide barcelona three sided enclosure 24mm surface mounted wall channels and underframe to base
 majestic install ation guide barcelona three sided enclosure 24mm surface mounted wall channels and underframe to base These Instructions are for a left and right handed unit. The diagrams show a left
Hollow or Cinder Block Wall Mount Job Aid
 Summary This Job Aid covers: Hollow or Cinder Block Wall Mount Job Aid Hollow or Cinder Block wall Mount Bracket Installing the Mount Bracket into Cinder Block This Job Aid supports the Technician audience.
AM/FM ANTENNA KIT (TOUR-PAK MOUNT)
") -J077 REV. 008-0-0 AM/FM ANTENNA KIT (TOUR-PAK MOUNT) GENERAL Kit Number 7-98A Models For model fitment information, see the P&A Retail Catalog or the Parts and Accessories section of www.harley-davidson.com
-J077 REV. 008-0-0 AM/FM ANTENNA KIT (TOUR-PAK MOUNT) GENERAL Kit Number 7-98A Models For model fitment information, see the P&A Retail Catalog or the Parts and Accessories section of www.harley-davidson.com
AVENTOS HF Wood / wide aluminum door application
 AVENTOS HF Wood / wide aluminum door application Lift mechanism set Lift mechanism (qty 2) #7 x 35 mm (-3/8 ) wood screw (qty 0) Power factor 85 230 ( lift mechanism req.) 20F2200.N5 23 470 20F2200.N5
Beautifully Traditional
 Arcade 800mm Single Sliding Door Quadrant - nickel Arcade 900mm Single Sliding Door Quadrant - nickel ARC48 ARC49 INSTALLATION INSTRUCTIONS A www.arcadebathrooms.com IMPORTANT - Please read before installation
Heavy Glass Frameless Shower Door With Return Panel
 202 Anderson Ave., elvue, KS 66407 Phone: 800-669-9867 Fax: 800-393-6699 www.onyxcollection.com Heavy Glass Frameless Shower Door With Return Panel Full Showers with Return ench Seat with Return FRLSDRPL-0116
INSTRUCTIONS: LocknCharge Laptop Carts
 INSTRUCTIONS: LocknCharge Laptop Carts www.lockncharge.com Extra Tools required: Hammer, Philips head screwdriver, medium adjustable spanner. (Allen key supplied) (Panel colours for illustration purposes
Panel Track Installation Guide
 Panel Track Installation Guide We make it easy! BTG 493361 EN_0510 Before starting Your new Blinds To Go panel track is custom made to your specifications from the finest materials available. To ensure
SPIRAL STAIR KIT INSTALLATION MANUAL
 SPIRAL STAIR KIT INSTALLATION MANUAL Effective January 1, 2014 If you have any questions, please call the location that your Stair Kit was purchased from: Broomall, Pennsylvania 1-800-52-7427 Ontario,
SLIDING PATIO DOOR INSTALLATION INSTRUCTIONS USING FRAME SCREWS
 Vinyl Windows and Doors Manufactured by Pella Corporation Part Number: V984528 2012 Pella Corporation SLIDING PATIO DOOR INSTALLATION INSTRUCTIONS USING FRAME SCREWS Installation Instructions for Typical
How To Install Your Frameless Shower Enclosure
 How To Install Your Frameless Shower Enclosure a) Installing Single Frameless Door Side Mounted Wall Hinges b) Installing Frameless Door with In-Line Panel c) Installing Frameless Door Between In-Line
Item #: BTOL Assembly Instructions
 Item #: BTOL Assembly Instructions For our most current instructions, to request missing, lost or broken parts, or for any other Customer Service issues, please visit our website at www.walkeredison.com
Bathroom Installation Guide
 Bathroom Installation Guide Step-by-step installation of your cabinets We do a lot of groundwork to make it as simple as possible for you to assemble and install your new bathroom furniture yourself. We
AM/FM ANTENNA RELOCATION KIT
 -J0 REV. 008-09-0 AM/FM ANTENNA RELOCATION KIT GENERAL Kit Number 766-09 Models This kit is used to relocate a fender-mounted AM/FM antenna to a Detachable Tour-Pak on specific model motorcycles. For model
Installation Operation Care
 Installation Operation Care Duette and Applause Honeycomb Shades LiteRise Lifting System CONTENTS Getting Started: Product View... 1 Tools and Fasteners Needed... 2 Mounting Types and Window Terminology...
IN00419 (rev A) Aqua 6 Glide Quadrant and Off-set Quadrant Enclosure
 Aqua 6 Glide Quadrant and Off-set Quadrant Enclosure") IN00419 (rev A) Aqua 6 Glide Quadrant and Off-set Quadrant Enclosure Instruction suitable for both Quadrant & Off-set Quadrant variations. Instruction suitable for both Right and Left Hand fixing variations
IN00419 (rev A) Aqua 6 Glide Quadrant and Off-set Quadrant Enclosure Instruction suitable for both Quadrant & Off-set Quadrant variations. Instruction suitable for both Right and Left Hand fixing variations
Installation Guide. Bath and Wall Surrounds SERIES 7104 1021861-2-B
 Installation Guide and Wall Surrounds SERIES 7104 1021861-2-B Thank You For Choosing Sterling We appreciate your commitment to Sterling value. Please take a few minutes to review this manual before you
MGB Chrome Bumper Conversion
 MGB Chrome Bumper Conversion Installation Instructions For 1974 1/2-1980 MGB This kit requires cutting, welding, and painting. Professional installation recommended. Note: Every MGB body is slightly different
LACAVA. Table of Contents. Owner s Manual. Wall-mounted & Vessel Sinks PS#:
 LACAVA 2243 S. Throop St. Chicago, IL 60608 info@lacava.com www.lacava.com Owner s Manual Important: Keep this manual for future technical assistance and/or replacement parts. Please read the instructions
VISION SHOWER DOOR & TUB DOOR INSTALLATION INSTRUCTIONS
 VISION SHOWER DOOR & TUB DOOR INSTALLATION INSTRUCTIONS IMPORTANT DreamLine TM reserves the right to alter, modify or redesign products at any time without prior notice. For the latest up-to-date technical
Ceramic Glass Electric Galley Ranges
 Ceramic Glass Electric Galley Ranges OWNER S MANUAL Models # 65335, 65336, 75331, 75332 Read all instructions and warnings before operating. Force 10 Manufacturing Corporation Unit A 19169 21 st Ave Surrey,
Sun Windows General Information Sun New Construction Window Installation Instructions
 Sun Windows General Information Section 1 G F H H H A. Apply Weather Resistive Barrier B. Apply Sill Flashing Tape C. Place Waterproof Sill Shims D. Caulk Back of Nail Fin Sides & Top, Set Window, Fasten
Sliding Door Hardware Installation Instructions
 Sliding Door Hardware Installation Instructions Installation Instructions Structural Information For standard systems and most custom single door opening systems. General Overview ff All Krown Lab sliding
We urge you to read and follow the attached installation instructions. Failure to do so may void the warranty of this garden window unit.
 Important Information for New Construction Installations Attention Installer! We urge you to read and follow the attached installation instructions. Failure to do so may void the warranty of this garden
Installation Instructions
 READ BEFORE INSTALLING UNIT For Slider Casement Air Conditioners To avoid risk of personal injury, property damage, or product damage due to the weight of this device and sharp edges that may be exposed:
ENIGMA-X SHOWER DOOR & TUB DOOR INSTALLATION INSTRUCTIONS
 ENIGMA-X SHOWER DOOR & TUB DOOR INSTALLATION INSTRUCTIONS IMPORTANT DreamLine TM reserves the right to alter, modify or redesign products at any time without prior notice. For the latest up-to-date technical
Extra Tall Wide Span Gate
 Extra Tall Wide Span Gate MODEL NO: 1154 Owner s Manual 11/19/2013_BL READ ALL INSTRUCTIONS BEFORE ASSEMBLY AND USE OF GATE. KEEP INSTRUCTIONS FOR FUTURE USE. www.regalo-baby.com... Regalo International,
Retractable Screen. Replacement Screen Instructions
 Retractable Screen Patent Pending Replacement Screen Instructions For RTS, RET, & RTM Products ATTENTION! Retractable screens are not intended to provide security or provide for the retention of objects,
INFINITY-Z SHOWER DOOR & TUB DOOR INSTALLATION INSTRUCTIONS
 INFINITY-Z SHOWER DOOR & TUB DOOR INSTALLATION INSTRUCTIONS IMPORTANT DreamLine TM reserves the right to alter, modify or redesign products at any time without prior notice. For the latest up-to-date technical
UB1 AIR CONDITIONING UNIT INSTALLATION INSTRUCTIONS
 UB1 AIR CONDITIONING UNIT INSTALLATION INSTRUCTIONS INSTALLATION INSTRUCTIONS: Carefully read these instructions before installing your new air-conditioner. AUSTRALIAN AUTOMOTIVE AIR AL00500054E 1 Table
MIRAGE. Set-Up Instructions. www.skyline-exhibits.com
 MIRAGE Set-Up Instructions www.skyline-exhibits.com Table of Contents Mirage is available in many sizes from 32 tall tabletops to 92 tall backwalls. The following set-up and repacking instructions depict
Model 349KLX Remote Display Digital Scale User Instructions
 Model 349KLX Remote Display Digital Scale User Instructions P/N UM349KLX Rev 3-080713 1 Model 349KLX Thank you for your purchase of this Health o meter Professional product. Please read this manual carefully,
Models A spe n, Econoline C o l o n i al. and Savoy. Installation Instructions. Contractors Wardrobe
 Installation Instructions Models A spe n, Econoline C o l o n i al and Savoy Contractors Wardrobe DESIGNERS MANUFACTURERS TOLL FREE: (800) CW-DOORS (800) 293-77 www.cwdoor.com 2121 Avenue Hall Valencia,
Installation Instructions
 PUSH Installation Instructions A DA C O M PLIA NT shown with optional Bradley 90-75 faucet Front-Mounted Barrier Free Rectangular Bowl Stainless Steel Lav Table of Contents Pre-Installation Information...........2
Reachout Lock Replacement for Andersen 2-Panel and 4-Panel 400 Series Frenchwood Gliding, 200 Series Narroline, and Perma-Shield Gliding Patio Doors
 for Andersen 2-Panel and 4-Panel 400 Series Frenchwood Gliding, 200 Series Narroline, and Perma-Shield Gliding Patio Doors Thank you for choosing Andersen. For questions call 1-888-888-7020. For more information
Integral Kit Instructions
 Integral Kit Instructions For Fisher & Paykel Cabinet widths of 525, 635, 680, 790 mm wide For curved door Models Series B, C, D & G Manual 814980 Updated August 2008 IMPORTANT If your refrigerator has