Project 2: Making a Hanging Drawer & Shelf
|
|
|
- Crystal Morris
- 7 years ago
- Views:
Transcription
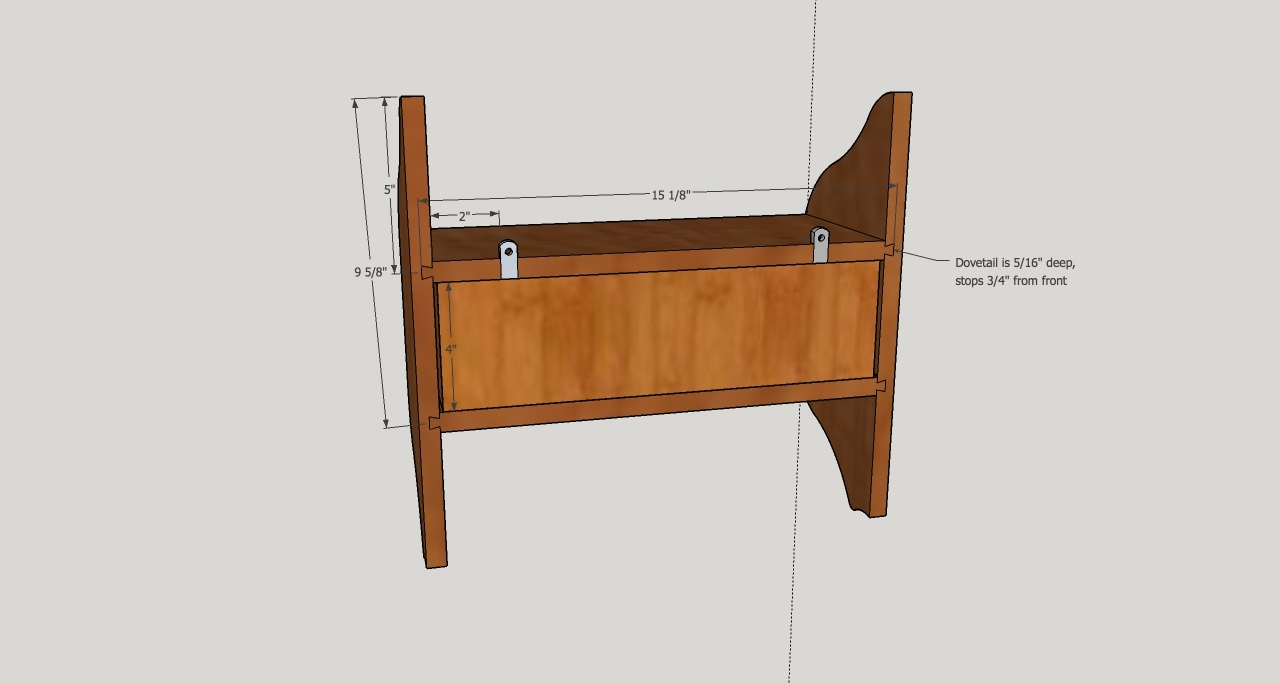
1 Project 2: Making a Hanging Drawer & Shelf Your second project is to construct a Hanging Drawer and Shelf, which includes using skills and tools from the first project. It also includes many new skills, including measurement, several different types of joinery, reading a set of plans and a cut list, and using some hand tools. Be sure to put your name & block # on all your parts with a pencil throughout the project 1. First, to make sure all of our pieces are the same thickness, head to the Timesaver and run them through once, bringing them to exactly 5/8 thick. 1.Head to the miter saw or table saw and cross cut your boards. You will need 2 pieces at 15 (sides) and 2 pieces at 15 1/8 (shelf/drawer supports). See Plan A. 2. Layout the locations for your sliding dovetails on your sides. Put your pieces together, open them like a book. Locations for dovetails are on Plan B. The dovetails should stop 3/4 from the edge of your pieces. 3. Head to the lumber room and use the dado machine to cut sliding, stopped dovetails in the pieces at 15 long. The preset depth of your sliding dovetail is 5/ Using the router table with a dovetail bit and finger board, cut the sliding dovetail on the ends of the shelf/drawer support pieces. These should be tight to the side and fit snugly in the socket you cut on the dado machine. Be very careful as you are going across the grain. 5. Rip the shelf/drawer support pieces to 6 7/16. This will provide a small shadow line. 6. Now, using a hand saw & chisel trim the front ends of these pieces so they will fit flush with the back of the case. You will now have a small reveal at the intersection of the horizontal and vertical pieces. 7. Using the template for the sides, layout each side with the proper end. Be careful of your dovetail joints, be sure they are oriented properly in relation to the template! Use the bandsaw to cut out the sides and sand up to the line using various sanders. 8. Before you assemble the carcass of your project, sand all the sides of each part to 180 grit. It s easier to sand individual parts than an assembled project. After you have sanded, glue and clamp your project. Finally, check your carcass for square by measuring the diagonals. This measurement should be the same if the carcass is square. If not, use a clamp on the long diagonal and tighten it up until both measurements are the same. Be sure to wipe away squeeze out with a damp paper towel! Write your name and block in pencil on the side and let it set in the clamps overnight. 9. Now, take a drawer face (4 5/8 wide, 5/8 thick) and cross cut it at the table saw or miter saw to 14 1/2 long. See Plan C. 10.Take the piece that will become your sides and back (3 7/8 wide, 1/2 thick, 28 long). At the table saw or miter saw, cross cut your board so you have 2 drawer sides, 6 long, and one drawer back, 14 1/4 long. See Plan D. 11. Use the table saw set up with a dado head and a sacrificial fence to create rabbets (not rabbits) on all 4 edges of the drawer face and the two ends of the drawer back. See Plan D. The rabbets on the drawer face ends should be the same width +
2 1/8 (approximately 5/8 wide) as your drawer sides. The rabbets on the drawer face top and bottom should be about 5/16. The rabbets on the back should be the same thickness as your drawer sides (1/2 ). Remember to use the miter gauge when going across the grain and a push stick for going with the grain! 12. Next, using the table saw with the dado blade set 1/4 high and 1/4 from the fence, run dados in the drawer back and side. 13. At the other table saw, run the dado on your drawer face, which is at a different location then the drawer sides and back. Dry fit your drawer together and mark the location of the drawer side dados on your face and run your dado to that line. *This will already be set up for you. 14. Round over the front of the drawer face using a 1/4 round over bit in the router table that has the bearing aligned with the fence. Use a miter gauge and a backer block to prevent tear out for going across the grain. 15. Measure and trim your drawer bottom on the table saw to fit in the dados. Cut it about 1/16 less than the overall dimension to allow for expansion and contraction. 16. Sand all your drawer parts, then assemble your drawer with brad nails and glue. Glue and nail the sides and drawer face together first, nailing through the drawer sides. Slide your drawer bottom into the dados WITHOUT GLUE. Next, glue and nail your drawer back onto the drawer sides. Finally, check your drawer for square. Your drawer should fit right into your shelf. 17. Sand your entire project to 220 grit. Round over all sharp edges with 220 grit sandpaper. 18. Now it s time to finish your project. Blow off excess dust, and head to the finishing room. Apply the stain, covering all surfaces of the carcass, but only the face and rabbeted edges of the drawer. Wipe off all the excess after 10 minutes. 19. Apply a coat of polyurethane after the stain has dried for 24 hours. 20. Sand all the polyurethane with 220 grit sandpaper and use a tack cloth to wipe off all the dust. Apply another coat of polyurethane. Repeat as needed for 3 coats of polyurethane. 21.While the polyurethane is drying, use a vise, a metal countersinking bit and a drill to countersink a hole in the L brackets to accept the mounting screws 22. After you ve completed your finish, using a hammer, chisel and razor knife, cut 2 small mortises at the locations laid out in your plans in the back of the carcass to accept the L brackets. See Plan B. 23. Last, take some masking tape and apply it to the center of your drawer front. Use a straight edge and mark an X going from corner to corner of the drawer face. Go up 1/8 from the middle. Drill a hole the diameter of the screw for the pull. Use a backer block when drilling through the face to prevent blowout. Remove the tape and tighten down your drawer pull with a screw driver. 24. Congratulations! You ve finished! Now get to work on your personal project!
3 Plans A B

4 C D
5 Evaluation *This evaluation list MUST be submitted with your project otherwise 10 points will be subtracted from your project grade! Category 0-3 points 4-7 points 8-10 points Points received Dimensions Overall dimensions are greater than 1/4 off specified dimensions Overall dimensions are within 1/8-1/4 of plans Overall dimensions are within 1/16 of plans Templating 3/8 or more difference of the matching template 1/8-1/4 of the matching template Within 1/16 of the matching template Stopped Sliding Dovetails Are very loose, not flush with the back, major gaps, lots of squeeze out Are slightly loose, 2 ends are not flush with the back, some small gaps or some glue squeeze. Are snug, flush with the back and tight with the sides, no glue squeeze out Sanding Sanding is rough, uneven or incomplete. Sanding is somewhat smooth or rough in areas, uneven or not to 220 grit, some edges not rounded over Sanding is smooth, even and to 220 grit, all edges are slightly rounded over Drawer Construction Joints are loose, not well sanded, nails are not set, drawer face does not fit flush against supports. More than 1/8 out of square. Drawer face is not rounded over or beveled. Drawer bottom is unfinished. Joints are somewhat tight, not well sanded, some nails not set, or drawer face does not fit flush against supports. 1/16-1/8 out of square. Drawer face is rounded over with some tear out or not consistently beveled. Drawer bottom is loose. All joints are tight, neatly sanded, nails are set below the surface and drawer face fits flush against the supports. Less than 1/16 out of square. Drawer face is rounded over with no tear out or consistently beveled. Drawer bottom fits well. Finishing No finish was applied Polyurethane is somewhat smooth, some blotches in stain Polyurethane is smooth, stain is even, not blotchy Other Mistakes (see comments) Major mistakes made Some, minor mistakes made No other mistakes made Comments: Total /70
Ladder Shelf Plans Final dimensions: 25 L x 21 W x 72 H
 Ladder Shelf Plans Final dimensions: 25 L x 21 W x 72 H Copyright 2011. MLCS Woodworking. Page 1 Router bits and supplies needed: 3/8 Rabbeting bit (#10691) 1 Bottom Cleaning bit (#7941) Top and Bottom
DIY CABINET REFACING INSTALLATION GUIDE
 DIY CABINET REFACING INSTALLATION GUIDE CABINET REFACING INSTALLATION Are you ready to reface your outdated cabinets? This guide will show you how to install your new Facelifters Cabinet Refacing Products
Gate Leg Drop Leaf Table Plans
 Preparing the table top blanks: Cut and glue enough 3/4 stock to make three panels 40 long by 24 wide (they will be cut to final size at a later time). While the glue dries we will work on the legs. Preparing
How to Build a Poker Table
 How to Build a Poker Table www.pokertablematerials.com 10-Person Poker Table- 96 x 48 These are step by step instructions for building a poker table. The table will measure 48" x 96" and have a 4" wide
How to Build Your Own CornHole Game
 How to Build Your Own CornHole Game DIMENSIONS Here is a diagram with the basic measurements for the Cornhole board game. SUPPLIES 1/2 thick sheet of plywood one 4 x4 or two 2 x4 s 8 long 2 4 s (4) 4 1/2
Installing Window and Door Mouldings
 Installing Window and Door Mouldings About Window and Door Mouldings The trim around windows and doors greatly influences the look and style of your interior. They also bridge the gaps and cover spaces
SHELVES. www.tedswoodworking.com
 SHELVES It's rare that bookshelves look as interesting as the objects you display on them. After all, how much can you decorate the edges of your shelves and sides? This unit is unusual because the shelves
Raised Panel Doors Made Simple With Freud s 2+2 Raised Panel Bit Set
 Raised Panel Doors Made Simple With Freud s 2+2 Raised Panel Bit Set Congratulations on your purchase of Freud s world class 2 + 2 Raised Panel Bit Set. This revolutionary design combines two small wings
KITCHENS. Tip PAGE 1 FITTING YOUR KITCHEN GUIDE. How to mark out a kitchen. Tools required for installing a kitchen STEP ONE STEP TWO STEP THREE
 FITTING YOUR KITCHEN GUIDE How to mark out a kitchen PAGE 1 Before starting on the installation, measure 870mm from the lowest point of the floor and mark a datum line around the room to indicate where
Complete Dovetail Jig Instructions
 Complete Dovetail Jig Instructions 18 15 1 12 13 8 (22818) 19 17 16 4 3 6 14 5 9 9 11 10 2 PARTS LIST - COMPLETE DOVETAIL JIG Introduction Your new dovetail jig will cut Full Through Dovetails and three
Making Wooden Hinges
 Making Wooden Hinges By Alex Reid - www.mokkou.jp Materials and tools used - 3.2mm straight router bit - 1/8 round-over router bit - Flush-cut straight bit (with bearing on bottom) - Finger-joint jig -
HONING LATHE DUPLICATOR CUTTERS
 Lay the flat face of the cutter or bit on the flat top surface of the hone with the rest of the cutter overhanging the edge. Rub the cutter or bit up and down the hone (Figure 24-44). Be sure to hold the
The tablesaw may be your shop s most valuable cutting. Crosscut Sleds. Foolproof. Innovative approach guarantees perfect results
 Foolproof Crosscut Sleds Innovative approach guarantees perfect results B Y A L A N T U R N E R The tablesaw may be your shop s most valuable cutting tool, but for precise, repeatable crosscuts it needs
Building an Off-Center Fixture for Turning Pendants
 Building an Off-Center Fixture for Turning Pendants Turning a pendant off-center with most available metal pendant chucks means that you will have a significant amount of mass off center, which will limit
Home Storage Projects
 This is an excerpt from the book Home Storage Projects by Paul Anthony Copyright 2001 by The Taunton Press www.taunton.com KITCHEN WORK STATION IN MANY KITCHENS, counter space is at a premium. There just
WHI 90-Minute Rated Veneered Door Frame Installation Instructions
 No. 940-03-10 INSTALLATION INSTRUCTIONS 90 MINUTE RATED VENEERED DOOR FRAME DOOR REQUIREMENTS: Consult the door manufacturer to make sure that the doors are qualified for the hardware to be installed,
Here is your set of Detailed Plans from Copyright 2004 All Rights Reserved
 Here is your set of Detailed Plans from Copyright 2004 All Rights Reserved Materials for the House Here is the list of materials you will need to construct the basic house then to cover it with roofing
www.cornholesupplies.com
 www.cornholesupplies.com How To Build Regulation Cornhole Boards Home of the Original Cornhole Bags and Boards Supply List: 1-4' X 8' Piece of Plywood (pre sanded) 4-2" X 4" X 8' Studs (2 by 4s make sure
The Hive Bodies. In the Beekeeper s Work Shop. Building a Bee Hive: The Hive Bodies. by Stephen E. Tilmann
 The Hive Bodies In the Beekeeper s Work Shop The hive body is the heart of a managed bee hive colony (Figure 1). It is where the queen lays her eggs, the house bees raise the brood and the workers store
Dining Tables by Kim Carleton Graves
 This is an excerpt from the book Dining Tables by Kim Carleton Graves Copyright 2001 by The Taunton Press www.taunton.com Vineyard Table The vineyard table is almost as old a design as the trestle table,
Router Table Plans. www.bobsplans.com
 www.bobsplans.com Router Table Plans Increase the capabilities of your router with this weekend project. Features a sliding fence with EZ-Mount clamps. These clamps are simple to make and grip tightly
Panel/Hand Saw Kit Assembly Instructions
 Panel/Hand Saw Kit Assembly Instructions PLEASE READ THE FOLLOWING INSTRUCTIONS BEFORE BEGINNING Brief Summary You will be performing the following Tasks: 1. Determining the degree of shaping laying out
Chapter 3 Installing Over-the-Post Railing on an L-Shaped Stair
 49 Chapter 3 Installing Over-the-Post Railing on an L-Shaped Stair In this chapter: The Over-the-Post Balustrade System Determining the Rail Centerline Using Rail Bolts Making a Pitch Block Laying Out
Picnic Table Plans. Made out of a single sheet of plywood, it s also portable! By Kevin Ayer. This children's picnic table would
 Picnic Table Plans Made out of a single sheet of plywood, it s also portable! By Kevin Ayer Materials One 4- by 8-foot sheet of 3 4-inch AC plywood Twelve 11 4-inch wood screws Primer and exterior paint
Easy Six Cube Bookshelf. Copyrighted Material. Page 1
 Compare to: Land of Nod Cube Collection, 6 Cube Bookshelf Skill Level: Beginner Easy Six Cube Bookshelf I love the storage cubes in kids rooms because they give you an opportunity to have your children
Hive Top Ventilation Shims
 Hive Top Ventilation Shims When preparing your bee hives for the winter, it is very important to provide for ventilation at the top of the hive. Through out the winter, the bees are expelling a lot of
These instructions will show you how to install an internal door into a non-loadbearing partition wall. The instructions are split into three parts.
 No 8 in the series of 'How to' brochures produced by PlaceMakers, New Zealand How to Frame and Hang a Door These instructions will show you how to install an internal door into a non-loadbearing partition
The JIG is UP Or A couple hours up front pays in the long run.
 Ed Simon Page 1 of 5 The JIG is UP Or A couple hours up front pays in the long run. A large part of the fun of beekeeping is the construction and assembly of the equipment. Since it is a hobby, I decided
COMPLIMENTARY WOODWORKING PLAN
 COMPLIMENTARY WOODWORKING PLAN Adirondack Chair This downloadable plan is copyrighted. Please do not share or redistribute this plan in any way. It has been created for Wilton Tools, a division of WMH
Vinyl Brick Mould Field Installation Instructions All Vinyl and Vinyl Clad Windows
 Vinyl Brick Mould Field Installation Instructions All Vinyl and Vinyl Clad Windows Viewed from the exterior. IMPORTANT: Please read before you begin installation. TABLE OF CONTENTS AND TOOL / MATERIAL
Children s Furniture Projects
 This is an excerpt from the book Children s Furniture Projects by Jeff Miller Copyright 2002 by The Taunton Press www.taunton.com CHILD S ROCKER KIDS ARE ALWAYS IN MOTION. It s not easy to get them even
HOW TO INSTALL A BEAUTIFUL NEW KITCHEN
 HOW TO INSTALL A BEAUTIFUL NEW KITCHEN Easy to follow step-by-step kitchen cabinet installation TOOL AND MATERIAL LIST Hammer Pry bar Screwdriver Phillips Flathead Level Tape measure Pencil Straight edge
Introduction to Door Construction
 Entry Door Construction Made Simple with Freud s Entry & Interior Door Router Bit System Congratulations on your purchase of Freud s Entry & Interior Door Router Bit System. This unique set allows you
Pepper Mill Instructions by Fred Kachelhofer
 by Fred Kachelhofer I have seen Nick Cook turn a pepper mill twice and read his article posted at http://www.nickcookwoodturner.com/articles.htm (follow link and then click on Pepper Mill ). I have had
INSTALLATION INSTRUCTIONS for Bifold Doors (JII103)
") Thank you for selecting JELD-WEN products. Attached are JELD-WEN s recommended installation instructions for premium composite, hollow and solid core molded Bifold Doors. Bifolds are designed for fast
Thank you for selecting JELD-WEN products. Attached are JELD-WEN s recommended installation instructions for premium composite, hollow and solid core molded Bifold Doors. Bifolds are designed for fast
Premier & Deluxe 3-Season Room Sliding Glass Door
 DTSSGD-11 Premier & Deluxe 3-Season Room Sliding Glass Door Installation Instructions Screen Door Seal Left Side Track Top Track Assembly Right Side Track Right Side Trim Sliding Glass Door Sliding Screen
A Simple Approach to Raised-Panel
 A Simple Approach to Raised-Panel 82 FINE HOMEBUILDING Wainscot BY GARY STRIEGLER Stock molding and MDF panels transform a room 1 2 3 4 3 5 6 Raised-panel wainscot speaks of a time when craftsmen had an
DE Frame with C Series Sidelight
 TOOLS REQUIRED Tape measure 6' magnetic level 3' magnetic level Screw gun with clutch adjusted #2 phillips tip #3 phillips tip Screwdriver (used to adjust frame on will using oval slots) Pry Bar Powder
Brick Veneer Construction
 Brick Veneer Construction Check list of suggested tools & support items Claw hammer Tape measure 3/4" [19 or 20] Wood chisel Wood or plastic shims Pry bar Utility knife Caulking and caulking gun Power
Composite Stone Veneer
 Composite Stone Veneer Installation Guide Ver 1 Jun 2015 www.compstone.com Composite Stone Veneer Installation Guide Contents Introduction & Overview 3 Required Tools 4 Optional Tools 4 Attachment Guidelines:
BUILDINGA 1/10 SCALE FLATBED TRAILER
 VOLUME 1, ISSUE 1 BUILDINGA 1/10 SCALE FLATBED TRAILER BUILT, DESIGNED & WRITTEN BY NATHAN MYERS MATERIALS: FEATURES: While the design was kept simple to allow anyone to be able to build their own trailer,
Build a Precision. Crosscutting Sled
 Build a Precision Crosscutting Sled On-the-money, splinter-free crosscuts are well within your grasp using most well-made tablesaws, but you do have to do a few things to ensure great results cut after
MONTANA STATE UNIVERSITY SCHOOL OF ARCHITECTURE WOOD SHOP SAFETY MANUAL. Craft Shop Manager Bill Clinton wclinton@montana.
 MONTANA STATE UNIVERSITY SCHOOL OF ARCHITECTURE WOOD SHOP SAFETY MANUAL Craft Shop Manager Bill Clinton wclinton@montana.edu 994 4402 1 Policies and Procedures 1. Eye Protection Eye protection must be
Things you need to assemble the tube actuator. Left to right. are small piece of masking tape, super glue,pen knife and small
 Things you need to assemble the tube actuator. Left to right are small piece of masking tape, super glue,pen knife and small crosspoint screwdriver. You will also need a few drops of light oil. Begin by
Assembly GUIDE. display wine cellar kits. Required. Suggested. Questions? 888.373.6057. or visit wineracksamerica.com
 Page 1 Middle Ladder End Ladder Display Tray Screwless Connector Package Contents * All models follow the same assembly procedure varying only in the number of middle ladders your rack will require. Depending
HOW-TO LAY HARDBOARD OR PLYWOOD FLOOR OVERLAY
 HOW-TO HOW-TO LAY HARDBOARD OR PLYWOOD FLOOR OVERLAY Most floor coverings, if laid over uneven wooden floors, will wear unevenly and look unsightly. The answer is to cover the old boards with hardboard
Assembly Instructions Basic Folding-Leg Box Frame Style
 Assembly Instructions Basic Folding-Leg Box Frame Style Basic Folding Leg Cornhole Board Concept 1 2 12 3 1 2 3 15 16 4 1 4 52 9 R1 3 4 6 21 48 12 1 4 Bolt Washer 9 13 16 35 Washer Double Nut CornholePlayers.net
Making Laminated Rolling Pins
 Making Laminated Rolling Pins Introduction Why go to the trouble to make a rolling pin when you can go down to your local discount store and buy one that works just fine for less than $5? As wood turners,
Gear PEPSI CAN STOVE INSTRUCTIONS
 Gear PEPSI CAN STOVE INSTRUCTIONS [NOTE: Updated Instructions are now available. The new stove is less likely to develop flame leaks and the fuel/air mixture is improved. Instructions for a simmer ring
REDWOOD. Adirondack Chair. Naturally beautiful Easy to use Practical and economical Durable and stable Resistant to decay and insects
 B U I L D I T W I T H REDWOOD Adirondack Chair R E D W O O D Naturally beautiful Easy to use Practical and economical Durable and stable Resistant to decay and insects Adirondack Chair BUILD THE CHAIR
DINING OUT. Build this outdoor table and bench set. TEXT AND PHOTOS BY NEAL BARRETT Photo by Eugene Thompson
 DINING OUT Build this outdoor table and bench set. TEXT AND PHOTOS BY NEAL BARRETT Photo by Eugene Thompson http://popularmechanics.com/home_improvement/furniture/2001/4/table_and_bench_set/print.phtml
Total Quantity: IMPORTANT: Plans are to be used with 3 x6 Plexiglass (SKU #298-017).
.") # Materials: Quantity Each: 4x4x8 3 2x4x8 2 2x8x8 1 4x8x3/4 plywood 1 3 x6 corkboard (can be 18 of the 1 x1 pieces) 1 3 x6 plexiglass 1 8 door casing 3 Primer 1 qt. Total Quantity: TIPS FOR SUCCESSFUL
# Materials: Quantity Each: 4x4x8 3 2x4x8 2 2x8x8 1 4x8x3/4 plywood 1 3 x6 corkboard (can be 18 of the 1 x1 pieces) 1 3 x6 plexiglass 1 8 door casing 3 Primer 1 qt. Total Quantity: TIPS FOR SUCCESSFUL
QWALL 4 ACRYLIC SHOWER WALL INSTALLATION INSTRUCTIONS
 QWALL 4 ACRYLIC SHOWER WALL INSTALLATION INSTRUCTIONS IMPORTANT DreamLine TM reserves the right to alter, modify or redesign products at any time without prior notice. For the latest up-to-date technical
OLD BRICK ORIGINALS KILN-FIRED THIN BRICK VENEER Installation Guide. GeneralShale.com
 OLD BRICK ORIGINALS KILN-FIRED THIN BRICK VENEER Installation Guide GeneralShale.com OLD BRICK ORIGINALS THIN BRICK VENEER Page 2 INTRODUCTION Check local building codes for proper installation guidelines
Clad Direct Glaze Window Installation Instructions
 Clad Direct Glaze Window Installation Instructions Sill flashing and sealing: 2. An overview of the proper flashing sequence is shown in figure 1. Please read entire installation instructions carefully
Black Wolf POCKET BILLIARD TABLE INSTALLATION MANUAL. SERVICE DEPARTMENT P.O. BOX 68 BRISTOL, WI 53104
 Black Wolf TM POCKET BILLIARD TABLE INSTALLATION MANUAL www.brunswickbilliards.com SERVICE DEPARTMENT P.O. BOX 68 BRISTOL, WI 53104 51-905710-000 SEPTEMBER 2010 NOTE: Please use the instructions in this
Installing Shutters using Fasteners
 Installing Shutters using Fasteners Electric drill, ¼" drill bit, 3 8" drill bit, hammer, and shutter fasteners. (¼" carbide drill bit is required for stucco, hardboard, fiber cement, brick or masonry.)
2002 2005 Mini Cooper S Grille Install Instructions
 2002 2005 Mini Cooper S Grille Install Instructions Lower Front Grille BEFORE AFTER Package Contents 1 perforated grille (Stiletto, RAZR, or Monster) 6 Zip Tie Mounting Pads 1 is for the temp. sensor 5
2.9 WINDOW & DOOR BUCKS
 2.9 WINDOW & DOOR BUCKS Bucks provide attachment surfaces for windows and doors while holding back concrete from these openings during concrete placement. Mark the center and edges of openings as you place
KITCHEN INSTALLATION GUIDE
 KITCHEN INSTALLATION GUIDE The step-by-step guide to installing your new kitchen right The materials and tools you ll need This brochure is your guide to preparing and installing your new kitchen. Inside
Active and Passive Sash Replacement
 for Andersen Gliding Windows Read all instructions carefully before attempting this procedure. If you have any questions about your ability to complete the procedure, call Andersen at 1-888-888-7020 for
CT052 12 DOVETAIL JIG Manual
 CT052 12 DOVETAIL JIG Manual Table of Contents Introduction... 3 Commentary... 3 Important Safety Rules... 4 Features... 5 Unpacking... 6 Assembly... 6 Hand Lever... 6 Mounting... 6 Capacities... 7 Preparation...
A Screened Bottom Board
 A Screened Bottom Board As the name implies, a bottom board sits at the bottom of the hive; it is the floor of the hive (Figure 1). Basically, the bottom board is a platform connected to two side rails.
Stair Parts Installation. Tricks
 Stair Parts Installation Tips & Tricks Introduction Your DIY staircase guide Welcome to the Stairpart home installation guide. Your stairway is both a functional and focal point in your home, so keeping
RadianceRail Installation Guide
 RadianceRail Installation Guide Installing RadianceRail with CableRail by Feeney... 2 Installing CableRail by Feeney for RadianceRail... 7 Installing RadianceRail Stairs with CableRail by Feeney... 10
Aspect Metal Peel & Stick Tile Installation Guide
 Aspect Metal Peel & Stick Tile Installation Guide Proper surface preparation is essential for a successful project Failure to follow recommended surface preparation instructions may void the warranty Read
Cedar Cottage Doghouse Plans
 Overlapping cedar shingles add an element of charm to this medium size doghouse. The walls, floor, and trim are constructed of solid cedar, making it naturally weather resistant and provides excellent
BLADE REPAIR INSTRUCTION BOOKLET
 BLADE REPAIR INSTRUCTION BOOKLET Contents Section I: Section II: Section III: Section IV: Section V: Section VI: Removing a Blade Refer to this section if you need to remove the blade from an oar shaft.
We urge you to read and follow the attached installation instructions. Failure to do so may void the warranty of this garden window unit.
 Important Information for New Construction Installations Attention Installer! We urge you to read and follow the attached installation instructions. Failure to do so may void the warranty of this garden
Wine Rack & Glass Storage Bench Chris Gardner
 Wine Rack & Glass Storage Bench Chris Gardner Quantity Length Width Material Part 2 48 16 3/4 birch plywood top, bottom 2 14 16 3/4 birch plywood sides 2 14 13 3/4 birch plywood support dividers 2 3 15
Speed-Mat Rectangle Cutter
 Speed-Mat Rectangle Cutter 1 Honeycomb baseboard. 2 Left hold down. 14 3 Bottom hold down. 4 4 Left / right rule. 8 5 8 5 Left / right rule pointer. 1 6 Top / bottom rule. 7 Top / bottom rule pointer.
MGB Chrome Bumper Conversion
 MGB Chrome Bumper Conversion Installation Instructions For 1974 1/2-1980 MGB This kit requires cutting, welding, and painting. Professional installation recommended. Note: Every MGB body is slightly different
Hoosier Step Stool. America s leading woodworking authority. Step by Step construction instruction. A complete bill of materials.
 America s leading woodworking authority Step by Step construction instruction. Hoosier Step Stool A complete bill of materials. Exploded view and elevation drawings. How-to photos with instructive captions.
1958-64 WINDOW CHANNEL, WEATHERSTRIP & WHISKER STRIP REPLACEMENT FOR 2-DOOR SEDANS
 By Denny Williams Photos by Denny Williams 1958-64 WINDOW CHANNEL, WEATHERSTRIP & WHISKER STRIP REPLACEMENT FOR 2-DOOR SEDANS Denny Williams - Technical Writer Denny is first and foremost a dyed-in-thewool
NATURAL RAILING INSTALLATION INSTRUCTIONS
 NTURL RILING INSTLLTION INSTRUCTIONS Manufactured by fiberondecking.com 800.573.8841 FI-0217-PKG 5/14 Natural Railing Installation Instructions Natural Top Rail Profile Required Tools and Supplies: Power
INSTRUCTION MANUAL TOOLS NEEDED FOR ASSEMBLY: OPTIONAL FINISHING MATERIALS: Champaign, Illinois (217) 398-8970 E-mail: partssupport@hobbico.
 398-8970 E-mail: partssupport@hobbico.") INSTRUCTION MANUAL Thank you for purchasing the Hobbico Ultra-Tote! You have purchased one of the finest values available in field support equipment. We think you will be impressed with the design and
INSTRUCTION MANUAL Thank you for purchasing the Hobbico Ultra-Tote! You have purchased one of the finest values available in field support equipment. We think you will be impressed with the design and
SHOP NOTES METAL SHAPER FOR YOUR SHOP
 SHOP NOTES METAL SHAPER FOR YOUR SHOP A METAL SHAPER is indispensable for certain machining operations where flat surfaces must be produced within very close limits, such as machining flats on castings,
Router. A. Identify the major parts of the router. B. Complete a written test on safety and operating procedures of the router with 100% accuracy.
 Router I. Competencies Given a properly adjusted router, instruction and demonstration of use, each student will be able to: A. Identify the major parts of the router. B. Complete a written test on safety
Lathe Milling Attachment
 Lathe Milling Attachment By L C. MASON BY CLEVERLY stacking cold-rolled flat stock together, T-slots and slide for this lathe milling attachment are made without costly machinery. In fact, only two tools,
AZEK Rail Install Guide
 TRIM MOULDING DECK PORCH RAIL PAVERS AZEK Rail Install Guide Installing AZEK Rail with CableRail by Feeney... 1 Installing CableRail by Feeney for AZEK Rail... 7 Installing AZEK Rail Stairs with CableRail
FREEBIRD THE ORIGINAL D.I.Y. ORNITHOPTER! Tools and Glue. Required Materials
 Do not try to make your ornithopter using "household materials". If you want it to fly, you have to build it right. FREEBIRD THE ORIGINAL D.I.Y. ORNITHOPTER! Wingspan: 16 inches Weight: 1/4 ounce The Ornithopter
INSTALLATION INSTRUCTIONS for Premium Pocket Windows (JII022) IMPoRtaNt INFoRMatIoN & glossary. safety & HaNdlINg
 IMPoRtaNt INFoRMatIoN & glossary. safety & HaNdlINg") Thank you for selecting JeLd-weN products. Attached are JeLd-weN s recommended installation instructions for pocket (replacement) double-hung, casement, awning, picture or transom windows, designed to
Thank you for selecting JeLd-weN products. Attached are JeLd-weN s recommended installation instructions for pocket (replacement) double-hung, casement, awning, picture or transom windows, designed to
Overnight Sensations Speaker Kit
 Overnight Sensations Speaker Kit Thank you for purchasing the Overnight Sensation cabinet kit. This speaker kit was precision cut using CNC machinery for the best possible fit and finish. With a little
SPRITE and BIGFOOT DESKTOP CNC MACHINE KIT ASSEMBLY INSTRUCTIONS
 SPRITE and BIGFOOT DESKTOP CNC MACHINE KIT ASSEMBLY INSTRUCTIONS README FIRST: Thank you for purchasing your MyDIYCNC Desktop CNC Machine Kit. We hope this versatile and innovative machine brings you many
HVAC Vents & Diffusers
 2 HVAC Vents & Diffusers Drywall, Stone, & Wood Applications TRUFIG can be installed in a variety of finishes and surfaces. This guide will detail the install of HVAC vents and diffusers in drywall, stone,
FRAMED & MOUNTED TILE MURAL
 Page 1 of 5 There is no denying that tile murals have taken the sublimation industry by storm. The unique ability to take a customer s artwork or high resolution photograph, tile it using your software
GARDEN WINDOW GLAZING AND DE-GLAZING INSTRUCTIONS
 GARDEN WINDOW GLAZING AND DE-GLAZING INSTRUCTIONS DE-GLAZING 1.) If there is any PVC cement covering the joints where external glazing bead strips meet, cut through the cement with a utility knife. 2.)
Beadboard Wall Bookcase
 Beadboard Wall Bookcase Note: The maximum load for each shelf is 30lbs.This hanging system is meant for drywall/wood stud mounting only. If walls are concrete, brick or plaster, please consult your local
Barewood Octagon and Elongated Windows Installation Instructions
 Step-by-step instructions to a beautiful window. Measuring and Installation of your new window from Century Specialty Windows couldn't be easier with our step-by-step instructions. Quality, function and
DECKING INSTALLATION, CARE & MAINTENANCE INSTRUCTIONS. 866.729.2378 MOISTURESHIELD.COM limited lifetime warranty 866.729.2378 WWW.MOISTURESHIELD.
 DECKING INSTALLATION, CARE & MAINTENANCE INSTRUCTIONS 866.729.2378 MOISTURESHIELD.COM limited lifetime warranty Welcome To The Even Greater Outdoors. Congratulations on choosing MoistureShield for your
Please calculate with around 5% more square meters than needed because you will have material loss due to cutting and sorting.
 1. TEKA Soft Loc Installation Guide Thank you for having chosen TEKA Parquet. To guarantee a constant quality product TEKA engineered hardwood flooring is made out of selected wood species and runs only
Replacement Window Installation Guide Non-Impact & Impact Resistant Windows without Nailing Fin
 Replacement Window Installation Guide Non-Impact & Impact Resistant Windows without Nailing Fin americancraftsmanwindows.com Project Requirements: Failure to follow these instructions may void product
Go-kart for little race-drivers
 Go-kart for little race-drivers Drill and drive. Go-kart What it lacks in speed, it more than makes up for in fun: the go-kart will excite little race-drivers. 1 Introduction It s only a go-kart, but it
AZEK Rail Install Guide
 TRIM MOULDING DECK PORCH RAIL PAVERS AZEK Rail Install Guide Installing AZEK Rail with Glass Infill... 2 Installing AZEk Rail Stairs with Glass Infill... 9 Notes...14 Please read all instructions completely
Garage Workbench Plans
 www.bobsplans.com Garage Workbench Plans Every home woodworker knows the importance of making efficient use of the available space in his or her shop. This workbench is designed to provide the maximum
WOODWORKS: ADVANCED PROJECT 2008-2009 TV STAND
 WOODWORKS: ADVANCED PROJECT 2008-2009 TV STAND For advanced woodworkers, this project is a great exercise in typical cabinet construction. The case, face-frame, doors and drawer are great small-scale samples
Basement Window Installation Guide Hopper and Sliding
 Basement Window Installation Guide Hopper and Sliding americancraftsmanwindows.com Project Requirements: Installation must comply with all applicable building codes. Existing window frame, wall and weatherresistant
How to Install UnderDeck The Original.
 How to Install UnderDeck The Original. TOOLS: Chalk Line Caulk Gun Garden hose or water bucket Gloves Hammer or Screw Gun Power Mitre Saw with OSB Blade Pencil Pliers Safety Glasses Straight Edge / Carpenter
How to Install GoBoard:
 How to Install GoBoard: A Step-by-Step Guide Durable, Ultra-Lightweight, Waterproof Tile Backer Board Introducing GoBoard Every tiling project requires a durable, waterproof surface under the tile, called
majestic install ation guide barcelona three sided enclosure 24mm surface mounted wall channels and underframe to base
 majestic install ation guide barcelona three sided enclosure 24mm surface mounted wall channels and underframe to base These Instructions are for a left and right handed unit. The diagrams show a left