Fold-down Outfeed Table
|
|
|
- Meryl Thomas
- 7 years ago
- Views:
Transcription

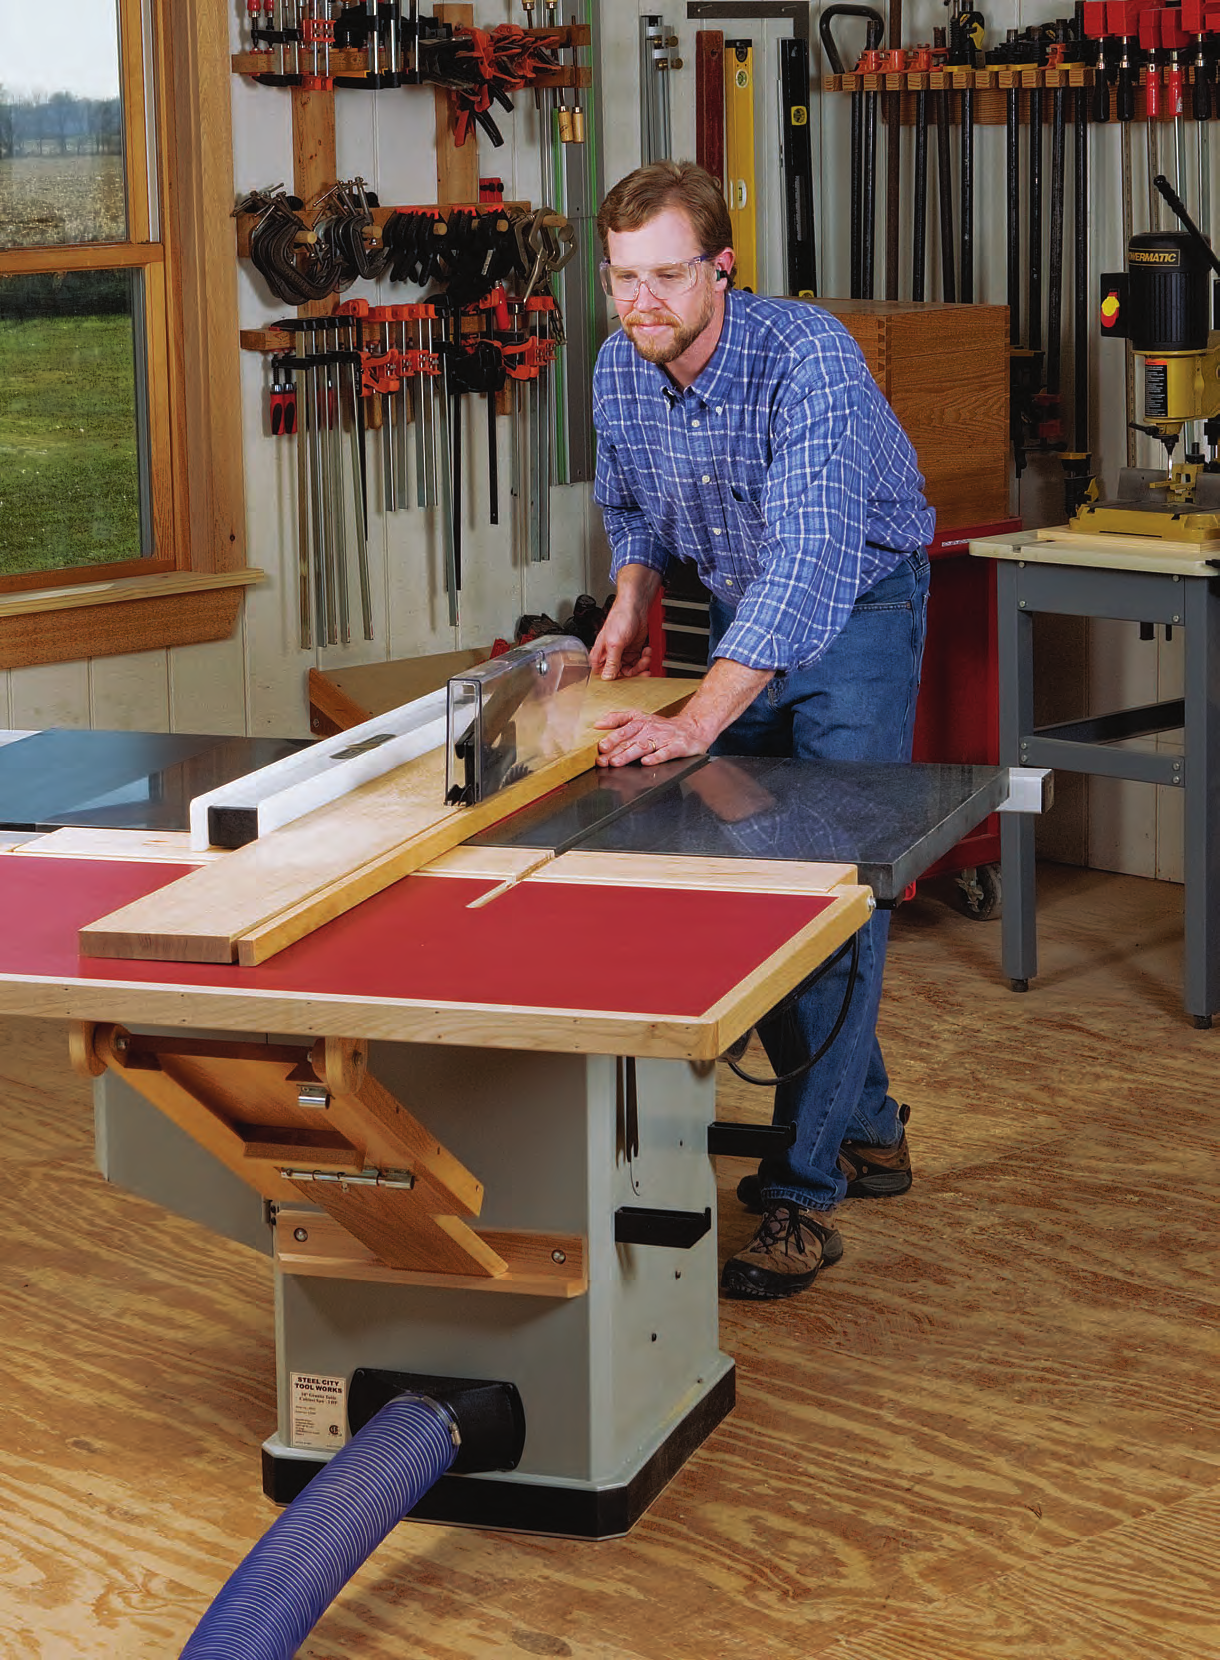
1 Fold-down Outfeed Table By Chris Marshall A small-shop delight, this project is a sweet upgrade to your shop s centerpiece. Many new cabinet saws have a side extension table, and they re a big help for supporting wide sheet materials or long workpieces when crosscutting. But I use a table saw even more often for ripping lumber. No cabinet saws that I m aware of provide a means of support behind the saw where I really need it. I ve tried using a worktable back there, but it s just one more fixture to get in the way in a small shop, and, I ve never found a roller stand that provides the amount of stability I want. So, my solution was to build an outfeed table that I can flip Cover both faces of the table s core with sheets of plastic laminate. Use spacers to align the laminate and pull them out one at a time. Be sure to roll the surfaces thoroughly to bond the cement. up when I need it and fold down when I don t. It mounts to the saw s back fence rail and sets up with an extendable leg that props against the cabinet. Ordinary barrel-bolt hardware locks it quickly in the up position, so I never have to futz with the setting. It provides a 30"-deep platform behind the machine plenty of room to keep long rip cuts from tipping off into the netherworld and its triangulated design is sturdy as can be. After five years of hard use, the prototype for the fold-down table you see here has become an essential feature on my cabinet saw. Tailoring the Table to Your Saw If you decide to build one for your saw, first grab a tape measure and size up your machine. The parts in the Material List on page 53 are suitable for a saw with 26" of vertical clearance between the tabletop and the dust port. Make sure to adjust your table s front-to-back size, if needed, so it won t interfere with the dust port when you fold it down. I made my table stretch from one extension wing to the other. You could make yours even wider if you like, but remember that the leg should be relatively centered underneath for stability. I suggest widening the leg to broaden its stance if you make a substantially wider outfeed table. Building the Table Get this project rolling by cutting the MDF table core top and bottom (pieces 1 and 2) to size and gluing them together. Drive a brad through each corner to keep the pieces from shifting during clamping. It s essential that the edges line up evenly. Pull out your contact cement, J-roller and spacers so you can cover the top and bottom of the core with plastic laminate (pieces 3 and 4). February 2009 Woodworker s Journal
2 51

3 Plow a pair of 3/4"-wide dadoes across the filler strip to accommodate the table s leg pivot brackets. Set the width of these dadoes carefully so they provide a snug, friction fit for the brackets. Start with oversized sheets, and bring them to final size with a trim router and piloted laminate cutter. A filler strip (piece 5), machined with two small dadoes, tucks into place along the front bottom edge of the table core. The dadoes create pockets for the leg pivot brackets (pieces 6). Make the pivot brackets first, rounding their ends and drilling the centered 5/16"-diameter bolt holes. Then, use the brackets to set the width of the dadoes in the filler piece so you ll arrive at a nice, snug fit. Glue and screw the pivot brackets into their dadoes, then attach the filler strip to the core with more glue and screws (see Drawings). I wrapped hardwood edging all around the table. It helps protect the edges of the MDF and laminate. Another important feature is that the back ends of the side edging (pieces 7) are also shaped and drilled to form pivot hinges. Here s the best order for completing and installing the edging: First create the side edging (see Drawings), then fashion the table pivot brackets (pieces 10) so you can round the ends and drill the through-bolt holes in all four pivoting parts at the same time. Make the table pivot brackets about a quarter inch longer than necessary, and set them aside. Now, glue, clamp and nail the side edging to the core with 1 1 2" brads. Mark and cut the front edging (piece 8) to length, then glue and nail it in place. Fit a strip of back edging (piece 9) to the side edging, and install it. Take the time to round its ends on a disc sander so the corners won t become gut busters Fasten the pivoting leg braces to the leg s back panel, then glue and screw the beveled guide strips inside this leg housing. later on. Wrap up by cutting the table pivot brackets to final length, gluing and screwing them in place to beef up the pivot points. Ease all the sharp edges of the trim with a 1/8" roundover bit, a file or a block plane. Wrap the table with hardwood edging, starting with the side pieces (pieces 7), then the front and finally the back. Secure with glue and pairs of 1 1 2" brad nails spaced approximately every 6". Complete the edging by gluing and screwing the table pivot brackets to the side edging. Making the Leg When I designed my original outfeed table, I wanted the leg to extend and brace against the saw cabinet but also retract so it could tuck behind the table when folded down. As you can see in the Drawings and photos, a telescoping leg provided the functionality I needed. The body of the leg houses an extension piece, and the parts open and close by what amounts to a giant sliding dovetail. Assemble the leg by gluing and screwing the two side braces (pieces 12) to the back (piece 11). Since the braces must pivot on the top ends, first round them over on your band saw, and step to the drill press to bore centered bolt holes. Attach the braces to the back panel so the 52 February 2009 Woodworker s Journal

4 8 5 6 Table Assembly (Section View) 5 /16" Dia. 1 1 /2" R /2" space 3 /4" R. Two barrel bolts serve three purposes. The bolt underneath the table prevents the leg from swinging uncontrolled as the table is tipped up or down. The one on the leg keeps it retracted or extended for use. 1 3 /8" 3 /4" Table and Leg Closed (Side View) Side Edging and Braces (Side Views) 13 /16" R. 5 /16" Dia. Guide Strip (End View) /16" 3 /4" 2" 3 /4" R /16" Dia A 1/2 -diameter, 1 -deep hole in the leg brace receives the barrel bolt to keep the leg folded closed Filler Strip (Front View) 5 1 /4" 10 3 /4" 3 /4" MATERIAL LIST T x W x L 1 Table Core, Top (1) 3/4" x " x " 2 Table Core, Bottom (1) 3/4" x " x " 3 Laminate, Top (1) 1/16" x " x " 4 Laminate, Bottom (1) 1/16" x " x " 5 Filler Strip (1) 3/4" x 3" x " 6 Leg Pivot Brackets (2) 3/4" x 3" x 3 1 4" 7 Side Edging (2) 3/4" x 1 5 8" x " 8 Front Edging (1) 3/4" x 1 5 8" x 44" 9 Back Edging (1) 3/4" x 1 5 8" x " 10 Table Pivot Brackets (2) 3/4" x 1 5 8" x 2 3 4" 11 Leg Back Panel (1) 3/4" x 9" x " 12 Braces (2) 3/4" x 1 1 2" x 22" T x W x L 13 Guide Strips (2) 3/4" x 1 3 4" x " 14 Extension (1) 3/4" x " x 22" 15 Handle (1) 3/4" x 1" x 5 3 8" 16 Bolts, Washers, Nuts (2) 5/16" x 2" (Nylon lock nuts) 17 Spacer (1) 3/4" x 2" x " 18 Build-up Strip (1) 5/8" x 2" x 4 1 2" 19 Barrel Bolts (2) 6" Steel 20 Mounting Plate (1) 2 1 4"* x 5 3 4" x " 21 Lag Screws, Washers (5) 5/16" x 2" 22 Lag Screws, Washers (2) 5/16" x 5" 23 Leg Stop, Back (1) 3/4" x 2" x 16" 24 Leg Stop, Bottom (1) 3/4" x 1 1 2" x 16" * Adjust the thickness to suit your saw. Woodworker s Journal February

5 Spacer Mark centerpoints for long pivot screws on the ends of the mounting plate using a brad-point bit tapped through the table pivot holes. Hold the plate and table apart with a couple of 1/2" spacers. Clamp and then bolt the mounting plate to the the saw s fence rail with five 2" lag screws and washers. Keep these fasteners well clear of the miter slots you ll need to rout later. The leg stops here: it s simply a wooden ledge fastened to the saw cabinet with three short carriage bolts set into counterbored holes. bottom ends of the three parts are flush. Next come the guide strips (pieces 13). Tilt your table saw blade to 35, bevel-rip the strips to shape and cut them to length. Glue them inside the leg housing with the bevels facing inward. Drive countersunk screws through the back and into the strips to reinforce these important load-bearing joints. Cut the leg extension (piece 14) to width and length, and bevel-rip both of its edges at 35 so it fits well between the guide strips. Aim for a slightly tight squeeze at first, then shave the bevels with a block plane until the extension slides smoothly into the leg housing. Glue and screw a handle (piece 15) to the extension. Now, close up the leg, and fasten a barrel bolt (piece 19) near the handle: the male side mounts to the leg extension, and the female receiver piece goes on the guide strip. When the table is folded down, this bolt keeps the leg retracted. Attach the leg to the table pivots with bolts, washers and nylon lock nuts (pieces 16). Next, cut the spacer and build-up strip (pieces 17 and 18) to shape, and fasten them together with one pair of their ends flush. They serve as a mount for a second male barrel bolt it locks the leg against the table and prevents it from swinging loose when folded down. Slip the spacer between the leg and table and position it 8" in from the back edging. Screw the spacer to the table and the barrel bolt to the build-up strip. Slide the bolt over against the leg brace, and give it a good rap with a hammer to mark the bolt s location. Drill a 1/2"-diameter, 1"-deep hole here to allow the bolt to slide fully into the leg and secure it. Mounting the Table to the Saw Time to get this project mounted up! Laminate a thick blank of lumber together to form the mounting plate (piece 20) that attaches to the saw s fence rail. Plane it down so the top face will be about 1/16" below the saw table when it s attached to the fence rail. Ease the front bottom Hang the outfeed table from the mounting plate with two 5/16" x 5" lag screws and washers. 54 February 2009 Woodworker s Journal

6 Use a pair of clamps to pinch the leg parts together and hold the table up. Check your table s setting with a long straightedge, and adjust the leg a little at a time until you arrive at a nice, flush platform. edge of the plate with a 3/4"- diameter roundover bit to create swing clearance for the table. You may also need to knock a little off the bottom back edge so the plate fits snugly against the fence rail. Sand all the table s wooden parts and the mounting plate up through the grits, and apply a couple of coats of wipe-on finish before proceeding. When the finish cures, flip the mounting plate and the table facedown on a flat surface, and set the parts together. Slip a couple of 1/2"- Screw the second metal receiver next to the first barrel bolt to set the open length of the leg. The top receiver keeps the leg retracted. thick spacers in between. Poke a 5/16" brad-point bit into each table pivot hole, and tap it with a hammer to mark the ends of the mounting plate for pivot screw holes. Drill the 1/4"-diameter pilot holes 3 1 2" deep and as straight as you can. Bolt the plate to the metal fence rail with five lag screws and washers (pieces 21) spaced evenly along its length. Keep these screws clear of the table saw s miter slot locations. With the mounting plate in place, make up the leg s wooden stop ledge by gluing and screwing pieces 23 and 24 together. Attach it to your saw cabinet with three short carriage bolts, washers and locknuts. (I know, I know... this is a lot of holes to put in your trusty saw, but it s worth it!) I positioned the leg stop assembly so the bottom face of piece 24 is " up from the floor. Fasten the table assembly to the mounting plate with a couple of 5" lag screws and washers (pieces 22). Final Fine-tuning and Routing Grab a helper to give you a hand in setting up the table with the leg extended and propped against the stop. Mark and trim the bottom corners of the leg extension so it nests completely against the leg stop. Then use two clamps to hold the leg extension and housing at the correct length (see photo above). Adjust and reclamp the leg parts as needed until the outfeed table is flush with the saw table. Extend the first barrel bolt and slip the remaining metal receiver piece over it. Screw the receiver to the guide strip to finalize the leg s up and open position. I made a long, slotted jig and used a 1" O.D. rub collar and 3/4" straight bit to extend my saw s miter slots over into the outfeed table. A couple of stops limited these cuts and kept my bit from tangling with the saw s granite table. I chiseled away the waste where the bit couldn t reach. Wipe finish into the miter slots, and you re really ready to rip! Best of all, those long rip cuts will never be a seesaw operation again! Chris Marshall is Woodworker s Journal s field editor. The author used a long slotted routing jig, a rub collar on his plunge router and a 3/4"-diameter straight bit to mill a pair of miter slots into the outfeed table. Woodworker s Journal February 2009
How to Build a Poker Table
 How to Build a Poker Table www.pokertablematerials.com 10-Person Poker Table- 96 x 48 These are step by step instructions for building a poker table. The table will measure 48" x 96" and have a 4" wide
The tablesaw may be your shop s most valuable cutting. Crosscut Sleds. Foolproof. Innovative approach guarantees perfect results
 Foolproof Crosscut Sleds Innovative approach guarantees perfect results B Y A L A N T U R N E R The tablesaw may be your shop s most valuable cutting tool, but for precise, repeatable crosscuts it needs
Ladder Shelf Plans Final dimensions: 25 L x 21 W x 72 H
 Ladder Shelf Plans Final dimensions: 25 L x 21 W x 72 H Copyright 2011. MLCS Woodworking. Page 1 Router bits and supplies needed: 3/8 Rabbeting bit (#10691) 1 Bottom Cleaning bit (#7941) Top and Bottom
Router Table Plans. www.bobsplans.com
 www.bobsplans.com Router Table Plans Increase the capabilities of your router with this weekend project. Features a sliding fence with EZ-Mount clamps. These clamps are simple to make and grip tightly
www.cornholesupplies.com
 www.cornholesupplies.com How To Build Regulation Cornhole Boards Home of the Original Cornhole Bags and Boards Supply List: 1-4' X 8' Piece of Plywood (pre sanded) 4-2" X 4" X 8' Studs (2 by 4s make sure
How to Build Your Own CornHole Game
 How to Build Your Own CornHole Game DIMENSIONS Here is a diagram with the basic measurements for the Cornhole board game. SUPPLIES 1/2 thick sheet of plywood one 4 x4 or two 2 x4 s 8 long 2 4 s (4) 4 1/2
Gate Leg Drop Leaf Table Plans
 Preparing the table top blanks: Cut and glue enough 3/4 stock to make three panels 40 long by 24 wide (they will be cut to final size at a later time). While the glue dries we will work on the legs. Preparing
DIY CABINET REFACING INSTALLATION GUIDE
 DIY CABINET REFACING INSTALLATION GUIDE CABINET REFACING INSTALLATION Are you ready to reface your outdated cabinets? This guide will show you how to install your new Facelifters Cabinet Refacing Products
Children s Furniture Projects
 This is an excerpt from the book Children s Furniture Projects by Jeff Miller Copyright 2002 by The Taunton Press www.taunton.com CHILD S ROCKER KIDS ARE ALWAYS IN MOTION. It s not easy to get them even
SHELVES. www.tedswoodworking.com
 SHELVES It's rare that bookshelves look as interesting as the objects you display on them. After all, how much can you decorate the edges of your shelves and sides? This unit is unusual because the shelves
Making Wooden Hinges
 Making Wooden Hinges By Alex Reid - www.mokkou.jp Materials and tools used - 3.2mm straight router bit - 1/8 round-over router bit - Flush-cut straight bit (with bearing on bottom) - Finger-joint jig -
MGB Chrome Bumper Conversion
 MGB Chrome Bumper Conversion Installation Instructions For 1974 1/2-1980 MGB This kit requires cutting, welding, and painting. Professional installation recommended. Note: Every MGB body is slightly different
Black Wolf POCKET BILLIARD TABLE INSTALLATION MANUAL. SERVICE DEPARTMENT P.O. BOX 68 BRISTOL, WI 53104
 Black Wolf TM POCKET BILLIARD TABLE INSTALLATION MANUAL www.brunswickbilliards.com SERVICE DEPARTMENT P.O. BOX 68 BRISTOL, WI 53104 51-905710-000 SEPTEMBER 2010 NOTE: Please use the instructions in this
Home Storage Projects
 This is an excerpt from the book Home Storage Projects by Paul Anthony Copyright 2001 by The Taunton Press www.taunton.com KITCHEN WORK STATION IN MANY KITCHENS, counter space is at a premium. There just
POD Visor Instructions
 POD Visor Instructions Please read fully before beginning assembly and mounting the Visor Parts List - Visor Left Part (LV), Visor Right Part (RV) Qty 2, Aluminum Crossbars Hardware - Qty 17, 1/4" X 3/4"
Build a Precision. Crosscutting Sled
 Build a Precision Crosscutting Sled On-the-money, splinter-free crosscuts are well within your grasp using most well-made tablesaws, but you do have to do a few things to ensure great results cut after
SHOP NOTES METAL SHAPER FOR YOUR SHOP
 SHOP NOTES METAL SHAPER FOR YOUR SHOP A METAL SHAPER is indispensable for certain machining operations where flat surfaces must be produced within very close limits, such as machining flats on castings,
Pole Lathe and Shave Horse Design
 Pole Lathe and Shave Horse Design These pictures and accompanying words are Copyright Michael Hughes February 2002. They are not to be re-produced, in part or whole, without permission from the author.
Installing Window and Door Mouldings
 Installing Window and Door Mouldings About Window and Door Mouldings The trim around windows and doors greatly influences the look and style of your interior. They also bridge the gaps and cover spaces
Introduction to Door Construction
 Entry Door Construction Made Simple with Freud s Entry & Interior Door Router Bit System Congratulations on your purchase of Freud s Entry & Interior Door Router Bit System. This unique set allows you
The Hive Bodies. In the Beekeeper s Work Shop. Building a Bee Hive: The Hive Bodies. by Stephen E. Tilmann
 The Hive Bodies In the Beekeeper s Work Shop The hive body is the heart of a managed bee hive colony (Figure 1). It is where the queen lays her eggs, the house bees raise the brood and the workers store
HONING LATHE DUPLICATOR CUTTERS
 Lay the flat face of the cutter or bit on the flat top surface of the hone with the rest of the cutter overhanging the edge. Rub the cutter or bit up and down the hone (Figure 24-44). Be sure to hold the
Garage Workbench Plans
 www.bobsplans.com Garage Workbench Plans Every home woodworker knows the importance of making efficient use of the available space in his or her shop. This workbench is designed to provide the maximum
Lathe Milling Attachment
 Lathe Milling Attachment By L C. MASON BY CLEVERLY stacking cold-rolled flat stock together, T-slots and slide for this lathe milling attachment are made without costly machinery. In fact, only two tools,
STEADYfast Stabilizer Installation Notes Fifth Wheel and Travel Trailers 11/23/13
 STEADYfast Stabilizer Installation Notes Fifth Wheel and Travel Trailers 11/23/13 (See Supplemental Instructions for trailers with heavy duty round footplates and/or Power Leveling Systems) PHONE SUPPORT
BUILD A TABLETOP LOOM
 BUILD A TABLETOP LOOM From 1" x 2" stock (actual 3/4" x 1"1/2) cut: 4 pieces 15" long 4 pieces 5"1/2 long Use the above to make 2 frames for the front and back of the loom. From 1" x 4" stock (actual 3/4"
Ceiling Mounted Folding Attic Ladders Installation Instructions
 Ceiling Mounted Folding Attic Ladders Installation Instructions WARNING Before you start installing your new Louisville Ceiling Mounted Folding Attic Ladder, you must read and understand the following:
KITCHENS. Tip PAGE 1 FITTING YOUR KITCHEN GUIDE. How to mark out a kitchen. Tools required for installing a kitchen STEP ONE STEP TWO STEP THREE
 FITTING YOUR KITCHEN GUIDE How to mark out a kitchen PAGE 1 Before starting on the installation, measure 870mm from the lowest point of the floor and mark a datum line around the room to indicate where
Hive Top Ventilation Shims
 Hive Top Ventilation Shims When preparing your bee hives for the winter, it is very important to provide for ventilation at the top of the hive. Through out the winter, the bees are expelling a lot of
Here is your set of Detailed Plans from Copyright 2004 All Rights Reserved
 Here is your set of Detailed Plans from Copyright 2004 All Rights Reserved Materials for the House Here is the list of materials you will need to construct the basic house then to cover it with roofing
Raised Panel Doors Made Simple With Freud s 2+2 Raised Panel Bit Set
 Raised Panel Doors Made Simple With Freud s 2+2 Raised Panel Bit Set Congratulations on your purchase of Freud s world class 2 + 2 Raised Panel Bit Set. This revolutionary design combines two small wings
FRONT BUMPER INSTALLATION INSTRUCTIONS 2007-2011 DODGE / MERCEDES SPRINTER
 Aluminess Products Inc 9402 Wheatlands Ct. #A Santee, CA 92071 619-449-9930 FRONT BUMPER INSTALLATION INSTRUCTIONS 2007-2011 DODGE / MERCEDES SPRINTER Please read before beginning Stainless steel hardware
PROJECT PLAN. Stackable shelves
 PROJECT PLAN Stackable shelves This article originally appeared in The Family Handyman magazine. For subscription information, visit www.familyhandyman.com Please note that pages that appeared in the magazine
INSTRUCTIONS THOROUGHLY BEFORE BEGINNING***************
 Bill of Materials: RAC0012 Green Wing Aerodynamic Skirt Kit Item Part Number Description Quantity 1 RMC0218 Gen 2 Trailer Skirt Roadside 1 2 RMC0219 Gen 2 Trailer Skirt Curbside 1 3 RMC0041 Trailer Skirt
Hoosier Step Stool. America s leading woodworking authority. Step by Step construction instruction. A complete bill of materials.
 America s leading woodworking authority Step by Step construction instruction. Hoosier Step Stool A complete bill of materials. Exploded view and elevation drawings. How-to photos with instructive captions.
Speed-Mat Rectangle Cutter
 Speed-Mat Rectangle Cutter 1 Honeycomb baseboard. 2 Left hold down. 14 3 Bottom hold down. 4 4 Left / right rule. 8 5 8 5 Left / right rule pointer. 1 6 Top / bottom rule. 7 Top / bottom rule pointer.
Modular Locomotive System Instruction Manual for HBK8 George Body Kit
 Modular Locomotive System Instruction Manual for HBK8 George Body Kit Roundhouse Engineering Co. Ltd. Units 6-10 Churchill Business Park. Churchill Road, Wheatley. Doncaster. DN1 2TF. England. Tel. 01302
COMPLIMENTARY WOODWORKING PLAN
 COMPLIMENTARY WOODWORKING PLAN Adirondack Chair This downloadable plan is copyrighted. Please do not share or redistribute this plan in any way. It has been created for Wilton Tools, a division of WMH
Assembly Instructions Basic Folding-Leg Box Frame Style
 Assembly Instructions Basic Folding-Leg Box Frame Style Basic Folding Leg Cornhole Board Concept 1 2 12 3 1 2 3 15 16 4 1 4 52 9 R1 3 4 6 21 48 12 1 4 Bolt Washer 9 13 16 35 Washer Double Nut CornholePlayers.net
BUILDINGA 1/10 SCALE FLATBED TRAILER
 VOLUME 1, ISSUE 1 BUILDINGA 1/10 SCALE FLATBED TRAILER BUILT, DESIGNED & WRITTEN BY NATHAN MYERS MATERIALS: FEATURES: While the design was kept simple to allow anyone to be able to build their own trailer,
Picnic Table Plans. Made out of a single sheet of plywood, it s also portable! By Kevin Ayer. This children's picnic table would
 Picnic Table Plans Made out of a single sheet of plywood, it s also portable! By Kevin Ayer Materials One 4- by 8-foot sheet of 3 4-inch AC plywood Twelve 11 4-inch wood screws Primer and exterior paint
Premier & Deluxe 3-Season Room Sliding Glass Door
 DTSSGD-11 Premier & Deluxe 3-Season Room Sliding Glass Door Installation Instructions Screen Door Seal Left Side Track Top Track Assembly Right Side Track Right Side Trim Sliding Glass Door Sliding Screen
Go-kart for little race-drivers
 Go-kart for little race-drivers Drill and drive. Go-kart What it lacks in speed, it more than makes up for in fun: the go-kart will excite little race-drivers. 1 Introduction It s only a go-kart, but it
Build a Trade-Show Booth for Under $200!
 Build a Trade-Show Booth for Under $200! This corner booth, with a seven foot front and sweeping 4x8 backdrop, assembles in less than 20 minutes and can be built in one weekend. Materials Tools 4 x8 x3/4
Cedar Cottage Doghouse Plans
 Overlapping cedar shingles add an element of charm to this medium size doghouse. The walls, floor, and trim are constructed of solid cedar, making it naturally weather resistant and provides excellent
RECLINE IN THE SUMMERTIME Get comfortable on the patio or deck with this sturdy reclining lounge chair
 RECLINE IN THE SUMMERTIME Get comfortable on the patio or deck with this sturdy reclining lounge chair As early as the eighth century B.C., the Greeks used a piece of furniture called the kline, for lounging
Assembly Instructions Model 1544 Heart-Of-The-Kitchen Island
 Assembly Instructions Model 1544 Heart-Of-The-Kitchen Island A. These units are Ready-to-Assemble. Catskill uses positive fastening methods such as wood screws and in some places hidden Bastion fasteners.
DIRECTIONS FOR ASSEMBLING BASE & WALL CABINETS
 DIRECTIONS FOR ASSEMBLING BASE & WALL CABINETS TheRTAStore.com STEP 1: CLEAR A WORK SPACE Place your RTA cabinet panels on a smooth, scratch resistant surface in a large, open area. (Some people like to
Gravity Racing Challenge STEM Team Competition Open Class High School Division Car Assembly Plans And Rules
 Gravity Racing Challenge STEM Team Competition Open Class High School Division Car Assembly Plans And Rules 1 Table Of Contents Introduction...Page 3 Floorboard...Page 4 Step One Steering Stop Installation...Page
Wren Kitchens Installation Tips... 3. Carefully check your kitchen delivery... 4. Measuring out and marking up... 5. Fitting the base cabinets...
 tra 1 Index Wren Kitchens Installation Tips... 3 Carefully check your kitchen delivery... 4 Measuring out and marking up... 5 Fitting the base cabinets... 6 Fitting the corner cabinets... 7 The 972mm or
Guidelines for Earthquake Bracing of Residential Water Heaters
 Guidelines for Earthquake Bracing of Residential Water Heaters Department of General Services Division of the State Architect 1102 Q Street, Suite 5100 Sacramento, CA 95814 Phone: (916) 324-7099 Fax: (916)
Chapter 3 Installing Over-the-Post Railing on an L-Shaped Stair
 49 Chapter 3 Installing Over-the-Post Railing on an L-Shaped Stair In this chapter: The Over-the-Post Balustrade System Determining the Rail Centerline Using Rail Bolts Making a Pitch Block Laying Out
Turning the table. Shape shifter: The picnic table splits into twobenches (opposite) to suit your space and seating needs.
 to suit your space and seating needs.") Turning the table Shape shifter: The picnic table splits into twobenches (opposite) to suit your space and seating needs. 62 PRIL/MY 2002 COTTGE LIFE ...from eating to seating. These convertible benches
Turning the table Shape shifter: The picnic table splits into twobenches (opposite) to suit your space and seating needs. 62 PRIL/MY 2002 COTTGE LIFE ...from eating to seating. These convertible benches
INSTALLATION INSTRUCTIONS for Bifold Doors (JII103)
") Thank you for selecting JELD-WEN products. Attached are JELD-WEN s recommended installation instructions for premium composite, hollow and solid core molded Bifold Doors. Bifolds are designed for fast
Thank you for selecting JELD-WEN products. Attached are JELD-WEN s recommended installation instructions for premium composite, hollow and solid core molded Bifold Doors. Bifolds are designed for fast
Stair Parts Installation. Tricks
 Stair Parts Installation Tips & Tricks Introduction Your DIY staircase guide Welcome to the Stairpart home installation guide. Your stairway is both a functional and focal point in your home, so keeping
NATURAL RAILING INSTALLATION INSTRUCTIONS
 NTURL RILING INSTLLTION INSTRUCTIONS Manufactured by fiberondecking.com 800.573.8841 FI-0217-PKG 5/14 Natural Railing Installation Instructions Natural Top Rail Profile Required Tools and Supplies: Power
Dining Tables by Kim Carleton Graves
 This is an excerpt from the book Dining Tables by Kim Carleton Graves Copyright 2001 by The Taunton Press www.taunton.com Vineyard Table The vineyard table is almost as old a design as the trestle table,
SPRITE and BIGFOOT DESKTOP CNC MACHINE KIT ASSEMBLY INSTRUCTIONS
 SPRITE and BIGFOOT DESKTOP CNC MACHINE KIT ASSEMBLY INSTRUCTIONS README FIRST: Thank you for purchasing your MyDIYCNC Desktop CNC Machine Kit. We hope this versatile and innovative machine brings you many
Wine Rack & Glass Storage Bench Chris Gardner
 Wine Rack & Glass Storage Bench Chris Gardner Quantity Length Width Material Part 2 48 16 3/4 birch plywood top, bottom 2 14 16 3/4 birch plywood sides 2 14 13 3/4 birch plywood support dividers 2 3 15
Total Quantity: IMPORTANT: Plans are to be used with 3 x6 Plexiglass (SKU #298-017).
.") # Materials: Quantity Each: 4x4x8 3 2x4x8 2 2x8x8 1 4x8x3/4 plywood 1 3 x6 corkboard (can be 18 of the 1 x1 pieces) 1 3 x6 plexiglass 1 8 door casing 3 Primer 1 qt. Total Quantity: TIPS FOR SUCCESSFUL
# Materials: Quantity Each: 4x4x8 3 2x4x8 2 2x8x8 1 4x8x3/4 plywood 1 3 x6 corkboard (can be 18 of the 1 x1 pieces) 1 3 x6 plexiglass 1 8 door casing 3 Primer 1 qt. Total Quantity: TIPS FOR SUCCESSFUL
2. This is a close up of a typical area where the rocker is rusted out leaving holes under where the rocker moulding would be..
 ROCKER PANELS 55,56,57 CHEVY REPLACEMENT Do not throw away any pieces when you first remove them. There are many supports that are not reproduced and will need to be used again. When disassembling try
1958-64 WINDOW CHANNEL, WEATHERSTRIP & WHISKER STRIP REPLACEMENT FOR 2-DOOR SEDANS
 By Denny Williams Photos by Denny Williams 1958-64 WINDOW CHANNEL, WEATHERSTRIP & WHISKER STRIP REPLACEMENT FOR 2-DOOR SEDANS Denny Williams - Technical Writer Denny is first and foremost a dyed-in-thewool
REDWOOD. Adirondack Chair. Naturally beautiful Easy to use Practical and economical Durable and stable Resistant to decay and insects
 B U I L D I T W I T H REDWOOD Adirondack Chair R E D W O O D Naturally beautiful Easy to use Practical and economical Durable and stable Resistant to decay and insects Adirondack Chair BUILD THE CHAIR
Best Barns USA Assembly Book
 Best Barns USA Assembly Book Revised November 27, 2013 the Easton - R 12'x 20' Manufactured by Reynolds Building Systems, Inc. 205 Arlington Drive Greenville, PA 16125 724-646-3775 This manual is copyrighted.
OWNER S MANUAL Table Tennis Table Patent Pending
 OWNER S MANUAL Table Tennis Table Patent Pending Be sure to write your model number and serial number here for future reference. You can find these numbers printed on the bottom of the table. MODEL # T8179
TOOLS FOR SELF RELIANCE REFURBISHING SHEET No 2. Registered Charity No 280437. Saws for Woodworking
 Registered Charity No 280437 Saws for Woodworking Issued December 2002 Registered Charity No 280437 page no 1 SAW TYPES Rip saw For cutting along the grain Crosscut saw [A smaller version is known as a
Building an Off-Center Fixture for Turning Pendants
 Building an Off-Center Fixture for Turning Pendants Turning a pendant off-center with most available metal pendant chucks means that you will have a significant amount of mass off center, which will limit
INSTALLATION INSTRUCTIONS
 Turbo Tube Slide INSTALLATION INSTRUCTIONS C A U T I O N Do not climb on the outside of the slide This slide is designed for home use only, not for Public Playgrounds PlayCore, Inc. 2004 Copyrighted Material.
SUPER SHED. Indoor shelter for your outdoor tools.
 SUPER SHED Indoor shelter for your outdoor tools. Not everyone needs a garden shed. But, if you've no more space on your garage wall for that new leaf rake, if you can't find your potting trowel because
DTU Animal Cart Programme
 DTU Animal Cart Programme TECHNICAL 21 RELEASE PIPE AND ROLLER DONKEY CART AXLES Development Technology Unit, Department of Engineering, University of Warwick, Coventry, CV4 7AL UK, tel: +44 (0)1203 523523
Panel/Hand Saw Kit Assembly Instructions
 Panel/Hand Saw Kit Assembly Instructions PLEASE READ THE FOLLOWING INSTRUCTIONS BEFORE BEGINNING Brief Summary You will be performing the following Tasks: 1. Determining the degree of shaping laying out
Biscuit Joiner BISCUIT JOINER- SETUP AND FEATURES
 Biscuit Joiner Most woodworking projects require at least some assembly. This is especially true for projects such as tables, cabinets or bookcases where wide panels must first be built up from several
Router Table. Operating Procedures for
 Operating Procedures for Router Table INTRODUCTION: The router table is a very versatile tool. It can be used to cut a molding profile, cut workpieces to match the shape of a pattern and cut a molding
Installation Instructions
 Installation Instructions READ BEFORE INSTALLING UNIT For Low Profile Window Air Conditioner INSTALLATION WARNINGS AND CAUTION Carefully read the installation manual before beginning. Follow each step
A Simple Approach to Raised-Panel
 A Simple Approach to Raised-Panel 82 FINE HOMEBUILDING Wainscot BY GARY STRIEGLER Stock molding and MDF panels transform a room 1 2 3 4 3 5 6 Raised-panel wainscot speaks of a time when craftsmen had an
Complete Dovetail Jig Instructions
 Complete Dovetail Jig Instructions 18 15 1 12 13 8 (22818) 19 17 16 4 3 6 14 5 9 9 11 10 2 PARTS LIST - COMPLETE DOVETAIL JIG Introduction Your new dovetail jig will cut Full Through Dovetails and three
Brick Veneer Construction
 Brick Veneer Construction Check list of suggested tools & support items Claw hammer Tape measure 3/4" [19 or 20] Wood chisel Wood or plastic shims Pry bar Utility knife Caulking and caulking gun Power
A Screened Bottom Board
 A Screened Bottom Board As the name implies, a bottom board sits at the bottom of the hive; it is the floor of the hive (Figure 1). Basically, the bottom board is a platform connected to two side rails.
HOW TO INSTALL A BEAUTIFUL NEW KITCHEN
 HOW TO INSTALL A BEAUTIFUL NEW KITCHEN Easy to follow step-by-step kitchen cabinet installation TOOL AND MATERIAL LIST Hammer Pry bar Screwdriver Phillips Flathead Level Tape measure Pencil Straight edge
Building Pluto Subwoofers with Large PVC Pipe
 Building Pluto Subwoofers with Large PVC Pipe I decided to make the Pluto subwoofers from 10-12 diameter PVC pipe. It seemed to me that these would be a better visual match to the Plutos themselves. The
These instructions will show you how to install an internal door into a non-loadbearing partition wall. The instructions are split into three parts.
 No 8 in the series of 'How to' brochures produced by PlaceMakers, New Zealand How to Frame and Hang a Door These instructions will show you how to install an internal door into a non-loadbearing partition
Responsibilities of a Volunteer Leader
 Responsibilities of a Volunteer Leader Inspecting tools for safe conditions. Removing unsafe tools from use and immediately notifying site supervisor. Teaching safe tool use to volunteers on your crew.
Guidelines for Earthquake Bracing Residential Water Heaters
 Guidelines for Earthquake Bracing Residential Water Heaters Department of General Services Division of the State Architect In accordance with the Health and Safety Code Section 19215, the Division of the
Dave s Sheet Metal Bending Brake
 Dave s Sheet Metal Bending Brake I started building a Zenith CH601XL from plans in mid January 2006. After several failed attempts to bend the rudder spar I ended up going to a local sheet metal shop for
Micro. Pitts Special for the RFFS-100 by Chris O Riley
 Micro Pitts Special for the RFFS-100 by Chris O Riley F1 F2 F3 F4 1 2 3 4 All wood 1/32 inch sheet unless otherwise stated. F1 F2 F3 F4 Small balsa blocks for LG reinforcement Small balsa blocks for LG
Trundle Bed Plans (For Use Under Twin or Full-Size Standard Length Beds)
") Bunk Beds Unlimited Trundle Bed Plans (For Use Under Twin or Full-Size Standard Length Beds) On the following pages we have included all of the necessary drawings and requirements for a Modified twin-size
Bunk Beds Unlimited Trundle Bed Plans (For Use Under Twin or Full-Size Standard Length Beds) On the following pages we have included all of the necessary drawings and requirements for a Modified twin-size
Balance Beam Plans. Copyright 2007 Ben MacLeod Email: sales@betterplans.net Website: www.betterplans.net
 Balance Beam Plans Copyright 2007 Ben MacLeod Email: sales@betterplans.net Website: www.betterplans.net Balance Beam Plans By Ben MacLeod Copyright 2007 Tools required: -Mitre saw, circular saw, jig saw,
Slide the new steering column shaft through the steering column from the driver compartment.
 Slide the new steering column shaft through the steering column from the driver compartment. Push the column shaft through the steering column until the machined end is out past the column lower bushing.
1998-2002 Suzuki Katana Fender Eliminator
 1998-2002 Suzuki Katana Fender Eliminator The following are instructions and illustrations on the installation of the custom fender elimination. 1 Begin by removing seat, both rear fairings, and tail light
Composite Stone Veneer
 Composite Stone Veneer Installation Guide Ver 1 Jun 2015 www.compstone.com Composite Stone Veneer Installation Guide Contents Introduction & Overview 3 Required Tools 4 Optional Tools 4 Attachment Guidelines:
Triple Threat 3-in-1 Game Table 3 IN 1 GAME TABLE
 NG0M Triple Threat 3-in- Game Table 3 IN GAME TABLE Thank 3 in Y Game Table Thank you for your purchase of our product. We work around the clock and around the globe to ensure that our products maintain
glass & Glazing Products
 glass & Glazing Products WallMaker Create an unlimited variety of bright, beautiful and secure interior environments with the easy-to-install Stylmark WallMaker glass wall system. This versatile system
Build an Oak Bookcase From Getting Started in Woodworking, Season 2. Lumber and hardware List Part QtY size material sides. 4 in. 4 in. 3 in. 33 in.
 24 in. 24 in. Side 31/2 in. Side 31/2 in. 17 in. 17 in. ou can thank Mike Pekovich, Fine Woodworking s art director, for designing this simple but stylish bookcase. He took a straightforward form--an oak
Retail Reception kiosk
 Retail Reception kiosk put 42" corner post in below 66" to allow post to extend above kiosk for raised box sign Mini cantilever option - 24" overhead support leg Mini cantilever option - 24" overhead 66/48E
CIRCULAR SAW SAFETY Reviewed 9/24/2007
 1. General Safety Rules CIRCULAR SAW SAFETY Reviewed 9/24/2007 DANGER -- Keep hands away from cutting area behind the saw blade since kickback could cause the saw to jump backwards over your hand. Keep
DINING OUT. Build this outdoor table and bench set. TEXT AND PHOTOS BY NEAL BARRETT Photo by Eugene Thompson
 DINING OUT Build this outdoor table and bench set. TEXT AND PHOTOS BY NEAL BARRETT Photo by Eugene Thompson http://popularmechanics.com/home_improvement/furniture/2001/4/table_and_bench_set/print.phtml
The Bonelle Tool and Cutter Grinder
 The Bonelle Tool and Cutter Grinder The grinder was constructed about 1987 and exhibited at the 89th Model Engineering exhibition where it was awarded a bronze medal (see ME Vol164 No 3868 page 273). Subsequently
WHI 90-Minute Rated Veneered Door Frame Installation Instructions
 No. 940-03-10 INSTALLATION INSTRUCTIONS 90 MINUTE RATED VENEERED DOOR FRAME DOOR REQUIREMENTS: Consult the door manufacturer to make sure that the doors are qualified for the hardware to be installed,
Standard Sleep Pod Side Entry Assembly Instructions
 Standard Sleep Pod Side Entry Assembly Instructions www.podtime.co.uk enquiries@podtime.co.uk Working House Ltd How to assemble your pod Pod assembly onsite is a relatively simple exercise for two people
Things you need to assemble the tube actuator. Left to right. are small piece of masking tape, super glue,pen knife and small
 Things you need to assemble the tube actuator. Left to right are small piece of masking tape, super glue,pen knife and small crosspoint screwdriver. You will also need a few drops of light oil. Begin by