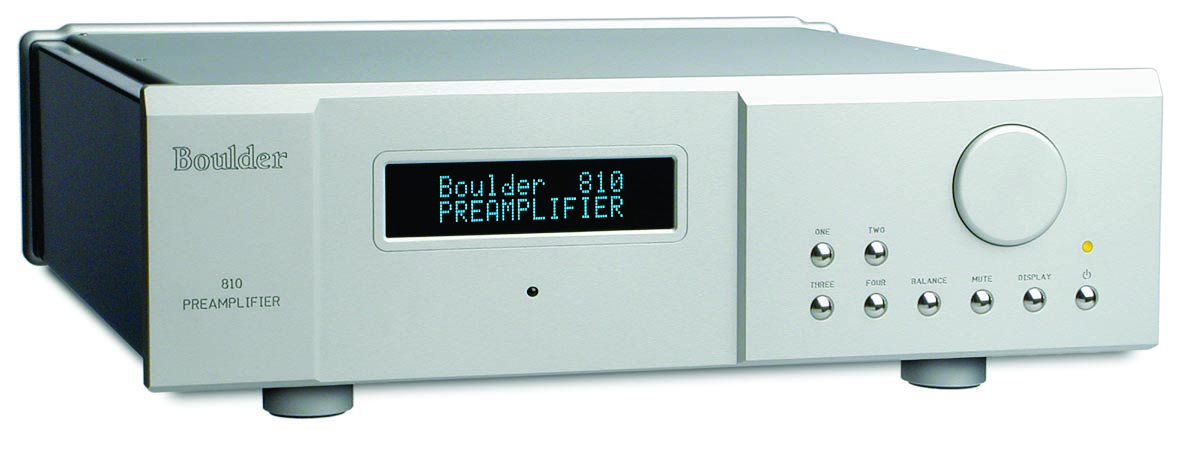
Boulder 810 Preamplifier
|
|
|
- Sherilyn Imogen McLaughlin
- 7 years ago
- Views:
Transcription
1
2 Boulder 810 Preamplifier Owners Manual 6/8/06 Boulder Amplifiers, Inc. 255 Taylor Ave. Louisville, CO (303) APPENDIX RECORDING BOULDER LINK PROGRAMMING REMOTE CONTROL OPERATION GETTING STARTED

3 B o u l d e r P r e a m p l i f i e r R e a r P a n e l APPENDIX RECORDING BOULDER LINK PROGRAMMING REMOTE CONTROL OPERATION GETTING STARTED
4 TABLE OF CONTENTS GETTING STARTED Introduction Quick Start Placement of the 810 Preamplifier Connecting to the Mains Outlet Polarity Connecting a Balanced Source Connecting an Unbalanced Source Connecting to a Balanced Input Amplifier Connecting to an Unbalanced Input Amplifier Setting the Boulderlink Switch OPERATION Powering Up Input Selections Volume Balance Mute Display APPENDIX RECORDING BOULDER LINK PROGRAMMING REMOTE CONTROL OPERATION GETTING STARTED
5 REMOTE CONTROL Batteries Source Selection Volume, Balance and Mute Polarity PROGRAMMING Input Names Input Polarity Input Level Calibration Input Balance Calibration Theater Mode Start Volume Programming by the Display Button Main Outputs Polarity Boulderlink ID Remote ID Boulderlink Speed Reset to Factory Defaults APPENDIX RECORDING BOULDER LINK PROGRAMMING REMOTE CONTROL OPERATION GETTING STARTED
6 BOULDERLINK Connecting the Boulderlink Connecting 800 Series to 1000 or 2000 Series with Boulderlink Setting Boulderlink Switches Setting Boulderlink ID Numbers Power up via Boulderlink Boulderlink Messages RECORDING Connecting a Recording Device APPENDIX Block Diagram Specifications Troubleshooting Notes APPENDIX RECORDING BOULDER LINK PROGRAMMING REMOTE CONTROL OPERATION GETTING STARTED

7 GETTING STARTED INTRODUCTION Congratulations on your selection of the Boulder 810 Preamplifier. We at Boulder Amplifiers are certain it will provide years of listening pleasure. QUICK START To get started listening, you only need to connect the 810 as you would any other preamplifier, but you should take note of the following. WARNING: The volume control is attractive and because it is optical and has no stops, it is tempting to just spin it. DO THIS ONLY WITH THE POWER OFF! It must be given the respect you would any other volume control with the ability to get loud very quickly. By the time you have turned it up to db with a source turned on, you should be hearing some music. If not, don t proceed any louder until you have solved this problem. See trouble shooting section. For the 810 to work properly, the Boulderlink s MASTER/SLAVE switch should be set to MASTER in most instances. A thorough reading of this manual will definitely enhance your enjoyment of your 810 Preamplifier. 1-1 GETTING STARTED
8 PLACEMENT OF THE 810 PREAMPLIFIER Your Boulder 810 Preamplifier is designed to reduce the effects that external magnetic and radio fields (RF) have on its internal circuitry. While placement is not critical, known magnetic fields should be avoided. Line of sight from the listening position is necessary for the remote control to function properly. Because the preamplifier is heavy, a solid, stable surface should be used. As it will generate some heat, there should be good air circulation around it. You may want to have some access to the rear panels for cable changes. 1-2 GETTING STARTED

9 CONNECTING TO THE MAINS OUTLET Your 810 Preamplifier is supplied with a mains cord suitable to the location where it was purchased. The exact voltage and frequency range is indicated on the rear panel. Make certain that the mains voltage used is within the specifications shown. Also listed are the fuse ratings. There are two fuse holders on the rear of the 810, one for each of the digital and analog power transformers. Use only specified fuses. Check with a qualified service person first. 1-3 GETTING STARTED
10 POLARITY Please note that the 810 Preamplifier conforms to the standard of pin 2 as the positive or hot pin for all analog balanced inputs and outputs. Because input and output polarities are handled through programming setups and the remote control, no concern for polarity is needed while connecting sources. CONNECTING A BALANCED ANALOG SOURCE To fully realize the sonic potential of your 810 Preamplifier, use balanced connections whenever possible. Balanced cables reduce interference from magnetic and RF sources to an absolute minimum. Connect each line source to one of the four inputs provided. Later, you will be able to name each input with the source s name, so you might want to make a list as you connect them. 1-4 GETTING STARTED
 on the 810 Preamplifier.")
11 CONNECTING AN UNBALANCED SOURCE Although the inputs are all of the 3 pin type, an unbalanced source is easily accommodated by using a special cable. This cable has an RCA phono type connector on the source end and a 3 pin connector (for going to an input) on the 810 Preamplifier. The negative input (pin 3) should be wired to ground only at the RCA phono connector. This brings the negative input reference of the 810 to the unbalanced source ground, thus reducing ground loops. Another option for accommodating unbalanced sources is that of the Boulder ABL input adapter. It converts a balanced input into a RCA connector input right at the rear of the 810. Like the above cable, the negative input of the 810 is connected to the ground of the RCA connector. However, this negative side will then share the shield wire with the chassis ground and will not have the best hum rejection. UNBALANCED INPUT CABLE 2-POS INPUT 3-NEG INPUT 1-GROUND 1-5 GETTING STARTED
12 CONNECTING TO A BALANCED INPUT AMPLIFIER With your 810 Preamplifier s balanced output driving a balanced input power amplifier, you can take sonic advantage of short speaker cables and correspondingly longer input cables. With the 810 s low output impedance, distances of more than 50 meters between preamplifier and power amplifier are practical. Connect each amplifier input to the main outputs labeled MAIN OUT. If it is desired to use 2 or more amplifiers such as in bi-amping, splitters will be required. If in doubt, consult your Boulder dealer. 1-6 GETTING STARTED
 to ground will cause excessive ground currents and degrade performance.")
13 CONNECTING TO AN UNBALANCED INPUT AMPLIFIER A special cable is required to make this connection. This cable connects pin 1 to the shield and pin 2 to the center pin. It leaves the output pin 3 unconnected. Connecting the unused output pin (usually pin 3) to ground will cause excessive ground currents and degrade performance. Use an ohmmeter or continuity checker to determine how a cable is wired. UNBALANCED OUTPUT CABLE 2-POS OUTPUT 3-NEG OUTPUT 1-GROUND LINE PREAMP INPUT 1-7 GETTING STARTED

14 SETTING THE BOULDERLINK SWITCH When using the 810 with only power amplifiers, the Boulderlink MASTER / SLAVE switch should be set to MASTER. For more information on Boulderlink, see the Boulderlink section as indicated by the finger tab below. 1-8 GETTING STARTED

15 OPERATION POWERING UP With all your connections made, you are ready to listen to your Boulder 810 Preamplifier. The power LED will cycle through a variety of colors indicating a standby mode. Power is applied only to the microprocessor during this mode. Press the STANDBY button to turn on the 810. The indicator will change to amber and power will be applied to the audio section. During the power up sequence, the displays at left will be briefly shown. The front panel STANDBY button should be used for everyday turn on and off. This switch mutes the audio, turns off all sections except the microprocessor, and puts the preamplifier in a standby mode. 2-1 OPERATION

16 INPUT SELECTIONS To select an input, press one of the pushbuttons labeled ONE, TWO, THREE or FOUR. The respective input will be shown in the display and that signal will be routed to both the main and record outputs. For example, if input ONE is chosen, 1. INPUT ONE will show in the display. NOTE: There will be a delay when switching from one source to another. This is necessary to allow the circuitry to adjust to the new input source. 2-2 OPERATION

17 VOLUME Because the precise feel of the Boulder 810 s volume control may be different than you are used to, we recommend starting the source device so that an audio signal is fed to the 810 before increasing the volume. The display will show VOLUME INFINITE to indicate maximum attenuation or no sound. By placing a finger at the edge of the rotating control and moving it slowly so it turns in a clockwise direction, the volume will increase and an indication such as VOLUME dB in the display will show the respective volume. At this point you should be listening to music. Each volume step is a change of 0.5 db. WARNING: The volume control must be given the respect you would any other volume control with the ability to get loud very quickly. WARNING: If the input is programmed to be in THEATER MODE, then the volume control will have no effect. For more information, see THEATER MODE in the programming section. 2-3 OPERATION
18 BALANCE To change the level balance, press the BALANCE pushbutton. BALANCE CENTERED will show in the display. Now, rotating the control will change the balance instead of the volume for as long as BALANCE... is displayed. Turning the control counterclockwise (left) will cause an indication such as BALANCE R -2.0dB < in the display. This means that the right channel has been attenuated -2.0 db below the left channel, regardless of volume setting, making the left channel louder. The range of balance offset is limited to db. If the control is then rotated further counterclockwise, the BALANCE RIGHT MUTED< will be displayed to indicate that only the left channel is on. 2-4 OPERATION
19 After several seconds of not changing the balance, the display will return to the VOLUME... indication. You may also return to controlling volume by again pressing the BALANCE pushbutton. The balance resolution is the same as for the volume control, 0.5 db steps. WARNING: If the input is programmed to be in THEATER MODE, then the balance control will have no effect. For more information, see THEATER MODE in the programming section. MUTE To temporarily reduce the volume, press the MUTE pushbutton. VOLUME MUTED will show in the display, replacing the volume indication. Again pressing the MUTE pushbutton will return the volume to normal level. While muted, the level of both channels will be set to -100 db, regardless of volume setting. 2-5 OPERATION
20 DISPLAY The display brightness may be set to any of 4 brightness levels. To change the brightness level, press the DISPLAY pushbutton. DISPLAY 100% will show in the display. Rotate the center control until the desired brightness is obtained such as DISPLAY 50%. The number in the display is the relative brightness. After several seconds of not changing the brightness level, the display will return to the VOLUME... indication. You may also return to controlling volume by again pressing the DISPLAY pushbutton. With the display at a brightness less than that of 100%, any operation of a pushbutton or the volume control will cause the display to go to full brightness for several seconds, and then return to the desired brightness. This ensures that if a function is changed, it will be noticed whether intentional or inadvertent. 2-6 OPERATION

21 REMOTE CONTROL BATTERIES A standard small flat blade screwdriver is required to install the three AAA batteries. To install batteries in the remote control, it is necessary to separate the two sections. WARNING: When opened, the pushbutton balls will be loose and care must be taken to properly retain them. It is recommended to lay the remote control face down on a flat surface so that the balls will stay in position. Then, remove the three screws. Lift off the cover and set aside, making certain that the battery holder comes out from the cover. Install the batteries with the positive (+) terminals facing as indicated on the holder and replace the cover. 3-1 REMOTE CONTROL

22 SOURCE SELECTION To select an input (source) press one of the four buttons on the left side of the remote control. You will now be listening to your desired source, and it will be showing in the display. VOLUME, BALANCE and MUTE To increase the volume, press the button marked with an up arrow. To reduce, press the one marked with a down arrow. Holding either button down will cause the volume to change continuously until released. To change the balance to the left, press the button marked with a left arrow until the display shows BALANCE CENTERED and continue holding until the display shows the desired balance change. Similarly, you may change the balance to the right by holding the button marked with a right arrow. To temporarily mute the audio, press MUTE. To return to normal audio level, again press MUTE. 3-2 REMOTE CONTROL
23 POLARITY NOTE: Often polarity is mistakenly called phase. As phase indicates any angle between two channels from 0 to 360 degrees, the correct term of polarity is preferred to indicate the 180º phase change, or inversion, available in the 810 Preamplifier. By using the remote control, the polarity of both channels may be changed simultaneously at the main outputs during any listening mode. The record outputs are never affected by the polarity setting. To change polarity, press the POL pushbutton on the remote control. POLARITY INVERTED will show in the display. Also, the decimal point after the source abbreviation (e.g. 1.) will change to a - (e.g. 1-) symbol for as long as the polarity remains inverted, even if the source is changed. To return to normal (noninverted) polarity, again press the POL pushbutton. POLARITY NORMAL will show in the display. 3-3 REMOTE CONTROL
24 PROGRAMMING While it is not necessary to ever use any programming functions, you will find they maximize the enjoyment of your Boulder 810 Preamplifier. Each input has several programmable features associated with it. These include assigning an alphanumeric name of your choosing, setting an individual offset attenuation and balance, correcting polarity, and setting theater mode. After holding down an input button until RELEASE BUTTON NOW is displayed, each additional press of this input button will step through the programming options. Changes made during the programming process are automatically stored as they are made. If no changes are made, the original settings are retained. INPUT NAMES For the analog inputs, press and hold the input number you wish to program. If you selected ONE, then PROGRAM INPUT 1 will show in the top display row and CHANGE NAME? NO will show in the bottom display row. Rotating the volume control clockwise will allow you to choose YES if you want to change the name. Again press the same input source number to continue. 4-1 PROGRAMMING
25 If you chose to assign a name, then 1 INPUT ONE will be shown in the bottom display row with a blinking cursor before the name s first character. Rotate the control until the desired character appears. Press the same input source number to accept the displayed character and go to the next character. Continue in this manner until all 17 characters are set. For example, Boulder can be set. NOTE: The space character is just before the exclamation mark (!). INPUT POLARITY Input polarity is used to match the 810 s input polarity to that of each individual source. If uncertain of a particular source s polarity, check the source s owners manual or consult with its manufacturer. After the last character is assigned, pressing the same input source number will make INPUT PIN 2 POSITIVE show in the bottom display row. As you rotate the volume control to INPUT PIN 3 POSITIVE the polarity relays will immediately activate. After the desired polarity is selected, or if no change is desired, press the same input source number. 4-2 PROGRAMMING
26 INPUT LEVEL CALIBRATION Pressing the same input source number will make INPUT LEVEL 0.0dB show in the bottom display row. Rotating the volume control will change the display and the main outputs levels simultaneously. This allows calibration of each input with test tones if desired. For example, setting the display to -6.0dB will allow an input which is twice the voltage of the other inputs to be heard at the same level. A maximum of -20 db may be set. This is easiest to do if you start with the quietest source as your reference, and then adjust the louder sources to match it. 4-3 PROGRAMMING
27 INPUT BALANCE CALIBRATION Pressing the same input source number will make INPUT BAL CENTERED show in the bottom display row. Rotating the volume control will simultaneously change the display and the main output s balance so that the action can be monitored or measured. For example, setting the display to R -9.0dB will make the left channel louder than the right channel. A maximum of -14 db may be set. Again pressing the same input source number will end the programming of this input and initiate a power up sequence. 4-4 PROGRAMMING
28 THEATER MODE When the 810 preamplifier is used in a surround sound theater system, it is normally desired to bypass the volume control, thus letting the surround processor control the volume. WARNING: Setting an input to THEATER MODE forces the volume to unity gain. Use only in conjunction with a surround processor. Again pressing the same input source number will make NORMAL MODE show in the bottom display row. Rotating the volume control will show THEATER MODE-Caution. 4-5 PROGRAMMING
29 START VOLUME When changing inputs, it is possible to have the 810 go to a preset volume level every time the input is selected. Pressing the same input source number will make START VOL? NO CHANGE show in the bottom display row. Rotating the volume control will allow you to choose -50, -60, -70, -80, or -90 db as the new preset level. 4-6 PROGRAMMING
30 PROGRAMMING BY THE DISPLAY BUTTON Several special features are programmed by pressing and holding the DISPLAY pushbutton until the display changes indicating you are in a programming mode. If no action is taken for some time, then the 810 reverts back to normal operation. The sequence is as follows. MAIN OUTPUTS POLARITY The polarity of the main outputs may be adjusted to match the power amplifiers used. For Boulder series 1000 or 2000 amplifiers, it should be set to PIN 2 POSITIVE. If you are using a Boulder 100, 250 or 500 series, this should be set to PIN 3 POSITIVE. For other brands, consult the product s owners manual. If uncertain, set to PIN 2 POSITIVE. Press and hold the DISPLAY pushbutton. OUTPUT POLARITY, PIN 2 POSITIVE will show in the display. Rotate the volume control until the desired polarity is shown in the display. The polarity changes simultaneously with the display. 4-7 PROGRAMMING

31 BOULDERLINK ID Again pressing the DISPLAY pushbutton will make PROGRAM BOULDER LINK, BOULDER LINK ID 20 show in the display. Rotating the volume control changes the ID number. For more information consult the Boulderlink section. Unless you are using two or more 810 Preamplifiers together, this setting should be left at 20. REMOTE ID Again pressing the DISPLAY pushbutton will make PROGRAM REMOTE ID, REMOTE CONTROL ID 5 show in the display. Rotating the volume control changes the ID number. This feature is used in conjunction with a wiring change in the remote control and should always be left set at 5. Consult your dealer to change this setting. BOULDERLINK SPEED Again pressing the DISPLAY pushbutton will make BOULDERLINK SPEED, BAUD-Standard show in the display. Rotating the volume control changes the baud rate. This feature increases the 1012 s compatibility with other brands of equipment. Consult your dealer before changing this setting. 4-8 PROGRAMMING
32 RESET TO FACTORY DEFAULTS Should you wish to have all settings reset to original factory defaults, you may execute a master reset. Normally, this function is not used. Press and hold the STANDBY pushbutton. RESET ALL PARAMETERS, INPUT 1=Y, INPUT 2=N will show in the display. To leave all settings as they currently are, press the TWO pushbutton. To reset all settings, press the ONE pushbutton. WARNING: All settings which you have programmed in will be lost, including the names of each input. The microprocessor and PROM version numbers are momentarily displayed. All other pushbuttons are inoperative during this time. The 810 Preamplifier will then return to normal operating mode and initiate a power up sequence. 4-9 PROGRAMMING
33 BOULDER PRE- AMPLIFIER BOULDERLINK "DAISY CHAIN" BOULDER POWER AMPLIFIER BOULDER POWER AMPLIFIER MASTER SLAVE SLAVE TO ALL OTHER SLAVE UNITS BOULDERLINK Boulderlink is a means of interconnecting most Boulder products so that their microprocessors can talk to each other and pass important information. Among the key features, Boulderlink allows sequential initiation of power amplifiers and other products when the 810 Preamplifier is turned on. Power amplifiers can send messages to the 810 which are then shown on its display. CONNECTING THE BOULDERLINK Turn off all products are to be linked before connecting Boulderlink cables and setting Boulderlink ID and Master/Slave switches. Boulderlink cables in various lengths are available as an accessory from your Boulder dealer. Two connectors are provided on the back of the 810 and other Boulderlink enabled products. All the chassis are connected together in a daisy chain manner. Start by connecting one chassis to another then from that chassis to the next until all are connected. The order does not matter. A special interface may be obtained to enable Boulderlink to be used with other control systems. Contact your Boulder dealer for details. 5-1 BOULDER LINK

34 CONNECTING 800 SERIES TO 1000 OR 2000 SERIES WITH BOULDERLINK If you are using the 810 Preamplifier with other Boulder products, a Boulder Link Adapter Box (BLAB) is required to make the connection. Although the connectors are mechanically different between the series, they are electrically the same, thus allowing the series to be mixed. Contact your Boulder dealer for further information. 5-2 BOULDER LINK
35 SETTING BOULDERLINK SWITCHES Every Boulderlink system must have one MASTER component, and only one component can be set to MASTER. Usually this is the preamplifier. Power amplifiers and other products not having a MASTER/SLAVE switch are not allowed to be MASTER. On the 810, the Boulderlink MASTER/SLAVE switch will normally be set to MASTER. SETTING BOULDERLINK ID NUMBERS Each component is required to have a unique Boulderlink ID number. The 810 ID is preset to 20 at the factory and/or when a master reset sequence is executed. If multiple preamplifiers are connected together, see pages 4-5 through 4-6 for instructions on how to change the ID numbers of the additional units. Each Boulder power amplifier has a thumbwheel switch on the rear panel. Start by setting the first switch to 0 or 1 and then going up from there without any duplication. Use of the lowest numbers will speed up turn on as each amplifier is allowed about 3 seconds before the next. This spreads out the power line inrush currents thus preventing house circuit breakers from unnecessary tripping. Up to 16 power amplifiers may be connected together in one Boulderlink cable daisy chain. 5-3 BOULDER LINK
36 POWER UP VIA BOULDERLINK With each component connected together with a Boulderlink cable, and individually connected to the mains, pressing the 810 s STANDBY pushbutton will initiate the turn on sequence of all components. The first time a MASTER 810 is powered up, it will search for any slave units connected to it. As the Master finds each slave, the slave s ID number will be shown on the display. If any of the connected slaves are amplifiers, then each time the master is turned on it will display WAITING FOR AMPS. Each amplifier will be turned on in the order of their Boulderlink ID. To minimize turn on time, the amplifier s Boulderlink IDs should be set to the lowest sequential numbers possible. For example, use 0, 1, and 2 instead of 13, 14, and 15. An amplifier set to ID 15 will take 47 seconds to turn on. A 810 set to SLAVE, will display THIS UNIT SLAVE #22. If there is no component set to MASTER, the 810 will display THERE IS NO MASTER! In this case, the 810 s MASTER/SLAVE switch should be set to MASTER. It may take up to 30 seconds for the 810 to recognize the switch change. 5-4 BOULDER LINK
37 BOULDERLINK MESSAGES Each component in the system can send a message to the 810 which is then shown on its display. This is particularly helpful in confirming the operating status of each power amplifier in a multiple amplifier system. AMPLIFIER 1 ERROR means that an internal power supply has failed and the amplifier has turned itself off to protect the speakers from damage. AMPLIFIER 1 HAS DC means that it has turned itself off due to a DC offset voltage being detected at its inputs. AMPLIFIER 1 IS HOT means that is has turned itself off due to a higher than normal temperature condition on the heatsinks. AMPLIFIER CLIP means that the amplifier s output has momentarily reached its output voltage limitation. 5-5 BOULDER LINK
38 UNIT 1 IS OFFLINE means that the slave is no longer responding via Boulderlink. Its Boulderlink cable may have become disconnected, or the mains power has been disconnected. UNIT 1 IS ONLINE means that the slave is now responding via Boulderlink in a normal manner and has been recognized by the master. 5-6 BOULDER LINK
39 RECORDING A separate analog output is provided for making recordings or supplying a fixed level output to other system components. CONNECTING A RECORDING DEVICE A recording device may be connected to the 810 Preamplifier. You may use balanced or unbalanced connections as previously described in the sections on connecting power amplifiers. See pages 1-8 and RECORDING

40 7-1 APPENDIX
41 BOULDER 810 PREAMPLIFIER SPECIFICATIONS Balance Line Inputs 4 Main Balanced Outputs 2 Record Balanced Outputs 1 Maximum Input Level 6.0 Vrms Maximum Output Level 14.0 Vrms THD+N, 2V Output, from 20 Hz to 20 khz Less than % Output loaded with 150Ω Less than 1 db distortion change, khz Maximum Voltage Gain, Line input 20 db Volume Range 100 db Volume Steps 0.5 db ±0.05 db (200 Steps) Record Path Gain, Balanced Output 8.5 db Record Path Gain, Unbalanced Output 2.5 db Frequency Response, 20 Hz to 20 khz +0.00, db Frequency Response, -3 db at 0.07 Hz & 250 khz Clip to noise ratio 118 db Crosstalk, L to R or R to L -113 db or better 20 Hz to 20kHz Crosstalk, Adjacent Inputs -113 db or better 20 Hz to 20kHz Input Impedance 100kΩ Balanced Output Impedance 100Ω Balanced, 50Ω Unbalanced Preamp Size, W x H x D 17.0 x 5.50 x inches Weight 18 pounds, Shipping: 26 pounds Power Requirements 100 / 120 / V, Hz, 22 W Max, 3 W Standby. 7-2 APPENDIX
42 TROUBLESHOOTING SYMPTOM CAUSE REMEDY No power indication Preamplifier is not plugged in Connect to an AC outlet Analog source selected, Amber power indication but sound not heard from either channel Amber power indication, but sound not heard from one channel Displays UNIT x ONLINE, then UNIT x OFFLINE continuously Fuse open or missing No signal from source No signal to power amplifier Preamp is defective No signal from one channel of source One Channel is muted by balance control Preamp is defective More than one slave unit has the same Boulderlink ID Reinsert or Replace Fuse Check source controls, cables and connections Check amplifier power status, cables and connections Return to dealer for service Check source controls, cables and connections Push BALANCE and recenter Return to dealer for service Make certain all slave units have a unique Boulderlink ID. See page APPENDIX
43 NOTES 7-4 APPENDIX
************* OWNER'S MANUAL BAMF800/2 BAMF1250/2 BAMF1800/2 BAMF2200/2 BAMF2600/2 BAMF1200/4 BAMF1600/4 BAMF2000/1D BAMF4000/1D BAMF5500/1D
 ************* OWNER'S MANUAL BAMF800/2 BAMF1250/2 BAMF1800/2 BAMF2200/2 BAMF2600/2 BAMF1200/4 BAMF1600/4 BAMF2000/1D BAMF4000/1D BAMF5500/1D INTRODUCTION Power Acoustik amplifiers provide high-performance
Hegel H1 High End Integrated Amplifier
 Hegel H1 High End Integrated Amplifier www.hegel.com info@hegel.com USER GUIDE Congratulations on your new HEGEL! Our products are based on a simple philosophy: The component shall reproduce the original
MANUAL PC1000R INFO@APART-AUDIO.COM
 MANUAL PC1000R INFO@APART-AUDIO.COM Features The APart PC1000R is a professional multisource CD/USB/SD card music player, equipped with balanced and unbalanced analog outputs, coaxial and optical digital
LOXONE 12 Channel Amplifier
 LOXONE 12 Channel Amplifier Item no.: 200110 Thank you for purchasing the Loxone Twelve Channel Amplifier. The versatility of the Amplifier makes it the perfect choice for almost every type of custom multi-room
GCX. Guitar Audio Switcher OWNER S MANUAL
 GCX Guitar Audio Switcher OWNER S MANUAL Please visit our web site at: www.voodoolab.com Copyright 1998 by Digital Music Corporation. This publication is protected by copyright and all rights are reserved.
MODEL 2202IQ (1991-MSRP $549.00)
") F O R T H E L O V E O F M U S I C F O R T H E L O V E O F M U S I C MODEL 2202IQ (1991-MSRP $549.00) OWNER'S MANUAL AND INSTALLATION GUIDE INTRODUCTION Congratulations on your decision to purchase a LINEAR
F O R T H E L O V E O F M U S I C F O R T H E L O V E O F M U S I C MODEL 2202IQ (1991-MSRP $549.00) OWNER'S MANUAL AND INSTALLATION GUIDE INTRODUCTION Congratulations on your decision to purchase a LINEAR
Mini Effect Gizmo. User s Manual. RJM Music Technology, Inc.
 Mini Effect Gizmo User s Manual RJM Music Technology, Inc. Mini Effect Gizmo User s Manual Version 1.3 September 26, 2013 RJM Music Technology, Inc. 2525 Pioneer Ave #1 Vista, CA 92081 E-mail: support@rjmmusic.com
Features, Benefits, and Operation
 Features, Benefits, and Operation 2014 Decibel Eleven Contents Introduction... 2 Features... 2 Rear Panel... 3 Connections... 3 Power... 3 MIDI... 3 Pedal Loops... 4 Example Connection Diagrams... 5,6
JBL CINEMA BASE. Home Cinema 2.2 all-in-one soundbase for television OWNER S MANUAL
 JBL CINEMA BASE Home Cinema 2.2 all-in-one soundbase for television OWNER S MANUAL JBL CINEMA BASE TABLE OF CONTENTS INTRODUCTION 1 DESCRIPTION AND FEATURES 1 JBL CINEMA BASE TOP PANEL CONTROLS 2 JBL CINEMA
TOA 900 SERIES II MIXER POWER AMPLIFIER
 Operating Instructions TOA 900 SERIES II MIXER POWER AMPLIFIER A-903MK2 A-906MK2 A-912MK2 TO REDUCE THE RISK OF ELECTRICAL SHOCK, DO NOT REMOVE COVER. NO USER SERVICEABLE PARTS INSIDE. REFER SERVICING
Owner s Manual 900.4. 4 channel amplifier
 Owner s Manual 900.4 4 channel amplifier THANK YOU Limited Warranty: for purchasing RE AUDIO Bluetooth amplifiers BT-900.4. With almost no sacrifice on sound quality, BT-900.4 easily plays the music from
STEREO PREAMPLIFIER INSTRUCTIONS FOR USE
 XX STEREO PREAMPLIFIER INSTRUCTIONS FOR USE Thank you for purchasing the Musical Fidelity A5 CR Preamplifier. Used properly and carefully, it should give many years of outstanding musical reproduction.
Hegel H80 High End Integrated Amplifier. User manual
 Hegel H80 High End Integrated Amplifier User manual USER GUIDE Congratulations on your new HEGEL H80! All Hegel products are based on a simple philosophy: The audio reproduction instrument shall reproduce
Operation Manual for Users
 Operation Manual for Users Model No.: FLTAMFMRCD!!!!!!!!!! ATTENTION!!!!!!!!!! THE RESET BUTTON MUST BE PRESSED TO ENSURE PROPER OPERATION. SEE INSTRUCTION MANUAL Table of Contents Table of Contents ---------------------------------------------------------------------------------------------
CX Zoner Installation & User Guide
 CX Zoner Installation & User Guide Cloud Electronics Limited 140 Staniforth Road, Sheffield, S9 3HF England Tel +44 (0)114 244 7051 Fax +44 (0)114 242 5462 e-mail info@cloud.co.uk web site http://www.cloud.co.uk
Brio-Rmanual:Cursamanual.qxd 08/04/2011 09:25 Page1
 - Brio-Rmanual:Cursamanual.qxd 08/04/2011 09:25 Page1 Brio-Rmanual:Cursamanual.qxd 08/04/2011 09:25 Page2 CONTENTS INTRODUCTION, FEATURES AND TECHNOLOGY 1-3 INSTALLATION 3 CONNECTIVITY 4-6 LOUDSPEAKER
EC4.8. BalancedReferencePreamplifier. Owner smanual ENG
 EC4.8 BalancedReferencePreamplifier Owner smanual ENG Unpacking the EC 4.8 Immediately upon receipt of the EC 4.8, inspect the carton for possible damage during shipment. The carton and packaging have
KEYBOARD EXTENDED RANGE. Sixty Owner, s Manual P/N 049254
 THE SOUND THAT CREATES LEGENDS KEYBOARD EXTENDED RANGE Sixty Owner, s Manual P/N 049254 INTRODUCTION Your new Fender KXR 60 Keyboard Amplifier is the result of Fender s ongoing dialog with many of today
HIGH PERFORMANCE CAR AUDIO MODEL:CR-82 8 CHANNEL ELECTRONIC CROSSOVER NETWORK SYSTEM. www.pyramidcaraudio.com
 HIGH PERFORMANCE CAR AUDIO MODEL:CR-82 8 CHANNEL ELECTRONIC CROSSOVER NETWORK SYSTEM 1 www.pyramidcaraudio.com INTRODUCTION This CR-82 is an Electronic Crossover Network with which you can install various
ECD 2 High Performance Balanced DAC. 24 Bit /192kHz. Owner's Manual
 ECD 2 High Performance Balanced DAC 24 Bit /192kHz Owner's Manual EN Unpacking the ECD 2 Immediately upon receipt of the ECD 2, inspect the carton for possible damage during shipment. If the carton is
Model DB 750 Tube Bass Head
 Model DB 750 Tube Bass Head Congratulations on purchasing Aguilar Amplification s DB 750 Tube Bass Head! The DB 750 is a groundbreaking hybrid amplifier with a discrete Mosfet output section and an all
Perseus. Owner s Manual. Vacuum Tube Preamplifier. Rogue Audio, Inc. 3 Marian Lane Brodheadsville, PA 18322. Issue date: 02/01/06
 Perseus Vacuum Tube Preamplifier Owner s Manual Rogue Audio, Inc. 3 Marian Lane Brodheadsville, PA 18322 Issue date: 02/01/06 TABLE OF CONTENTS 1) Introduction 2 2) Unpacking the Perseus Preamplifier 2
JBL CINEMA SB350. Home Cinema 2.1 soundbar with wireless subwoofer
 JBL CINEMA SB350 Home Cinema 2.1 soundbar with wireless subwoofer Owner s Manual BASS English JBL CINEMA SB350 JBL CINEMA SB350 Optical cable Table of Contents INTRODUCTION 5 ITEMS INCLUDED 5 JBL CINEMA
INTRODUCTION. Please read this manual carefully for a through explanation of the Decimator ProRackG and its functions.
 INTRODUCTION The Decimator ProRackG guitar noise reduction system defines a new standard for excellence in real time noise reduction performance. The Decimator ProRackG was designed to provide the maximum
PS 29M DUAL CHANNEL BELTPACK IN METAL CASE
 PS 29M DUAL CHANNEL BELTPACK IN METAL CASE USER MANUAL October 2013 This product is designed and manufactured by: ASL Intercom BV Zonnebaan 42 3542 EG Utrecht The Netherlands Phone: +31 (0)30 2411901 Fax:
Instructions - THP-700RTS Telephone Headset Radio Transfer Switch with Dry Switch Closure Output
 This document applies to all THP-700RTS family members Instructions - THP-700RTS Telephone Headset Radio Transfer Switch The THP-700RTS is an interface between telephones or Automatic Call Directors and
Troubleshooting Tips Lifestyle SA-2 & SA-3 Amplifier. Troubleshooting Tips
 Troubleshooting Tips Lifestyle SA-2 & SA-3 Amplifier Refer to the Lifestyle SA-2 & SA-3 Amplifier service manuals, part number 271720 for schematics, PCB layouts and parts lists. Preventative Repair Measures
THE MclNTOSH MC 2100 SOLID STATE STEREO POWER AMPLIFIER
 THE MclNTOSH MC 2100 SOLID STATE STEREO POWER AMPLIFIER Price $1.25 Your MC 2100 stereo amplifier will give you many years of pleasant and satisfactory performance. If you have any questions concerning
IMPORTANT SAFETY INSTRUCTIONS
 IMPORTANT SAFETY INSTRUCTIONS When using this electronic device, basic precautions should always be taken, including the following: 1. Read all instructions before using the product. 2. Do not use this
High Power Receiver CR-W400U Operating Instructions
 High Power Receiver CR-W400U Operating Instructions Please read these instructions carefully before using this product and save this manual for future use. Panasonic welcomes you to our ever growing family
User's Guide. Integrating Sound Level Datalogger. Model 407780. Introduction
 User's Guide 99 Washington Street Melrose, MA 02176 Phone 781-665-1400 Toll Free 1-800-517-8431 Visit us at www.testequipmentdepot.com Back to the Extech 407780 Product Page Integrating Sound Level Datalogger
MIDI control allows the Split Personality to be used remotely in rack systems, or integrated into MIDI controlled setups for easy preset recall.
 Introduction Trying to drive multiple amplifiers can typically be a frustrating experience. The Decibel Eleven Split Personality is an active AB/Y switcher that enables musicians to run multiple amplifiers
Safety Warnings and Guidelines
 Safety Warnings and Guidelines Thank you for purchasing this Wireless Speaker Amplifier! For best results, please thoroughly read this manual and carefully follow the instructions. Please pay extra attention
Liquid Carbon Balanced Transportable Headphone Amplifier. Cavalli audio. Copyright 2015-2016 Cavalli Audio, LLC All Rights Reserved
 Liquid Carbon Balanced Transportable Headphone Amplifier Cavalli audio All Rights Reserved Page 2 of 15 Congratulations! You re now the proud owner of the Cavalli Audio Liquid Carbon Balanced Transportable
INSTALLATION & SERVICE MANUAL. Display Panel
 INSTALLATION & SERVICE MANUAL Display Panel The PowerLine EMS TM is a specialized power distribution and energy management system intended to be used in recreational vehicles. The Control Module is housed
F(t) Forssell Technologies Inc
 Forssell Technologies Inc") F(t) Forssell Technologies Inc SMP-2Aa Microphone Preamplifier User Manual Forssell Technologies Inc Sandpoint Idaho USA (208) 263-0286 Introduction The Forssell Technologies Inc SMP-2A is a 2 channel,
F(t) Forssell Technologies Inc SMP-2Aa Microphone Preamplifier User Manual Forssell Technologies Inc Sandpoint Idaho USA (208) 263-0286 Introduction The Forssell Technologies Inc SMP-2A is a 2 channel,
DAB1001. Wireless Digital Radio Interface. Installation & User Guide
 DAB1001 Wireless Digital Radio Interface Installation & User Guide Contents Contents... 2 Introduction... 3 Contents of Package... 4 Installation... 5 Product Overview... 5 Installation Procedure... 5
WOO AUDIO WA3. Stereo Headphone Amplifier. Single-Ended OTL, Class A Vacuum Tube Headphone & Pre Amplifier. Owner s Manual
 WOO AUDIO WA3 Stereo Headphone Amplifier Single-Ended OTL, Class A Vacuum Tube Headphone & Pre Amplifier Owner s Manual Please review this manual before operating your WOO AUDIO product. Inc. All rights
Hear The Future...Now! SIEM-2T/SIEM-2R
 Hear The Future...Now! SIEM-2T/SIEM-2R UHF PLL Mono In Ear Monitoring System 856 59508-03 ATTENTION Please pay high attention to the following information. The guideline published by Occupational Safety
TELIKOU Intercom System. MS-500(4+1 channel) Main Station Instruction Manual
 Main Station Instruction Manual") TELIKOU Intercom System MS-500(4+1 channel) Main Station Instruction Manual TELIKOU Systems All Rights Reserved While TELIKOU makes every attempt to maintain the accuracy of the information contained in
TELIKOU Intercom System MS-500(4+1 channel) Main Station Instruction Manual TELIKOU Systems All Rights Reserved While TELIKOU makes every attempt to maintain the accuracy of the information contained in
Applied Electronics. Commercial Dimming System UPDATE NOTICE
 REV. A Applied Electronics Commercial Dimming System UPDATE NOTICE This notice is to inform the end user of an additional feature added to this DP12/2400 dimming unit. This unit has been outfitted with
Tone Hammer 500. Owners Manual. Manual Version 1.0
 Tone Hammer 500 Owners Manual Manual Version 1.0 1. Incorporating the preamp from the popular Tone Hammer preamp/di pedal this superlight bass head combines three bands of flexible EQ, a colorful "Drive"
CINEMA SB100 powered soundbar speaker
 CINEMA SB100 powered soundbar speaker quick-start guide Thank You For Choosing This JBL Product The JBL Cinema SB100 powered soundbar speaker is a complete, integrated sound system that will dramatically
USA 305. Power Amplifier OWNERS MANUAL AND INSTALLATION GUIDE PARALLEL/SERIES WIRING DIAGRAMS. two 4 ohm woofers in parallel = 2 ohms
 PARALLEL/SERIES WIRING DIAGRAMS USA 305 two 4 ohm woofers in parallel = 2 ohms two 4 ohm woofers in series = 8 ohms SOUNDSTREAM TECHNOLOGIES 120 Blue Ravine Road Folsom California 95630 USA ph 916.351.1288
ACTIVE. www.edgecaraudio.com
 ACTIVE www.edgecaraudio.com INTRODUCTION This instruction manual is for your safety and must be adhered to at all times. Please read and ensure that you fully understand the installation and set up procedures
QUICK START GUIDE. Thank you for purchasing the ButtKicker Kit. This guide will help you quickly set up your new ButtKicker Kit Contents: BK-Kit-4
 BK-Kit-4 QUICK START GUIDE Thank you for purchasing the ButtKicker Kit. This guide will help you quickly set up your new ButtKicker Kit Contents: ButtKicker Advance Remote Control Chair/Couch Mounting
Owner s Manual AWM910 JENSEN AWM910 COMPACT DISC PLAYER RADIO CD COMPACT MUSIC SYSTEM MUTE AUX BAND AUX IN PUSH PUSH PWR VOL ALARM T/F AUD SPK A SPK B
 AWM910 Owner s Manual COMPACT DISC PLAYER PUSH 1 2 3 4 5 6 RPT SCAN RDM H M PUSH PWR VOL ALARM SET ON/OFF EQ T/F AUD RADIO CD COMPACT MUSIC SYSTEM MUTE AUX BAND CD AUX IN A B A+B JENSEN AWM910 Thank You!
40 Watt Mixer Amplifier Owners Manual with Media Player
 40 Watt Mixer Amplifier with Media Player Model #USB-80 2009 MCM Electronics MCM Custom Audio MCM Electronics Centerville, Ohio www.mcmelectronics.com SAFETY INSTRUCTIONS Please be sure to read all the
USER MANUAL. 914 Power Amplifier MODEL: P/N: 2900-300280 Rev 1
 KRAMER ELECTRONICS LTD. USER MANUAL MODEL: 914 Power Amplifier P/N: 2900-300280 Rev 1 Contents 1 Introduction 1 2 Getting Started 2 2.1 Achieving the Best Performance 2 3 Overview 3 3.1 Energy Star 3
F25 REMOTE CONTROL STEREO PREAMPLIFIER INSTRUCTIONS FOR USE
 REMOTE CONTROL STEREO PREAMPLIFIER INSTRUCTIONS FOR USE Thank you for purchasing the Musical Fidelity Preamplifier. Used properly and carefully, it should give you many years of outstanding musical reproduction.
OWNER'S MANUAL HIGH PERFORMANCE AMPLIFIERS
 OWNER'S MANUAL HIGH PERFORMANCE AMPLIFIERS B2 has through years of dedication introduced our line of Ref 0.5 & Anno amplifiers. The B2 line up are made to fullfil our philosophy for amplifiers; A variety
The RIDZ 8x2 Audio Switcher
 The RIDZ 8x2 Audio Switcher Engineering Manual Support Number 800-765-2930 International 712-852-2813 Table of Contents General Information for the RIDZ (8 x 2) Switcher..... 3 Input 9 on the RIDZ Switcher....6
Q1-750 Q1-1200.2 Q1-2200.2 Q1-4500 Q2-200 Q4-90 Q4-120 HIGH PERFORMANCE AMPLIFIER
 Owner s Manual Q1-750 Q1-1200.2 Q1-2200.2 Q1-4500 Q2-200 Q4-90 Q4-120 HIGH PERFORMANCE AMPLIFIER INTRODUCTION Thanks you for purchasing SoundQubed amplifiers for your car audio systems and competitions
AVR 158. Audio/video receiver. Quick-Start Guide ENGLISH
 158 Audio/video receiver ENGLISH Quick-Start Guide 158 Introduction, Speaker Placement and Connection Introduction Thank you for choosing a harman kardon product! This quick-start guide contains all the
BXR. Owner, s Manual. One hundred BASS EXTENDED RANGE P/N 040695
 THE SOUND THAT CREATES LEGENDS BASS EXTENDED RANGE BXR One hundred Owner, s Manual P/N 040695 BXR 100 Owner s Manual Congratulations on your purchase of the Fender BXR 100 Bass amplifier. The Fender BXR
Hegel H160 High End Integrated Amplifier
 Hegel H160 High End Integrated Amplifier User manual USER GUIDE Congratulations with your new HEGEL product! The Hegel H160 Integrated Amplifier is easy to connect and operate and requires no prior technical
Short Range Wireless Switch System Handheld 8 Installation and Operations Guide
 Phone: (866) 701-1146 Fax: (425) 216-7558 www.remotecontroltech.com Short Range Wireless Switch System Handheld 8 Installation and Operations Guide Introduction... 2 Before Installation... 2 Receiver Installation...
VK-250 WARRANTY REGISTRATION FORM
 VK-250 WARRANTY REGISTRATION FORM Unit Serial Number: Customer Name: Address: Date of Purchase: Purchased From: Dealer Name: Address: IMPORTANT NOTE: In order to receive the full five year product warranty,
SESSION ACOUSTIC DI USER S GUIDE
 SESSION ACOUSTIC DI USER S GUIDE INTRODUCTION Inspired by the LR Baggs Handcrafted Video Sessions and our experience in some of Nashville s great studios, Session Acoustic DI brings our signature studio
Evolution Digital HD Set-Top Box Important Safety Instructions
 Evolution Digital HD Set-Top Box Important Safety Instructions 1. Read these instructions. 2. Keep these instructions. 3. Heed all warnings. 4. Follow all instructions. 5. Do not use this apparatus near
CAUTION RISK OF ELECTRIC SHOCK NO NOT OPEN
 Evolution Digital HD Set-Top Box Important Safety Instructions 1. Read these instructions. 2. Keep these instructions. 3. Heed all warnings. 4. Follow all instructions. 5. Do not use this apparatus near
SP1790JK 900MHz Wireless Indoor/Outdoor Speakers. User Manual INTRODUCTION FEATURES IMPORTANT SAFETY INFORMATION
 SP1790JK 900MHz Wireless Indoor/Outdoor Speakers INTRODUCTION This 900 MHz digital hybrid wireless speaker system uses the latest wireless technology that enables you to enjoy music and TV sound anywhere
DAB+ / FM Tuner Model: TU-201
 DAB+ / FM Tuner Model: TU-201 Instruction Manual www.pulse-audio.co.uk 1 Safety Information The lightning bolt within a triangle is intended to alert the user to the presence of dangerous voltage levels
Amplifier: AMP-8125. Feature Summary
 Savant Systems AMP-825 is a multi-room amplifier for distributed audio applications. The AMP-825 is an ultraefficient Class D amplifier delivering 8 channels of reliable amplification rated at 25 watts
Black Lion Audio 1800 W Cuyler Ave., Suite 2 East Chicago, IL 60613 773-549-1885
 Black Lion Audio 1800 W Cuyler Ave., Suite 2 East Chicago, IL 60613 773-549-1885 1 V1.0 WARNING FOR YOUR SAFTEY, PLEASE READ THE FOLLOWING: GROUNDING: For your safety, do not defeat the grounding connection
SYSTEM MIX PLUS. Owner's Manual DIGITAL MUSIC CORPORATION
 SYSTEM MIX PLUS Owner's Manual 1 Table of Contents 1. Introduction.................. 2 1.1 Overview 1.2 Unpacking 2. Operation................... 3 2.1 Front Panel 2.2 Rear Panel 3. Mixer.....................
Message from the Development Team. Contents. Message from the Development Team..2. Panel Controls and Terminals...3. Using the UR22mkII...
 EN Contents Contents Message from the Development Team..2 Panel Controls and Terminals...3 Front Panel...3 Rear Panel...5 Software...7 Using the UR22mkII...10 Connections...10 Configuring Audio Driver
CLASS-D MONO BLOCK POWER AMPLIFIERS BZA-1000D / BZA-2000D OWNER'S MANUAL
 CLASS-D MONO BLOCK POWER AMPLIFIERS BZA-1000D / BZA-2000D OWNER'S MANUAL Table of Contents Table of Contents Introduction & Features Specification Features & Controls Installation & Precautions System
Y-Not. User s Manual. RJM Music Technology, Inc.
 Y-Not User s Manual RJM Music Technology, Inc. Y-Not User s Manual Version 2.0 July 14, 2014 RJM Music Technology, Inc. 2525 Pioneer Ave #1 Vista, CA 92081 E-mail: support@rjmmusic.com Web: www.rjmmusic.com
Hi! Let s get started.
 Hi! Let s get started. What s in the Box Roku player Remote control 2 x AAA batteries for remote A/V cable RCA Power adapter Get to know your roku A Front view B C F Back view D E A B C D E F Status light
Daker DK 1, 2, 3 kva. Manuel d installation Installation manual. Part. LE05334AC-07/13-01 GF
 Daker DK 1, 2, 3 kva Manuel d installation Installation manual Part. LE05334AC-07/13-01 GF Daker DK 1, 2, 3 kva Index 1 Introduction 24 2 Conditions of use 24 3 LCD Panel 25 4 Installation 28 5 UPS communicator
Achat 115MA full-range speaker. user manual
 Achat 115MA full-range speaker user manual Musikhaus Thomann Thomann GmbH Hans-Thomann-Straße 1 96138 Burgebrach Germany Telephone: +49 (0) 9546 9223-0 E-mail: info@thomann.de Internet: www.thomann.de
Powered Subwoofer. Owner s Manual 2013 PINNACLE LOUDSPEAKERS
 Powered Subwoofer Owner s Manual 2013 PINNACLE LOUDSPEAKERS We congratulate and thank you for choosing a PINNACLE subwoofer. Our subwoofers exemplify the best in modern audio technology, and are designed
Smarthome SELECT Bluetooth Wireless Stereo Audio Receiver and Amplifier INTRODUCTION
 Smarthome SELECT Bluetooth Wireless Stereo Audio Receiver and Amplifier INTRODUCTION The Smarthome SELECT Bluetooth Wireless Stereo Audio Receiver and Amplifier is a multi-functional compact device. It
Active Monitor Box McCrypt S.T.E.V.E. 15. Order No. 30 17 06
 Active Monitor Box McCrypt S.T.E.V.E. 15 Order No. 30 17 06 1 McCrypt Active Monitor 15 Introduction Dear Customer, Thank you for purchasing this McCrypt Active Monitor. You have chosen a quality product
RVA600.1 4 OHM MONOBLOCK
 RVA600.1 4 OHM MONOBLOCK Introduction Thank you for purchasing this Rockville RVA600.1 amplifier. Over the years, the technology used to create audio amplifiers has grown by leaps and bounds. Our competition
BeoLab 1. User s guide
 BeoLab 1 User s guide Legal notice: CAUTION RISK OF ELECTRIC SHOCK DO NOT OPEN CAUTION: To reduce the risk of electric shock, do not remove cover (or back). No User-serviceable parts inside. Refer servicing
ELECTRICAL AUDIO EApreq
 ELECTRICAL AUDIO EApreq (Preliminary Info) The EAPreq is a two channel transformer-based microphone preamp/equalizer. The preamp is designed to allow the character of the input transformer to color the
CMP30. User Manual. www.audac.eu
 CMP30 User Manual www.audac.eu 2 Index Introduction 4 Precautions 5 Safety requirements 5 Caution servicing 5 EC Declaration of Conformity 5 Waste of Electrical and Electronic Equipment (WEEE) 6 Caution
S-8, S-10 AND S-12 POWERED SUBWOOFER. Owner s Manual
 S-8, S-10 AND S-12 POWERED SUBWOOFER Owner s Manual Introduction Congratulations on your purchase of an RBH Sound powered subwoofer! Your subwoofer is the result of many years of research and development
PRODUCTIVITY THROUGH INNOVATION 600 CONTROL DIRECT DRIVE TECHNICAL/OPERATION MANUAL
 Rev. D PRODUCTIVITY THROUGH INNOVATION 600 CONTROL DIRECT DRIVE TECHNICAL/OPERATION MANUAL 10 BORIGHT AVENUE, KENILWORTH NEW JERSEY 07033 TELEPHONE: 800-524-0273 FAX: 908-686-9317 TABLE OF CONTENTS Page
www.burntec.com User's Guide Integrating Sound Level Datalogger Model 407780
 User's Guide Integrating Sound Level Datalogger Model 407780 Introduction Congratulations on your purchase of the Extech 407780 Integrating Sound Level Meter. The 407780 with programmable integrating time
USER GUIDE PRO-EQ PLATINUM
 USER GUIDE PRO-EQ PLATINUM Welcome Thank you for making Fishman a part of your acoustic experience. We are proud to offer the finest acoustic amplification products available: high-quality professional-grade
Digital Radio/DAB+/FM RDS digital clock radio with dual alarm Operating instruction
 381SE1D-A Digital Radio/DAB+/FM RDS digital clock radio with dual alarm Operating instruction GB Contents Controls... 2-3 Using the clock radio for the first time... 4 Operating your clock radio... 5 Selecting
CABLE ONE ALL DIGITAL
 CABLE ONE ALL DIGITAL The world is going All Digital and so is Cable ONE. With the switch from analog to digital technology, Cable ONE will be able to add new channels, especially more HD channels, and
user guide Meridian 558 Multi Channel Power Amplifier
 user guide Meridian 558 Multi Channel Power Amplifier Meridian 558 Multi Channel Power Amplifier User Guide ipreface Sales and service in the UK Meridian Audio Ltd Stonehill Stukeley Meadows Cambs PE18
Active Speaker System LX523 AUDAC PROFESSIONAL AUDIO EQUIPMENT. Active Speaker System with remote input LX523. User Manual & Installation Guide
 Active Speaker System LX523 AUDAC PROFESSIONAL AUDIO EQUIPMENT Active Speaker System with remote input LX523 User Manual & Installation Guide AUDAC PROFESSIONAL AUDIO EQUIPMENT User Manual & Installation
DP-DMX20L 4 CHANNEL DMX DIMMER PACK MODE MENU DISPLAY. OUTPUT: 10A/CH, TOTAL 20A Max. DMX CHANNEL RECEIVE TOTAL DMX CHANNEL DIMMER / SWITCH
 DP-DMX0L OUTPUT: 0A/CH, TOTAL 0A Max. CHANNEL DMX DIMMER PACK DISPLAY RECEIVE DMX CHANNEL TOTAL DMX CHANNEL DIMMER / SWITCH 8888 CHASE PROGRAM CHASE CHASE SPEED CHASE DIMMER MODE MENU Elation Professional
OPERATING INSTRUCTIONS Model ST-888 DTMF ANI/ENI Display Decoder
 P R O D U C T G R O U P OPERATING INSTRUCTIONS Model ST-888 DTMF ANI/ENI Display Decoder Manual # 600-0901 November 30, 1999 Rev. D - 99068 DESCRIPTION The ST-888 Mobilecall Display Decoder is a desktop
TS510 & TS500. Installation & User Guide. Compatible Equipment
 Installation & User Guide Compatible Equipment TS510 REM - Remote Keypad 9040 - Loudspeaker DC54/58 - Digital Communicator SD1+ - Speech Dialler 496525 Issue A 1 of 10 TS510 and TS500 Overview Introduction
MISE - STEREO ENCODER
 MISE - STEREO ENCODER 1. FRONT PANEL CONTROLS and INDICATORS AUDIO LEVEL F1 F2 F3 F4 OVER- MOD F5 F1:AUDIO LEVEL Control The setting of this screwdriver adjustment determines the audio input signal level.
ZMR 80 STEREO MODULAR ZONER USERS MANUAL
 ZMR 80 STEREO MODULAR ZONER USERS MANUAL Lime Technologies http://limetechnologies.co.uk Tel: 08712 233127 ZMR80 Stereo Modular Zoner Mixer Introduction The modular construction of the ZMR80 allows it
TELIKOU Intercom System. TM-200 Main Station. Instruction Manual
 Intercom System TM-200 Main Station Instruction Manual TELIKOU Systems All Rights Reserved I. Introduction Thank you for choosing TELIKOU intercom product. TM-200 main station is suitable for television
Ameritron ATP-102 Tuning Pulser II
 Ameritron ATP-102 The Ameritron ATP-102 relieves temperature related stress on amplifiers, tuners, and dummy loads while allowing proper system adjustments. It allows amplifiers to be properly adjusted
ASP-DTH. DVI & Audio to HDMI Converter. User Manual. Manual Number: 100901
 ASP-DTH DVI & Audio to HDMI Converter User Manual Manual Number: 100901 Safety and Notice The ASP-DTH DVI & Audio to HDMI Converter has been tested for conformity to safety regulations and requirements,
Line Level Converter Box. S Class Signal Processors
 Line Level Converter Box S Class Signal Processors Table Of Contents Introduction and Features 3 Front and Rear Panel Layout 4 Operating the S convert Using the LEVEL controls 5 Typical Set-up 6 Wiring
PagePac PAGEPAL V-5335700
 PagePac Issue 3 by PAGEPAL V-5335700 INTRODUCTION The PagePal unit interfaces most telephone systems (PBX, KTS, Centrex) to virtually any public address audio system. In addition, PagePal furnishes inputs
ReSound Unite TV FREQUENTLY ASKED QUESTIONS. Setup & Configuration. Use & Operation. Troubleshooting
 Tip for use of FAQ: Click on questions to go to answer. Setup & Configuration How do I pair the hearing aids to the Unite TV?... 2 What is the latency of the streamed signal?... 2 Does the Unite TV use
Information & Operation Manual
 Information & Operation Manual 381/381i CD Player 381/381i CD Player 381/381i CD Player Information & Operation Manual Table of Contents Preliminaries Wadia Digital A Brief History.........................................................
M Zero. Owner's Information. Music's Finest Conductor. Level 0 line pre-amplifier
 M Zero Level 0 line pre-amplifier Owner's Information Music's Finest Conductor Introduction to the M Zero pre-amplifier Congratulations on your purchase of the Audio Note M Zero level 0 pre-amplifier.