Five Simple Steps DL806 / DL1608 DL806 / DL1608
|
|
|
- Rosemary Fields
- 10 years ago
- Views:
Transcription
1 QUICK START GUIDE
2 DL806 / DL1608 Hello friends and welcome to the future of mixing. This document is just what it says it is: a Quick Start Guide for the DL806 and DL1608. No introduction, no filler, no fluff. Just the very basics to get you started quickly. In the following pages, you will be taught how to make connections and set levels. You will learn your way around the Master Fader app. And in the end, you will be known around the neighborhood as the cool kid. Yes, you. Upon completion, if you re still hungry for more, the DL806 / DL1608 Reference Guide contains major in-depth coverage of everything listed within these pages. Five Simple Steps 1. Get the ipad (and Wi-Fi Router): Ah, the easiest step of the bunch... or is it? Simply grab your ipad and Wi-Fi router. But first......where did I leave that darn thing? Is it in the bedroom? The bathroom? Did I leave it at work? Wait, the dogs are using it...that s right! Once Charlie, Sammy, Rocky, Rhodie and Juno have finished checking out the closest place to get their favorite doggie treats, it s time for you to get going. Ruh, good doggie! One of the exciting features of this mixer ipad marriage is the ability to mix wirelessly. Although not required for wired operation, be sure that your Wi-Fi router is nearby, as we will be discussing wireless connectivity shortly. The exact hardware needed for wired and wireless functionality depends on the DL Series mixer and ipad in use. Make sure you have the right ipad, mixer dock and tray insert for your combination. Please see the Compatibility Matrix on the DL Series website for the latest information: dlseries/specs/ Let s get started in five simple steps Get the Apple ipad (and Wi-Fi Router). 2. Download the Master Fader App. 3. Connect the ipad to the DL806 or DL Make the Audio Connections. 5. Fire Up the DL806 or DL1608 and Launch the Master Fader App. 2 DL806 / DL1608

3 2. Download the Master Fader App: The Master Fader app controls the mixer and may be downloaded via itunes on Mac or PC or right from the ipad. You ve downloaded apps on an ipad before and it s the same method to download this one, as well. Here s how... With a good internet connection via Wi-Fi, 3G, or LTE, turn on the ipad and tap the App Store icon. Type master fader in the search box located near the top-right of the screen. Five Simple Steps Tap the blue FREE button.this then turns into a green INSTALL button. Do not be afraid...install! Even if your ipad has the Master Fader app already installed, it s a good idea to go to the App Store now to check for updates. You will want the latest and greatest version for the absolute best in functionality and versatility. 3. Connect the ipad to the DL806 or DL1608: The ipad easily slides onto the mixer right to left, face up, Home button on the left; keep sliding until it mates with the ipad s dock connector. As if by magic, the Master Fader icon appears on the ipad Home screen after it has finished downloading. The docked ipad should be as naked as possible! Remove all covers, skins, cases, stickers, magnets, etc. Naked isn t always a good thing, but in this case it s a necessity! Also included with the mixer is a PadLock. This is used to lock the ipad into place on the mixer. Place the PadLock on the right hand side of the mixer and hand-tighten each of the two security screws using the supplied wrench. Need a little more information on any of the above? Detailed descriptions (with pictures even!) exists in the Reference Guide. 3

4 DL806 / DL Make the Audio Connections: Now it s time to make some audio connections. First, make sure the Power switch and Phantom Power switch are both OFF [down], [Figure A]. Also, be sure all Gain knobs and the Phones knob are fully counter-clockwise to start, [Figure B]. You will need (at the very least) the following items to get the most out of this : 1) microphone, 2) speakers, 3) headphones, 4) cables. Power Switch Phantom Power Switch Five Simple Steps 1) Plug the microphone into the channel 8 input [Figure A]; that s right, we re getting all crazy now, skipping channels who knows what we ll do next?! 2) Connect the Main Outs [Figure A] of the mixer to the line-level inputs of powered speakers or to the line-level inputs of an amplifier (with speakers already attached). 3) Plug your favorite pair of headphones into the 1/4" Phones output jack [Figure B]. Channel 8 Signal / Clip LED A 12V DC power supply [aka The Power Block] and a line cord are included with the mixer. A locking barrel connector resides at the end of the cord attached to The Power Block. Attach it to the mixer s Power Connector [Figure C] and rotate the outer ring clockwise to lock. Now plug the female end of the line cord into The Power Block and the male end into a live grounded AC outlet. The mixer may accept any AC voltage ranging from 100 VAC to 240 VAC. Phones Output Jack Phones Knob Power Connector Network Connector Figure C Power / Network Main Outs Channel 8 Input Figure A Rear Panel Channel 8 Gain Knob Figure B Front Panel For now, disregard the Network Connector, Aux Sends and anything else not mentioned in these first few pages. We will dive into all of these features later. Our first goal is to ensure that the mixer and app are communicating with each other, followed by driving signal through the mixer. 4 DL806 / DL1608
 Plug the microphone into the channel 8 input [Figure A]; that s right, we re getting all crazy now, skipping channels 1 7.")
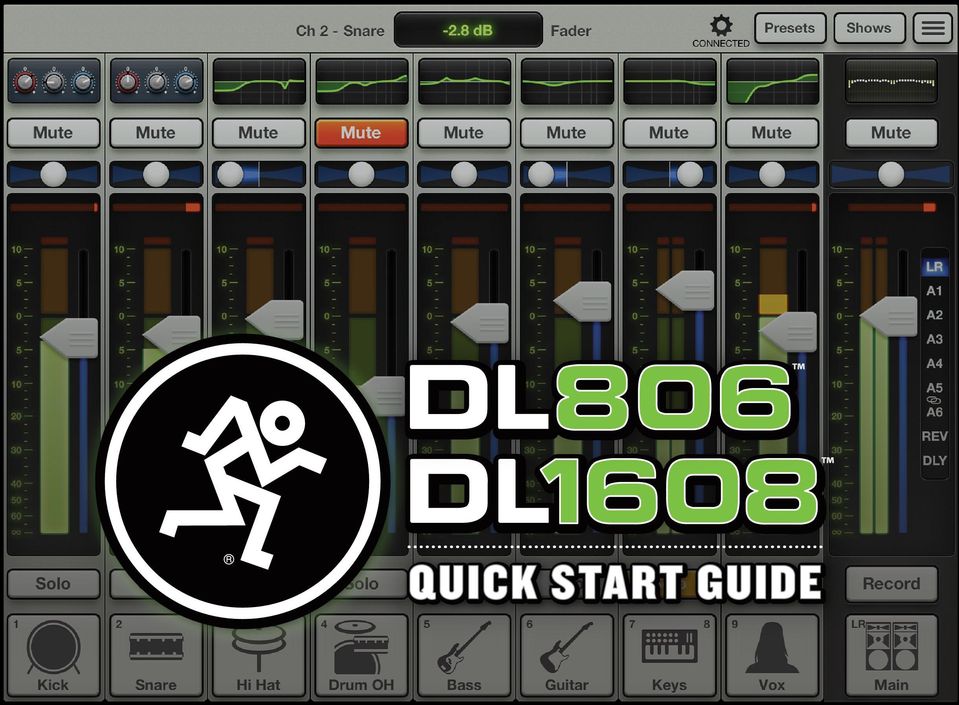
5 5. Fire Up the DL806 or DL1608 and Launch the Master Fader App: Step five is the reward for following the four previous steps. It s time to turn on the mixer, but whispering sweet nothings to it won t help. Instead, you will need to press the top edge of the Power switch to fire it up [Figure A]. The Power LED will illuminate green when engaged. Now launch the Master Fader app to get it started. Go ahead and tap that app! At this point, you will likely be prompted to update the firmware. Do so by following the on-screen instructions before continuing. Five Simple Steps After updating, the Mixer View [Figure D] will be shown and at this point you will want to verify connectivity. This is easy to do, as there are only two possibilities: connected or offline. Figure E below shows an ipad that is currently offline. In other words, not connected to the mixer. Figure E Mixer View: Offline So if your app looks like Figure D, you are cool as a cucumber, ready to rock...or jazz...or country...or whatever else it is that you do at times like these. In the unusual instance that OFFLINE is displayed, please follow the directions again, stepby-step, and also check out the Troubleshooting section in the Reference Guide. Figure D Mixer View: Connected If OFFLINE still remains, please contact our splendid Technical Support heroes. See page 31 for contact information. 5

6 DL806 / DL1608 Setting the Level on Channel 8 Dudes and dudettes, the mixer hardware and Master Fader app are now one and we are ready to start working! Let s get signal running through the mixer from channel 8. Is a condenser mic (or any other mic that requires phantom power) connected to the channel 8 input? If so, engage the Phantom Power switch [Figure A] by pressing up on it. If not, leave it be. This switch lies conveniently next to the Power switch. The Phantom Power LED will illuminate red when the switch is engaged. Setting the Levels Next, start talking, singing, crooning, chanting, humming, warbling, yodeling, whistling and / or growling into the mic at a realworld level. While doing this, turn the channel 8 Gain knob [Figure F] clockwise until the meters on the channel 8 fader bounce between the green and yellow [Figure G]. Perfect Input Level Figure F: Channel 8 Gain Knob Note: Audio geeks may refer to this area as 15 dbfs. Go ahead and impress your friends with this knowledge. This one s a freebie, but the next one will cost you. Channel 8 Master Fader Figure G Mixer View: Channel 8 and Master Fader 6 DL806 / DL1608
![If so, engage the Phantom Power switch [Figure A] by pressing up on it. If not, leave it be. This switch lies conveniently next to the Power switch.](/docs-images/40/376147/images/page_6.jpg "The Phantom Power LED will illuminate red when the switch is engaged.")
7 Do you notice the Signal / Clip LED located near the upper-right area of the channel 8 Gain knob? This LED illuminates green (to indicate signal) and red (to indicate clipping). Clipping is undesirable; turn the Gain knob counter-clockwise if this LED constantly flashes red. Are you ready to kick things up a notch? Touch the channel 8 fader and drag it up to around the 0 db mark. Slowly do the same to the master fader, while continuing to rock out on the mic. Setting the Levels Now let s get signal through the headphones. WARNING: The headphones amp is loud and could cause permanent hearing damage. Even intermediate levels may be painfully loud with some headphones. BE CAREFUL! Always turn the Phones knob all the way down before connecting headphones or doing anything new that may affect the headphone volume. Then turn it up slowly while listening carefully. 0 db You should now see signal on the input and output meters [Figure H], as well as hear the signal through the speakers. How s that for kicking it up a notch?! Put the headphones on and slowly turn the Phones knob [Figure B] clockwise until you hear the talking/ singing/crooning/chanting/humming/ warbling/yodeling/whistling/growling coming through the cans. Congratulations! You just downloaded the Master Fader App, connected the ipad to the mixer, made audio connections and set the level on your first channel! Channel 8 Master Fader Figure H Mixer View: Channel 8 and Master Fader Now let s take a look at the hardware and software in greater detail. 7

8 DL806 / DL1608 Mixer Hardware : Connections 8 Mixer Hardware: Inputs You already hooked up a mic to the channel 8 input and got signal out of the speakers and headphones. This means that there are an additional 15 inputs at your disposal! 1 All channels may accept a mic or line-level signal on an XLR connector, while channels may also accept a 1/4" line-level signal. The steps for setting the levels on the remaining channels is exactly the same as it was for channel 8 (as described in the previous two pages, 6-7). 1 Seven additional inputs on the DL Channels 5-8 on the DL806. Mixer Hardware: Aux Sends Also on the rear panel of the mixer are six Aux Sends 3. Here you may run up to six separate monitor mixes by connecting these balanced 1/4" jacks to the line-level inputs of powered speakers or to line-level inputs of an amplifier (with speakers already attached). Headphone amplifiers and/or external effects devices may also be connected to the Aux Sends. We will discuss setting aux levels later in the. 3 Four Aux Sends on the DL806. Mixer Hardware: Network The real power of the mixer becomes clear when it is controlled wirelessly. All that s necessary is to connect it to a Wi-Fi access point. It is possible to utilize an existing network, but with a dedicated Wi-Fi router, you have complete control of the router, resulting in the best possible performance. Nearly any Wi-Fi router found at a reputable store will work. There are four things to look for: (1) Ethernet connection. Make sure the Wi-Fi router connects via Ethernet, NOT USB! (2) DHCP. The router needs to be able to assign an IP address to the mixer. DL806 / DL1608
. 1 Seven additional inputs on the DL806.")
9 In most cases, the router will handle this task. However, there are some routers that can t complete this simple assignment and should not be used. Routers with a single Ethernet port often will not work well with the DL806 and DL1608 for this reason. (3) n. We prefer and strongly suggest going with an n as your Wi-Fi mode. However, g also works. (4) Name. We are not in the business of suggesting what Wi-Fi router to go with, but choosing one with an instantly recognizable, quality, trustworthy brand name doesn t hurt. OK let s go! Step 1: Turn the mixer off. Step 2: Plug in the Wi-Fi router. Most of the default router settings will work with your mixer, but you might need to configure the wireless router first. Please refer to the router s manual for detailed information. Step 3: Connect an Ethernet cable between the mixer and router. Make sure you are using a LAN port on the router, not a WAN port! Step 4: Turn on the Wi-Fi router first and wait for it to completely boot up. Good? Now turn on the mixer. Mixer Hardware : Wireless Setup Step 5: In the ipad s Wi-Fi settings page, select the name of the wireless network you created. This might be the default name of the router. You might also have to enter the router s default password at this time. Make sure the correct network is selected. Step 6: Slide the ipad into the dock of the mixer, if it isn t already. Step 7: Launch the Master Fader app. Step 8: Click the Gear icon to display the Tools menu. From here, select Devices. Step 9: There will be three unique sections listed: Work Offline/ Demo, Wired and Wireless. At this point the Wired DL806 or DL1608 should be selected. Now leave the Tools menu and reconfirm that the DL806 or DL1608 may be controlled from Master Fader over the wired connection. Step 10: Go back to the Tools > Devices menu. Now undock the ipad from the mixer and select the Wireless DL806 or DL1608 from the devices list. At this point you should be able to control the mixer wirelessly. Also, CONNECTED should now be displayed below the Tools icon. If DISCONNECTED is shown, or the DL806 or DL1608 is not shown in the wireless devices list, please follow the directions again, step by step, and also check out the Reference Guide for more detailed instructions. If all else fails, contact our splendid technical support heroes. See page 31 for contact information. That wasn t so bad now, was it? Hardware complete, commence with software. Turn the page to learn more about the Master Fader app... 9

10 DL806 / DL1608 Introduction The Master Fader app has powerful features, but it is easy to learn...and the more you use it, the more intuitive it becomes. As you work your way through each of these sections, we urge you to NOT just read this Quick Start Guide and look at the images, but instead, take each piece of newfound knowledge and put it to use...play with it! Move faders, engage buttons, change images and personalize names, etc. This is software and cannot be broken. We ll start with the features of the Mixer View as this is where you will spend much of the time. The key mixing controls of every input and output of the mixer exist here. You will also spend quite a bit of time in the Channel View. The Channel View is where plug-in processing is adjusted on individual channel inputs and outputs, including EQ, dynamics and FX. More on this later. Navigation Bar Mixer View Overview We ll start in the Mixer View discussing Channel Strips and the Master Fader. Then we ll have even more fun in Channel View territory and finish off this tutorial with the Navigation Bar that lies horizontally across the top. Channel Strips 1 8 Master Fader Nine channels (including the Master Fader) and the Navigation Bar will always be displayed on the Mixer View. In fact, the Master Fader and Navigation Bar will remain regardless of the selected view, channel, effect, etc. 10 DL806 / DL1608

11 The Swipe Zone Channel Strips Take a look at the Mixer View image on the previous page and the Mixer View image on this page. What differences do you notice? Reverb Delay Overview ipad Master Fader Navigation Bar Mixer View They look similar (and are similar to a degree)... However, the image on the previous page displays Channel Strips 1-8, while the image on this page displays Channel Strips , Reverb, Delay and the ipad channel. 4 The DL806 will display Channel Strips 4-8, Reverb, Delay and the ipad channel. But just how did we get from the image displayed on the previous page to the image displayed on this page? And what about channels 9, 10 and 11? This is where your ipad skills come into play! To view a different set of channels, simply touch anywhere on the black background [we call this The Swipe Zone ] of a channel and drag or flick the Mixer View left or right. The view scrolls, giving you immediate access to whatever channels you desire. Dragging and flicking are both seamless transitions. Flicking just happens to occur at a faster rate. You will be doing this gesture quite a bit. Some items may be dragged or flicked up and down, too. In this case, But just how did we get from the image displayed on the previous page to the image displayed on this page? drag or flick the view left to view the image displayed on this page or drag or flick the view right to view the image displayed on the previous page. Got it? Let s look at how the Channel Strips work... 11

12 DL806 / DL1608 Channel Strips: Introduction While dragging the Mixer View left and right, you may have noticed that each channel strip looks almost exactly the same. Well, it s because they are! We will go over the features of one channel strip top to bottom. The same idea works for the remaining channel faders. Since we already dialed in signal on channel 8, let s utilize each function on that channel as they are discussed; this gives you an audible, as well as a visual, representation of each function. Channel Strips: EQ The EQ curve displays the current EQ processing applied to each channel. Tapping a channel s EQ curve will change the outlook from the Mixer View to that channel s Channel View. EQs that are engaged will illuminate. You will learn how to adjust the EQ soon, but if you re feeling saucy, go try it out now! When you are ready to return to the Mixer View, just tap the Mixer button located in the top-left corner of the app. Channel Strips Channel Strips: Mute Mute buttons do just what they sound like they do. They mute turn off the signal on the channel(s). Mute buttons illuminate red when engaged. Go ahead and mute and un-mute channel 8 to hear and see the difference. Channel Strips: Pan Just below the Mute buttons are the horizontal Pan sliders. These controls allow you to adjust how much of the channel signal is sent to the left versus the right outputs. Touch and drag the channel 8 Pan slider left and right to make adjustments. Tapping a channel s Pan ball twice will center it. Note that the pan function is only available when the selected output is LR. More on the selected output later. Channel Strips: Gain Reduction The Gain Reduction Meter displays the input channel gain reduction from the Gate and Compressor. The single meter shows the sum of the total reduction applied by the Gate and Compressor. EQ Mute Pan Gain Reduction Channel Faders and Input Meters Selected Output Indicator Solo Name and Image 12 You will learn how to adjust the Gates and Compressors soon. DL806 / DL1608

13 Channel Faders and Input Meters The channel fader adjusts the level of each channel going to the selected output, including the LR Main Mix, Auxes, Reverb and Delay. We will discuss the ins and outs of the selected output later. Adjustments are made by touching and dragging channels up and down. You may have noticed that a touched fader increases in size and its border becomes highlighted, giving you clear indication that a fader is being adjusted. This is called Grow & Glow and gives you confidence that the fader is under your control. Channel Strips Finally, the thin illuminated strip underneath the fader cap indicates which output type is currently selected; the color varies and is dependent on the selected output [LR, Auxes or FX]. This topic will be discussed further on page 16 of the Master Fader section. Channel Strips: Solo Solo offers the opportunity to audition channel(s) before they are added to the mix. Whenever a channel s Solo button is engaged, only the soloed channel(s) may be heard in the headphones. Channel Strips: Name and Image Each channel strip name and image is user-editable. Simply tap the button at the bottom of the channel and a popover allows editing a name or selecting an image. Utilize the keyboard to personalize the name or choose a new image from the popover [Figure J]. If the name is too long to fit, the button scrolls, displaying the entire name. Next to each channel fader lies an input meter. These display the input signal level to the channel before all channel processing. Changes made to the EQ, mute and fader do not affect these meters. As mentioned earlier, this meter should remain green with the occasional bump into the yellow zone. Turn down the Gain knob if the input meter remains consistently yellow. If the input is too high [overloading], a clip indicator at the top of the meter will illuminate red. If clipping occurs, reduce the gain. These Solo buttons are PFL which stands for Pre-Fader Listen. Therefore, the level of the channel fader does not affect the level heard in the headphones. Solo is also post-eq, so if a soloed channel s EQ is engaged, the EQ settings will be heard. But, solo is unaffected by the position of the Mute button. If no channels are soloed, you will hear the LR signal through the headphones. The Solo button illuminates yellow when engaged. Figure J Names and Images 13

14 DL806 / DL Channel Strips: FX and ipad Drag the Mixer View left until Channel Strips 12-16, Reverb, Delay, ipad and the Master Fader 5 are in view. The two FX channels [Reverb and Delay] and one ipad channel look similar to the Channel Strips, but function a little differently. Let s find out how... Channel Strips: Reverb / Delay There are four ways in which the Reverb and Delay channel strips differ from the other channel strips. First, the EQ curve is replaced with an image of the FX in use. Aditionally, the Pan slider becomes a Balance slider, acting as a stereo balance. It allows you to adjust how much of the left or right output signals are heard. Touch and drag the slider left or right to make adjustments. Also, there are no dynamics on FX channels, so Gain Reduction Meters are not shown. 5 Channels 4-8, Reverb, Delay, ipad and the Master Fader on the DL806. Channel Strips Channel Strips Finally, since these are stereo returns, the meters are in stereo, not mono. You will learn how to adjust the FX soon. Channel Strips: ipad / Playback This is the channel where you control the level and EQ from the ipad music library or any other audio app on the ipad that supports background audio playback. Reverb Delay ipad Master Fader Keep the ipad attached to the mixer here, as playback only works when attached to the mixer, not in Wi-Fi mode. Now start playback in the audio app of your choice, then switch to the Master Fader app to control that source in the mix. DL806 / DL1608

15 Play Channel Strips Space previously known as the Music app volume slider Figure K Music app ipad Channel Fader Meters For example, switch to the Music app on the ipad [Figure K]. Notice that the volume slider image is not available. This is because the volume is now changed with the Master Fader app. Tap the Play button to begin playback. Now switch back to the Master Fader app by pressing the Home button on the ipad and relaunching the Master Fader app. Everything will be just as you left it. Heed our advice and raise the ipad channel fader slowly [Figure L]. Most mastered music coming off the ipad is loud. As the fader rises, so should the music in your speakers and headphones. Like the FX channel strips, the ipad channel also has stereo meters, although this channel may be unlinked to create two separate mono ipad channels. Check out the Reference Guide for instructions! Figure L ipad Channel 15

16 DL806 / DL1608 Master Fader: Introduction The master fader is arguably the most important tool of the mixer. So much so, in fact, that the master fader is always displayed no matter what view is shown. Take a look at the master fader displayed to the right and the one on the next page. They look similar, but there are a few differences. The Output Selector has the most important role, so we ll start there. After that, we will head back to the top of the master fader and work our way down. Master Fader: Output Selector The Mixer View shows a fader for each channel. Initially, this fader controls the level to the LR output. But how do you control the level going to the Aux Sends? Or how about the Aux Master level? Simple. Use the Output Selector to switch between outputs. There are nine possible outputs to select: LR, A1-A6 6, Reverb and Delay. Master Fader Figure M Master Fader: LR Balance Output Selector Selected Output Indicator As seen in Figure M, the currently selected output [LR] is illuminated. Changing the selected output is easy. Simply touch the Output Selector and it will immediately Grow & Glow. Move your finger to the desired output and release. Once a different output has been selected, the channel faders will change to show the level going to the newly selected output. Similarly, the master fader will change to show the controls of the newly selected output. Here the Mixer View acts like a window where you may view and change one output s mix at a time. No matter which output is currently selected, the others are still there, as they were. Do you notice the thin illuminated strip underneath the master fader cap? This also helps indicate which output type is currently selected; the color varies and is dependent on the selected output. This is the same indicator that is also on display underneath the fader cap of each input fader. 6 A1-A4 on the DL DL806 / DL1608

17 Master Fader: GEQ and PEQ The master fader EQ displays the current Graphic EQ and Parametric EQ settings simultaneously. When the Graphic EQ and/or Parametric EQ is engaged, it will illuminate. Tapping the master fader s GEQ/PEQ will change the view from the Mixer View to the Channel View for the currently selected output. The GEQ/PEQ is available with all selected outputs, except Reverb and Delay. You will learn how to adjust the GEQ/PEQ soon. Master Fader: Mute Graphic & Parametric EQ Pre DSP Pre Fader Post Fader Master Fader Mute Master Fader: Balance & Pre/Post When LR is the selected output, the Balance slider controls how much of the output signal is sent to the left versus the right outputs [Figure M]. Touch and drag the slider left or right to make adjustments. Tapping the master fader s Balance ball twice will center it. When an Aux Send, Reverb or Delay is the selected output, the Balance control is replaced with a Pre / Post selection [Figure N]. Here, the output may be configured as Pre DSP (auxes only), Pre Fader or Post Fader. Simply tap which setting you prefer. The master fader mute works exactly like a channel mute, except it mutes the output. Use it as a break switch to mute monitors when the band takes a break, for example. The Mute button is available when any output is selected. It illuminates red when engaged. Figure N Master Fader: Auxes & FX 17

18 DL806 / DL1608 Master Fader: Gain Reduction Like channel faders, the output Gain Reduction Meter shows the amount of gain reduction applied to the output by the Compressor / Limiter. Output channels do not contain gates. You will learn how to adjust the Output Compressor / Limiter soon. Master Fader and Output Meter As discussed, the master fader adjusts the output level of the LR, Aux Masters and the Reverb and Delay Master Sends, depending on which output is selected. While one fader controls the output level of each output, each output is independent of the others. Once the selected output has been chosen, touch and drag the master fader up and down to make adjustments. The output meter displays the output signal level. The output meter is presented in mono or stereo depending on the selected output. It is stereo for LR while the Auxes and FX Sends are presented in mono. 7 Aux Masters 1-4 on the DL806. Master Fader Master Fader and Output Meter Record Figure M Master Fader: LR Gain Reduction Speaking of FX, if Reverb or Delay is selected, the fader controls the master send into the corresponding FX processor. This meter should remain green with the occasional bump into the yellow zone. The output meters are post-fader, so if there is too much yellow (or any red clipping), lower the master fader until it s gone and check the input channels, as well. Master Fader: Record and Solo If the selected output is LR, a Record button resides below the master fader as seen to the left in Figure M. This allows you to easily record the LR output on the ipad. Similar to playback, recording also only works when the ipad is attached to the mixer, not in Wi-Fi mode. Pressing Record will begin recording immediately. The Recording button illuminates red when engaged. Pressing this button a second time asks you to confirm your wish to stop the recording, then asks you to name this masterpiece. If you d prefer to think this recording never took place it happens, we know it may be discarded at this point. 18 DL806 / DL1608

19 The stereo recording is automatically saved as a.wav file within the application. In addition to the name, this.wav file also includes the date and time the recording started. Use itunes to retrieve recordings off of the ipad. No worries if the selected output is changed during recording. Recording will continue on as if nothing happened until recording is stopped manually. Now check out the Record button on Figure N. It s gone! Well, maybe not gone per se, but just replaced with a Solo button. If the selected output is any Aux, Reverb, or Delay, the Record button will be replaced with a Solo button. Soloing offers the opportunity to audition the selected output and make any necessary level adjustments to the inputs. The output solo is AFL, so the fader level will affect the signal you hear in the headphones. The Solo button illuminates yellow when engaged. Master Fader Solo Figure N Master Fader: Auxes & FX Name and Image Master Fader: Name and Image The master fader s name and image is similar to that of a channel strip s name and image. Like the channel faders, the master fader s name and image is also user-editable. Simply tap the button at the bottom of the master fader and a popover allows editing a name or selecting an image. Utilize the keyboard to personalize the name or choose a new image from the popover [Figure O]. If the name is too long to fit, the button scrolls, displaying the entire name. Figure O Names and Images 19

20 DL806 / DL Channel View: Introduction Now the real fun begins! We have a good grasp on the Mixer View, including the Channel Strips, Master Fader and Navigation Bar, so let s spice up the mix now with some processing. All channel processing is accessed in the Channel View. There are multiple views including EQ, Gate and Compression and FX for inputs and Graphic EQ and Compressor / Limiter for the outputs. EQ is the first processor in the Channel View, so we ll begin there. To get to the Channel View tap the channel s EQ curve from the Mixer View. Since we have signal on channel 8, tap that channel s EQ curve. Note: If at any time you need to return to the Mixer View, just tap the Mixer button located in the top-left corner of the app. It s that easy! EQ: Introduction The input channels, Reverb, Delay and ipad channels all have 4-band EQ, including low shelving, low-mid peaking, high-mid peaking and high shelving. The mic inputs also have a high-pass filter [HPF]. Navigation Bar EQ View EQ Channel Strip Before discussing the components that make up the EQ View, let s first take a look at it and get our bearings. Laid out vertically on the far left of the screen is the Channel Strip of the current channel. As mentioned earlier, no matter what view is displayed, the Master Fader would remain vertically on the far right and the Navigation Bar would lie horizontally across the top. As such, they are both there. EQ Controls Master Fader Finally, boxed in between the Channel Strip, the Master Fader and the Navigation Bar is the current channel s EQ controls...or as we like to call it, the playground! We have our bearings, so let s get to work! Like we did with the Mixer View, we ll look at the EQ View starting at the top-left and work our way counter-clockwise. DL806 / DL1608 The Swipe Zone

21 EQ: EQ On / Off Tap this button to turn the current channel s EQ on and off. When on, the EQ controls affect the signal and the button illuminates green. When off, the EQ controls have no affect on the signal, nor will the button illuminate. However, the EQ controls may still be adjusted. Notice the difference between the EQ Display on the previous page [EQ On] versus the EQ Display on this page [EQ Off]. EQ: Modern / Vintage Tap this button to choose between using clean, surgical modern EQ or classic sounding vintage EQ. EQ Display: Gain, Frequency & Q The EQ is easily adjusted by moving the four numbered balls (representing each band) until the desired sound has been achieved. Move a ball up and down to change the gain and move it left and right to change the frequency. Pinch a ball to adjust its Q [bandwidth]. Double-tap a ball to reset its gain to zero. Notice that whatever ball is touched, it Grows & Glows. Additionally, a line runs vertically EQ On / Off EQ Display Shelf / Bell Gain Frequency Q HPF On / Off through the middle for easy viewing of its frequency. Each band is represented by a different color corresponding to the individual band controls located at the bottom of the EQ View. The settings may also be changed here by dragging these sliders left and right. EQ: Shelf / Bell EQ A Shelf / Bell option is available for the Low Band EQ [Band 1] and High Band EQ [Band 4]. Simply tap which setting you would prefer for each band. Modern / Vintage EQ: HPF On / Off and Level Tap this button once to engage the high pass filter and illuminate the button. When disengaged, the HPF has no effect on the signal, nor will the button illuminate. The slider to the right is utilized to increase or decrease the frequency. You may also slide the HPF ball right and left to achieve the same result. EQ: Polarity Invert [Ø] When the Polarity Invert button [Ø] is engaged, the polarity of the signal is inverted. The button will also illuminate. Polarity Invert Shelf / Bell HPF Level 21
22 DL806 / DL1608 Gate/Compression: Introduction We ve learned how to manipulate sounds in the EQ View, so now it s time to learn how to shape the sound with Gates and Compressors. The input channels all have Gates and Compressors readily available, with the ability to tweak and manipulate multiple settings on each. To get here, simply swipe the entire view up from any gray area of the EQ View. The next view is that of the Gate and Compressor. From here, you may swipe down to get back to the EQ View or up again to get to the FX View. Additionally, you may swipe left and right in any gray area to stay in the Gate and Compression View, but instead change to the previous or next channel. Note: The Swipe Zone is called out in each Channel View. If you believe these indicate great places to swipe, you would be correct! Gate and Compression Gate and Compression View Channel Strip The layout of the Gate and Compression View is similar to that of the EQ View in that the Channel Strip, Master Fader and Navigation Bar are present, with the Gate and Compressor controls in the middle. Gate and Compressor Controls Master Fader The Gate and Compressor are presented together as one view with the Gate on top and the Compressor below. It is easy to set parameters of both for each channel at one time. We will first discuss the features of the Gate followed by the Compressor. The Swipe Zone 22 DL806 / DL1608
23 Gate On / Off Tap this button to turn the current channel s Gate on and off. When on, the Gate controls affect the signal and the button illuminates green. When off, the Gate controls have no affect on the signal, nor will the button illuminate. However, the Gate controls may still be adjusted. Notice the difference between the Gate Display on this page [Gate On] versus the Gate Display on the next page [Gate Off]. Gate and Compression Gate On / Off Gate Display Compressor On / Off Compressor Display Modern / Vintage Gate Controls Soft Knee / Hard Knee Compressor Controls Gate: Modern / Vintage Tap this button to choose between using a clean, surgical modern gate or a classic sounding vintage gate. Gate Display and Controls The Gate Display has two dragable balls, one for the Threshold [T] and one for the Range [R]. The Threshold ball may be dragged up and down diagonally on a 45 axis. The Range ball will always be on the same vertical strip as the threshold and it may only move up and down. On the far right are the Gate Controls. The threshold and range may be changed here, as well. Three additional gate controls also available for tweaking are attack, hold and release. These time-based controls may be changed by dragging the sliders left and right. The time is shortest to the left, resulting in a faster response. As the slider is dragged right, the time lengthens, resulting in a slower response. Gate / Compressor Meters Comp On / Off The Compressor On / Off button functions exactly like the Gate On / Off button, as described previously. Comp: Modern / Vintage Tap this button to choose between using a clean, surgical modern compressor or a classic sounding vintage compressor. 23
24 DL806 / DL1608 Compressor Display and Controls The Compressor Display is quite similar to that of the Gate. The dragable ball controls for the compressor include the Gain [G], Threshold [T], Ratio [R]. The Gain ball adjusts the output gain. It lies on the far left of the display and may only be dragged up and down. The Threshold ball may be dragged up and down on a 45 axis. The Ratio ball is anchored to the far right of the display and may only be dragged up and down. It will always be above the threshold. On the far right are the compressor controls. The gain, threshold and ratio may be changed here, as well. Two additional compressor controls also available for tweaking are attack and release. These timebased controls may be changed by dragging the sliders left and right. The time is shortest to the left, resulting in a faster response. As the slider is dragged right, the time lengthens, resulting in a slower response. Gate and Compression Gate On / Off Gate Display Compressor On / Off Compressor Display Soft / Hard Knee Compression A Soft Knee / Hard Knee option is available for each channel compressor. Simply tap which setting you would prefer for each channel. Gate / Compressor Meters Gate/Compressor Meters Between the Gate and Compressor Display and their corresponding controls lies a set of vertical meters. These three meters indicate their individual Input [IN], Gain Reduction [GR] and Output [OUT]. Use these meters to get the desired amount of gain reduction from the Gate and Compressor. Gate Controls Soft Knee / Hard Knee Compressor Controls 24 DL806 / DL1608
25 FX: Introduction The FX View looks and works similarly to that of the EQ and Compressor and Gate views. To get to the FX View, simply swipe the entire view up (again, from any gray area) from the Gate and Compression View. From here, you may swipe down to get back to the Gate and Compression View. Additionally, you may swipe left and right in a gray area to stay in the FX View, but instead change the channel. The Reverb and Delay are presented together as one view with the Reverb on top and the Delay below. As seen in the image to the right, the Reverb and Delay sections have similar layouts, so we will go through their features left to right. FX: Name & Image On the far left are the Reverb and Delay names and images displaying what types of effects are currently in use. This may be changed by tapping the name of the current effect type and choosing a new one from the popover. The image will change to reflect the chosen type. FX View FX: Sends FX Directly to the right of each image is a vertical send level slider, one for each effect. This controls the level being sent to the effect from the current channel. FX: Controls Reverb Name & Image Delay Name & Image To the right of each send level are various FX controls which may be slid horizontally, increasing in value to the right. The FX controls are not affected on a per-channel basis, but rather globally. In other words, there is just one reverb and one delay for the entire mixer. FX Sends FX: Returns FX Controls FX Returns And residing on the far right side of the FX View are the vertical return channel level sliders and meters. Again, one for each effect. These control the return level from the effect to the selected output. You have seen these before as they are the same faders displayed in the Mixer View. A pair exists [one for Reverb, one for Delay] for each selected output. The Swipe Zone 25
26 DL806 / DL1608 Graphic EQ: Introduction Now let s talk about the Graphic EQ, Parametric EQ and output Compressor / Limiter. The Channel View is utilized to adjust these, too. Getting here is easy. Simply tap the Graphic EQ curve at the top of the master fader channel from the Mixer View or from any input Channel View. Graphic EQ Graphic EQ View Graphic EQ On / Off The Swipe Zone 2X Draw The Graphic EQ View looks and works similarly to that of a typical 31-band graphic EQ. Graphic EQ: On / Off 31-Band EQ 26 Tap this button to turn the Graphic EQ on and off. When on, the EQ controls affect the signal and the button illuminates green. When off, the EQ controls have no affect on the signal, nor will the button illuminate. However, the EQ controls may still be adjusted. Graphic EQ: 31-Band EQ The 31-band EQ is a great tool for really dialing in the sound you re looking for or use it to squelch feedback from monitors. There are 31 vertical sliders ranging from 20 Hz-20 khz. Drag these sliders up and down until the desired sound has been achieved. Tapping a band s Graphic EQ ball twice will zero it. Graphic EQ: 2X Tap this button to turn the 2X zoom on or off. This allows you to zoom in on the Graphic EQ, perfect for our friends with sausage fingers and/or mixing with the ipad mini. Swipe left and right to view and adjust the remaining bands. It will illuminate green when engaged. Graphic EQ: Draw If the Draw button is engaged, you may draw an EQ curve over the display (regardless of where the slider balls reside) and the sliders will snap to the corresponding position. Go ahead and try it; make a smiley face. We did the same thing! If the Draw button is disengaged, the sliders may only be adjusted one at a time. The Draw button illuminates green when engaged. Note that Draw is unavailable when in 2X mode. DL806 / DL1608
27 Parametric EQ: Introduction In addition to a Graphic EQ, DL mixers also have a Parametric EQ on each output. To get here, simply swipe the entire view down (from the gray area) above the Graphic EQ. The Parametric EQ View looks and works similarly to that of the Channel EQ View. PEQ: On / Off Tap this button to turn the Parametric EQ on and off. When on, the PEQ controls affect the signal and the button illuminates green. When off, the PEQ controls have no affect on the signal, nor will the button illuminate. However, the PEQ controls may still be adjusted. PEQ Display: Gain, Frequency & Q The PEQ is easily adjusted by moving the four numbered balls (representing each band) until the desired sound has been achieved. Move a ball up and down to change the gain and move it left and right to change the frequency. Pinch a ball to adjust its Q [bandwidth]. Double-tap a ball to reset its gain to zero. Parametric EQ Parametric EQ View Parametric EQ On / Off PEQ Display Shelf / Bell Gain Frequency Q HPF On / Off / Slope Each band is represented by a different color corresponding to the individual band controls located at the bottom of the PEQ View. The settings may also be changed here by dragging these sliders left and right. PEQ: Shelf / Bell A Shelf / Bell option is available for the Low Band EQ [Band 1] and High Band EQ [Band 4]. Simply tap which setting you would prefer for each band. The Swipe Zone PEQ: HPF & LPF On / Off / Slope Tap this button once to engage the high (and/or low) pass filter and illuminate the button. When disengaged, the HPF/LPF has no effect on the signal, nor will the button illuminate. The accompanying slider is utilized to increase or decrease the frequency. You may also slide the HPF/LPF ball right and left to achieve the same result. Both the HPF and LPF have a selectable slope button. Simply tap the button and select the desired slope. The Swipe Zone LPF On / Off / Slope 27
28 DL806 / DL Output Compression: Introduction Here we are...the final stop of the Channel View playground. The output Compressor / Limiter looks and functions similar to that of the channel compressors we discussed just a few short pages back. The only difference is that the output compressor affects and alters the sound of everything passing through the selected output. To get here, simply swipe the entire view up (from the gray area) above the Graphic EQ. This brings us to the Output Compressor / Limiter. Comp On /Off Output Compression / Limiting and Delay Tap this button to turn the Output Compressor / Limiter on and off. When on, the Compressor / Limiter controls affect the signal and the button illuminates green. When off, the Compressor / Limiter controls have no affect on the signal, nor will the button illuminate. However, the controls may still be adjusted. Comp: Modern / Vintage Tap this button to choose between using a clean, surgical modern compressor or a classic sounding vintage compressor. Compressor On / Off Compressor Display Compressor Meters Output Delay Compressor Display and Controls Like the channel compressor, the dragable balls here include the Gain [G], Threshold [T], Ratio [R]. On the far right are the compressor controls. Once again, the gain, threshold and ratio may be changed here or in the aforementioned compressor display. Soft / Hard Knee Compression Modern / Vintage The difference between a soft and hard knee here has nothing to do with joints. Rather, it has everything to do with compression. Simply tap which knee compression setting you would prefer, soft or hard. Compressor Meters Between the Compressor Display and their corresponding settings lies a set of vertical meters. These three meters indicate their individual Input [IN], Gain Reduction [GR] and Output [OUT]. Use these meters to get the desired amount of gain reduction out of the Output Compressor / Limiter. Output Delay The Delay and Temperature controls are for detailed settings for the output alignment delay. This is advanced live mixing, so please refer to the Reference Guide for more information. Soft Knee / Hard Knee DL806 / DL1608 Compressor Controls The Swipe Zone
29 Figure P Figure Q Mixer Navigation Bar: Introduction This is it! Time to finish off the education with the Navigation Bar. Like the Master Fader, the Navigation Bar is also always displayed no matter what view is open. It lies horizontally across the top of each view. Images of the Navigation Bar are displayed above. You might inquire, Why are there two images of the Navigation Bar? I would reply with Good question! As discussed previously, you will be in one of two possible views: Mixer View or Channel View. Each view displays a different Navigation Bar. Figure P will be prominently displayed when a Channel View is open and Figure Q is available when in the Mixer View. We will quickly cover each feature of the Navigation Bar starting on the far left with Mixer and working our way right to Shows and the Quick Access Panel. Navigation Bar Current Parameter Display Navigation Bar: Mixer As mentioned in the Navigation Bar introduction, the Mixer button will only be displayed when working within a Channel View [EQ, Gate and Compression, FX, Graphic EQ, Compressor / Limiter]. Simply tap the Mixer button to return to the Mixer View. If a Mixer button is not displayed (as seen in Figure Q), then you are already in the Mixer View. Current Parameter Display Tools Presets The Current Parameter Display shows the channel and value of the current parameter being adjusted. However, this is not just a point of reference. Tap the Current Parameter Display and a keyboard appears. Here you may enter the exact value you would like for that parameter. Shows Quick Access Panel Navigation Bar: Tools Displayed while in Channel View Displayed while in Mixer View Tools is where the Master Fader app settings reside, as well as configuration options for the mixer. Tap the Tools button to reveal these controls. Additionally, Tools is where you select which DL806 or DL1608 device to control wirelessly. Notice that Figure Q has OFFLINE underneath the Tools image and Figure P has CONNECTED. ipads not connected to the mixer (either wired or wirelessly) will display OFFLINE or DISCONNECTED. We ve already discussed Disconnected in the Wireless setup, but why would you ever work offline? Simply put, you could create presets, snapshots and shows while en route to a gig or show off the awesomeness of your new mixer to friends without regard to the local surroundings. Tap Tools (again) to return to the previous view. 29
30 DL806 / DL1608 Navigation Bar: Presets Tap the Presets button to display a popover similar to what may be seen below in Figure R. Here you may select from a list of factory presets for the current channel and each DSP type, as well as save and recall user presets. As seen in Figure R, the Presets button illuminates green when engaged. Tapping the factory default button will reset the current selection to its default state. Tap Presets (again) to return to the previous view. Navigation Bar Navigation Bar: Shows To the right of the Presets button is the Shows button. Tap Shows to display a popover similar to what may be seen below in Figure S. This is where you load and save shows and snapshots and also configure channel safes. As seen in Figure S, the Shows button illuminates green when engaged. Snapshot 0 resets everything (except channel images, solo and anything selected in Channel Safes) to its default state. Tap Shows (again) to return to the previous view. Notice that on all of these images that the Navigation Bar is still presented, regardless of what view or popover may dominate the ipad. Navigation Bar: QAP Finally, residing on the far right of the Navigation Bar is the Quick Access Panel button [Figure T]. The Quick Access Panel allows for fast control over critical functions such as clearing solos, various effects controls, mute group control and view group control. All features of the Navigation Bar are discussed at greater length in the Reference Guide. Figure T Quick Access Panel Figure R Presets Figure S Shows 30 DL806 / DL1608
31 Conclusion And there you have it! As mentioned throughout, this is just a. Nearly everything you need to utilize your DL806 or DL1608 mixer and Master Fader app is referenced here. Think of the as a 4-star thriller; it s pretty exciting and keeps you engaged throughout. However, should you desire more, the Reference Guide is infinitely more in-depth and is a fantastic resource for increasing your knowledge about each of the features listed within these pages. Conclusion In fact, the Reference Guide is filled with much, much more than this : more screen shots, a Troubleshooting Guide, the technical specifications (including the block diagram and dimensions), graphs, arrows, a Table of Contents, Introduction and list of Features... While we compared the Quick Start Guide to a 4-star thriller, think of the Reference Guide as an action-packed, high drama with bigger, better explosions and a bigger budget. As mentioned previously, DL mixers work wirelessly via iphone and ipad touch. Simply download and install the My Fader app. Want to know more about My Fader? Check out the Reference Guide! Wood-Red Road NE Woodinville, WA USA Phone: Toll-free: Fax: Need help with your DL806 or DL1608? Visit and click Contact Tech Support to find: FAQs, manuals, and addendums. us at: [email protected]. Telephone or toll-free at to speak with one of our splendid technical support chaps. (Monday through Friday, normal business hours, Pacific Time) LOUD Technologies Inc. All rights reserved. Apple, ipad, iphone and ipod touch are trademarks of Apple Inc., registered in the U.S. and other countries. All other marks are Registered Trademarks, or Trademarks, of LOUD Technologies in the United States and other countries. DL806 and DL1608 Patent Pending. All specifications, descriptions and screen shots subject to change. Made for ipad means that an electronic accessory has been designed to connect specifically to ipad and has been certified by the developer to meet Apple performance standards. Apple is not responsible for the operation of this device or its compliance with safety and regulatory standards. Please note that the use of this accessory with ipad may affect wireless performance. Part No. SW1056 Rev. A 01/14 31
32 ACCESSORIZE YOUR Mixer Bag Dust Cover Tray Kits Rackmount Kit Talk to an authorized dealer to order today!
Mixing Station Manual Manual Version 0.21. This manual is not yet complete, please be patient
 Manual Version 0.21 This manual is not yet complete, please be patient Content About... 3 Compatible Mixer:... 3 Quick start... 4 Start View... 5 UI Elements... 6 Knobs... 6 Fader... 6 Main View... 7 Channel
Basics. Mbox 2. Version 7.0
 Basics Mbox 2 Version 7.0 Copyright 2005 Digidesign, a division of Avid Technology, Inc. All rights reserved. This guide may not be duplicated in whole or in part without the express written consent of
SwannEye HD Plug & Play Wi-Fi Security Camera Quick Start Guide Welcome! Lets get started.
 EN SwannEye HD Plug & Play Wi-Fi Security Camera Quick Start Guide Welcome! Lets get started. QHADS453080414E Swann 2014 1 1 Introduction Congratulations on your purchase of this SwannEye HD Plug & Play
QUALITY AV PRODUCTS INMATE/INMATE USB PROFESSIONAL 19" MIXER. User Guide and Reference Manual
 INMATE/INMATE USB PROFESSIONAL " MIXER User Guide and Reference Manual INTRODUCTION Welcome to the NEWHANK INMATE and INMATE USB professional " mixers series user manual. INMATE and INMATE USB both offer
D01167420A. TASCAM PCM Recorder. iphone/ipad/ipod touch Application USER'S GUIDE
 D01167420A TASCAM PCM Recorder iphone/ipad/ipod touch Application USER'S GUIDE Contents Introduction...3 Trademarks... 3 What's in the Main Window...4 What's in the Settings Window...6 The Sharing Window...7
User Guide FFFA001106. www.focusrite.com
 User Guide FFFA001106 www.focusrite.com TABLE OF CONTENTS OVERVIEW.... 3 Introduction...3 Features.................................................................... 3 Box Contents...3 System Requirements....4
Getting Started with a blank desk...3. Understanding the Rear Panel and Top Connectors...3. Understanding the Front Panel...5
 2nd Edition Table of contents Getting Started with a blank desk...3 Understanding the Rear Panel and Top Connectors...3 Understanding the Front Panel...5 Controlling Channel Faders...6 Changing INPUT PATCH...7
TF5 / TF3 / TF1 DIGITAL MIXING CONSOLE
 TF5 / TF3 / TF1 DIGITAL MIXING CONSOLE Reference Manual EN Table of contents Table of contents Overview... 4 Using this document... 4 The display... 4 Universal operations... 8 Library screen... 8 Keyboard
Mbox Basics Guide. Version 6.7 for LE Systems on Windows XP or Mac OS X. Digidesign
 Mbox Basics Guide Version 6.7 for LE Systems on Windows XP or Mac OS X Digidesign 2001 Junipero Serra Boulevard Daly City, CA 94014-3886 USA tel: 650 731 6300 fax: 650 731 6399 Technical Support (USA)
LSR4300 Control Center Software
 LSR4300 Control Center Software User Guide Updated for version 2.0 software Table Of Contents Introduction...3 System Requirements...4 Installation...4 Launching The Software...5 Reference...7 Main Screen...7
Hi! Let s get started.
 Hi! Let s get started. What s in the box Roku 2 player Roku 2 enhanced remote Headphones 2 x AA batteries for remote A/V cable (RCA) Power adapter Get to know your Roku 2 A Front view B E C Back view
Hi! Let s get started.
 Hi! Let s get started. What s in the box Roku player Remote control with in-ear headphone jack 2 x AA Alkaline batteries In-ear headphones Power adapter Get to know your Roku B A Front view C D E Back
Software version 1.1 Document version 1.0
 Software version 1.1 Document version 1.0 1 RDNET PROTOCOL OVERVIEW... 2 1.1 Network description... 2 1.2 Connection topology... 2 2 SOFTWARE BASIC OPERATIONS... 3 2.1 Main View elements... 3 2.2 Scanning
Universal Host. Desktop Digital Hybrid. User Guide. JK Audio
 Universal Host Desktop Digital Hybrid User Guide JK Audio Introduction Universal Host will allow you to send and receive audio through your multi-line PBX, ISDN, VoIP or analog telephone. While this may
STEELSERIES FREE MOBILE WIRELESS CONTROLLER USER GUIDE
 STEELSERIES FREE MOBILE WIRELESS CONTROLLER USER GUIDE INTRODUCTION Thank you for choosing the SteelSeries Free Mobile Controller! This controller is designed by SteelSeries, a dedicated manufacturer of
DiGiCo SD App User Manual
 DiGiCo SD App User Manual User Manual Version D for App Version 1.2.0 for SD Console Software Versions 685+ Copyright 2014 Digico UK Ltd All rights reserved. No part of this publication may be reproduced,
Lenovo Miix 2 8. User Guide. Read the safety notices and important tips in the included manuals before using your computer.
 Lenovo Miix 2 8 User Guide Read the safety notices and important tips in the included manuals before using your computer. Notes Before using the product, be sure to read Lenovo Safety and General Information
Setting up RDP on your ipad
 This document will show you how to set up RDP (Remote Desktop Protocol) on your ipad. It will cover the following: Step 1: Creating an itunes account (if necessary) Step 2: Using the App Store Step 3:
User Manual. For additional help please send a detailed e-mail to [email protected]. - 1 Phoenix Audio Technologies www.phnxaudio.
 User Manual Please read the instructions in this manual before using the Duet Please refer to our website www.phnxaudio.com for more information, specifically to our Q&A section in our Support page. For
PART 1. Using USB Mixer with a Computer
 PART 1. Using USB Mixer with a Computer Universal Serial Bus Mixers The USB mixer is equipped with either one or two USB ports that allow you to play and record audio directly from your computer! Just
How to Start Making Music in Pro Tools
 How to Start Making Music in Pro Tools Read this guide if you are new to Pro Tools or are just starting out making your own music. Inside, you ll find quick examples of how to record, compose, mix, and
User Guide. Your first steps to smart monitoring
 User Guide Your first steps to smart monitoring 2 3 Important safety and legal Information We have taken all measures to ensure the BabyPing Video Monitor meets the highest safety standards but it must
innkeeper PBX Desktop Digital Hybrid User Guide JK Audio
 innkeeper PBX Desktop Digital Hybrid User Guide JK Audio Introduction Innkeeper PBX will allow you to send and receive audio through your multi-line PBX, ISDN or analog telephone. While this may seem like
innkeeper PBX Desktop Digital Hybrid User Guide JK Audio Warranty
 Warranty Innkeeper PBX is covered by a 2-year warranty to be free from defective workmanship and materials. In the event that the innkeeper PBX needs repair, you must call us to get an authorization, and
Enjoy Music over Your Wi-Fi Network
 Personal Audio System Enjoy Music over Your Wi-Fi Network Read this document first. Enjoy Music over Your Wi-Fi Network GB SRS-X7 This manual introduces how to play music connecting this unit to your Wi-Fi
Gauge Drawing Tool... 8. Slider Drawing Tool... 8. Toggle Button Drawing Tool... 8. One-Way List Drawing Tool... 8
 v. 20120510 Table of Contents RTiPanel Overview and Requirements... 3 Software Requirements:... 3 Hardware Requirements:... 3 Network Requirements:... 3 Licensing Requirements:... 4 Basic Integration Designer
User Manual I1010Q16DCZ
 User Manual I1010Q16DCZ Explanation, Note and Warning *Explanation: important information, which can help you better use your tablet PC. *Note: indicates that not observing the content may result in hardware
ShareLink 200 Setup Guide
 ShareLink 00 Setup Guide This guide provides instructions for installing and connecting the Extron ShareLink 00. The ShareLink USB 00 Wireless Collaboration Gateway allows anyone to present content from
WAVES JJP STRINGS & KEYS User Guide
 WAVES JJP STRINGS & KEYS TABLE OF CONTENTS CHAPTER 1 INTRODUCTION...3 1.1 WELCOME...3 1.2 PRODUCT OVERVIEW...3 1.3 COMPONENTS...4 1.4 A FEW WORDS FROM JJP...4 CHAPTER 2 QUICKSTART GUIDE...5 CHAPTER 3 CONTROLS,
ilive Reference Guide Part 2 Firmware
 ilive Reference Guide Part 2 Firmware Firmware Version 1.7 This guide describes the ilive system operating firmware and how to use its feature set. For information on connecting ilive hardware please refer
ADOBE ACROBAT CONNECT PRO MOBILE VISUAL QUICK START GUIDE
 ADOBE ACROBAT CONNECT PRO MOBILE VISUAL QUICK START GUIDE GETTING STARTED WITH ADOBE ACROBAT CONNECT PRO MOBILE FOR IPHONE AND IPOD TOUCH Overview Attend Acrobat Connect Pro meetings using your iphone
Getting Started with the ipad
 Getting Started with the ipad A Guide for Mac Users Copyright 2011 Information Technology Services Kennesaw State University This document may be downloaded, printed, or copied, for educational use, without
Using the Wireless Music Bridge
 Using the Wireless Music Bridge Stream music to a room in the home from your mobile devices Now you can control and stream music from your handheld Apple * ipod, ipod touch, iphone, ipad ; Bluetooth ;
PORTABLE PA SYSTEM #1 LAST UPDATED: FEBRUARY 2011
 PORTABLE PA SYSTEM # LAST UPDATED: FEBRUARY 20 The portable PA system has been created to offer student groups an easy to use solution for self-operated sound needs. The system has the capability for:
LIBRATONE LIVE LOUNGE OWNER S MANUAL
 LIBRATONE LIVE 1 LOUNGE OWNER S MANUAL 2 3 For manuals in other languages please visit www.libratone.com/manual CONGRATULATIONS! 4 FullRoom 5 AirPlay / PlayDirect 6 Placement 8 Button Functions 9 Status
Hi! Let s get started.
 Hi! Let s get started. What s in the Box Roku player Remote control 2 x AAA batteries for remote A/V cable RCA Power adapter Get to know your roku A Front view B C F Back view D E A B C D E F Status light
Finding What You Need... 4 Setting Up the Wireless Network Feature... 6 Practice Using the Touchscreen Display... 15
 user guide Table of Contents Getting Started Finding What You Need... 4 Setting Up the Wireless Network Feature... 6 Practice Using the Touchscreen Display... 15 Using Your Phone Making Captioned Phone
User Guide USB 2.0 LAPTOP DOCKING STATION WITH VIDEO N2953
 USB 2.0 LAPTOP DOCKING STATION WITH VIDEO 410-1864-001B / ACP51US 1 YEAR LIMITED WARRANTY: We pride ourselves on the quality of our products. For complete warranty details and a list of our worldwide offices,
User Guide for Windows 10
 User Guide for Windows 10 System requirements E10684 First Edition July 2015 To facilitate a smoother transition from your previous operating system, read the system requirements below before upgrading
Apogee ONE. QuickStart Guide. V3, March, 2013
 Apogee ONE QuickStart Guide V3, March, 2013 Contents Overview!... 5 Introduction! 5 Package contents! 6 ONE Panel Tour! 8 Optional Battery Power! 9 Connecting to your Mac!... 10 System Requirements! 10
ALIBI Witness and ALIBI Witness HD Apps for Android - Quick Start Guide
 ALIBI Witness and ALIBI Witness HD Apps for Android - Quick Start Guide Version 4.0.3 ALIBI Witness and ALIBI Witness HD are free applications (Apps) for the and Android OS (V2.3.3 or later) smartphone
Aura. Wireless Speaker System Owner s Manual
 Wireless Speaker System Owner s Manual Table of Contents Introduction 3 Included IteMS 3 Controls and ConnectionS 3 Harman Kardon Aura Front Panel ControlS 3 Harman Kardon Aura Rear Panel ControlS 4 ConnectionS
Windows 10.1 Tablet (UB-15MS10 and UB-15MS10SA) FAQ December 2014
 FAQ December 2014") Windows 10.1 Tablet (UB-15MS10 and UB-15MS10SA) FAQ December 2014 Navigation... 2 Question 1: What are charms used for?... 2 Question 2: How do I navigate while using a mouse or trackpad?... 3 Question
Windows 10.1 Tablet (UB-15MS10 and UB-15MS10SA) FAQ December 2014 Navigation... 2 Question 1: What are charms used for?... 2 Question 2: How do I navigate while using a mouse or trackpad?... 3 Question
How To Use The Lutron Home Control+ App On An Ipad Or Ipod
 for the Apple ipad TM, iphone TM and ipod touch revision B Page 1 1.800.523.9466 Overview... 3 What hardware and software do I need?... 4 How does the ipad/iphone/ipod Touch connect to my Lutron system?...
Message from the Development Team. Contents. Message from the Development Team..2. Panel Controls and Terminals...3. Using the UR22mkII...
 EN Contents Contents Message from the Development Team..2 Panel Controls and Terminals...3 Front Panel...3 Rear Panel...5 Software...7 Using the UR22mkII...10 Connections...10 Configuring Audio Driver
OPERATION MANUAL. MV-410RGB Layout Editor. Version 2.1- higher
 OPERATION MANUAL MV-410RGB Layout Editor Version 2.1- higher Table of Contents 1. Setup... 1 1-1. Overview... 1 1-2. System Requirements... 1 1-3. Operation Flow... 1 1-4. Installing MV-410RGB Layout
Mobility with Eye-Fi Scanning Guide
 Mobility with Eye-Fi Scanning Guide Scan and Transfer Images Wirelessly with Eye-Fi This document is to be used in addition to the scanner s user guide located on the installation disc. The instructions
Axxon Monitor. User Manual
 Axxon Monitor by DComplex LLC User Manual This document has the latest documentation about the Axxon Monitor, iphone/ipad app by DComplex LLC, for monitoring Axxon Intellect Video Management System. Download
innkeeper PBX Desktop Digital Hybrid User Guide JK Audio Warranty
 Warranty Innkeeper PBX is covered by a 2-year warranty to be free from defective workmanship and materials. In the event that the innkeeper PBX needs repair, you must call us to get an authorization, and
Breathe. Relax. Here Are the Most Commonly Asked Questions and Concerns About Setting Up and Programming the SurroundBar 3000.
 Breathe. Relax. Here Are the Most Commonly Asked Questions and Concerns About Setting Up and Programming the SurroundBar 3000. Our Customer Service Department has compiled the most commonly asked questions
ibaby Monitor Model: M3s User Manual
 ibaby Monitor Model: M3s User Manual Index 1 Introduction...3 1.1 The package contents...3 1.2 Product Features...3 1.3 Product Specifications...4 2 Appearance and Interface...5 2.1 Appearance...5 2.2
Understanding the DriveRack PA. The diagram below shows the DriveRack PA in the signal chain of a typical sound system.
 Understanding the DriveRack PA The diagram below shows the DriveRack PA in the signal chain of a typical sound system. The diagram below shows all the pieces within a sound system that the DriveRack PA
Brief Introduction... 2. Thump Bluetooth Wireless Headphones features... 2. What s in the package?... 2. Bluetooth Wireless technology...
 Thump User Guide Thank you for choosing the Thump Bluetooth Wireless Headphones. Please read this guide carefully to ensure your ease in using your Thump features fully. Reproduction, transfer, distribution
Hello! Let s get started.
 Hello! Let s get started. What s in the Box Roku player Enhanced remote control 2 x AA batteries for remote A/V Cable Power adapter Get to know your roku B A Front view C D G Back view E F H A B C D E
US-16x08. USB2.0 Audio Interface/Mic Preamp. Reference Manual
 D01247020B US-16x08 USB2.0 Audio Interface/Mic Preamp Reference Manual Before connecting this unit to a computer, you must download and install a dedicated driver. Contents 1 Introduction...3 Features...
Welcome. You re watching Apple TV. This guide contains all the information you need to get from setup to your sofa.
 Welcome. You re watching Apple TV. This guide contains all the information you need to get from setup to your sofa. Contents Chapter 1: Connect. 7 What s in the box 8 Apple TV at a glance 10 What you
HP Advanced Wireless Docking Station. User Guide
 HP Advanced Wireless Docking Station User Guide Copyright 2014, 2015 Hewlett-Packard Development Company, L.P. Intel is a trademark of Intel Corporation in the U.S. and other countries. Windows and Windows
Reverb and Multi-Effects. Plug-in for Digidesign Pro Tools. User Guide
 Reverb and Multi-Effects Plug-in for Digidesign Pro Tools User Guide Copyright 2004, Eventide Inc. P/N: 141086, Rev A Eventide and Harmonizer are registered trademarks of Eventide Inc. Digidesign and Pro
Getting Started on the PC and MAC
 Getting Started on the PC and MAC Click on the topic you want to view. Download the Desktop App Download the ios or Android App Desktop App Home Screen Home Screen Drop Down Menu Home Screen: Upcoming
ZeppelinAir AirPlay. set up
 ZeppelinAir AirPlay set up To use the AirPlay feature, Zeppelin Air must be connected to your existing home network (from now on referred to as your home network ). The following procedure will give you
USER GUIDE ENGLISH ( 3 6 )
") USER GUIDE ENGLISH ( 3 6 ) GUÍA DEL USUARIO ESPAÑOL ( 7 10 ) GUIDE D'UTILISATION FRANÇAIS ( 11 14 ) GUIDA PER L'USO ITALIANO ( 15 18 ) BENUTZERHANDBUCH DEUTSCH ( 19 22 ) USER GUIDE (ENGLISH) Box Contents
USER GUIDE ENGLISH ( 3 6 ) GUÍA DEL USUARIO ESPAÑOL ( 7 10 ) GUIDE D'UTILISATION FRANÇAIS ( 11 14 ) GUIDA PER L'USO ITALIANO ( 15 18 ) BENUTZERHANDBUCH DEUTSCH ( 19 22 ) USER GUIDE (ENGLISH) Box Contents
Ultimate USB & XLR Microphone for Professional Recording
 eti pro Ultimate USB & XLR Microphone for Professional Recording 3 desktop or studio, the possibilities are endless. Congratulations on your purchase of Yeti Pro, the first microphone to combine the exceptional
WiFi DSL Modem Router
 Support Thank you for purchasing this NETGEAR product. After installing your device, locate the serial number on the label of your product and use it to register your product at https://my.netgear.com.
CM500 High Speed Cable Modem User Manual
 User Manual February 2015 202-11472-04 350 East Plumeria Drive San Jose, CA 95134 USA Support Thank you for selecting NETGEAR products. After installing your device, locate the serial number on the label
Welcome to life on. Get started with this easy Self-Installation Guide.
 Welcome to life on Get started with this easy Self-Installation Guide. Welcome to a network that s light years ahead. Welcome to life on FiOS. Congratulations on choosing Verizon FiOS! You re just a few
SMART Board User Guide for PC
 SMART Board User Guide for PC What is it? The SMART Board is an interactive whiteboard available in an increasing number of classrooms at the University of Tennessee. While your laptop image is projected
1 All safety instructions, warnings and operating instructions must be read first.
 ONYX USER MANUAL 2 Dateq ONYX Manual Safety instructions EN Safety instructions 1 All safety instructions, warnings and operating instructions must be read first. 2 All warnings on the equipment must be
How to Install and Set up a Jabra Go 6400 and Pro9400 Series Headset with an Avaya 96x1 Series IP Phone
 How to Install and Set up a Jabra Go 6400 and Pro9400 Series Headset with an Avaya 96x1 Series IP Phone Note: The EHS (Electronic Hook Switch) link 14201-35 is used with all Jabra Headsets sold by CNS/NI&S.
CM400 High Speed Cable Modem User Manual
 User Manual July 2015 202-11412-02 350 East Plumeria Drive San Jose, CA 95134 USA Support Thank you for selecting NETGEAR products. After installing your device, locate the serial number on the label of
GETTING STARTED WITH STUDIO ONE ARTIST
 GETTING STARTED WITH STUDIO ONE ARTIST 2009, PreSonus Audio Electronics, Inc. All Rights Reserved. TABLE OF CONTENTS Studio One Artist Features...3 System Requirements...4 Installation and Authorization...5
Getting Started Guide. January 19, 2014
 Getting Started Guide January 19, 2014 User Guide Chapters 1. Scheduling Meetings Configuring Meeting Details Advanced Options Invitation Email, received by the Participants Invitation Email, sent to the
quick start guide Public beta release
 quick start guide Version: Public beta release Date: March 21, 2013 2 Introduction What is HiQnet Audio Architect? HiQnet Audio Architect combines the feature set of System Architect and London Architect,
User Manual. Please read this manual carefully before using the Phoenix Octopus
 User Manual Please read this manual carefully before using the Phoenix Octopus For additional help and updates, refer to our website To contact Phoenix Audio for support, please send a detailed e-mail
Nighthawk AC1900 WiF Range Extender
 Nighthawk AC1900 WiF Range Extender Model EX7000 User Manual December 2014 202-11469-01 350 East Plumeria Drive San Jose, CA 95134 USA Nighthawk AC1900 WiF Range Extender Support Thank you for selecting
USER GUIDE ENGLISH ( 3 6 )
") USER GUIDE ENGLISH ( 3 6 ) GUÍA DEL USUARIO ESPAÑOL ( 7 10 ) GUIDE D'UTILISATION FRANÇAIS ( 11 14 ) GUIDA PER L'USO ITALIANO ( 15 18 ) BENUTZERHANDBUCH DEUTSCH ( 19 22 ) USER GUIDE (ENGLISH) Box Contents
USER GUIDE ENGLISH ( 3 6 ) GUÍA DEL USUARIO ESPAÑOL ( 7 10 ) GUIDE D'UTILISATION FRANÇAIS ( 11 14 ) GUIDA PER L'USO ITALIANO ( 15 18 ) BENUTZERHANDBUCH DEUTSCH ( 19 22 ) USER GUIDE (ENGLISH) Box Contents
QUICK START GUIDE FOR VIDEO CONFERENCING SET-UP. For the Boulder and the Denver Conference Rooms 6 th Floor 1800 Grant St. Denver
 QUICK START GUIDE FOR VIDEO CONFERENCING SET-UP For the Boulder and the Denver Conference Rooms 6 th Floor 1800 Grant St. Denver I. Video Conference Hardware and Components The what, where, and functionality
Using GIGABYTE Notebook for the First Time
 Congratulations on your purchase of the GIGABYTE Notebook! This Manual will help you to get started with setting up your notebook. For more detailed information, please visit our website at http://www.gigabyte.com.
2.0 AUDIO RECORDING INTERFACE
 24-Bit/96kHz USB 2.0 AUDIO RECORDING INTERFACE USER MANUAL 1 of 13 Contents: 1. Instruction 03 2. Key Features 03 3. Front Panel 03 4. Rear Panel 04 5. Minimum System Requirements 04 6. Installation Process
Life Is Calling. Meet Your New CaptionCall Phone. Spoken Words into Captions. Free Service Means No Cost to You. 2 CaptionCall
 setup guide Life Is Calling Meet Your New CaptionCall Phone We d like to introduce you to CaptionCall. Your new CaptionCall phone looks and works pretty much like an ordinary telephone, but with one big
Document authored by: Native Instruments GmbH Software version: 2.6.4 (09/2013)
") Setup Guide Disclaimer The information in this document is subject to change without notice and does not represent a commitment on the part of Native Instruments GmbH. The software described by this document
Setup Guide Disclaimer The information in this document is subject to change without notice and does not represent a commitment on the part of Native Instruments GmbH. The software described by this document
PA500II Enterprise Mobile Computer
 PA500II Enterprise Mobile Computer - PA500II - Quick Reference Guide 400891G Version 1.0 PA500II Product Introduction & Accessory Kit After opening the box, ensure the following accessories for the PA500II
Wi-Fi handheld microscope for use with the Apple iphone, ipod touch, or ipad.*
 Instruction Manual Model: ProScope Mobile **Important: The ProScope Mobile only works on Apple ios devices including iphone, ipad and ipod touch. This device DOES NOT WORK with Mac or PC computers. Contents
Welcome to your NOOK Tablet. Quick Start Guide
 Welcome to your NOOK Tablet Quick Start Guide Charge your NOOK 1 You must fully charge your NOOK before using it the first time. Plug your NOOK into a wall outlet using the Power Adapter and USB Cable
USER GUIDE PRO-EQ PLATINUM
 USER GUIDE PRO-EQ PLATINUM Welcome Thank you for making Fishman a part of your acoustic experience. We are proud to offer the finest acoustic amplification products available: high-quality professional-grade
Soundcraft Signature MTK Recording Guide
 Soundcraft Signature MTK Recording Guide S O U N D C R A F T S I G N AT U R E M T K R E C O R D I N G G U I D E 2 Table of Contents USB Overview... 04 Installing the Drivers (PC Only)... 04 Finding the
Getting Started Guide
 Getting Started Guide User Guide Chapters 1. Scheduling Meetings Configuring Meeting Details Advanced Options Invitation Email, received by the Participants Invitation Email, sent to the Moderator (scheduler)
User Guide. VT1708A VIA HD Audio Adeck For Windows 2000, Windows XP & Server 2003. Jun 13 2007 Revision 1.1e
 VT1708A VIA HD Audio Adeck For Windows 2000, Windows XP & Server 2003 Jun 13 2007 Revision 1.1e VT1708A VIA HD Audio Adeck For Windows 2000, Windows XP & Server 2003 Revision History Rev Date Initial Note
Pocket PC Phone Quick Start Guide. Read this guide before operating your Pocket PC Phone.
 Pocket PC Phone Quick Start Guide Read this guide before operating your Pocket PC Phone. 1 Feature Maps Front Panel Components 4. 5. 2. 3. 6. 7. 1. 12. 11. 9. 8. 10. 1 Volume. Press to adjust the volume
Intel Unite Solution. Standalone User Guide
 Intel Unite Solution Standalone User Guide Legal Disclaimers & Copyrights All information provided here is subject to change without notice. Contact your Intel representative to obtain the latest Intel
Parrot Zikmu by Starck. User guide
 Parrot Zikmu by Starck User guide Contents Getting started... 4 Installation... 4 Installation... 4 Maintenance and precautions... 5 Commands... 5 Turning the speakers on / off... 5 Selecting an audio
BLU Vivo 4.3 User Manual
 BLU Vivo 4.3 User Manual 1 Table of Contents Phone Safety Information... 3 Appearance and Key Functions... 4 Installation and Charging... 5 Phone Operation... 7 Communication... 10 Camera... 11 Gallery...
How To Use A Magistrate Desktop Computer
 Windows 7 Tips and Tricks 2013 Fall Magistrates Conference (This page left blank) Magistrate Laptops Page 2 Purpose: Magistrates desktop computers are being replaced with a laptop, external monitor, docking
Welcome to icue! Version 4
 Welcome to icue! Version 4 icue is a fully configurable teleprompter for ipad. icue can be used with an external monitor, controlled by remote and can easily share files in a variety of fashions. 1 of
Installation & Operation Manual HANDS-FREE BLUETOOTH MEDIA INTEGRATION KIT. Perfect for ANDROID TM
 GET CONNECTED Installation & Operation Manual HANDS-FREE BLUETOOTH MEDIA INTEGRATION KIT TranzIt BLU HF ISFM2351 Perfect for ANDROID TM Note to Readers, The information contained within the following documentation
Welcome to the Quick Start Guide for TrialPad 2.0, the leading trial presentation and legal file management app for the ipad!
 trialpad.com facebook.com/trialpad twitter.com/trialpad Welcome to the Quick Start Guide for TrialPad 2.0, the leading trial presentation and legal file management app for the ipad! We re very excited
SMART Board User Guide for Mac
 SMART Board User Guide for Mac What is it? SMART Board is an interactive whiteboard available in an increasing number of classrooms at the University of Tennessee. While your laptop image is projected
Getting Started Guide. November 25, 2013
 Getting Started Guide November 25, 2013 Getting Started Guide Chapters 1. Scheduling Meetings Configuring Meeting Details Advanced Options Invitation Email, received by the Participants Invitation Email,
User Manual. Updated for igrill 2.7.1 and ios 7
 User Manual Updated for igrill 2.7.1 and ios 7 Table of Contents 1. Getting Started... 3 2. Quick Start Instructions... 4 3. igrill Instructions... 5 3.1 Batteries... 5 3.2 Probes... 5 3.3 Fahrenheit or
CONTENTS Getting Started.............................................. 4 Using the Livescribe+ Menu....................................
 CONTENTS Getting Started.............................................. 4 Setting Up Livescribe+...................................................... 4 Connecting Your Smartpen and Device........................................
How Do I Connect My Mac with Bluetooth Devices?
 How Do I Connect My Mac with Bluetooth Devices? 1 2 3 4 5 6 7 8 9 10 11 12 That mass of wires and cables under your desk doesn t have a name, although some of the more waggish suggestions I ve heard are